

Page 1
MODEL EJ-8
Multi-Input Adapter Box
Solve Your Sound
Connection Problems The Easy Way…
Page 2

Table of Contents
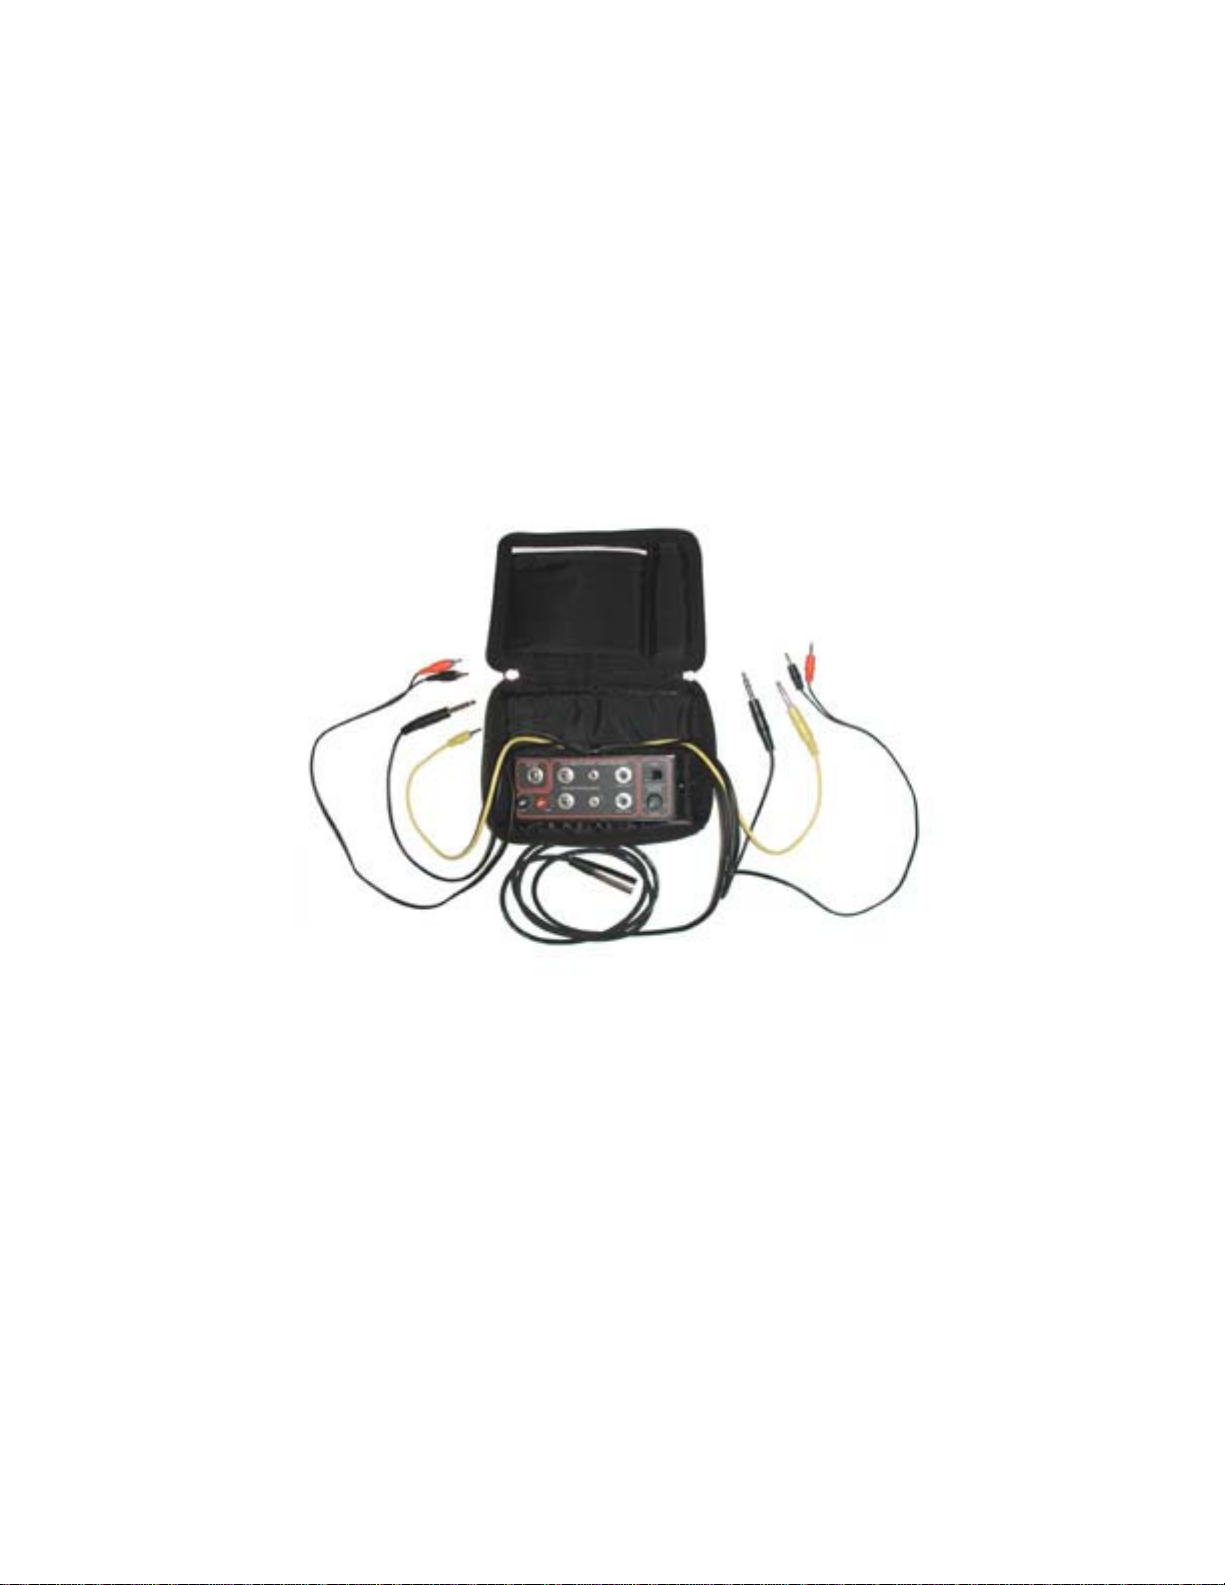
Controls and Functions (illustration)
Controls and Functions (description)
Basic Information
Read this section for basic information on the EJ-8: what it includes, how it
works, and what you need to use it.
Using the EJ-8 with Audio Equipment
Read this section for step-by-step instructions for using the EJ-8 in some common
situations.
• Using the EJ-8 with audio devices with AUX-type connections
• Using the EJ-8 with audio devices with loudspeaker connections
• Troubleshooting
Technical Information
Read this section for details about the EMtech Model EJ-8 Multi-Input Adapter
Box’s technical specifications.
Warranty
2
Page 3

Controls & Functions
1. Stereo Input - accepts stereo line level audio signal input - 1 volt RMS to
microphone.
2. Loudspeaker Level Input – accepts speaker level signals up to 10 volts RMS
and provides a power load 10 ohms – 10 watts for lowest distortion noise.
3. Mono RCA, 1/8” Mini & ¼” Phone Auxiliary Line Level Inputs – accepts line
level 1 volt RMS inputs – buffered inputs allow up to six different inputs at
the same time.
4. Cords Clip – patch cords are clipped to the EJ-8’s box so they won’t get lost.
Clip can be removed to add or subtract patch cords.
5. Hum Switch – connects the shield ground from inputs to output allowing a
selection for lowest hum pick up.
6. Volume Control – controls signal volume from Inputs to Microphone Out.
7. Output Cord to Microphone Input (XLR) – buffered isolated microphone level
signal out to: microphone input jack of the sound system, microphone wall
jack, existing P.A., sound reinforcement system, or house sound system.
3
Page 4

The EJ-8
Basic Information
The EJ-8 is a multi-input adapter box that allows you to use one or more pieces of
audio/visual equipment with the speakers and volume of an existing public address (P.A.)
or sound system. Several audio devices can be used simultaneously. The EJ-8 provides
everything you need to simply connect tape recorders (of all types), record players, movie
projectors, video cassette recorders, telephones, or electronic instruments (such as guitars
or keyboards) to the microphone connection of an existing sound system.
Even though these audio devices use different plugs and strengths of signal, with
the EJ-8 and its basic set of cables, these usually incompatible audio devices can work
together. The EJ-8 provides the necessary matching and isolation to protect the existing
public address system while providing a high quality audio interface to the system.
The EJ-8 has its own volume control which allows you to balance the signal of
the incoming sound to the needs of your sound system. When more than one audio
device is connected through the EJ-8, the EJ-8 serves as a master volume control. The
EJ-8 uses the power from the signal itself; this means it doesn’t need batteries or a power
cord.
The cords attached to the back of the EJ-8 are some of the most useful kinds of
cables for connecting your equipment to the EJ-8. These cables are clipped to the EJ-8’s
box so they won’t get lost. If you find you frequently need another type of cable (as
when using two audio devices which require identical cables), you can easily add it to the
clip. Use a Phillips screwdriver to remove the clip to add more cords.
• Mini (1/8”) to Standard (1/4”) Stereo Phone Plugs
• Standard (1/4”) to Standard (1/4”) Phone Plugs
• Paired RCA to Mini (1/8”) Phone Plugs
The EJ-8 is the finest multi-interconnect system available. The EJ-8 does not
compromise the quality of sound of the equipment it is used with; it expands the
capabilities and range or use of whatever equipment you have. The EJ-8’s straightforward, efficient design ensures that you will enjoy many years of trouble-free use.
Using the EJ-8 with Audio Equipment
Line Level Audio Devices
Audio device Output labeled: LINE OUT, AUXILIARY, AUX OUT, EARPHONES,
EAR, EXT. SP., PHONO, etc.
4
Page 5

This section explains how to use the EJ-8 to properly connect the following audio
devices to a microphone input jack (connector) of a sound system. Use this procedure
with the following:
• Compact Disc Players
• Cassette Players
• AM/FM Stereo Cassette Players
• Tape Decks
• VCR’s
• Radios
• Dictaphones
• Reel-to-Reel Tape Decks
• Stereo Receivers
• Record Players
• Musical Instruments (such as electric guitars and electronic keyboards)*
• Or other equipment with the AUX-type output
NOTE: More than one audio device can be connected to the EJ-8 at the same time. In
this case, the EJ-8’s volume control serves as master volume control for all audio devices.
* Electronic instruments will only work if they contain a preamplifier (pre-amp). If you
are unsure whether the instrument has a pre-amp or not, you will not harm either the
instrument or the EJ-8 by simply attempting to connect it as described below.
To Get Ready:
1. Take audio device and EJ-8 to the most convenient microphone connector of the
sound system. NOTE: You need not attempt to remove the EJ-8 from its case; it
is permanently attached to prevent loss or damage to the EJ-8 and its cables. If
you cannot place the audio device near a microphone connector you will need a
microphone extension cord long enough to reach from the EJ-8 to microphone
connector. If you need it, plug the extension cord into the microphone connector
and carefully place the cord so that the free end is within easy reach of the audio
device and the EJ-8.
2. Turn the volume control knob of the EJ-8 down to minimum volume (MIN).
3. Plug in the audio device’s power cord (use a properly rated extension cord if
necessary).
4. Turn on the sound system and set its microphone volume control to a moderate or
mid-way position.
To Make Connections:
5
Page 6

5. Locate the output connector (jack) on the audio device. It may be labeled LINE
OUT, AUXILIARY, AUX OUT, EARPHONES, EAR, EXT. SP., PHONO, etc.
If the audio device is stereo, there may be two connectors: one for each channel.
NOTE: The EJ-8 mixes the stereo signals and sends a balanced, mono signal to
the sound system. Some audio devices have AUX or MIC inputs, so be sure to
use output connectors.
6. Select the cord from the set on the back of the EJ-8 that mates with the output
connector(s) you just located on the audio device. Plug the patch cord(s) into the
audio device. Chose whichever end of the patch cord matches the audio device’s
output connector; the other end will mate with one of the inputs on the EJ-8. If
need be, you may use only half of the paired cable.
NOTE: If your audio device has a single outlet stereo jack, use either the yellow
Mini (1/8”) to Standard (1/4”) or the black Standard (1/4”) to Standard Stereo
cord. For audio devices with mini (1/8”) jacks, plug the mini end of the yellow
cord into the audio device. For audio devices with standard (1/4”) jacks, plug
either end of the standard cord into the audio device.
7. Check that the volume control on the EJ-8 is turned to MIN, then plug the other
end of the patch cord (the cords are color coded) into the matching jack (or jacks
for paired stereo cords) on the EJ-8. Choose from the seven jacks on the center
top of the EJ-8 labeled AUXILIARY LINE LEVEL INPUTS and
STEREO/MONO. If you used half of the paired cable, be sure to use the same
color plug at both ends.
NOTE: If you used either the yellow or black single-connection stereo cord, be
sure to use the STEREO jack on the EJ-8. On the EJ-8 the standard (1/4”) jacks
can take either mono or stereo inputs. If none of the patch cords mate with your
audio device, we have provided a pair of binding posts that can take either banana
jacks or bare wires.
8. Plug the XLR microphone connector (the connector on the thick black cord that
comes out of the right side of the EJ-8) into the microphone input jack of the
sound system (or into the microphone extension cord if you are using one).
9. Turn on the power to the audio device and turn its volume up partway (you should
not hear anything yet).
10. Turn the EJ-8’s volume control up to the desired level (with the audio device
operating, you should be able to hear it now). If you have more than one audio
device connected, use the audio devices’ own volume controls to set the balance
among them; the EJ-8 serves as the master volume control.
6
Page 7

11. Try switching the EJ-8’s HUM switch (on the upper right corner of the EJ-8) back
and forth. Set it in the position that produces the least amount of hum.
Speaker Level Audio Devices
Device Output labeled: SPEAKER OUT
This section explains how to use the EJ-8 to connect the following audio devices
to a microphone input jack (connector) of a sound system. Use this procedure with the
following:
• 16 mm Film Projectors
• Super 8 and 8 mm Film Projectors (those with sound)
• Power Amplifiers
• Home Stereos
• Or other equipment with a SPEAKER OUT-type output
NOTE: More than one audio device can be connected to the EJ-8 at the same time. In
this case, the EJ-8’s volume control serves as master volume control for all audio devices.
To Get Ready:
1. Take audio device and EJ-8 to the most convenient microphone connector of the
sound system. If you cannot place the audio device near a microphone connector
you will need a microphone extension cord long enough to reach from the EJ-8 to
microphone connector. If you need it, plug the extension cord into the
microphone connector and carefully place the cord so that the free end is within
easy reach of the audio device and the EJ-8.
2. Turn the volume control knob of the EJ-8 down to minimum volume (MIN).
3. Plug in the audio device’s power cord (use a properly rated extension cord if
necessary).
4. Turn on the sound system and set its microphone volume to a moderate or mid-
way position.
To Make Connections:
5. Locate the output connector (jack) on the audio device. It may be labeled
SPEAKER or SPEAKER OUT.
6. Select the black 1/4” Standard to Standard phone plug patch cord from the set on
the back of the EJ-8. Plug one end into the audio device.
7
Page 8

7. Check that the volume control on the EJ-8 is turned to MIN, then plug the other
end of the patch cord into the jack on the EJ-8 labeled LOUDSPEAKER LEVEL
INPUT. (To prevent distortion, the EJ-8’s loudspeaker connector provides a 10
ohm, 20 watt resistive load to the audio device).
8. Plug the XLR microphone connector (the connector on the thick black cord that
comes out of the right side of the EJ-8) into the microphone input jack of the
sound system.
9. Turn on the power to the audio device and turn the volume up partway (you
should not hear anything yet).
10. Turn the EJ-8’s volume control up to the desired level (with the audio device
operating, you should be able to hear it now). If you have more than one audio
device connected, use the audio devices’ own volume controls to set the balance
among them; the EJ-8 serves as the master volume control.
11. Try switching the EJ-8’s HUM switch (on the upper right corner of the EJ-8) back
and forth. Set it in the position that produces the least amount of hum.
8
Page 9

Troubleshooting
All Audio Devices (Auxiliary Line Level or Loudspeaker)
Symptom Corrective Procedure
Hum-background noise Move HUM switch to the other position. Choose the
position that produces the least hum.
No sound Connection Problems
Be sure that you are using both ends of the same patch
cord. Cord and plug colors must match. In particular, if
you used half of the paired RCA/Mini phone plug cable, be
sure you used the same color plug on both ends.
Some audio devices may have AUX level inputs; be sure
that the patch cords are plugged into the OUTPUT jacks on
the audio device.
Check that the plugs fit into the outlets completely and
firmly. (The plugs with four thin metal “petals” around a
central shaft must be used with outlets that have smooth
collars that stick out from the connector).
The cord itself may have been damaged. Try a different
cord if one is available.
No sound Equipment and Sound System Problems
Check that the audio device itself is working. If it isn’t
getting power, the power outlet it is plugged into may be
defective or turned off.
Check that the sound system is turned on (there is usually a
power light to indicate that the unit is operating).
Check that the volume controls on both the audio device
and the sound system are turned up to moderate levels. Try
turning up the EJ-8’s volume control.
If there is still no sound, disconnect the EJ-8 from the
sound system’s microphone input jack. Plug a microphone
into the sound system and go through the following steps to
test the sound system:
9
Page 10

1. Check that the sound system amplifier is on.
2. Check that the microphone volume control knob is on
and set to a moderate level.
3. Speak into the microphone to test the sound system.
At this point, the microphone should be working. If it isn’t,
the sound system itself is not working as needed for proper
functioning with the EJ-8. You will need someone to
check and perhaps repair the sound system.
If the microphone is working, continue with the following
steps:
4. Disconnect the microphone and reconnect the EJ-8 to
the microphone input jack.
5. Check that the audio device is turned on with its
volume turned up to a moderate level.
6. Turn up the volume on the EJ-8
If there is still no sound, verify the connections between the
audio device and the EJ-8 if you have not already done so.
The cord itself may have been damaged. Try a different
cord if one is available.
If you have tested the sound system and verified
connections, there is a problem with either the audio device
itself or the EJ-8. They will need to be checked and
possibly repaired.
Incomplete Stereo Sound Check to see if the audio device has two audio line outputs.
(Only one channel) You must connect both to get both stereo channels.
If the audio device has a single mini (1/8”) stereo outlet, be
sure to use the yellow patch cord and plug the standard
(1/4”) end into the jack marked STEREO on the EJ-8.
If the audio device has a single standard (1/4”) stereo
outlet, be sure to use the black patch cord and plug the
other end into the jack marked STEREO on the EJ-8.
10
Page 11

Multi-Input Adapter Box
Specifications
Inputs:
Unbalanced Line
Stereo phone, phone, mini phone, & “RCA” phono
Speaker Level
1/4-inch phone plug
Outputs:
Transformer balanced low-impedence (100 ohms) adjustable mic level output on
3-foot cable with XLR type plug.
Attenuation:
Line levels: -20 dB to -100 dB
Speaker level: -35 dB to -100 dB
Frequency Response (nominal):
Speaker & line: 20 Hz to 20 kHz
Technical Information
Model EJ-8
Supplied Interconnect Cables:
• 1/4-inch stereo phone plug to 1/8-inch stereo mini phone plug
• 1/4-inch stereo phone plug (both ends)
• Paired RCA type to paired 1/8-inch mini phone plugs
Size:
3 in. H x 6.6 in. L x 2.5 in. W
Weight:
1 lb.
Package:
All metal case mounted inside a black fabric protective zippered case with
carrying handle. Supplied interconnect cables attached to clip on back of metal
case (cables enclosed by protective case).
Architects’ and Engineers’ Specifications
The general purpose adapter box shall accept mono or stereo line and speaker level inputs
and convert them to transformer balanced mic level output. The unit must have an
adjustable output control and a hum removal switch. All system interconnect cables must
be attached to the unit and a padded zippered carrying case must be provided for
11
Page 12

protection and transporting. Basic instructions and complete operations manual must be
stored in the carrying case. The size must be 3 in. H x 6.6 in. L x 2.5 in. W and its weight
shall be 1 lb.
12
Page 13

Limited Warranty
The Model EJ-8 is guaranteed for two years from date of original purchase against
malfunction due to defects in workmanship and materials. If such malfunction occurs,
unit will be repaired or replaced (at manufacturer’s option) without charge for materials
or labor if delivered prepaid to the factory. Unit will be returned prepaid.
This warranty does not extend to finish, appearance, malfunction due to abuse, or
operation under other than specified conditions, nor does it extend to incidental or
consequential damages. Repair by anyone other than EMtech voids this warranty. Any
other warranty, expressed or implied is expressly excluded. You may also have other
rights which vary from state to state.
EMTECH ELECTRONICS, INC.
1126 NORTH 1200 WEST
OREM, UTAH 84057
(866) 200-2878
(801) 426-8333
FAX (801) 426-8334
www.emtechelectronics.com
13
 Loading...