

Page 1
S860 manuel 28/12/06 14:33 Page 2
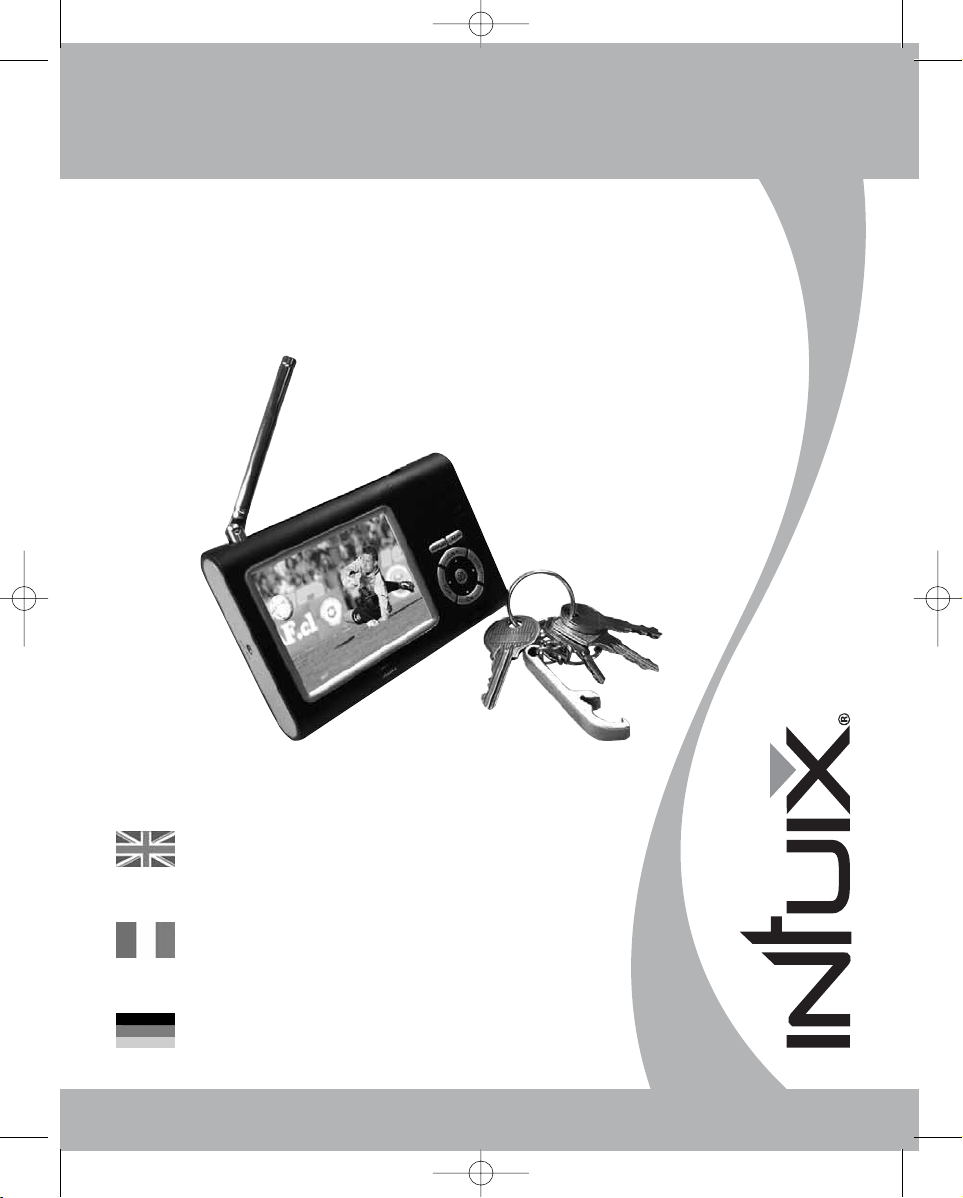
S860
TV TNT/DVB-T PORTABLE ET RADIO
User guide
Manuel d’utilisation
Benutzerhandbuch
www.intuix.net
Page 2

S860 manuel 28/12/06 14:33 Page 1
www.intuix.net
(and other countries)
www.intuix.net
Service Hot line 0820 825 333*
* numéro indigo 0,15 TTC/min
www.intuix.net
Service Hotline 0900-510 255 00*
* 1,99 /Min. vom deutschen Festnetz
Einen kostenlosen eMail-Support erhalten Sie über
www.intuix.net
Page 3

S860 manuel 28/12/06 14:33 Page 5
S860
Handheld DVB-T RADIO
User guide
Page 4
S860 manuel 28/12/06 14:33 Page 6
Table of Contents
Parts of the handheld TV . . . . . . . . . . . . . . . . . . . . . 1
Remote Control Operations . . . . . . . . . . . . . . . . . . . 3
Remote Control Battery Installation . . . . . . . . . . . . . 3
General Operating Instructions . . . . . . . . . . . . . . . . 4
Charging the Battery . . . . . . . . . . . . . . . . . . . . . . . . 5
First Time to Setup . . . . . . . . . . . . . . . . . . . . . . . . . . 7
Basic Operation . . . . . . . . . . . . . . . . . . . . . . . . . . . . 9
Automatic Channel Searching Steps . . . . . . . . . . .13
Connection to TV Set . . . . . . . . . . . . . . . . . . . . . . . 14
Trouble Shooting Q&A . . . . . . . . . . . . . . . . . . . . . . 15
Specification . . . . . . . . . . . . . . . . . . . . . . . . . . . . . . 16
Page 5
S860 manuel 28/12/06 14:33 Page 7
Important Safety Instructions and Caution
CAUTION
RISK OF ELECTRIC SHOCK
DO NOT OPEN
CAUTION : TO REDUCE THE RISK OF ELECTRIC SHOCK,
DO NOT REMOVE COVER (OR BACK).
NO USER-SERVICEABLE PARTS INSIDE REFER
SERVICING TO QUALIFIED SERVICE PERSONNEL.
The lighting flash with arrowhead symbol within
an equilateral triangle is intended to alert the
user to the presence of uninsulated dangerous
voltage within the product’s enclosure that may
be of sufficient magnitude to constitute a risk of
electric shock to persons.
The exclamation point within an equilateral
triangle is intended to alert the user to the
presence of important operating and
maintenance (servicing) instructions in the
literature accompanying the appliance.
WARNING : TO REDUCE THE RISK OF FIRE OR ELECTRIC SHOCK, DO NOT EXPOSE THIS
APPLIANCE TO RAIN OR MOISTURE.
CAUTION : TO PREVENT ELECTRIC SHOCK, MATCH WIDE BLADE OF POWER PLUG TO WIDE SLOT
OF AC OUTLET AND FULLY INSERT.
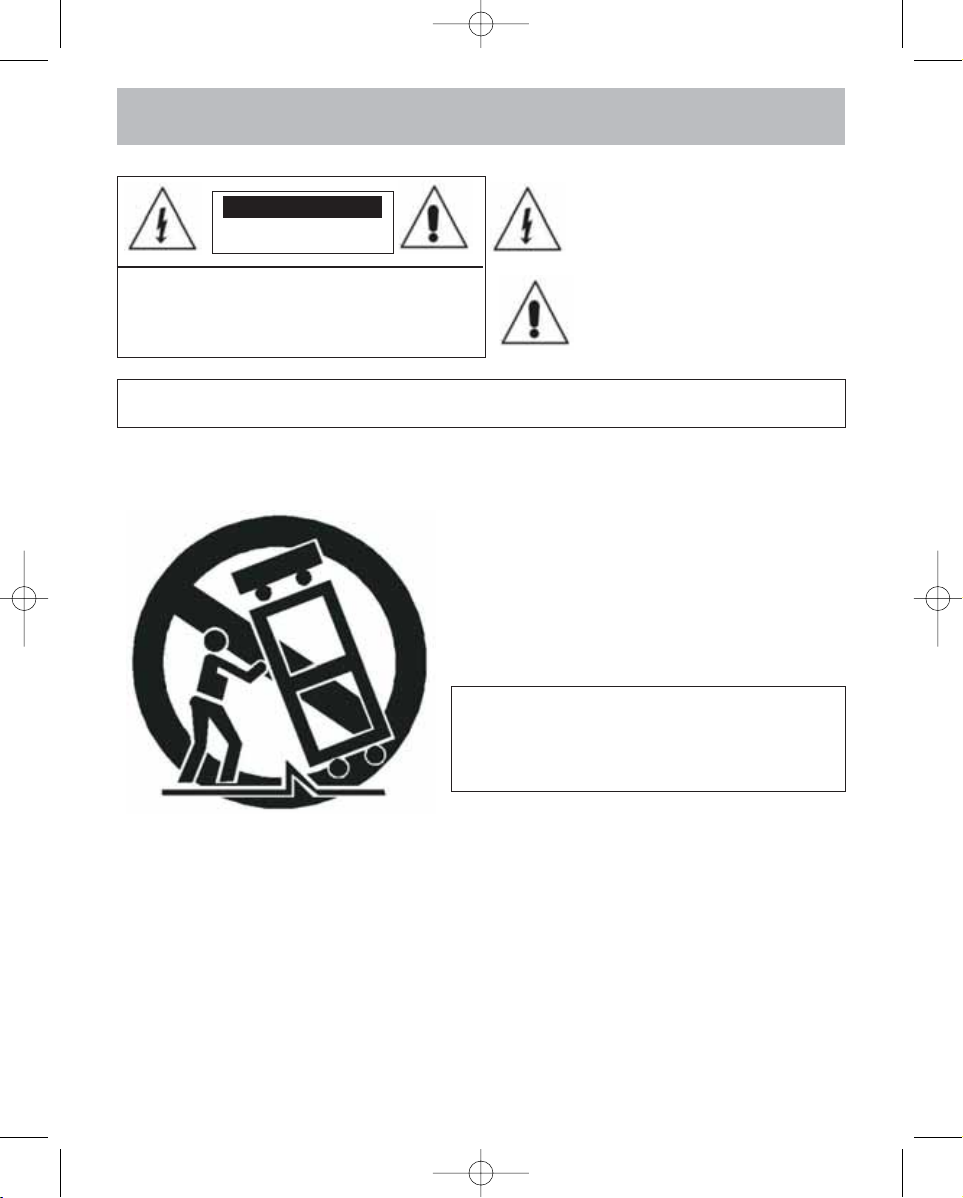
PORTABLE CART WARNING
DO NOT REMOVE THIS TAG (MARKING)
The words “WARNING, MOVE WITH CARE. THIS
CART/APPLIANCE COMBINATION SHOULD NOT BE
MOVED BY CHILDREN WITHOUT PROPER GUIDANCE
FROM AN ADULT”
OR
An appliance and cart combination should be moved
with care. Quick stops, excessive force, and uneven
surfaces may cause the appliance and cart
combination to overturn.
S3125A
Electrical energy can perform many useful functions. This unit has been engineered and manufactured to assure your personal
safety. Improper use can result in potential electrical shock or fire hazards. In order not to defeat the safeguards, observe the
following basic rules for its installation, use and servicing.
1. Read Instructions All the safety and operating instructions should be read before the product
is operated.
2. Retain Instructions The safety and operating instructions should be retained for future reference.
3. Heed Warnings All warnings on the product and in the operating instructions should be adhered to.
4. Follow Instructions All operating and use instructions should be followed.
5. Cleaning Unplug this product from the wall outlet before cleaning. Do not use liquid cleaners or aerosol
cleaners. Use a damp cloth for cleaning.
6. Attachments Do not use attachments not recommended by the product manufacturer as they may
cause hazards.
Page 6
S860 manuel 28/12/06 14:33 Page 8
7. Water and Moisture Do not use this product near water-for example, near a bath tub, wash bowl,
kitchen sink, or laundry tub, in a wet basement, or near a swimming pool, and the like.
8. Accessories Do not place this product on an unstable cart, stand, tripod, bracket, or table. The
product may fall, causing serious injury to a child or adult, and serious damage to the product. Use only
with a cart, stand, tripod, bracket, or table recommended by the manufacturer, or sold with the product.
Any mounting of the product should follow the manufacturer's instructions, and should use a mounting
accessory recommended by the manufacturer.
9. Carts and Stands The product should be used only with a cart or stand that is recommended by the
manufacturer.
9A. A product and cart combination should be moved with care. Quick stops, excessive force, and uneven
surfaces may cause the product and cart combination to overturn.
10. Ventilation Slots and openings in the cabinet are provided for ventilation and to ensure reliable
operation of the product and to protect it from overheating, and these openings must not be blocked
or covered. The openings should never be blocked by placing the product on a bed, sofa, rug, or other
similar surface. This product should not be placed in a built-in installation such as a bookcase or rack
unless proper ventilation is provided or the manufacturer's instructions have been adhered to.
11. Power Sources This product should be operated only from the type of power source indicated on the
marking label. If you are not sure of the type of power supply to your home, consult your product
dealer or local power company. For products intended to operate from battery power, or other
sources, refer to the operating instructions.
12. Grounding or Polarization This product may be equipped with a polarized alternating-current line plug
(a plug having one blade wider than the other). This plug will fit into the power outlet only one way. This
is a safety feature. If you are unable to insert the plug fully into the outlet, try reversing the plug. If the
plug should still fail to fit, contact your electrician to replace your obsolete outlet. Do not defeat the
safety purpose of the polarized plug.
Alternate Warnings This product is equipped with a three-wire grounding-type plug, a plug having a third
(grounding) pin. This plug will only fit into a grounding-type power outlet. This is a safety feature. If you are
unable to insert the plug into the outlet, contact your electrician to replace your obsolete outlet. Do not
defeat the safety purpose of the grounding-type plug.
13. Power-Cord Protection Power-supply cords should be routed so that they are not likely to be walked
on or pinched by items placed upon or against them, paying particular attention to cords at plugs,
convenience receptacles, and the point where they exit from the product.
14. Protective Attachment Plug The product is equipped with an attachment plug having overload
protection. This is a safety feature. See Instruction Manual for replacement or resetting of protective
device. If replacement of the plug is required, be sure the service technician has used a replacement
plug specified by the manufacturer that has the same overload protection as the original plug.
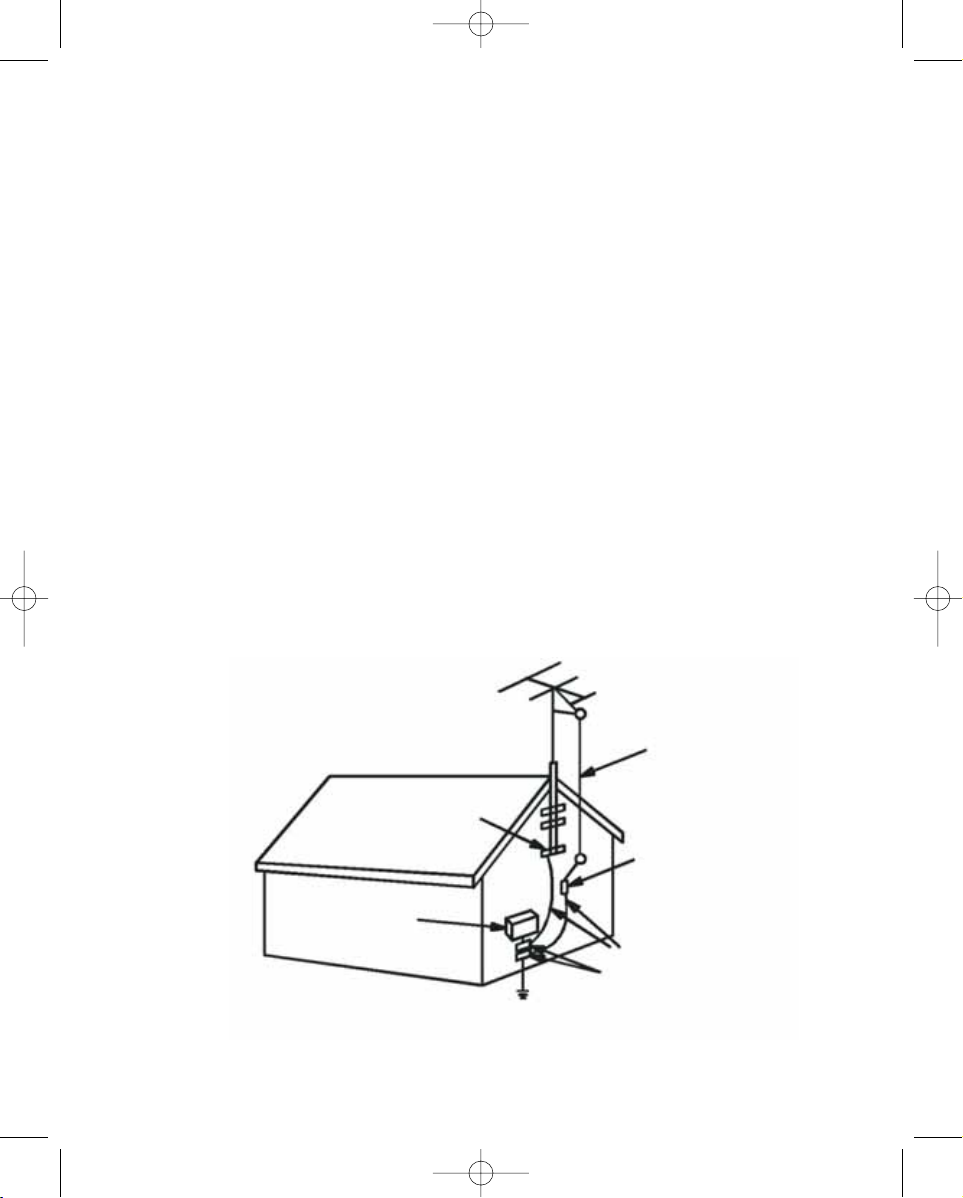
15. Outdoor Antenna Grounding If an outside antenna or cable system is connected to the product, be
sure the antenna or cable system is grounded so as to provide some protection against voltage surges
and built up static charges. Article 810 of the National Electrical Code, ANSI/NFPA 70, provides
information with regard to proper grounding of the mast and supporting structure, grounding of the
lead-in wire to an antenna discharge unit, size of grounding conductors, location of antenna-discharge
unit, connection to grounding electrodes, and requirements for the grounding electrode.
See Figure 131.1.
16. Lightning For added protection for this product during a lightning storm, or when it is left unattended
and unused for long periods of time, unplug it from the wall outlet and disconnect the antenna or cable
system. This will prevent damage to the product due to lightning and power-line surges.
17. Power Lines An outside antenna system should not be located in the vicinity of overhead power lines
or other electric light or power circuits, or where it can fall into such power lines or circuits. When
installing an outside antenna system, extreme care should be taken to keep from touching such power
lines or circuits as contact with them might be fatal.
18. Overloading Do not overload wall outlets, extension cords, or integral convenience receptacles as this
can result in a risk of fire or electric shock.
19. Object and Liquid Entry Never push objects of any kind into this product through openings as they
may touch dangerous voltage points or short-out parts that could result in a fire or electric shock.
Never spill liquid of any kind on the product.
Page 7
S860 manuel 28/12/06 14:33 Page 9
20. Servicing Do not attempt to service this product yourself as opening or removing covers may expose
you to dangerous voltage or other hazards. Refer all servicing to qualified service personnel.
21. Damage Requiring Service Unplug this product from the wall outlet and refer servicing to qualified
service personnel under the following conditions:
a) When the power-supply cord or plug is damaged,
b) If liquid has been spilled, or objects have fallen into the product,
c) If the product has been exposed to rain or water,
d) If the product does not operate normally by following the operating instructions. Adjust only those
controls that are covered by the operating instructions as an improper adjustment of other controls
may result in damage and will often require extensive work by a qualified technician to restore the
product to its normal operation,
e) If the product has been dropped or damaged in any way, and
f ) When the product exhibits a distinct change in performance this indicates a need for service.
22. Replacement Parts When replacement parts are required, be sure the service technician has used
replacement parts specified by the manufacturer or have the same characteristics as the original part.
Unauthorized substitutions may result in fire, electric shock, or other hazards.
23. Safety Check Upon completion of any service or repairs to this product, ask the service technician to
perform safety checks to determine that the product is in proper operating condition.
24. Wall or Ceiling Mounting The product should be mounted to a wall or ceiling only as recommended by
the manufacturer.
25. Heat The product should be situated away from heat sources such as radiators, heat registers, stoves,
or other products (including amplifiers) that produce heat.
Figure 131.1
Example of antenna grounding as per
National Electrical Code, ANSI/NFPA 70
GROUND CLAMP
ELECTRIC
SERVICE
EQUIPMENT
NEC - NATIONAL ELECTRICAL CODE
S2898A
ANTENNA LEAD
IN WIRE
ANTENNA
DISCHARGE UNIT
(NEC SECTION 810-20)
GROUNDING CONDUCTORS
(NEC SECTION 810-21)
GROUND CLAMPS
POWER SERVICE GROUNDING
ELECTRODE SYSTEM
(NEC ART 250, PART H)
Page 8
N
S860 manuel 28/12/06 14:33 Page 10
Precautions
On Safety
• Do not use wet hands to pull out the plug. It may cause electrical shock.
• If the player does not work, please pull out the plug for safety. Contact us for further
technical support.
• Before moving the player, please make sure the power adapter is disconnected from
the wall outlet.
• Do not move the player when playing. It may cause a fire or electrical shock.
• Should any solid object or liquid fall into the cabinet, unplug the player and have it
checked by qualified personnel before operating it any further.
• If you are not going to use the player for a long while, be sure to disconnect the player
from the wall outlet. To disconnect the power adapter, grasp the plug itself; never pull
the cord.
On Placement
• Please keep a sufficient distance between the player and a radio set. A sufficient distance is also needed between the player and any other devices with electromagnetic
field.
• Please place the player in a location with adequate ventilation to prevent heat build-up
in the player.
• Do not place the player on a soft surface such as a rug that might block the ventilation
holes on the bottom.
• Do not place the player in a location near heat sources, or in places subject to direct
sunlight, excessive dust, or mechanical shock.
• Do not place the player in a location exposed to cool air. Condensation may occur and
cause the player work incorrectly.
On Operation
• The player may not work because of improper operation. The limited warranty does not
cover consequent losses that rise from improper usage.
• Turn off the player when you are watching regular TV program. It may cause a picture
distortion.
• The player will not work correctly when affected by exterior elements such as static
electricity. In such cases, pull out the power adapter and plug it back to the outlet
again.
E
Page 9
S860 manuel 28/12/06 14:33 Page 1
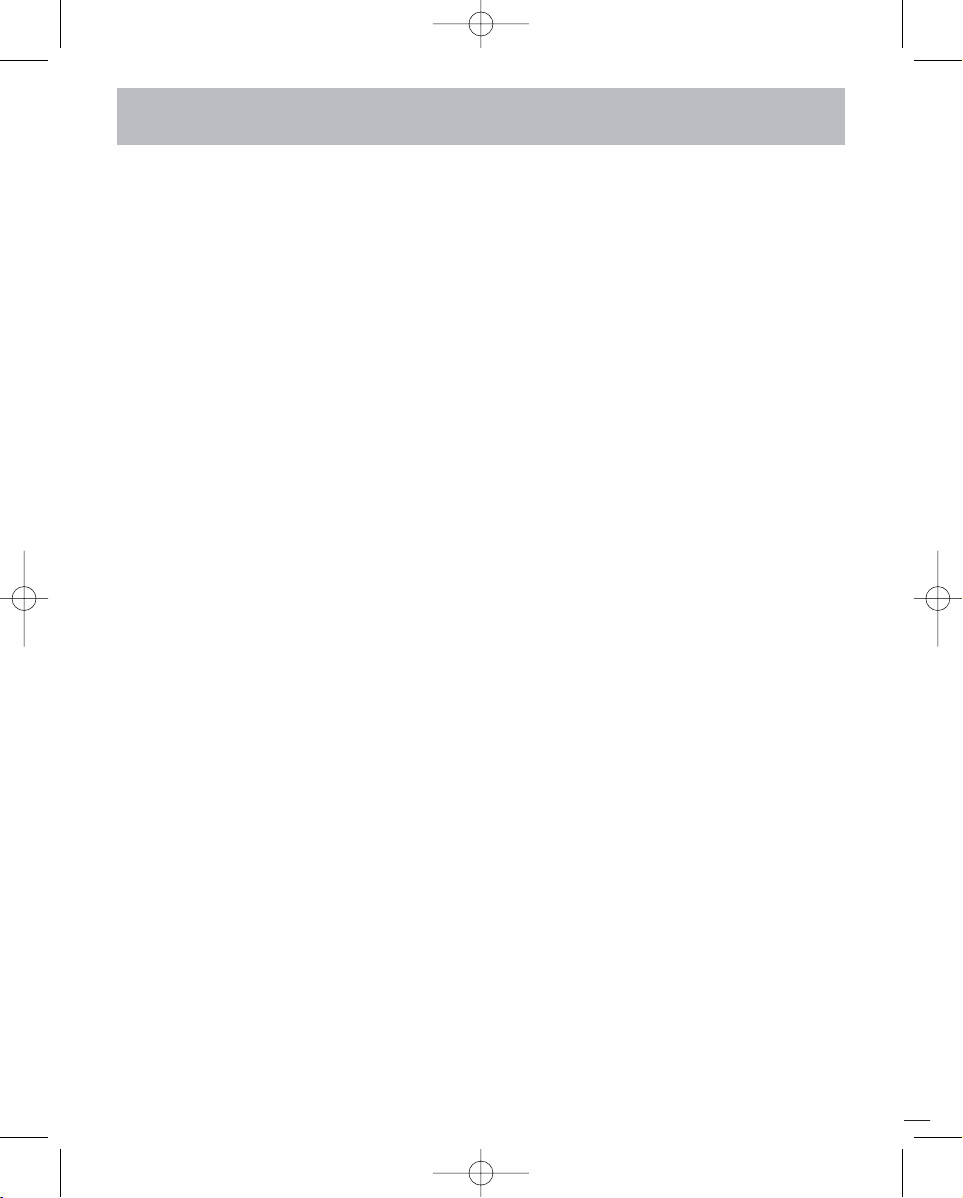
Parts of the Handheld TV
1
Antenna
2
LCD panel
3
Infrared remote sensor
Allow remote controller to navigate this unit.
4
Battery LED
Battery status indicator. When the battery is getting low, the LED will glow
red. And after successfully charging, it will glow green.
5
Power LED
When the unit operates, the LED will glow green.
6
Menu/Exit button
7
OK/Mute button
8
Multi selector (CH+( )/CH-( )/VOL+( )/VOL-( ))
9
Speaker
10
Display on-off control button
▲
▲
▲
▲
1
EN
6 7 8 10
: Please refer to the page 9 for more detailed
description.
Page 10
N
S860 manuel 28/12/06 14:33 Page 2
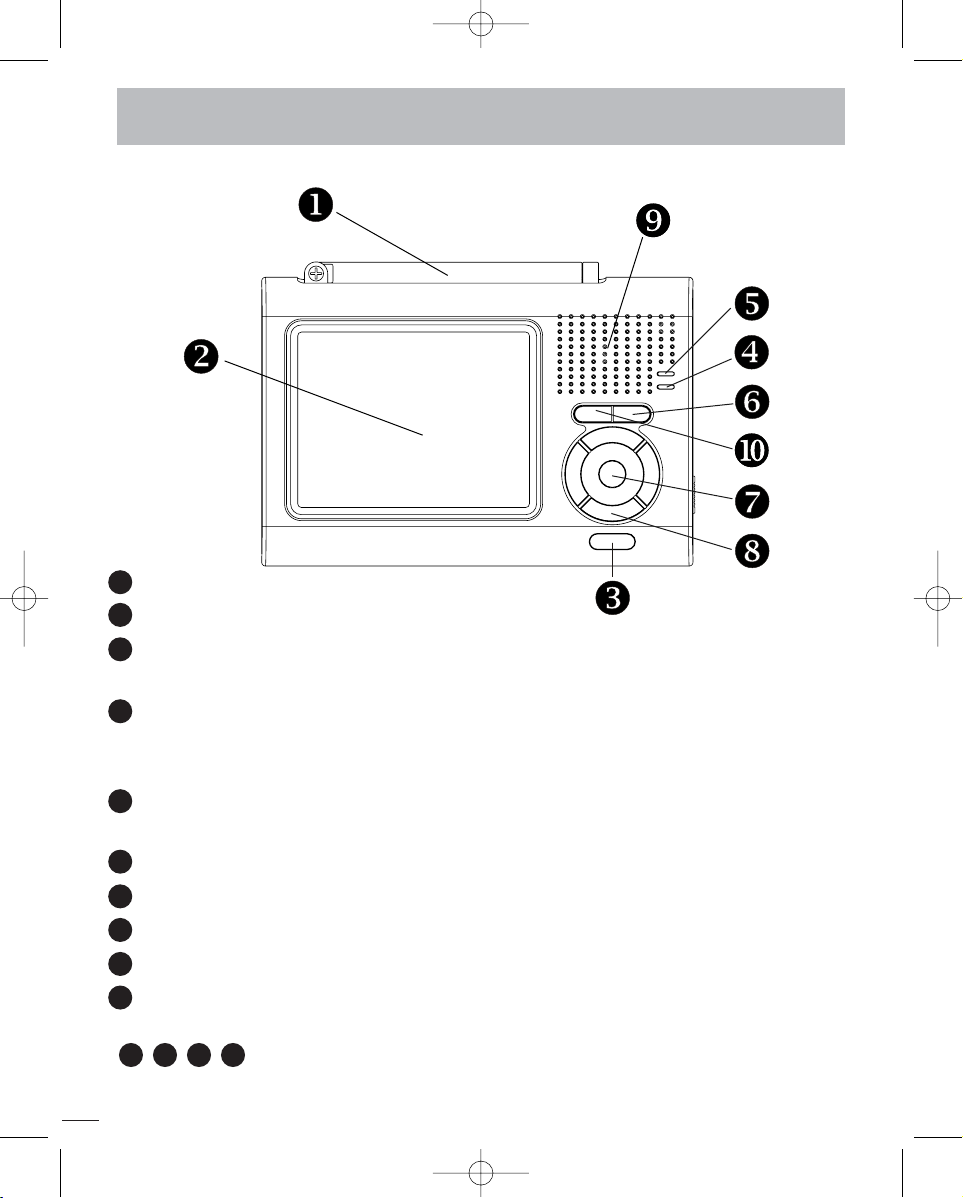
Parts of the Handheld TV
11
DC power connector
Connect with the AC/DC power adapter or the car cigarette
lighter power adapter
12
Video out connector
Output the video signal
Earphone/Audio out connector
13
Output the stereo audio signal
14
Holder
15
Eyelet for TV strap
16
External antenna connector
17
Power switch
2
EN
E
Page 11
S860 manuel 28/12/06 14:33 Page 3
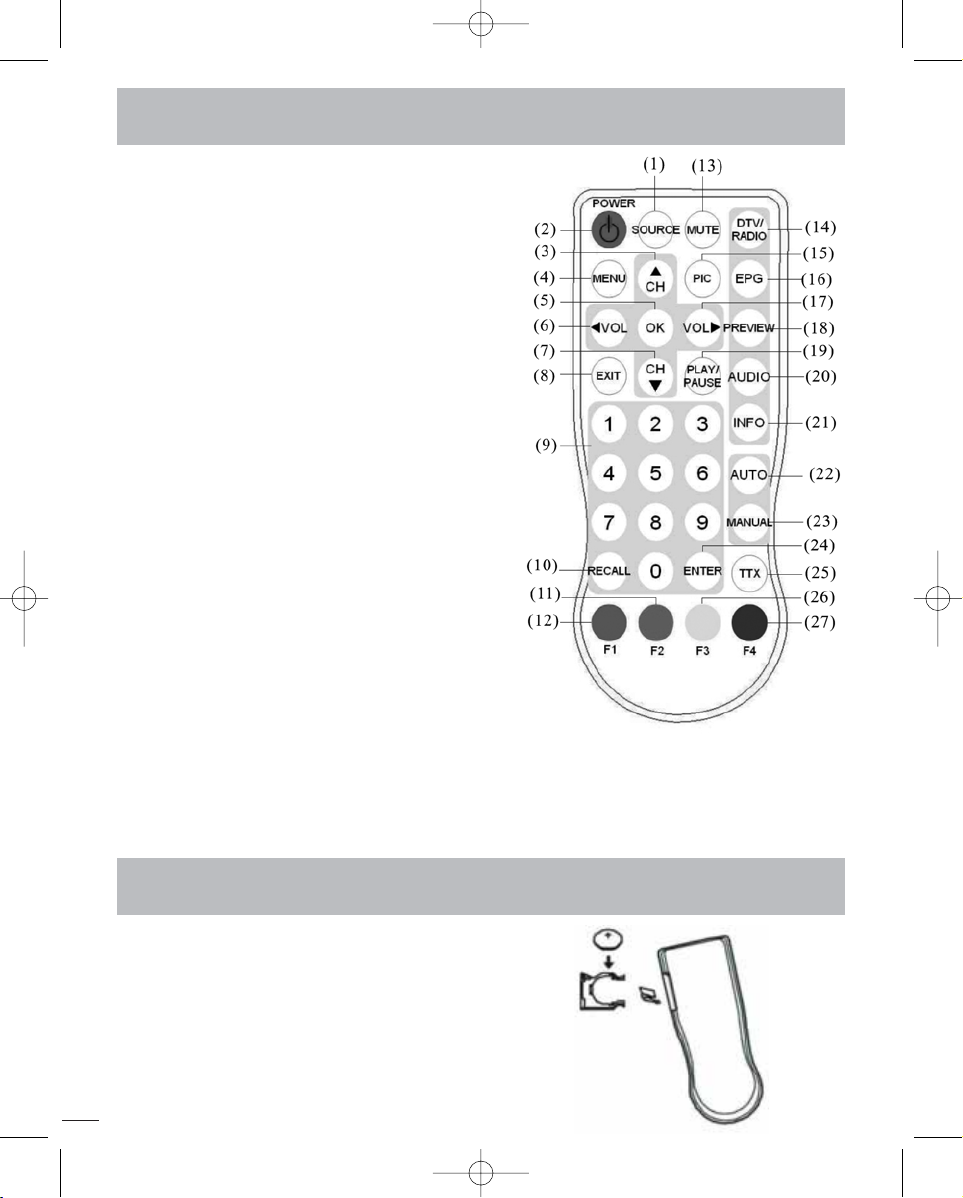
Remote Control Operations
(1) SOURCE: no function
(2) POWER: power-on/stand-by selection
(3) Channel selection up or move the cursor up
(4) MENU: enter the setup menu
(5) OK: select the highlight item
(6) Volume down or move the cursor left
(7) Channel selection down or move the cursor
down
(8) EXIT: exit the current setup
(9) Digital keys
(10) RECALL: return to the last selected channel
(11) Red button : sub-title key in the normal
operation mode or a hot key to go to the
browsed Teletextpages in teletext mode
(12) Green button : a hot key to go to the browsed
Teletext pages in the teletext mode
(13) MUTE: mute control
(14) DTV/Radio selection
(15) PIC: no function
(16) EPG: electronic program guide
(17) Volume up or move the cursor right
(18) PREVIEW: preview selected programs
(19) PLAY/PAUSE selection
(20) AUDIO: second language, and stereo selection
(21) INFO: DTV system information
(22) AUTO: automatic channel scanning
(23) MANUAL: manually select channels
(24) ENTER: enter the selected channel no.
(25) TTX: Teletext key to display Teletext (has to be supported by broadcaster)
(26) Yellow button : page up in the EPG mode or a hot key to go to the browsed Teletext pages in
the teletext mode
(27) Blue button: page down in the EPG mode or a hot key to go to the browsed Teletext pages in
the teletext mode
Remote Control Battery Installation
Before attempting to operate your remote control,
install the battery as described below.
(1) Turn the remote control face down
(2) Press down on the ridged area of
the battery cover and slide it off.
(3) Slide another battery in.
3
EN
Page 12
N
S860 manuel 28/12/06 14:33 Page 4
General Operating Instructions
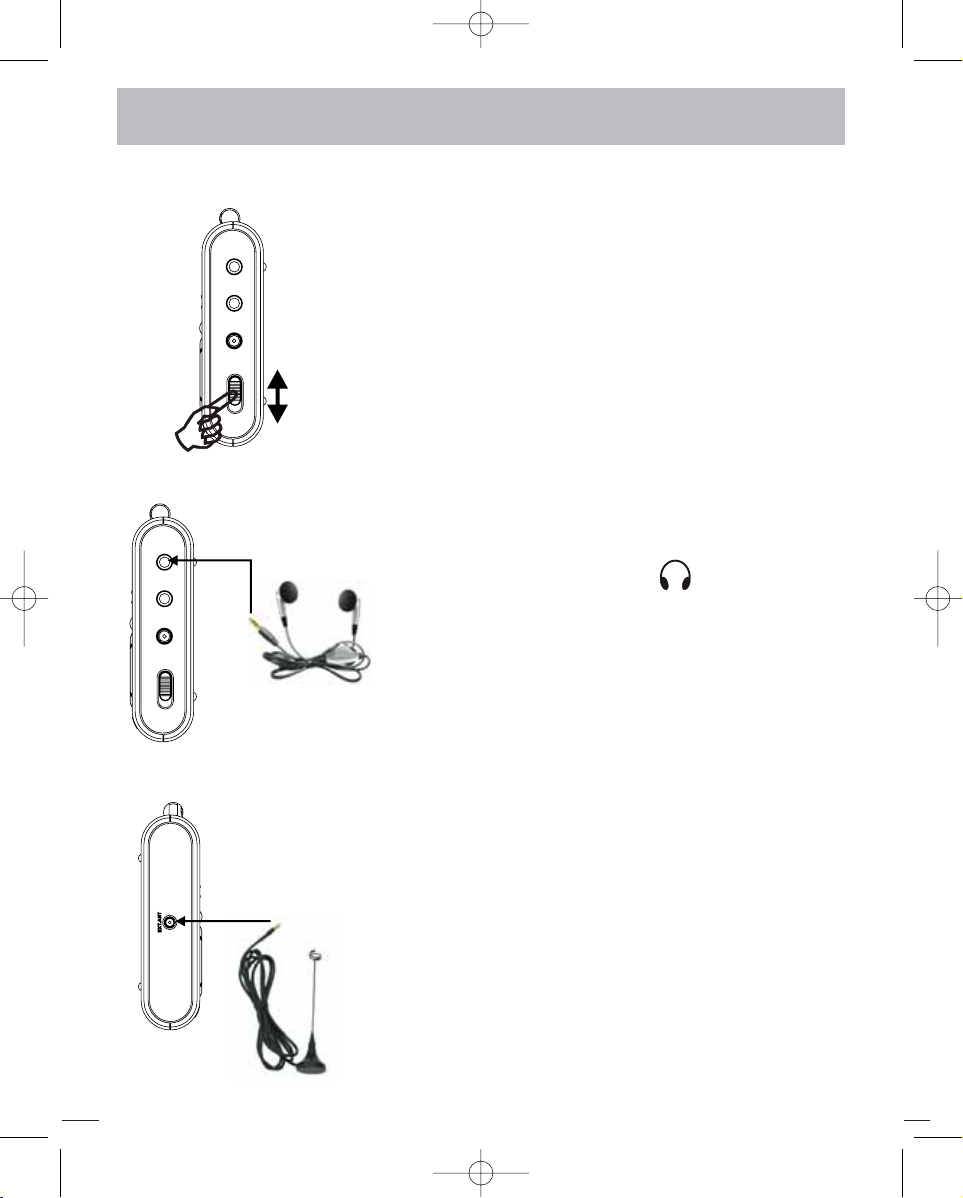
Turning the unit ON or OFF
• To turn on the system, slide the Power switch
on the top side of the unit to the position labeled “ON”.
• To turn off the system, slide the Power switch
on the top side of the unit to the position labeled “OFF”.
Connecting the earphone
• Insert the earphone plug into the “ ’’
jack on the side of the unit.
Earphone
plug
Connecting to the external antenna
• Insert the antenna plug into the “Ext. ANT” jack on the top
side of the unit.
Antenna plug
4
EN
E
Page 13
S860 manuel 28/12/06 14:33 Page 5
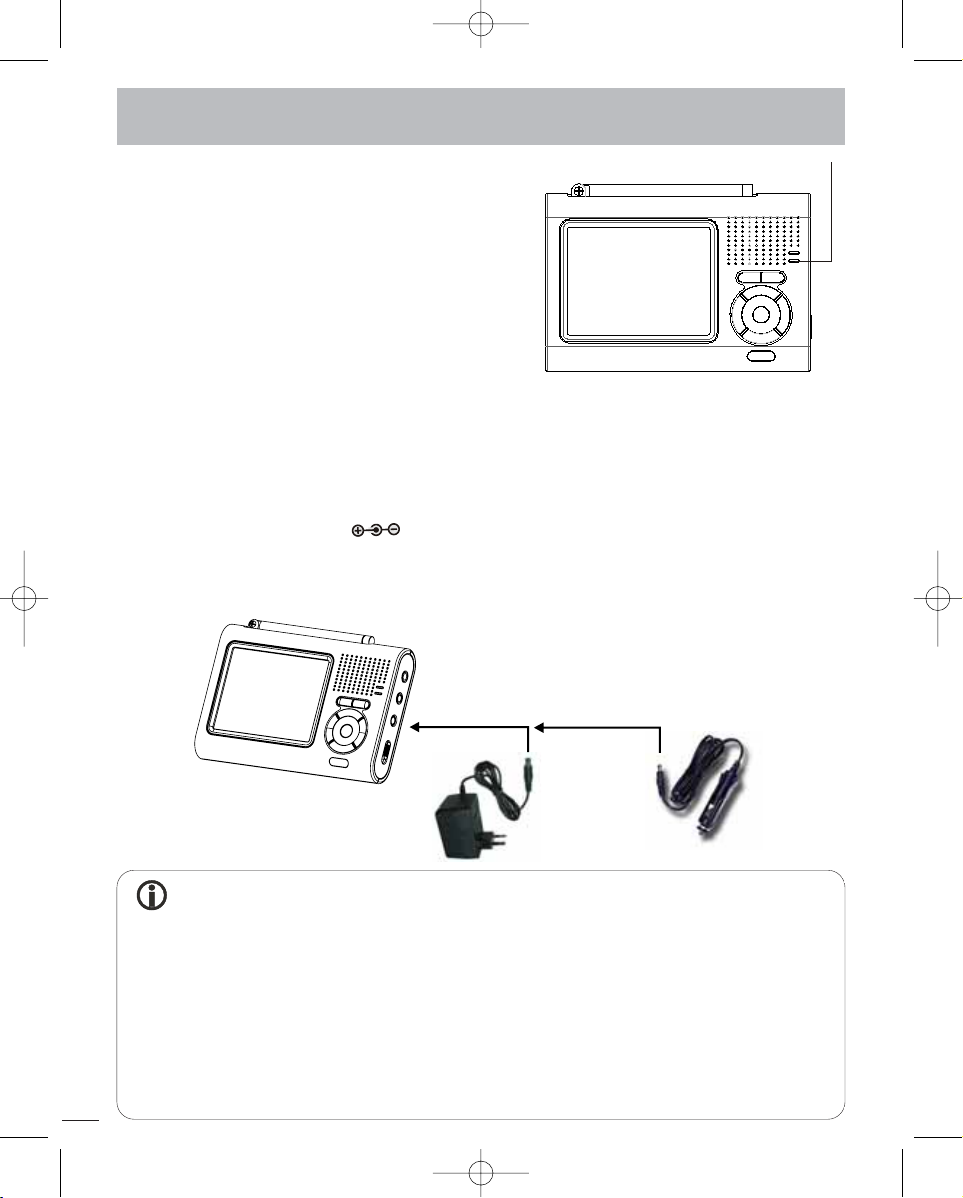
Charging the Battery
This unit contains built-in a rechargeable battery.
When the “Battery LED” lights in red, the battery will
stop supplying power to the system. Then, you need
to charge the battery. Please follow the steps below.
1. You can watch the TV and recharge the battery
simultaneously.
2. Connect the unit to the external power source via
AC/DC power adapter or car cigarette lighter
adapter. You can refer to the diagram below and
in next page.
3. When the battery is being charged, the battery led will glow red.
4. “Battery LED” will turn green after the battery is full.
5. Charge your battery for a minimum of 4 hours to get fully charged
Battery LED
Connecting to the AC/DC power adapter or the cigarette lighter
• Insert the DC plug into the “ “ jack on the side of the unit.
• Attach the AC plug to the AC outlet or attach the car cigarette lighter plug to the car’s
cigarette lighter power receptacle.
DC plug
DC plug
AC plug
Car cigarette lighter plug
NOTICE
• DO NOT, under any circumstances, use another make or model of AC adapter kit or
car cigarette lighter adapter to either charge the battery of this unit or supply power to
this unit. Failure to observe this precaution could result in overheating or damage to
this unit.
• After 300 recharging cycles, the capacity of the battery will be reduced to 70%.
Hence, after many times of recharging, please consider replacing the battery.
• The battery may become hot during playing or charging.
5
EN
• Recharge the battery at room temperature between 0°C and 40°C.
Page 14
N
S860 manuel 28/12/06 14:33 Page 6
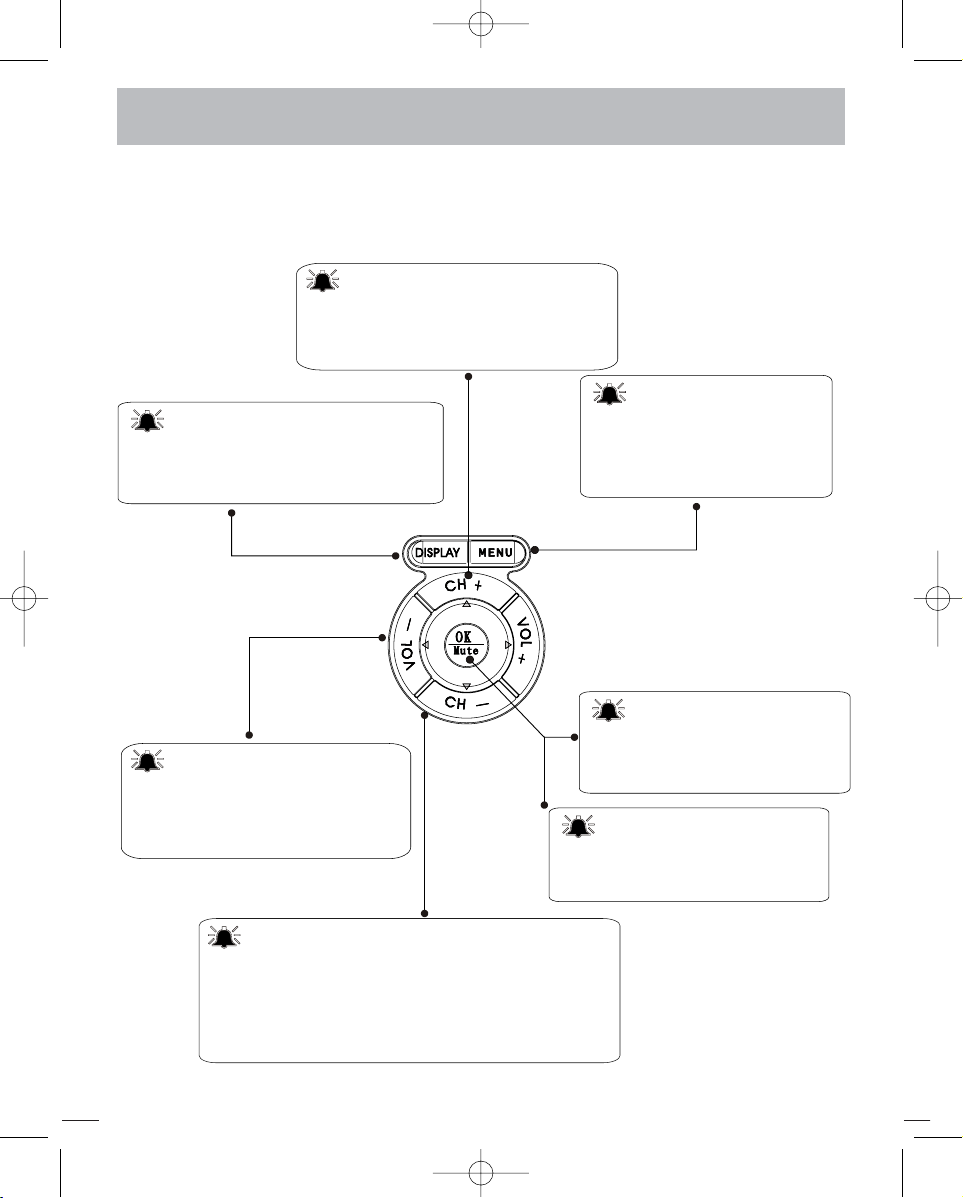
Basic Operations
This section details the basic TV operations.
KEY FUNCTION
Channel selection
Press [CH+] button or [CH-] button
to select the TV/Radio channel.
Panel Control
Press this button to turn off or turn on
the panel back light.
Menu
Press this button to enter
or exit the menu mode.
Mute control
Volume adjustment
Press [VOL-] button or [VOL+]
button to adjust the volume.
Press this button to mute
or restore the volume.
Make selection
In menu mode, press this button
to make selection.
Navigating the Menu
In menu mode, press [CH+] button and [CH-]
button to move cursor up and down. Press [VOL-]
button and [VOL+] button to move cursor left
and right
6
EN
.
E
Page 15
S860 manuel 28/12/06 14:33 Page 7
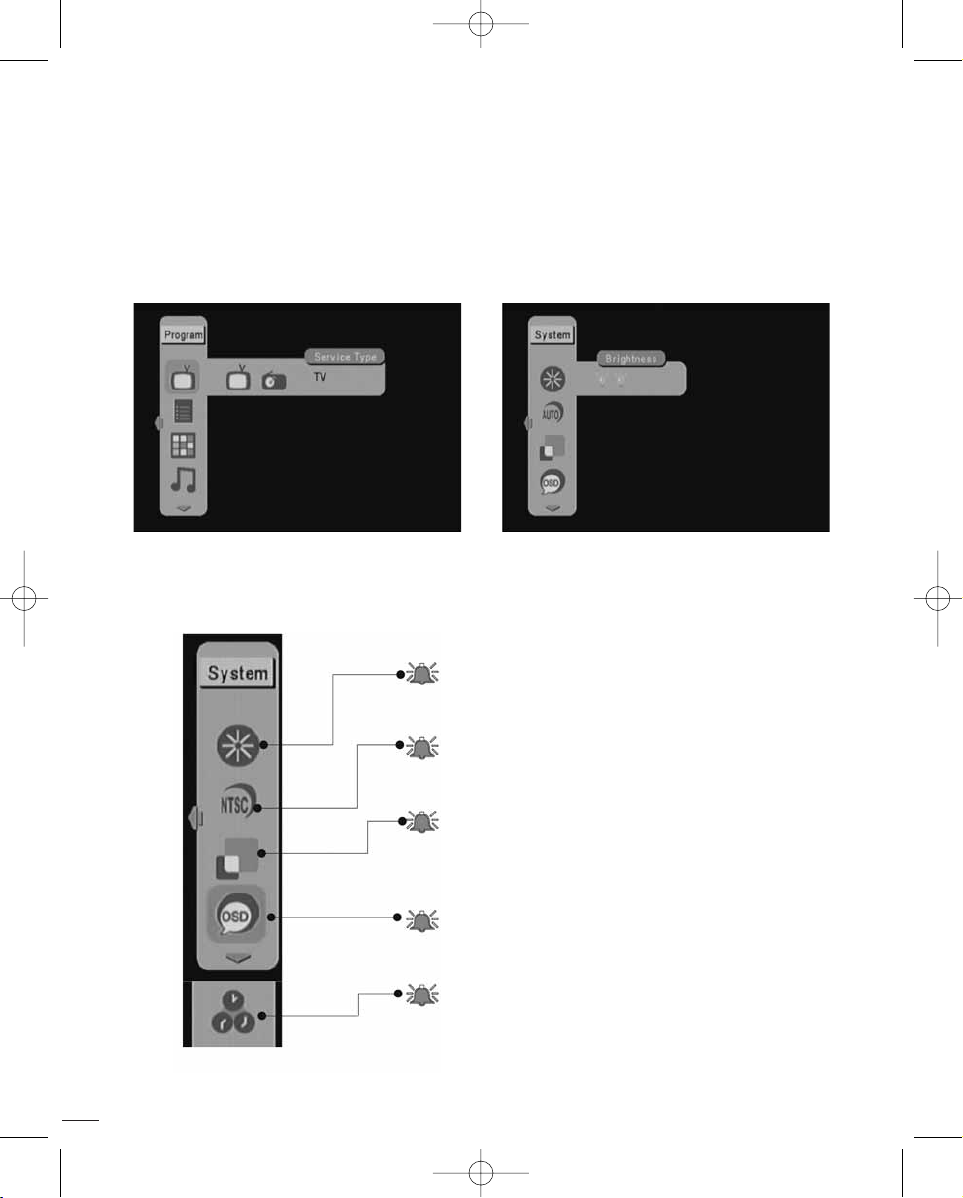
MENU
There are two pages of the menu, including program and system. You can use [VOL-] button to
select each page. In the program page of the menu, you can highlight the service type,
program list, preview, audio channel, subtitle language, program info, automatic search, or
manual search to perform TV program related operation. And in the system page of the menu,
you can highlight the brightness, TV system, regional setting, osd language, time zone to adjust
the system setting. You can use [CH+] button and [CH-] button to highlight the item and press
[VOL+] button and [VOL-] button to select your choice and then press [OK] button to set the setting.
SYSTEM PAGE
Brightness
To adjust the brightness of the screen
TV System
To select the TV display format
Regional Setting
To select the region where you are located in
OSD Language
Selection of the OSD language
Time Zone
To set the time zone
7
EN
Page 16
N
S860 manuel 28/12/06 14:33 Page 8
PROGRAM PAGE
Service Type
Selection of either TV or Radio programs
Program List
To show the information of all of the available channels
Preview
To preview up to 9 selected channels
Audio Channel
Selection of either master or secondary language
Subtitle language
To select a subtitle language available from service
providers
Program info
To provide the TV program information about the
system parameters and signal information
Automatic Search
To search the program channels automatically
Manual Search
To search the program channels manually
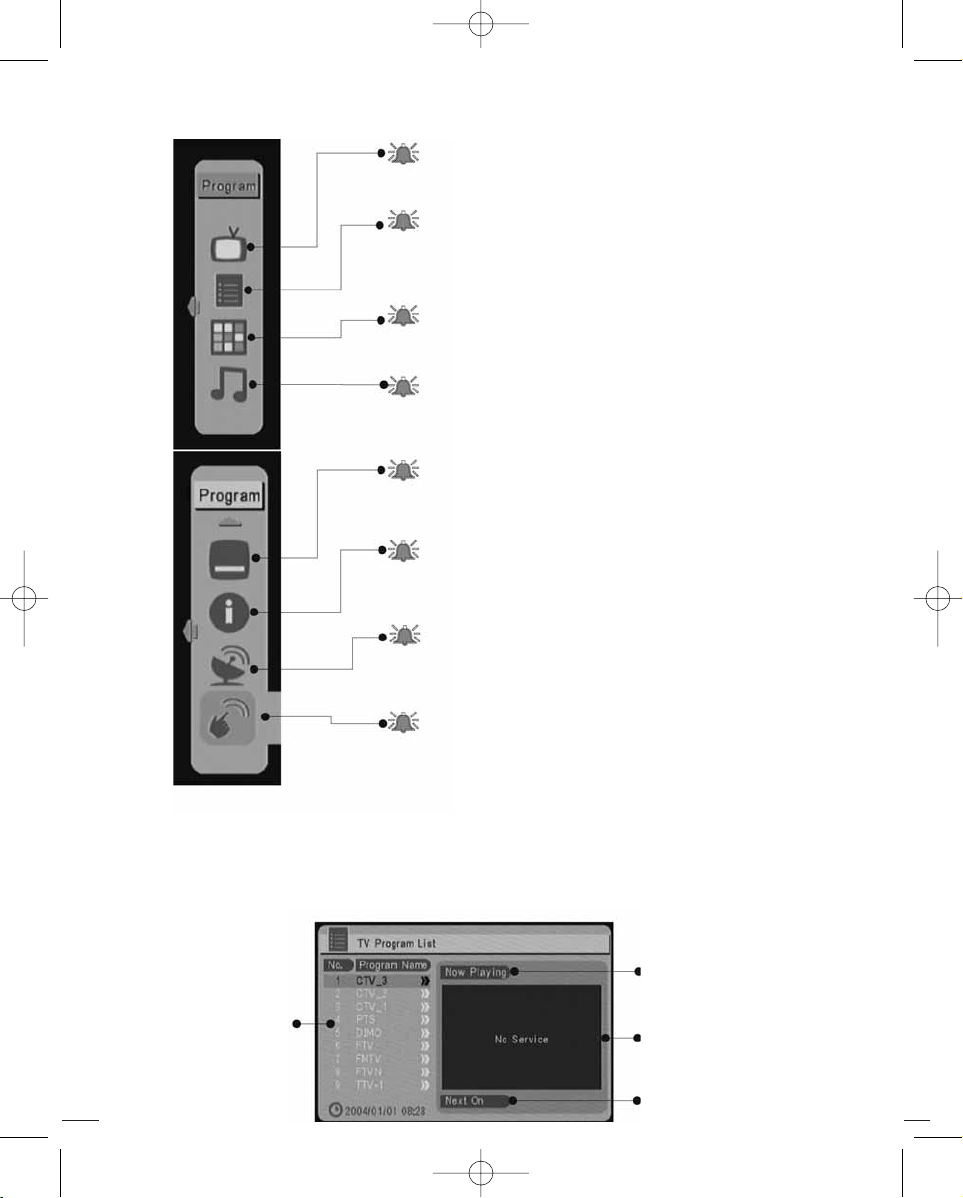
PROGRAM LIST (EPG, Electronic Program Guide)
It shows the information of all of the available channels. You can use [CH+] button and [CH-]
button to choose any channel, while [VOL-] button and [VOL+] button are the keys to show the
details of the channel.
Current program name
Program List
8
EN
TV scene
Next on program name
E
Page 17
S860 manuel 28/12/06 14:33 Page 9
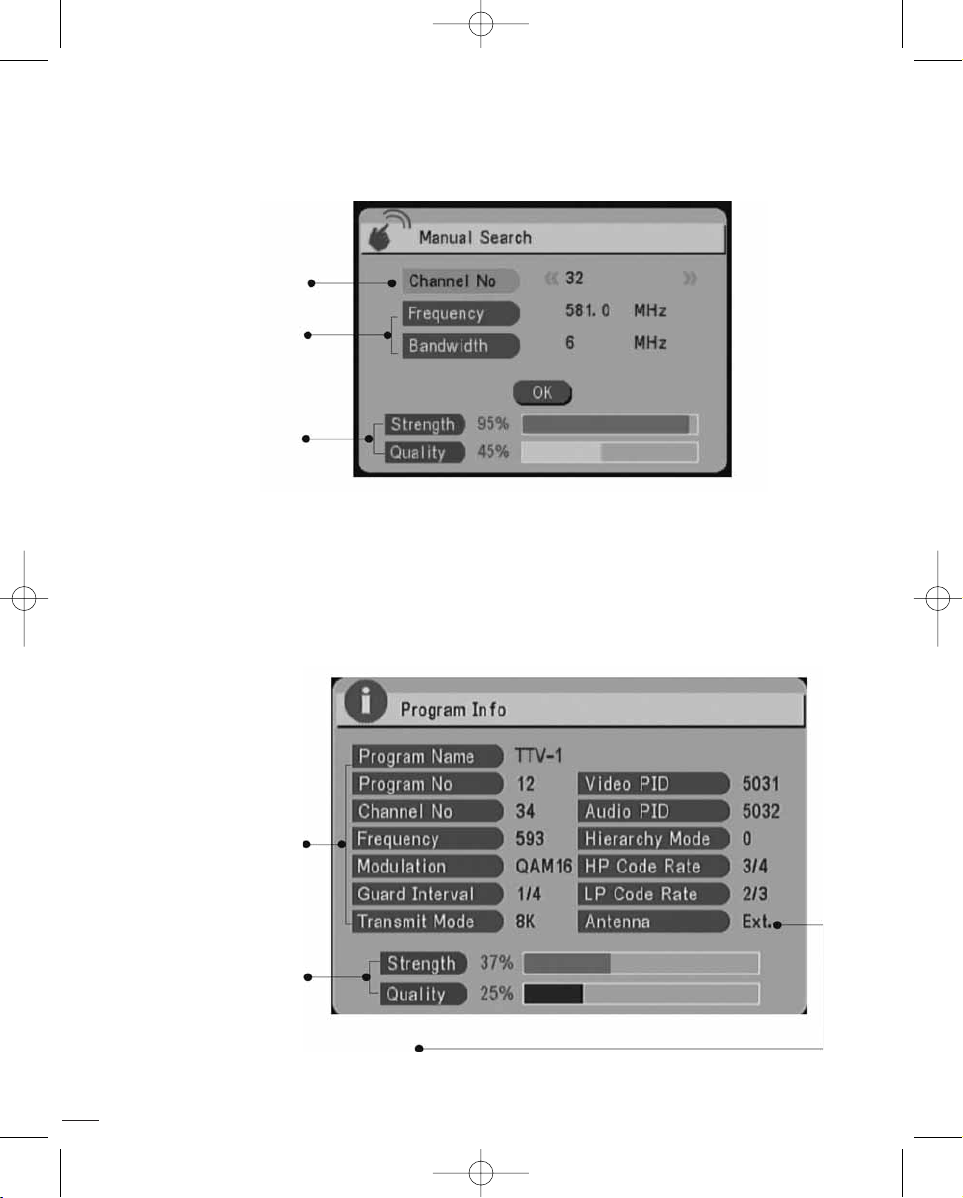
MANUAL SEARCH
You can use [VOL-] button and [VOL+] button to select the desired channel and press [OK]
button to perform program searching. The found programs will be appended to the program list.
Selected channel
Channel information
Signal information
PROGRAM INFORMATION
It provides you the TV program information about the system parameters and signal information.
Press [MENU] button to exit the screen.
System parameters
Signal information
Antenna selection information
9
EN
Page 18

N
S860 manuel 28/12/06 14:33 Page 10
First Time to Setup
When the first time this unit is turned on, please follow the following steps to finish
the initialization.
Press [MENU] button firts and then press
[VOL-] button to enter the menu for system
configuration selection
Press [VOL+] button and highlight your TV
system output and press [OK]button
Press [VOL+] button to adjust the
brightness level of the display and press
[OK] button
Press [VOL+] button and highlight your
OSD language and press [OK] button
Press [VOL+] button and highlight your
region and press [OK] button
10
EN
Time will automatically set by your region.
If you need to correct it, press [CH+] button
or [CH-] button to adjust the time.
E
Page 19

S860 manuel 28/12/06 14:33 Page 11
Back to the top of the menu and press
[VOL-] button to enter program menu
screen.
Highlight the OK item ans press [OK]
button.
Highlight the automatic search item ans
press [OK] button.
Channel searching will take a few minutes.
When the channel seraching is over, press
[CH+] button or [CH-] button to select the
You could press [VOL+] button or [VOL-]
button to adsjust the volume.
program.
11
EN
Page 20

S860 manuel 28/12/06 14:33 Page 12
Page 21

S860 manuel 28/12/06 14:33 Page 13
TV numérique
TV TNT/DVB-T PORTABLE ET RADIO
S860
(TNT)
Manuel d’utilisation
Page 22

S860 manuel 28/12/06 14:33 Page 14
Table des matières
Présentation du mini-téléviseur portable . . . . . . . . . 1
Utilisation de la télécommande . . . . . . . . . . . . . . . . 3
Installation de la pile de la télécommande . . . . . . . 3
Instructions générales de fonctionnement . . . . . . . 4
Chargement de la batterie . . . . . . . . . . . . . . . . . . . . 5
Fonctionnement de base . . . . . . . . . . . . . . . . . . . . 7
Mise en route du mini-téléviseur . . . . . . . . . . . . . . . 9
Recherche automatique des canaux . . . . . . . . . . . .13
Connexion à un poste de télévision . . . . . . . . . . . 14
Dépannage – Questions et réponses . . . . . . . . . . 15
Spécifications techniques . . . . . . . . . . . . . . . . . . . 16
Page 23

S860 manuel 28/12/06 14:33 Page 15
Consignes de sécurité
ATTENTION
RISQUE D’ÉLECTROCUTION
NE PAS OUVRIR
Le symbole de l’éclair dans un triangle équilatéral
est destiné à alerter l’utilisateur de la présence
de tension dangereuse non isolée dans le produit,
qui peut avoir assez d’ampleur pour constituer
un risque de décharge électrique.
ATTENTION : POUR RÉDUIRE LE RISQUE D’ÉLECTROCUTION,
N’ENLEVEZ PAS LA COQUE AVANT (OU
L’ARRIÈRE). AUNCUNE PARTIE UTILISABLE PAR
L’UTILISATEUR À L’INTÉRIEUR. L’ENTRETIEN
EST RÉSERVÉ AU PERSONNEL QUALIFIÉ.
Le symbole du point d’exclamation dans un
triangle équilateral est destiné à alerter
l’utilisateur de la présence de fonctionnement
important et des instructions de maintenance
dans le manuel accompagnant l’appareil.
AVERTISSEMENT : POUR RÉDUIRE LE RISQUE D’INCENDIE OU D’ÉLECTROCUTION, NE PAS
EXPOSER CET APPAREIL À LA PLUIE OU À L’HUMIDITÉ.
ATTENTION : POUR EMPÊCHER UNE DÉCHARGE ÉLECTRIQUE, FAITES CORRESPONDRE LA LARGE
PRISE ÉLECTRIQUE À LA LARGE SORTIE AC ET INSÉREZ À FOND.
Il est obligatoire de ne pas se débarrasser des déchets d’équipements électriques et électroniques avec les déchets municipaux
non triés, et d’utiliser les systèmes de collecte mis à la disposition des usagers. La présence de substances dangereuses dans
les équipements électriques et électroniques peuvent engendrer des effets potentiels sur l’environnement et la santé humaine.
AVERTISSEMENT POUR CHARIOT PORTATIF
N’ENLEVEZ PAS CETTE ÉTIQUETTE
Les mots “WARNING, DÉPLACER AVEC PRÉCAUTION.
CE CHARIOT NE DOIT PAS ÊTRE DÉPLACÉ PAR DES
ENFANTS SANS L’AIDE D’UN ADULTE”.
OU
Un appareil ou une combinaison de chariot doit être
déplacé avec soin. Des arrêts brusques, une charge
excessive ou l’utilisation sur des surfaces inégales
peuvent provoquer un renversement.
S3125A
L’électricité est une énergie utilisée dans de nombreuses applications. Ce produit a été conçu et fabriqué pour fonctionner en
respectant votre sécurité. Une utilisation inappropriée peut provoquer électrocutions ou incendies. Veuillez respecter les simples
règles qui suivent pour la mise en service, l’utilisation et l’entretien.
1. Veuillez lire attentivement les instructions relatives à la sécurité et au fonctionnement de ce produit
avant de l’utiliser.
2. Veuillez conserver ce manuel soigneusement, afin de pouvoir vous y référer ultérieurement.
3. Veuillez respecter les consignes de sécurité données dans ce manuel.
4. Veuillez suivre les instructions données dans ce manuel, afin de pouvoir profiter au maximum de votre
appareil.
5. Avant tout nettoyage de l’appareil, veuillez débrancher le récepteur TNT de la prise murale ou débrancher l’antenne portable. N’utilisez pas de produits liquides, corrosifs ni d’aérosols pour nettoyer l’appareil. Il est préférable d’utiliser un chiffon sec et doux pour cette opération.
6. Extensions : veuillez ne pas utiliser d’autres câbles que ceux fournis dans le coffret, afin d’éviter de
provoquer un court-circuit
.
7. Eau et humidité : pour des raisons de sécurité évidentes, notamment les risques d’électrocution,
il est fortement déconseillé d’utiliser cet appareil à proximité de l’eau ou dans des endroits fortement
humides, par exemple dans votre baignoire ou sous votre douche, près d’une piscine ou d’un évier,
ainsi que sur des surfaces humides.
Page 24

S860 manuel 28/12/06 14:33 Page 16
8. Accessoires : merci de ne pas placer cet appareil sur un chariot, une étagère, une table ou un trépied
instable. L’appareil pourrait tomber et blesser un enfant ou un adulte, et subir de sérieux dommages.
Tout montage de l’appareil doit être fait en conformité avec les instructions de ce manuel, et opéré
avec des accessoires fournis ou recommandés par le fabricant de ce produit.
9. Manutention (ce paragraphe s’adresse aux revendeurs) : ce produit doit être manipulé soigneusement
avec un chariot et rangé sur des étagères recommandées par le fabricant.
9A. Merci de déplacer avec précaution ces produits. De brusques arrêts, de trop fortes charges, et un
rangement sur des surfaces inégales ou n’étant pas à l’équerre, peuvent endommager les récepteurs.
10. Aération : la coque du récepteur TNT Intuix est parcourue de plusieurs ouvertures qui assurent le bon
fonctionnement et la ventilation des composants électroniques, et permettent d’éviter une surchauffe
de l’appareil. Veillez à ne pas obturer ces aérations. Ces ouvertures sont moins fonctionnelles notamment si vous utilisez l’appareil sur un lit, un sofa, une couverture ou d’autres surfaces ayant des reliefs
enveloppants. Il est préférable de ne pas poser ce récepteur TNT dans une bibliothèque ou sur des
étagères si l’espace autour de l’appareil est insuffisant, et que la ventilation ne peut se faire correctement.
11. Alimentation : avant de recharger les batteries de votre appareil, assurez-vous que la prise de courant
délivre un voltage compatible avec le chargeur de batterie contenu dans ce coffret. En cas de doute
sur votre installation électrique, veuillez consulter votre revendeur ou votre fournisseur d’électricité.
L’appareil peut fonctionner avec des piles plutôt qu’avec des accumulateurs ; veuillez consulter ce
guide afin d’en savoir plus.
12. Mise à la terre et Polarisation : cet appareil peut être équipé d’une prise secteur pour courant alternatif
polarisée (une des lames de la prise est plus large que l’autre). Dans ce cas, la fiche ne peut être
insérée dans la prise murale que d’une seule façon. C’est un équipement de sécurité passive. Si vous
ne parvenez pas à insérer totalement la fiche dans la prise murale, essayez de retourner la fiche, cela
devrait fonctionner. Si cela ne convient toujours pas, ne tentez en aucun cas d’enlever ou de remplacer
la fiche polarisée de cet appareil ; il conviendra de remplacer votre fiche murale.
Autre consigne : dans le cas où cet appareil est équipé d’une fiche à 3 bornes, dont une de raccordement
à la terre, vous ne pourrez, de la même façon, la raccorder qu’à une prise murale adoptant le même
dispositif. C’est un autre facteur de sécurité. Si vous ne parvenez pas à insérer la fiche dans la prise
murale, veuillez remplacer cette dernière, et ne tentez pas d’enlever la protection de la fiche.
13. Fils et rallonges électriques : veillez à dérouler et à ranger vos fils et rallonges électriques de manière
à ce qu’on ne puisse pas marcher dessus, et à ce qu’ils ne soient pas écrasés par des éléments se
trouvant à proximité. Vérifiez particulièrement que les fils ne soient pas soumis à de fortes torsions au
niveau des fiches murales, des prises, et aux endroits où les fils sortent de l’appareil.
14. Protection contre les surcharges électriques : la prise de ce produit est équipée d’une protection
anti-surcharges électriques. Veuillez vous conformer aux instructions de ce manuel en cas de
remplacement ou de travaux sur cet équipement de sécurité. Assurez-vous que le technicien qui
intervient sur l’appareil remplace cet élément par une prise dotée du même dispositif.
15. Antenne extérieure et raccordement à la terre : en cas de raccordement de votre appareil à une prise
d’antenne extérieure ou à un système câblé, veuillez vous assurez que cet élément est relié à la terre,
afin de bénéficier d’une protection contre les surcharges électriques et les décharges d’électricité statique. L’article 810 du code électrique des Etats-Unis fournit des renseignements relatifs à une mise en
terre appropriée du mât et de la structure de soutien de l’antenne, la mise à la terre de la descente
d’antenne au paratonnerre de l’antenne, le calibre des conducteurs de mise en terre, l’emplacement du
paratonnerre de l’antenne, le branchement aux électrodes de terre et les caractéristiques de ces
électrodes. Reportez-vous au schéma 131.1 se trouvant à la fin de cette section sur les consignes de
sécurité.
16. Foudre : pour éviter que la foudre ne détériore votre récepteur TNT portable, tout particulièrement s’il
vous arrive de laisser votre appareil inactif pendant de longues périodes, veillez à débrancher sa prise
d’alimentation ainsi que le câble le raccordant à la prise d’antenne murale.
17. Lignes électriques et antenne extérieure : une antenne extérieure ne doit jamais être installée à
proximité de lignes ou de courants électriques, ou de lampes alimentées par le courant domestique,
afin d’éliminer tout risque de contact avec ces derniers. Lors de l’installation d’une antenne extérieure,
prenez d’extrêmes précautions afin de ne surtout pas risquer de toucher de telles lignes ; leur contact
pourrait se révéler fatal.
18. Court-circuit : ne surchargez pas vos prises d’alimentation, vos rallonges et multiprises secteur :
cela pourrait provoquer un court-circuit, dont résulterait un incendie ou une électrocution.
Page 25

S860 manuel 28/12/06 14:33 Page 17
19. Intrusion d’objet ou de liquide : veillez à ce que de petits objets ne puissent pas pénétrer dans
l’appareil à travers les orifices dont sa surface est parcourue. Ils pourraient entrer en contact avec
des zones parcourues par le courant domestique, provoquant un incendie ou une électrocution.
Ne renversez jamais de liquide, quel qu’il soit, sur cet appareil, pour les mêmes raisons.
20. Réparations de fortune : ne tentez pas d’effectuer vous-mêmes une réparation sur cet appareil, en
l’ouvrant ou en déplaçant les capots. Vous risqueriez une électrocution. Veuillez faire effectuer toute
réparation par du personnel qualifié.
21. Réparations nécessaires : veuillez débrancher très rapidement la prise d’alimentation et contacter
votre revendeur ou un réparateur qualifié dans les cas suivants :
a) Le cordon et/ou la prise d’alimentation sont détériorés,
b) Du liquide a été renversé sur l’appareil ou des objets sont rentrés à l’intérieur du produit,
c) L’appareil a été exposé à des projections d’eau (pluie, éclaboussures…),
d) L’appareil ne fonctionne pas normalement, même si vous suivez les instructions.
N’effectuez que les réglages que décrit ce manuel ; tout autre réglage hasardeux pourrait endommager
l’appareil, et nécessiter une intervention plus poussée de la part de notre service technique pour
remettre le récepteur en état de marche,
e) Le récepteur est tombé ou a été endommagé par un choc,
f ) Les fonctions de l’appareil sont altérées ; ceci nécessite une intervention également.
22. Remplacement de pièces : veuillez vous assurer que le technicien auquel vous confiez votre récepteur
TNT pour des réparations utilise des pièces détachées approuvées par le fabricant, et ayant les mêmes
caractéristiques que les pièces d’origine. Une pièce détachée inappropriée pourrait provoquer un
incendie, un court-circuit ou des dégâts sur votre appareil.
23. Contrôles occasionnels : si vous avez fait réparer votre appareil par un technicien, demandez-lui de
contrôler occasionnellement l’ensemble des fonctions de votre récepteur, afin de déterminer si
l’appareil fonctionne convenablement et en toute sécurité.
24. Raccordement à une antenne extérieure : l’appareil ne doit être raccordé à une antenne extérieure
que dans les conditions décrites dans ce manuel, afin de vous garantir un niveau optimal de sécurité.
25. Sources de chaleur : veillez à toujours placer votre appareil à une distance suffisante de sources de
chaleur telles que radiateur, régulateur thermique, cuisinière, ou tout autre appareil (y compris des
amplificateurs) produisant de la chaleur.
Schema 131.1
Fixation reliée
à la terre
Appareil électrique
domestique
Fil reliant l’antenne
à la terre
Unité de protection
de l’antenne
Fils conducteurs allant
vers la terre
Fixations reliées à la terre
Mise à la terre
Page 26

R
S860 manuel 28/12/06 14:33 Page 18
Precautions
Mesures de sécurité
• Ne débranchez pas le cordon d’alimentation les mains humides, vous risqueriez de
vous électrocuter.
• Avant toute intervention sur l’appareil, débranchez l’alimentation, et n’hésitez pas à
contacter la Hotline Intuix.
• Avant de déplacer l’appareil, assurez-vous que le cordon d’alimentation est débranché
de la prise secteur.
• Ne secouez pas le récepteur pendant qu’il est allumé ; cela pourrait l’endommager et
créer un court-circuit.
• Si un objet ou un liquide pénètre à l’intérieur de l’appareil, éteignez-le et débranchez-le
immédiatement, et ne l’allumez à nouveau qu’après avoir eu l’avis d’un technicien.
• Si vous deviez laisser l’appareil éteint pendant un long laps de temps, assurez-vous
que le cordon d’alimentation soit débranché aux 2 extrémités. Tirez sur la prise ellemême pour enlever la fiche de la prise murale, et non sur le fil électrique
Position du récepteur
• Veuillez placer l’appareil à une distance suffisante de tout équipement radio, et de tout
appareil produisant ou utilisant un champ magnétique.
• Veuillez vous assurer que l’appareil soit toujours suffisamment ventilé pour éviter une
surchauffe des composants électroniques.
• Evitez de placer l’appareil sur une surface molle telle qu’une couverture, qui pourrait
obstruer les orifices assurant la ventilation du récepteur, et se situant à l’arrière de ce
dernier.
• Placez le récepteur à distance raisonnable de toute source de chaleur, évitez de
l’utiliser à la lumière directe du soleil, dans des endroits fortement poussiéreux ou
à un endroit où il pourrait subir des chocs.
• Evitez d’utiliser l’appareil à proximité d’une arrivée d’air froid : la condensation pourrait
endommager les composants électroniques.
Fonctionnement
• La garantie de ce produit ne pourrait évidemment pas jouer s’il venait à ne plus
fonctionner ou à être détérioré suite à une utilisation inappropriée.
• Si vous disposez d’une double antenne télé, veillez à éteindre cet appareil lorsque
vous regardez des programmes sur un autre poste de télévision, afin de ne pas créer
d’interférence avec l’autre poste.
• Le fonctionnement du récepteur pourrait être perturbé par de l’électricité statique. Pour
y remédier, débranchez la prise d’alimentation, puis rebranchez-la après avoir patienté
un court instant.
F
Page 27

S860 manuel 28/12/06 14:33 Page 1
Présentation du mini-téléviseur portable
1
Antenne
2
Ecran LCD
3
Cellule infrarouge de la télécommande
Capteur permettant d'accéder aux fonctions de cet appareil à l'aide
de la télécommande.
4
Voyant de la batterie
Indicateur d'état de la batterie. Si le niveau de la batterie est faible, le voyant
vire au rouge. Après chargement, il passe au vert.
5
Voyant d'alimentation
Lorsque le mini-téléviseur fonctionne, le voyant est vert
6
Bouton Menu/Arrêt
7
Bouton OK/Coupure du son
8
Sélecteur multiple (CH+( )/CH-( )/VOL+( )/VOL-( ))
9
Haut-parleur
10
Bouton d'activation de l'écran
▲
▲
▲
▲
1
FR
6 7 8 10
: veuillez vous reporter à la page 9 pour une description
plus détaillée.
Page 28

R
S860 manuel 28/12/06 14:33 Page 2
Présentation du mini-téléviseur portable
11
Connecteur d'alimentation CC
A relier à la prise d'alimentation CA/CC ou à l'allume-cigare de la voiture.
12
Connecteur de sortie vidéo
Sortie des signaux vidéo
Connecteur pour écouteurs/sortie audio
13
Sortie des signaux audio stéréo
14
Poignée
15
Oeillet pour dragonne
16
Connecteur d'antenne externe
17
Curseur d'alimentation
2
FR
F
Page 29

S860 manuel 28/12/06 14:33 Page 3
Utilisation de la télécommande
(1) SOURCE: aucune fonction
(2) POWER: mise en marche/mise en veille
(3) Sélection de la chaîne dans l'ordre croissant
ou déplacement du curseur vers le haut
(4) MENU: accès au menu de configuration
(5) OK: sélection de l'élément en surbrillance
(6) Réduction du volume ou déplacement du
curseur vers la gauche
(7) Sélection de la chaîne dans l'ordre décroissant
ou déplacement du curseur vers le bas
(8) EXIT: sortie de la configuration actuelle
(9) Touches numériques
(10) RECALL: accès à la dernière chaîne sélectionnée
(11) Bouton rouge : touche de sous-titrage en mode de
fonctionnement normal ou touche de fonction pour
accéder aux pages consultées en mode télétexte
(12) Bouton vert : touche de fonction pour accéder
aux pages consultées en mode télétexte
(13) MUTE: commande pour couper le son
(14) Sélection des chaînes de télévision numérique
ou des stations de radio
(15) PIC: aucune fonction
(16) EPG: guide électronique des chaînes
(17) Augmentation du volume ou déplacement
du curseur vers la droite
(18) PREVIEW: aperçu des chaînes sélectionnées
(19) PLAY/PAUSE: lecture ou pause
(20) AUDIO: sélection de la deuxième langue
ou sélection du mode stéréo
(21) INFO: : informations système au sujet des chaînes numériques
(22) AUTO: recherche automatique des chaînes
(23) MANUAL: : recherche manuelle des chaînes
(24) ENTER: : validation du numéro de canal sélectionné
(25) TTX: touche d'affichage des pages télétexte (doit être compatible avec l'émetteur)
(26) Bouton jaune : déplacement d'une page vers le haut en mode EPG ou touche de fonction pour
accéder aux pages consultées en mode télétexte
(27) Bouton bleu : déplacement d'une page vers le bas en mode EPG ou touche de fonction pour
accéder aux pages consultées en mode télétexte
Installation de la pile de la télécommande
Avant d'utiliser la télécommande, installez la pile
selon les instructions suivantes .
(1) Placez la télécommande à l'envers
(2) Enlevez le couvercle du compartiment de la pile
en le faisant coulisser vers le bas.
(3) Insérez la pile de rechange
3
FR
Page 30

R
S860 manuel 28/12/06 14:33 Page 4
Instructions générales de fonctionnement
Marche/arrêt du téléviseur
• Pour allumer le système, faites glisser le curseur
d'alimentation sur le côté de l'unité sur la position « ON ».
• Pour l'éteindre, faites glisser le curseur d'alimentation s
ur la position « OFF ».
Branchement des écouteurs
• Insérez la fiche des écouteurs dans la prise “ ’’
située sur le côté de l'unité
.
Prise
écouteurs
Raccordement à l'antenne externe
• Insérez l'extrémité du câble de l'antenne dans la prise
« Ext. ANT » située sur le côté de l'unité.
Prise antenne
4
FR
F
Page 31

S860 manuel 28/12/06 14:33 Page 5
Chargement de la batterie
Ce mini-téléviseur portable est équipé d'une batterie
rechargeable. Si le voyant de la batterie est rouge,
cela signifie que la batterie est sur le point d'être
épuisée. Vous devez alors la recharger en procédant
de la façon suivante :
1. Vous pouvez regarder le mini-téléviseur tout en
rechargeant la batterie.
2. Connectez le mini-téléviseur à la source
d'alimentation externe via un adaptateur CA/CC
ou l'allume-cigare de la voiture. Si besoin est,
aidez-vous du schéma ci-dessous ou reportez-vous à la page suivante.
3. Lorsque la batterie est en cours de chargement, le voyant correspondant est rouge.
4. Le voyant vire au vert dès que la batterie est chargée.
5. Un minimum de 4 heures est nécessaire au chargement complet de la batterie.
Voyant batterie
Connexion de l'adaptateur CA/CC ou de l'allume-cigare
• Insérez la fiche CC dans la prise « » située sur le côté de l'unité
• Reliez la fiche CA à la prise secteur ou reliez l'extrémité du câble de l'allume-cigare
au connecteur de l'allume-cigare de la voiture.
Fiche CC
Fiche CC
Fiche CA
Fiche de l'allume-cigare
de la voiture
IMPORTANT
• N'utilisez, en aucun cas, un autre type ou un autre modèle d'adaptateur CA ou
d'allume-cigare pour charger la batterie ou alimenter le mini-téléviseur. Vous
risqueriez sinon de provoquer une surchauffe ou d'endommager votre appareil.
• Après 300 cycles de rechargement, la capacité de la batterie descend à 70%.
Par conséquent, après de nombreux rechargements, pensez à remplacer la batterie.
• La batterie peut s'échauffer en cours de chargement ou de fonctionnement du
mini-téléviseur.
5
FR
• Rechargez la batterie à une température ambiante comprise entre 0°C et 40°C.
Page 32

R
S860 manuel 28/12/06 14:33 Page 6
Fonctionnement de base
Cette section décrit en détail les commandes de base du mini-téléviseur.
FONCTIONS PRINCIPALES
Sélection de la chaîne
Appuyez sur les boutons [CH+] ou
[CH-] pour sélectionner la chaîne
de télévision ou la station radio.
Commande de rétroéclairage
Appuyez sur ce bouton pour activer
ou désactiver le rétroéclairage.
Menu
Appuyez sur ce bouton pour
accéder au mode de menu
ou en sortir.
Commande de coupure
du son
Réglage du volume
Appuyez sur [VOL-] ou sur [VOL+]
pour réduire ou augmenter le
volume.
Appuyez sur ce bouton pour
couper le son ou le rétablir.
Commande de sélection
En mode menu, appuyez sur ce
bouton pour faire une sélection.
Navigation dans le menu
En mode menu, appuyez sur les boutons [CH+] et
[CH-] pour déplacer le curseur vers le haut ou vers
le bas. Appuyez sur les boutons [VOL-] et [VOL+]
pour le déplacer vers la gauche ou vers la droite.
6
FR
F
Page 33

S860 manuel 28/12/06 14:33 Page 7
MENU
Le menu se compose de deux pages : une pour le paramétrage des chaînes et l'autre pour la
configuration du système. Appuyez sur le bouton [VOL-] pour passer d'une page à l'autre. Dans
la page de menu des chaînes, mettez en surbrillance l'option qui vous intéresse (type de service,
liste des chaînes, aperçu, canal audio, langue de sous-titrage, infos chaîne, recherche automatique
ou recherche manuelle) et effectuez votre sélection. Dans la page de menu du système, mettez
en surbrillance une des options proposées (luminosité, système TV, paramètre régional, langue
de l'interface et fuseau horaire) et sélectionnez la valeur voulue. Servez-vous des boutons [CH+]
et [CH-] pour mettre une option de menu en surbrillance, appuyez sur [VOL+] et [VOL-] pour
sélectionner le paramètre d'option désiré et validez votre choix à l'aide du bouton [OK].
PAGE SYSTÈME
Luminosité
Réglage de la luminosité de l'écran
Système TV
Sélection de la norme d'affichage
Paramètre régional
Sélection de la région où vous vous trouvez
Langue d'interface
Sélection de la langue d'affichage du texte à l'écran
Fuseau horaire
Définition du fuseau horaire
7
FR
Page 34

R
S860 manuel 28/12/06 14:33 Page 8
PAGE DES CHAINES
Type de service
Sélection des chaînes de télévision ou des stations radio
Liste des chaînes
Affichage d'informations complètes sur toutes les
chaînes disponibles
Aperçu
Prévisualisation d'un maximum de 9 chaînes
présélectionnées
Canal audio
Sélection de la langue d'émission principale ou
secondaire
Langue des sous-titres
Sélection de la langue de sous-titrage parmi celles
proposées par les fournisseurs de services
Infos chaînes
Affichage d'informations détaillées sur les paramètres
système et la réception des signaux pour chacune des
chaînes captées
Recherche automatique
Lancement de la recherche automatique des chaînes
Recherche manuelle
Lancement de la recherche manuelle des chaînes
LISTE DES CHAINES (EPG, guide électronique des chaînes)
Cet écran permet d'obtenir divers renseignements au sujet des chaînes disponibles.
Servez-vous des boutons [CH+] et [CH-] pour sélectionner la chaîne et utilisez les boutons
[VOL-] et [VOL+] pour afficher les informations correspondantes.
Nom de la chaîne
actuelle
Liste des chaînes
8
FR
Aperçu
Nom de la chaîne
suivante
F
Page 35

S860 manuel 28/12/06 14:33 Page 9
RECHERCHE MANUELLE
Utilisez les boutons [VOL-] et [VOL+] pour sélectionner le canal désiré et appuyez sur le bouton
[OK] pour commencer la recherche. Les chaînes détectées sont automatiquement ajoutées à la
liste des chaînes.
Chaîne sélectionnée
Informations
Données relatives
au signal
INFOS CHAINES
Cet écran vous donne des informations détaillées sur les paramètres système et les signaux de
réception correspondant aux chaînes de télévision captées. Appuyez sur le bouton [MENU] pour
quitter l'écran.
Paramètres système
Données relatives
au signal
Informations sur l'antenne
9
FR
sélectionnée
Page 36

R
S860 manuel 28/12/06 14:33 Page 10
Mise en route du mini-téléviseur
Voici comment terminer la configuration initiale de votre mini-téléviseur lors de la première
utilisation.
Appuyez sur le bouton [MENU], puis sur le
bouton [VOL-] pour accéder au menu de
sélection de la configuration système.
Appuyez sur le bouton [VOL+] et mettez
votre sortie TV en surbrillance, puis
appuyez sur le bouton [OK].
Appuyez sur le bouton [VOL+] pour régler
le niveau de luminosité de l'écran, puis
appuyez sur le bouton [OK].
Appuyez sur le bouton [VOL+] et mettez
votre langue d'interface en surbrillance,
puis appuyez sur le bouton [OK].
Appuyez sur le bouton [VOL+] et mettez
votre région en surbrillance, puis appuyez
sur le bouton [OK].
10
FR
L'heure est automatiquement réglée en
fonction de votre région. Si vous devez la
modifier, appuyez sur le bouton [CH+] ou
sur le bouton [CH-].
F
Page 37

S860 manuel 28/12/06 14:33 Page 11
Revenez en haut du menu et appuyez sur
le bouton [VOL-] pour afficher la page de
menu des chaînes.
Mettez OK en surbrillance et appuyez sur
le bouton [OK].
Mettez l'option de recherche automatique
en surbrillance et appuyez sur le bouton
[OK].
La recherche des canaux peut durer
quelques minutes
Dès que la recherche des canaux est
terminée, appuyez sur le bouton [CH+]
ou sur le bouton [CH-] pour sélectionner
Si besoin est, appuyez sur le bouton
[VOL+] ou sur le bouton [VOL-] pour régler
le volume.
la chaîne de télévision/station radio.
11
FR
Page 38

S860 manuel 28/12/06 14:33 Page 12
S860
PORTABLE DVB-T RADIO
Benutzerhandbuch
Page 39

S860 manuel 28/12/06 14:33 Page 13
Inhaltsverzeichnis
Teile des tragbaren Fernsehers . . . . . . . . . . . . . . . . 1
Fernbedienungsfunktionen . . . . . . . . . . . . . . . . . . . . 3
Einlegen von Batterien in die Fernbedienung . . . . . 3
Allgemeine Bedienungsanleitung . . . . . . . . . . . . . . 4
Laden der Batterie . . . . . . . . . . . . . . . . . . . . . . . . . . 5
Inbetriebnahme . . . . . . . . . . . . . . . . . . . . . . . . . . . . . 7
Grundfunktionen . . . . . . . . . . . . . . . . . . . . . . . . . . . . 9
Schritte zur automatischen Sendersuche . . . . . . .13
Anschluss an einen Fernseher . . . . . . . . . . . . . . . 14
Problembehandlung Fragen & Antworten . . . . . . . 15
Technische Daten . . . . . . . . . . . . . . . . . . . . . . . . . 16
Page 40

S860 manuel 28/12/06 14:33 Page 14
Wichtige Sicherheitshinweise
CAUTION
RISK OF ELECTRIC SHOCK
DO NOT OPEN
CAUTION : TO REDUCE THE RISK OF ELECTRIC SHOCK,
DO NOT REMOVE COVER (OR BACK).
NO USER-SERVICEABLE PARTS INSIDE REFER
SERVICING TO QUALIFIED SERVICE PERSONNEL.
ACHTUNG Um elektrischem Stromschlag vorzubeugen, stecken Sie den breiten Steckerkontakt in die
breite Aussparung der Steckdose und drücken Sie den Stecker vollständig in die Steckdose
The lighting flash with arrowhead symbol within
an equilateral triangle is intended to alert the
user to the presence of uninsulated dangerous
voltage within the product’s enclosure that may
be of sufficient magnitude to constitute a risk of
electric shock to persons.
The exclamation point within an equilateral
triangle is intended to alert the user to the
presence of important operating and
maintenance (servicing) instructions in the
literature accompanying the appliance.
CAUTION : TO PREVENT ELECTRIC SHOCK, MATCH WIDE BLADE OF POWER PLUG TO WIDE SLOT
OF AC OUTLET AND FULLY INSERT.
PORTABLE CART WARNING
DO NOT REMOVE THIS TAG (MARKING)
The words “WARNING, MOVE WITH CARE. THIS
CART/APPLIANCE COMBINATION SHOULD NOT BE
MOVED BY CHILDREN WITHOUT PROPER GUIDANCE
FROM AN ADULT”
OR
An appliance and cart combination should be moved
with care. Quick stops, excessive force, and uneven
surfaces may cause the appliance and cart
combination to overturn.
S3125A
Electrical energy can perform many useful functions. This unit has been engineered and manufactured to assure your personal
safety. Improper use can result in potential electrical shock or fire hazards. In order not to defeat the safeguards, observe the
following basic rules for its installation, use and servicing.
1. Anleitung lesen Sicherheitshinweise und Gebrauchsanweisung sollten vor Inbetriebnahme gelesen
werden.
2. Aufbewahrung Sicherheitshinweise und Gebrauchsanweisung sollten für evtl. Rückfragen aufbewahrt
werden.
3. Warnungen beachten Den Warnhinweisen ist Folge zu leisten.
4. Hinweisbeachtung Sicherheitshinweise und Gebrauchsanweisung sollten befolgt werden.
5. Reinigung Ziehen Sie den Netzstecker bevor Sie das Gerät reinigen. Verwenden Sie keine
Flüssig- /oder Sprühreiniger. Benutzen Sie nur ein feuchtes Tuch zur Reinigung.
6. Zubehör Verwenden Sie kein Zubehör, das vom Hersteller nicht freigegeben wurde, da diese Defekte
verursachen können.
Page 41

S860 manuel 28/12/06 14:33 Page 15
7. Wasser und Feuchtigkeit Verwenden Sie das Gerät nicht in der Nähe von Wasser, wie z.B.
Spülbecken, Badewanne, Dusche etc. oder in der Nähe von Trocknern, in feuchten Kellerräumen und
in der Nähe von Schwimmbecken und ähnlichem.
8. Zubehör Stellen Sie das Gerät nicht auf einen Rollwagen, ein instabiles Gestell, Stativ, Halter oder
Tisch. Das Gerät kann Kinder oder Erwachsene durch Herunterfallen verletzen und es kann zu
Beschädigungen an dem Gerät kommen. Stellen Sie es nur auf feste Gegenstände oder verwenden Sie
Halterungen, die vom Hersteller empfohlen werden. Bei der Montage des Gerätes an eine Halterung,
halten Sie sich an die Herstellervorgaben. Benutzen Sie nur geeignete Halterungen.
9. Halterungen/Gestelle Das Gerät darf nur auf Halterungen und Gestelle montiert werden, die den
Herstellervorgaben entsprechen.
9A. Sollte das Gerät auf einem Rollwagen abgestellt werden, bewegen Sie diesen vorsichtig. Schnelle
Richtungsänderungen und Stopps, sowie unebene Untergründe können Wagen und Gerät zum
Umkippen bringen.
10. Belüftung Schlitze und Öffnungen an dem Gerät gewährleisten die Belüftung des Gerätes, schützen
vor Überhitzung und sorgen für einwandfreie Funktion. Diese Schlitze und Öffnungen dürfen nicht
verdeckt oder verschlossen werden, indem das Gerät z.B. auf einem Sofa, Bett oder ähnlichem
platziert wird. Das Gerät darf auch nicht an Orten platziert werden, an denen keine ausreichende
Belüftung gewährleistet ist, wie z.B. in Regalen, die die Herstellervorgaben nicht erfüllen.
11. Stromversorgung Das Gerät darf nur an die auf dem Hinweisschild aufgeführten Stromspannungen
angeschlossen werden. Sollten Sie nicht sicher sein, welche Stromspannung vorherrscht, fragen Sie
bei Ihrem Elektronikhändler oder bei der Stromversorgungsgesellschaft nach. Wird das Gerät mit
Batterien betrieben, halten Sie sich an die Vorgaben der Gebrauchsanweisung.
12. Erdung / Polarisation Diese Gerät kann mit einem Polarisationsstecker ausgestattet sein. (Ein Kontakt
ist breiter als der andere) Dieser Stecker passt nur in einer Stellung an eine Steckdose. Dies ist aus
Sicherheitsgründen. Sollte es nicht möglich sein den Stecker einzustecken, versuchen Sie den Stecker
wieder zu entfernen. Sollte der Stecker immer noch nicht passen, ziehen Sie einen Elektriker zu Hilfe,
der ggf. eine moderne Steckdose einsetzen kann. Entfernen Sie auf keinen Fall die Schutzvorrichtung
vom Polarisationsstecker.
Warnung Dieses Gerät ist mit einem Drei-Kabel-Erdungsstecker ausgerüstet, der über einen dritten
(Erdungs-) Kontakt verfügt. Dieser Stecker passt nur in eine geerdete Steckdose. Dies ist aus
Sicherheitsgründen. Sollte es nicht möglich sein den Stecker einzustecken, ziehen Sie einen Elektriker zu
Hilfe, der ggf. eine moderne Steckdose einsetzen kann. Entfernen Sie auf keinen Fall den Erdungsstecker.
13. Schutz des Stromkabels Stromkabel sollten so verlegt werden, dass man nicht darauf tritt, sie nicht
eingequetscht werden. Gehen Sie sorgfältig mit den Kabeln, Steckern und Schutzeinrichtungen um.
14. Sicherheitsstecker Das Gerät ist mit einem Anschlussstecker mit Überspannungsschutz ausgestattet.
Dies ist aus Sicherheitsgründen. Lesen Sie die Gebrauchsanweisung bevor sie Schutzeinrichtungen
austauschen oder entfernen. Sollte ein Austausch des Anschlusses notwendig sein, versichern Sie
sich, dass der Techniker einen Anschluss mit dem gleichen Überspannungsschutz oder wie vom
Hersteller spezifiziert, einsetzt.
15. Außenantennenerdung Wenn das Gerät an eine Außenantenne oder Kabelsystem angeschlossen
wird, vergewissern Sie sich, dass die Antenne bzw. das Kabel geerdet sind um Schutz von Spannung
und statischer Aufladung zu haben. Artikel 810 der nationalen Elektrik Verordnung, ANSI/NFPA 70,
beschreibt Informationen über das richtige Erden eines Mastes, Erdung des Eingangskabels einer
Antenne an eine Entladestation, Größe der Erdungsanschlüsse, Platzierung dieser, sowie
Anforderungen an eine Erdungselektrode. Beachten Sie Punkt 131.1.
16. Blitzschlag Für zusätzliche Sicherheit ziehen Sie den Gerätestecker während eines Gewitters oder bei
längerer Abwesenheit aus der Steckdose und ziehen Sie den Antennenstecker. Dies beugt Schäden
durch Gewitter und Überspannung vor.
17. Hochspannungsleitungen Eine Außenantenne darf nicht in der Nähe von Stromleitungen oder ande-
ren Stromkreisen platziert werden, auch nicht dort, wo die Antenne auf oder in die Nähe eine solchen
Stromleitung fallen könnte. Wenn Sie eine Außenantenne installieren passen Sie besonders auf, dass
Sie keine Stromleitungen oder andere Stromkreise berühren. Dies kann schwere Schäden verursachen.
18. Überlastung Überlasten Sie keine Steckdosen, Verlängerungskabel, da dies Feuer oder Kurzschlüsse
verursachen könnte.
Page 42

S860 manuel 28/12/06 14:33 Page 16
19. Fremdkörper und Feuchtigkeitseintritt Stecken Sie niemals Gegenstände in Öffnungen des Gerätes,
da diese spannungsführende Teile berühren oder Teile herausbrechen könnten, was zu Kurzschluss
oder Feuer führen könnte. Setzen Sie das Gerät niemals Feuchtigkeit aus.
20. Wartung Versuchen Sie nicht das Gerät selbst zu warten. Durch öffnen des Gehäuses könnten Sie
sich gefählicher Spannung aussetzen. Beauftragen Sie mit Wartungsarbeiten nur Fachpersonal.
21. Reparatur und Kundenservice Ziehen Sie den Netzstecker und wenden Sie sich an qualifiziertes
Fachpersonal, wenn:
a) das Stromkabel beschädigt ist,
b) Flüssigkeit oder Gegenstände in das Gerät eingedrungen sind,
c) das Gerät Wasser oder Regen ausgesetzt war,
d) das Gerät trotz Beachtung der Gebrauchsanweisung nicht funktioniert. Verändern Sie nur die
Einstellungen, deren Verstellung durch die Gebrauchsanweisung beschrieben ist. Andere
Änderungen können das Gerät beschädigen und verursachen meist einen Mehraufwand für
qualifiziertes Fachpersonals um die Funktionalität wieder herzustellen,
e) das Gerät heruntergefallen oder beschädigt ist und
f ) das Gerät eine deutliche Veränderung der Funktionalität aufweist.
22. Ersatzteile Sollten Ersatzteile benötigt werden, versichern Sie sich, dass der Techniker vom Hersteller
freigegebene Teile oder Teile die den gleichen technischen Anforderungen entsprechen verwendet.
Unsachgemäße Handhabung können zu Feuer, Kurzschluss oder Ausfall des Gerätes führen.
23. Sicherheitskontrolle Nach Wartung oder Reparaturarbeiten bitten Sie den Techniker um eine
Sicherheitskontrolle, um die Funktion zu gewährleisten.
24. Wand oder Deckenhalterung Das Gerät darf nur an Wand oder Decke montiert werden, wie vom
Hersteller empfohlen.
25. Hitze Das Gerät sollte im Abstand zu Wärmequellen wie z.B. Verstärkern, Heizungen, Öfen usw.
aufgestellt werden.
Punkt 131.1
Beispiel einer Antennenerdung nach ANSI/NF PA 70
Erdungsklammer
Verteilerkasten
NEC - NATIONAL ELECTRICAL CODE
S2898A
Antenneneingangsk
Antennen Entladungs Einheit
(NEC Sektion 810-20)
Erdungsanschluß
(NEC Sektion 810-24)
Erdungsklammer
Stromerdungselektrodensystem
Page 43

S860 manuel 28/12/06 14:33 Page 17
Schutzmaßnahme
Sicherheit
• Netzstecker nicht mit feuchten Händen ziehen. Stromschlaggefahr.
• Wenn das Gerät nicht funktioniert, ziehen Sie aus Sicherheitsgründen den Stecker und
fragen Sie uns nach technischer Hilfe.
• Vergewissern Sie sich, dass der Netzstecker gezogen ist, bevor sie das Gerät an einem
anderen Ort aufstellen.
• Bewegen Sie das Gerät nicht während der Wiedergabe. Kurzschluss und Feuergefahr.
• Sollten Gegenstände oder Flüssigkeiten in das Gehäuse eingedrungen sein, lassen Sie
das Gerät von qualifiziertem Fachpersonal prüfen, bevor Sie es wieder anschließen.
• Sollten Sie das Gerät längere Zeit nicht benutzen, ziehen Sie den Netzstecker. Ziehen
Sie dabei am Stecker selbst, nicht am Kabel
Standort
• Halten Sie ausreichenden Abstand zwischen dem Gerät und einem Radio. Das
Gerät muß auch einen ausreichenden Abstand zu anderen Geräten haben, die
elektromagnetische Felder erzeugen.
• Stellen Sie das Gerät an einer Stelle mit ausreichender Belüftung auf, um einen
Hitzestau zu vermeiden.
• Stellen Sie das Gerät nicht auf weichen Untergrund, der die Lüftungsschlitze
verdecken könnte.
• Stellen Sie das Gerät nicht an Stellen auf, die in der Nähe von Wärmequellen, in
direkter Sonneneinstrahlung, sehr staubig oder Vibrationen ausgesetzt sind.
• Setzen Sie das Gerät keiner kalten Luft aus. Durch Kondenswasser kann es zu
Funktionsstörungen kommen.
Funktion
• Das Gerät funktioniert nicht, wegen unsachgemäßer Handhabung. Die eingeschränkte
Garantie kommt für Schäden aufgrund unsachgemäßer Handhabung nicht auf.
• Schalten Sie den Player aus, während sie TV schauen. Es kann sonst zu Bildstörungen
kommen.
• Der Player kann bei elektrostatischer Spannung nicht korrekt funktionieren. Ziehen Sie
den Netzstecker und stecken Sie ihn erneut ein.
Page 44

2
S860 manuel 28/12/06 14:33 Page 1
Teile des tragbaren Fernsehers
1
Antenne
2
LCD Bildschirm
3
Infrarotsensor
Empfängt das Signal der Fernbedienung
4
Batterie LED
Batteriezustandsanzeige. Wenn die Batteriekapazität nachlässt, leuchtet die
LED rot. Nach erfolgreichem Ladevorgang leuchtet die LED grün.
5
Power LED
Wenn das Gerät in Betrieb ist, leuchtet die LED grün.
6
Menü/Beenden Taste
7
OK/Stummschaltung Taste
8
Mehrfachauswahltaste (CH+( )/CH-( )/VOL+( )/VOL-( ))
9
Lautsprecher
10
Display Ein/Aus Taste
▲
▲
▲
▲
1
D
6 7 8 10
: Für eine detaillierte Beschreibung lesen Sie bitte auf
Seite 9 weiter.
D
Page 45

S860 manuel 28/12/06 14:33 Page 2
Teile des tragbaren Fernsehers
11
DC Netzsteckerbuchse
Zum Anschluss des Netzteils oder des Zigarettenanzünderadapters.
Video out connector
12
Videoausgangsbuchse
Ausgang des Videosignals.
Kopfhörer/Audioausgangsbuchse
13
Ausgang des Audio-Stereo-Signals
14
Griff
15
Befestigungsöse
16
Externer Antennenanschluss
17
Netzschalter
2
D
Page 46

4
S860 manuel 28/12/06 14:33 Page 3
Fernbedienungsfunktionen
(1) SOURCE: keine Funktion
(2) POWER: Power-ein/Stand-by Auswahl
(3) Senderauswahl nach oben oder Cursor nach
oben bewegen
(4) MENU: Einstellungsmenü
(5) OK: Auswahl des gewählten Elements
(6) Lautstärke verringern oder Cursor nach links
(7) Senderauswahl nach unten oder Cursor nach
unten bewegen
(8) EXIT: die aktuelle Einstellung verlassen
(9) Nummerntaste
(10) RECALL: zurück zum letzten gewählten Sender
(11) Rote Taste: Untertitel-Taste bei normalem Bedienmodus
oder Schnelltaste im Videotextmenü, um zu bereits
besuchten Videotextseiten zu wechseln
(12) Grüner Kopf: Schnelltaste im Videotextmenü, um zu
bereits besuchten Videotextseiten zu wechseln
(13) MUTE: Stummschaltung
(14) DTV/Radio Auswahl
(15) PIC: keine Funktion
(16) EPG: elektronische Programmzeitschrift
(17) Lautstärke erhöhen oder den Cursor nach
rechts bewegen
(18) PREVIEW: Vorschau für ausgewähltes Programm
(19) PLAY/PAUSE Auswahl
(20) AUDIO: zweite Sprache und Stereo-Auswahl
(21) INFO: DTV Systeminformation
(22) AUTO: automatischer Sendersuchlauf
(23) MANUAL: manuelle Senderauswahl
(24) ENTER: Eingabe der gewählten Sendernummer
(25) TTX: Videotext-Taste um Videotext anzuzeigen
(Muss vom Sender unterstützt werden)
(26) Gelbe Taste: Seite nach oben im EPG-Modus oder eine Schnelletaste, um zu bereits besuchten
Videotextseiten zu wechseln
(27) Blaue Taste: Seite nach unten im EPG-Modus oder eine Schnelletaste, um zu bereits besuchten
Videotextseiten zu wechseln
Einlegen von Batterien in die Fernbedienung
Bevor Sie die Fernbedienung in Betrieb nehmen,
legen Sie die Batterien wie folgt ein.
(1) Drehen Sie die Fernbedienung auf den Kopf.
(2) Drücken Sie die geriffelte Stelle der
Batterieabdeckung herunter und schieben
Sie sie weg.
(3) Legen Sie eine andere Batterie ein.
3
D
D
Page 47

S860 manuel 28/12/06 14:33 Page 4
Allgemeine Bedienungsanleitung
EIN- und AUS-Schalten des Gerätes
• Um das Gerät einzuschalten, schieben Sie den
Netzschalter oben auf dem Gerät in die mit "ON"
bezeichnete Position.
• Um das Gerät auszuschalten, schieben Sie den
Netzschalter oben auf dem Gerät in die mit "OFF"
bezeichnete Position.
Anschließen von Kopfhörern
• Stecken Sie den Kopfhörerstecker in die mit “ ’’
gekennzeichnete Buchse an der Seite des Gerätes.
Kopfhörerstecker
Anschließen der externen Antenne
• Stecken Sie den Antennenstecker in die mit “Ext. ANT”
gekennzeichnete Buchse an der Geräteoberseite
Antennenstecker
4
D
Page 48

6
S860 manuel 28/12/06 14:33 Page 5
Laden der Batterie
Dieses Gerät besitzt eine eingebaute wiederaufladbare Batterie. Wenn die "Batterie LED" rot leuchtet,
gibt die Batterie keinen Strom mehr an das System
ab. In diesem Fall müssen Sie die Batterie aufladen.
Bitte befolgen Sie diese Schritte:
1. Fernsehen und das Aufladen der Batterie kann
gleichzeitig stattfinden.
2. Schließen Sie das Gerät an eine externe
Stromquelle mit Hilfe des Netzteils oder des
Zigarettenanzünderadapters an. Sehen Sie sich
dazu die Darstellung unten und auf der nächsten Seite an.
3. Während des Ladevorgangs leuchtet die "Batterie LED" rot.
4. Wenn die Batterie komplett geladen ist, leuchtet die "Batterie LED" grün.
5. Laden Sie die Batterie mindestens 4 Stunden, um Sie komplett aufzuladen.
Battery LED
Anschluss über das Netzteil oder den Zigarettenanzünderadapter
• Stecken Sie den DC-Stecker in die “ “ Buchse an der Seite des Gerätes
• Stecken Sie das Netzteil ein, oder stecken Sie den Zigarettenanzünderstecker in den
Zigarettenanzünder.
DC-Stecker
DC-Stecker
Netzstecker
Autozigarettenanzünderstecker
HINWEIS
• Benutzen Sie unter keinen Umständen ein Netzteil oder einen
Zigarettenanzünderadapter eines anderen Herstellers, um entweder die Batterie
dieses Gerätes zu laden oder es mit Strom zu versorgen. Bei Nichtbeachtung kann es
zu Überhitzungen oder Schäden am Gerät kommen.
• Nach 300 Ladezyklen wird die Batteriekapazität auf 70% gesunken sein. Ein
Austausch der Batterie kann deshalb nach vielen Ladevorgängen sinnvoll sein.
• Die Batterie kann während des Ladens oder des Betriebs heiß werden.
• Laden Sie die Batterie bei Raumtemperatur zwischen 0°C und 40 °C.
5
D
D
Page 49

S860 manuel 28/12/06 14:33 Page 6
Grundfunktionen
Dieses Kapitel beschreibt die Grundfunktionen ausführlich.
TASTENFUNKTIONEN
Senderwahl
Drücken Sie die [CH+] oder [CH-] Taste,
um einen TV- oder Radiosender zu
wählen.
Hintergrundbeleuchtung
Drücken Sie diese Taste, um die
Bildschirmhintergrundbeleuchtung EIN
oder AUS zuschalten.
Menü
Drücken Sie diese Taste, um
das Menü aufzurufen oder zu
schließen.
Lautstärkeregelung
Drücken Sie [VOL-] oder [VOL+],
um die Lautstärke einzustellen.
Innerhalb des Menüs navigieren Sie mit der [CH+]
und der [CH-] Taste nach oben und nach unten.
Mit den Tasten [VOL-] und [VOL+] bewegen Sie
den Cursor nach rechts und links
6
D
Stummschaltung
Mit dieser Taste können Sie die
Stummschaltung EIN oder AUS
schalten.
Auswählen
Drücken Sie diese Taste, wenn
Sie sich im Menü befinden und
eine Auswahl treffen möchten.
Menünavigation
.
Page 50

8
S860 manuel 28/12/06 14:33 Page 7
MENÜ
Es gibt zwei Menüseiten: Programmmenü und Systemmenü. Sie können die [Vol-] Taste benutzen, um die jeweilige Seite aufzurufen. Im Programmmenü können Sie Betriebsart, Senderliste,
Vorschau, Audiokanal, Untertitelsprache, Programminformationen, automatische Suche, oder
manuelle Suche auswählen, um senderbezogene Funktionen auszuführen. Im Systemmenü können Sie Helligkeit, Fernsehsystem, regionale Einstellungen, Menüsprache, Zeitzone auswählen,
um die Systemeinstellungen anzupassen. Benutzen Sie die [CH+] und [CH-] Tasten um ein
Untermenü zu wählen und die [VOL+] und [VOL-] Tasten um eine Auswahl zu treffen um dann
mit der [OK] Taste die Einstellungen zu bestätigen.
SYSTEMMENÜ
Helligkeit
Zur Einstellung der Helligkeit des Bildschirms
Fernsehsystem
Zur Auswahl des Fernsehübertragungssystems
Regionale Einstellungen
Zur Auswahl der Region, in der Sie sich befinden
Menüsprache
Zur Auswahl der Menüsprache
Zeitzone
Zur Einstellung der Zeitzone
7
D
D
Page 51

S860 manuel 28/12/06 14:33 Page 8
PROGRAMMMENÜ
Betriebsart
Auswahl von entweder Fernseh- oder Radiosendern
Senderliste
Zur Anzeige aller vorhandener Senderinformationen
Vorschau
Zur Vorschau von bis zu 9 gewählten Sendern
Audiokanal
Auswahl von Haupt- und Zweitsprache
Untertitelsprache
Zur Auswahl einer vom Anbieter zur Verfügung
gestellten Untertitelsprache
Programminformation
Anzeige von Fernsehsenderinformationen bezüglich
der Systemparameter und Signalinformationen
Automatische Suche
Automatischer Sendersuchlauf
Manuelle Suche
Manueller Sendersuchlauf
SENDERLISTE (EPG, Elektronische Programmzeitschrift)
Sie zeigt die Informationen aller verfügbaren Sender. Benutzen Sie die [CH+] und [CH-] Tasten,
um den Sender auszuwählen, und die [VOL-] und [VOL+] Tasten zum Anzeigen der
Senderdetails.
aktueller Sender Name
Senderliste
8
D
aktuelle Szene
Nächste Sendung Name
Page 52

1
S860 manuel 28/12/06 14:33 Page 9
MANUELLE SUCHE
Benutzen Sie die [VOL-] und [VOL+] Tasten, um den gewünschten Sender auszuwählen und
drücken Sie die [OK] Taste, um einen Sendersuchlauf durchzuführen. Die gefundenen
Programme werden zur Senderliste hinzugefügt.
Ausgewählter Sender
Senderinformation
Signalinformation
PROGRAMMINFORMATION
Zeigt die Programminformation bezüglich der Systemparameter und Signalinformationen an.
Drücken Sie die [MENU] Taste, um das Menü zu verlassen.
Systemparameter
Signalinformation
Gewählte Antenne
9
D
D
Page 53

S860 manuel 28/12/06 14:33 Page 10
Inbetriebnahme
Wenn dieses Gerät zum ersten Mal in Betrieb genommen wird, nehmen Sie bitte die folgenden
Schritte nacheinander vor.
Drücken Sie zuerst die [MENU] Taste und
danach die [VOL-] Taste, um zum
Systemkonfigurationsmenü zu gelangen
Drücken Sie die [VOL+] Taste, wählen Sie
Ihren TV-Ausgang aus und bestätigen Sie
mit [OK].
Drücken Sie die [VOL+] Taste, um die
Bildschirmhelligkeit einzustellen und
bestätigen Sie mit [OK].
Drücken Sie die [VOL+] Taste, wählen Sie
Ihre Menüsprache aus und bestätigen Sie
mit [OK].
Drücken Sie die [VOL+] Taste, wählen Sie
Ihre Region aus und bestätigen Sie mit
[OK].
10
D
Die Zeit wird automatisch durch die
ausgewählte Region festgelegt. Falls Sie sie
korrigieren möchten, drücken Sie die [CH+]
oder [CH-] Taste, um die Zeit einzustellen.
Page 54

S860 manuel 28/12/06 14:33 Page 11
Zurück am Anfang des Menüs drücken Sie
die [VOL-] Taste, um in das Programmmenü
zu gelangen.
Markieren Sie das OK Feld und drücken Sie
die [OK] Taste.
Wählen Sie den automatischen
Sendersuchlauf und drücken Sie die [OK]
Taste.
Der Sendersuchlauf kann einige Minuten
dauern.
Wenn der Sendersuchlauf beendet ist,
drücken Sie die [CH+] oder [CH-] Taste,
um den Sender auszuwählen.
11
D
Mit den [VOL+] und [VOL-] Tasten können
Sie die Lautstärke einstellen.
 Loading...