

Page 1
Page 2

Presto! PVR
Analog
Digital TV – DVB-T
Digital TV – ATSC
User’s Guide
507100-02-01-W-E-052507-09
ii
Page 3

Copyright
ii
© 2005-2007, Emtec Technology Corp. All Rights Reserved. No portion of
this document may be copied or reproduced in any manner without prior
written permission from Emtec Technology Corp. (Emtec)
Emtec has no warranties to this documentation and disclaims any implied
warranty of merchantability or fitness for a particular purpose. All
information contained herein is subject to change without notice.
All sample images and electronic files included in the documentation and
distribution materials are copyrighted by their respective photographers
and are not to be copied or reproduced in any manner.
Trademarks
Windows 2000, Windows XP, and Windows Vista are registered
trademarks of Microsoft Corporation.
Pentium is a registered trademark of Intel Corporation.
All other trademarks are the properties of their respective owners.
www.emtec-international.com
Page 4

Contents
i
Chapter 1 Introducing Presto! PVR 1
System Requirements...........................................................1
Features..................................................................................2
Chapter 2 Using Your Presto! PVR 3
Installing Presto! PVR............................................................3
Receiving a Channel..............................................................5
Receiving S-Video and Composite Signals.........................8
Receiving FM Radio...............................................................8
Choosing a Channel to Watch..............................................9
Channel List.......................................................................10
Channel Surfing Window....................................................11
Teletext (available for DVB-T or PAL Analog TV)..............11
Recording a Program...........................................................12
Scheduling Your Program Recording................................13
Adjusting the Schedule Settings........................................15
Task..............................................................................15
Time..............................................................................16
Quality..........................................................................16
Using EPG (Electronic Program Guide).............................16
Time Shifting........................................................................17
Adjusting the Volume..........................................................18
Taking Snapshots................................................................18
Chapter 3 Menus and Settings 20
Main Screen..........................................................................20
Program Viewer....................................................................27
Screen Menu.........................................................................27
Page 5

Settings.................................................................................33
Device................................................................................34
Device...........................................................................35
Audio............................................................................36
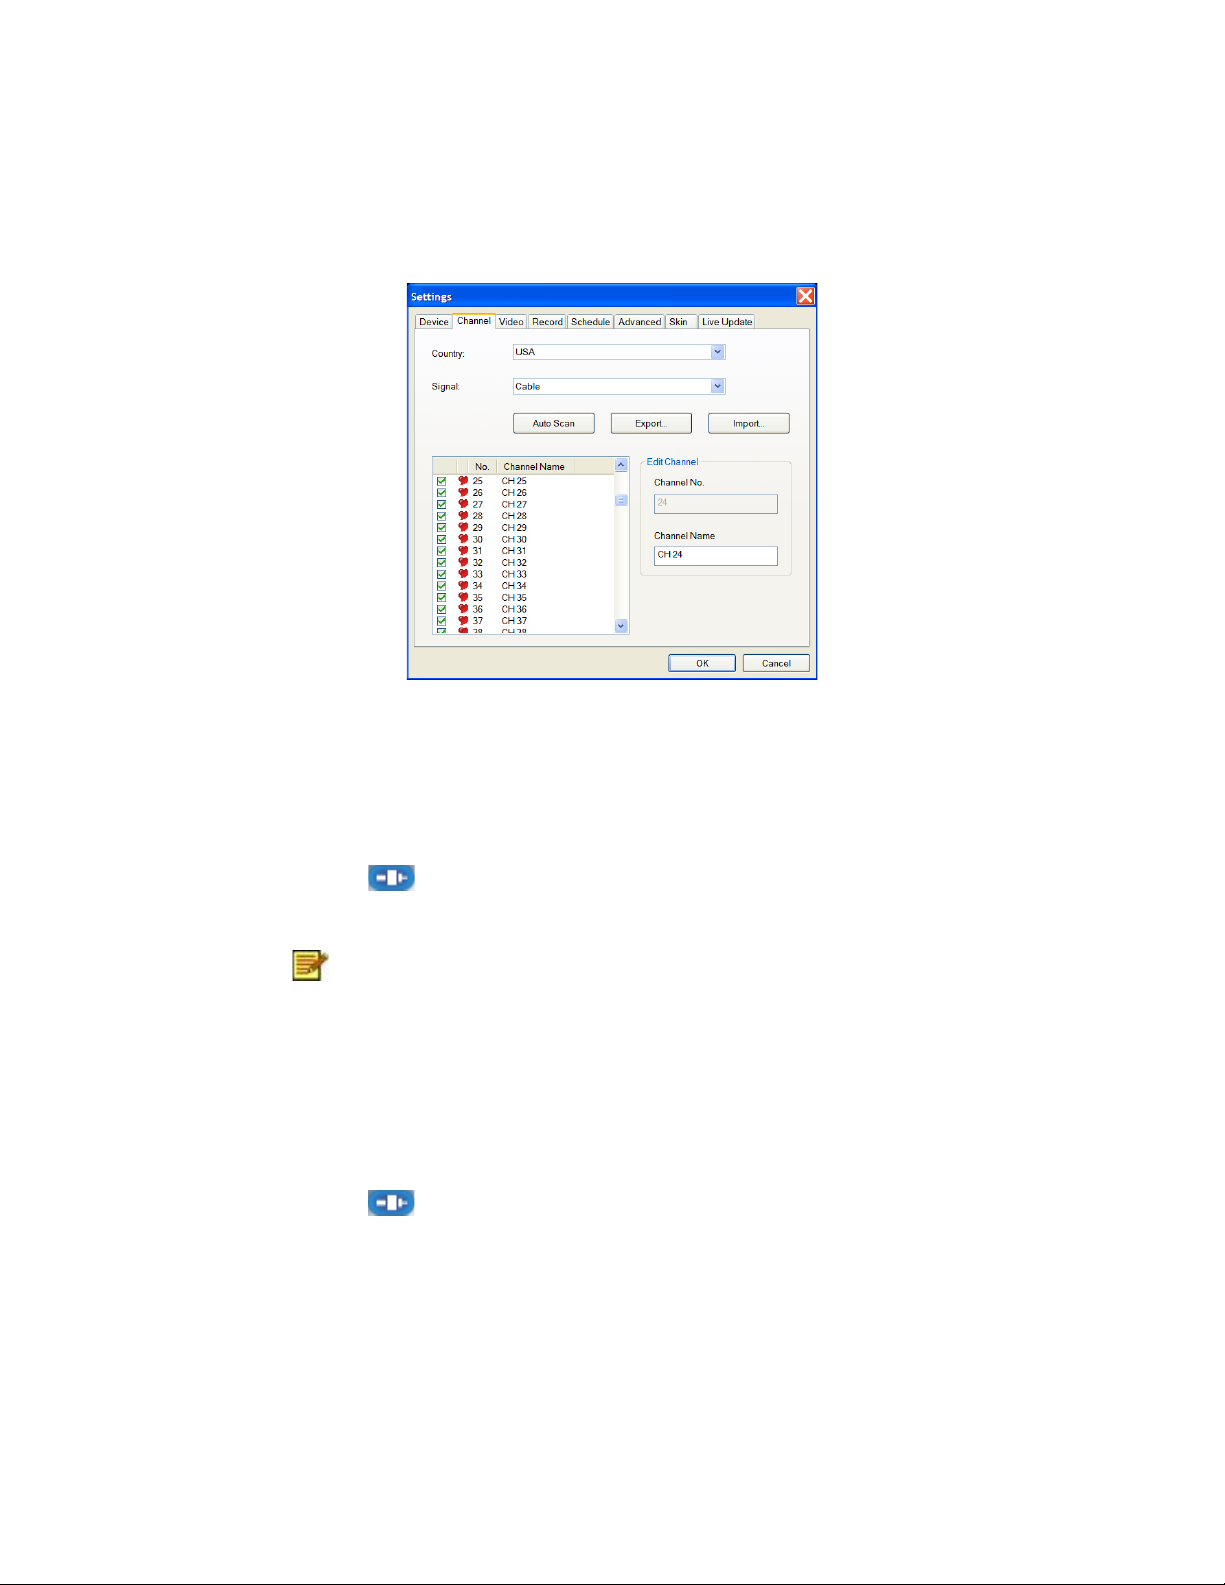
Channel..............................................................................36
Video..................................................................................39
Record................................................................................40
Recording.....................................................................42
Time Shifting.................................................................43
Schedule............................................................................44
Advanced...........................................................................46
Skin....................................................................................47
Live Update........................................................................48
Channel Surfing...................................................................49
History...................................................................................50
Taskbar Commands.............................................................51
Shortcut Keys ......................................................................52
Chapter 4 Appendix 53
Frequently Asked Questions..............................................53
Troubleshooting...................................................................54
Glossary................................................................................57
v
Page 6

Page 7

Chapter 1 Introducing Presto! PVR
Presto! PVR is a video recorder for your computer. It takes television
signals and records them onto your hard drive. You have all the
convenience of a VCR (recording, playback, fast forwarding, rewinding,
pausing) without having to rewind any tape. Here are the requirements
and features of the program.
• System Requirements
• Features
System Requirements
• Presto! PVR will run on Microsoft Windows 2000,
-Windows XP, or Windows Vista. A Pentium 4 or AMD
Athlon 2.0 GHz processor is required. (Pentium 4, 2.4
GHz is recommended.)
• At least 256 MB RAM is needed (512 MB is
recommended).
• A least 100 MB of hard disk space is required for
installing the program. An additional 500 MB of space will
be needed working with files.
• A True Color or HiColor display card supporting DirectX
9.0, 16-bit high color mode and with at least 1024 x 768
pixel resolution.
• DirectX 9.0 or higher is installed.
• An AC'97 compatible sound card.
• Digital or analog TV antenna.
1
Page 8

Features
Chapter 1 Introducing Presto! PVR
• Record programs to a hard disk or DVD. (This feature
is available only when your program supports Direct
Disc Recording (DDR).)
• Schedule your recordings for the future.
• Use the EPG (Electronic Program Guide) function to
get the program guide for current TV listings and add
them to your recording schedule with the click of a
button. This function also has support for multiple
languages.
• Easily play the shows that you have recorded on the
hard disk. Just look in the History section.
• Pause the program while watching (to do things like
answer the door or make a sandwich) and then resume
watching without missing any of the show.
• Watch video in a resizable preview window. Choose to
freely resize or retain the original ratio. Adjust the
brightness and color. The preview window changes
while the adjustments are made.
• Receive analog or digital TV programs.
• Digital tuner supports AC3 audio, DVB radio, and
HDTV.
• View Subtitles and Closed Captions in multiple
languages.
• Take snapshots of your favorite TV moments.
• Browse many channels in one window with Tile mode.
2
Page 9

Chapter 2 Using Your Presto! PVR
This program has everything a personal video recorder needs—preview,
full screen view, snapshot, channel selection, channel surfing, recording,
programmed recording, time shifting, settings, help, and a link to our
website. Here are explanations of how to perform the most common
tasks.
• Installing Presto! PVR
• Receiving a Channel
• Receiving S-Video and Composite Signals
• Receiving FM Radio
• Choosing a Channel to Watch
• Recording a Program
• Scheduling Your Program Recording
• Time Shifting
• Adjusting the Volume
• Taking Snapshots
Installing Presto! PVR
3
Page 10
Chapter 2 Using Your Presto! PVR
Before you begin, make sure that the antenna or Cable is connected to
the Presto! PVR device. Insert the Presto! PVR disc into your computer
disc drive and follow the installation instructions. After the installation, the
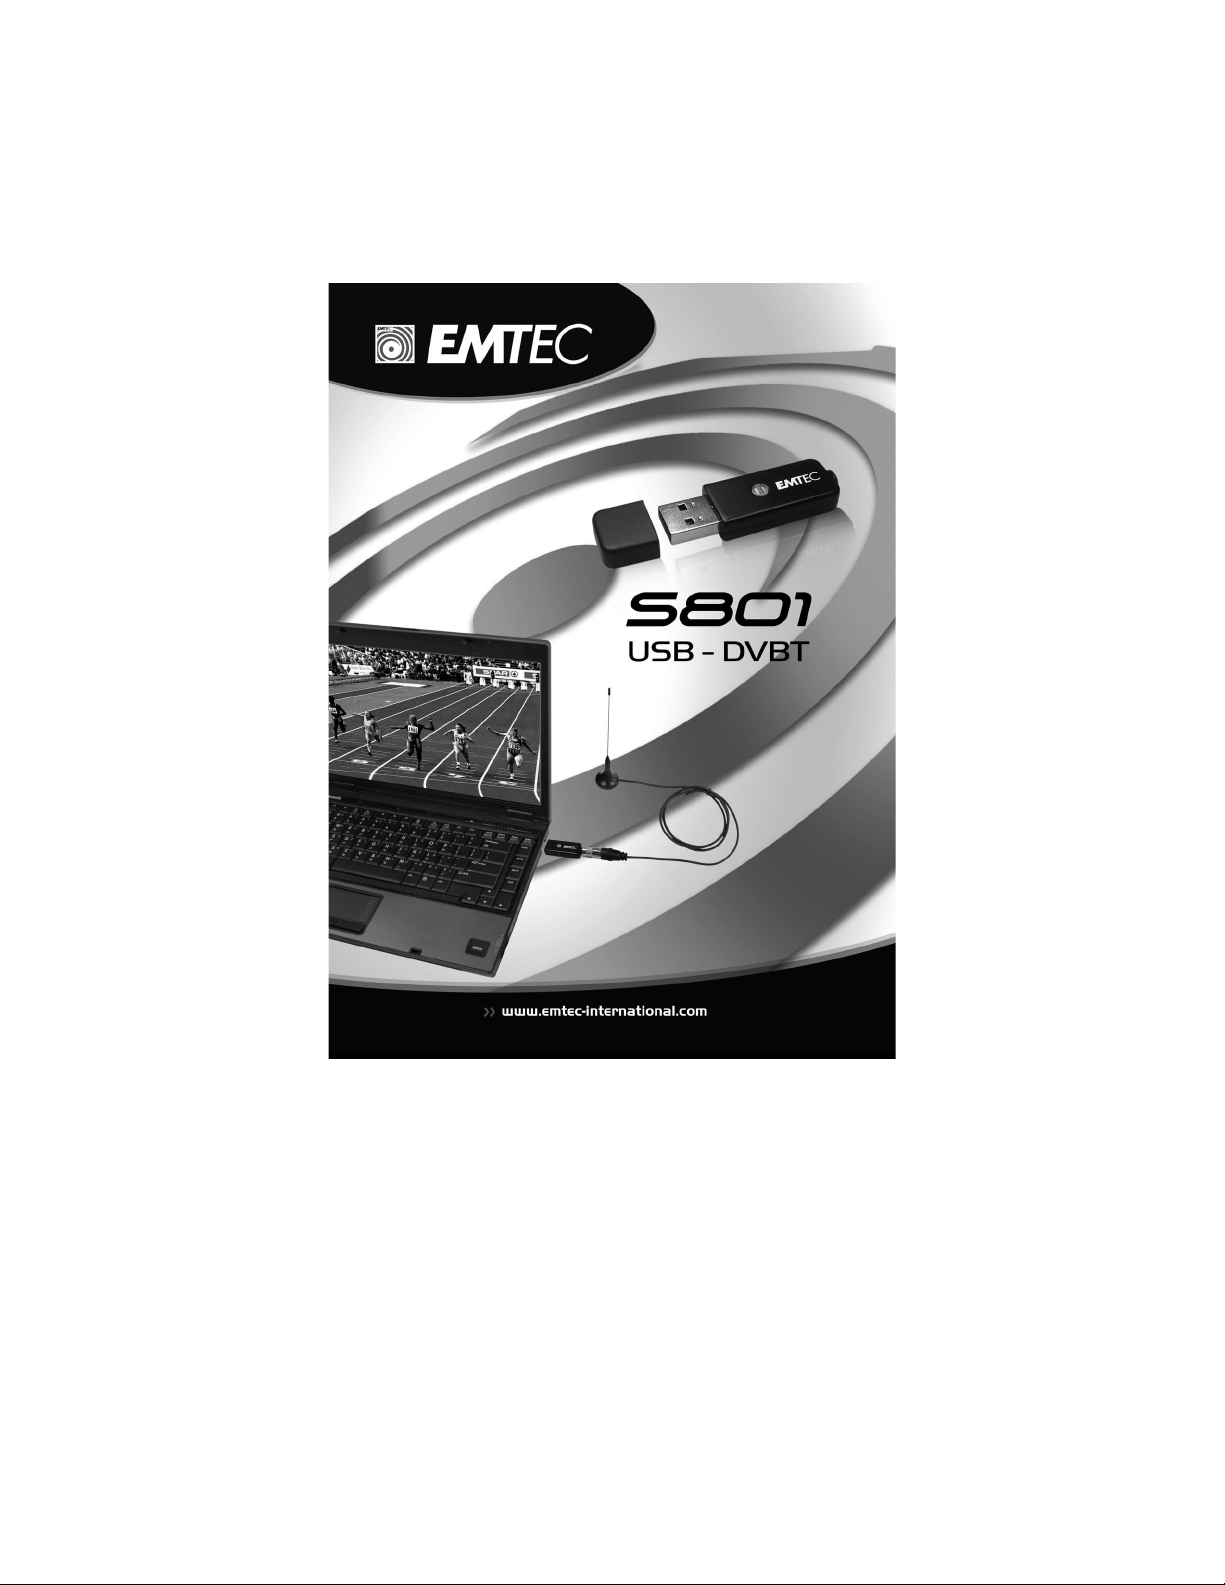
Wizard will open to let you choose what type of signal you will be using.
The ima ge above is for reference only. This dialog box
may vary depending on the version of your Presto! P VR
program.
After selecting the signal type, the Settings Wizard for the selected option
will open.
Analog TV Digital TV
4
Page 11

Chapter 2 Using Your Presto! PVR
Click the desktop icon to start using your Presto! PVR program.
Receiving a Channel
5
Page 12
Chapter 2 Using Your Presto! PVR
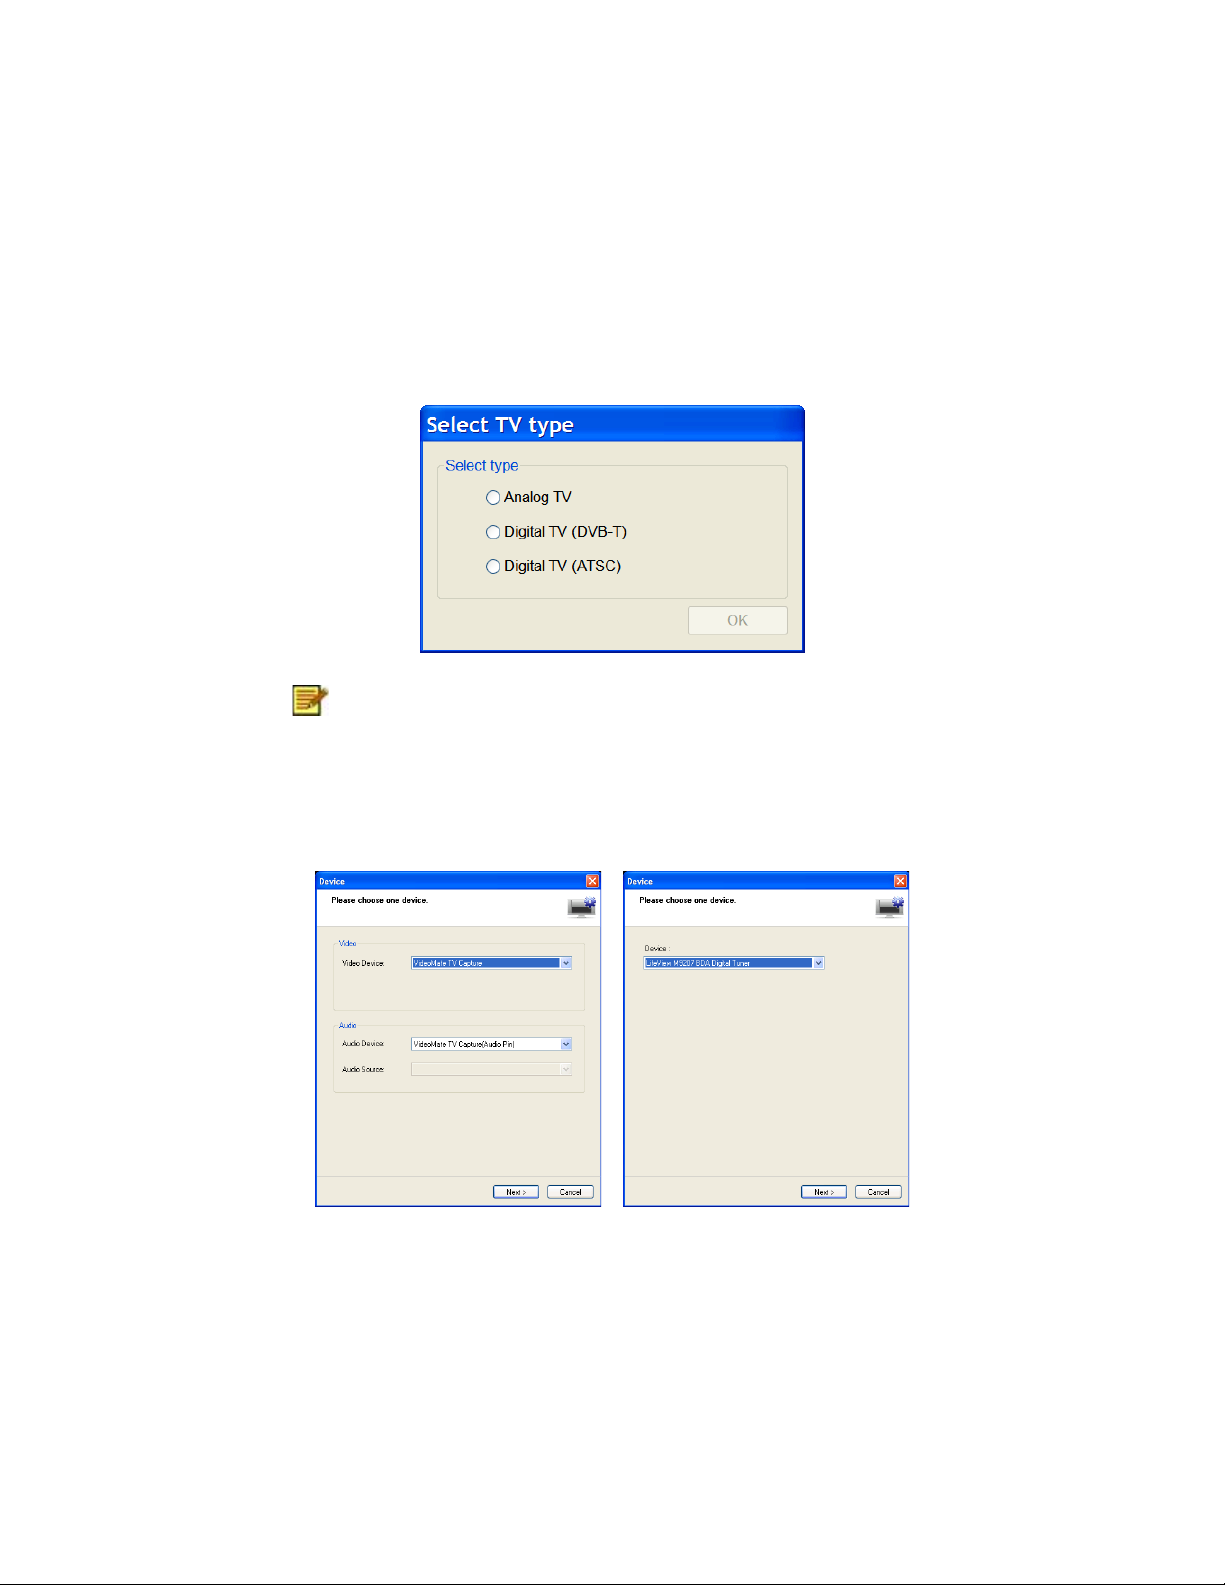
To receive a channel through your network, please connect the antenna
to the Presto! PVR device and make the proper settings.
1. Click to open the Settings dialog box, and then click the Device
tab.
2. Choose a device from the Device list. The options will be different
depending on the type of TV signal selected.
Analog TV Digital TV
For Analog TV signals, you can choose an audio device and source.
3. Click the Channel tab on the Settings dialog box, and then click
Scan or Auto Scan to search for channels. If a channel is found, it
will be included in the channel list. When finished, you can choose a
channel and change its name. You can also scan for changes by
selecting Add or Update Channels, or use the Minimum Frequency
and Maximum Frequency boxes to limit the frequency range to be
scanned. Other options include importing and exporting channel lists.
You can remove selected channels by clicking the Delete button.
6
Page 13
Digital TV - DVB-T
Chapter 2 Using Your Presto! PVR
Digital TV - ATSC
7
Page 14
Chapter 2 Using Your Presto! PVR
Analog TV
4. Click OK to close the Settings dialog box and watch some TV.
Receiving S-Video and Composite Signals
1. Click and choose S-Video or Composite from the source type.
2. PVR will pick up video and audio signals.
These two features may not be available on all devices.
Please refer to the user guide for your device.
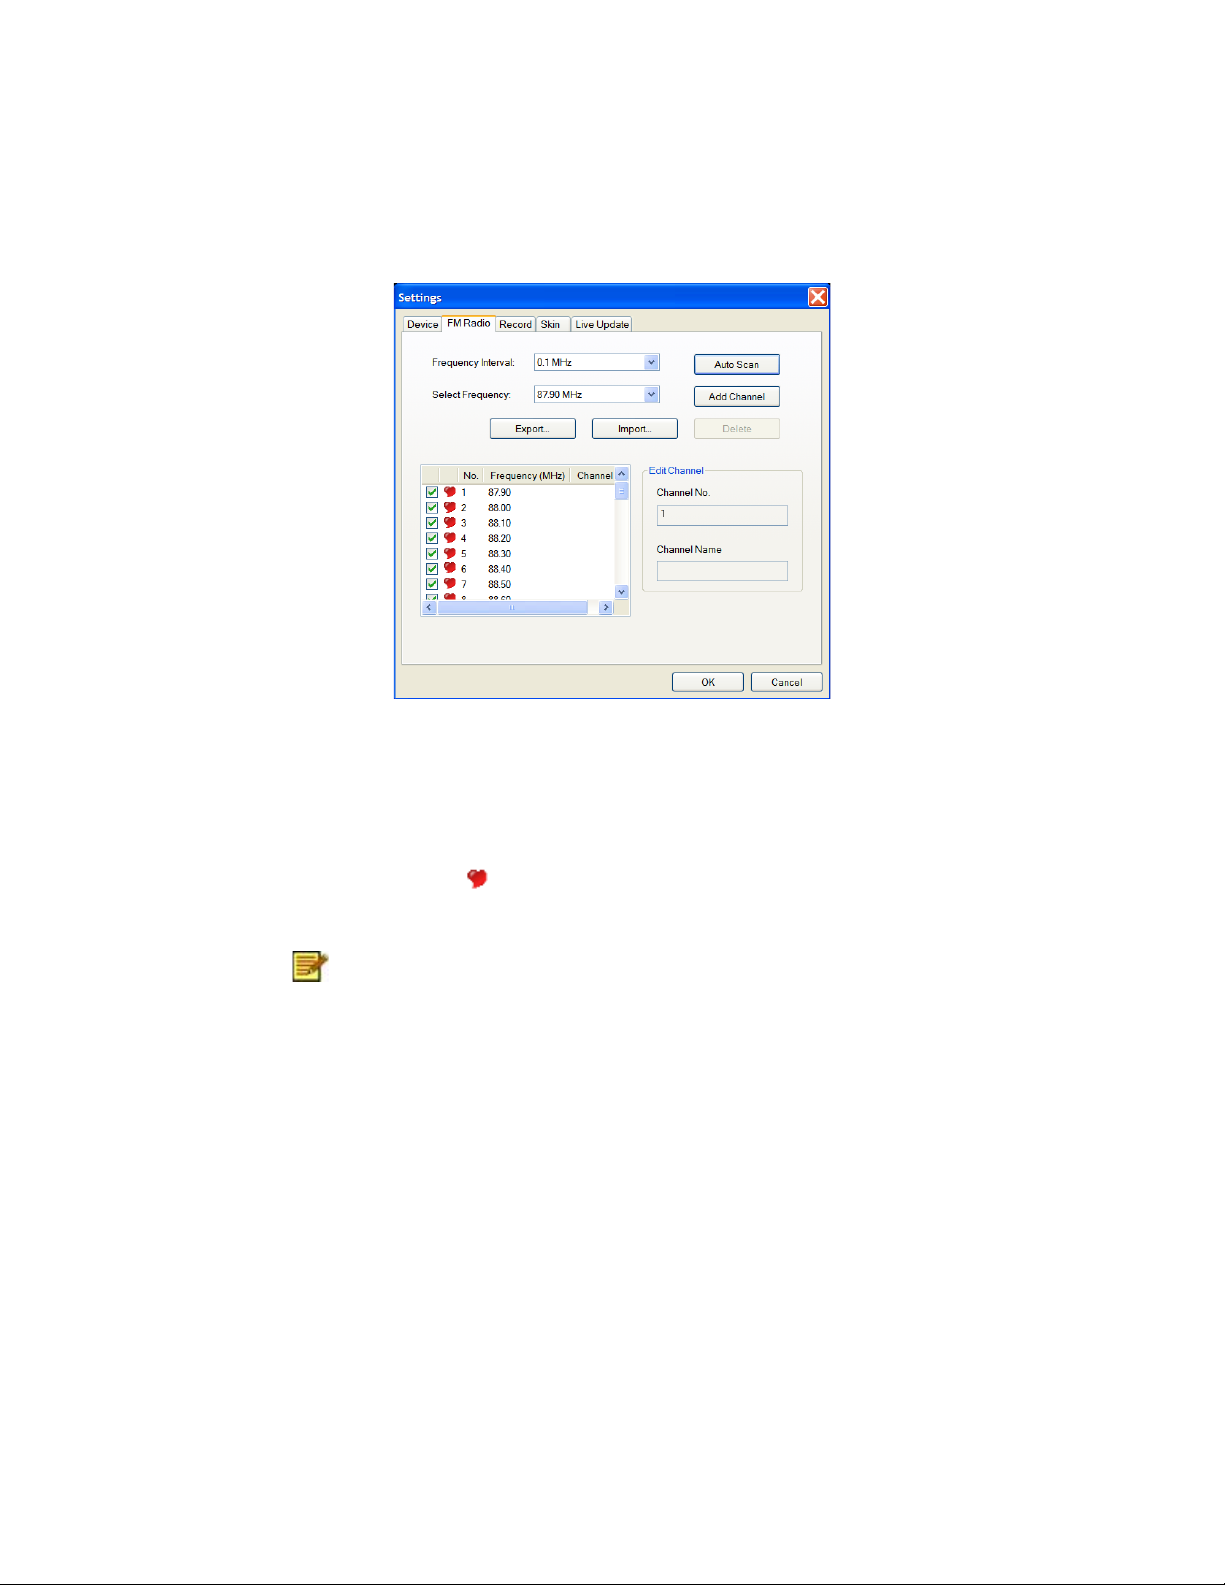
Receiving FM Radio
To get the latest cool and hip music and news through your computer, you
can set it up to receive FM Radio.
1. Click and choose FM Radio from the source type.
2. Click Auto Scan to find all the available radio stations.
8
Page 15
Chapter 2 Using Your Presto! PVR
When scanning is finished, you can choose a station and change its
name. You can also select a frequency and click the Add Channel button
to add the corresponding station directly to the list of stations, or remove
selected channels by clicking the Delete button. Other options include
importing and exporting lists of stations.
Select the red heart to identify a station as your favorite. Clear it to
remove the station from the favorites list.
Search results vary fro m device to device. If your device
doesn’t support radio, you won’t be able to receive FM
Radio. Please refer to the user guide for your d evice.
Choosing a Channel to Watch
9
Page 16
Chapter 2 Using Your Presto! PVR
After you have installed Presto! PVR and scanned for channels, you can
click and select a channel from the channel list to watch. Click or
to switch between channels, and to go to the last channel viewed.
• Channel List
• Channel Surfing Window
• Teletext (available for DVB-T or PAL Analog TV)
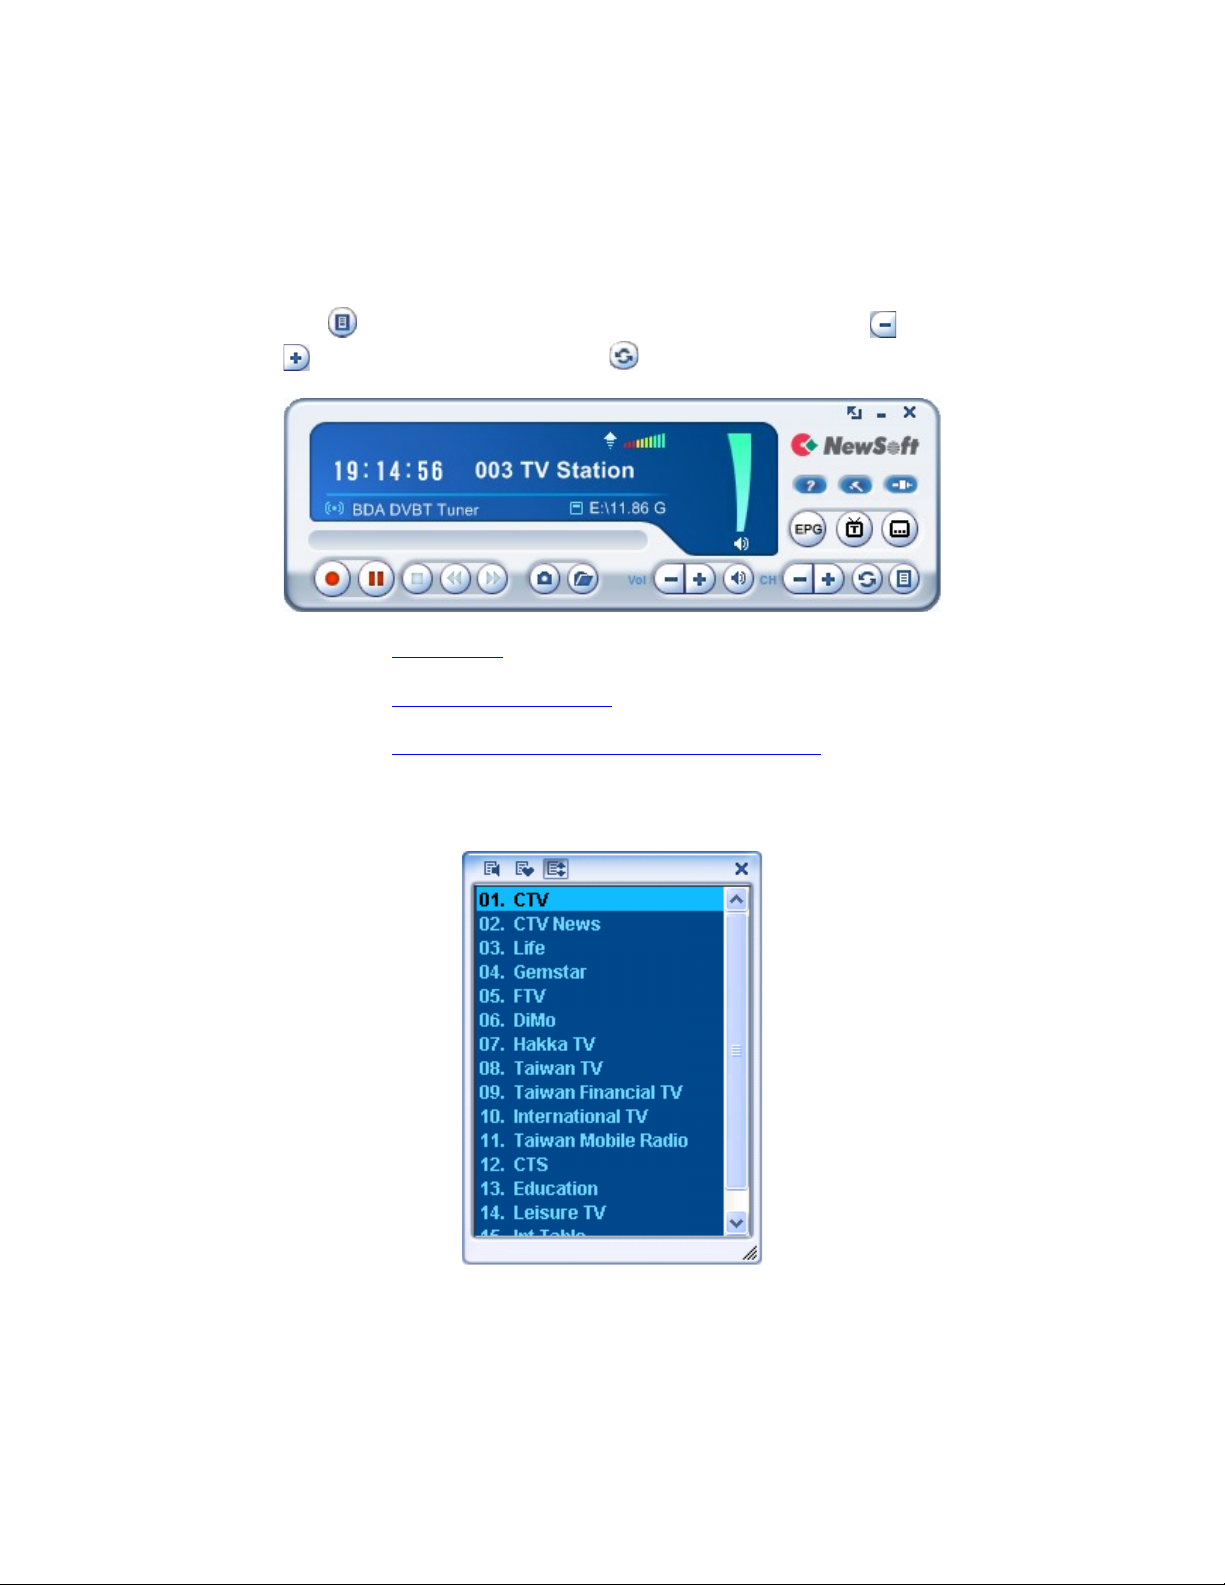
Channel List
10
Page 17

Chapter 2 Using Your Presto! PVR
This is a quick way to select a channel. There are three buttons at the top
of the window. Each shows different channels based on the settings you
made on the Channel tab of the Settings dialog box. Here are some
details for the channel list.
TV Radio : Click this button to listen to the TV radio. Please note that
this button is not available when the input source is Analog TV.
Favorite Channels : Click this button to show your favorite channels.
Favorite channels are chosen on the Channel tab of the Settings dialog
box.
All Channels : Click this button to list all available channels.
Channel Surfing Window
You can browse all the TV channels from the Channel Surfing window.
Right-click the program viewer and select Channel Surfing from the
screen menu. Presto! PVR provides different options for tiling the
channels in thumbnails. You can play a channel by clicking the thumbnail.
To change the Channel Surfing window settings, click
and choose the Advanced tab.
Teletext (available for DVB-T or PAL Analog TV)
11
Page 18
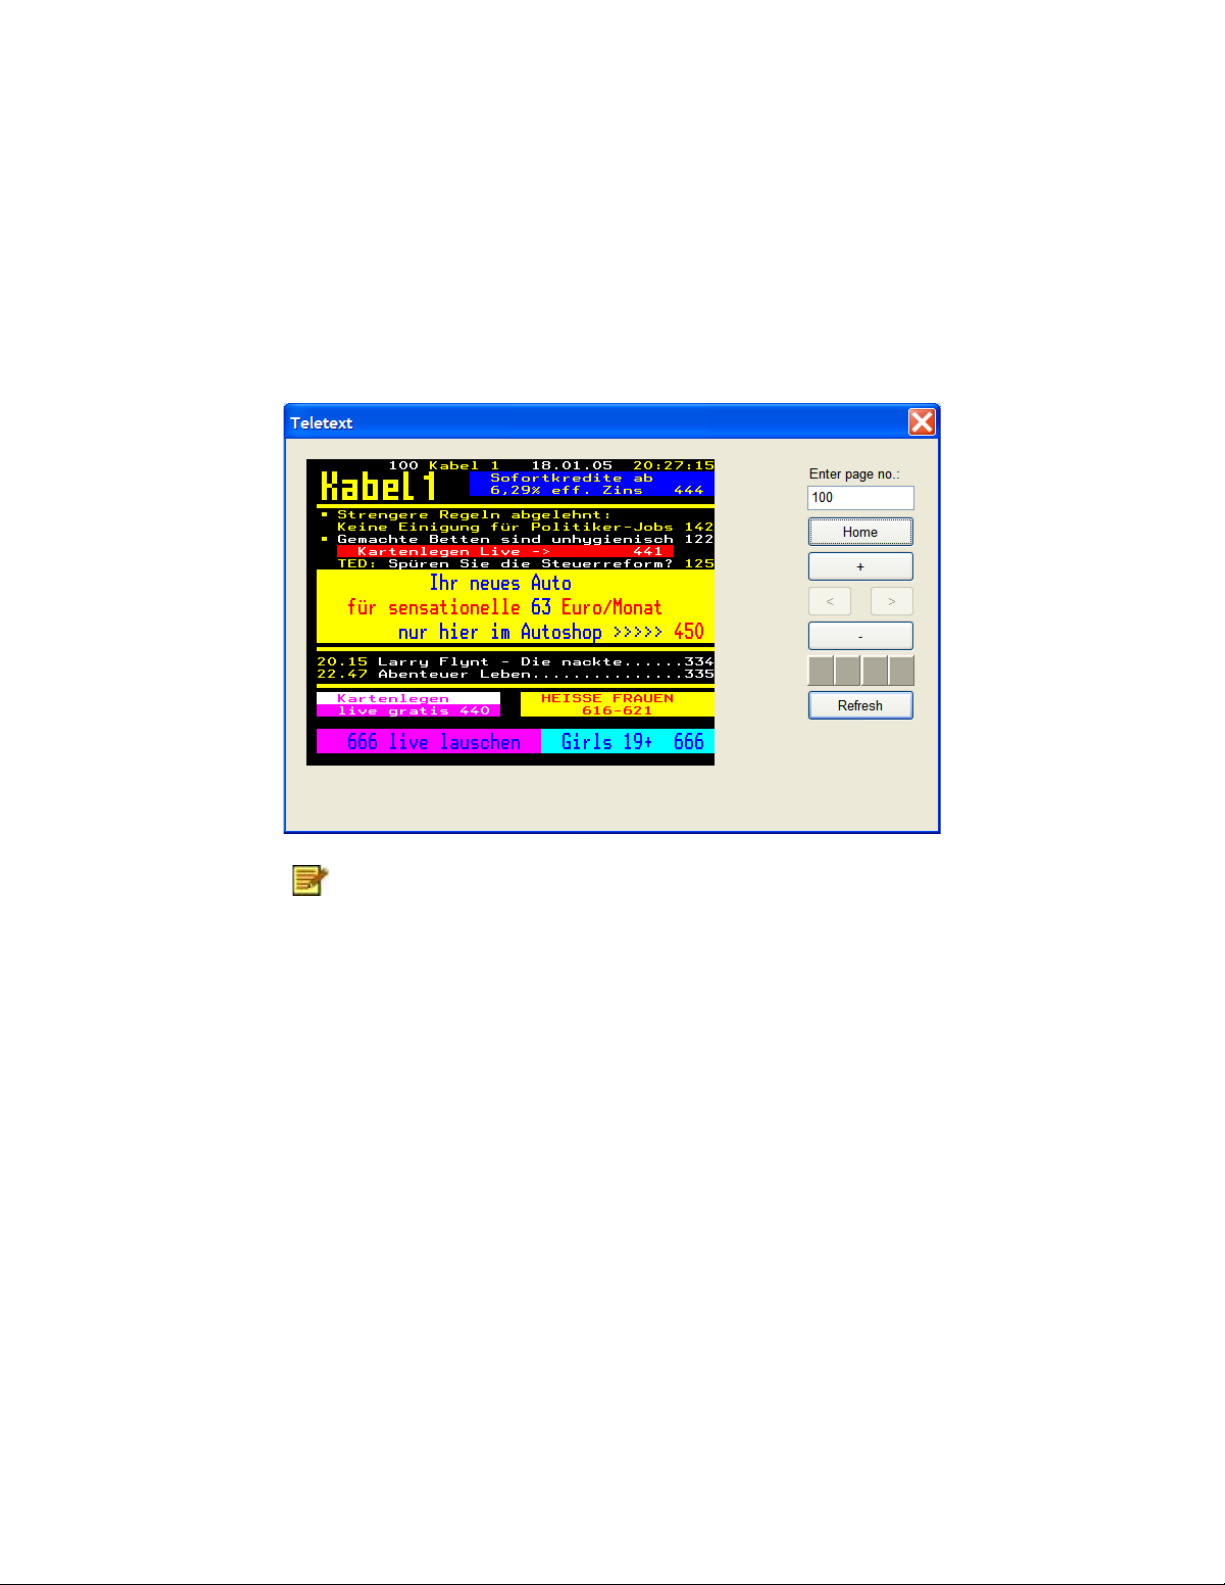
Chapter 2 Using Your Presto! PVR
Teletext is a quick and easily accessible service that gives you useful
information for free. As long as a signal is present at the tuner and the
channels are already scanned and stored, you will see the Teletext
information offered by the corresponding TV station.
This service varies for different areas. It may not be
available in all the countries.
Recording a Program
12
Page 19

Chapter 2 Using Your Presto! PVR
When you find a good show, click to start recording. The button will
change to . The recorded program will be saved in the working folder.
You can click to pause recording. If you click while you are
watching, recording will stop and the preview screen will return to the live
program.
When recording, you can go to full screen, minimize, and
restore, but you cannot chang e programs, or close t he
program.
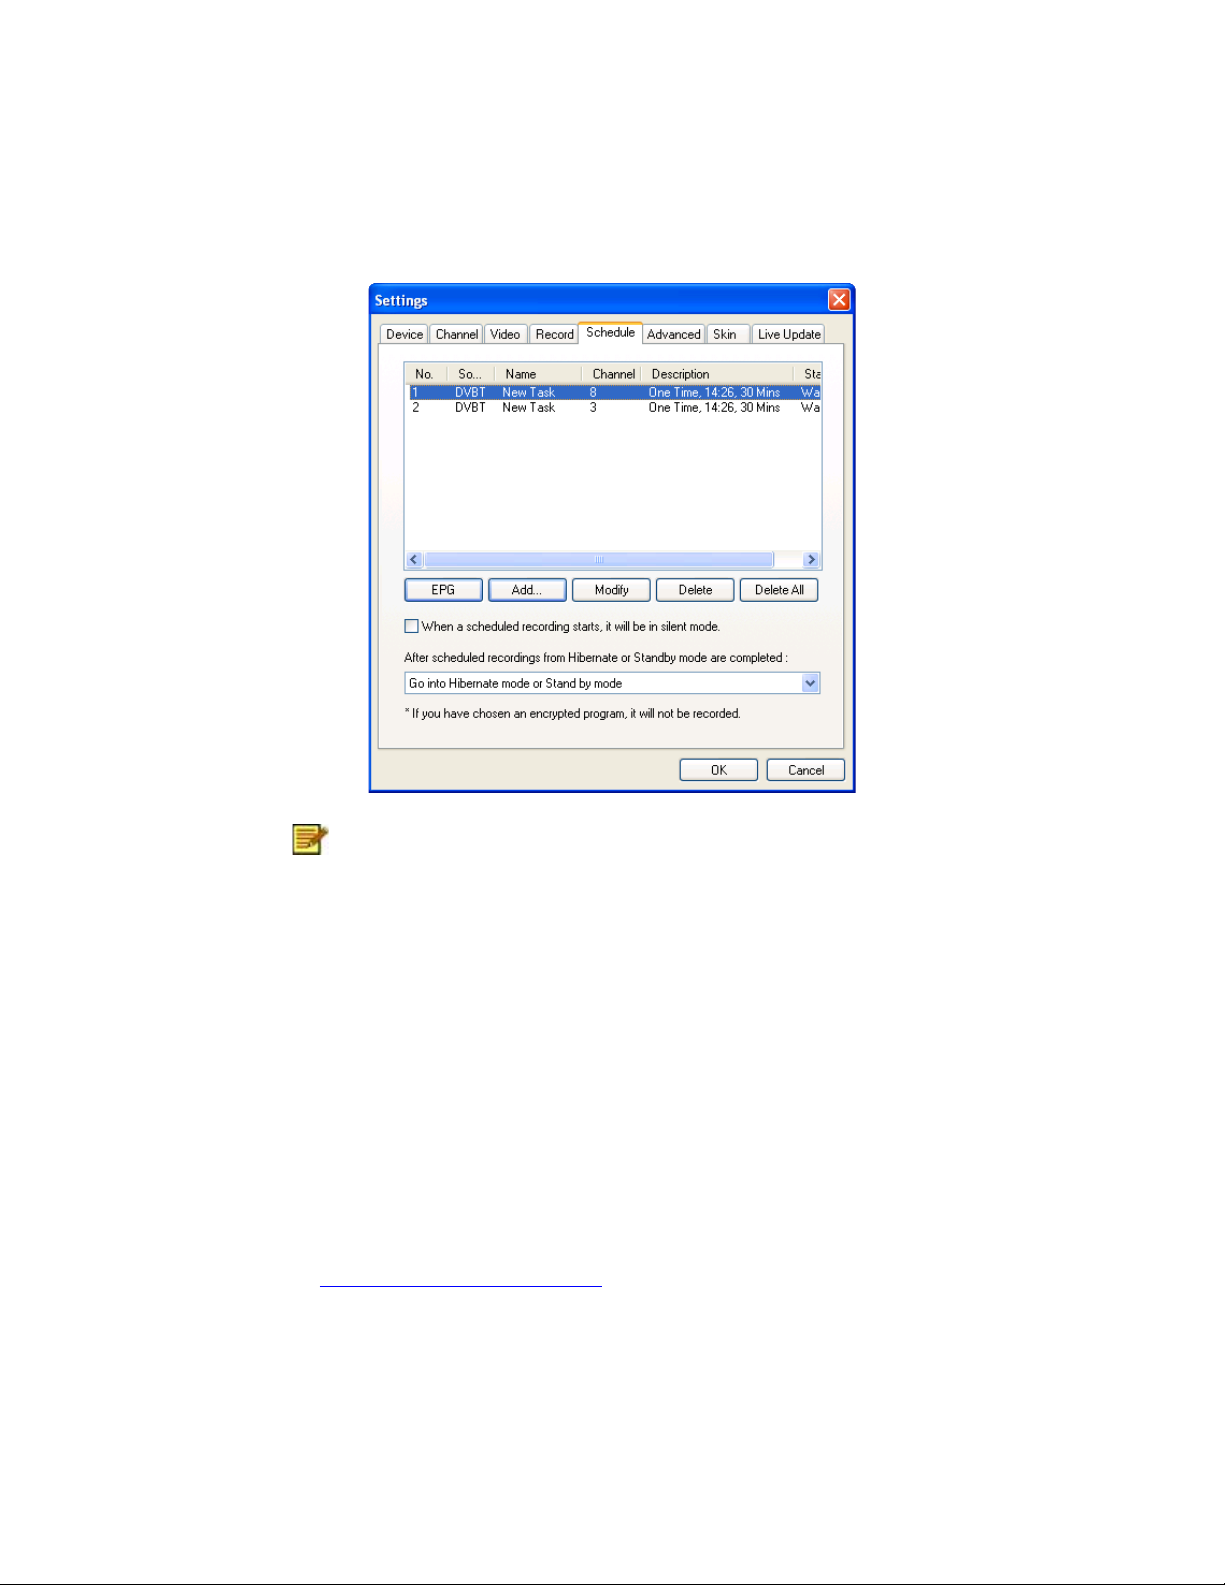
Scheduling Your Program Recording
You can add, modify, or delete items for recording shows in the future. For
this, you will have to open the Settings dialog box by clicking and
selecting the Schedule tab.
13
Page 20
Chapter 2 Using Your Presto! PVR
The message about encrypted programs will not appear
when the input source is analog TV.
• Click Add… to schedule additional recording, or click Modify to
change the schedule for selected recordings.
• Click Delete to cancel a selected recording, or Delete All to cancel all
scheduled recordings.
• Click EPG to get an online listing to current TV programs.
• If you want to use Silent mode while recording, click When a
scheduled recording starts, it will be in silent mode.
• You can choose the action to be taken when a scheduled recording is
finished from the After scheduled recordings from Hibernate or
Standby mode are completed box.
For more information see:
• Adjusting the Schedule Settings
14
Page 21
Chapter 2 Using Your Presto! PVR
• Using EPG (Electronic Program Guide)
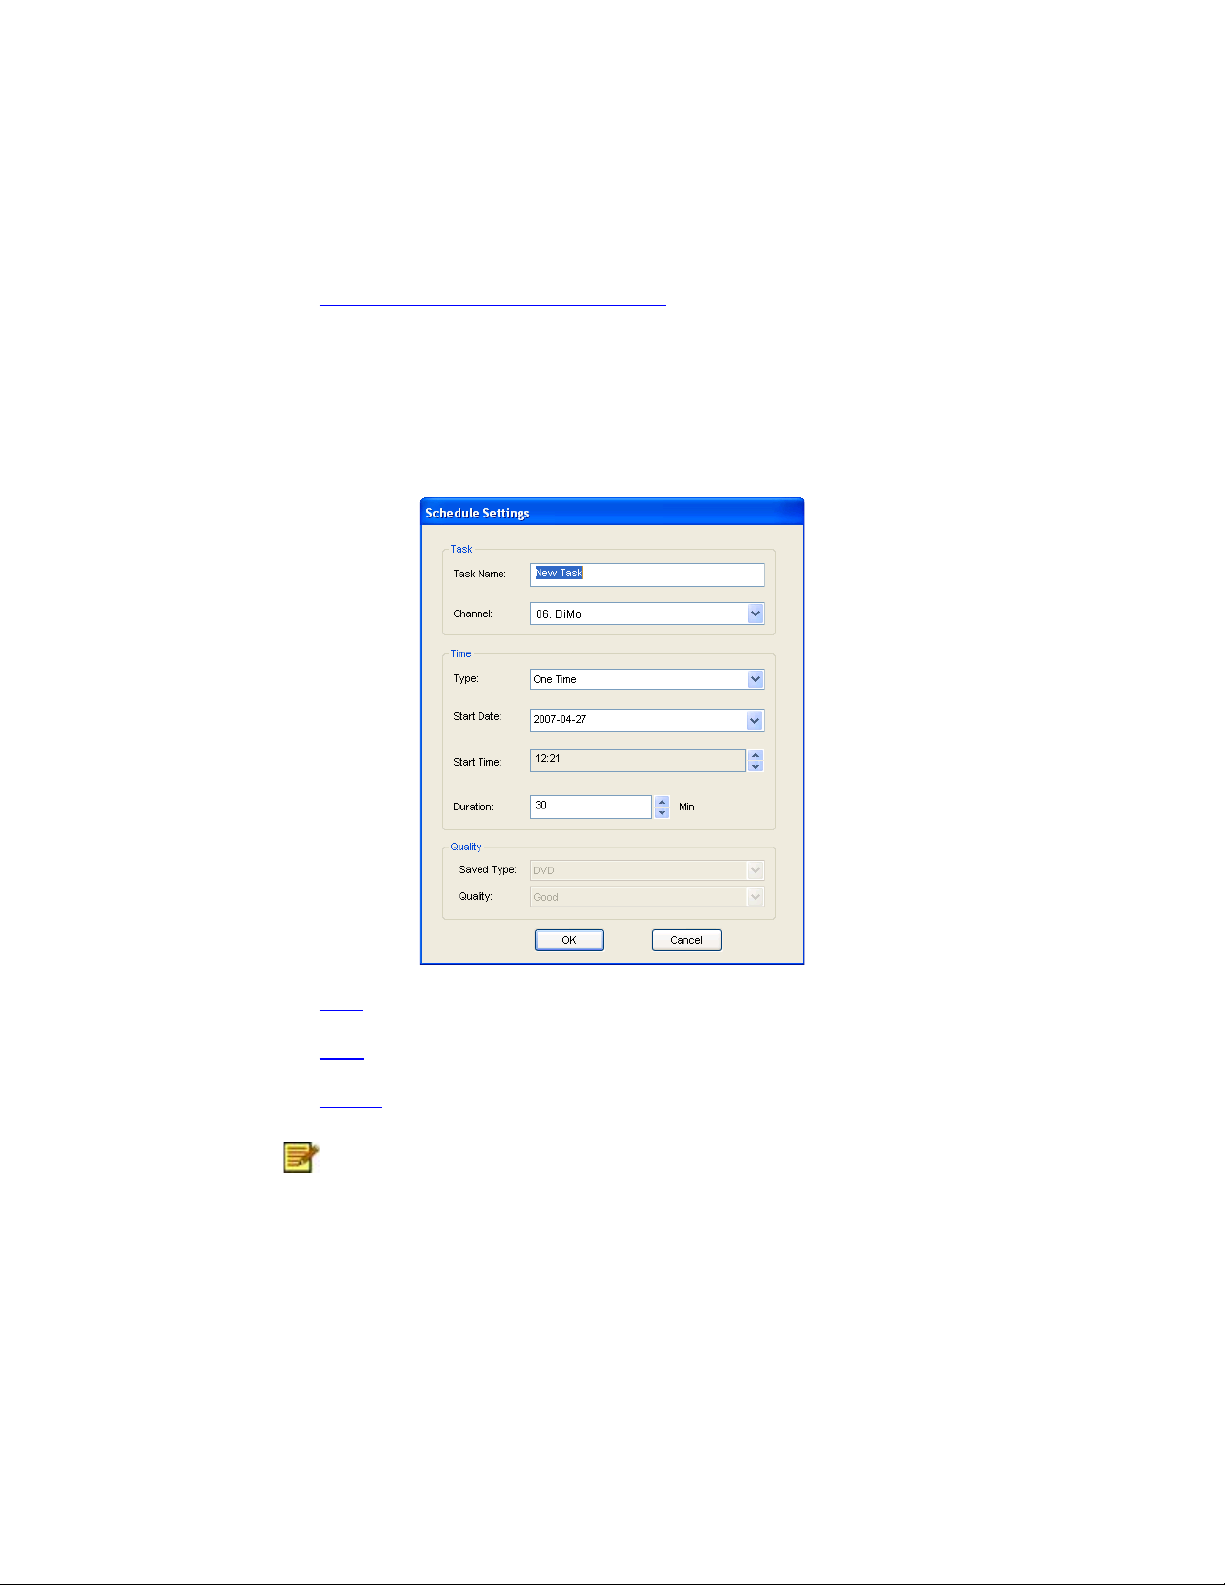
Adjusting the Schedule Settings
If you click Add… or Modify from the Schedule tab, the Schedule
Settings dialog box will open. There are three sections to pay attention to
—Task, Time, and Quality.
• Task
• Time
• Quality
Quality is on ly available when sele cting the analog device.
Task
15
Page 22

Chapter 2 Using Your Presto! PVR
Task Name: Give a name to the recording session or use the default.
Channel: Choose from the available channels for the one you want.
Time
Type: You can choose to record the selected channel One Time, Daily,
Sunday, Monday, Tuesday, Wednesday, Thursday, Friday, Saturday,
Monday to Friday, Monday to Saturday, or Saturday to Sunday.
Choose Assign the Date to pick a more specific date.
Start Date: This option is available only when you have selected One
Time in the Type field. Pick the day to start recording on.
Start Time: Choose what time to start recording on the selected date.
Duration: Choose how long to record. The recording will stop after the
specified time period.
Quality
Saved Type: Choose what kind of recording you are scheduling.
Quality: Choose the level of quality for the selected recording.
After selecting the appropriate dialog box options, click OK to return to the
Schedule list.
(1) If a scheduled task comes up when running time
shifting or recording, the running task will be terminated
and the scheduled task will be performed.
(2) If you have scheduled tasks that overlap, you will be
reminded after you click OK. Presto! PVR cannot record
more than one show at a time.
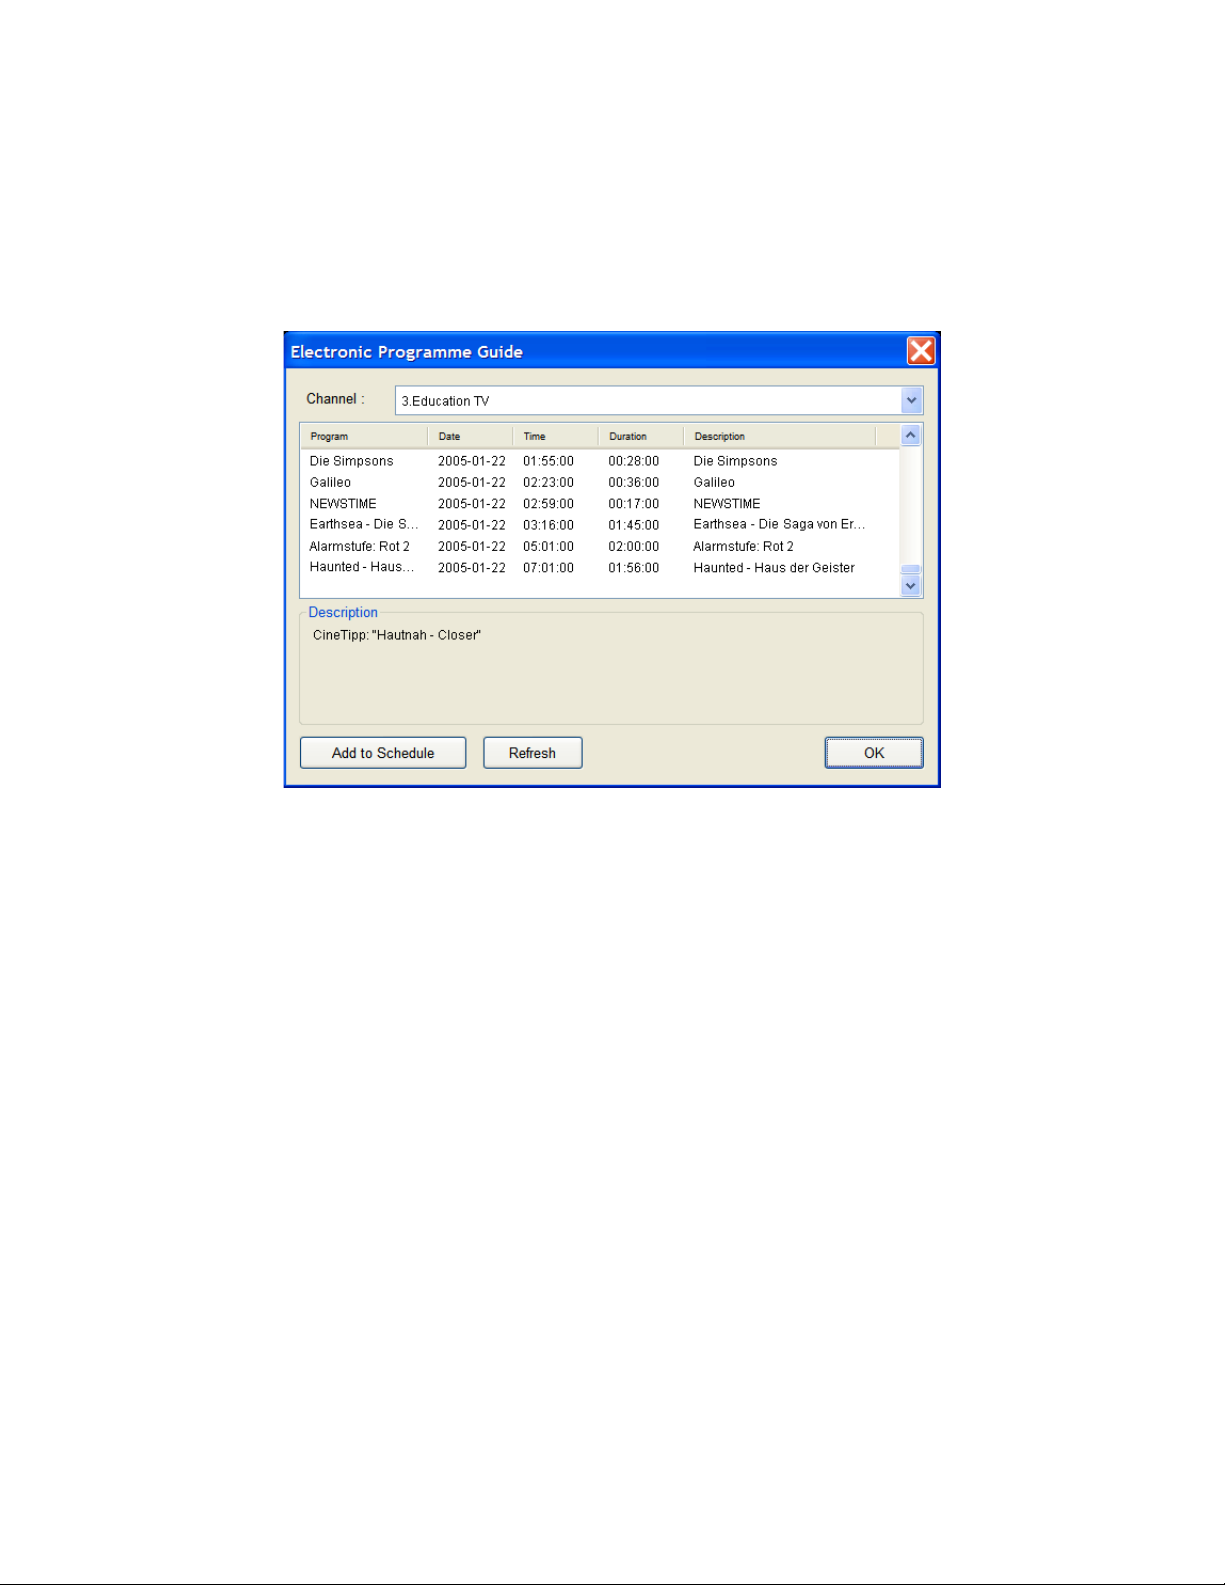
Using EPG (Electronic Program Guide)
16
Page 23
Chapter 2 Using Your Presto! PVR
Use the Channel box to choose an available channel.
Select the program that you want to record, and then click Add to
Schedule. The program will be added to the schedule. Click Refresh to
make sure that the schedule is up-to-date.
Time Shifting
17
Page 24

Chapter 2 Using Your Presto! PVR
Time Shifting means that you can pause a program while watching the big
game, click the pause button, and then go get another bag of chips
without missing any of the action. When you come back and click the play
button, you will resume watching from the point at which you paused.
• Click to pause. The preview screen will freeze, but the recording
will continue.
• Click to continue watching the program from the point at which it
was paused.
• Click to stop time shifting and return to the live program.
When paused, you can change the screen size and adjust
the volume, but you cannot ch ange programs, take
snapshots, change the configuration, or close the program.
Adjusting the Volume
Use the plus and minus buttons to increase and decrease the volume.
The indicator will reflect the changes. Clicking on the speaker button will
turn the sound on and off.
Taking Snapshots
18
Page 25

Chapter 2 Using Your Presto! PVR
Click to capture the screen at that moment. The snapshots will be
saved in the working folder. You can change the file format to save the
snapshots on the Advanced tab of the Settings dialog box.
19
Page 26
Chapter 3 Menus and Settings
For all that it does, Presto! PVR is very easy to use. There are only a few
menus and settings that you need to worry about. Here they are in their
entirety.
• Main Screen
• Program Viewer
• Screen Menu
• Settings
• Channel Surfing
• History
• Taskbar Commands
• Shortcut Keys
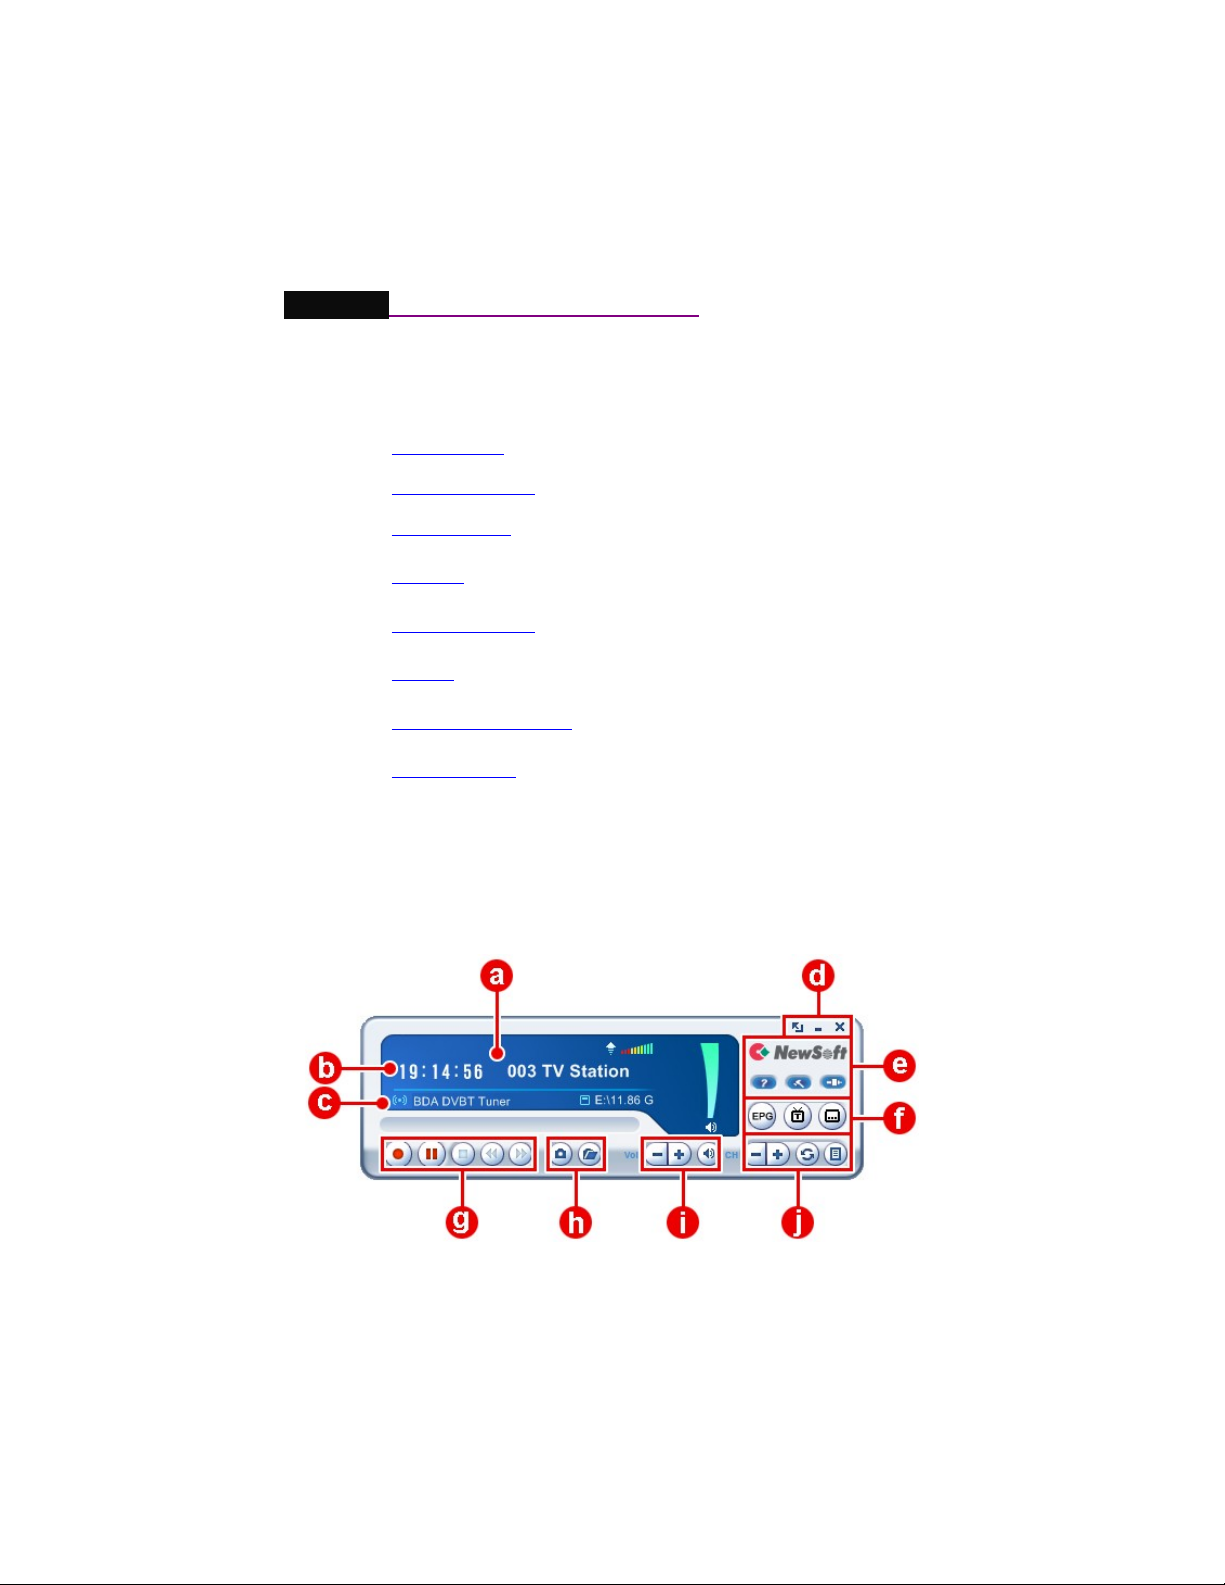
Main Screen
The PVR screen is very compact and useful. Here is an overview of the
various displays and buttons.
Digital TV - DVB-T
20
Page 27

Digital TV – ATSC
Chapter 3 Menus and Settings
21
Page 28

Chapter 3 Menus and Settings
Across the top of the presentation area will be listed the program
status (Time shifting, Recording, Playing, Forward, Backward, and
the program name) as well as the signal quality.
(1) The program status will only appear when playing,
recording, or time shif ting.
(2) The signal quality will only be shown when the
source is Digital TV .
List the time along with the channel number and name.
Display the currently connected adapter and how much free space
is available for recording.
These are the buttons for controlling the program. There are full
screen, minimize and close
22
Page 29

Chapter 3 Menus and Settings
Click the Emtec logo to connect to our website. Also available is the
help file, the settings button, and a button for selecting the input
source.
23
Page 30

Chapter 3 Menus and Settings
24
Page 31

Chapter 3 Menus and Settings
These are special feature buttons. EPG (for Digital TV), Teletext
(for DVB-T and PAL Analog TV), and Closed Captions (for ATSC
and NTSC Analog TV) / Subtitles (for DVB-T). EPG is available for
Digital TV only.
The program control buttons are used for recording programs and
watching the programs that have already been recorded.
Click to capture screen at that moment and check the programs that
have already been recorded
The volume controls let you turn it up and down as well as off.
There is also an indication of the current volume level.
25
Page 32

Chapter 3 Menus and Settings
These buttons are for choosing a channel to watch on TV. Either by
going up or down a channel, going back to the previously viewed
channel, or choosing from the channel list.
26
Page 33

Chapter 3 Menus and Settings
Program Viewer
There are four buttons in the upper-right corner of the program viewer.
Here is a quick tour of how to use them.
Exit : Clicking this button closes the program.
Minimize : Clicking this button sends the program viewer to the taskbar.
Full Screen : Clicking this button maximizes the program viewer to full
screen.
Always on Top : Clicking this button keeps the program viewer on top
of all other windows.
Screen Menu
When you right-click your Presto! PVR screen when a video is playing,
you will see the following menu. This will give you quick control over how
you watch the program.
27
Page 34
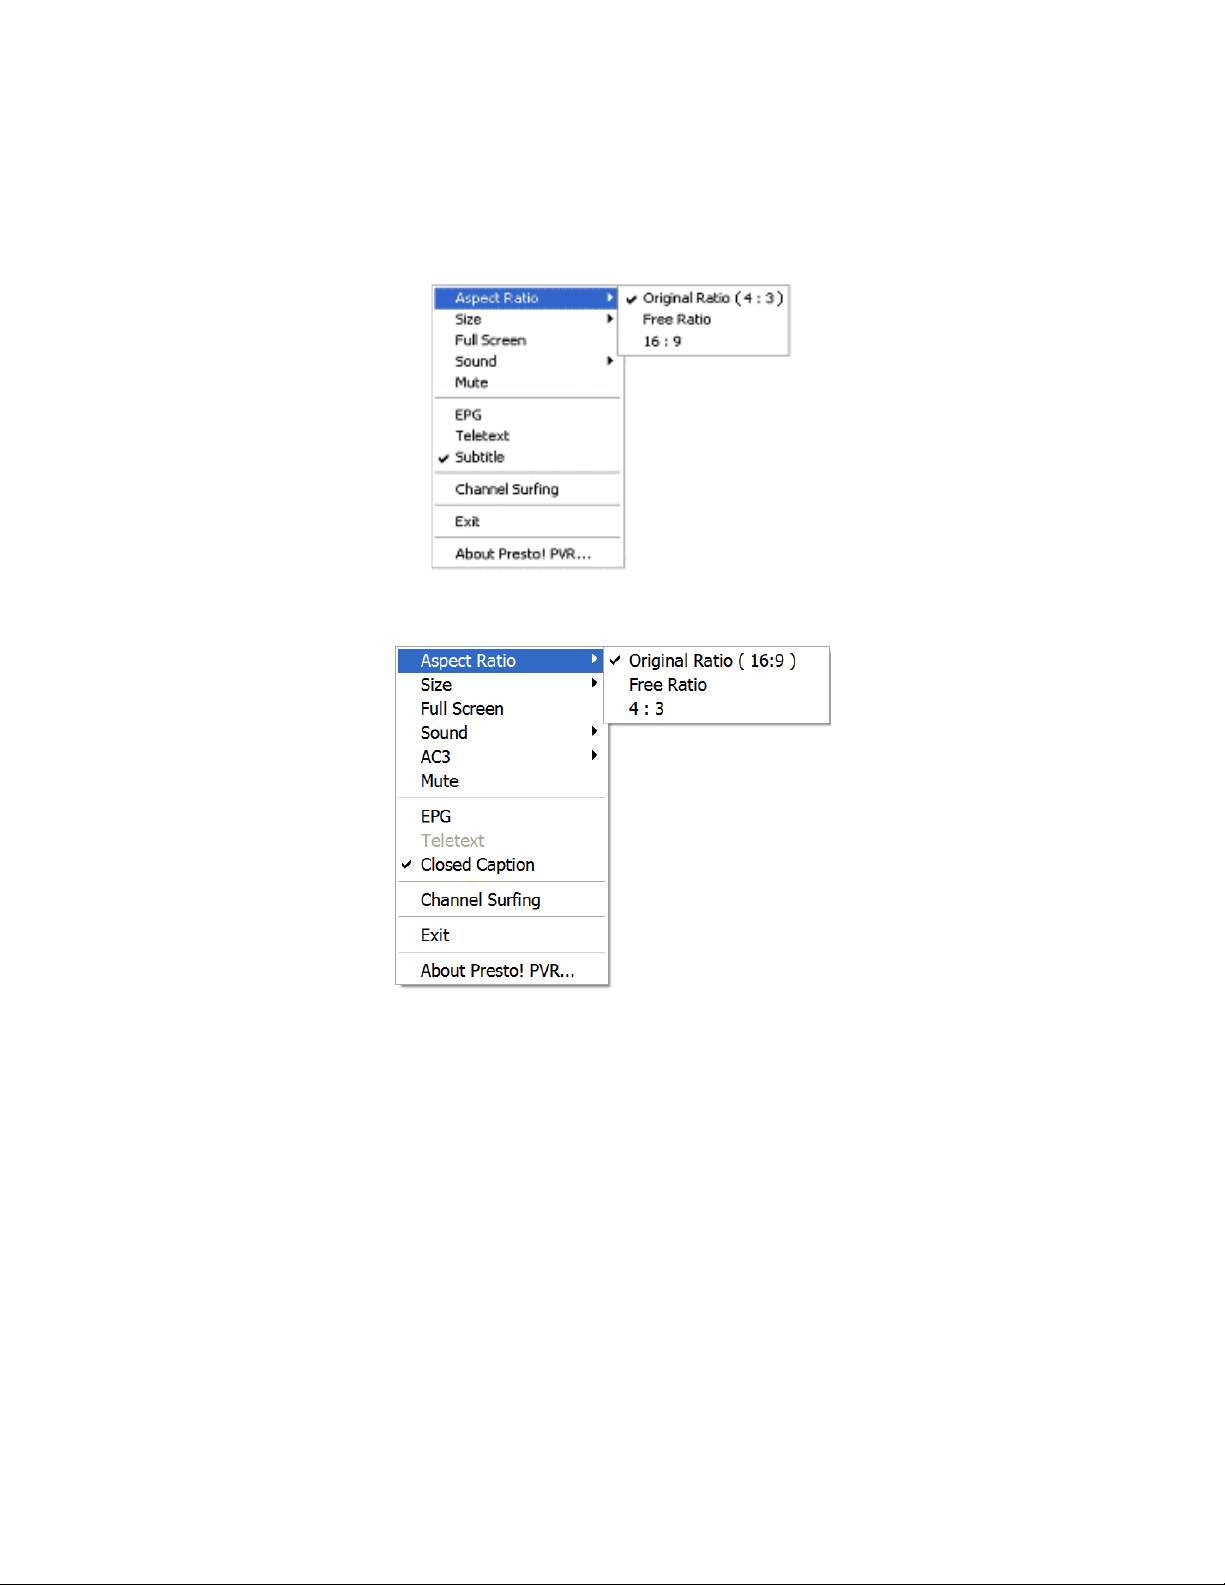
Aspect Ratio - DVB-T
Chapter 3 Menus and Settings
Aspect Ratio - ATSC
28
Page 35

Size - DVB-T
Chapter 3 Menus and Settings
Size - ATSC
29
Page 36

Sound - DVB-T
Chapter 3 Menus and Settings
Sound - ATSC
30
Page 37

Chapter 3 Menus and Settings
AC3 - ATSC
Aspect Ratio: Click to select the width to height ratio for your Presto!
PVR screen. You can choose Original Ratio ( 4:3 ), Free Ratio or 16:9.
Choosing Free Ratio will allow you to distort your TV picture by dragging
the lower-right corner of the screen. If you have chosen Original Ratio
( 4:3 ), the ratio will not change as you resize the picture.
Original Ratio varies depe nding on the program o r channel
you have switched to. Sometimes the submenu options
may appear like Origina l Ratio (16:9), Free Ratio or 4:3.
The ima ge above is for reference only.
31
Page 38

Chapter 3 Menus and Settings
Size: Click to change the size of the display window or restore it to the
original size. If you are receiving a Digital TV signal, you have the
additional option of choosing to watch in the Original Size – 720x540
(4:3).
Similarly, original size may be 704x540 (4:3) depen ding on
the program or channel you are watching.
Full Screen: Click to see the program in the entire video screen. Press
the ESC key to restore the screen to the most recently selected size.
32
Page 39

Chapter 3 Menus and Settings
Sound: If the program has multiple sound tracks, you can switch them
here. Analog TV offers Stereo, Mono, or SAP audio, while Digital TV has
a list of the available soundtracks.
AC3: AC3 audio is only available for Digital TV. Access to this feature
requires additional codecs. Please check our website for updates in case
your PVR doesn’t support AC3 audio.
Mute: Click to turn the audio off and on.
EPG: Click to get a current TV schedule online. This option is available for
Digital TV only.
Teletext (only for DVB-T and PAL Analog TV): Click to get useful
information offered by some TV stations.
Closed Caption (for ATSC and NTSC Analog TV) / Subtitle (for DVBT): Click to get Closed Captions for NTSC Analog TV and ATSC, or
Subtitles for DVB-T.
Multiple languages can be viewed for captions an d
subtitles as long as th ey are included in the signa ls.
Channel Surfing: Click to browse TV channels in a tiled window.
Exit: Click to close the program.
About Presto! PVR…: Click to display the program version information.
Settings
33
Page 40

Chapter 3 Menus and Settings
Click to see the Settings dialog box to help you personalize you
Presto! PVR program.
• Device
• Channel
• Video
• Record
• Schedule
• Advanced
• Skin
• Live Update
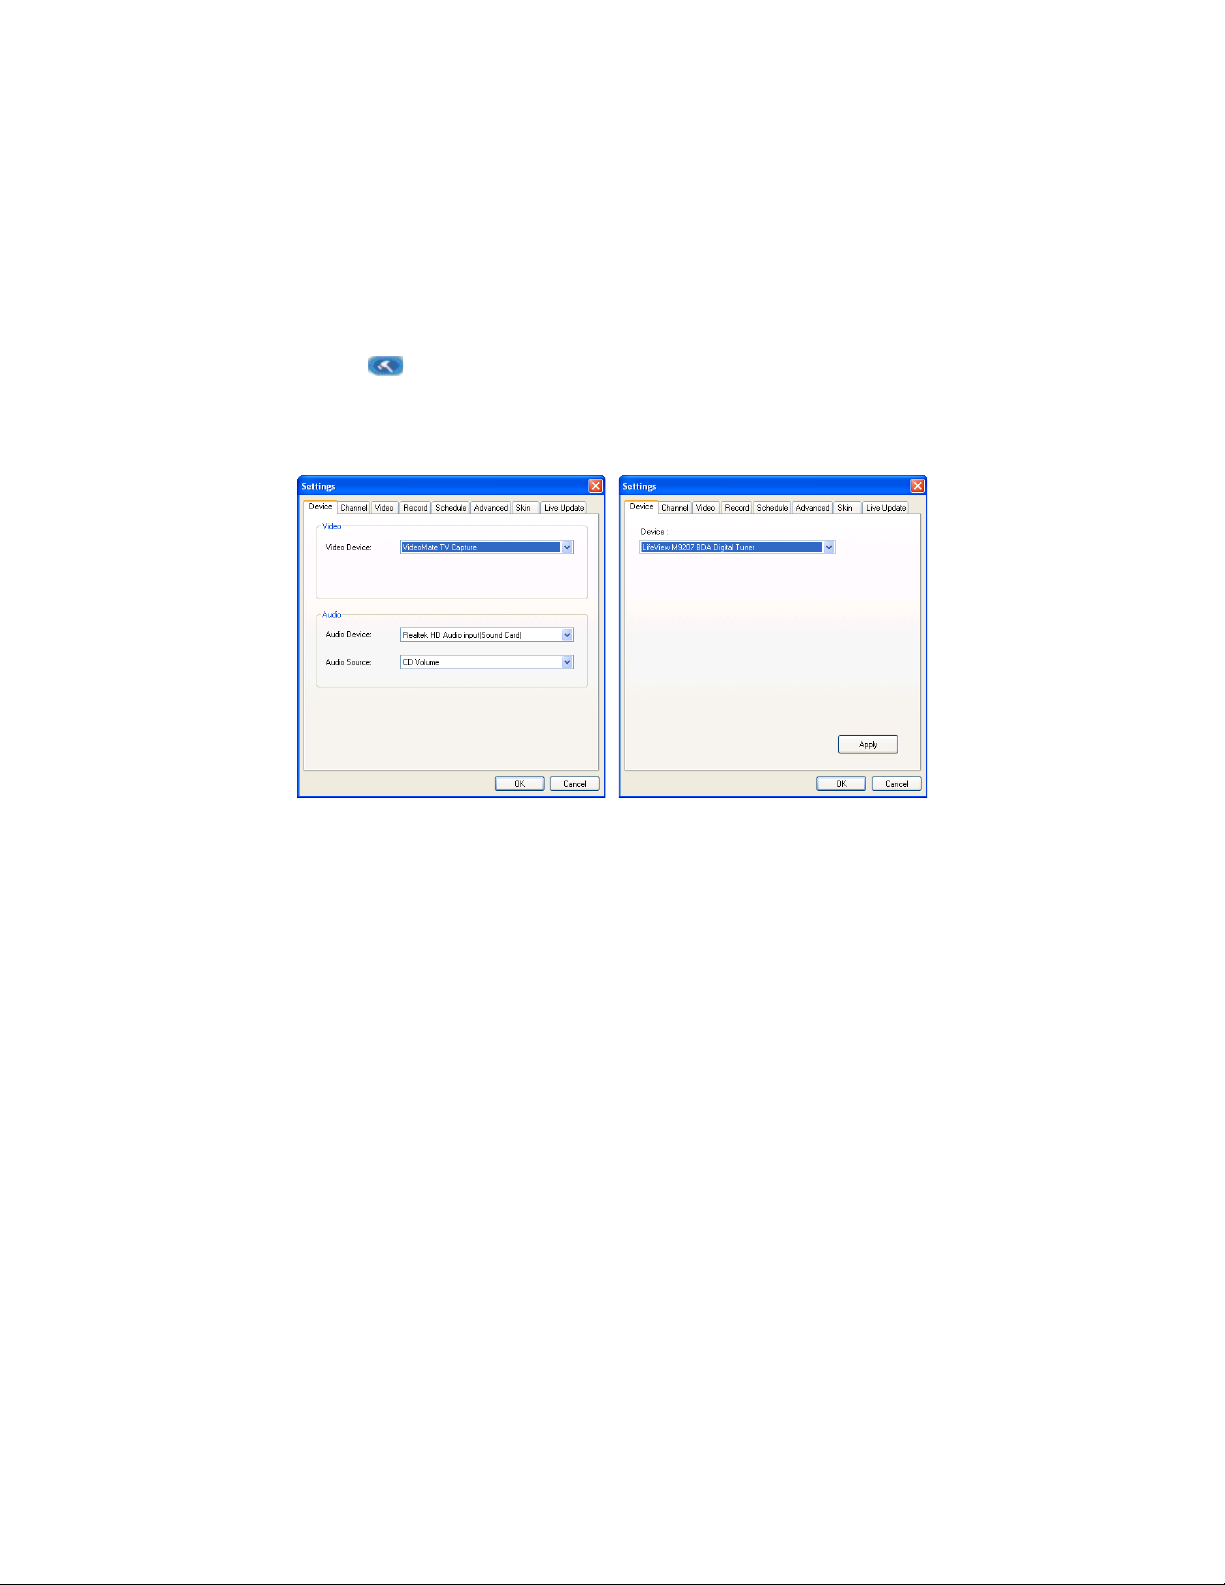
Device
On the Device tab, you can select how you control the Presto! PVR
device.
• Device
• Audio
34
Page 41

Analog TV
Chapter 3 Menus and Settings
Device
Digital TV
35
Page 42

Chapter 3 Menus and Settings
Available Presto! PVR devices are listed here. Other settings on this tab
will be disabled unless you select a device.
Audio
For Analog TV only, you can choose an audio device and source.
Channel
36
Page 43

Chapter 3 Menus and Settings
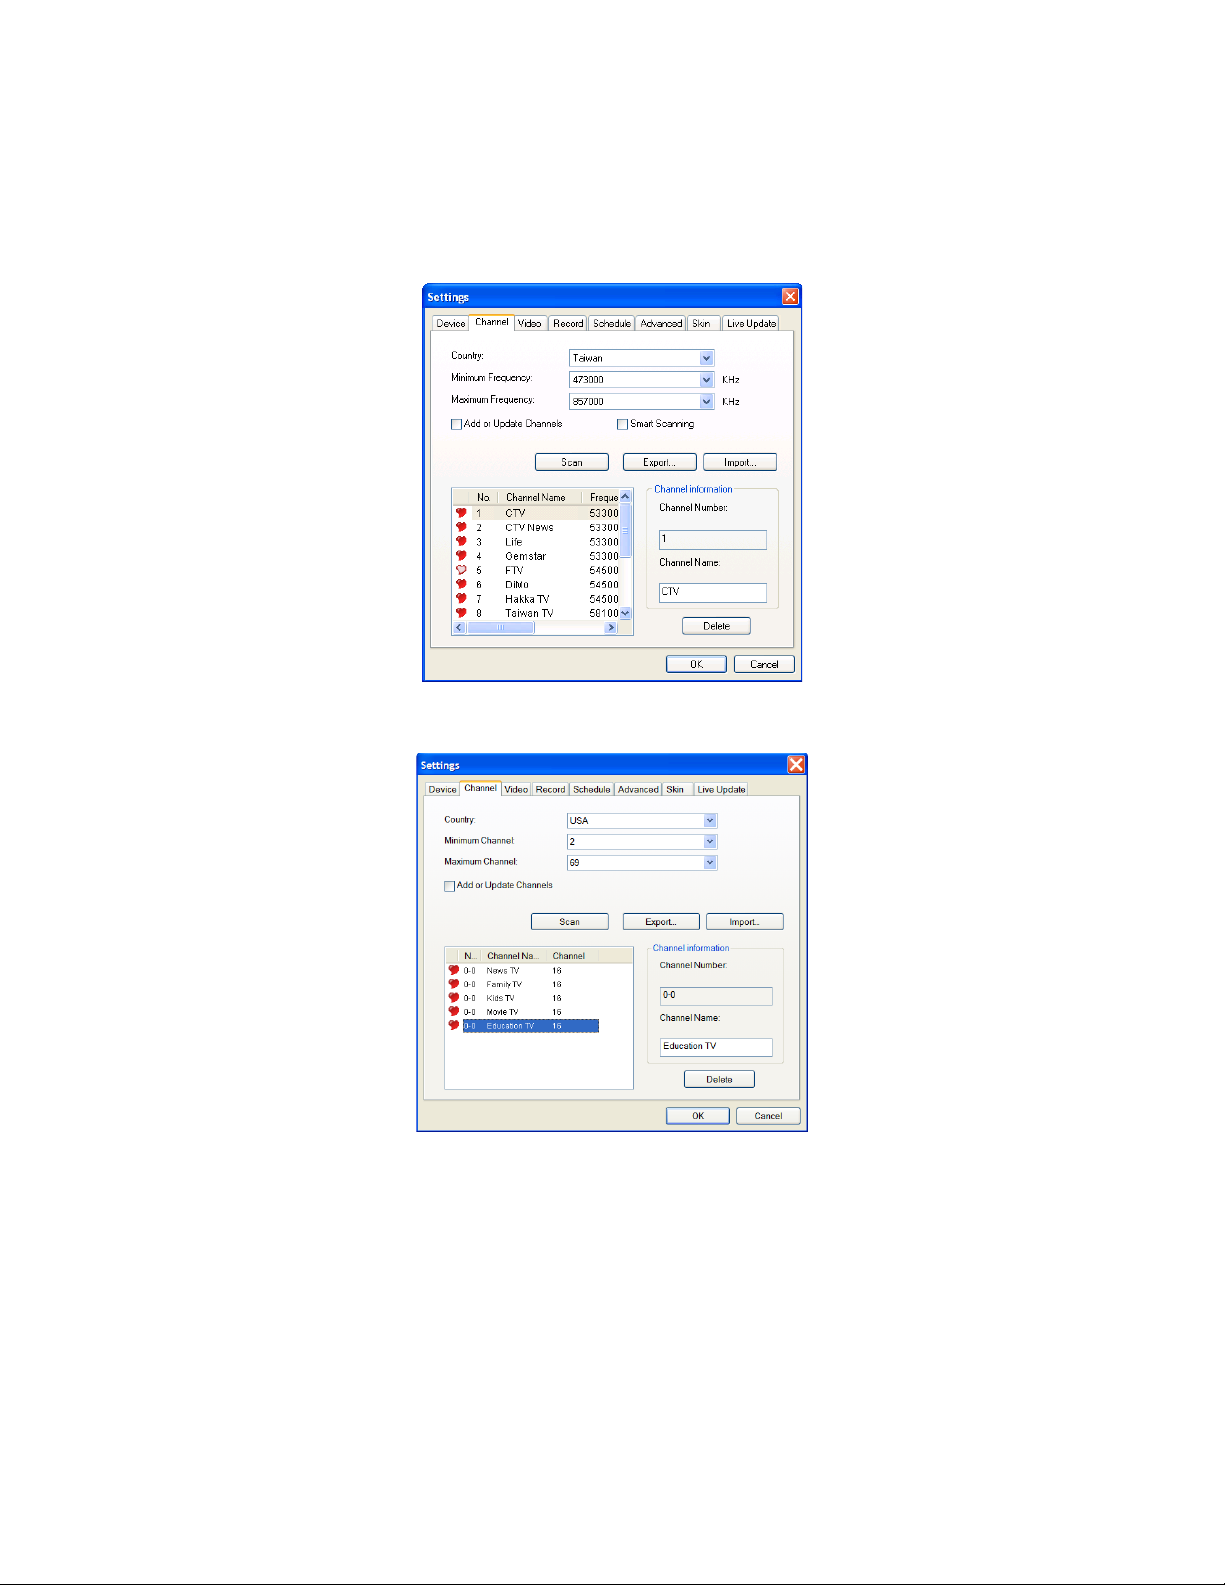
On the Channel tab, you can set up the scan parameters to more
efficiently scan for available television channels.
Digital TV- DVB-T
37
Page 44

Chapter 3 Menus and Settings
Digital TV - ATSC
Analog TV
Country: Select the country you are in to have the television reception
properly formatted.
Minimum Frequency/Minimum Channel, Maximum
Frequency/Maximum Channel: For Digital TV only, these settings can
be changed to restrict the range that Scan will use to search for available
channels.
Signal: For Analog TV only, choose the source of the television signals.
Scan/Auto Scan: Click to look for all available channels and list them.
Export, Import: You can use these two functions to export or import a
channel list so that you don’t need to scan again when using other
computers.
Delete: For Digital TV – DVB-T only, you can remove a channel from the
list by clicking this button.
38
Page 45

Chapter 3 Menus and Settings
Add or Update Channels: For Digital TV only, select the frequency range
you want and then click Scan. This feature saves time by allowing you to
rescan for channels to add or update without having to run through the
whole frequency spectrum.
Smart Scanning: For Digital TV - DVB-T, enabling this option can widen
the scanning range to get improved results. However, it’ll take longer to
finish the scanning process. If the first scan was not satisfactory, select
this option and scan again.
Channel Information/Edit Channel: You can edit the name for each
channel. Type a name that may help you be clearer about what kind of
show it is.
Select the red heart next to a channe l to make it a
favorite. Clear the heart to remove it from the favorites
list. Favorite channels will be shown when you click the
button on the channel list .
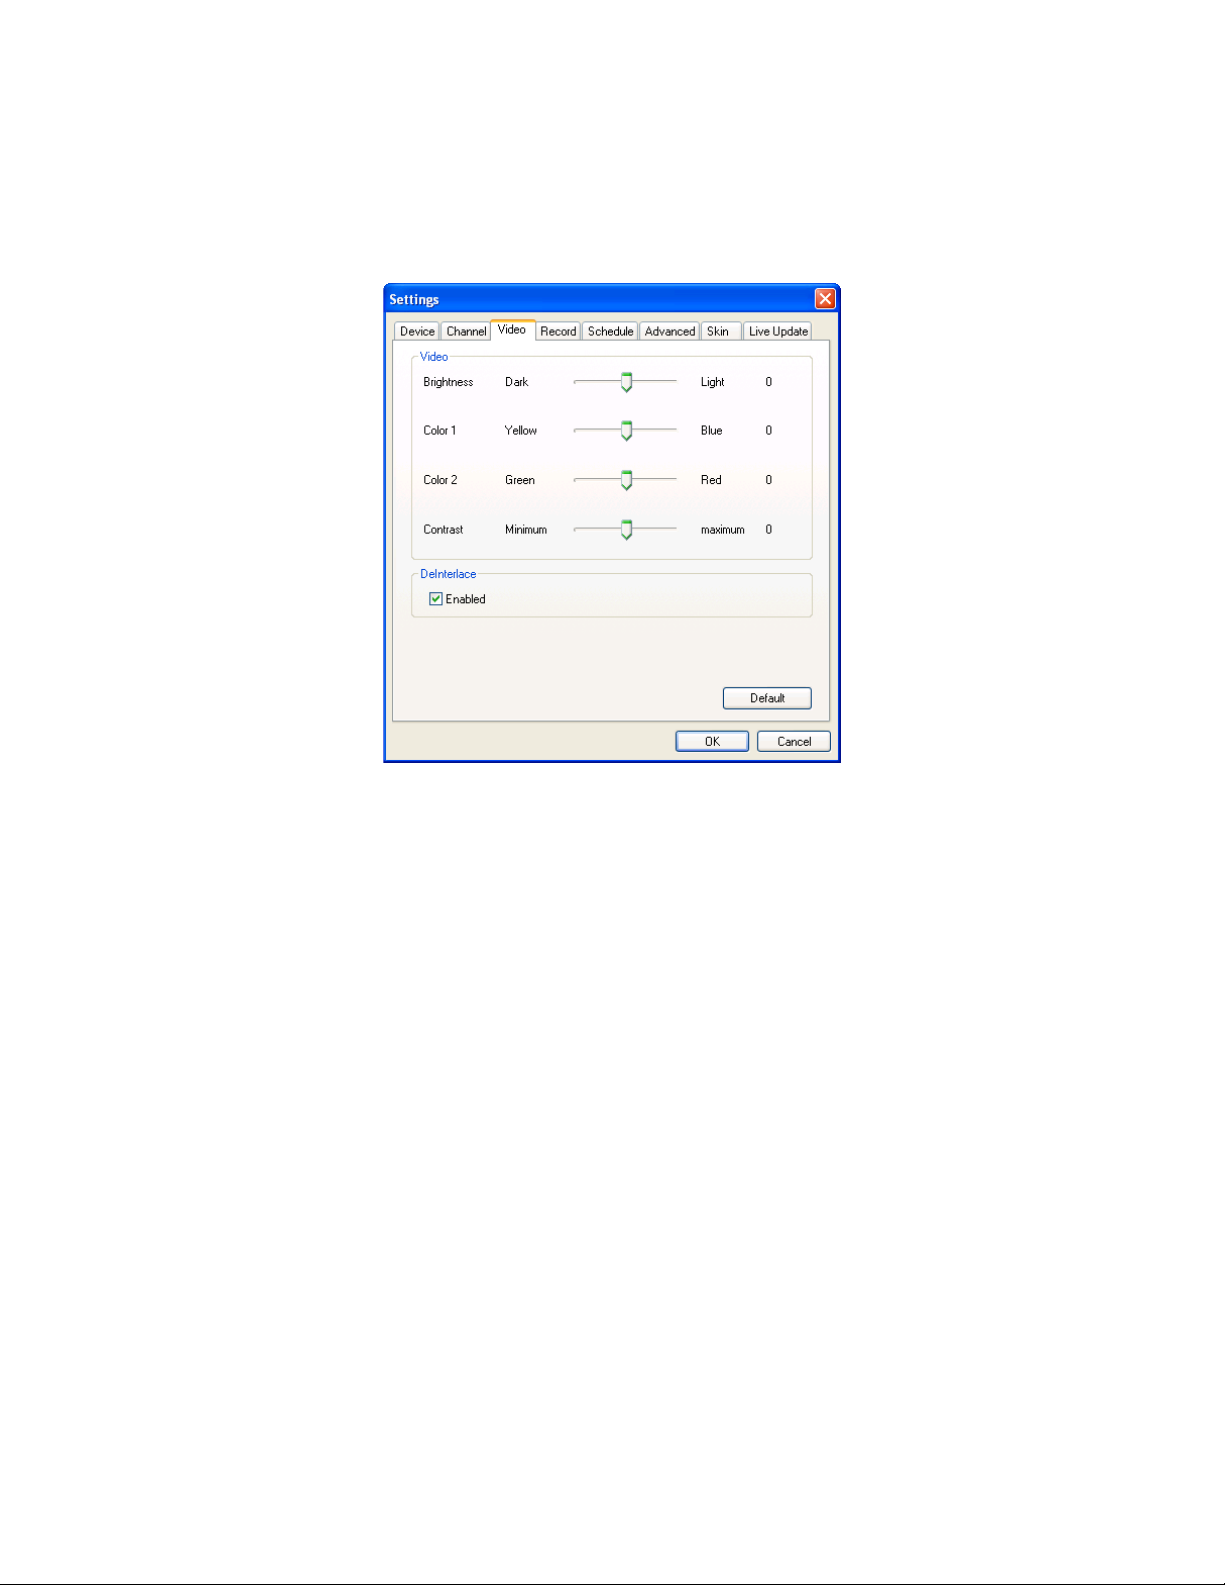
Video
On the Video tab, you can adjust the brightness and the color in the
picture. Enable DeInterlace to prevent lines from appearing in the video.
39
Page 46
Chapter 3 Menus and Settings
Record
40
Page 47

Chapter 3 Menus and Settings
This tab will let you adjust your recording preferences.
Record to the Hard Disk
You are allowed to choose Saved type and Q uality only
when your input source is Analog.
If your PVR doesn’t support DDR, the Destination
option will not be a vailable.
41
Page 48

Chapter 3 Menus and Settings
The Quality option for Time Shifting is available only
when the input source is analog TV. It is not available
for DVB-T or ATSC.
The Quality option is a vailable when your PVR supports
DDR and your input source type is Analog.
For more information see:
• Recording
• Time Shifting
Recording
Record to DVD RW
42
Page 49

Chapter 3 Menus and Settings
You can choose a disc drive under Destination and a Folder for saving
your recorded files and snapshots. Then use the slider to adjust the Auto
cut file size. The video will be automatically cut into separate files when
the limit is reached. If your disk file system is FAT32, the maximum size of
each file will be 4 GB. If your disk file system is NTFS, it will be equal to
the space available on the specified disk.
You can burn programs onto DVD. If the disc contains data, the Erase
Disc button will be activated, allowing you to erase it before you proceed
with the burning process. You can also append new data to a previous
session. The Customize Menu button provides a choice of DVD screen
menus.
Scheduled recordings will be burned onto the hard disk
even if you have selected the DVD burner as the output
device.
Before you click the Record button, Presto! PVR will
check whether the disc contains data and is
appendable. If the DVD is not appendable, you will be
prompted to erase any existing data.
Saved type: Select the kind of recording you want to save. You can
choose DVD or VCD with hard disk set as the output destination. You are
not allowed to choose saved type with the DVD burner as the output
device.
Quality: Select the quality of the recording. This will affect the size of the
recorded file. You are not allowed to choose Quality when your input
source is Digital TV.
Time Shifting
Use the slider to control the buffer size for time shifting. This will
determine how long you can pause a program and not miss any of it. The
buffer can be set for up to 60 minutes. When the limit is reached, time
shifting will continue, but the buffer will be overwritten and you may lose
part of the live program.
43
Page 50

For computers with limited speed and power, lower the
quality for time- shifting live TV programs to avoid CPU
overload. Plea se note that while the Quality option is
available when the input source is analog TV. It is not
available when the source is digital TV.
The estimated recording time will be displaye d at the
bottom of this dialo g box as Maximum recording time.
Schedule
Chapter 3 Menus and Settings
44
Page 51

Chapter 3 Menus and Settings
The schedule will display the programs that have been selected for
recording at a later date. For more information, see Scheduling Your
Program Recording.
Digital TV – DVB-T
45
Page 52

Chapter 3 Menus and Settings
Analog TV
For Digital TV – ATSC, *If you have chosen an
encrypted program, i t will not be recorded will appear
at the bottom. This message won’t appear w hen th e
input source is analog TV.
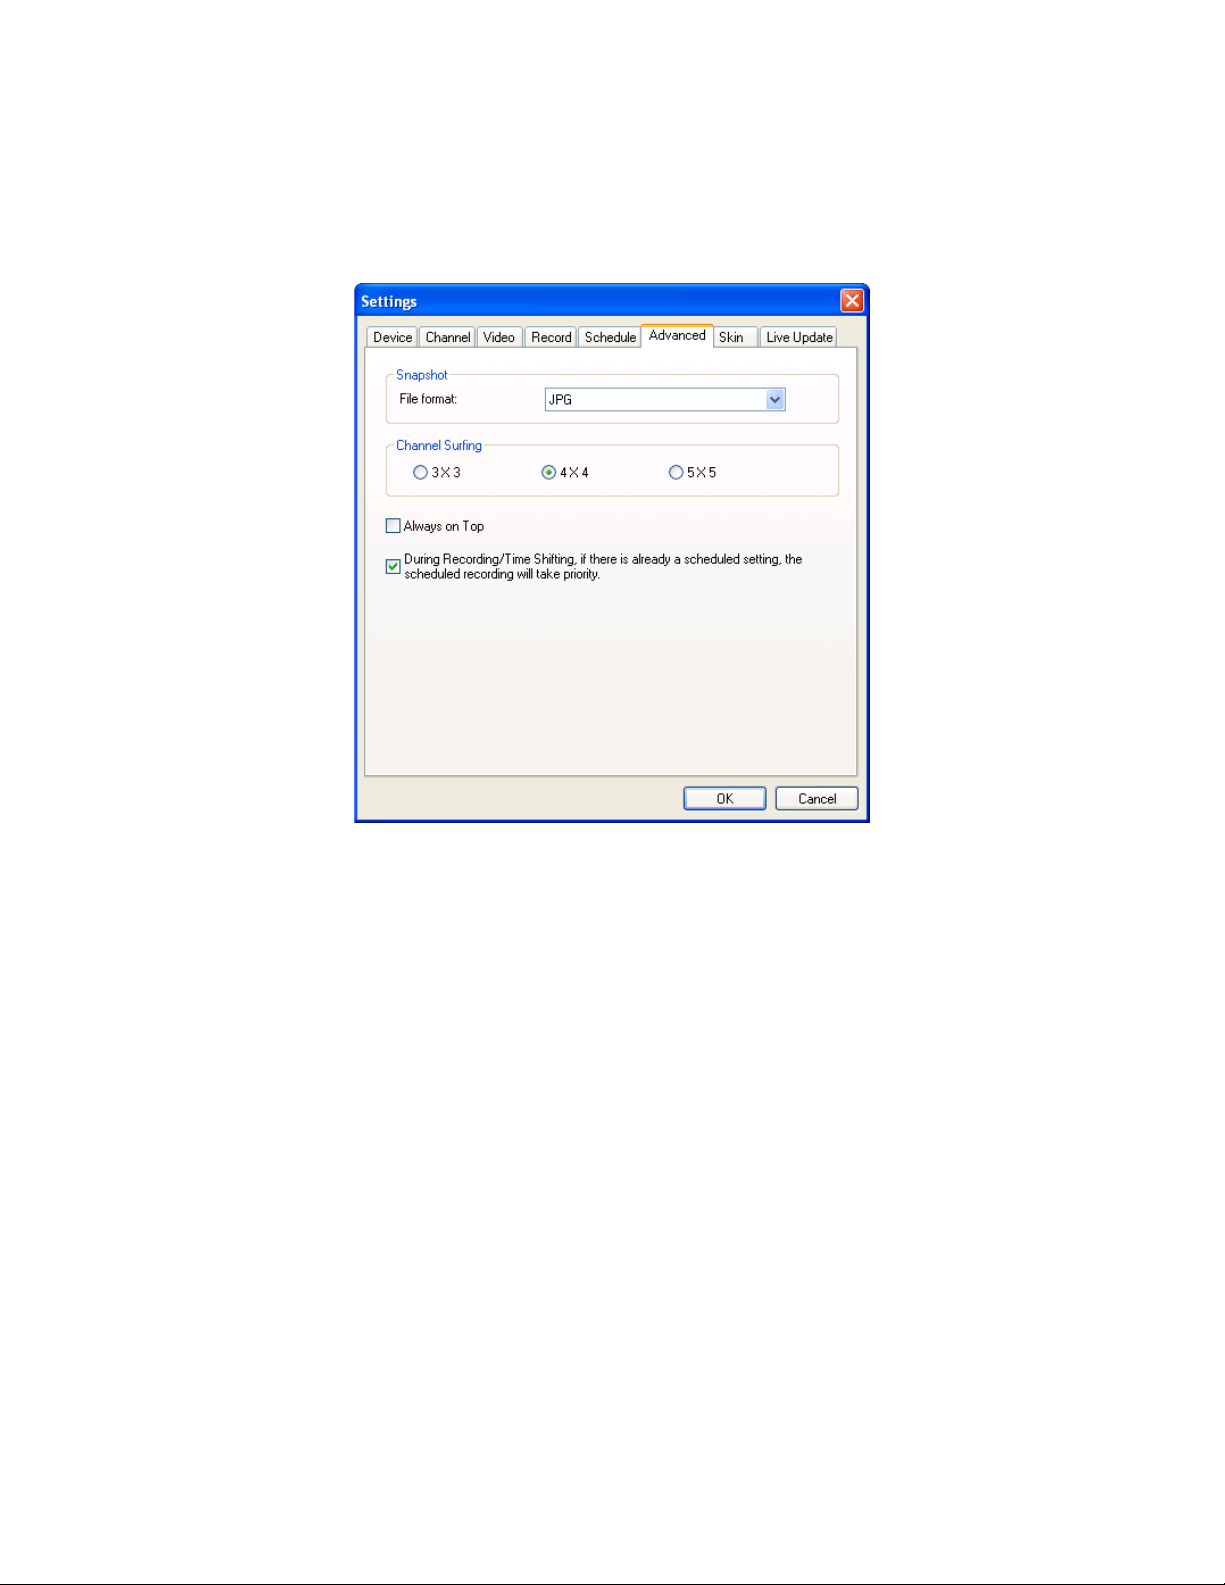
Advanced
Under Snapshot, select a file format for saving the images. In the
Channel Surfing section, you can select the display mode for channel
surfing.
46
Page 53
Chapter 3 Menus and Settings
Other options include:
Always on Top.
During Recording/Time Shifting, if there is already a scheduled
setting, the scheduled recording will take priority: When this option is
selected, scheduled recording is given the highest priority, which means
the system will begin scheduled recording regardless of whether other
recording or time shifting is in process.
Skin
47
Page 54

Chapter 3 Menus and Settings
In this tab, you can change the skin. Choose a different skin from the
Select list and see how it looks in the Preview window. Click OK to
accept.
Live Update
In this tab, you can check for product updates and news under Live
Update. If your Presto! PVR doesn’t support the AC3 audio format, an
update message for AC3 support will appear under the Live Update box.
48
Page 55

Chapter 3 Menus and Settings
Channel Surfing
49
Page 56

Chapter 3 Menus and Settings
Right-click the program viewer and select Channel Surfing from the
screen menu to tile the channels in thumbnails. You can play a channel by
double-clicking the thumbnail. To quit this function, click Esc and back to
live program.
History
50
Page 57

Chapter 3 Menus and Settings
Click to see the programs you have recorded, with the most recent
listed first. The first frame of the selected recording will be shown in the
preview area.
• Click Browse… to look through the recorded programs.
• Click Play to watch the selected program.
• Click Delete to erase a selected program from the hard disk.
• Click Close to close the History dialog box.
Taskbar Commands
After Presto! PVR is installed, the program icon on the system tray
can be used to start and monitor Presto! PVR. There are three commands
that you can choose from.
Start Presto! PVR: This command quickly starts Presto! PVR. It is
unavailable if the program is running.
Set Schedule: This command allows you to set up a recording schedule.
For details, go to Scheduling Your Program Recording.
51
Page 58

Chapter 3 Menus and Settings
Quit: Clicking this command stops all Presto! PVR tasks and removes the
icon from the system tray.
Shortcut Keys
Shortcut keys are a quick way to manipulate the program. See the
Readme.txt file for details. Click the Start button, point to Programs,
Emtec, and then Presto! PVR. Locate the folder that contains the
Readme file and open it.
52
Page 59

Chapter 4 Appendix
• Frequently Asked Questions
• Troubleshooting
• Glossary
Frequently Asked Questions
Sometimes we get questions about our product. Here are the
questions that we get asked the most. Hopefully this information will
be useful to you.
How can I optimize the PVR performance?
PVR performance depends on the computer system. The
following steps can help to make things better.
1. Try to retain as much free hard disk space as possible.
2. Use a faster hard disk drive. (7,200 rpm or higher.)
3. Disable Power Management in the BIOS.
4. Close unnecessary programs, and do not run other
programs while recording.
5. Use the defragment tool to optimize the hard disk.
6. Make sure your system meets the PVR minimum
requirements.
a. Use a USB 2.0 port since some TV tuner devices won't
work with the older USB 1.1 ports. You may need to
purchase a USB 2.0 PCI card or card bus. If the USB
port is version 1.0 or 1.1, a message will ask you to
connect to a Hi-Speed USB 2.0 port when you plug the
USB device into the system.
b. PVR requires at least a Pentium III, 800 MHz CPU or
better for the preview function, and requires at least a
Pentium 4, 2.0 GHz CPU or better for recording and
time-shifting functions.
53
Page 60

Annexe
c. PVR requires either Windows 2000 SP4 or Windows
XP SP2.
d. PVR requires DirectX 9.0c or later.
Can I record subtitles from DTV channels?
Dynamic subtitles are subtitles that can be disabled and
enabled. The current version of Presto! PVR doesn't support
recording dynamic subtitles. You can record programs with
dynamic subtitles, but the subtitles will not record.
Troubleshooting
If you are having trouble with the product, please check here first. You
may find the answer quickly.
My system does not recognize the DVB-T/ATSC tuner
in the USB port or the DVB-T/ATSC PCI slot.
It could be that a related driver already exists on the system, or
it may be a hardware issue.
1. Make sure the device is properly connected.
2. Make sure the device driver is installed.
3. If the above steps do not fix the problem, try unplugging the
device from the computer and uninstalling the driver. Then
plug the device into a different port and install the driver
again.
4. If you are connecting the device through a USB hub, try
connecting it directly to the computer.
If the device driver has not been certified by Windows x64, it will
not be recognized under Windows x64. For device driver
issues, contact the manufacturer for assistance and
information.
If the problem persists, contact the hardware manufacturer for
further assistance.
54
Page 61

Annexe
Presto! PVR does not respond after being started, or
it displays stuttering or corrupted video.
If you encounter one of these problems and are using Windows
XP Service Pack 2, please visit the Microsoft website at this
link, http://www.microsoft.com/downloads/details.aspx?
displaylang=en&FamilyID=14caaf6d-198c-4197-82ad-28251f9c
50a5, and download the latest patch.
I can watch and record TV programs, but cannot play
them back or preview the channels.
Make sure that DirectX 9.0 or later has been installed on the
computer. Microsoft DirectX 9.0 improves graphics, video, 3-D
animation, audio, security, and performance in the operating
system. Go to the Start menu, click Run, and type dxdiag. You
will find a list that shows the DirectX version. If the installed
DirectX version is older than 9.0, download and install the latest
DirectX version from the Microsoft website at
http://www.microsoft.com/windows/directx/default.aspx. It's free.
To find out which version of DirectX you are using, click Run
from the Windows Start menu, type "dxdiag", and then OK. The
DirectX diagnostic tool will open, and the version number will be
listed under System Information.
I can’t record Digital TV programs onto DVD.
High-definition Digital TV (DVB-T/ATSC) can’t be recorded onto
DVD.
I can't change the recording settings.
The file type and quality settings are designed for analog TV.
These settings will be disabled and set to 'DVD' and 'Good'
when watching the DVB-T/ATSC TV. The settings, on the
Record tab of the Settings dialog box, will be enabled for
analog TV.
Is the TV tuner device properly installed?
1. From the Start menu, open the Control Panel.
2. Open System, click the Hardware tab, and then open the
Device Manager.
55
Page 62

Annexe
3. Under Video and Game Controllers, make sure there are
no problems listed for the TV tuner device.
4. If there is a problem indicated, check the device manual
and reinstall the hardware.
If the digital TV signal is not strong enough, adjust the antenna
to get the best reception. (You might consider buying an active
antenna.) Try moving the equipment to a different area in the
house, and then scan for channels again.
Some useful tips.
Visit our patch download page to check if there are any
program patches available.
Visit the manufacturer's website for latest updates for the TV
tuner driver.
Reinstallation is a way to correct many kinds of problems.
We suggest that you install the built-in Windows driver for USB
2.0 PCI cards.
If you need to contact the Emtec support center, either by
phone or by e-mail, here are the details that you should pass
on.
a. Operating system, language, and service pack.
b. PVR version and Product ID.
c. TV tuner device interface (PCI, USB, PCMCIA, etc).
d. USB port type (1.1 or 2.0).
e. Is it an onboard USB port or an external USB device?
f. Brand name of the TV tuner device.
g. Did the software work when you first installed it.
h. Error Message:
i. Details of the problem (step by step):
56
Page 63

Annexe
Glossary
Here are terms used in the manual for Presto! PVR.
AC'97 – (Short for Audio Codec '97) This is an audio encoding system
for computer files.
Analog TV – This is the traditional old-style television signal. Kind of
like radio waves.
Aspect Ratio – This is a measure of how wide your television picture
is compared to how tall it is. Regular television is 4:3, and HDTV is
16:9.
ATSC - The Advanced Television Systems Committee developed the
ATSC digital television standard for the United States. These
standards were also adopted by Canada, Mexico, and South Korea. It
is intended to replace the widely used NTSC system and produces
wide screen 16:9 images. The ATSC standards also boast theater
quality audio through the AC3 format.
Auto Scan – Automatic scanning. The computer looks for television
signals.
Buffer – This is a memory space for making time shifting possible.
Closed Captions – Closed captions are subtitles specifically provided
for the hard of hearing.
Deinterlace – This is used for making you picture look like it is not
composed of many separate lines.
Digital TV – Television signals made up of computer data. Ones and
zeros.
DDR (Direct Disc Recording) – Recording TV programs directly to
DVD or hard disk.
DirectX 9 – DirectX is technology for displaying video and playing
audio. 9 is the version number.
DVB – Digital Video Broadcast.
EPG – Electronic Program Guide
57
Page 64

Annexe
SAP – Second Audio Program. Usually used to present the material in
a different language.
Smart Scanning – A more efficient way to scan for channels and
frequencies.
Teletext – A free program to give information about broadcasts and
schedules. (Not available everywhere.)
58
Page 65

Annexe
Regulatory Information:
Declaration of Conformity
Trade Name: Emtec Limited
Model: S801
For customers in Europe
This product conforms to the following European Directives:
89/336/EEC (EMC Directive)
This product complies with EN55022/A1:2000 and EN 55024/A1:2001
for use in the following areas: residential, commercial and light
industrial.
Liability Exemption Statement
1. All the information included in this manual was produced with our
careful caution, but there may still be some errors and mistakes.
Emtec will not be held responsible for those errors and mistakes.
2. As we can't control users' understanding of this manual, Emtec will
not be held responsible for any accident or other loss caused by
misunderstanding of this manual. We shall not be held responsible
either for any loss caused by using this product or for any claim by
any third party.
3. Emtec will be held responsible only for the inherent problem of the
device itself, but not for data loss, modification of the device or other
indirect loss resulting from mal-operation of software, maintenance or
other accidents. Emtec will not be held responsible for restoration of
any personal data lost.
4. Emtec reserves the modification right of any software, hardware
and user manual of this device without prior notice.
5. To make copies, publish, transfer, store in a traceable system, or
translate to any other language without written authorization from
Emtec is strictly prohibited.
59
Page 66

Annexe
Important
1. Do not drop or give a hard impact. It may cause malfunction.
2. Do not subject the device to high temperature or direct sunlight.
3. Keep it far away from humidity or damp.
4. Do not disassemble it by yourself.
5. Use a dry cloth to clean the device.
6. Keep it away from the chemicals such as benzene or diluents.
7. Take the battery out if the device is not in use for a long period of
time.
Safety Precaution
Before using this device, read carefully and understand all safety
instructions included in this chapter, and observe them strictly when
using to ensure that the device provides you with pleasure and
entertainment for a long period of time.
1. Read carefully through this manual, and fully understand all the
operation instructions and warnings of this device.
2. Check if the contents in the packing comply with the packing list. If
not, contact the dealer immediately.
3. When it is left unused for a long period of time, the battery must be
taken out from battery chamber. If battery liquid leakage is detected
and the device works abnormally, do not disassemble the device for
cleaning, which may lead to irremediable damage. In this case,
contact Emtec customer service center for technical support and help
from Emtec professional service team. However, Emtec takes no
liability for any damage resulting from battery liquid leakage.
4. This device is a hi-tech electronic product, which should be kept
away from heat, cold or moisture when being used. Special care
should be taken to observe the followings:
a) The device should not be exposed to strong sunlight, and should be
kept away from heat sources.
60
Page 67

Annexe
b) Avoid using the device outdoor at low temperature for a long period
of time.
c) The device should not be placed in the environment of extrahumidity; Care should be taken so that water and other liquids are not
spilled into the device. If it happens, it should be switched off
immediately.
d) The device should not be used in dust-plagued or very dirty places.
e) Do not clean the device with any type of detergent containing
chemical elements or other solutions in order to avoid damages from
corrosion or moisture. If necessary, please clean it with soft cloth or
paper slightly.
5. Never use the device in a strong magnetic field. Avoid strong
electric charge or electromagnetic interference environment to prevent
data from being lost.
6. Do not drop the device to the ground or suffer it from fierce impact
by other objects, which may lead to unnecessary damage.
7. The device uses a rapid internal storage for data memory.
Generally, even when the power is suddenly turned off, the data in the
device will not lose. However, mal-operation, malfunction or external
strong electromagnetic interference may lead to data loss. So, it is
advisable for users to make a copy of all useful data in time. Emtec
will be responsible only for the inherent problem of the device, not for
data loss or other indirect loss arising from maloperation, maintenance
or other accidents. Emtec will not be held responsible for restoration
of any personal data lost.
8. The device should be opened under no circumstances. The
manufacturer takes no liability for any damage resulting from
unauthorized tampering.
61
 Loading...