

Page 1

USER GUIDE
FOR iPhone/iPad
Compatibility: Apple iOS 5.1 or higher
Page 2

2
1. Overview .......................................................................................................................................... 4
2. Install and Set Up ............................................................................................................................. 4
2.1. Download Emtec Connect App .................................................................................................... 4
2.2. Connect your Wi-Fi HDD to your iPhone/iPad (no Internet connection required) ..................... 4
2.3. Charge your Wi-Fi HDD ................................................................................................................ 5
3. Main interface ................................................................................................................................. 6
3.1. Home page .................................................................................................................................. 6
3.2. Access to the files of Wi-Fi HDD/ iPhone/iPad ............................................................................ 7
3.3. Videos/ Photos/ Music/ Documents Gallery ............................................................................... 8
3.4. Play movie/ video ........................................................................................................................ 9
3.5. Listen to music ............................................................................................................................. 9
3.6. View pictures ............................................................................................................................. 11
3.7. View documents ........................................................................................................................ 12
3.8. Download/upload files .............................................................................................................. 13
3.9. Share files .................................................................................................................................. 14
4. Settings .......................................................................................................................................... 15
4.1. Emtec Connect settings ............................................................................................................. 15
4.1.1. Wi-Fi settings ......................................................................................................................... 16
4.1.2. LAN setting ............................................................................................................................ 18
4.1.3. Internet settings/ Router function ........................................................................................ 20
4.1.4. System settings ...................................................................................................................... 22
4.1.5. Cache ..................................................................................................................................... 26
4.1.6. Language ............................................................................................................................... 26
4.1.7. About ..................................................................................................................................... 27
4.1.8. Log out ................................................................................................................................... 27
Page 3

3
WARNING!
To avoid damage or malfunction:
Do not expose the product to excessive heat caused by heating equipment or direct sunlight.
Do not drop the product or allow objects to fall on your device.
Do not allow the product to be submerged in water. Do not expose device to water, as water
entering the set may cause major damage.
Avoid damp environments.
Protect the device against electromagnetic sources.
Back up your files. Ensure that you retain the original files you have downloaded to your
device. EMTEC is not responsible for any loss of data if the product becomes damaged or not
readable / legible.
Do not use any cleaning agents containing alcohol, ammonia, benzene, or abrasives as these
may harm the product.
About operating and storage temperatures:
Best operating conditions: 41° to 104°F (5°C à 40°).
Technical Support:
Online assistance:
support@emtec-international.com
https://twitter.com/EMTEC_Support
Page 4
4
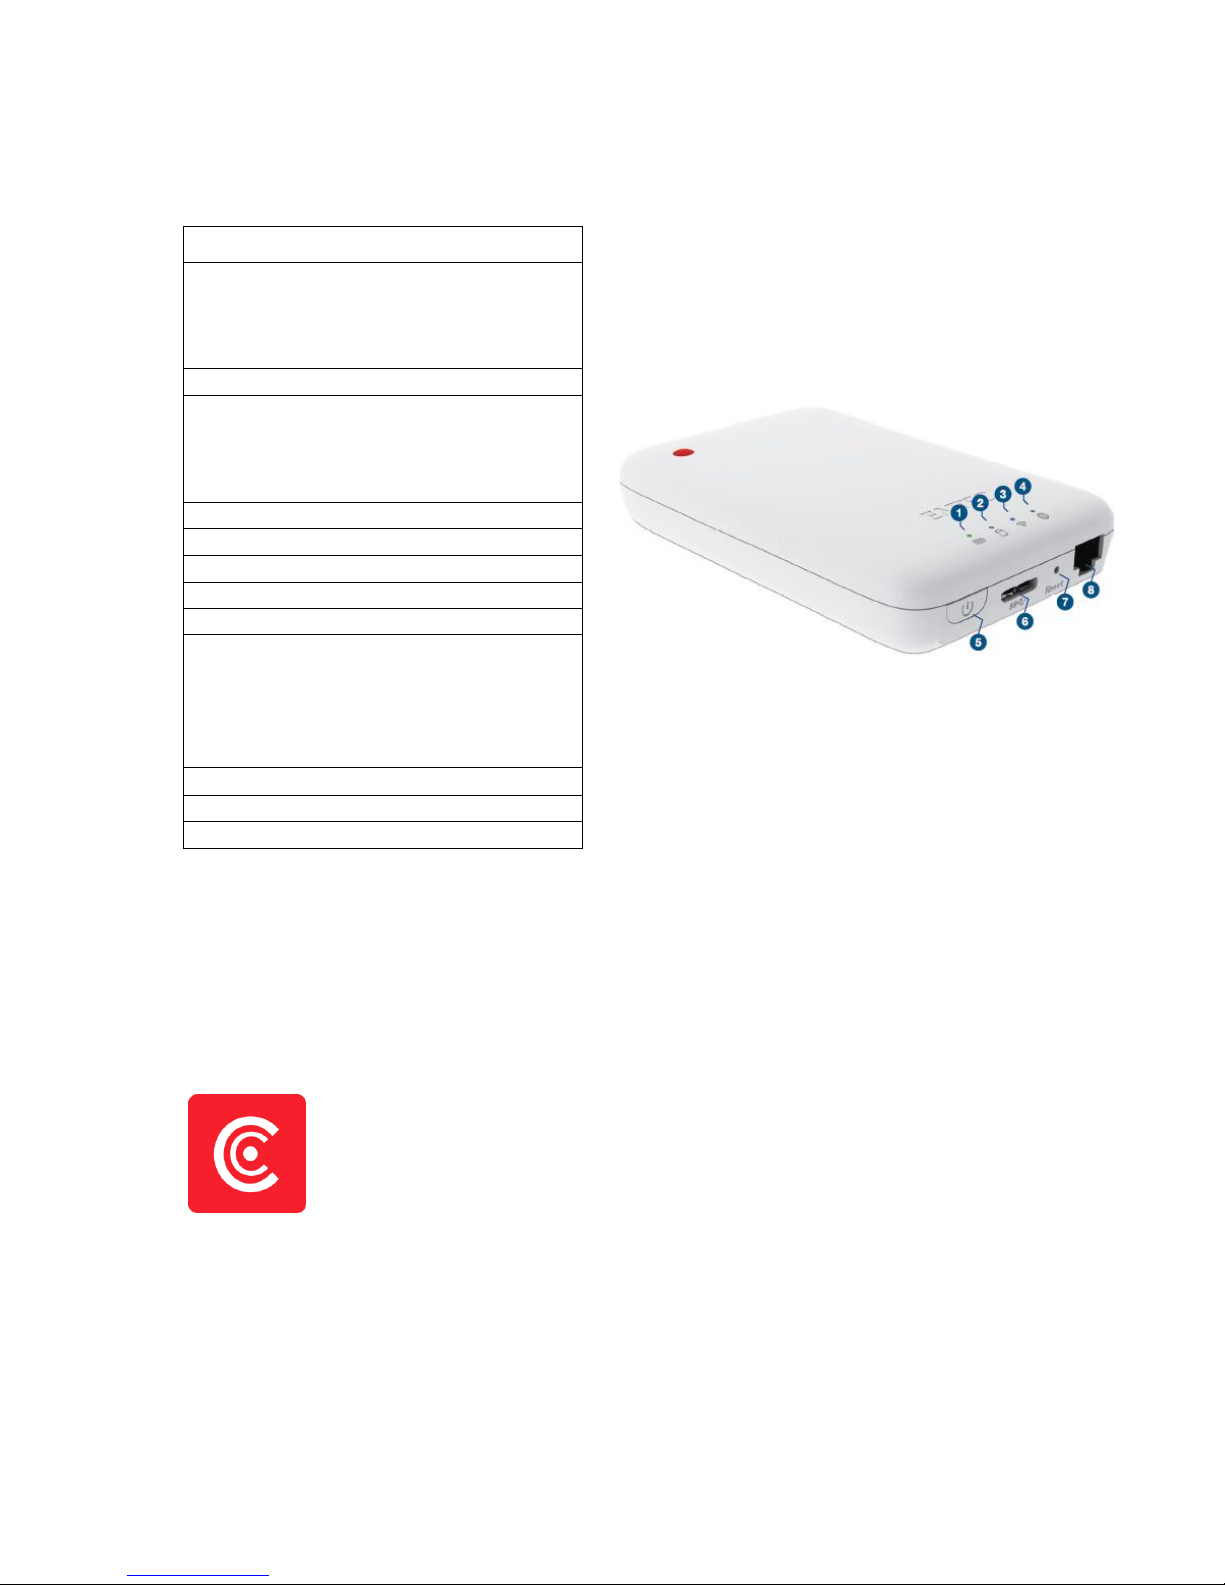
1. Overview
1. Battery level LED
Red: Low battery
Flashing Green: Charging
Solid Green: Drive On
Off: Battery full or Drive Off
2. HDD read/write LED
White: Stand-by
Flashing White: Read/Write
(LED is blue when the device is connected at
a USB3.0 port)
3. Wi-Fi LED
Blue: Wi-Fi ready
4. Internet LED
Green: connected to Internet
5. Power Button
Press and hold for 2 seconds to power
on/turn off the device.
On: Wi-Fi HDD mode.
Off: Synchronization mode (The HDD works
as a standard portable HDD).
6. USB 3.0 Port
7. Reset
8. Ethernet port (RJ45)
2. Install and Set Up
2.1. Download Emtec Connect App
Download “Emtec Connect” application on the App Store.
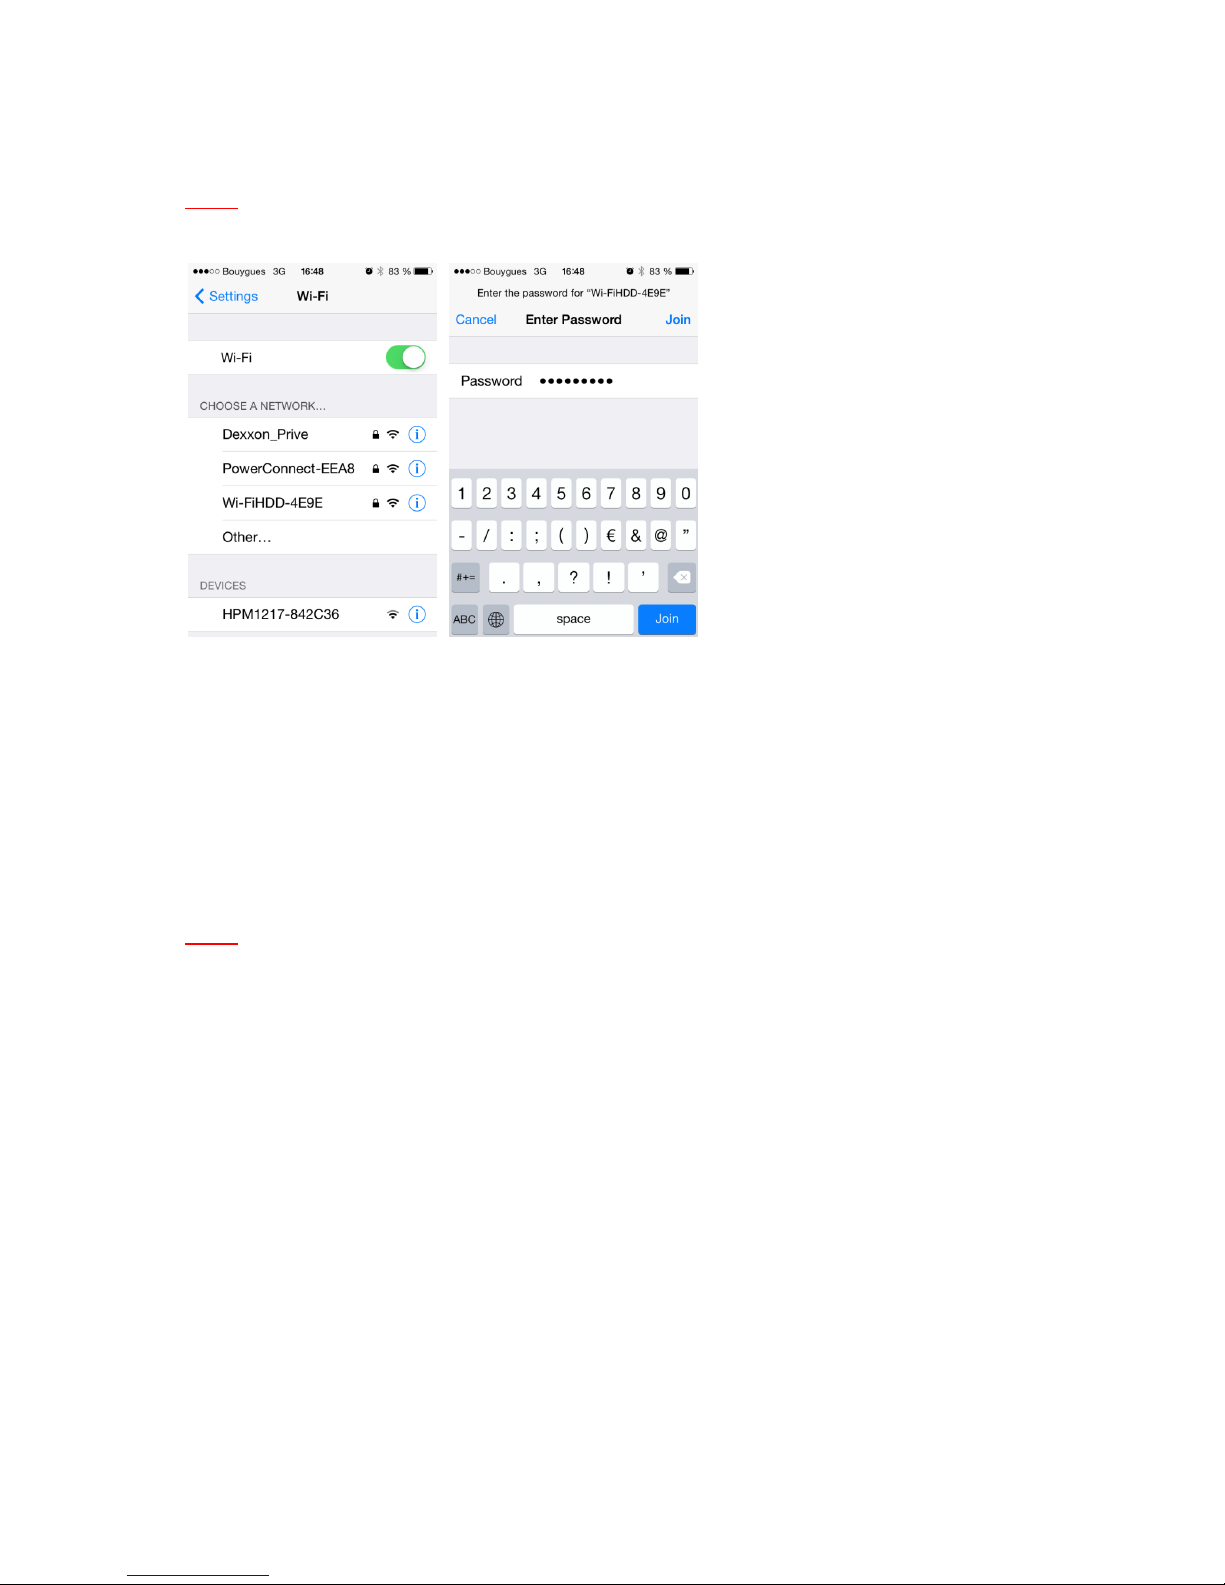
2.2. Connect your Wi-Fi HDD to your iPhone/iPad (no Internet connection required)
1. Turn-on your Wi-Fi HDD P600. Once the Wi-Fi blue LED stops flashing, the Wi-Fi function is ready.
2. Go to Wi-Fi settings on your iPhone/iPad and activate your Wi-Fi connection. Then choose the
name of your Wi-Fi HDD in the network list.
Page 5
5
3. Enter the password (default: EMTEC4567).
Note: Your iPhone/iPad will remember the password and you will not need to enter it again a
second time.
4. When the connection is established, open Emtec Connect app to enjoy your files.
2.3. Charge your Wi-Fi HDD
Connect the included USB 3.0 cable into any available USB port on your computer. The battery LED
will start flashing while it is charging and will turn off once it is fully charged. You may use any Power
Adapter (not included) with 5V/2.1A charging current to charge the product.
Note: In Wi-Fi HDD mode, Wi-Fi function works when the battery is charging. Just turn on the Wi-Fi
HDD before you start charging.
Page 6
6
3. Main interface
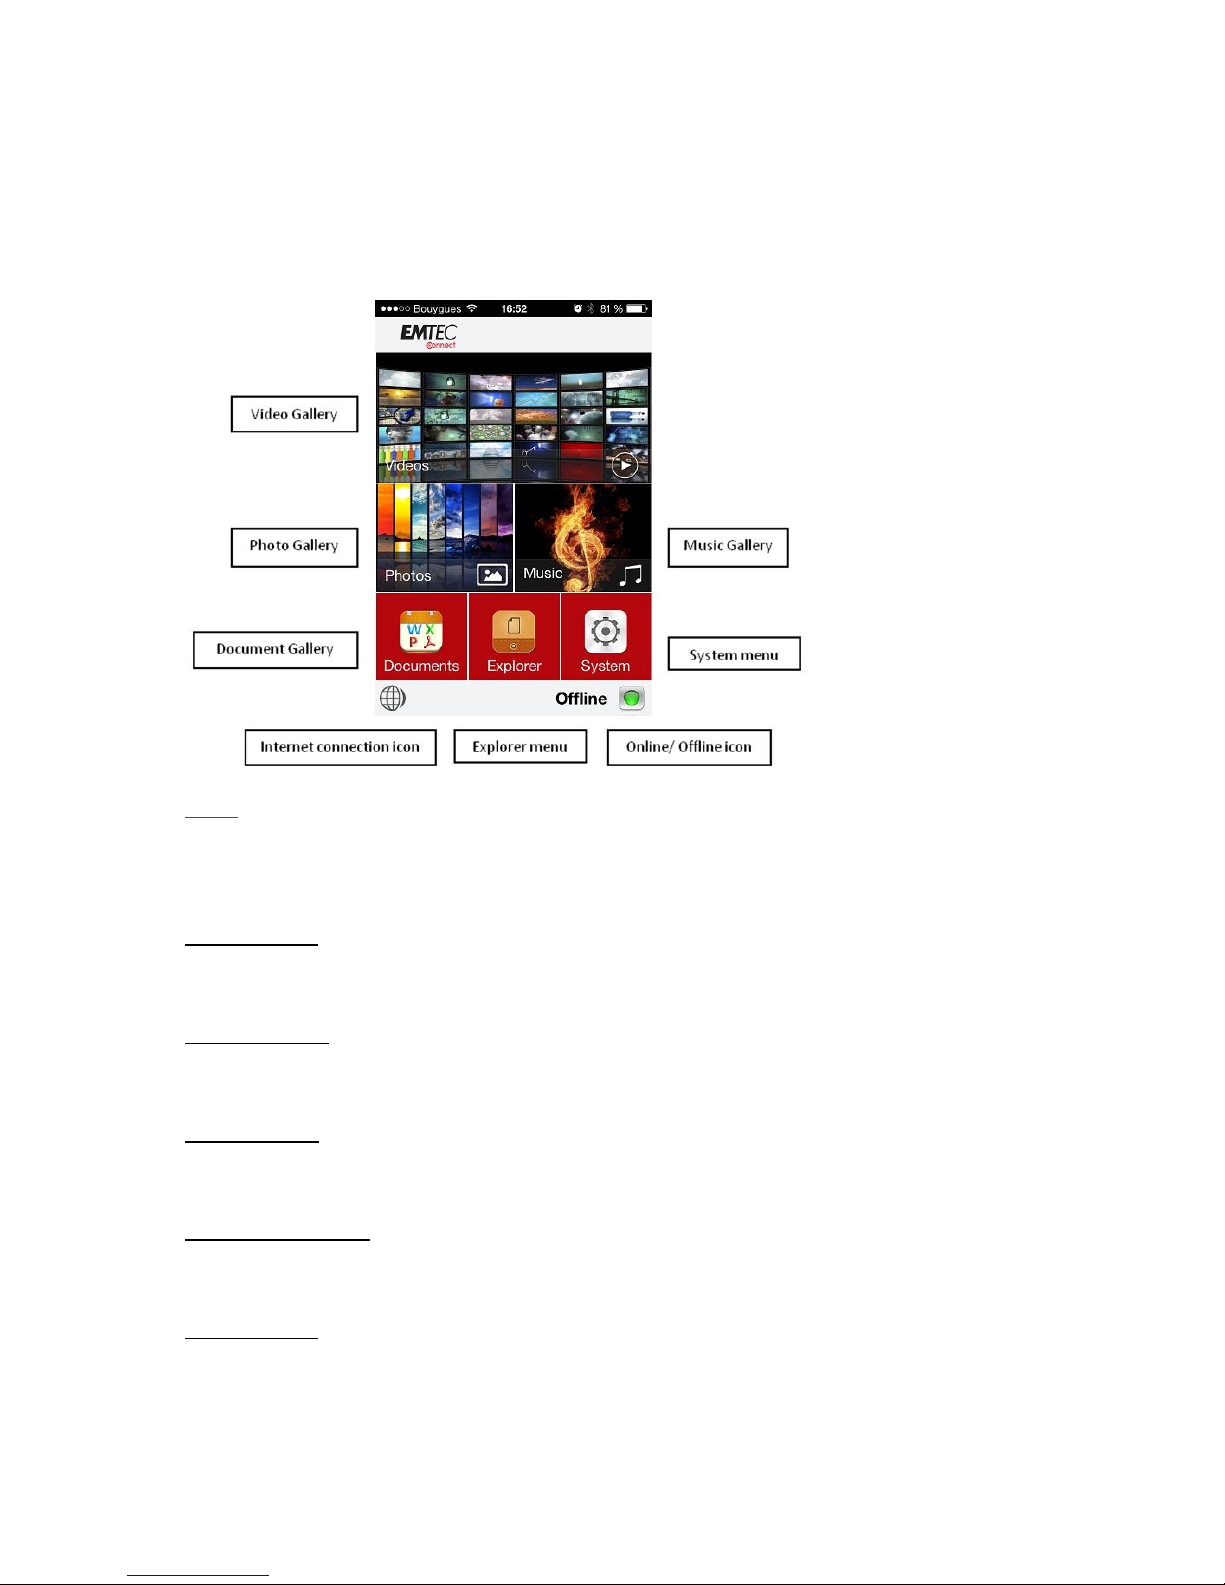
3.1. Home page
Note: Once your iPhone/iPad is connected with your Wi-Fi HDD, the “Online” pictogram will be
green.
Video Gallery:
Allows you to see all the videos available on the Wi-Fi HDD and your iPhone/iPad.
Photos Gallery:
Allows you to see all the photos available on the Wi-Fi HDD and your iPhone/iPad.
Music Gallery:
Allows you to see all the music available on the Wi-Fi HDD and your iPhone/iPad.
Documents Gallery:
Allows you to see all the documents available on the Wi-Fi HDD and your iPhone/iPad.
System menu:
Access to all the settings of your Wi-Fi HDD.
Page 7

7
Explorer menu:
Allows you to manage and upload/download files (copy/paste, new folder…) from your iPhone/iPad
to your Wi-Fi HDD or from your Wi-Fi HDD to your iPhone/iPad.
Note: From the homepage, you can directly see the different files (compatible directly with the app)
you have in "Videos", "Photos" and "Music" by sliding your finger on the thumbnail.
3.2. Access to the files of Wi-Fi HDD/ iPhone/iPad
Emtec Connect / “iPhone”/”iPad” access:
Select file location by clicking on “EmtecConnect" (your Wi-Fi HDD) or "iPhone"/”iPad”.
Page 8
8
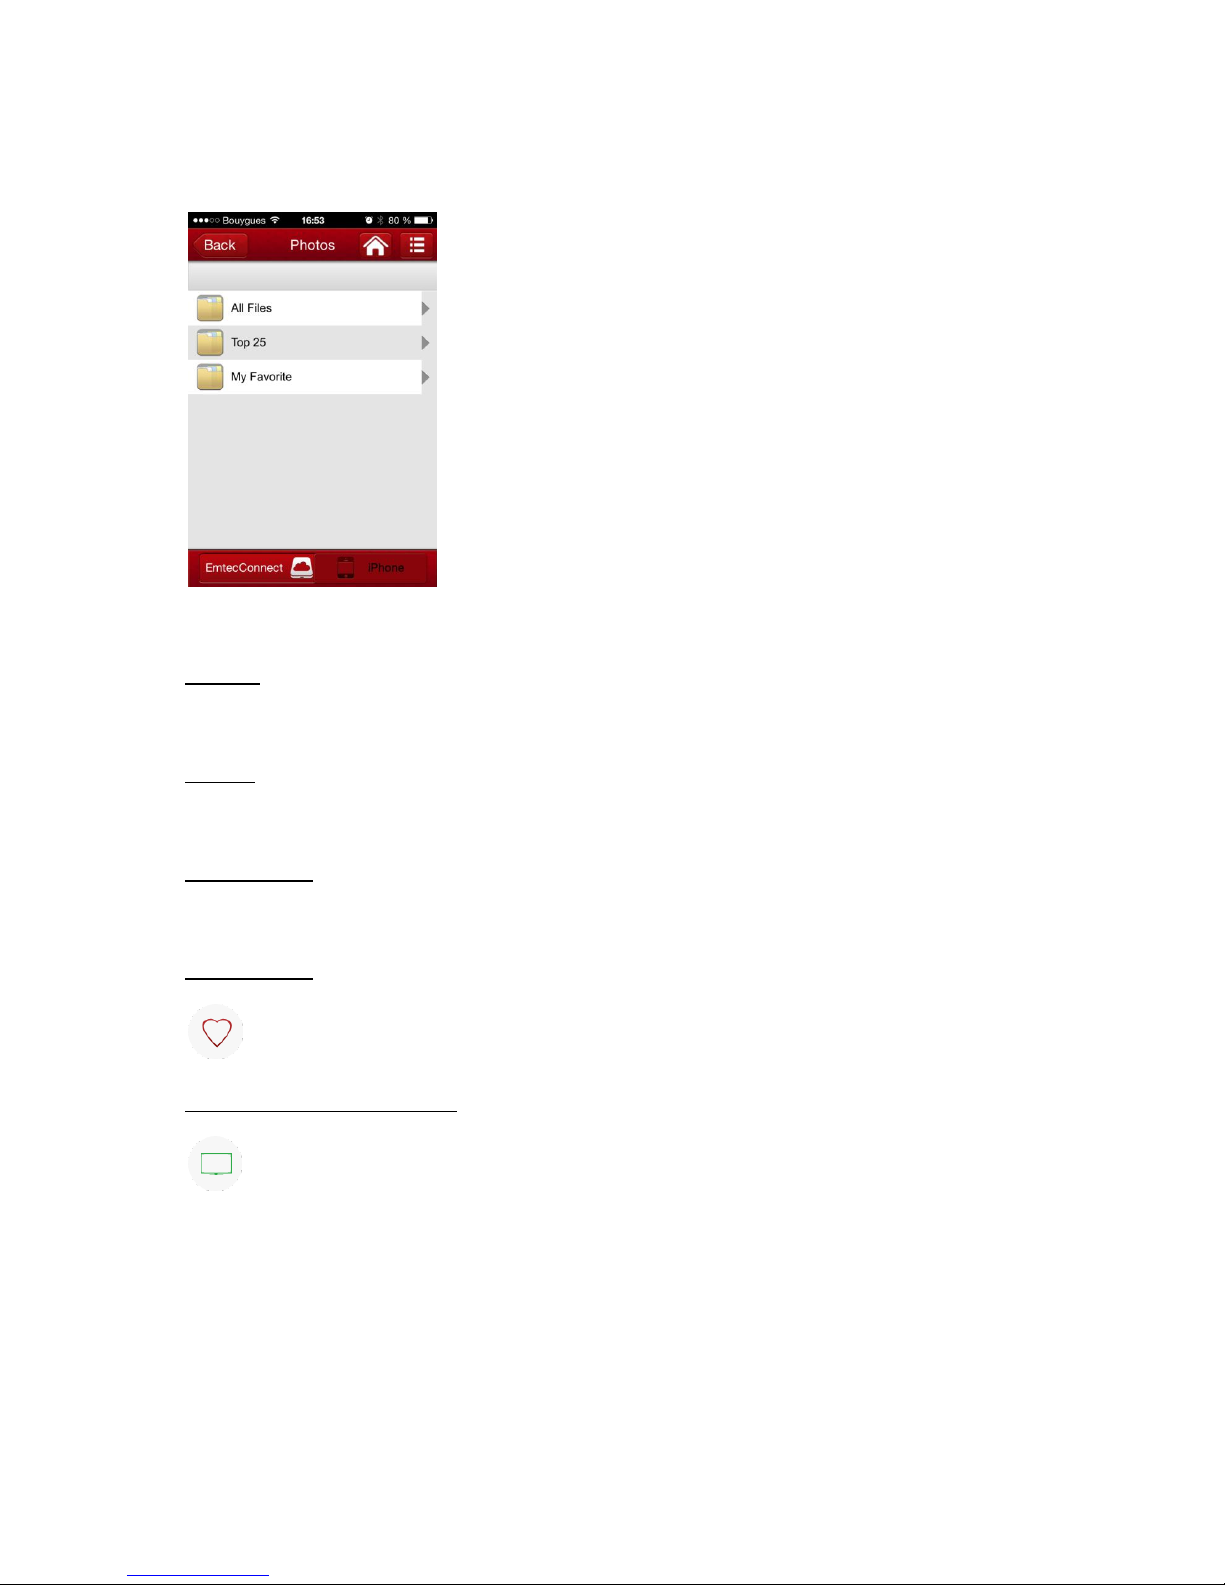
3.3. Videos/ Photos/ Music/ Documents Gallery
All files:
Show all the files available (Videos/ Photos/ Music/ Documents) on your Wi-Fi HDD or iPhone/iPad.
Top 25:
Show the 25 Videos/ Photos/ Music/ Documents you look at most often.
My Favorites:
Shows your favorite Videos/ Photos/ Music/ Documents.
Favorite icon:
Click on the Favorite icon to add the file in “My Favorites” section.
DLNS/ Digital Media Sharing:
Click on the TV icon to display on your TV.
Page 9

9
3.4. Play movie/ video
Note: Compatible fles: MP4, MOV, M4V. Other formats will be opened in a third party app available
on your iPhone/iPad. If no movie player is available on your iPhone/iPad, you can download one on
the App Store. Many movie players are available for free.
To play a video, you can go in the “Videos” gallery or in Explorer.
Just click and hold on the video you want to play and choose the movie player you desire to see the
video with.
3.5. Listen to music
To listen to music, you can go in the “Music” gallery or in Explorer.
Note: Compatible files: AAC, MP3, M4A, AIFF, WAV. Other files will be opened in a third party app
available on your iPhone/iPad. If no music player is available on your iPhone/iPad, you can download
one on the App Store. Many music players are available for free.
Simply locate the music file that you would like to play. Click on the file and your music will
automatically play.
Page 10

10
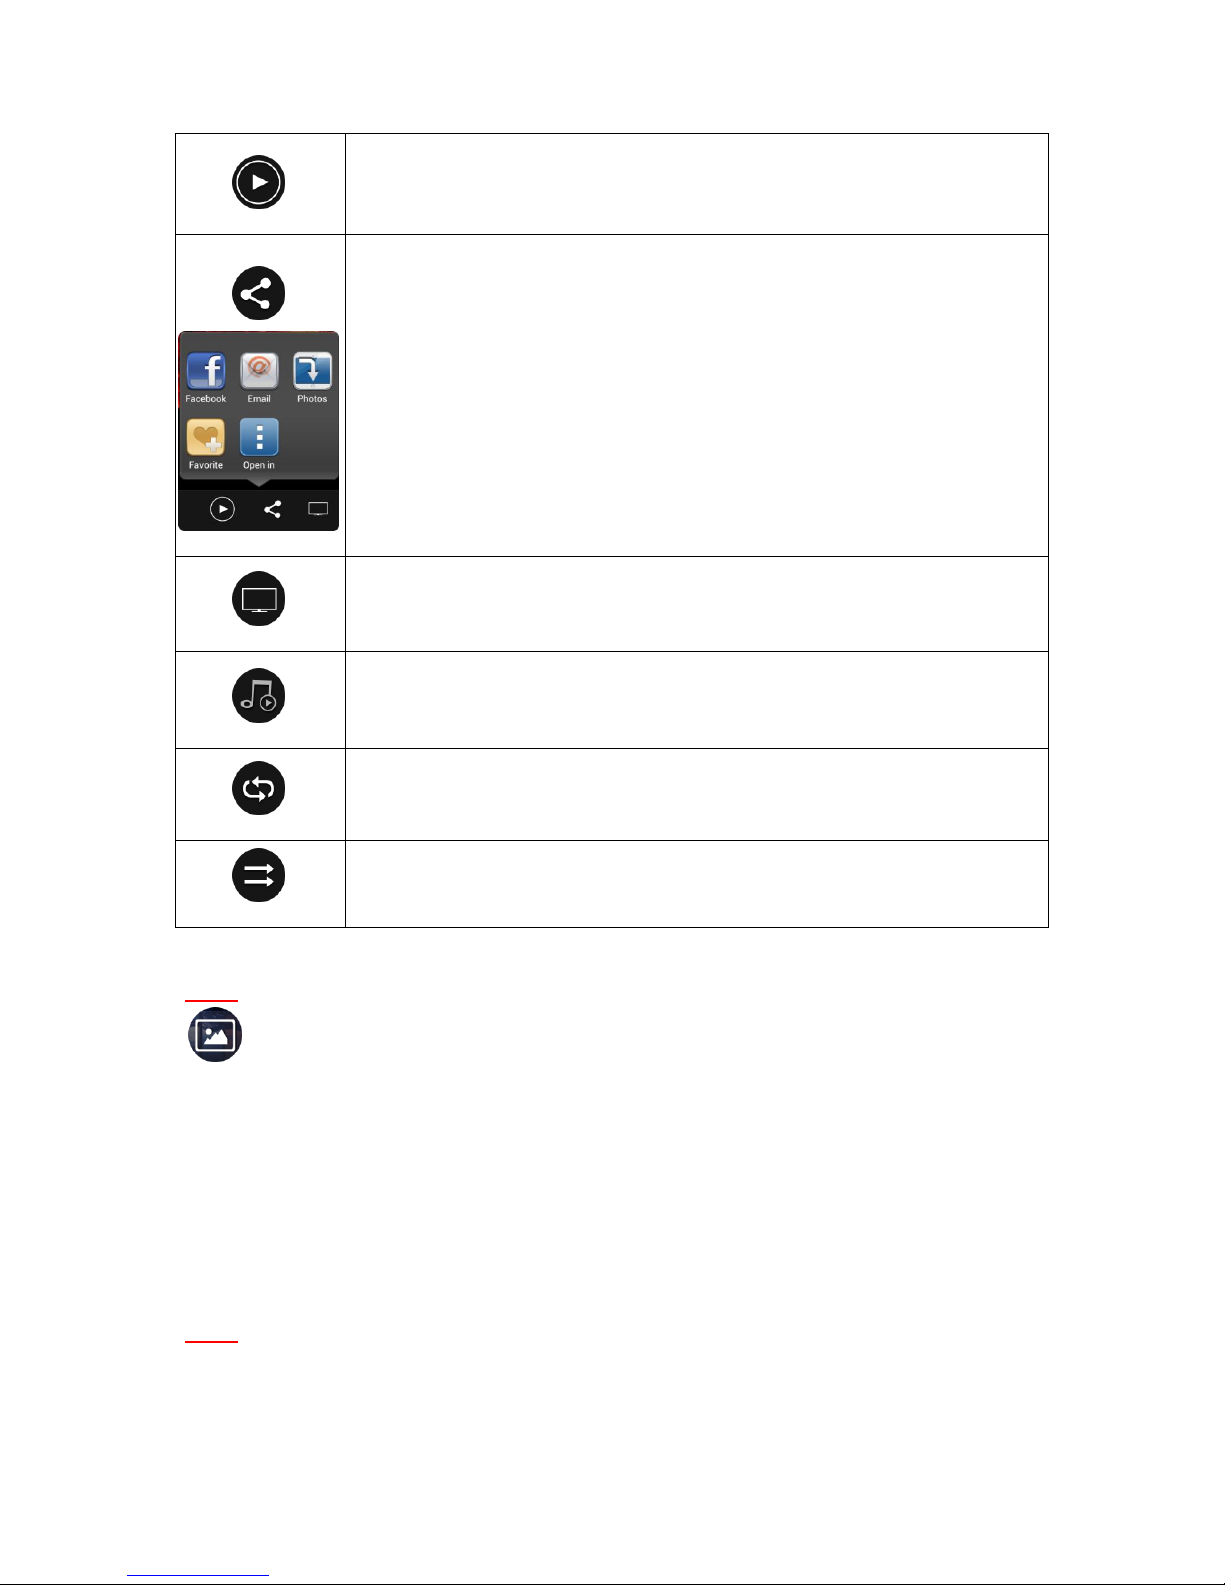
Play / Pause button
Forward button
Backward button
Repeat all songs
Note: Click on this icon to select the other functions below
Repeat current song
Shuffle mode
Play current playlist and then stop
Play current song and then stop
Share button:
Facebook: Share on Facebook
Email: Send by email
Favorite: Add to “My Favorites”
Open in: Open in selected application
Other songs in the file
Note: You can exit the Music Player Interface at any time and will continue to play the music or
audio file in the background.
You can even control play/pause on the homepage and slideshow pages via the “Music Play/Pause”
icon:
Page 11

11
On the homepage you can directly access the music player by clicking on the “Music” shortcut:
3.6. View pictures
To see a picture, you can go in the “Photos” gallery or in Explorer.
Compatible files: TIF, JPG, JPEG, GIF, PNG, BMP, ICO, TIFF.
The supported images can be viewed as thumbnails or as a list as seen on the screenshot below. Any
images that are not supported will be viewed as a generic thumbnail or icon.
You can swipe your finger across the screen to manually view the pictures or images or click the play
button, to automatically play the slideshow.
Page 12
12
Play/ Pause
Share
Facebook: Share on Facebook
Email: Send by email
Photos: Add the file in "opensave" folder on your iPhone/iPad. Path: "Emtec
Connect/opensave"
Open in: Open in selected application
UPNP/ Digital media sharing
Music control
Repeat mode
Play current slideshow and then stop
Note: On the homepage you can directly access the slideshow by clicking on the “Picture” shortcut:
Internet connection is required to share photos/images via email or to access any social media
networks.
3.7. View documents
To see a document, you can go in the “Documents” gallery or in Explorer.
Note: Compatible files: DOC, DOCX, TXT, XLS, XLSX, PPT, PPTX, PDF, HTML, HTM. The other
formats will be opened in a third party app available on your iPhone/iPad. You can download one on
the App Store.
Page 13

13
Just click and hold on the file you want to open and choose the application you desire to see the
document with.
3.8. Download/upload files
From the homepage, select "Explorer."
Select file location by clicking on “EmtecConnect" » (your Wi-Fi HDD) or "iPhone"/”iPad”.
Click on the icon “Tools”
Select the action you want to do.
Select file destination by clicking on “EmtecConnect" or "iPhone"/”iPad”.
Click on the action you want to do.
Unselect all
Deselect all files
Select all
Select all files in the folder
Create folder
Create a new folder
Copy
Copy selected files
Cut
Cut selected files
Paste
Paste selected files
Rename
Rename selected files or folder
Delete
Delete selected files or folder
Transfer Status:
Transfer status is available in the transfer tab.
Page 14

14
3.9. Share files
From the gallery
Open the file you want to share and click on the icon
Then choose the action:
Facebook: Share on Facebook
Email: Send by email
Photos: Add to “Photos” gallery on the Wi-fi HDD
Open in: Open in selected application
From the explorer
Select the file(s) you want to share and click on the icon.
Then choose the action:
Facebook: Share on Facebook
Email: Send by email
Photos: Add to “Photos” gallery on the Wi-fi HDD
Open in: Open in selected application
Note: The Explorer allows files multiselection.
Page 15

15
4. Settings
Access the settings of the Wi-Fi HDD by clicking on System icon on homepage.
Available settings depend on connection status.
When your iPhone/iPad is not connected or is connected in Guest mode to your Wi-Fi HDD, only a
few settings are available (Cache/ Language/ About)
Settings page when iPhone/iPad is connected
Settings page when no iPhone/iPad is
connected or is connected in Guest mode
4.1. Emtec Connect settings
Page 16

16
4.1.1. Wi-Fi settings
SSID:
Change the SSID name (device name) of your Wi-Fi HDD by clicking on SSID. Save your change before
exiting.
Page 17

17
Channel:
Change the number o channels on your Wi-Fi HDD. Save your change before exiting. Auto mode is
recommended.
Mode:
Change the Wi-Fi standard of your Wi-Fi HDD. Save your change before exiting.
Page 18

18
Security
Change the security mode and the password of the Wi-Fi connection of your Wi-Fi HDD. Save your
change before exiting.
4.1.2. LAN setting
Change the Internet-related settings.
Page 19

19
IP Adress:
Change the IP address. Save your change before exiting.
Subnet mask:
Change the subnet mask. Save your change before exiting.
Page 20

20
4.1.3. Internet settings/ Router function
You can access the Internet on your iPhone/iPad via the Wi-Fi HDD. It allows you to browse the
Internet and to stay connected to the Wi-Fi HDD at the same time. 2 options:
Wired access: via LAN cable (Ethernet port).
Wireless access: via Wi-Fi.
You can enable and disable the Internet access by clicking on the On/Off Intern Access button.
Note: When your Wi-Fi HDD is connected to the Internet, the “Internet connection” icon is green on
the homepage.
Wireless access:
Select “Wireless access” in Internet access mode and “Save”.
Then you can choose the Wi-Fi connection in the network list. Enter the Wi-Fi password if needed
(Password is requested for secured connection).
Page 21

21
Wired access:
- Connection:
Connect an Ethernet cable to the Ethernet port of your WiFi HDD.
Select “Wired access” in Internet access mode and “Save”. You are connected.
- Wired access settings (advanced mode):
Once you are connected with the “Wired access,” you can configure the network of the Wi-Fi HDD.
Network settings include DHCP and static IP. DHCP is automatically assigned IP by DHCP server on the
router (recommended). Static option may manually input the IP address, subnet mask, Router, DNS1,
DNS2 of the Wi-Fi HDD.
Page 22

22
4.1.4. System settings
User:
On top of the connection password to access your Wi-Fi HDD, you can define an “Admin” and a
“Guest” modes, with dedicate passwords for each. So your friends or coworkers can access your Wi-
Fi HDD with limited access to your settings and data (photos/ videos/ music/ documents) via Guest
mode.
Indeed in Guest mode, user can only access and modify “Cache,” “Language” and “About” info in
settings and files available in “Share” file.
To allow Guest mode, please click on the button ”Guest” in “Settings” section.
Page 23

23
Admin password setting:
Enter the password and confirm it. Then save.
Page 24

24
Guest password setting:
Click on the first line and select guest mode.
Enter the wanted password.
Confirm the password and save.
Now, your application access is also protected by a password.
When application is launched, choose admin mode or guest mode.
Enter password and click OK to access the application.
Page 25
25
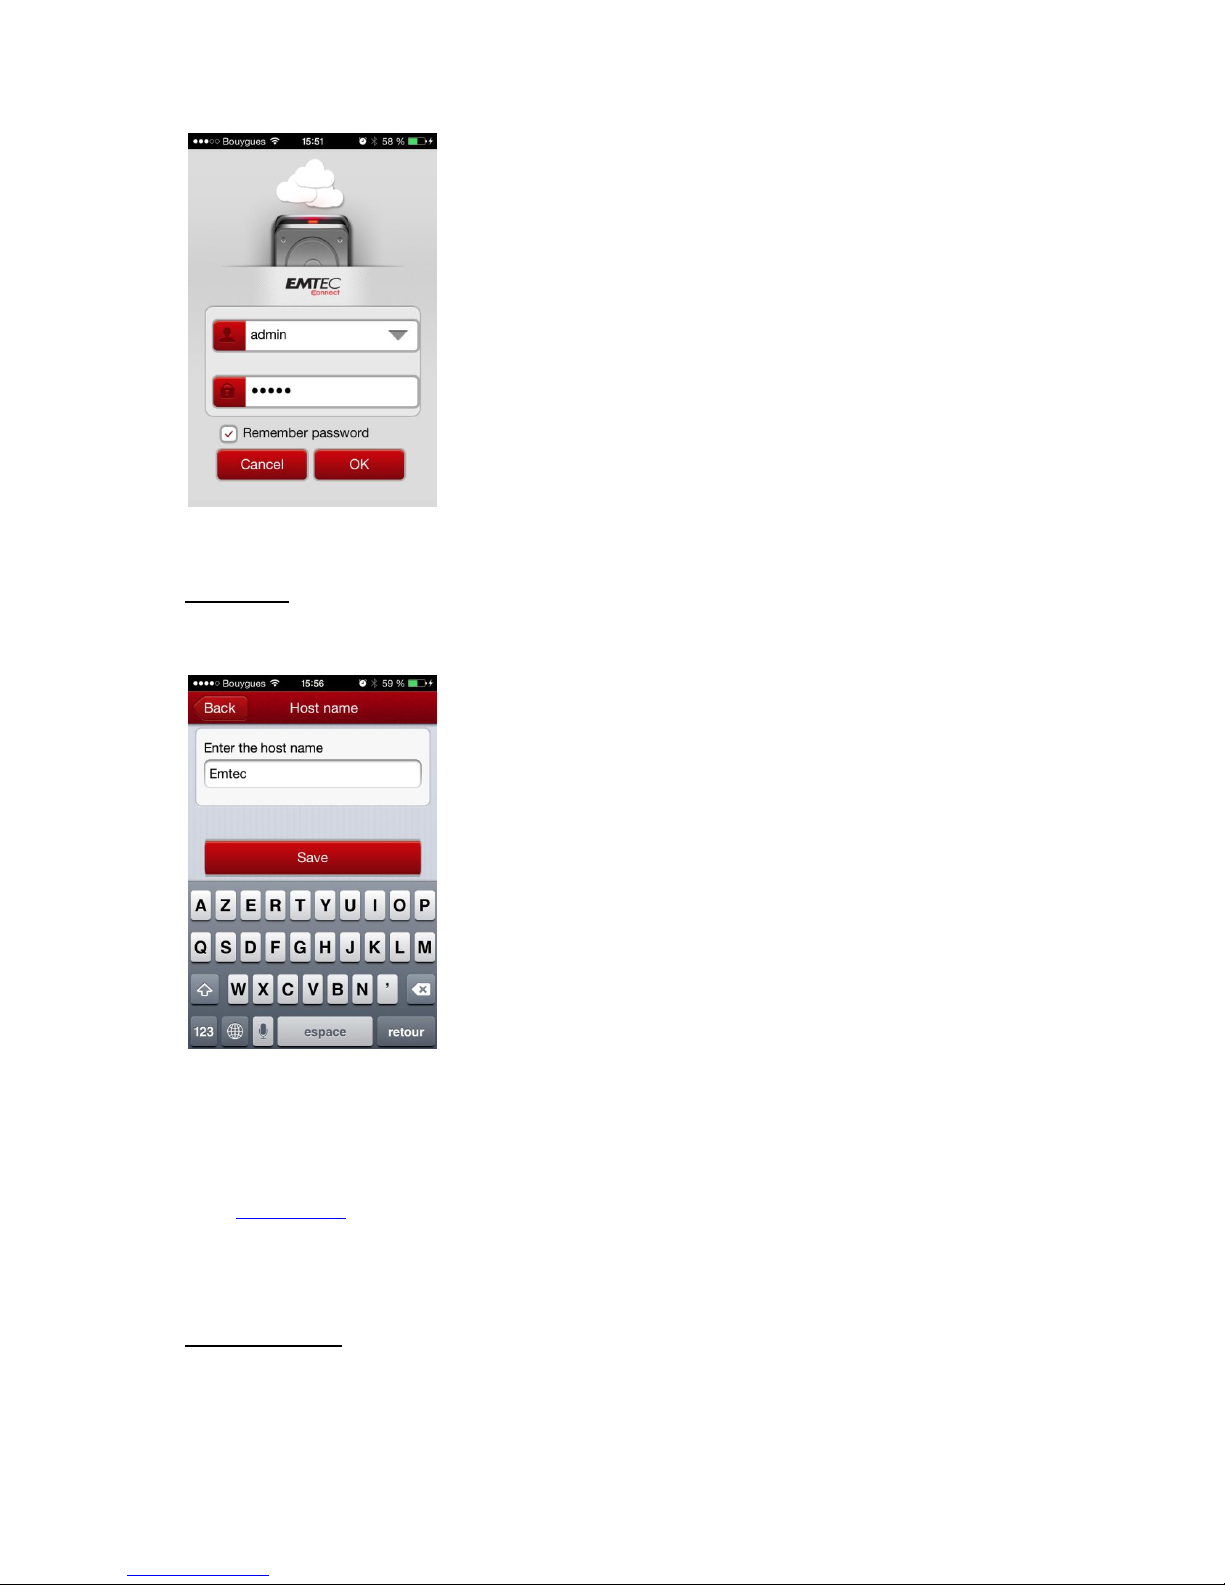
Host Name
You can change the host name of the Wi-Fi HDD.
Host name will be used to access your Wi-Fi HDD via web browser (host name or IP address can be
used to access your Wi-Fi HDD via web browser).
Choose the new name and save.
Enter http://emtec (or replace emtec by the new host name you save) in the address bar of your web
browser to access your Wi-Fi HDD via the web browser.
Disk information
Indicates available capacity on your Wi-Fi HDD.
Page 26

26
Online update
In order to see if a new version is available, connect your Wi-Fi HDD as a router (see section:
“Internet settings” to allow Internet access.
Click on “Online update”. The system will search to see if a new firmware version is available.
If there is a higher version than the system firmware version, the upgrade prompt box will pop-up.
Follow the indicated instructions to upgrade the firmware.
4.1.5. Cache
Set the cache size of the application on your iPhone/iPad.
To clear cache, click on the button “Clear Cache”.
4.1.6. Language
Choose your language among the list.
Page 27

27
4.1.7. About
Firmware and application versions are indicated in the “About” menu.
4.1.8. Log out
Click on “Log out” to log out of the application.
 Loading...