

Page 1

Page 2

Thank you for purchasing the C220 versatile digital audio player, that delivers a combination of
style, features and user friendliness. It is the best combination that you cannot find anywhere else - a
new experience of powerful, yet intuitive control over your multimedia collection.
Internal memory: max 1GB available
1.8" full color TFT display
Built-in speaker
Support MP3/ WMA playback
USB 2.0 full speed
ID3 tag supported
Photo viewing (JPG supported)
Video viewing ( conversion required )
Mass storage class
High quality voice recording with built-in microphone
Integrated FM radio with 20 station memory
FM frequency 87.5MHz – 108MHz in 0.1MHz / step
5 equalizers: Normal, Jazz, Rock, Classic, Pop
5 play modes: Normal, Repeat one, Repeat all, Random, Repeat random
Features and highlights
01
Page 3

REGULATORY INFORMATION:
For customers in USA or Canada
This device complies with part 15 of FCC rules. Operation is subject to the following two
conditions:
(1) This device may not cause harmful interference, and
(2) This device must accept any interference received, including interference that may cause
undesired operation.
FCC Notice:
This equipment has been tested and found to comply with the limits for a Class B digital device,
pursuant to part 15 of the FCC Rules. These limits are designed to provide reasonable protection
against harmful interference in a residential installation. This equipment generates, uses, and can
radiate radio frequency energy and, if not installed and used in accordance with the instructions,
may cause harmful interference to radio communications. However, there is no guarantee that
interference will not occur in a particular installation. If this equipment does cause harmful
interference to radio and television reception, which can be determined by turning the equipment
off and on, the user is encouraged to try to correct the interference by one or more of the
following measures:
- Reorient or relocate the receiving antenna.
- Increase the separation between the equipment and receiver.
- Connect the equipment into an outlet on a circuit different from that to which the receiver is
connected.
- Consult the dealer or an experienced radio/ TV technician for help.
If the product suddenly has no response or power off, it may be caused by electrostatic discharge.
If this circumstance, please follow the procedures below for recovery:
- Turn off the unit pressing and holding the Power key for a few seconds.
- Turn on the unit again in 15 seconds.
02
Declaration of Conformity
Trade Name: EMTEC
Model: C220
Page 4

For customers in Europe
This product conforms to the following European Directives: 89/336/EEC (EMC Directive)
This product complies with EN55022/A1: 2000 and EN 55024/A1: 2001 for use in the following
areas: residential, commercial and light industrial.
DISPOSAL OF YOUR OLD PRODUCT
Your product is designed and manufactured with high quality materials and components, which
can be recycled and reused.
When this crossed-out wheeled bin symbol is attached to a product it means the product
is covered by the European Directive 2002/96/EC.
Please inform yourself about the local separate collection system for electrical and electronic
products.
Please act according to your local rules and do not dispose of your old products with your
normal household waste. The correct disposal of your old product will help prevent potential
negative consequences for the environment and human health.
CUSTOMER SERVICE
If you have any question about this product, please send email to
WWW.EMTEC-international.com
03
Page 5

Liability exemption statement........................................................................................................06
Safety precaution.......................................................................................................................07-08
Locating the controls and keys.......................................................................................................09
Description of LCD display..........................................................................................................10
Contents in the packaging..............................................................................................................11
Battery charging............................................................................................................................12
Minimum PC system requirements...............................................................................................13
Connected to the computer...........................................................................................................14
File transfer...................................................................................................................................15
Disconnect the player from PC.....................................................................................................16
Format hard disk...........................................................................................................................
...17
Firmware upgrade..........................................................................................................................17
Basic operation..............................................................................................................................18
Power on/off..............................................................................................................................18
Key lock.....................................................................................................................................18
Adjust volume............................................................................................................................18
Speaker.......................................................................................................................................18
Navigate main menu.......................................................................................................................19
Music mode...............................................................................................................................20-22
Browse music...................................................................................................................
..........20
Play songs.................................................................................................................................20
Ajust volume during playback.......
............................................................................................21
Browse multimedia collection during playback.....
...................................................................21
Playlist on-the-go.......................................................................................................................21
Photos mode..................................................................................................................................23
04
CONTENTS
Page 6

Videos mode............................................................................................................................24-26
File conversion..........................................................................................................................24
Play videos................................................................................................................................26
Radio mode..............................................................................................................................26-27
Recordings mode...........................................................................................................................28
Settings Mode........................................................................................................................
..28-29
Nowplaying mode.........................................................................................................................29
Trouble shooting......................................................................................................................30-31
Technical specification.............................................................................................................
.....32
05
CONTENTS
Page 7

LIABILITY EXEMPTION STATEMENT
1. All the information included in this manual was produced with our great caution, but there
may still be some errors and mistakes. EMTEC will not be held responsible for those errors
and mistakes.
2. As we can’t control users’ understanding of this manual, EMTEC will not be held
responsible for any accident or other loss caused by misunderstanding of this manual. We
shall not be held responsible either for any loss caused by using this product or for any
claim by any third party.
3. EMTEC will be held responsible only for the inherent problem of the device itself, but
not for data loss, modification of the device or other indirect loss resulting from
mal-operation of software, maintenance or other accidents. EMTEC will not be held
responsible for restoration of any personal data lost.
4. EMTEC reserves the right to modify software, hardware and user manual of this device
without prior notice.
5. To make copies, publish, transfer, store in a traceable system, or translate to any other
language without written authorization from EMTEC is strictly prohibited.
06
Page 8

07
SAFETY PRECAUTION
Warning:
C220 is a precise device made of sensitive components like hard disc, TFT display and
rechargeable battery. There are some safety precautions and guidelines which must be followed
strictly.
Do not place heavy objects
on the device. Keep away
from harsh environments
including humid,dusty
and smoky areas.
Avoid contact with water
and other liquid.
Do not use water or
chemicals to clean the
device. Clean the surface
with a soft cloth.
Do not clean with chemical
or detergent.
Do not use excessive force
on the buttons.
Keep out of direct sunlight,
extreme heat or cold.
Keep the player away from
strong magnetic fields.
Do not disassemble or
modify the device yourself.
To avoid damage, make
sure you do not drop,
smash, bend or crash
the playe
r.
Page 9

08
Reduce volume while
walking especially at
pedestrian crosswalk.
Do not use headphone/
earphone at high volume.
Hearing experts advise that
do not listen to continuous,
loud and extended playback.
Reduce volume or stop
using the player if you
experience a ringing in
your ears.
Do not use headphone/
earphone while cycling,
driving, or operating any
motorized vehicle.
Do not use the device at
high volume for continuous
listening.
Keep headphone/ earphone
cords under control to avoid
getting caught on various
objects.
Do not dry the device
with heater or microwave.
When you upload or
download files using USB
cable, do not disconnect USB
cable during data transfer or
turn the device o
ff.
Data can be damaged
because of physical impact,
lightning and power failure.
0
°C
Make sure you only use
40
°C
the device where temperature
is between 0
°C
- 40 °C.
Page 10

REC
REC
LOCATING THE CONTROLS AND KEYS
09
M
M
C
MEN U
REC
VOL
MIC
MIC
1
3
4
5
6
7
8
11
12
13
10
9
2
1
3
4
5
6
7
8
11
12
13
10
9
2
Built-in microphone
USB 2.0 port and its cover
Earphone jack
Record key
1.8" TFT display
Hold key
Previous track / Rewind
/ Navigation key
Next track / Fast forward
/ Navigation key
Play / Pause / Enter /
Built-in Speaker
Volume
Volume
Menu key ( Jump to main
menu by holding the Menu
key ) / back / exit
M
Page 11

DESCRIPTION OF LCD DISPLAY
10
1
3
4
5
6
7
8
11
12
13
14
15
10
9
2
11
12
13
14
15
10
9
Volume indicator
Battery indicator
File format
Playmode indicator
Playback status
Total playback time
of current track
Playback progress bar
8
Hold icon
Mode indicator
Current track no. / Total track no.
Song name
Artist name
Album name
Elapsed playback time
of current track
Lisening with earphone icon
Lisening with built-in speaker icon
1
3
4
5
6
7
2
Page 12
11
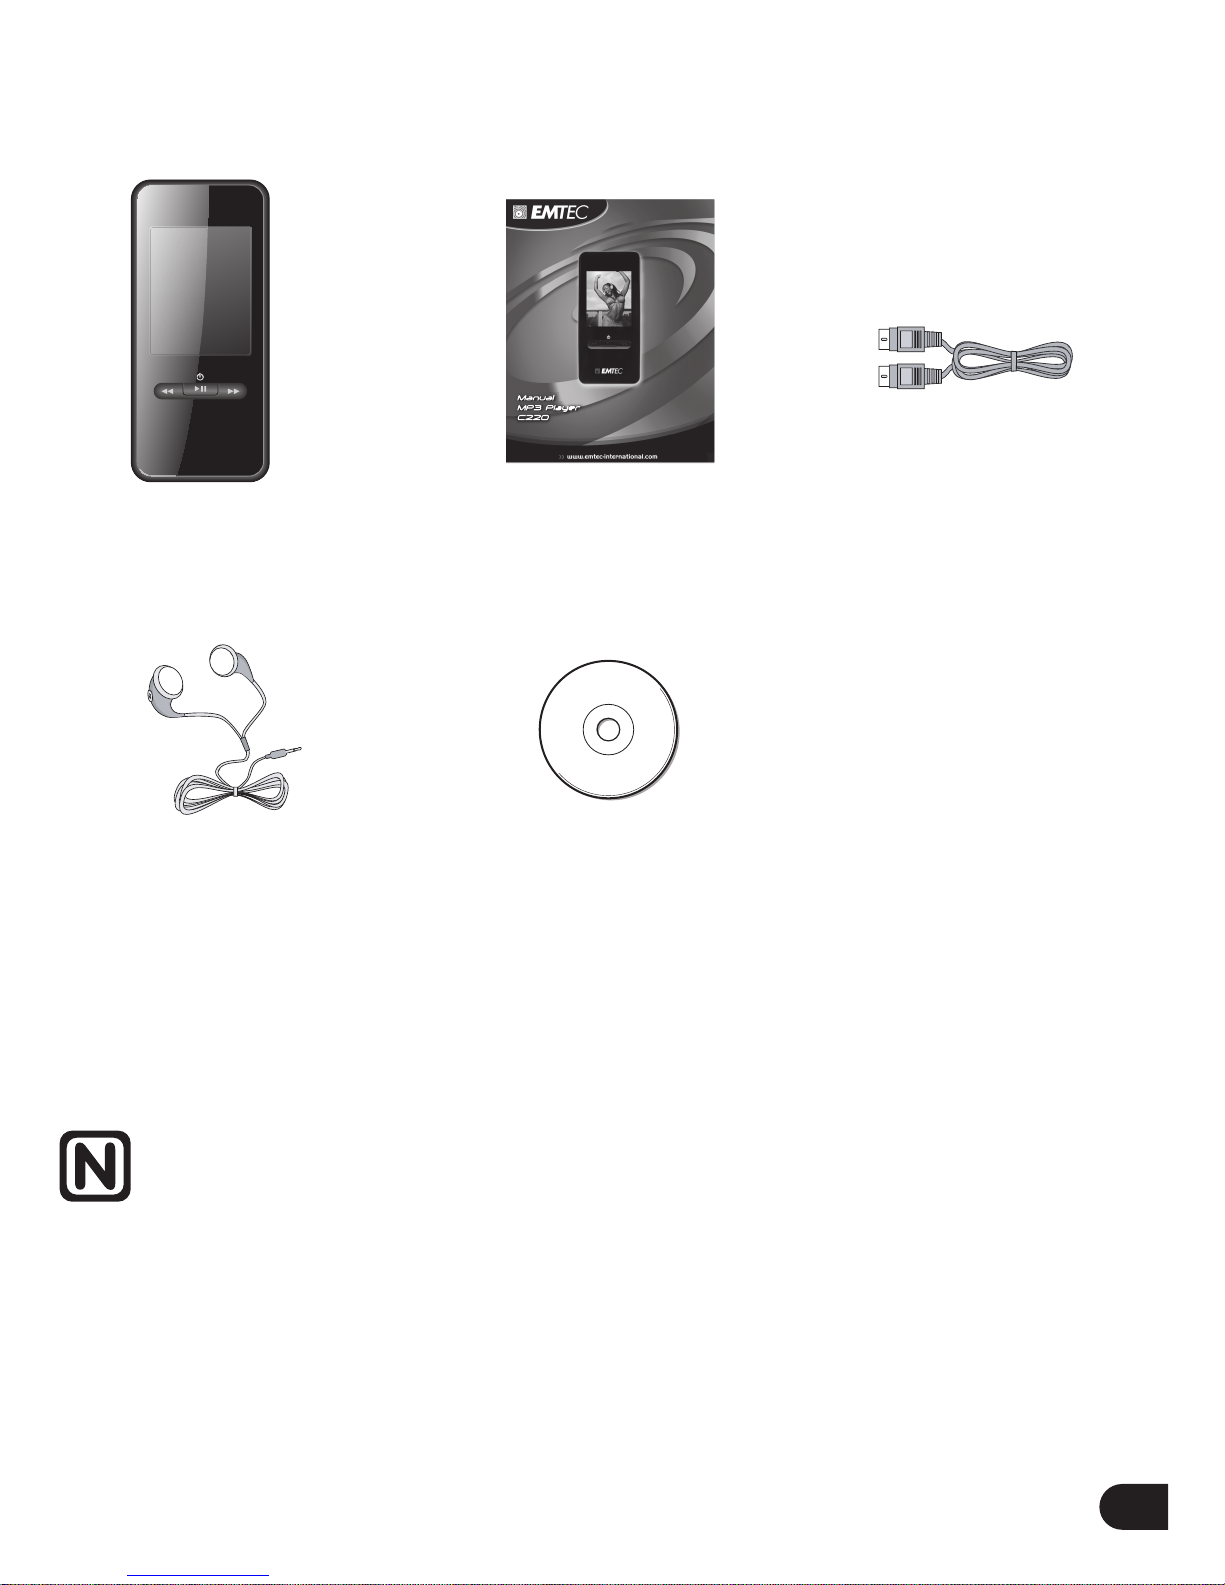
CONTENTS IN THE PACKAGING
User ManualMain Unit
Earphone
USB cable
(for PC connection
and battery cha
rging)
Note:
Please keep all the packing materials for future use in case the device needs transportation or
eventual repair.
CD
Page 13
12
BATTERY CHARGING
Charge the battery using the supplied USB2.0 cable. When connecting the player to PC via USB
cable and it will start charging automatically. And it will take about 4 hours to charge the player
fully.
Note:
1. For first time use, please charge the player for at least 4 hours.
2. If the device is connected to PC via a USB hub, the USB hub
must be self-powered in order to charge the battery properly.
3. Charging time may be prolonged due to file transfer.
Screen displays as below when charging:
Page 14

MINIMUM PC SYSTEM REQUIREMENT
You can connect the player to PC via the provided USB2.0 cable for the purposes of battery
charging, file transfer and firmware upgrade. Your PC system must meet the following
minimum requirement:
- Windows 2000 (Service pack 3 or above) with Windows Media Player 9 Series
- Or Windows XP (Service pack 2 or above) with Windows Media Player 10 Series
- Pentium Class MMX 166 MHz processor or better
- 96MB RAM
- 50MB hard drive space
- Internet connection
- Microsoft Internet Explorer 5.5 or later
- Video display card
- Sound card
- USB port 1.1 (for faster data transfer, USB 2.0 is highly recommended)
13
Page 15

14
CONNECTED TO THE COMPUTER
Connect C220 to PC
Connect the smaller end of the included USB cable to the USB 2.0 port on the device and the
bigger end to a free USB port on your computer as illustrated below:
Page 16

Windows will show "Found New Hardware" when the device is first attached. The device will
be recognized as a new device under “My Computer”.
Please note that depending on the hardware configuration, it may take several minutes for
Windows to recognize the device for the first time.
FILE TRANSFER
When the device is connected to PC for uploading/downloading, no special operation but only
simple "drag-drop" is needed.
1. Double click "My Computer" in Windows, you will find a new icon "
Removable Disk",
which represents the device.
2. Drag the desired files to "
Removable Disk".
15
Page 17

DISCONNECT THE PLAYER FROM PC
1. Double click the hardware icon on the task tray of your computer as the figure below:
16
2. Click the popup message as shown below, then a window will appear.
4. When the popup window "Safe To Remove Hardware" appears, click "ok" and disconnect the
USB cable from PC.
3. Select your player and click "ok" button in the new popup window to confirm the disconnection.
Page 18

Note:
1. You can also upload the files from C220 to your computer.
2. During uploading or downloading, keep the supplied USB cable connected to PC.
Unplug the USB cable from PC after file transfer is completed.
3. The device can store all types of files in addition to media files (music, photo, converted video).
4. Data files that are stored on the player cannot be browsed using the player's interface.
FORMAT HARD DISK
To format the harddisk, connect the device to PC, then right click the drive and select "Format"
under FAT 32.
Note:
Please refer to the instructions on our website for detail.
17
Page 19

REC
VOL
BASIC OPERATION
Power on / off
Press and hold the key for a few seconds to turn on/off the device.
Key lock
When the slide key "Hold" is in UP position, all keys except the key will be disabled
and there will be "lock" icon ( ) at the upper left corner of display. With this function,
unintended operations shall be prevented.
Adjust volume
Press Vol. + /- key to adjust the volume.
Speaker
The speaker on the device will work automatically when there is no earphone inserted.
18
RE C
RE C
Hold key
Slide the “hold” key upward
Vol+
Vol+/-
Vol-
Speaker
Page 20
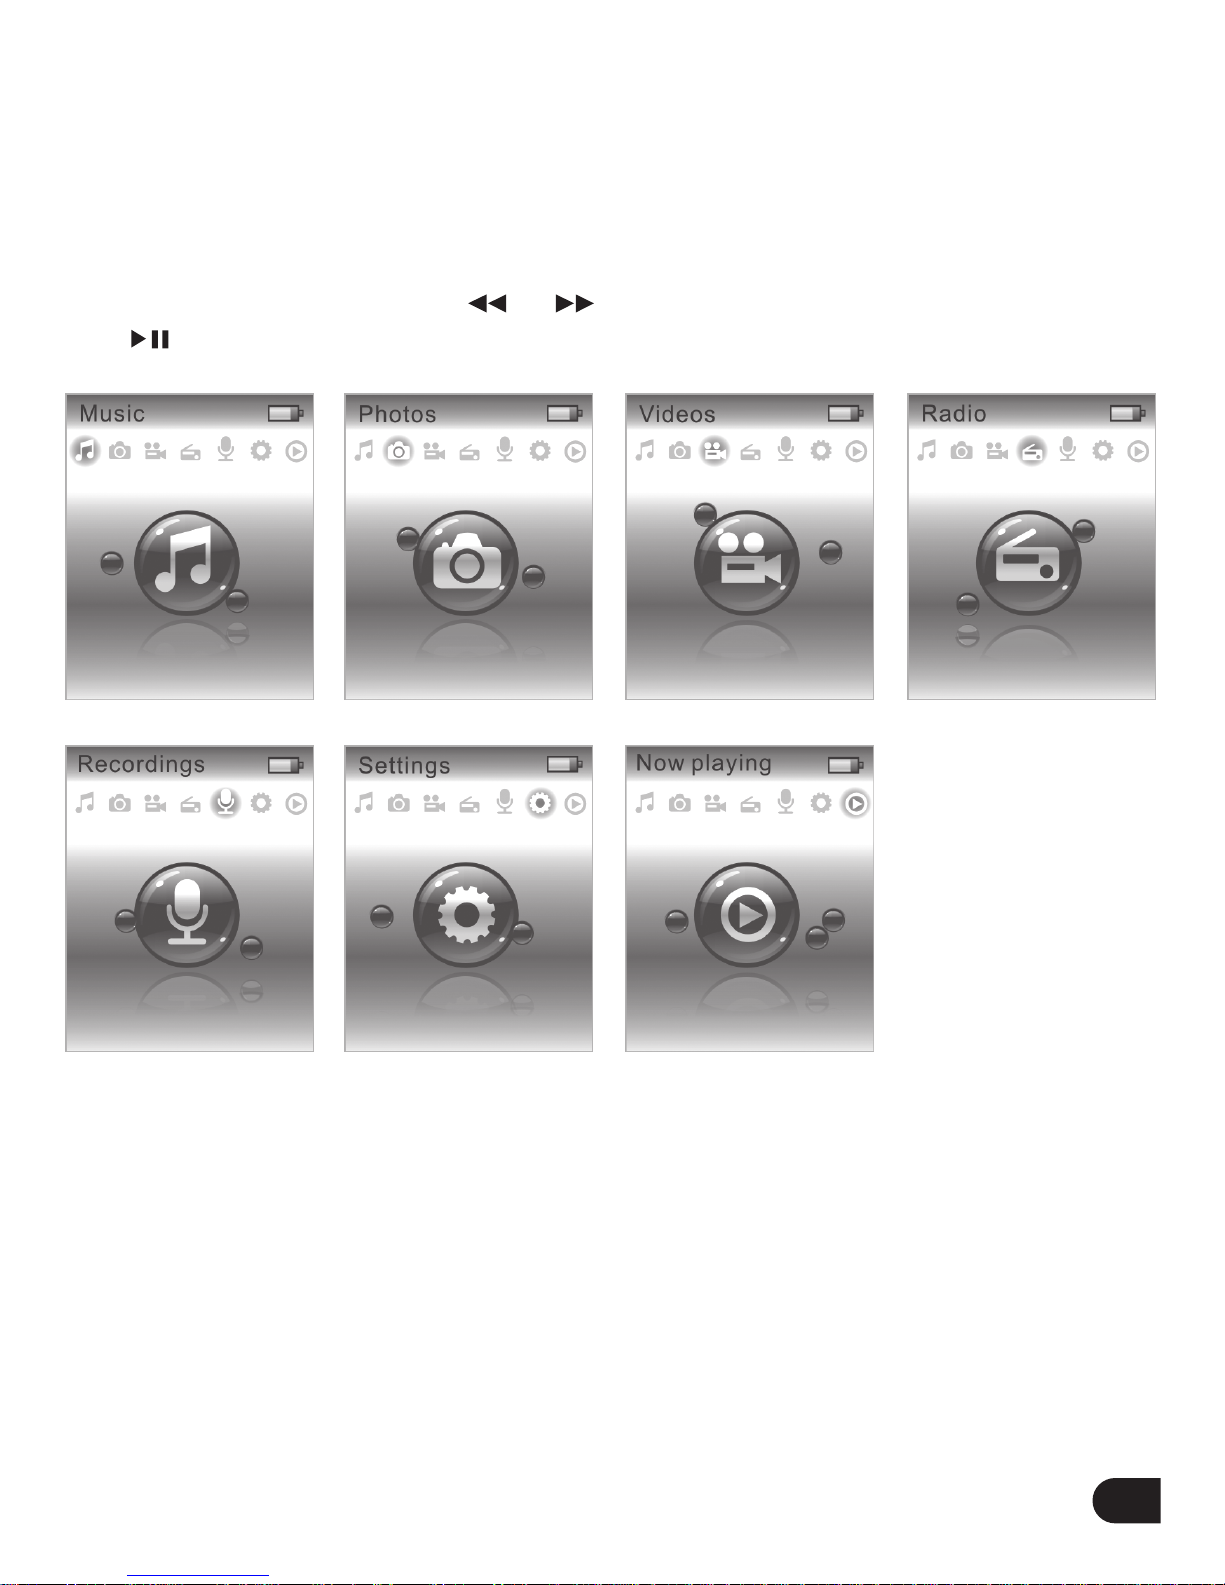
NAVIGATE MAIN MENU
Main menu contains Music mode, Photos mode, Videos mode, Radio mode, Recordings, Settings
and Now playing mode (visible only when music is being played right now). You can always
press and hold key to go back to main menu regardless of the operation mode in which you
are now.
When you are in main menu, press or key to select different modes (highlighted), then
press key to enter as illustrated below.
19
M
Available only when a
song is being played.
Page 21

MUSIC MODE
Browse music
Tracks grouped by different categories, including Play all, Artists, Albums, All songs, Genres and
Playlists can be browsed level by level. The last level is the song level.
Here is the key operation as below:
Play songs
When the desired song is select, press key to start playback. In playback mode, press
key to pause and resume the playback when pressing it again. During playing, press " " to
start playing the next track. Within 5 seconds after start of a track, press " " to start playing
the previous track; after 5 seconds from the start of a track, press " " to go to the start of the
track. Press and hold or key for a few seconds to fast rewind or fast forward.
20
Key Operation
Go to the next page or Start playback / Play the whole categories
Move upward
Move downward
Go to previous page ( press briefly ) /
Go to main menu ( press and hold for a few seconds )
M
Tips:
You can always go back to main menu pressing and holding key for a few seconds.
M
Page 22

MUSIC MODE
Adjust volume during playback
Press Vol. + /- key to adjust the volume; volume adjust bar will popup as illustrated below and
it will disappear after 1.5 seconds for no further input.
Browse multimedia collection during playback
If you’d like to select any other mode (Photos mode, Video
s mode etc.) during playback, press
key to go back to previous page. Press and hold the key for a few seconds to go back to
main menu and select the desired mode.
Playlist on-the-go
Add songs to “Playlist on-the-go”
When on the playback screen, you can press “REC” key to add the song being played to
“playlist on-the-go”.
Note:
when selecting the option “Play all” in Music mode, this feature is not available.
21
M
M
Page 23

MUSIC MODE
Play “Playlist on-the-go”
Select the option “Playlists” in Music mode using the or key and press key to enter.
Then, select the option “ Playlist on-the-go” and press to enter. Now you can see all the
music files added to “Playlist on-the-go”. Select the desired music file and press key to start
playback.
Delete “Playlist on-the-go”
Select the option “Playlists” in Music mode using the or key and press key to enter.
Then, select the option “Clear playlist on-the-go” and press to enter. And now there are two
options “Cancel” and “Delete” on the screen. Select “Delete” and press key to clear
“Playlist on-the-go”. Select “Cancel” and press key to exit.
22
Page 24

PHOTOS MODE
Highlight the desired photo in Photos mode, press key to display it. Press or key to
display the previous or next photo.
You can enjoy photos in two modes: browse in thumbnail / full size and slideshow.
View the photo
To view a photo, the default viewing angle of the unit is shown as below:
You can rotate the photo by pressing key.
23
RE C
Page 25
VIDEO MODE
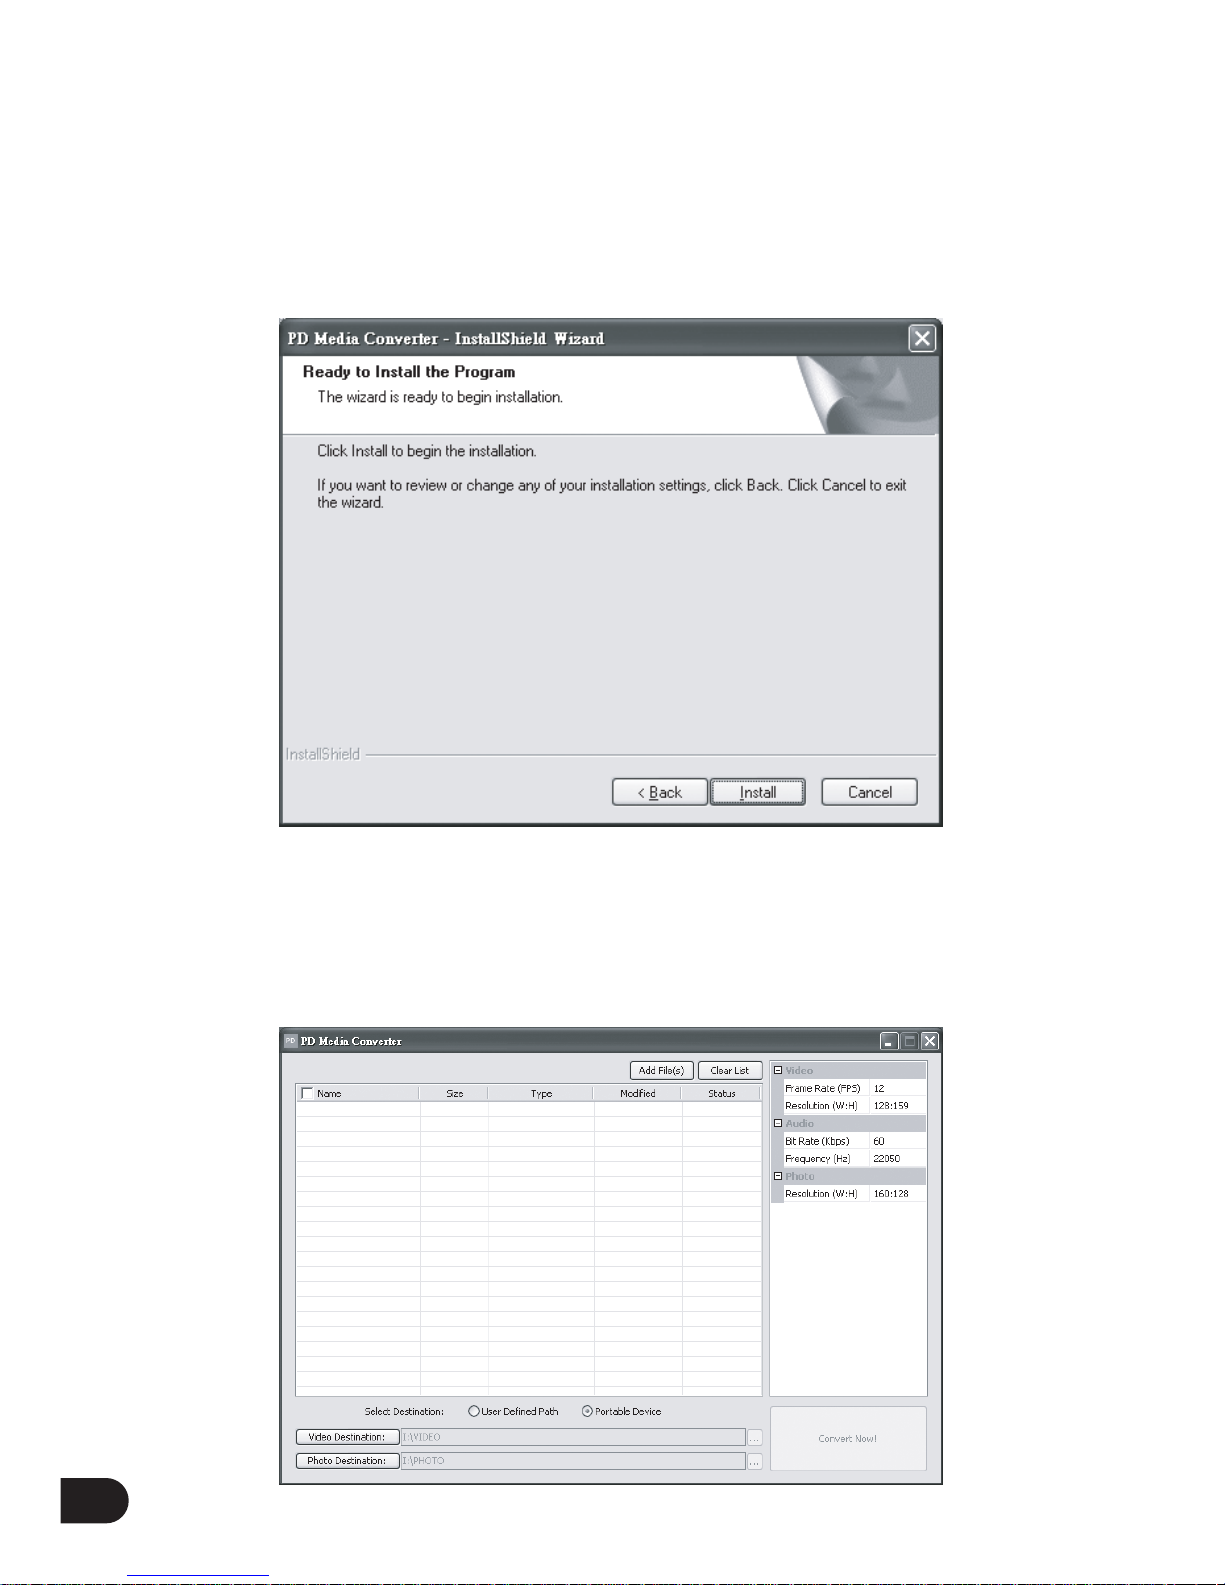
File conversion
To play a video clip or view an image in the player, you have to install the conversion software
and convert the files before file transfered to the player.
1) Please insert the included CD and install the conversion software.
2) Follow the instruction and complete the installation
After the installation is completed, you can start converting the files.
1) Connect your device to PC and run the software. Following screen will be shown.
24
Page 26

VIDEO MODE
2) The best configuration (on the right panel) is set according to your device connected.
3) Click “Add Files” and choose the file you want to convert.
4) The converted files can be stored to
- Portable device (default), or
- User Defined Path
5) If “User Defined Path” is chosen, you can select the video and photo destination.
6) Click “Convert Now!” to start the conversion.
7) After conversion is completed, converted files will be stored to your device or defined
destination.
25
Note:
Actual interface of the software will subject to the changes on software version.
Page 27

Play videos
Highlight the desired video in Videos mode, press key to start playback.
Press key to pause and press it once again to resume normal playback. Press and hold or
key for a few seconds to fast backward and fast forward. Press and hold key for a few
seconds to go back to main menu or press it briefly to go back to the previous page.
RADIO MODE
Note:
In Radio mode, an earphone must be inserted into the device as it serves as radio antenna.
In main menu, select and highlight the Radio mode using or key and press key to
enter. Three options will be available on the screen, i.e. Presets, Manual tune and Auto tune.
Presets
Select and enter the option Presets, you can find all the radio stations saved in the device. Select
one station you like using or key and press key to listen. When you are listening
to one preset station, press or to go to previous or next preset station.
(note: up to 20 stations can be saved in the device)
26
M
Page 28
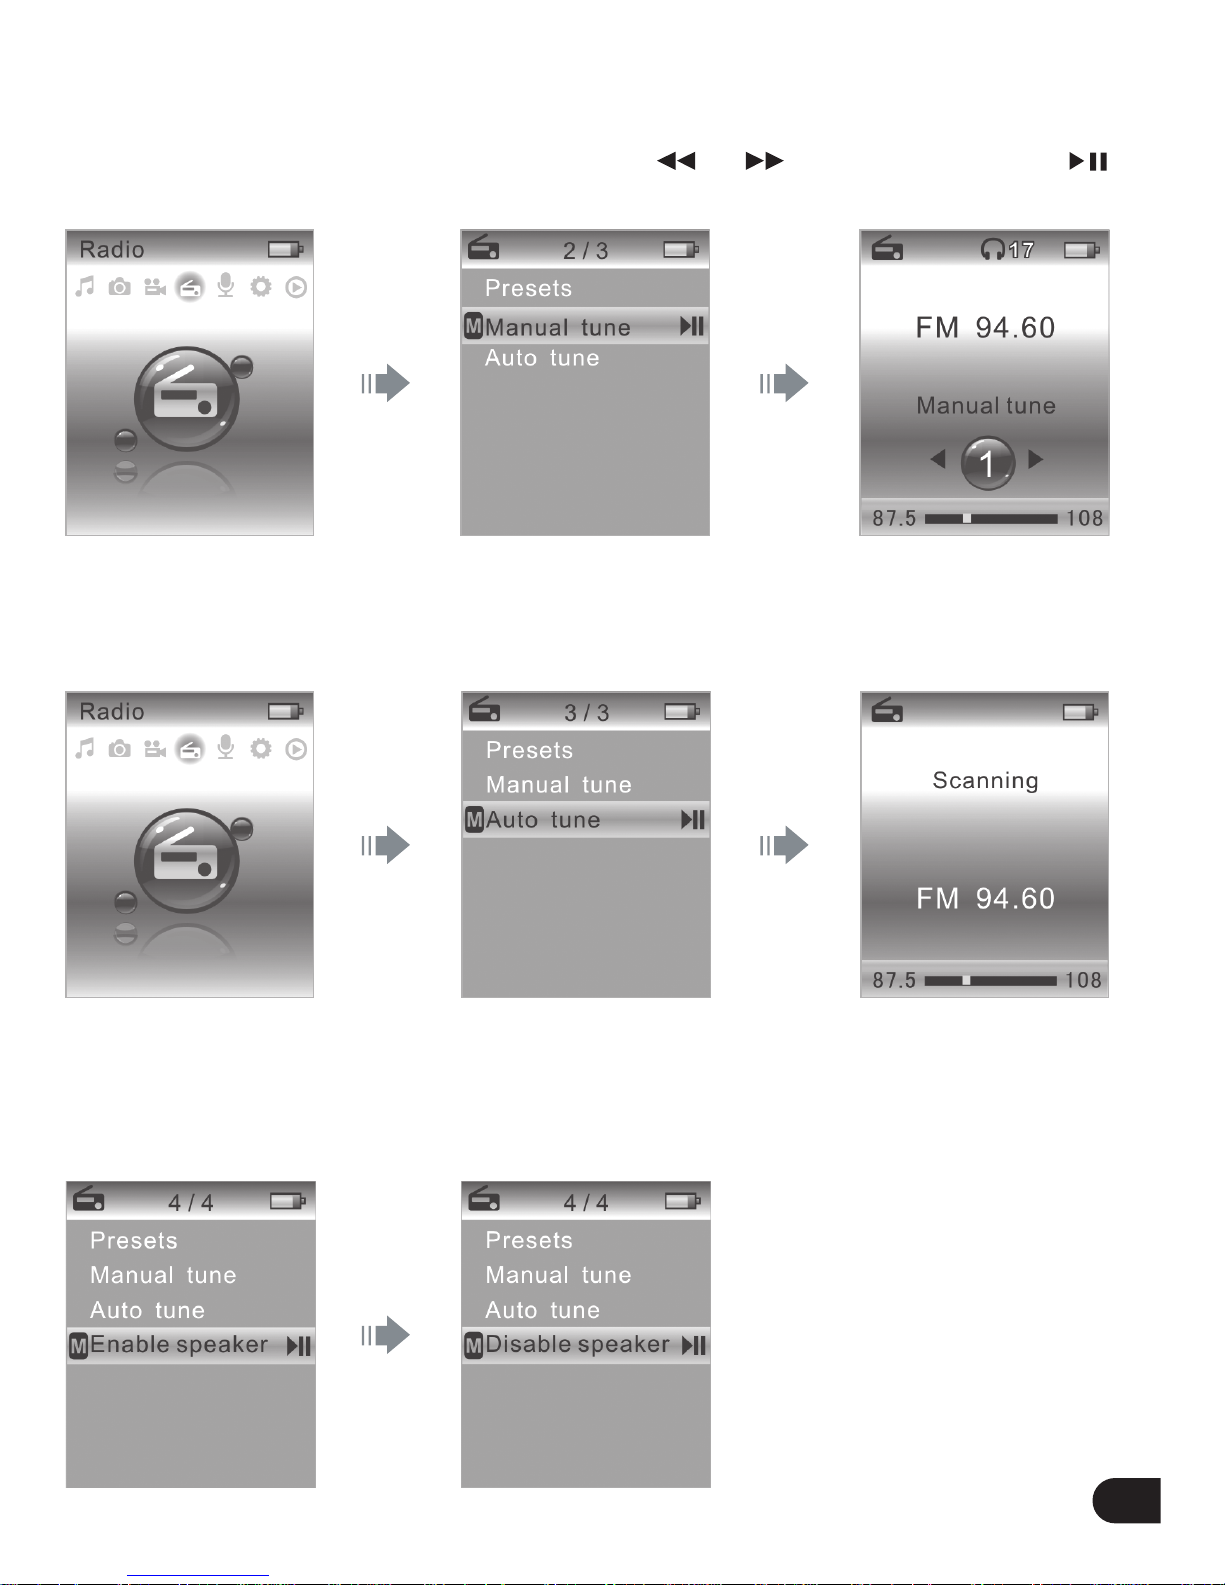
Manual tune
Select and enter the option Manual tune, you can search for a radio station manually
(FM frequency range: 87.5MHz ~ 108MHz). Press or key to search and press
key to save in the device.
Auto tune
Select and enter the option Auto tune, you can scan all the radio stations and save them in the
device automatically.
Speaker
When listening to the radio, press key to find the following screens in order to enable or
disable the built-in speaker as you wish. (note: in Radio mode, an earphone must be inserted
into the device as it serves as radio antenna.)
27
M
Page 29

RECORDINGS MODE
In main menu, select and highlight the Recordings mode using or key and press key
to enter. Then, two options will be available on the screen, i.e. Start voice recording and
Recordings library.
Select and enter the option “Start voice recording”, you can start voice recording. Press key
to pause and press it again to continue the recording. Press key to save the recording.
You can also press and hold the key for a few seconds to start voice recording directly
regardless of the operation mode in which you are.
Select and enter the option “Recordings library”, you can play all the recordings saved in the device.
SETTINGS MODE
In main menu, select and highlight the Settings mode using or key and press key to
enter. You can set it as illustrated below:
28
M
RE C
Page 30

SETTINGS MODE
There are seven settings available in the device as illustrated below in the table.
When making the settings, press or key to navigate and located the desired options,
press key to go back to the previous page and press key to enter and confirm.
NOW PLAYING MODE
Now playing mode provides a short cut to the music file being played now.
29
Play mode
Equalizer
Slideshow settings
Language
Backlight
Factory settings
Information
Adjust the play mode. Options: Off, Repeat 1, Repeat all,
Shuffle all and Repeat & Shuffle.
Adjust the EQ mode. Options: Off, Rock, Jazz, Classic and Pop
Adjust the interval of slideshow. Options: 3 sec, 5 sec and 10 sec.
Select the OSD menu language. Options: English, German, Dutch,
French, Spanish, Portuguese, Portuguese (for Brazil), Italian,
Swedish, Russian, Polish.
Adjust the backlight of the LCD display. Options: Always on,
10 seconds, 30 seconds and 60 seconds.
To restore the factory settings
To check the information of the device,
including Capacity, Free space and Firmware version.
Settings Control
M
Page 31

TROUBLE SHOOTING
30
The player cannot power on.
The player cannot be charged
automatically when connected to PC.
No sound during playback.
Keys don't work.
WMP or PC does not
recognize the player.
There is noise during playback.
The music file cannot be played.
Characters are corrupted.
- The battery level is too low. Connect to PC for charging.
- Disconnect the player from PC.
Then connect it again to PC for charging.
- Check whether the volume is too low.
- Ensure to plug the earphone firmly.
- Check whether the HOLD key is ON. Move the slide
switch to OFF position (downward) and try again.
- Restart the device.
- Ensure that you have Windows XP and Windows Service
Pack 2 installed on your computer before proceeding.
- Windows Media Player 10 is recommended.
You can download Windows Media Player 10 at
www.windowsmedia.com.
- Check whether the USB cable is attached firmly.
- Check if your PC meets the minimum requirement.
- Try to use any other USB port
- Check if the earphone plug is inserted firmly.
- Check if the earphone plug is dirty.
- The songs may be corrupted, please download
other songs and try again.
- The file may not be compatible with our player.
Please check the supported formats in the section
“Technical Specification”.
- Check if it is a copyright protected file, if so, the transfer
should be downloaded by Windows Media Player and
check if the usage of the copyright protected file is expired.
- Make sure to select the correct language.
Try to download some songs and go through
auto music library building process.
Symptom Possible solution
Page 32
TROUBLE SHOOTING
31
The video file cannot be played.
File can't be seen in PC.
Some files are missing
in the player database.
Cannot transfer song to player.
- Make sure that the video file can be played in Windows
Media Player. Use the same PC to convert the video file.
- Make sure that the clip contains video and audio content.
The player does not support any video file without audio
channel.
- Make sure the clip is converted successfully through
the conversion software.
- Exceed maximum file limit
- Some file types are not supported
(supported types: MP3, JPG, WAV and WMA)
- Exceed maximum file limit
- Capacity of the device is full
Symptom Possible solution
Page 33
TECHNICAL SPECIFICATION
Note:
The above specifications are subject to change without prior notice.
32
Size
Net weight
Display
Frequency range
Audio format supported
Video format supported
Power Supply
Battery life per full charge
Charging mode
Signal to noise ratio
THD
Channel isolation ratio
Audio output power
Operation Temperature
Storage Temperature
40 x 87.5 x 8.5 mm (W x H x D)
46g
1.8" 128 x 160dots full color TFT display
60Hz ~ 20KHz
mp3, wma
smv
320mAh lithium polymer rechargeable battery
12 hours of audio playtime,
4 hours of audio + video playtime
Via USB port
> 85dB
<0.1%
>40dB
2 x 5mW @32 Ohm
0°C ~ 40°C (Non-condensing)
-10°C~50 °C (Non-condensing)
Item Specification
 Loading...