

Page 1

EMTAC S3 BTGPS
TM
GPS Receiver
User Guide
Notice
We suggest that you carefully review the User Guide prior to using your GPS
receiver. The S3 BTGPS receiv er is a highly sensitive piece of electrical equipment
that can be easily damaged through misuse. In order to help you fulfill any
warranty obligations, read the User Guide in its entirety.
Page 2
2
Congratulations on your purchase of the S3 BTGPS!
The S3 is an excellent navigation and positioning aid when used with a Bluetooth
enabled host device and GPS application software. Your package should contain: S3
BTGPS Receiver, charger, leather case, and a product CD containing this manual
and the Crux-View test software.
Utilizing the User Guide
This User Guide is an important part of the S3 BTGPS. Reading the User Guide will
help you get the best performance from your receiver. In addition to helpful
operating information, the User Guide brings attention to potential safety concerns
and warranty obligations regarding the receiver. The S3 BTGPS Receiver is a highly
sensitive piece of electrical equipment that can be easily damaged through misuse.
The warranty will not cover failure if the product is abused, misused or used for
other than the intended purpose. Read all the information carefully to avoid
damage to the GPS receiver.
Page 3

3
Table of Contents
What You Need to Get Started 4
Parts of the S3 & What They Do 5
Power Switch 6
LED indicators 6
Antennae façade 7
External antenna port 7
Power jack 8
Battery 8
Charger 9
Accessories 10
Getting Started 11
Basic Use Guidelines 13
Frequently Asked Questions 14
Care & Maintenance 15
How GPS Works 17
Warranty 18
Disclaimers & Liability 20
Warnings 21
Glossary 24
Page 4

4
What You Need to Get Started
1. A Host Device
A Bluetooth enabled host device (i.e. PDA, smartphone, laptop, etc.) is needed
to receive GPS input data. Each host device receives GPS input differently.
Consult the instructions of your particular host device on how to enable your
device to receive GPS input.
2. GPS or Mapping Software
Before you begin using your S3 BTGPS Receiver you must complete the
application software installation tasks on your host device. Different software
programs configure the GPS input differently. Consult your software’s user
manual to configure the software to accept GPS input.
If you do not have mapping software, in this User Guide CD-ROM, there is the
“Crux-View Test Program” (trial version) for testing purpose. Please follow the
step-by-step operation guide indicated and described in the Crux-View (Trial)
Manual file (in .pdf format). This will give you the basic GPS information
needed to proceed.
Note: The Crux-View Test Program is helpful to have installed if you need
additional technical support.
Note:
(a) The Crux-View Test Program is a trial version program and is available only
for testing purposes.
(b) The Crux-View program is only to be used with EMTAC BTGPS units.
(c) The Current version of Crux-View supports ARM (StrongARM/X Scale) based
PPC.
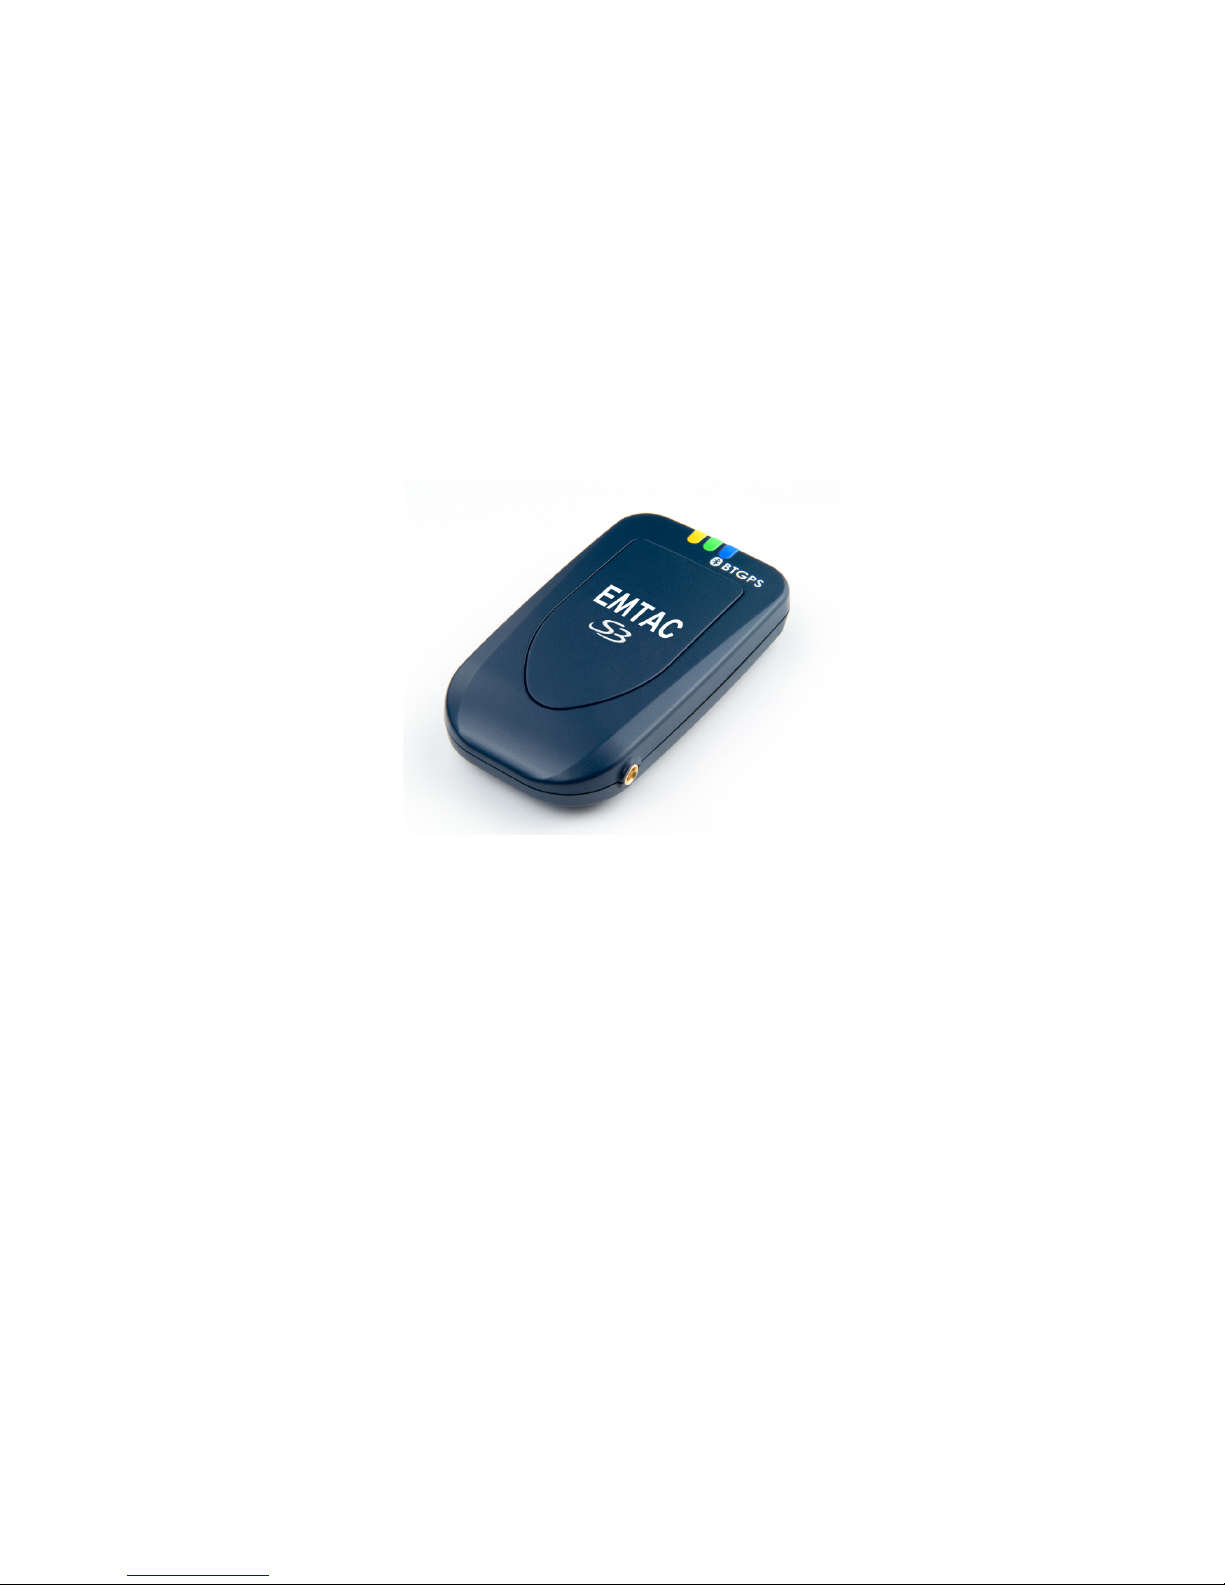
3. S3 BTGPS Receiver
The S3 needs to be fully charged prior to using it for the first time.
CAUTION: Use only an EMTAC branded charger with the S3 to charge
the receiver. Use of other chargers can result in failure of the unit
and/or its internal Lithium-ion battery.
Page 5
5
Parts of the S3 BTGPS Receiver
& What They Do
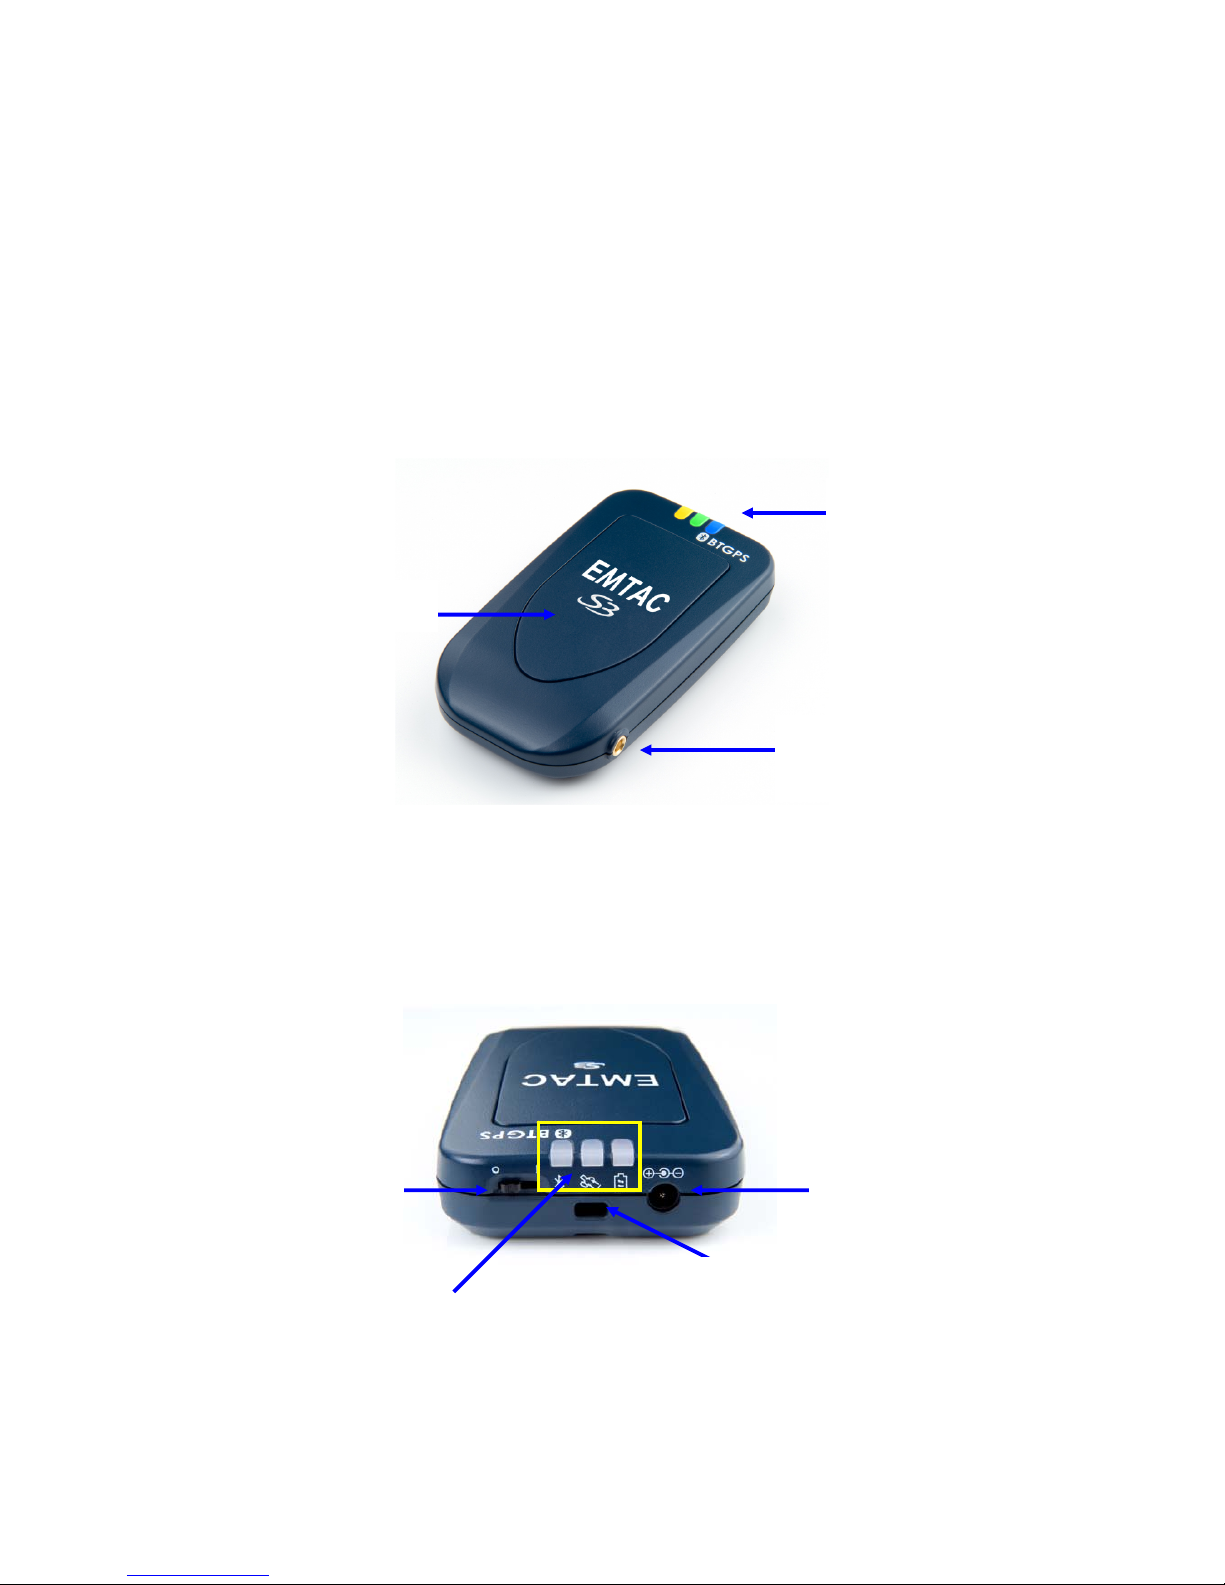
S3 BTGPS at a Glance
LED Indicators
Power Jack
Antenna Facade
LED Indicators
External Antenna
Port
Power Switch
Lanyard attachment
Page 6
6
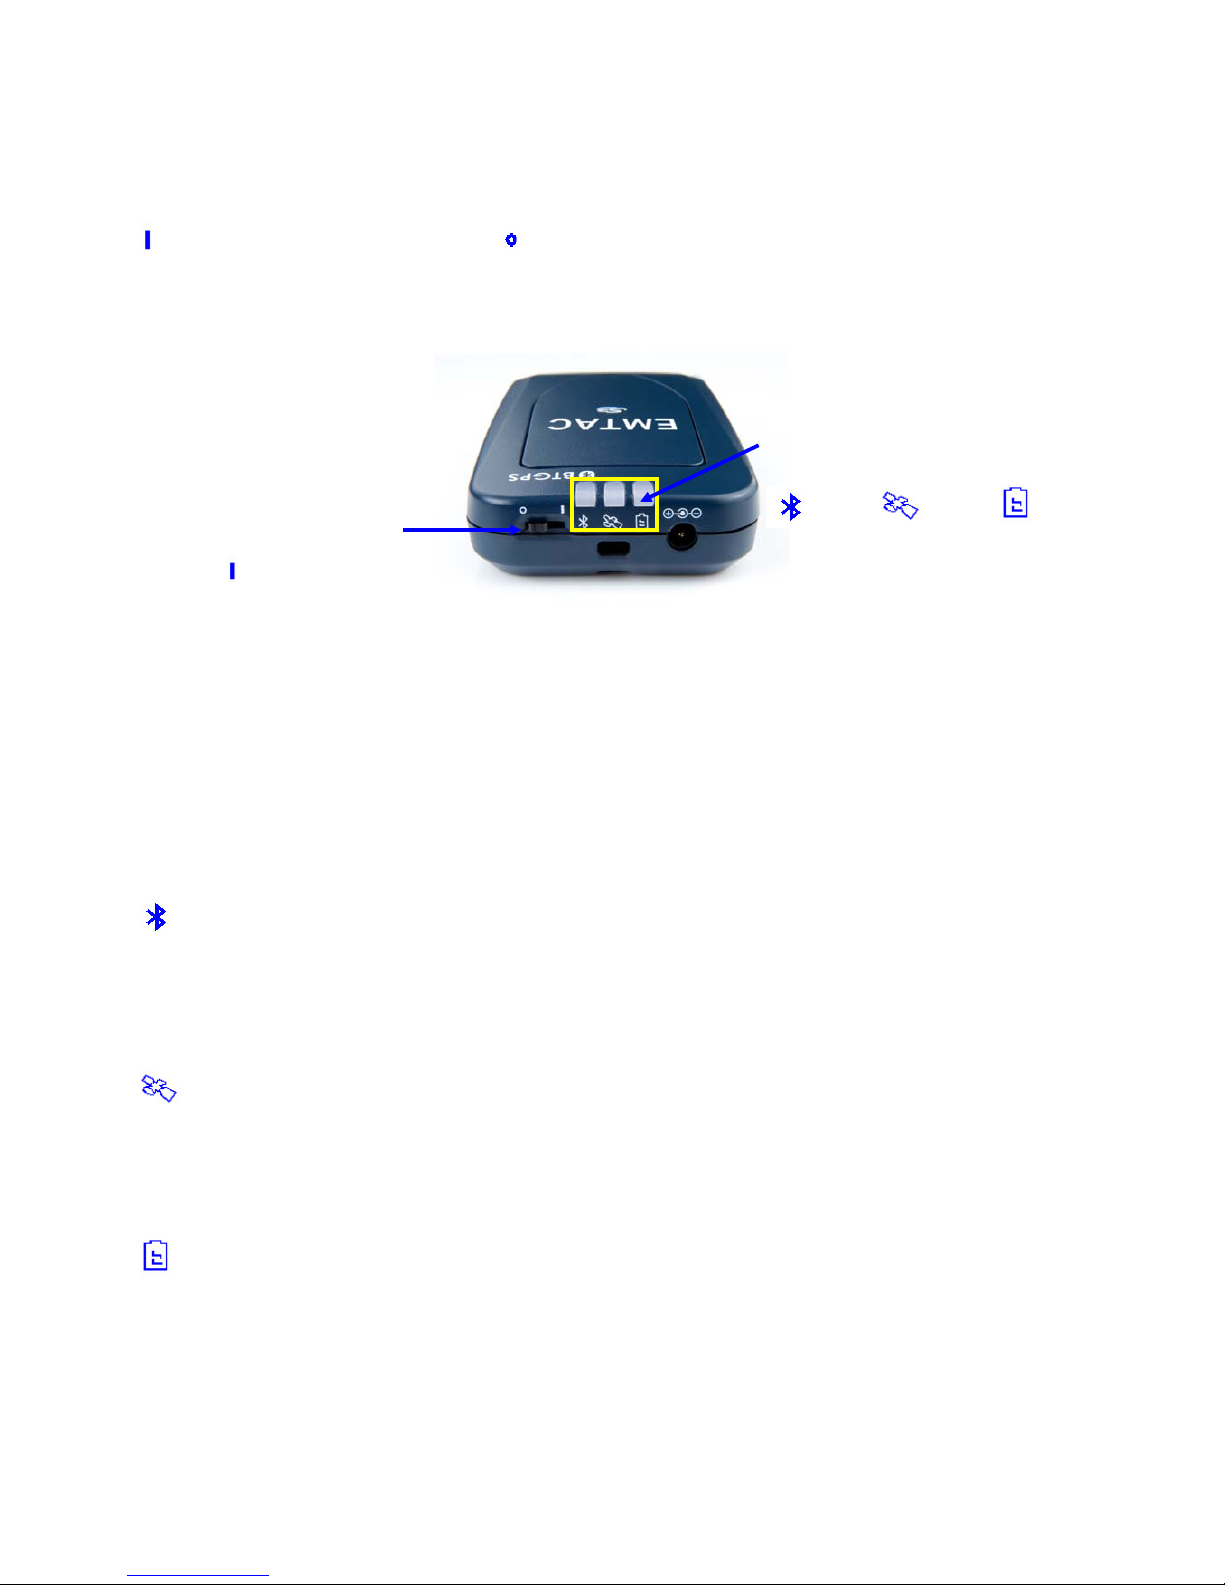
Power Switch
Slide the switch sideways to turn power on and off.
represents power ON represents power OFF
LED Indicators
The three LED lights indicate the operational status of Bluetooth, GPS, and battery.
Symbol: Blue LED Light indicates Bluetooth pair/connect status
Flashing every 1 second: S3 powered-on and waiting to pair/connect.
Flashing every 2 seconds: S3 is connected and paired with the host.
Symbol: Green LED Light indicates GPS status
Constant on: S3 is powered on, attempting a location fix.
Flashing: S3 has a location fix.
Symbol: Orange /Red LED Light indicates Battery status
Red light constant on: Battery low.
Orange light constant on: Battery under charging.
No light (light off): Battery fully charged
Switch to power-on
position:
“
”
Status LED Indicators:
Blue Green Orange/Red
Page 7
7
Antenna Façade
Your S3 is integrated with a highly sensitive internal 1.5GHz GPS antenna and a
2.4GHz Bluetooth radio. These internal components provide satellite signal
reception for position fix as and data communication between the S3 and your
Bluetooth enabled host device.
The antenna facade is the top surface of the S3. Keep this surface clean and with
an unobstructed view to the sky while operating the S3. CAUTION: Do not
cover the antenna façade with any object containing metal and/or
electromagnetic wave absorption material such as: screwdrivers, pens,
watches, floppy diskettes, CDs and metal wires, aluminum foil and
metal-coated plastic bags, water or liquids, and/or carbon paper.
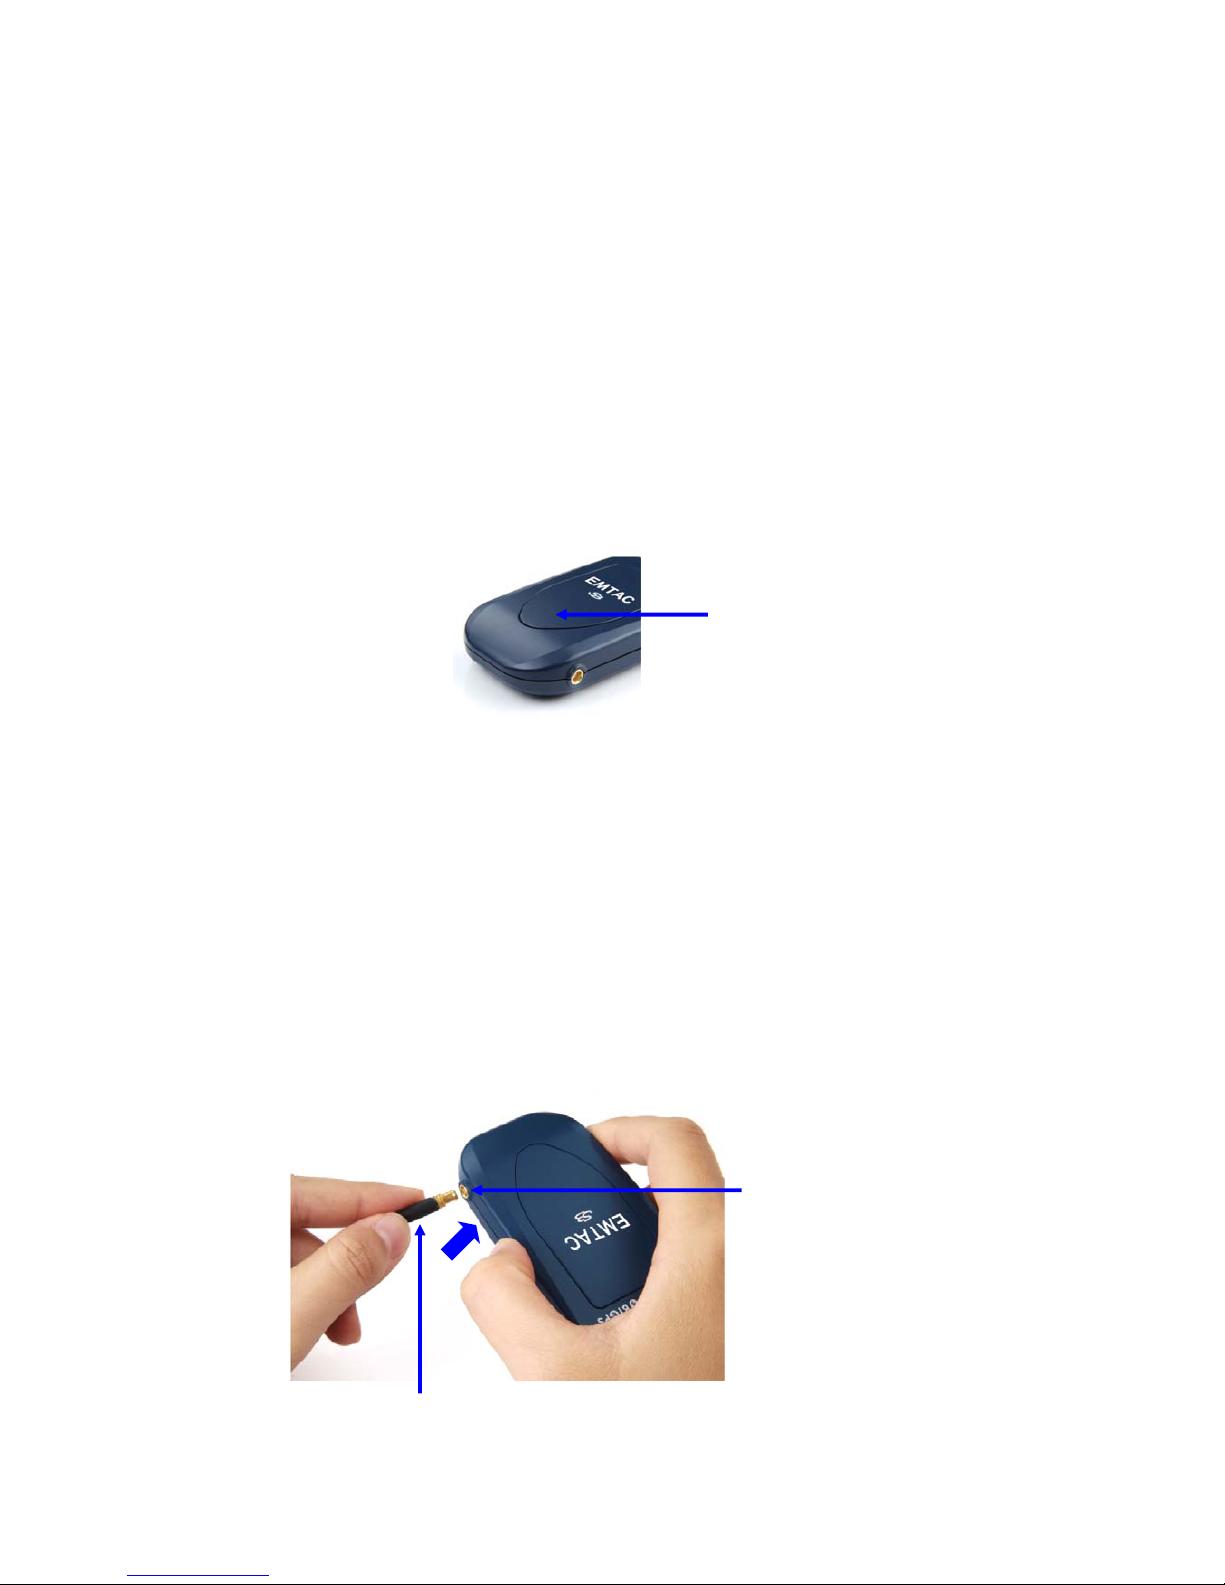
External Active Antenna Port
The external active antenna port is where you connect the external antenna. The
S3 is equipped with a RF connector port (MCX type). To connect to an external
active antenna (an optional accessory), locate the external antenna port (MCX
female), and then plug the connector (MCX male) of antenna into the external
antenna port.
CAUTION: Use only the GPA-18 external antenna with the S3 BTGPS
Receiver. Use of other antennas may severely degrade performance
and/or damage to your S3, and will void the warranty.
Antennae Facade Area
External Antenna Port
(MCX-type/female)
Connector of the optional External Active Antenna
(MCX-type/male)
Page 8
8
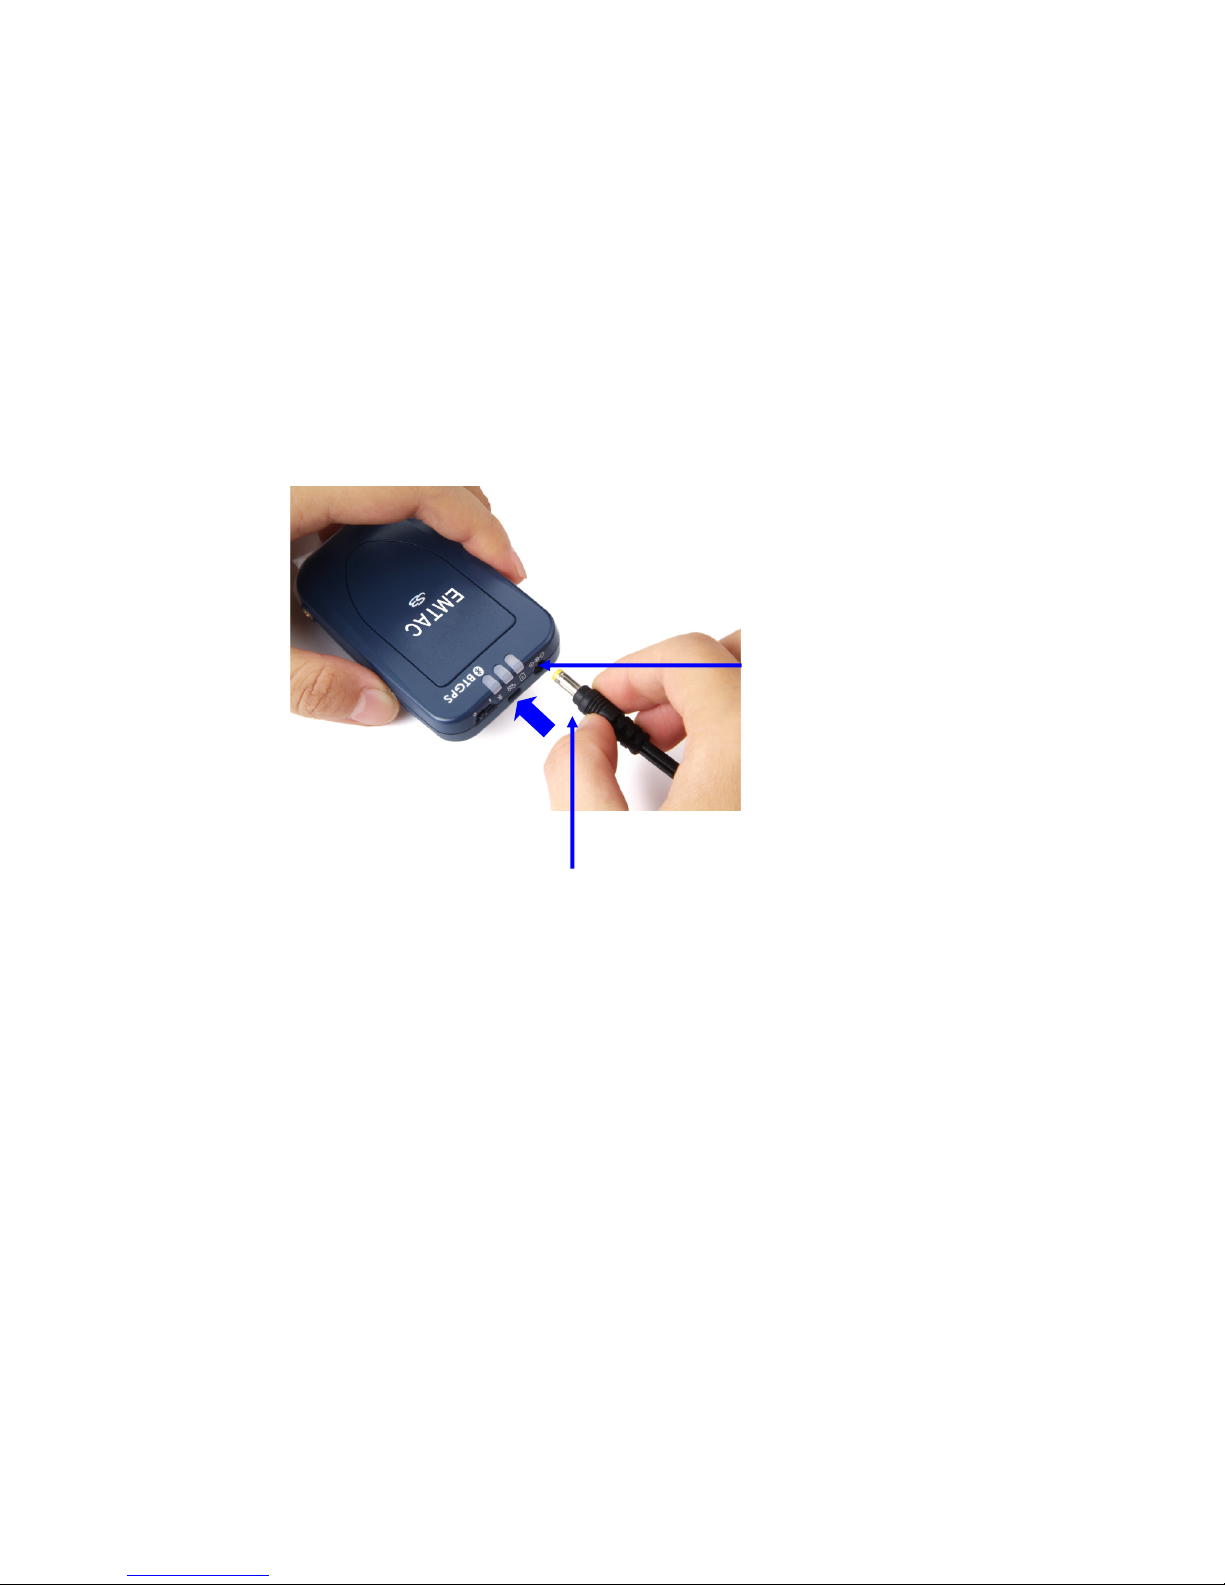
Power Jack
The power jack enables you to connect the receiver to the charger and re-charge
the internal Lithium-ion battery. The S3 may be used while plugged into a power
source and at the same time charge the battery.
CAUTION: Use only EMTAC branded chargers with the S3 to charge the
receiver.
WARNING: Use of other chargers can result in failure of the unit and/or
its internal lithium-ion battery.
Charger
The charger connects the S3 Receiver to a power source so the battery can be
re-charged. The small, yellow tipped end of the charging cord connects to the S3
via the power jack while the large end of the charger connects to the power source.
The S3 may be used while plugged into a power source and charging.
CAUTION: Use only EMTAC branded chargers with the S3 to charge the
receiver.
WARNING: Use of other chargers can result in failure of the unit and/or
its internal lithium-ion battery.
Power Jack
Charger Plug
Page 9

9
Battery (internal)
The S3 contains an internal, rechargeable Lithium-ion battery which supplies the
power for the operation of the GPS and Bluetooth circuits inside the receiver. It is
a low consumption battery with a minimum of 6 hours of continuous use after fully
charged. The battery can be recharged using the EMTAC branded charger which
came with the S3. The S3 may be used while the battery is being charged.
CAUTION: Use only EMTAC branded chargers with the S3 to charge the
receiver.
WARNING: Use of other chargers can result in failure of the unit and/or
its internal lithium-ion battery.
WARNING: Do not open the unit. There are no serviceable parts inside.
Opening the unit will void the warranty.
WARNING: Exposure to temperatures greater than 60°C (140°F) will
damage the battery and poses a risk of explosion.
See WARNINGS on pages 22 - 23 for more extensive safety information on
the battery.
Page 10

10
Accessories
External Active Antenna
Positional accuracy and time to fix can be affected by obstructions such as tall
buildings, heavy foliage, large cliffs, and other situations where GPS satellite signals
are blocked. An external antenna provides better reception and faster time to fix
when operating in these conditions. Use only the GPA-18 external active
antenna with the S3 BTGPS Receiver.
CAUTION: Use of other antennas may severely degrade performance
and/or damage the receiver, and will void the warranty.
Using the external antenna
Locate the external antenna port (MCX female) and then plug the connector
(MCX male) of external active antenna (optional accessory) into the external
antenna port. Place the external active antenna on the metal surface of the
roof or on the front top-surface of the dash board where it will not affect
driving safety. Connect and install the optional external active antenna into
position before driving. The GPS-18 active antenna has an embedded magnet
in its base for easy mounting on metal surfaces.
Caution: Do not put antenna near materials that are sensitive to magnetic
fields, such as magnetic storage media like floppy diskettes and mechanical
wrist watches.
Page 11

11
Getting Started
Before using the S3 BTGPS Receiver, the following tasks must
be completed:
install a GPS/Mapping application software properly and
completely on the host device.*
enable Bluetooth on the host device.*
fully charge the S3 BTGPS receiver.
* For information about the operation of the host device and GPS/Mapping
application software installation procedures, please refer to the
documentation that accompanies each product respectively.
1. Turn on the power of the S3 & host device.
► Turn on the power of the host device and prepare for connection.
► Turn on the power of the BTGPS, the power switch is indicated as “B” in Figure 2.
(Make sure the battery of the BTGPS is fully charged.)
Once the S3 is powered-on and before being paired/connected, the LED indicator
lights should look like this:
LED Indicator Symbol Status Indication
BLUE Flashing one time every second
GREEN Constant on (i.e. no fixed position)
ORANGE/RED No light (if fully charged)
Switch to power-on
position:
“
”
Status LED Indicators:
Blue Green Orange/Red
Page 12

12
2. Connect the S3 with the host device.
Typical examples are given in the .pdf files named “BTpair_” (and/or similar
files), in this User Guide CD-ROM. Please follow the step-by-step operation
guide indicated and described in the files, respectively. If prompted, the S3
BTGPS passkey is 0183.
3. Operating the GPS/Mapping software.
To open and use the GPS/MAP application, in your host device:
1. Make sure your BTGPS is connected with the host via Bluetooth.
2. Open the GPS/MAP application on the host device.
3. Enter the correct COM port and baud rate (4800-38400) into the GPS
setup area of your GPS/MAP application.
You can use all the functions of GPS/MAP application software by following the
detailed User Guide of the GPS/MAP application software.
4. Connect the external active antenna (optional)
Example:
This screen-shot indicates the BTGPS is
connects with host.
Page 13

13
Basic Use Guidelines
PROPER HANDLING
Do not bend the S3 BTGPS receiver while connected to the charger; bending
will damage the connector, resulting in damage to the BTGPS and/or the
charger’s plug.
The S3 BTGPS has one external antenna (port) connector, and one DC power
jack. Caution and care must be exercised when handling these parts. Bending
or breaking these parts will severely degrade positioning performance and/or
damage the receiver. Bending or breaking these parts will void your warranty.
Use only manufacturer approved accessories with the S3 BTGPS. (See page
10.)
There are no serviceable parts inside the S3 BTGPS receiver. DO NOT OPEN
THE S3 RECEIVER! Only a qualified service professional may install or repair
equipment. Opening the receiver will void the warranty.
RECEPTION OF SATELLITE SIGNALS
A longer than normal time-to-first-fix of position may result the first time you
use the S3 BTGPS.
Operating the GPS receiver requires a clear and unobstructed view of sky with
the antenna facade pointing upward to the sky.
GPS receivers may receive interference near cellular base-stations and when in
close proximity to mobile phone antennas. This interference may affect
positioning and time-to-fix performance.
SAFETY
Read the “Warnings” section comprehensively before operation.
Read the User Guide and these basic guidelines comprehensively. Breaching
the regulations and rules may be dangerous or illegal.
Road safety is the first priority; do not use or operate the S3 BTGPS receiver
while driving.
The S3 BTGPS is a radio emitting device. For your safety and the safety of
others, discontinue operation of the S3 receiver in areas with life support
equipment, aircrafts, gasoline stations, near fuels or chemicals, near blasting
areas, and in other areas restricting radio emitting devices.
Keep the S3 receiver away from high temperatures and fire. Additional detailed
information is given in the “Warnings” section on page 20 of this User Guide.
Page 14

14
Frequently Asked Questions
Which GPS/Map application software can I use?
There are a lot of major application software packages available. The S3 will
work with any mapping software that uses the industry standard NMEA
messages.
Can I use the Crux-View for navigation purpose?
No. The Crux_View Test Program is only for evaluation and for testing purposes
only; it is NOT designed for navigation.
What is the passkey or pin code for the S3 paring with the PDA?
Please key-in: 0183. This the passkey or the pin code required.
I already paired the S3 BTGPS Receiver with the PDA, but sometimes it
just cannot connect to the S3.
Delete the ‘old BTGPS icon’ on your Bluetooth manager software, and re-search
and pair it again.
It is possible to charge the battery and at the same time use the S3?
Yes. This means you can have continuous use of the S3 BTGPS Receiver.
The GPS program is not showing my location.
If the green light on the S3 is flashing, check to see that you have the correct
COM port and baud rate selected (4800-38400) and that your device is paired
with the S3. If the green light is not flashing, position the receiver so that it
has an unobstructed view of the sky. If the green light is not flashing after
being outside for more than fifteen minutes, please contact technical support.
The green light on my S3 BTGPS will not come on.
Remove the unit from external power source. Turn unit on and let the
batteries drain for 24-48 hours. After 24-48 hours, fully charge the S3 and
turn on. If green light is still off, please contact Technical Support for more
information.
The blue light on my S3 BTGPS will not come on.
Please contact Technical Support for more information.
Additional FAQ, technical support and
new product information can be found at www.EMTAC.com.
Page 15

15
Care and Maintenance
Your S3 BTGPS receiv er is a highly sophisticated piece of electrical equipment which
requires special care and maintenance. Please follow the suggestions below to
fulfill any warranty obligations and ensure you get the best performance possible
from your S3.
DO
Keep the S3 BTGPS receiver dry.
Exposure to rain and/or environments with high humidity will cause the receiver
to malfunction and create irreversible damage. Precipitation, humidity, and
other liquids contain minerals that can corrode the electronic circuit boards as
well as the connector, jack, and plug. Protective cases are available for the S3.
Please contact your retailer for more information.
Use/store the S3 at a temperature between 15°C (59°F) & 25°C (77°F).
Exposure to extreme hot or cold conditions, such as a closed car in summer or
winter, will affect the performance of the receiver and reduce both the capacity
and lifetime of the battery.
When not in use, store the receiver in a clean environment.
If left in an unclean environment, dirt and dust can enter the circuit board and
damage the receiver.
Clean with a soft, dry cloth.
Use of harsh cleaning solvents, chemicals or strong detergents will damage the
receiver.
Use only EMTAC branded chargers to charge the S3 receiver.
Use of any charger other than the one provided may damage the S3 and create
the risk of explosion.
Use only accessories approved for use with the S3.
Unauthorized accessories, antenna, modifications or attachments can damage
the S3, may void warranty, and violate regulations governing radio devices.
Keep the S3 and all accessories out of small children’s reach.
Page 16

16
DON’T
Hit, drop, or shake the S3.
Rough handling can break the internal electronic circuit boards, the connector,
and/or the power jack resulting in irreversible damages and unit malfunction.
Store or expose to temperatures higher than 60°C (140°F).
High temperatures, such as in a car under direct sunlight, can shorten the life of
electronic devices, and melt or drape certain plastics.
Store or expose to temperatures lower than 0°C (32°F).
Extreme temperatures affect the performance the battery. In addition, when
the receiver warms up to its normal operation temperature, moisture can
condense inside it, which may severely damage electronic circuit boards inside.
Attempt to open the S3.
There are no serviceable parts inside the S3. Unauthorized handling will void the
warranty and may damage the receiver.
Paint on the S3.
Paint can clog the connector, jack, and prevent proper normal operation of the
receiver.
Page 17

17
How the S3 BTGPS Works
The Global Positioning System (GPS) is a space-based radio-navigation system.
This system consists of 24 satellites, which orbit the Earth at an altitude of
approximately 17,500 kilometers. Each of the 24 satellites is deployed in 6 orbital
planes and circles the earth twice a day. These systems of satellites continuously
transmit signals containing precise information, 24 hours a day in any weather
condition, everywhere around the world. By processing the signals received, the S3
BTGPS receiver provides users with helpful information of position, velocity, and
time for navigation and location based services anytime, anywhere on the Earth.
The time it takes the GPS to find the satellites is called the Time to First Fix
(TTFF). The GPS receiver needs to lock on to at least 3 satellites for a position fix.
The S3 BTGPS Receiver acquires a position fix typically within 10 seconds from a
hot-start state and roughly 80 seconds from a cold-start state. The initial state of
the receiver, (i.e. the latest status in the memory of the receiver) primarily
determines the time of TTFF. If you have not used your GPS unit for several
months, the almanac data for the satellites may be out of date. The unit is capable
of recollecting this information on its own, but the process can take as long as 3 to
5 minutes. The TTFF will also be longer the very first time the user first turns on
the GPS receiver, when a GPS receiver has lost memory, or has been moved over
300 miles (500 km) from its last location will also be longer.
Both TTFF and positional accuracy can be affected by obstructions such as tall
buildings, narrow streets & passageways, protective film on glass, heavy foliage,
large cliffs, and other situations where GPS satellite signals are blocked. An
external antenna provides better reception and faster time to fix when operating in
these conditions.
Once there is a position fix, the S3 uses the satellite signals to calculate an
exact geodetic location through triangulation method, contained in 10 meters CEP
accuracy devoid of Selective Availability (SA). The position data is then converted
within the receiver to latitude and longitude coordinates, which is usually provided
in the geodetic datum on which GPS is based (WGS 84). The map datum selected
on a GPS receiver needs to match the datum listed on the corresponding paper map
in order for the position readings to match. Using the wrong datum can result in
position offsets of hundreds of meters or much more. In addition to using the
wrong datum, accuracy can be limited by satellite orbiting errors, multi-path signals,
atmospheric delay and receiver clock timing.
Page 18

18
Transplant GPS Limited Warranty
HARDWARE: Transplant GPS warrants to the original end user (ie. Customer) that this product wi ll be free
from defects in workmanship and materials, for one year from the date of original purchase from Transplant
GPS. The provisions of this warranty shall not apply if, in Transplant GPS’s judgment, the product has been
subject to misuse or neglect, improper installation, damaged in an accident, or repaired or altered in any way
that adversely affects its performance and reliability. Transplant GPS’s sole obligation under this express
warranty shall be, at Transplant GPS’s option, to replace the product or part with a comparable product or part,
repair the product or part, or if neither repair nor replacement is reasonably available, Transplant GPS may, in
its sole discretion, refund to Customer the purchase price paid for the product or part. Replacement products
or parts may be new or reconditioned. Transplant GPS warrants any replaced or repaired product or part, and
any hardware upgrade to which Customer is entitled under an agreement between Customer and Transplant
GPS, for a period of ninety (90) days from shipment, or through the end of the original warranty, whichever is
longer. All products or parts that are replaced become the property of Transplant GPS. This warranty does not
cover products sold AS IS or WITH ALL FAULTS.
OBTAINING WARRANTY SERVICE: Customer must contact Transplant GPS within the applicable warranty
period to obtain warranty service authorization. Dated proof of original purchase from Transplant GPS or its
authorized reseller will be required. Transplant GPS is not responsible for Customer products or parts received
without a warranty service authorization. Products or parts shipped by Customer to Transplant GPS must be
sent prepaid and packaged appropriately for safe shipment, and it is recommended that they be insured or sent
by a method that provides for tracking of the package. THIS WARRANTY SHALL NOT BE EXTEND ED, ALTERED
OR VARIED EXCEPT BY A WRITTEN INSTRUMENT DULY SIGNED BY TRANSPLANT GPS, LLC. WARRANTIES
EXCLUSIVE. IF THIS PRODUCT DOES NOT OPERATE AS WARRANTED ABOVE, CUSTOMER’S SOLE REMEDY FOR
BREACH OF THAT WARRANTY SHALL BE REPLACEMENT OR REPAIR OF THE PRODUCT OR PART OR REFUND OF
THE PURCHASE PRICE PAID, AT TRANSPLANT GPS’S DISCRETION. THIS WARRANTY IS IN LIEU OF ALL OTHER
WARRANTIES (OR CONDITIONS), EXPRESSED OR IMPLIED, INCLUDING (WITHOUT LIMITATION), ANY
WARRANTIES OF MERCHANTABILITY, NON-INFRINGEMENT, OR FITNESS FOR A PARTICULAR PURPOSE.
TRANSPLANT GPS SHALL NOT BE LIABLE FOR LOSS OF PROFITS OR ANY SPECIAL, INCIDENTAL, OR
CONSEQUENTIAL DAMAGES WHICH THE PURCHASER MAY SUSTAIN. IN NO EVENT SHALL TRANSPLANT GPS’S
LIABILITY EXCEED THE PURCHASE PRICE OF THE DEFECTIVE PRODUCT. TRANSPLANT GPS NEITHER ASSUMES
NOR AUTHORIZES ANY OTHER PERSON TO ASSUME FOR IT ANY OTHER LIABILITY IN CONNECTION WITH THE
SALE, INSTALLATION, MAINTENANCE OR USE OF ITS PRODUCTS. TRANSPLANT GPS SHALL NOT BE LIABLE
UNDER THIS WARRANTY IF ITS TESTING AND EXAMINATION DISCLOSE THAT THE ALLEGED DEFECT OR
MALFUNCTION IN THE PRODUCT DOES NOT EXIST OR WAS CAUSED BY CUSTOMER’S OR ANY THIRD PERSON’S
MISUSE, NEGLECT, IMPROPER INSTALLATION OR TESTING, UNAUTHORIZED ATTEMPTS TO OPEN, REPAIR, OR
MODIFY THE PRODUCT, OR ANY OTHER CAUSE BEYOND THE RANGE OF THE INTENDED USE, OR BY ACCIDENT,
FIRE, LIGHTNING, OTHER HAZARDS, OR ACTS OF GOD. THIS WARRANTY DOES NOT COVER PHYSICAL
DAMAGE TO THE SURFACE OF THE PRODUCT, INCLUDING CRACKS OR SCRATCHES ON OUTSIDE CASING.
THIS WARRANTY DOES NOT APPLY WHEN THE MALFUNCTION RESULTS FROM THE USE OF THIS PRODUCT IN
Page 19

19
CONJUNCTION WITH ACCESSORIES, OTHER PRODUCTS, OR ANCILLARY OR PERIPHERAL EQUIPMENT AND
TRANSPLANT GPS DETERMINES THAT THERE IS NO FAULT WITH THE PRODUCT ITSELF. THIS WARRANTY DOES
NOT APPLY TO ANY MALFUNCTION OR FAILURE OF THE PRODUCT OR PART DUE TO ANY COMMUNICATION
SERVICE CUSTOMER MAY SUBSCRIBE TO OR USE WITH THE PRODUCT.
LIMITATION OF LIABILITY: TO THE FULL EXTENT ALLOWED BY LAW, TRANSPLANT GPS ALSO EXCLUDES
FOR ITSELF AND ITS SUPPLIERS ANY LIABILITY, WHETHER BASED IN CONTRACT OR TORT (INCLUDING
NEGLIGENCE), FOR INCIDENTAL, CONSEQUENTIAL, INDIRECT, SPECIAL, OR PUNITIVE DAMAGES OF ANY KIND,
OR FOR LOSS OF REVENUE OR PROFITS, LOSS OF BUSINESS, LOSS OF INFORMATION OR DATA, OR OTHER
FINANCIAL LOSS ARISING OUT OF OR IN CONNECTION WITH THE SALE, INSTALLATION, MAINTENANCE, USE,
PERFORMANCE, FAILURE, OR INTERRUPTION OF THIS PRODUCT, EVEN IF TRANSPLANT GPS OR ITS
AUTHORIZED RESELLER HAS BEEN ADVISED OF THE POSSIBILITY OF SUCH DAMAGES, AND LIMITS ITS
LIABILITY TO REPLACEMENT, REPAIR, OR REFUND OF THE PURCHASE PRICE PAID, AT TRANSPLANT GPS’S
DISCRETION. THIS DISCLAIMER OF LIABILITY FOR DAMAGES WILL NOT BE EFFECTED IF ANY REMEDY
PROVIDED HERE-IN SHALL FAIL OF ITS ESSENTIAL PURPOSE.
DISCLAIMER: Some countries, states, or provinces do not allow the exclusion or limitation of implied
warranties or the limitation of incidental or consequential damages for certain products supplied to consumers,
or the limitation of liability for personal injury, so the above limitations and exclusions may be limited in their
application to you. When the implied warranties are not allowed to be excluded in their entirety, they will be
limited to the duration of the applicable written warranty. This warranty gives you specific legal rights which
may vary depending on local law.
GOVERNING LAW: This Limited Warranty shall be governed by the laws of the State of Minnesota, U.S.A.
excluding its conflicts of laws principles and excluding the United Nations Convention on Contracts for the
International Sale of Goods.
FCC Statement: This device complies with part 15 of the FCC rules. Operation is subject to the following two
conditions: (1) This device may not cause harmful interference, and (2) this device must accept any
interference received, including interference that may cause undesired operation. Caution: Changes or
modifications not covered in this manual must be approved in writing by the manufacturer’s Regulatory
Engineering Department. Changes or modifications made without written approval may void the user’s
authority to operate this equipment.
Page 20

20
Disclaimer and Limitation of Liability
Transplant GPS and its subsidiaries assume no responsibility for any damage or loss
resulting from the use of this product, software and User Guide.
Transplant GPS and its subsidiaries assume no responsibility for any loss or claims
by third parties which may arise through the use of the software. Transplant GPS
and its subsidiaries assume no responsibility for any damage or loss caused by
deletion of data as a result of malfunction, dead battery, or repairs. Under no
circumstances shall Transplant GPS and its subsidiaries be responsible for any loss
of data or income or any special, incidental, consequential or indirect damages
however caused.
The contents of this User Guide are provided “as is”. Except as required by
applicable laws, no warranties of any kind, eithe r express or implied, including, but
not limited to, the implied warranties of merchantability and fitness for a particular
purpose, are made in relation to the accuracy, reliability or contents of this User
Guide. Transplant GPS reserves the right to revise this User Guide or withdraw it at
any time without prior notice. Transplant GPS reserves the right to make changes
and improvements to any of the products described in this User Guide.
Copyright
©
Transplant GPS 2005. All rights reserved.
Reproduction, transfer, distribution or storage of part or all of the contents in this
document in any form without the prior written permission of Transplant GPS is
prohibited.
The Bluetooth trademarks are owned by Bluetooth SIG, Inc. USA and used under
license. Other products and company names mentioned herein may be trademarks
or trade names of their respective owners.
Transplant GPS reserves the right to make changes and improvements to any of the
products described in this document without prior notice.
Under no circumstances shall Transplant GPS be responsible for any loss of data or
income or any special, incidental, consequential, or indirect damages howsoever
caused.
Page 21

21
Warnings
Care and Caution
The Global Positioning System (GPS) is operated by the United States Government
which is solely responsible for the accuracy and continued operation of the system.
Accuracy of position fixes (longitude, latitude and altitude) can be affected by
alterations made to the GPS satellites by the U.S. Government. Accuracy is subject
to change in accordance with the U.S. Department of Defense civil GPS user policy
and Federal Radio Navigation Plan. Positional accuracy and time to fix time can also
be affected by poor view of caused by obstructions such as tall buildings, heavy
foliage, large cliffs and other obstructions where GPS satellite signals are blocked.
The S3 BTGPS does not substitute the needs of careful steering and good judgment.
Never rely on a single tool or apparatus for positioning and navigation.
Accessories
The GPS-18 is the recommended external active antenna for the S3 BTGPS receiver.
Use of other antenna may severely degrade performance or damage the receiver,
and will void the warranty of the receiver.
Use only an EMTAC branded charger with the S3 BTGPS receiver. Use of other
chargers can result in failure of the unit and /or its internal Lithium-ion battery.
Software
The software supplied in and with the S3 BTGPS receiver is solely for personal use.
Copies may be made only for personal use. The software may not be copied,
modified, reverse engineered or transferred unless expressively pro v ided by written
agreement. The software is the property of Transplant GPS and/or its supplier and
is protected by international treaty provisions.
Follow the operation guide as stated and described in the User Guide of the GPS
application software.
Safety
The S3 BTGPS contains Lithium-ion battery. For optimal battery capacity and life,
keep the S3 BTGPS between +15°C (+59°F) and +25°C (+77°F). Leaving the S3
BTGPS in hot or cold conditions (e.g. a closed car in summer or winter conditions)
Page 22

22
will reduce the capacity and lifetime of the battery. The performance of
Lithium-ion batteries is particularly limited in temperatures below 0°C (+32°F). A
S3 BTGPS with a hot or cold battery may temporarily not work, even when the
battery is fully charged. Temperature extremes will also affect the ability of your
battery to charge. When operating in temperature extremes, allow the S3 BTGPS
to cool down or warm up prior to charging.
Charge the S3 BTGPS only with the supplied charger. When a charger is not in use,
disconnect it from the power source. Do not leave the S3 BTGPS connected to a
charger for longer than 24 hours; excessive charging may shorten its life. If left
unused, a fully charged battery will discharge itself over time.
Batteries must be recycled or disposed of properly. Batteries must not be disposed
of in municipal waste.
DO NOT DISPOSE OF THE S3 BTGPS RECEIVER IN A FIRE!
CAUTION
RISK OF EXPLOSION IF BATTERY IS REPLACED BY AN INCORRECT TYPE.
DISPOSE OF USED BATTERIES ACCORDING TO THE INSTRUCTIONS.
To assure product safety, the battery maker requests following the statements be
included in the instruction manual/User Guide of the equipment.
Danger
When charging the battery, use dedicated chargers.
Use the battery only in the specified equipment.
Don’t connect battery directly to an electrical outlet or cigarette lighter charger.
Don’t heat or throw battery into a fire.
Don’t use or leave battery close to fire or inside of a car where temperatures may be over 60°C.
Also don’t charge/discharge in such condition.
Don’t immerse, throw, or wet battery in/with water / seawater.
Don’t put batteries in your pockets or a bag together with metal objects such as necklaces,
hairpins, coins, or screws. Don’t store batteries with such objects.
Don’t short circuit the (+) and (-) terminals with other metals.
Don’t place battery in a device with the (+) and (-) in the wrong way around.
Page 23

23
Don’t pierce battery with a sharp object such as a needle, etc.
Don’t hit with a hammer, step on, throw, or drop to cause strong shock.
Don’t disassemble or modify the battery.
Don’t solder a battery directly.
Don’t use a battery with serious scar or deformation.
Don’t use battery in a corrosive environment (damage from salt water, sea water, acid, alkali,
corrosion gas, etc.).
Warning
Don’t put battery into a microwave oven, dryer, or high-pressure container.
Don’t use battery with dry cells and other primary batteries, or batteries of a different package,
type, or brand.
Stop charging the battery if charging isn’t completed within the specified time.
Stop using the battery if abnormal heat, odor, discoloration, deformation, or abnormal
conditions are detected during use, charge, or storage.
Keep away from fire immediately when leakage or foul orders are detected.
If liquid leaks onto your skin or cloths, wash well with fresh water immediately.
If liquid leaking from the battery gets into your eyes, don’t rub your eyes, wash them well with
clean water and go to see a doctor immediately.
Caution
Store batteries out of reach of children so that they are not accidentally swallowed.
Before using the battery, be sure to read the user’s manual and conditions on handling
thoroughly.
Thoroughly read the user’s manual for the charger before charging the battery.
For information on installing and removing from equipment, thoroughly read user’s manual for
the specific equipment.
Batteries have life cycles. If the time that the battery powers equipment becomes much shorter
than usual, the battery life is at an end. Replace the battery with a new battery of the same
type.
Remove a battery whose life cycle has expired from equipment immediately.
When the battery is thrown away, be sure it is non-conduction by applying vinyl tape to the (+)
and (-) terminals.
When not using a battery for an expanded period, remove it from the equipment and store in a
place with low humidity and low temperature.
While the battery is charged, used and stored, keep it away from objects or materials with static
electric chargers.
If the terminals of the battery become dirty, wipe with a dry cloth before using the battery.
Page 24

24
Glossary
Almanac data
A set of information that transmitted by each GPS satellite in orbit and the state of every satellite in
the GPS constellation. Each GPS satellite contains and transmits the almanac data set for the entire
GPS satellite system network. Almanac data allows the GPS receiver to rapidly acquire satellites
shortly after it is turned on.
Active Antenna
An antenna that amplifies the GPS signal before it sends it to the receiver.
Altitude
The distance between the current position and the nearest point on WGS 84 reference ellipsoid,
usually it is expressed in meters or feet and is positive outside the ellip soid.
Baud
Bits per second. Also referred to as a baud rate.
Channel
Channel refers to a set of hardware in the receiver that detects locks on and continuously tracks the
signal from a single GPS satellite. The more channels available, the greater number of GPS satellite’s
signals a receiver can simultaneously lock and track. A receiver of 12 channels is the optimized
design, considering the current consumption, chip-package size and cost.
CEP - Circular Error Probable
CEP is the radius of a circle, centered at a true location, within which fifty percent of positioning
solutions fall. CEP is used to achieve horizontal accuracy.
C/N
o
Carrier-to-Noise density ratio. An indication of satellite signal strength received by the GPS receiver.
Cold Start
A condition in which the GPS receiver can arrive at a navigation solut ion w ithou t init ial posit ion, time,
current Ephemeris, and almanac data.
Constellation
Constellation refers to the specific set of orbiting GPS satellites sy stem, used in calculating positions
or all the satellites visible to a GPS receiver at one time. The pattern created by the relative
positioning of a GPS satellite network is designed to achieve a very high probability of global satellite
coverage even in the event of satellite outages.
Page 25

25
dB
Decibel. A notation of relative unit such as the satellite signal strength received.
Datum
A math model which depicts a part of the surface of the earth. Latitude an d longitude lines on a
paper map are referenced to a specific map datum. The map datum selected on a GPS receiver
needs to match the datum listed on the corresponding paper map in order for the position readings
to match.
Elevation mask
Elevation mask is an adjustable feature of GPS receivers that specifies a satellite must be a certain
number of degrees above the horizon before its signals are used for positioning. Satellites at low
elevation angles (five degrees or less) have lower signal strengths and are more prone to loss of
lock thus causing noisy solutions.
Ellipsoid
A geometric surface which all of whose plane sections are either ellipses or circles.
Ephemeris
Ephemeris is a set of parameters used by a global navigation satellite receiver to predict the location
of a satellite and its clock behavior. Each satellite contains and transmits ephemeris data about its
own orbit and clock. Ephemeris data is more accurate than the almanac data but is applicable over a
short time frame from four to six hours. Ephemeris data is transmitted by the satellite every 30
seconds. The predictions of current satellite position are transmitted to the user in the data
message.
Geodetic coordinate
A coordinate system whose elements are latitude, longitude and geodetic height. The latitude is an
angle based on the perpendicular to the ellipsoid. Longitude is the angle measured in the XY plane.
GIS (Geographic Information System)
A computer based system that is capable of collecting, managing and analyzing geographic spatial
data. This capability includes storing and utilizing maps, displaying the results of data queries and
conducting spatial analysis.
Hot Start
Start mode of the GPS receiver when current position, clock offset, approximate GPS time and
current ephemeris data are all available.
Page 26

26
L1 frequency
1575.42 MHz GPS carrier frequency which contains only encrypted P code, used primarily to
calculate signal delays caused by the ionosphere.
Latitude
A north/south measurement of position perpendicular to the earth's polar axis.
Longitude
An east/west measurement of position in relation to the Prime Meridian, an imaginary circle that
passes through the north and south poles.
Multipath
Multipath is the reception of a signal both along a direct path and along one or more reflected paths.
Multipath signals result in an incorrect pseudorange measurement.
NMEA (NATIONAL MARINE ELECTRONICS ASSOCIATION)
A U.S. standards committee that defines data message structure, contents, and protocols to allow
the GPS receiver to communicate with other pieces of electronic equipment aboard ships.
Selective Availability (SA)
Selective Availability is a process whereby the U.S. Department of Defense dithers the satellite clock
and/or broadcasts erroneous orbital ephemeris data to create a pseudorange error to prevent
adversaries from using the extremely accurate GPS positioning data.
Spread Spectrum
The received GPS signal is wide bandwidth and low power. The L-band signal is modulated with a
pseudo random noise code to spread the signal energy over a much wider bandwidth than the signal
information bandwidth. This provides the ability to receive all satellites unambiguously and to give
some resistance to noise and multipath.
Time To First Fix (TTFF)
The time it takes to find the satellites is called the Time to First Fix (TTFF). If you have not used
your GPS unit for several months, the almanac data for the satellites may be out of date. The unit is
capable of recollecting this information on its own, but the process can take several minutes. The
time it takes after the user first turns on the GPS receiver, when a GPS receiver has lost memory, or
has been moved over 300 miles from its last location.
TRIANGULATION
A method of determining the location of an unknown point, as in GPS navigation, by using the laws
Page 27

27
of plane trigonometry.
Universal Time Coordinated (UTC)
UTC is the time as maintained by the U.S. Naval Observatory. Because of variations in the Earth's
rotation, UTC is sometimes adjusted by an integer second. The accumulation of these adjustments
compared to GPS time, which runs continuously, has resulted in an offset between GPS time and
UTC. After accounting for leap seconds and using adjustments contained in the navigation message,
GPS time can be related to UTC within 20 nanoseconds or better. Greenw ich Mean Time (GMT) is still
the standard time zone for the prime meridian (zero longitude).
Warm Start
Start mode of the GPS receiver when current position, clock offset and approximate GPA time are
input by user or by the application software. Almanac is retained, but ephemeris data is clear.
Wide Area Augmentation System (WAAS)
Developed by the United States government, WAAS is a Satellite-Based Augmentation System
(SBAS) that calculates the errors in the GPS signal at several monitoring stations around the country,
then transmits error correction messages from geostationary satellites to GPS receivers.
World Geodetic System 1984 (WGS 84)
The primary map datum used by GPS. Secondary datums are computed as differences from the
WGS 84 standard. WGS 84 is a set of U.S. Defense Mapping Agency (DMA) parameters for
determining global geometric and physical geodetic relationships. Parameters include a geocentric
reference ellipsoid; a coordinate
system; and a gravity field model. GPS satellite orbital information
in the navigation message is referenced to WGS 84.
 Loading...