

Page 1

iVCS3 © is the official EMS emulator. You can learn all that you need to know
about the EMS VCS3™ from the original User Manual or from the many
resources now online.
Important Changes (Since Ver. 1.6)
In this version we have updated the Samplers (see back panel). This new
implementation adds many new interesting features such as Loop Crossfade,
Wave Scrubbing, Precise Zoom etc. When you save a new preset, all
sampler information (file name, loop-point, start-point) are saved. But since
this new update implements our new sampler, the presets saved with the old
sampler are no longer available for the loop-points parameter. So we suggest
you may need to resave your presets.
Almost all the build-in Preset Banks have been updated, they have more
consistent levels & panning now. Users of previous versions can restore the
Factory Presets from the Preset Manager to benefit from these new
improvements. See the Preset Manager for more details.
Also the In-App purchase ‘LALA - Sonic Pleasures library' has now been
updated. To get the new version, press ‘Restore Purchases’ under Presets
and Mod. Shop.
Important Changes (Since Ver. 1.1.3)
The Ramp wave of VCO 1 has been reversed in polarity, exactly as on the
original Putney VCS3.
The Square wave of VCO 2 and VCO 3 has been modified to recreate the
offset drift during PWM (Pulse Width Modulation), exactly as on the original
Putney VCS3.
The! Triangular/Ramp wave of VCO 3 has been redesigned to reproduce
better original PWM wave shaping and amplitude, exactly as on the original
Putney VCS3.
The changes in VCO, VCA and VCF implementations can affect the resulting
sound of some old presets. But only for the CONTROL INPUT MATRIX
marked with ‘I’, ‘J’, ‘K’, ’N’, ‘O’ and ‘P’, do we suggest updating the old
presets.
Page 2

The novel glide parameter was introduced to enhance the sound quality of
the VCF and optimize the smoothing of the cutoff frequency control.!You can
adjust and trim this parameter (Settings) to get the more interesting sound.!In
particular, the lower the glide threshold, the better is the sound when the VCF
is frequency modulated by the oscillators. In other words, when high
frequency controlled voltages are applied to the filter, they are low-pass
filtered by the C31 capacitor. This means that the filter will not respond to high
frequency CVs, and respond slowly to rapid changes in incoming CVs. The
knob parameter sets the C31 cap. from the CV input circuit, so the filter will
respond to high frequency control.
Tips & Tricks
-
MAINS Toggle on/off DSP (Digital Signal Processing). iVCS3 supports
mixed audio with other applications, you can also disable DSP in order to
save battery and CPU consumption. You cannot toggle off the Audio
Engine when it’s connected to Audiobus or Inter-App Audio.
-
When the user presses the Home button, the app goes to the background
process and will store the whole status of parameters to reload when next
opening the app. See Settings for more explanations.
-
Double tap on the Knobs/Toggles to show the options. In the ‘Edit’ field
you can enter the value from the keyboard. Tap ‘Random’ to generate a
random value, ‘Default’ to reset to the factory settings and configure the
knobs dragging behavior. Step fine resolution sets how many points of
movement result in a one degree rotation in the knob's position. Only used
in the horizontal/vertical slider modes. You can set Knobs behavior from
Settings.
-
Tap over the Matrix for zooming in, this then allows new connections to be
made. Tap or drag outside the Matrix area to zoom out. Pinch for the
removal of all connections."
-
Double Tab in the Joystick handle to reset at the central position i.e. zero
-
iVCS3 can play audio in the background and/or mix it’s own audio with
other iOS apps. iVCS3 also supports Apple IAA (i.e. Inter-App Audio for iOs
7 or higher) and Audiobus, so you can send and receive audio through
applications.
Page 3

-
All Signals connected to the METER in the Matrix will be shown in the
Oscilloscope and you can now feedback through to the iVCS3.
-
Swipe (right to left) on Preset, Presets Bank or Samples Manager (non
built-in file) to delete.
-
You can load Presets (current selected bank) by remotely sending a MIDI
Program Change message. The channel listening is the same for the MIDI
Note On/Off, You can configure this setting through ‘Channel’ in the MIDI
Manager (see later for further details). The available range is 0 ÷ 127. A
value of zero will select the first preset in the list, a value of 1 for the
second etc… But no bank selection is supported yet."
-
We suggest you disable the screen rotation, otherwise the accelerometer
doesn't work properly.
-
Tap over the Recovery Pins (Matrix bottom) to change pin color to white
green or red. White pins are 2.7K Ohm resistance and green ones are 68K
Ohm. For the iVCS3 this translates as: white pins no attenuation, green
pins for 0.66, red pins will allow a connection to be adjusted between the
normal signal and its inverse. See ‘Essential and Recommended EMS
Modifications’ for more details.
-
MIDI Panic sends a general Message ‘All Notes Off’, resets the DSP and
Keyboard.
-
Init will reset to default values and removes the Matrix Connections and
Sequencer Grooves, a reset message will be displayed.
-
Create Random Sound values for all of the parameters (not matrix and
Sequencer), including the Flanger and Compressor Effects. The result can
be very interesting and wayward.
!
Show the back panel of iVCS3 see Back Panel section.
"
Enable/Disable the scrolling for the Main View.
Enable/Disable Accelerometer X/Y and LFO, see the Control
Manager for more details.
Page 4

Captures Output stereo signal (post Effects) and creates an audio file
wav format 44.1 kHz 16 bit in the Documents Folder. Files created by iVCS3
are saved with an id-name followed by a number, for example:
Output Rec 1.wav, Output Rec 2.wav etc…
Each new file will be numbered with the next consecutive number.
SYNC
The goal of SYNC is to setup a global Metronome (MASTER BPM).
This will affect the LFO (Low Frequency Oscillator) and/or the Sequencer
when it’s enabled to receive the SYNC signal - see Control Manager for more
details. The SYNC can be controlled remotely from a MIDI Clock signal or an
Ableton Link.
You can adjust the BPM (Beats Per Minute) through the minus/plus buttons
and these will replace the current value with the integer BPM (previous/next)
or you can TAP to set your own Tempo. When the MIDI Clock is activated
(see MIDI Manager), the 'MASTER BPM' slider will be disabled and the
Tempo value is controlled by the MIDI Clock. When connected to Ableton
Link, the slider is enabled.
Ableton Link description
Ableton Link is a new technology that synchronizes the beat, phase and
tempo of Ableton Live and Link-enabled iOS apps over a wireless network. It
lets you play devices together with the freedom of a live band. Anyone can
start and stop their part while others keep playing, and anyone can adjust the
tempo and the rest will follow. You can use Link to play with several copies of
Ableton Live, with Live and iOS apps, or with iOS apps together – even
without Live in your setup.
By default 120 BPM corresponds to 1 Hz.
The ‘Sync’ button waits for the next beat (Tempo Forte) from the MIDI Clock
or Ableton Link and resets all phases for LFO, Sequencer etc.
You can enable the MIDI Clock Signal by following these steps:
1 Open MIDI Manager
2 Send a MIDI Clock Signal
3 Enable the MIDI Clock for the chosen Source, see MIDI Manager for
further information
Page 5

Page 6
Essential and Recommended EMS Modifications
These superb extra features are available now through In-App Purchasing.
You can access the ‘In-App Shop’ simply from the menu tools.
Tapping the Modification buttons will open the mod-view (and before you
ask why these buttons are so small and concealed, we didn’t want to mess
with the original interface). You will find these symbols on the following iVCS3
modules:
1)
Oscillators Synchronisation
2)
Oscillator 3 Lo/Hi Range Switchable Oscillator
3)
Oscillators 1 and 2 VC Shape
4)
Sample & Hold
5)
Filter Slew/Unslew
1
6)
Envelope Shaper Attack and Decay Time Extension
7)
Inverted/Controlled Matrix Red Pins
8)
Joystick Glide
Oscillators Synchronisation
The Sync feature provides a tonally harmonic sound, the VCO 2 is the
MASTER and you can select VCO 1 or both VCO 1 and VCO 3 as slaves.
This means every cycle of VCO 2 involves a resetting of the VCO slaves
phase.
Lo/Hi Range Switchable Oscillator
As standard, Oscillators 1 and 2 were meant to be tracking audio generators
and Oscillator 3 an LFO. As the circuitry is almost identical Oscillator 3 may
This Modification is available since ver 1.1.3 and it’s not part of the In-App Purchasing: ‘Essential
1
and Recommended EMS Modifications’.
Page 7

be converted to be the same as Oscillator 2. Please note that when the VCO3
is switched in 'High Range Mode’, the Ramp Shape does not work anymore
with 'Phase Sync Oscillators’. Also we’ve noted it's a bit more CPU intensive.
Oscillators 1 and 2 VC Shape
This modification is often done with cheap Cliff 3.5mm jacks on the front
panels, but cable patching is not really in the spirit of the VCS3. The toggle
switch converts the matrix columns 'O' and 'P' (i.e. 'Output Ch. 1 and 2
Voltage Controlled') in 'Oscillator 1 Shape' and 'Oscillator 2 Shape' Voltage
Controlled. The sensitivity range is ±3V.
Sample & Hold
This modification brings a Simple Random Voltage Generator or a Sample &
Hold to the iVCS3. You can switch between S&H to generate random
numbers and hold them for a period of time and also Glide to generate a
user-controlled random number series with interpolation between each new
number. When enabled, the COLOUR parameter is the frequency with which
new random numbers are generated in the range 0.016 ÷ 10 Hz. The LEVEL
parameter is the range over which random numbers are distributed.
Filter Slew/Unslew
The novel glide parameter was introduced to enhance the sound quality of
the VCF and optimize the smoothing of the cutoff frequency control.! You can
adjust and trim this parameter to get the most concise sound.! We’ve found
that the lower the glide threshold, the better the sound when the VCF is
frequency modulated by oscillators. In other words, when high frequency
controlled voltages are applied to filter, they are low-pass filtered by the C31
capacitor. This means that the filter will not respond to high frequency CVs,
and respond slowly to rapid changes in incoming CVs. The knob parameter
sets the C31 cap from the CV input circuit, so the filter will respond to high
frequency controlled voltages.
N.B. Old parameters will set automatically to the maximum Glide amount
(left), this parameter is saved for Snapshots, HVPad and will work with
Control Manager.
Envelope Shaper Attack and Decay Time Extension
This modification will give you an attack of 5 seconds and decay of up to 3
minutes. Press the ATTACK button and play!
Inverted/Controlled Matrix Red Pins
Tap over the Recovery Pins (Matrix bottom) to change pin color: white, green
and red. White pins are 2.7K Ohm resistance and green ones are 68K Ohm.
Page 8

In the digital domain this translates as: white pins no attenuation, green pins
0.66. Red pins will allow that connection to be adjusted between the normal
signal and its inverse.
N.B. Old parameters will set automatically to a default resistors value (-1), this
parameter is saved for Snapshots but is not enabled for HVPad of the Control
Manager.
N.B. This is a setup parameter and it should not be adjusted during the
performance. If you are playing a patch and moving the resistor control at the
same time, you will encounter audio glitches.
Joystick Glide
Each new step value of JOYSTICK is low-pass filtered to move towards that
value at a rate determined by the Knob. This is the 'half-time' of the function
(in seconds), during which the curve will traverse half the distance towards
the new value, then half as much again, etc., theoretically never reaching its
asymptote.
N.B. Old parameters will set automatically to the default Glide amount, this
parameter is saved for Snapshots but is not enabled for HVPad or for the
Control Manager.
Presets
Preset Manager will collect all the Banks (i.e. .ivcs3 suffix) and Snapshots. A
Snapshot is a simple “photo” of the parameters in the UI (i.e. User Interface).
Both the Matrix and Keyboard/Sequencer are included but they can also be
excluded, see the Settings for more details.
So, once you find an interesting sound you can take a snapshot (i.e. save this
new preset) by touching the ‘plus’ icon and this new preset will be added to
the selected Bank. The top four elements of the Snapshots list are assigned
for ‘HV Snapshot Pad’, you can then sort or delete the Snapshots in the List
by tapping the ‘List Icon’. You can even share the selected Bank through
Dropbox or e-mail and you can restore the factory Built-In Banks from the
‘Cloud’ icon, there is two options:
1)
‘Overwrite’ will erase all user presets that have been saved in the factory
preset-banks and give you the unaltered factory preset-banks back;
2)
‘Merge’ will preserve the preset-banks which contain the user presets; If
you created your own user preset-banks and saved presets there they will
stay untouched.
Snapshot banks are located in Documents folder, you can access files via
iTunes Sharing (see Add files to iVCS3 through iTunes Sharing).
Page 9

You can add new files by copying in the app's documents (through iTunes
or from another app) and refresh the list from there.
Load a preset, randomly from the banks list.
Delete all Presets for a selected bank. A warning message will be
displayed.
The Snapshots bank file is a kind of Property List format (.ivcs3), you can edit
as text and modify the values just rename in .plist
Swipe (right to left) on Snapshots or Snapshots Bank, to delete.
The purpose of the unique Snapshot Pad is to obtain intermediate
values between four snapshots (corners). You can change snapshots
assigned in the corner through the Snapshots list (see above).
The Snapshots Pad performs complex interpolations between four snapshots
on a two-dimensional space. By scrubbing your finger on the Snapshots Pad
a temporary new snapshot will be created by mixing the four snapshots
depending on distance. Thus you can modify hundreds of parameters with a
single touch, this is also called Hyper Vectorial Synthesis.
Snapshots Pad can be resized on fullscreen for detailed controls (left bottom
icon).
N.B. Snapshot Pad have no effect on Matrix, Sequencer and Toggles.
Samples
Samples manager can read/write in the Documents folder, you can also share
files through AudioCopy, Dropbox or iCloud. Samples manager can also read
the Built-in files, but you cannot rename or delete them. Touch on a file in the
list to show the actions popup. Here it is possible to Load a file in one of two
Samplers (i.e. Sampler Ch.1 and Sampler Ch.2), Open In... contains all
system actions over the file, according to file type. For example you can send
files as an e-mail, open file with a listed app etc…
You can rename files in the Documents Folder, if you omit the file
extension then Samples Manager will fill the original audio file extension for
Page 10

you. N.B. Samples manager shows only audio files supported, the other files
in the Documents folder will not be seen.
You can pre-listen to the samples before you load them.
Starts audio capture from the microphone immediately and saves new
stereo audio file in wav format 44.1 kHz, 16 bit in the Documents Folder. Files
created are composed by id-name followed by a number, for example:
Input Rec 4.wav, Input Rec 5.wav etc…
Every new file will be numbered with the next consecutive number.
N.B. You can record a mono or stereo file in wav format 16 bit 44.1 kHz
according to the iDevice channels. Even if the iVCS3 is connected to
Audiobus or IAA, the Grab Audio will record always from iPad microphone/
line
You can import files from your Dropbox account, you can login/logout from
the Settings. Paste Audio file from AudioCopy clipboard.
Access to the iPod library, this allows the application to read user’s songs,
audio books, and audio podcasts. The file can be converted in .wav (PCM 16
bit 44.1 kHz) or .caf formats and stored in the local app Documents Folder. If
the file exist at path then progressive number will be attached to the file
name.
The document picker feature lets users select documents from outside your
app’s sandbox. These include documents stored in iCloud Drive and
documents provided by a third-party extension. Users can open these
documents directly, editing them in place. This access simplifies sharing
documents between apps and easily enables more complex workflows.
Add files through iTunes
• Connect your iPad to your computer and then open iTunes. Select your iPad
under the!DEVICES!header in the left navigation column.
• Click on the “Apps” tab above the main window.
• Scroll down to the “File Sharing” section.
• Select iVCS3 from the list of Apps.
• Under “iVCS3 Documents” click the “Add” button; this opens a dialog box to
select the location of the presets on your computer.
Page 11

Control
MIDI
Scrub Y
Accelerometer X
Accelerometer Y
LFO
After selecting MIDI, iVCS3 enters into "learn mode" !i.e. it “hears” incoming
MIDI Control Change messages. It’s then possible to send messages with
MIDI hardware, Virtual MIDI and Network MIDI. Flashing screen means the
association between the parameter and the MIDI message has been
successful and displays the corresponding control Change and Channel.
Alternatively you can enter direct CC and MIDI Channel number through
number keyboard. You will also receive an additional setting: 'Widget Range'
that allows you to resize the range of action on the parameter. This is
because you can use all 128 steps MIDI to control precisely particular part of
the parameters.
Scrub Y binds the widget to vertical movement on the keyboard
(Scrub Y). An additional setting allows you to specify the speed
(gravity) of the action.
Aftertouch Y Scrub, you can assign one or more iVCS3
parameters to aftertouch scrub Y, so after a played note, you
can scrub in the vertical axis (Y) by controlling one or more of
the parameters. An additional setting allows you to specify the
speed (gravity) of the action.
N.B. Playing keys from top to bottom, you can change the amplitude of each
note i.e. key velocity (0 ÷ 127). The same with black keys.
Accelerometer X and Y are used to control the parameters through the
horizontal or vertical inclination of the device.
LFO, Low Frequency Modulation is a table look-up oscillator with seven builtin shapes. The frequency of LFO is expressed in Hz and BPM (Beats per
Minute). You can get the period time by dividing 1/freq. The LFO Frequency
value is converted in BPM (Beats Per Minute), you can adjust this value
Page 12

through the minus/plus buttons, these will replace current value with the
integer BPM (previous/next) or you can TAP to set your own Tempo.
ϕ Will reset to zero the phase of current LFO.
Φ Will reset to zero the phase of ALL LFO actives.
Enabling the Link symbol, you will disable the ‘Low Frequency Oscillator
in Hz' Slider, so the value of the current LFO is sampled from the global
‘MASTER BPM’. You can adjust the BPM value from SYNC view. When the
MIDI Clock or Ableton Link is enabled (see MIDI Manager and SYNC) the
BPM value will affect all LFO enabled for SYNC mode. The goal of the ‘SYNC
Subdivision’ Slider is to rescale the ‘MASTER BPM’ from SYNC according to
the relative symbol (abbreviate musical note time values):!
Normal : 1/1, 1/2, 1/4, 1/8, 1/16, 1/32, 1/64
Triplets : 1/1T, 1/2T, 1/4T, 1/8T, 1/16T, 1/32T, 1/64T
Dotted : 1/1D, 1/2D, 1/4D, 1/8D, 1/16D, 1/32D, 1/64D
Where ‘D’ is a dotted note and ’T’ is triplet.
With 1/4 (Default), the BPM follows the 'SYNC BPM' or 'MIDI Clock’ BPM
when enabled, i.e. 120 BPM corresponds to 1 Hz.
• 1/4 - each step is a quarter note (or BPM), e.g. 60 BPM is 0.5 Hz
• 1/4D - each step is a dotted quarter note (or 1.5 x BPM),
• 1/4T - each step is a triplet quarter note (or 0.5 / 3) etc.
♩ Reset default value (1/4 = 120 BPM)
MIDI
You can enable/disable the incoming MIDI signal from all the physical, virtual
and network ports available. iVCS3 also understands MIDI Clock signals from
remote apps. As for the MIDI ports, you can enable/disable the MIDI Clock on
a port and the configuration is saved as default and restored when you open
the app.
The swipe symbol (if present) indicates that you can fast switch to that
app listed in the cell by swiping once to the right.
Page 13
If the Core MIDI Network is connected a wifi symbol will appear in the
Network port cell.
Only ports that receiving MIDI Clock will be displayed as icons,
touch the clock symbol (if present) to enable/disable receiving MIDI Clock. It
will change its color from red to blue. You can receive MIDI Clock from one
port at a time, you can enable/disable the clock for the current port or
mutually selects another one in the list.
You can receive MIDI Clock from one port at a time, you can
enable/disable the Clock for the current port or mutually selects another one
in the list.
Channel sets the input channel for the selected port, the iVCS3 DK
(Keyboard) will receive the Note On/Off messages in OMNI (from all 16
channels) or, one of the 16 channels.
Configure Bluetooth LE MIDI
With the release of iOS 8 and OS X Yosemite, sending and receiving MIDI
data is supported using Bluetooth Low Energy connections on any iOS device
or Mac that has native Bluetooth Low Energy support. All established
connections are secure which means that pairing is enforced and connections
cannot be made to your devices without your explicit consent. After a
connection is established, it simply appears as an ordinary MIDI device that
any MIDI application can communicate with.
Enable NRPN
NRPN stands for "Non-Registered Parameter Number" and is part of the MIDI
specification for the control of electronic musical instruments. NRPNs allow
for manufacturer-specific or instrument-specific MIDI controllers that are not
part of the basic MIDI standard.
Unlike other MIDI controllers (such as velocity, modulation, volume, etc.),
NRPNs require more than one piece of controller data to be sent. First,
controller 99 - NRPN Most Significant Byte (MSB) - followed by 98 - NRPN
Least Significant Byte (LSB) sent as a pair specify the parameter to be
changed. Controller 6 then sets the value of the parameter in question.
Controller 38 may optionally then be sent as a fine adjustment to the value
set by controller 6.
This fine adjustment is part of the conventional MIDI controller specification,
where any of the first 32 controls can be optionally paired with a control offset
Page 14

32 higher. This is the rare 14-bit Continuous Controller feature of the MIDI
specification, and NRPNs simply take advantage of that existing option in the
same way offering 16,384 possible values instead of only 128.
(http://en.wikipedia.org/wiki/NRPN)
When you enable NRPN, you should not employ CC 99 and 98 as the normal
CC in order to avoid an undesired overlap. An NRPN message must be sent
with this order: CC 99 98 6 38 where the first couple is the CC number and
the second couple is the data. You can MIDI learn as for the normal CC, and
NRPN works for all knobs and parameters. Although an NRPN CC number
can be greater than 127, you will not be able to learn CC beyond 127.
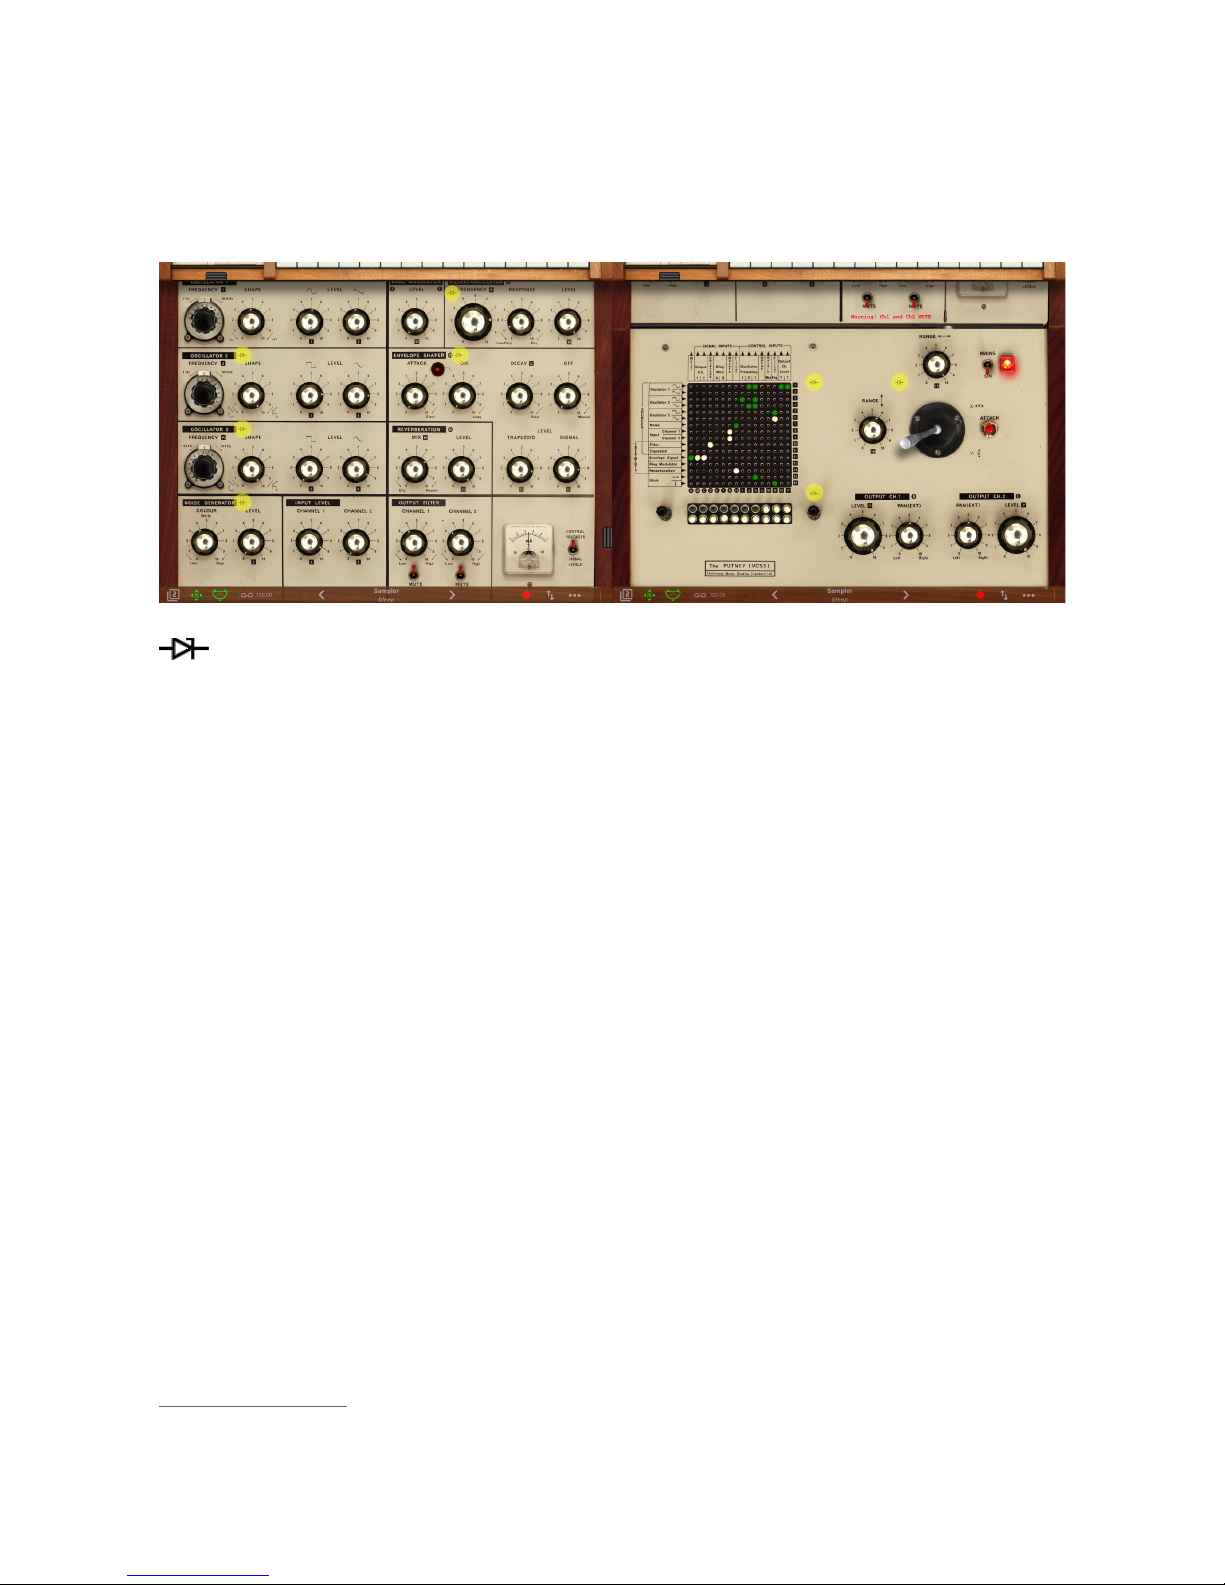
Back Panel
This Back Panel adds features to the app (such as Sequencers, Samplers
and Effects) and should be thoroughly utilized as a further experimental
environment:
OUTPUT Channels feeds a chain of Flanger/Delay/Compressor FX.
INPUT is from hardware Microphone or software bus as Audiobus/Inter-App
Audio or from Integrated Samplers. INPUT can be also feed from DK/
Sequencer or From SCOPE feedback.
All Signals connected to the METER in the Matrix, will be shown in the
Oscilloscope and you can feedback through to the VCS3.
Ext. Input
The first features is the [Dk/Sequencer], [Mute] or [Mic/Sampler] switch. As
you know the VCS3 is Voltage Controlled Based and you have to remain
aware that the DK Keyboard or Sequencer or Sampler provides a Voltage
Signal which feeds the VCS3. You can get this from Matrix Row 8 and 9
(Input Channel 1 and 2) and you can employ this for controlling or feeding the
VCS3 audio modules. This triple switch is a source selector or mute.
You can select Ext, Input between DK/Sequencer or Mic/Sampler (or
Audiobus/Inter-App), for each channel. You will get these through the Matrix
INPUTS CH1/CH2. In Mic/Sampler mode, you can mix both signals. Muted is
mainly used for clearing the Ext Input if you intend on feeding back through
SCOPE Jack-socket.
DK Keyboard
VCS3 Keyboard DK produces a voltage control signal of 3 Volt.
Middle F# produce 0V, High C -1.5V and Low C +.5V (select three octaves
view from Settings).
Page 15

As you know you can employ DK as Controller Voltage based or play DK with
internal VCO (saw). For this you have four controls: Frequency, Dynamic
Range, Tuning Spread and Level. As explained, middle F# produce 0V, if
you want to tune the iVCS3 you will need to play F# adjusting the Frequency
knob to 369.99 Hz (i.e. tempered F#4 and is default value for VCO 1 and DK
VCO Frequency). Thus you will achieve standard musical scale tuned to 440
Hz (diapason). Likewise, when you employ DK as Voltage Controller, you
must calibrate the VCO Frequency controls.
In the original VCS3, the Tuning Spread range is +- half semitone (although
it is voltage), where zero spread produces no tuning deviation. In iVCS3 this
range was extended to +- 2 semitones and default value is 0 (which means
no spread). When you use DK as Voltage Controller, tuning spread can be
done by the Input Level (Ch.1 or 2) on the main panel.
IN order to achieve perfect pitch from the DK (temperate scale) you need to
set the Input Level Channel 1 or 2 to 0.32v. If input level knobs are at other
settings you`ll get +- tones per keyboard octave, this is good for using other
scales like !quarter tone, 19 or 21 notes/octave or such.
Dynamic Range.The DK keys have a built-in VCO, when you are playing
with this VCO and the DYNAMIC VOLTAGE knob is turned left (disabled) the
amplitude of the DK VCO plays with the same amplitude (mezzo forte). The
level of DK VCO is controlled according to touch position of DK keys: top:
pianissimo, middle: mezzoforte, bottom: fortissimo). Playing iVCS3 keyboard
keys from top to bottom, you can change the amplitude (dynamics) of the
note i.e. MIDI key velocity (0 ÷ 127). Another new feature of DK is that there
is a VCA inside where you can send an audio signal from the iVCS3 for
mixing with the internal DK VCO.
If you send something to the METER (i.e. SCOPE
jack-socket) row, then that will go to the DK and the
signal will be mixed with the internal DK VCO, you
control the mix with the DK Level. ! Then you can
send this mixed signal back to the VCS to input 1 by
putting the switch to "signal" . The keyboard
dynamic (velocity) will affect this mixed signal! So,
for example, you can send, lets say, VCO 1&2 to
METER, then they will go to the DK "mixer" and mix the internal DK VCO as
the third VCO. Then put switch1 to "signal" and switch2 to "key voltage".!
Input 1 goes to "input 1" row in the iVCS3 and so this is the mixed signal of
the three VCOs but with the level controlled by the keyboard dynamic. Key
voltages go to input2 so that you can patch to VCO1 & 2 frequency, so all
three can track in pitch.
Page 16

Another difference between the Original Analogue DK and iVCS3 DK is the
“Legato behavior”. In the Original DK, the priority goes to the highest note,
this means that if you're holding down a note, the lowest notes can not be
played until you release the held note.
Now you can switch between the Original VCS3 legato and NEW (to improve
the playability of the keyboard on the ‘legato’) through the Settings.
! Locking the DK Keyboard (in the DK Keyboard) means that every note
is sustained. So when you play a note it will hold the last pressed key even
when you lift your finger from the keyboard. When the Keyboard is locked,
Snapshots will save/restore touched keys, see Settings for more
explanations.
Sequencer
Also note that the DK Keyboard puts a 1V for octave output, so you need to
trim this voltage using the Input Level Channel 1 or 2 to 0.32v if you want 12
notes within an octave. If input level knobs are at other settings you will get +tones per keyboard octave, this is good for using other scales like quarter
tone, 19 or 21 notes/octave.
Sequencer is fully programmable, you can impose direction, steps number,
tempo and random direction from the Sequencer Manager, while Groove
Values sets information for every step.
We have two independent groove values, one for the DK and another for the
Joystick. Every groove takes two values for every step: Key and Dynamics.
An auxiliary groove with one parameter is for Channel 1 Panning and is
expressed as an absolute and will overwrite (when enabled) Ch1 PAN (Ext.)
in the Main Panel. Joystick and Panning Grooves can be disabled. In order to
record values in the Groove, you will need to Tap DK or STICK buttons and
Keyboard AKS information will be shown. With KS you can program Keys and
Dynamics. Dynamics are controlled by playing keys along the key’s vertical: 0
V in the middle part of the key height, pianissimo at the top and fortissimo at
the bottom (see Dynamic Range for more details). DK Groove values are
strictly correlated to DK values.
When you enable ‘Record’ in KS (Sequencer), every note will skip to next
Sequencer groove step, allowing consecutive notes and dynamic
programming. And for Random and Fifth, Third, etc tone buttons: the Random
will play a random note every time you push it. It works for the current groove
step or also when recording a sequence (‘Record’ enabled). The other
buttons will transpose the sequence! by the amount it says and they can be
combined (you can touch several at time for doing more intervals). These
Page 17

interval buttons don´t transpose the recorded sequence but introduce an
offset voltage when touched down. After programming Grooves, you can
enable or disable every Sequencer step by pushing down Steps buttons. Also
you can Sync and/or jump through steps during performance, touching the
top bar step numbers, the same goes for selecting programming Groove,
below.
Step numbers bar <—>
Groove bar <—>
The Sequencer has two separate Voltage Outputs. One for the keyboard (DK
keyboard) going to Input 1 (Keys) and Input 2 (Dynamics). The other Voltage
Output goes from the Sequencer to the Vertical and Horizontal STICK rows
(Vertical is the Keyboard Voltage and Horizontal is the Dynamics). You can
disable/only vertical/both the Joystick Outputs from the toggle. N.B. The
Joysticks Vertical Range (16) must be set to 0.32 (0.32 V/Octave sensitivity
for an 'equal scale') as for Input 1 (8). The Joystick handles work as an offset,
you can resets it to zero (central handle position, double tap for reset).
DK GROOVE:
Keyboard Voltage → Input 1 (8)
Dynamics Voltage → Input 2 (9)
STICK GROOVE:
Keyboard Voltage → Vertical Stick (16)
Dynamics Voltage → Horizontal Stick (15)
Sequencer SYNC
By enabling the SYNC switch, (green highlighted) you will not longer be
able to set the local tempo since now the TEMPO is sampled from Master
SYNC Clock. You can subdivide the SYNC Tempo from the Subdivision
Menu.
Subdivision Menu will show a list of symbols that abbreviate musical note
time values:
Normal : 1/1, 1/2, 1/4, 1/8, 1/16, 1/32, 1/64
Page 18

Triplets : 1/1T, 1/2T, 1/4T, 1/8T, 1/16T, 1/32T, 1/64T
Dotted : 1/1D, 1/2D, 1/4D, 1/8D, 1/16D, 1/32D, 1/64D
Where ‘D’ is a dotted note and ’T’ is triplet.
With 1/4 (Default), the Sequencer will fire a ‘step’ every BPM according to
'Local Tempo' or 'MIDI Clock’ BPM.
• 1/4 - each step is a quarter note (or BPM),
• 1/4D - each step is a dotted quarter note (or 1.5 x BPM),
• 1/4T - each step is a triplet quarter note (or 0.5 / 3) etc.
Feedback
The SCOPE jack-socket is connected to Column A in the Patchboard (Matrix)
and therefore sees any output connected to the METER.!In conjunction with
the Control Output sockets there are three possible ways of gaining access to
the Matrix Board. !Although this socket is marked SCOPE (for Oscilloscope),
it can be used for a variety of purposes, including feeding back a signal into
the Studio via one of the Input Amplifiers (see section V in the official VCS3
Putney User Manual).! Naturally you can rescale feedback signals with knobs
(exponential knobs).
Oscilloscope/Spectral
Oscilloscope can manage time scale for zooming and amplitude input gain,
you can read either DC and AC signals.
In Spectral mode, the time scale and amplitude are used as exponent to
logarithmically display the frequency and amplitude. The frequency analysis
FFT (i.e. Fast Fourier Transform) is 4096 samples.
Mic/Samplers
You can fe ed iVCS3 with two samplers and/or mixed signal from
microphone /line or Audiobus/Inter-App Audio when connected. See the
original VCS3 manual for more details.
You can touch and drag the sampler’s waveform to scrub the audio file. The
speed of the scrubbing is relative to the position of the finger inside the
waveform: higher positions produce faster scrubbing
# Tap the symbol to set the loop points. When in "loop edit mode" you can:
Page 19

- tap and hold inside the selection for the fine regulation of the loop
- double tap inside the selection to select again the whole file
When a loop is set, deselect the (tap again #) to zoom-in into the loop
selection.
$
Reset scanning to the start position.
%
Waveform Scrubbing Mode, when selected the pointer jumps to the Absolute
position of the finger that touches the waveform. If unselected (Relative) it
does not jump but the scrubbing occurs from Sampler position toward finger
touch.
From left to right:
1)
Reset to beginning both samplers
2)
Synchronise the sampler Ch. 2 phase according to sampler Ch. 1
3)
Load an audio sample, see Samples Manager for mode details.
If you are loading a stereo sample, you can chose the input channel: left/right
or 50% mix of both channels.
It’s possible trigger the ‘reset scanning’ from DK or the Sequencer.
Finally you can link the Ratio of Sampler Ch.2 with the Sampler Ch1 (lock
icon), in this mode you can feed iVCS3 with stereo files and keep the
scanning ratio synchronised.
N.B. You can disable the Crossfade and change Waveform style from
the Settings. See the Settings for more details.
FX
Just outside of the Master Output (Matrix Columns B and C) this
Flanger/Delay effect can be toggled in three positions: Off, Flanger and
Delay, FLANGER: The!‘lfo’!(i.e. Low Frequency Modulation) and!‘d’ (i.e.
Delay)! knobs adjust the frequency and amplitude of the controlling
oscillator. Increasing the amount of feedback, with the! ‘g’!(i.e. Gain or
Feedback) knob will produce more metallic timbres by reinforcing and
Page 20

emphasizing the harmonic resonances of the internal delay line whose length
(and resulting resonant frequency) is set by the!delay!knob.
DELAY:! The! ‘d’! knob sets the length of the delay line with lower settings
corresponding to shorter delays.! The amount of feedback, controlled with
the! ‘g’! knob, will determine how many “echoes” will be heard – this is the
echo-density.
!Note: Wild and wonderful pitch glissandi will result from riding or randomizing
the!‘d’!knob.!!This is because you are changing the length of the delay-line on
the fly and this has the effect of temporarily transposing the “sample” that is
loaded into the delay line at that time.
!Note: The delay line is cleared and reset when you toggle the on button.
Note: ‘d’ time in Flanger is in the range 1 ÷ 10 Milliseconds, while in Delay is
in the range 10 ÷ 2000 Milliseconds. Flanger ‘lfo’ is in the range 0.01 ÷ 10 Hz
while in Delay mode is in the range 0 ÷ 1 for dry/wet mix.
Dynamic Compressor/Expander. This unit functions as an audio
compressor, limiter, expander, using either soft-knee or hard-knee
mapping, and with dynamically variable performance characteristics.
Settings
Sampling Rate, for full-range audio, the recommended sampling rate is 44.1
kHz. Using a lower rate iVCS3 will reduce the number of samples that has to
calculate, this will facilitate your Device's burden, but it will also reduce the
frequency range. If your device is struggling at 44.1 kHz, you should try a
lower rate and/or increase Buffer Size.
Buffer Size set the Audio Device latency. When you run iVCS3 from
Audiobus, or Inter-App !this value will be taken from Audiobus or Inter-App
Host. Warning! When an app runs first and keeps running in the background,
the Sampling Rate and Buffer Size will impose for the whole iOs while
running.
Keyboard Split (Octaves) sets the number of keys visible in the main view.
Spring Reverberation
You can select one of the six reverberation modes.
FDN is 8 delay line stereo FDN reverb, with feedback matrix based upon
physical modelling scattering junction of 8 lossless waveguides of equal
characteristic impedance. Based on Csound orchestra version by Sean
Costello.
Parametric is the Eugenio Giordani Schroeder model.
Page 21

IR implements direct convolution with VCS3 Spring Impulse <response
Sample.
Hybrid 1 perform an hybrid model between FDN/IR
Hybrid 2 perform an hybrid model between Parametric/IR
The last FTConv perform a convolutions between signal and IR pre-loaded
table in memory. Thus you can perform some interesting actions, (abbreviate
or retrograde IR) achieve very interesting results.
Spring crash use hardware accelerometer for triggering spring tilts, as the
original.
Ring Modulation
The Ring Modulation (i.e. RM) was one of the most recognisable effects used
by the BBC Radiophonic Workshop. It was the effect used to create the
voices of both the Cybermen and The Daleks for Dr Who.
The iVCS3 app implements three types of RM:
1)
’Ideal’ performs a simple multiplication between two signals A and B;
2)
’VCS3’ use a quadratic operator and can also simulate the vintage
leakage as the original;
3)
‘Diode’ is an implementation of Julian Parker’s digital model of a Ring
Modulator. N.B. The RM ‘Input A’ is the Modulating Signal and the ‘Input
B’ is the Carrier Signal. By inverting the order you can achieve different
sound results.
Include in Presets
The switch in this section is designed to include or exclude the Matrix,
Keyboard, Sequencer, Control Manager and Knobs Color when you save new
preset.
Snapshot Pad Resolution Update sets the time interval for the
interpolations, from about 15 to 350 milliseconds. Short times for higher
resolution but higher consumption of CPU.
Save/Restore the Last App Setup, when you exit from the application, save
the status (all iVCS3 and Fx Parameters) and reload when next opening the
app.
Joystick Handle Springy, enable/disable.
Dropbox link/unlink account.
 Loading...