

Page 1
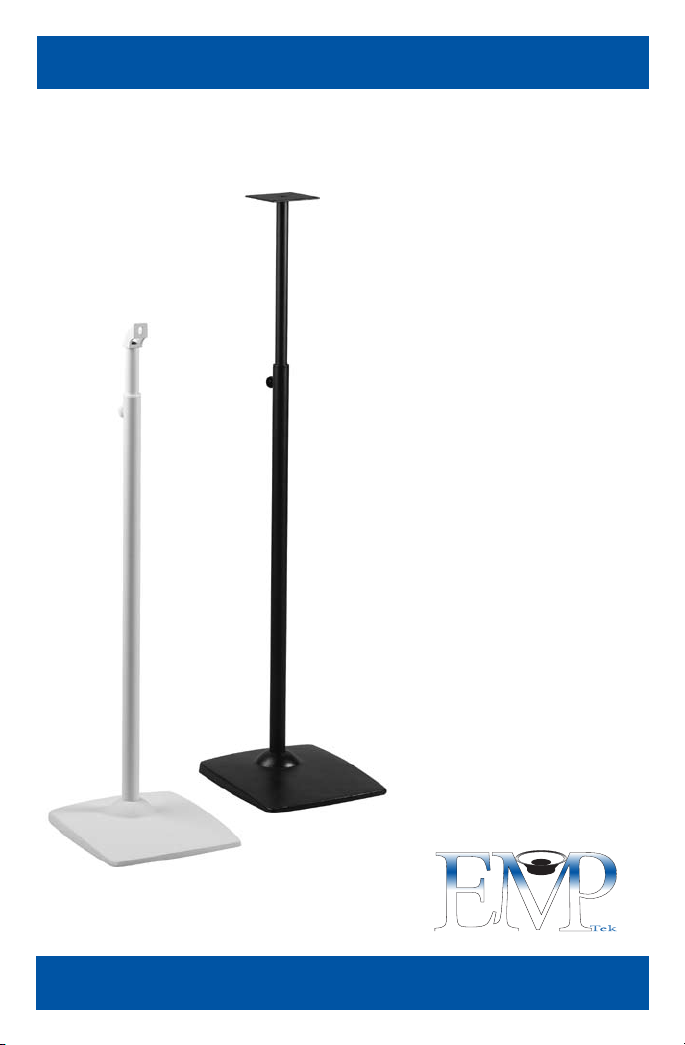
ON-WALL SP EAKE RS
Model
EMS
SPEAKER STANDS
USER & I N STA L L AT I O N M A N UAL
Page 2
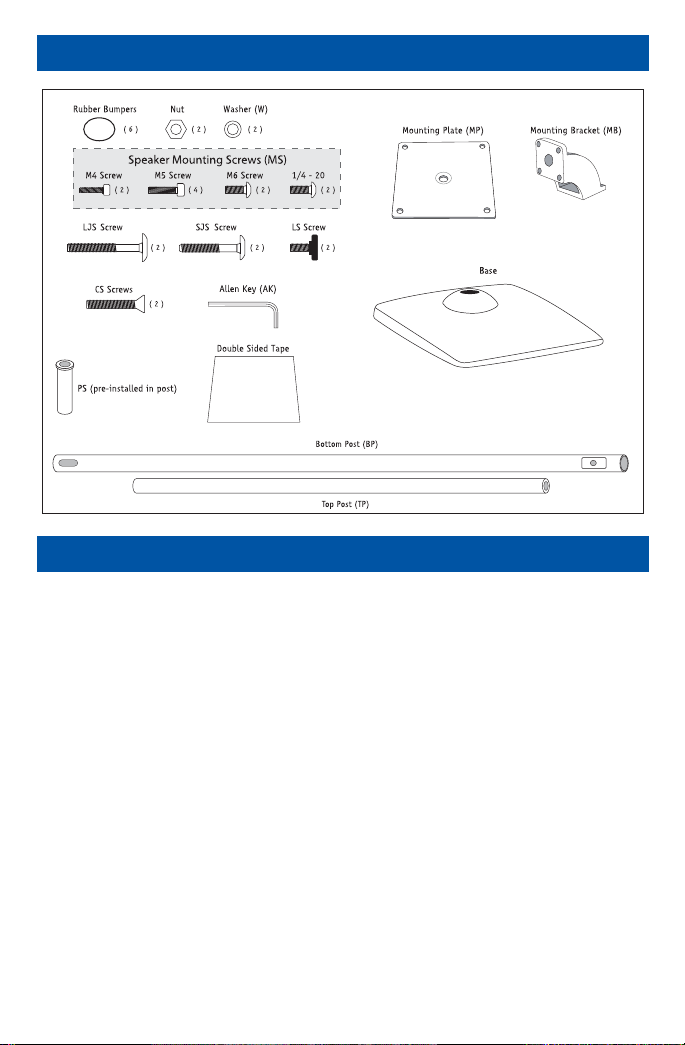
Kit Contents
Instructions
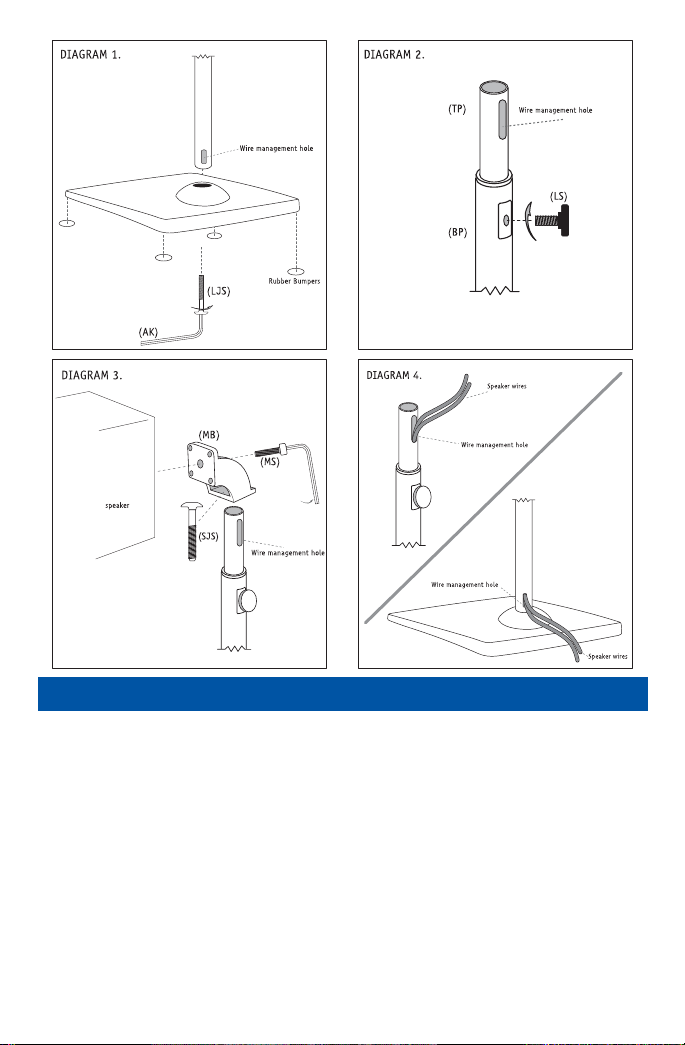
Step 1. Attach the Bottom Post (BP) to the Base with the Long Joining Screw (LJS) and Allen Key (A K)
Step 2. Attach the Rubber Bumpers (RB) to the underside of the base. (see diagram 1)
Step 3. Insert the Top Post (TP) into the Bottom Post (BP). Make sure that the Wire Management Hole
Step 4. Install the Lock ing Screw (LS) into the threaded hole in t he top of the Bottom Post (BP), a nd
Step 5. Attach the Mounting Bracket (MB) to the Top Post (TP) usi ng the Short Joining Screws (SJS)
OPTIONA L: Att ach t he Mount ing Plate (MP) to the Top Post (TP) using t he Counter Si nk
Step 6. Attach t he speakers to the Mounting Bracket (MB) u sing the appropriate Mou nting Screw
Step 7. Adjust the stand height by loosening the Lock ing Screw (LS), adjusting the height of the
Step 8. Repeat steps 1 through 7 for other sta nd.
supplied. NOTE: Please make sure that the wire management hole faces to the back of the base.
(see diagram 1)
is to the top. (see dia gram 2)
tighten. (see diagram 2)
and A llen Key (AK), make sure the back of the mount ing bracket faces the wire management
hole. (see diagram 3).
Screws (CS) a nd Allen Key (AK). Use the Double-Sided Tape to prevent the speaker f rom
sliding by adhering the tape in between the mount ing plate and the speaker. Using the tape is
optional as it may not be removable later.
(MS) and Washer (W) for your speaker. Tighten rmly, using t he Allen key (AK) supplied. (see
diag ram 3)
spea ker to the desired height a nd then re-tightening the Locking Screw (LS) fully. Feed the
spea ker wire through the post a nd connect to the system. (see diagram 4)
Page 3
Warranty
Your EMS Speaker Stands are covered by a limited warranty against defects in materials
and workma nship for a period of 1 year from the original date of purchase. is wa rranty
is provided by the authorized EMP Tek dealer where the speaker was purchased. Warranty
repair will be performed only when your purchase receipt is presented as proof of ownership
and date of purchase. Defective parts will be repaired or replaced without charge by your
dealer’s store or the location designated by your dealer authorized to service EMP Tek products.
Charges for unaut horized service and transportation cost a re not reimbursable under this
warranty. is warranty becomes void if the product has been damaged by a lteration, misuse
or neglect. e warrantor assumes no liability for property damage or any other incidental
or consequential damage whatsoever which may result from the failure of this product. Any
and all warranties of merchantability and tness implied by law are limited to the duration of
this express warranty. Some states do not allow limitations on how long an implied warranty
lasts, so the above limitations may not apply to you. Some states do not allow the exclusion
or limitation of incidental or consequential damages, so the above limitation or exclusion
may not apply to you.
Page 4

382 Marshall Way, Layton, Utah • USA • 84041
Toll Free: (800) 543-2205 • Fax: (801) 543-3300
www.emptek.net
It is EMP Tek policy to contin uously incorporate im provements into products; all s pecications are subj ect to change without notic e.
Copyright © 20 07 EMP Tek . All Rights Rese rved.
 Loading...