

Page 1
Page 2

FCC Certification
This device complies with part 15 of the FCC rules. Operation is subject to
the following two conditions:
(1) This device may not cause harmful interference, and
(2) This device must accept any interference, received, including interference
that may cause undesired operation.
Note:
This equipment has been tested and found to comply with the limits for a
Class B digital device, pursuant to part 15of the FCC Rules. These limits are
designed to provide reasonable protection against harmful interference in a
residential installation.
This equipment generates, uses, and can radiate radio frequency, energy and,
if not installed and used in accordance with the instructions, may cause
harmful interference to radio communications. However, there is no
guarantee that interference will not occur in a particular installation. If this
equipment does cause harmful interference to radio or television reception,
which can be determined by turning the equipment off and on, the user is
encouraged to try to correct the interference by one or more of the following
measures:
- Reorient or relocate the receiving antenna.
- Consult the dealer or an experienced radio/TV technician for help
- Increase the separation between the equipment and receiver.
- Connect the equipment into an outlet on a circuit different from that to
which the receiver is connected.
CAUTION
Any changes or modifications not expressly approved by the party
responsible for compliance could void the user’s authority to operate the
equipment.
FOR EUROPE
“The drive is in conformity with the EMC directive and low-voltage
directive.”
Page 3

WEEE LOGO
Disposal of Old Electrical & Electronic Equipment (Applicable
in the European Union and other European countries with
separate collection systems)
This symbol on the product or on its packaging indicates that this product
shall not be treated as household waste. Instead it shall be handed over to the
applicable collection point for the recycling of electrical and electronic
equipment. By ensuring this product is disposed of correctly, you will help
prevent potential negative consequences for the environment and human
health, which could otherwise be caused by inappropriate waste handling of
this product. The recycling of materials will help to conserve natural
resources. For more detailed information about recycling of this product,
please contact your local city office, your household waste disposal service or
the shop where you purchased the product.
Page 4

SAFETY INSTRUCTIONS
Caution:
Please read this page carefully before use.
POWER
AC adapter power rating must be checked before use.
IMPORTANT NOTE
Please note that there is a removable Lithium-ion battery.
WARNING
To prevent fire or shock hazard, do not expose the unit to rain or
moisture.
SAFETY PRECAUTIONS
1. The unit should only be operated with a recommended AC
adapter.
2. AC adapter should be routed carefully such that it will not obstruct
the way of any moving things.
3. Do not drop the unit or apply shock to it. Damages arise from here
will not be covered by warranty.
4. Do not remove the cover, attempt to disassemble the device or use
the wrong type of batteries. Damages arise from here will not be
covered by warranty.
5. Avoid hindering the ventilation of the unit by covering it with a
cloth, etc.
6. If an abnormal smell or smoke is detected, immediately turn the
power OFF and pull out AC adapter. Contact your nearest service
center.
7. Avoid placing the unit under direct sunlight or near a source of
heat. Particularly, never leave it in an automobile or on the
dashboard.
8. The unit may not function properly if used at extreme low or
freezing temperatures. The ideal ambient temperature is above
+5°C(41°F).
Page 5

9. The unit should not be used near water, e.g. near a bathtub,
washbowl, kitchen sink, laundry tub, in a wet basement, or near a
swimming pool, etc.
10. Avoid places where it is dusty or where the humidity is high.
11. Avoid placing the unit on an unstable place such as a shelf or in a
place subject to vibrations.
12. Keep the unit away from sources of magnetic fields such as TC
sets, speaker systems, radios, motorized toys or magnetized
objects.
13. AC adapter of the unit should be unplugged from the outlet when
left unused for a long period of time.
14. All damages or failure in operation should be attended by a trained
technician.
When using in car,
1. In case of abnormality such as smoke production, immediately
unplug the car battery adapter from the cigar lighter socket.
2. Do not leave the products or batteries in the car, particularly above
the dashboard, for this may lead to malfunction or damage due to
solar heat.
Page 6

Earphones
Follow Traffic Safety Instructions
•
Do not use the earphones while driving an automobile or riding a
bicycle. It is not only dangerous, but also against the law.
• To avoid an accident, do not turn up the volume of the earphones too
high while walking.
Protect your ears
•
Do not turn up the volume too high. Doctors warn against prolonged
exposure to high volume.
•
Stop using the device or turn the volume down if you experence
ringing in your ears.
Ambient operating conditions
•
Ambient temperature: 5°C ~ 35°C (41°F ~ 95°F)
•
Humidity: 10 ~ 75%
Environmental Information
•
Follow local guidelines for waste disposal when discarding packages,
batteries, and old electronic appliances.
•
Your player is packaged with cardboard, polyethylene etc., and does
not use any unnecessary materials.
Page 7

Table of Contents
1 INTRODUCTION 1
1.1 O
1.2 P
1.3
1.3.1 Connection 3
1.3.2 Caution 4
VERVIEW
ACKAGE CONTENT
HARGING THE BATTERY
C
1
2
3
2 GETTING STARTED 5
2.1
2.2 P
ONNECTION
C
OWER ON/OFF
PERATION
& O
7
5
3 AUDIO PLAYER 8
3.1 MAIN MENU 8
3.1.1 Music Mode 9
3.1.2 FM Radio 15
3.1.3 Recording 17
3.1.4 Browser 18
3.1.5 Copy 19
3.1.6 Settings 22
4 DEVICE MODE 26
TO CONNECT TO
4.1
PC 26
5 DRIVER INSTALLATION (WIN98/98SE ONLY) 27
6 SAFE REMOVAL OF USB STORAGE DEVICE 31
WINDOWS
6.1
6.2 M
AC
2000/XP/ME 31
SERS
OS U
32
7 TECHNICAL DATA 33
Page 8

1 INTRODUCTION
1.1 Overview
First of all, we would like to thank you for the purchase of this OTG AUDIO
Player. Welcome to a new solution for mobile interconnectivity: USB 2.0
*
OTG (On-The-Go)
Enhanced with a USB OTG interface, this portable AUDIO Player
combines versatility and quality. Besides working as an audio player it
plays a dual role as a host or a peripheral. When it connects to other USB
mobile devices/peripherals such as MP3 players, digital cameras, card
readers, or flash memory disks (that are compliant to USB Mass Storage
Class), it supports data backup and downloading without linking to a PC.
When connected to PC, it works as a storage device (Hard drive) enabling
large data storage.
With this handy and efficient OTG AUDIO Player navigating your music
library and managing files will be quick and simple. Here is an overview of
the key features:
!
•
Sleek & compact size, ideal for On-The-Go backup
•
Streamlined controls and animated function icons for easy
operation
•
Intelligent USB2.0 OTG interface with dual role capability (host or
peripheral)
•
Dynamically switches between USB2.0 On-The-Go (OTG)
Storage Device mode and USB2.0 OTG Host (stand-alone)
•
One-Touch copy and backup data from any USB mass storage
device without connecting to a PC
•
Removable Lithium-ion rechargeable battery
• Distinctive LCD display indicating host/device mode, battery level
status, copy progress etc.
•
Auto power saving mode
1
Page 9
* USB On-The-Go (OTG)
specification that augments the capability of existing mobile devices and
USB peripherals by adding host functionality for connection to USB
peripherals. USB OTG defines a way for portable devices, through only
one mini-connector, to connect to supported USB products in addition to
the PC. (Please refer to www.usb.org
is a new supplement to the USB 2.0
for more details on USB OTG.)
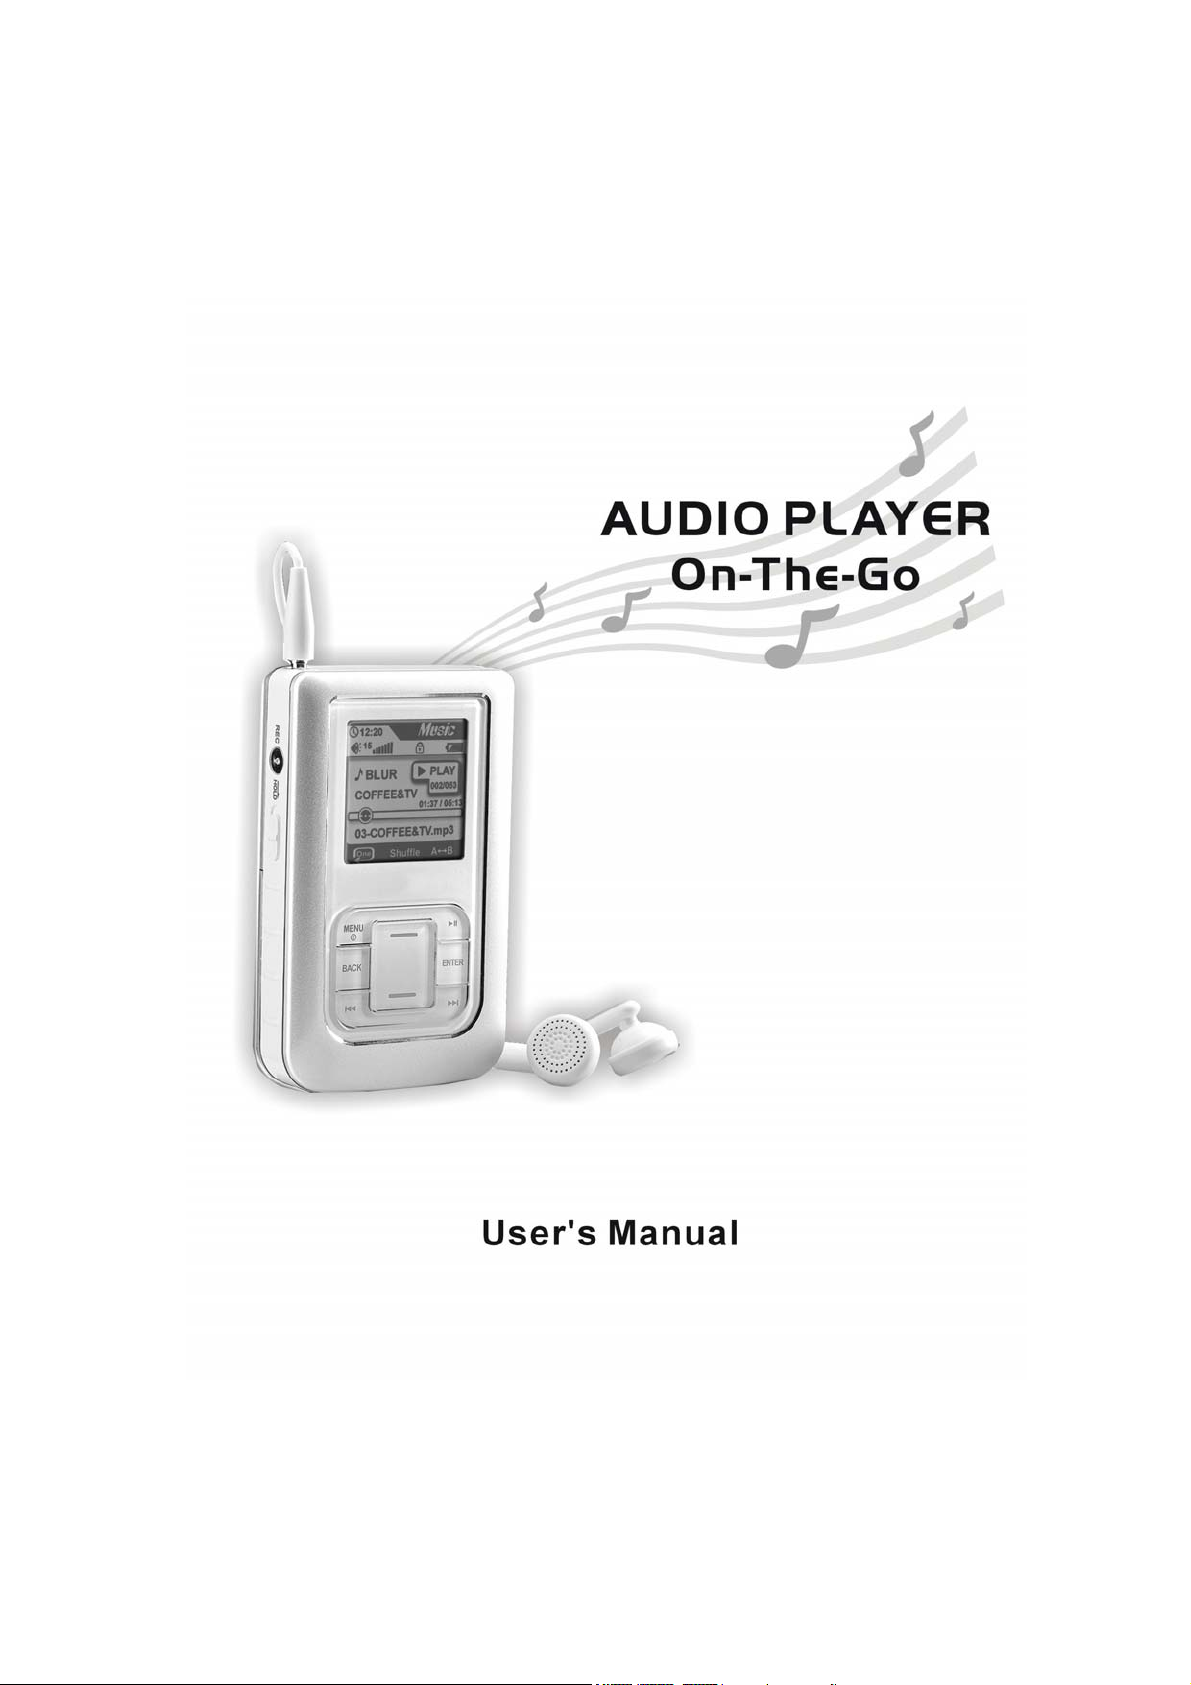
1.2 Package Content
Accessories subject to change without notice and items displayed may vary.
2
Page 10
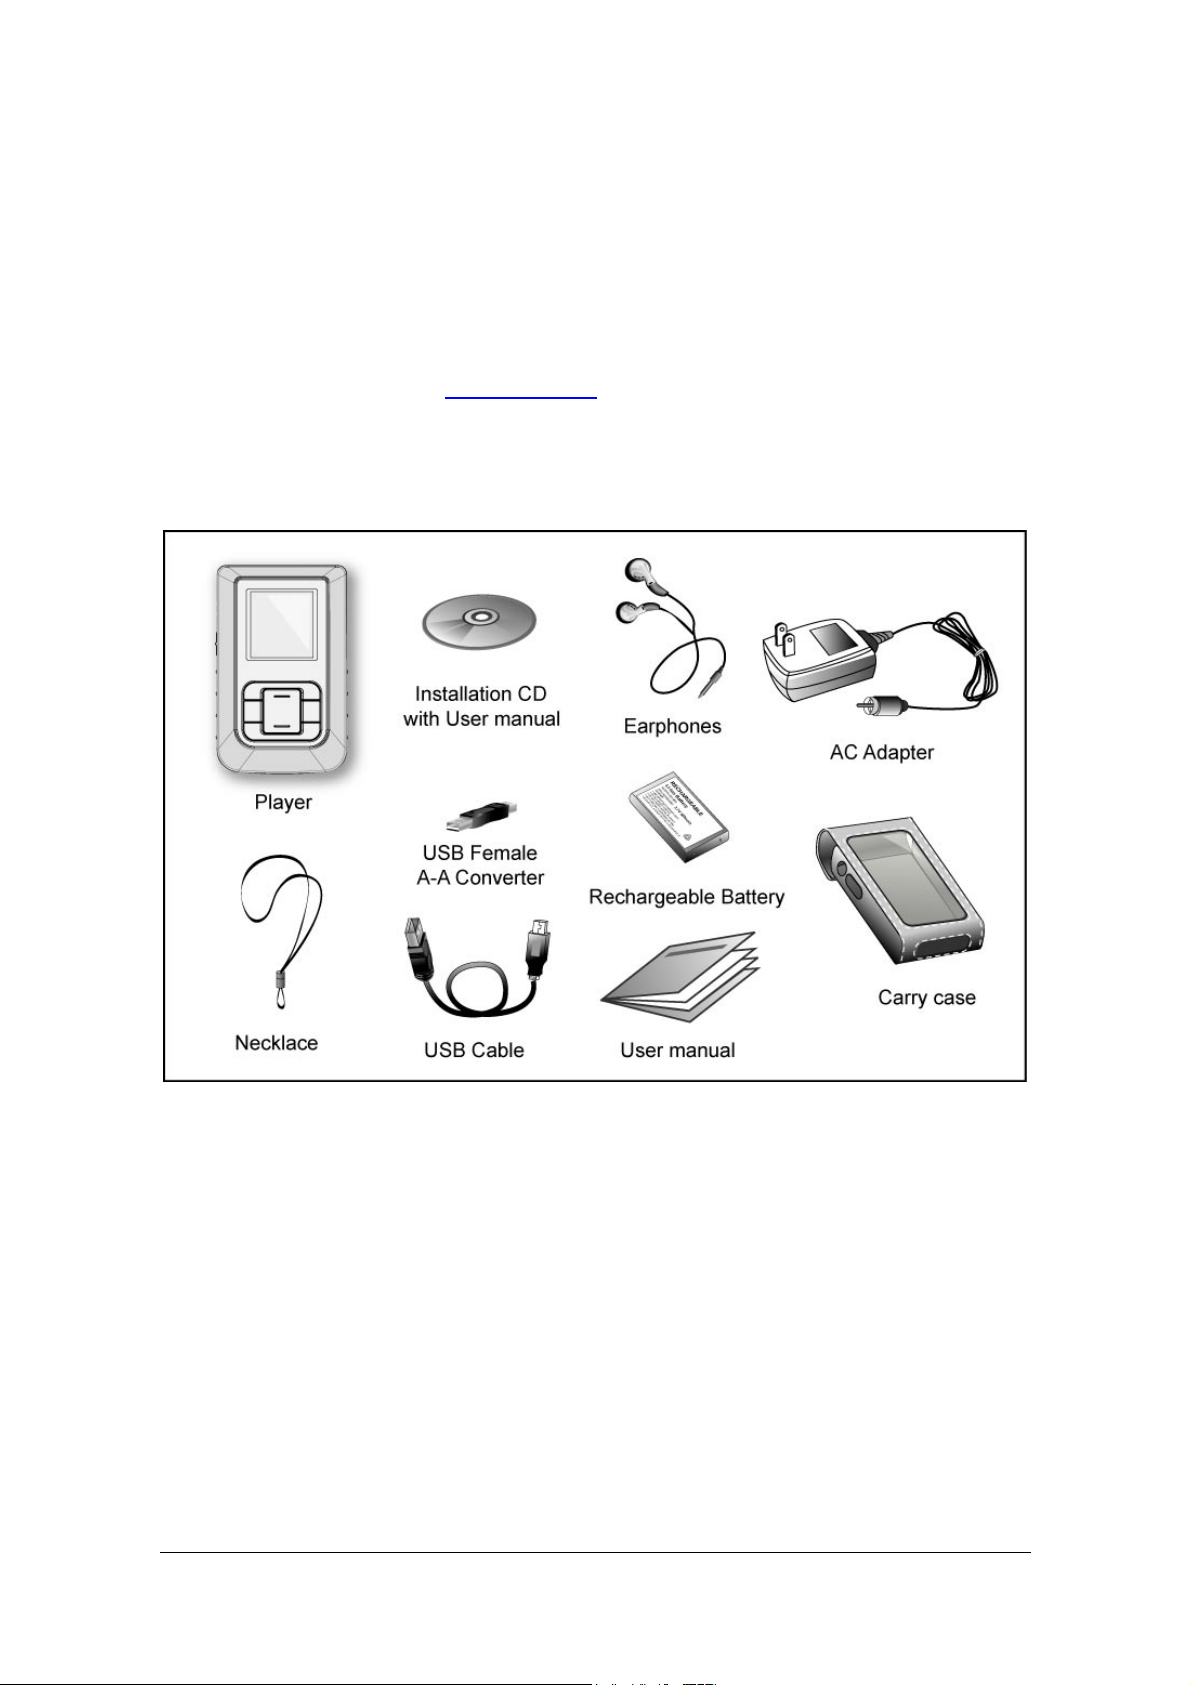
1.3 Charging the battery
1.3.1 Connection
1. Plug one end of the AC adapter to the DC jack of the player.
2. Connect the AC adapter to a power socket.
AC adapter for this product is 100~240V, 50~60Hz
Note:
The first time the battery is charged, it will take approximately 3
hours.
Battery recharge time in normal operation is approximately 2
hours.
We recommend that you charge the battery with AC adapter,
which is faster, though it’s also available to charge the battery
with USB cable connecting to PC.
If the device hangs, open the battery door (on the rear of the
player). Remove the battery and put it back in again.
3
Page 11

1.3.2 Caution
•
To avoid the risk of fire, do not charge longer than 12 hours.
•
Do not plug several devices into the same outlet.
•
Do not use a rechargeable battery or charger that is defective.
• When using the rechargeable battery for the first time or after
several months of non-use, fully charge it first.
•
Overcharging will reduce the battery life.
•
The rechargeable battery is a consumable item and its capacity
will decrease gradually.
•
To prolong the life of your battery, use the fully charged battery
until it is completely discharged, and then fully charge it again
before use. If you charge the battery that is not completely
drained, the battery operating time will decrease. In this case, fully
cycle (fully charge and then fully discharge) the battery several
times.
•
Do not let metallic objects, such as necklaces or coins, come into
contact with the terminals (metallic parts) of the charger and the
built-in rechargeable battery. A fire or electric shock may result.
•
Do not touch the charger with wet hands.
4
Page 12
2 GETTING STARTED
2.1 Connection & Operation
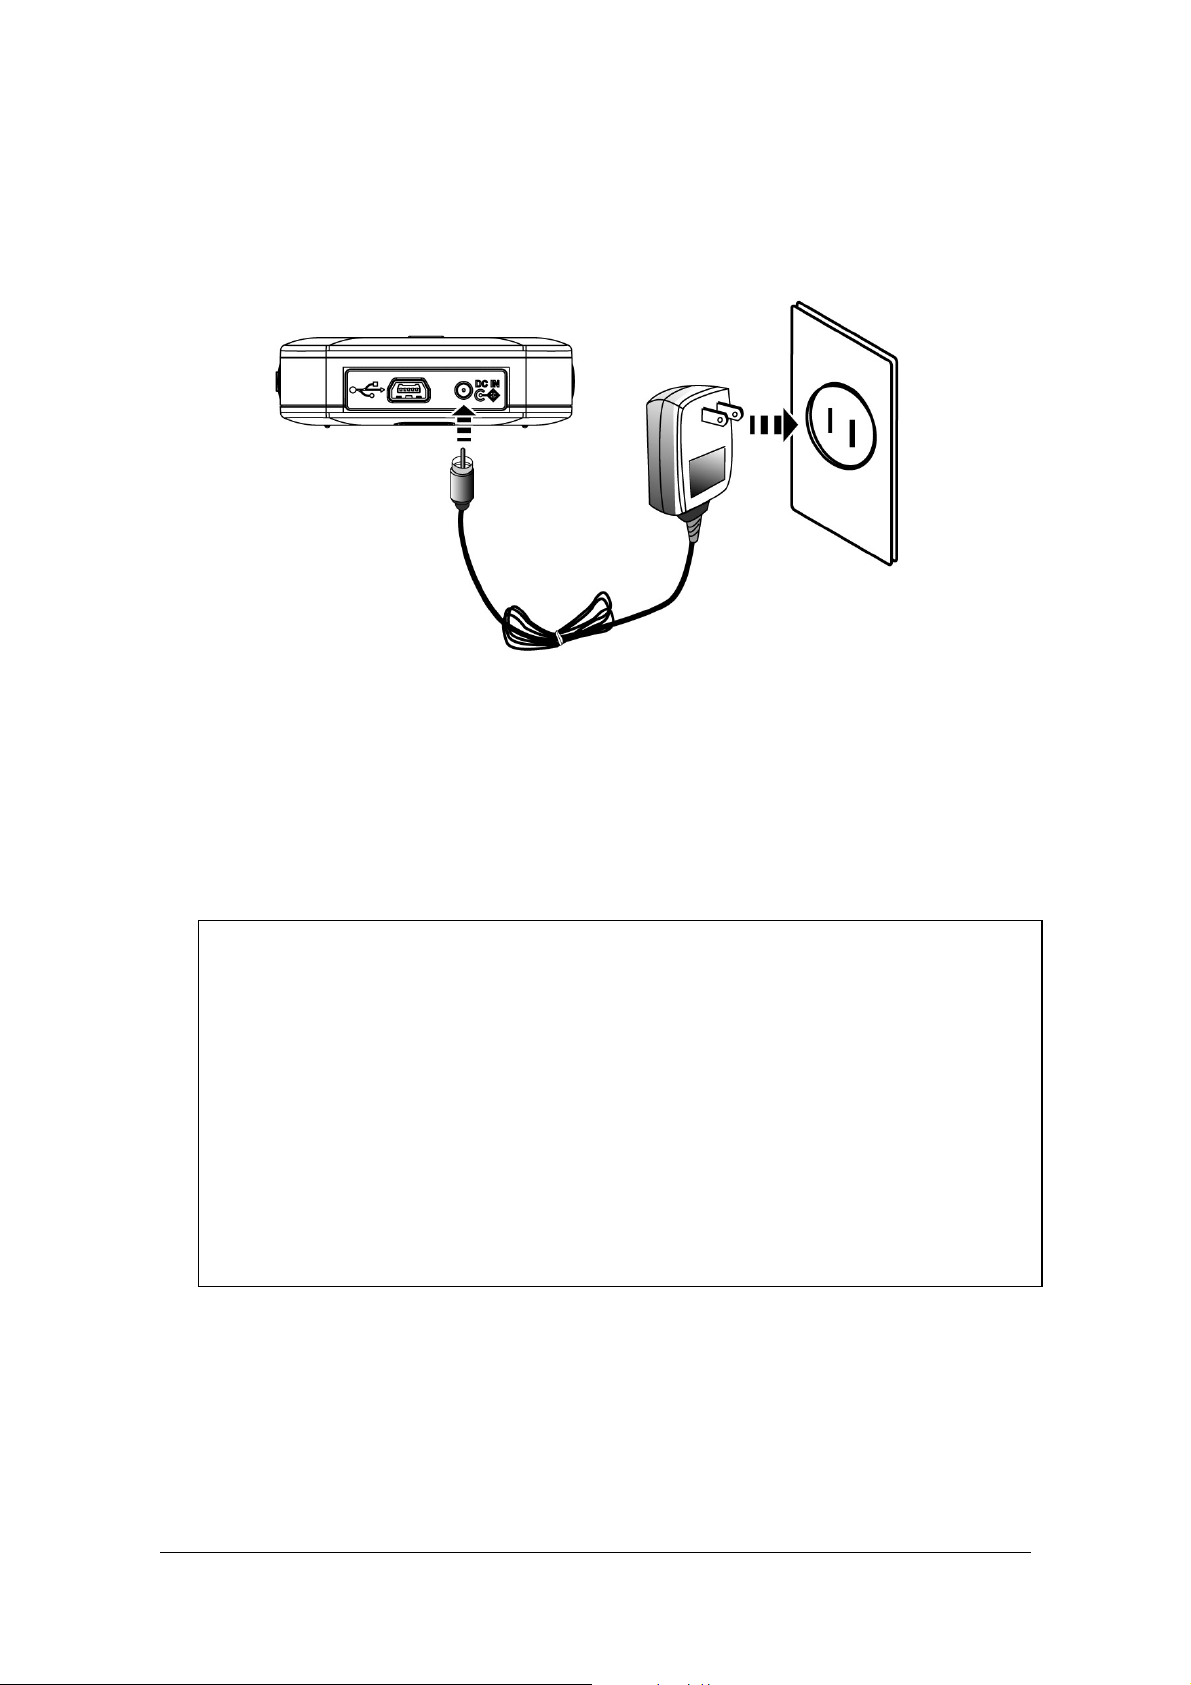
Front / Side View
Note: HOLD
Push
switch is to disable all controls of the player.
Hold
switch up/down on the side to activate this function.
5
Page 13
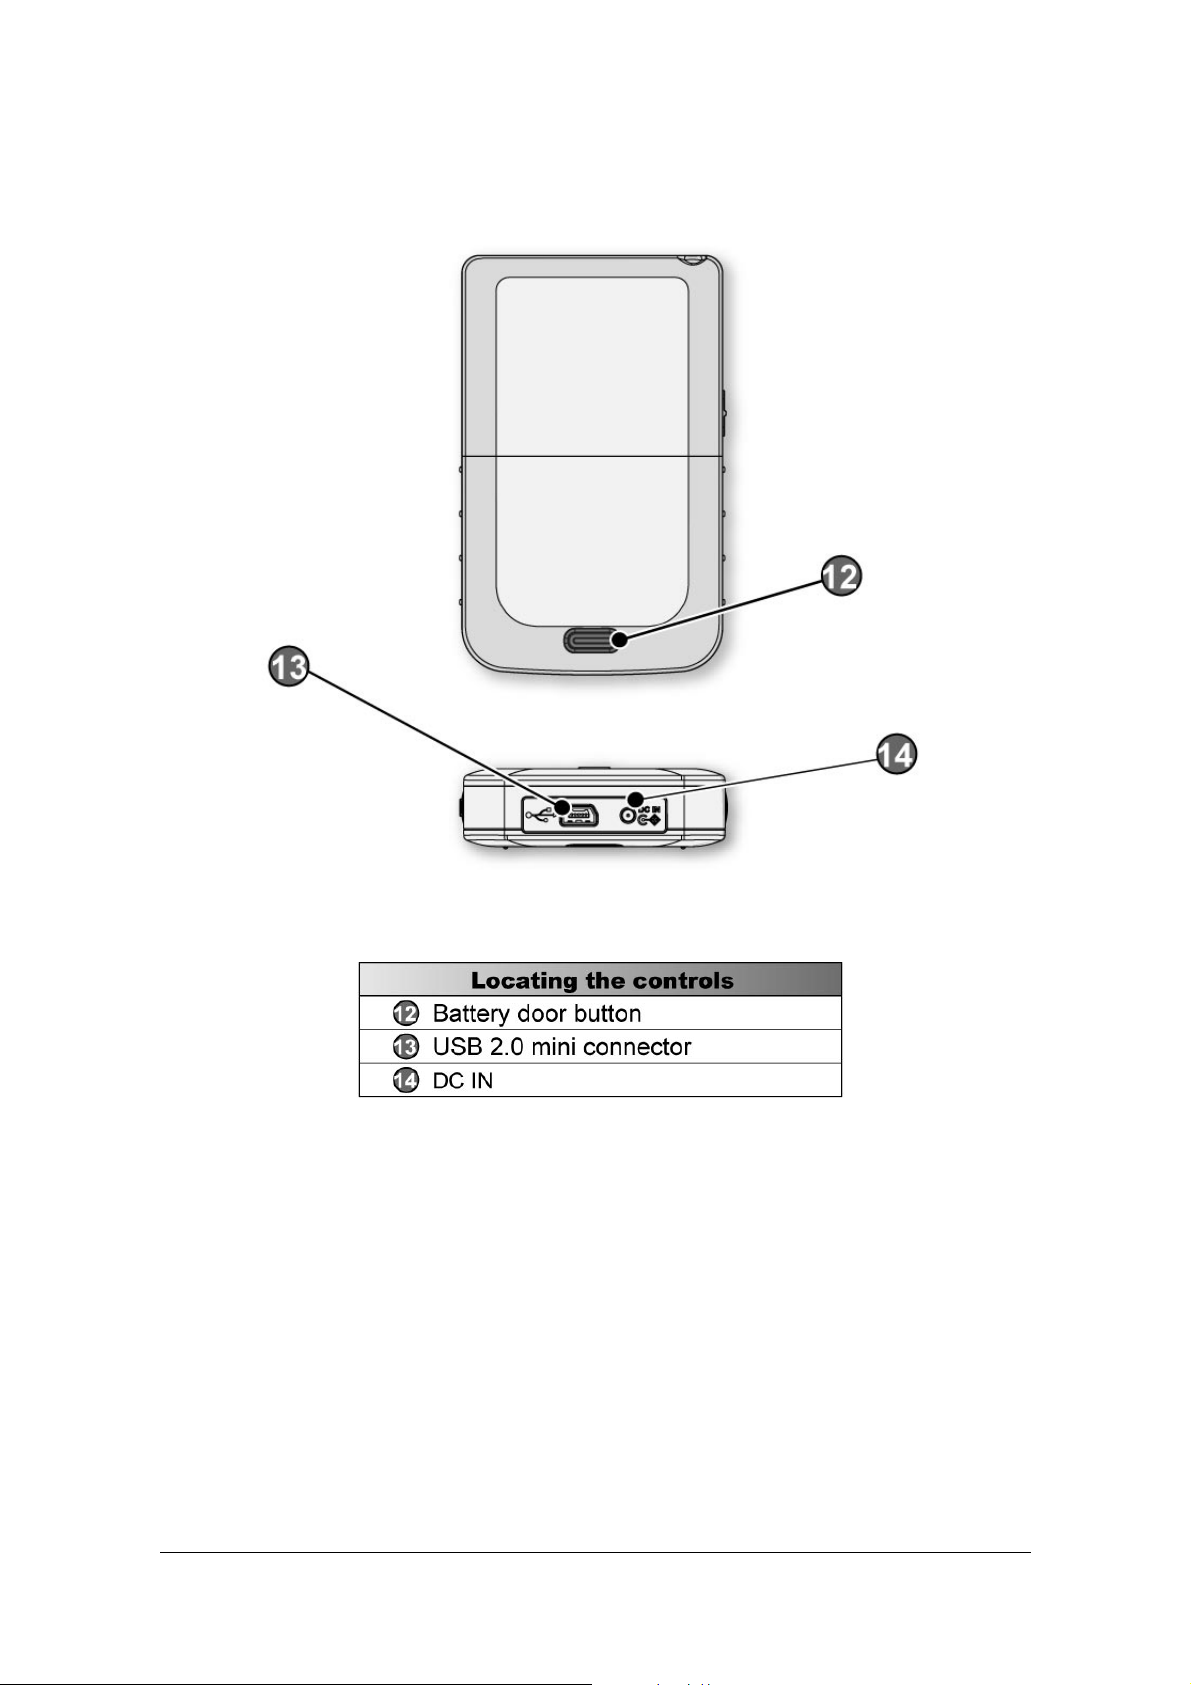
Rear / Bottom View
6
Page 14

2.2 Power On/Off
To turn on the AUDIO Player, press and hold
To turn off the AUDIO Player, press and hold
MENU
MENU
for two seconds.
for two seconds.
7
Page 15

3 AUDIO PLAYER
3.1 Main Menu
Press
portion to scroll rapidly.
Press
Press
After powering on the OTG AUDIO Player, the main menu, which shows
the major functions, will follow the greeting logo:
ENTER
BACK
UP & DOWN
to select or hold down the top/bottom
to confirm and enter.
to return to the previous menu or screen.
Mode Function description
Music Audio (MP3) Playback function
FM Radio FM radio tuning
Recording Voice/FM recording
Browser File browsing
Copy Copy (backup) files
Settings System settings
8
Page 16

3.1.1 Music Mode
Clock
Sound volume indicator
File name
Repeat Mode
Icons Function description
Hold
Main function title
Battery life indicator
Playback indicator
Elapsed / Total Time Indicator
Progression Bar
Repeat AB
Sound volume
Sound volume control indicator.
indicator
Battery life
indicator
Playback indicator
Battery voltmeter. The battery life is divided
into 5 levels.
Playback indication. It includes the play icon
indication, the current track playing order and
the total track numbers.
Clock Clock
Progression bar Shows the progress of the track currently
being played.
Hold
Disable all controls of the player
Push
Hold key up/down on the side to
activate this function.
Elapsed / Total
Time Indicator
Shows the elapsed time of the current track
being played and the total time of the current
track.
Main function Title Indicates the main function that is activated
File name Indicates file name of current track
Repeat Mode
Repeat Mode Selection.
(Repeat None/ One/ Album/ All/ Shuffle)
Repeat AB Partial playback of current track
9
Page 17

A. Operation
Play
Press to play music.
Pause
While in Play mode, press to pause playback of the current file. Pressing
again will resume playback.
Stop
While in Play mode, press and hold for a moment to stop playback.
Volume
Press the top/bottom portion to increase/decrease the audio volume level.
Next / Fast Forward
While in Play mode, press this button once to go to the next song.
Continuous pressing will activate the fast forward function.
Previous/Rewind
While in Play mode, press this button once to go back to the previous song.
Continuous pressing will activate the rewind function.
REC
In each mode (except
FM Radio
and
Copy
), press this button to record
voice. Press this button to start voice recording and press again to stop.
10
Page 18

B. Setting
Music
In
Repeat A-B
This function allows you to repeat a designated section of the file/track you
choose.
1. In Play mode, press
2. While in Play mode, select the first point (A) and press
3. Select the second point (B) and press
4. To cancel, press
Mode, press
setting list. Press ENTER and back to the Play screen.
of stops flashing.)
flashing.).
ENTER
ENTER
BACK
and there are following settings:
and choose
to the main Menu.
Repeat A-B
ENTER
form the
(B of stops
ENTER
. (A
Other Setting
Press
Press
portion to scroll rapidly.
To browse options available in each setting, press or
Press ENTER to confirm.
Press
ENTER
UP & DOWN
BACK
to view the setting list.
to return to the previous screen.
to select or hold down the top/bottom
.
11
Page 19

Repeat Mode
Repeat None
Repeat None
Repeat One
The default setting, all tracks are played in order.
Repeats the current file/track.
Repeat Album
Repeat All
Repeats all the files on the disc.
Repeats the current directory.
12
Page 20

Shuffle
EQ (Equalizer)
By activating Shuffle, all tracks will be played in random order.
Six EQ pre-sets are available:
Jazz
music is maintained and no effects are added.
and
Ultra bass
. In
Flat
Flat, User define, Rock, Classic
mode, the natural sound of the
,
User define
allow to define different levels for: 60Hz, 250 Hz, 1000 Hz, 4000
Hz, & 12000 Hz.
enables a user defined 5-band equalizer which
Maximum
Indicator
Minimum
Frequency
13
Page 21

SRS
This is a patented technology that significantly enhances the quality of
mono and stereo audio material.
When SRS is activated, four kinds of SRS sound effects are available:
SPK type, Focus, SRS and TruBass.
SPK Type
Focus
•
Enhances audio quality of headphones.
•
Activated when SRS function is on.
•
Levels of headphone (HP): 40, 60, 100, 150, 200,
250, 300 and 400 are available.
•
Elevates the sound image field to create the
perception of image height.
•
Levels of low, middle and high are available.
SRS
TruBass
EQ and SRS can’t work at the same time.
EQ works when SRS is OFF.
•
3D surround sound effect
•
Sets the level of 3D effect
•
Levels of 0-10 are available.
•
Enhances bass performance.
•
Delivers the perception of deep rich bass up to an
octave below the physical low frequency limitation of
small, medium, and large speakers or headphones.
•
Levels of 0-10 are available.
14
Page 22

3.1.2 FM Radio
Sound volume
indicator
Station
number
Recording file
Recording indication
A. Operation
Press
Clock
VOL+ & VOL-
Hold
Title
Frequency scale
Sound effect
Frequency Indicator
to control the volume.
Press
Previous / Rewind
or
Next / Fast Forward
select FM frequency/channel.
FM Recording
A dedicated recording function in FM Radio.
Press to start FM recording and press again to stop.
to
15
Page 23

B. Setting
Press ENTER to view the setting list.
Press
portion to scroll rapidly.
Press
Press
Memory channel
ENTER
BACK
UP & DOWN
to confirm.
to return to the previous screen.
Memory function of 20 preset FM channels
to select or hold down the top/bottom
Scroll bar Channel
Delete channel
The preset channels can be deleted.
16
Page 24

3.1.3 Recording
Go to the Main Menu and select
Press to start FM recording in
Press to start copy files in
Sound volume
indicator
Press
Recording
to start voice recoding and press again to
.
stop.
Voice recording is also available in other modes by
pressing
Hold
Clock
(except FM Radio and Copy modes)
.
FM Radio
Copy
mode.
mode.
Title
Battery life
Recording indicator
Recording
Note: Files recorded are saved in
RECORD
Recording file
folder under
Browser
.
17
Page 25

3.1.4 Browser
Browser supports the file management of the AUDIO Player and there are
two sub-functions: Play and Delete.
Go to the Main Menu and select
Press
Press or to choose Delete or Play icon on the bottom.
Delete
to select folder and press
: Press
file/folder deletion, and then press
Play
: Select the file and press
Browser
ENTER
.
to view folder contents.
or to confirm “Yes” & “No” for
ENTER
ENTER.
.
Hold
Folder
Delete
Play indication
18
Page 26

3.1.5 Copy
Working as a stand-alone host, the OTG AUDIO Player can connect to
other USB devices that are compliant to USB Mass Storage class. It
supports the data and photo backup of digital cameras, MP3 Players, card
readers or flash memory disk with one single touch, and without PC
connection.
3.1.5.1 Connecting a USB Device
a) To connect flash memory disks, or card readers:
Use the USB convertor (Standard A-female to Standard A- female)
included in this package to connect to the OTG AUDIO Player.
b) To connect MP3 players or digital cameras:
19
Page 27

Use the USB cable originally packed with your USB device to connect
the USB convertor (Standard A-female to Standard A- female) and then
to the OTG AUDIO Player.
3.1.5.2 USB Copy
USB Copy supports data backup from USB Storage Device
mentioned above to the OTG AUDIO Player.
Go to the Main Menu and select
Choose YES for dialogue box “Are you sure to Enter copy
COPY
.
mode?”
Press
REC
to start.
20
Page 28

3.1.5.3 Error Message
Disk Full
Copy Error This may occur when
•
Appears when the disk capacity is full.
•
Press Menu / Back to make it disappear.
1. there is an operation failure.
2. the device is not properly connected.
Note:
Only one USB device is supported at any one time; do not
connect more than one device.
21
Page 29

3.1.6 Settings
To set the basic system value for LCD Setting, Power Management,
Language, Firmware Upgrade, and Time Setting.
Go to the Main Menu and select Settings.
Press
UP & DOWN
to select or hold down the top/bottom
portion to scroll rapidly.
Press
Press or to adjust levels of each option.
Press
ENTER
BACK
Item
to select setting and enter/confirm.
to return to the previous menu or screen.
Scroll Bar
LCD Setting
sets the panel display.
1) LCD Contrast
Levels of 0-10 are available.
Scale bar
22
Page 30

2) Backlight Timer
sets the time for backlight supply.
Levels of 0-10 are available, and pushing to the end will always keep the
light on. (one second as a unit)
Power Management
1) Suspend Timer
A system suspend timer which starts when the
system enters suspend mode. Levels of 1-10 are available (one minute as
a unit), and pushing to the end will shut the function off.
2) Auto Power Off Timer
A system which sets the time to power off
automatically. Levels of 1-10 are available. (one minute as a unit.)
Scroll bar
Progressive Bar
Language
sets the screen language for AUDIO Player operation.
23
Page 31

Select the language by pressing and press
Firmware Upgrade
ENTER
to confirm.
First of all, connect the AUDIO Player to the PC and copy
firmware.sys
the AUDIO player.
Note: Make sure that the battery is fully charged before upgrading.
1. Select Firmware Upgrade and press
ENTER
.
2. Press or to select YES for dialogue box “Are you sure
to upgrade?” and then press
ENTER
.
3. Upgrade is in progress.
to
4. When firmware upgrade is complete, AUDIO player turns off
automatically.
24
Page 32

Time Setting
a system which sets the correct time.
Press or to set hours, minutes and seconds.
Press UP & DOWN to add/delete numbers.
25
Page 33

4 DEVICE MODE
Connect the OTG AUDIO Player to a PC/Notebook to transfer music/file
and charge the battery. In this mode, the OTG AUDIO Player works as a
USB2.0 high-speed device to the PC host and PC will see it as an external
drive, allowing you to drag and drop files onto the player. It is also
compliant to USB Mass Storage class.
4.1 To Connect to PC
1. Turn on the Audio Player.
2. Use the USB cable included in the package to connect the
player and the USB port of your PC.
3. The removable icon, such as
your computer and the working status shows on the Audio
Player.
4. Now you can back up or manage your files.
, appears on the taskbar of
26
Page 34

5 DRIVER INSTALLATION
(WIN98/98SE ONLY)
When you need to connect this Audio Player to the computer and use it as
a USB storage device, please make sure what your operating system is.
For the users of
driver. Please follow the steps below:
1. Insert the installation CD (bundled with the player) into the computer.
Browse the driver file and execute
First, choose the setup language.
Windows 98/98SE
, it’s required to install the USB storage
Win98SE Driver.
27
Page 35

2. Installation begins and then click “
Next
”.
3. Choose destination location and then click “Next”.
28
Page 36

4. Select a program folder and then click
“Next”
.
5. Setup is progressing.
29
Page 37

6. Driver installation is complete. Select “
computer now
.” and click “OK” to finish.
Yes, I want to restart my
30
Page 38

6 SAFE REMOVAL OF USB STORAGE DEVICE
Warning:
To protect against damage to your computer or your data, it is
strongly recommended that you follow the instructions below to remove the
USB Storage Device.
6.1 Windows 2000/XP/ME
(Example demonstrated under Windows 2000)
1. Click the removable icon showing “Unplug or eject hardware” on
the taskbar.
2. Select the device to unplug and click “
Stop
”.
3. Confirm the highlight selection and click “
31
OK
” to continue.
Page 39

4. When the message box below appears, click “
OK
You can now safely remove the device from the USB port of your
computer.
6.2 Mac OS Users
To unplug the USB OTG Storage Device, follow these steps:
.”
1. Drag the icon of the USB OTG device to the trash icon.
2. You can now disconnect the USB OTG device.
32
Page 40

7 TECHNICAL DATA
Specification
Storage & Song capacity
USB device support
1
2.2GB
3.3GB (888 songs)
4.0GB (1200 songs)
(666 songs2)
6.0GB (1500 songs)
USB Mass Storage devices such as:
Flash Memory Disk / Card Reader (Single or
3
all-in-1) / MP3 Player / Digital Camera
, etc.
File support: FAT16/32 (Host mode)
Audio support
Connectivity
File system support
OS support
MP3, WMA, OGG, WAV
USB 2.0 high speed interface port
USB connector: Mini USB standard type AB
Standard FAT16/32 (Device mode)
WinXP / Win2000 / WinME / Win98SE (with
Driver) / Mac OS Xv10.1.5 or later
Power supply
Battery Life Up to 12 hours
AC adapter DC 6V, 1A
Charger time Approx. 2 hours (Full charge)
General
Dimensions (LxWxH) 95 x 59 x 17.6 (mm)
Weight
Approx. 85 g (without battery) / 108 g (with battery)
Display
Operating Temperature
1 “1MB= 1,000,000 bytes , “1GB = 1,000,000,000 bytes , “Your total accessible
memory/storage/data capacity will be less than stated as a result of operating system
and other factors.
2 Capacity based on 4 minutes per song
3 Digital camera with USB mass storage class support
1.7” Matrix gray scale with blue LED backlight
-5℃ ~ 40℃
33
Page 41

3100552960
Version 1.0
July 2005
 Loading...