

Page 1
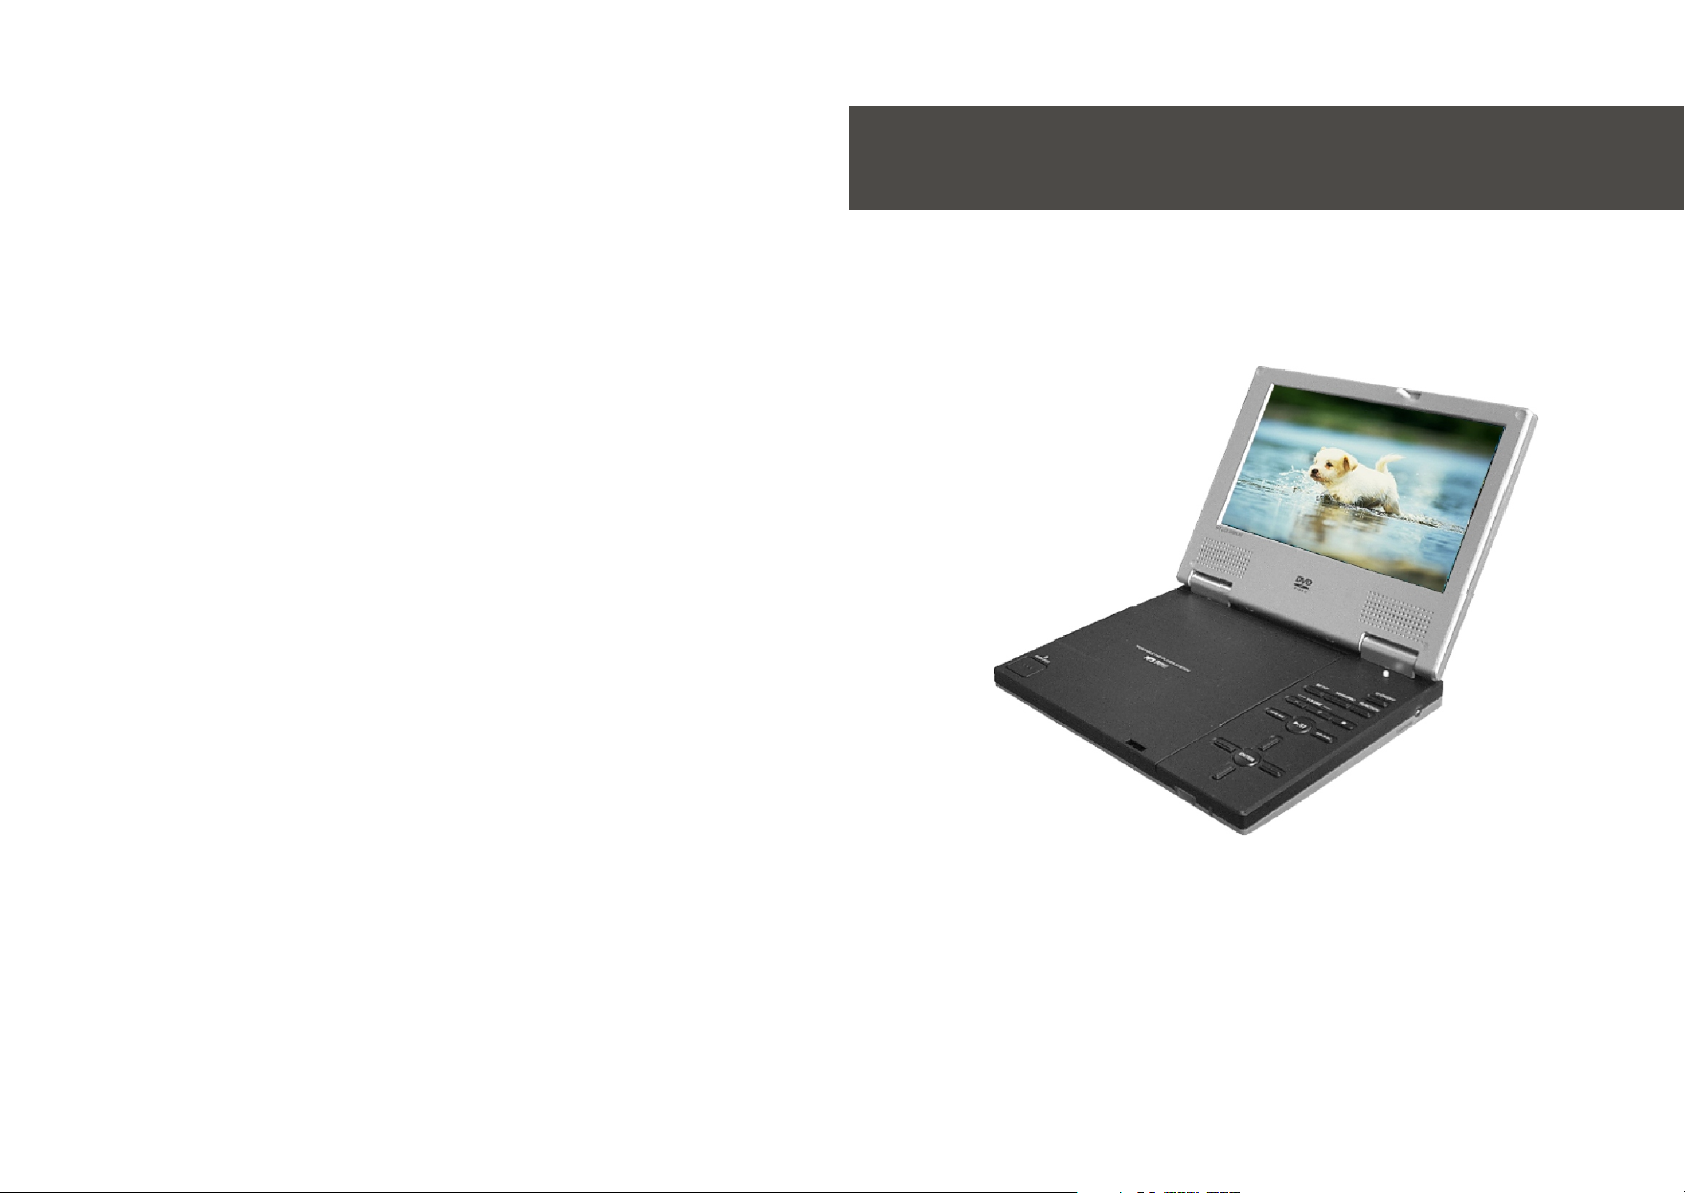
Portable DVD PlayerPortable DVD Player
PD-7001 User Manual
Version 1.1
Page 2
Important Safety Precautions
.
.
Warning To reduce the risk of fire or shock hazard, do not expose this DVD player to
rain or moisture. No objects filled with liquids, such as vases, should be placed on the
apparatus.
DVD disc does not correspond to the
Region number of this DVD player, this DVD player cannot play this disc.
2. Apparatus should not be exposed to dripping or splashing liquids. No objects filled
with liquids, such as vases, should be placed on the apparatus.
This portable DVD player contains mercury. Disposal of this material may be regulated due to environmental considerations. For disposal or recycling information, please
contact your local authorities or the Electronic Industries Alliance: www.eiae.org
Model number: Serial Number:
Purchase date:
Place of purchase and phone number:
Package Contents
Getting to know your DVD player
Attaching and removing the battery
Turn on the DVD player
Basic playback
Using DVD video menu
Volume & Mute
6. Safety Guide
7. Warranty Information
8. Technical Support
9. Appendix
1
2
3
3
4
4
5
6
6
7
8
9
10
11
12
13
15
15
16
17
20
22
24
26
28
29
32
34
34
34
35
CLASS 1
LASER
PRODUCT
Page 3
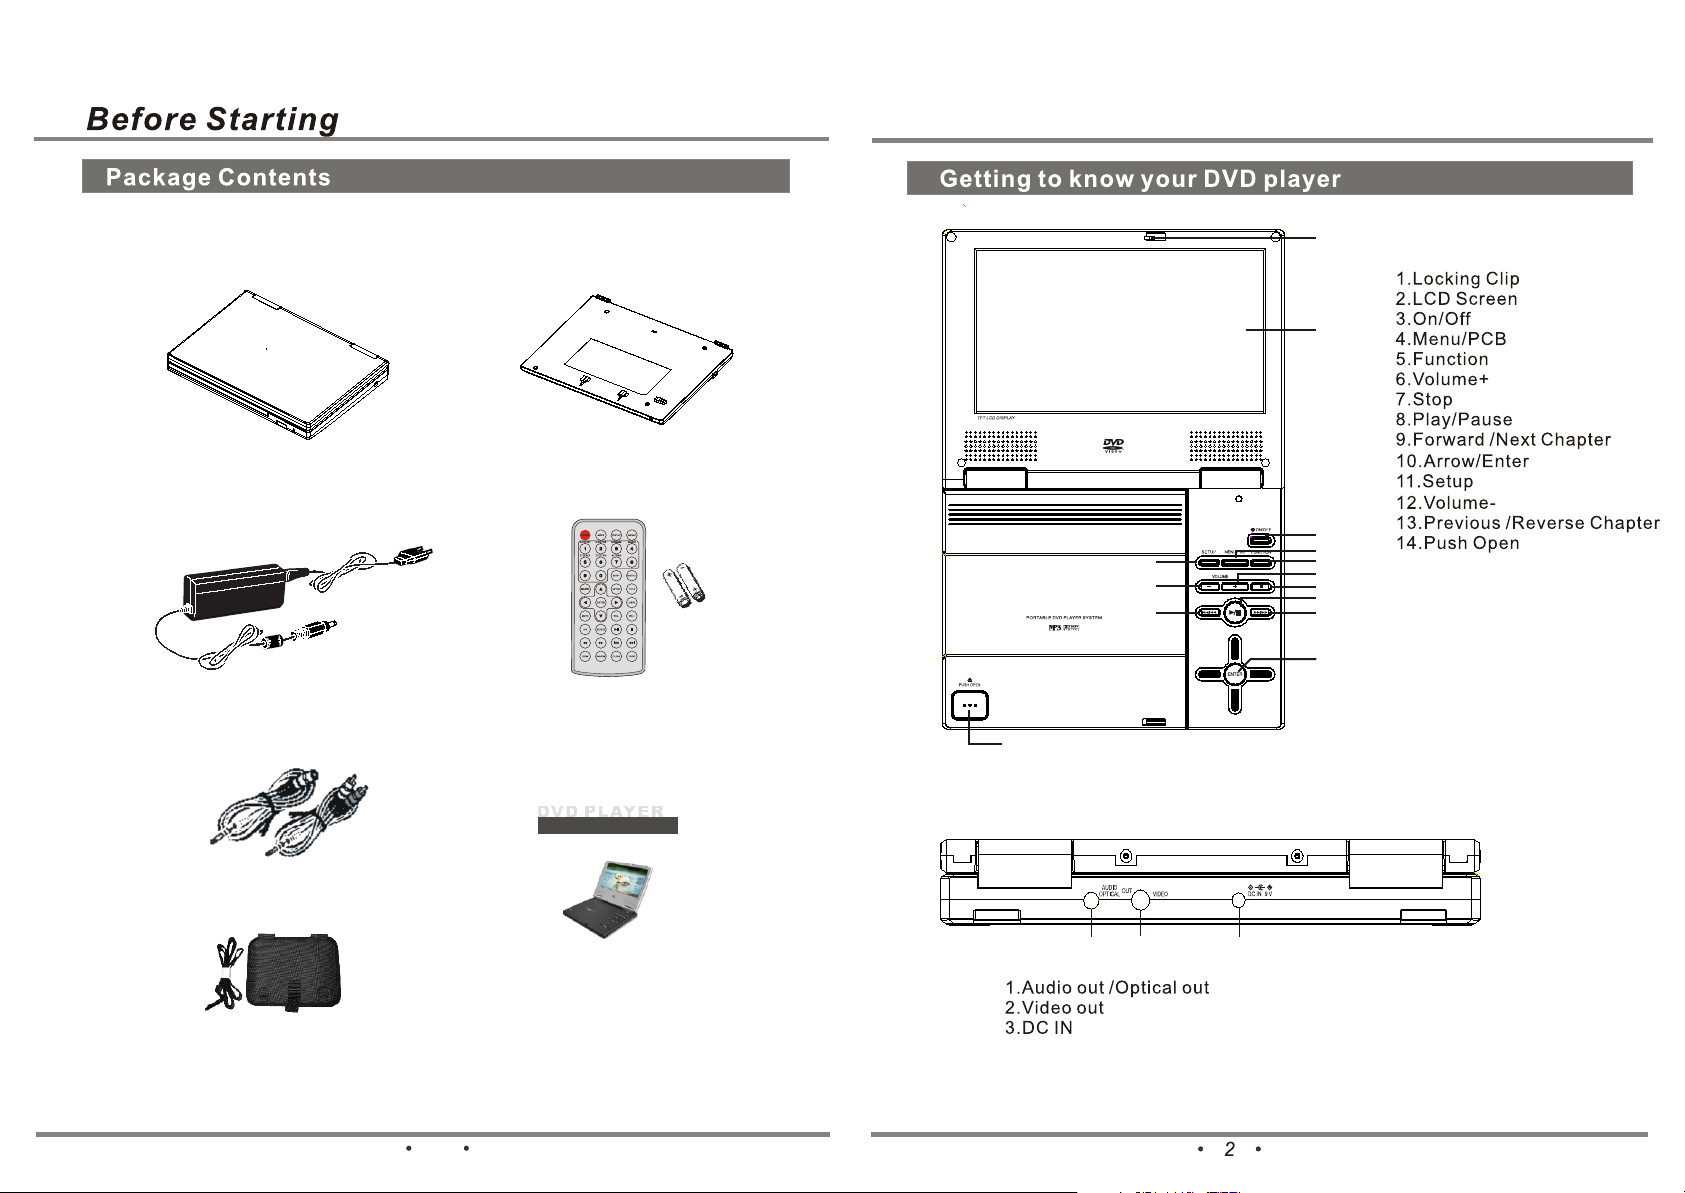
Package ContentsPackage Contents
Getting to know your DVD playerGetting to know your DVD player
Thank you for purchasing the PD-7001 Portable DVD player. Unpack the box and
remove any protection films. The following items should be in the package:
Portable DVD Player
Power Adapter and Charger
Battery
Remote Control
Portable DVD PlayerPortable DVD Player
11
12
13
14
Ports on your DVD player
1
2
3
4
5
6
7
8
9
10
Audio/Video Cable
Car Headrest Mounting Case
1
PD-7001 User Manual
Version1.1
User Manual
1
2
3
Page 4
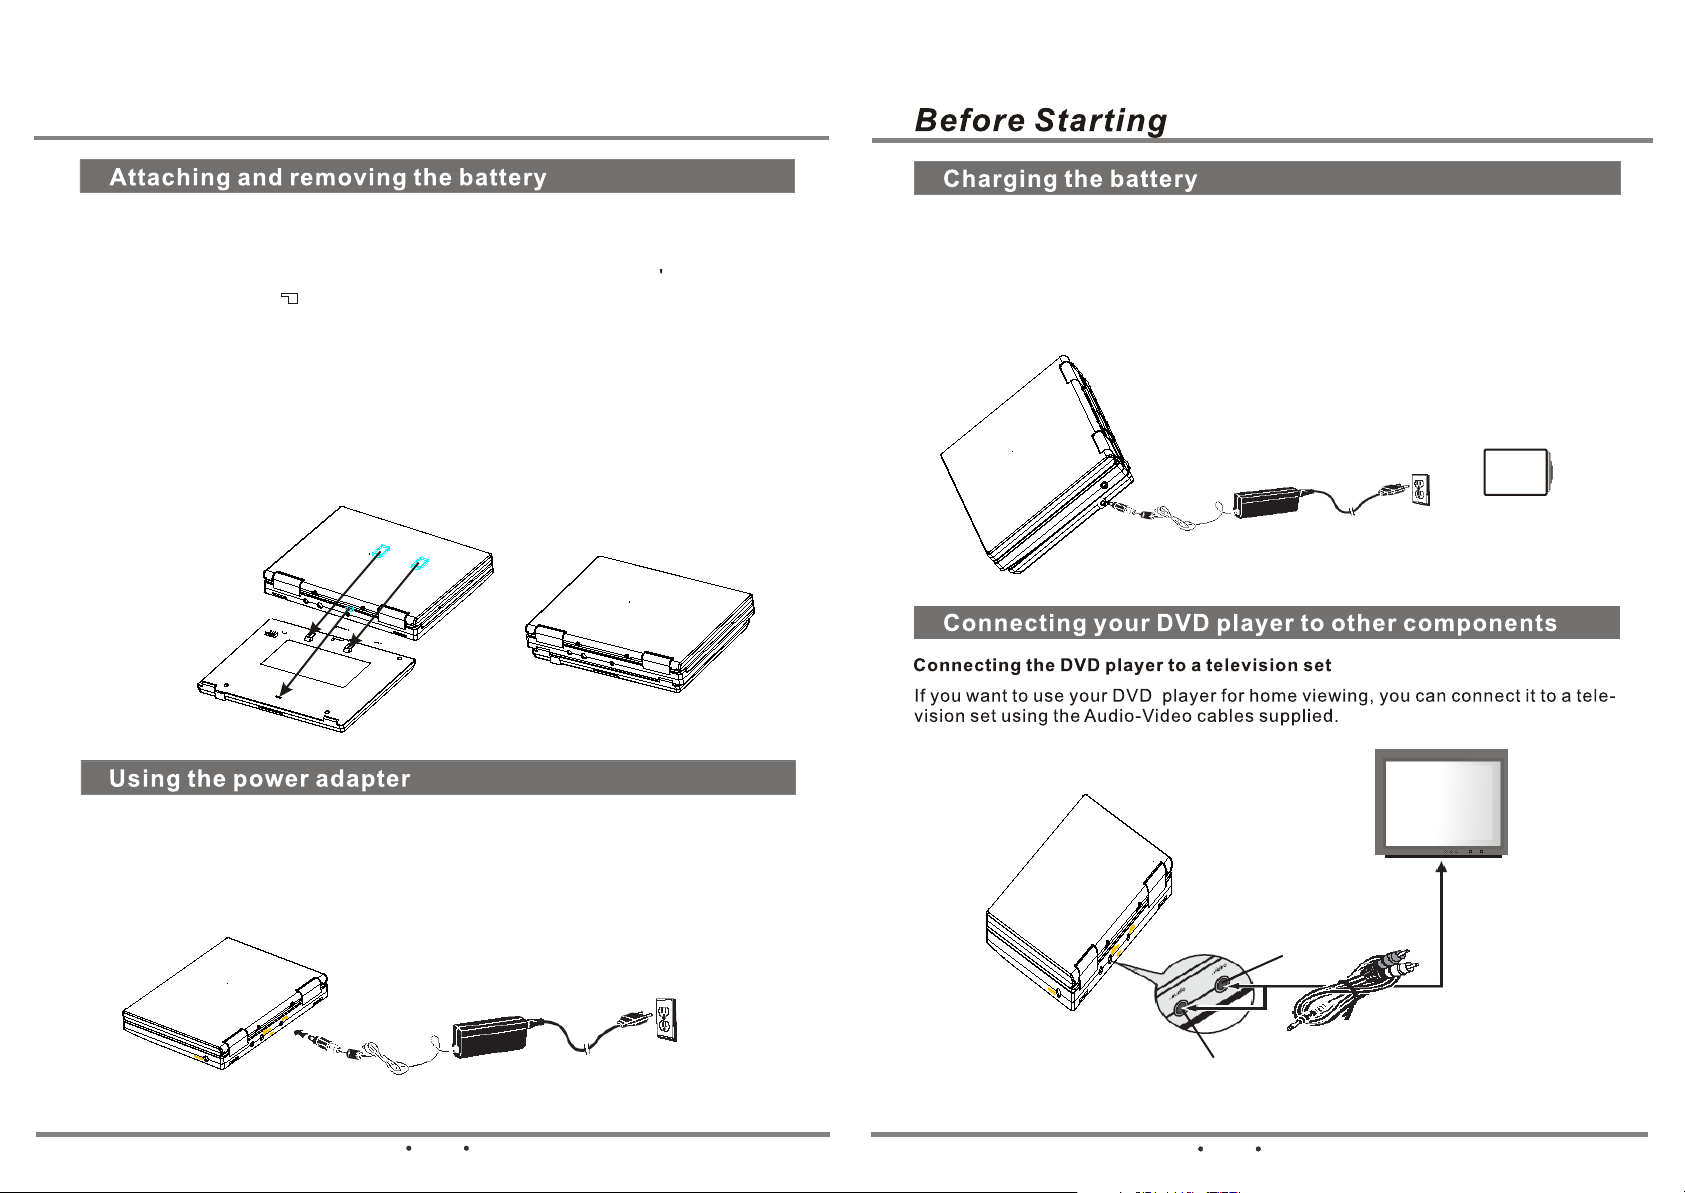
Attaching and removing the batteryAttaching and removing the battery
Attaching the battery
1.Lay the battery down flat as shown in the illustration.
2.Place the player centered on top of the battery so that the battery s locating pegs
fit into the fixing holes( )on the underside of the player.
3.Slide the player back onto the battery until it clicks into place.
Removing the battery
1.Turn the player over, with the rubber pads facing up.
2.While pushing the removal tab down, slide the battery in the opposite direction.
The battery will slide right off.
Note: Contact the appropriate local governmental office or your current waste re moval provider for assistance in determining the correct battery disposal
method in your area.
1. Connect the output from the power adapter to the player's DC IN socket.
2. Connect the power adapter's supply cable to a AC power outlet.
Note: If the power adapter is plugged in, the player will function even if the battery
is not attached.
Make sure the battery is properly attached to the player.
Connect the output from the power adapter to the DC IN port on the player(Figure
1.1) and the LED will light up.
This LED will turn to green once the battery is fully charged.
When charging the battery for the first time, please charge for at least 12 hours.
Battery Warning Information: When the battery level is low, it will show a low
battery warning on the LCD screen .(Figure1.2)
1.1 1.2
Note: Remember to turn your TV on and
tune it to the corresponding input
channel on your TV .
3
VIDEO OUT
AUDIO/OPTICAL OUT
4
Page 5
10
11
12
13
14
15
16
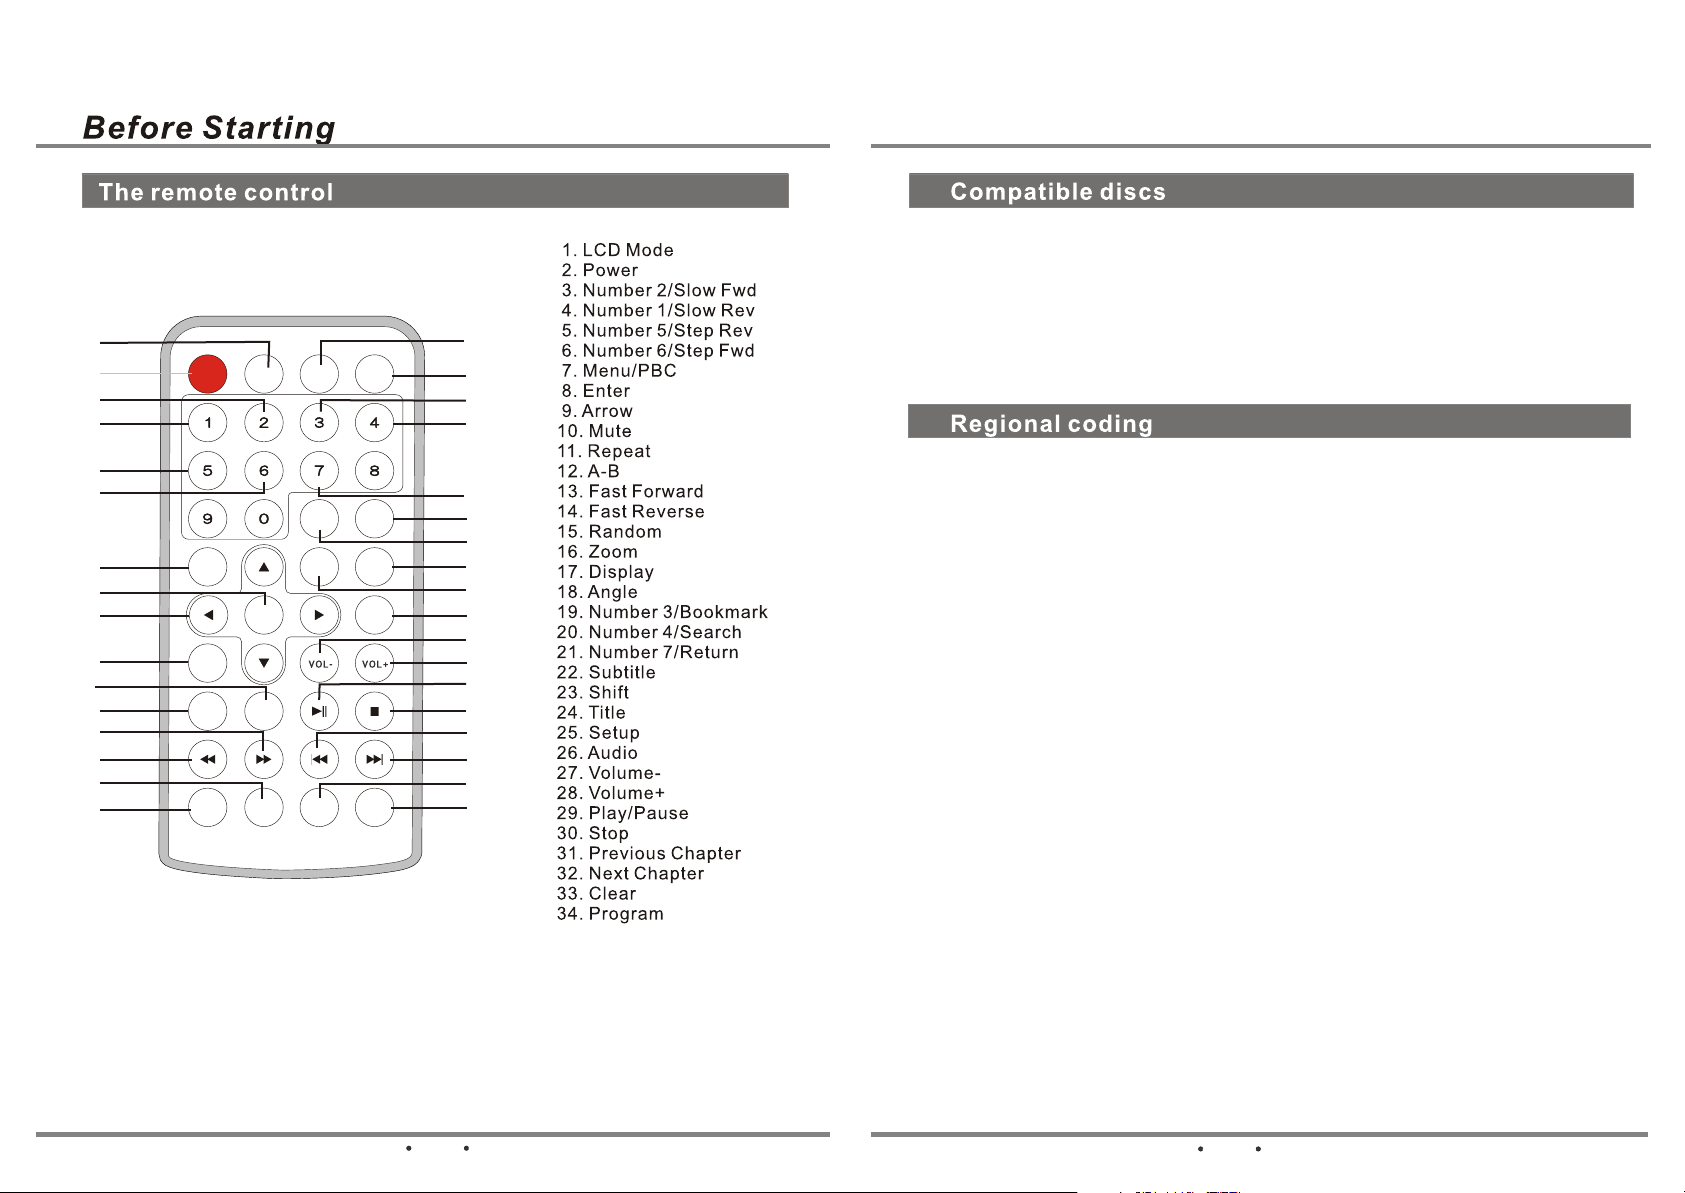
This DVD player is compatible with the following types of discs/formats:DVD movies,
Video CD's, MP3 files, WMA files, and JPEG files. Before you put a disc in the player,
make sure the disc/format is compatible.
Note:
1
2
3
POWER
SLOW REV
MODE
SLOW FWD
BOOKMARK SEARCH
DISPLAY
ANGLE
4
STEP FWDSTEP REV
RETURN
17
18
19
20
5
6
SHIFT
SUBTITLE
21
22
23
7
MENU/PBC
8
9
ENTER
SETUP
TITLE
AUDIO
24
25
26
27
MUTE
28
29
REPEAT
A-B
30
31
32
Some discs may not be compatible due to laser pickup and design.
For the regional code assignment, the Motion Picture Association of America (MPAA) has divided the world into 6 regions:
Region 1: United States, Canada, East-Pacific Islands.
Region 2: Japan, West Europe, Egypt, South Africa, Far East.
Region 3: South East Asian countries include the R.O.C. Hong Kong,
South Korea, Thailand, Indonesia, etc.
Region 4: Australia, New Zealand, Central South America, South
Pacific Islands.
Region 5: Russia, Mongolia, Indian Islands, Central Asia, East Europe,
North Korea, North Africa, North West Asia, etc.
Region 6: Mainland China.
If the region number of your DVD disc does not correspond to the region number of
this DVD player, this player may not be able to play the disc.
33
ZOOM
RANDOM
CLEAR PROG
34
5
6
Page 6
Basic Operations
Turn on the DVD player Turn on the DVD player
1.Set the player on a table or on a steady surface.
2.Raise the screen to the open position.
3.Press the Power key of the remote control to turn on the unit, you can also press
and hold the On/Off button for 3 seconds to turn on the unit.
4.When the power is turned on . The player will automatically search for the disc.
If a compatible disc is available, the unit will start the disc playback automatically.
Standby Mode :
(1). Press Power key to turn off the disc play-
Power
back when the unit is on.
(2). When the unit is off, press Power key to
startd disc playback again.
(3). Disconnecting the main power to the
device will end the standby state.
Note:
To save battery power, the unit has an auto-
screensaver and auto shut-off function.
When the unit is stopped or paused, and no
operations are performed within 5 minutes,
the screen saver mode will be activated auto matically.
for 5 minutes, the unit will turn off automati cally without the resume play feature
After the screensaver has been on
.
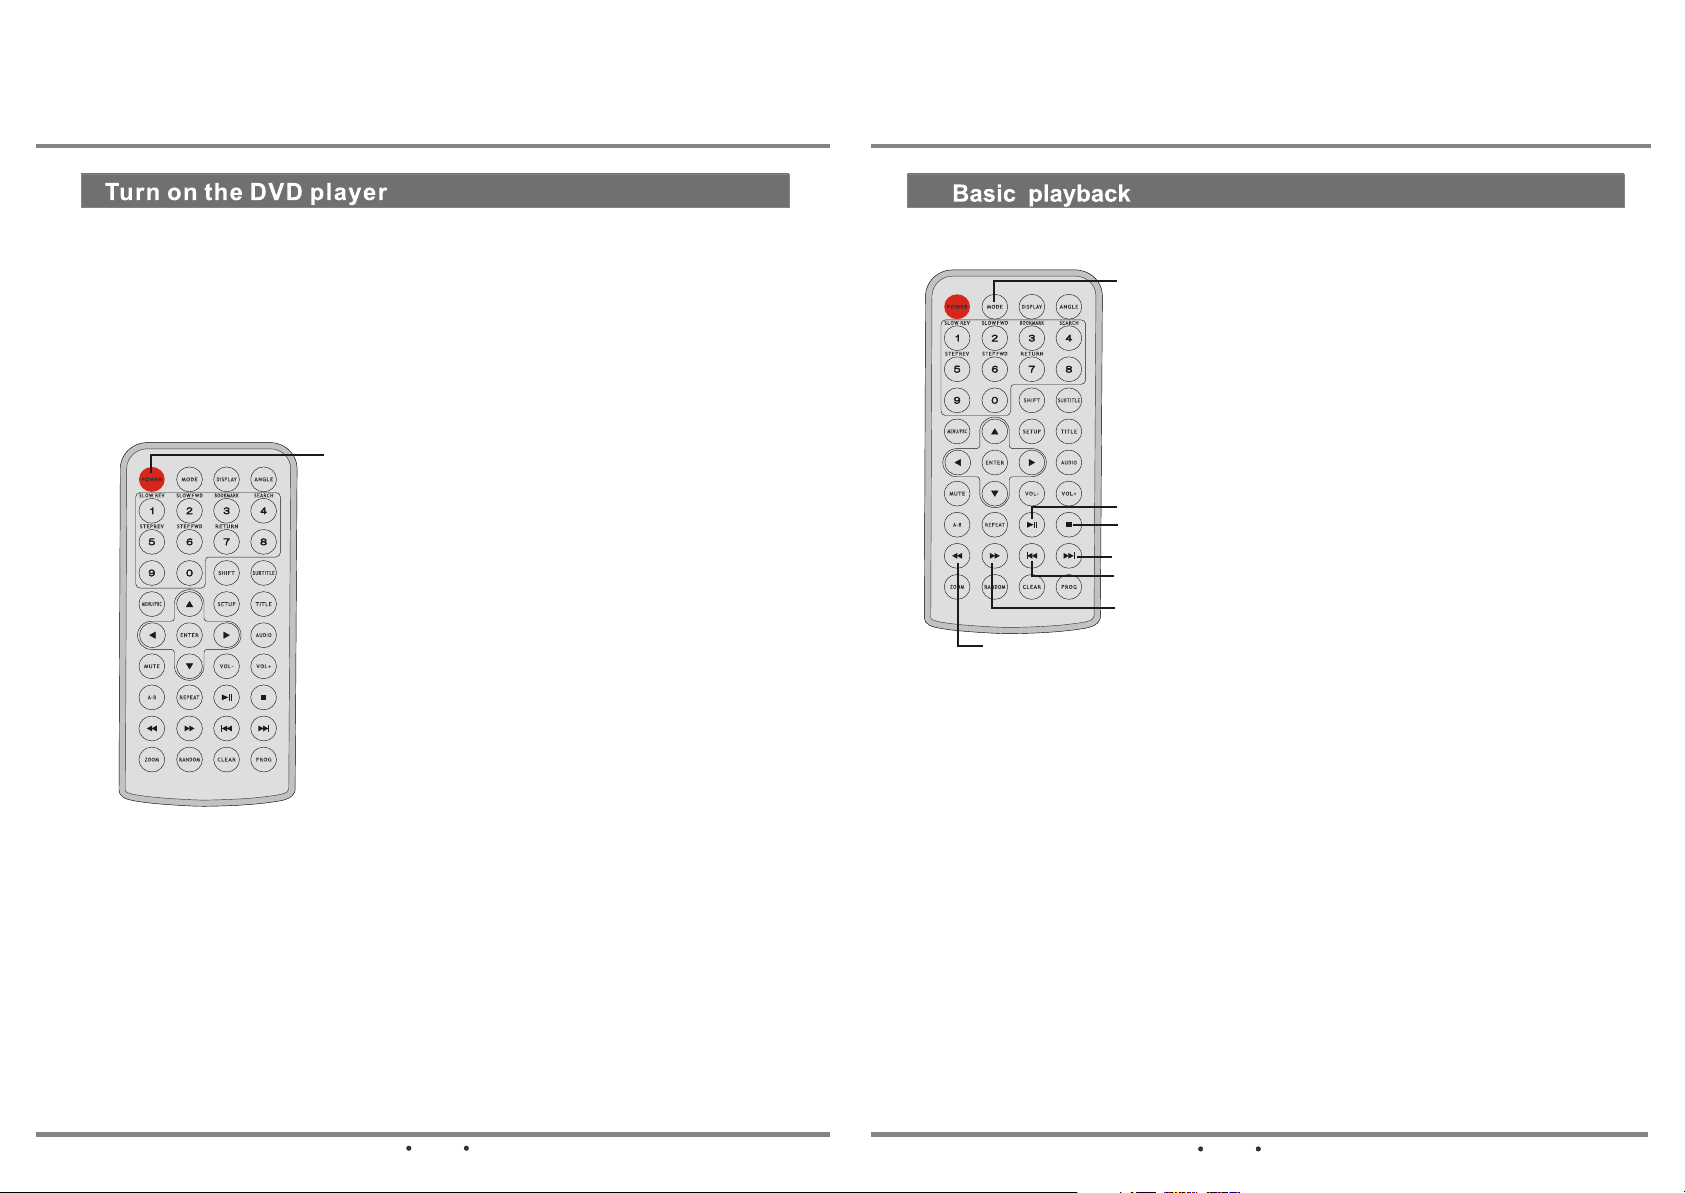
Basic playbackBasic playback
Play/Pause: If disc playback is stopped,
press this key to make player start again.
LCD Mode
Stop: Stops disc playback. Press once to
stop the disc playback. (Playback will start
at location where you stopped.) Pressing
twice will cause a full stop. (Playback will
start at the beginning the disc).
Play/Pause
Stop
Next
Previous
Fast forward
Fast reverse
Previous Chapter/Next Chapter: When you press this key, the player will skip to
the Previous/Next chapter or track and play automatically.
LCD Mode: The Mode button brings up the LCD picture menu. You can adjust the
picture options: COLOR, CONTRAST, BRIGHTNESS, HUE, REVERSAL, NORMAL
and RESET using the arrow and ENTER buttons to make adjustments.
If in the pre - stop condition it executes
memory play function. During disc playback, press once to pause; press again to
resume playback.
Fast forward/Reverse: When you press
the Fast forward/Reverse key during
playback, the unit will Fast forward/
Reverse the disc. With each consecutive
press of the Fast forward/Reverse key,
the playback speed increases. There are
4 speed levels for DVD discs in FWD/ REV:
2x,4x,16x,100x. For all other discs, there
are 3 speed levels: 2x,4x, 8x. Press the
Play key to resume normal playback.
7
COLOR: adjusts the richness of color.
CONTRAST: adjusts the difference between the light and dark areas.
BRIGHTNESS: adjusts the brightness.
HUE: adjusts the balance between red and green levels.
REVERSAL: turns the image upside down.
NORMAL: adjusts the 4:3 or normal LCD screen format.
RESET: adjusts all MODE options back to the factory settings except NORMAL .
8
Page 7
Basic Operations
Using DVD video menuUsing DVD video menu
When you insert a DVD disc in the DVD
player and start to play it:
1. The unit will automatically start the play back from the beginning of the disc and
then the Menu will be brought up.
Menu
Arrow
Title
Q:How can I set the subtitle language?
A: Select Subtitle or Options on the disc menu of the disc, and press Enter. In
the subtitle list that appears, select the subtitle language you want and
press Enter. Note that the title of this option may vary from disc to disc.
Q: How do I play the disc from a certain scene in the movie?
A: Select Scene Select on the disc menu of the disc, and press Enter. The screen
will display the starting picture of each chapter. Move the highlight the chapter
you want and press Enter. Note that the title of the option may vary from disc
to disc.
2. Press Up/ Down/ Left/ Right to
move the highlight in the Menu.
3. Press on the selected option.
Q:How can I see the contents of the disc?
A: Move the highlighted bar to
or on the disc menu of the disc and
press . The title of this option may
vary from disc to disc.
Play
Play
EnterEnter
Enter
Enter
Play Movie
Play Movie
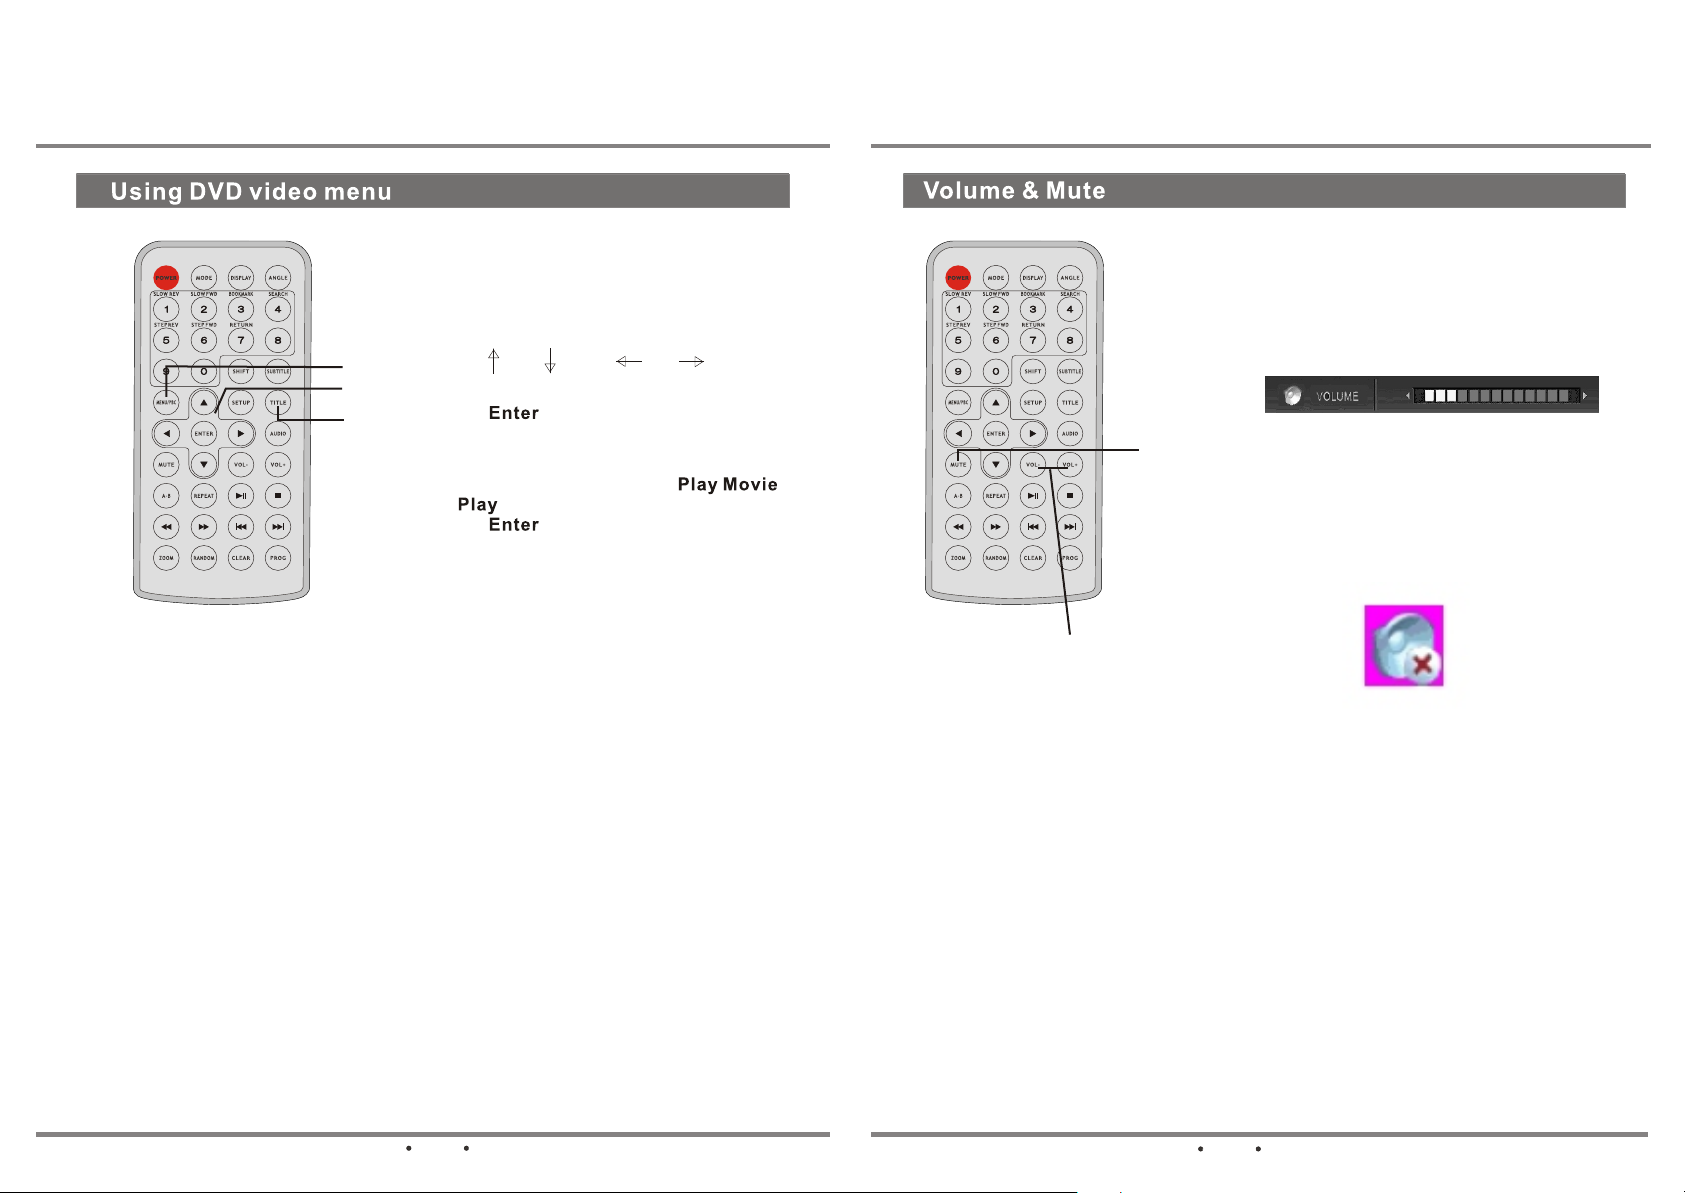
Volume & MuteVolume & Mute
VOL+/VOL-
Mute
Volume
Press the VOL+/VOL- buttons and the
following volume adjust menu will appear
on the screen.
Use VOL+ to increase the volume and
VOL- to decrease the volume.
Mute
If you do not want to have audio while the
movie or music is being played:
1.Press Mute to turn audio off.
2.Press Mute again to turn audio on.
Q:How do I open the Menu while the disc is being played?
A: Simply press Menu or Title.
Note:
On a CD with MP3, WMA and JPEG, press the Title button to switch between
Music ,Photo and Movie options. Please refer to the related descriptions in
the Playing MP3, WMA and JPEG files section.
9
10
Page 8

Advanced Operation
Repeat/A-B Repeat/A-B
Some VCD and SVCD discs(Karaoke-discs )have disc menus. They are used to
select the contents that you want to view. This type of menu can also be called the
PBC (Playback Control)MENU.
If this type of disc is being played:
1.When the PBC option is set to ON in the
Others settings of the setup menu, the disc
Number
playback will be automatically started and
will stop at the PBC MENU screen.
You can press PBC button on the remote
control to turn the PBC function ON/OFF.
PBC
2.Press Prev and Next to scroll the previo-
us/next Menu pages if available.
3.Press the Number buttons to enter the
number of the segment or track that you
wish to play. If the segment or track is a
Prev
Next
two digit number, simply enter the two
digits consecutively.
Q: I do not want to see the PBC Menu. I just
want to the disc to play.
A: Simply set PBC option to OFF in the Others seting of the setup menu, and the
PBC function will be disabled. The unit will resume the disc playback from the
beginning of the disc, and will not show the PBC menu.
Q: How do I get back to the menu during the playback?
A: With the PBC function on, enter the second function by pressing Shift and then
pressing Return to stop the disc playback and get back to the menu.
Q: The PBC function has been turned off, how do I turn it back on again?
A: Simply set PBC option to ON in the Others setting of the setup menu to restore
the PBC function. The other way is press Menu/PBC key again. Note that after
the PBC is turned on, the current playback will be stopped and the PBC menu
will be displayed.
Note:
If no operations are executed within 10 seconds after the PBC menu
is displayed, the unit will resume the playback from the first track.
Repeat: Press Repeat if user wants to repeat the whole disc or a specific track/
chapter of the disc
1.Press Repeat to switch between different repeat modes.
2.When Repeat is pressed, the repeat results may differ depending on the disc
types. See the diagram below:
A-B:Press A-B if you want to repeat a
specific segment on the DVD that you
can define.
A-B
1.Press A-B once at the point(A) where
you want to start the repeat.
Repeat
2.Press A-B again at the point (B) where
you want to end the repeated segment.
3.The A-B segment repeat will then start to play.
4.Press A-B a third time to cancel the A-B repeat mode and resume the normal
disc playback.
OFF
Note:
When playing VCD2.0,the repeat function can only be achieved with the
PBC function turned off.
11
12
Page 9

Advanced Operations
Console operationConsole operation
You can display the general playback status on the screen. Some items can be
changed using the menu. To use the on-screen display:
1. Press Display during playback.
2. Press to select an item. The selected item is highlighted.
3. Press to change the setting. You can also use the number buttons if approp riate(e.g.inputting the title number). For some functions, press Enter to execute
the setting.
Notes:
Some discs may not provide all of the features shown below.
If no button is pressed for 10 seconds, the on-screen Display disappears.
Example: On-Screen Display during playing DVD/DVD-VR/
Chapter Number
/
/
Title Number
Time Search
Numbers Enter
/
Numbers Enter
/
Numbers Enter
Angle
Sound /
Example: On-Screen Display during playing VCD
Track Number
(or PBC mode)
Time Search Numbers Enter
Stereo
Audio Channel
Stereo
/
/
or Angle
or Audio
Audio language
and digital Audio
output mode
Subtitle language
13
/
/
Sound /
or Audio
or Subtitle
14
Page 10

Advanced Operations
RandomRandom
1. Each time you press Random, the unit automatically executes the random
playback function.
2. In Random mode, press Random again to return to the normal playback
mode.
Note:
1. The function is only valid for VCD, SVCD and CD discs.
2. The function is only valid for VCD/SVCD discs when the PBC function is turned
off.
Zoom & ProgrammingZoom & Programming
Zoom
1. When playing a disc, press Zoom to
magnify the image. Each time you press
Zoom, the picture is magnified even
more (until you get to the maximum zoom
level).
2.To see other parts of the picture when you
are zoomed in on the image, try pressing
Arrow
Prog
Zoom
1. The program playback function is valid only when the PBC function is off, and
when the unit has stopped playback for VCD discs.
2. Please see the audio playback section for more information on how to set the
program playback menu for VCD or audio discs.
the Arrows to move in corresponding
directions. This feature is called Pan and
Scan.
Programming
The program playback function allows you
to enter the order in which you want the
tracks to play. This feature is not available
on DVD discs.
Special features only in DVD discSpecial features only in DVD disc
Three special functions are available for DVD discs.
Select the Subtitle Language
Angle
Subtitle
Audio
You will see the language selected and the digit audio output information as illustr ated below:
2. Each time you press Audio, you can switch to the next audio language.
3. If the audio menu is not displayed, press Audio to bring up the audio menu..
Select the Camera Angle
1. Press Angle once to bring up the angle information shown on the top left
corner of the screen. See the illustration below:
1. Press Subtitle once to bring up the
subtitle information shown on the top
left corner of the screen. See the illustra tion below:
ENG
2. Each time you press Subtitle, you can
switch to the next subtitle.
3. If the Subtitle menu is not displayed
press Subtitle to bring up the subtitle
menu.
Select the Audio Language
1. Press Audio once to bring up the
audio information shown on the top left
corner of the screen.
15
2. Each time you press Angle, the camera angle changes.
3. If the camera angle menu is not displayed, press Angle to bring up the cam-
era angle menu.
16
Page 11

Adnanced Operations
The second function Shift keyThe second function Shift key
Shift key: The Shift key on the remote control is used in combination with the
number keys which have a second function. The number keys that have a dual
functions are labeled as SLOW REV, SLOW FWD, BOOKMARK, SEARCH,
STEP REV, STEP FWD, RETURN.
Second function keys
Step FWD/Step REV: During playback pressing the Step FWD/Step REV key
allows you to progress the playback one frame at a time.
Return: During playback, .
When playing picture CD, press the Return key to show and hide picture menu.
press the Return key to return to the PBC menu
Note:
The Slow REV, Slow FWD, Bookmark, Search, Step REV, Step FWD, Return
must be in second function mode.
1.Press Shift to open the following function
symbol.
Press the second function key you want to
2.
use
, and press it within 5 seconds,
otherwise the second function will quit
automatically.
SLOW FWD: If a disc is being played, holding the Slow forward key will cause the
playback to play forward slowly. When playing in Slow forward, the image plays slowly
and the sound stops. Press Play to resume
normal play
SLOW REV: If a disc is being played, hol ding the Slow reverse key will cause the
playback to play forward slowly. When play ing in Slow reverse, the image plays slowly
and the sound stops. Press Play to resume
normal play.
During disc playback, you can use the
Bookmark function, as follows:
1.Press the Shift key to open the function
symbol below:
2.When you want to set a bookmark at the
position currently being played, press
Bookmark. On the bookmark menu,
you will see the following picture. It
indicates a bookmark has been set at
this specified position.
3. If you want to see the bookmark that
you just set, follow these steps:
(1).Press the Shift key to open the function symbol below:
(2).Press Search to achieve search function. The bookmark you have set
appears as below;
Use the arrow keys to move the cursor to the related bookmark, and press Play or
Enter.
Notes:
(1). Press the Search again to exit the search menu.
(2). You can set a total of 9 bookmarks. You also can delete the bookmark point
you have set by pressing Clear on the remote control.
17
18
Page 12

Advanced Operations
Frequently asked questionsFrequently asked questions
Q: After I inserted the DVD disc into the unit,
password
A:
This is because the DVD disc that you have inserted is rated with the Parental
Control, and the current rating level set is lower than the rating of the disc.
After you enter the password correctly, the disc playback can start normally.
Provided that you have not already changed it, the factory preset password for
the player is empty. Please refer to Setup Menu/Lock Setup for the details
on how to set the rating level of the parental control on the DVD player.
Note on Parental Control:
The DVD Parental Control is a rating system, like movie ratings. It helps you to
control the rating of DVDs that your family watches. Use the settings on the screen
to set the rating of the player (including the software player on the PC). If the disc
rating is higher than the rating of the unit, the disc cannot be played. Note that some
times, the rating control sequence is different subject to the disc types. The unit
alerts you when you try to play a movie with a rating that exceeds the limit you are
set. If you choose to override the rating limit, you will need to enter your password
to resume the disc playback. If you choose to unlock the parental control, the parental control feature will not function, and the whole disc contents will be played.
The same DVD disc can also be edited into different editions based on the rating
set by the parental control. or
replace the violent scenes that are unsuitable for children..
List of parental control levels:
1. Adult
2. NC-17
3. R
4. PG-R
5. PG-13
6. PG
7. G
8. Kids
. Why?
With the parental control, you can also edit out
the screen asks for a 4-digit
19
Page 13

Advanced Operations
Playing MP3, WMA, and JPEG files Playing MP3, WMA, and JPEG files
When you insert a disc that contains MP3, WMA, MPEG, or JPEG data or an audio
CD into the unit, you will see the files listed as illustrated below:
1. Press Title to switch among the 3 option pages: Music, Photo and Movie.
.
2. The music page is divided into 3 areas: Playback list, Program list and the
Edit area in the middle.
You can press Play or Enter on the high
MusicMusic
ListList
1-0001.mp31-0001.mp3
1-0001.mp31-0001.mp3
1-0002.mp31-0002.mp3
1-0002.mp31-0002.mp3
1-0003.mp31-0003.mp3
1-0003.mp31-0003.mp3
1-0004.mp31-0004.mp3
1-0004.mp31-0004.mp3
1-0005.mp31-0005.mp3
1-0005.mp31-0005.mp3
0:00:230:00:23
0:00:230:00:23
\MP3\0001. Mp3\MP3\0001. Mp3
\MP3\0001. Mp3\MP3\0001. Mp3
PhotoPhoto
PhotoPhoto
1/101/10
1/101/10
Movie Movie
Movie Movie
ProgramProgram
ProgramProgram
lighted folder in the Playback list to view the
folder contents, or play the corresponding
audio files in the Playback list or Program
list.
You can use the ADD, ADD ALL, DELETE
and DELETE ALL options provided in the
middle edit area to choose what files get
played in the program list..
To remove a file, simply move the highlight
to the corresponding file under the program
list, and press Clear.
After you press Enter on mix in the middle edit area, all the pictures will be dis-
played in order, and the MP3 songs will be played as background music.
The speed in the edit area is used to adjust the time spent during the picture
transition.
MusicMu s ic
ListLis t
JPE GJPE G
Mp3Mp3
VCDVCD
WMAWMA
PhotoPh oto
Movie Movi e
4. In the movie page, you can press Play
or Enter on the highlighted folder in the
playback list to view the folder contents
or play the corresponding file.
Note :
The playback interface and operations of the audio CD disc is very similar to that
of Music. Please refer to the related descriptions in the music section for more
information audio CD playback.
3. The photo page is divided into 3 areas: Playback list, Preview window and the
Edit area in the middle.
You can press Play or Enter on the highligh-
MusicMu sic
ListLi st
JPE GJP EG
Mp3Mp 3
VCDVCD
WMAWM A
PhotoPh oto
Movie Movie
Pre vie wPre vie w
ted folder in the Playback list to view the
folder contents
When the highlighted file you select is a
picture file, you will see a minimized version
of the picture in the preview window on the
right side of the photo page.
After you press Enter on the slide show
option in the middle Edit area, you will see
all the pictures displayed in order.
20
21
Page 14

System Setup Menu
System setup menuSystem setup menu
You can press the Setup key on the remote control to bring up system setup menu.
When the cursor is located at the top of the On-Screen Display, press Left/
Ø
arrow keys to switch between different pages.
Ø
Ø
→
Press Down arrow key to move to the setup page, and press Up/ Down
to select the setting that you want to change.
Open the selection list by pressing Right arrow key on the selected item. Change
the selection by Up/ Down arrow keys and enter key.
→
→
→
→
→
→
→
Right
Arrow keys
Setting the languageSetting the language
L A N G U A G E L A N G U A G E
Menu Language
Disc AudioDisc Audio
Disc SubtitleDisc Subtitle
Disc MenuDisc Menu
L A N G U A G EL A N G U A G E
Menu LanguageMenu LanguageMenu Language
Disc AudioDisc Audio
Disc SubtitleDisc Subtitle
Disc MenuDisc Menu
EnglishEnglish
OriginalOriginal
OriginalOriginal
OriginalOriginal
MoveMove
EnglishEnglish
FrenchFrench
Chinese
Japanese
Prev.Prev.
MoveMove
SelectSelect
EnterEnter
1. You will first see the LANGU AGE menu page when the
setup menu is brought up, as
illustrated on the left.
2. The item Menu Language is
used to select the setup menu
and OSD (ON-Screen Display)
language used during the disc
playback and instructional
operations. The language
selection includes English,
French, Chinese, Japanese
on the left.
3.Disc Audio: When you play a DVD disc, the unit will select the default audio
language if the language is available in the disc. Please note that if the language
recorded on the disc is not available in the language in the disc menu, the language
originally recorded on the disc will be used. If the disc is equipped with a specific
playback language, the language specified will be used.
4.The Disc Subtitle and Disc Menu functions are similar to that of Disc Audio. They
are used to set the default playback language for the DVD subtitle and Menu
display language.
L A N G U A G EL A N G U A G E
Menu languageMenu languageMenu language
Disc AudioDisc Audio
Disc SubtitleDisc Subtitle
Disc MenuDisc Menu
OriginalOriginal
EnglishEnglish
FrenchFrench
GermanGerman
SpanishSpanish
ItalianItalian
ChineseChinese
Prev.Prev .
MoveMove
EnterEnter
Display setupDisplay setup
1.When entering the Display Setup Menu page, you will see the screen
illustrated below.
D I S P L A YD I S P L A Y
TV Aspect
Display ModeDisplay Mode
TV Output
16:9
Wides creenWides creen
AUTO
22
23
Mode Mode
Select Select
Page 15

System Setup Menu
Display setupDisplay setup
TV Aspect: Depending on the type of television you have, the image adjustment
2.
offers 2 options for your setting: 4:3 and 16:9.This item is used to display image
data in the wide-screen film on the normal TV set. The option 16:9 is used when
the DVD player is connected to wide screen TV in Full Mode, and the screen will
display pictures in full size.
D I S P L A YD I S P L A Y
TV AspectTV Aspect
Display ModeDisplay Mode
3. The Display Mode item can only be modified when the TV Display mode is set to
4:3. Two options are provided: Letterbox and Panscan.
Letterbox : This image option will display the panoramic frame movie in the sm-
Ø
aller portion of the screen. And the movie might appear with black bars at the top
and bottom of the screen.
Ø Panscan: This image option refers to pictures where the left and right edges of the
picture are cut off so it fills the whole screen. It is selected for the normal TV set
display. This mode is selected when the picture is displayed in panoramic view
and complete scan format.
4:34:3
16:916:9
Audio setupAudio setup
1.You will first see the picture as shown on the below side after you enter the
AUDIO. For language code, refer to Appendix2.
A U D I OA U D I O
Dolby DigitalDolb y D igit al
DTSDTS
Sample FreqSa m ple F re q
Dig it a l O utp u tD ig it a l O u tp u t
2.The Dolby Digital option allows you to toggle the Dolby Digital output On/Off.
Two options are provided: Bitstream and PCM. The DTS indicates the output
mode of the Digital Cinema.
Bitstream: Select this option when the unit is connected to an amplifier with a
Ø
builtin DTS decoder, Dolby Digital decoder and MPEG decoder,or other audio
equipment with digital audio output terminals.
Ø
PCM: Select this option when the unit is connected to the dual stereo digital audio equipment. When the DVD disc being played is recorded with the dolby digtal,
MPEG1/MPEG2 recording systems, the DVD player selects PCM as the audio
output.
Bit str ea mB it str e am
Bit str eamBitstr eam
48 K H Z48KHZ
OFFOF F
TV AspectTV Aspect
Display ModeDisplay Mode
TV Output
LetterboxLetterbox
PanscanPanscan
AUTO
Prev.Prev .
MoveMove
EnterEnter
4.TV Output is used to switch TV system when you need . Here provide PAL, AUTO, and
NTSC. When connect to TV set, choose TV system according to actual situation until
get satisfied picture. In defect mode, choose NTSC.
24
Dolby DigitalDolby Digital
DTSDTS
Sample FreqSample Freq
Digital OutputDigital Output
A U D I OA U D I O
BitstreamBitstream
PCMPCM
25
Page 16

System Setup Menu
Audio setupAudio setup
3.The Sample Freq provides 2 options. If the connected receiver or amplifier is no cap able of processing digital input with a sampling frequency of 96khz, it will select 48khz
as the sampling frequency to compress the signal to a standard signal. After the 48khz
frequency is selected, the unit will automatically convert 96khz signals into 48khz sig nals, and then your system will be able to decode the signals. If the receiver is capa ble of outputting digital signals with a sampling frequency of 96khz, it will select 96khz
as the output signal. After 96khz frequency is selected, the unit will be able to process
all signals without any compression.
A U D I OA U D I O
48KHz
Digital Output
4.The Digital output option is used to turn the Dolby Digital/DTS/Sample Freq. On/Off.
96KHz
A U D I OA U D I O
Lock setupLock setup
1.You will see the screen illustrated below upon entering the Lock Setup Menu.
This page is used to set the Parental Control.
2.
The Rating item is used to set the rating level.
Before you enter into the item, the system will request you to input the password
Ø
first. After the password is entered correctly, the parental control rating level can
be changed.
Ø
If you did not set any password for Parental Control, the system will request you
to input a new password.
Ø
If you make a mistake before pressing Enter, press Clear and enter your 4-digit
password again.
RatingRating
PasswordPassword
Country CodeCountry Code
UnlockUnlock
NewNew
USUS
¡û
¡ú ¡ý ¡ü
After the new password is entered successfully, press Up/ Down to change
Ø
the parental control rating level. Including the Unlock level, there are a total of
9 levels in the parental control rating levels. See the Parental Control section
for details.
→
→
26
ONON
OFFOFF
Ra t i n gRati ng
Pa ssw ordPa ss wo rd
Count ry C odeC oun try Code
27
L O C KL O C K
Unlock
Unloc k
Adult
Adult
NC-17
NC-17
R
R
PG-R
PG-R
PG-13
PG-13
PG
PG
G
G
Kids
Kids
Page 17

System Setup Menu
Lock setupLock setup
4.The Password option is used to set a new password or change the old password.
Before you can change the password, the system will require you to input the old
password first. The new password will be accepted only when the old password is
input correctly.
Country Code
5.The Country Code item is used to set the region code. The Parental Control level is
only valid when the Country Code of the unit is matched with that of the disc. Changes
can be made by modifying the two letter code.
←
Country Code
Other settingsOther settings
Press Enter to confirm the selection of the Country Code.
Ø
Note :
Submit password: 6512.
For country code, refer to Appendix 1.
1.You will see the screen illustrated below upon entering the Others setting page.
This page is used to set on the PBC, Auto Play, B.L.E, Load Default, Screen
Saver, and Last Play options.
ON ON
ONON
OFFOFF
Screen Saver
LastPlay
2.The PBC function provides 2 options: ON and OFF. Please refer to theVCD/
SVCD PBC menu section for detailed descriptions of ON and OFF option of the
PBC function.
SelectSelect
ONON
ONON
Ø
Before the user can enter into the country code item, the system will request you to
input the password first. The country code can be changed only after the pass
word is inputted successfully.
Ø Press Up/ Down to select the first letter.
Ø Press Right to move the highlight
Ø Press Up/ Down again to select the second letter.
→
→
→
→
→
28
¡û
¡ú ¡ý ¡ü
Auto Play
Screen Saver
LastPlay
OFFOFF
ONON
29
Page 18

System Setup Menu
Other settingsOther settings
3.The Auto Play provides 2 options: ON and OFF. When the option is set as ON , the
auto play function is activated. For VCD and CD discs, the unit will automatically play
the VCD/CD disc from the beginning once the disc is recognized. When the auto play
option is set as OFF, the user will need to manually play VCD/CD discs.
PBCPBC
Auto PlayAuto Play
B.L.EB.L.E
Load DefaultLoad Default
Screen SaverScreen Saver
LastPlayLastPlay
Note:
If the Auto Play function is set to OFF, a VCD disc is read, shows the VCD icon, but
playback does not start, press the Play key to play.
4.When the B.L.E. (Black Level Expansion) function is executed on the picture, the best
.
picture quality is achieved. The B.L.E. item provides 2 options: ON and OFF. When
this option is turned ON, the black level of the picture will be expanded (0 IRE is cut off,
dark). When this option is turned OFF, the black level of the picture will be the standard
level(7.5 IRE is cut off, light).
O T H E R SO T H E R S
PBCPBC
Auto PlayAuto Play
B.L.EB.L.E
Load DefaultLoad Default
Screen SaverScreen Saver
LastPlayLastPlay
Note :
Note :
The B.L.E. function is only valid when the TV color signal system is set at NTSC.
The B.L.E. function is only valid when the TV color signal system is set at NTSC.
ONON
OFF OFF
ONON
OFFOFF
Prev .Prev .
MoveMove
EnterEnter
Other settingsOther settings
5.Load Defaults function: If you have made changes in the setup menu, and wish
to revert back to the default factory settings, just move the cursor to the selection
and press enter. Any changes made to the setup menu will be restored to the
factory defaults.
O T H E R SO T H E R S
PBCPBC
Auto PlayAuto Play
B.L.EB.L.E
Load DefaultLoad Default
Screen SaverScreen Saver
LastPlayLastPlay
.
6.Screen Saver function: You can toggle ON/OFF the Screen Saver if you do not
wish to have the Screen Saver appear.
PBCPBC
Auto PlayAuto Play
B.L.EB.L.E
Load DefaultLoad Default
Screen SaverScreen Saver
LastPlayLastPlay
O T H E R SO T H E R S
SelectSelect
Prev.Prev .
ONON
OFFOFF
Prev.Prev .
MoveMove
MoveMove
EnterEnter
EnterEnter
30
31
Page 19

Troubleshooting
Other settingsOther settings
7. Memory Play function: This player has memory play function. If you reset or put the
previous disc into the tray after reopening the tray, the player will continue to play
from the point interrupted last time. If you do not want to have this function you can
select the OFF.
O T H E R SO T H E R S
PBCPBC
Auto PlayAuto Play
B.L.EB.L.E
Load DefaultLoad Default
Screen SaverScreen Saver
LastPlayLastPlay
ONON
OFFOFF
Prev .Prev .
MoveMove
EnterEnter
TroubleshootingTroubleshooting
Before requesting service for this DVD player, please check the items below for a
possible cause of the problem you are encountering . Some simple checks or a minor
adjustment on your part may eliminate the problem and restore the proper operation.
1. Power
Ø No power
Check if the AC power cord has been connected correctly or if the battery is in place.
2.Picture
Picture distortionØ
Need to clean the disc.
Ø Picture does not fit TV screen
The images may not fill up the whole TV screen even after the mode has been set.
This is because the DVD images are fixed in width.
3. Sound
No SoundØ
(a).If the unit is being played in slow or pause mode, press Play to return to normal
playback.
(b).If the unit is played in 8x, 16x, or 100x mode, press Play to return to the normal
playback speed.
(c).When the unit is in System Setting/Program Menu, press Setup/Prog to
exit the System Menu/Program menu, or press Play to return to the normal
playback mode
(d).If the unit is Muted, press Mute again to enable the normal sound play.
4.Operations
Ø The remote control does not work properly.
(a).Using remote control near the unit. Aim the remote control at the remote
sensor of the unit.
(b).If the batteries in the remote control are dead, please replace batt eries with new ones.
Ø Disc Playback Failure
(a).No disc is inserted. (No disc symbol appears on the screen). Please insert
your disc. It is possible that the disc is dirty. Please clean the disc.
(b).There could be humidity in the unit. Power on the unit for 30 minutes with out playing any discs.
Ø The player fails to play from the beginning
(a).The play mode is in the Program, Random, Repeat or Repeat A-B mode.
Press the relative functions again to restore the normal play mode.(Please
refer to the advanced operations chapter for detailed instructions.)
(b).While the DVD Title/Chapter or DVD setup menu is displayed on the TV
screen directly, or while playing Video CD that includes PBC function, the
setup menu is displayed on the TV screen.
Ø Stops playing automatically
Some discs have recorded the pause automatically command in the original
recording. The unit will stop playing automatically at the segment where the
command is recorded.
If the battery is dead, please recharge the battery or connect the unit to the
adapter.
The battery life is between 3 and 4 hours depending on your usage. A Low battery
warning will be displayed about five minutes, after which the unit will automatically switch off.
32
33
Page 20

Appendix 1
Safety Guide
Read all instructions and warnings provided. Save these instructions for
future use.
If service is required, ensure work is done by a qualified technician.
Do not use this unit near water or in a rainy/moist environment
Do not attempt to service this product yourself. Doing so will expose you to
various hazards including dangerous voltage
This unit is suitable for a 110V to 230V AC power supply
Disconnect the power cable (pull plug) and USB cable in the following situations:
-In the event of service
-Power cable/plug becomes damaged
-Unit is exposed to excess moisture/rain
-Unit is being cleaned
Unit must be used with adult supervision at all times; children must not be
allowed to handle any of the cable
Never insert any objects other than CDs/DVDs into the tray.
Warranty Information
One Year Limited Warranty
This EMPREX device is guaranteed against manufacturing defects for one
full year from the original date of purchase.
This warranty is valid at the time of purchase and is non-transferable. Sales
slip or other authentic evidence is required to validate warranty. Damage
caused by accident, misuse, abuse, improper storage, and/or uncertified
repairs is not covered by this warranty.
All mail or transportation costs including insurance are at the expense of the
owner.
Do not send any product to EMPREX for warranty without an RMA (Return
Merchandise Authorization) and proof of purchase. Ensure delivery method
can be tracked (keep tracking number).
Warranty is valid only in the country of purchase. EMPREX assumes no
liability that may result directly or indirectly from the use or misuse of these
products.
IMPORTANT
This warranty will be voided if the device is tampered with, improperly serviced,
or the security seals are broken or removed.
Technical Support
US: 4180 Business Center Drive Fremont,CA 94538,USA
Website:www.allsupport.net Email:support@allsupport.net
EUR : Website:www.emprex.com Email:tech_eu@emprex.com
Other: Website:www.emprex.com Email:service@emprex.com
Country Codes
Choose a country code from this list.
Country
Afghanistan
Argentina
Australia
Austria
Belgium
Bhutan
Bolivia
Brazil
Cambodia
Canada
Chile
China
Colombia
Congo
Costa Rica
Croatia
Czech Republic
Denmark
Ecuador
El Salvador
Egypt
Ethiopia
Fiji
Finland
France
Germany
Great Britain
Greece
Code
AF
AR
AU
AT
BE
BT
BO
BR
KH
CA
CL
CN
CO
CG
CR
HR
CZ
DK
EC
EG
SV
ET
FJ
FI
FR
DE
GB
GR
Country
Hungary
India
Indonesia
Israel
Italy
Jamaica
Japan
Kenya
Kuwait
Libya
Luxembourg
Malaysia
Maldives
Mexico
Monaco
Mongolia
Morocco
Nepal
Netherlands
Netherlands Antilles
New Zealand
Nigeria
Norway
Oman
Pakistan
Panama
Paraguay
Philippines
Code
HU
IN
ID
IL
IT
JM
JP
KE
KW
LY
LU
MY
MV
MX
MC
MN
MA
NP
NL
AN
NZ
NG
NO
OM
PK
PA
PY
PH
34
35
Page 21

Appendix 1
Country
Russian Federation
Saudi Arabia
Senegal
Singapore
Slovak Republic
Slovenia
South Africa
South Korea
Spain
Sri Lanka
Sweden
Greenland
Islands
Hong Kong
Code Code
RU
SA
SN
SG
SK
SI
ZA
KR
ES
LK
SE
GL
HM
HK
Country
Switzerland
Taiwan
Thailand
Turkey
Uganda
Ukraine
United States
Uruguay
Uzbekistan
Vietnam
Zimbabwe
Poland
Portugal
Romania
CH
TW
TH
TR
UG
UA
US
UY
UZ
VN
ZW
PL
PT
RO
Appendix 2
Language Codes
Use this list to input your desired language for the following initial
settings: Disc Audio, Disc Subtitle, Disc Menu
Language
Abkhazian
Afar
Afrikaans
Albanian
Ameharic
Arabic
Armenian
Assamese
Aymara
Azerbaijani
Bashkir
Basque
Bengali;Bangla
Code
6566
6565
6570
8381
6577
6582
7289
6583
6588
6590
6665
6985
6678
Language
English
Esperanto
Estonian
Faroese
Fiji
Finnish
French
Frisian
Galician
Georgian
German
Greek
Greenlandic
Code
6978
6979
6984
7079
7074
7073
7082
7089
7176
7565
6869
6976
7576
36
Bhutani
Bihari
Breton
Bulgarian
Burmese
Byelorussian
Cambodian
Catalan
Chinese
6890
6672
6682
6671
7789
6669
7577
6765
9072
Hungarian
Icelandic
Indonesian
Interlingua
37
Guarani
Gujarati
Hausa
Hebrew
Hindi
7178
7185
7265
7387
7173
7285
7383
7378
7365
Page 22

Appendix 2
Appendix 2
Language Language
Kashmiri
Kazakh
Kirghiz
Korean
Kurdish
Laothian
Latin
Latvian,Lettish
Lingala
Lithuanian
Macedonian
Malagasy
Malay
Malayalam
Maltese
Maori
Code Code
7583
7575
7589
7579
7585
7679
7665
7686
7678
7684
7775
7771
7783
7776
7784
7773
Portuguese
Quechua
Rhaeto-Romance
Rumanian
Russian
Samoan
Sanskrit
Scots Gaelic
Serbian
Serbo-Croatian
Shona
Sindhi
Singhalese
Slovak
Slovenian
Somali
8084
8185
8277
8279
8285
8377
8365
7176
8382
8672
8376
8368
8373
8375
8376
8379
Language
Tigrinya
Tonga
Turkish
Turkmen
Twi
Ukuainian
Urdu
Uzbek
Corsican
Croatian
Czech
Danish
Dutch
Persian
Polish
Code
8473
8479
8482
8475
8487
8575
8582
8590
6779
7282
6783
6865
7876
7065
8076
Language
Vietnamese
Volapuk
Welsh
Wolof
Xhosa
Yiddish
Yoruba
Zulu
Irish
Italian
Japanese
Javanese
Kannada
Thai
Tibetan
Code
8673
8679
6789
8779
8872
7473
8979
9085
7165
7384
7465
7487
7578
8472
6679
Marathi
Moldavian
Mongolian
Nauru
Nepali
Norwegian
Oriya
Panjabi
Pashto,Pushto
7782
7779
7778
7865
7869
7879
7982
8065
8083
38
Spanish
Sudanese
Swahili
Swedish
Tagalog
Tajik
Tamil
Tatar
Telugu
6983
8385
8387
8386
8476
8471
8465
8484
8469
39
 Loading...