

Page 1

P2P Download Engine
NSD – 100
User Guide
Page 2

Page 3

Contents
1. Attention
2. Product Introduction
3. System Requirements
4. Package Content
5. Hardware Introduction
6. Installation ...............................................................12
6-1 Connect the NSD-100 to ADSL MODEM .......12
6-2 Connect the NSD-100 to HUB .......................21
...................................................................5
...............................................6
............................................8
....................................................8
............................................9
Front View.......................................................9
Rear View .....................................................10
6-3 Connect the NSD-100 to ROUTER................22
6-4 DMZ Setting...................................................27
6-5 Share mapping...............................................32
7. WEB Administration.................................................38
7-1 Home page ....................................................38
7-2 Administration ................................................39
7-2-1 BitTorrent.................................................... 39
7-2-2 FTP Server................................................. 45
Page 4

7-2-3 LAN ............................................................ 48
7-2-4 Device Setting ............................................ 48
7-2-5 USB............................................................ 49
7-2-6 User Folder ................................................ 53
7-2-7 Share Folders............................................. 55
7-2-8 Media ......................................................... 55
7-2-9 Tool............................................................. 56
8. Q & A.......................................................................62
Page 5

1. Attention
1. Please back up your data in the NAS hard disk regularly to avoid
data losing due to uncertain manual fault, accident or hard disk
crash.
2. Please do not place this product on an unstable desk or uneven
surface to avoid falling and damage.
3. Please use independent power source for USB HDD while connect
USB HDD with NSD-100 to avoid insufficient electric power
effecting the data access.
4. Please do not remove any USB HDD from NSD-100 directly while
NSD-100 is on working. Follow the instruction of Charter 7 to avoid
any data losing or HDD crash.
It is a criminal offence, under applicable copyright laws, to make
unauthorised copies of copyright-protected material, including
computer programs, films, broadcasts and sound recordings.
This equipment should not be used for such purposes.
5
Page 6
2. Product
Introduction
Thank you for buying this product. NSD-100 is a compact, economical
NAS (Network-attached stooge), providing an excellent data storage
for personal requirement. With first time setup procedure are simple
and user-friendly, besides, benefits are
▪
Computers are not required to be powered on whole time while in
process of downloading; this leads to cut the electricity bill.
▪
Not connected to the computer is one of the advantages to prevent
unauthorized accesses form data leak out
▪
Using P2P program on the computer will come with troublesome
program installation or configuration of computer, NSD-100 will
remove the troublesome procedures.
▪
It only requires Internet to queue the new task of download to the
NSD-100 from anywhere.
.
Specifications
Features
Hard disk Support USB2.0 interface external HDD
Specification
6
Page 7

Standard USB 1.0/1.1/2.0, IEEE 802.3, IEEE 802.3u
Ports 1. 10/100 RJ-45 Ethernet port x1
2. USB 2.0 x2
LAN protocol TCP/IP Protocol
Buttons 1. USB eject x2
2. Reset hole x1
Power Input: 100~240V,
Output: 5V/2A
Memory 1. Flash ROM 8MB
2. RAM: 64MB
LED indicators 1. Power indicator x1
2. LAN indicator x1
3. USB indicator x2
Dimension (W)150mm x (D)111.8mm x (H)30mm
Weight 190g(Net)
Environment Storage Temperature => -20ºC to 70ºC
Storage Humidity => 5% to 90% Non-Condensing
Operating Temperature => 5ºC to 40ºC
Operating Humidity => 10% to 85%
Non-Condensing
7
Page 8

3. System
Requirements
1. Windows, Mac or Linux operation system and Ethernet adapter
2. 10/100 Base-T network cable with RJ-45 connector.
3. TCP/IP protocol
4. ADSL/CABLE modem and user account of ISP (Internet Services
Provider).
5. NAT Router or Switching HUB (Optional)
6. USB HDD.
4. Package
Content
Please check the following list of content first. If there is anyone
missing or flawed, please contact with your seller.
1. NSD-100 Device X 1
2. User Guide X 1
3. Power Adapter (5V/2A) X 1
4. Network cable 10-100 BASE-T X 1
5. Installation disc X 1
8
Page 9

5. Hardware
Introduction
Front View
USB LED II (Green)
①
Lighten Green USB device I connected to port ⑥
Off No USB device connects to port ⑥
Blinking Green Data TX/Rx
② USB LED I (Green)
Lighten Green USB device I connected to port ⑤
Off No USB device connects to port ⑤
Blinking Green Data TX/RX
9
Page 10
Network LED (Green)
③
Green Cable (10/100 base-T) connected
Off LAN disconnection
Blinking Green Data TX/RX
④ Power LED
Green Power on and NSD-100 ready
Blinking Yellow
System initializing
Red
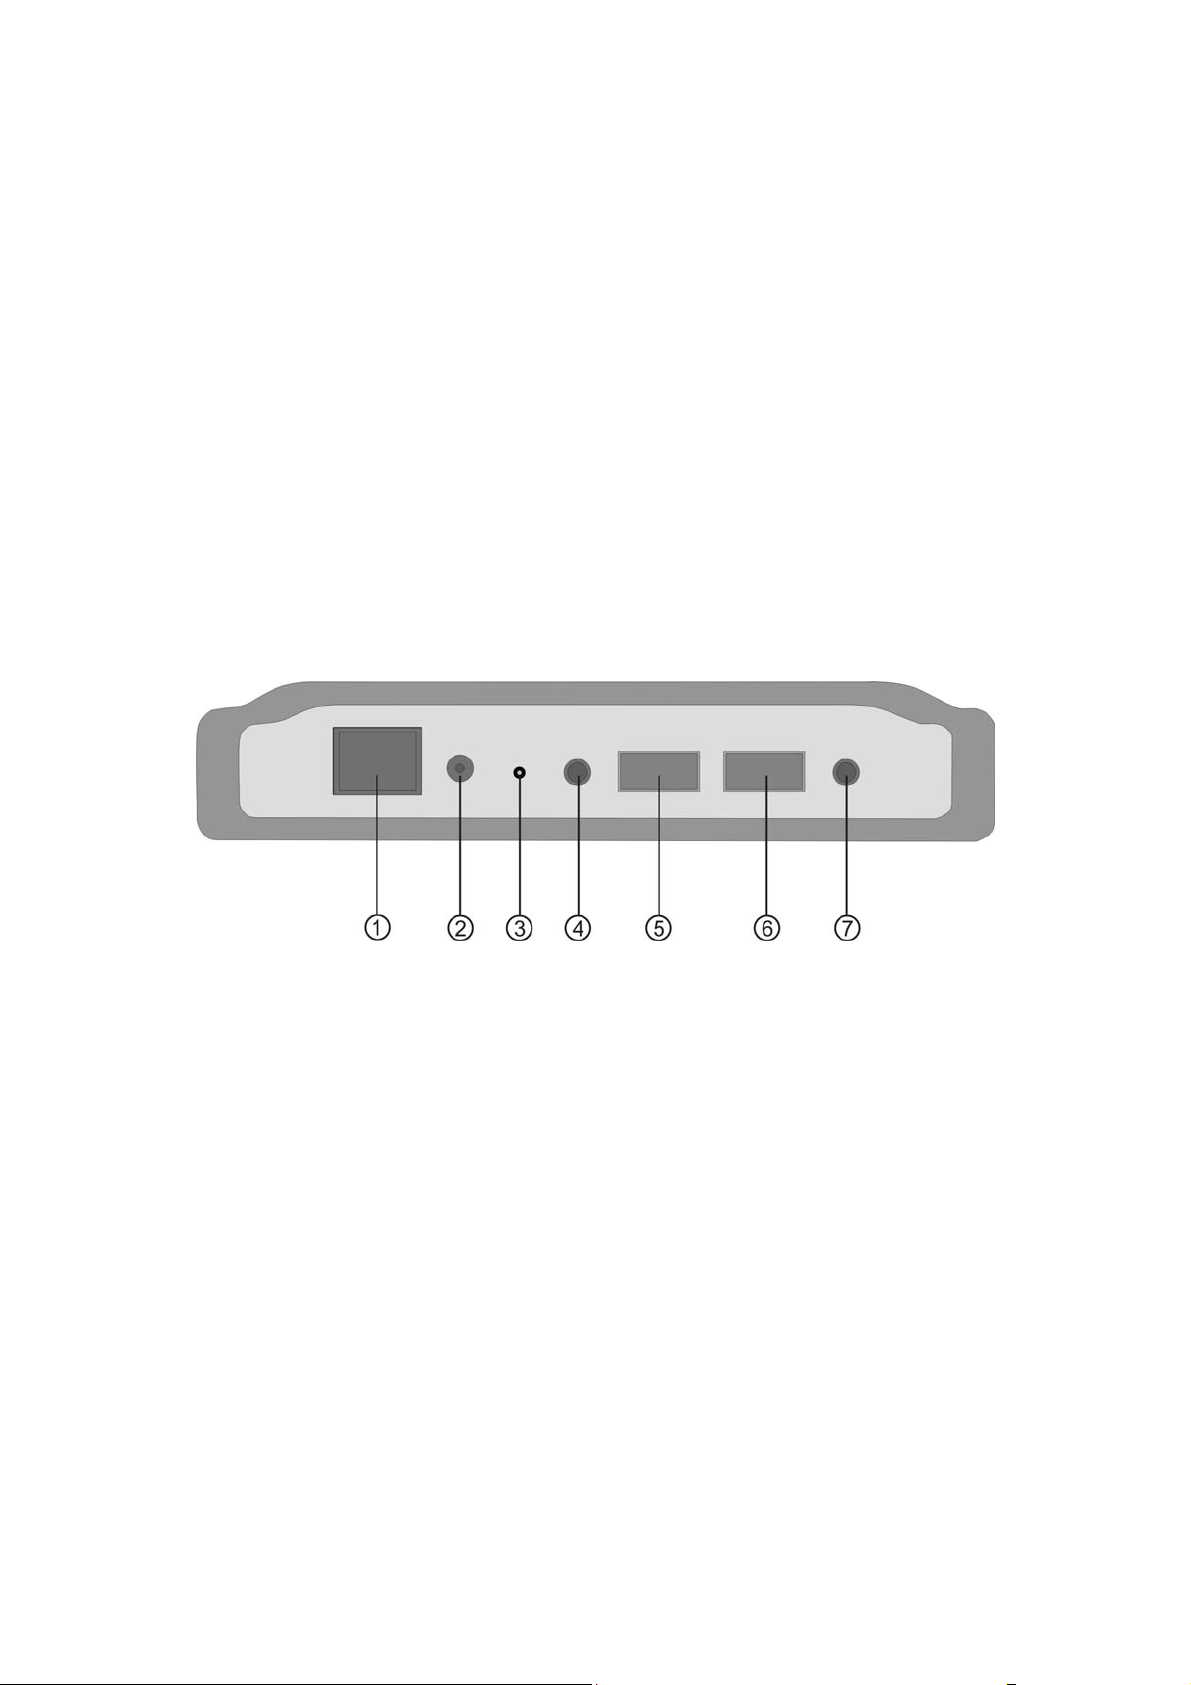
Rear View
①
Network port
Connect the port with cable (10/100 base-T) to your switching
Power on but NSD-100 not ready or faulty
HUB or NAT Router
② Power source port
Connect with power adaptor.
③ Reset key
Press and hold for 10 seconds to reset all configurations to factory
default settings.
10
Page 11

④
USB eject key I
Press and hold for 20~30 seconds and hear ‘’bee’ twice and LED
“USB I” go off. Now you could safely remove the USB I device
from NSD-100.
⑤ USB I port
Connect with your USB device.
⑥
USB II port
Connect with your USB device.
⑦ USB eject key II
Press and hold for 20~30 seconds and hear ‘’bee’ twice and LED
“USB II” goes off. Now you could safely remove the USB II device
from NSD-100.
Attention:
In order to use USB HDD with NSD-100, the capacity of external HDD
must be more than 10GB and formatted to Linux-HD or FAT32-HD by
NSD-100. NSD-100 will recognize the formatted BT-HDD when the
HDD connects to USB I or USB II. Please note that Windows operation
system is unable to recognize Linux-HD format directly without through
NSD-100. (Please refer 7-2-9-2 for formatting HDD)
11
Page 12
6. Installation
According to different users’ hardware environment, please select one
of following ways to install NSD-100.
1. Now, if your computer is linking and using under ADSL MODEM,
please select the way of chapter 6-1 to install NSD-100
2. If your computer is linking and using under HUB, please select the
way of chapter 6-2 to install NSD-100
3. If your computer is linking and using under Router, please select
the way of chapter 6-3 to install NSD-100
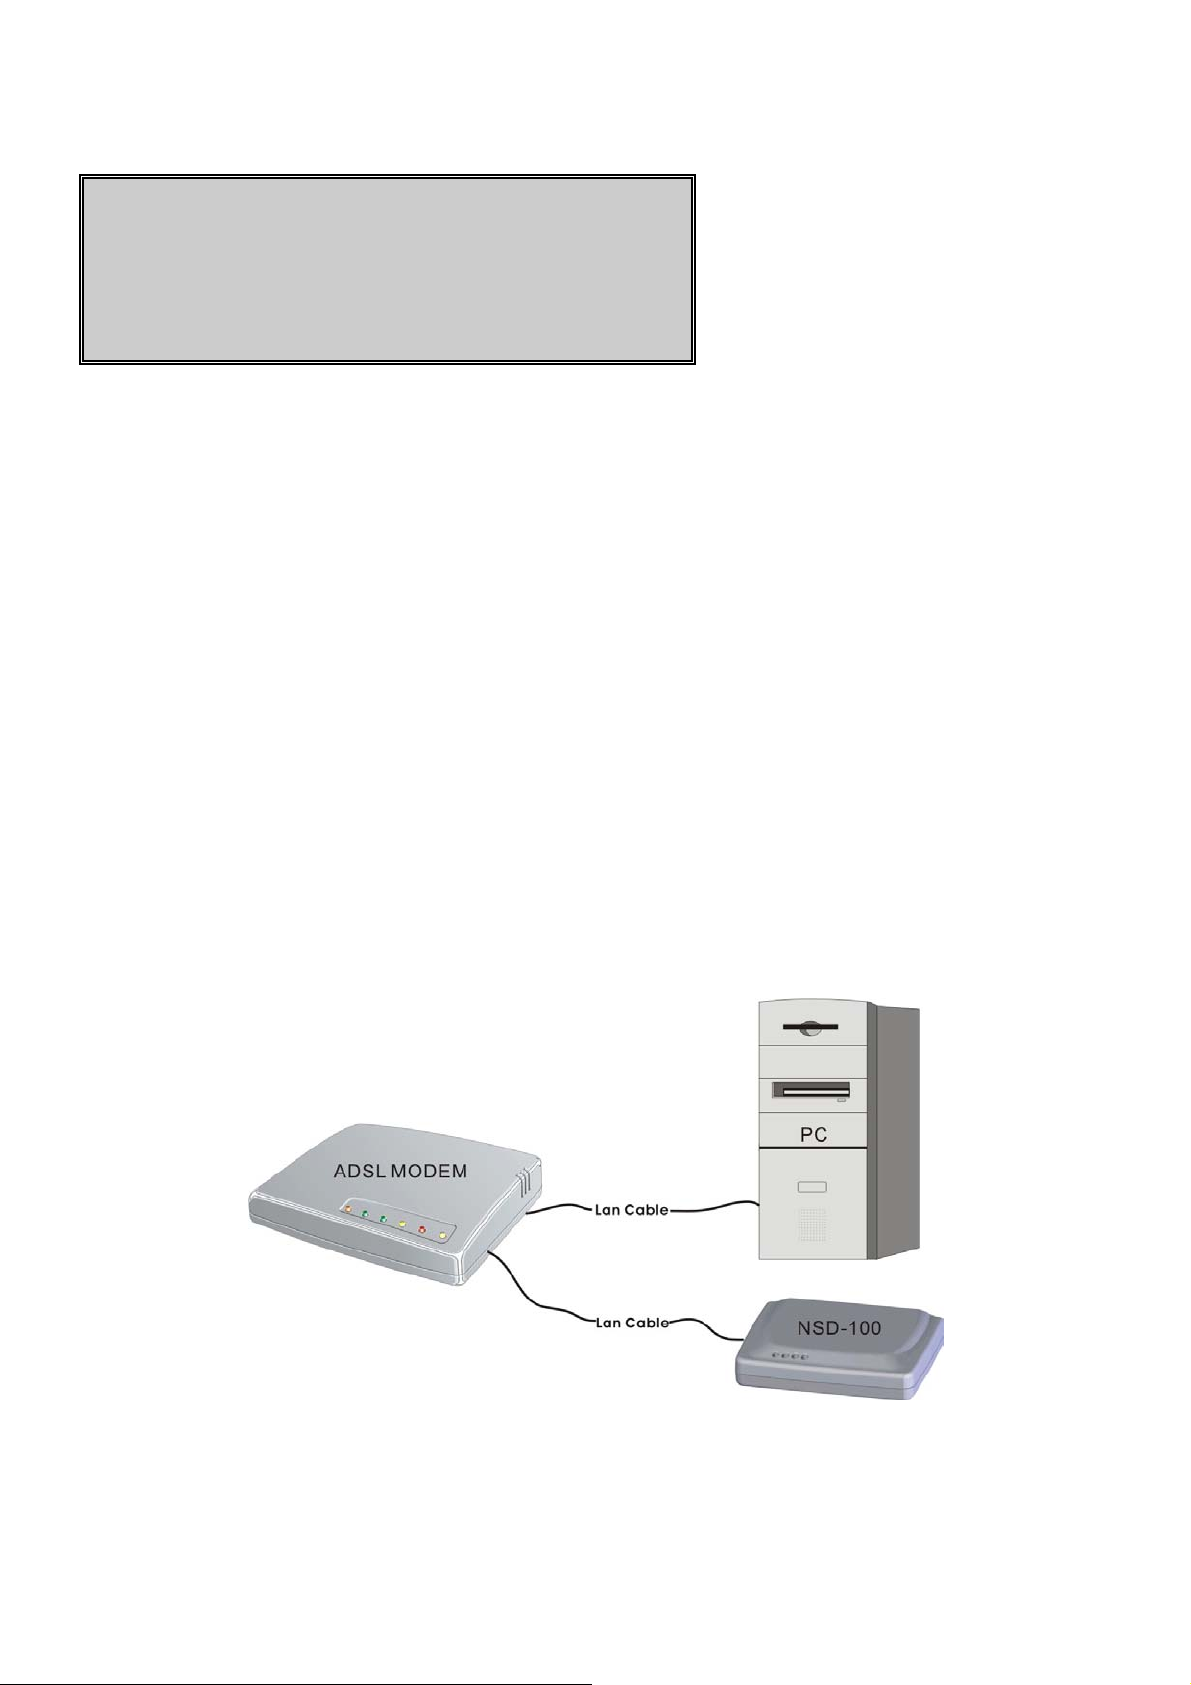
6-1 Connect the NSD-100 to ADSL MODEM
12
Page 13

Dialing mode (PPPoE)
First, please make sure that your ADSL modem already have switching
HUB (over 2 LAN port), also have a static IP or more dynamic IP
address. Following section indicate how to configure on your NSD-100.
Second, Connect the LAN port of ADSL modem to NSD-100 and PC.
Third, please set up the network with the following steps.
Step 1.
Click “Start”-Æ select “My Network Places” and press right key of
Mouse Æ select “Properties”
13
Page 14
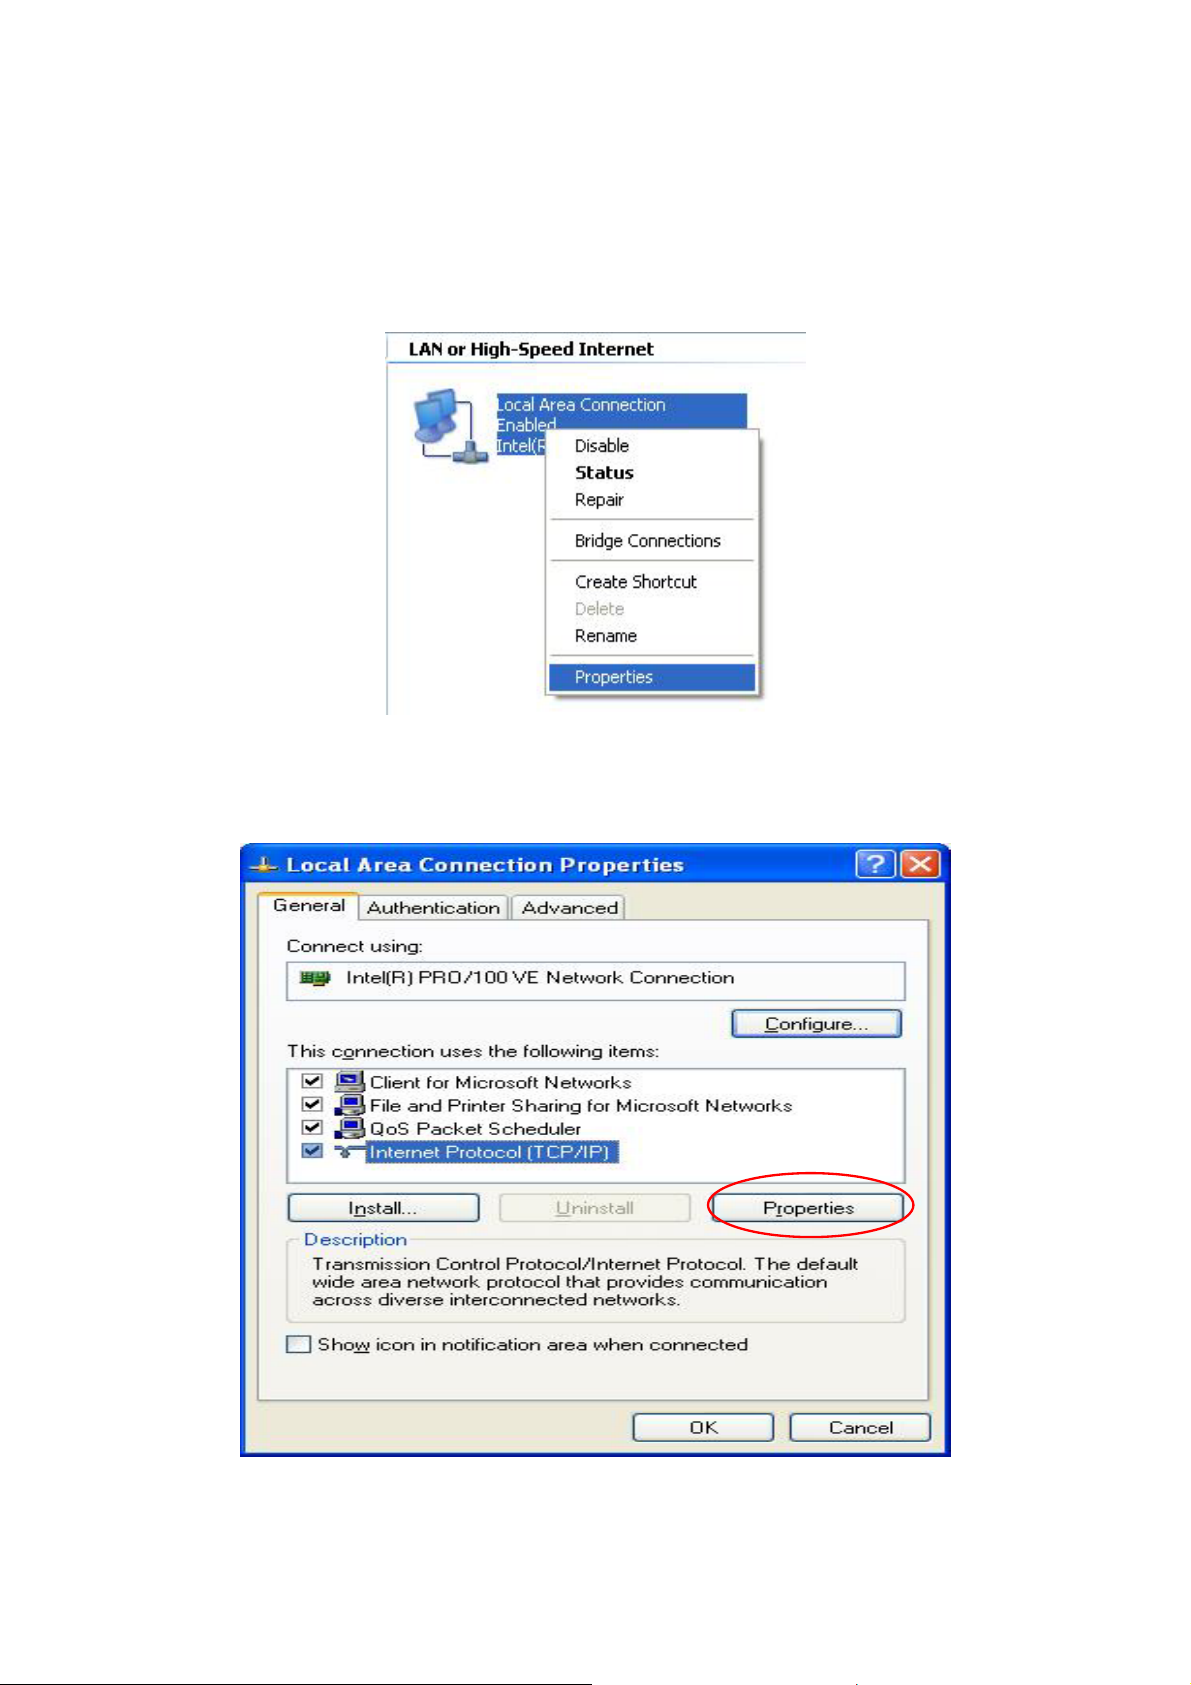
Step.2
Double click the icon “Local Area Connection” and press right key of
your mouse, select “Properties”.
Step 3.
Select “Internet Protocol (TCP/IP)” Æ select “Properties”
14
Page 15
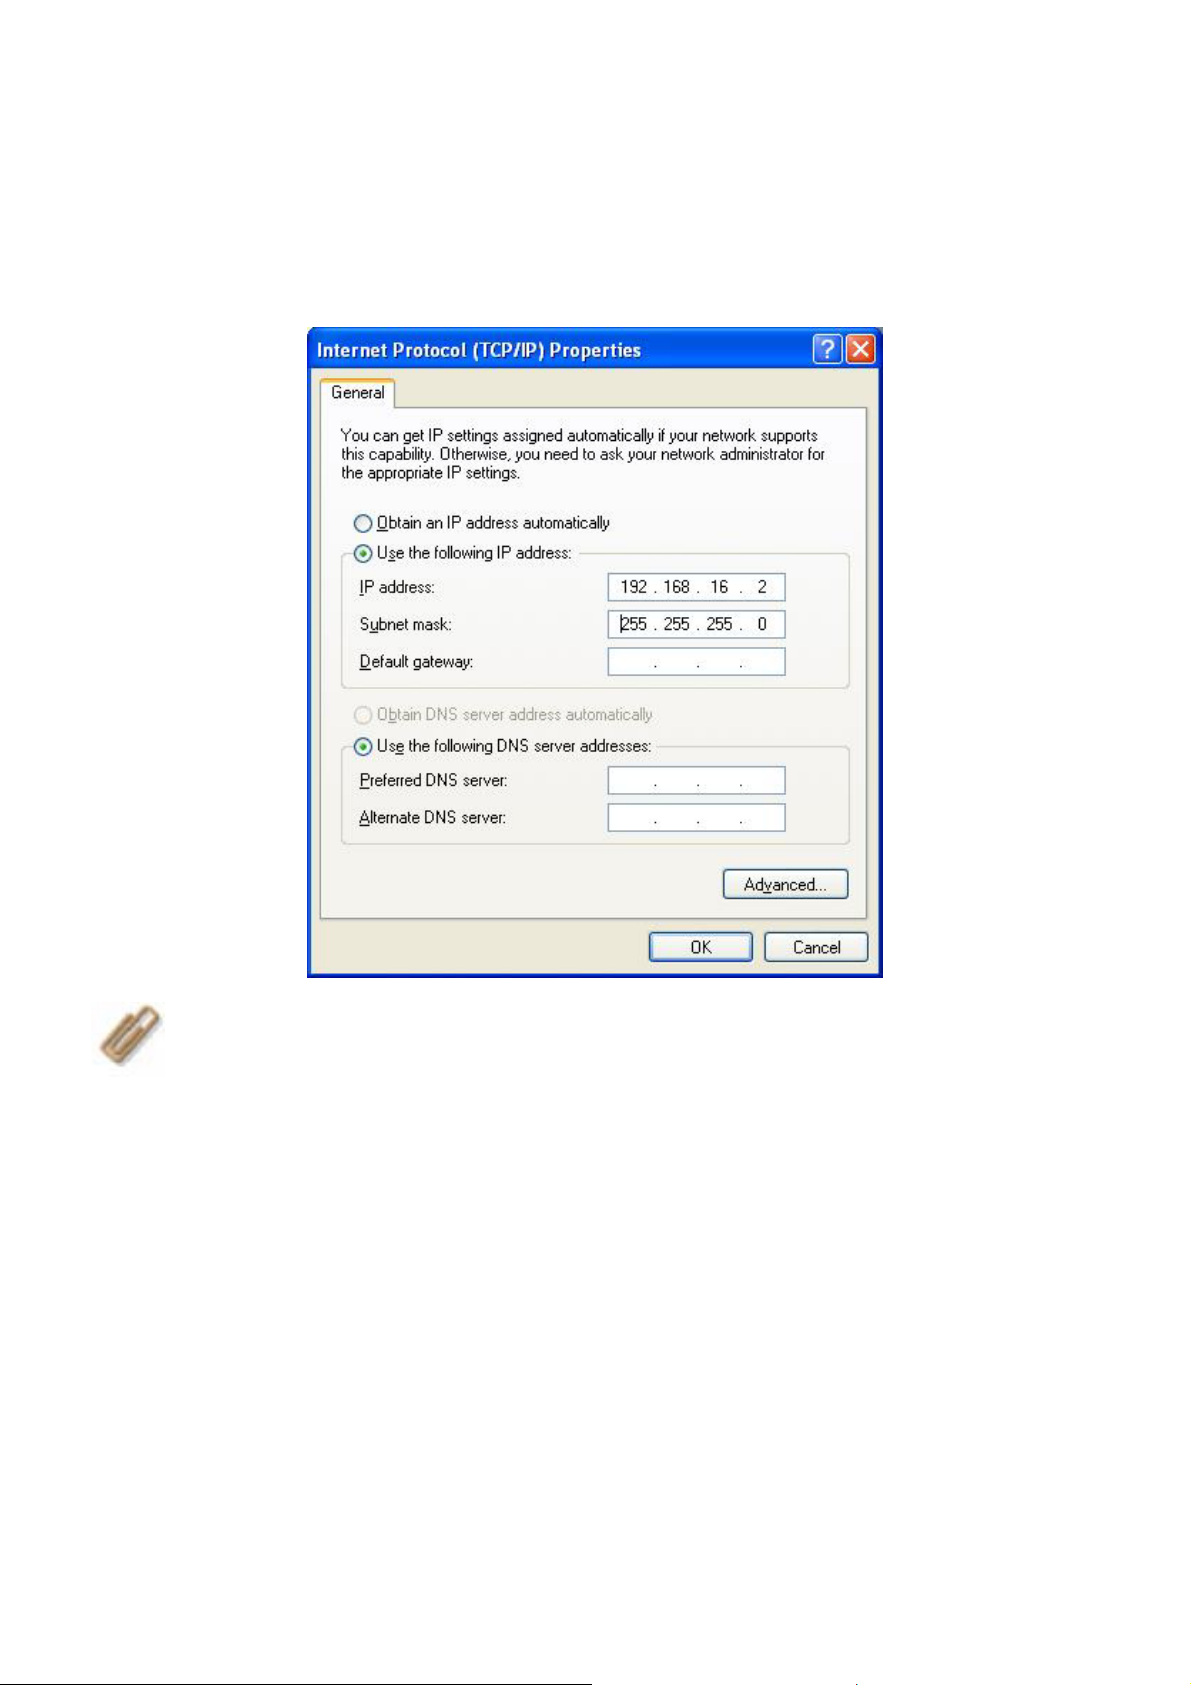
Step. 4.
Enter the IP address: 192.168.16.2, Subnet Mask ID: 255.255.255.0
into below dialog box.
NOTE
Default IP of NSD-100 is 192.168.16.1
1.
Please make sure your PC and NSD-100 in the same LAN.
2.
Finally, please set up the NetTool with following steps.
Step 5
The bundled program, NetTool is green software. Please copy it to
desktop and execute it directly.
:
15
Page 16
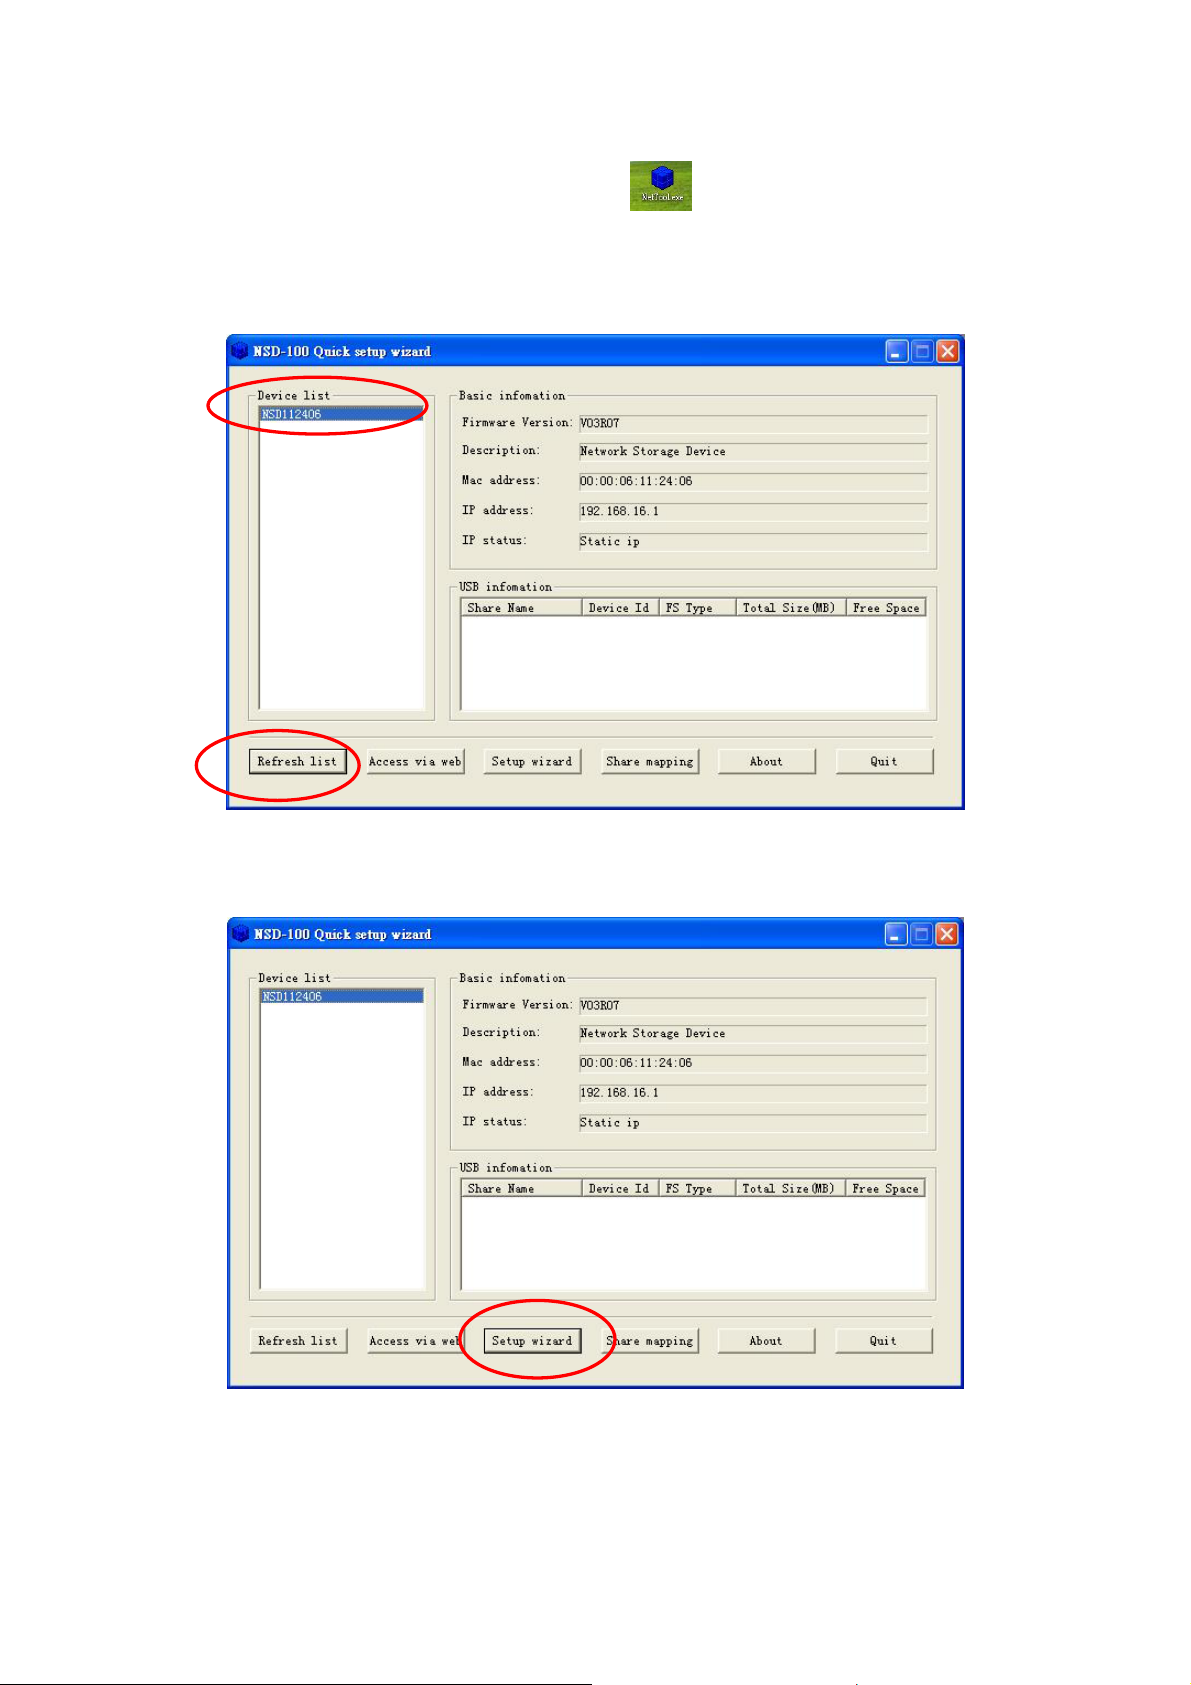
Double click the ICON “NetTool.exe”
to start setting wizard. Click “Refresh list” and you will see NSD100
(Serial Number) on the upper of dialogue “Device list”.
on the desktop of Windows
Step 6. Click “Setup wizard”
16
Page 17
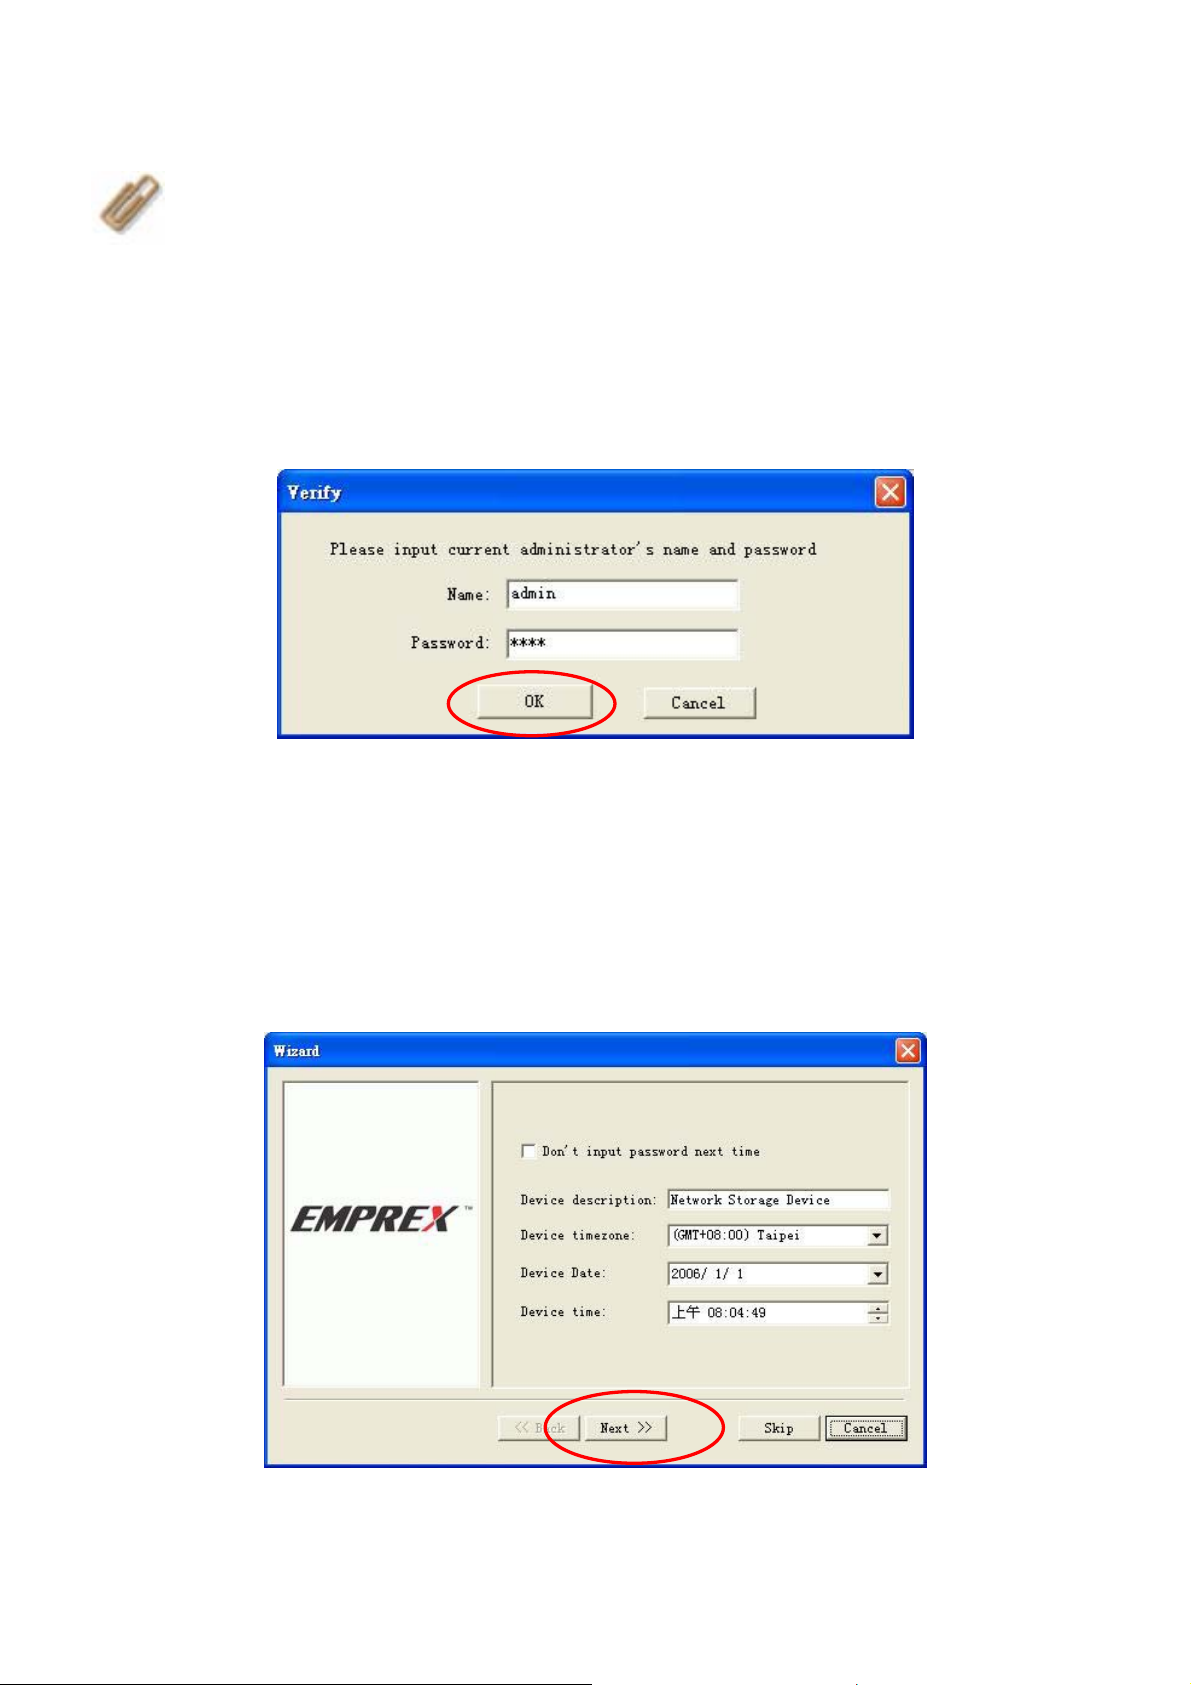
NOTE:
Step 7.
a. When the “Verify” window pops up, enter the username and
password, the user name and password are “admin” & “root”.
b. Click “OK.” and window “Wizard” will automatically appear.
Default IP of NSD-100 is 192.168.16.1
Step 8.
a. Select the time zone that corresponds to your region from the drop
list “Device time zone”.
b. Select the date that corresponds to your local date from the drop
list “device date”.
c. Adjust the time that corresponds to your local time and click “Next”.
17
Page 18
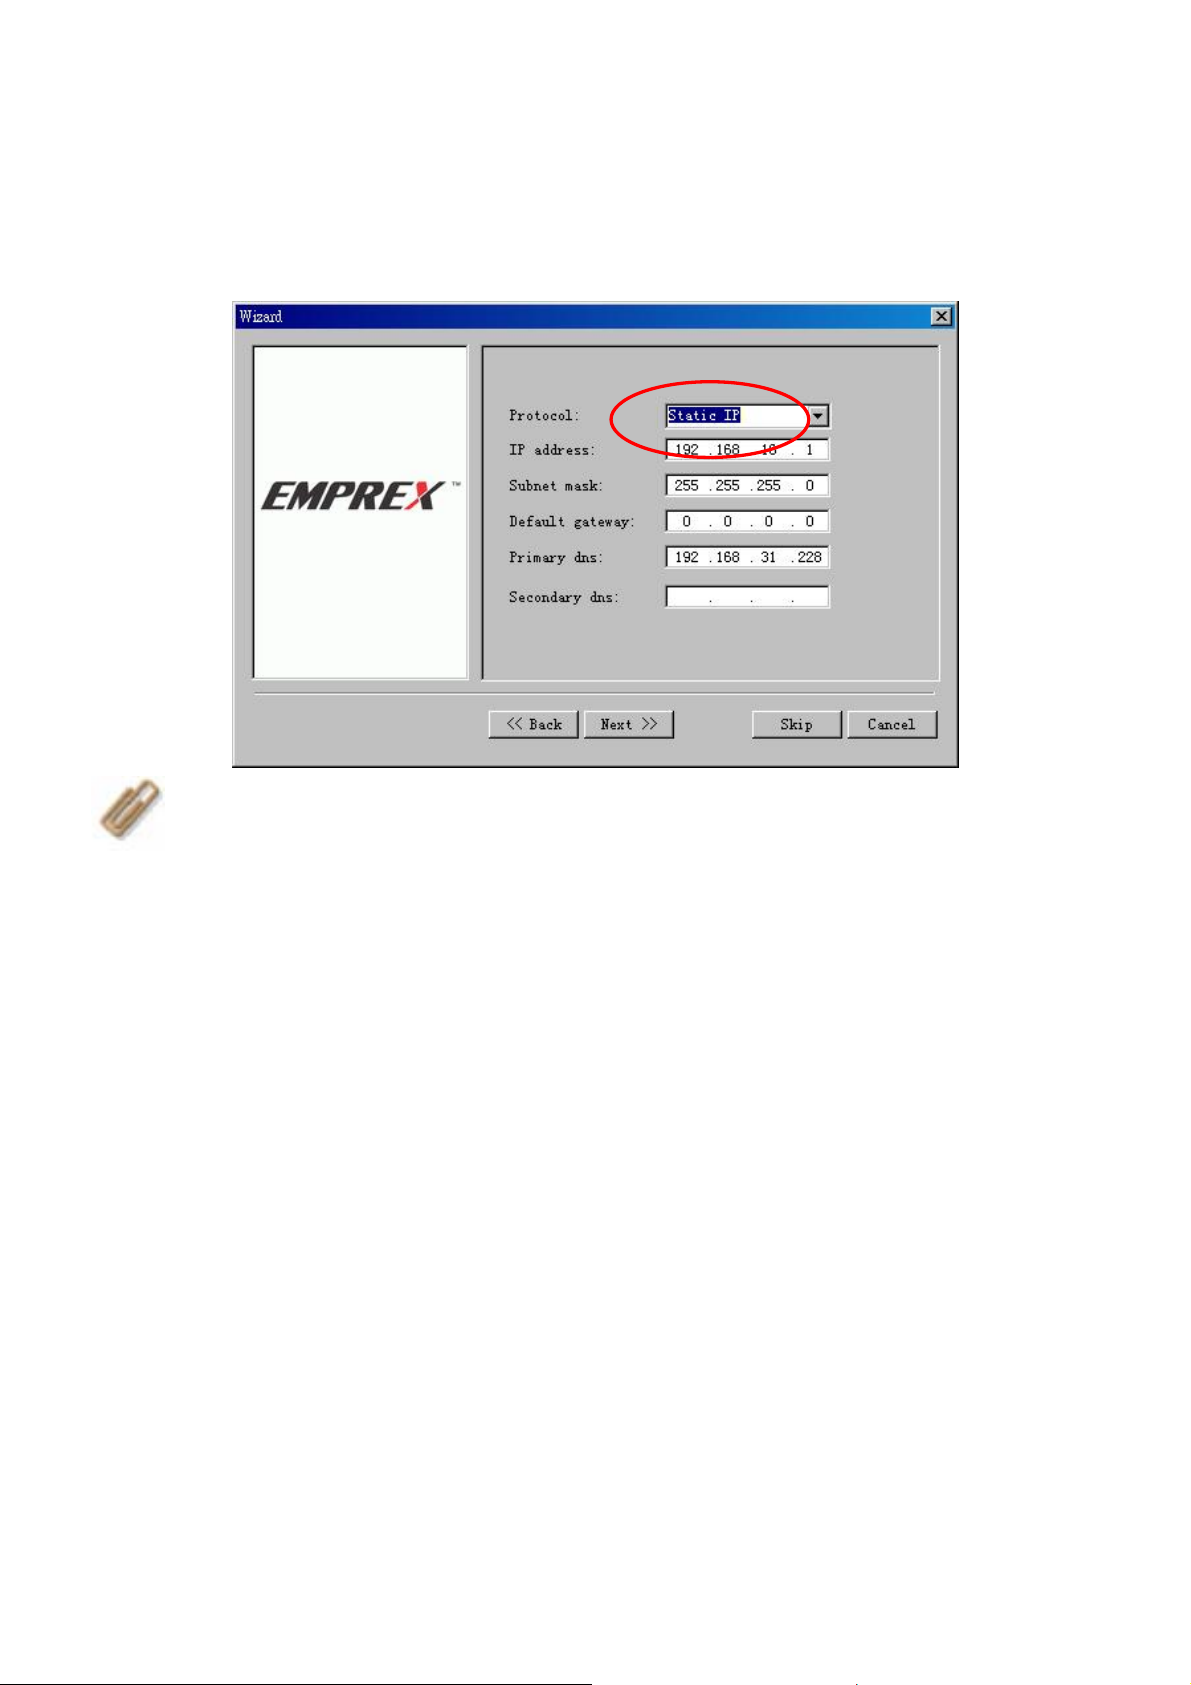
Step 9.
a. Select “Static IP” for Protocol
b. Enter IP address 192.168.16.1, subnet mask 255.255.255.0,
NOTE
If you select Static IP, please make sure your PC and NSD-100
are in the same LAN.
:
18
Page 19
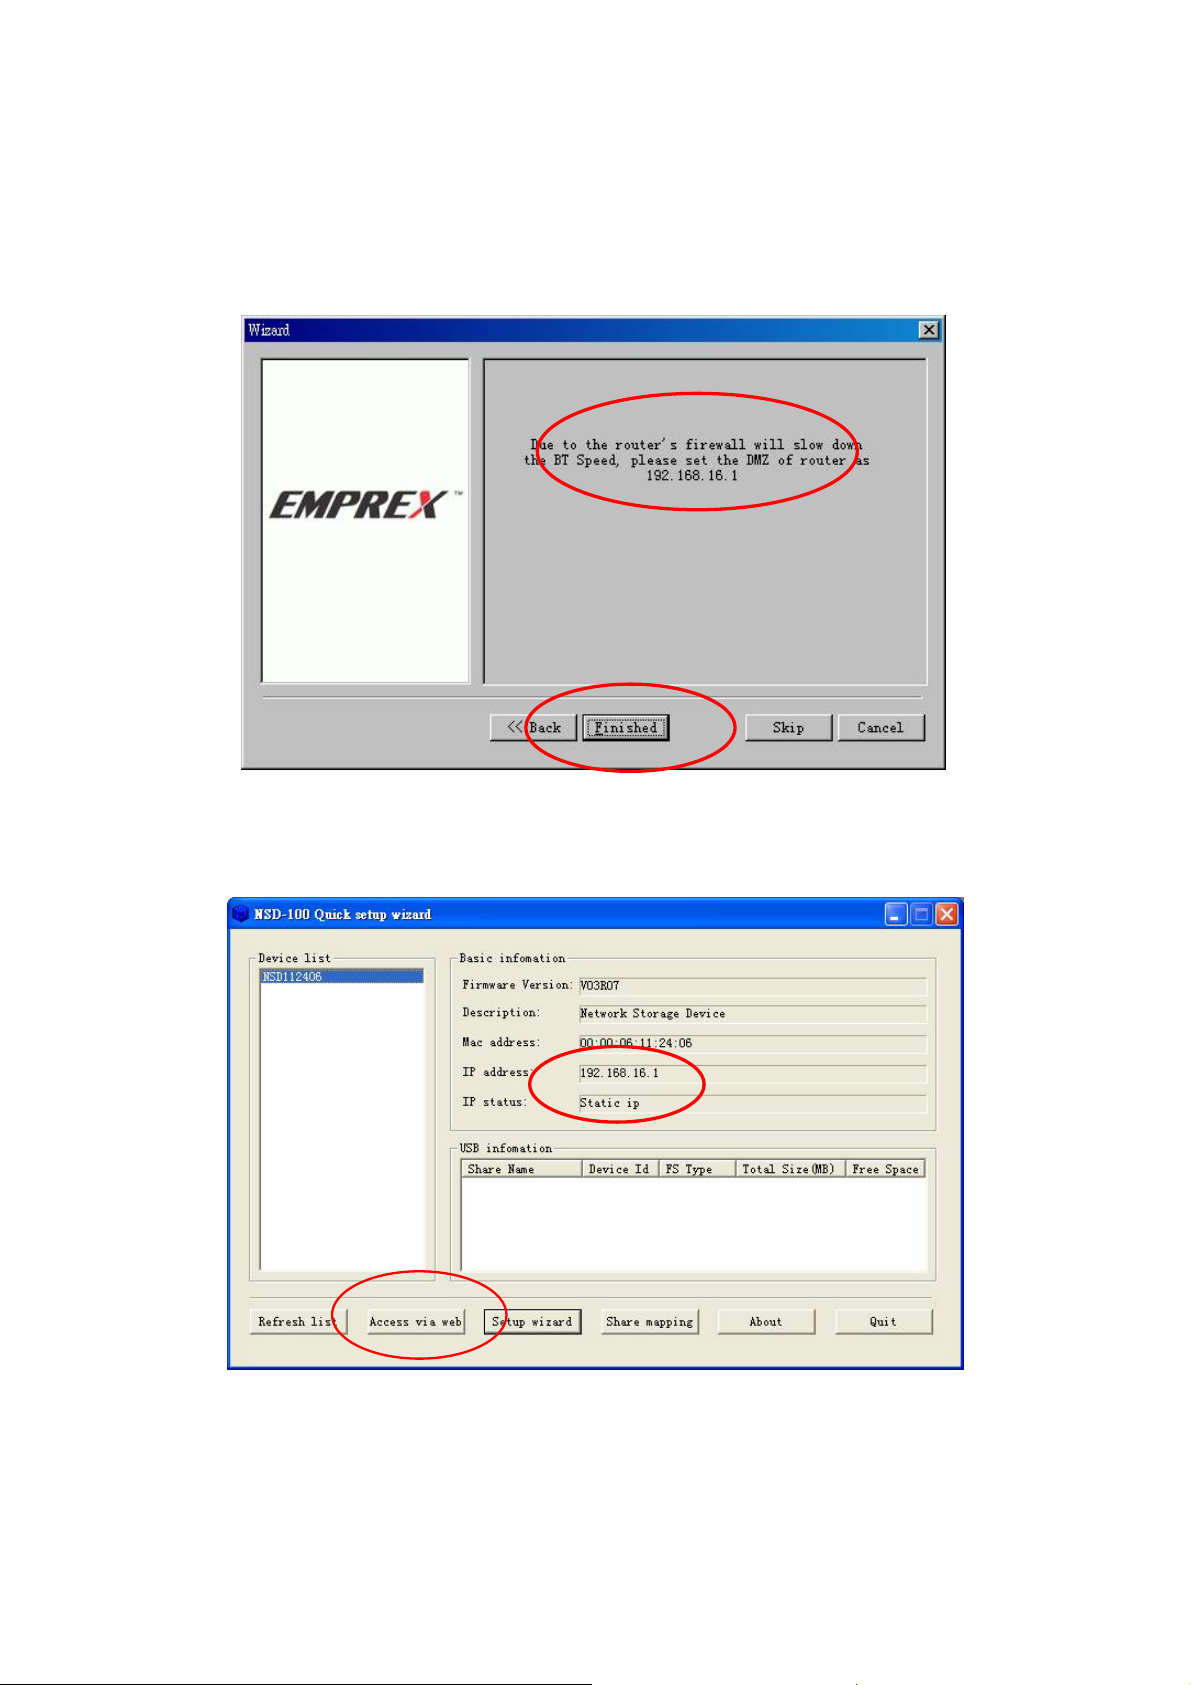
Step 10.
Due to the connection is not with NAT Router, please ignore the
message and click “Finished”.
Step 11.
Click “Access via Web” to enter WEB administration.
19
Page 20
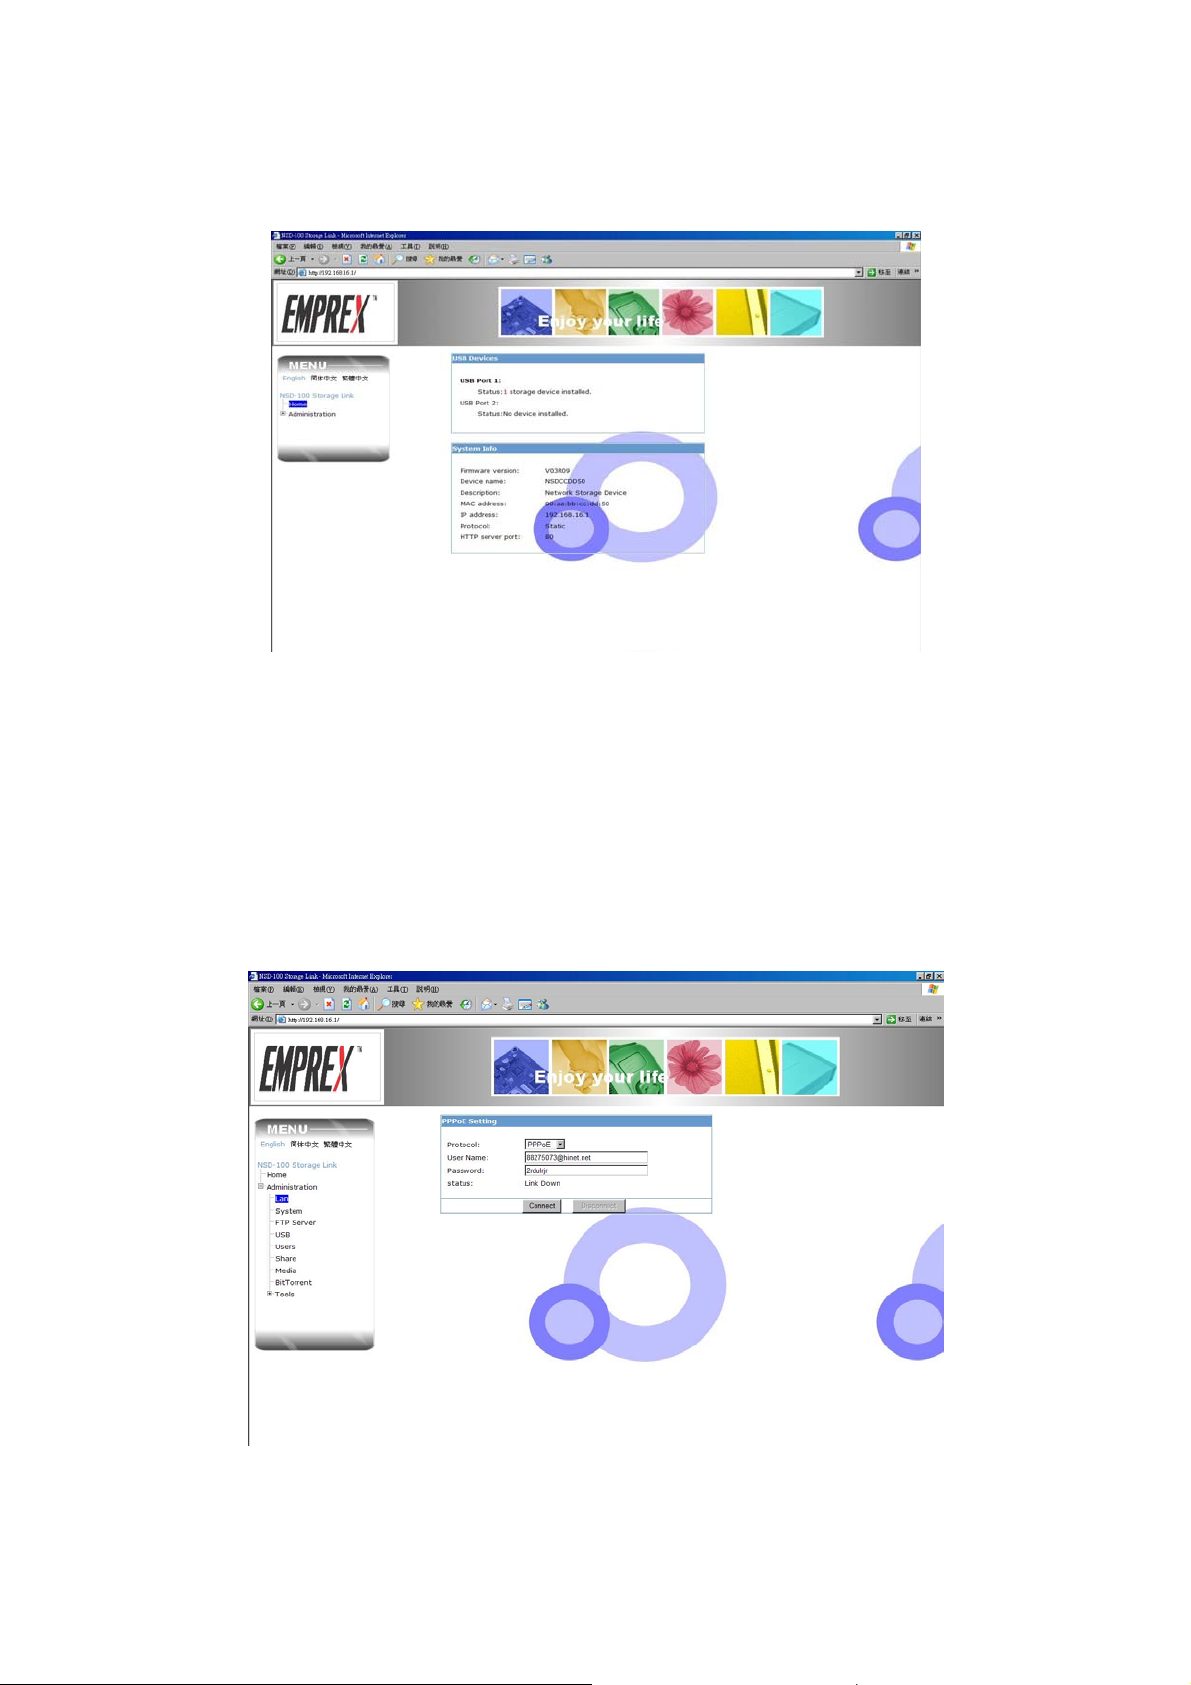
WEB Administration
Step 12
a. Click “administration” on the left and will pop up windows, enter
Username and password, the username and password are
“admin” & root.
b. Select “PPPoE” for protocol, enter your ADSL username and
password which is provide by the internet Services Provider (ISP)
c. Click “connect”
20
Page 21
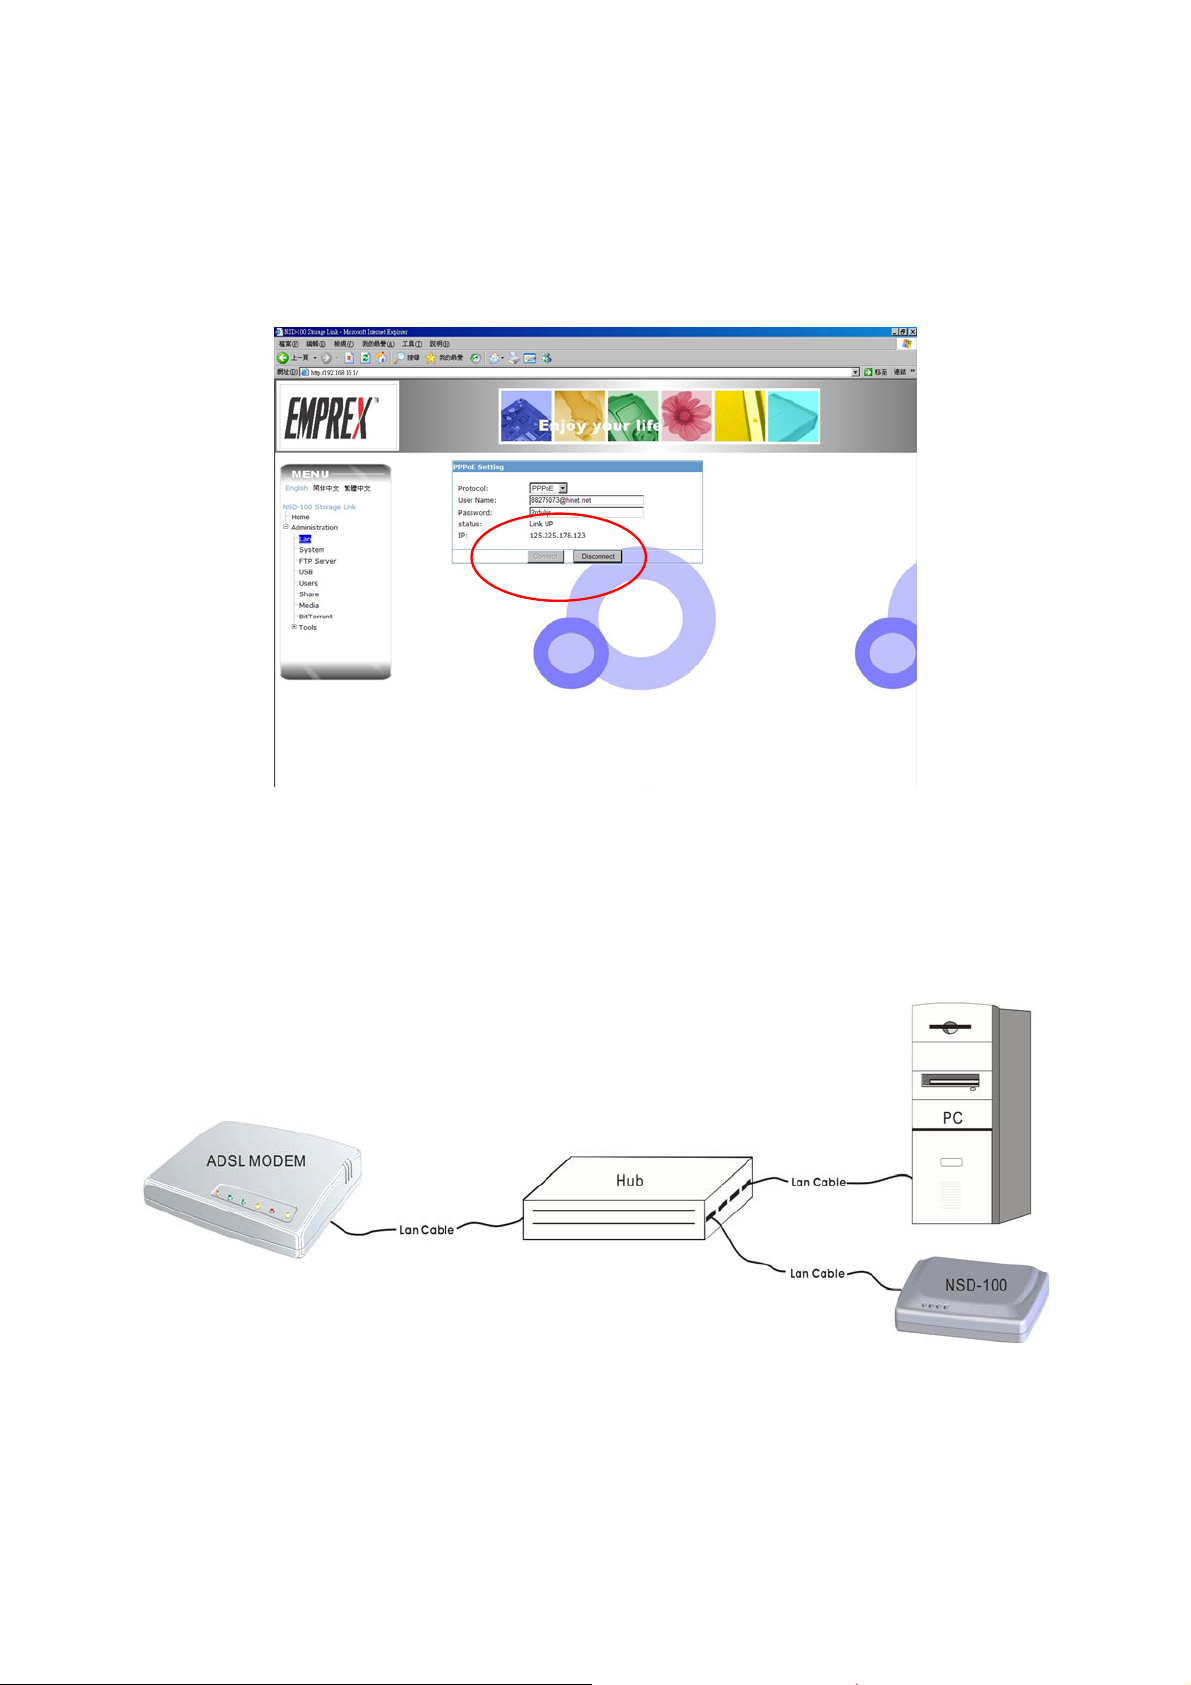
Step 13
The status will show “Link UP” that mean established connection
completed successfully.
setting)
(Please skip to chapter 7-2-1 for operate of BT
6-2 Connect the NSD-100 to HUB
Confirm it belong to the connection way is dialing (PPPoE,
Point-to-Point Protocol over Ethernet) or static IP that the
telecommunication company offers service of giving to you first.
Dialing mode (PPPoE)
Network & NetTool setting is the same as chapter 6-1。
21
Page 22

6-3 Connect the NSD-100 to ROUTER
Confirm it belong to the connection way is dialing (PPPoE,
Point-to-Point Protocol over Ethernet) or static IP that the
telecommunication company offers service of giving to you first.
DHCP mode
Step 1.
Click NetTool.exe ICON on the desktop to open. Click
“Refresh list” and you will see NSD100 (Serial Number) on Drive list of
the upper left corner
22
Page 23

Step 2.
Click “Setup Wizard”
Step 3.
Enter the default setting Name: admin; Password: root and click “OK.”
23
Page 24

Step 4.
Click “Next”
Step 5.
Select “DHCP” for Protocol
NOTE:
If you select “DHCP” protocol, please make sure to
enable DHCP function in your Router.
24
Page 25

Step 6.
Click “Next”
Step 7.
There will be a screen show “Due to the router’s firewall will slow down
the BT speed, please set the DMZ of router as xxx.xxx.xx.x ” Please
remember this IP Address and click “Finished.”
25
Page 26

NSD-100 will link to your Router automatically, please key in the
router’s account and password (please refer to Router’s manual) for
DMZ setting. (Setting manner is in chapter 6-4)
Step 8.
After finishing the DMZ setting, please click “Access via Web” to enter
WEB administration.
26
Page 27

Web administration
6-4 DMZ Setting
We recommend user to start Router’s DMZ function when the
BT-Download slows down. DMZ function could speed up BT-Download
and enable user to link NSD-100 homepage from outer network to
browse and set jobs.
Some Routers provide DMZ function. If your NSD-100 is located
behind the NAT router, you can forward LAN IP address specified by
DMZ to NSD-100. When this setting is done, all ports from WAN to
LAN will be forwarded to NSD-100.
User might set DMZ only under Router’s LAN IP. After completing the
setting of NSD-100, NetTool will automatically connect to your NAT
Router. Here is an example regarding how to set DMZ with commercial
NAT router.
27
Page 28

Step 1
When NetTool accesses your NAT Router, a dialogue will ask for user
name and password to login. In general the factory default setting are
“admin” and “admin,” please refer to your user’s manual of NAT router
for detail.)
Step 2
After logging in, you will see the home page of NAT Router. Please
click “Advanced setting” and “Fictitious server” and follow the
instruction to set the NAT Router.
28
Page 29

Step 3
Set the IP Address of DMZ as same as the IP Address of NSD-100 and
click “Add” to continue.
IP of NSD-100
You will see the IP Address of NSD-100 in the dialogue after setting
successfully.
You may also open your PC’s web browser and enter your static IP
Address of NAT Router. NSD100’s home page will be accessed
complete successfully.
29
Page 30

Port Forwarding
If your Router does not have DMZ function, you can select Port
Forwarding function too, it has function of accelerating BT download
speed too (the port range that BT downloads is downloaded at random
by 10000~65535). Here is an example regarding how to set Port
Forwarding with commercial NAT router.
When NetTool accesses to your NAT Router, a dialogue will ask for
user name and password to login. In general, the factory default setting
are “admin” and “admin,” please refer to your user’s manual of NAT
Router for detail.)
30
Page 31

Click “fictitious server” in NAT Router’s setting page.
1. Enter a port value which is not used in “WAN port”
2. Enter the IP Address of NSD-100 in " server IP address ",
3. Click “Apply.”
4. Enter the “ Router IP address:WAN port value” on browser.
5. Click “Enter.” It will transfer to NSD100’s home page.
31
Page 32

6-5 Share mapping
If user want to create a shortcut in order to check some folders of
NSD-100 HDD. You could use “Share Mapping” function of software
NetTool.
1. Click “Share mapping”
32
Page 33

2. Enter the default username and password (Default setting Name =
t
admin, Password = root) and then click “OK”.
3. Enter the user name and password on left up side of the page.
4. Select the folder and drive letter you want to build for the network
drive and click”Map.” (But if you changed this user's name and
password, please input the amended name and password
Select the name of folder you wan
to build for the network drive
Select the Drive letter for network drive
33
Page 34

NOTE:
The username, password and properties of share folder for map
remote to local drive are the same as those were configured in
following page 7-2-5. To get supervisor authority to manage, you may
enter administrator name and password, the username and password
“admin” & “admin”.
5. Select the folder and code you want to build the LAN drive and
click ”Map.”
34
Page 35

6. You can see network disk Z in following page
Confirm if the LAN drive setting is the
same as NetTool’s.
35
Page 36

If the LAN drive disappear each time restart the computer, you may try
the following setting to exist the drive.
Click “My Computer” → “Tool” → “Map Network Drive”
36
Page 37

After setting the “drive” and “folder”, please check the option
“Reconnect at logon.”
Click “Unmap” to remove LAN drive.
37
Page 38

7. WEB
Administration
NSD-100’s administration page supports three languages interfaceEnglish, Traditional Chinese, Simple Chinese for users.
7-1 Home page
Users may select language and check the information of NSD-100 and
connecting USB device.
NOTE:
Default IP of NSD-100: http://192.168.16.1
38
Page 39

7-2 Administration
The default setting for username is【admin】, password is【root】.
The sub directory of administration shows items “LAN”, “Device
Setting”, “FTP server”, “USB”, “Users”, “Share”, “Media”, “Bit Torrent”
list on left side of window. It also supplies some tools to help users.
7-2-1 BitTorrent
First, please connect USB-HD to any USB PORT of NSD-100. The
USB-HD needs to format via NSD-100. Next, you could access BT file.
(Please refer to chapter 7-2-9-2 Hard Disk Format)
39
Page 40

Please click " Bit Torrent" from MENU on the left.
7-2-1-1 BitTorrent Global setting
1. Place the torrent file in folder “Public” or other folder.
2. You may set the download/upload speed and job procedure.
40
Page 41

a. You may enter the value of download/upload speed depending on
your network environment. Besides, you can set “0= no limit” for
maximum download/upload speed or “1= automatic” for auto control
download/upload speed by NSD-100.
b. For manage job procedure of list in table of “BitTorrent management”,
especially for some job (downloading file) lacked for seeds or unable
to connect with peer in internet. For example, if there is no data
downloaded from this job within 4 hours, NSD-100 will jump to
process next job. That means if there is no one share and upload
the file to you, NSD-100 will follow the setting to stop job polling.
This setting is important to avoid resource occupation and then
delay other jobs.
3. Seed Options
a. Seed infinitely:
After file download completed successfully, the file will become
seed and allow upload automatically.
b. Moreover, the upload ratio could be changed by share ratio or
share time.
41
Page 42

c. Start next uncompleted job automatically:
NSD-100 will re-start uncompleted job automatically if there is an
uncompleted job and NSD-100 confirms to upload setting of item b.
7-2-1-2 Create New Job
1. Put the seed file into the folder of computer
2. Click “Browse” to find directory of the seed and click “Add”.
NSD-100 allows uploading maximum 20 torrent files.
42
Page 43

The new job will be listed in BitTorrent table.
Click “Start” will launch to download file
43
Page 44

Click “Details” will display the detailed progress of download
7-2-1-3 Refresh
Click “Refresh” will show latest status of the download file.
44
Page 45

7-2-2 FTP Server
NSD-100 could be a FTP server with Static IP.
You could modify the port setting (default value is 21) for service and
restrict anonymous user to upload or download.
NOTE:
Since most FTP clients do not support Unicode currently, we
recommend user to disable Unicode supported here and select
language the same as your OS in “client PC’s Language.”
*How to Use FTP
1. Should have FTP software first (ex. CoreFTP)
The following picture set FTP port 21 for NSD-100, please set FTP
software access port to 21, too.
45
Page 46

2. Confirm that user name and password is the same as NSD-100
setting.
46
Page 47

3. Enter the IP Address of NSD-100 and click “Connect.”
47
Page 48

7-2-3 LAN
DHCP
Obtain IP address automatically via DHCP. If your network
configuration support DHCP, NSD-100 will use DHCP protocol to
retrieve the IP address and related information automatically.
Static IP
To use fixed IP for network connection, enter fixed IP address, subnet
and default gateway, primary DNS and secondary DNS.
PPPoE
To build ADSL dial-up connection, enter username and password of
Internet Service Provider (ISP).
NOTE:
If your previous setting is PPPoE, please click “Stop” before
changing the setting to “Static IP” or “DHCP”.
7-2-4 Device Setting
Decvie name
48
Page 49

Enter the name of NSD-100, The device name can be 16 characters
long at maximum.
Date/time
Set the date, time zone according to your location.
NTP/NTP server
NTP Server is an internet time server that enables NSD-100 to show
the same time as your computer. You may check NTP -“Enable” to
synchronize the system time.
Http port
Enter the port number for web service, the default number is 80.
7-2-5 USB
You may access the USB device that connects with NSD-100.
49
Page 50

7-2-5-1 USB device
To be use as BT-HDD, the capacity of HDD must be more than
10GB and formatted into Linux-HD or FAT32-HD by NSD-100.
NSD-100 will recognize the formatted BT-HDD when the HDD
connects to USB I or USB II. Please note that Windows system cannot
recognize Linux-HD format directly without NSD-100.
(Please refer to 7-2-9-2 format hard disk for more detail)
7-2-5-2 USB Printer
You could connect USB printer to any USB port on NSD-100 as
printer’s server. Please install the newest factory’s driver. Do not use
the built-in similar driver.
50
Page 51

Step 1:
Click “USB” from MENU on the left.
Step 2:
Select “USB Storage Devices” → “Share Name” → “NSD-100 HD” and
click twice.
Step 3:
It will show the connected printer’s name on your computer. Please
click the printer’s icon twice.
51
Page 52

Step 4:
There will be a pop-up window asking the installation program.
Step 5:
After you find the printer’s driver, please select “Have Disk” and click
“OK.”
52
Page 53

Step 6:
Please click “Open” to install the drive after you find the driver’s route.
You could use the printer after installation.
NOTE
1. If each computer needs to share printer under the same LAN, each
computer must install driver first.
2. If there are more than two printers, please set NSD-100 as default
value.
7-2-6 User Folder
You may add new user, change password and delete user.
:
53
Page 54

Add a new user:
Set the user name, password and share properties whether sharing
folder to other user or not.
Modify the password
Delete a user
1. Leave user’s share folder for administrator (read/write)
Leave user’s folder in sub directory of admin.
2. Remove user’s share folder completely
Remove user’s folder includes in root directory and sub directory of
admin.
54
Page 55

7-2-7 Share Folders
You may set the properties for user’s folder on following screen.
Select the user’s folder and click ”Modify Properties.” You may set the
properties “not accessible to other users”, “read-only to other users” or
“read/write to other users”.
7-2-8 Media
Once enable UPNP AV server function and assign AV sharing folder,
Nero Show-Time or other software that supports UPNP AV could
automatically find and play the video and audio from NSD-100.
55
Page 56

7-2-9 Tool
7-2-9-1 Restart Device
You may click “Restart Now” to reboot NSD-100.
7-2-9-2 Format a Hard Disk
To be use as BT-HDD, the capacity of HDD must be more than 10GB
and formatted into Linux-HD or FAT32-HD by NSD-100.
Note1: Windows system cannot recognize Linux-HD format directly
without through NSD-100.
Note2: Windows system can recognize FAT32-HD format directly
without through NSD-100 but the maximum file size is 4GB due
to FAT32 limitation.
56
Page 57

7-2-9-3 Firmware Upgrade
User may check new firmware at the website http://www.emprex.com.
Firmware location:
Support/Download/Multimedia storage/P2P download
You may download the new firmware to PC. After completed download,
click “FW upgrade” → “Browse” for firmware located directory and
click “Start upgrade”. “Bee” twice shows the upgrade is completed
7-2-9-4 Save Configuration
You can back up the current configuration into desired PC directory or
restore the previous configuration.
Save the current setting
57
Page 58

Save to the desired directory
Click “Restore” to restore previous setting.
Select “Browse” to find the previous directory and click “Open.”
58
Page 59

7-2-9-5 Factory Default
Users may click “Restore Default Settings” key to restore factory
default setting, or press the “Reset” button on the rear panel of
NSD-100 for 10 seconds.
59
Page 60

7-2-9-6 Login Setting (Security setting)
User may change the user name and password here. (Factory default
value Name = admin, Password = root)
7-2-9-7 System Log
NSD-100 can store recent event logs for analyzing system problem.
7-2-9-8 E-Mail Sending
Once the following events happened, NSD-100 will send e-mail to
inform user
1. IP changed
2. BT download done
3. NTP get date/time success
4. User share folder remove
5. HD mount error
60
Page 61

6. Format USB HDD completely
61
Page 62

8. Q & A
1. Q: How to enhance NSD-100 download speed?
A: Due to the firewall of NAT router will affect the internet access
speed, please assign private IP address of NSD-100 in DMZ
under NAT router.
2. Q: why does the USB LED still lighten after I removed USB device?
A: You just need to restart NSD-100 since USB device was removed
irregularly. Please follow chapter 5 to remove your SUB device.
3. Q: Why can’t my printer print more than two pages of document?
A: Please confirm if the printer has installed original factory driver
and HD is well connected. (The capacity for HDD must be over
10GB and formated via NSD-100 because the document was
temporarily saved in HDD.
4. Q: Why can’t I open page of Web administration with IE?
A: You can try to clear temporary Internet files to solve the problem
5. Q: Why doesn’t BT number sort forward when I delete files?
A: It is designed for user to insert new BT job here.
6. Q: Why doesn’t BT homepage refresh automatically?
A: please click “Refresh” to update homepage by manually.
62
Page 63

7. Q: How do I remote NSD-100 and set BT from WAN?
A: Most ISP will provide one or more dynamic public IP for Internet
connection if your NSD-100 works in static IP framework. Open
your web browser with this static IP address to access NSD-100.
If NSD-100 works with dynamic IP, you may use an NAT router
that supports DDNS function with NSD-100 and register an
easy-to-remember address from DDNS provider to connect to
NSD-100 on the Internet, e.g. myNSD-100.dyndns.org.
NOTE:
1. If your NSD-100 is located behind the NAT router, you need to
open “DMZ” function in NAT router. (Please refer to chapter 6-4
for DMZ setting)
2. If you are using your NSD-100 without being behind an NAT
router, you can also configure to use the DDNS function on NAT
router.
8. Q: How do I use NSD-100’s FTP function?
A: If your NSD-100 works in static IP, you may enter the static IP
Address, user name and password in FTP software for
connecting NSD-100 as FTP server; If your NSD-100 works in
dynamic IP, you need to register an address from DDNS provider
to identify NSD-100 on the Internet and then enter the address
registering of DDNS provider, user name and password in FTP
software for connecting NSD-100 as FTP server.
9. Q: Why do I use NSD-100’s BT-Download and the network speed
slow down?
63
Page 64

A: Please check whether max. upload rate of BitTorren setting
(refer section 7-2-8) is “0” (No limit). If so, please change the
rate.
10. Q: Why does the printer work late when I click “Print”?
A: Printer’s buffer and network’s speed will affect printing
response.
11. Q: Why can’t I add new files when I connect with a NTFS hard disk
drive?
A: USB HDD with NTFS format will be Read-only when it connects
to NSD-100
12. Q: Why do I browse folder via ftp://user:password@ipaddress
display the folder name in disorder?
A: This is language-decoding problem of web browser. It is
recommended to use professional FTP software, like CoreFTP
to set both languages to “Union Code” for NSD-100 and FTP
software.
13. Q: If the network drive disappears each time while reboot the
computer, you may try the following setting to keep the
connection of network drive after rebooting.
A: 1. Check NSD-100 setting whether correct or not.
will
64
Page 65

2. Click “My Computer” → “Tool” → “Map Network Drive”
65
Page 66

After setting the drive and folder, please check the option “Reconnect
at logon.”
14. Q: Why does BT download rate slow down or download error?
A: Some users stopped sharing file lead to torrent decrease or
error. The error may slow down BT download rate or download
error.
If your NSD-100 is located behind route, you may refer to 6-4
DMZ setting in details, and the BT download rate should be
enhanced.
66
Page 67

Page 68

3100553880
Version 1.0
July 2007
 Loading...