

Page 1

Multimedia Enclosure
ME1
User’s Manual
1
Page 2

Table of Contents
Before using ...................................................................3
Preparations..................................................................10
Install the HDD into ME1 ..................................................................10
Connection ...................................................................12
Connecting ME1 with TV or monitor ................................................12
Plugging the AC power ......................................................................15
Getting started..............................................................16
Initializing the HDD...........................................................................16
Basic operation.............................................................20
Watching the input video....................................................................20
One Touch Recording
Time Shifting................................................................................21
Playback the recorded video...............................................................22
Play : Play the recorded video ........................................................23
Delete : Delete the video selected
Rename : Rename the name of the video ........................................24
Sorting : Change the sequence of video list.....................................25
Title Edit : Edit the select video title...............................................25
Browsing the multimedia files............................................................28
....................................................................20
...................................................24
Advanced operation .....................................................33
1
Page 3

FAQ..............................................................................41
Technical Specifications...............................................42
2
Page 4
Before using
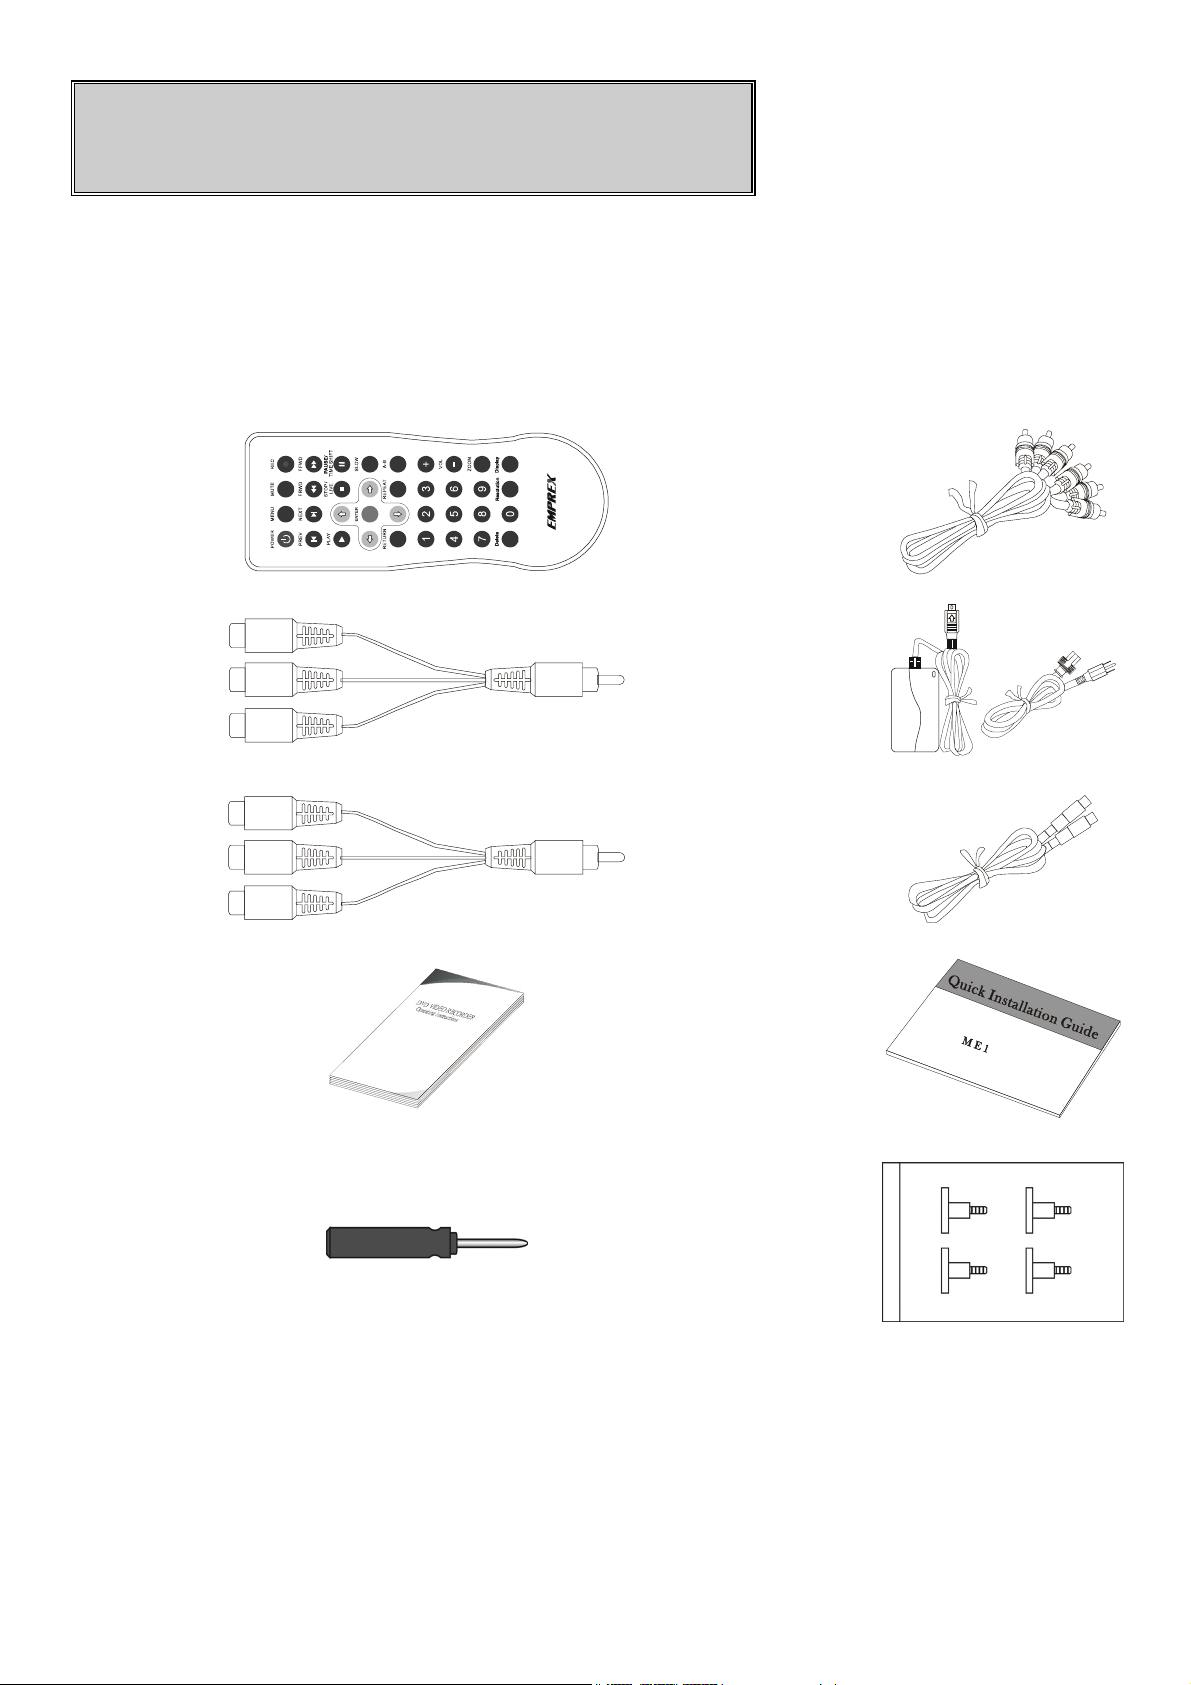
I. Checking the package contents
A. Accessory
Remote
Control 1pc
(With
Battery)
Composite AV
cable 1pc
Composite
AV
extension
Cable 2 pcs
Component
video
extension
Cable 1pc
Manual 1pc
Red
White
Yell ow
Red
Green
Blue
Power adaptor &
AC power cord
1set
USB Cable 1pc
QIG 1 pc
Screw driver
1pc
Screw pack
3
1 pc
Page 5
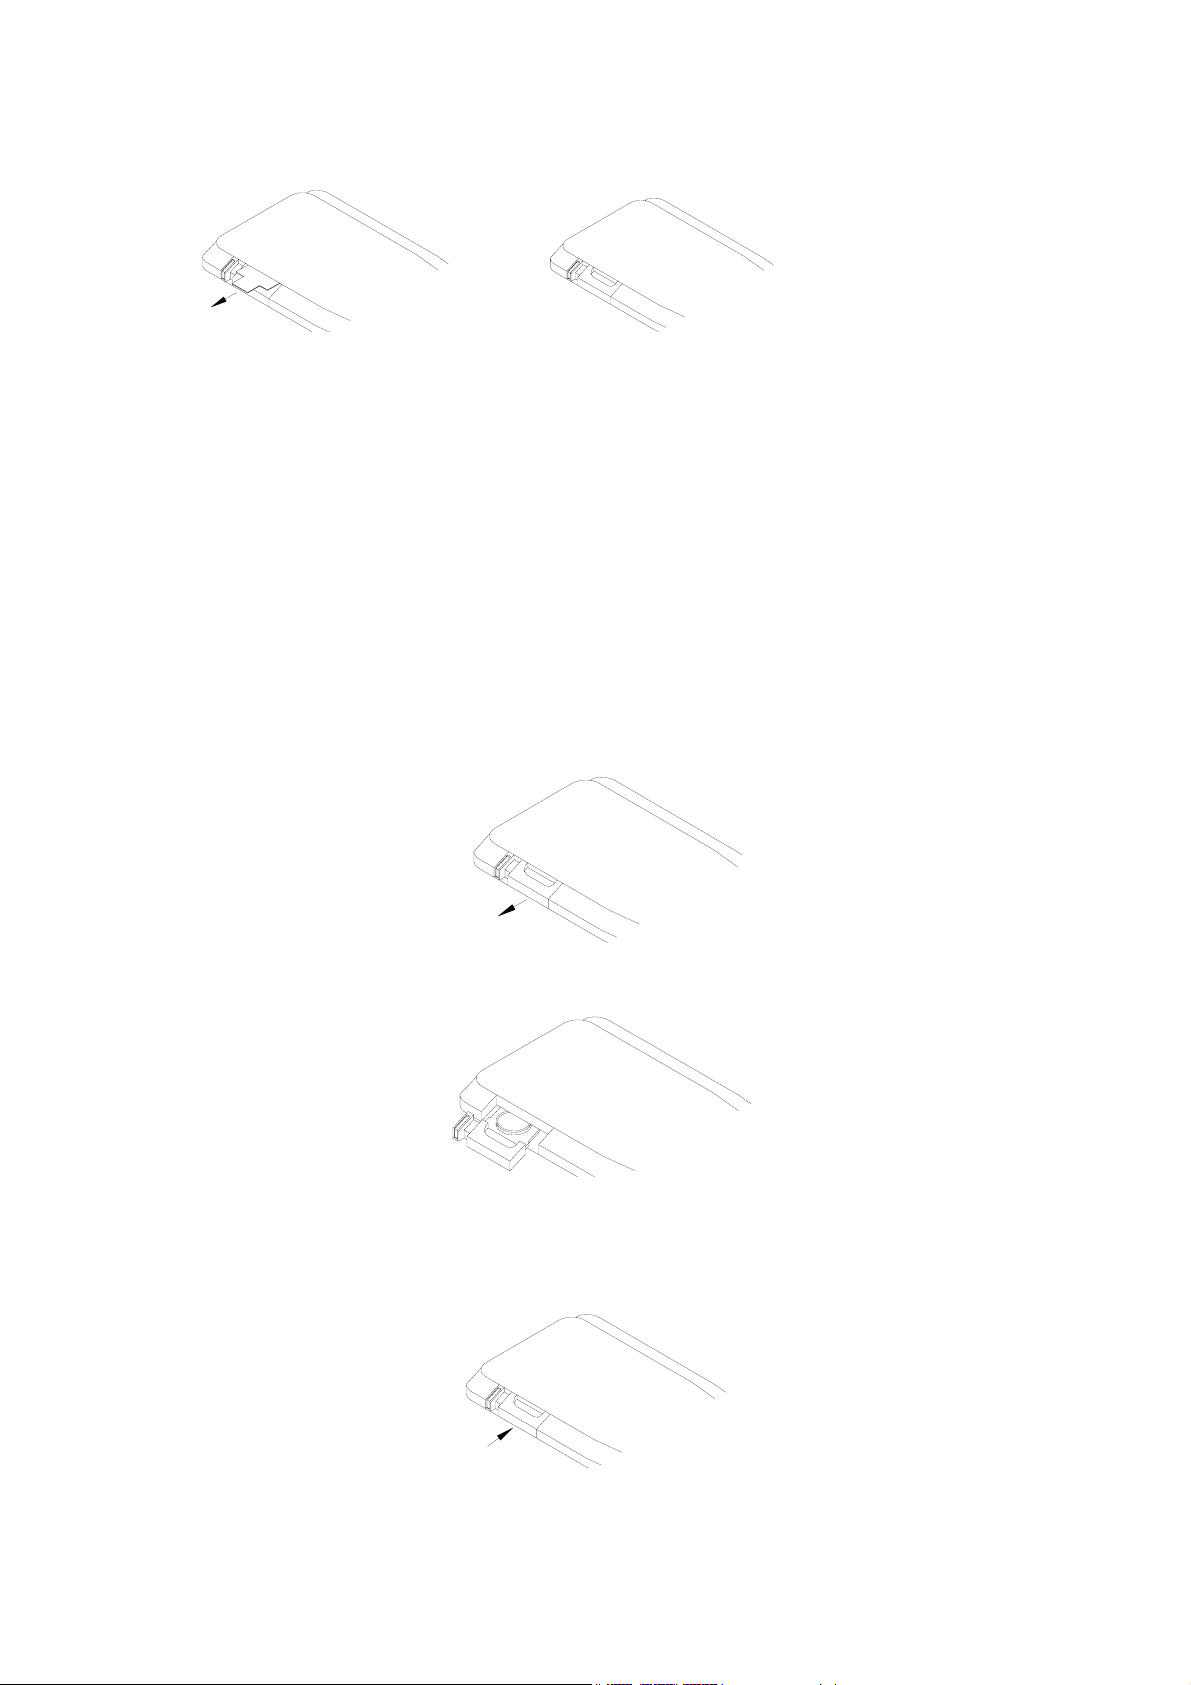
B. Preparing the remote control
1.
Pull out the
isolator
2.
Ready to use
Pull out a piece of isolator, then remote control can be used.
C. How to replace battery of remote control
When the remote control runs out of battery, you may follow the
instructions to replace the battery.
1. Open the battery cover
2. Put in CR2025 battery
( Positive pole "+" face
up)
3. Put on the battery cover
4
Page 6

Note:
1. The model of the battery is CR2025.
2. Please confirm the polarity before you insert the battery.
5
Page 7
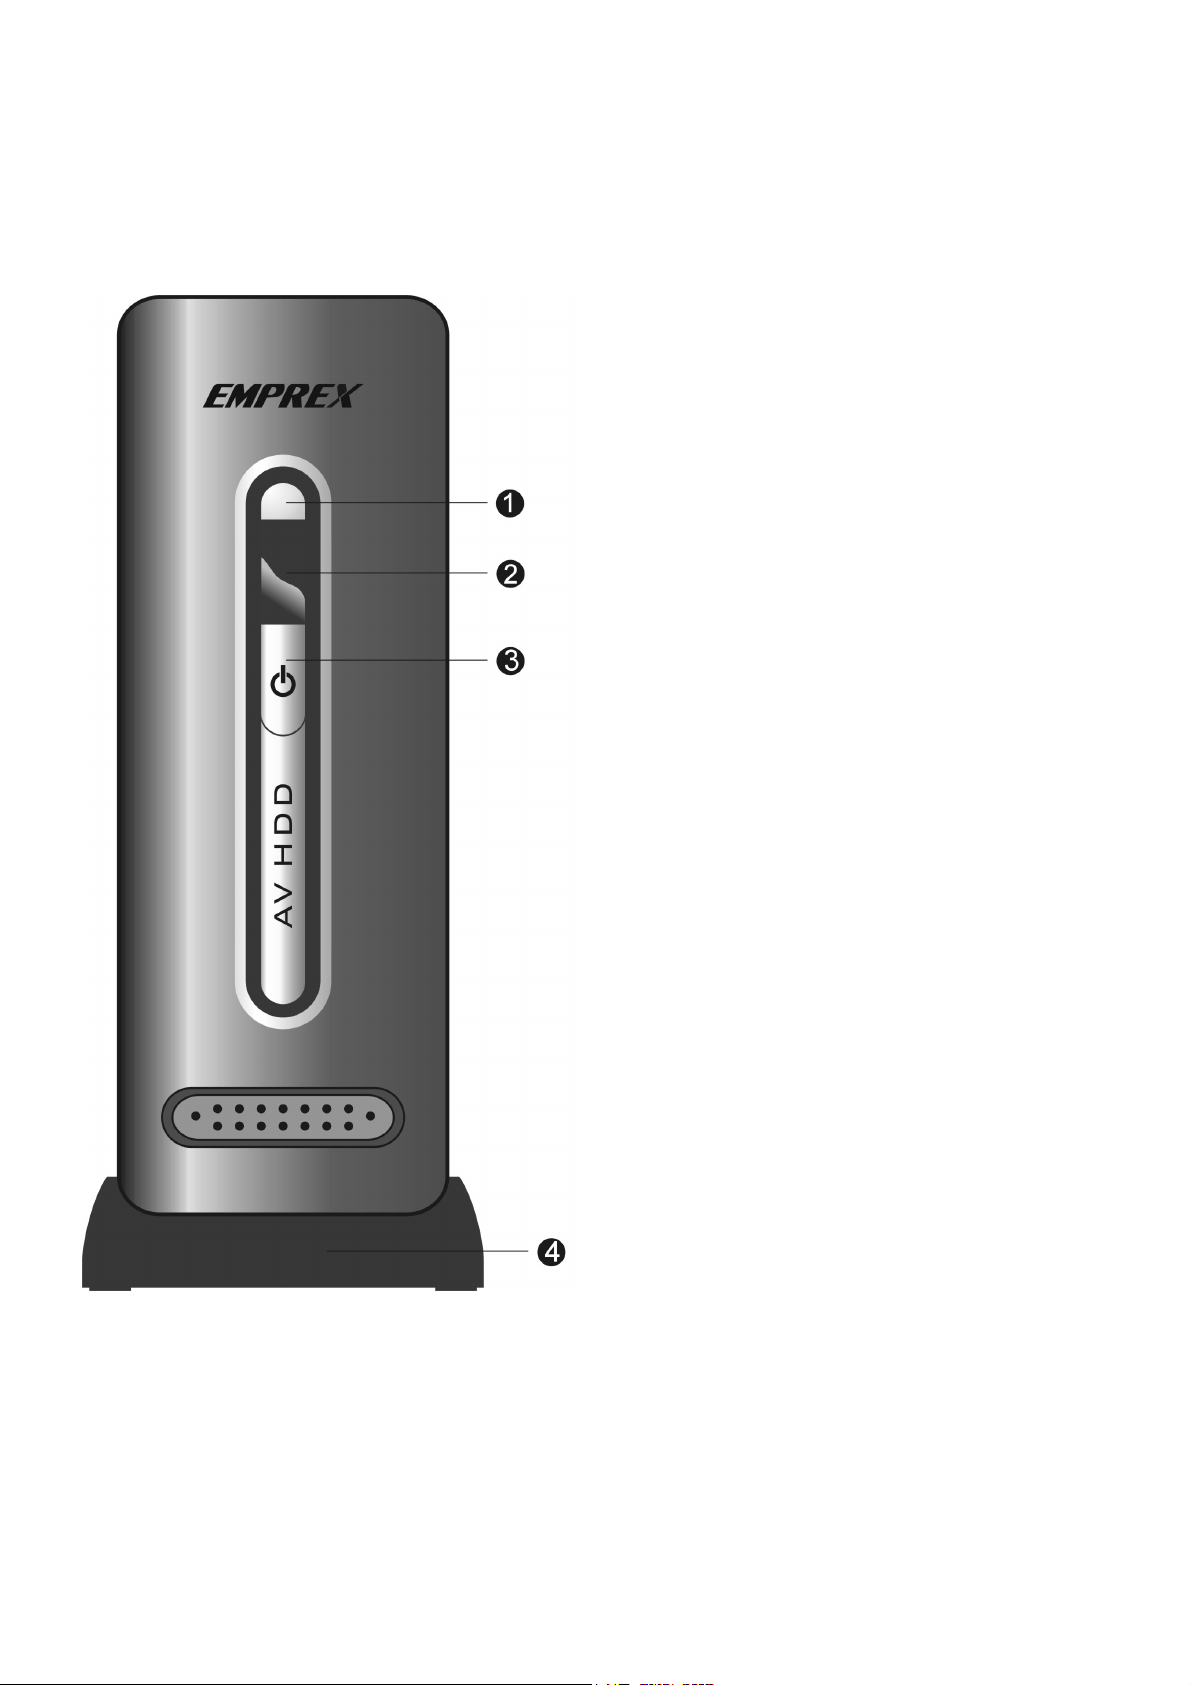
II. Name and function
A. Front Panel
1. LED cover
2. IR receiver
(For remote control)
3. Power button
4. Stand
6
Page 8
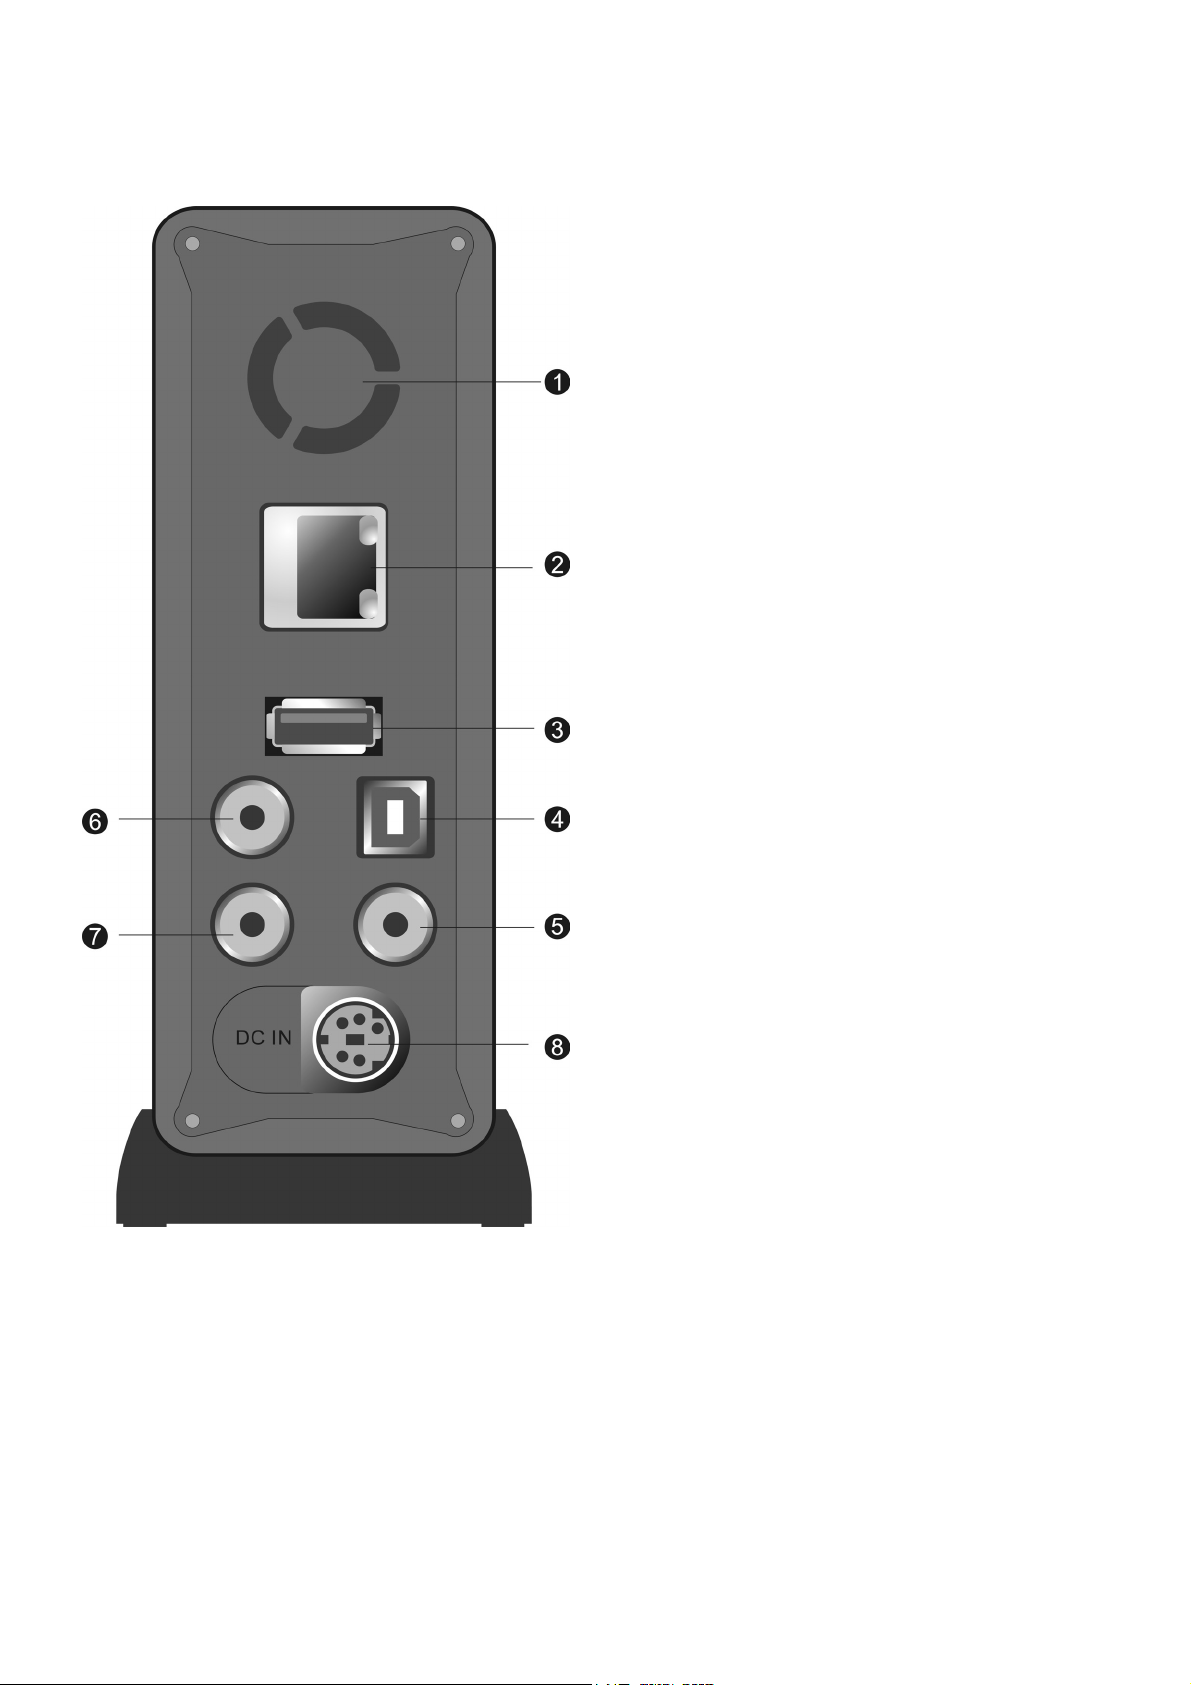
B. Back Panel
1. Fan
2. Ethernet jack
3. USB Host port
To connect with USB storage
device, or USB card reader
4. USB Device port
To connect with PC
5. (Component) YPbPr OUT jack
6. (Composite) AV OUT jack
7. (Composite) AV IN jack
8. DC IN Jack
7
Page 9
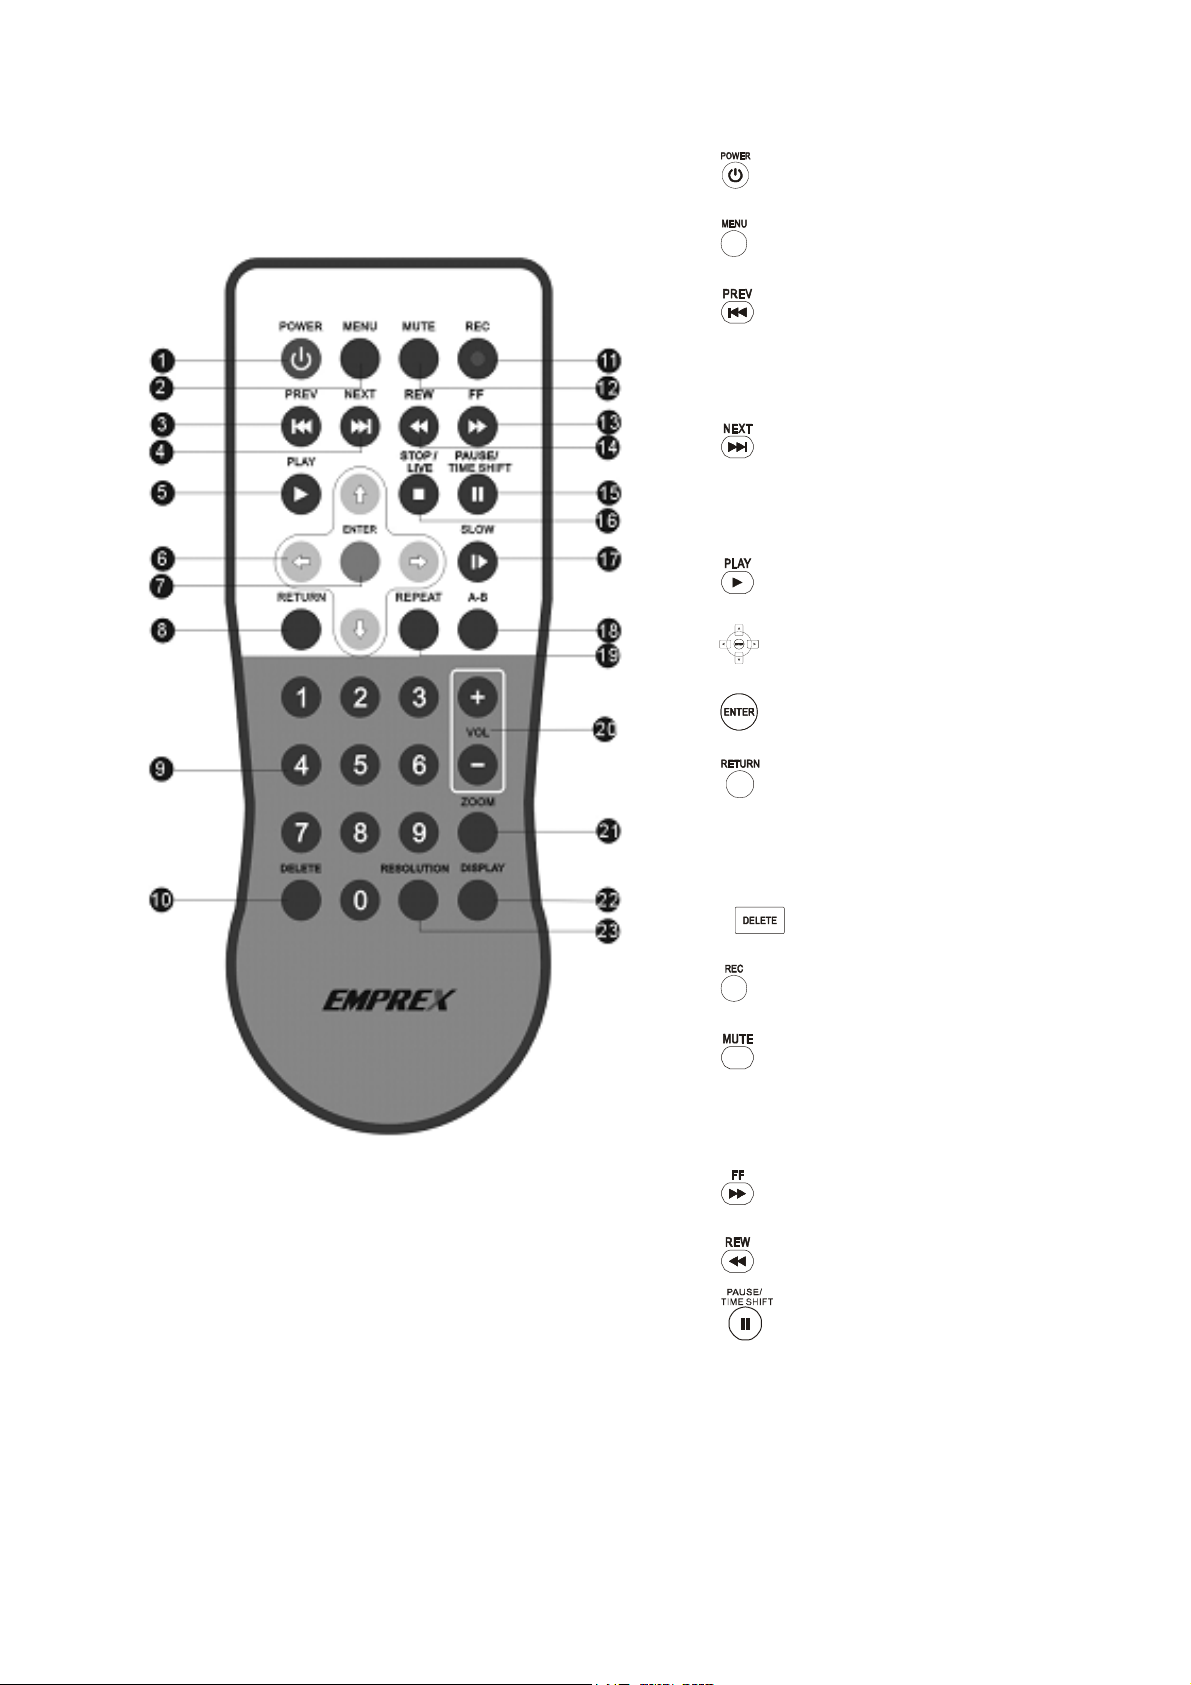
1. POWER
2.
3.
Jump to previous
4.
Jump to next
5.
6.
7.
8.
MENU
PREW (Previous)
NEXT
PLAY
ARROW keys
ENTER
RETURN
9. 0~9 Numeric keys
10.
11.
12.
Turn off and on of the output audio
13.
14.
15.
Pause playing, or time-shift the
DELETE
REC (Record)
MUTE
FF (Fast forward)
REW
PAUSE/TIME SHIFT
(Fast Rewind)
input video
8
Page 10

16.
STOP/LIVE
Stop playing, or time-shifting
17.
18.
19.
20.
21.
22.
23.
SLOW (Slow play)
A-B
REPEAT
VOL +, VOL -
ZOOM
DISPLAY
RESOLUTION
(A-B repeat)
Zoon in the display
Show or hide the status display
9
Page 11

Preparations
Installing the HDD into ME1
1.Remove remote control 2.Unscrew the HDD frame from
the bottom (2 screws)
3.Pull out front panel with HDD frame 4.Connect the data cable and
power cable to HDD
5.Put HDD in the frame 6.Screw HDD with the frame (4
screws)
10
Page 12
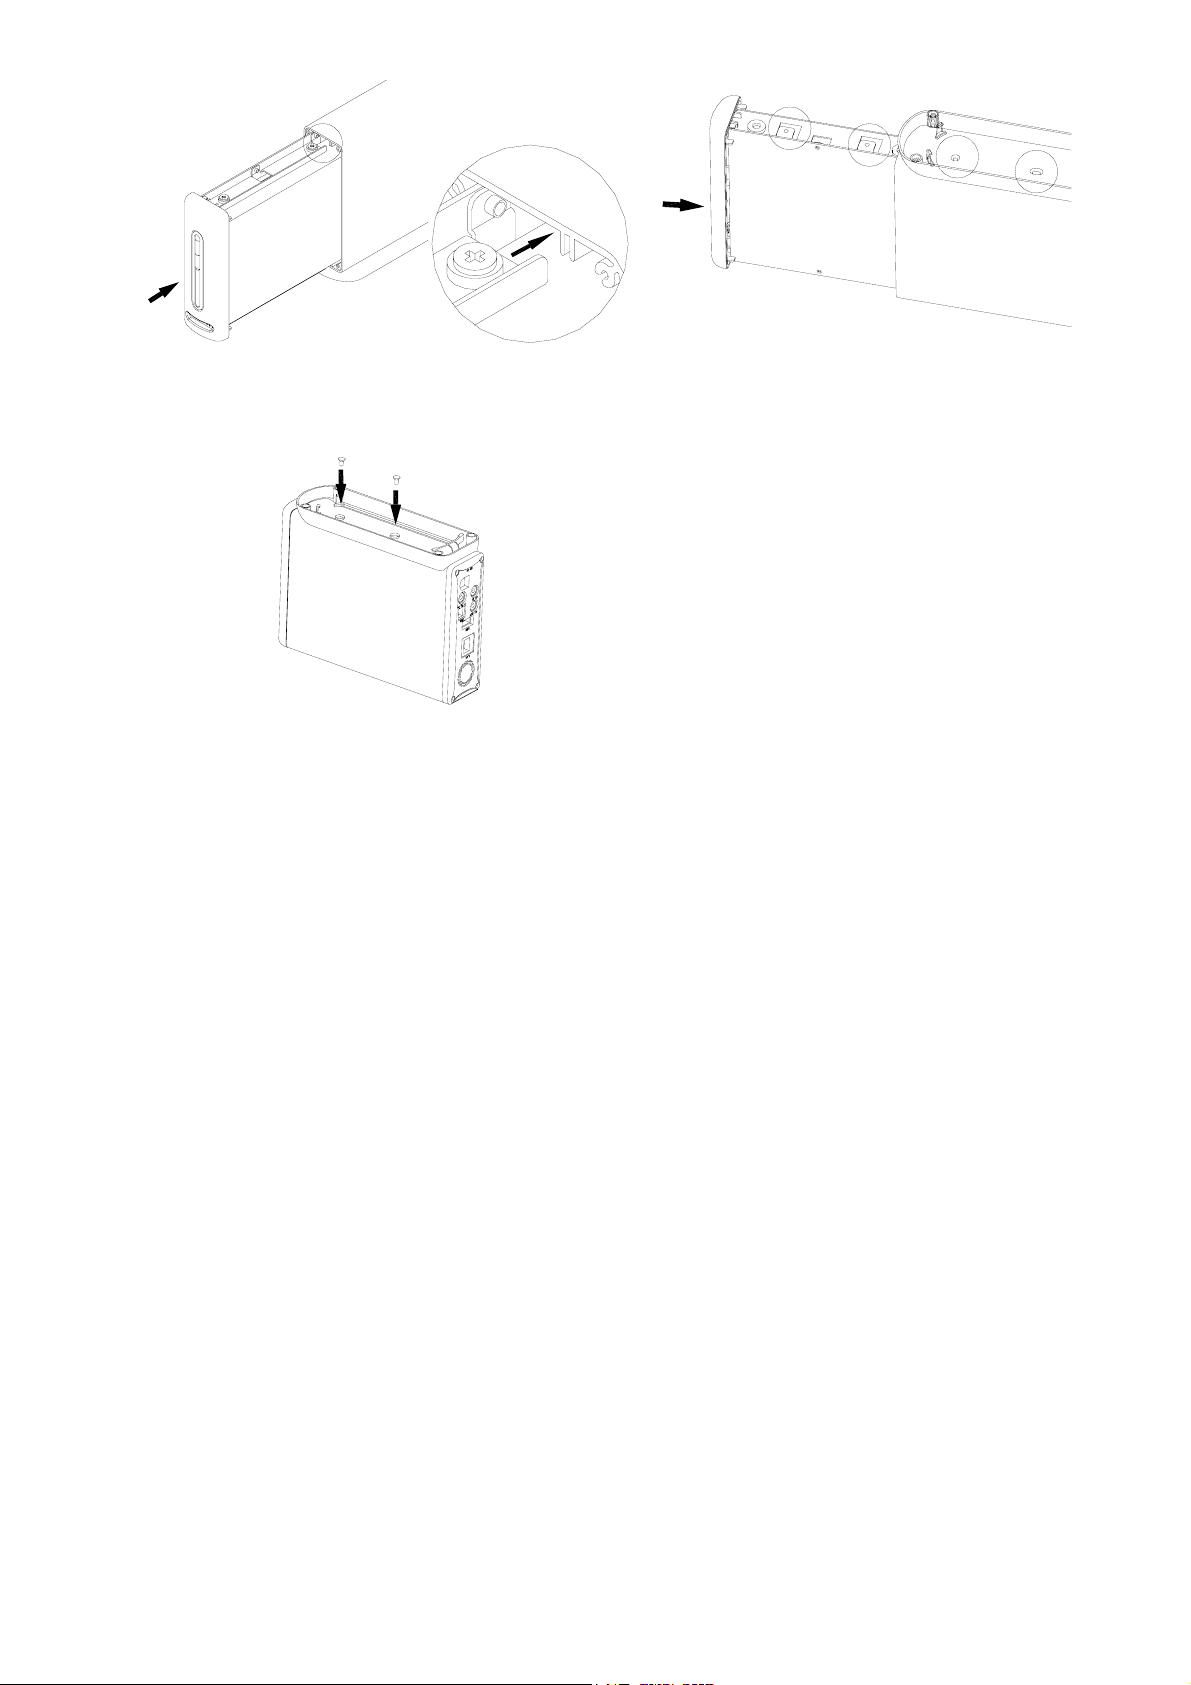
7.Slide the HDD frame in
8. Frame with holes should be on
the bottom side
9. Screw HDD frame from the Bottom
11
Page 13
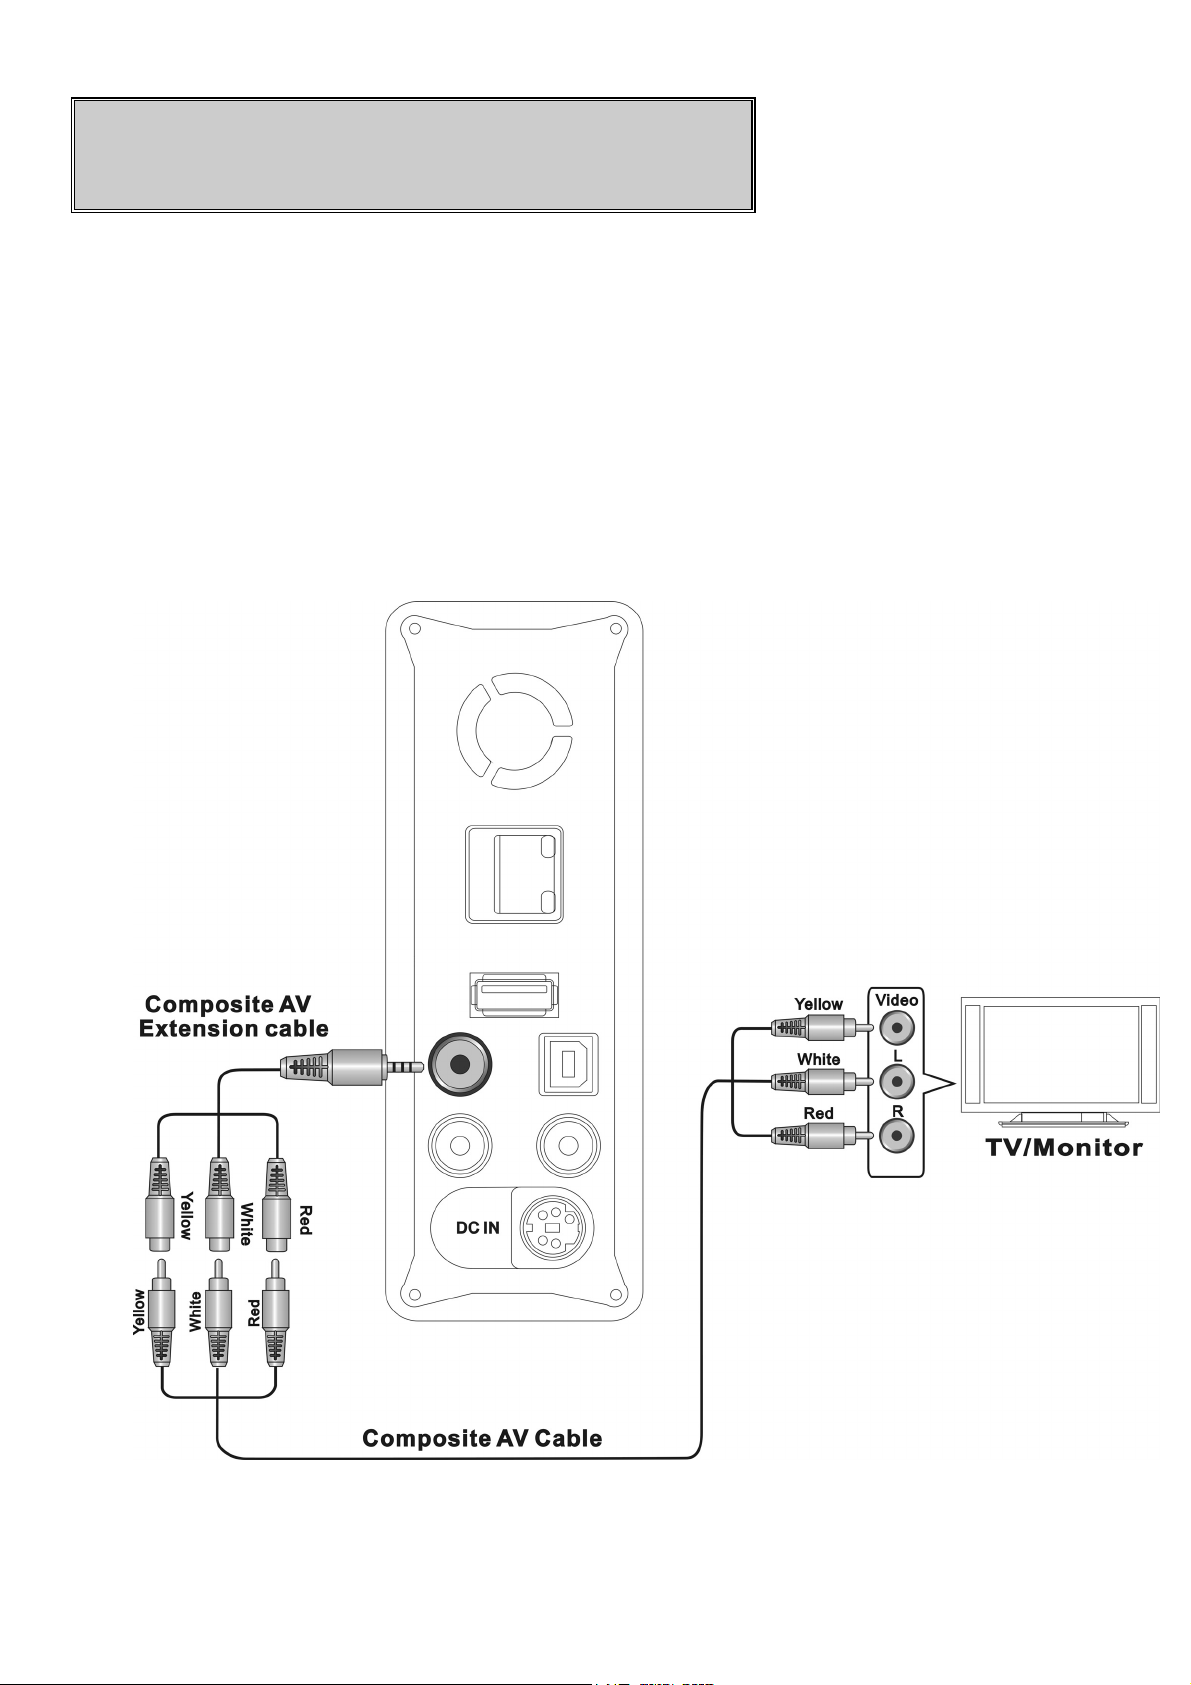
Connection
Connecting ME1 with TV or monitor
A. Composite audio and video output connection
Plug the black mini plug of the supplied composite AV extension cable into the
AV OUT
AV extension cable and AV input port on your TV or monitor. Be sure to
match the color of the plug with color of the jack on TV or monitor. ME1
supports NTSC and PAL video signal from the
jack on ME1. Use the supplied composite AV cable to connect the
AV OUT
jack.
Figure Composite AV OUT connection
12
Page 14
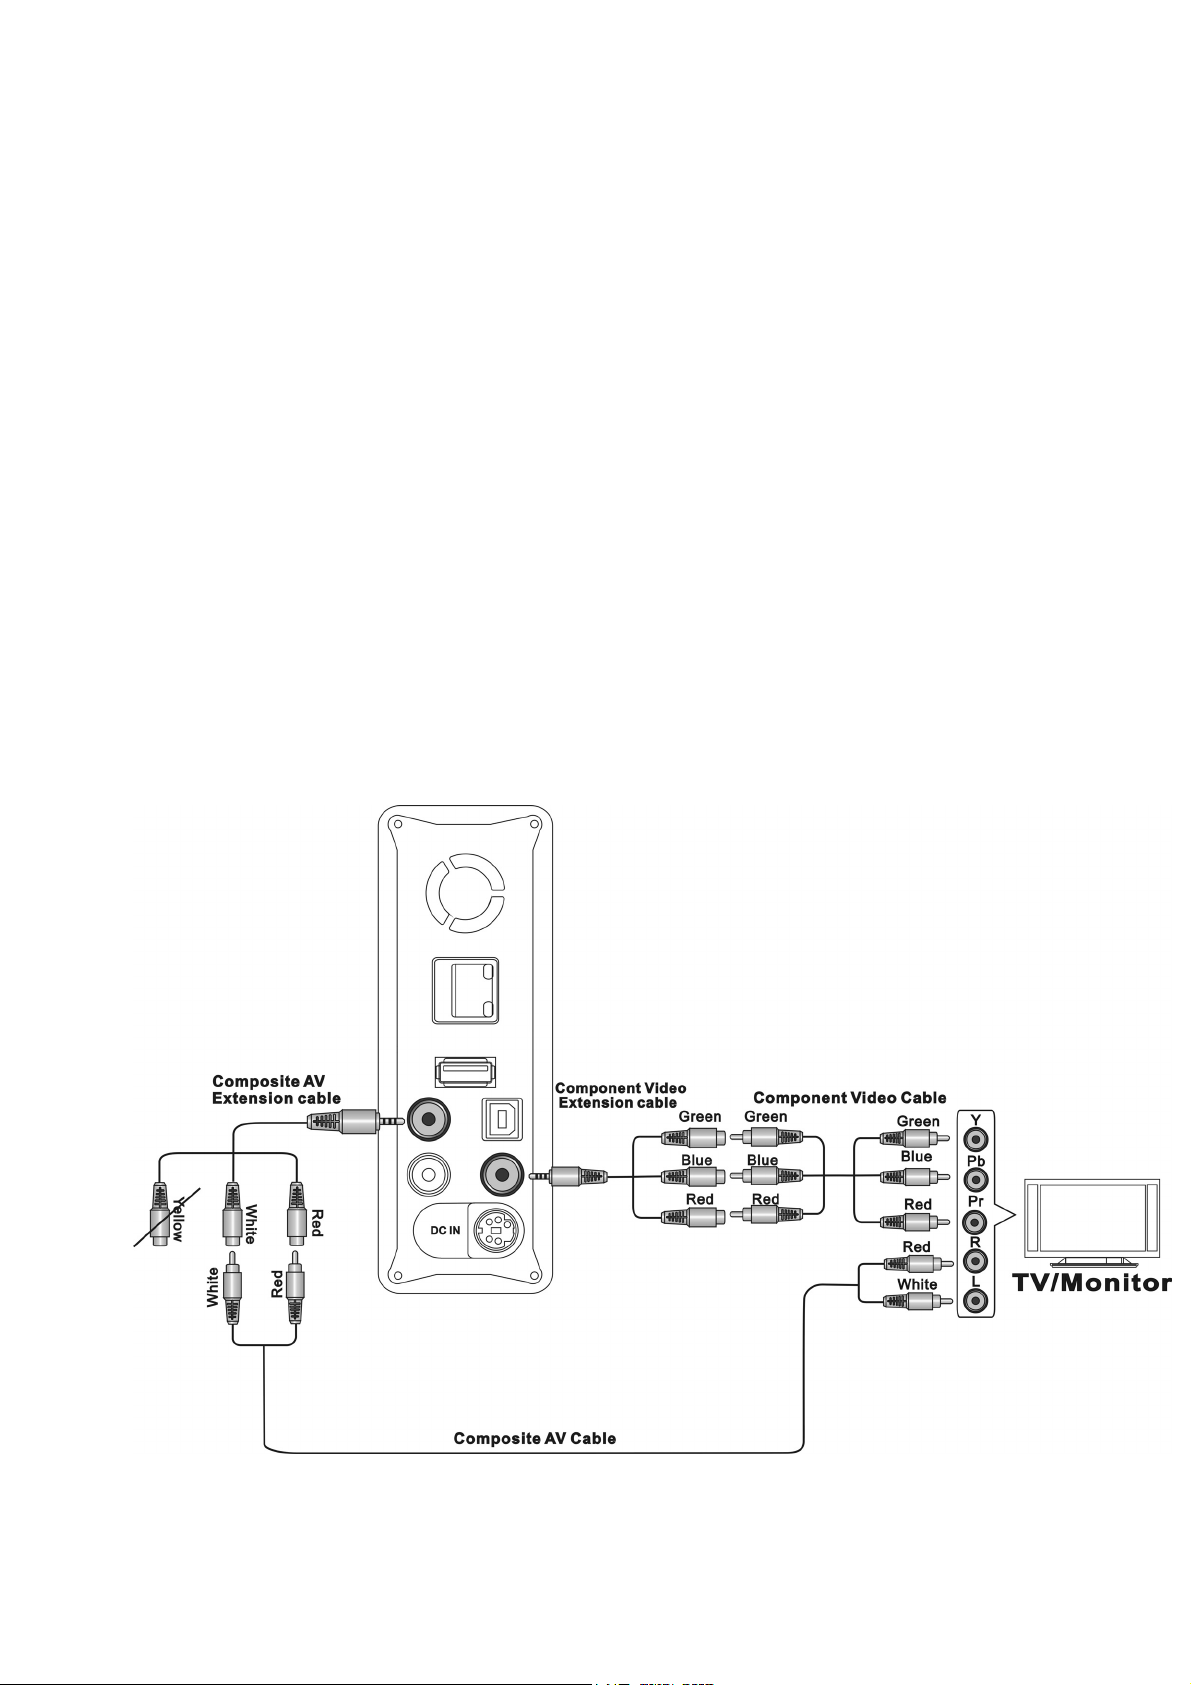
B. Component (YPbPr) video and audio output connection (To
have better video quality)
Plug the black mini plug of the supplied Component video extension cable into
YPbPr
the
supplied) to connect the component video extension cable and component
(YPbPr) video input port on your TV or monitor. Be sure to match the color of
the plug with color of the jack on TV or monitor. ME1 supports NTSC and
PAL progressive scan, 720p, and 1080i component video output.
Use the supplied composite AV cable to connect the AV extension cable and
audio input jack of the component input port on your TV or monitor. Be sure
to match the color of the plug with color of the jack on TV or monitor.
jack on the ME1. Use a component (YPbPr) video cable (NOT
Note:
1. Standard component video cable is NOT included. In order to have
good video quality, to use a standard YPbPr component video cable is
suggested.
2. Only one of the two connections described above is required.
Figure Component (YPbPr) connection
13
Page 15

C. Connecting with other video source
ME1 can play, time-shift and record the input video from other device, such as
VCR, Set top box, DVD player, and Camcorder. ME1 can support both NTSC
and PAL input video signal from AV IN jack.
Plug the black mini plug of the supplied composite AV extension cable into the
AV IN
extension cable and audio/video output port on other device. Be sure to
match the color of the plug with color of the jack (yellow, white, and red) on the
device.
jack on ME1. Use the supplied composite AV cable to connect the AV
Figure
Composite AV IN connection
14
Page 16

Plugging the AC power
Insert DC plug of the adaptor to
power cord to power adaptor and plug the AC plug to a power outlet.
DC IN
jack on ME1. Connect one end of AC
Figure
Power connection
15
Page 17

Getting started
Turn on your TV or monitor and ME1. If your TV or monitor can not
display correctly, press RESOLUTION key to change the resolution.
Initializing the HDD
In the first time using ME1, you should initialize the HDD of ME1 after a
new HDD is installed
Please follow the following procedure to initialize the HDD.
Select
OK
to confirm the process.
Step 1: To set the buffer size for time shifting function.
The buffer is used to temporarily store the input video for time shifting
function. You can choose from 1 hr to 4 hrs. Press
Select NEXT to proceed to the next step.
16
g, h
key to adjust.
Page 18

Step 2: Adjust the size for video recording.
Once you specify the size, rest of the HDD can be used for storing music,
photo, and video files. Press
Select NEXT to proceed to the next step.
g, h
key to adjust.
Step 3: Start the format process.
Once you confirm all the previous adjustment, select Format to start the
process.
Warning:
1. Once ME1 start formatting, all the data in HDD will be destroyed.
17
Page 19

Initial setup
Once the HDD is initialized, you can start the ME1 initial setup process.
Note:
1. ME1 can operate without HDD installed.
Enter Setup menu from the top Menu.
Figure: To p Menu
Enter
specification.
You can press
Video
setup to change the setting to match your TV or monitor
i, j, g, h
key to select a setting, and press
18
ENTER
to
Page 20

change setting.
Figure: Video setup menu
Note:
Enter
System
setup to select the
Menu Language
, and set
Time.
Figure: System
1. Please refer to Advanced Operation chapter in the manual on Setup
setup menu
procedure.
2. The
Time
is unplugged.
setting can only last for some time after the AC power cord
19
Page 21

Basic operation
When you turn on the power of ME1, the top MENU will be shown. Whenever the
MENU
key is pressed, the top
MENU
will be shown on top of the previous screen.
Watching the input video
Make sure the
connected video device, like VCR, Set top box, Camcorder, or DVD player.
Select
video from AV IN jack.
With input video playing, you can record and Time-shift the video.
Video In
AV IN
icon on top
connection is correct, then turn on the power of the
MENU
and press
ENTER
key to display the input
Figure Video In icon
One Touch Recording
When input video is playing, you can press
into HDD. You may tune the recording quality in Record setup menu. You may
press
recording time.
time will be changed sequentially, 30 min, 60 min, 90 min, 120min, 180 min, and
240 min, each time REC key is pressed. When 240 min is selected, press REC
key again will cancel the recording time setting.
You can play, edit, and manipulate the recorded video in Playback mode.
STOP key to stop recording. You can press REC key again to select the
ME1
will stop the recording when recording time is up. Recording
REC
key to record the on-screen video
20
Page 22

Note:
1. You can play video, browse photo, or play music when ME1 is in
recording. HD video can not be played when ME1 is in recording.
2. Some functions can not be operated when ME1 is in recording.
3. When recording is stopped, a red will be displayed on the screen.
4. Please refer to the Advanced Operation chapter to change the
recording quality.
Time Shifting
Time shifting is a powerful function for you to enjoy the long video. Once the
time shifting is started, ME1 will buffer the input video in the background. You
can use PLAY CONTROL keys to pause, fast forward, and fast backward play
the video just like you are playing a recorded video.
When input video is played, in
key to start the Time Shifting function. " Live Pause: Preparing …"
message will be shown on the top of the screen. Time shifting buffer
indication bar will be shown on the bottom of the screen.
Video In
mode, press
(PAUSE/TIME SHIFT)
Figure Time shifting buffer indication bar
When the " Live Pause: Preparing …" message disappear, you can use
PLAY CONTROL
the
keys to operate time shifting function.
21
Page 23

Key Function
PLAY
PAUSE/TIME SHIFT
FFWD
FRWD
PREV
NEXT
STOP/LIVE Cancel the Time Shifting function
Slow
Play
Pause
Fast forward play
Fast backward play
Jump to previous chapter mark
Jump to next chapter mark
Slow play
Note:
1. The buffer length of time shifting is selected in HDD
initialization.
2. When REC key is pressed, ME1 will start the recording and
the time shifting function will stop automatically.
3. ME1 supports 1.5x, 2x, 4x, 8x, 16x, 32x fast play.
4. ME1 supports 3/4x, 1/2x, 1/4x, 1/8x, 1/16x slow play.
5. Auto Chapter function can be set in Record Setup menu.
Playback the recorded video
Select Playback icon to enter recorded video playback menu. All the
recorded video titles are listed by the sorting method. A preview window is
22
Page 24

shown with selected video playing. The free HDD space for recording and
equivalent recording time are shown at the bottom of the preview window.
Figure Playback menu
You can play, delete, rename, edit the recorded title on Playback menu. Use
g, h
of the screen. Use i, j keys to select a recorded video. Press
key to apply the operation to the selected video.
Note:
keys to select an operation. The operation will be highlighted on the top
ENTER
1. A red sign, on the recorded video list, indicates the video is
in recording. A yellow sign indicates the recorded video
is not played yet.
Play : Play the recorded video
You can use
video.
PLAY CONTROL
keys to play, pause, fast play, and slow play the
Key Function
PLAY
PAUSE
FFWD
Start to play
Pause
Fast forward play
23
Page 25

FRWD
Fast backward play
PREV
NEXT
STOP/LIVE
Slow
Jump to previous chapter mark
Jump to next chapter mark
Stop the playing, a green indication displayed
Slow play
When playback started, the video selected will display in full screen. ME1
supports 1.5x, 2x, 4x, 8x, 16x, 32x fast play and 3/4x, 1/2x, 1/4x, 1/8x, 1/16x slow
play.
Delete : Delete the video selected
"Confirm to delete"
A
message box will be shown. Select
Confirm
to confirm,
and select Cancel to Cancel.
Note:
1. Delete operation will be rejected when ME1 is under recording.
Rename : Rename the video
A keypad will be shown on screen. Use i, j, g, h to select the character
and press ENTER key to input characters. Select OK icon on keypad and
press
ENTER
key to complete the input.
Figure
Screen keypad
24
Page 26

Sorting : Change the sequence of video list
A "Automatically sorting by:" message box will be shown. Use i, j keys
to select and press
sequence can be sorted by Title Number, Recording Time, Title Name, or
Fresh Titles.
ENTER
key to change the sorting method. Video listing
Figure "Automatically sorting by:"
message box
Title Edit : Edit the select video
A Title Edit toolbox will be shown. Press i, j keys to select and press
ENTER
key to apply the editing tool.
Figure Title Edit
toolbox
25
Page 27

Set Thumbnail : Change the thumbnail picture of the
video title
You can capture a video frame and use the picture as the thumbnail of
the video title. The select video is shown and ready to play. Use
PLAY CONTROL
select CONFIRM icon on the tool bar and press ENTER key to capture
the video frame.
keys to select the video frame. Use g, h keys to
Figure Thumbnail Capture
AB Erase
Delete from point A to point B in the video. Point A and point B in the
video should be set first. The select video is shown and ready to play.
PLAY CONTROL
Use
icon on the toolbox and press ENTER key to set the point A, a green
d
indication
point B. Select
CONFIRM icon to delete, a "Confirm to delete" message box will be
shown. Select
Cancel
will be shown. Repeat the same procedure to set the
CANCEL
Confirm
to Cancel.
keys to browse the video. Select the
icon to cancel the operation. Select the
to confirm
AB Erase
operation, and select
SET A
26
Page 28

Figure AB Erase
2.
Split Title
Select a point in the video and split the video into two video titles.
PLAY CONTROL
Use
and press ENTER key to split the video from the point displayed.
3. Merge Title
Merge the select video and the following video into a new video title.
4. Add Chapter Mark
You may add more Chapter Mark in the select video. Use PLAY
CONTROL
keys to browse video. Select
toolbox
keys to browse video. Select
ADD
icon and press
CONFIRM
icon
ENTER key to add the mark. A red fmark will be added in the tool
bar.
Figure Add chapter Mark
tool bar
5.
Remove Chapter Mark
You can delete Chapter Mark of the select video. Play the video,
passing to a
Select the
delete the mark.
Chapter Mark
DELETE
icon in the tool bar and press
, the mark will be shown in
bright red
ENTER
.
key to
6.
Copy to FAT32 partition
ME1 stores the recorded video clips in a special partition of the HDD
27
Page 29

which can not be read directly by PC. If you select the
FAT32 partition operation, ME1 will convert the video into MPEG
format and make a copy to FAT32 partition of the HDD . Then you
can read the file, using an USB Device connection with ME1, from PC.
Note:
1. The copy process may take some time depending on the length of
the video.
2. The converted file will be stored in \rec folder of HDD. You can
enter browser mode to play the file.
Tools
Copy to
Select
to Delete" message box will be shown. Select
delete, and select Cancel to Cancel.
Delete All Title
to delete all the recorded videos. A "Confirm
Browsing the multimedia files
ME1 can play music, high resolution photo, and HD quality of video
files. The multimedia files can be copied from PC to HDD of ME1.
(Please refer to
operation chapter in the manual). ME1 supports various multimedia
file formats.
Exchange files with PC
Playback Formats : Audio: MP3, WMA
Video: MPEG 1/2, DivX HD, DivX 3.11, 4.12, 5, 6; AVI,
Confirm
section in
to confirm the
Advanced
Picture: JPG , BMP
Subtitle: SRT
Tabl e
Supported file formats
Note:
VOB, MPG , DAT, Xvid
28
Page 30

1. ME1 does not support progressive JPEG format.
Select Browser icon and press ENTER key to enter the browser
mode. The media type bar is shown on the top. The selected
media type is highlighted on the leftmost of the bar. File source
selection box is shown on the left, and preview window is shown on
the right of the screen. Press g, h key to select media type, and
press i, j key to select the file source. Press ENTER to browse the
multimedia files in the select file source.
There are three file source can be browsed, including HDD, USB port, and NET.
A. HDD
Select HDD icon and press ENTER key to browse the HDD in the ME1.
Press g, h key to select media type, press i, j key to select the folder,
and press
ENTER
key to open the folder.
Figure Browser
screen
Only selected file type is highlighted on the left of the media type bar. The
folder name and its sub-folder are listed on the left window. The
thumbnail picture of the files, with the selected file type, are listed on the
bottom. Only the files, with selected file type, are listed. Press g, h
key to select a file to preview. A preview window, shown on the right,
shows the information of the selected file. Press ENTER key to play the
selected file.
29
Page 31

You can use
backward play the video, photo, and music.
PLAY CONTROL
keys to pause, fast forward, and fast
Key Function
PLAY
PAUSE
FFWD
FRWD
PREV
NEXT
STOP Stop the playing, a green indication displayed
SLOW
Start to play
Pause
Fast forward play
Fast backward play
Jump to previous photo, or music file
Jump to next photo, or music file
Slow playing video file
When previewing a file, only selected media type will be shown on the
media type bar, you can not change the media type. You can press i, j
key to select other folder, all media types will be shown, press g, h key to
change media type. You may press i, j key to select other folder and
press
ME1 supports 1.5x, 2x, 4x, 8x, 16x, 32x fast play and 3/4x, 1/2x, 1/4x, 1/8x,
1/16x slow play
You can press
B. USB port
You may store your multimedia files in USB flash drive, USB hard disk
drive, or memory card. ME1 can browse the files from USB flash drive,
USB hard disk drive, and USB card reader directly. You need to have a
ENTER
key to browse.
DELETE
key to delete the selected file.
USB card reader (Not supplied) to read the files in memory card.
Plug USB storage device or USB card reader to USB Host port on the
back panel.
30
Page 32

Figure USB Host connection
Note:
If
1.
your multimedia files are stored in memory card, you need to have a
USB card reader which can read the type of memory card.
2. Some USB hard disk drive may consume more current than
USB Host
USB hard disk drive. Please check the instruction of your USB
hard drive to use an external power source to supply enough current
to the hard disk drive.
Select
to
key to select the folder, and press
USB icon and press ENTER key to browse the device connected
USB Host
port can supply. In this case, ME1 may not detect the
port. Press g, h key to select media type, press i, j
ENTER
31
key to
open the folder.
ME1
Page 33

C. NET
Select NET icon and press ENTER key to browse the shared folder of
other PC in the LAN. Press g, h key to select media type. Press i,
j
key to select a PC in the LAN, and press ENTER key to connect. Then
press i, j key to select the folder and press ENTER key to open the
folder.
Note:
a. You have to set the connect network parameters on Network
setup menu before you can browse from the NET.
32
Page 34

Advanced operation
I. Play photo with background music
Enter
files in the same folder will play sequentially. The music will keep playing
in the background.
Change to
file to start playing. ME1 will play all the photo files in the same folder.
The music will keep playing in the background.
If you want to stop the music playing, press
and press (STOP) key again to stop the background music.
Browser
Photo
mode, select a music file in a folder to play. All the music
media type, select a photo file folder, and elect a photo
(
STOP) key to stop photo
II. Repeat playing
ME1 supports two kind of repeat modes, REPEAT and A-B repeat.
Press REPEAT key to select the repeat type of the playing.
Media type Press REPEAT key Press A-B key
Music
Video
Recorded video
playback
Repeat 1, Repeat ALL, Repeat Off
Repeat Title, Repeat Off
Repeat Title, Repeat Chapter,
Repeat Off
(N.A.)
(N.A.)
Repeat from A to B
For recorded video, you can use A-B key to repeat portion of video.
Press
A-B
key to set the point A, which is the start point of the repeating.
33
Page 35

Press
ME1 starts playing from point A to point B repeatedly, until A-B key is
pressed again.
A-B
key again to set point B, which is the end of the repeating.
III. Change the output video resolution
ME1
supports several video output resolution, NTSC, PAL, NTSC
progressive scan, PAL progressive scan, 720p, and 1080i. Press
RESOLUTION key can change the resolution sequentially.
Note:
1. Only component (YPbPr) video output can support all the resolutions.
2. Composite (
resolution. If you change to other resolutions, using Composite (
video connection, you may not display the video on TV or monitor
accordingly.
3. The selected resolution needs to be supported by your TV or Monitor,
otherwise there will be no display.
4. If TV or monitor does not support a resolution, you can press
RESOLUTION
display resume.
IV. Zoom in
You can
recorded video. Press ZOOM key to zoom in the display, and ZOOM
factor will change from 2x, 3x, 4x, 8x, and 1x sequentially.
ZOOM
AV OUT
key to change to other resolution one by one until the
in the display when ME1 is playing photo, video, or
) video output can only support NTSC, and PAL
AV OUT
)
V. Exchange files with PC
ME1 can serve as an external HDD of PC. When ME1 is powered on,
use supplied USB cable to connect USB Host port of PC and USB Device
port of
ME1
.
34
Page 36

Windows of PC will detect HDD of ME1 automatically. You can use file
explorer to manipulate the files in HDD of ME1.
Note:
1. The OS of PC needs to be compatible with Windows XP and
above.
2. Use safely removal function in Windows to stop the HDD before
removing the USB connection.
3. DO NOT break the USB connection when HDD is writing or
reading.
VI. Setup
Select Setup icon on the top MENU to enter Setup menu..
Press g, h key to select setup type. Press i, j key to select an item and
press
ENTER
key to setup.
When setting up an item, the choice of the item display on the right side of the
menu. Press i, j key to select a choice, and press
change. Press RETURN key to cancel the setup.
ENTER
key to confirm the
A. Video setup
Figure Video
setup menu
1. Aspect Ratio
35
Page 37

Select an aspect ratio setting to match the connected TV or monitor.
a. Pan Scan 4:3
If your TV or monitor is 4:3 screen, you can select either Pan Scan
4:3
With Pan Scan 4:3 setting, ME1 crops both side of wired screen video
to fit the 4:3 screen.
Letter Box 4:3
or
setting.
b. Letter Box 4:3
ME1 places black bars at the top and bottom of the screen. Wide
screen video will fit the width of the 4:3 display.
c. 16:9
Select 16:9, if your TV or monitor is 16:9 wide screen.
2. Brightness
Adjust the brightness of the output video. Press g, h key to adjust and
press
ENTER
Figure Brightness adjusting
key to confirm.
3. Contrast
Adjust the contrast of the output video. Press g, h key to adjust and press
ENTER
key to confirm.
4. Video System
Display the resolution in use. This item can not be changed.
5. DIVX
Display the DIVX registration code.
36
Page 38

B. Record setup
Figure Record setup menu
1. Quality
Change the recording quality. There are 5 different type of recording
quality to be chosen. Different quality affects the file size of the recorded
video.
2. Auto Chapter
Change the period of chapter mark or turn off the auto chapter function.
You can press PREV or NEXT key to jump to position of previous or
next chapter mark.
C. Network setup
37
Page 39

Figure Network setup menu
1. Wired LAN Setup
Select DHCP IP(AUTO), or FIX IP (MANUAL) according to your LAN
configuration. If your LAN supports
select DHCP IP(AUTO) setting. ME1 will get the IP address
automatically.
Otherwise, you have to select
Subnet Mask, and Default Gateway parameters manually.
2. Wired LAN ON/OFF
Set Wired LAN ON to enable the network operation.
D. System setup
DHCP IP (AUTO)
FIX IP (MANUAL)
function, you can
and set the
IP Address,
Figure System
setup menu
1. Menu Language
Change the menu language.
2. Time
Set the Date and Time.
38
Page 40

Figure Time
setting
3. HDD Format
Format the HDD in the ME1. Please refer to the
in the manual and follow the
Initializine the HDD
Getting Started
procedures.
chapter
Warrning:
1. HDD Format operation will destroy all the data in the HDD.
4. Restore Default
ME1 will restore all the default settings.
Please follow the display to select menu language, set time, and set
network parameters.
E. MISC setup
1. Network Browser
You may set Net User ID, Net Password, and Specific File Server IP.
When you select the
Shortcuts/
File Server IP will be listed. This saves your time to key in the IP
NET
as file source in
will be listed. When you open
39
Browser
mode,
/My Shortcuts/
"/My
, the
Specific
Page 41

address. If you open the IP address, ME1 will send
Password to the server for authentication.
Net User ID, Net
Figure Network Browse setting
40
Page 42

FAQ
Q1: There is no display when using composite AV OUT connection.
Composite AV OUT only supports NTSC/PAL system. You might select
NTSC/PAL
RESOLUTION
Q2: When a video is played on screen, but can not be recorded.
Some DVD video disc, with copy protection, can not be recorded.
Q3: No sound in component video connection
Component video only deliver video signal. You still need to connect the
red and white plug of composite AV extension cable to AV input on your TV or
monitor.
Q4: No display when the resolution is changed
progressive scan, 720p, or 1080i resolution. Please press
key to change the resolution setting to
NTSC/PAL
system.
Please check whether your display support the resolution or not. If you use
AV OUT
Q5: ME1 can not detect a USB device
Please refer to the manual of your USB device to use external power to support
the USB device.
◎
Please visit www.emprex.com
connection,
ME1
may not detect an USB device which consume too much current.
ME1
only support
NTSC
for more products and support information.
and
PAL
system.
41
Page 43

Technical Specifications
Physical Dimension Height: 136.6 mm x Depth: 207.5 mm x Width: 44.3mm
Weight 0.65 Kg (without Hard disk drive)
Playback Format Audio: MP3, WMA
Video: MPEG 1/2, DivX HD, DivX 3.11, 4.12, 5, 6; AVI, VOB,
MPG , DAT, Xvid
Picture: JPG , BMP
Subtitle: SRT
Remote Controlt IR remote controller
Audio Out 2 channels stereo output
Video Out Component: Y, Pb, Pr ( support NTSC, PAL, NTSC progressive,
PAL Progressive, 720p, 1080i )
Composite video out (NTSC / PAL)
Audio In 2 channels stereo input
Composite video in (NTSC / PAL Auto converting)
Extensibility USB 2.0 Device port
USB 2.0 Host port
Ethernet (10/100 Mbps) port
HDD supported Size: 3.5 inch IDE type HDD (FAT32)
(Not included) Capacity: max. 500GB supported
Power Adapter Input:AC90V~250V
Output: DC +12V 2A, DC +5V 4A
Language English, French, German, Spanish, Italian, Nederland, Russian
42
Page 44

3100554191
Version 1.0
Aug.2007
43
 Loading...