

Page 1

BEFORE USING THIS PRODUCT.............................................................................................................................1
COMMUNICATION REGULATION.....................................................................................................................................1
I
MPORTANT SAFETY INSTRUCTIONS...............................................................................................................................2
S
AFETY INFORMATION...................................................................................................................................................3
M
AINTENANCE AND PRECAUTION..................................................................................................................................4
GETTING STARTED (PREPARATION)....................................................................................................................5
INTRODUCTION YOUR TELEVISION....................................................................................................................6
SUPPLIED ACCESSORIES.................................................................................................................................................6
TV C
ONTROL FUNCTIONS .............................................................................................................................................7
S
ETTING UP THE REMOTE CONTROL..............................................................................................................................8
R
EMOTE CONTROL FUNCTIONS......................................................................................................................................9
I
NPUTS AND OUTPUTS..................................................................................................................................................10
SETTING UP YOUR TELEVISION...........................................................................................................................19
CHANGING THE SOURCE ..............................................................................................................................................19
A
SPECT .......................................................................................................................................................................20
A
CCESSING THE OSD (ON SCREEN DISPLAY) MENU ................................................................................................... 21
I
CON DESCRIPTION ......................................................................................................................................................22
C
HANNEL....................................................................................................................................................................23
P
ICTURE......................................................................................................................................................................28
S
OUND ........................................................................................................................................................................30
F
UNCTIONS..................................................................................................................................................................31
S
ETUP .........................................................................................................................................................................37
BASIC TROUBLESHOOTING..................................................................................................................................41
GENERAL SPECIFICATIONS..................................................................................................................................43
RGB FREQUENCY TABLE.......................................................................................................................................45
Page 2

Before Using This Product
Communication Regulation
FCC Compliance
This equipment has been tested and found to comply with the limits for a class B digital device, pursuant to
Part 15 of the FCC Rules. These limits are designed to provide reasonable protection against harmful
interference in a residential installation. This equipment generates, uses, and can radiate radio frequency
energy and, if not installed and used in accordance with the instructions, may cause harmful interference to
radio communications. However, there is no guarantee that interference will not occur in a particular
installation. If this equipment does cause harmful interference to radio or television reception, which can be
determined by turning the equipment off and on, the user is encouraged to try to correct the interference by
one or more of the following measures:
Reorient or relocate the receiving antenna;
Increase the separation between the equipment and receiver;
Connect the equipment into an outlet on a circuit different from that to which the receiver is
connected;
Consult the dealer or an experienced radio/TV technician for help.
This device complies with Part 15 of the FCC Rules. Operation is subject to the following two conditions:
1. This device may not cause harmful interference.
2. This device must accept any interference received, including interference that may cause un- desired
operation.
Canada Class B Statement
This Class B device meets all requirements of the Canadian interference-causing equipment regulations.
Cet appareil numerique de la Class B respecte toutes les exigencies du Reglemensur le materiel
brouilleur du Canada
1
Page 3

Important Safety Instructions
Improperly use of this electronic device may cause injury to your body and damage the property as well. This
LCD TV device has designed and manufactured to meet international industrial safety standard. Same as
other home electronic devices, you need to operate this equipment carefully in order to obtain the best
performance of this equipment and to ensure the safety of using it. Before you start to use this equipment,
please read and thoroughly understand what it is described below。
If you realize any weird symptom on your TV when it is turned on and under operation, such as stinky
smell, smoking, please unplug the power cable and inform our near by service office。
This device is equipped with high voltage inside, please keep it in a dry place and don’t open the back
cover to do any picture adjusting or cleaning the inside components. It is easy to get electrical body
injury and very possible to cause a fire.
Please do not use any peripheral with this LCD TV set, which is not recommended by the manufacture.
Improper use of it may easy to damage this device and cause an accident.
Before moving this device, please remember to unplug the power cable. Never try to move this device
while its power cable is still plugged to the power outlet on the wall. It may cause fire and damage to
your property if you are doing so. If you drop this device on the floor while moving it, please inform
service office immediately to get a safety checking.
In order to avoid firing and property damage as the consequence, please do not place this LCD TV in a
place which the temperature will go beyond 35℃ or below 5℃, or in a humidity condition that is lower
than 10% and higher than 80%.
When you place this LCD TV in a cabinet or in a narrowed location, please keep this area in a good
ventilation condition.
Mesh screen on the back cover is for air flow, which prevents over heat from occurring. This area
shouldn’t be covered.
Keep this device away from any heat generator, such as portable heater, gas heater, and stove.
When you know this device will not be used for a long period, please unplug the power cable. Doing
this will protect your LCD TV away from the damage which is happened due to suddenly unstable
voltage.
Don’t plug this device to a power outlet, which is already overloaded. It will lead a fire and/or electrical
shock.
Keep a safety distance among devices, which have power applied, keep good ventilation in that area or
it will easy to cause a fire.
Take battery out from the remote control unit if it is not been used for a long period. Keep batteries in a
dry and cool place.
Do not spread any liquid to your LCD TV.
Install this TV device stably, keep it away from touching by the children
Due to the big size, it is recommended to have at least two adults when install this device.
Please don’t place this device on a table with wheel to avoid any damage caused by falling down.
2
Page 4
Safety Information
r
r
This equipment generates, uses, and can radiate radio frequency energy and, if not installed and used in
accordance with the instructions, may cause harmful interference to radio or television reception. However,
there is no guarantee that interference will not occur in a particular installation. If this equipment does cause
interference to radio and television reception, which can be determined by turning the equipment off and on,
the user is encouraged to try to correct the interference by one or more of the following measures:
Reorient or relocate the receiving antenna;
Increase the separation between the equipment and receiver;
Connect the equipment into an outlet on a circuit from that to which the receiver is connected.
Caution
To prevent
shock, do not use the plug with an extension cord, receptacle, or other outlet unless the blades can be fully
inserted to prevent blade exposure. To reduce the risk of electric shock, do not remove the unit cover or back.
There are no serviceable parts inside. Refer servicing to a quali
fi
re, shock hazard, or interference, only use the recommended accessories. To prevent electric
fi
ed personnel only.
This symbol is intended to alert the
RISK OF ELECTRIC SHOCK
NOT OPEN
DO
CAUTION:
TO
REDUCE THE RISK OF ELECTRIC SHOCK
NOT REMOVE COVER
DO
NO USER-SERVICEABLE PARTS INSIDE
REFER SERVICING TO QUALIFIED SERVICE PERSONNEL
user to the presence of uninsulated
dangerous voltage within the product’s
enclosure that may be of suf
magnitude to constitute risk of
electric shock
This symbol is intended to alert the use
to the presence of important operating
and maintence instructions in the
li t er a t u r e accompanying this product
fi
cient
fi
re o
3
Page 5

Maintenance and Precaution
Do not remove the cover or back of the TV. Any unauthorized changes or modification to the product will
void the user’s warranty.
Do not place the TV in a closed compartment. This will overheat the TV.
Turn off the product if liquid is accidentally spilled into the TV. Contact your local dealer for assistance.
Do not expose the TV to rain or moisture.
According to the industrial standards, when pulling the power cord from the outlet, hold the power plug
instead of the cord.
Make sure the power cord from the AC outlet is unplugged, and disconnect from the antenna if the TV is
left unattended and unused for a long period. This will prevent damages to the TV lighting and power-line
surge.
Do not expose the TV to heat sources such as radiators, heaters, stoves and other heat-generating
products (including audio amplifiers).
Unplug the power cord from the AC outlet before cleaning the TV. Use specific screen cleaner kit for LCD
screens. Do not use liquid cleaners or aerosol cleaners
Do not use this TV with an extension cord or power bar; this can cause a fire or an electric shock..
Do not place heavy items or belongings on the top of the TV.
Hand carry the TV with at least another person.
4
Page 6

Getting Started (Preparation)
Distance recommendations:
Avoid improper installation and never position the unit where ventilation is impossible. When installing this TV,
distance recommendations must be maintained between the set and the wall, as well as inside a tightly
enclosed area or piece of furniture. Refer to the minimum distance guidelines shown for a safe operation.
Cleaning the screen:
The screen is coated with a special thin
discoloration, scratches, and other problems that cannot be repaired may occur. Pay attention to the following
when handling the screen.
Do not use glue or adhesive tape on the screen.
Do not write on the screen.
Do not allow the screen to come in contact with any hard objects.
fi
lm to reduce reflection. If this film is damaged, uneven colors,
Do not allow condensation to form on the screen.
Do not use alcohol, thinner, benzene or other solvents on the screen.
Do not rub the screen forcefully.
CAUTION:
fi
Operate only from the power source speci
Avoid damaging the AC plug and cord.
When you are not using this unit for a long period of time, it is recommended that you disconnect the
power cord from the main outlet.
When the source has no signal to input, TV will be “Auto Power Off” after 15 minutes.
POWER CORD CONNECTION:
Connect the power cord, after completing all other connections.
1.
Connect the power cord to this device
2. Connect the power cord to the power outlet.
ed (AC 120V) on the unit.
5
Page 7
Introduction Your Television
Supplied Accessories
The following items come along with your LCD TV:
6
Page 8
TV Control Functions
MENU SOURCE –VOL+ -CH+ POWER
6
5
The LED indicator light up in 2 different colours green, red. Each colours
1 LED Indicators
2
3
4
5
6
POWER
-
CH+
-
VOL+
SOURCE
MENU
represent different status.
Green - Power is on; Red - Standby.
Press this button to turn the power on/standby.
Press to change channel/when is menu mode, these acts as navigation
keys.
Press to adjust the volume/when is menu mode, these acts as navigation
keys.
Video input selection. Press this button to display the menu for input
selection mode.
Press this button to display the OSD menu. It contains all the options to
configure your TV's settings.
1
button (Beneath)
button (profile)
1
2 34
7
Page 9
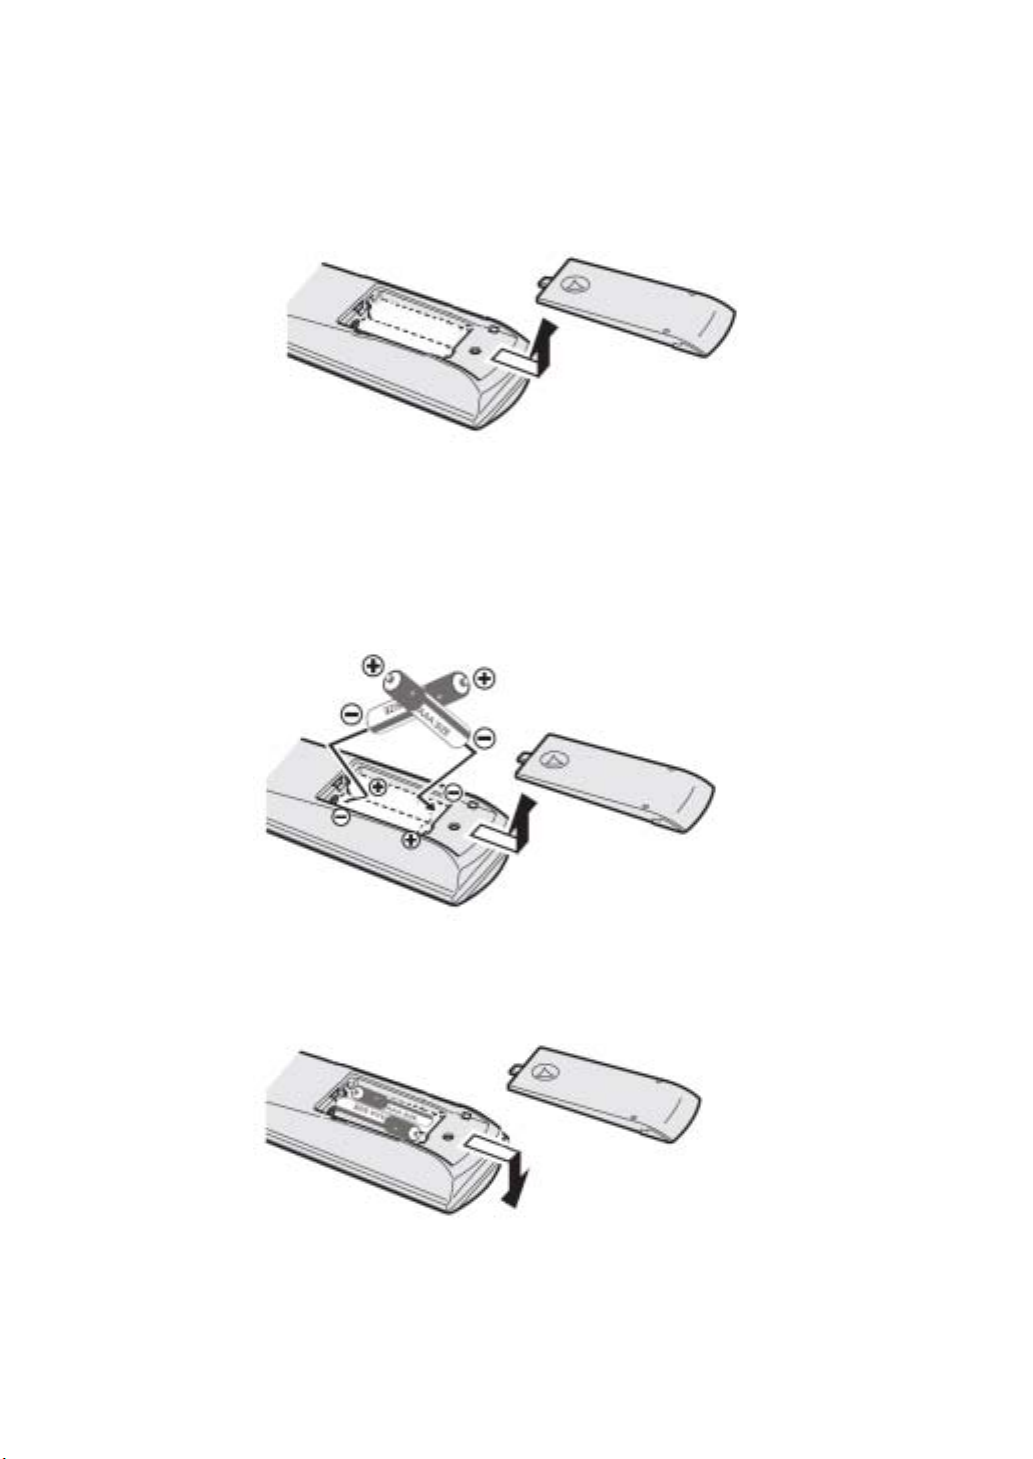
Setting Up the Remote Control
1. Open the lid of your remote control battery compartment on the back of the remote control.
-
Insert two AAA batteries. Use the (+) and (
2.
correspond to the (+) marks on the compartment. The (-) marks on your battery correspond to the (-)
marks on the compartment.
Note: Do not mix new and old or different kind of batteries
) marks to guide
you. The (+) marks on your batteries
3. Put the lid back onto the remote control battery compartment.
8
Page 10
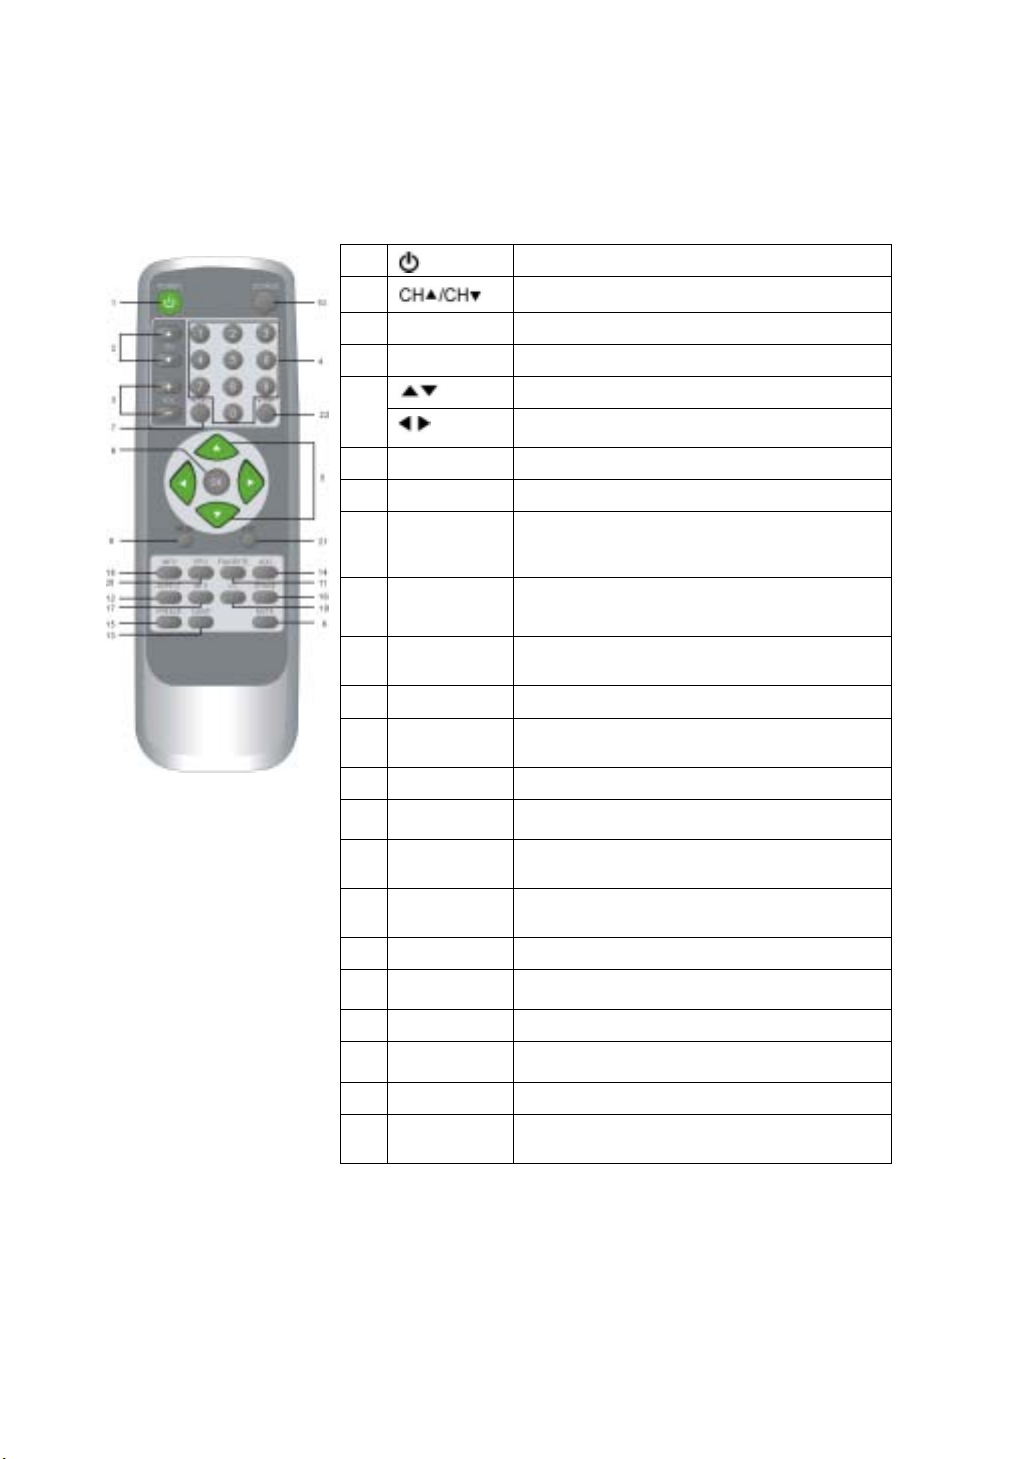
Remote Control Functions
The table below explains each button’s function.
1
2
3 VOL +/VOL -Press
4
0~9 Numerical keys to select desired channel
5
6 OK Press this key to confirm selection.
7 RECALL Recall last channel.
8 MUTE
9 MENU
10 SOURCE
11 FAVORITE Press to switch your favorite channels
12 ASPECT
13 SLEEP Activates the sleep timer.
14 ADD
15 FREEZE
16 ERASE
17 MTS Switch among MONO, stereo and SAP.
18 INFO
19 C.C. Turns the closed caption on or off
20 EPG
21 EXIT To exit menu or function select.
22 -/DRF
Power on/o
Press
Navigation keys in Setup menu.
Navigation keys in Setup menu.
Press this key to turn off the sound.
Press the "MUTE" button again or press
"VOL+/ VOL-" to enable sound.
Press this key to display the OSD menu. I n
the OSD menu, press this key to exit the
menu.
Press this key to display the video source
selection menu.
Choose from widescreen, 4: 3 video,16: 9
zoom. (More details on Page20)
Press to add current channel.
(All sub channels will adds)
Press this key to freeze current fra me from
the screen.
Press to skip the current channel in
CH-Up, CH-Down and favorite channel.
Press to display information about the
current source.
Opens the program guide & show all active
channels. (For digital channels only)
Minor channel indicator or DRF (Direct
Digital RF Channel tune)
ff.
these keys to c
these keys to adjust vo
hange the c
hannels.
lume.
9
Page 11
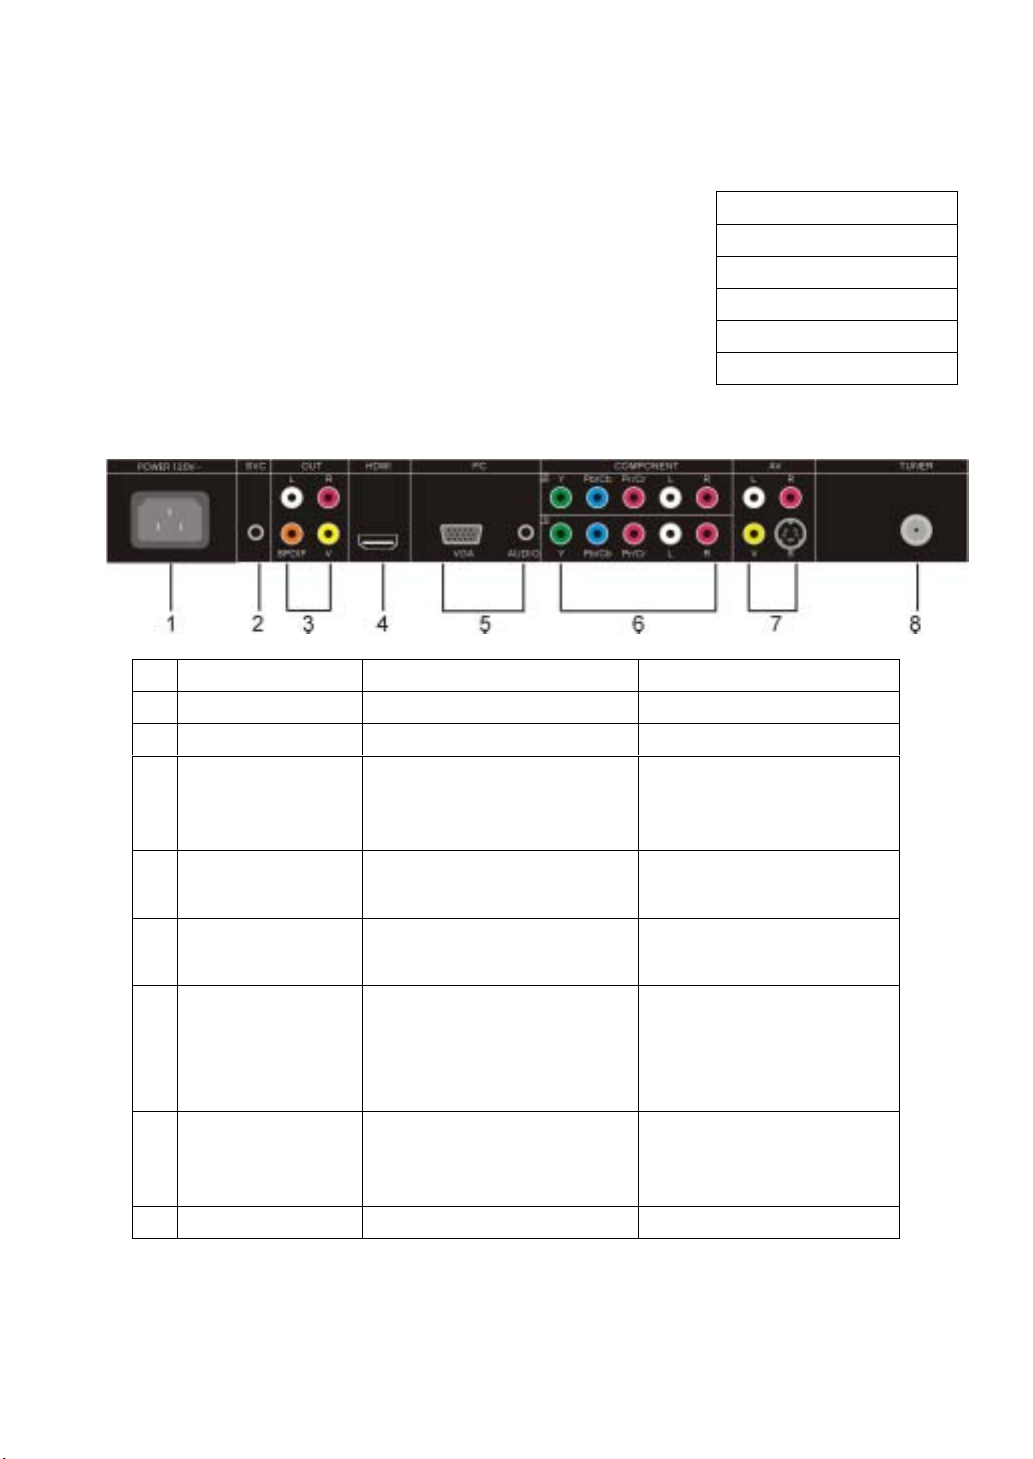
Inputs and Outputs
Your LCD TV has five types of video connections. You should capitalize
on the best connection available from your LCD TV to get the best
display quality. For example, if you have a progressive DVD player that
supports a component video connection, you should connect the DVD
player to your LCD TV using component video connections instead of
composite video or S-video connections.
Available Interface Description
1
Power Input AC 120V
2
SVC
Service connector Maintenance use only
3
A
udio Outp
uts
Contains composite video,
SPDIF and one pair of R/L
audio outputs.
4
HDMI
HDMI input
5
PC Input
VGA input (PC Input) and audio
inputs.
6 Component Inputs
(Component 1
Component 2)
Component support both High
Definition programs
(720p/1080i) and standard
definition programs (480i/ 480p)
7 AV Inputs (AV1) Contains S-video, composite
video, a pair of R/L audio inputs.
8
TUNER
NTSC/ATSC/Clear QAM
10
Cables
1.RCA composite video cable
2. S-video cable
3. RCA component video cable
4. RGB (VGA) video cable
5. HDMI A/V Cable
Recommended Devices
HDTV, Set-top Box,
Progressive HD DVD Player.
PC.
Progressive DVD player,
HDTV set-top- box, HD PVR,
D-VHS, digital media player.
Camcorder, non-progressive
DVD player, digital camera,
VCR.
Page 12
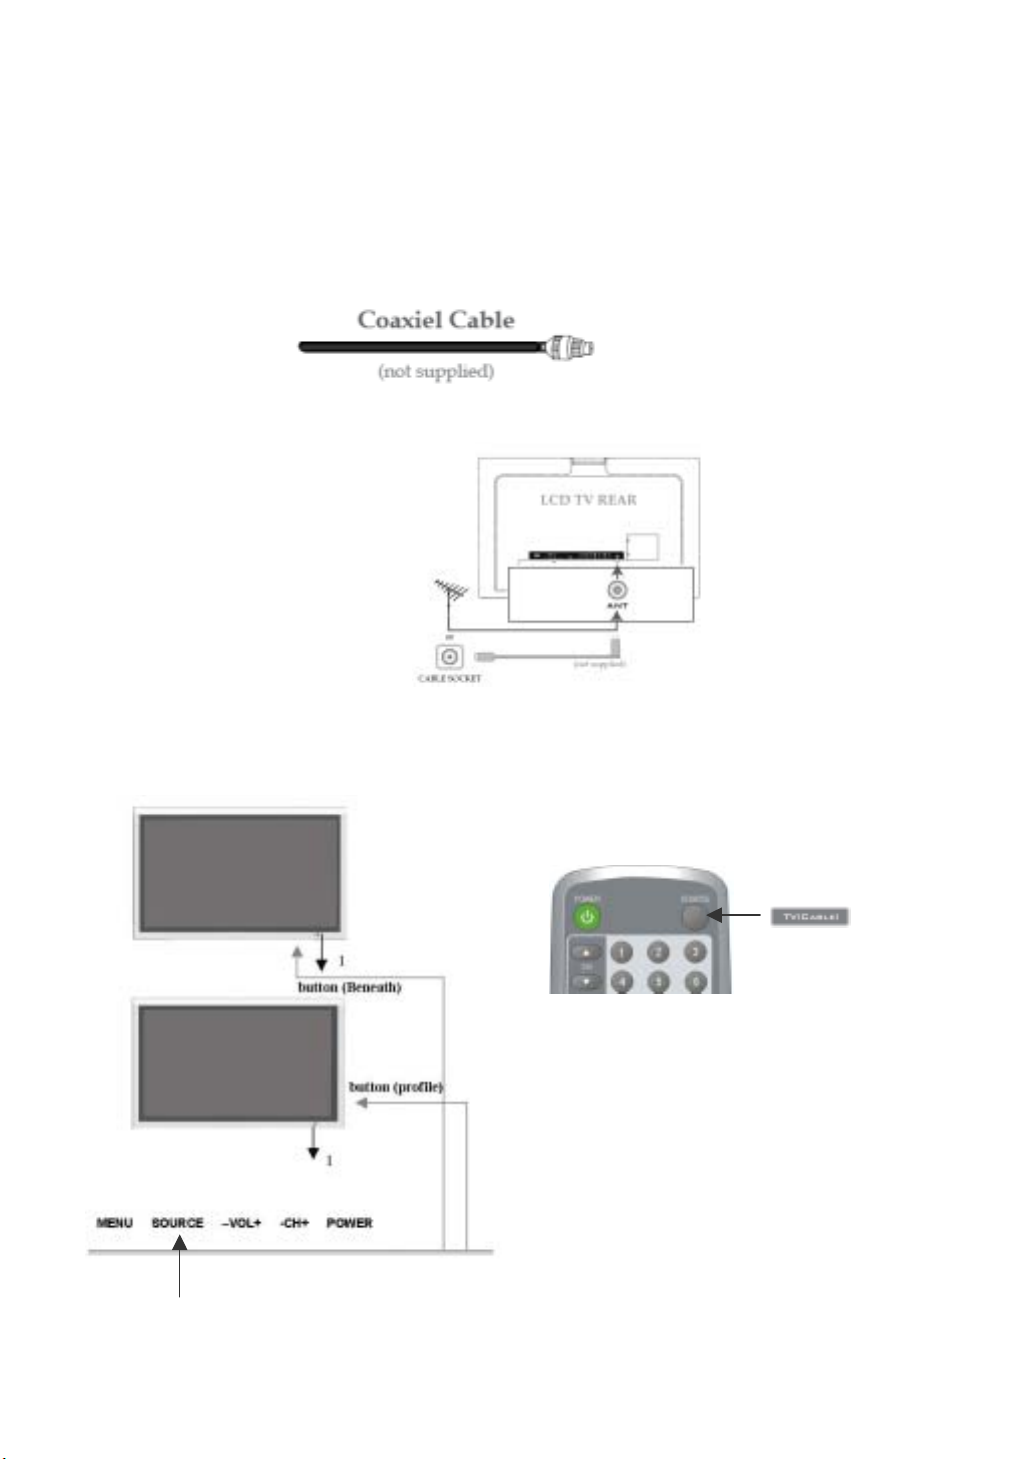
Connecting the Antenna or Analog Cable TV (CATV):
1. Disconnect the TV from all power sources before making any connections.
2. Use the coaxial cable (75 ohms) for connecting TV signal from your antenna or cable TV
the tuner input.
Hook up the cable to the TUNER input in
3.
the rear of the LCD TV.
Connect the power cord of the LCD TV to a power outlet.
4.
5. Press the “SOURCE” button on either the remote control or the TV controls and select TV on the source
menu.
provider to
11
Page 13
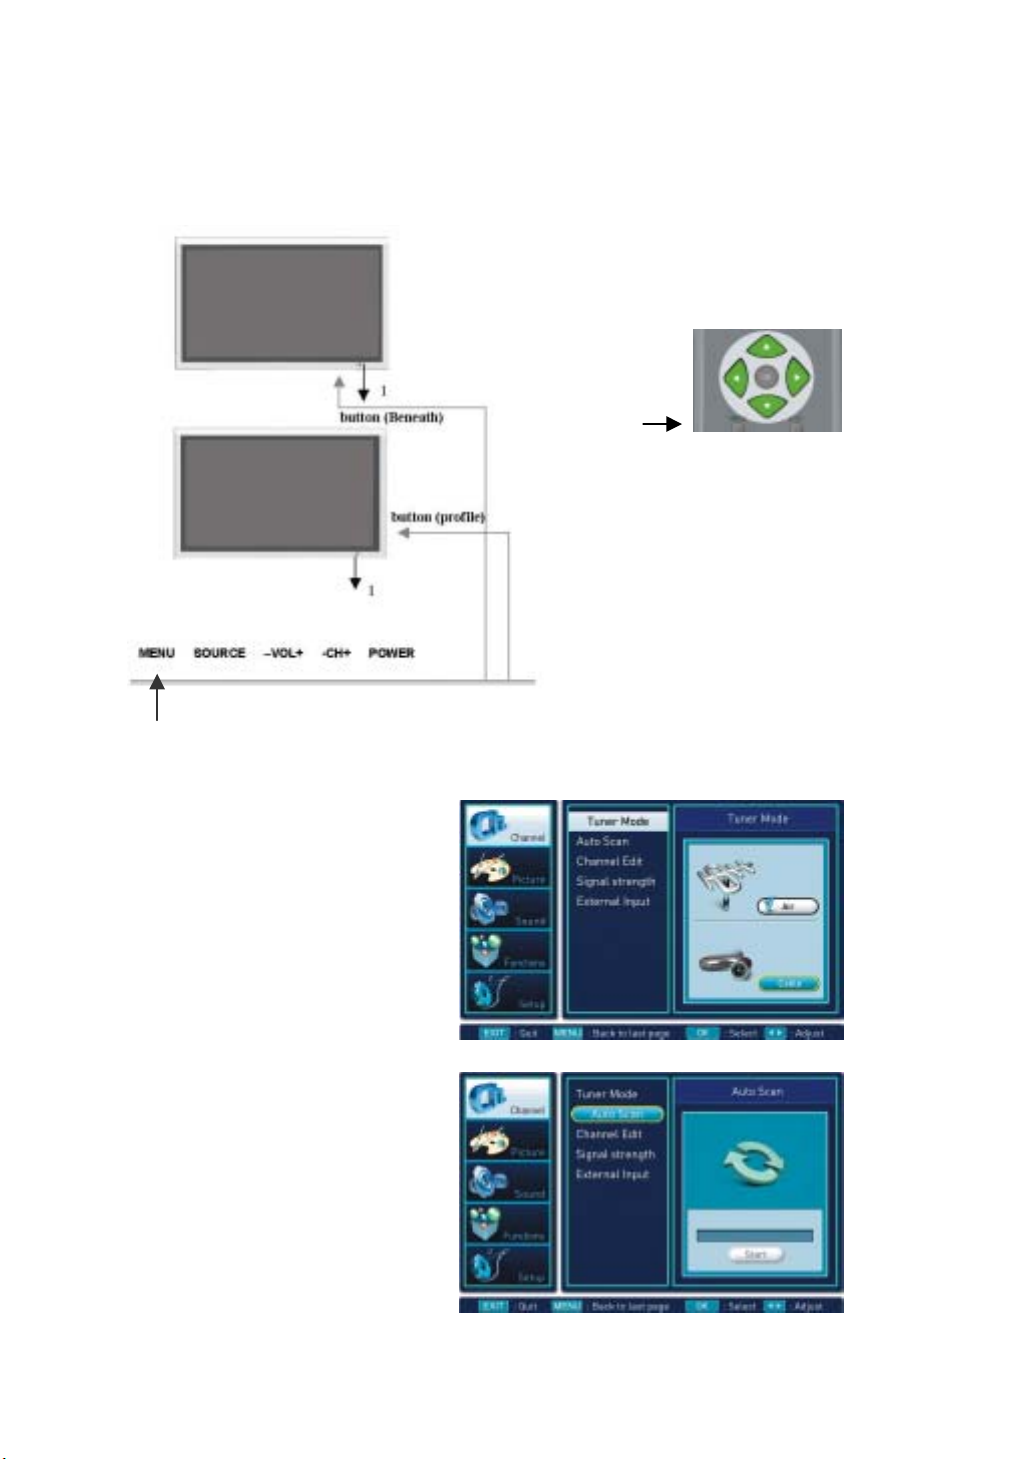
Press the “MENU” button on the
6.
through the icons. In the first option (Channel), press “OK”. Choose the first option “Tuner Mode” and press
“OK”. If your TV is connected to the antenna, choose Air. If your TV is connected to the cable television
outlet, choose Cable. (For more information on the Channel menu, refer to Page 23.)
remote control to display the OSD menu use ▲▼ or ◄► to navigate
7. Then choose STD and press
“OK”
STD-Standard
HRC-Harmonic Related Carrier
IRC-Incremental Related Carrier
8. In order for the LCD TV to detect
available
choose the
press “OK”. Scroll down to “Auto Scan”
and press “OK”. The television will
automatically scan the available channels
for you. (For more information
on the channel menu, refer to Page 23 )
channels, press “MENU” and
first
option “Channel” and
12
Page 14
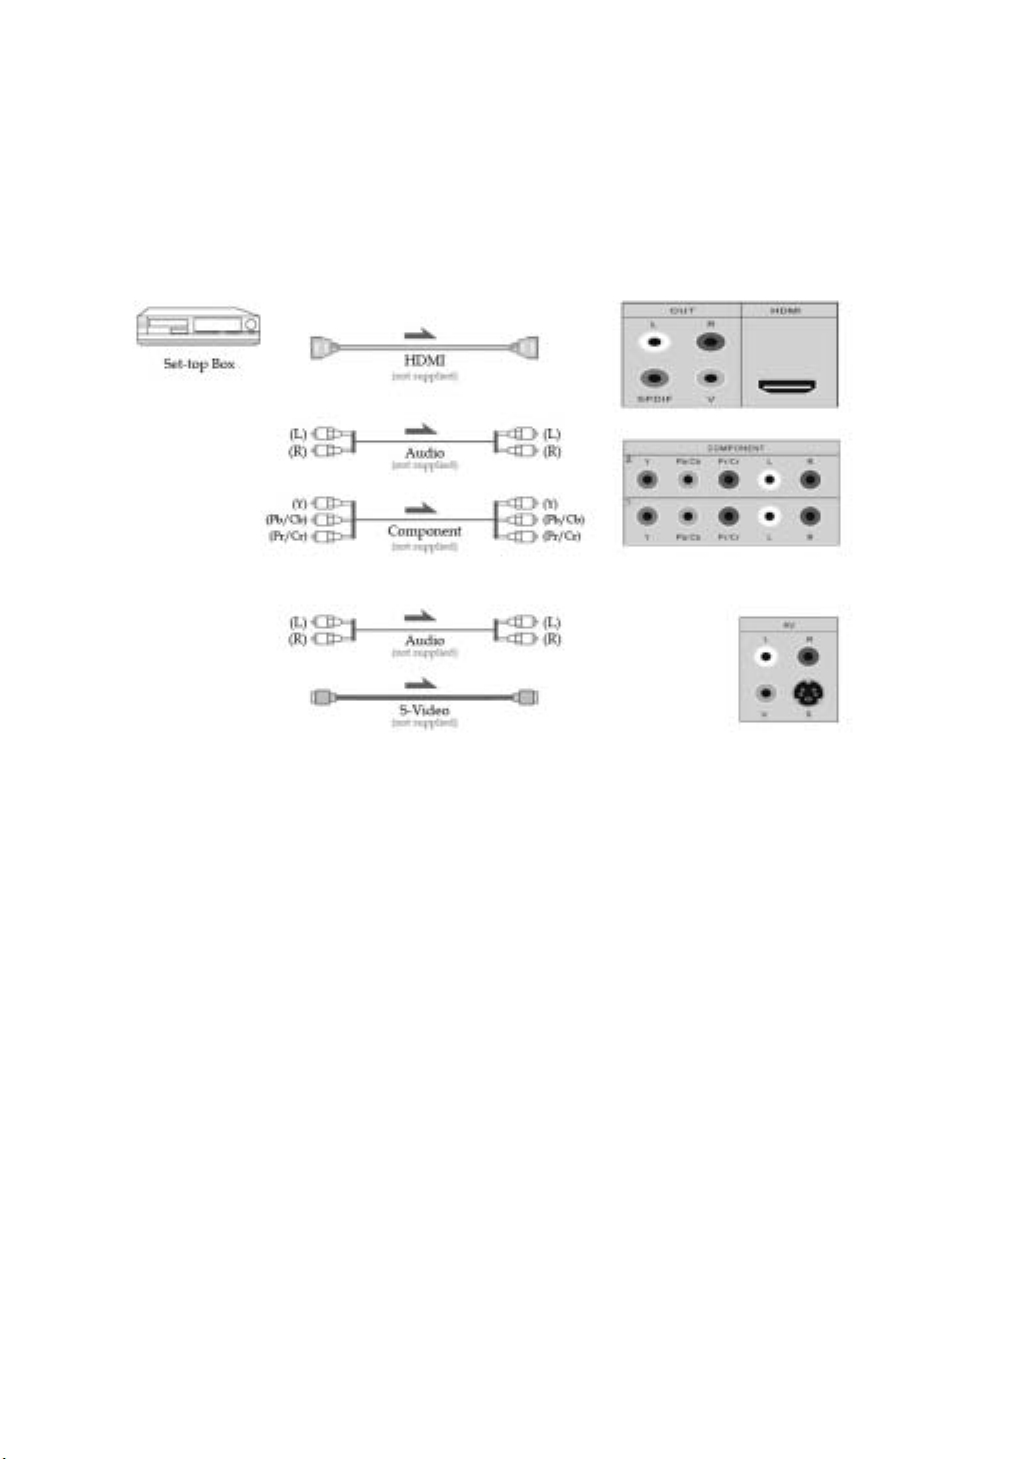
Connecting the Digital Set-Top Box (Commonly Used For HDTVs, Satellite TVs, etc.):
1. Disconnect the TV and set-top box from all power sources before making any connections.
2. Use a HDMI cable, component video cable, or S-video cable to connect the HDMI, COMPONENT, or
S-VIDEO output jacks of your digital set-top box to the HDMI, COMPONENT, or S-VIDEO input jacks in
the rear of the LCD TV.
3. Use the AUDIO cables to connect the AUDIO (L/R) output jacks of your digital set-top box to the AUDIO
(L/R) input jacks in the rear of the LCD TV. If you use the HDMI cable, you don’t need to connect the
audio cable between the two equipments. The HDMI cable transmits both digital video and audio signals.
4. Connect the power cords of your digital set-top box and LCD TV to the power outlets.
13
Page 15

Press the “SOURCE” button on either the remote control or the TV controls. Select
5.
AV1(S-Video)/AV1(CVBS)/
connected to. (Changing the source, refer to Page19)
Note:
1. It is strongly recommended that the user connects Digital Set-Top Box via HDMI connection if
provided. HDMI signal is pure digital signal; therefore, it gives the best performance for HD programs.
2. If your digital set-top box doesn’t provide HDMI jacks, use the component cables for better picture quality
or S-video cable for standard picture quality.
YPbPr1 /YPbPr2/HDMI
, depending on which input is the digital set-top box
14
Page 16

Connecting the Component Video:
To connect your progressive DVD player or HD DVD Player via component video:
1. Connect the green Y jack on the back of your DVD player to the green component Y jack on the
rear of the LCD TV.
2. Connect the red Pr/Cr jack on the back of your DVD player to the red Pr/Cr jack on the rear of the
LCD TV.
3. Connect the blue Pb/Cb jack on the back of your DVD player to the blue Pb/Cb jack on the rear of
the LCD TV.
4. Use the AUDIO Cable to connect the AUDIO (L/R) output jacks of your DVD Player with the
AUDIO (L/R) input jacks in the rear of the LCD TV.
5. Press the “SOURCE” button of the remote control to select “YPbPr1“ or “YPbPr2”
15
Page 17

Connecting the S-Video or Composite Video:
This section shows you how to connect devices to the S-video and composite video inputs
Most devices like VCRs, camcorders, non-progressive scan DVD players, etc only provide composite video
output or S-video output. The steps below are to show you how to connect two devices simultaneously.
Connect the S-video on the back of your camcorder to the S-video under AV Input
1.
2. Connect the audio red (R) and white (L) on the back of camcorder to the audio red (R) and white (L) jacks
on the rear of your LCD TV.
3. Connect the yellow video jack on the back of your VCR to the yellow composite video input jack on the rear
of your LCD TV under AV Input.
Press the “SOURCE” button on the remote control to display the OSD setup menu and
4.
(CVBS) to display video from the VCR or choose AV1 (S-VIDEO) to display video from the camcorder.
of your LCD TV.
jack.
choose AV1
16
Page 18

Connecting the PC:
If you wish to connect a PC to the LCD TV, connect the 15-pin D sub RGB connector on
1.
PC connector on the rear of the LCD TV.
2. Connect the audio output on your PC to the PC audio input on the rear of the LCD TV.
3. Press the “SOURCE” button on the remote control to select “VGA”.
4. You may configure your PC’s VGA resolution to optimized resolution on the LCD TV.
your PC to the
The recommended resolution of the LCD TV is 1024 x 768.
17
Page 19

Connecting the HDMI:
1. Use a HDMI cable to connect the HDMI output jack of your external device to the
of the LCD TV.
HDMI input jack in the rear
Press the “SOURCE” button on either the remote control or the TV controls. Select
1.
(Changing the source, refer to Page 19)
Note: HDMI connection includes both digital audio and video signals.
18
HDMI.
Page 20

Setting Up Your Television
Changing the Source
1. Press the “SOURCE” button on either the remote control or TV controls.
2. Repeat it according to selecting until wanting of “source”.
TV→AV1(CVBS)→AV1(S-Video)→YPbPr1→YPbPr2→HDMI→VGA
Note: When the source has no signal to input, TV will be “Auto Power off” after 1
19
5 minutes.
Page 21

Aspect
When the input is 4:3 (the image dimension
usually used by cable television, and video
cassette), the user might want to eliminate the
“black spots” on the left and the right of the
screen.
By doing this, the user might choose WIDE
SCREEN, which distorts image by stretching
the whole image horizontally
In most cases, widescreen videos (such as
DVD movies’ widescreen modes) will have
“black spots” on the top and the bottom of the
screen (this is called letterbox). To eliminate
this, the user may select 16:9 zoom.
Sometimes the television might receive
widescreen signals. If the user sets the mode
on 4:3, the image might be distorted into a thin
image. By fixing this, the user may switch to
widescreen mode
20
Page 22

Accessing the OSD (On Screen Display) Menu
1. Press “MENU” on the remote control
the OSD menu.
2. Use ▲▼◄► to navigate through the main
function.
3. Press ► or “OK” to enter the highlighted
category.
4. Use ▲▼ to navigate
5. Press “MENU” or ◄► to change the
selected settings.
6 Press “EXIT” to exit the OSD menu or press
“MENU” to switch to previous step.
to start
21
Page 23

Icon Description
There are 5 main functions (Channel, Picture, Sound, Functions, Setup) in the OSD menu. Before you start
using the OSD menu, it is recommended that you read through the following icon descriptions.
CHANNEL
PICTURE
FUNCTIONS
SOUND
SETUP
TUNER MODE
AUTO SCAN
CHANNEL EDIT
SIGNAL STRENGTH
EXTERNAL INPUT
PICTURE MODE
BRIGHTNESS
SATURATION
CONTRAST
SHARRNESS
TINT
RGB
COLOR TEMP
DNR
BACKLIGHT CONTROL
SOUND MODE
TREBLE
BASS
BALANCE
AVL
AUDIO LANGUAGE
DIGITAL AUDIO OUT
AUTO LOCK
CAPTION
CAPTION OPTION
CC BACKGROUND
CAPTION TEXT
EPG VIEW
DATE/TIME
POWER ON TIME
POWER OFF TIME
SLEEP
MENU LANGUAGE
MENU OPACITY
EMERGENCY ALERT
PC
22
Page 24

Channel
r
How to set the parameters in the Channel menu
Function
Tuner Mode
Auto Scan
Channel Edit
Signal Strength
External Input
Description
This allows the user to switch between Air
and cable TV.
The auto scan helps the user to search fo
available channels on television.
This option allows the user to add/delete
recognized channels.
User can recognize the signal strength with
this.
User can select input video source with this
selection.
Options
Start/Stop
ADD/DELETE Favorite
Less than 50, unacceptable to
watch 50~79, not stable
More than 80, no problem in
watching TV
TV(AIR/CABLE)
AV1
AV1
YPbPr1
YPbPr2
Air(Analog antenna)/Cable(Cable
TV)
(CVBS)
(S-Video)
HDMI
VGA
23
Page 25

Tuner Mode
1. Press MENU button.
2. Use ▲,▼ button to highlight
icon, then press “OK”
3. Use ▲,▼ button to make a choice from
Air or Cable, then press “OK”
4. If choose cable, must choose STD, HRC
or IRC again.
“Channel”
Press EXIT to exit the menu screen.
Press MENU button to switch to previous step on the menu screen.
24
Page 26

Auto Scan
1. Press MENU button.
2. Use ▲,▼ button to highlight “Tuner
Mode” icon, then press “OK”.
3.Choose the “Air” and press “
4. Use ▲,▼ button to highlight “Auto
Scan” icon, then press “OK”.
(Scan “Digital channel” after Analog
channel” finish.)
5.It will automatically scan and store all of
the channels that are available in your
local area.
(To stop the auto searching, press
“OK” button.)
6. The scanned channel is displayed
when done.
7.It is possible to memorize user’s choice
of channels as is done in Channel Edit
Menu.
Press EXIT button to exit the menu screen.
Press MENU button to switch to previous step on the menu screen.
Use OK button to make selection.
OK
”
25
Page 27

Channel Edit
”
l
e
o
s
1. Press MENU Button.
2. Use ▲,▼ button to highlight
icon, then press “OK”.
3. Press ▲,▼ button to highlight “channe
Edit” icon, then press “OK”
4. Use ▲,▼/◄,► button to select
channels. Selected channels will b
yellow colored. Then press “OK”button t
add or delete channels. If channel
added, user can see the “√”mark
5.Press “OK” button to add channels to
the Favorite Channel, and press again to
cancel adding. If channel added to the
Favorite, can see the “
Press EXIT button to exit the menu screen.
Press MENU button to switch to previous step on the menu screen.
Use OK button to make selection.
“Channel
” marks
26
Page 28

Signal Strength
,
”
1. Press MENU button.
2. Use▲,▼ button to highlight “Channel”
then press “OK”.
3. Use ▲,▼ button to highlight “Signal Strength
icon, then press “
•Less than 50, unacceptable to watch
•50~79, not stable
•More than 80, no problem in watching TV
Press EXIT to exit the menu screen.
Press MENU button to switch to previous step on the menu screen.
OK
icon
”.
27
Page 29

Picture
r
Adjusting contrast, brightness, color, tint, or sharpness requires the user to switch the mode to “user”.
While adjusting customized selections, only the selection and its status bar will be shown on the screen.
Example:
1.Use ▲or▼ to “Picture Mode” and press
“OK”
2.Use ▲or▼ to “User” and press “OK”
3.Press ▼ to brightness and press “OK” o
► to select
4. Press ◄► to adjust the
brightness.
5. Use ▲or▼ to adjust R,G,B Value
Separately.
28
Page 30

How to set the parameters in the Picture mode menu.
Function Description Options
Mode is the selection that allow
Picture Mode
Brightness Adjusts the brightness. 0-100
Saturation Adjusts the color 0-100
Contrast Adjusts the contrast. 0-100
Sharpness
Tint
RGB
Color Temp
DNR
Backlight Control Adjusts the backlight 0-10
the user to choose among
default video settings and
customizable video settings.
Sharpness adjusts increase
or reduce the picture
performance sharpness.
Tint adjusts the natural aspect
of a color.
This option allows user to adjust
R,G,B Value Separately
This option allows the user
choose among three styles of
displaying colors.
This is used to reduce image
noise.
User / Standard / Movies /
Sports / Vivid / Recall
0-100
(-10) - (+10)
R:0-100
G:0-100
B:0-100
COOL-The colors of the
television will shift towards the
blue end of the spectrum.
NORMAL-The colors of the
television will be nature.
(unaltered)
WARM-The colors of the
television will shift towards the
red end of the spectrum.
1.OFF-the television will not
use NR.
2.Minimum- recommended use
for low quality videos.
3.Medium-recommended use
for medium quality videos (VCR
movies/tapes).
4.Maximum- recommended use
for high quality videos.
29
Page 31

Sound
How to set the parameters in the Sound menu
.
Function
Sound Mode
Treble
Bass
Balance
AVL
Audio Language
Digital Audio Out
User selects and enjoy sound
mode made by factory in the
favor of user’s. In Standard,
Movie, music and Speech
mode. If changing the value
of Treble, Base, Balance, go to
user mode automatically.
Adjusts the higher pitched
sounds.
Adjusts the lower pitched
sounds.
Adjusts the "position" of the
sound. The negative end
represents that the sound will
lean towards the left and the
positive end represents that
the sound will lean towards the
right.
This option is less sound
adjusting uses at midnight.
This is workable in only DTV
broadcasting. If user select
the specific language,
detecting that language in DTV
signal source at the real time.
This option lets the user
choose Dolby Digital and PCM
Description
30
User / Standard / Movies / Music /
Speech / Recall
0-100
0-100
(-50) - (+50)
ON/OFF
English/French/Spanish
Dolby Digital/PCM
Options
Page 32

Functions
”
e
o
s
Auto Lock
1. Press MENU button.
2.Use▲,▼/◄,► button to highlight
icon, then press “OK”
3.Choose the “Auto Lock” and press “
or “►".
4.When the “Enter PIN” box pops up, enter th
The default password is 0000
Set Blocking
1. After get released, use ▲,▼ button t
2. Use ▲,▼ button to make a choice
Channel Blocking
1. After get released, use ▲,▼ button to
2. Use ▲,▼ button to choose the channel,
Press EXIT to exit the menu screen.
Press MENU button to switch to previous step on the menu screen
4 digit password
highlight “Set Blocking” icon, then pres
“OK”
Either ”ON” or ”OFF”, then press
highlight “Channel Blocking” icon, then
press “OK”.
then press “
OK
” to choice lock or not.
“Functions
OK”
31
Page 33

g
y
n
h
Block by Ratin
1.Use ▲,▼ button to highlight “Block b
Rating” icon, then press “OK”.
2. Use ▲,▼ button to make a choice, the
press “OK”.
G
PG
PG-13
R
X
TV-Y: For all children
TV-Y7: For children above 7
TV-G: For anyone
Press EXIT to exit the menu screen
Press MENU button to switch to previous step on the menu screen.
NC-17
NR
TV-PG: children can watch wit
guardian
TV-14: need parent guide
TV-MA: Only for adult
ALL: Select all functions above
FV: Fantasy Violence
D: Dialog (sexual)
L: Language (abusive, sexual)
S: Sexual
V: violence
32
Page 34

DTV Rating
1. Use ▲,▼ button to highlight
“DTV Rating
This function works only in
DTV
Setup Code
1.Use ▲,▼ button to highlight
“Setup Code”, then press “OK”
”, then press “OK”.
input.
2.When the box pops up, enter
the new password and confirm it
with entering the same number
once more
Press EXIT to exit the menu screen.
Press MENU button to switch to previous step on the menu screen.
33
Page 35

"
Caption
1. Press MENU button.
2. Use ▲,▼ button to highlight
“Functions” icon, then press
“OK”
3. Use ▲,▼ button to highlight
“Caption”
4. Use ◄,► button to highlight
“Display”
press “OK”
5. When “Display” is “Always
On” user can choose the
“Service” icon
6.Use ▲,▼ button to highlight
"Service".
7. Use ◄,► button to make a
choice from"CC1~CC4" 、
"TXT1~ TXT4", then press "
icon, then press “OK”
Always On or Off, then
OK
Press EXIT to exit the menu screen
Press MENU button to switch to previous step on the menu screen.
34
Page 36

r
A
A
d
Caption Option
1.
Use ▲,▼ button to highlight “Caption
Option”, then press “OK”
2. Use ◄,► button to make a choice, either
“Auto” or “Options”, then press “OK”
If choosing “Auto”, CC background
and Option Text is not activated, And
will follow CC saved in broadcasting
information
If choosing “Options”. CC backgroun
and Option Text is activated.
CC Background
1.Press MENU button.
2.Use ▲,▼ button to highlight
then press “OK”
3.Use ▲,▼ button to highlight “CC”
then press “OK”.
4.
Press ▲,▼ button to make a choice
or “opacity”, then press◄,►. Can choose othe
forms, then press “OK”
Color:
uto→Black→White→Red →Green → Blue
→Yellow →Mangenta→Cyan
Opacity
uto→Solid→Flashing→Translucent→
Transparent
“Functions” icon,
Background,
from “Color”
Press EXIT to exit the menu screen
Press MENU button to switch to previous step on the menu screen
35
Page 37

Caption Text
1. Use ▲,▼ button to highlight “Caption
Text”, then press “OK”
2.
When the box pops up, highlight the
(Ex. Size, Style.) that you want to make a
change, then use ◄,► button to see the
choices
3.
After making all the choices, then press
“OK”
Caption Size:Auto→Small→Standard→Large
Caption Style:Auto→Style1,2,3,4,5,6,7
Text Color:Auto→Black→White→Red →Green →Blue →Yellow →Mangenta →cyan
Text Opacity:→ Auto→Solid→Flashing→Translucent→ Transparent
Edge Style: Auto→None→Raised→Depressed →Uniform →Drop –Shadow
Edge Color: Auto→Black→White→Red →Green →Blue →Yellow →Mangenta →cyan
box
Italic: Auto→On→Off
Underline: Auto→On→Off
EPG View
1. Use ▲,▼ button to highlight “EPG
View”, then press “OK”
This Function works only in DTV
input.
Press EXIT to exit the menu screen.
Press MENU button to switch to previous step on the menu screen.
36
Page 38

Setup
Date/Time
1. Press Menu Button
2.Use ▲,▼ button to highlight “Setup”,
“OK”
3.Use ▲,▼ button to highlight “Date/
press “OK”
4. Choose the "Manual", then press
5. Use ▲,▼/◄,► button to set for Date/
Power on Time
1. Press Menu Button
2.
Use ▲,▼ button to highlight “Setup”,
press “OK”
3.
Use ▲,▼ button to highlight “Power on
then press “OK”
4. Choose the "Activate", then press "
user can choose the follows: Off→ Daily
→Once
5. Choose the "Time", then press "
user can set the time of power on
6. Choose the "Channel", then press "
user can set the channel of power on
then press
Time”, then
" OK "
Time
then
OK
". The
OK
". The
OK
". The
Time”,
Press EXIT to exit the menu screen.
Press MENU button to switch to previous step on the menu screen
37
Page 39

Power off Time
n
1. Press MENU Button
OK
then
OK
".
2.Use ▲,▼ button to highlight “Setup”,
press “OK”
3. Use ▲,▼ button to highlight “Power off
Time”, then press “OK”
4.
Choose the "Activate", then press "
The user can choose the follows: Off→
Daily →Once
5. Choose the "Time", then press "
The user can set the time of power off
Sleep
1. Press MENU button
2. Use ▲,▼ button to highlight “Setup”
icon, then press “OK”
3. Use ▲,▼ button to highlight “Sleep”
icon, then press “OK”
4.
Use ▲,▼ button to make a choice, the
press “OK”
Off→15 Minutes→30 Minutes→60
Minutes →90 Minutes →120 Minutes
Menu Language
1. Press MENU button
2. Use ▲,▼ button to highlight “Setup”
icon, then press “OK”
3. Use ▲,▼ button to highlight “Menu
Language” icon, then press “OK”
English→French→Espanol
".
Press EXIT to exit the menu screen.
Press MENU button to switch to previous step on the menu screen
38
Page 40

s
,
s
A
r
Menu Opacity
1.Press MENU Button
2.Use ▲,▼ button to highlight “Setup”,
“OK”
3.Use ▲,▼ button to highlight “Menu
then press “OK”
4.Use ◄,► button to set for “Menu
Emergency Alert
1.Press MENU Button
2.Use ▲,▼ button to highlight “Setup”,
“OK”
3.
Use ▲,▼ button to highlight
lert”, then press “OK”
4.
Choose the "Low" or "Medium", then press "
OK
"
5. Use ◄,► button to set for "Present" o
"Discard", then press "
then pres
Opacity”
Opacity”.
then pres
“ Emergency
OK
"
Press EXIT to exit the menu screen.
Press MENU button to switch to previous step on the menu screen
39
Page 41

s
s
s
s
.
r
.
r
s
r
g
PC
1. Press MENU Button
2.
Use ▲,▼ button to highlight “Setup”,
“Select”
3. Use ▲,▼ button to highlight “PC”, then
press “Select”
4. Choose the "Auto Adjust", then pres
"SELECT". Return to the factory default
5.
Choose the "Hor. Center", then pres
"SELECT". User can adjust horizontal position.
6.
Choose the "Ver. Center", then pres
"SELECT". User can adjust vertical position.
7.
Choose the “Phase”, then press “SELECT”
User can adjust the input sampling phase fo
precise sample timing control
8.
Choose the “Clock”, then press “SELECT”
User can adjust line locked PLL divider fo
generating pixel clock from input HSYNC
9.
Choose the “Pref. Resolution”, then pres
“SELECT”. User can Preferred resolution fo
manually selection the input resolution amon
the 1024x768, 1280x768, 1360x768.
This Function works only in VGA
input
then pres
Press EXIT to exit the menu screen.
Press MENU button to switch to previous step on the menu screen
40
Page 42

Basic Troubleshooting
Read this section to learn how to maintain and troubleshoot your LCD TV
Problem Possible Solution
1.Make sure the power plug is properly
There is no picture or sound
There is just noise
Color abnormal or improper.
Picture is too bright.
connected to the power outlet.
2.The channel may not have been scanned and
can be re-scanned again from the setup OSD
menu.
3.Make sure you have selected the correct input
mode.
1.The antenna reception strength may be weak.
2.Reposition the antenna's placement.
3.Make sure the antenna cable is properly
connected to the LCD TV set.
1.Check the color adjustment in the OSD video
menu.
1. Check the brightness setting; it may be set too
high.
2. Check the "Backlight" setting in the OSD
options menu. The Backlight setting is to adjust
Picture is too dark
the screen's backlight with respect to the
environment's lighting.
1.Check the brightness and contrast level
setting from the OSD video menu.
2. Check the "Backlight" setting in the OSD
options menu.
41
Page 43

Problem
No picture, there is sound.
Possible Solution
1. Check to see if the video cable is properly
connected.
2. Press the "SOURCE" button from the remote
control to see if the input is correctly selected.
There is no sound.
The picture is not sharp.
Remote control does not work
1. Make sure the volume level is not set to the
minimum.
2. Make sure the mute function is not selected.
1. The program reception may be weak .
2. Check the "Sharpness" setting in the OSD
video menu. (Refer to page 29)
1. Check the remote control's batteries.
2. Make sure there is no device near by the LCD
TV generating interference.
3. Turn the TV off for 10 seconds and turn it on
again.
42
Page 44

General Specifications
Screen Size 32" diagonal
LCD Panel
Input/Output
Audio
Resolution WXGA (H) 1366 X (V) 768pixels
Display Color 16, 777, 216 Color
Aspect Ratio 16:9 WIDE
Video in/ out
S-VIDEO in
Y / Pb/Cb / Pr/Cr
Audio L/R in/out
Analog RGB in
HDMI in
PC Audio in
Antenna input
Built-in speaker
1 Vp-p/75 Ω
Y 1 Vp-p/75 Ω, C 0.7 Vp-p/75 Ω
Y 1 Vp-p/75 Ω, Cb/Pb / Cr/Pr 0.7 Vp-p/75 Ω
Input: 400 mV/47 KΩ, Output: 400 mV/600 Ω
D-Sub X 1
HDMI X 1
Phone Jack X 1
75 Ω
10W X 2
Compatibility
Compatibility
Other
Color Temperature
Screen Size
adjustment
Progressive Scan
3-2 pull down
Color system
SDTV/HDTV
PC
Power
Operative temperature
Storage temperature
Dimension
Net Weight
Normal/Warm/Cool
Normal/Zoom/Wide
Yes
Yes
NTSC
480i, 480p, 1080i, 720p
VGA/SVGA/XGA
AC 120V, 190W
32°F - 95°F
14°F ~ 104°F
①*(W)32.32 X (D) 9.45 X (H) 24.49 inch (with speaker/stand)
②*(W) 40.31 X (D) 10.40 X (H) 23.39 inch (with speaker/stand)
③*(W) 27.00 X (D) 10.40 X (H) 32.30 inch (with speaker/stand)
①*43.6 lbs
②*44.2 lbs
③*45.1 lbs
①*55.5 lbs
*Refer to page 44
Gross Weight
②*56.1 lbs
③*56.6 lbs
43
Page 45

Pictures for different crust
①
②
③
44
Page 46

RGB Frequency Table
The table below shows the frequency ranges supported by the LCD TV. It supports from
VGA to XGA. If you are connecting your PC to the LCD TV via the RGB port, please use the following table in
order to setup your PC’s VGA output for maximum optimization.
Source
HDMI input
Component
(Y/PbCb/PrCr)
Source
Resolution
640 x 480
Resolution
640 x 480
480p
576p
1080i
720p
480i
480p
1080i
720p
Refresh
Rate
(Hz)
60
Vertical
Frequency
(Hz)
60
60
50
50/60
50/60
60
60
60
60
Horizontal
Frequency
(Khz)
31.469
Vertical
Frequency
(Hz)
59.940
P: positive, N: negative
Horizontal
Polarity
Sync
(TTL)
N
Vertical
Sync Polarity
(TTL)
N
PC input
800 x 600
1024 x 768
1280 x 768
1360 x 768
72
75
85
60
72
75
85
60
70
75
60 47.770 60.000 N P
60 47.720 60.000 N P
37.861
37.500
43.269
37.879
48.077
46.875
53.674
48.363
56.476
60.023
72.809
75.000
85.008
60.317
72.188
75.000
85.061
60.004
70.069
75.029
N
N
N
P
P
P
P
N
N
P
N
N
N
P
P
P
P
N
N
P
45
 Loading...