

Page 1
EU – S10C Quick Start Guide
Important Note
1. You will be required to partition and format the hard drive disk (HDD) after installing it in the
encrypted enclosure. Always perform partition and format functions with the Secure Key
plugged in. If you are adding a new disk, then no backup is required. Otherwise, you are
advised to back up the disk. WE ARE NOT RESPONSIBLE FOR ANY LOST DATA.
2. There is no “back door” into the security system of the enclosure. Without the Secure Key, you
will not be able to access the data or operating system on the protected disk. This means you
must keep the backup key in a safe place at all times. WE ARE NOT ABLE TO CREATE A
SECURE KEY WITH THE SAME “SECRET KEY” WITHOUT YOUR BACKUP KEY. Please
contact your supplier immediately if you lose one of your Secure Keys. If you lose all Secure
Keys, you will NOT be able to decrypt your HDD.
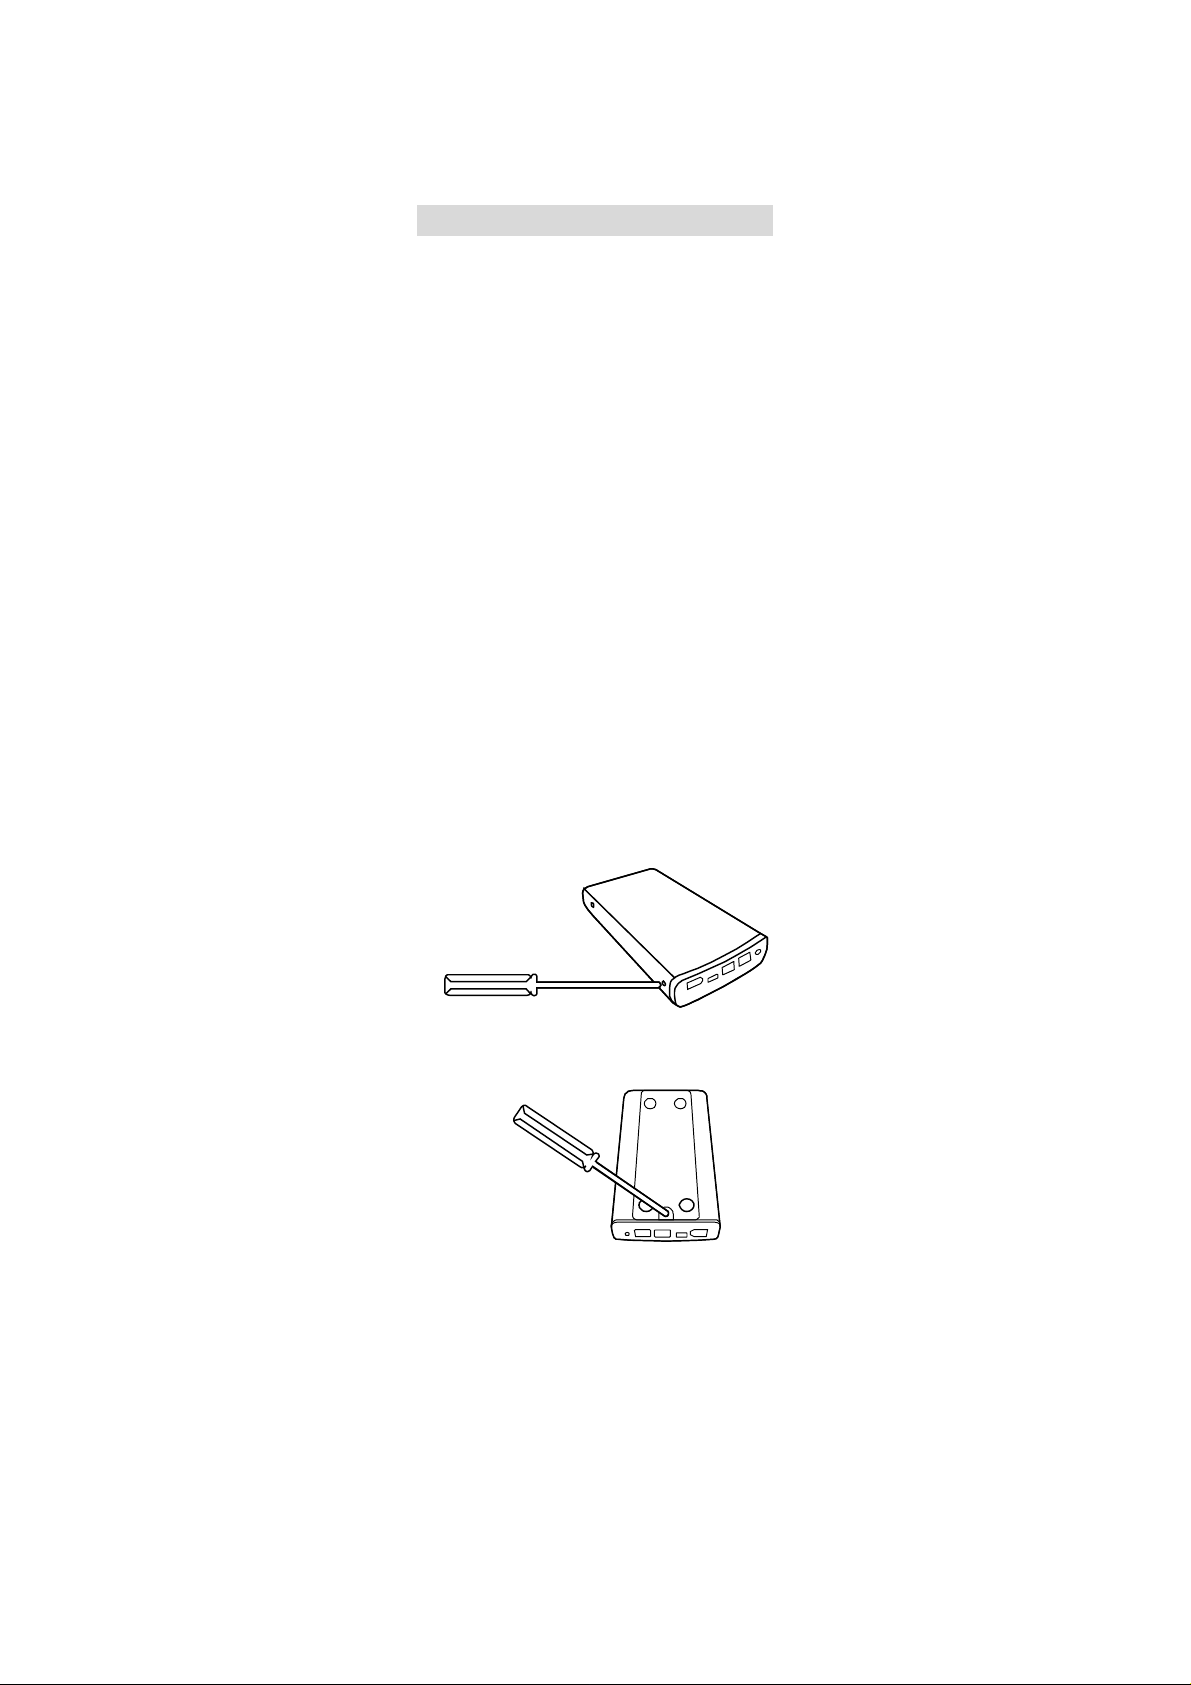
Hard Drive In stal lation
Install a hard disk drive in the Enclosure Kit by completing the following steps.
1) Remove the rear panel covering the connection interface from the housing by removing one
screw from each side of the housing with a Phillips screwdriver.
2) Remove the screw from the bottom of the Enclosure Kit.
3) Carefully remove the rear panel from the enclosure.
1
Page 2
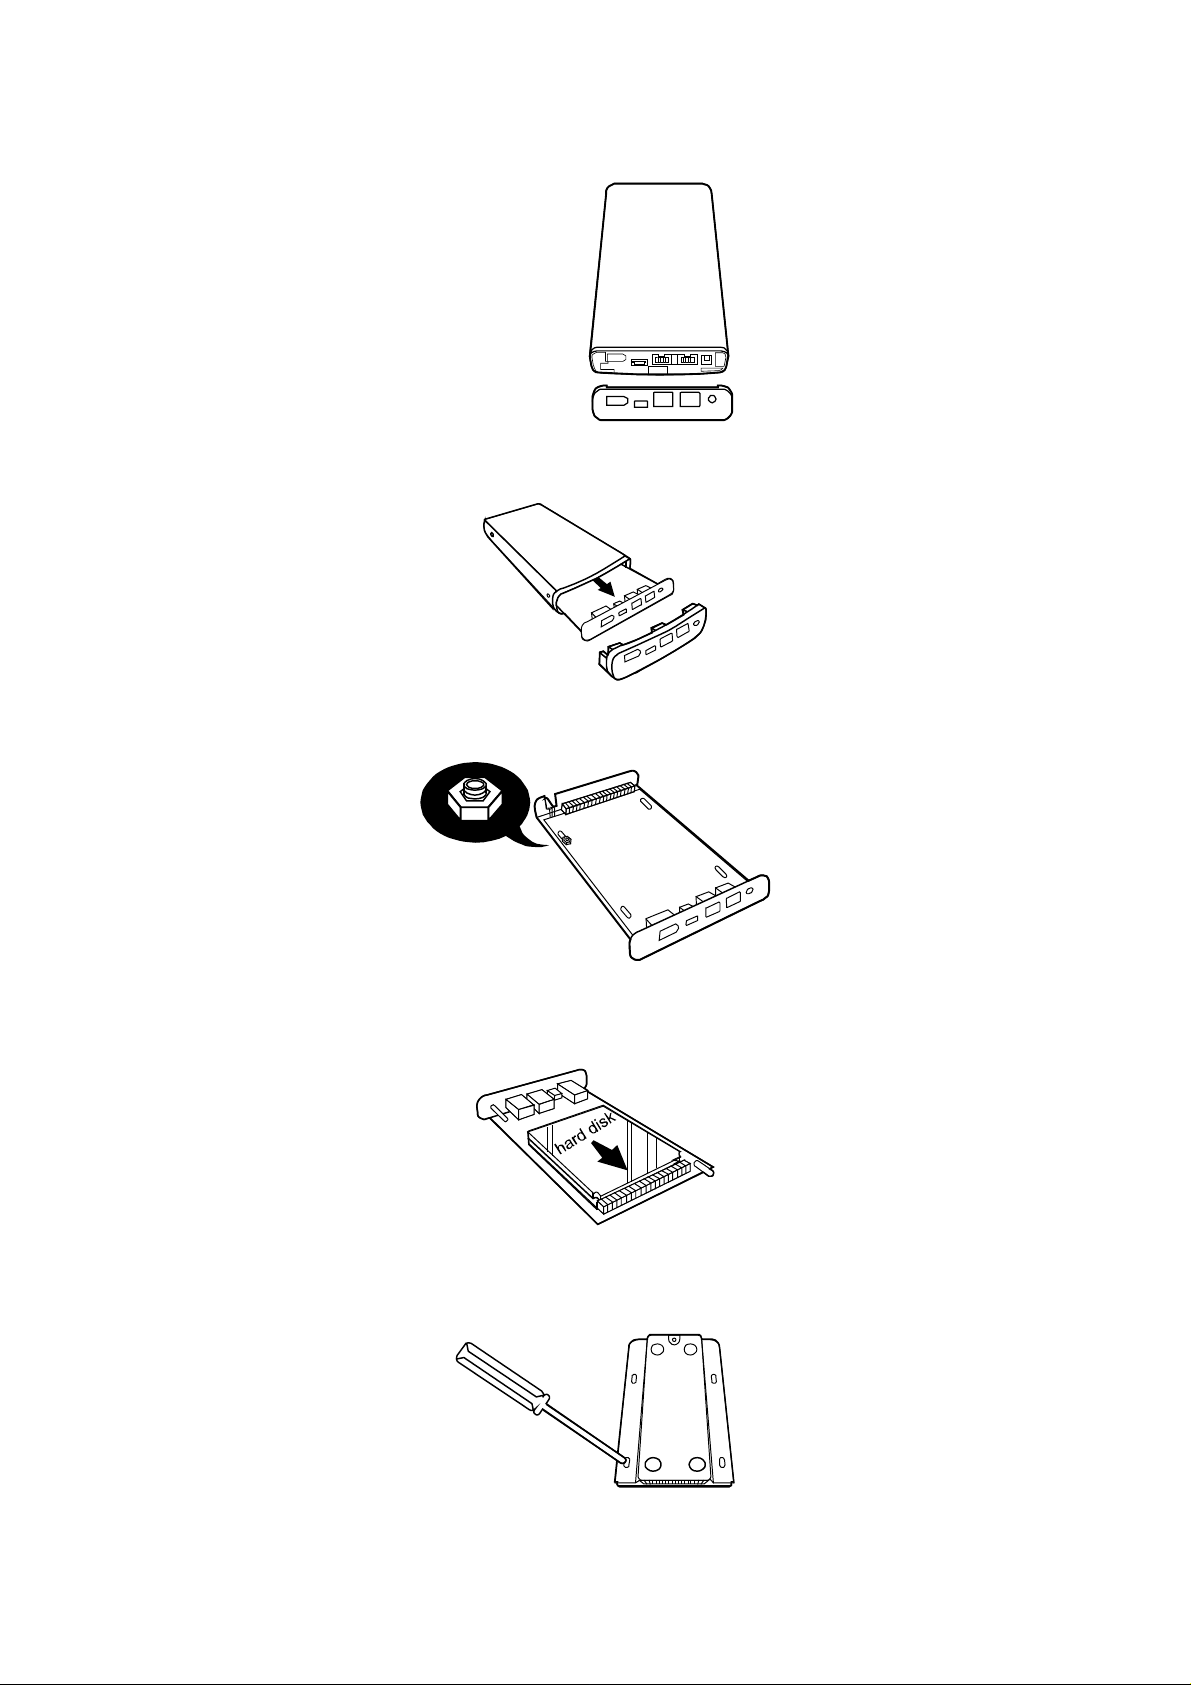
4) Carefully slide the bottom panel out of the enclosure housing.
5) Remove the screw from the control board by loosening the plastic caps.
6) Gently slide the Hard Drive into place. When properly inserted, part of the IDE plug will be
slightly offset.
7) Fasten the hard drive to the base using a Phillips screwdriver and the (4) screws included in
the package.
2
Page 3
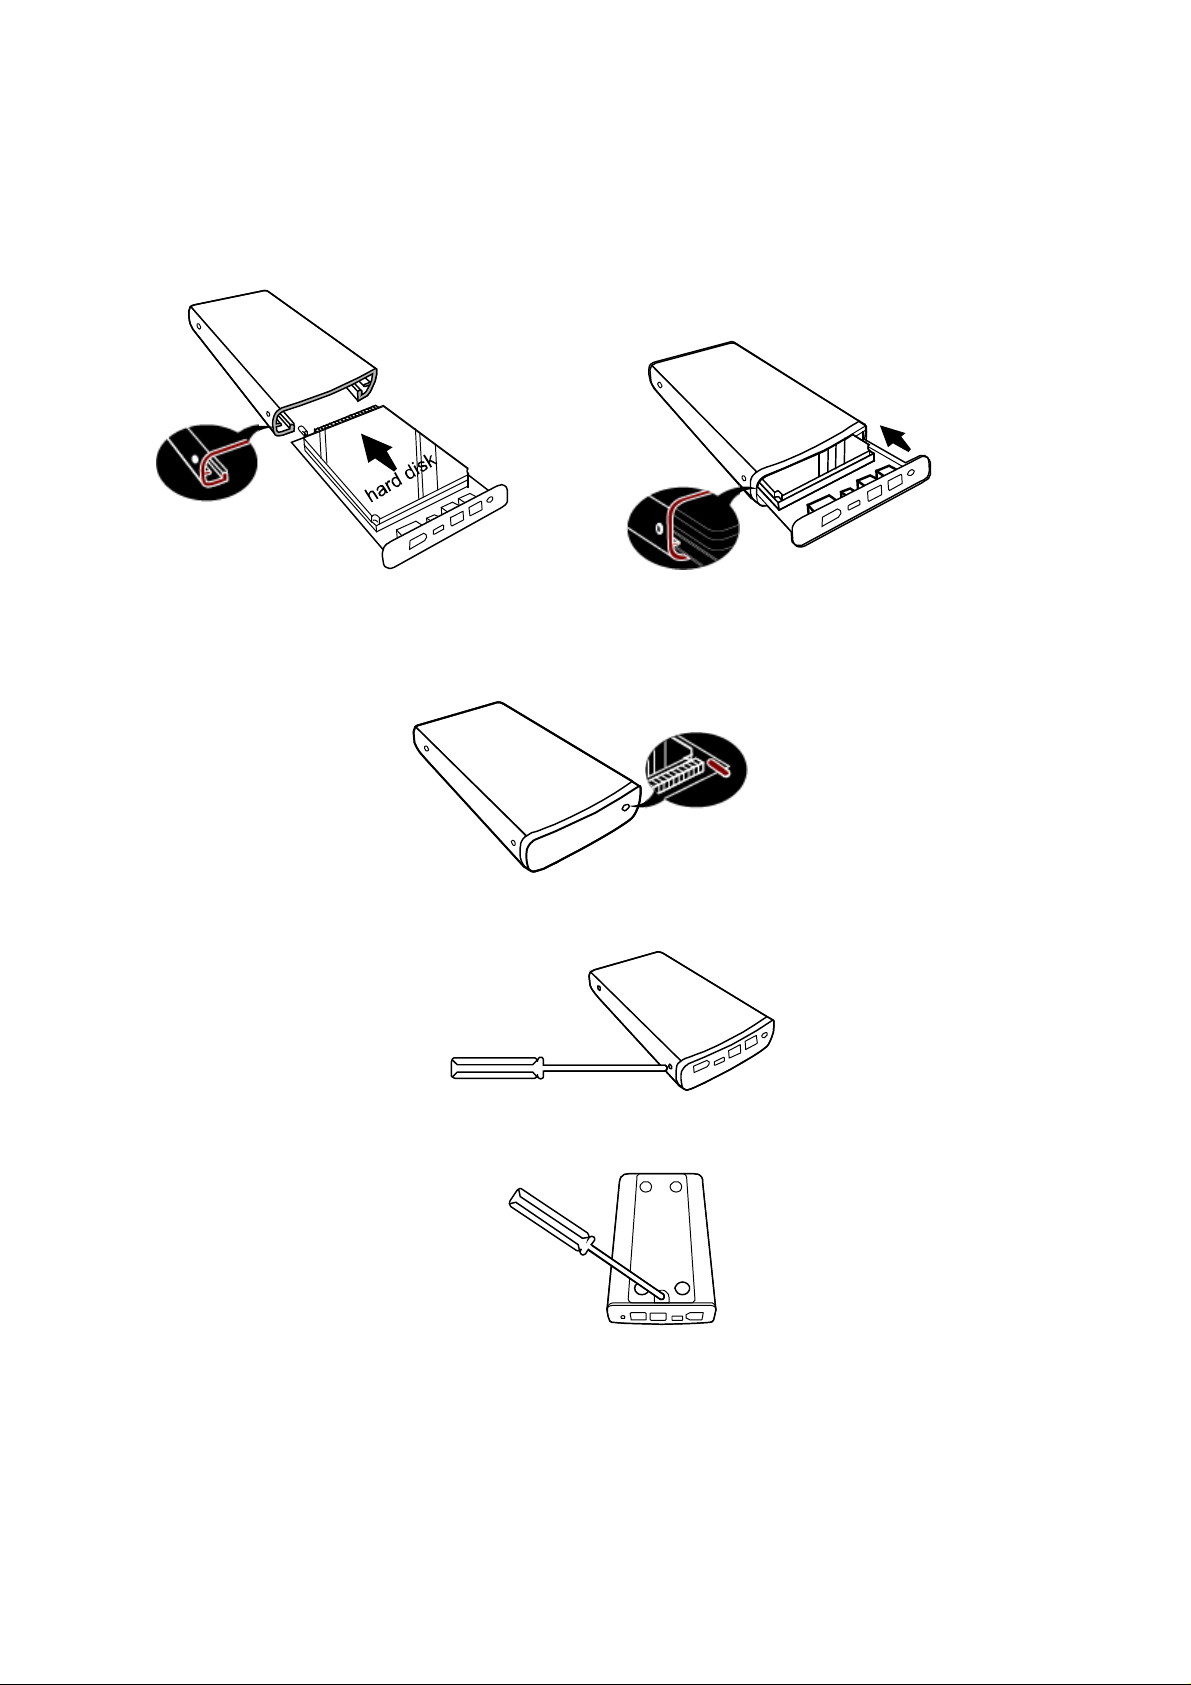
8) Align the edges of the hard drive platform with the integral rails and carefully slide the
assembled platform into the enclosure housing.
9) Ensure that the LED indicator is properly aligned with the opening on the front panel of the
enclosure.
10) Reassemble the enclosure by replacing the (2) screws removed in step 1.
11) Fasten the last (1) screw to reattach the bottom panel.
12) The enclosure kit in now assembl ed and ready for connectio n to a computer.
3
Page 4
OK!!
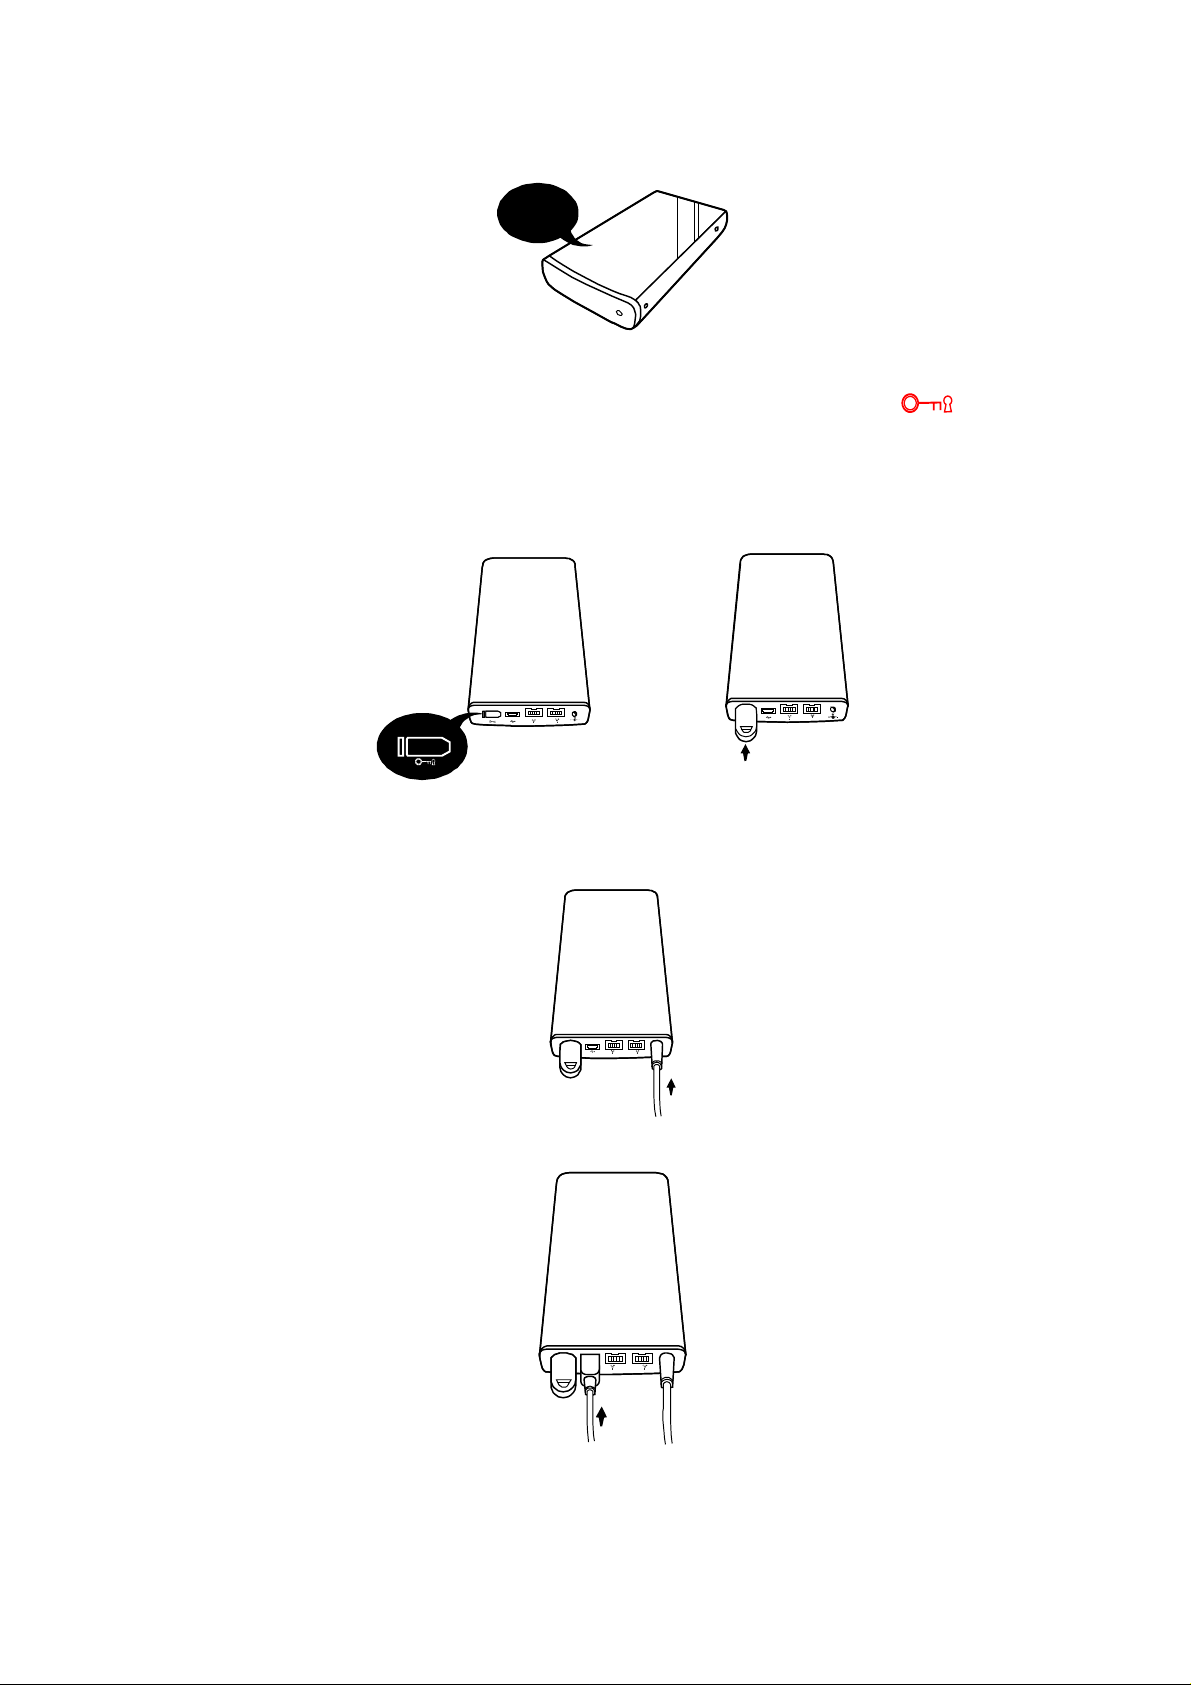
Connecting the Enclosure Kit to a Computer
1) Insert the Secure Key into the secure key port indicated by the secure key “ “ icon on
the rear panel of the Enclosure Kit. As the shape of the secure key port is very similar to the
shape of the IEEE 1394 port, ensure that the Secure Key is inserted onl y into the secure key
port. Incorrect insertion into a port other than the designated secure key port may re sult in
damage to the Secure Key or other ports/equipment.
2) Connect the AC/DC power adapter; ensure that the green LED indicator is active. The
orange LED indicator will blink during data transfer.
3) Insert one end of the USB or IEEE 1394(b) connector into a corresponding port on the
enclosure.
4) Insert the USB or IEEE 1394(b) connector into an available port on the computer.
4
Page 5

Note: If the LED indicator is red, security is no t enabled. Ensu re that the Secure Key is inserted
before power on, and the enclosure is properly connected.
5
Page 6

Kurzanleitung
Wichtiger Hinweis
1. Die Festplatte (HDD) muss formatiert und partitioniert werden, nachdem sie im
Verschlüsselungs-Festplattengehäuse installiert worden ist. Führen Sie Partitionierung und
Formatierung immer mit eingestecktem Secure Key (Hardwareschlüssel) durch. Wenn Sie
eine fabrikneue Platte einbauen, ist keine Datensicherung erforderlich. Andernfalls raten wir
dringend, eine Sicherung (Backup) der Platte zu erstellen. WIR SIND NICHT
VERANTWORTLICH FÜR VERLORENE DATEN.
2. Es gibt keine "Hintertür" in das Sicherheitssystem Ihres Festplattengehäuses. Ohne den
Secure Key werden Sie nicht in der Lage sein, auf die Daten oder ein Betriebssystem auf der
geschützten Platte zuzugreifen. Das bedeutet, dass Sie einen Zweitschlüssel immer an einem
sicheren Ort aufbewahren müssen. WIR SIND NICHT IN DER LAGE, OHNE IHREN
ZWEITSCHLÜSSEL EINEN SECURE KEY MIT DEM SELBEN "GEHEIMSCHLÜSSEL"
ZU ERZEUGEN. Bitte kontaktieren Sie Ihren Händler bzw. Administrator sofort, wenn Sie
einen Ihrer Secure Keys verlieren. Wenn Sie alle Secure Keys verlieren, werden Sie Ihre
Festplatte NICHT entschlüsseln können.
Installation der Festplatte
Installieren Sie eine Festplatte im Gehäusebausatz durch die folgenden Schritte:
1) Entfernen Sie die Rückentafel, welche die Schnittstellen-Ports abdeckt vom Gehäuse, indem
Sie je eine Schraube auf jeder Seite des Gehäuses mit einem Kreuzschlitz-Schraubenzieher
entfernen.
2) Entfernen Sie die Schraube im Boden des Festplattengehäuses.
3) Entfernen Sie vorsichtig die Rückentafel von der Festplattenhülle.
6
Page 7

4) Lassen Sie die Bodenplatte vorsichtig aus der Außenhülle des Festplattengehäuses gleiten.
5) Entfernen Sie die Schrauben von der Platine, indem Sie die Plastikkappen lösen.
6) Lassen Sie die Festplatte vorsichtig an ihren Platz gleiten. Wenn sie richtig eingesetzt ist,
wird wegen der Jumper ein Teil des IDE-Steckers etwas seitlich überstehen.
7) Setzen Sie die (4) Schrauben ein und ziehen diese fest, um die Festplatte am Boden zu
befestigen.
8) Richten Sie die Kanten des Festplattenlaufwerks auf die integrierten Schienen aus und lassen
Sie die zusammengesetzte Plattform vorsichtig in das Außengehäuse gleiten.
7
Page 8

9) Stellen Sie sicher, dass die LED-Anzeige richtig auf die Öffnung in der Frontplatte des
Festplattengehäuses ausgerichtet ist.
10) Bauen Sie das Festplattengehäuse wieder zusammen, indem Sie die (2) Schrauben wieder
einsetzen, die wir in Schritt 1 herausgenommen haben.
11) Setzen Sie die letzte (1) Schraube ein, um die Bodenplatte wieder zu befestigen.
12) Der Festplattengehäuse-Bausatz ist jetzt zusammengebaut und bereit, an einen Computer
angeschlossen zu werden.
OK!!
8
Page 9

Anschluss des Fe stp l a t t e n g e häuses an einen Computer
1) Stecken Sie den Secure Key (Hardwareschlüssel) in seinen Secure Key Port ein, welcher durch
das Symbol “
des Secure Key Ports sehr ähnlich der Form der IEEE 1394-Buchse ist, stellen Sie sicher, dass
der Secure Key nur in den Secure Key Port eingeführt wird. Inkorrekte Einführung in eine andere
Buchse als den vorgesehenen Secure Key Port kann zu Beschädigungen des Secure Key oder
anderer Buchsen/Apparaturen führen.
3) Schließen Sie ein Ende des USB oder IEEE 1394(b) Kabels an eine entsprechende Buchse am
Festplattengehäuse an.
“ auf der Rückentafel des Festplattengehäuses bezeichnet ist. Da die Form
4) Schließen Sie das USB oder IEEE 1394(b) Kabel an einer freien Buchse am Computer an.
9
Page 10

Hinweis: : Wenn die LED-Anzeige rot ist, ist die Sicherheitsfunktionalität nicht aktiviert.
Stellen Sie sicher, dass der Secure Key vor der ersten Stromzufuhr eingesteckt worden ist und das
Festplattengehäuse richtig angeschlossen worden ist.
10
Page 11

Guide de démarrage
Note importante
1. Vous devez partitionner et formater le disque dur après son installation dans la baie cryptée.
Partitionnez et formatez toujours avec la clé de cryptage branchée. Si vous ajoutez un nouveau
disque, aucune procédure de sauvegarde n’est requise. Autrement, il est conseillé de sauvegarder
les données sur le disque. NOUS NE SOMMES PAS RESPONSABLES EN CAS DE PERTES
DE DONNEES.
2. Le système de sécurité de la baie n'offre pas une procédure de récupération de données. Vous ne
pourrez pas accéder aux données ou au système d'exploitation sur le disque protégé sans la clé de
cryptage. Ceci signifie que vous devez garder la clé de sauvegarde dans un endroit sûr. NOUS
NE POUVONS PAS RECREER UNE CLE DE CRYPTAGE AVEC LE MEME CODE DE
SECURITE SANS VOTRE CLE DE SAUVEGARDE. Veuillez contacter votre revendeur
immédiatement si vous avez égaré l'une de vos clés de cryptage. Si vous perdez toutes les clés de
cryptage, vous ne pourrez pas décrypter votre disque dur.
Installation du disque dur
Installez un disque dur dans la baie externe en complétant les étapes suivantes.
1) Retirez une vis de chaque côté du logement avec un tournevis Phillips pour retirer le panneau
postérieur.
2) Retirez la vis du dessous de la baie externe.
3) Retirez soigneusement le panneau postérieur de la baie.
11
Page 12

4) Faites glisser le panneau inférieur en dehors du logement de la baie.
5) Retirez la vis du panneau de contrôle en desserrant les capuchons en plastique.
6) Glissez doucement le disque dur en place. Une fois inséré convenablement, une partie de la
fiche IDE est un peu décalée.
7) Vissez les quatre vis précédentes pour attacher le disque dur à la base.
12
Page 13

8) Aligner les bords de la plate-forme du disque dur avec les traverses et glissez la plate-forme
assemblée dans le logement de la baie.
9) Assurez-vous que le voyant est bien aligné avec l’ouverture sur le panneau avant de la baie.
10) Réassemblez la baie en replaçant les deux vis retirées à l’étape 1.
11) Fixez la dernière vis sous le panneau inférieur.
12) La baie externe est maintenant assemblée et prête à être connectée à un ordinateur.
13
Page 14

OK!!
Connecter la baie externe à un ordinateur
1) Insérez la clé de cryptage dans le port indiqué par l’icône « » sur le panneau postérieur
de la baie externe. Le port de la clé de cryptage est très similaire au port IEEE 1394. Assurezvous de bien insérer la clé de cryptage dans son port. Insérer la clé dans un autre port peut
endommager la clé ou les autres ports/périphériques.
2) Connectez l’adaptateur d’alimentation CA/CC et assurez-vous que le voyant vert est allumé.
Le voyant orange clignote pendant le transfert de données.
3) Insérez le connecteur USB ou IEEE 1394(b) dans un port correspondant de la baie.
4) Insérez le connecteur USB ou IEEE 1394(b) dans un port disponible de l’ordinateur.
14
Page 15

Note : Si le voyant est rouge, le cryptage n’est pas activé. Assurez-vous d’insérer la clé de
cryptage avant d’allumer l’appareil, et que la baie est bien connectée.
15
 Loading...