

Page 1
Color TFT LCD Monitor
User’s Manual
※ Important Notice:Please read this manual carefully.
PDF created with FinePrint pdfFactory Pro trial version www.pdffactory.com
Page 2
1
Contents
Precaution…………………………………………..……………….2
Package Contents……………………………….……………..……2
English………………………………………..……………………...3
Français………………………………………………..…….….…...9
Deutsch……………..…………………………………..…………..15
Italiano..……………………...…………………….…..…………...21
Español………………………………………..…………………….27
Nederlands…………………………………….……..………….….33
Polski…………………………………………...…………..…….....39
Portuguese………………………………………………………….45
PDF created with FinePrint pdfFactory Pro trial version www.pdffactory.com
Page 3
2
Precaution
Read all of these instructions and save this manual for later use. Follow all
warnings and instructions on the product.
1. Do not cover or block the ventilation holes in the case.
2. Do not insert sharp objects or spill liquid into the LCD monitor through the cabinet
slots; this may cause accidental fire, electric shock or failure.
3. Unplug the unit when not in use for an extended period of time.
4. Do not attempt to service this product yourself, as opening or removing the cover may
expose you to potential electric shock. Only a qualified technician should service this
product.
5. Do not touch the screen directly with your fingers as it may damage the screen; the oil
from your skin is difficult to remove.
6. Do not apply pressure to the screen, the LCD is very delicate.
7. Keep the monitor away from extreme heat, cold or humid places.
8. Do not place directly under sunlight, dusty surroundings or near equipment, which
may generate strong magnetic fields.
Product Description
For 15.4"LCD monitors: The native resolution of the LCD panel is 1280 X 800.
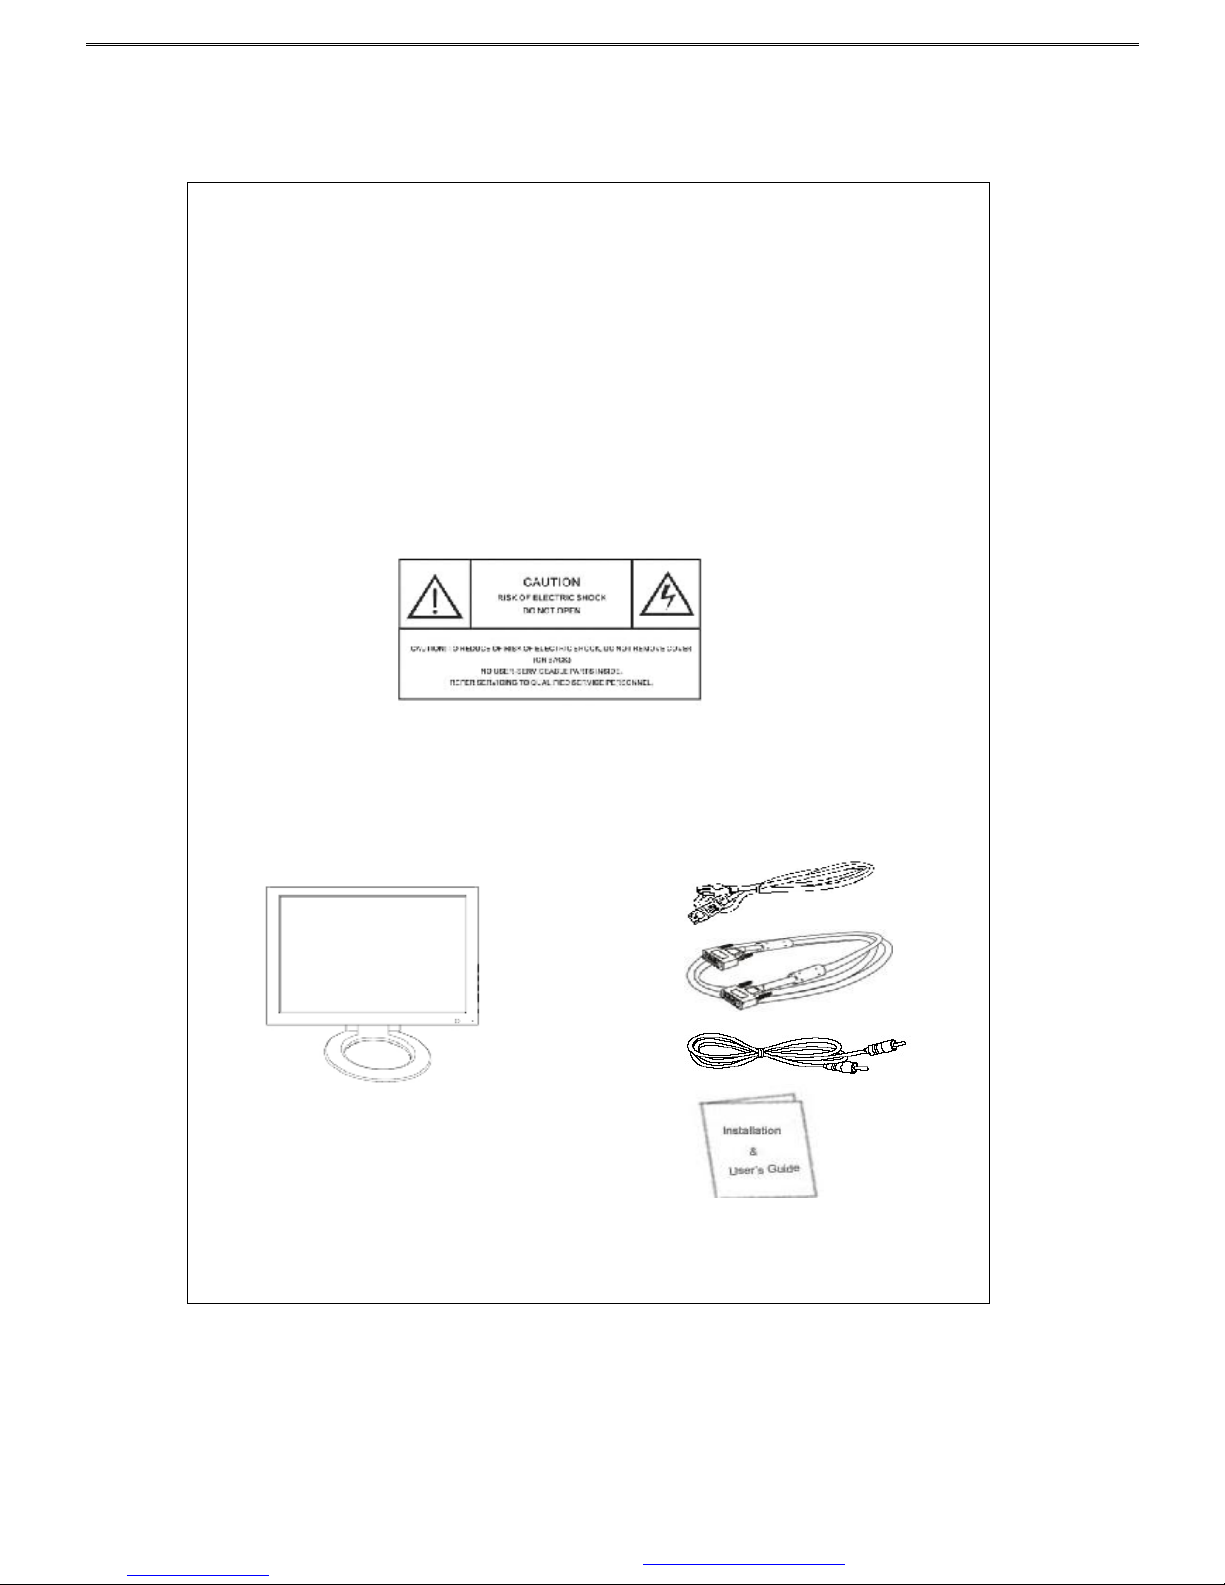
Package Contents
Please check the TFT-LCD Monitor Package to make sure it contains the following items:
LCD Monitor
Power Cord
VGA Cable
Audio Cable
Users Manual
PDF created with FinePrint pdfFactory Pro trial version www.pdffactory.com
Page 4

3
INTRODUCTION
Thank you for purchasing this LCD monitor produced by our company. This monitor uses a
TFT (thin film transistor) liquid crystal display (LCD) panel, and it’s designed with high
quality and highly efficient production technology to provide a more professional and
consistent image quality to the user.Besides, this TFT LCD monitor is designed to save space
and to offer different display positions, complying with the living space of modern age.Please
read the instructions and precautions in this booklet before you start to use it.
Features
Uses TFT (thin film transistor) active matrix color LCD (liquid crystal display)
panel.Offers high resolution image.
Elegant ultra-slender with small footprint saves more space for users.
Complies with the latest standard of European ergonomics.
15 ゚ forward and backward tilt flexibility lets you adjust to the most favorable angle.
Low power consumption, low heat and zero radiation emission protect the user.
Check Package Content
After you open the package, make sure the following items are included. If anything is missing
or damaged, please contact your local dealer or supplier:
TFT LCD Monitor
User’s Manual (including specifications)
Power Cord
VGA Cable
Audio Cable
Precautions
Please read the following instructions carefully first to prevent unnecessary hazards. This
manual should be retained for future reference.
Before you clean or move this monitor, make sure it is power off and the AC power cord
is unplugged, so as to avoid accidental injury to the monitor or human body.
Please keep the radiator at the back of the monitor unobstructed.
Keep the monitor away from any liquid.
Some of the components and parts carry high voltage. To avoid unnecessary danger,
please don’t disassemble the monitor yourself.
If smoke or cacophony comes out from the monitor, please disconnect the power
immediately and get in touch with your local dealer.
Please don’t apply pressure onto the screen panel to avoid permanent damage.
Before you clean this monitor, please make sure the AC power cord is removed first, and
please don’t spray liquid cleaner onto the unit directly. Clean the screen with a slightly
dampened rag gently without applying excess pressure.
PDF created with FinePrint pdfFactory Pro trial version www.pdffactory.com
Page 5
4
Installation of the Monitor
Please switch off the power supply to the computer and its peripheral equipments first.
1. Connect the power adaptor to the AC power input socket at the back of the unit, and
connect the other end to the AC power socket.
2. Connect the VGA Analog Signal Cable to the 15-pin connecting port of the unit.
3. Turn on the screen and the power supply of the computer.
Front Control Panel :
Tilting and Swiveling of the Screen
You can tilt the panel up or down by 15 ゚.
OSD (On-Screen Display) Adjustment Control
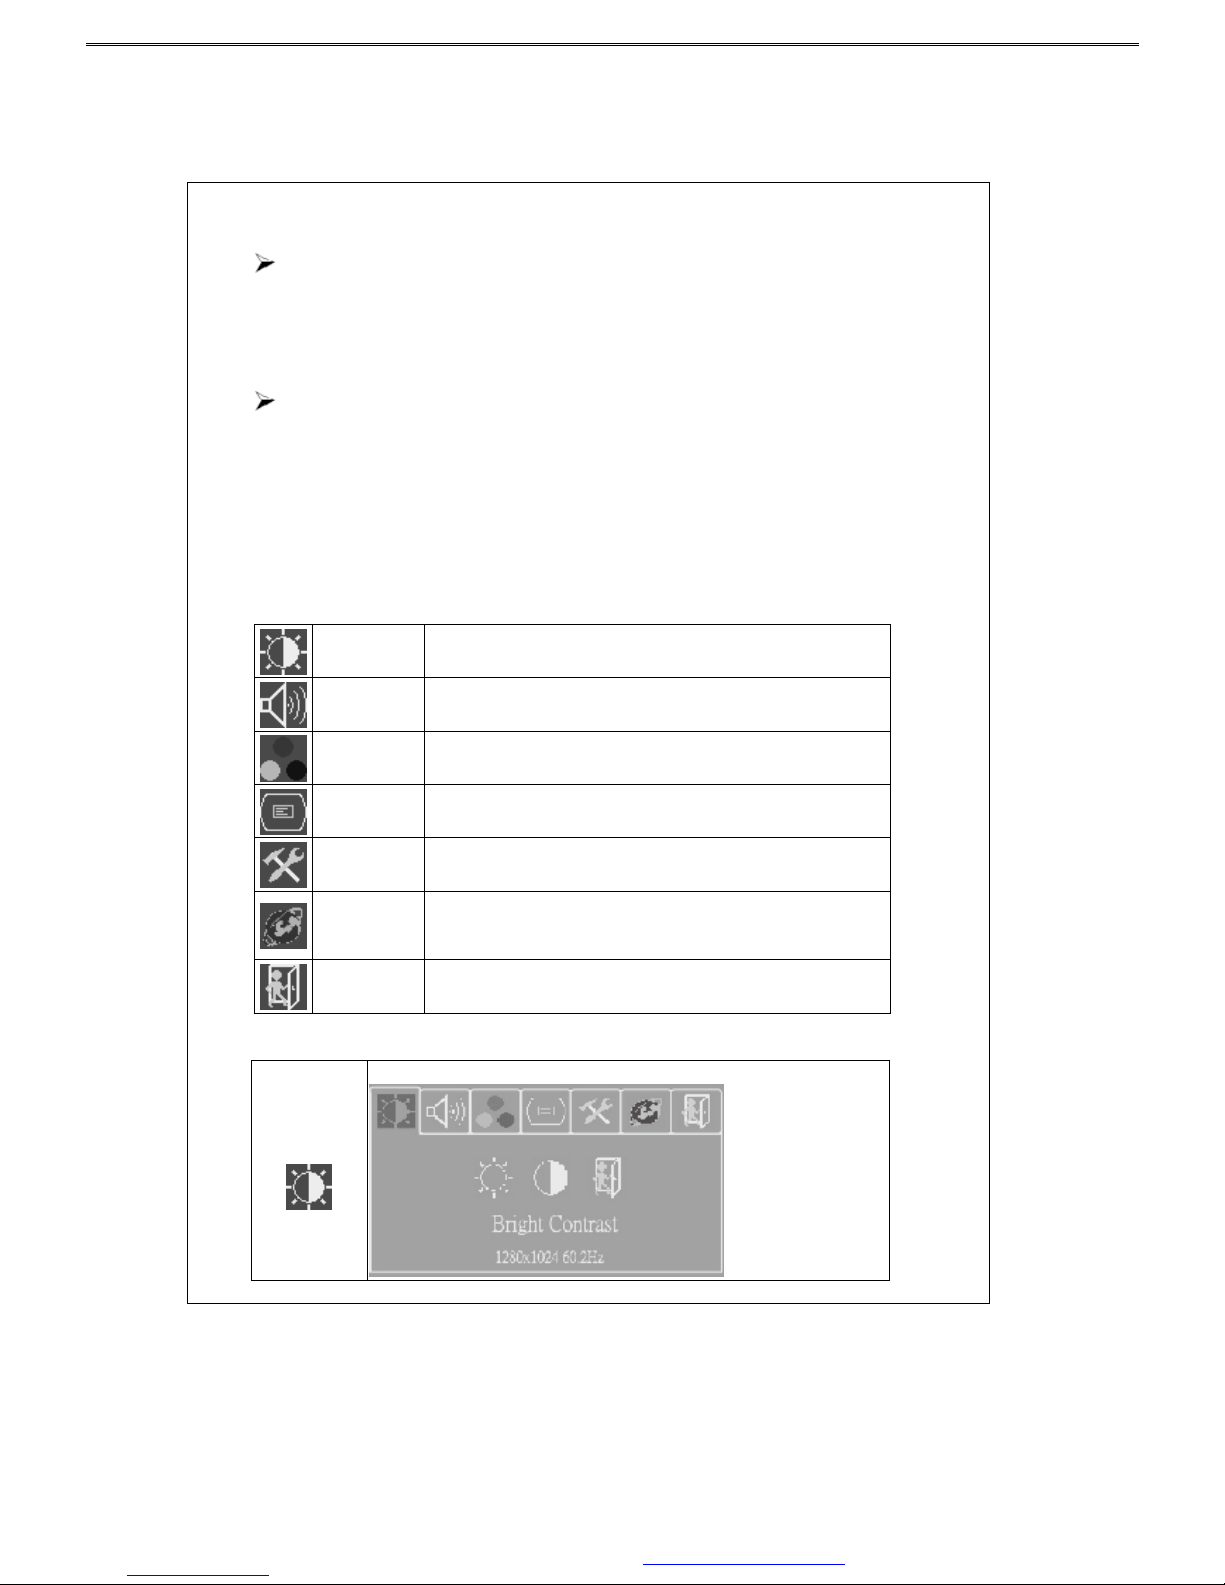
Step 1: Press “menu” to activate the OSD on-screen display menu.
Step 2: Press “+”or “-” key to move the cursor to select the function.
Step 3: Press “auto” to choose the option to adjust
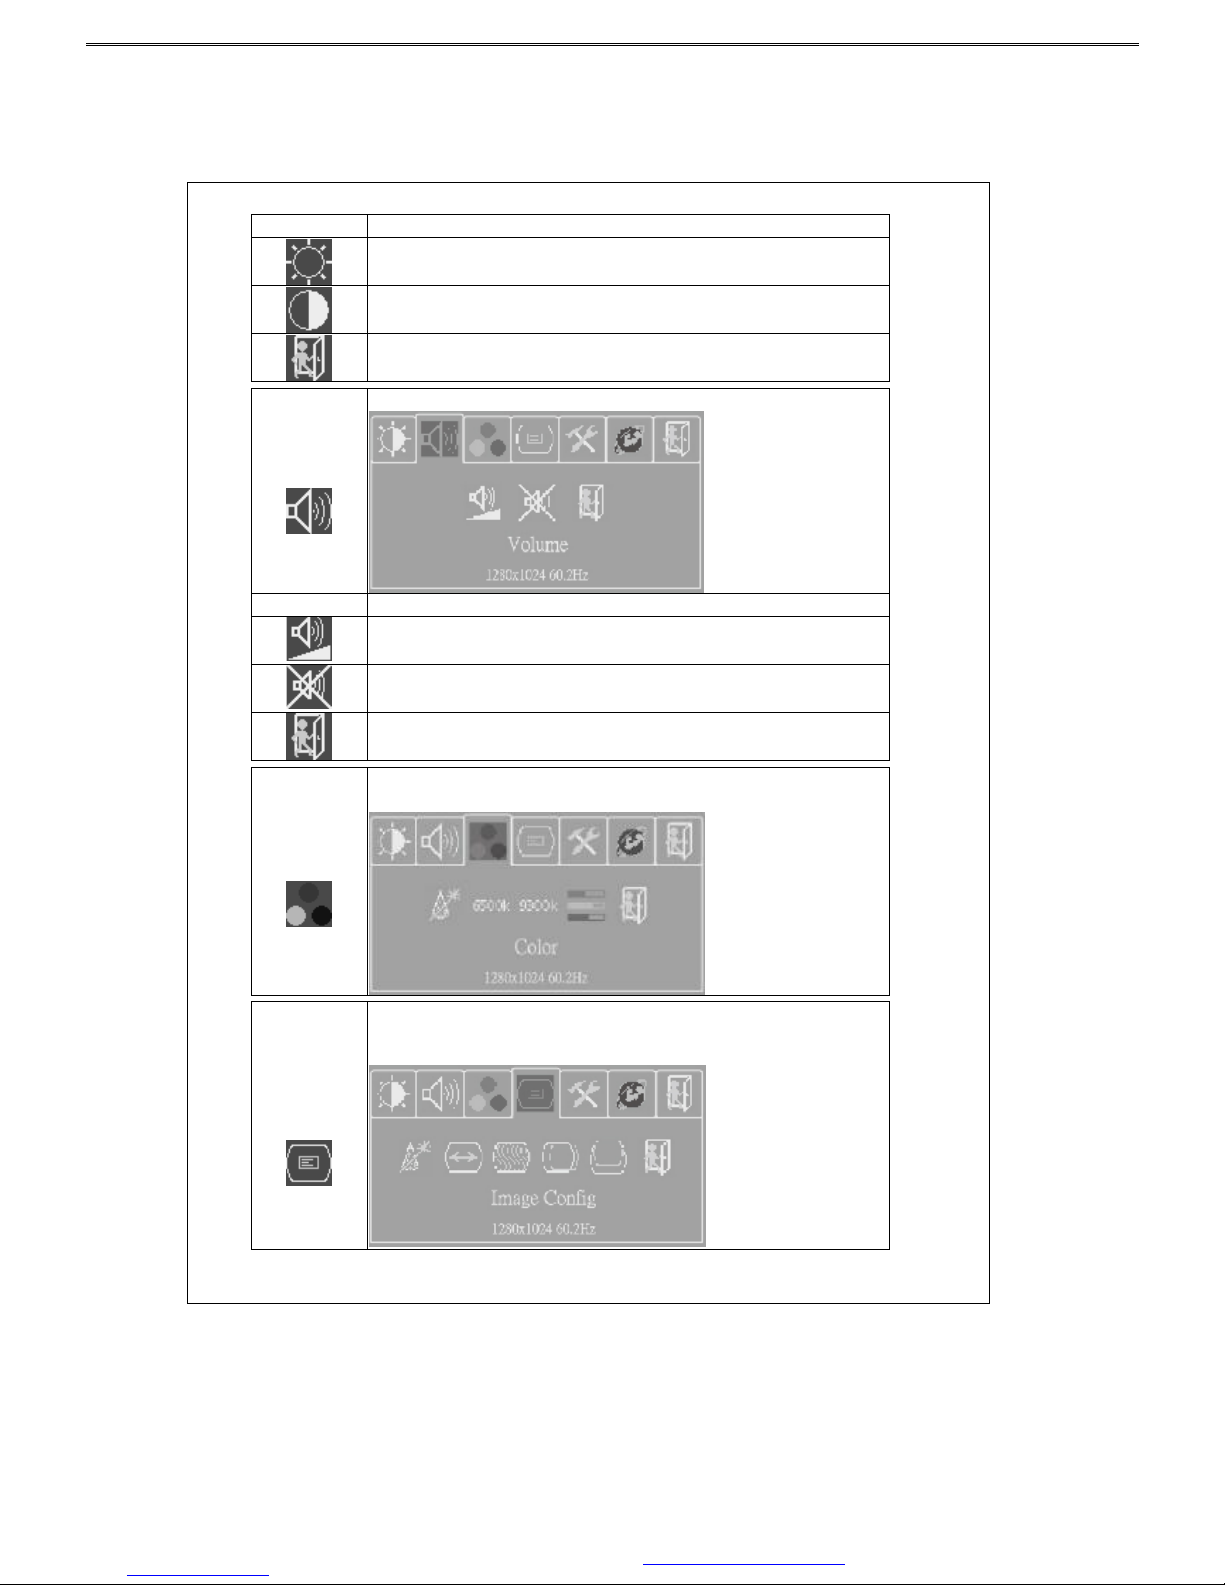
Quick Menu Functions
You can press “+”or“-”to adjust the volume
Brightness
To adjust the brightness of the background.
Audio To adjust the volume of the speakers.
Color
Temperatur
To adjusts the parameters for red, green and blue colors on the
screen.
Image
Config
To adjust the vertical and horizontal positions of the screen.
OSD
Adjustment
To set the position of OSD display status automatically.
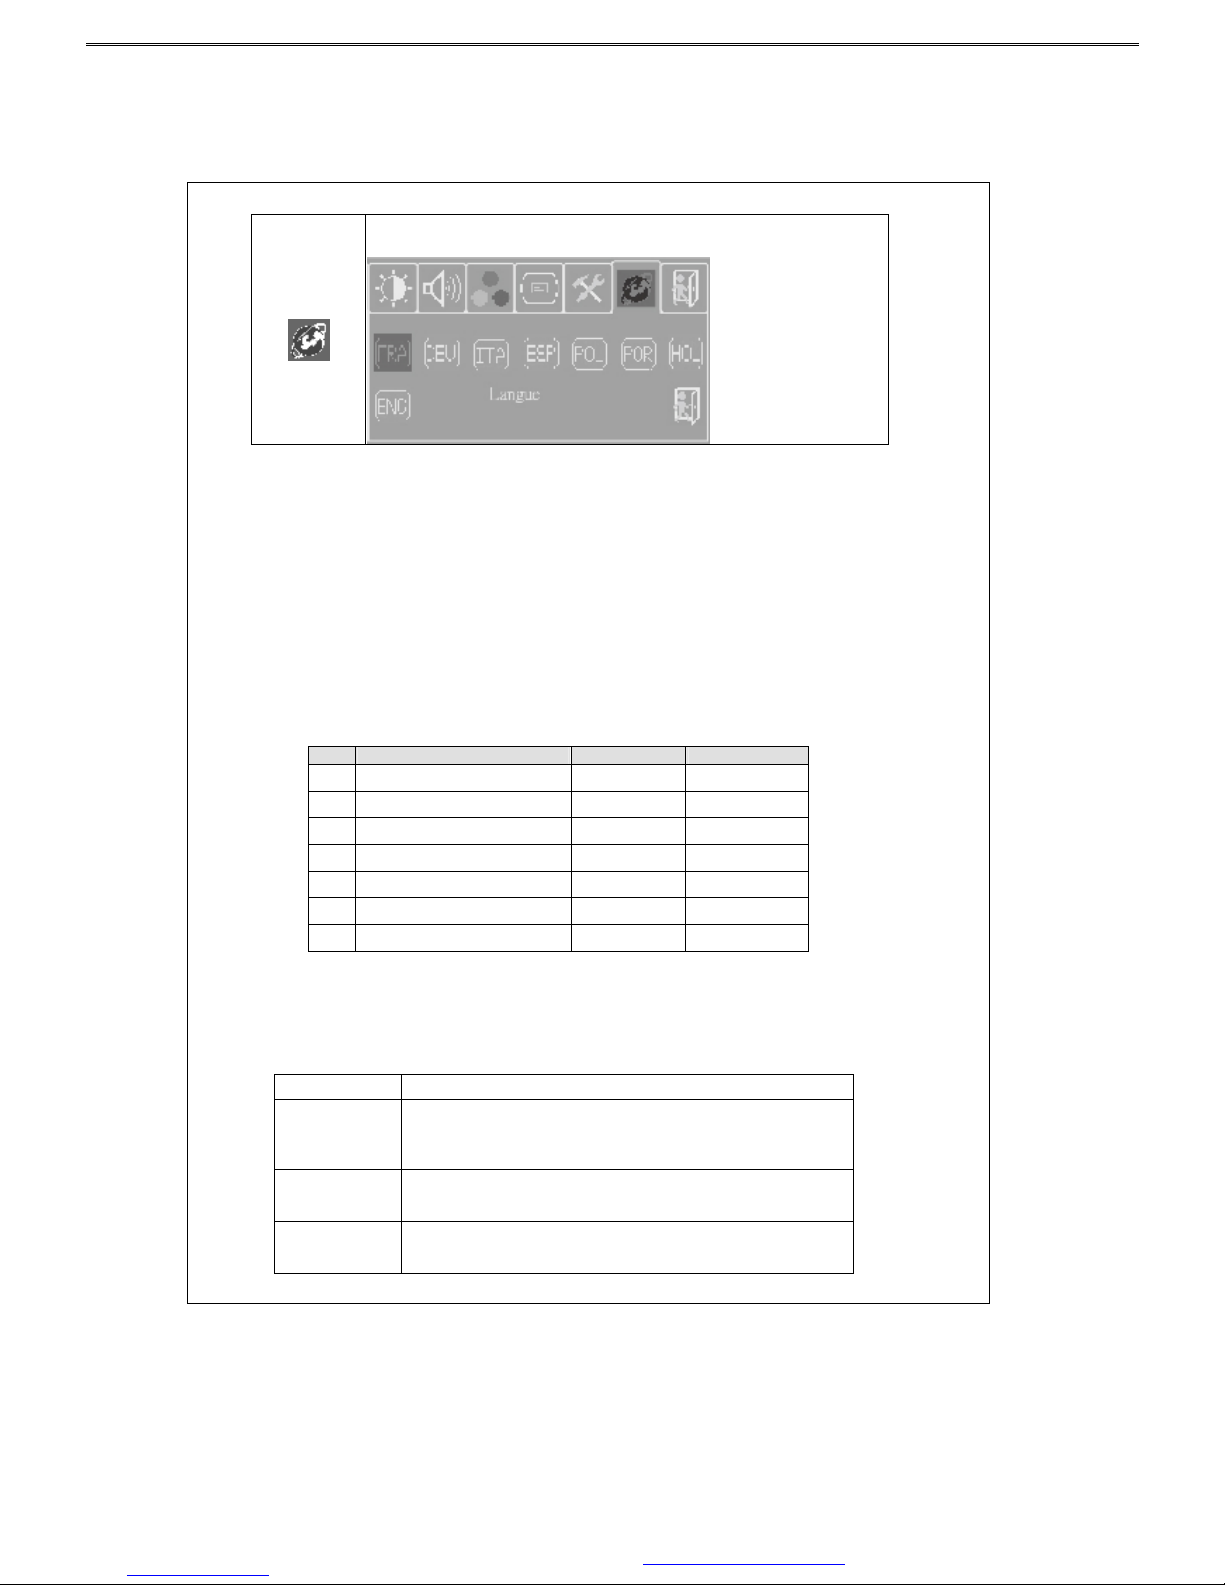
Language
To select English, French, German, Italian, Spanish, and
Traditional Chinese for OSD language display on your own
preference. The user can select a preferred language.
Exit To quit from the OSD Menu.
Secondary Menu Settings
Brightness
To adjust the brightness of the background.
PDF created with FinePrint pdfFactory Pro trial version www.pdffactory.com
Page 6
5
Function Description
Use “+” or “-”
key to adjust the numerical level of brightness (0~100).
Press “auto” key to save and menu key return to the previous page.
Press “+”or “-” key to adjust the numerical value of contrast (0-100)
. Press
“auto” key to save and menu key return to the previous page.
Back to the previous menu.
Audio
To adjust the volume of the speakers.
Function
Description
Use “+”or “-” key to adjust the volume, and press “auto” key to save and
menu key return to the previous page.
Press “auto” key to turn the speaker on or off.
Back to the previous page.
Color
Temperature
Use “+”or “-” key to choose the function, and press “auto
” key to make
adjustment.
Image
Config
Use “+”or “-” key to select a function, and press “auto
” key to enter the
adjustment menu. After the adjustment is finished, press “auto
” key to save
and menu key exit.
PDF created with FinePrint pdfFactory Pro trial version www.pdffactory.com
Page 7

6
Function
Description
Press the “auto” key to adjust H/V positions, clock and phase automatically.
When there is distortion between characters, use “+” or”-”
key to correct this
problem.
Use “+”or “-” key to adjust the ADC sampling real image value.
Use “+”or “-” key to move the screen left or right.
Use “+”or “-” key to move the screen up or down.
Back to the previous menu.
OSD Display
Adjustment
Use “+”or “-” key to select a function, and press “auto
” to adjust. After the
adjustment is done, press “auto” key to save and menu key
to return to the
previous page.
Function
Description
Use “+”or “-”
key to move the OSD display position to the right or the left of
the screen.
Use “+”or “-” key to move the OSD display position up or down the screen.
Use “+”or “-” key to set the OSD off time and press “auto” key to save it.
Sets the system to factory default value.
Back to the previous page.
Language
Use “+”or “-” key to select a language of OSD menu, and press “auto
” key to
confirm.
PDF created with FinePrint pdfFactory Pro trial version www.pdffactory.com
Page 8
7
Power Saving Mode
This monitor meets the criterion of NUTEK/TCO and VESA DPMS mode for display power
management.It has a effective built-in power management system that reduces power
consumption automatically when the PC is not used.
Display Mode Support
Mode Power Consumption (watts) LED Indicator
Normal
Power Saving Mode
15.4” 35W (typical)
<3W
Green
red
There are 7 preset modes for this monitor. The following modes are preset as factory defaults.
No. Description H-Freq. (KHz) V-Freq. (Hz)
1. VGA640×400 31.480 70.000
2. VGA640×480 31.649 60.000
3. VGA720×400 37.469 70.000
4. VESA 800×600 35.156 56.250
5. VESA 1024×768 48.363 60.000
6. VESA 1024×768 56.476 70.000
7 VESA 1280×800 49.702 59.810
Preliminary Troubleshooting
If the monitor does not run normally, please use the following table to resolve the most common
and possible causes of the problem before you call the service personal. If the problems still
can't be solved, please contact the local dealer for assistance.
Symptom Correct Action
No Display on
Screen
1. Check the connection of the VGA Signal Cable.
2.
Check to make sure the power is turned on, or that the power adaptor is
on.
3. Check whether the power cord of TFT LCD monitor is loose.
Fuzzy image.
1. The power supply may not be stable.Try connect the unit to another
power socket.
2. Move the LCD monitor away from magnetic objects.
No sound from
the speakers.
1. Please check if the audio cable is plugged in.
2.
The speakers may have been muted or the volume adjusted to the
minimum. Rectify the situation.
PDF created with FinePrint pdfFactory Pro trial version www.pdffactory.com
Page 9

8
Specifications
15.4”
Panel
Ultra-slender color TFT diagonal active matrix panel.
Resolution
1280 x 800 (WXGA)
Display Area (H x V)
331.2 mm x 207.0 mm
Pixel Pitch
0.2588 mm (Horizontal) x 0.2588 mm (Vertical)
View Angle
50º Vertical / 90º Horizontal
Vertical Frequency: 31.47 to 80kHz
Horizontal Frequency: 56 to 60 Hz
Input Signals
Analog RGB: 0.7 Vp-p
Sync: 5V (pos./net. Separate)
Maximum Input Video Band Width
135 MHz
Color Display
262K colors
Signal System
D-sub
Luminance (typical)
180 cd/m2
Contrast (typical)
400:1
Response Time (typical)
16 msec
Input Connectors 15-pin D-sub Type, a power input socket and an earphone socket.
Audio Output
Built-in 2W/8ohmx2 Speakers.
Maxim Power Consumption
35 watts (typical)
Power Management
VESA DPMS standard, EPA/Energy Star compliant
PnP Compatibility
VESA DDC 1& 2B standards compliant
EMI Ergonomics
FCC, CE(CISPR-II)
External Dimension
435(L)X145(W)X310.(H)
Temperature
Operating: 0°C to 50°C Storage: -20°C to 60°C
Humidity
Operating: 25% to 90% RH Storage: 0% to 90% RH
PDF created with FinePrint pdfFactory Pro trial version www.pdffactory.com
Page 10
9
INTRODUCTION
Merci pour l'achat de cet écran LCD produit par notre compagnie. Ce moniteur utilise un
panneau d'affichage à cristaux liquides (LCD) utilisant la technologie TFT (transistor à
couches minces), et a été conçu avec des technologies de production respectant des standards
de qualités et d'efficacité afin de vous offrir une qualité d'image professionnelle. De plus ce
moniteur LCD TFT a été conçu pour avoir un encombrement minimum et offre différentes
positions de positionnement de l'écran. Veuillez lire avec soin les instructions et les
précautions d'emploi avant de commencer à utiliser ce moniteur.
Description
Utilise un panneau d'affichage à cristaux liquides (LCD) doté d'un film couleur à matrice
active TFT (transistor à couches minces). Offre une image à haute résolution.
Ultra mince et élégant, avec une petite base avant de limiter l; encombrement.
Compatible avec les derniers standards ergonomiques européen.
Inclinaison de 15 ゚ vers l'avant et vers l'arrière afin que vous puissiez ajuster la position
de l'écran à votre convenance.
Basse consommation électrique, peu de dégagement de chaleur et aucune émission de
radiation.
Vérification du contenu du carton
Après avoir ouvert le carton, veuillez vous assuré que les éléments suivant sont bien présent.Si
l'un des éléments est absent ou endommagé, veuilles prendre contact avec votre revendeur ou
fournisseur.
Moniteur LCD TFT
Manuel utilisateur (incluant les spécifications)
Cordon d'alimentation
Câble VGA
Câble audio
Précautions d'emploi
Veuillez lire attentivement avant la première utilisation les instructions suivantes afin de
prévenir tout risque d'accident. Ce manuel doit être conservé afin que vous puissiez vous y
référez en cas de besoin.
Avant de nettoyer ou de déplacer ce moniteur, assurez-vous que le moniteur est éteint et
que le cordon d'alimentation est débranché, afin d'éviter d'endommager votre moniteur ou
de vous blesser.
Veuillez ne pas obstruer l'orifice de ventilation situé derrière le moniteur.
Ne pas verser de liquide sur le moniteur.
Certains composants sont alimentés par une tension importante. Pour éviter tout risque
d'électrocution veuillez ne pas démonter votre moniteur vous même.
Si de la fumée ou des bruits sortent de votre moniteur, veuillez le débrancher
immédiatement et contacter votre revendeur.
Veuillez ne pas appuyer sur l'écran afin d'éviter de causer des dommages permanents.
Avant de nettoyer ce moniteur, assurez-vous que le cordon d'alimentation est débranché,
et veuillez ne pas pulvérisé de liquide de nettoyage directement sur le moniteur. Nettoyez
l'écran en tamponnant légèrement avec un chiffon sans exercer une pression excessive sur
l'écran.
PDF created with FinePrint pdfFactory Pro trial version www.pdffactory.com
Page 11

10
Installation du moniteur
Veuillez tout d'abord débrancher votre ordinateur et tout ses périphériques.
1. Brancher le cordon d'alimentation dans la prise située derrière le moniteur et brancher
l'autre extrémité du cordon sur la prise murale.
2. Brancher le câble VGA du moniteur sur le port 15 broches de l'ordinateur.
3. Allumer l'écran et l'ordinateur.
Panneau de contrôle avant :
Orienter l'écran
Vous pouvez incliner l'écran de 15 degré vers l'avant ou l'arrière.
Réglage des paramètres de l'écran avec le menu OSD (On-Screen
Display)
Etape 1: Appuyez sur le bouton "menu" pour afficher le menu OSD à l'écran.
Etape 2: Appuyez sur “+” ou " -" pour sélectionner une fonction.
Etape 3: Appuyez sur "auto" pour choisir une option à régler.
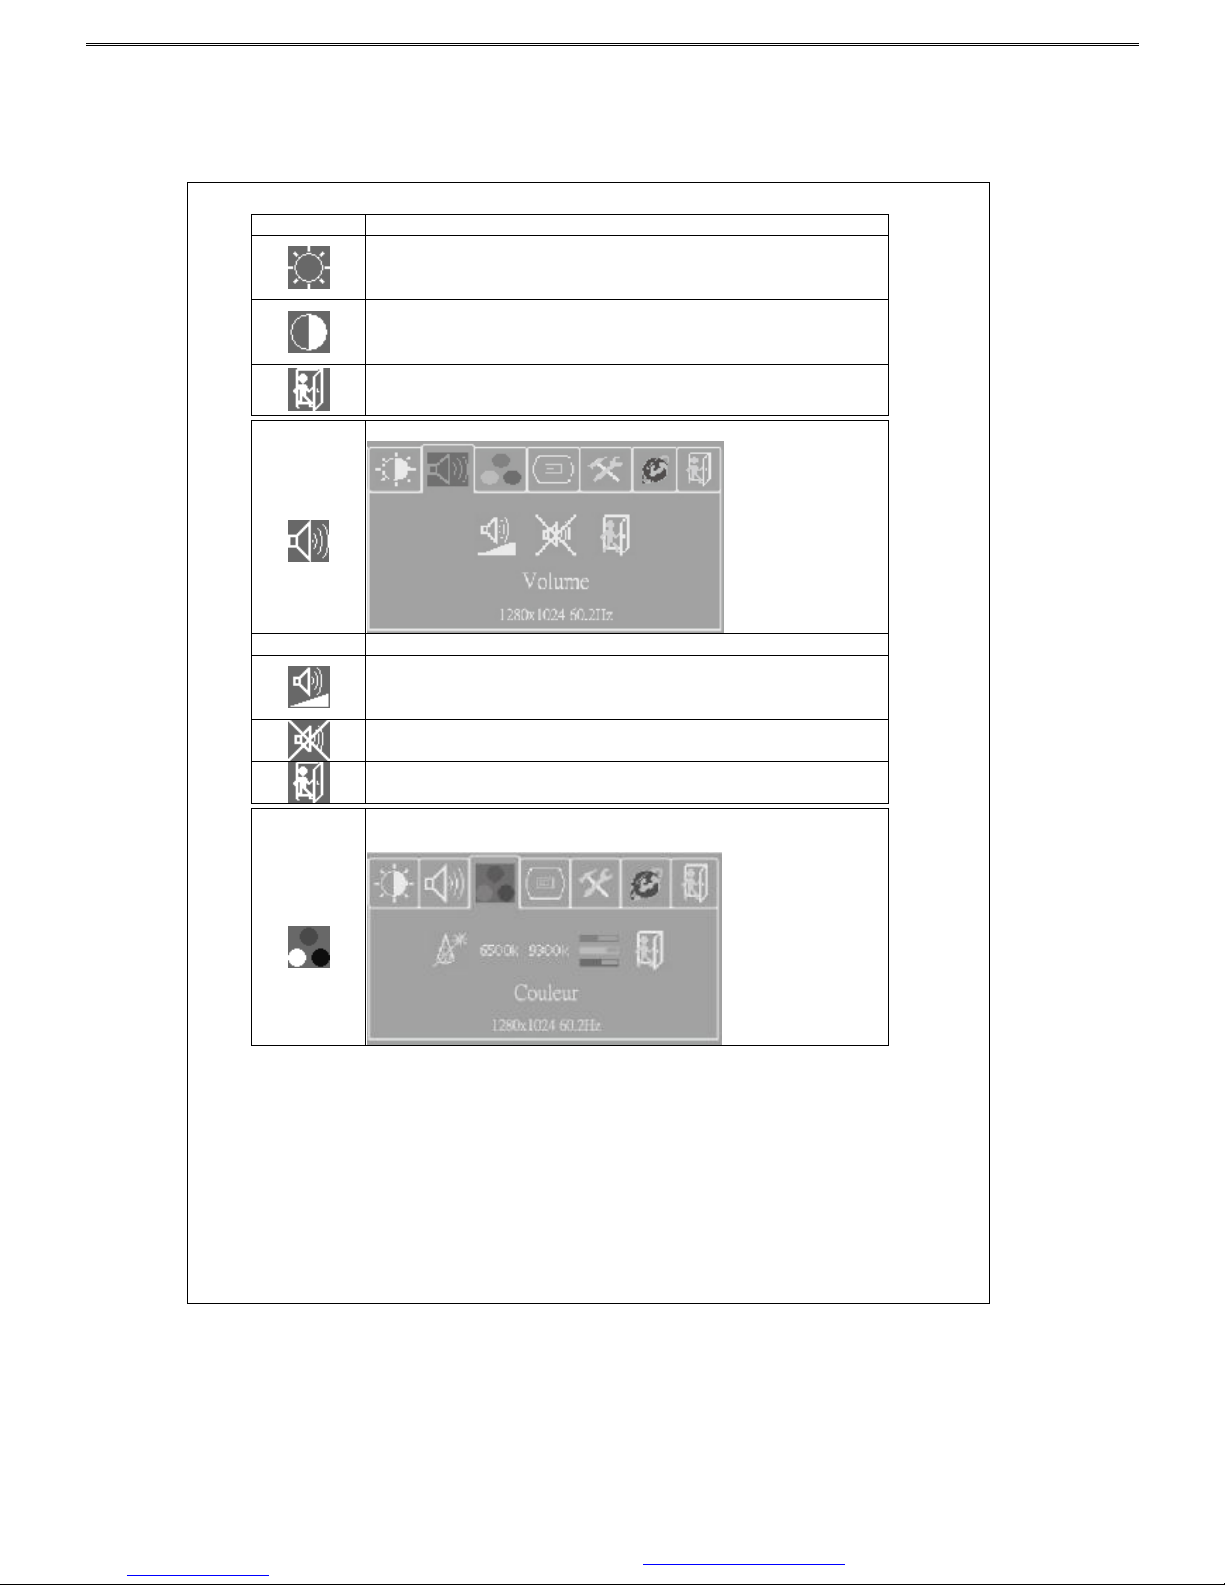
Menu rapide Fonctions
Vous pouvez appuyé sur“+”or" -" pour ajuster volume
Luminosité
Pour ajuster la luminosité de l'écran.
Audio
Pour ajuster le volume des haut-parleurs.
Température des
Couleurs
Pour ajuster l'intensité du rouge, du vert et du bleu à l'écran.
Config Image
Pour ajuster la position verticale et la position horizontale de
l'image.
Ajustement OSD
Pour définir automatiquement la position de l'affichage OSD.
Langue
Pour sélectionner la langue de votre menu OSD, vous avec le
choix parmi les langues suivantes : anglais, français, allemand,
italien, espagnol ou chinois traditionnel. L'utilisateur peut
sélectionner sa langue préférée.
Quitter
Pour quitter le menu OSD.
Menus secondaires
Luminosité
Pour ajuster la luminosité de l'écran.
PDF created with FinePrint pdfFactory Pro trial version www.pdffactory.com
Page 12
11
Fonctions Description
Appuyez sur la touche + ou - pour ajuster le niv
eau de luminosité (de 0 à
100). Appuyez sur la touche “auto” pour enregistrer votre réglage et sur la
touche “menu” pour retourner à l'écran précédent.
Appuyez sur la touche + ou - pour ajuster le niveau de contraste (de 0 à
100). Appuyez sur la touche “auto” pour enregistrer votre réglage et sur la
touche “menu” pour retourner à l'écran précédent.
Retour au menu précédent.
Audio
Pour ajuster le volume des haut-parleurs
Fonctions Description
Appuyez sur la touche + ou - pour ajuster le volume et appuyez sur la
touche “auto” pour enregistrer votre réglage et sur la touche “menu” pour
retourner à l'écran précédent.
Appuyez sur la touche “auto” pour activé ou désactivé les haut-parleurs.
Retour à la page précédente.
Température
des Couleurs
Appuyez sur la touche + ou -
pour choisir la fonction et appuyez sur la
touche “auto” pour faire votre réglage.
PDF created with FinePrint pdfFactory Pro trial version www.pdffactory.com
Page 13

12
Config
Image
Appuyez sur la touche + ou -
pour choisir la fonction et appuyez sur la
touche “auto” pour entrer dans le menu d'ajustement. Une fois le
réglage
effectué, appuyez sur la touche “auto
” pour enregistrer et sur la touche
“menu” pour quitter ce menu.
Fonctions Description
Appuyez sur la touche “auto
” pour ajuster automatiquement la position
horizontale ou verticale de l'image, la distorsion et la phase.
En cas de problème de distorsion de l'image, utilisez la touche △ ou ▽
pour
corriger ce problème.
Utilisez la touche + ou - pour ajuster la valeur de la phase.
Utilisez la touche + ou -
pour déplacer l'image vers la droite ou vers la
gauche.
Utilisez la touche + ou - pour déplacer l'image vers le haut ou vers le bas.
Retour au menu précédent.
OSD Display
Adjustment
Appuyez sur la touche + ou -
pour sé lectionner une fonction et appuyez sur
“auto” pour effectuer le réglage.
Une fois le réglage effectué, appuyez sur la
touche “auto” pour enregistrer et sur la touche “menu” pour quitter ce menu.
Fonctions Description
Appuyez sur la touche + ou -
pour dé placer le menu OSD vers la gauche ou
vers la droite.
Appuyez sur la touche + ou -
pour déplacer le menu OSD vers le haut ou
vers le bas.
Appuyez sur + ou - pour définir le temps d'affichage du menu OSD puis
appuyez sur la touche “auto” pour enregistrer votre réglage.
Remettre les paramètres d'usine.
Retour à la page précédente.
PDF created with FinePrint pdfFactory Pro trial version www.pdffactory.com
Page 14
13
Langue
Appuyez sur la touche + ou - pour choisir la langue du menu OSD
, puis
appuyez sur la touche “auto” pour confirmer.
Mode d'Économie d'Énergie
Ce moniteur est conforme aux normes NUTEK/TCO et VESA DPMS concernant la gestion de
la consommation électrique. Il intègre un système actif de gestion de la consommation
électrique qui permet de réduire automatiquement la consommation électrique lorsque le PC
n'est pas utilisé.
Support des modes d'affichage
Mode Consommation (W) Indicateur (LED)
Normal
Mode Économie d'Énergie
15.4" 35W (typique)
<3W
Vert
Rouge
Il y a 7 modes prédéfinis sur ce moniteur. Les modes suivant sont définis comme paramètres
usine par défaut.
No.
Description H-Freq. (KHz) V-Freq. (Hz)
1. VGA640×400 31.480 70.000
2. VGA640×480 31.649 60.000
3. VGA720×400 37.469 70.000
4. VESA 800×600 35.156 56.250
5. VESA 1024×768 48.363 60.000
6. VESA 1024×768 56.476 70.000
7. VESA 1280×800 49.702 59.810
Résolution des problèmes les plus communs
Si le moniteur ne fonctionne pas normalement, veuillez utiliser le tableau suivant qui liste les
problèmes les plus communs et propose des solutions pour résoudre ces problèmes avant de
contacter le service clientèle. Si le problème ne peut toujours pas être résolu, veuillez contacter
votre revendeur local pour demander une assistance.
Symptôme Solution
Pas d'image à
l'écran.
1. Vérifiez si le câble VGA est bien branché.
2. Vérifiez que l'écran est allumé, ou que l'adaptateur él
ectrique est
allumé.
3. Vérifiez si le câble secteur est bien branché sur l'écran.
L'image est
brouillée.
1. Le tension électrique n'est peut être pas stable. Essayez de brancher le
moniteur sur une autre prise électrique.
2. Éloigner le moniteur des sources de champ magnétique.
Pas de son.
1. Vérifiez si le câble audio est bien branché.
2. Les haut-parleurs ont peut-
être été désactivé ou le volume a été réglé sur
le minimum. Rectifiez la situation.
PDF created with FinePrint pdfFactory Pro trial version www.pdffactory.com
Page 15
14
Spécifications
15.4”
Écran
Écran couleur ultra-fin à matrice active TFT
Résolution
1280 x 800 (WXGA)
Surface d'affichage (H x V)
331.2 mm x 207.0 mm
Pas de pixels
0.2588 mm (Horizontal) x 0.2588 mm (Vertical)
Angle de vision
Vertical : 50º / Horizontal : 90º
Fréquence verticale : de 31.47 à 80kHz
Fréquence horizontale : de 56 à 75 Hz
Signaux d'entrée
Analogique RGB : 0.7 Vp-p
Synchronisation : 5V (pos./net. Séparée)
Bande passante vidéo maxi en
entrée
135 MHz
Nombre de couleurs
262K de couleurs
Système de signal
Entrées D-sub / DVI (Si il y a un connecteur DVI)
Luminance (typique)
180 cd/m2
Contraste (typique)
400:1
Temps de réponse (typique)
16 msec
Connecteurs d'entrée
Connecteur D-sub 15 broches,
une prise électrique et une
prise casque.
Sortie audio
2 haut-parleurs 2W/8ohmx intégrés.
Consommation maxi
35 watts (typique)
Gestion de la consommation
Compatible avec les standards VESA DPMS standard et
EPA/Energy Star
Compatibilité Plug and Play
Compatible avec les standards VESA DDC 1& 2B
Ergonomie EMI
FCC, CE(CISPR-II)
Dimensions externes
435(L)X145(W)X310(H)
Température
En fonctionnement : 0°C à 50°C
Rangement : -20°C à 60°C
Humidité
En fonctionnement: 25% à 90% d'humidité relative
Rangement : 0% à 90% d'humidité relative
PDF created with FinePrint pdfFactory Pro trial version www.pdffactory.com
Page 16
15
EINLEITUNG
Vielen Dank, dass Sie diesen von unserem Unternehmen hergestellten LDC Monitor erworben
haben. Dieser Monitor benutzt einen TFT (Dünnschichttransistor) LCD (Flüssigkristall)
–Flachbildschirm. Dieser TFT LCD Monitor ist in höchster Qualität und mit hocheffizienter
Produktionstechnologie erstellt worden, um dem Benutzer eine professionellere und
konstantere Bildqualität zu bieten. Er ist mit dem Ziel entwickelt worden, dass er Platz spart
und entsprechend den modernen Lebensraumbedingungen verschiedene Displaypositionen
ermöglicht. Bitte lesen Sie die Anweisungen und Vorsichtsmaßnahmen in dieser Brochüre
aufmerksam durch, bevor Sie den Monitor benutzen.
Eigenschaften
Benutzt einen TFT (Dünnschichttransistor) Aktiv Matrix Farb LCD (Flüssigkristall)
Flachbildschirm. Bietet hochauflösende Bilder.
Elegant und ultra-schlank mit einem kleinen Ständer, läßt mehr Platz für den Benutzer.
Entspricht den neuesten europäischen Ergonomiestandards.
15 ゚ vor- und rückwärts Kipp Flexibilität erlaubt es Ihnen, den bevorzugten Winkel
einzustellen.
Niedriger Stromverbrauch, geringe Hitze und null Strahlungsausstoß schützt den
Benutzer.
Überprüfen Sie den Packungsinhalt
Wenn Sie die Packung öffnen, vergewissern Sie sich, dass die folgenden Gegenstände
enthalten sind. Sollte irgendetwas fehlen oder beschädigt sein, wenden Sie sich bitte an Ihren
örtlichen Händler oder Lieferanten:
TFT LCD Monitor
Benutzerhandbuch (eingeschlossen der Spezifikationen)
Stromkabel
VGA Kabel
Audio Kabel
Vorsichtsmaßnahmen
Bitte lesen Sie die folgenden Anweisungen aufmerksam durch, um unnötige Schäden zu
vermeiden. Sie sollten dieses Handbuch für zukünftige Fragen aufbewahren.
Bevor Sie diesen Monitor reinigen oder bewegen, vergewissern Sie sich, dass der Strom
abgeschaltet und das Stromkabel ausgezogen ist, um Schäden am Monitor und
Körperverletzungen zu vermeiden.
Bitte blockieren Sie nicht den Radiator auf der Rückseite.
Halten Sie Flüssigkeiten vom Monitor fern.
Einige der Teile stehen unter Hochstrom. Um unnötige Gefahren zu vermeiden, nehmen
Sie den Monitor nicht selbst auseinander.
Sollte Rauch aus dem Monitor austreten oder dieser Misstöne von sich geben, schalten
Sie umgehend den Strom ab und wenden Sie sich an Ihren örtlichen Händler.
Üben Sie bitte keinen Druck auf den Bildschirm aus, um dauernden Schaden zu
vermeiden.
Bevor Sie diesen Monitor reinigen, vergewissern Sie sich zunächst, dass das Stromkabel
ausgezogen ist. Bitte sprühen Sie keinen flüssigen Reiniger direkt auf das Gerät.
Reinigen Sie den Bildschirm mit einem angefeuchteten Lappen, ohne übermässigen
Druck auszuüben.
PDF created with FinePrint pdfFactory Pro trial version www.pdffactory.com
Page 17

16
Installation des Monitors
Bitte schalten Sie den Computers und seine Peripheriegeräte ab.
1. Verbinden Sie den Stromadapter mit der Stromeingangsbuchse auf der Rückseite des
Gerätes und stecken Sie dann das andere Ende in die Steckdose.
2. Verbinden Sie das VGA Analog Signalkabel mit der 15-Pin Verbindungsschnittstelle des
Gerätes.
3. Schalten Sie den Bildschirm und den Computer an.
Frontbedienungspult:
Kippen und Drehen des Bildschirms
Sie können den Bildschirm bis zu 15゚ rauf- oder runterkippen.
OSD (On-Screen Display) Einstellungen
Schritt 1: Drücken Sie “Menü”, um das OSD (On-Screen Display) Menü zu aktivieren.
Schritt 2: Drücken Sie die “+” oder “-” Taste, um den Cursor zu bewegen und so die
gewünschte Funktion auszuwählen.
Schritt 3: Drücken Sie “Auto”, um die Option, die Sie einstellen möchten, auszuwählen.
Schnellmenü Funktionen
Sie können mit“+” oder “-”die Lauststärke einstellen.
Helligkeit
Zur Einstellung der Hintergrundhelligkeit.
Audio
Zur Einstellung der Laustärke der Lautsprecher.
Farbtemperatu
r
Zur Einstellung der Parameter für die roten, grünen und blauen
Farben auf dem Bildschirm.
Bild Konfig
Zur Einstellung der vertikalen und horizontalen Position des
Bildes.
OSD
Einstellung
Zur automatischen Positionseinstellung der OSD Anzeige.
Sprache
Hier kann der Benutzer je nach persönlicher Vorliebe die
bevorzugte Sprache für die OSD Anzeige aus Englisch,
Französisch, Deutsch, Italienisch, Spanisch und traditionellem
Chinesisch auswählen
Schließen
Zum Verlassen des OSD Menüs.
Sekundäre Menüeinstellungen
Helligkeit
Zur Einstellung der Hintgergrundhelligkeit.
Funktion
Beschreibung
Mit den “+”und “-”
Tasten können Sie die Helligkeitsstufen (0~100)
einstellen. Drücken Sie die “Auto” T
aste, um die Einstellung zu speichern
und die Menütaste, um zur vorherigen Seite zurückzukehren.
PDF created with FinePrint pdfFactory Pro trial version www.pdffactory.com
Page 18

17
Mit den “+”und “-” Tasten können Sie die Kontraststufen (0~100)
einstellen. Drücken Sie die “Auto
” Taste, um die Einstellung zu speichern
und die Menütaste, um zur vorherigen Seite zurückzukehren.
Zurück zum vorherigen Menü.
Audio
Zur Einstellung der Lautstärke der Lautsprecher.
Funktion
Beschreibung
Stellen Sie mit den “+”und “-
” Tasten die Lautstärke ein. Drücken Sie die
“Auto” Taste, um di
e Einstellung zu speichern und dann die Menütaste,
um zur vorherigen Seite zurückzukehren.
Drücken Sie die “Auto” Taste, um die Lautsprecher ein –
oder
auszuschalten.
Zurück zur vorherigen Seite
Farbtemperatur
Wählen Sie mit den “+”und “-” Tasten die gewünschte Funktion und
klicken Sie dann die “Auto
” Taste, um die entsprechenden Einstellungen
vorzunehmen.
Bild
Konfig
Wählen Sie mit den “+”und “-” Tasten die gewünschte Funktion und
klicken Sie dann die “Auto” Taste, um in das Einstellungsmenü zu
gelangen. Nachdem Sie die entsprechenden Einstellungen vorgenommen
haben, drücken Sie die “Auto” Taste, um die Einstellung zu speichern und
dann die Menütaste, um das Menü zu verlassen.
PDF created with FinePrint pdfFactory Pro trial version www.pdffactory.com
Page 19

18
Funktion Beschreibung
Klicken Sie die “Auto” Taste, um d
ie H/V Positionen, den Takt und die
Phase automatisch einzustellen.
Sollte zwischen den Buchstaben eine Verzerrung auftreten, korigieren Sie
dieses Problem mit den “+” und “-” Tasten.
Mit “+”oder “-” passen Sie den ADC Sampling Echtbildwert an.
Mit den “+”und “-”
Tasten können Sie den Bildschirm nach rechts bzw.
nach links bewegen.
Mit den “+”und “-”
Tasten können Sie den Bildschirm nach oben bzw.
nach unten bewegen.
Zurück zum vorherigen Menü.
OSD
Einstellung
Wählen Sie mit den “+”und “-” Tasten die gewünschte Funktion aus.
Klicken Sie anschließend auf “Auto” , um die Einstellungen
vorzunehmen. Nachdem Sie die entsprechenden Einstellungen
vorgenommen haben, drücken Sie die “Auto” Taste, um die Einstellung zu
speichern und die Menütaste, um zur vorherigen Seite zurückzukehren.
Funktion Beschreibung
Bewegen Sie die OSD Position auf dem Bildschirm mit den “+”und “-
”
Tasten nach links oder rechts.
Bewegen Sie die OSD Position auf dem Bildschirm mit den “+”und “-
”
Tasten nach oben oder unten.
Stellen Sie mit den “+”und “-
” Tasten die OSD Off Time ein und klicken
Sie anschließend die “Auto” Taste, um die Einstellung zu speichern.
Stellt das System auf den Fabrik Standardwert ein.
Zurück zur vorherigen Seite.
PDF created with FinePrint pdfFactory Pro trial version www.pdffactory.com
Page 20

19
Sprache
Wählen Sie mit den “+” und “-
” Tasten die für das OSD Menü gewünschte
Sprache aus. Drücken Sie zur Bestätigung die “Auto” Taste.
Stromsparmodus
Dieser Monitor entspricht den Kriterien des NUTEK/TCO und VESA DPMS Modus zur
Verwaltung des Bildschirmstromes. Er verfügt über ein effizientes, eingebautes
Strommanagement System, welches den Stromverbrauch automatisch verringert,
wenn der PC nicht gebraucht wird.
Bildschirm Modi
Modus Stromverbrauch (Watt) LED Anzeige
Normal
Stromsparmodus
15.4” 35W (typisch)
<3W
Grün
rot
Dieser Monitor verfügt über 7 voreingestellte Modi. Die folgenden Modi sind als
Fabrikstandard voreingestellt.
No. Beschreibung H-Freq. (KHz) V-Freq. (Hz)
1. VGA640×400 31.480 70.000
2. VGA640×480 31.649 60.000
3. VGA720×400 37.469 70.000
4 VESA 800×600 35.156 56.250
5. VESA 1024×768 48.363 60.000
6 VESA 1024×768 56.476 70.000
7 VESA 1280×800 49.702 59.810
Erste Problembehebung
Sollte der Monitor nicht normal funktionieren, benutzen Sie bitte die folgende Tabelle, um die
gewöhnlichsten und möglichsten Ursachen für die Probleme herauszufinden und diese zu
lösen, bevor Sie sich an das Servicepersonal wenden. Sollten Sie die Probleme jedoch nicht
beheben können, wenden Sie sich bitte an den örtlichen Händler.
Symptom Korrektur
Kein Bild auf
dem Bildschirm
1.Überprüfen Sie, ob das VGA Signal Kabel richtig angeschlossen ist.
2.Vergewissern Sie sich, dass der Strom angeschaltet ist, bzw. dass der Adapter an ist.
3.Überprüfen Sie, ob das Stromkabel des TFT LCD Monitors locker ist.
Unscharfes
Bild.
1.Die Stromversorgung könnte instabil sein. Schließen Sie das Gerät an eine andere
Stromquelle an.
2.Entfernen Sie magnetische Objekte aus der Nähe des LCD Monitors.
Kein Ton von
den
Lautsprechern
1.Bitte überprüfen Sie, ob das Audiokabel eingesteckt ist.
2.
Es könnte sein, dass die Lautsprecher stumm geschaltet sind oder dass die Lautstärke
auf das das Minimum eingestellt ist. Korrigieren Sie gegebenenfalls die Situation.
PDF created with FinePrint pdfFactory Pro trial version www.pdffactory.com
Page 21

20
Spezifikationen
15.4”
Bildschirm
Ultra-schlanker Farb TFT Diagonal Aktiv Matrix Bildschirm.
Auflösung
1280 x 800 (WXGA)
Wiedergabefläche (H x V)
331.2 mm x 207.0 mm
Bildpunkt Einteilung
0.2588 mm (Horizontal) x 0.2588 mm (Vertikal)
Sichtwinkel
50º Vertikal / 90º Horizontal
Vertikale Frequenz: 31.47 bis 80kHz
Horizontale Frequenz: 56 bis 75 Hz
Eingabesignale
Analog RGB: 0.7 Vp-p
Sync: 5V (pos./net. Getrennt)
MaximaVideo Bandweite
135 MHz
Farbwiedergabe
262K Farben
Signalsystem
D-sub / DVI Eingang(Wenn ein DVI Anschluss vorhanden ist)
Helligkeit (typisch)
180 cd/m2
Kontrast (typisch)
400:1
Reaktionszeit (typisch)
16 msek
Eingangsanschluss
15-pin D-Ssub Typ, eine Stromeingangsbuchse und eine Kopfhörerbuchse.
Audio Ausgabe
Eingebaute 2W/8ohmx2 Lautsprecher.
Maximaler Stromverbrauch
35 Watt (typisch)
Strommanagement
VESA DPMS Standard, EPA/Energy Star konform
PnP Kompatibilität
VESA DDC 1& 2B Standard konform
EMI Ergonomie
FCC, CE(CISPR-II)
External Dimension
435(L)X145(W)X310(H)
Temperatur
Betrieb: 0°C to 50°C Speicher: -20°C to 60°C
Feuchtigkeit
Betrieb: 25% to 90% RH Speicher: 0% to 90% RH
PDF created with FinePrint pdfFactory Pro trial version www.pdffactory.com
Page 22

21
INTRODUZIONE
Grazie per aver acquistato questo monitor LCD prodotto dalla nostra ditta. Questo monitor
utilizza un pannello TFT (Thin Film Transistor, transistor a film fine) con display a cristalli
liquidi (LCD) ed è stato progettato usando le migliori tecnologie esistenti per fornire all’utente
una qualità d’immagine più professionale e più nitida. Inoltre, questo monitor LCD TFT è
stato disegnato con l’intento di occupare meno spazio possibile, per offrire diversi angoli di
visualizzazione e per fondersi meglio negli spazi della vita moderna. Leggere attentamente le
istruzioni e le indicazioni ivi contenute prima di iniziare ad usare questo prodotto.
Caratteristiche
Uso di un pannello LCD (display a cristalli liquidi) a colori a a matrice attiva TFT (thin
film transistor). Permette la visualizzazione d’immagini ad alta risoluzione.
Elegante, ultra-sottile, di minimo ingombro.
Conforme ai più recenti standard ergonomici europei.
Angolazione regolabile di 15 ゚ in avanti e indietro per impostare la visuale migliore.
Basso consumo d’energia, basse emissioni di calore e zero emissioni di radiazioni per la
sicurezza dell’utente.
Controllare il contenuto della confezione
Dopo aver aperto la confezione, assicurarsi che le seguenti parti siano presenti. In caso di parti
mancanti o danneggiate, contattare il proprio rivenditore:
Monitor LCD TFT
Manuale utente (incluse le specifiche tecniche)
Cavo d’alimentazione
Cavo VGA
Cavo audio
Precauzioni
Leggere attentamente queste istruzioni per prevenire possibili infortuni. Conservare questo
manuale per future consultazioni.
Prima di pulire o spostare il monitor, assicurarsi che sia spento e che il cavo
d’alimentazione sia scollegato, per evitare di rovinare inavvertitamente il monitor o di
farsi male.
Non ostruire la feritoia sul retro del monitor.
Tenere il monitor lontano da fonti liquide.
In alcune parti del monitor passa corrente ad alto voltaggio. Per evitare possibili scosse
elettriche, non smontare il monitor.
In caso di fumo o di cacofonia provenienti dal monitor, scollegare dalla presa elettrica
immediatamente e contattare il proprio rivenditore.
Non fare pressione sullo schermo per evitare di danneggiarlo.
Prima di pulire il monitor, assicurarsi che il cavo d’alimentazione sia scollegato e non
spruzzare direttamente sulla superficie alcun liquido. Pulire lo schermo con un panno
morbido leggermente inumidito senza fare pressione.
PDF created with FinePrint pdfFactory Pro trial version www.pdffactory.com
Page 23

22
Installazione del monitor
Scollegare dalla presa elettrica il computer e le eventuali periferiche.
1.Collegare l’alimentatore alla presa AC sul retro del monitor e dopo collegare l’altra estremità
alla presa elettrica a muro.
2.Collegare il cavo a segnale analogico VGA all’entrata a 15-pin del monitor.
3.Accendere lo schermo e poi il computer.
Pannello di controllo frontale :
Regolazione dell’angolazione e della rotazione dello schermo
Si può regolare lo schermo di 15 ゚ in avanti e indietro.
Regolazione OSD (Menu su schermo)
Passo 1: Premere “menu” per attivare il menu su schermo OSD.
Passo 2: Premere “+” o “-” per spostare il cursore e selezionare la funzione.
Passo 3: Premere “auto” per selezionare l’opzione da regolare
Funzioni menu rapido
E’ possibile premere“+”o “-” per regolare il volume
Luminosità
Per regolare la luminosità dello sfondo.
Audio
Per regolare il volume delle casse.
Temperatura del
colore
Per regolare i valori di rosso, verde e blu su schermo.
Regolazione
immagine
Per regolare la posizione orizzontale e verticale dello schermo.
Impostazioni
OSD
Per impostare automaticamente la posizione dell’ OSD.
Lingua
Per selezionare inglese, francese, tedesco, italiano, spagnolo o
cinese tradizionale come lingua dell’OSD. L’utente può
selezionare la lingua preferita.
Esci
Per uscire dal menu OSD.
Impostazioni secondarie del menu
Luminosità
Per regolare la luminosità dello sfondo.
PDF created with FinePrint pdfFactory Pro trial version www.pdffactory.com
Page 24

23
Funzione Descrizione
Usare “+”o “-”
per regolare il valore numerico della luminosità (0~100).
Premere “auto” per salvare e il tasto
menu per tornare alla schermata
precedente.
Premere “+”o “-” per regolare il valore numerico del contrasto (0-100)
.
Premere “auto” per salvare e il tasto
menu per tornare alla schermata
precedente.
Torna al menu precedente.
Audio
Per regolare il volume delle casse.
Funzione Descrizione
Usare “+”o “-” per regolare il volume e premere “auto” per salvare e il tasto
menu per tornare alla schermata precedente.
Premere “auto” per attivare o disattivare le casse.
Torna al menu precedente.
Temperatura
del colore
Usare “+”o “-” per selezionare la funzione e premere “auto
” per effettuare
le modifiche.
Regolazione
immagine
Usare “+”o “-” per selezionare una funzione e premere “auto
” per accedere
al menu delle impostazioni. Terminate le modifiche, premere “auto
” per
salvare e menu per uscire.
PDF created with FinePrint pdfFactory Pro trial version www.pdffactory.com
Page 25

24
Funzione Descrizione
Premere “auto
” per regolare automaticamente la posizione orizz./vert., l’ora
e il valore di phase.
In caso di distorsione tra caratteri, usare “+” o”-”
per correggere il
problema.
Usare “+”o “-” per r
egolare il valore dell’immagine reale di campionamento
ADC.
Usare “+”o “-” per spostare lo schermo a sinistra o destra.
Usare “+”o “-” per spostare lo schermo su o giù.
Torna al menu precedente.
Impostazioni
OSD
Usare “+”o “-” per selezionare una funzione e premere “auto” per la
regolazione. Terminate le modifiche, premere “auto” per salvare e il tasto
menu per tornare alla schermata precedente.
Funzione Descrizione
Usare “+”o “-” per spostare l’OSD verso destra o verso sinistra.
Usare “+”o “-” per spostare l’OSD verso l’alto o verso il basso.
Usare “+”o “-”
per impostare il tempo di spegnimento dell’OSD e premere
“auto” per salvare.
Riporta il sistema ai valori di fabbrica.
Torna al menu precedente.
Lingua
Usare “+”o “-”
per selezionare una lingua per il menu OSD e premere
“auto” per confermare.
PDF created with FinePrint pdfFactory Pro trial version www.pdffactory.com
Page 26

25
Modalità a basso consumo energetico
Questo monitor è conforme agli standard NUTEK/TCO e VESA DPMS per la gestione del
consumo del display. Ha un sistema interno che riduce automaticamente il consumo energetico
quando il PC non è utilizzato.
Supporto modalità display
Modalità Consumo energetico (watt) Indicatore LED
Normale
Modalità a basso consumo
energetico
15.4” 35W (tipico)
<3W
Verde
rosso
Ci sono 7 modalità pre-impostate nel monitor. Le seguenti modalità sono pre-impostate come
valori di fabbrica.
N. Descrizione Freq. Orizz. (KHz) Freq. Vert. (Hz)
1. VGA640×400 31.480 70.000
2. VGA640×480 31.649 60.000
3. VGA720×400 37.469 70.000
4 VESA 800×600 35.156 56.250
5 VESA 1024×768 48.363 60.000
6 VESA 1024×768 56.476 70.000
7 VESA 1280×800 49.702 59.810
Risoluzione dei problemi
Se il monitor non dovesse funzionare correttamente, consultare la tabella di seguito per
risolvere i più comuni problemi prima di contattare il servizio di assistenza. Se i problemi
dovessero persistere, contattare il rivenditore o il l’assistenza.
Sintomi Azione da intraprendere
Nessuna
immagine su
schermo
1. Controllare il collegamento del cavo VGA.
2. Assicurarsi che sia acceso e che l’alimentatore sia acceso.
3.
Controllare che il cavo d’alimentazione del monitor TFT LCD non
sia staccato.
Immagine sfocata
1. La fonte elet
trica può non essere stabile. Provare a cambiare presa
elettrica.
2. Allontanare il monitor LCD da eventuali oggetti magnetici.
Nessun suono
dalle casse
1. Controllare che il cavo audio sia inserito.
2. Le casse possono essere in modalità silenziosa o il volume è
stato
impostato al minimo. Effettuare le regolazioni opportune.
PDF created with FinePrint pdfFactory Pro trial version www.pdffactory.com
Page 27

26
Specifiche tecniche
15.4”
Pannello
Pannello a matrice attiva diagonale TFT a colori ultra piatto.
Risoluzione
1280 x 800 (WXGA)
Area display (O x V)
331.2 mm x 207.0 mm
Distanza pixel
0.2588 mm (orizzontale) x 0.2588 mm (verticale)
Angolo di visualizzazione
50º verticale / 90º orizzontale
Frequenza verticale: 31.47 a 80kHz
Frequenza orizzontale: 56 a 75 Hz
Segnali d’input
RGB analogico: 0.7 Vp-p
Sync: 5V (pos./net. separati)
Larg
hezza di banda video in
entrata massima
135 MHz
Display a colori
262K colori
Sistema segnale
input D-sub / DVI(in caso di connettore DVI presente)
Luminanza (tipico)
180 cd/m2
Contrasto (tipico)
400:1
Tempo di risposta (tipico)
16 msec
Connettori d’entrata
D-sub a 15-pin, una presa elettrica ed una per le cuffie.
Uscite audio
Casse integrate 32W/8ohm x 2.
Consumo massimo
35 watt (tipico)
Gestione consumo
conforme a VESA DPMS standard, EPA/Energy Star
Compatibilità PnP
conforme a standard VESA DDC 1& 2B
Ergonomia EMI
FCC, CE(CISPR-II)
Dimensioni esterne
435(L)X145(P)X310(A)
Temperatura
Operativa: da 0°C a 50°C Stoccaggio: da -20°C a 60°C
Umidità
Operativa: da 25% a 90% RH Stoccaggio: da 0% a 90% RH
PDF created with FinePrint pdfFactory Pro trial version www.pdffactory.com
Page 28

27
INTRODUCCIÓN
Gracias por adquirir este monitor LCD producido por nuestra compañía.Este monitor utiliza un
panel visualizador de cristal líquido (LCD, por sus siglas en inglés) de transistor de película
delgada (TFT, por sus siglas en inglés) y está diseñado con alta tecnología y tecnología de
producción muy eficiente,a fin de proveer al usuario una calidad de imagen más profesional y
consistente. Además, este monitor TFT LCD está diseñado para ahorrar espacio y ofrecer
distintas posiciones de exposición, adaptándose así al espacio vital de la era moderna.Por favor
lea las instrucciones y precauciones de este manual, antes de comenzar a usarlo.
Características
Utiliza un panel TFT (transistor de película delgada) color de matriz activo LCD
(visualizador de cristal líquido). Ofrece una imagen de alta resolución.
Ultra delgado elegante con una huella pequeña, ahorra más espacio para los usuarios.
Cumple con los últimos estándares de la ergonomía europea.
Flexibilidad de inclinación de 15° hacia delante y hacia atr ás le permite ajustarlo al
ángulo más favorable.
Bajo consumo de energía, poco calor y cero emisión de radiación protegen al usuario.
Compruebe el Contenido de la Caja
Después de que abra la caja, asegúrese de que estén los siguientes ítems. Si cualquiera de ellos
faltara o estuviera dañado, por favor contacte a su concesionario o proveedor local:
Monitor TFT LCD
Manual del Usuario (incluyendo las especificaciones)
Cable de energía
Cable VGA
Cable de Audio
Precauciones
Por favor lea primero con atención las siguientes instrucciones para prevenir riesgos
innecesarios. Guarde este manual para futuras referencias.
Antes de limpiar o mover este monitor, asegúrese que esté apagado y que el cable de
energía AC esté desenchufado, a fin de evitar un daño accidental al monitor o al cuerpo
humano.
Por favor mantenga sin obstrucciones el radiador ubicado en la parte posterior del
monitor.
Mantenga el monitor lejos de cualquier líquido.
Algunos de los componentes y partes tienen alto voltaje. A fin de evitar peligros
innecesarios, por favor no desarme el monitor usted mismo.
Si el monitor humea o produce ruidos, por favor desconecte la energía de forma inmediata
y póngase en contacto con su concesionario local.
A fin de evitar daños permanentes, por favor no aplique presión sobre el panel de la
pantalla.
Antes de limpiar este monitor, por favor asegúrese de retirar primero el cable de energía
AC y por favor no rocíe limpiadores líquidos directamente sobre la unidad. Limpie la
pantalla de forma suave con un trapo un poco humedecido, sin aplicar mucha presión.
PDF created with FinePrint pdfFactory Pro trial version www.pdffactory.com
Page 29

28
Instalación del Monitor
Por favor primero apague la fuente de energía a la computadora y sus equipos periféricos.
1. Conecte el adaptador de energía al enchufe de entrada de energía AC en la parte posterior
de la unidad y conecte el otro extremo en el enchufe de energía AC.
2. Conecte el Cable de Señal Análogo VGA al puerto de conexión de 15 pins de la unidad.
3. Encienda la pantalla y la fuente de energía de la computadora.
Panel Frontal de Control:
Inclinación y giro de la pantalla
Usted puede inclinar la pantalla hacia arriba y hacia abajo en 15°.
Control de Ajuste OSD (Visualizador en Pantalla)
Paso 1: Presione el “menú” para activar el menú de visualización en pantalla OSD
Paso 2: Presione las teclas “+”o “- ” para mover el cursor para seleccionar la función.
Paso 3: Presione “auto” para elegir la opción a ajustar
Funciones del Menú Rápido
.Usted puede presionar “+”o“-” para ajustar el volumen
Brillo
Para ajustar el brillo del fondo.
Audio
Para ajustar el volumen de los parlantes.
Temperatura
del Color
Para ajustar los parámetros de los colores rojo
, verde y azul en la
pantalla.
Config. de
imagen
Para ajustar las posiciones vertical y horizontal de la pantalla.
Ajuste OSD
Para ajustar de forma automática la posición del estado del
visualizador OSD.
Idioma
Pera elegir inglés, francés, alemán, italiano, español y chino
tradicional para el idioma del visualizador OSD para su propia
preferencia. El usuario puede elegir su idioma preferido.
Salir
Para salir del Menú OSD.
Configuraciones del Menú Secundario
Brillo
Para ajustar el brillo del fondo.
PDF created with FinePrint pdfFactory Pro trial version www.pdffactory.com
Page 30

29
Función
Descripción
Use las teclas “+”o “-”
para ajustar el nivel numérico del brillo (0~100).
Presione la tecla “auto” para guardar y la tecla menú para volver a la
página anterior.
Use las teclas “+” o “-” para ajustar el nivel numér
ico del contraste
(0-100).
Presione la tecla “auto” para guardar y la tecla menú para volver
a la página anterior.
Volver al menú anterior.
Audio
Para ajustar el volumen de los parlantes.
Función
Descripción
Presione la tecla “+”o “-”para aj
ustar el volumen y presione la tecla
“auto” para guardar y la tecla menú para volver a la página anterior.
Presione la tecla “auto” para apagar y encender el parlante.
Volver a la página anterior.
Temperatura
del Color
Utilice la tecla “+” o “-”
para elegir la función y presione la tecla “auto”
para realizar el ajuste.
Config. de
imagen
Utilice la tecla “+” o “-”
para elegir la función y presione la tecla “auto”
para acceder al menú de ajuste. Después de realizar el ajuste, presione la
tecla “auto” para guardar y la tecla menú para salir.
PDF created with FinePrint pdfFactory Pro trial version www.pdffactory.com
Page 31

30
Función
Descripción
Presione la tecla “auto” para ajustar de forma automática las posiciones
H/V, reloj y fase.
Si hubiera distorsión entre los caracteres, utilice la tecla “+”o “-
”para
corregir el problema.
Utilice la tecla “+”or “-
” para ajustar el valor de imagen de muestra real
ADC.
Utilice las teclas “+”o “-”
para mover la pantalla hacia la izquierda o
derecha.
Utilice la tecla “+” o “-” para mover la pantalla hacia arriba o abajo.
Volver al menú anterior.
Ajuste del
Visualizador
OSD
Utilice la tecla “+” o “-” para elegir la función y presione “auto” para
ajustar.
Después de hacer el ajuste, presione la tecla “auto” para guardar
y la tecla menú para volver a la página anterior.
Función
Descripción
Utilice la tecla “+” o “-”
para mover la posición del visualizador OSD a la
derecha o a la izquierda de la pantalla.
Utilice la tecla “+” o “-”
para mover la posición del visualizador OSD
hacia arriba o a hacia abajo de la pantalla.
Utilice las teclas “+” o “-
” para configurar el tiempo de apagado del OSD
y presione la tecla “auto” para guardarla.
Configura el sistema a los valores predeterminados de fábrica.
Volver a la página anterior.
Idioma
Utilice la tecla “+” o “-”
para elegir el idioma del menú OSD y presione la
tecla “auto” para confirmar.
PDF created with FinePrint pdfFactory Pro trial version www.pdffactory.com
Page 32

31
Modo de Ahorro de Energía
Este monitor cumple los criterios del modo NUTEK/TCO y VESA DPMS para la
administración de energía de visualización. Tiene un efectivo sistema incorporado de
administración de energía que reduce el consumo de energía de forma automática cuando no se
utiliza la PC.
Soporte de Modo de Visualización
Modo Consumo de energía (vatios) Indicador LED
Modo de Ahorro de
Energía Normal
15.4” 35W (típico)
< 3W
Verde
rojo
Este monitor tiene 7 modos predeterminados. Los siguientes modos son preestablecidos de
fábrica.
No. Descripción Frec. H (KHz) Frec. V (Hz)
1. VGA640×400 31.480 70.000
2. VGA640×480 31.649 60.000
3. VGA720×400 37.469 70.000
4 VESA 800×600 35.156 56.250
5 VESA 1024×768 48.363 60.000
6 VESA 1024×768 56.476 70.000
7 VESA 1280×800 49.702 59.810
Solución de problemas preliminares
Si el monitor no funciona de forma normal, por favor utilice la siguiente tabla para resolver las
causas más comunes y probables del problema, antes de llamar al personal de servicio. Si aún
así el problema no se resuelve, por favor pida asistencia al concesionario local.
Síntoma Acción Correcta
La Pantalla no
muestra nada
1. Compruebe la conexión del Cable de Señal VGA.
2.
Asegúrese que la energía esté encendida o que el adaptador de energía esté
encendido.
3. Compruebe si el cable de energía del monitor TFT LCD está suelto.
Imagen
borrosa.
1. Puede que el suministro de energía no esté estable. Intente conectar la
unidad a otro enchufe de energía.
2. Aleje el monitor LCD de objetos magnéticos.
Los parlantes
no suenan.
1. Por favor compruebe que el cable de audio esté enchufado.
2.
Puede que los parlantes hubieran sido silenciados o que el volumen esté
ajustado al mínimo.Rectifique la situación.
PDF created with FinePrint pdfFactory Pro trial version www.pdffactory.com
Page 33

32
Especificaciones
15.4”
Panel
Panel de matriz activa diagonal TFT de color ultra delgado.
Resolución
1280 x 800 (WXGA)
Área de visualización (H x
V)
331.2 mm x 207.0 mm
Tamaño de píxeles
0.2588 mm (Horizontal) x 0.2588 mm (Vertical)
Ángulo de visión
50º Vertical / 90º Horizontal
Frecuencia vertical: 31.47 a 80kHz
Frecuencia Horizontal: 56 a 75 Hz
Señales de entrada
RGB Análoga: 0.7 Vp-p
Sinc: 5V (pos./net. Separado)
Ancho de Banda de Vídeo de
Entrada Máximo
135 MHz
Visualización de Colores
262K colores
Sistema de señal
Entrada D-sub / DVI (si hay un conector DVI)
Luminosidad (típica)
180 cd/m2
Contraste (típico)
400:1
Tiempo de respuesta (típico)
16 mseg
Conectores de entrada
Tipo 15-pin D-sub, un enchufe de entrada de energía y de
audífonos.
Salida de Audio
Parlantes 2W/8ohmx2 incorporados.
Consumo máximo de
energía
35 vatios (típico)
Administración de energía
Cumple con el estándar VESA DPMS, EPA/Energy Star
Compatibilidad PnP
Cumple con los estándares VESA DDC 1& 2B
Ergonomía EMI
FCC, CE(CISPR-II)
Dimensión externa
435(L)X145(A)X310(Alt)
Temperatura
Funcionando: 0°C a 50°C Almacenado: -20°C a 60°C
Humedad
Funcionando: 25% a 90% RH Almacenado: 0% a 90% RH
PDF created with FinePrint pdfFactory Pro trial version www.pdffactory.com
Page 34

33
INTRODUCTIE
Dankt u voor het kopen van deze LCD monitor geproduct bij onze bedrijf. Deze monitor
gebruikt een TFT (thin film transistor) liquid crystal display (LCD) dashboard, en het is
opgezette met hoge kwaliteit en hogelijk kundige productie technologie om een meer
professioneel en consequent beeld kwaliteit naar het gebruiker verstrekken. Behalve, deze
TFT LCD monitor is opgezette om een ruimte te besparen en verschilent display plaatsen
aangebiedt, het zou met levendige ruimte van een modern tijdperk aanpassen zijn. Gelieve te
lezen de instructie en voorzorgsmaatregel in het boekje voor u om het monitor begint te
gebruiken.
Hoofdzaken
Gebruikt TFT (thin film transistor) actief matrix kleur LCD (liquid crystal display)
dashboard. Het aanbiedt de hoge resolutie beeld.
Zwierig ultra-slank met klein voetafdruk bespaart meer ruimen voor gebruikers.
Aanpassen met de laatst standaard van European ergnomiks.
15 ゚ naar voor en acht buigzaamheiden geneigen, laat u de meest geliefde hoek aan te
passen.
Laag stroom consumptie, laag hitte en geen straling output om gebruiker te beschermen.
Controleren Pakket Inhoud
Na u het pakket opent, gelieve goede gekeurt dat u de volgende item heeft. Als er is enkele
article gemist of geschadt zijn, gelieve kontakt met onze local verkoper of leverancier nemen.
TFT LCD Monitor
Gebruiker Handboek (inclusief specificaties)
Stroom Koord
VGA Kabel
Audio Kabel
Voorzorgsmaatregel
Gelieve eerst leest het instructies daarbeneden goed om het nodeloos risicos af te houden. Deze
handboek zou vasthouden zijn voor verder referentie in de toekomst.
Voor u het monitor schoonmaakt of beweegt, om het accidenteel schade van de monitor of
lichaam van mansen te vermijden, gelieve geode gekeurt dat stroom is af en de AC stroom
koord is af verbindt zijn.
Gelieve houdt de radiator onbelemmeert op de achtkant van de monitor.
Gelieve houdt de monitor verwijdeert van allerlei vloeistoffen.
Sommige component en onderdeel heeft hoge voltage gedracht. Om het accidenteel
gevaren te vermijden, gelieve nooit zichzelf afmonteert de monitor.
Als rook of geluid van rumoer uit de monitor komt, gelieve meteen sluiten de stroom af en
kontakt met uw local verkoper nemen
Om het permanent schade te vermijden, gelieve nooit laat de drukken aan de beeldscherm
dashboard brengt .
Voor u de monitor schoonmaakt , gelieve geode gekeurt dat AC stroom dashboard al
eerder weggehaalt en gebruikt geen vloeistoffen zuiverstoffen direkt aan de unit.
Zachtiglijk maakt de monitor schoon met een lichtelijk vochtige lap, niet laat meer
drukken aan de beeldscherm dashboard brengen .
PDF created with FinePrint pdfFactory Pro trial version www.pdffactory.com
Page 35

34
Installatie van de Monitor
Gelieve eerst sluit de stroom van de computer en het peripheral apparaturen uit.
1. Sluit de stroom adaptor aan de AC stroom input kontaktdoos van de achterkant van de unit,
en sluit de andere kant naar de AC stroom aan.
2. Sluit de VGA Analog Signaal Kabel aan de 15-pin aansluitpoort van de unit aan.
3. Zet de beeldscherm en de stroom aanvoer van de computer.
Voorkant Kontrole Dashboard :
Neiging en draaibaar van de beeldscherm.
U kunt de dashboard met 15 ゚ naar boven of beneden neigt.
OSD (Aan- Beeldscherm Display) Aanpassen Kontrole
Stap 1: Druk “menu” om de OSD aan- beeldscherm display te activeren.
Stap 2: Druk “+”of “-” toets voor de cursor te verroeren om het functie te kiezen
Stap 3: Druk “auto” om de optie aanpassen te kiezen.
Snel Menu Functies
U kunt druk “+”of“-”om het volume aan te passen.
Helderheid
Aan de helderheid van de achtergrondte te passen
Audio Aan de volume van de spreker te passen
Kleur
Temperatuur
Aan de parameters voor rood
,groen en blauw kleur
aan de beeldscherm te passen
beeld figuur
Aan de vertikaal en horizontaal plaats van de beeldscherm te
passen
OSD
Aanpassen
Om de plaats van OSD display status automatisch te zetten
taal
Het taal van engel, frans, duits, italiaans, spans en traditie
Chinees voor OSD taal display te kiezen op uw eigen voorkeur.
De gebruiker kunt een voorliefde taal te kiezen
Uitgaan Uit van de OSD Menu.
Tweede Menu Zetten
Helderheid
Aan de helderheid van de achtergrond te passen
PDF created with FinePrint pdfFactory Pro trial version www.pdffactory.com
Page 36

35
Functie
Beschrijving
Gebruikt “+”of “-” toets om de nummer niveau van helderheid (0~100) te
aanpassen. Druk “auto” toets te bewaren en “menu
” toets om vorige pagina te
terugkeren.
Druk “+”of “-” toets aan de numeriek waardigheid van
Afsteken (0~100) te passen. Druk “auto” toets te bewaren en “menu
” toets om
vorige pagina te terugkeren.
Terug naar de vorig menu.
Audio
Aan volume van de spreker te passen.
Functie
Beschrijving
Gebruik “+”of “-”toets om volume aan te passen, en druk “auto” t
oets te
bewaren en “menu” toets om vorige pagina te terugkeren.
Druk “auto” toets om sprker aan te zetten of uit te zetten.
Terug naar de vorig menu.
Kleur
Temperatuur
Gebruik “+”of “-”
toets om de functie te kiezen, en druk “auto” toets om
aanpassen te maken.
beeld figuur
Gebruik “+”of “-”
toets om de functie te kiezen, en druk “auto” toets naar
aanpassen menu in te gaan. Na de aanpassen is gedaan, druk “auto” toets te
bewaren en “menu” toets te uit.
PDF created with FinePrint pdfFactory Pro trial version www.pdffactory.com
Page 37

36
Functie
Beschrijving
Druk de “auto” toets om H/V plaats, klok en phase automatisch te aanpassen,
Wanneer er is verdraaiing tussen karakters, gebruik “+” of “-”
toets om deze
problem te correct.
Gebruik “+”of “-”
toets om de ADC voorbeeldig reëel beeld waardigheid te
aanpassen.
Gebruik “+”of “-” toets voor beeldscherm naar link of recht te verroeren.
Gebruik “+”of “-” toets voor beeldscherm naar boven of beneden te verroeren
.
Terug naar de vorig menu.
OSD Display
Aanpassen
Gebruik “+”of “-”toets om de functie te kiezen, en druk “auto” toets te
aanpassen. Na de aanpassen is gedaan, druk “auto” toets te bewaren en
“menu” toets om vorige pagina te terugkeren.
Functie
Beschrijving
Gebruik “+”of “-”
toets voor OSD display plaats naar recht of link van de
beeldscherm te verroeren.
Gebruik “+”of “-”
toets voor de OSD display plaats naar boven of beneden van
de beeldscherm te verroeren.
Gebruik “+”of “-”
toets om de OSD aftijd te zetten en druk “auto”toets te
bewaren
Zetten de system naar fabriek default value.
Terug naar de vorig pagina.
Taal
Gebruik “+”of “-”
toets om a taal vam OSD menu te kiezen, en druk “auto”
toets te bevestigen
PDF created with FinePrint pdfFactory Pro trial version www.pdffactory.com
Page 38

37
Stroom Bewaar Mode
Deze monitor met de standaardmaat van NUTEK/TCO en VESADPMS mode voor display
stroom administratie. Er heeft een effectief in- bouw stroom administratie systeem die nemen
de verbruiken van stroom automatisch af wanneer de PC is niet gebruikt.
Display Mode Support
Mode Stroom Gebruiken(watts) LCD aanwijzer
Normaal
Stroom Bewaar Mode
15.4” 35W (typisch)
<3W
Groen
Rood
Er zijn 7 voorgezette modes voor deze monitor. De modes als volgt zijn voorgezette
als fabriek defaults.
Preliminair Moeite Schieting
Als de monitor niet normal loopt, gelieve gebruikt de tabel als volgt om de meest gewoon en
mogelijk oorzaken van de problem te oplossen voor u de service personaal te bellen.Als de
problem steeds niet oplossen kunt, dan gelieve kontakt met de lokaal verkoper te nemen voor
assistentie.
Symptoom Correctie handeling
Geen Display aan
beeldscherm
1. Kontroleert de aansluiting van de VGA Signaal Kabel
2.
Kontroleert en zeker weet het stroom is aangesluit, of die stroom
adaptor is aan..
3.
Kontroleert of de stroom koord van TFT LCD monitor is onvast.
onhelderheid.
beeld
1. De stroom aanvoeren misschien niet stabiel zijn.
Probeert sluit de
unit aan andere stroom kontaktdoos
2. Verroert de LCD monitor weg van magnetisch objects.
Geen geluid
van de
spreker
1. Gelieve kontroleert als de audio kabel is verbindt
2.
De sprekers missichien stom geword of de volume naar de
minimum gezet. Gelijkzet de situatie.
Nr.
Beschrijving
H-Freq. (KHz) V-Freq. (Hz)
1. VGA640×400 31.480 70.000
2. VGA640×480 31.649 60.000
3. VGA720×400 37.469 70.000
4 VESA 800×600 35.156 56.250
5 VESA 1024×768 48.363 60.000
6 VESA 1024×768 56.476 70.000
7 VESA 1280×800 49.702 59.810
PDF created with FinePrint pdfFactory Pro trial version www.pdffactory.com
Page 39

38
Specificaties
15.4”
Dashboard
Ultra-slank kleur TFT diagonal aktieve matrix dashboard
Resolutie 1280 x 800 (WXGA)
Display gebied (H x V) 331.2 mm x 207.0 mm
Pixel Toonhoogte 0.2588 mm (Horizontal) x 0.2588 mm (Vertical)
Uitzicht Hoek 50º Vertikaal / 90º Horizontal
Vertikaal Frequency: 31.47 to 80kHz
Horizontal Frequency: 56 to 75 Hz
Input signaals
Analog RGB: 0.7 Vp-p
Sync: 5V (pos./net.Apart)
Maximum Input video
Band Breedte
135 MHz
Kleur Display 262K kleurs
Signaal Syateem D-sub / DVI input(Als er is een DVI aansluiting )
Luminance ( Typisch) 180 cd/m2
Kontrast ( Typisch) 400:1
Terugslag tijd( Typisch) 16 msec
Input Aansluitingen 15-pin D-sub Type, a en stroom input kontaktdoos en een oorphone kontak
tdoos
Audio Output Built-in 2W/8ohmx2 Sprekers.
Maxim Stroom Gebruiken 35 watts (typikaal)
Stroom Administratie VESA DPMS standaard,EPA/Energy Ster willig.
PnP Kompatibilitie VESA DDC 1& 2B standaards willig.
EMI Ergonomiks FCC, CE(CISPR-II)
Externaal Dimensie 435(L)X145(W)X310(H)
Temperatuur Inwerking 0°C to 50°C Bewaren: -20°C to 60°C
Vochtigheid Inwerking: 25% to 90% RH Bewaren: 0% to 90% RH
PDF created with FinePrint pdfFactory Pro trial version www.pdffactory.com
Page 40

39
WPROWADZENIE
Dziękujemy za zakup monitora LCD wyprodukowanego przez naszą firmę. Monitor ten
wykorzystuje ciekłokrystaliczny panel LCD TFT i został wyprodukowany z wykorzystaniem
technologii produkcji wysokiej jakości i wydajności w celu dostarczenia użytkownikowi
bardziej profesjonalnego obrazu. Poza tym, monitor TFT LCD jest zaprojektowany w sposób
umożliwiający ekonomiczne wykorzystanie przestrzeni i oferujący różne pozycje wyświetlania
w zgodzie z nowoczesną przestrzenią mieszkalną. Proszę zapoznać się z instrukcją i środkami
ostrożności przedstawionymi w tej broszurze zanim zaczniecie Państwo użytkować monitor.
Funkcje
Wykorzystuje panel LCD z aktywną kolorową matrycą TFT. Oferuje obraz w wysokiej
rozdzielczości.
Elegancki, super płaski zajmujący mało miejsca.
Zgodny z najnowszymi europejskimi standardami dotyczącymi ergonomii.
Elastyczność odchylania w przód i w tył pozwala ustawić monitor pod pożądanym kątem.
Niskie zużycie mocy, ograniczone nagrzewanie się i zerowe promieniowanie chroni
użytkownika.
Sprawdź zawartość opakowania
Po otwarciu opakowania upewnij się, że znajdują się w nim poniżej wymienione przedmioty.
Jeżeli któregoś z nich brakuje lub jest uszkodzony, proszę skontaktować się z lokalnym
przedstawicielem handlowym lub dostawcą:
Monitor LCD TFT
Instrukcja obsługi (łącznie ze szczegółami technicznymi)
przewód zasilający
przewód VGA
przewód Audio
Środki ostrożności
Zapoznaj się uważnie z poniższymi wskazówkami aby uniknąć niepotrzebnych
zagrożeń. Należy zachować tę instrukcję na przyszłość.
Przed czyszczeniem monitora nale ży upewnić się, że zasilanie jest wyłączone, a kabel
zasilający odłączony, aby uniknąć uszkodzenia monitora lub odniesienia obrażeń przez
jego użytkownika.
Nie należy zasłaniać niczym radiatora z tyłu monitora.
Chronić monitor przed płynami.
Niektóre elementy są pod wysokim napięciem. Aby uniknąć niepotrzebnego
niebezpieczeństwa, proszę nie rozmontowywać monitora samodzielnie.
Jeżeli z monitora wydobywa się dym lub kakofonia dźwięków, proszę natychmiast
odłączyć zasilanie i skontaktować się z lokalnym przedstawicielem handlowym.
Proszę nie naciskać na ekran aby uniknąć trwałego uszkodzenia.
Przed oczyszczeniem monitora nale ży upewnić się, że odłączony jest kabel zasilający i nie
należy nakładać bezpośrednio na urządzenie środka czyszczącego. Należy delikatnie
oczyścić monitor za pomocą wilgotnej szmatki, bez użycia silnego nacisku.
PDF created with FinePrint pdfFactory Pro trial version www.pdffactory.com
Page 41

40
Instalacja monitora
Proszę najpierw wyłączyć zasilanie komputera i jego urządzeń peryferyjnych.
1. Podłącz zasilacz do gniazdka z tyłu urządzenia i podłącz drugi koniec do sieci.
2. Podłącz kabel sygnału analogowego VGA do 15-sto bolcowego portu urządzenia.
3. Włącz ekran i zasilanie komputera.
Przedni panel sterujący:
Przechylanie i obracanie ekranu
Możesz przechylić ekran w górę lub w dół o 150
Menu ekranowe OSD (On-Screen Display)
Krok 1: Naciśnij menu aby uruchomić wyświetlenie menu OSD.
Krok 2: Naciśnij klawisz “+”lub “-”, aby przesunąć kursor i wybrać funkcję.
Krok 3: Naciśnij “auto” aby wybrać opcję, którą chcesz ustawić.
Szybkie funkcje menu
Możesz nacisnąć klawisz “+ ”lub“-”, aby regulować głośność
Jasność
Ustawianie jasności tła.
Audio
Ustawianie głośności.
Temperatura
barwowa
Ustawianie parametrów dla kolorów czerwonego, zielonego
oraz niebieskiego na ekranie.
Konfiguracja
obrazu
Ustawianie pionowych i poziomych pozycji ekranu.
Ustawienie
OSD
Automatyczne ustawianie pozycji statusu wyświetlania OSD.
Polski
Wybór języka angielskiego, francuskiego, niemieckiego,
włoskiego, hiszpańskiego oraz tradycyjnego chińskiego dla
wyświetlania OSD według własnych preferencji. Użytkownik
może wybrać pożądany język.
Wyjście
Wyjście z menu OSD.
Drugorzędne ustawienie menu
Jasność
Ustawienie jasności tła.
Funkcja
Opis
Użyj klawisza “+”lub “-”
, aby zmienić liczbę odpowiadającą jasności (0~100).
Naciśnij przycisk „auto” aby zapisać menu i powrócić do poprzedniej strony.
PDF created with FinePrint pdfFactory Pro trial version www.pdffactory.com
Page 42

41
Użyj klawisza “+”lub “-”, aby zmienić liczbę odpowiadającą kontrastow
i
(0~100). Naciśnij przycisk „auto” aby zapisać menu i powrócić do poprzedniej
strony.
Wstecz do poprzedniego menu.
Audio
Ustawianie głośności.
Funkcja
Opis
Użyj klawiszy “+”lub “-”
, aby zmienić głośność i naciśnij klawisz “auto”, aby
zapisać ustawienie lub klawisz powrotu, aby wrócić do poprzedniej strony.
Naciśnij przycisk „auto” aby włączyć/wyłączyć głośnik.
Wstecz do poprzedniej strony.
Temperat
ura
barwowa
Użyj klawiszy “+”lub “-”, aby wybrać funkcję i naciśnij "auto", aby z
mienić
ustawienia.
Konfigura
cja
obrazu
Użyj klawiszy “+”lub “-”
, aby wybrać funkcję i naciśnij "auto", aby wejść do
menu zmiany ustawień. Po dokonaniu zmiany ustawień naciśnij klawisz
“auto”, aby zapisać zmiany i klawisz wyjścia z menu.
Funkcja
Opis
Naciśnij klawisz „auto” aby automatycznie ustawić pozycje poziomą i
pionową, zegar oraz fazę.
PDF created with FinePrint pdfFactory Pro trial version www.pdffactory.com
Page 43

42
Gdy występują różnice między znakami, użyj klawiszy “+” lub “-” , aby je
skorygować.
Użyj klawiszy “+”lub “-” , aby ustawić częstotliwość próbkowania obrazu
przez przetwornik analogowo-cyfrowy.
Użyj klawiszy “+”lub “-” , aby przesunąć ekran w prawo lub w lewo.
Użyj klawiszy “+”lub “-” , aby przesunąć ekran w górę lub w dół.
Wstecz do poprzedniego menu.
Regulacja
wyświetla
nia OSD
Użyj klawiszy “+”lub “-”, aby wybrać funkcję i naciśnij "auto", aby zmienić
ustawienia. Po dokonaniu zmiany ustawień naciśnij klawisz “auto”, aby
zapisać zmiany i klawisz menu, aby powrócić do poprzedniej strony.
Funkcja
Opis
Użyj klawiszy “+”lub “-” , aby
przesunąć pozycję, w której wyświetlane jest
menu OSD w prawo lub w lewo.
Użyj klawiszy “+”lub “-”
, aby przesunąć pozycję, w której wyświetlane jest
menu OSD w górę lub w dół.
Użyj klawiszy “+”lub “-” , aby ustawić czas, po którym wyłączane jest
menu
OSD i klawisz “auto”, aby zapisać ustawienie.
Ustawia system na fabrycznie domyślną wartość.
Wstecz do poprzedniej strony.
Polski
Użyj klawiszy “+”lub “-”
, aby wybrać język menu OSD i naciśnij "auto", aby
potwierdzić wybór.
PDF created with FinePrint pdfFactory Pro trial version www.pdffactory.com
Page 44

43
Tryb oszczędzania energii
Monitor ten spełnia kryteria NUTEK/TCO oraz trybu VESA DPMS dla wyświetlania
ustawień zarządzania energią. Posiada wydajny wbudowany system zarządzania,
który automatycznie redukuje zużycie energii, gdy komputer nie jest używany.
Obsługa trybów wyświetlania
Tryb Moc (w watach) Wskaźnik LED
Normalny
Tryb oszczędności
15.4” 35 W (typowe)
<3W
Zielony
czerwony
Dla tego monitora istnieje 7 wstępnie ustawionych trybów. Następujące tryby są fabrycznie
wstępnie ustawione.
Numer
Opis
Częstotliwość odchylania
poziomego (KHz)
Częstotliwość odchylania
pionowego (Hz)
1. VGA640×400 31.480 70.000
2. VGA640×480 31.649 60.000
3. VGA720×400 37.469 70.000
4 VESA 800×600 35.156 56.250
5 VESA 1024×768 48.363 60.000
6 VESA 1024×768 56.476 70.000
7 VESA 1280×800 49.702 59.810
Wstępne rozwiązywanie problemów
Jeżeli ekran nie działa poprawnie, proszę skorzystać z poniższej tabeli, aby rozwiązać
najczęstsze możliwe przyczyny problemu przed wezwaniem serwisanta. Jeżeli mimo to
problemu nie udało się rozwiązać, proszę skontaktować się z lokalnym serwisantem.
Objaw Sposób naprawy
Na ekranie nic
się nie
wyświetla
1. Sprawdź podłączenie kabla sygnału VGA.
2. Upewnij się, że zasilanie i zasilacz są włączone.
3. Sprawdź, czy kabel zasilający monitora TFT LCD nie jest obluzowany.
Zamazany
obraz
1.
Zasilanie może nie być stabilne. Spróbuj podłączyć urządzenie do innego
gniazdka.
2. Odsuń monitor LCD z dala od magnesujących obiektów.
Z głośników
nie wydobywa
się głos.
1. Sprawdź, czy kabel audio jest podłączony.
2.
Głośniki mogły zostać wyciszone lub ustawione na minimalną głośność.
Skoryguj tę sytuację.
PDF created with FinePrint pdfFactory Pro trial version www.pdffactory.com
Page 45

44
Szczegóły techniczne
15.4”
Panel
Super cienki kolorowy, ukośny panel TFT z aktywną matrycą
Rozdzielczość
1280 x 800 (WXGA)
Obszar wyświetlania (H x
V)
331.2 mm x 207.0 mm
Rozstaw pikseli
0.2588 mm (poziomo) x 0.2588 mm (pionowo)
Kąt oglądania
50º pionowo / 90º poziomo
Częstotliwość pionowa: 31.74 do 80 kHz
Częstotliwość pozioma: 56 do 75 Hz
Sygnały wejściowe
RGB analogowy: 0.7 Vp-p
Sync: 5V (pos./net. oddzielny)
Maksymalna szerokość
pasma video wejściowego
135 MHz
Wyświetlanie kolorów
262K kolorów
System sygnałowy
Wejście D-sub/DVI (o ile jest złącze DVI)
Jaskrawość (typowa)
180 cd/m2
Kontrast (typowy)
400:1
Czas reakcji (typowy)
16 msec
Złącza wejściowe
Rodzaj D-sub, 15-sto bolcowy, gniazdko zasilające oraz gniazdko słuchawek.
Wyjście audio
Wbudowane dwa głośniki 2W/8ohmx.
Maksymalne zużycie
mocy
35 watów (typowe)
Zarządzanie mocą
Standard VESA DPMS, zgodny z EPA/Energy star
Kompatybilność PnP
Zgodny ze standardami VESA DDC 1& 2B
Ergonomia EMI
FCC, CE(CISPR-II)
Wymiary zewnętrzne
435(D)X145(S)X310(W)
Temperatura
W działaniu: 0°C do 50 °C W przechowywaniu: -20°C do 60 °C
Wilgotność
W działaniu: 25% do 90% RH W przechowywaniu: 0% do 90% RH
PDF created with FinePrint pdfFactory Pro trial version www.pdffactory.com
Page 46

45
INTRODUÇÃO
Obrigado por adquirir este monitor LCD produzido por nossa empresa. Este monitor possui
painel de cristal líquido (LCD) com transistores de filme fino (TFT) e foi projetado com uma
tecnologia de alta qualidade e alta eficiência, buscando oferecer uma imagem mais consistente
e profissional ao usuário. Além disso, este monitor LCD foi projetado para economizar espaço
e possibilitar diferentes posições de exibição, respeitando o espaço dinâmico da vida moderna.
Por favor, leia com atenção as instruções e precauções contidas neste manual antes de utilizar
o monitor.
Características
Utiliza painel LCD (de cristal líquido) com matriz ativa e TFT (transistores de filme fino).
Oferece imagens em alta resolução.
Extrafino e elegante com dimensões reduzidas, deixa mais espaço para o usuário.
Projetado de acordo com as mais novas normas ergonômicas européias.
Inclinação de 15
o
para frente e para trás que permite ajustar o ângulo mais confortável.
Consumo reduzido de energia, pouca emissão de calor e emissão zero de radiação para a
segurança do usuário.
Itens Contidos da Embalagem
Ao abrir a embalagem, certifique-se de que os seguintes itens estejam presentes. Se algum item
estiver faltando, favor consultar seu fornecedor ou distribuidor local.
Monitor TFT LCD
Manual do Usuário (incluindo especificações)
Cabo de energia
Cabo VGA
Cabo de Áudio
Precauções
Favor ler as seguintes instruções antes de usar para evitar danos desnecessários. Este manual
deve ser conservado para referências futuras.
Antes de mover ou limpar o monitor, certifique-se de que o mesmo esteja desligado e que
o cabo esteja desconectado da tomada para evitar danos ao monitor ou ao usuário.
Mantenha o radiador na parte traseira do monitor desobstruído.
Mantenha l íquidos longe do monitor.
Algumas das peças e componentes possuem alta voltagem. Para evitar perigo
desnecessário, não desmonte o monitor.
Se sair fumaça ou ruídos do monitor, desconecte o cabo de energia imediatamente e entre
em contato com o seu distribuidor local.
Para evitar danos permanentes não faça pressão na tela do monitor.
Antes de limpar o monitor, certifique-se de que o cabo de força esteja desconectado e não
aplique sprays diretamente. Limpe a tela com leveza, usando um pano levemente úmido.
PDF created with FinePrint pdfFactory Pro trial version www.pdffactory.com
Page 47

46
Instalação do Monitor
Desligue o computador, assim como os equipamentos periféricos primeiro.
1. Conecte o adaptador de energia à entrada de corrente AC na parte traseira do monitor e o
outro lado a uma tomada AC.
1. Conecte o Cabo de Sinal Análogo VGA à porta conectora de 15 pinos do monitor.
2. Ligue o monitor e o PC.
Painel de Controle Frontal:
Inclinação e Rotação da Tela
Você pode inclinar o painel para cima ou para baixo até 15o.
Controle de Ajustes OSD (Display na Tela)
Primeiro: Pressione "menu” para ativar o menu OSD.
Segundo: Pressione “+”ou “-” para mover o cursor e selecionar a função.
Terceiro: Pressione “auto” para escolher a opção a ajustar.
Funções Rápidas do Menu
Pressione “+”ou“-” para ajustar o volume
Brilho Para ajustar o brilho do fundo.
Áudio Para ajustar o volume dos auto-falantes.
Cor
Para ajustar os parâmetros referentes às cores ver
melho, verde e
azul no monitor.
Config da
Imagem
Para ajustar a posição vertical e horizontal da tela.
Ajuste OSD
Para ajustar automaticamente a posição do status do display
OSD.
Idioma
Para escolher entre inglês, francês, alemão, italiano, espanh
ol e
chinês tradicional para língua de exibição do display OSD.
Sair Para sair do Menu OSD.
Configurações Secundárias do Menu
Brilho
Para ajustar o brilho do fundo.
PDF created with FinePrint pdfFactory Pro trial version www.pdffactory.com
Page 48

47
Função
Descrição
Use “+”ou”-” para ajustar o nível de brilho (0~100).
Pressione “auto” para salvar e
a tecla menu para retornar à página anterior.
Pressione “+”ou”-” para ajustar o nível de contraste (0 -100).
Pressione “auto” para
salvar e a tecla menu para retornar à página anterior.
Voltar ao menu anterior.
Áudio
Para ajustar o volume dos auto-falantes.
Função
Descrição
Use “+”ou “-”
para ajustar o volume e pressione “auto” para salvar e a tecla menu
para retornar à página anterior.
Pressione “auto” para ligar e desligar os auto-falantes.
Voltar à página anterior.
Cor
Use “+”ou “-” para escolher a função e pressione “auto” para fazer ajustes.
Config
da
Imagem
Use “+”ou “-”
para escolher uma função e pressione “auto” para entrar no menu de
ajustes. Depois de fazer o ajuste, pressione “a
uto” para salvar e a tecla menu para
sair.
PDF created with FinePrint pdfFactory Pro trial version www.pdffactory.com
Page 49

48
Função
Descrição
Pressione "auto” para ajustar a posição H⁄ V, o relógio e a fase automaticamente.
Se houver distorção entre caracteres, use “+” ou”-” para corrigir o problema.
Use “+”ou “-” para ajustar o valor de sampleamento de imagem real do ADC
Use “+” ou “-” para mover a tela para a direita ou esquerda.
Use “+” ou “-” para mover a tela para a cima ou para baixo.
Voltar ao menu anterior.
Ajustes
do
Display
OSD
Use “+”ou “-” para escolher a função e pressione "auto” para fazer ajustes.
Depois
de faz
er o ajuste, pressione “auto” para salvar e a tecla menu para retornar à página
anterior.
Função
Descrição
Use “+”ou “-” para mover o display OSD para a direita ou para a esquerda.
Use “+” ou “-” para mover a tela para a cima ou para baixo.
Use “+”ou “-”
para escolher o tempo de desativação do OSD e pressione “auto”
para salvar.
Retorna as configurações para os valores padrões de fábrica.
Voltar à página anterior.
Idioma
Use “+” ou “-” para selecionar uma língua para o menu OSD, e
pressione “auto”
para confirmar.
PDF created with FinePrint pdfFactory Pro trial version www.pdffactory.com
Page 50

49
Modo de Economia de Energia
Este monitor está de acordo com os critérios NUTEK⁄ TCO e VESA para gerenciamento de
energia. Ele possui um sistema efetivo de gerenciamento de energia que reduz o consumo de
energia automaticamente quando o PC não está sendo usado.
Suporte para modo de exibição
Modo Consumo de Energia (watts)
Indicador LED
Normal
Modo de Economia de Energia
15.4” 35W (típico)
< 3W
Verde
vermelho
O monitor contém 7 modos pré-configurados. Os seguintes modos são pré-configurados como
padrões de fábrica.
No. Descrição Freq. H. (KHz) Freq. V. (Hz)
1. VGA640×400 31.480 70.000
2. VGA640×480 31.649 60.000
3. VGA720×400 37.469 70.000
4 VESA 800×600 35.156 56.250
5 VESA 1024×768 48.363 60.000
6 VESA 1024×768 56.476 70.000
7 VESA 1280×800 49.702 59.810
Solução preliminar de problemas
Se o monitor nã o estiver funcionando corretamente, use a tabela a seguir para tentar resolver os
problemas mais comuns antes de ligar para a assistência técnica. Se mesmo assim o problema
não for resolvido, peça assistência ao distribuidor local.
Problema
O que fazer
Não há Imagem na
Tela
1. Verifique a conexão do Cabo de Sinal VGA.
2. Verifique se o monitor e o adaptador de energia estão ligados.
3. Verifique se o cabo de energia do monitor TFT LCD está solto.
Imagem borrada.
1. A fonte de energia pode estar instável.Tente conectar o monitor a outra
tomada.
2. Afaste o monitor de objetos magnéticos.
Auto-falantes
mudos.
1. Verifique se o cabo de áudio está conectado.
2. Os auto-
falantes podem estar no modo “mudo” ou com o volume ajustado
para o nível mínimo.Corrija esses problemas.
PDF created with FinePrint pdfFactory Pro trial version www.pdffactory.com
Page 51

50
Especificações
15.4”
Tela
Tela TFT diagonal colorida extrafina com matriz ativa.
Resolução
1280 x 800 (WXGA)
Área de Exibição
331.2 mm x 207.0 mm
Distância entre Pixels
0.2588 mm (Horizontal) x 0.2588 mm (Vertical)
Ângulo de Visão
50º Vertical / 90º Horizontal
Freqüência Vertical: 31,47 a 80kHz
Freqüência Horizontal: 56 a 75 Hz
Sinais de Entrada
RGB Analógico: 0,7 Vp-p
Sinc: 5V (pos.⁄ net. Separado)
Largura de Banda Máxima
135 MHz
Cores
262K cores
Sistema de Sinal Entrada D-sub / DVI (caso haja um conector DVI )
Brilho (típico)
180 cd/m2
Contraste (típico)
400:1
Tempo de Resposta (típico)
16 msec
Conectores de Entrada
D-sub de 15 pinos, uma entrada para a energia e uma para fone de ouvido.
Saída de Áudio
Auto-falantes 2W/8ohmx2 Embutidos.
Consumo Máximo de Energia
35 watts (típico)
Gerenciamento de Energia
Normas VESA DPMS, de acordo com EPA/Energy Star.
Compatibilidade Plug & Play
De acordo com as normas VESA DDC 1& 2B
Ergonômico EMI
FCC, CE(CISPR-II)
Dimensões Externas
435(C) x 145(L) x 310(A)
Temperatura
Em operação: 0°C a 50°C Estoque: -20°C a 60°C
Umidade
Em operação: 25% a 90% HR Estoque: 0% a 90% HR
PDF created with FinePrint pdfFactory Pro trial version www.pdffactory.com
 Loading...