

Page 1
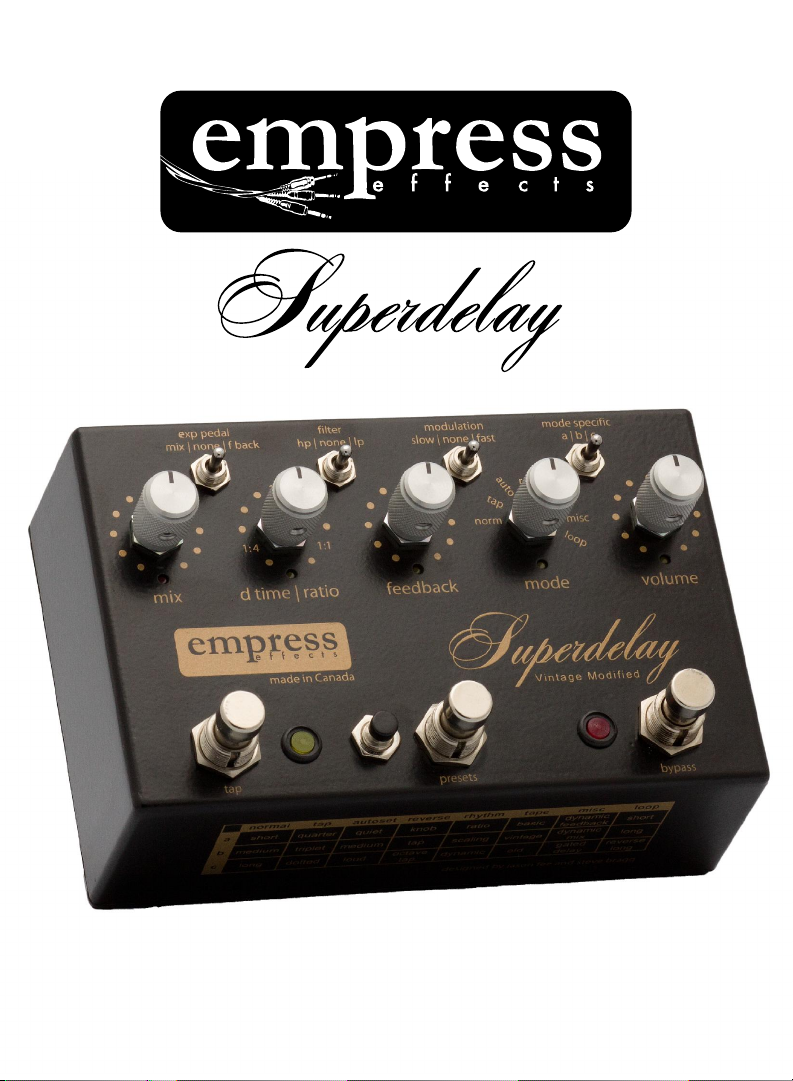
vintage modied
user manual
Page 2

Introduction
The Empress Effects Superdelay is the result of over 2 years of research,
development and most importantly talking to guitarists. In designing the
Superdelay, we strived to create a pedal with a comprehensive feature set and
new innovative sounds in a compact package.
We wanted to give guitarists a lot of control and ability to change sounds on the
fly. The Superdelay offers a myriad of tap modes, the ability to save and recall
multiple presets, support for an external expression pedal and much. We highly
recommend that you peruse this manual and keep the ‘mode overview’ section
handy as you explore and learn the features of the delay.
To get the most out of this product we’ve put some brief instructional videos on
our website:
www.empresseffects.com
Enjoy,
Steve Bragg
1
Page 3

Contents
Introduction ........................................................................................................... 1
Quick Start ............................................................................................................. 3
Overview of Modes and Sub-modes ..................................................................... 4
The Modes in Detail ............................................................................................... 5
Normal Mode .................................................................................................... 5
Tap Mode ........................................................................................................... 6
Auto-Set Mode .................................................................................................. 7
Reverse Mode .................................................................................................... 8
Controls at a Glance ......................................................................................... 9-10
The Modes in Detail (continued) ......................................................................... 11
Rhythm (Multi-Tap) Mode ............................................................................... 11
Tape Mode ....................................................................................................... 12
Misc Mode ....................................................................................................... 13
Looper Mode ................................................................................................... 14
Using Presets ....................................................................................................... 16
Expression Pedal .................................................................................................. 18
Specifications ....................................................................................................... 19
2
Page 4
Quick Start
Connect the supplied power adaptor to the Superdelay, plug in your guitar and
connect the Superdelay to your amplifier. Set the controls on the Superdelay to
the settings shown below.
If the red bypass LED is not already lit, press the bypass switch to engage the
Superdelay. You should hear a typical delay signal mixed with your guitar signal.
You can move the knobs to suit your tastes, and change modes and sub-modes.
3
Page 5
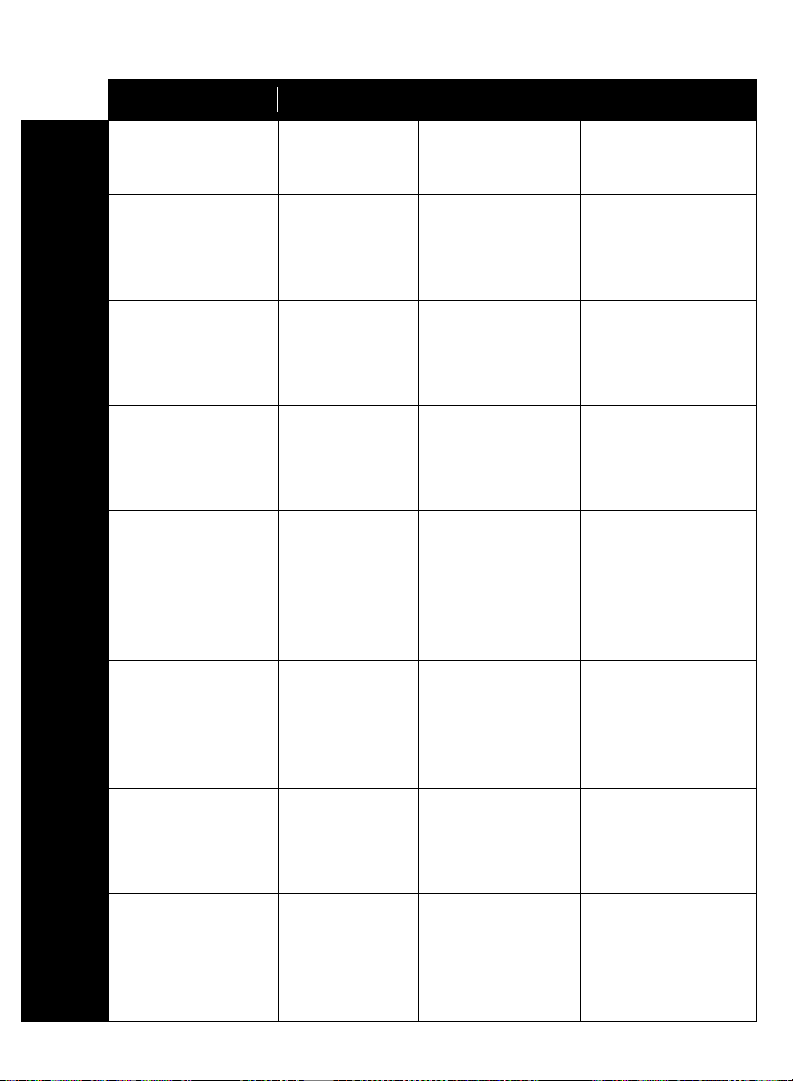
Overview of Modes and Sub-modes
Description
Sub-Mode A
Sub-Mode B
Sub-Mode C
Normal
Normal delay sounds
Short delay
(5.5ms – 95ms )
Medium delay
(45ms-800ms)
Long delay
(700ms-2.2s)
Tap
Tap tempo delay.
d time | ratio knob
controls ratio . Ratios
are 1:1, 1:2, 1:4.
Delay time is the
same as the tapped
time.
Triplet rhythm: delay
time is 1/3 the tapped
time.
Dotted quarter rhythm:
delay time is 1.5x the
tapped time.
Auto-Set
Delay time is set
automatically based on
the input. d time | ratio
knob controls ratio.
Low trigger
threshold for quiet
guitars or quiet
playing.
Medium trigger
threshold.
High trigger threshold
for loud guitars or loud
playing.
Reverse
Delayed signal is
reversed. d time | ratio
knob controls ratio in
sub-modes b and c.
d time | ratio knob
controls how long
reversed segments
of audio are.
Length of reversed
segments is set by
tapping the tap
switch.
Reversed segments are
played back an octave
higher.
Rhythm
Rhythmic repeats with
up to four repeats
entered by tapping.
d time | ratio knob
controls ratio and scale
of pattern.
d time | ratio
knob scales the
rhythm tapped.
d time | ratio knob
stretches or
compresses the
rhythm.
First tap is quiet, taps
get progressively louder.
Tape
Analog tape delay
emulation. tap switch
sets the delay time.
High quality tape
compression
artifacts added to
delayed signal.
Tape compression
artifacts with a little
bit of ‘wow and
flutter’ added to the
delayed signal.
Tape compression
artifacts with subtle
intermittent dropouts
akin to an older,
shedding tape.
Misc
Miscellaneous
operation modes.
Feedback increases
as input volume
decreases.
Mix increases (more
wet) as input volume
decreases.
Press tap switch to
start/stop delay. Lets
you trail off delayed
signal.
Looper
Record and loop audio
clips. tap switch
starts/stops recording.
presets switch stops,
clears existing loop.
Normal looper
mode. 6.8 seconds
of loop time.
Long looper mode.
13.6 seconds of loop
time.
Loop is played back in
reverse. Audio layered
after initial loop begins
playback is played back
forwards.
4
Page 6

The Modes in Detail
Normal Mode
This is the standard digital delay type operation, known and loved by all. In
Normal Mode the tap switch, when pressed, mutes the wet signal for one ‘delay
time’ period. This is useful if you’re using a high feedback setting; you can press
the tap switch when you change chords to avoid dissonance from the feedback
of the previous chord ringing over the current chord.
Sub-mode A – Short Delay
In sub-mode A the d time | ratio knob varies the delay time between
5.5ms and 95ms.
Sub-mode B – Medium Delay
In sub-mode B the d time | ratio knob varies the delay time between
45ms and 800ms
Sub-mode C – Long Delay
In sub-mode C the d time | ratio knob varies the delay time between
700ms and 2.8 seconds.
5
Page 7

Tap Mode
In Tap Mode the delay time is controlled by tapping the tap switch repeatedly to
a desired tempo. For tapped tempo accuracy the unit takes an average of
repeated taps.
In Tap Mode the d time | ratio knob acts as a ratio control in all sub-modes:
If the knob is set between 7 o’clock and 10 o’clock it is a 1:4 ratio. The delay
time will be four times as fast as the tempo tapped.
If the knob is set between 10 o’clock and 2 o’clock it is a 1:2 ratio. The delay
time will be twice as fast as the tempo tapped.
If the knob is set between 2 o’clock and 5 o’clock it is a 1:1 ratio. The delay
time will be the same as the tempo tapped.
Sub-mode A – Normal Tap
In sub-mode A the delay time is set to the tap time.
Sub-mode B – Triplet Tap
In sub-mode B the delay time is set to 1/3 of the tap time. If you tap quarter
notes the delay time will be eighth note triplets. Note that the d time | ratio
knob acts as a ratio knob in this mode.
Sub-mode C – Dotted Tap
In sub-mode C the delay time is set to 1.5 times the tap time. If you tap
quarter notes the delay time will be set to dotted quarter notes.
6
Page 8

Auto-Set Mode
In Auto-Set Mode the Superdelay sets the delay time by listening to the
dynamics in your playing. The Superdelay is watching for volume peaks in the
input signal. For this to work effectively the input passages should have
relatively consistent rhythmic content.
When you start playing in Auto-Set mode you should see the large, yellow LED
to the right of the tap switch blink with each note you strike. If it is blinking
inconsistently adjust the threshold by changing the sub-mode (described in
detail below). If you press the tap switch at this point, it changes the delay time
in use to the last interval between peaks that it detected.
Sub-mode A – Low Threshold
In sub-mode A the threshold is quite low, allowing the Auto-Set Mode to
identify the peaks in quiet passages or from instruments with quiet outputs. If
you’re playing too loud for this mode, some single notes may be interpreted as
two notes, causing the delay time to be too short. If the delay time is
consistently too short, switch to a higher threshold.
Sub-mode B – Medium Threshold
In sub-mode B the threshold is medium allowing the Auto-Set Mode to identify
the speed of the playing for instruments with average output levels, or parts of
average loudness.
Sub-Mode C – High Threshold
Sub-mode C caters to louder instruments or passages.
7
Page 9

Reverse Mode
In Reverse Mode the delay samples are played backwards.
Sub-mode A – Reverse Knob
In sub-mode A the delay time is set with the d time | ratio knob.
Maximum reverse delay time is 1.4 seconds. You will notice the yellow
tempo LED is lit when entering this mode – this signifies that the
input signal is being routed into the delay processor. When you press
the tap switch the input signal stops being routed into the delay
processor, but you will hear the trails of the delayed signal trail off. The
yellow tempo LED will go dark letting you know that the signal is no
longer being routed to the delay. This is similar to the behaviour of a
gated delay.
Sub-mode B – Tap Reverse
In sub-mode B the delay time is controlled by pressing the tap switch
repeatedly. The d time | ratio knob operates as a ratio in this sub-mode
giving ratios of 1:1, 2:1 and 4:1. Maximum delay time is 1.4 seconds.
Sub-mode C – Double Time Reverse
In sub-mode C the delayed audio is played back in reverse, twice as fast
as normal. This causes the audio to sound an octave higher. Maximum
delay time is 933ms in this mode. Try turning the feedback up in this
mode!
8
Page 10

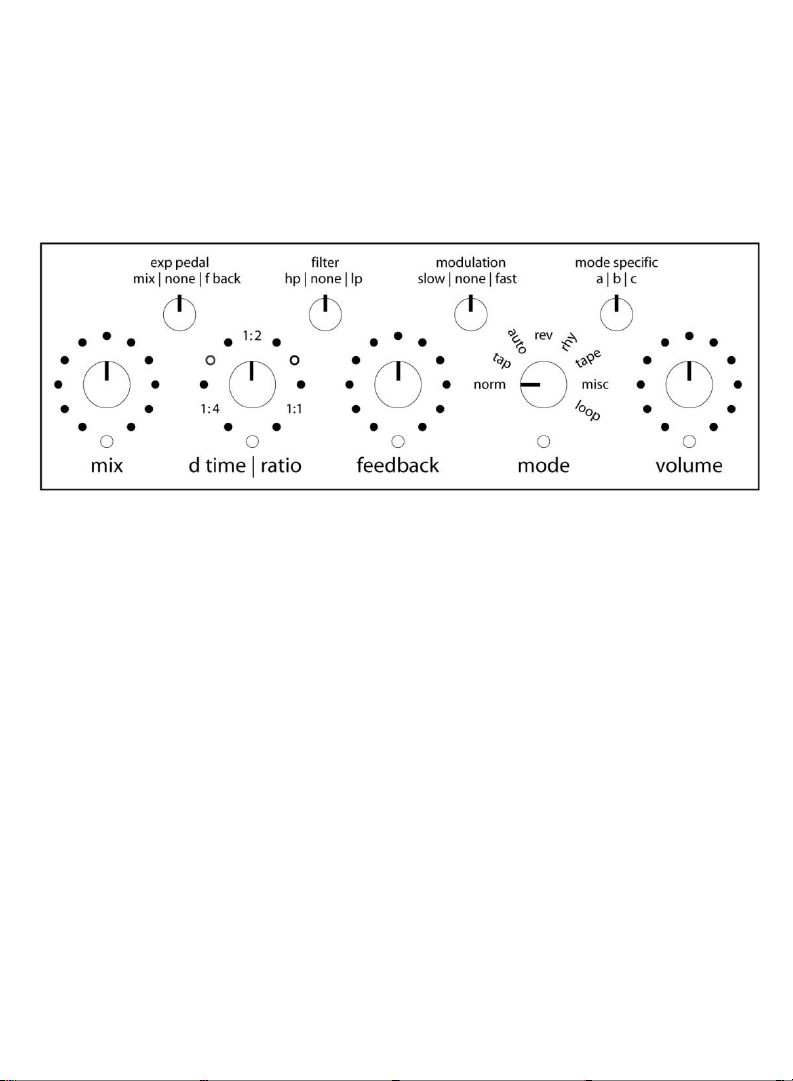
feedback : controls the delay feedback. Note the
feedback ratio goes higher than one. This means
if it is fully clockwise the sound will gradually
get louder and louder.
adds a high pass (hp) or low pass (lp)
exp pedal: when an expression pedal is plugged into
the rear of the unit, this switch determines which
parameter is controlled by the expression pedal.
mix: controls the level between the dry signal
and the wet, delayed signal. All the way clockwise
is 100% wet signal and all the way counterclockwise is 100% dry signal.
d time | ratio: in non-tap modes, this controls the delay time.
In tap modes it controls the ratio of the delay time relative
to the tempo that is tapped.
For example, at 1:2, the delay time will be twice as
fast as the tapped tempo.
EXPRESSION PEDAL
Controls at a Glance
-
power: 9V -12V DC positive
tip 2.1mm jack. 300mA or greater
tap switch: in tap modes, this sets the delay time when tapped. It will
change to the new delay time after 2 taps and will average the last 4
taps.
- When cycling through the presets, tap to select a preset.
- Also performs additional functions in normal, misc and looper modes.
save switch: small, black button to the left of the presets switch. Holding
the save switch and pressing the presets switch saves the current
parameters to the selected preset bank.
Page 11

modulation: applies modulation to the delayed signal.
-the slow setting is a slower, more subtle modulation.
-the fast position is a faster, slightly deeper modulation.
+
INPUTOUTPUT
See the Overview of Modes and Sub-modes section for a
detailed explanation of how the sub-modes work in each mode.
volume: controls the overall output
volume of the delay.
mode:
norm- normal, d time knob controls delay time (p 5)
tap- tap controls delay time (p 6)
auto- autoset (p 7)
rev- reverse delay (p 8)
rhy- rhythm (p 11)
tape- tape delay (p 12)
misc- miscelaneous modes (p 13)
loop- looper mode (p 14)
bypass switch:
bypassed (true bypass).
selects the sub-mode: a, b, or c.
presets switch: cycles through the stored presets, performs additional
tasks in looper mode.
Page 12

Rhythm (Multi-Tap) Mode
By pressing the tap switch repeatedly you can input a rhythm of up to four
taps. This rhythm will be mimicked by the delay.
Sub-mode A – Ratio
In sub-mode A the d time | ratio knob acts as a ratio control. Depending
where the d time | ratio knob points, the taps you’ve entered are
played back at the speed at which they were tapped, or either 2 or 4
times faster.
Sub-mode B – Scaling
In sub-mode B the d time | ratio knob allows you to scale the rhythm
you’ve entered. If you turn the d time | ratio knob clockwise after
a rhythm has been entered, the rhythm will be stretched and made
longer. If you turn the d time | ratio knob counter-clockwise, the
rhythm will be compressed and made shorter.
Note: If you stretch the rhythm to the point where one of the taps
exceeds the 2.8 second maximum delay time, that tap will no longer
be heard.
Sub-mode C – Dynamic Volume
Sub-mode C functions similar to sub-mode A with the exception that the
volumes of the repeats are varied. The first repeat is fairly quiet, and the
repeats get progressively louder.
11
Page 13

Tape Mode
Tape Mode was designed to impart some of the classic characteristics of
analog tape delays.
Delay time is controlled with the tap switch, and the d time | ratio knob
functions as a ratio control in Tape Mode.
Sub-mode A – Basic Tape Emulation
Sub-mode A provides basic tape emulation. Tape saturation and
compression artifacts are applied to the delayed signal.
Sub-mode B – Vintage Tape Delay
Sub-mode B adds a little bit of ‘wow’ and ‘flutter’ to the delayed signal;
the kind you would associate with an older tape machine that has tape
mechanisms needing replacement. This mode tends to impart the
sound of a subtle chorus.
Sub-mode C – Vintage Tape Delay with Old Tape
Sub-mode C is similar to sub-mode B but with subtle, intermittent
dropouts as one might experience from old, shedding tape and dirty
heads. The repeated signal will also saturate more than normal.
12
Page 14

Misc Mode
Sub-mode A – Dynamic I: Feedback increases as input volume
decreases.
In sub-mode A, feedback increases up to the value where the feedback
knob is set as the input signal gets quieter. During a loud passage the
feedback will decrease to nearly zero.
For example: If you have the feedback knob at 50%, when you play
quietly or as notes ring out and sustain, the feedback will increase
gradually to 50%.
Sub-mode B – Dynamic II: Mix increases as input volume decreases
In sub-mode B the mix increases (i.e. more wet) to the value where the
mix knob is set as the input signal gets quieter. Conversely, the mix
decreases (i.e. more dry) as the input signal gets louder.
Sub-mode C – Tap Mute: Soft bypass with trails
When playing, the output signal will be 100% dry until the tap switch is
pressed once, after which you will start to hear the delayed signal.
When you press the tap switch again the input signal stops being routed
into the delay processor, but you will hear the tails of the delayed signal
trail off.
Sub-mode C is great if you only want delay in certain sections of the
song but don’t want the delay signal to cut off abruptly when turning off
the effect using the bypass switch.
13
Page 15

Looper Mode
The Empress Effects Superdelay is able to sample and loop 13.6 seconds of
audio. Once an initial audio clip has been sampled it will loop continuously
and the user can add additional layers to the loop.
Sub-mode A – Normal Looper
In sub-mode A the looper operates normally using the controls which
are described in detail on the following page. You have 6.8 seconds of
loop time available.
Sub-mode B – Long Looper
In sub-mode B the looper time is doubled to approximately 13.6
seconds. The quality of the recording is degraded slightly to CD quality
samples in this sub-mode to allow for longer loop length.
Sub-mode C – Reverse Looper
In sub-mode C the initial loop is played back in reverse after it has been
recorded. Any overdubs made will play back forwards. We’ve added the
ability to switch from sub-mode B to sub-mode C while a loop is playing
back. This gives you the ability to overdub new passages in reverse. You
can record your loop in sub-mode B, switch to sub-mode C and the first
overdub recorded will be looped back in reverse.
Operating the Looper
When the looper is first turned on, it is in the zero state. In this state it will
pass the incoming signal without any effect.
While in Looper Mode the feedback and d time | ratio knobs do not control
anything.
The mix knob controls the level between the sound that is looping and the
sound that is played live.
14
Page 16

Capturing a Loop
Press the tap switch to begin recording a new loop. To stop recording press
the tap switch again. The loop will instantly return to the beginning and
start playing. This is referred to as the ‘looping state’.
While the loop is playing, the incoming signal gets mixed with the looping
audio so you’re able to play over top of the loop.
If you try to capture a loop longer than the maximum looping time allowed,
the looper will automatically start looping from the start of the captured
loop.
Adding a Layer to the Loop
If the Superdelay is in the ‘looping state’ you can record additional layers on
top of the loop. Pressing the tap switch commences overdub recording.
Pressing it a second time stops overdub recording. The yellow tempo LED
will be lit while the Superdelay is in overdub record mode.
Clearing the Loop
To reset the Superdelay back to the ‘zero state’ press the presets switch.
Leaving Looper Mode
To go to another preset from Looper Mode you must first tap the presets
switch once to bring the Superdelay to the ‘zero state’. Press the presets
switch a second time to enter Preset Mode and load a new preset.
15
Page 17

Using Presets
The Empress Effects Superdelay has 8 preset locations where users can
store and recall their favourite settings. All the settings of each mode can be
stored except for the audio loop in Looper Mode. When first powered up,
the unit operates with the settings that are on the knobs, as opposed to a
preset being automatically loaded.
Preset Organization
The 8 presets are represented by a series of LEDs located just below the
knobs. Press the presets switch to scroll through the presets. When cycling
through the presets, the small yellow LEDs below the knobs will turn on,
from left to right, representing preset locations 1 through 4. Then, the small
red LED below the mix knob will light and the small yellow LEDs will again
turn on, from left to right, representing preset locations 5 through 8.
When cycling through the presets you will notice that after preset 8, all the
small LEDs will flash very quickly. This represents the ‘knob preset’ location.
If you recall this preset the Superdelay will get its settings from the current
knob and switch positions on the unit. In ‘knob preset’ no small LEDs will be
lit. This is essentially going back to manual mode.
Saving a Preset
To save a preset, set the controls to the sound you would like to save. Then
press the preset switch until you reach the preset location in which you
would like to save. While the lights are flashing, press and hold the save
button and then press the preset button. Your preset is now saved.
16
Page 18

Recalling a Preset
To recall a preset simply press the presets switch until the preset you’d like
to recall is flashing, then press the tap switch to load the preset. The
preset’s LED indicators should now be solid and bright.
Changing a Preset
If you change the position of a knob or switch after a preset is loaded, the
preset’s LED indicators will dim to indicate that the preset has been
modified, but not saved. If you move the knob or switch back to the position
it was in when the preset was saved, the preset’s LED indicators will
brighten again. This lets you find the positions of all the knobs and switches
when the preset was saved.
Once you have made your changes to the preset, you can save it in the
current location by holding the save switch and then pressing the presets
switch. The preset indicator LEDs should brighten to indicate the changes
have been successfully saved.
Factory Reset Presets
To restore the Superdelay to its factory preset settings, do the following:
1. Unplug the power and plug back in.
2. When all the lights come on, press the tap switch.
3. Quickly hold down the save button and press the presets switch.
4. The lights should do a little jig confirming success.
WARNING! This will overwrite your current presets and replace them with
the factory presets.
17
Page 19

Expression Pedal
The Empress Effects Superdelay allows an external expression pedal to be
used to control the various features on the fly.
To access this capability plug an expression pedal into the exp pedal jack on
the back of the Superdelay , and use the exp pedal switch to select which
parameter you’d like to control with the pedal. You can select mix, or
feedback. The expression pedal replaces the knob on the top of the unit.
The Superdelay will work with most Tip-Ring-Sleeve (TRS) expression
pedals.
Any expression pedal used with the Superdelay should have:
Tip – signal
Ring – power
Sleeve – ground
The potentiometer in the pedal should measure approximately 10k Ohm.
18
Page 20

Input Impedance:
1MΩ
Output Impedance:
1kΩ
Frequency Response (-3dB):
20Hz – 16kHz
Distortion:
0.004%
Noise:
-101.5dB
Input Voltage:
9VDC-12VDC
Required Current:
Power Input Connector:
Height (enclosure only):
Height (including controls):
Length:
Width:
Weight:
300mA
2.1mm Barrel Connector
1.75”
2.25”
5.7”
3.75”
1.5lbs
Specifications
www.empresseffects.com
19
 Loading...