

Page 1

tremolo
user manual
2
Page 2

Introduction
Back in 2005 we released our first pedal, the Tremolo. It was one
of the first tap tempo tremolo on the market and, to this day,
remains as sought after as when it was first released. We have built
on everything we have learned over the past eight years, and are
proud to release the next generation of tremolo, the Empress
Tremolo2.
The Empress Tremolo2 has the same analog signal path as its
predecessor, but we've added a bunch of features that make it
more versatile. Now you can use up to 8 presets, and you can plug
in a slew of things to control it, including expression pedal, external
switches, and MIDI.
Please rock responsibly,
Steve Bragg
Page 3
Quickstart
Plug your guitar into the lower jack on the right side. Plug your
amplifier into the jack on the left side. Plug a 9-12VDC power supply
into the power jack on the left side (2.1mm barrel connector,
negative tip). Set the mode switch to "knob," the waveform switch
to "tube," the depth to half, rate to half, rhythm to 1, and output to
half.
That's your standard tremolo.
Page 4

Tap Tempo Mode
In tap tempo mode, use the "tap|preset" stompswitch to enter a
speed for the tremolo. The tremolo will change to the new speed
after 2 taps and will average the speed of the last 4 tap times. Use
the ratio knob to change the ratio of tapped tempo to tremolo
tempo. Available ratios are 1:1, 3:4, 1:2, 1:3, and 1:4.
Knob Mode
In knob mode, use the rate knob to set the speed of the tremolo.
Hold down the "tap|preset" stompswitch as a brake that will slow
down the tremolo speed while the stompswitch is held.
Preset Mode
Preset mode allows you to save and recall presets. All settings of
the pedal are saved in a preset including tempo, front panel
controls and expression pedal assignment. Each preset is
represented by a different color in the "tap|preset" LED.
Page 5

To load a preset, use the "tap|preset" stompswitch to scroll
through presets sequentially. The LEDs will blink indicating the
preset is ready to load. Press the bypass switch while the LEDs are
blinking to engage the new preset.
To save a preset, set the Tremolo2 to the settings you want to save.
Use the "tap|preset" switch to scroll to the color where you would
like to save the preset. Then, while the LEDs are blinking, hold
down the save button and press the "tap|preset" stompswitch.
Changing the number of available presets: The Empress Tremolo2
ships with 4 available presets, but you can use between 1 and 8
presets. Please see the "Advanced Configuration" section on how to
change the number of available presets.
While in Preset mode, use the rate knob or an external tap switch to
adjust the speed of the tremolo.
To modify tremolo parameters away from their saved value, simply
move the knob or toggle.
Page 6

Control Port
The control port jack allows the Empress Tremolo2 to be controlled
by a multitude of devices. The pedal ships configured to accept an
expression pedal. Please see the "Advanced Configuration" section
on how to configure the control port for the device you want to use.
Control Voltage (CV)
With CV control, the Empress Tremolo2 responds to CV signals from
0 to 5 volts. Otherwise, the CV configuration works exactly like the
expression pedal configuration.
External Tap Switch
The Empress Tremolo2 can be used with an external switch. In tap
tempo mode, both the pedal's "tap|preset" stompswitch and the
external switch control the tap tempo. In knob mode, the external
switch isn't utilized. In preset mode, the pedal's "tap|preset"
stompswitch toggles through presets, the external switch controls
tap tempo, and the "rate | ratio" knob controls the ratio.
Page 7

Expression Pedal
Each parameter, with the exception of the mode switch, can be
controlled simultaneously via the expression pedal.
To control a parameter with the expression pedal, move the
parameter's knob to the desired heel setting, then hold down the
save button and move the knob to the desired toe setting, then
release the save button. Multiple parameters can assigned for
expression pedal control simultaneously by repeating this process
for each parameter to be assigned. Each parameter can be set with
independent heel and toe settings.
To release a parameter from the expression pedal's control, simply
move the knob or switch that controls that parameter. To clear all
of the parameters from expression pedal control, press the save
switch 3 times.
Any expression pedal used with the Empress Tremolo2 should have
the following connections: tip to signal, ring to power, and sleeve to
ground.
Page 8

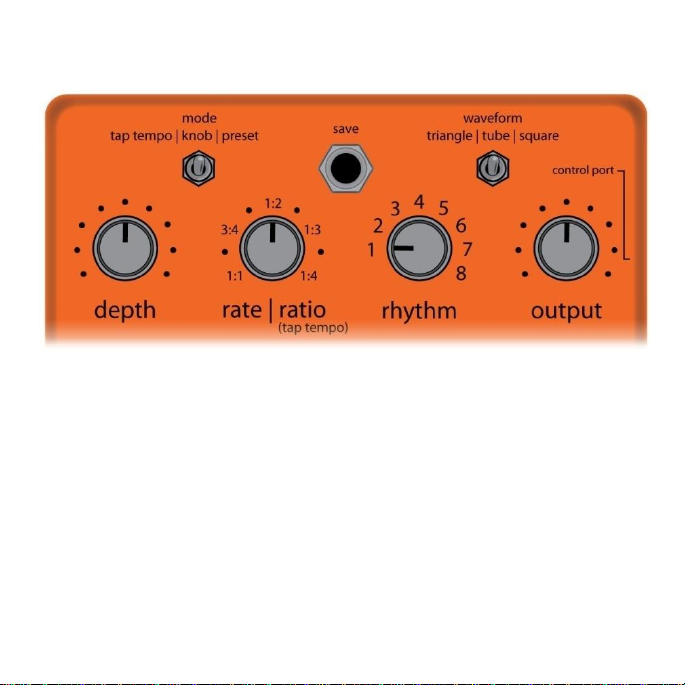
Mode: Sets the operation mode of the pedal.
Tap Tempo: The rate of the tremolo is set by tapping
on the tap stompswitch.
Knob: The rate of the tremolo is controlled by the rate
knob.
Preset: Save and recall settings stored in up to 8
presets.
Depth: The amount of tremolo eect applied to signal.
Rate | Ratio: In knob mode, this sets the
speed of the tremolo eect.
In tap tempo mode, this sets the ratio of
foot taps to tremolo pulses. For example,
at a 1:2 ratio, the tremolo will do eighth
notes when you tap quarter notes.
Tap | Preset: Perfoms a dierent function in each mode.
Tap Tempo: Tap to set the tempo of the tremolo
eect. Tapped tempo is multiplied by the ratio to set
the rate of the tremolo eect.
Knob: Press for a brake that slows the tempo of the
tremolo while switch is held down.
Preset: Press to scroll through presets.
Output
Controls at a Glance
+
Power: 9V - 12V DC. 100mA or greater
Save: Use to save presets and assign expression pedal control.
Bypass: Press to engage / bypass the pedal. When the LED is
illuminated, the tremolo is engaged.
Presets: When scrolling through presets, this LED will ash.
Press the bypass switch to engage the new preset.
-
Page 9

Waveform: Sets the shape of the tremolo envelope.
Triangle: Your standard tremolo waveform. Smooth ramp
from loud to soft.
Tube: An asymetrical waveform modeled after classic tube
amp tremolo.
Square: Tremolo turns on and o with no volume ramp.
Great for choppy sounding eects.
Output: Sets the overall output level (volume) of the pedal.
Control Port: Control the tremolo via expression
pedal, external tap, control voltage and MIDI.
Input
Rhythm: Here are the eight rhythms with "0" being
accented:
1) 0000 (normal tremolo)
2) 0x0x
3) 0xx0xx
4) 0xxx0 xxx
5) 0xx0xx0x
6) 0x0x00x 0x0 (this one is in 5/4)
7) 0xx0xx0x0x 0x
8) 0xx0xx0xxx0x0xxx
Page 10

Advanced Conguration
The advanced conguration mode lets you customize the functionality of the tremolo to suit your needs.
Bypass Mode: Select to use true bypass or buered bypass.
True Bypass (default): Set the mode toggle switch to the
left (tap tempo).
Buered Bypass: Set the mode toggle switch to the right
(preset).
Preset Mode: Select how to change presets.
Two Button Switching (default): Set the rate|ratio knob all
the way counter-clockwise.
One Button (instant) Switching: Set the rate|ratio knob all
the way clockwise.
Ramp Speed: Select how long it takes to ramp from one
preset to another.
Setting the depth knob fully counter-clockwise (default)
will have no ramping; the rate changes immediately to the
new preset's rate.
Setting the depth knob fully clockwise will have a long
ramp between presets, much like a Leslie cabinet changing
from slow to fast.
The knob can be set anywhere in between to ne tune the
ramp time.
Factory Reset: While in the advanced conguration, press the following stompswitches in order: tap, bypass, tap, bypass. The LEDs will do a little
dance to conrm that the tremolo has been reset to its factory settings. Please note that this overwrites the current presets with the factory presets.
Entering Advanced Conguration: Unplug the power
from the Empress Tremolo . Plug the power back in
while holding down both the tap and bypass
stompswitches. The bypass LED should blink twice to
conrm that you are in the advanced conguration
mode.
Modify Settings: Use the controls outlined below to
congure the pedal as you like. When a parameter is
modied, the tap LED will blink to conrm that a
change has been made.
Exiting Advanced Conguration: Press both the tap
and bypass stompswitches at the same time. The
bypass LED will blink twice to conrm that the tremolo
has exited the advanced conguration mode and will
reboot into the standard operation mode.
2
Page 11

Use the waveform switch to select which function to modify
then use the rhythm selector to set the value.
Number of Presets (default 4): Set the waveform switch to the
left (triangle) then use the rhythm knob to select from 1-8 presets.
MIDI Channel (default 1): Set the waveform switch to the right
(square) then use the rhythm knob to select from MIDI channel 1-8.
Control Port Conguration: Set the waveform switch to the
middle (tube) then use the rhythm knob to select how you would
like to use the control port from the chart below:
1 - expression pedal (default)
2 - control voltage
3 - external tap switch (latching)
4 - external tap switch (momentary - normally open)
5 - external tap switch (momentary - normally closed)
6 - MIDI
Presets Write Protect: Select if presets can be overwritten
and changed on the y or locked to prevent accidental
changes.
Unlocked (default): Turn the output knob all the way
counter-clockwise.
Locked: Turn the output knob all the way clockwise.
Page 12

MIDI Configuration
The Empress Tremolo2 allows all of its parameters to be controlled
via control change messages, it's presets to be selected with
program change messages, and its tempo controlled with MIDI clock
messages.
To use MIDI with your Empress Tremolo2, you'll have to do the
following:
1. Attach the Empress Midibox using a ¼” patch cable to the
control port. The Midibox is not included with the Empress
Tremolo2.
2. Configure the pedal for MIDI control and set the MIDI
channel. See the "Advanced Configuration" section for
instructions on doing this. Choose a MIDI channel that won't
conflict with other devices in your MIDI rig.
Page 13

Recalling a preset via MIDI (Program Change Messages)
You can activate a preset by sending a MIDI Program Change
message. For example, sending a Program Change message of 7
activates preset 7.
MIDI Clock (aka MIDI Beat Clock)
The Empress Tremolo2 will respond to MIDI Clock messages. MIDI
Clock specifies quarter notes, subdivided into 24 MIDI Messages.
Each quarter note corresponds to 1 period of the tremolo’s
waveform.
Warning: The Tremolo2 listens for MIDI Clock messages by default.
If it receives a MIDI Clock message, it will rely on the messages for
its tempo. This means that the Tremolo2's volume will freeze if the
MIDI Clock messages are discontinued. To unfreeze the Tremolo2,
send a MIDI Clock Listener message (CC #51) with a value of 0.
Page 14

Control Change Messages
Tremolo2 Parameter
CC #:
Note:
Depth
20
Sending a value 0 would be
equivalent to the knob completely
counter clock-wise, sending 127 is
equivalent to fully clock-wise.
Rate | Ratio
21
Output
23
Rhythm
22
Sending a value of 1 will set the
rhythm to 1, sending 2 will set
rhythm to 2, etc.
Mode
24
Sending 1 will set it to tap tempo
mode, 2 knob mode, and 3 preset
mode.
Waveform
25
Sending 1 will set it to triangle, 2
tube, 3 square.
Rhythm Downbeat
26
Value sent determines which beat of
the rhythm will fall on the downbeat.
A value of 3 will have the 3rd beat of
the rhythm on the downbeat.
The Empress Tremolo2 can be controlled with MIDI control change
messages. Below is a table that shows which MIDI control change
channel controls each Tremolo2 parameter.
Page 15

Waveform Phase
27
A Value of 64 has the waveform in
phase. Higher values move the
waveform ahead relative to the beat
and smaller values move it behind.
Tap Switch
35
Sending a value of 127 simulates the
switch being pressed. Sending a
value of zero simulates releasing the
switch.
Bypass Switch
36
Sending a value of 127 engages the
pedal, sending a value of 0 bypasses
the pedal.
Direct Control
40
Sending this message overrides all
other settings and lets you set the
amount of tremolo volume directly
with MIDI values This mode would
allow you to draw your own
waveforms in a DAW and send them
to the Empress Tremolo2.
Exit Direct Control
50
Sending this message with any value
will cause the pedal to exit direct
control.
MIDI Clock Listener
51
Sending a value of 0 causes the pedal
to ignore MIDI Clock messages.
Sending a value of 127 causes the
pedal to listen for MIDI Clock
messages. (by default, the pedal
listens for MIDI Clock messages)
Page 16

Specifications
Input Impedance:
1M Ω
Output Impedance:
330 Ω
Frequency Response (-3dB):
Output Headroom:
4Hz – 30kHz
+9.2 dBu
Distortion:
0.081%
Signal to Noise Ratio:
-107.7dB
Input Voltage:
9VDC – 12VDC
Required Current:
Power Input Connector:
Height (enclosure only):
Height (including controls):
Length:
Width:
Weight:
100mA
2.1mm Barrel Connector
1.5”
2”
3.5”
4.5”
1lbs
www.empresseffects.com
 Loading...