

Page 1
Instruction Manual
Instruction Manual
Empisal Electronic Sewing Machine
EES50
Page 2

Important
safety
instructions
When using an electrical appliance, basic safety should always be followed,
including the following:
Read all instructions before using this sewing machine.
DANGER - To reduce the risk of electric
shock:
1. An appliance should never be left unattended when plugged in.
2. Always unplug this appliance from the electric outlet immediately after using
and before cleaning.
1. Read the instruction carefully before you use the machine
2. Keep the instructions at a suitable place close to the machine and hand it
over if you give the machine to a third party.
3. Use the machine only in dry locations.
4. Never leave the machine unattended with children or elderly people due to
they may not be able to estimate the risk.
5. This appliance can be used by children aged from 8 years and above and
persons with reduced physical, sensory or mental capabilities or lack of
experience and knowledge if they have been given supervision or instruction
concerning use of the appliance in a safe way and understand the hazards
involved.
6. Children shall not play with the appliance.
7. Cleaning and user maintenance shall not be made by children without
supervision.
8. Always switch off the machine if you carry out preparation for work (change
the needle, feed the yarn thru the machine, change the footer, etc.).
9. Always unplug the machine if you leave it unattended, to avoid injury by
expediently switch on the machine.
10.Always unplug the machine if you changing the lamp or carry out
maintenance (oiling, cleaning).
11. Don't use the machine if it's wet or in humid environment.
12.Never pull at the cord, always unplug the machine by gripping the plug.
13.If the LED lamp is damaged or broken, it must be replaced by the
manufacturer or its service agent or a similarly qualified person, in order to
avoid a hazard.
14.Never place anything on the pedal.
15.Never use the machine if the air vents are blocked keep the air vents of the
machine and the foot pedal free from dust, fusel and leftovers.
16.The machine may only be used with foot pedal type C-8001.
17.The sound pressure level at normal operation is smaller than 75dB(A).
I
Page 3

Important
safety
instructions
II
18.Do not dispose of electrical appliances as unsorted municipal waste, use
separate collection facilities.
19.Contact your local government for information regarding the collection
systems available.
20.If electrical appliances are disposed of in landfills or dumps, hazardous
substances can leak into the groundwater and get into the food chain,
damaging your health and well-being.
21.When replacing old appliances with new ones, the retailer is legally obligated
to take back your old appliance for disposal at least for free of charge.
SAVE THESE INSTRUCTIONS
This sewing machine is intended for household use only.
Page 4

Contents
3
PRINCIPAL PARTS OF THE MACHINE . . . . . . . . . . . . . . . . . . . . . . . . . . . . . . . . . . . . . . . . . . . . . . . . . . . . . 1
MACHINE CONTROL BUTTONS . . . . . . . . . . . . . . . . . . . . . . . . . . . . . . . . . . . . . . . . . . . . . . . . . . . . . . . . 2-3
Operation buttons (see page 24/25) . . . . . . . . . . . . . . . . . . . . . . . . . . . . . . . . . . . . . . . . . . . . . . . . . . . . . 2
Function buttons (see page 26/27/28) . . . . . . . . . . . . . . . . . . . . . . . . . . . . . . . . . . . . . . . . . . . . . . . . . . . 2
Selection buttons (see page 29/30) . . . . . . . . . . . . . . . . . . . . . . . . . . . . . . . . . . . . . . . . . . . . . . . . . . . . . 3
LCD SCREEN . . . . . . . . . . . . . . . . . . . . . . . . . . . . . . . . . . . . . . . . . . . . . . . . . . . . . . . . . . . . . . . . . . . . . . . 4-5
PATTERN CHART . . . . . . . . . . . . . . . . . . . . . . . . . . . . . . . . . . . . . . . . . . . . . . . . . . . . . . . . . . . . . . . . . . . . 6-7
ACCESSORIES . . . . . . . . . . . . . . . . . . . . . . . . . . . . . . . . . . . . . . . . . . . . . . . . . . . . . . . . . . . . . . . . . . . . . . . 8
CONNECTING THE MACHINE TO THE POWER SOURCE . . . . . . . . . . . . . . . . . . . . . . . . . . . . . . . . . . . . . 9
Connecting the machine . . . . . . . . . . . . . . . . . . . . . . . . . . . . . . . . . . . . . . . . . . . . . . . . . . . . . . . . . . . . . . 9
WINDING THE BOBBIN. . . . . . . . . . . . . . . . . . . . . . . . . . . . . . . . . . . . . . . . . . . . . . . . . . . . . . . . . . . . . . 10-11
INSERTING THE BOBBIN . . . . . . . . . . . . . . . . . . . . . . . . . . . . . . . . . . . . . . . . . . . . . . . . . . . . . . . . . . . . . . 12
THREADING THE UPPER THREAD. . . . . . . . . . . . . . . . . . . . . . . . . . . . . . . . . . . . . . . . . . . . . . . . . . . . 13-14
USING THE NEEDLE THREADER. . . . . . . . . . . . . . . . . . . . . . . . . . . . . . . . . . . . . . . . . . . . . . . . . . . . . . . . 15
RAISING UP THE LOWER THREAD . . . . . . . . . . . . . . . . . . . . . . . . . . . . . . . . . . . . . . . . . . . . . . . . . . . . . . 16
CUTTING THE THREAD . . . . . . . . . . . . . . . . . . . . . . . . . . . . . . . . . . . . . . . . . . . . . . . . . . . . . . . . . . . . . . . 16
TWO-STEP PRESSER FOOT LIFTER . . . . . . . . . . . . . . . . . . . . . . . . . . . . . . . . . . . . . . . . . . . . . . . . . . . . . 17
STARTING SEWING . . . . . . . . . . . . . . . . . . . . . . . . . . . . . . . . . . . . . . . . . . . . . . . . . . . . . . . . . . . . . . . . . . . 18
Start/stop button . . . . . . . . . . . . . . . . . . . . . . . . . . . . . . . . . . . . . . . . . . . . . . . . . . . . . . . . . . . . . . . . . . . 18
Foot control . . . . . . . . . . . . . . . . . . . . . . . . . . . . . . . . . . . . . . . . . . . . . . . . . . . . . . . . . . . . . . . . . . . . . . . 18
THREAD TENSION. . . . . . . . . . . . . . . . . . . . . . . . . . . . . . . . . . . . . . . . . . . . . . . . . . . . . . . . . . . . . . . . . . . . 19
CHANGING THE PRESSER FOOT . . . . . . . . . . . . . . . . . . . . . . . . . . . . . . . . . . . . . . . . . . . . . . . . . . . . . . . 20
TYPE OF PRESSER FOOT CHART . . . . . . . . . . . . . . . . . . . . . . . . . . . . . . . . . . . . . . . . . . . . . . . . . . . . . . 21
MATCHING NEEDLE/ FABRIC/ THREAD . . . . . . . . . . . . . . . . . . . . . . . . . . . . . . . . . . . . . . . . . . . . . . . . . . 22
REPLACING THE NEEDLE . . . . . . . . . . . . . . . . . . . . . . . . . . . . . . . . . . . . . . . . . . . . . . . . . . . . . . . . . . . . . 23
TO RAISE OR DROP THE FEED DOGS . . . . . . . . . . . . . . . . . . . . . . . . . . . . . . . . . . . . . . . . . . . . . . . . . . . 23
OPERATION BUTTONS ............................................................. 24-25
Start/stop button . . . . . . . . . . . . . . . . . . . . . . . . . . . . . . . . . . . . . . . . . . . . . . . . . . . . . . . . . . . . . . . . . . . 24
Reverse button . . . . . . . . . . . . . . . . . . . . . . . . . . . . . . . . . . . . . . . . . . . . . . . . . . . . . . . . . . . . . . . . . . . . 24
Auto-lock button . . . . . . . . . . . . . . . . . . . . . . . . . . . . . . . . . . . . . . . . . . . . . . . . . . . . . . . . . . . . . . . . . . . 25
Needle up/ down position button . . . . . . . . . . . . . . . . . . . . . . . . . . . . . . . . . . . . . . . . . . . . . . . . . . . . . . 25
FUNCTION BUTTONS .............................................................. 26-28
Stitch width adjustment button . . . . . . . . . . . . . . . . . . . . . . . . . . . . . . . . . . . . . . . . . . . . . . . . . . . . . . . . 26
Stitch length adjustment button. . . . . . . . . . . . . . . . . . . . . . . . . . . . . . . . . . . . . . . . . . . . . . . . . . . . . . . . 27
MODE selection button . . . . . . . . . . . . . . . . . . . . . . . . . . . . . . . . . . . . . . . . . . . . . . . . . . . . . . . . . . . . . . 27
Elongation button (see page 59) . . . . . . . . . . . . . . . . . . . . . . . . . . . . . . . . . . . . . . . . . . . . . . . . . . . . . . . 27
Mirror button (see page 60) . . . . . . . . . . . . . . . . . . . . . . . . . . . . . . . . . . . . . . . . . . . . . . . . . . . . . . . . . . 28
Twin needle button (see page 61) . . . . . . . . . . . . . . . . . . . . . . . . . . . . . . . . . . . . . . . . . . . . . . . . . . . . . 28
SELECTION BUTTONS. . . . . . . . . . . . . . . . . . . . . . . . . . . . . . . . . . . . . . . . . . . . . . . . . . . . . . . . . . . . . . 29-30
Direct pattern selection and number buttons . . . . . . . . . . . . . . . . . . . . . . . . . . . . . . . . . . . . . . . . . . . . . 29
Edit button . . . . . . . . . . . . . . . . . . . . . . . . . . . . . . . . . . . . . . . . . . . . . . . . . . . . . . . . . . . . . . . . . . . . . . . . 30
Memory button . . . . . . . . . . . . . . . . . . . . . . . . . . . . . . . . . . . . . . . . . . . . . . . . . . . . . . . . . . . . . . . . . . . . 30
Clear button . . . . . . . . . . . . . . . . . . . . . . . . . . . . . . . . . . . . . . . . . . . . . . . . . . . . . . . . . . . . . . . . . . . . . . 30
USEFUL SKILLS . . . . . . . . . . . . . . . . . . . . . . . . . . . . . . . . . . . . . . . . . . . . . . . . . . . . . . . . . . . . . . . . . . . 31-32
Sewing corners . . . . . . . . . . . . . . . . . . . . . . . . . . . . . . . . . . . . . . . . . . . . . . . . . . . . . . . . . . . . . . . . . . . . 31
Reverse. . . . . . . . . . . . . . . . . . . . . . . . . . . . . . . . . . . . . . . . . . . . . . . . . . . . . . . . . . . . . . . . . . . . . . . . . . 31
Free arm . . . . . . . . . . . . . . . . . . . . . . . . . . . . . . . . . . . . . . . . . . . . . . . . . . . . . . . . . . . . . . . . . . . . . . . . . 31
Installing the extension table. . . . . . . . . . . . . . . . . . . . . . . . . . . . . . . . . . . . . . . . . . . . . . . . . . . . . . . . . . 32
Sewing on heavy fabric . . . . . . . . . . . . . . . . . . . . . . . . . . . . . . . . . . . . . . . . . . . . . . . . . . . . . . . . . . . . . . 32
NEEDLE POSITION AND STITCH LENGTH . . . . . . . . . . . . . . . . . . . . . . . . . . . . . . . . . . . . . . . . . . . . . . . . 33
ZIGZAG STITCHES . . . . . . . . . . . . . . . . . . . . . . . . . . . . . . . . . . . . . . . . . . . . . . . . . . . . . . . . . . . . . . . . . . . 33
STRETCH STITCHES . . . . . . . . . . . . . . . . . . . . . . . . . . . . . . . . . . . . . . . . . . . . . . . . . . . . . . . . . . . . . . . . . 34
Page 5

Contents
4
OVERCASTING STITCHES . . . . . . . . . . . . . . . . . . . . . . . . . . . . . . . . . . . . . . . . . . . . . . . . . . . . . . . . . . . . . 35
Using the overcasting foot . . . . . . . . . . . . . . . . . . . . . . . . . . . . . . . . . . . . . . . . . . . . . . . . . . . . . . . . . . . 35
Using the all purpose foot . . . . . . . . . . . . . . . . . . . . . . . . . . . . . . . . . . . . . . . . . . . . . . . . . . . . . . . . . . . . 35
BLIND HEMS . . . . . . . . . . . . . . . . . . . . . . . . . . . . . . . . . . . . . . . . . . . . . . . . . . . . . . . . . . . . . . . . . . . . . . . . 36
BUTTON SEWING . . . . . . . . . . . . . . . . . . . . . . . . . . . . . . . . . . . . . . . . . . . . . . . . . . . . . . . . . . . . . . . . . . . . 37
BUTTONHOLE STITCHING . . . . . . . . . . . . . . . . . . . . . . . . . . . . . . . . . . . . . . . . . . . . . . . . . . . . . . . . . . 38-41
Making a buttonhole on stretch fabrics .. . . . . . . . . . . . . . . . . . . . . . . . . . . . . . . . . . . . . . . . . . . . . . . . . 41
BAR TACK STITCH. . . . . . . . . . . . . . . . . . . . . . . . . . . . . . . . . . . . . . . . . . . . . . . . . . . . . . . . . . . . . . . . . . . . 42
EYELET STITCH. . . . . . . . . . . . . . . . . . . . . . . . . . . . . . . . . . . . . . . . . . . . . . . . . . . . . . . . . . . . . . . . . . . . . . 43
DARNING STITCH . . . . . . . . . . . . . . . . . . . . . . . . . . . . . . . . . . . . . . . . . . . . . . . . . . . . . . . . . . . . . . . . . 44-45
ZIPPER INSERTION . . . . . . . . . . . . . . . . . . . . . . . . . . . . . . . . . . . . . . . . . . . . . . . . . . . . . . . . . . . . . . . . 46-47
Inserting a centered zipper . . . . . . . . . . . . . . . . . . . . . . . . . . . . . . . . . . . . . . . . . . . . . . . . . . . . . . . . . . . 46
Inserting a lapped zipper. . . . . . . . . . . . . . . . . . . . . . . . . . . . . . . . . . . . . . . . . . . . . . . . . . . . . . . . . . . . . 47
NARROW HEMMING . . . . . . . . . . . . . . . . . . . . . . . . . . . . . . . . . . . . . . . . . . . . . . . . . . . . . . . . . . . . . . . . . . 48
CORDING . . . . . . . . . . . . . . . . . . . . . . . . . . . . . . . . . . . . . . . . . . . . . . . . . . . . . . . . . . . . . . . . . . . . . . . . . . . 49
Single cording .. . . . . . . . . . . . . . . . . . . . . . . . . . . . . . . . . . . . . . . . . . . . . . . . . . . . . . . . . . . . . . . . . . . . 49
Triple cording . . . . . . . . . . . . . . . . . . . . . . . . . . . . . . . . . . . . . . . . . . . . . . . . . . . . . . . . . . . . . . . . . . . . . 49
SATIN STITCH SEWING . . . . . . . . . . . . . . . . . . . . . . . . . . . . . . . . . . . . . . . . . . . . . . . . . . . . . . . . . . . . . . . 50
QUILTING . . . . . . . . . . . . . . . . . . . . . . . . . . . . . . . . . . . . . . . . . . . . . . . . . . . . . . . . . . . . . . . . . . . . . . . . . . . 51
GATHERING ......................................................................... 52
SMOCKING.......................................................................... 53
FREE MOTION DARNING, EMBROIDERY AND MONOGRAMMING . . . . . . . . . . . . . . . . . . . . . . . . . . 54-55
Darning . . . . . . . . . . . . . . . . . . . . . . . . . . . . . . . . . . . . . . . . . . . . . . . . . . . . . . . . . . . . . . . . . . . . . . . . . . 54
Embroidery . . . . . . . . . . . . . . . . . . . . . . . . . . . . . . . . . . . . . . . . . . . . . . . . . . . . . . . . . . . . . . . . . . . . . . . 55
Monogramming . . . . . . . . . . . . . . . . . . . . . . . . . . . . . . . . . . . . . . . . . . . . . . . . . . . . . . . . . . . . . . . . . . . . 55
WALKING FOOT . . . . . . . . . . . . . . . . . . . . . . . . . . . . . . . . . . . . . . . . . . . . . . . . . . . . . . . . . . . . . . . . . . . . . . 56
FAGOTING . . . . . . . . . . . . . . . . . . . . . . . . . . . . . . . . . . . . . . . . . . . . . . . . . . . . . . . . . . . . . . . . . . . . . . . . . . 57
PATCHWORK STITCHING . . . . . . . . . . . . . . . . . . . . . . . . . . . . . . . . . . . . . . . . . . . . . . . . . . . . . . . . . . . . . . 57
SCALLOPING . . . . . . . . . . . . . . . . . . . . . . . . . . . . . . . . . . . . . . . . . . . . . . . . . . . . . . . . . . . . . . . . . . . . . . . . 58
Scallop hem . . . . . . . . . . . . . . . . . . . . . . . . . . . . . . . . . . . . . . . . . . . . . . . . . . . . . . . . . . . . . . . . . . . . . . 58
Scallop edging . . . . . . . . . . . . . . . . . . . . . . . . . . . . . . . . . . . . . . . . . . . . . . . . . . . . . . . . . . . . . . . . . . . . 58
ELONGATION . . . . . . . . . . . . . . . . . . . . . . . . . . . . . . . . . . . . . . . . . . . . . . . . . . . . . . . . . . . . . . . . . . . . . . . 59
MIRROR IMAGE . . . . . . . . . . . . . . . . . . . . . . . . . . . . . . . . . . . . . . . . . . . . . . . . . . . . . . . . . . . . . . . . . . . . . 60
USING THE TWIN NEEDLE . . . . . . . . . . . . . . . . . . . . . . . . . . . . . . . . . . . . . . . . . . . . . . . . . . . . . . . . . . . . . 61
MEMORY . . . . . . . . . . . . . . . . . . . . . . . . . . . . . . . . . . . . . . . . . . . . . . . . . . . . . . . . . . . . . . . . . . . . . . . . . 62-65
Combining patterns or letters. . . . . . . . . . . . . . . . . . . . . . . . . . . . . . . . . . . . . . . . . . . . . . . . . . . . . . . 62-63
Adding patterns or letters . . . . . . . . . . . . . . . . . . . . . . . . . . . . . . . . . . . . . . . . . . . . . . . . . . . . . . . . . . . . 63
Editing patterns . . . . . . . . . . . . . . . . . . . . . . . . . . . . . . . . . . . . . . . . . . . . . . . . . . . . . . . . . . . . . . . . . . . . 64
Clearing patterns or letters . . . . . . . . . . . . . . . . . . . . . . . . . . . . . . . . . . . . . . . . . . . . . . . . . . . . . . . . . . . 64
Recalling and sewing the memorized pattern . . . . . . . . . . . . . . . . . . . . . . . . . . . . . . . . . . . . . . . . . . . . . 65
WARNING FUNCTIONS . . . . . . . . . . . . . . . . . . . . . . . . . . . . . . . . . . . . . . . . . . . . . . . . . . . . . . . . . . . . . 66-67
Warning animation message display . . . . . . . . . . . . . . . . . . . . . . . . . . . . . . . . . . . . . . . . . . . . . . . . . . . 66
Instruction animation message display . . . . . . . . . . . . . . . . . . . . . . . . . . . . . . . . . . . . . . . . . . . . . . . . . . 66
Warning beeping sound . . . . . . . . . . . . . . . . . . . . . . . . . . . . . . . . . . . . . . . . . . . . . . . . . . . . . . . . . . . . . 67
BUZZER SOUND . . . . . . . . . . . . . . . . . . . . . . . . . . . . . . . . . . . . . . . . . . . . . . . . . . . . . . . . . . . . . . . . . . . . . 68
MAINTENANCE . . . . . . . . . . . . . . . . . . . . . . . . . . . . . . . . . . . . . . . . . . . . . . . . . . . . . . . . . . . . . . . . . . . . 69-70
Cleaning the screen . . . . . . . . . . . . . . . . . . . . . . . . . . . . . . . . . . . . . . . . . . . . . . . . . . . . . . . . . . . . . . . . 69
Cleaning the sewing machine surface . . . . . . . . . . . . . . . . . . . . . . . . . . . . . . . . . . . . . . . . . . . . . . . . . . 69
Cleaning the hook . . . . . . . . . . . . . . . . . . . . . . . . . . . . . . . . . . . . . . . . . . . . . . . . . . . . . . . . . . . . . . . 69-70
TROUBLE SHOOTING GUIDE . . . . . . . . . . . . . . . . . . . . . . . . . . . . . . . . . . . . . . . . . . . . . . . . . . . . . . . . 71-72
Page 6
Principal
parts of the
machine
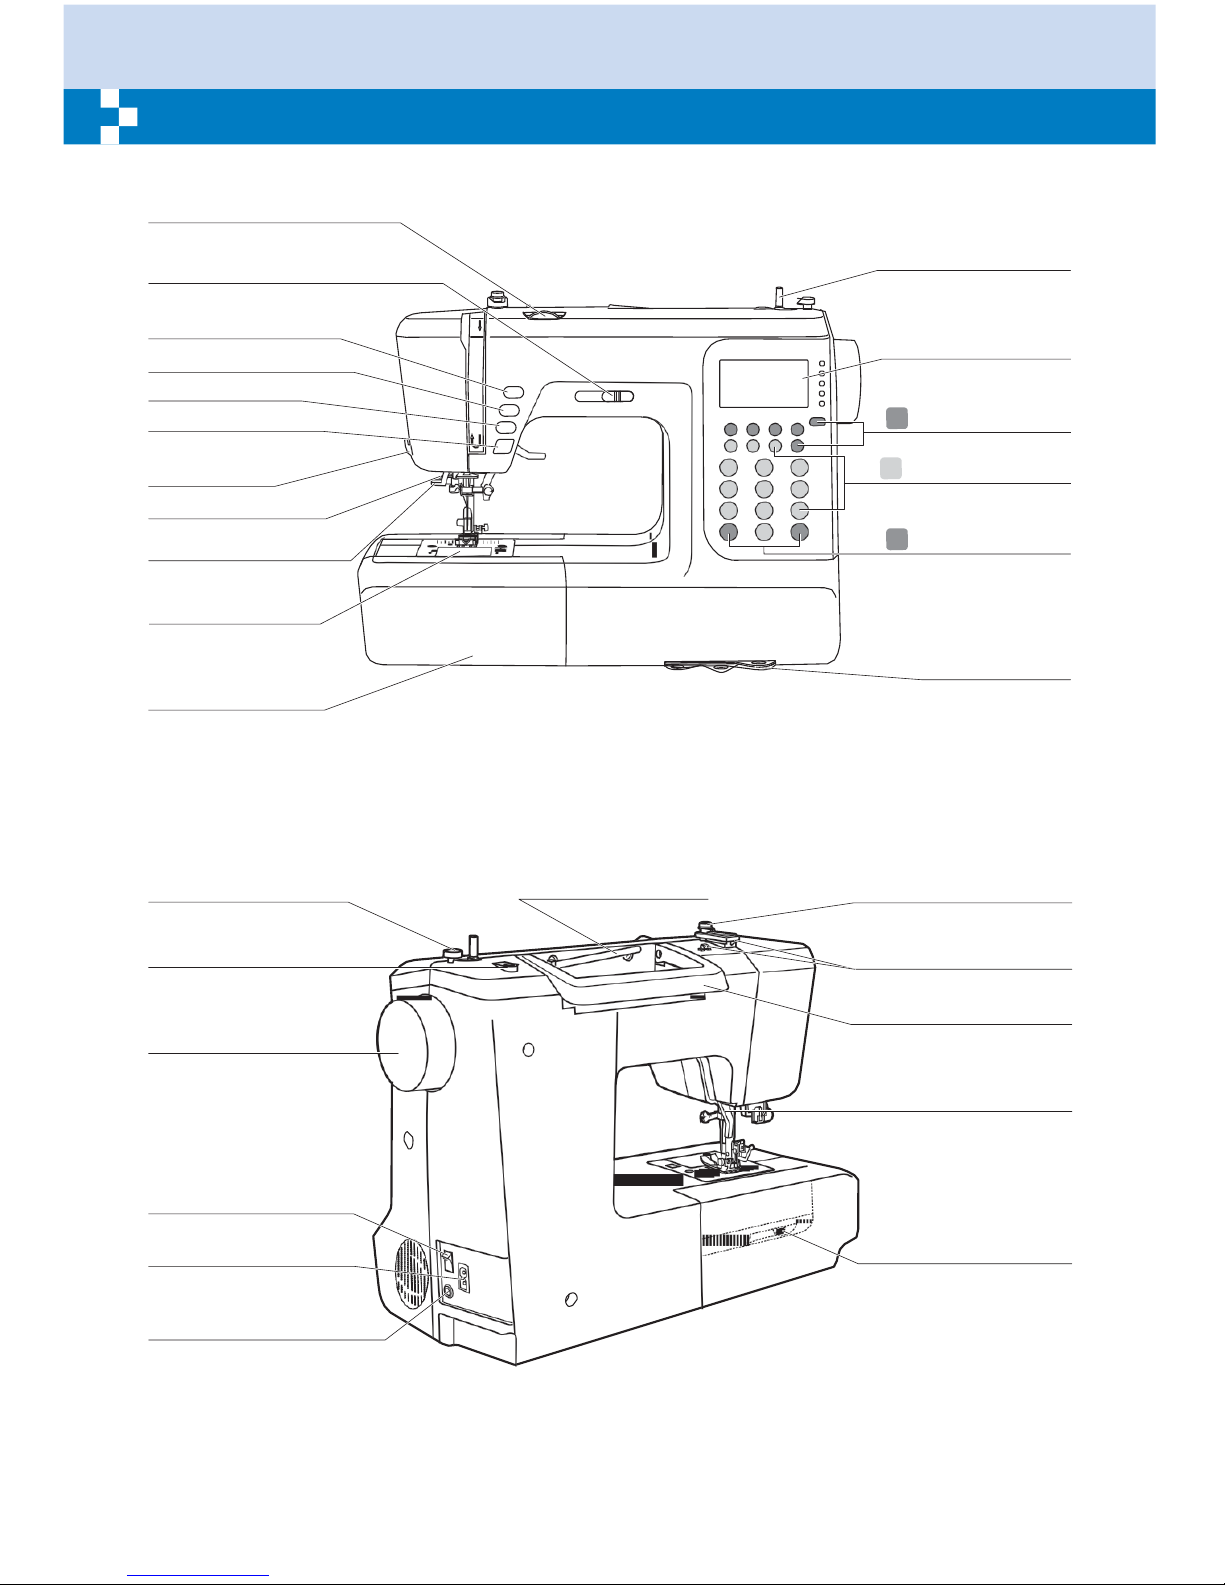
1
Tension dial
Speed limiting
adjustment lever
Needle up/down
position button
Auto-lock button
Reverse button
Start/stop button
Thread cutter
Buttonhole lever
Auto needle threader
Bobbin cover plate
Sewing table and
accessory box
Bobbin winder spindle
LCD
screen
B Function buttons
C
Selection buttons
B Function buttons
Stitch pattern plate
Bobbin winder stopper
Hole for second spool pin
Horizontal spool pin
Bobbin thread guide
Upper thread guide
Handwheel
Handle
Presser foot lifter
Main power switch
Power cord
Drop feed lever
Foot controller connector
Page 7
2
Machine Control
Buttons
6
4
3
2
2
3 7
8
4
9
0
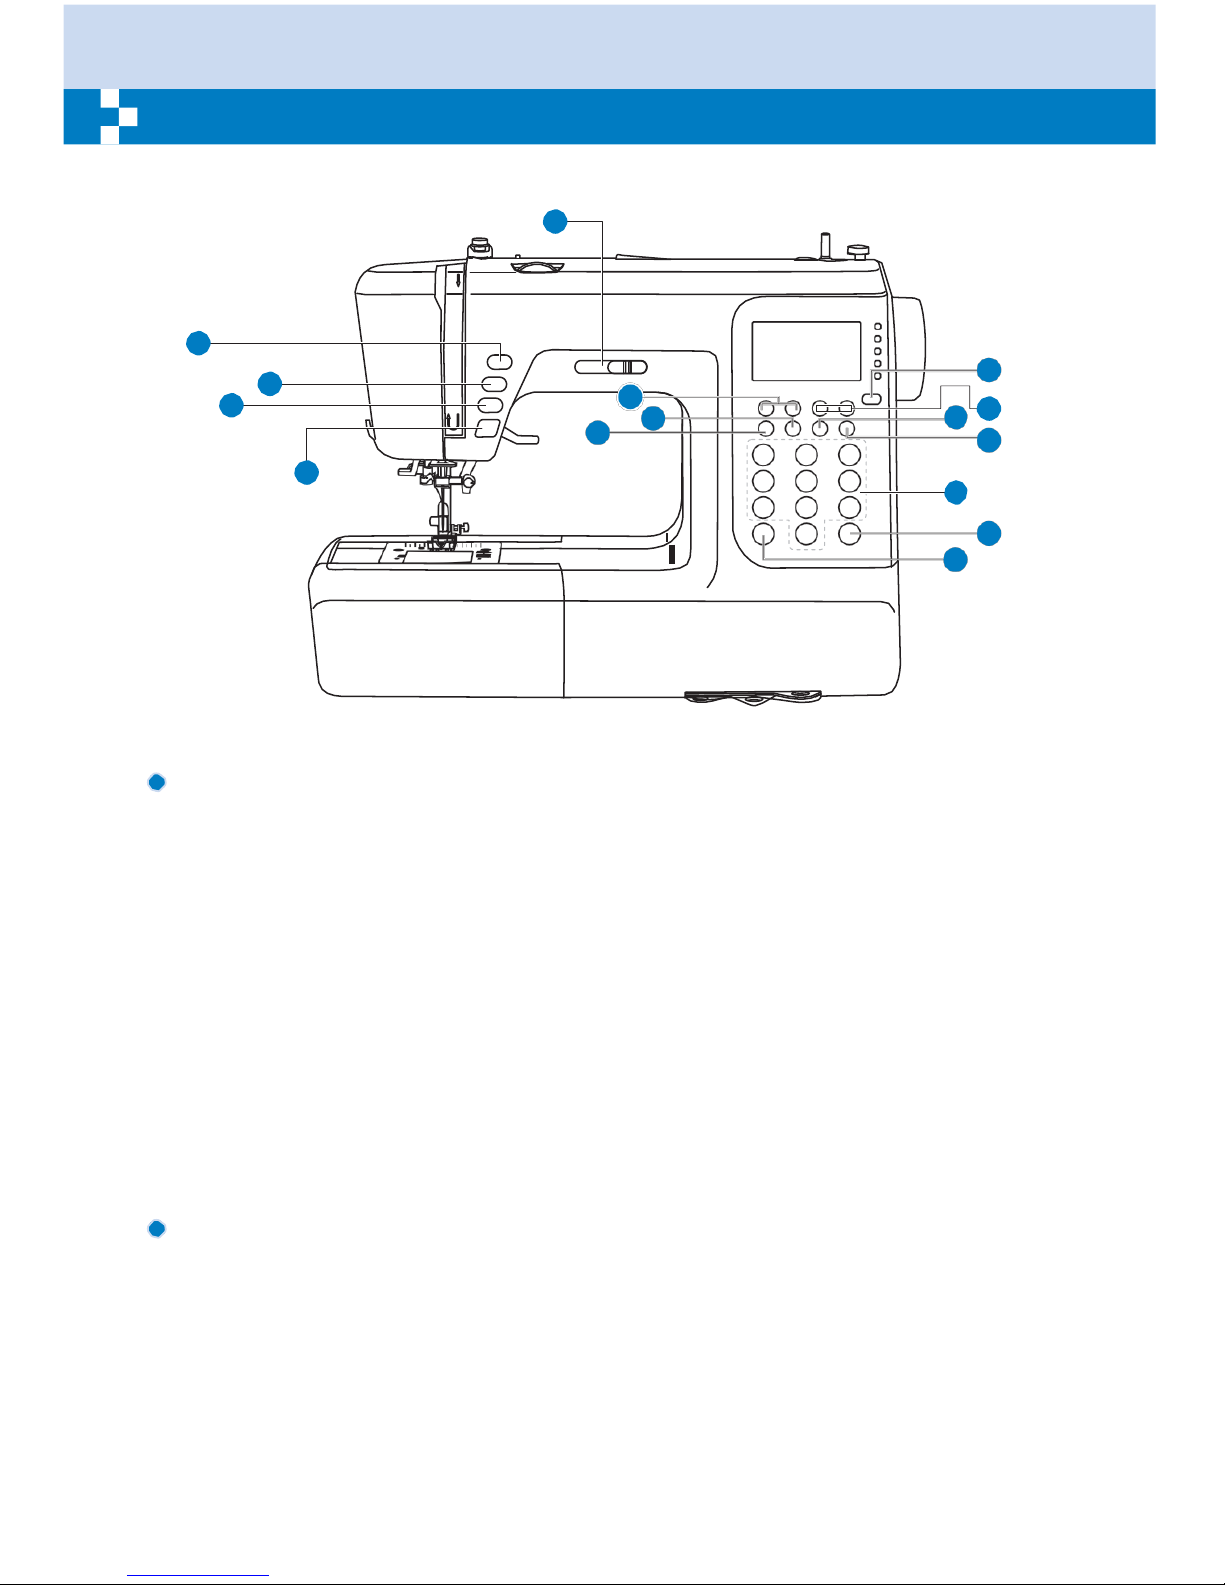
A. Operation buttons (see page 24/25)
1. Start/stop button
Press this button to start or stop the machine.
2. Reverse button
Hold down this button to sew stitches in reverse or sew reinforcement stitches at a low speed.
3. Auto-lock button
Hold down this button to sew locking stitches immediately or at the end of the current patterns
and automatically stop.
4. Needle up/down position button
Press this button to move the needle to either up or down position. Needle will be
programmed to stop in selected position until button is pressed again.
B. Function buttons (see page 26/27/28)
5. Mode selection button
Press this button to select direct mode, utility and decorative pattern mode, block letter mode,
script letter mode and outline letter mode.
6. Stitch width adjustment buttons
Press this button to adjust the width of the zigzag stitch.
Page 8

3
Machine Control
Buttons
7. Stitch length adjustment buttons
Press this button to adjust the length of the stitch.
8. Twin needle button
Press this button to fix the width range when using the twin needle to sew.
9. Mirror button
Press this button to sew a reflection pattern.
10. Elongation button
Pattern 28 to 51 can be elongated up to five times its normal length by pressing this button.
C. Selection buttons (see page 29/30)
11. Edit button
Press this button to set an added pattern when sewing combinations of decorative stitches.
12. Memory button
Press this button to enter or store the created pattern combination in the memory.
13. Clear button
If an incorrect pattern is selected or memorized, pressing this button will clear it.
14. Direct pattern selection and number buttons
Instant access to direct pattern or press number buttons of the pattern number to select the
desired pattern.
15. Speed limiting adjustment lever
Slide this lever to change the sewing speed.
Page 9
4
LCD
Screen
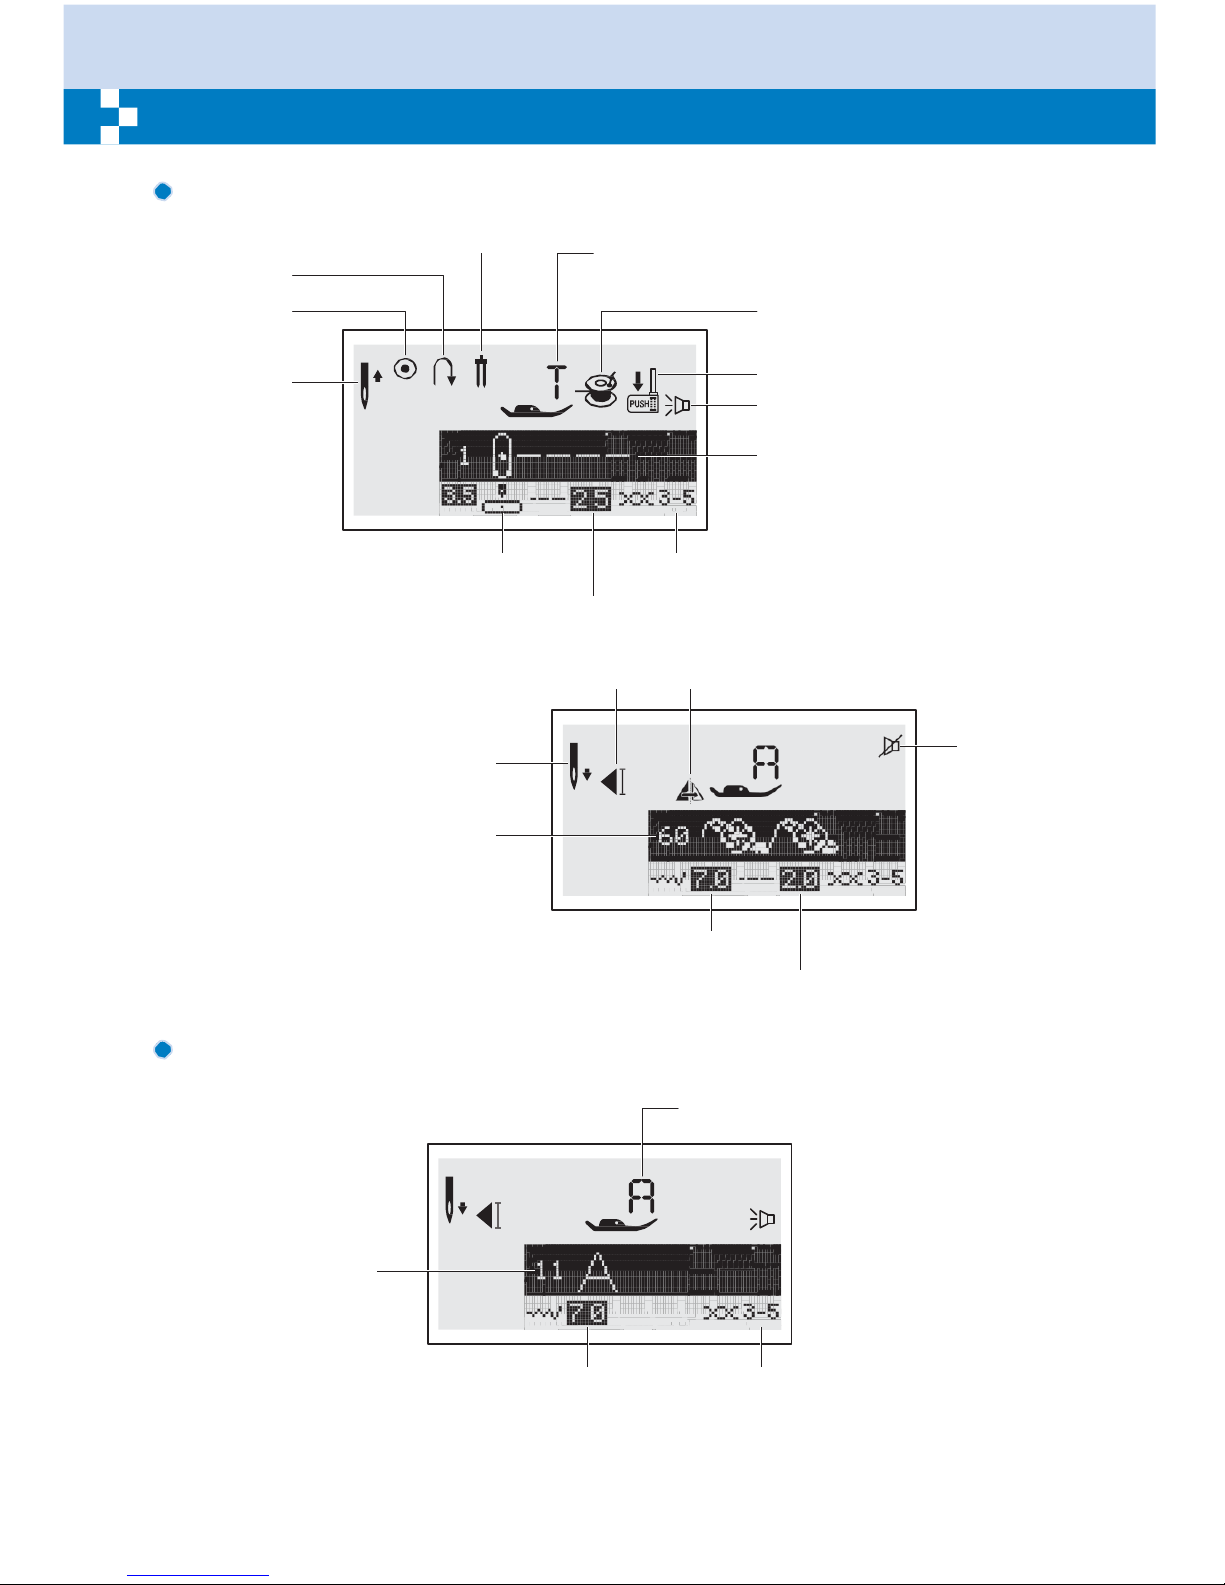
Pattern
Reverse
Auto-lock
Needle up
position
Twin needle
Suggested presser foot and
identification letter
Bobbin winding
Buttonhole lever
Sound on
Pattern
Needle position Tension
Stitch length
Auto-stop Mirror
Needle down
position
SSoouunndd ooffff
Pattern
number
Stitch width
Stitch length
Alphabet
Suggested presser foot and
identification letter
Pattern number
Stitch width Tension
Page 10
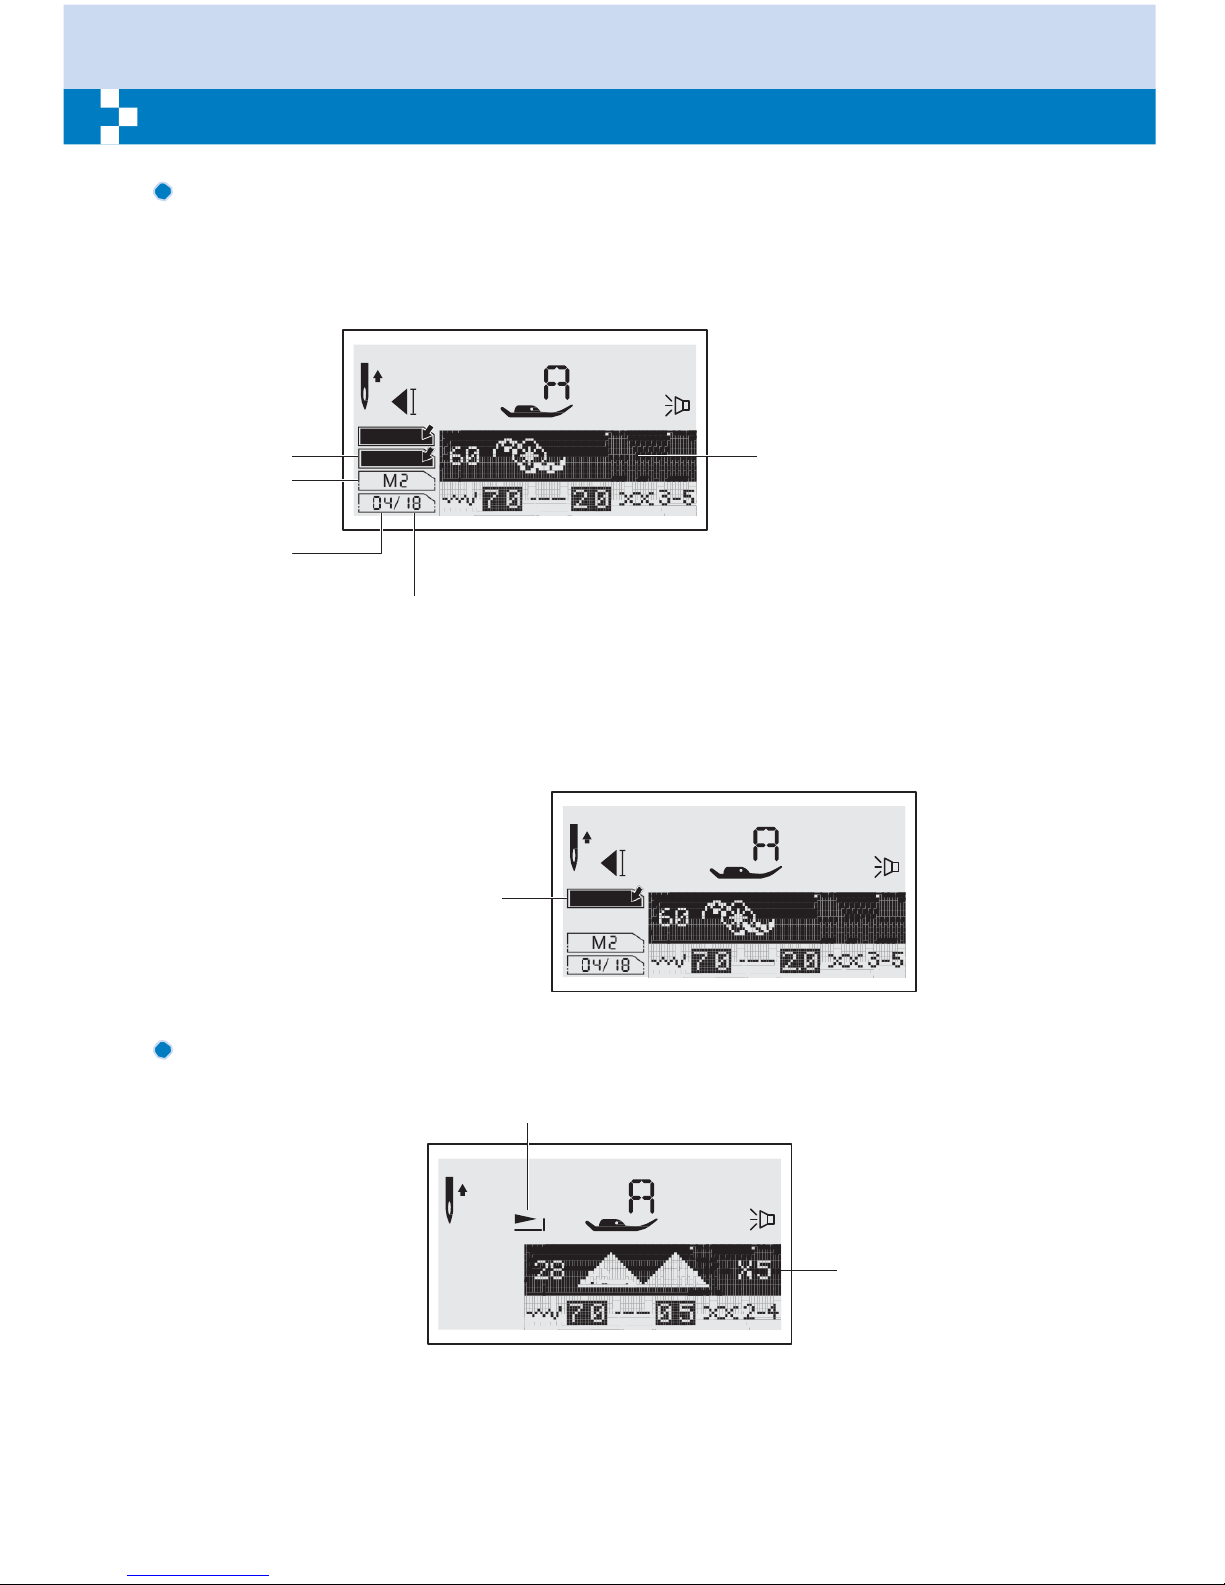
5
LCD
Screen
Memory
Editing
patterns
Edit mode
Memory group
Number of
current unit
M
EDIT
Pattern to edit
Total number
of unit
Sewing the memorized
pattern
Memory mode M
Elongation
Elongation
Amount of elongation
Page 11
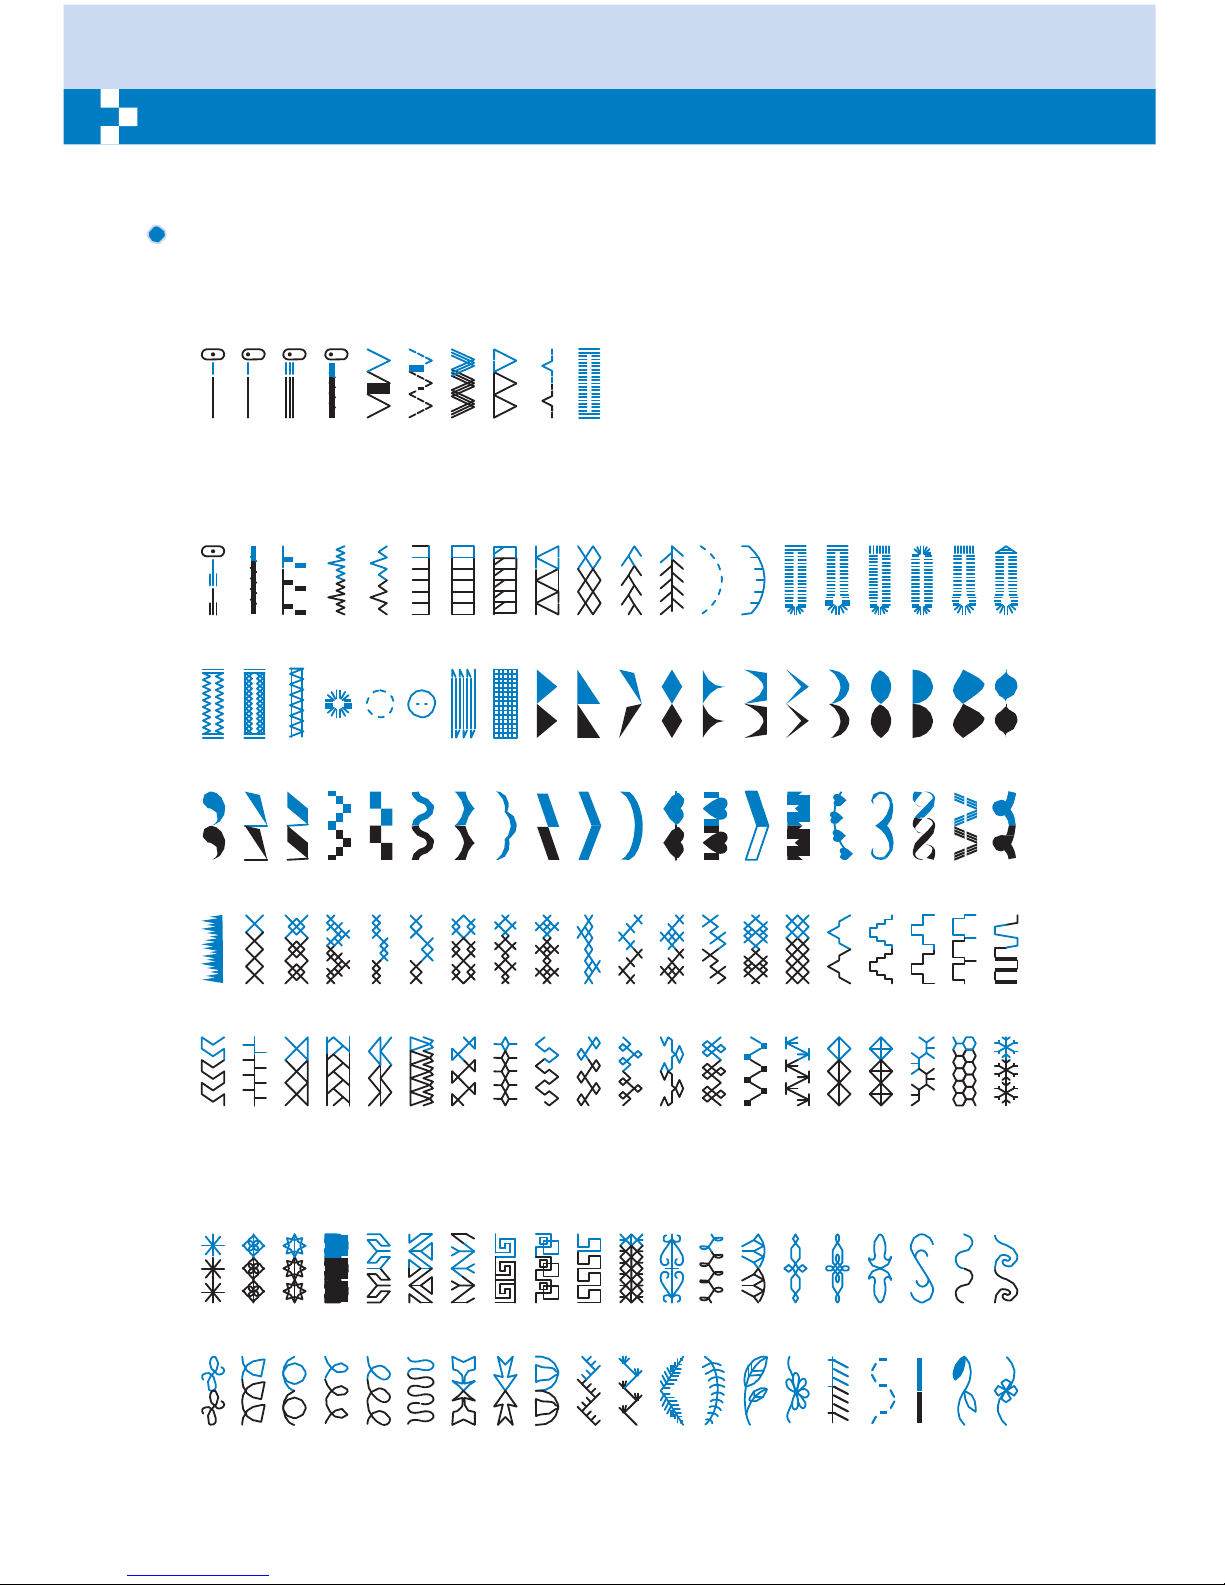
6
Pattern
Chart
The portion marked in colored on the chart below shows the one unit of each pattern.
Patterns
Direct
Patterns-10
1 2 3 4 5 6 7 8 9 0
A Group
Patterns-100
00 01 02 03 04 05 06 07 08 09 10 11 12 13 14 15 16 17 18 19
20 21 22 23 24 25 26 27 28 29 30 31 32 33 34 35 36 37 38 39
40 41 42 43 44 45 46 47 48 49 50 51 52 53 54 55 56 57 58 59
60 61 62 63 64 65
66 67 68 69 70 71
72 73 74 75 76 77 78 79
80 81 82 83 84 85 86 87 88 89 90 91 92 93 94 95 96 97 98 99
B Group
Patterns-100
00 01 02 03 04 05 06 07 08 09 10 11 12 13 14 15 16 17 18 19
20 21 22 23 24 25 26 27 28 29 30 31 32 33 34 35 36 37 38 39
Page 12
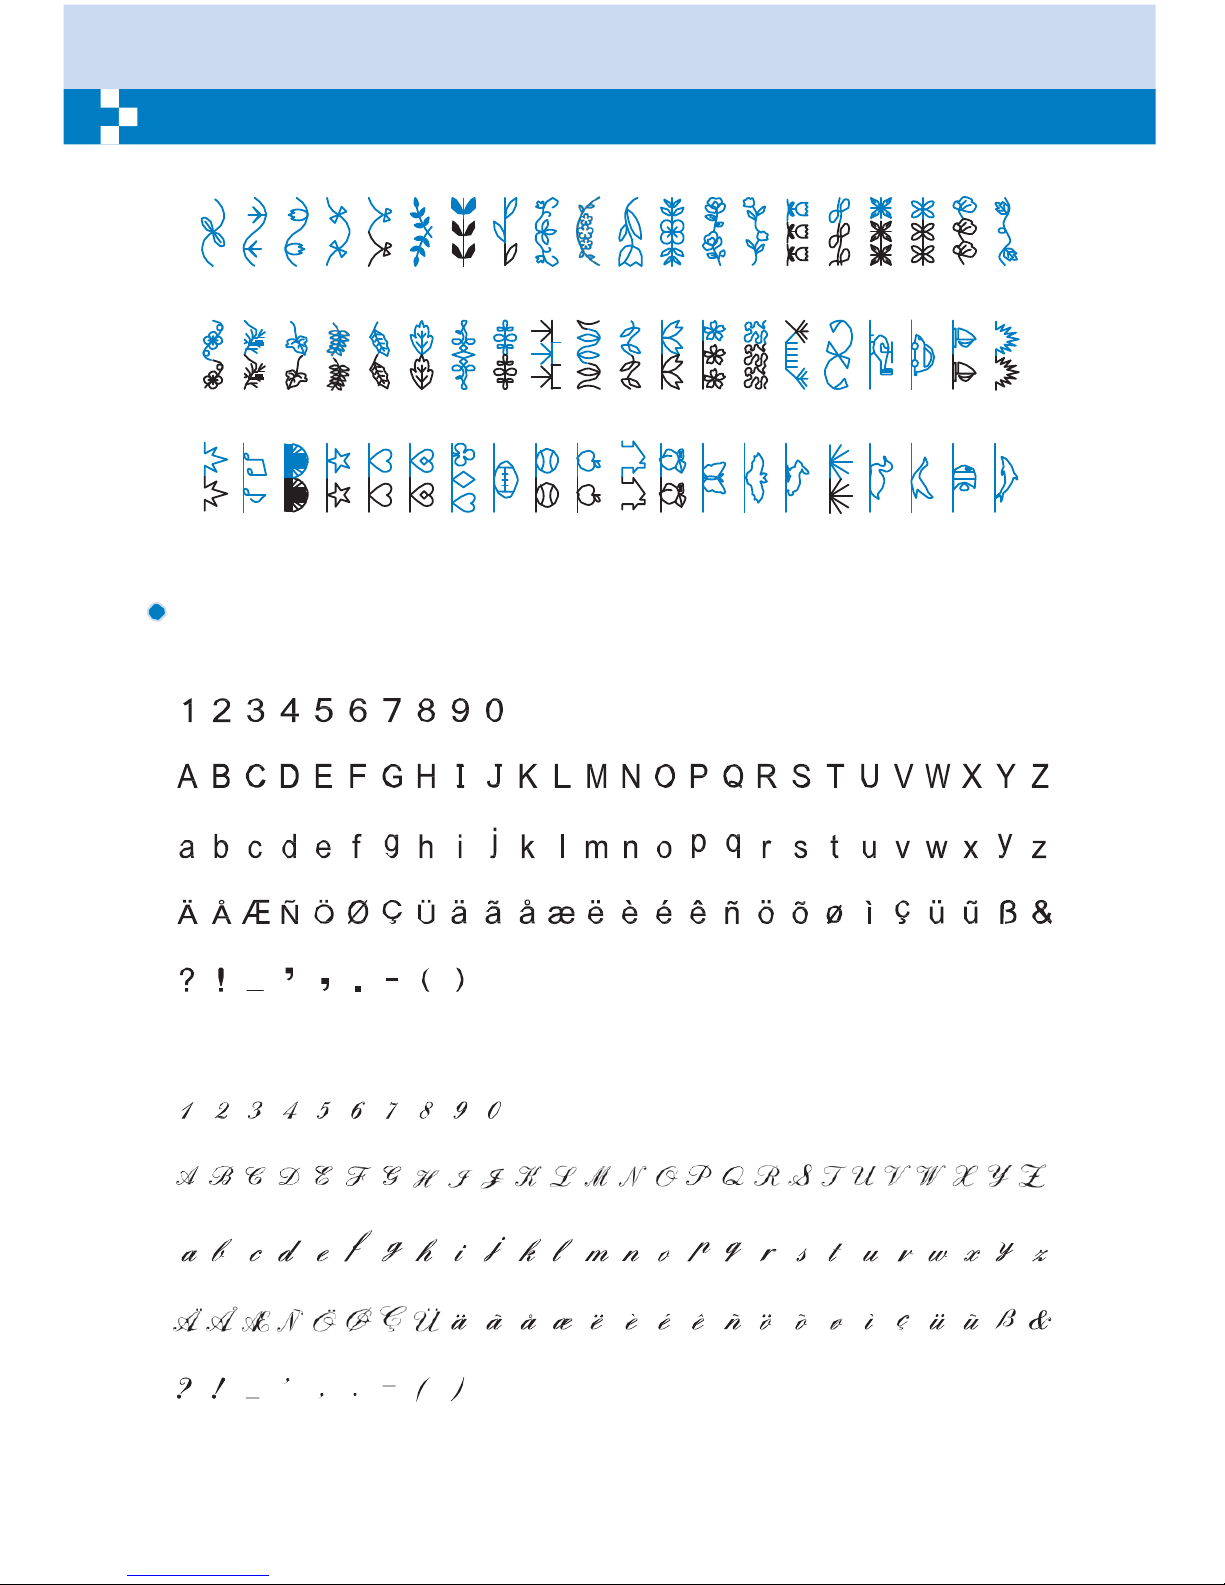
7
Pattern
Chart
40 41 42 43 44 45 46 47 48 49 50 51 52 53 54 55 56 57 58 59
60 61 62 63 64 65
66 67 68 69 70 71
72 73 74 75 76 77 78 79
80 81 82 83 84 85 86 87 88 89 90 91 92 93 94 95 96 97 98 99
Alphabets
Block
style
01 02 03 04 05 06 07 08 09 10
11 12 13 14 15 16 17 18 19 20 21 22 23 24 25 26 27 28 29 30 31 32 33 34 35 36
37 38 39 40 41 42 43 44 45 46 47 48 49 50 51 52 53 54 55 56 57 58 59 60 61 62
63 64 65 66 67 68 69 70 71 72 73 74 75 76 77 78 79 80 81 82 83 84 85 86 87 88
89 90 91 92 93 94 95 96 97
Script
style
01 02 03 04 05 06 07 08 09 10
11 12 13 14 15 16 17 18 19 20 21 22 23 24 25 26 27 28 29 30 31 32 33 34 35 36
37 38 39 40 41 42 43 44 45 46 47 48 49 50 51 52 53 54 55 56 57 58 59 60 61 62
63 64 65 66 67 68 69 70 71 72 73 74 75 76 77 78 79 80 81 82 83 84 85 86 87 88
89 90 91 92 93 94 95 96 97
Page 13
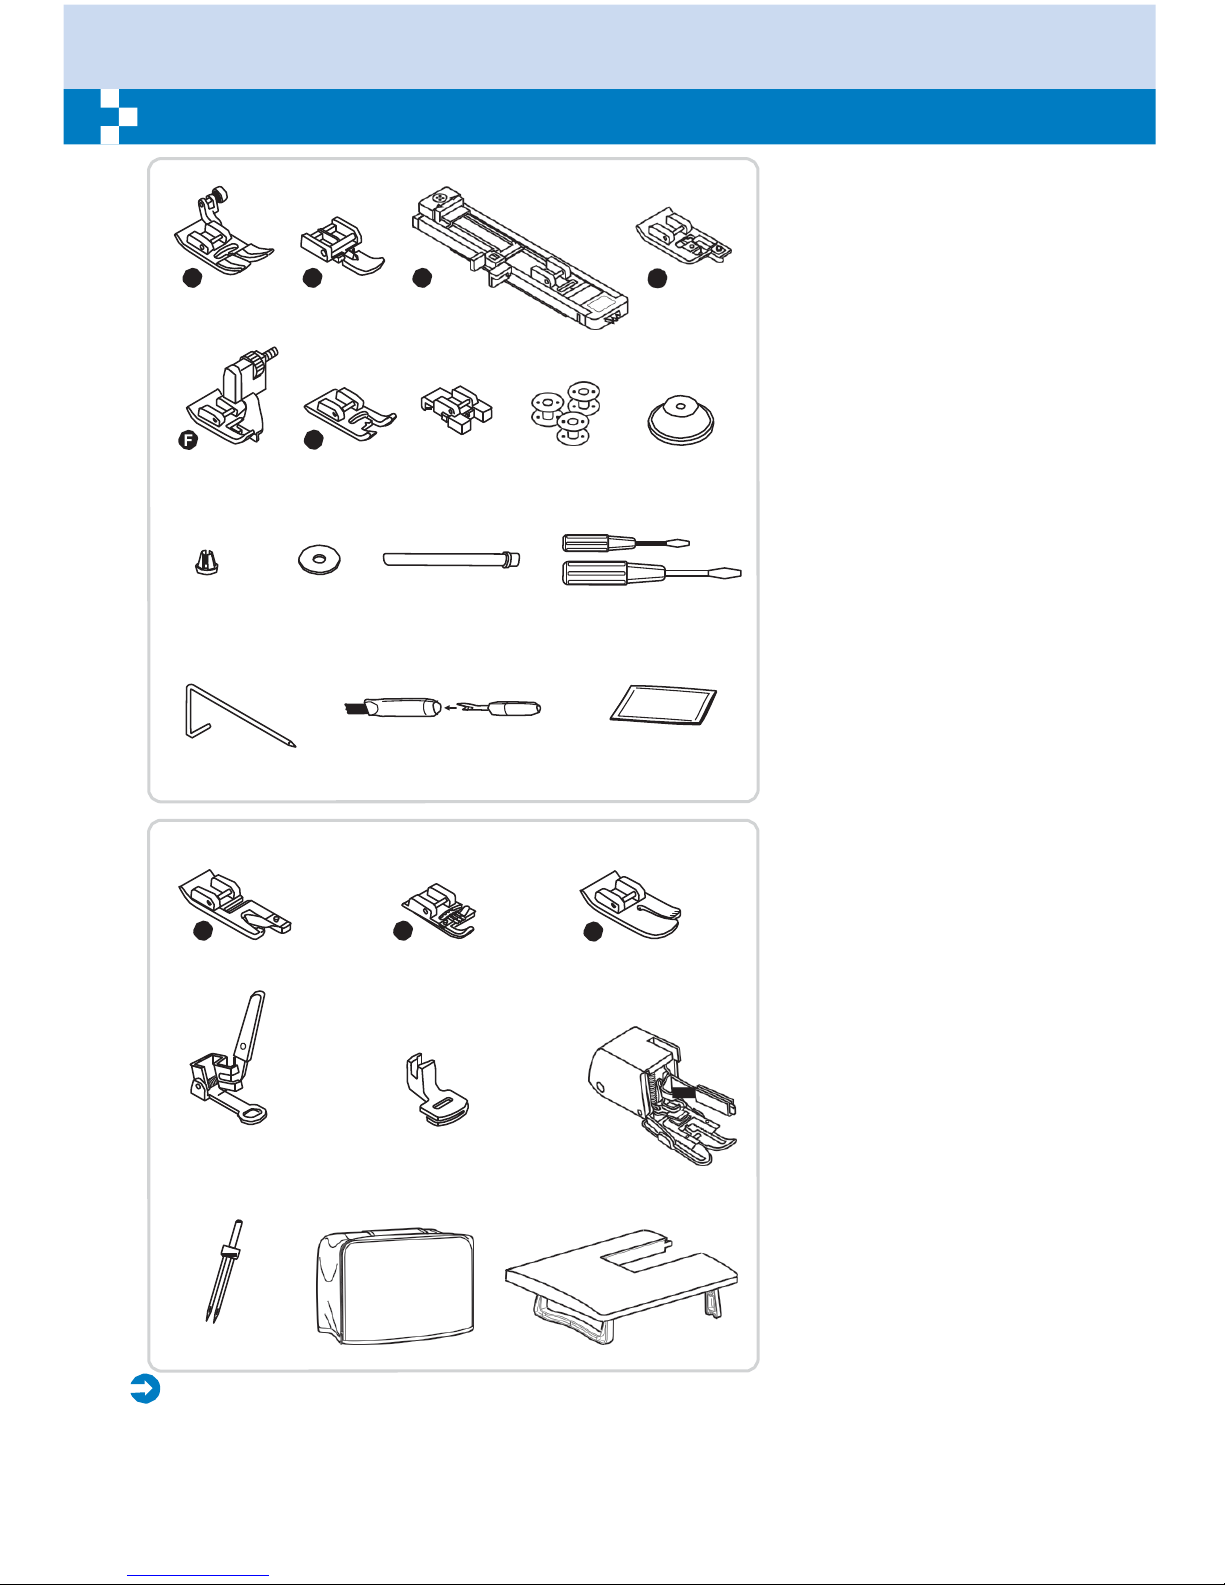
8
Accessories
1 2 3
T I
D
4
Standard
1. All purpose foot (T)
2. Zipper foot (I)
E
3. Buttonhole foot (D)
006186008 006905008 006H1A0004 006907008
4. Overcasting foot (E)
5. Blind hem foot (F)
5
006904008
10
6
A
006172008
11
7
006914008
12
8
006084009
13
9
R12373209
6. Satin stitch foot (A)
7. Button sewing foot
8. Bobbin (3x)
9. Spool holder (Large)
10.Spool holder (Small)
11. Spool pin felt
12.Second spool pin
TA10943209 006015009
R60033209
006012008
13.Screwdriver (L & S)
14.Edge/quilting guide
14 15 16
15.Brush/ Seam ripper
16.Needle (3x)
006008001 006099008
17
K
006900008
20
006016008
18
M
006813008
21
006917008
19
P
006916008
22
0061850081
Optional
17.Hemmer foot (K)
18.Cording foot (M)
19.Quilting foot (P)
20.Darning/ Embroidery foot
21.Gathering foot
22.Walking foot
23.Twin needle
24.Rigid cover
25.Extension table
23 24 25
006020008
Please
Note:
- Accessories are stored inside the accessory box.
- Optional accessories are not supplied with this machine; they are however available as special
accessories from your local dealer.
Page 14
9
Connecting
the machine to the power
source
Caution:
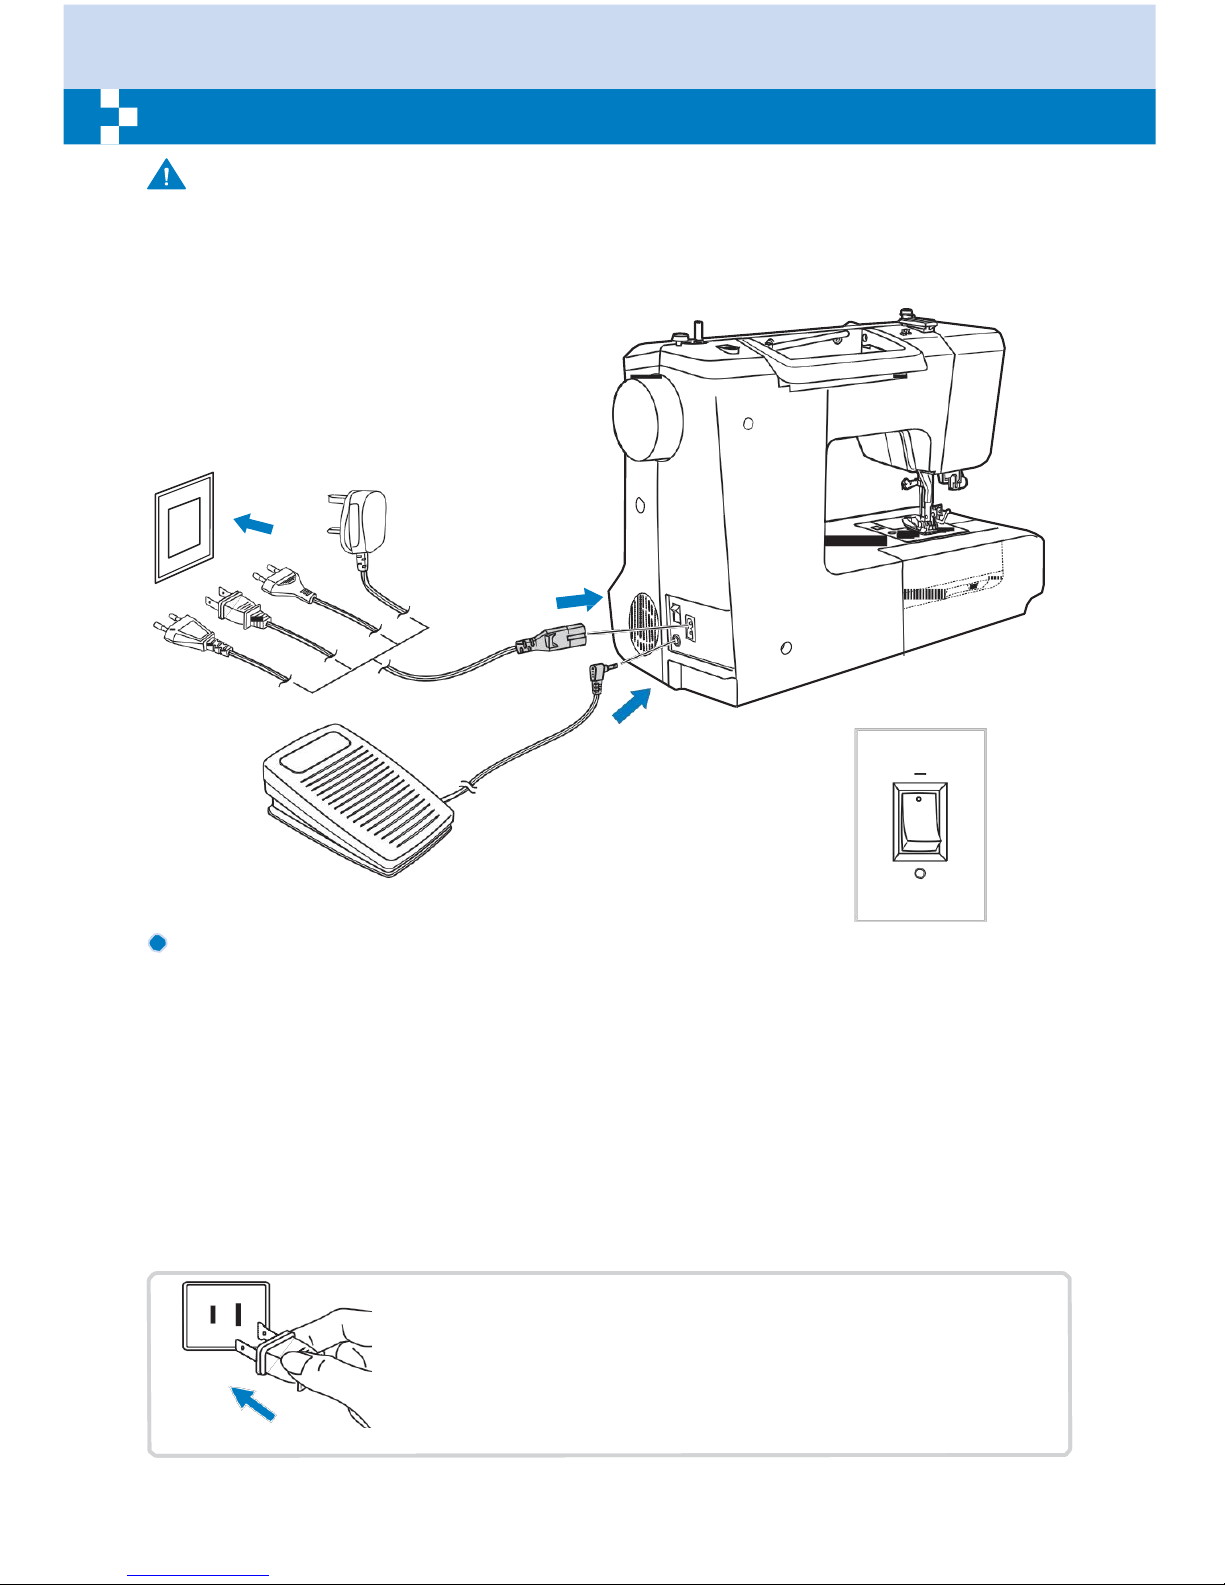
Always make sure that the machine is unplugged from power source and the main switch is on
("O"). when the machine is not in use and before inserting or removing parts.
After switching off, it will take some time to consume the residual power in the circuitry.The light
does not turn off immediately after switching off the power. This is normal phenomenon for an
energy efficient appliance.
ON
OFF
Connecting
the
machine
Before connecting the power supply, make sure that the voltage and frequency shown on the
machine is conforming with your electrical power.
Place the machine on a stable table.
1. Connect the power line cord to the machine by inserting the 2-hole plug into the terminal box.
2. Connect the power line plug to the electric outlet.
3. Turn on the power switch.
4. The sewing lamp will light up when the switch is turned on.
To disconnect, turn the power switch to the off position, then remove plug from outlet.
Polarized plug
information
This appliance has a polarized plug (one blade wider than the other),
to reduce the risk of electrical shock; this plug will fit in a polarized
outlet only one way. If the plug does not fit fully in the outlet, reverse
the plug. If it still does not fit, contact a qualified electrician. Do not
modify the plug in any way.
Page 15
1
Winding the
bobbin
2
3
4
0
1
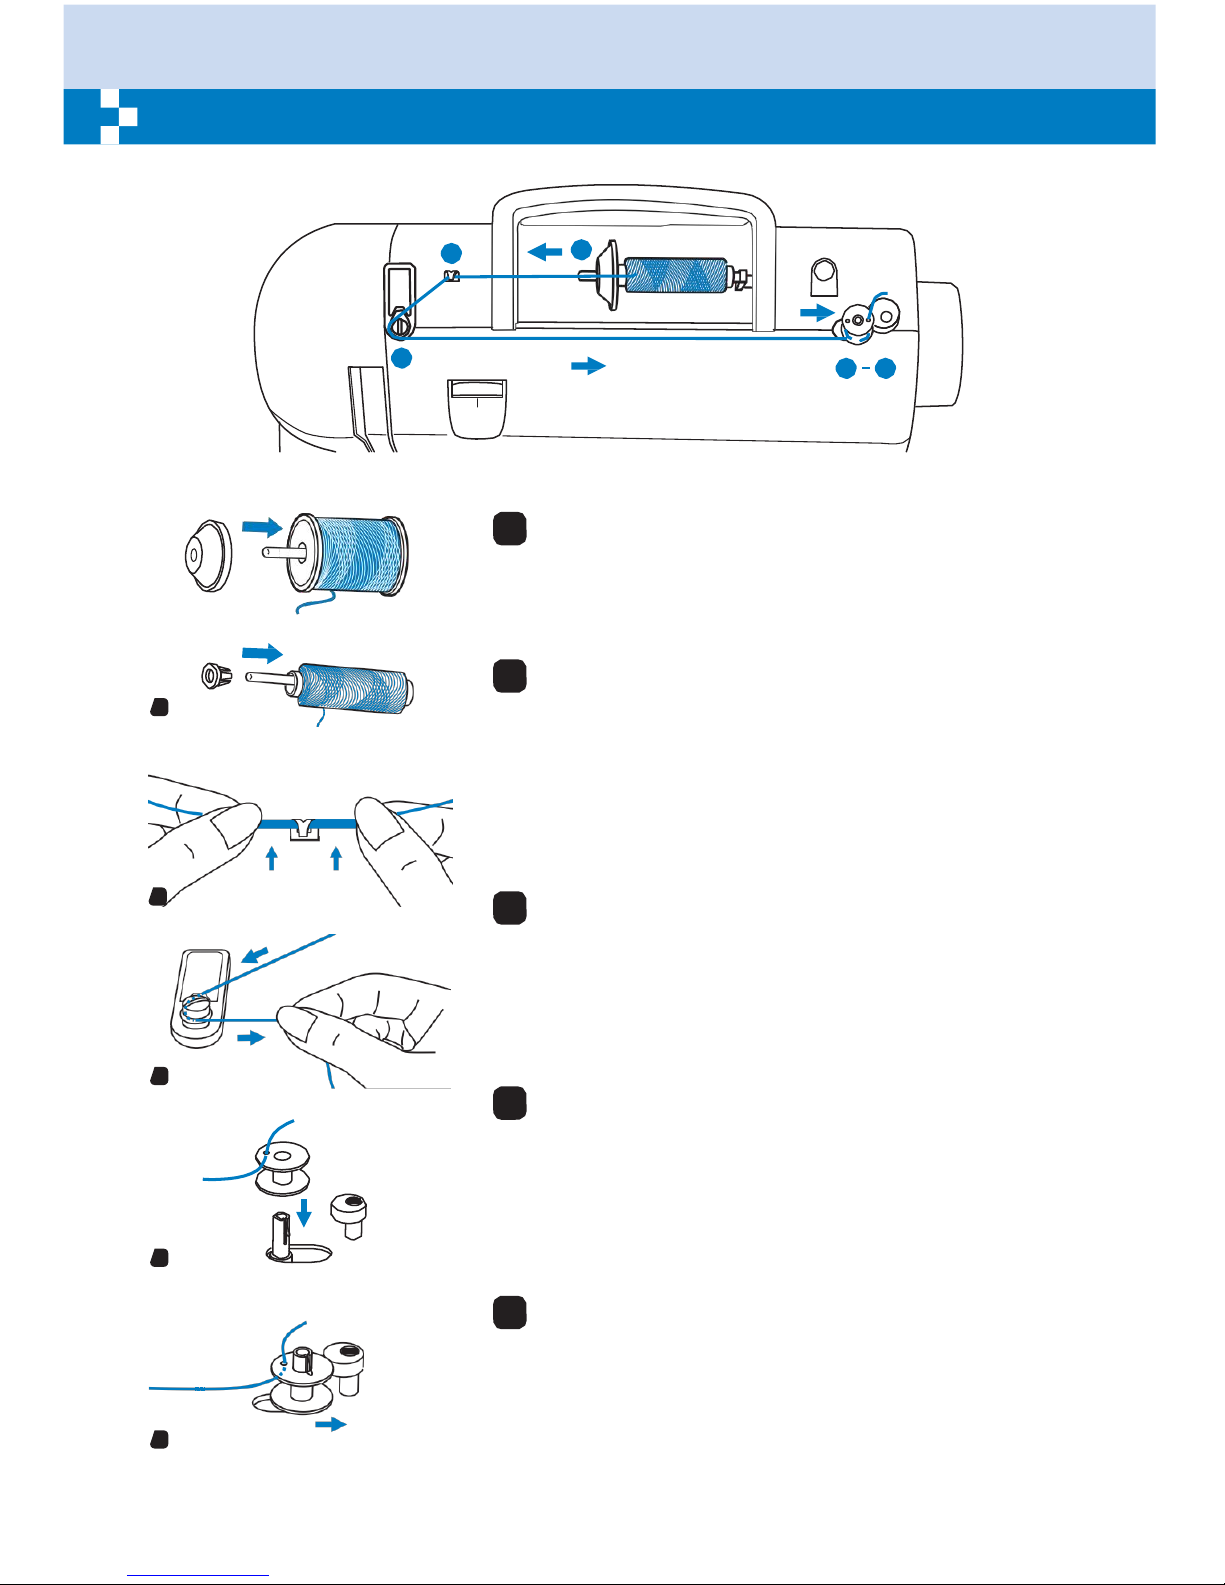
Place the thread and spool holder onto the spool pin.
For smaller spools of thread, place spool holder with
the small side next to the spool or use the small spool
holder.
2
Snap the thread into the thread guide .
1
2
2
2
3
Wind the thread contrary clockwise around the bobbin
winder tension discs.
3
4
Place the thread end through one of the inner holes in
the bobbin as illustrated and place empty bobbin on the
spindle.
4
5
Push the bobbin to right.
5
Page 16
1
Winding the
bobbin
6
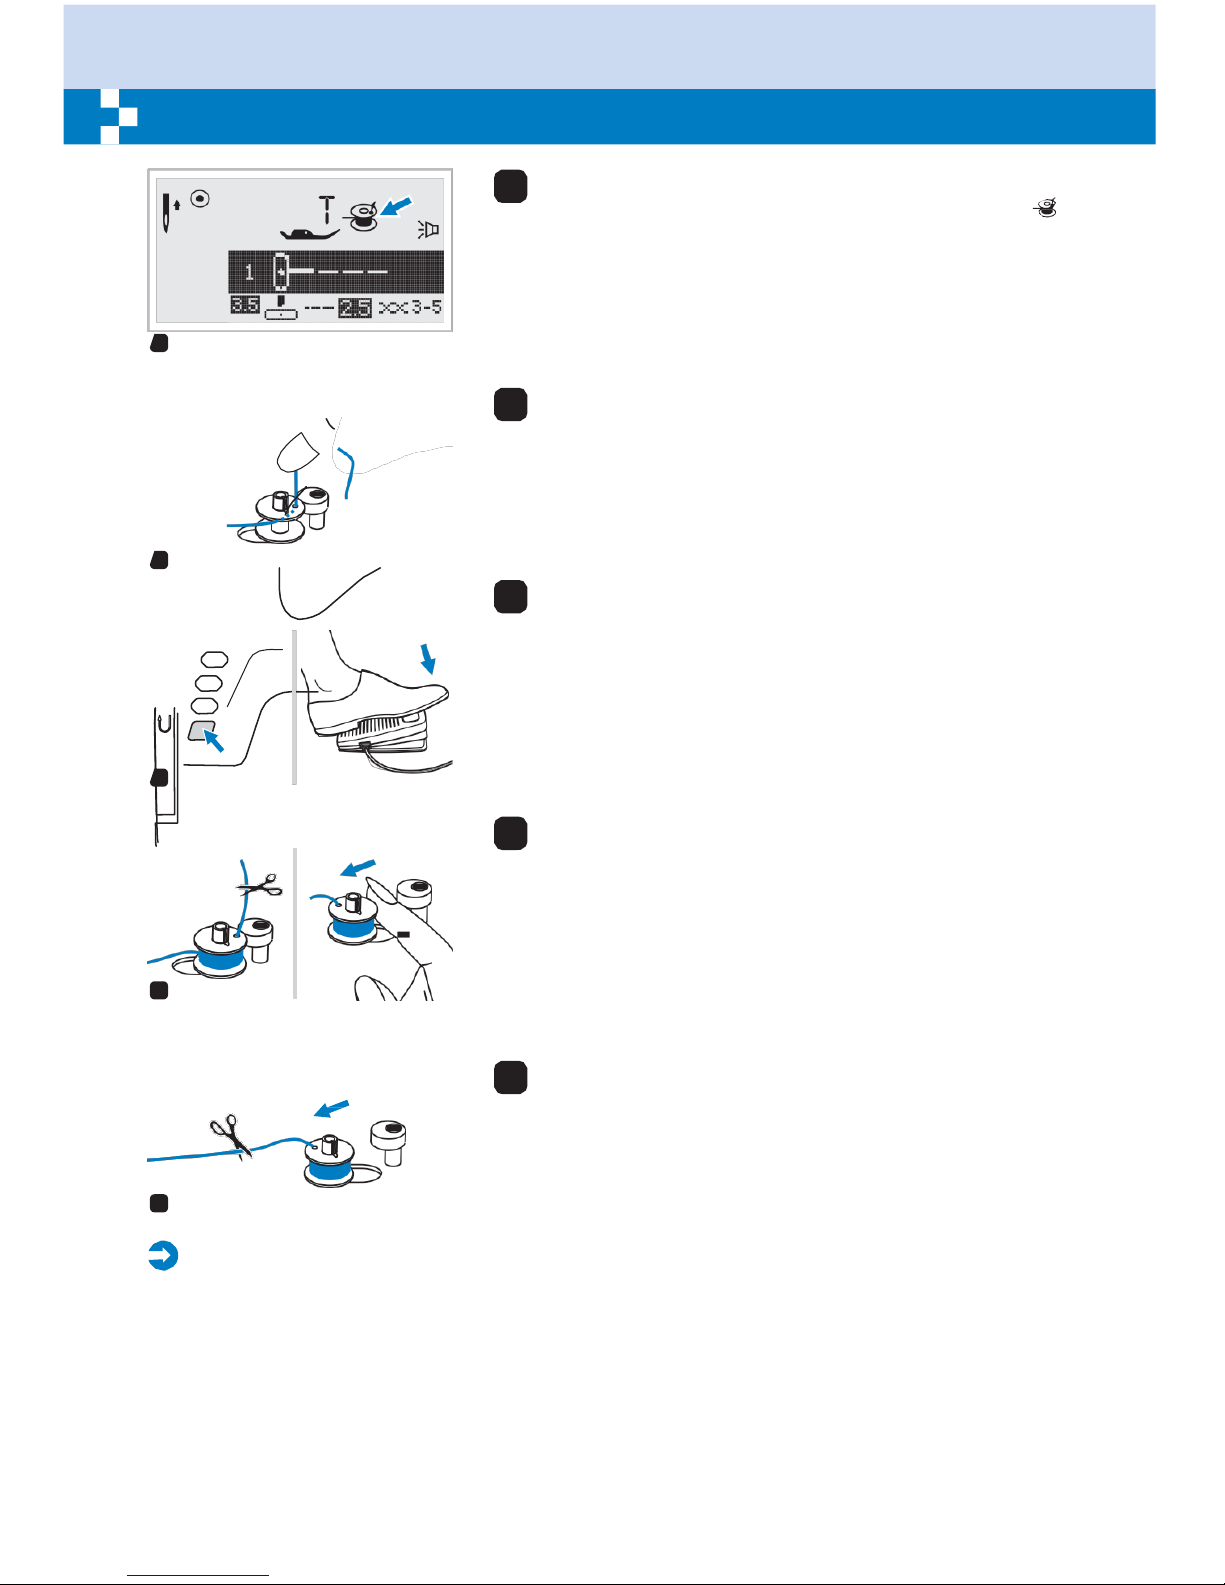
When the bobbin winder spindle is pushed to the right,
which is the "bobbin winding position", the symbol " "
appears on the LCD screen.
The symbol will disappear from the LCD screen when the
bobbin winder spindle is pushed to the left, which is the
"sewing position".
6
7
Hold the thread tail securely in one hand.
7
8
Press on the foot control or the Start/Stop button to
start winding the bobbin.
8
9
After the bobbin has wound a few turns stop the
machine and cut the thread near the hole of the bobbin.
Continue filling the bobbin until it is full. The motor stops
automatically when the bobbin is full. Stop the machine.
Push the bobbin winder spindle to left.
9
10
Cut the thread and then remove the bobbin.
10
Please
Note:
When the bobbin winder switch is placed on the right, "bobbin winding position", the machine will
not sew and the handwheel will not turn. To start sewing, push the bobbin winder switch to the left
"sewing position".
Page 17
12
Inserting
the
bobbin
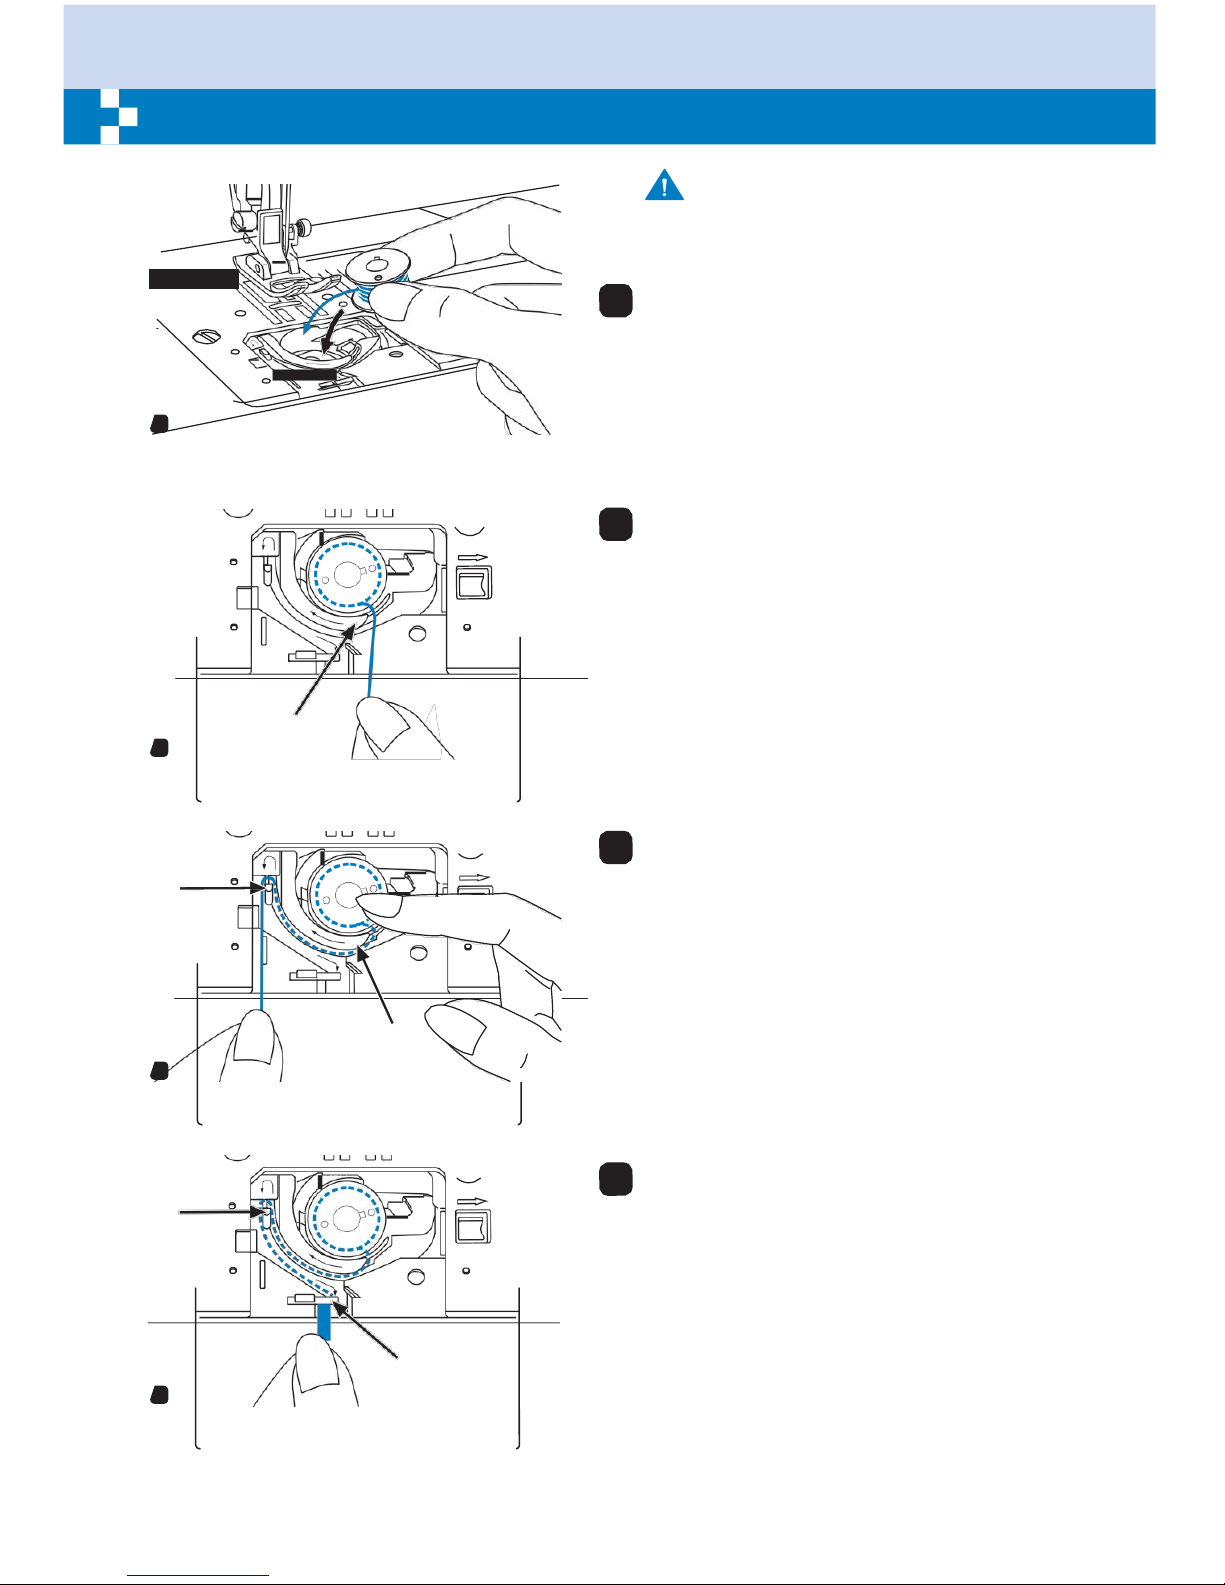
Attention:
Turn power switch to off ("O") before inserting
or removing the bobbin.
1
When
inserting
or
removing
the
bobbin,
the needle must be fully
raised.
Open the needle plate cover.
Insert the bobbin in the bobbin case with the
thread running in a counterclockwise
1
direction (arrow).
2
Pull the thread through the slit (A).
A
2
3
With a finger held gently on top of the
bobbin.
B
Draw the thread at the arrow markings into
the stitch plate thread guide from (A) to (B).
A
3
4
Pull the thread at the arrow markings into
B
the stitch plate thread guide from (B) to (C).
To cut off excess thread pull thread back
over the cutting off blade at point (C).
Close the needle plate cover.
C
4
Page 18
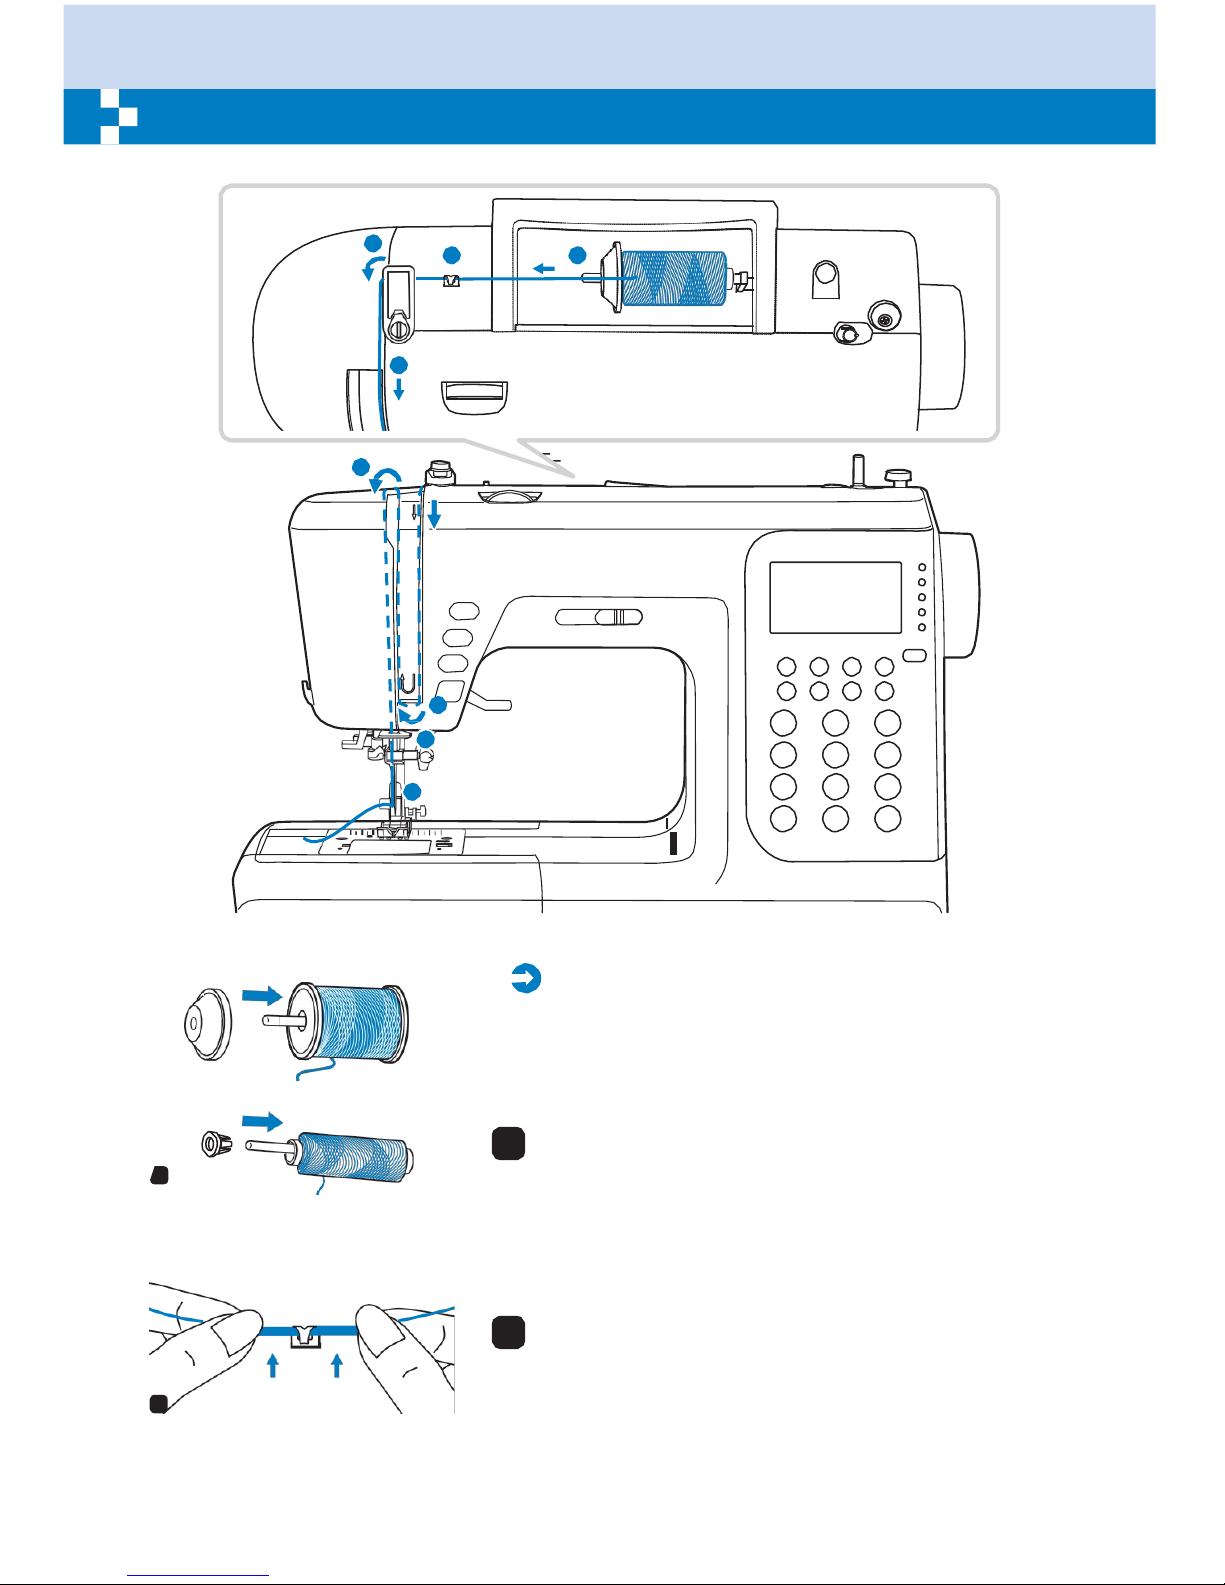
13
Threading the upper
thread
3
2
4
6
7
8
Please
Note:
It is important to carry out the threading correctly as by not
doing so several sewing problems could result.
Start by raising the needle to its highest point,
and
also raise the presser foot to release the tension
discs.
1
Place the thread and spool holder onto the spool pin. For
1
smaller spools of thread, place spool holder with the small
side next to the spool or use th e small spool holder.
2
Draw the thread from the spool through the upper thread
guide.
2
2
2
Page 19
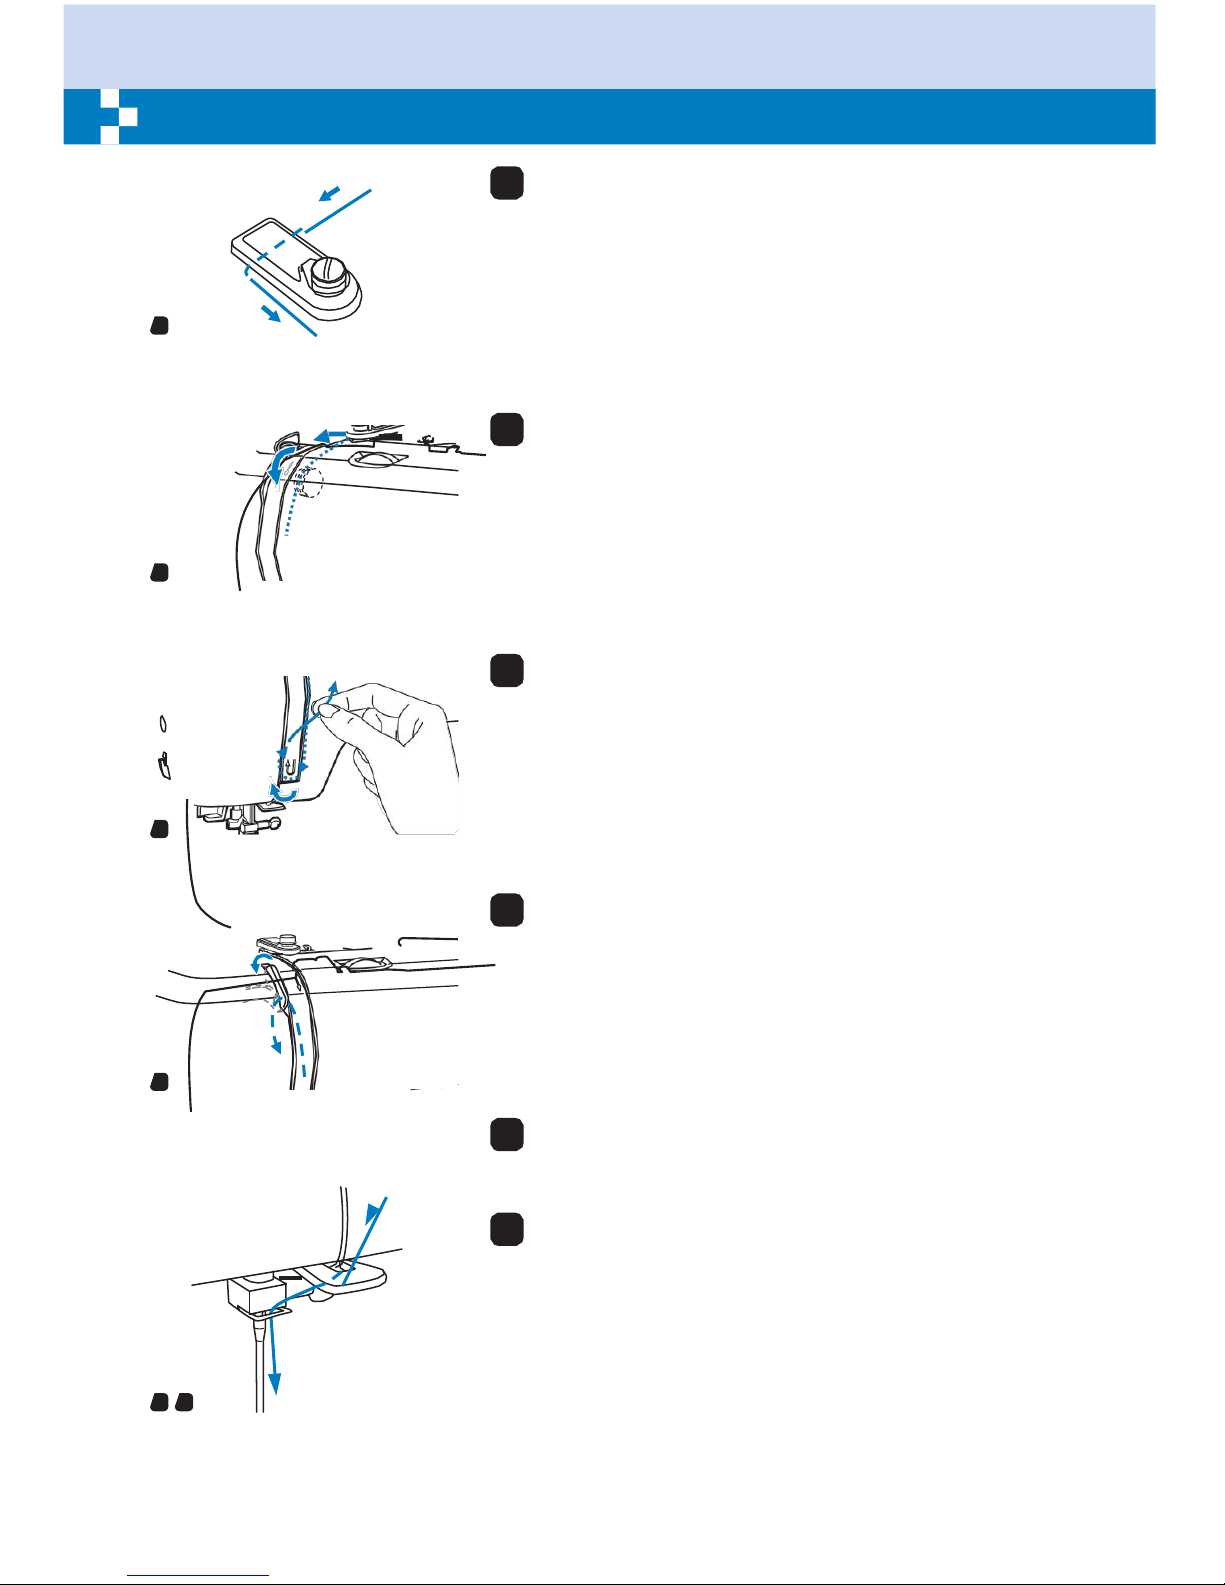
14
Threading the upper
thread
3
Guide the thread around the thread guide pulling the
thread through the pre-tension spring as illustrated.
3
4
Thread the tension module by passing the thread
between the silver discs.
4
5
Then, down and around the check spring holder.
5
6
At the top of this movement, pass the thread from right to
the left through the slotted eye of the take-up lever and
then downwards again.
6
7
Pass the thread behind the flat, horizontal thread guide.
Guide the thread through the wire loop.
8
Pull the end of the thread through the needle from front
to rear, and pull out about 10 cm of thread.
Use the needle threader to thread the needle. (On the
next page.)
7 8
Page 20
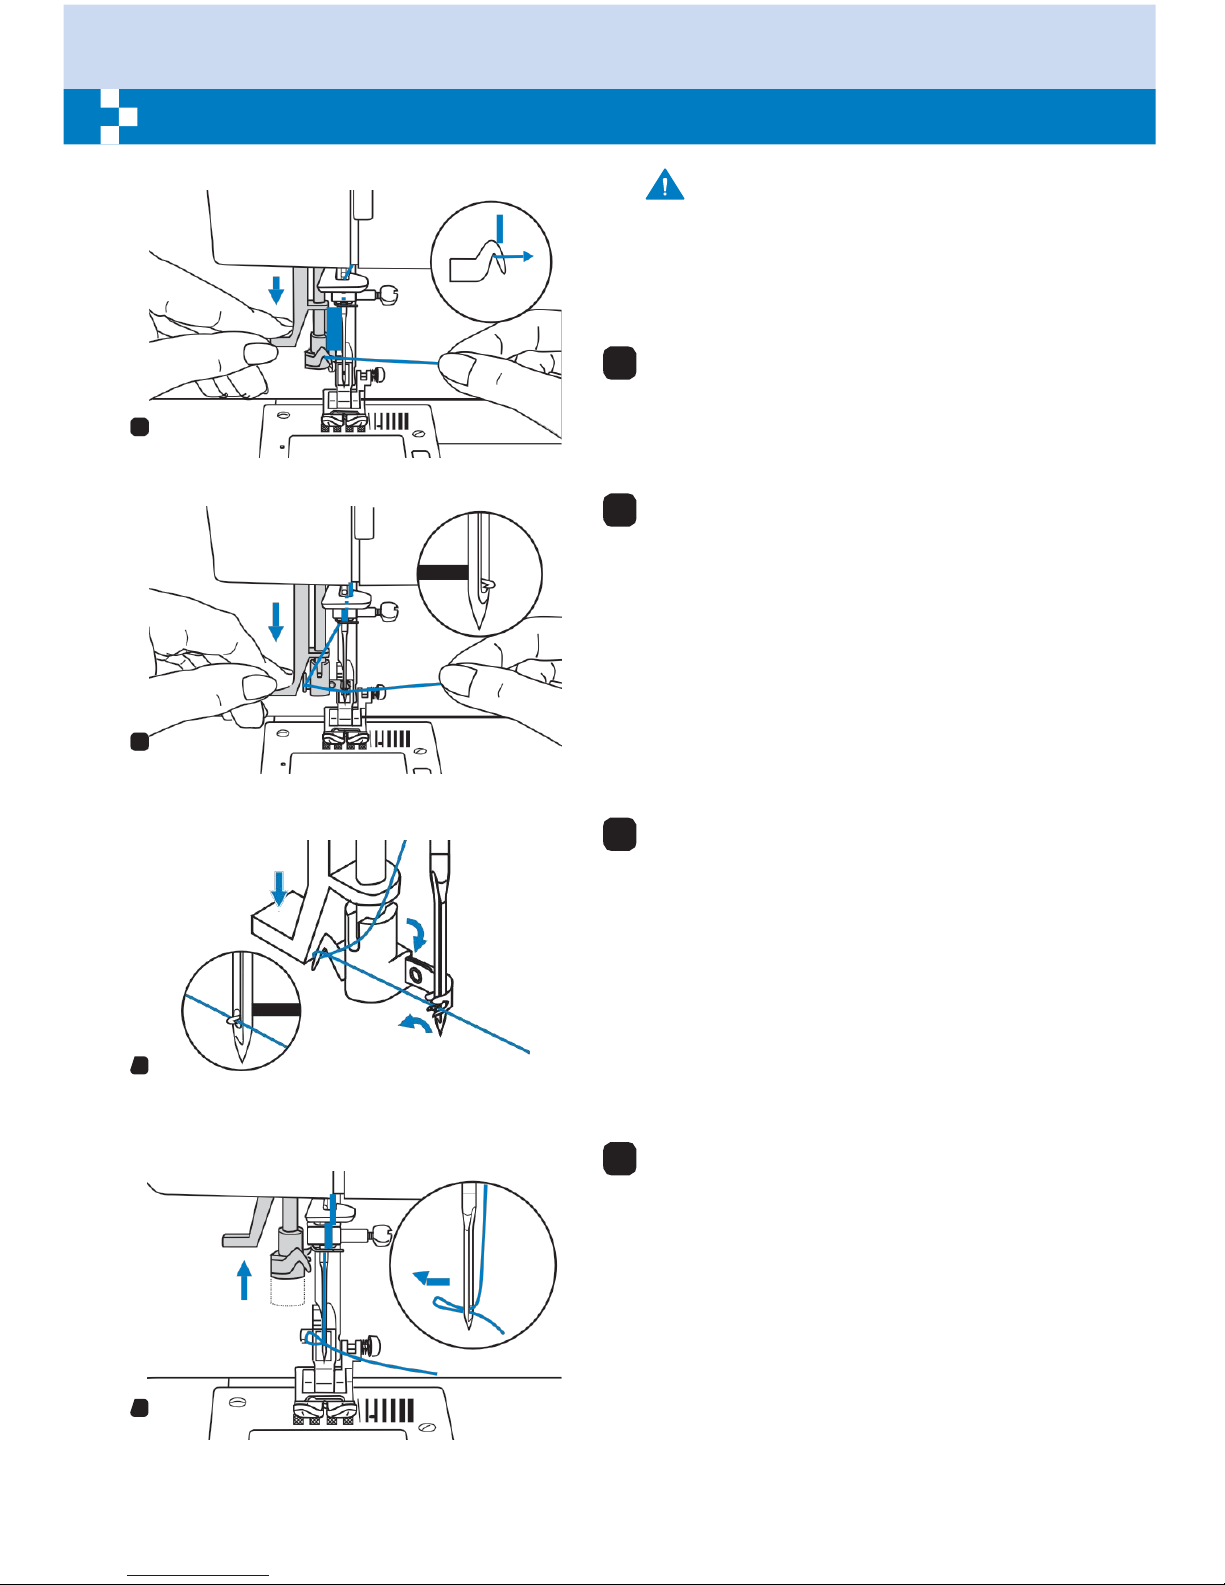
15
Using the needle
threader
Attention:
Turn power switch to the off position ("O").
Raise the needle to its highest
position
and lower the presser
foot.
1
Lower the needle threader lever slowly and
draw the thread through the thread guide as
illustrated and then to the right.
1
2
The needle threader automatically turns to
the threading position and the hook pin
passes through the needle eye.
2
3
Take the thread in front of the needle.
3
4
Hold the thread loosely and release the
lever slowly. The hook will turn and pass the
thread through the needle eye forming a
loop.
Pull the thread through the needle eye.
4
Page 21
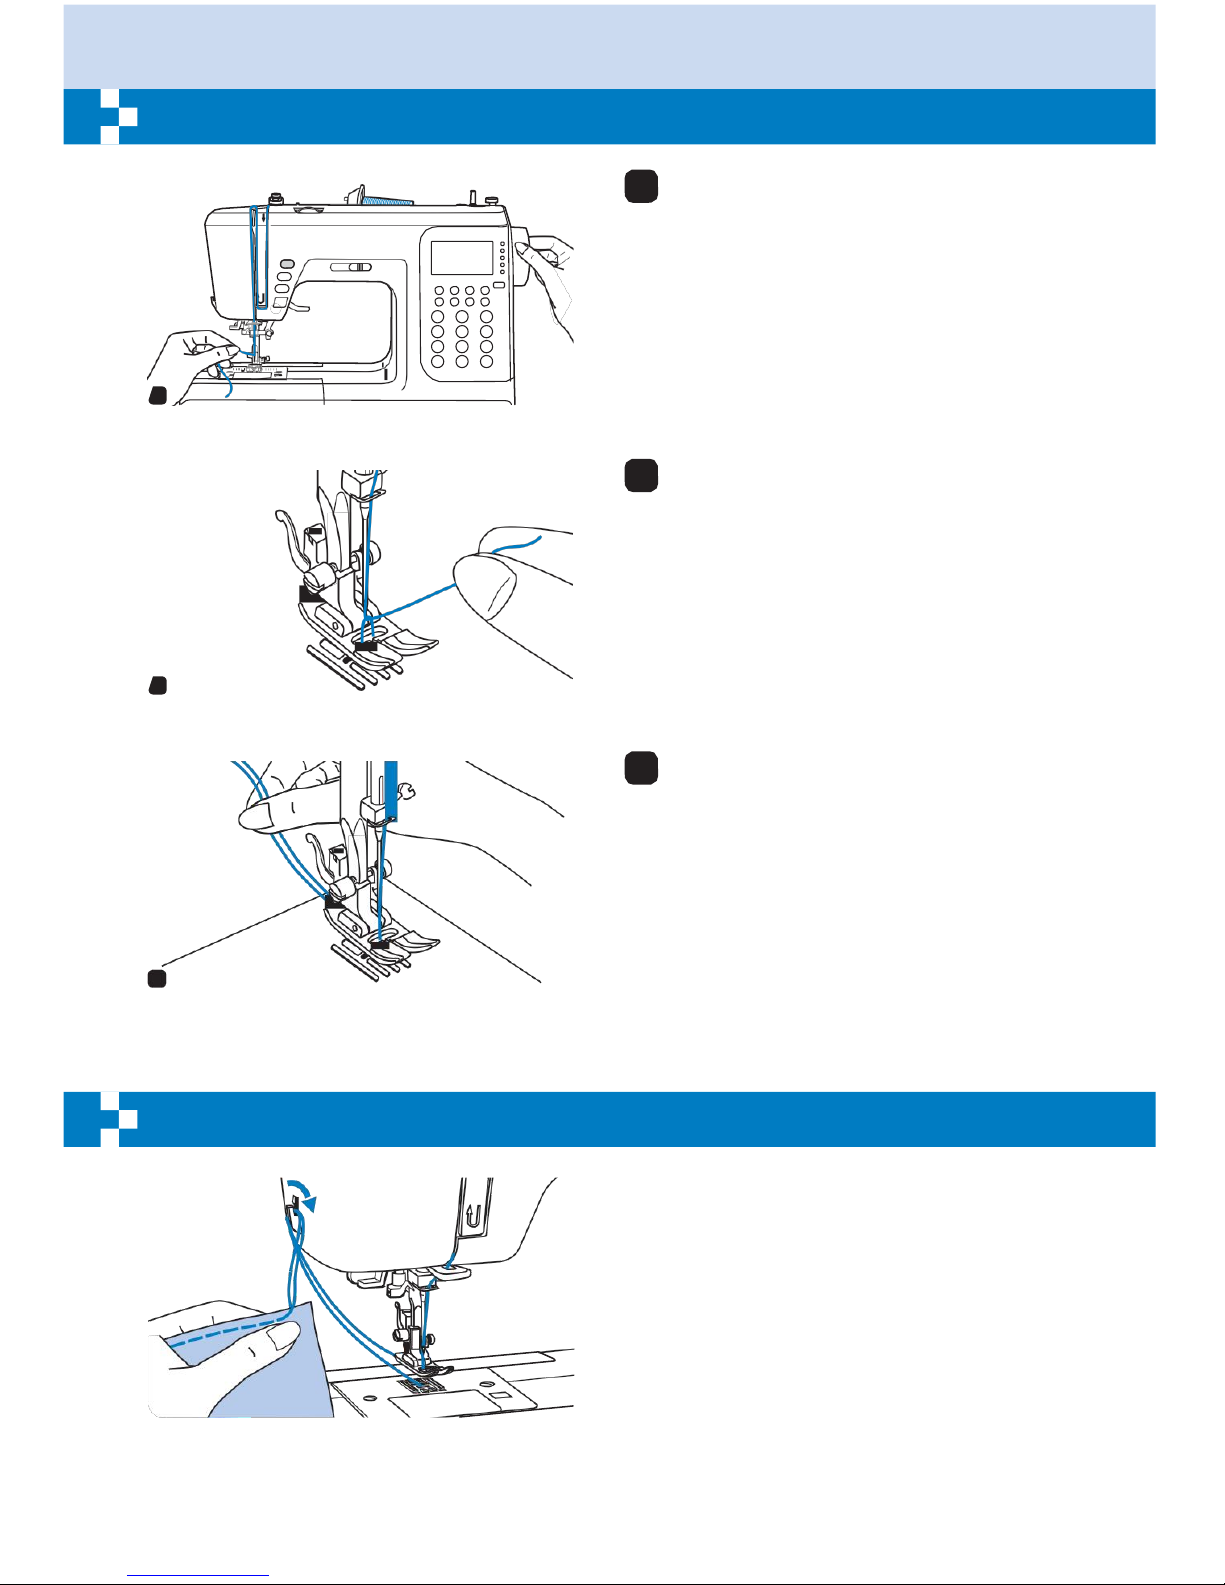
16
Raising up the lower
thread
1
Hold the upper thread with the left hand.
Tu rn the handwheel towards yo u
(counterclockwise) lowering, then raising
the needle.
1
2
Gently pull on the upper thread to bring
the bobbin thread up through the needle
plate hole. The bobbin thread will come
up in a loop.
2
3
Pull both threads to the back under the
presser foot.
3
Cutting the
thread
Raise the presser foot.
Remove the fabric, draw the threads to the
left side of the face cover and cut using the
thread cutter.
The threads are cut at the proper length to
start the next seam.
Page 22
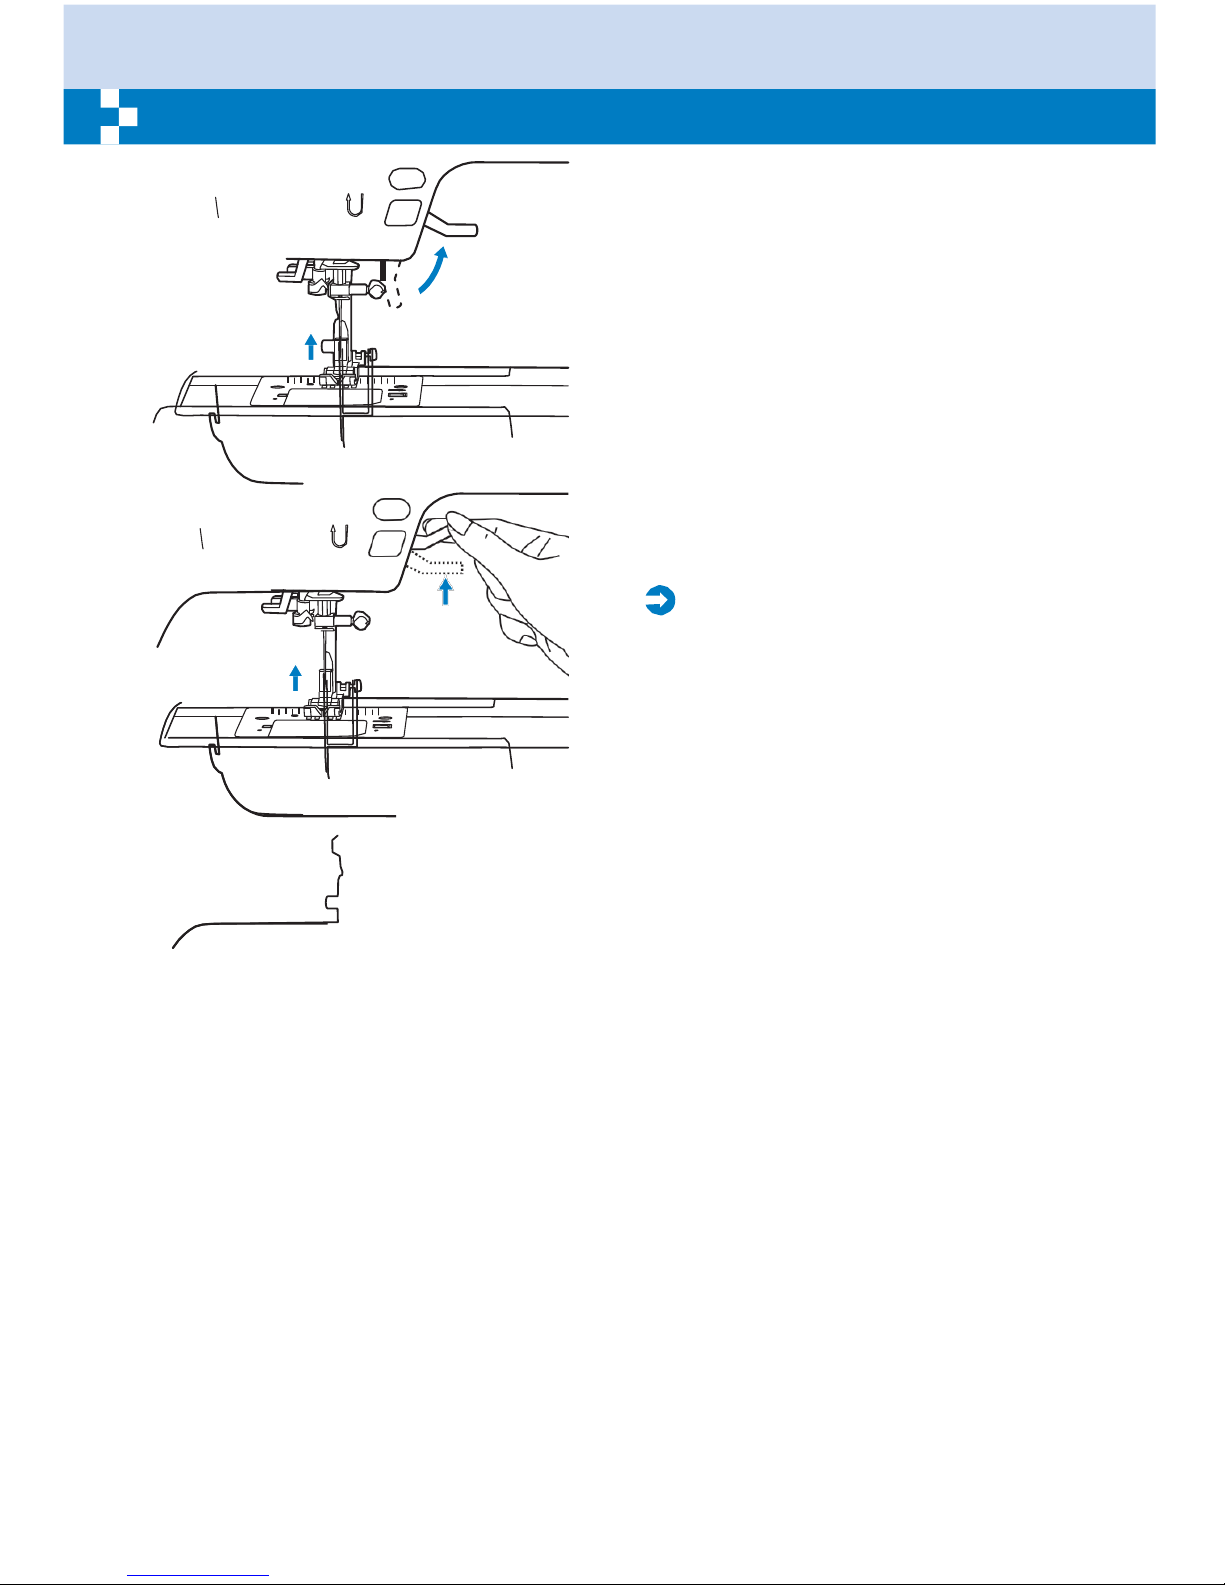
17
Two-step presser foot
lifter
The presser foot lifter raises and lowers your
presser foot.
When sewing several layers or thick fabrics,
the presser foot can be raised a second
stage for easy positioning of the work.
Please
Note:
The needle must always be at the highest
position.
Page 23
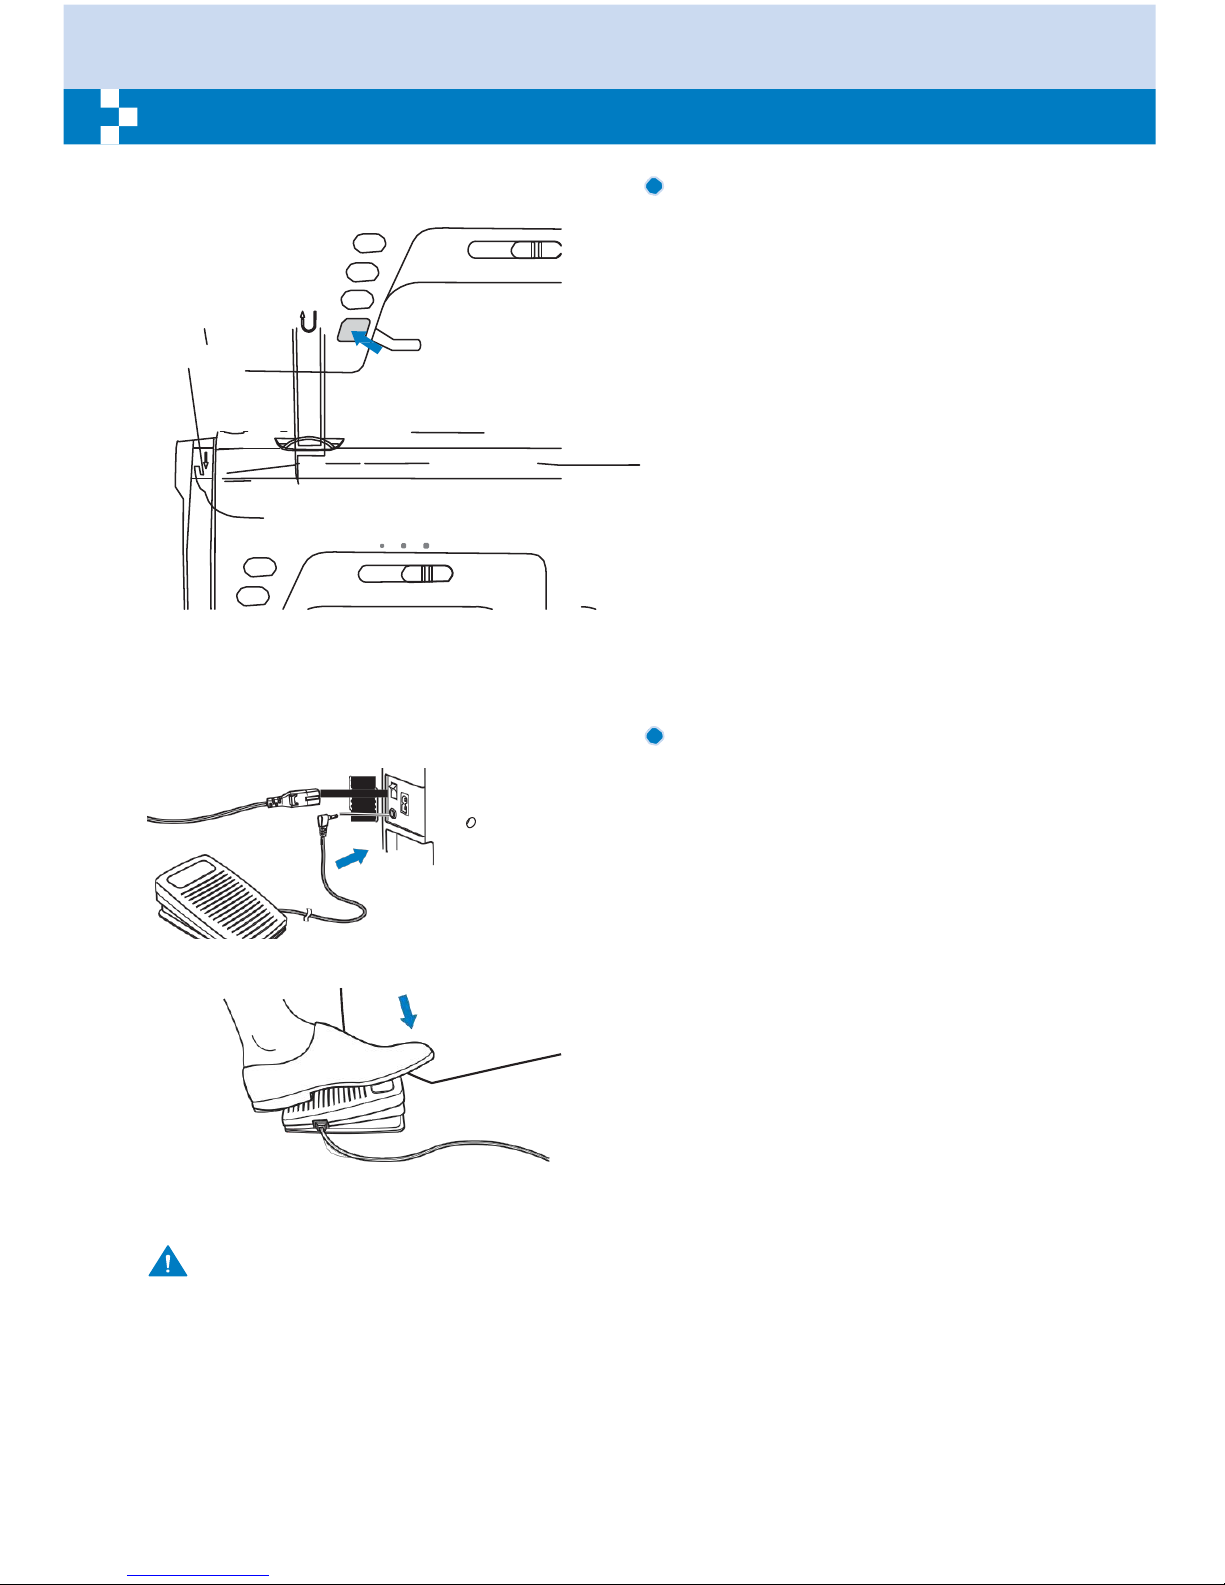
18
Starting
sewing
Start/stop button
The machine will start running when
Start/stop button is pressed and will stop
when pressed the second time.
The machine will rotate slowly at the
beginning of the sewing.
The speed limiting adjustment lever can
control the sewing speed. To increases the
speed, slide the lever to the right , To
decrease the sewing speed, slide the lever
to the left.
Foot
control
With the sewing machine turned off, insert
the foot control plug into its connector on the
sewing machine.
Turn on the sewing machine, and then
slowly depress the foot control to start
sewing.
Release the foot control to stop the sewing
machine.
Attention:
Consult a qualified electrician if in doubt as how to connect the machine to the power source.
Unplug the power cord when the machine is not in use.
The appliance must be used with the foot controller C-8001 manufactured by ZENG HSING
INDUSTRIAL CO., LTD.
Page 24
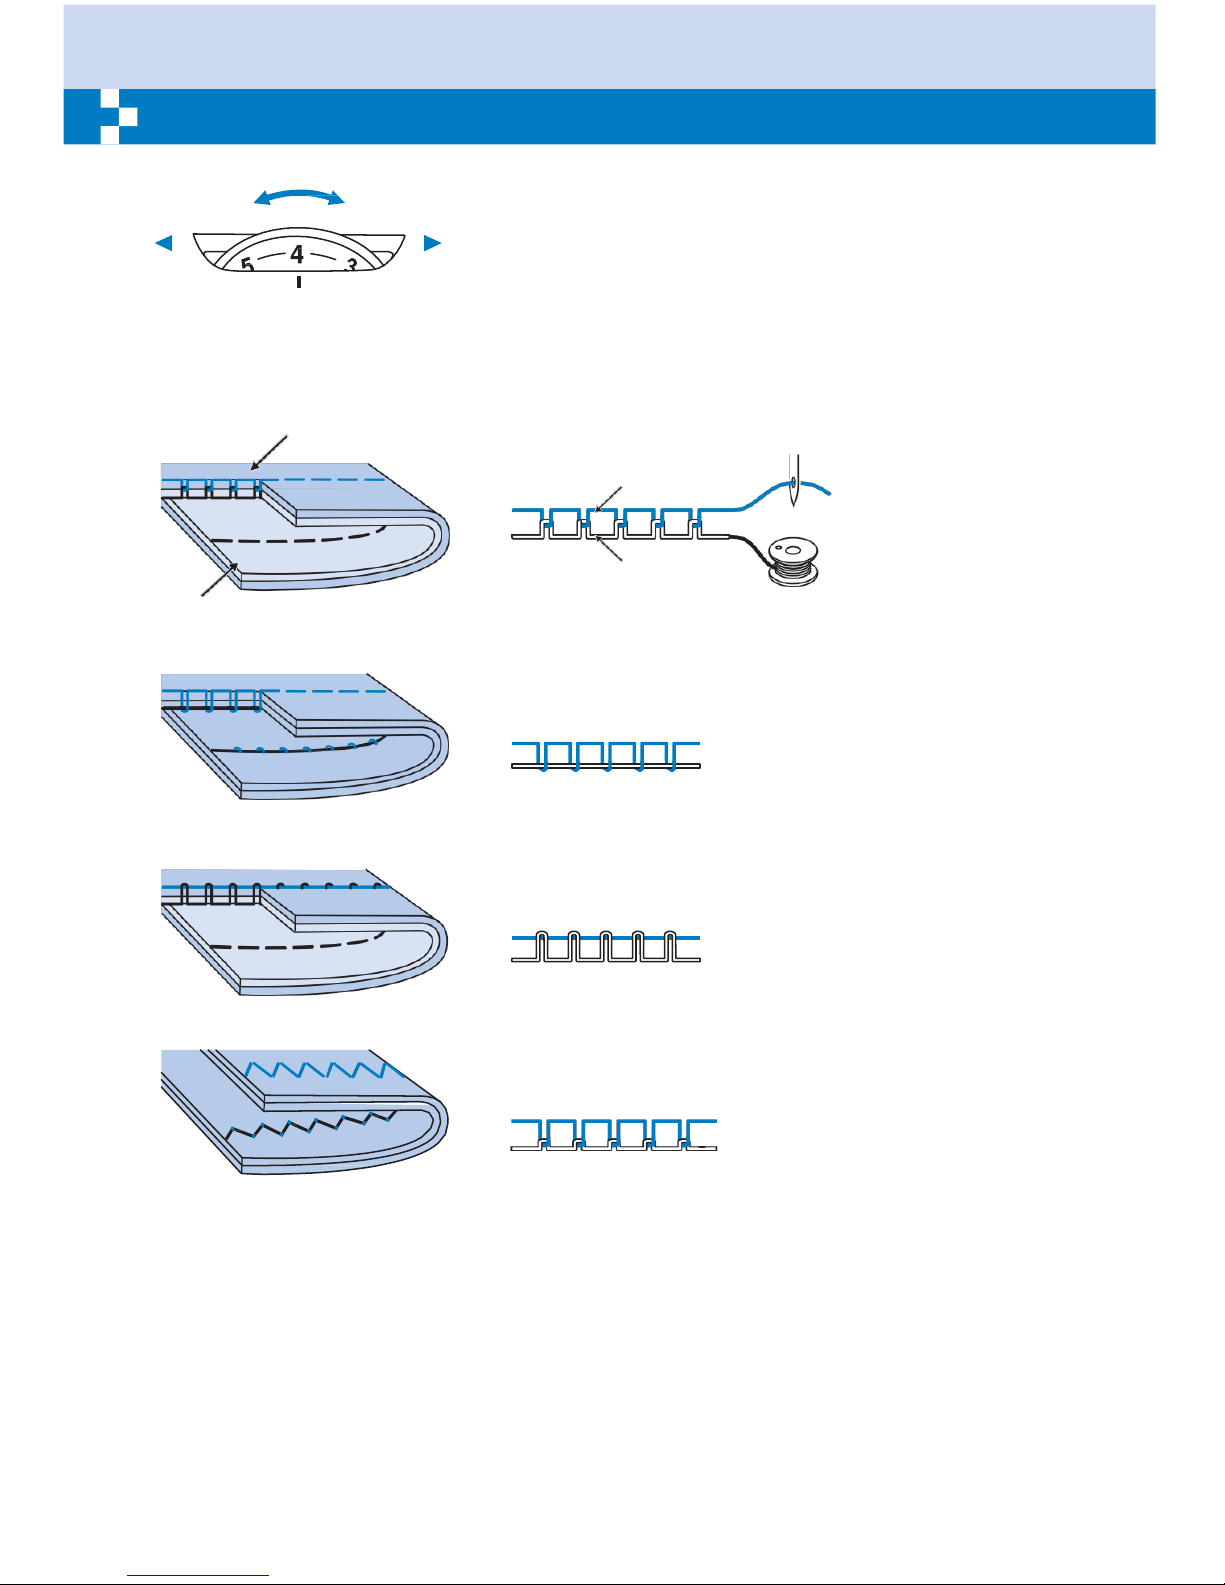
19
Thread
tension
Loose
T
ight
- Basic thread tension setting: "4"
- To increase the tension, turn the dial to the next number
up. To reduce the tension, turn the dial to the next
number down.
- Proper setting of tension is important to good sewing.
- For all decorative sewing you will always obtain a nicer
stitch and less fabric puckering when the upper thread
appears on the bottom side of your fabric.
Surface
Normal thread tension for straight stitch sewing.
Upper thread
Bobbin thread
Reverse side
Thread tension is too loose for straight stitch sewing. Turn
dial to higher number.
Thread tension is too tight for straight stitch sewing. Turn
dial to lower number.
Normal thread tension for zig zag and decorative sewing.
Page 25
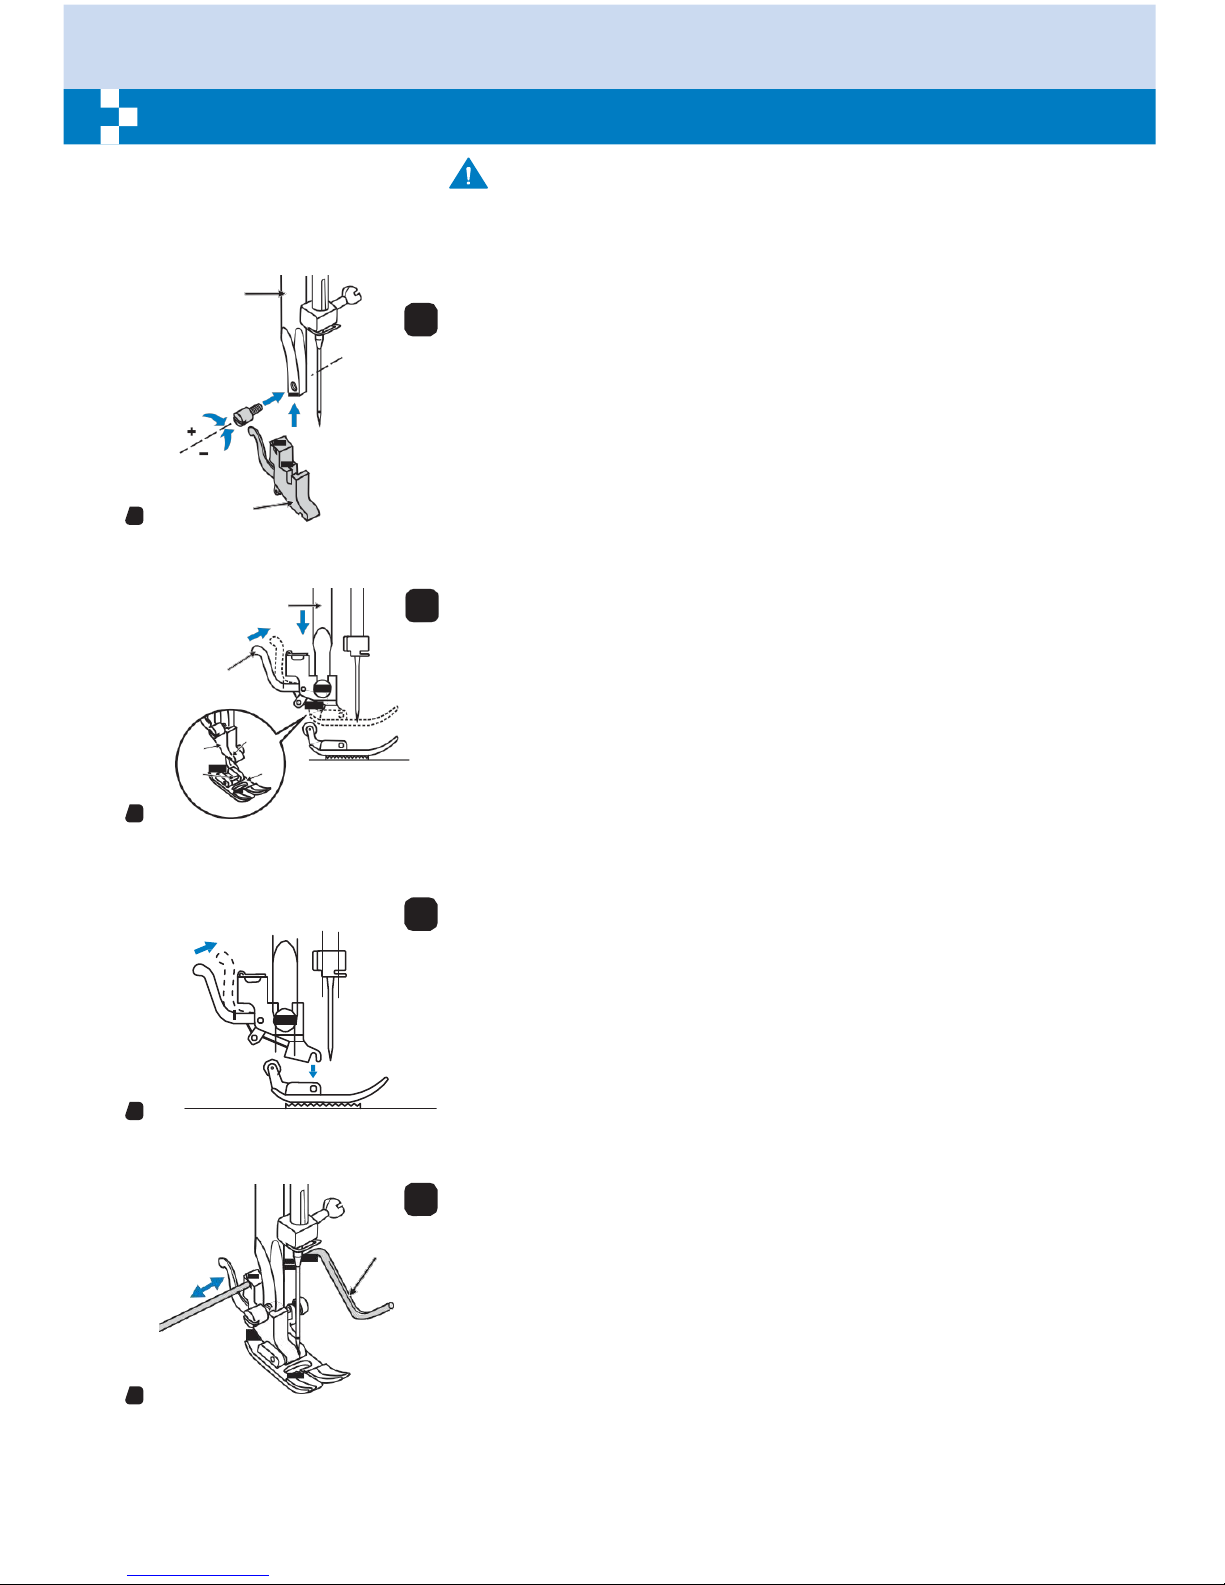
20
Changing the presser
foot
Attention:
Turn power switch to off ("O") when carrying out any of the below
operations!
a
1
Attaching
the presser foot
holder
Raise the presser foot bar (a).
Attach the presser foot holder (b) as illustrated.
1
b
a
2
Attaching
the presser
foot
Lower the presser foot holder (b) until the cut-out (c) is directly
above the pin (d).
e
Press the black lever (e).
Lower the presser foot holder (b) and the presser foot (f) will
b
c
engage automatically.
d
f
2
3
Removing the presser
foot
Raise the presser foot.
e
Press the black lever (e) and the foot will disengages.
3
4
Attaching
the
edge/quilting guide
Attach the edge/quilting guide (g) in the slot as illustrated. Adjust
g
according to need for hems, pleats, etc.
4
Page 26
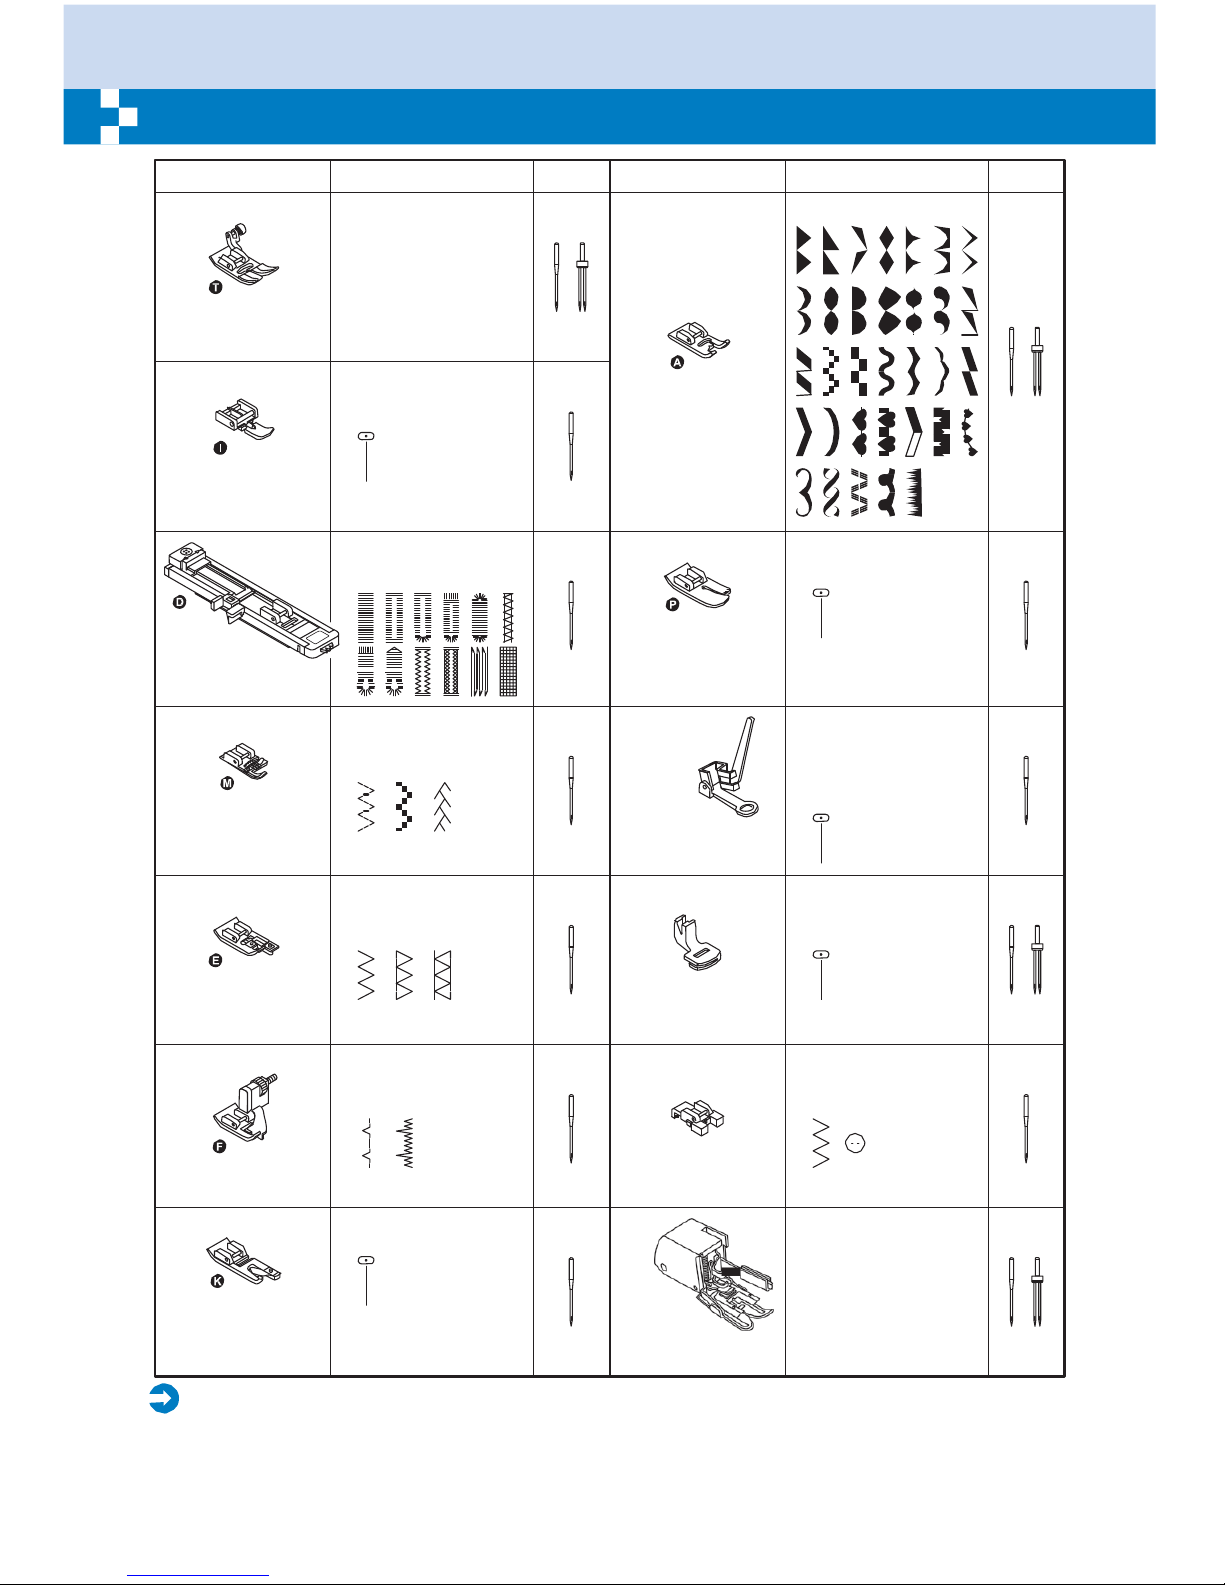
21
Type of presser foot
chart
PRESSER FOOT
All purpose foot (T)
APPLICA
TION
General sewing,
Patchwork stitches,
Decorative stitching,
Smocking, Fagoting,
etc.
NEEDLE
PRESSER FOOT APPLICA
TION
Satin stitch sewing
NEEDLE
Inserting zippers
Satin stitch foot (A)
Zipper foot (I)
Buttonhole sewing,
Darning-stitch sewing
Quilting
Buttonhole
foot
(D)
Quilting foot (P)
(Optional)
Cording
Free-motion darning,
embroidery,
monogramming
Cording foot (M)
(Optional)
Darning/
Embroidery foot
(Optional)
Overcasting Gathering
Overcasting foot
(E)
Gathering foot
(Optional)
Blind hem stitching
Button sewing
Blind hem foot (F) Button sewing foot
Rolled hem foot (K)
(Optional)
Please
Note:
Narrow hemming
Walking foot
(Optional)
This foot helps to
prevent uneven
feeding of quilt
layers, napped
fabrics, and difficultto-handle fabrics.
- The twin needle is optional. It is not include with the accessories.
- When sewing with twin needle, the stitch width should be set at less than "5.0".
Page 27

22
Matching needle/ fabric/
thread
NEEDLE, FABRIC, THREAD SELECTION GUIDE
NEEDLE SIZE FABRICS
THREAD
9-11 (70-80)
Lightweight fabrics-thin cottons, voile,
serge, silk, muslin, Qiana, interlocks,
cotton knits, tricot, jerseys, crepes, woven
polyester, shirt & blouse fabrics.
Light-duty thread in cotton, nylon,
polyester or cotton wrapped
polyester.
11-14 (80-90)
Medium weight fabrics-cotton, satin,
sailcloth, double knits, lightweight
woollens.
Most threads sold are medium
size and suitable for these
fabrics and needle sizes.
Use polyester threads on synthetic
materials and cotton on natural
woven fabrics for best results.
Always use the same thread on
top and bottom.
14 (90)
Medium weight fabrics-cotton duck,
woolen, heavier knits, terrycloth, denims.
16 (100)
Heavyweight fabrics-canvas, woolens,
outdoor tent and quilted fabrics, denims,
upholstery material (light to medium).
18 (110)
Heavy woollens, overcoat fabrics,
upholstery fabrics, some leathers and
vinyls.
Heavy duty thread, carpet thread.
Please
Note:
- In general, fine threads and needles are used for sewing fine fabrics, and thicker t h r eads
are used for sewing heavy fabrics.
- Always test thread and needle size on a small piece of fabric which will be used for actual
sewing.
- Use the same thread for needle and bobbin.
- Use a backing for fine or stretchy fabrics.
Page 28
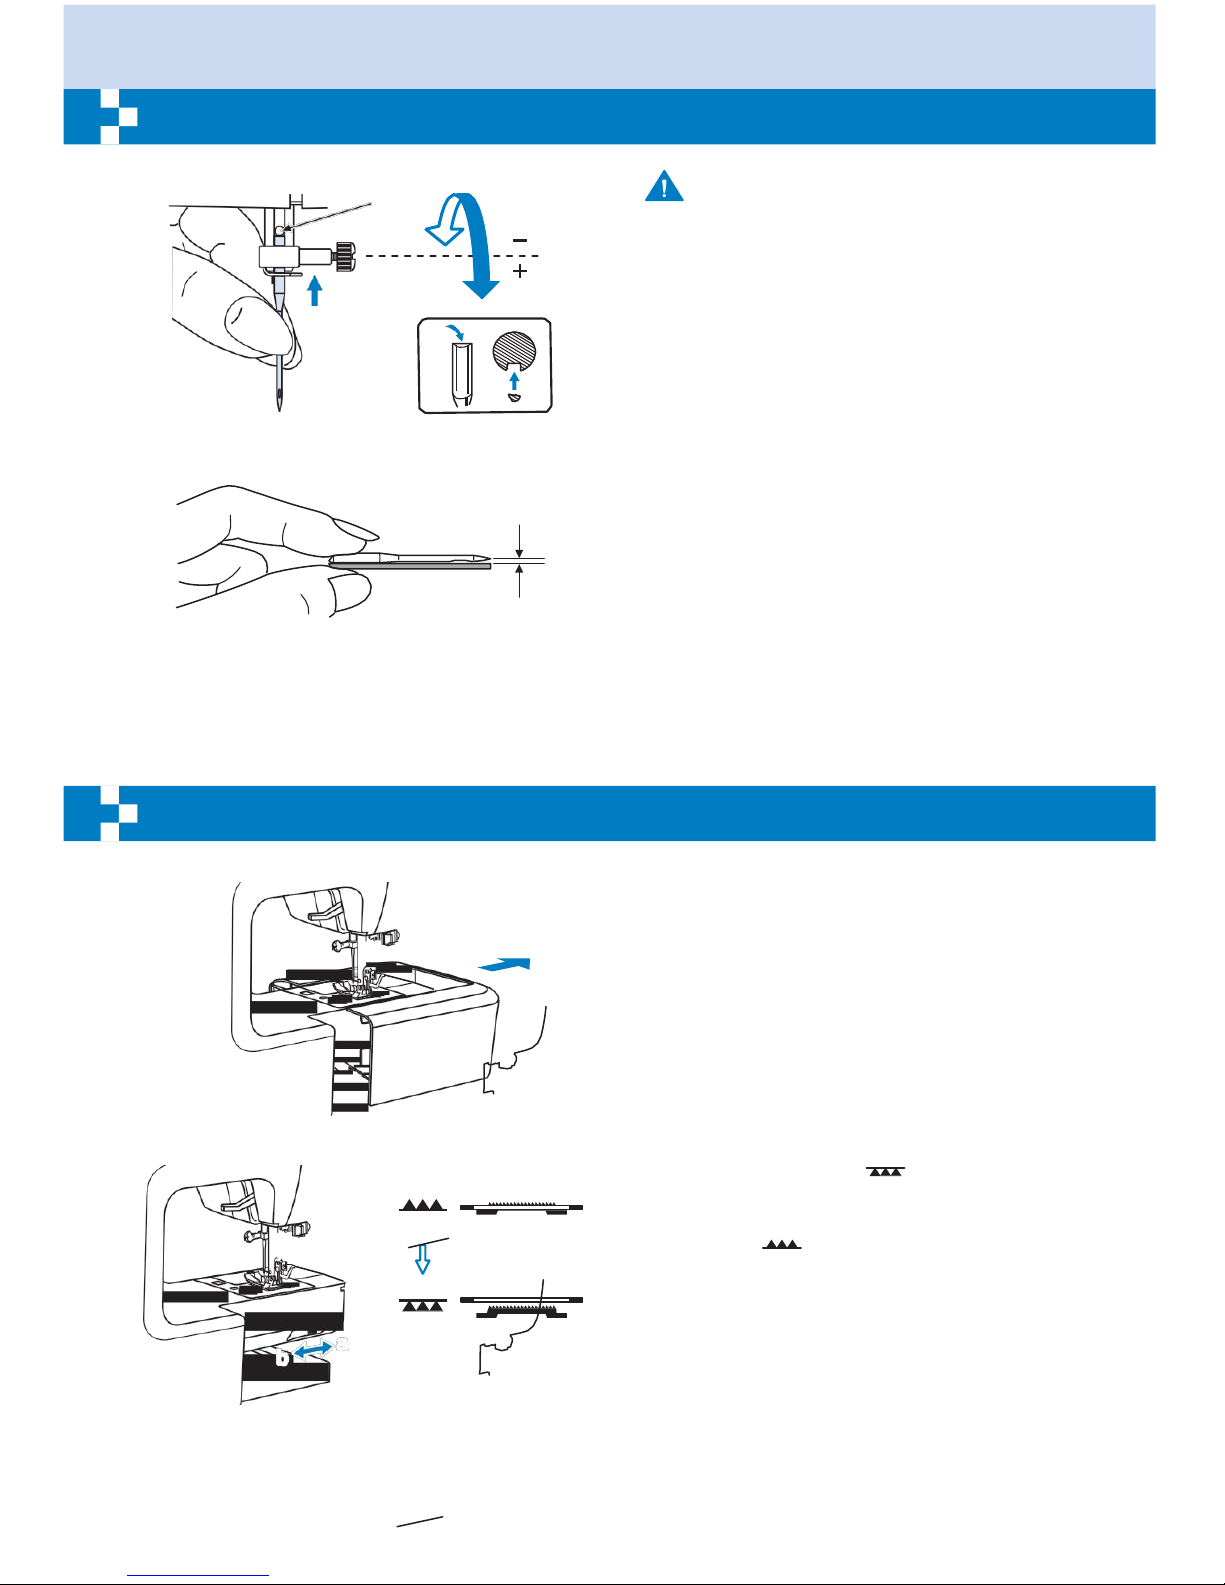
23
Replacing the
needle
Attention:
B
A
Turn power switch to off ("O") when carrying out
any of the above operations!
Change the needle regularly, especially if it
is showing signs of wear and causing
problems.
Insert the needle following the illustrated
instructions.
A. Loosen the needle clamp screw and
tighten again after inserting the new needle.
The flat side of the shaft should be towards
the back.
B. Insert the needle as far up as it will go.
Needles must be in perfect condition.
Problems can occur with:
- Bent needles
- Blunt needles
- Damaged points
To raise or drop the feed
dogs
With the sewing table off the machine, the
feed dog adjustment lever can be seen on
the base in back of the sewing machine.
Sliding the lever to the " " (b) will lower the
a
feed dog, for example during button sewing. If
you wish to continue sewing normally, slide the
lever to the " " (a) in order to raise the feed
dogs.
b
The feed dog will not rise up if you do not turn
the handwheel, even if the lever is slid to the
b
a
right. Make a complete turn to raise the feed
dogs.
Page 29
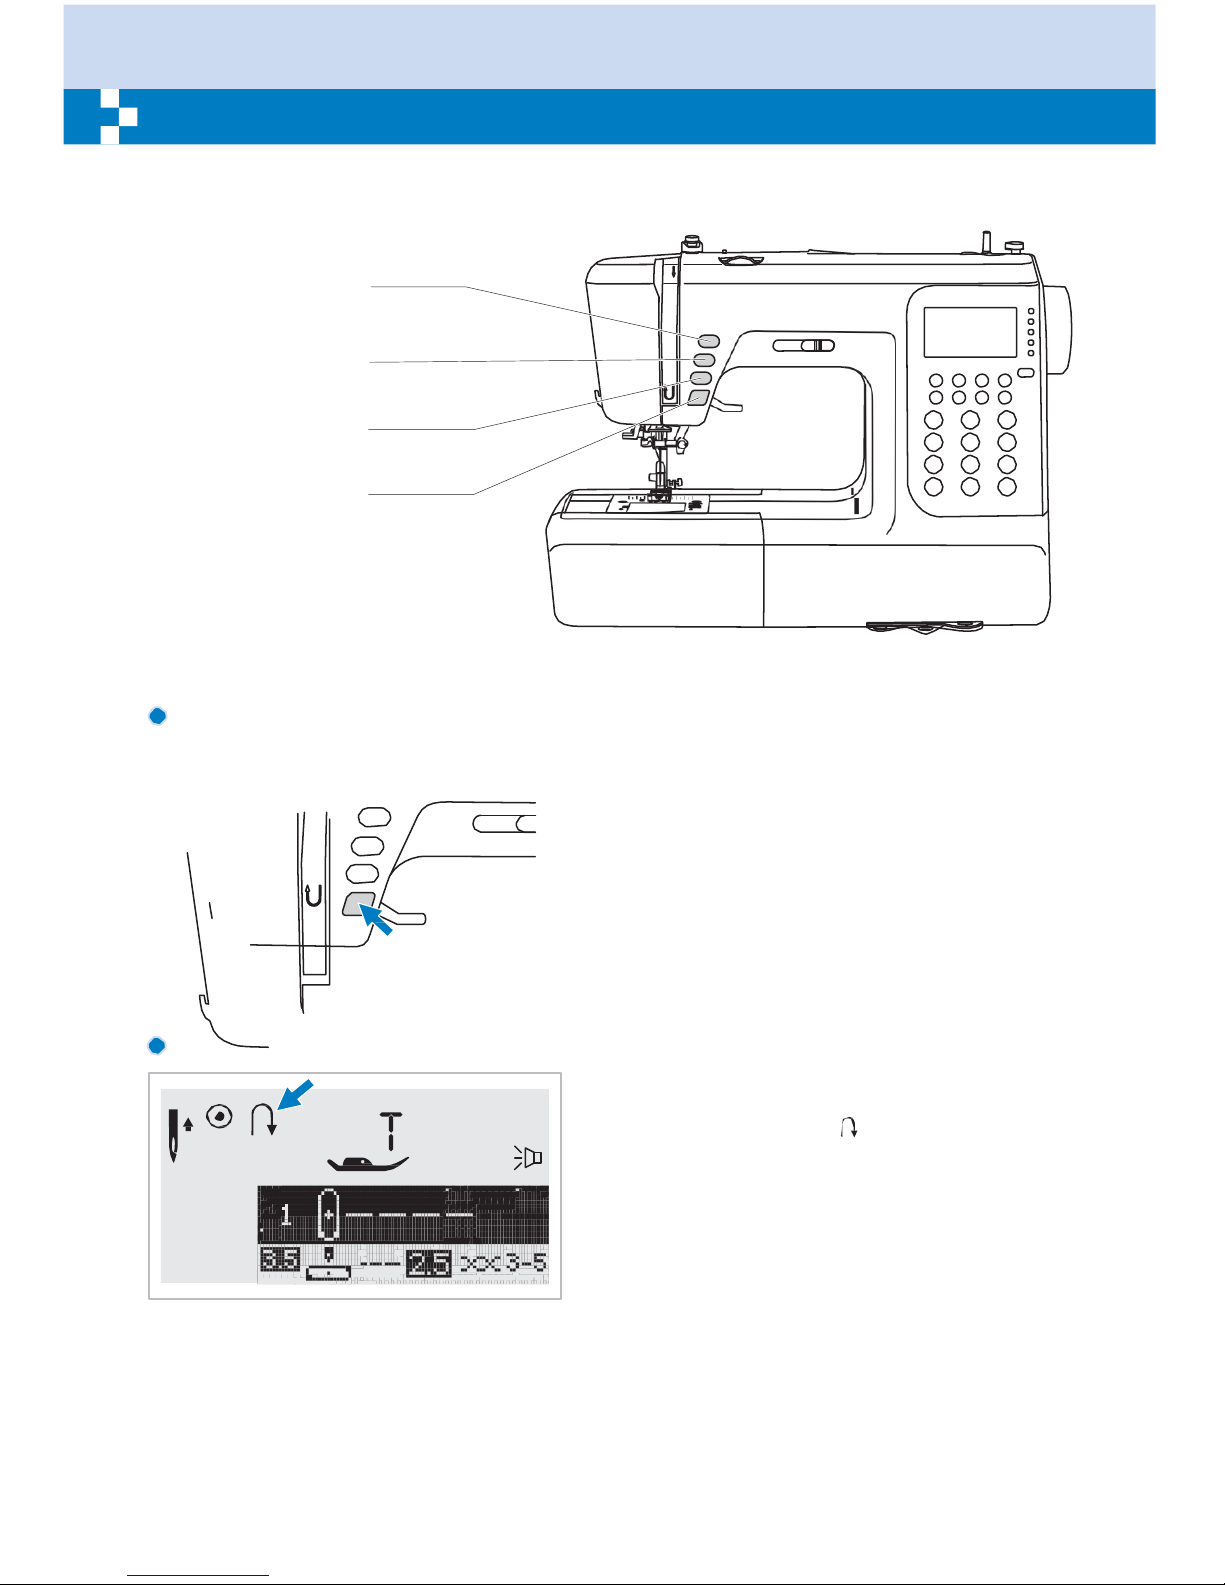
24
Operation
buttons
Needle up/down
position button
Auto-lock button
Reverse button
Start/stop button
Start/stop button
The machine will start running when
start/stop button is pressed and will stop
when pressed the second time. The machine
will rotate slowly at the beginning of sewing.
The sewing speed will increase slowly until
reaching the speed setting selected with the
speed limiting adjustment lever.
The foot control must be disconnected to
complete this operation.
Reverse
button
Select Direct Patterns 1-5, or A Group
Pattern 00 and the machine will sew in
reverse. An arrow " " on the LCD screen
display appears while stitching in reverse.
The machine will sew forward after the button
is released.
If you press and reverse the button before
starting to sew, the machine will permanently
sew in reverse. Press the button again to
sew forward again.
Select Direct patterns 6-9, A Group Patterns
01-13, 28-99, and B Group Patterns 00-99 a
reinforcement stitch sews at a low speed and
machine automatically stops if the reverse
button is pressed.
Page 30
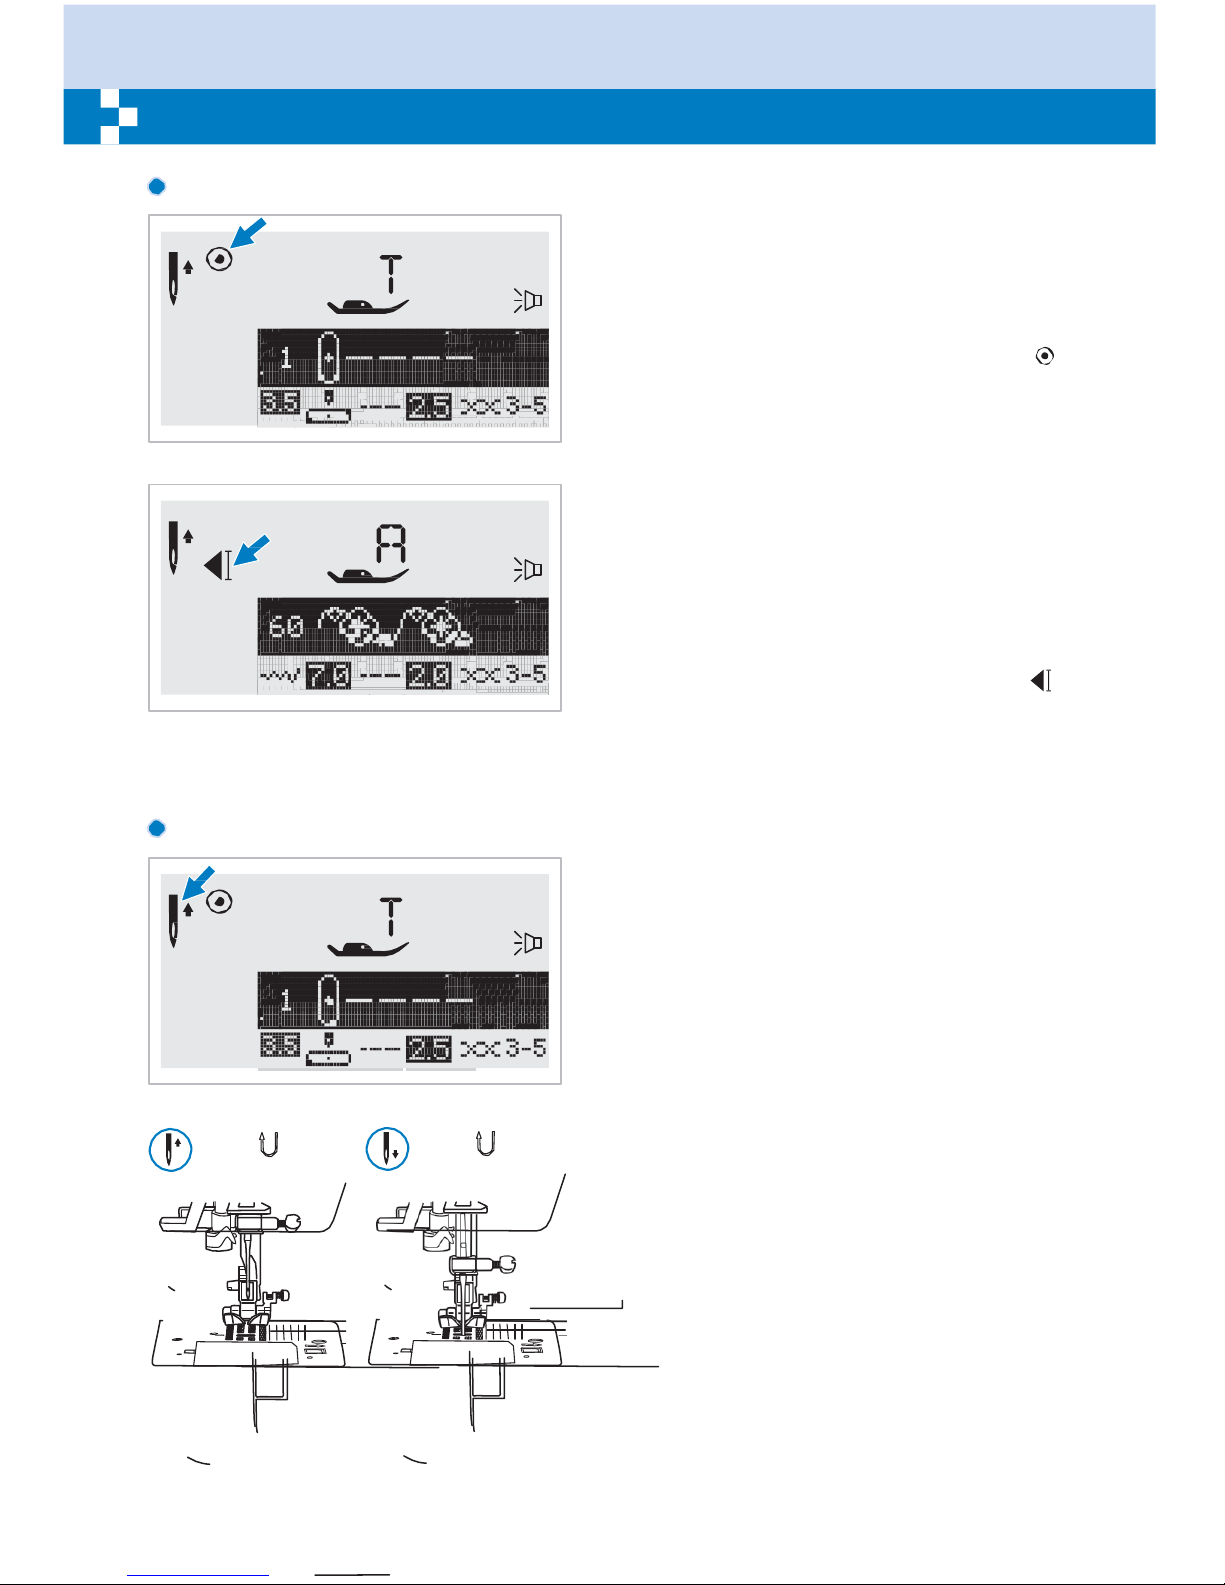
25
Operation
buttons
Auto-lock button
When Direct Patterns 1-4, and A Group
Pattern 00 are selected, the machine will
immediately sew 3 locking stitches when the
Auto-lock button i s p ressed, then
automatically stop.
The LCD screen will display the figure " "
until the machine is stopped.
When Direct Patterns 5-9, A Group Patterns
01-13 , 28-99, and B Group Patterns 00-99
are selected, press the Auto-lock button, the
machine will sew 3 locking stitches at the end
of the current pattern and automatically stop.
The function will be cancelled if you press the
button once again or select another pattern.
The LCD screen will display the figure " "
until the machine is stopped.
Needle up/ down
position button
With the Needle up/ down position button,
you decide whether the needle shall stop in
the up position or in the material when you
stop sewing.
When you press the button so that the arrow
(which displays just to the right of the needle
icon on the LCD screen) will point upward,
the needle will stop in the highest position.
When you press the button so that the arrow
(which displays just to the right of the needle
icon on the LCD screen) points downward,
the machine will stop with the needle in the
lowest position.
Page 31
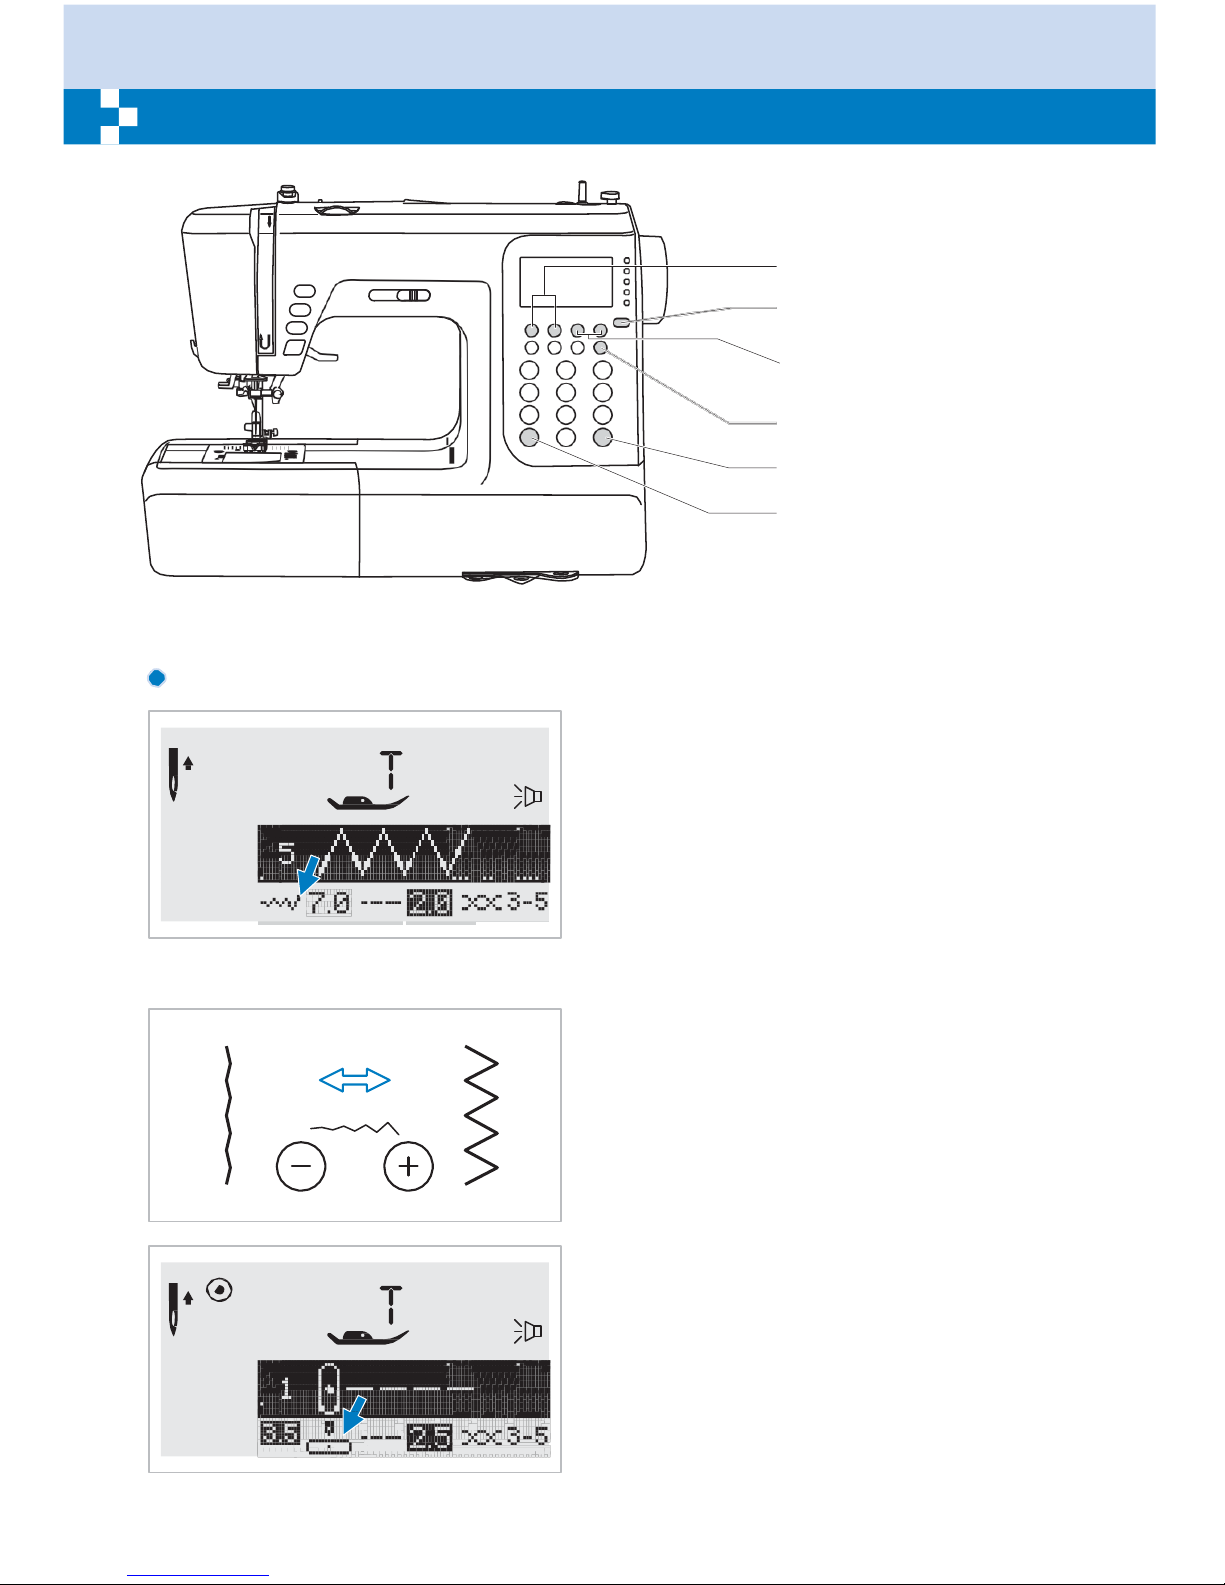
26
Function buttons
Stitch width
adjustment buttons
Mode selection
button
Stitch length
adjustment buttons
Twin needle button
Mirror
button
Elongation
button
Stitch width
adjustment button
When you select a stitch, the machine will
automatically set the recommended stitch
width, which will be indicated by numbers on
the LCD screen. The stitch width can be
regulated by pressing the stitch width
adjustment buttons.
Certain stitches have a limited stitch width.
–
For a narrower stitch, press the " " button
(left). For a wider stitch, press the " + " button
(right).
The stitch width can be adjusted between
"0.0-7.0".
Certain stitches have a limited stitch width.
When Direct Patterns
–
1-4, and A Group
Pattern 00 are selected, the needle position
is regulated by the stitch width adjustment
buttons. Pressing the " " button (left), will
move the needle to the left and pressing the "
+ " button (right), will move the needle to the
right. The numbers will be changed from left
position "0.0" to extreme right position "7.0".
The pre-set center needle position will be
indicated as "3.5".
Page 32
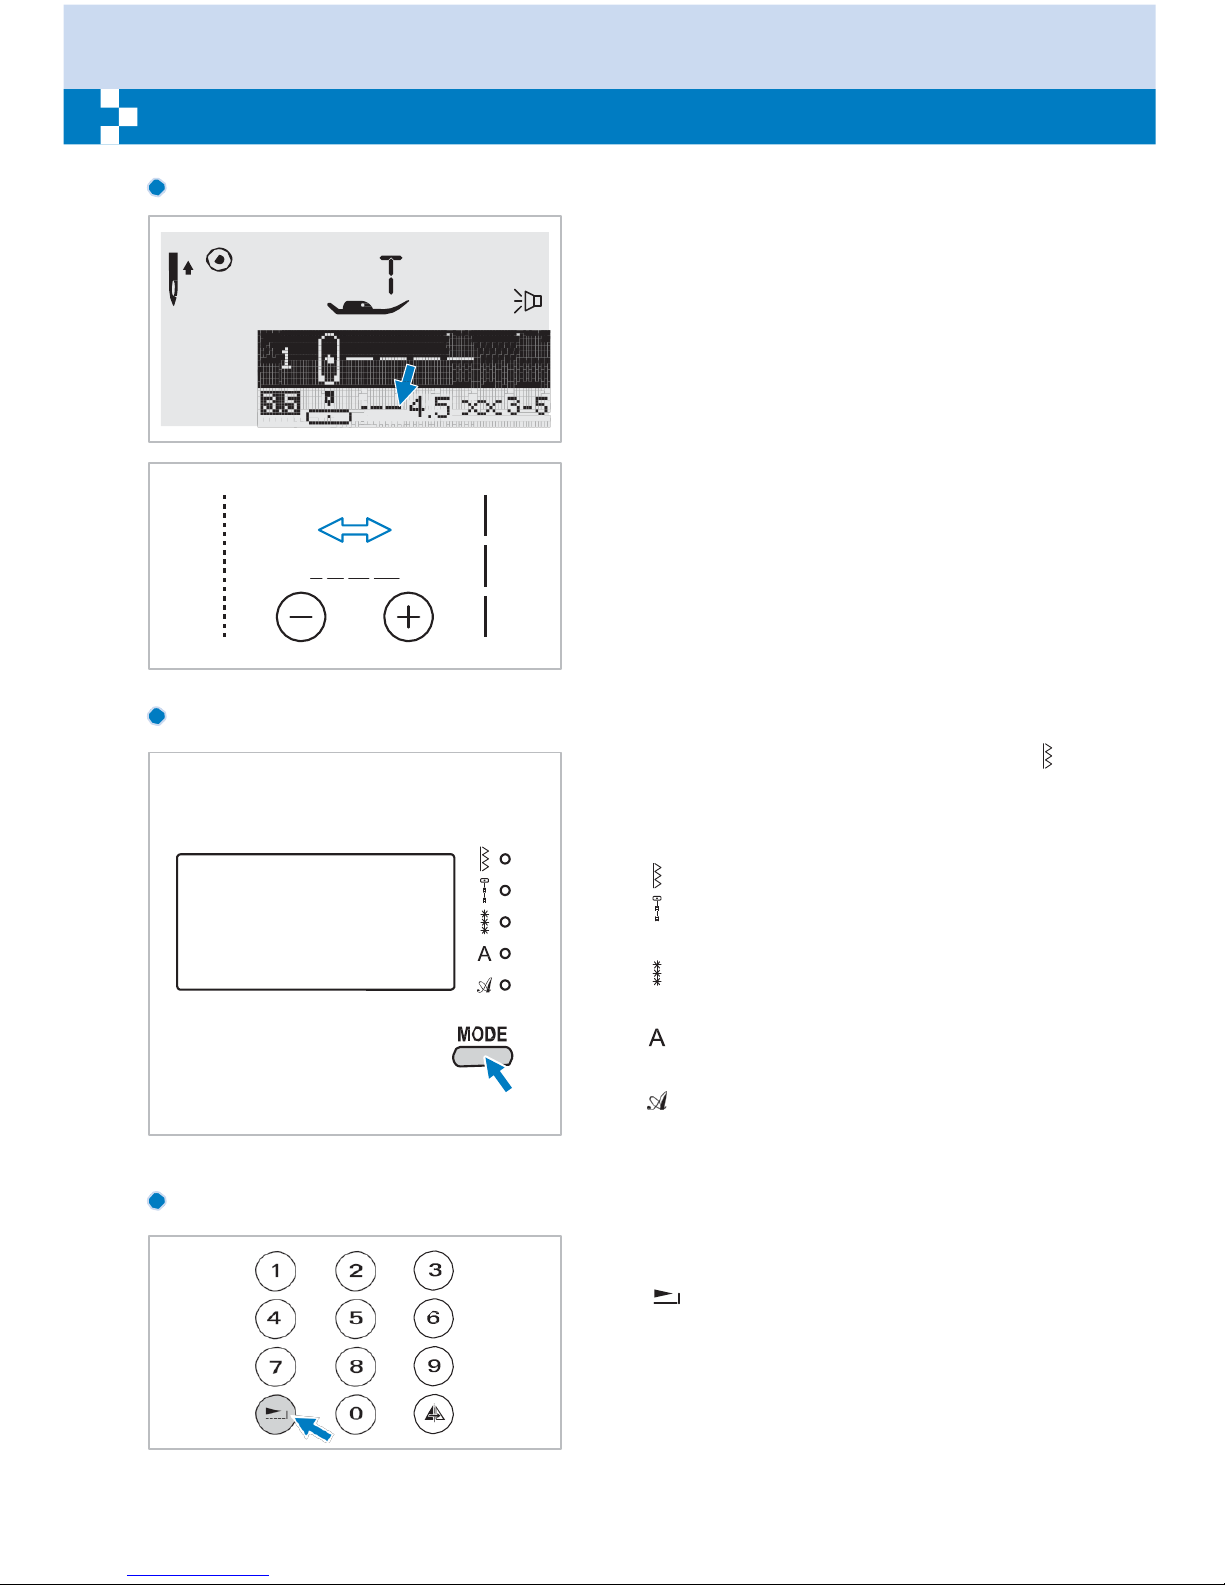
27
Function buttons
Stitch length
adjustment buttons
When you select a stitch the machine will
automatically set the recommended stitch
length which will be indicated by numbers on
the LCD screen. The stitch length can be
adjusted by pressing the stitch length
adjustment buttons.
To shorten the stitch length, press the " – "
button (left). For a longer stitch length, press
the "+" button (right). The stitch length can be
adjusted between "0.0-4.5". Certain stitches
have a limited length.
MODE
selection button
The LED light will be set at direct mode " "
when start the machine. By pressing the
button, LED light will move step by step to
select the stitch mode, as shown.
Direct mode stitch
selection.
Utility and satin pattern
mode:
Stitch selection using number buttons.
Decorative pattern
mode:
Character selection using number buttons.
Block letter
mode:
Character selection using number buttons.
Script letter
mode:
Character selection using number buttons.
Elongation
button (see page 59)
A Group Patterns 28-51 can be elongated up
to five times its normal length by pressing the
" " button.
When the width or length or stitch is changed,
a greater variety of patterns are available.
Page 33
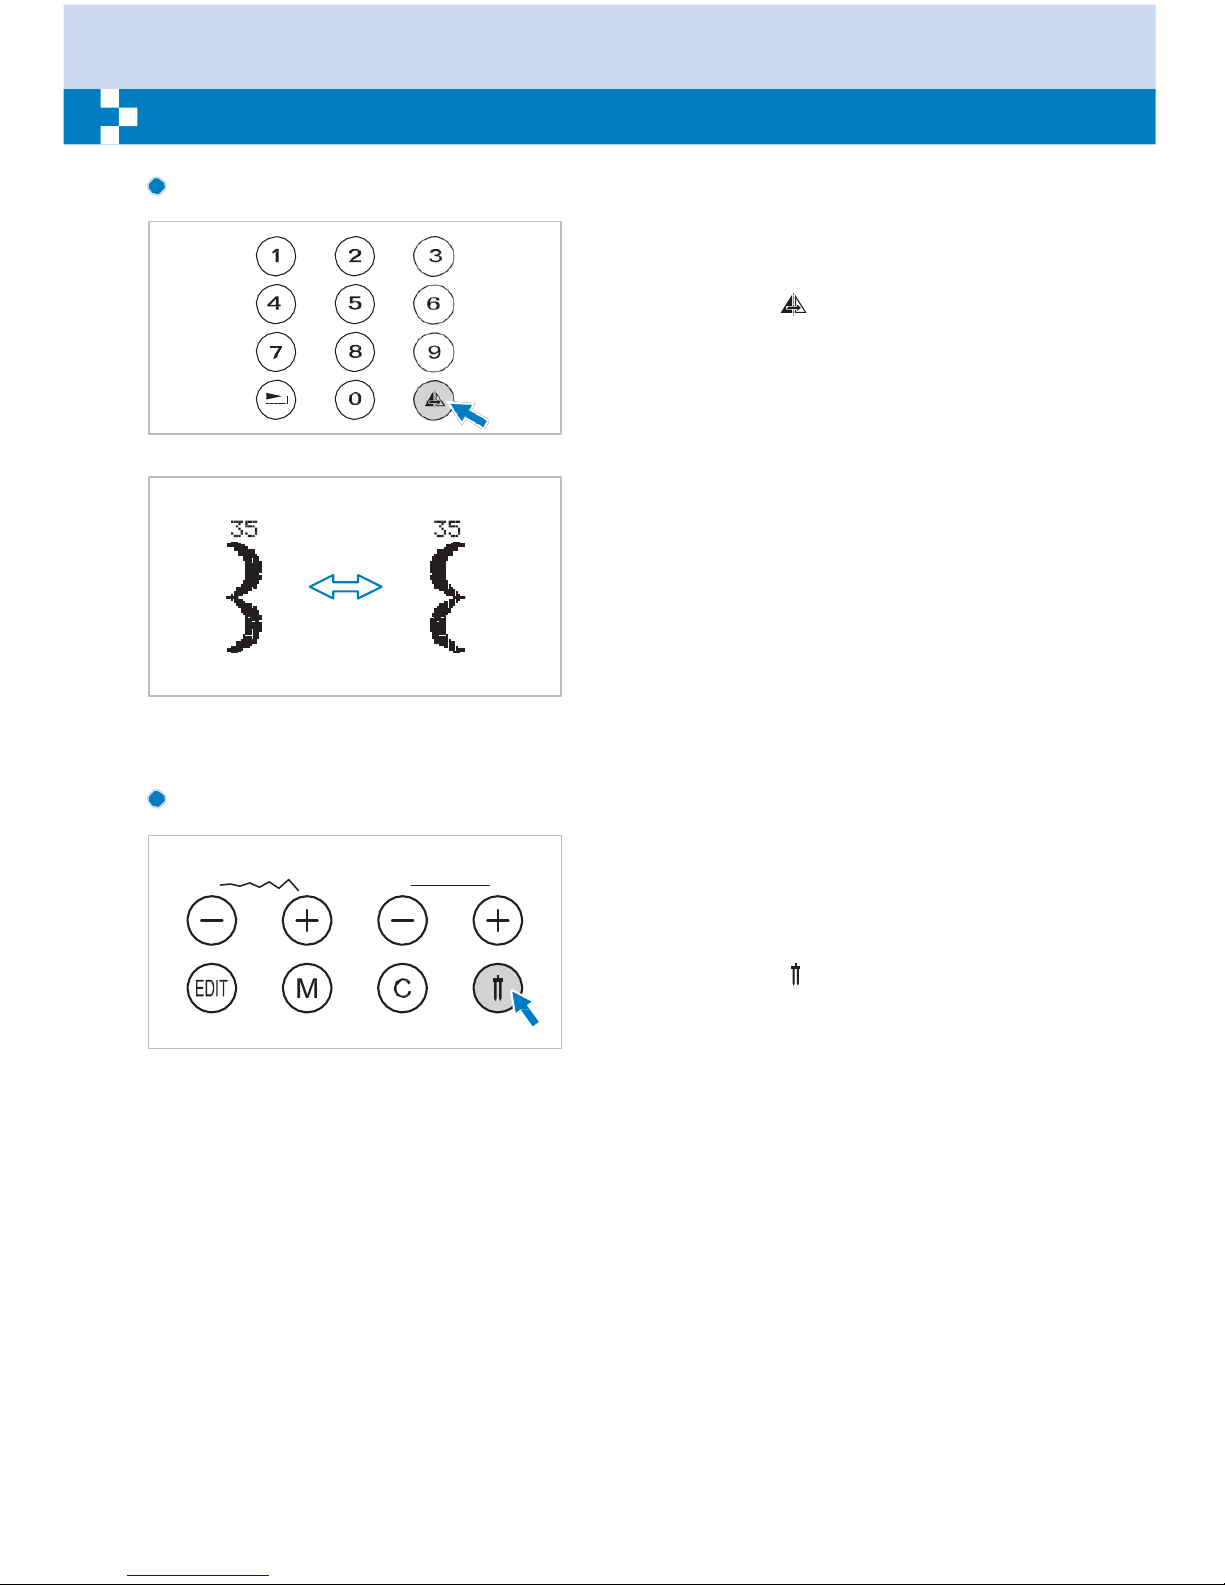
28
Function buttons
Mirror button (see page 60)
The Direct Patterns 1-9, A Group Patterns
00-13, 28-99, and B Group Patterns 00-99
can be mirror imaged along a vertical axis by
pressing the " " button. The machine will
continue to sew the reflected pattern until the
mirror button is pressed again. The mirror
function also will be canceled if the pattern
changed.
The function for mirror imaging the pattern
appears on the LCD screen.
Twin needle button (see page 61)
With the twin needle, the Direct Patterns 1-9,
A Group Patterns 00-13, 28-99, and B Group
Patterns 00-99 can be sewn in two parallel
lines of the same stitch with two different
threads.
Press the " " button, the machine
automatically reduces the maximum width for
twin needle sewing. Press the button again
for single needle sewing.
Page 34
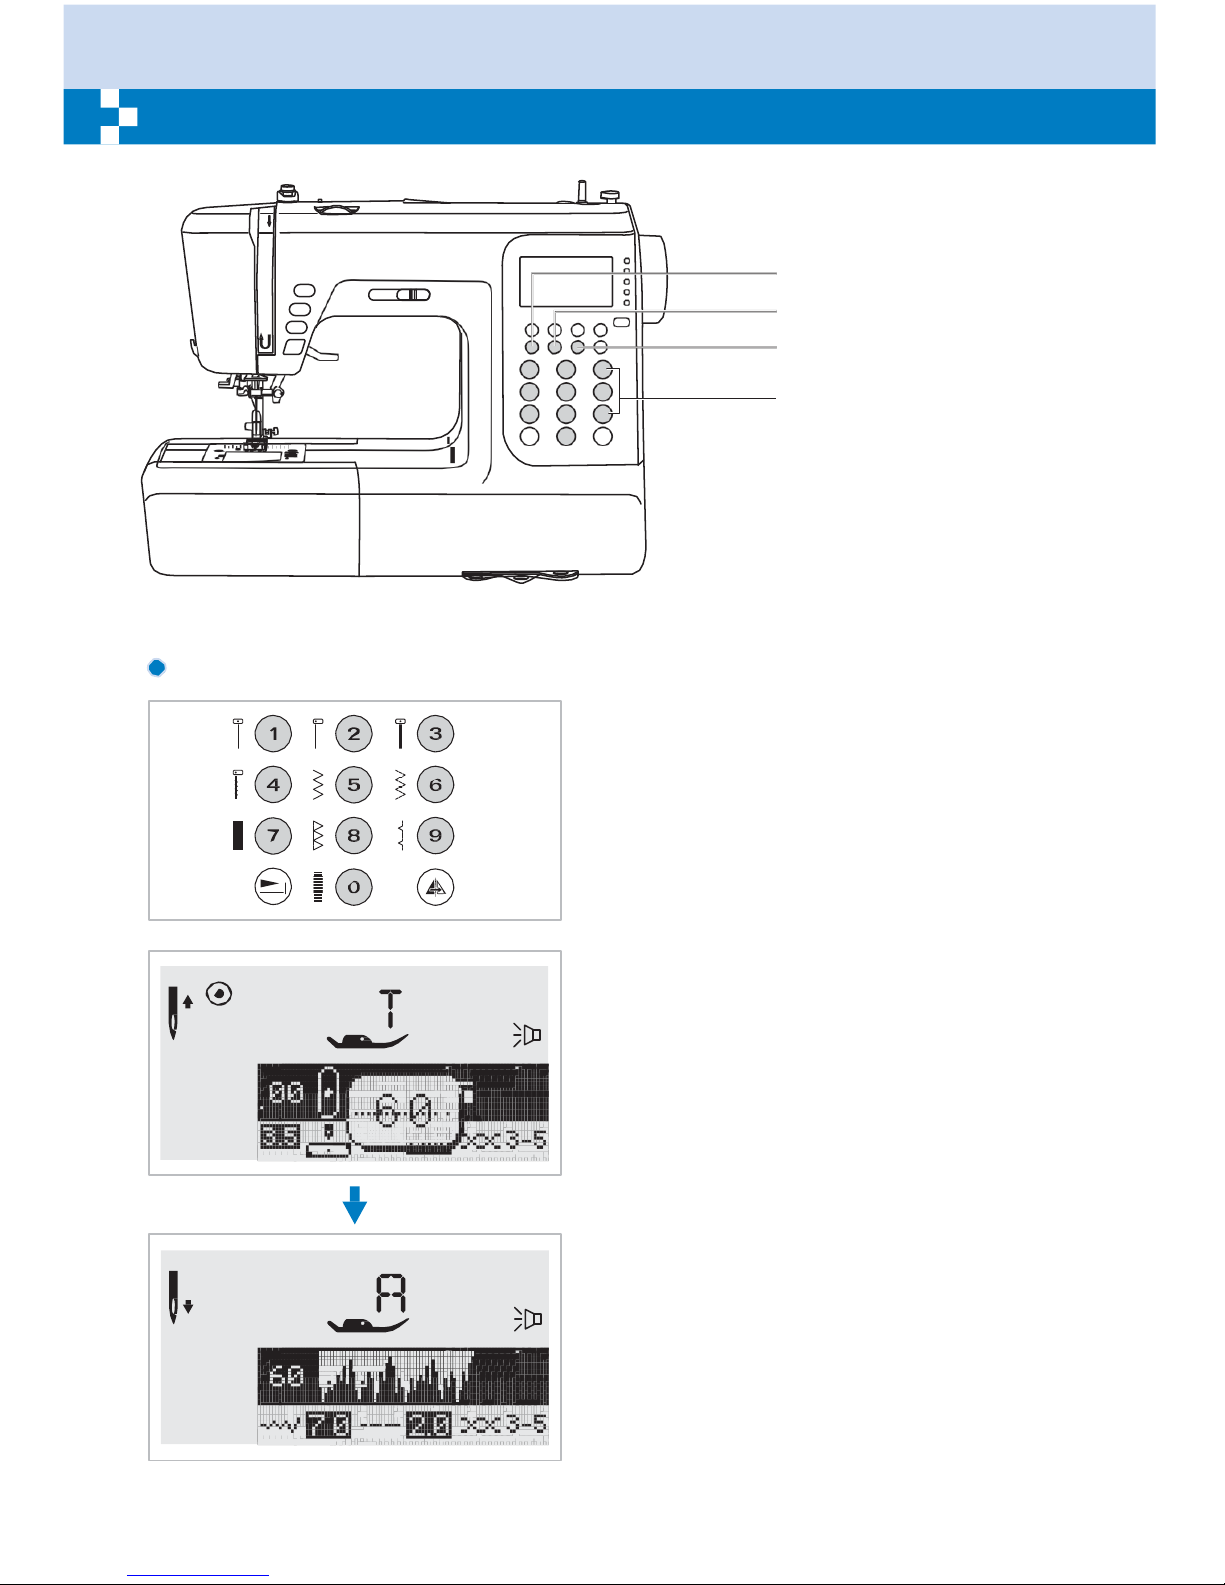
29
Selection
buttons
Edit
button
Memory button
Clear
button
Direct pattern selection
and number
buttons
Direct pattern
selection
and number
buttons
Direct pattern selection
Press the buttons to select the utility patterns
shown beside the number button when the
mode button is set at the Direct mode.
Number buttons
To select the desired pattern and press the
number buttons .
Except the Direct Pattern mode, the other
mode can be selected by pressing the desired
numbers.
For example: pattern 60
Page 35
30
Selection
buttons
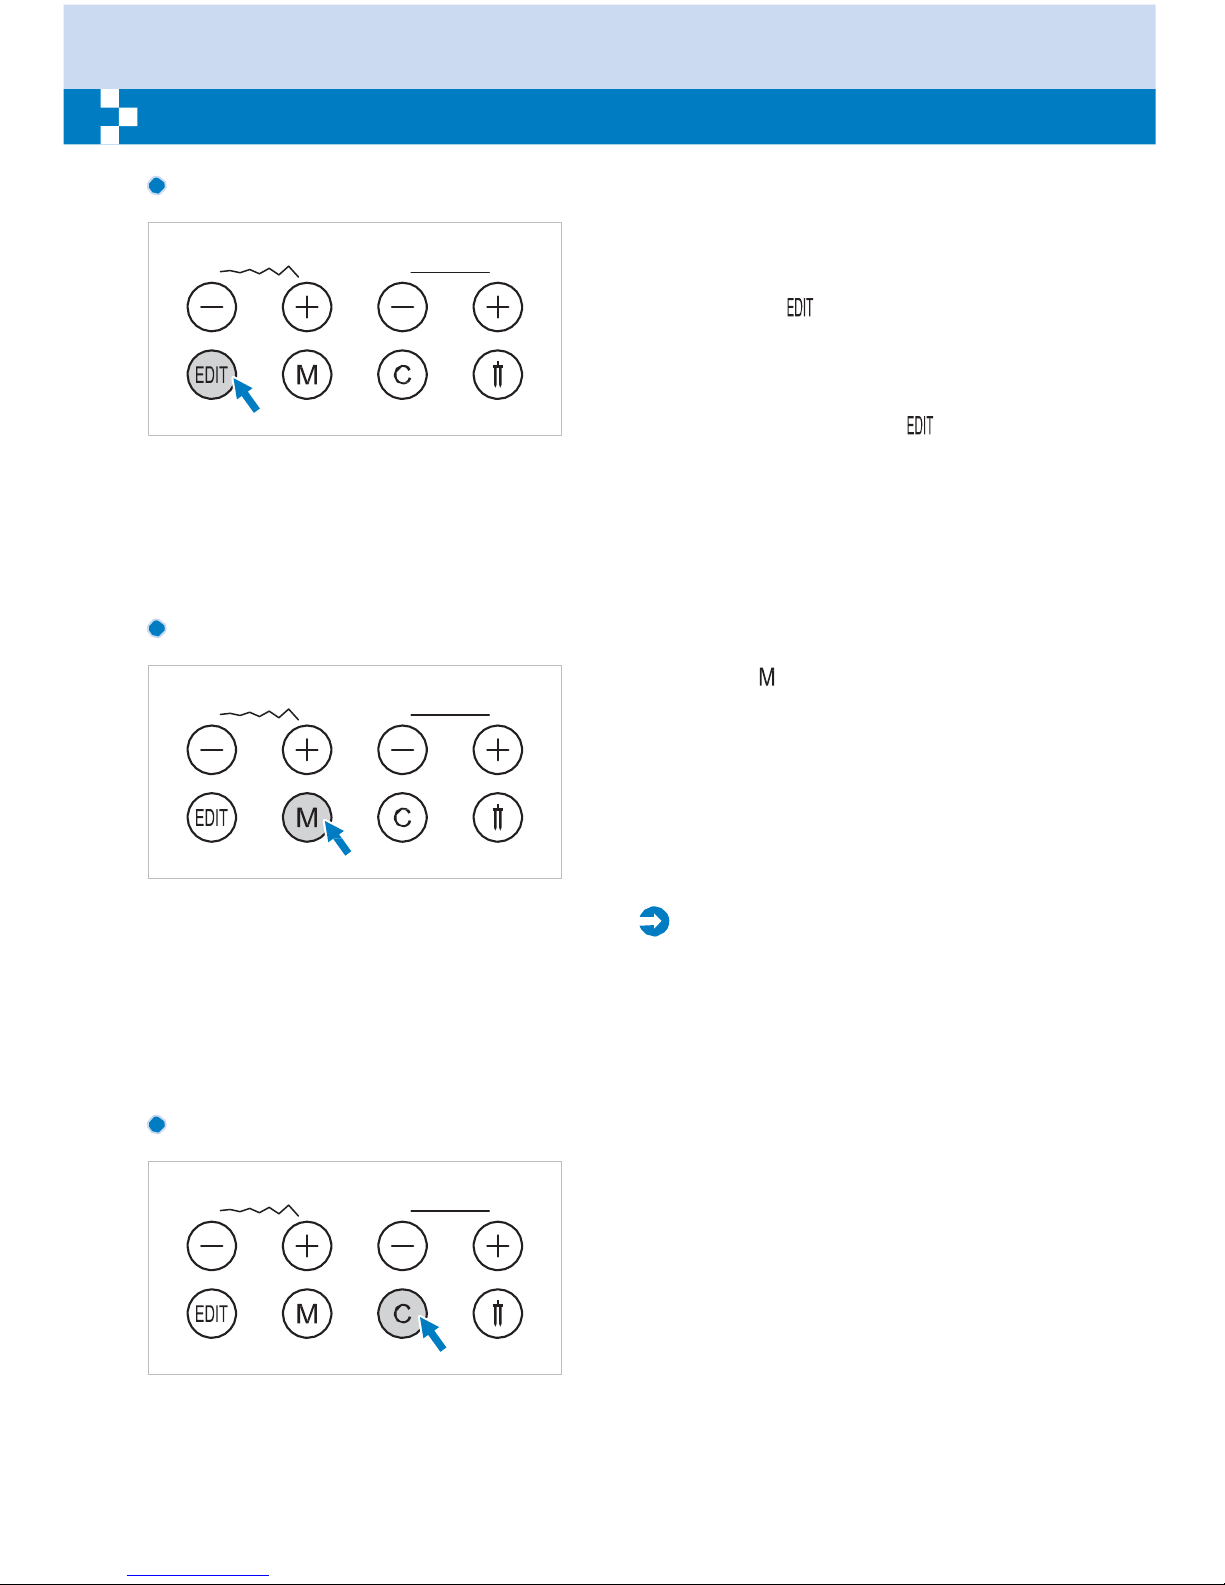
Edit button
–
If you wish to modify any settings in the
memory mode, use the stitch width "+" or "
" button to select the pattern to be modified,
and press the " " button to set the selected
pattern under the editing mode, the LED light
will turn on. Manual setting function of the
stitch width, stitch length, mirror, elongation
and auto-lock for these memorized patterns
is now possible. Press the " " button again
to leave the editing mode and return to
memory mode.
Memory
button
Press the " " butto–n to enter the memory
mode, and store the combinations of
characters or decorative stitches. Use the
stitch width " + " or " " button to confirm the
pattern memorized by pressing this button in
memory mode.
Please
Note:
The Direct mode patterns and the
A Group
Patterns 14-27 cannot be memorized.
Clear
button
Press this button when th e incorrect
character is selected. Each press of this
button erases one character, or press this
button to remove an added pattern when
sewing combinations of characters or
decorative stitches.
Page 36
31
Useful
skills
Sewing
corners
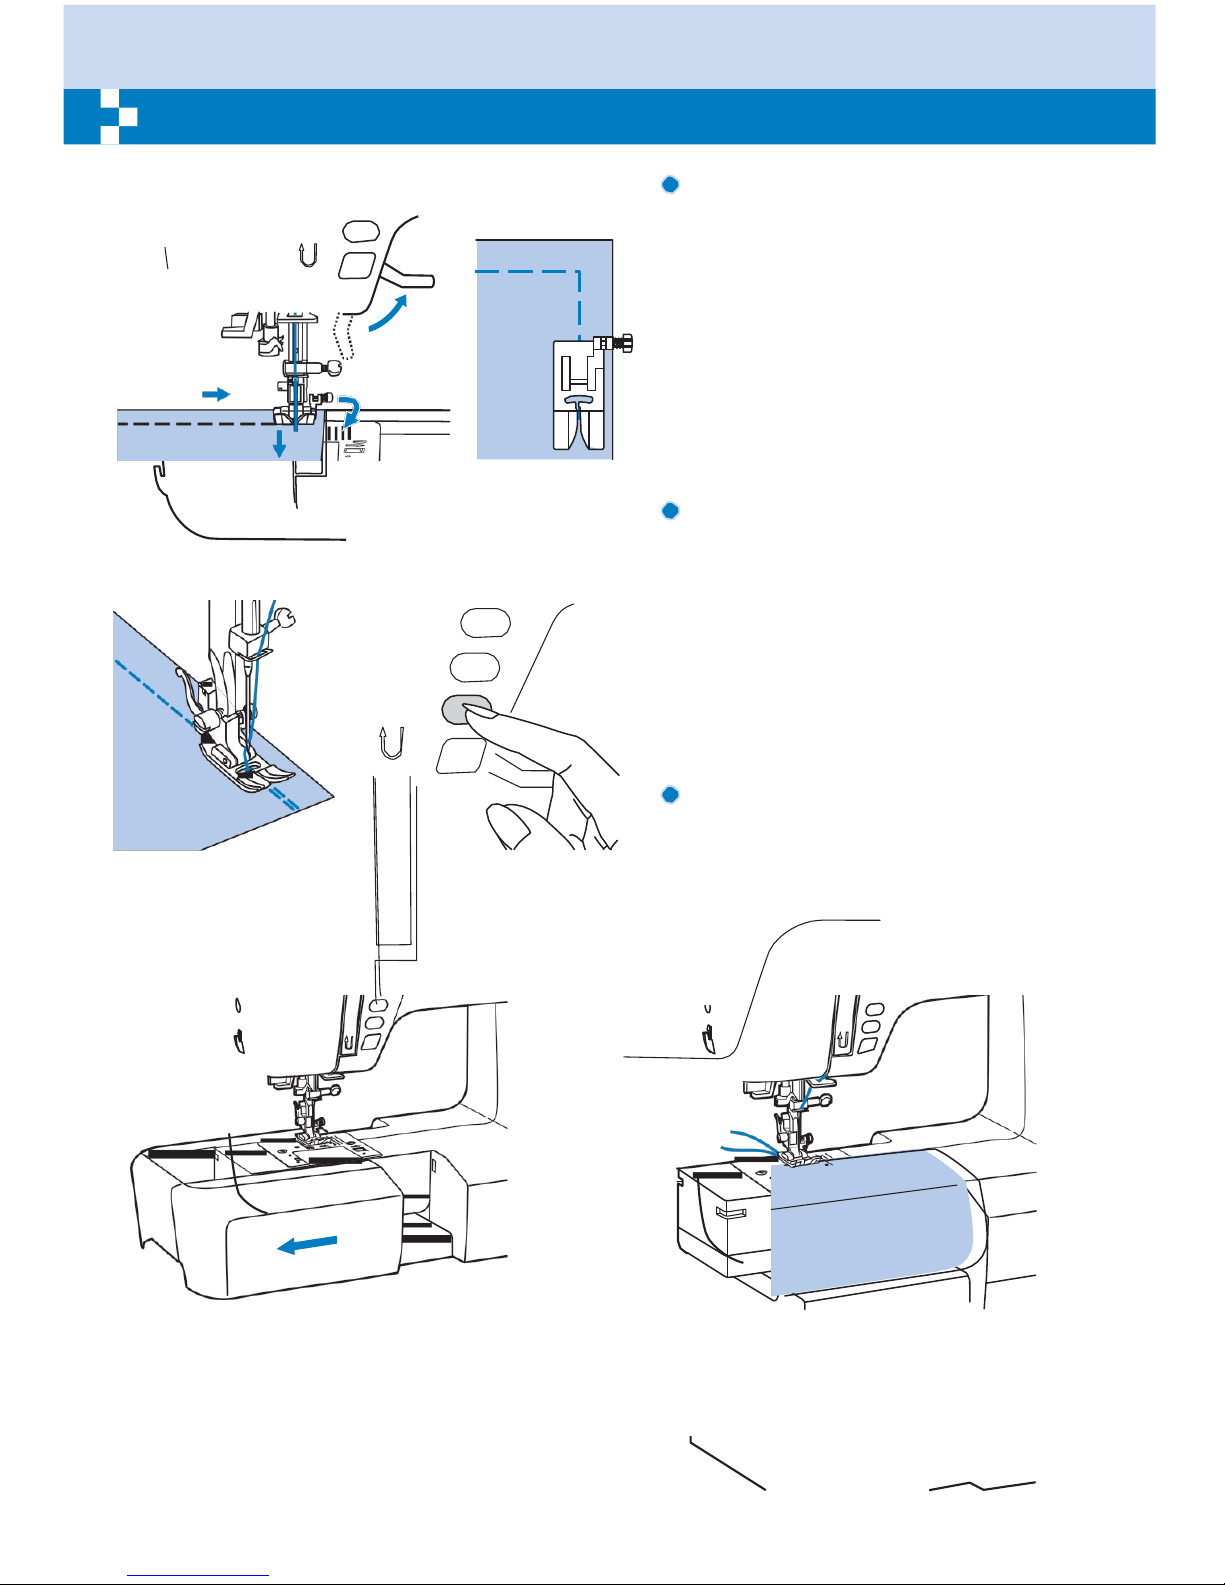
1. Stop the sewing machine when you reach
a corner.
2. Lower the needle into the fabric manually
or by pressing the needle up/ down button
3
once.
3. Raise the presser foot.
4. Use the needle as a pivot and turn the
4
fabric.
5. Lower the presser foot and resume
2
2
sewing.
Reverse
Reverse stitching is used to secure the
threads at the beginning and at the end of a
seam.
Press the reverse button and sew 4-5
stitches.
The machine will sew forward when the
button is released.
Free
arm
Free-arm sewing is convenient for sewing
tubular areas such as pant hems and cuffs.
Page 37
32
Useful
skills
Installing
the
extension table
* The Extension table accessory is optional.
It is not included with this machine.
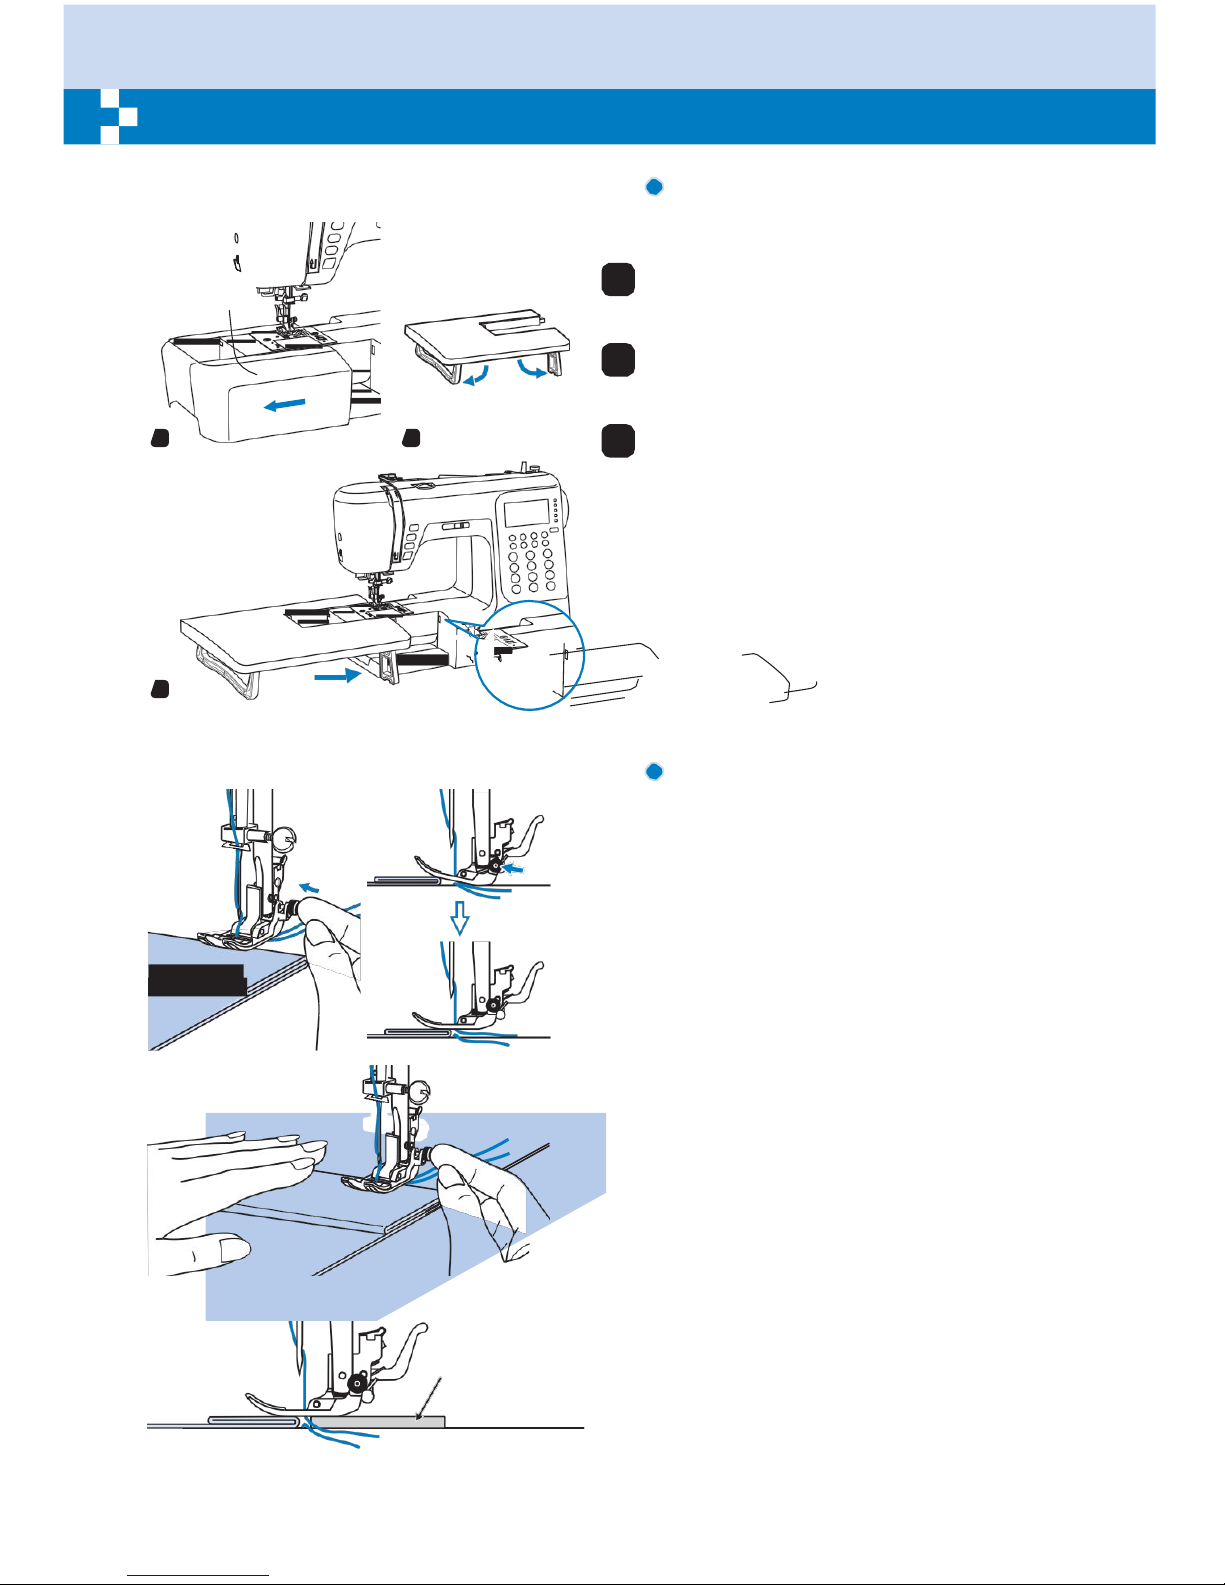
1
Pull the sewing table and accessory box off
by sliding it to the left.
2
Follow the arrow, and stretch the foot of the
extension table.
1
2
3
Snap (A) of the extension table into (B) of
the machine.
Extension table can help moving during
sewing.
A
B
3
Sewing on the heavy
fabric
The black button on the right side of the
presser foot will lock the presser foot in a
horizontal position if you push it in before
lowering the presser foot. This ensures even
feeding at the beginning of a seam and
helps when sewing multiple layers of fabric
such as sewing over seams when hemming
jeans.
When you reach the point of an increased
thickness, lower the needle and raise the
presser foot. Press the toe of the foot and
push in the black button, then lower the foot
and continue sewing.
The black button releases automatically
after sewing few stitches.
Cardboard or
thick fabric
You also can place another piece of fabric
with the same thickness at the back of the
seam. Or support the presser foot while
feeding by hand and sewing toward the
folded side.
Page 38
33
Needle
position
and stitch
length
A-00
T
Changing the needle
position
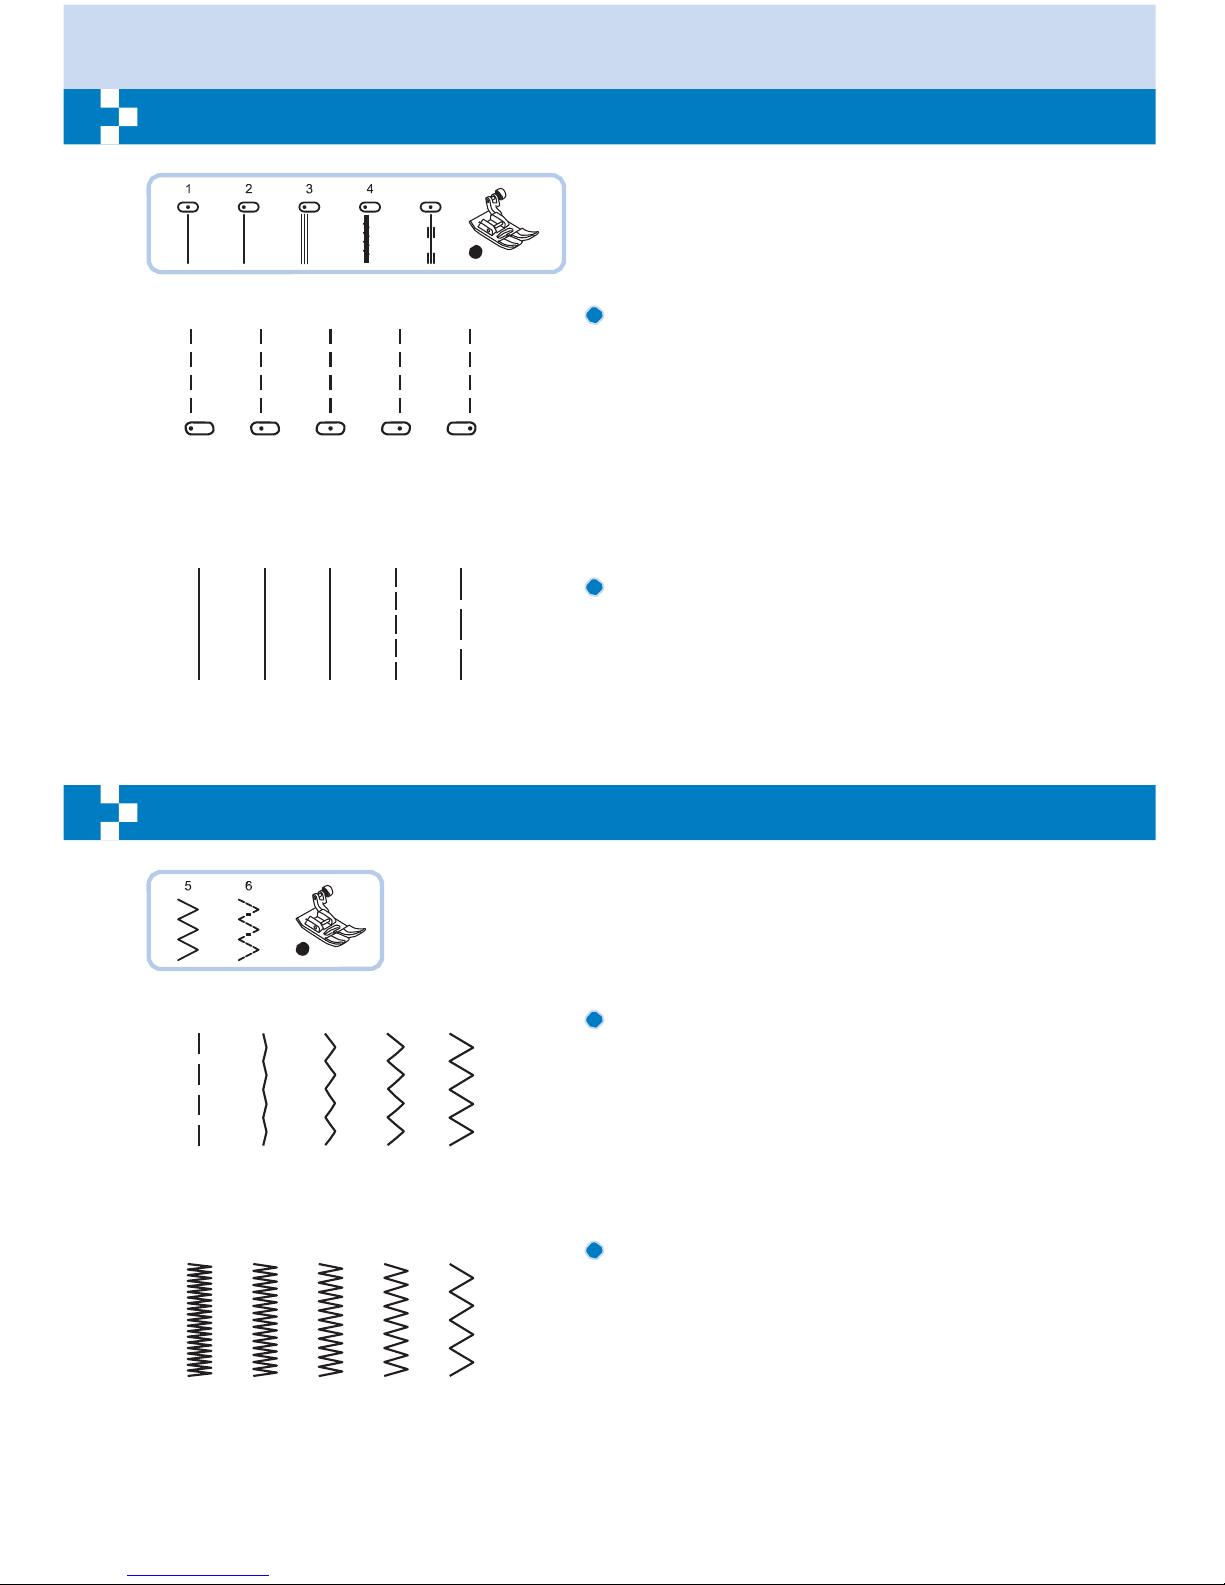
–
0.0 2.0 3.5 5.0 7.0
These setting apply only to Direct Patterns 1-4, or A
Group Pattern 00. The pre-set position is "3.5",
center position. When you press the " " of stitch
width adjustment button, the needle position will be
moved to the left. When you press the "+" of stitch
width adjustment button, the needle position will be
moved to the right. On the LCD screen, the point
illustration and the number indicate the needle
position.
–
Changing the stitch length
0.5
1.0
2.0
3.0
4.5
To shorten the stitch length, press the " " of stitch
length adjustment button. For a longer stitch length,
press the "+" of stitch length adjustment button.
Generally speaking, the thicker the fabric, thread
and needle, the longer the stitch should be.
Zigzac
stitches
T
0.0
0.5
1.0
1.0
3.0
2.0
5.0
3.0
7.0
4.5
Adjusting
the stitch width
The maximum zigzag stitch width for zigzag
stitching is "7.0" ; however, the width can be
reduced on any patterns. The width increases as
you press the " + " of stitch width adjustment button
from "0.0-7.0".
Adjusting
the stitch length
The density of zigzag stitches increase as the
setting of stitch length approaches "0.3".
Neat zigzag stitches are usually achieved at "1.0-
2.5".
Closed up zigzag stitches (close together) are
referred to as a satin stitch.
Page 39
34
Stretch
stitch
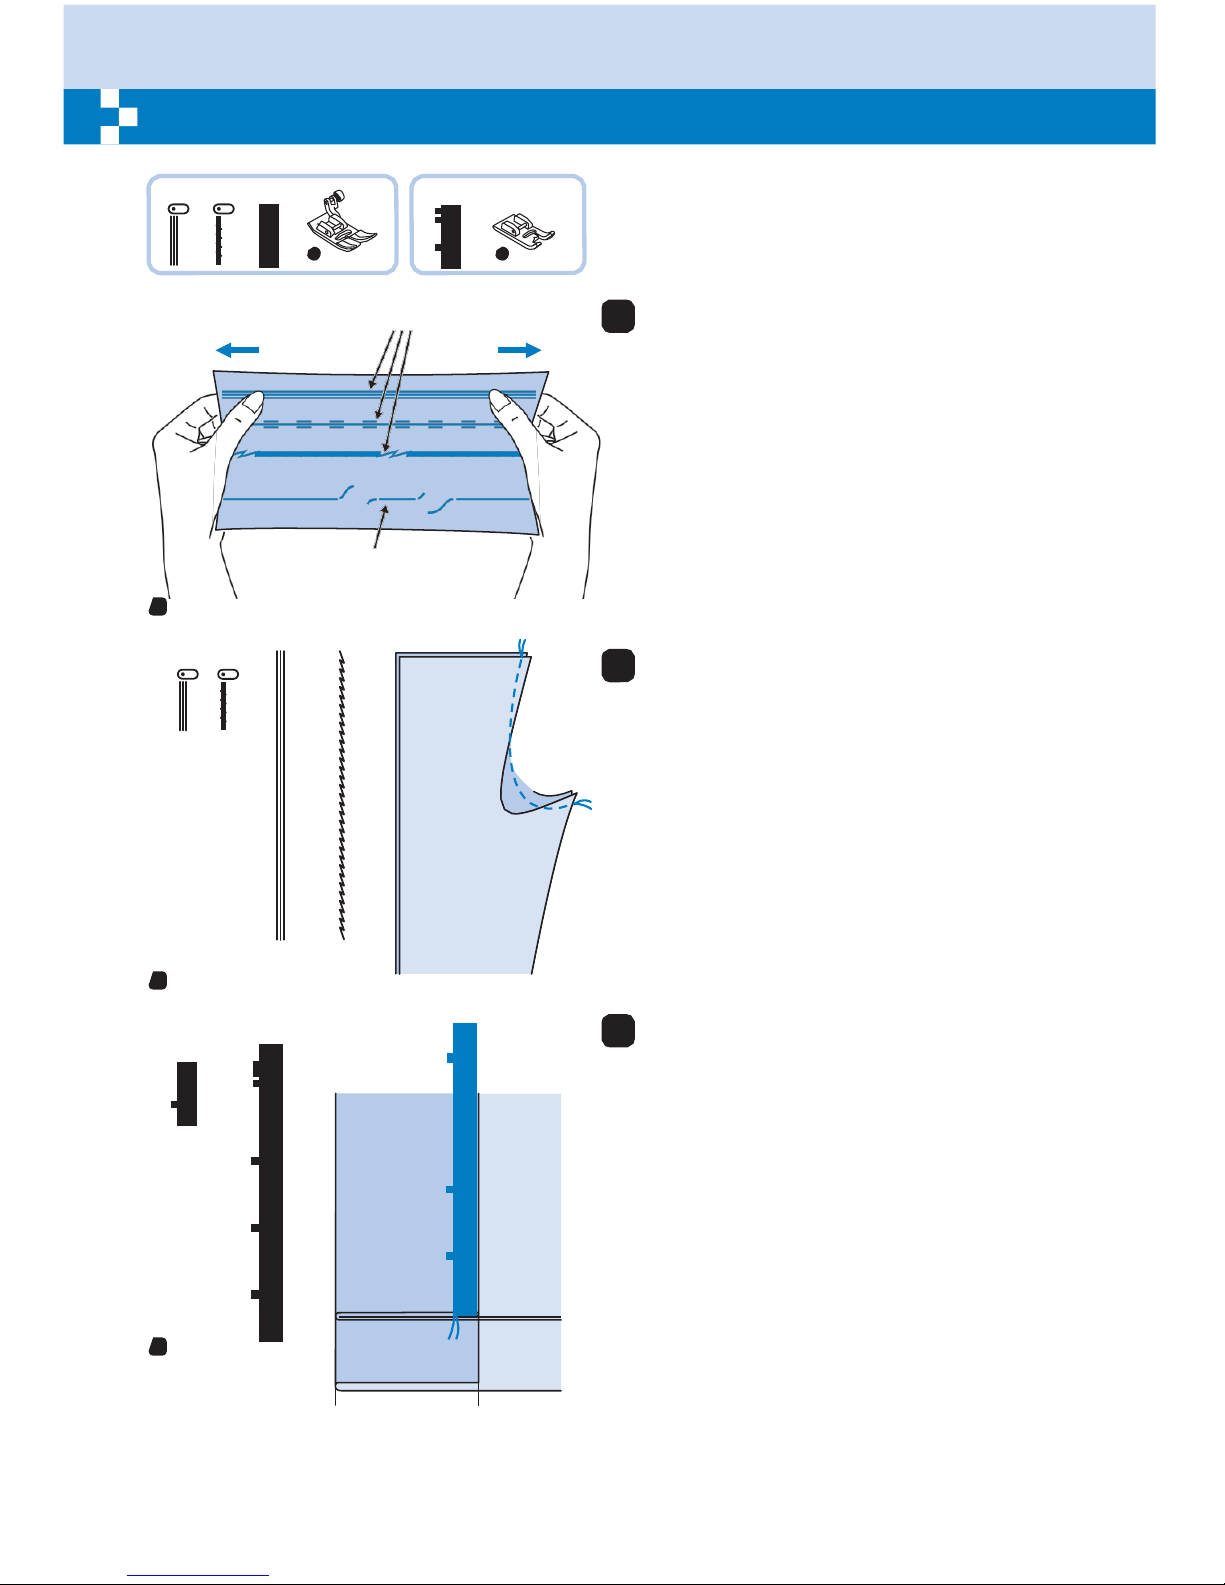
3 4 7 7
T
A
Straight stretch stitch
Straight stitch
1
Use this stitch with knitted, tricot or other
stretchy fabrics. The stitch enables your seam
to stretch without breaking the thread.
Good for easy to ravel and knit fabrics. It is
good for joining durable fabric such as
denims.
These stitches can also be used as a
decorative top stitch.
1
3 4
2
Straight stretch stitch is used to add triple
reinforcement to stretch and hardwearing
seams.
2
3
Triple zigzag stretch stitch is suitable for firm
7
fabrics like denim, poplin, duck, etc.
3
Page 40
35
Overcasting
stitches
Sewing
overcasting stitches
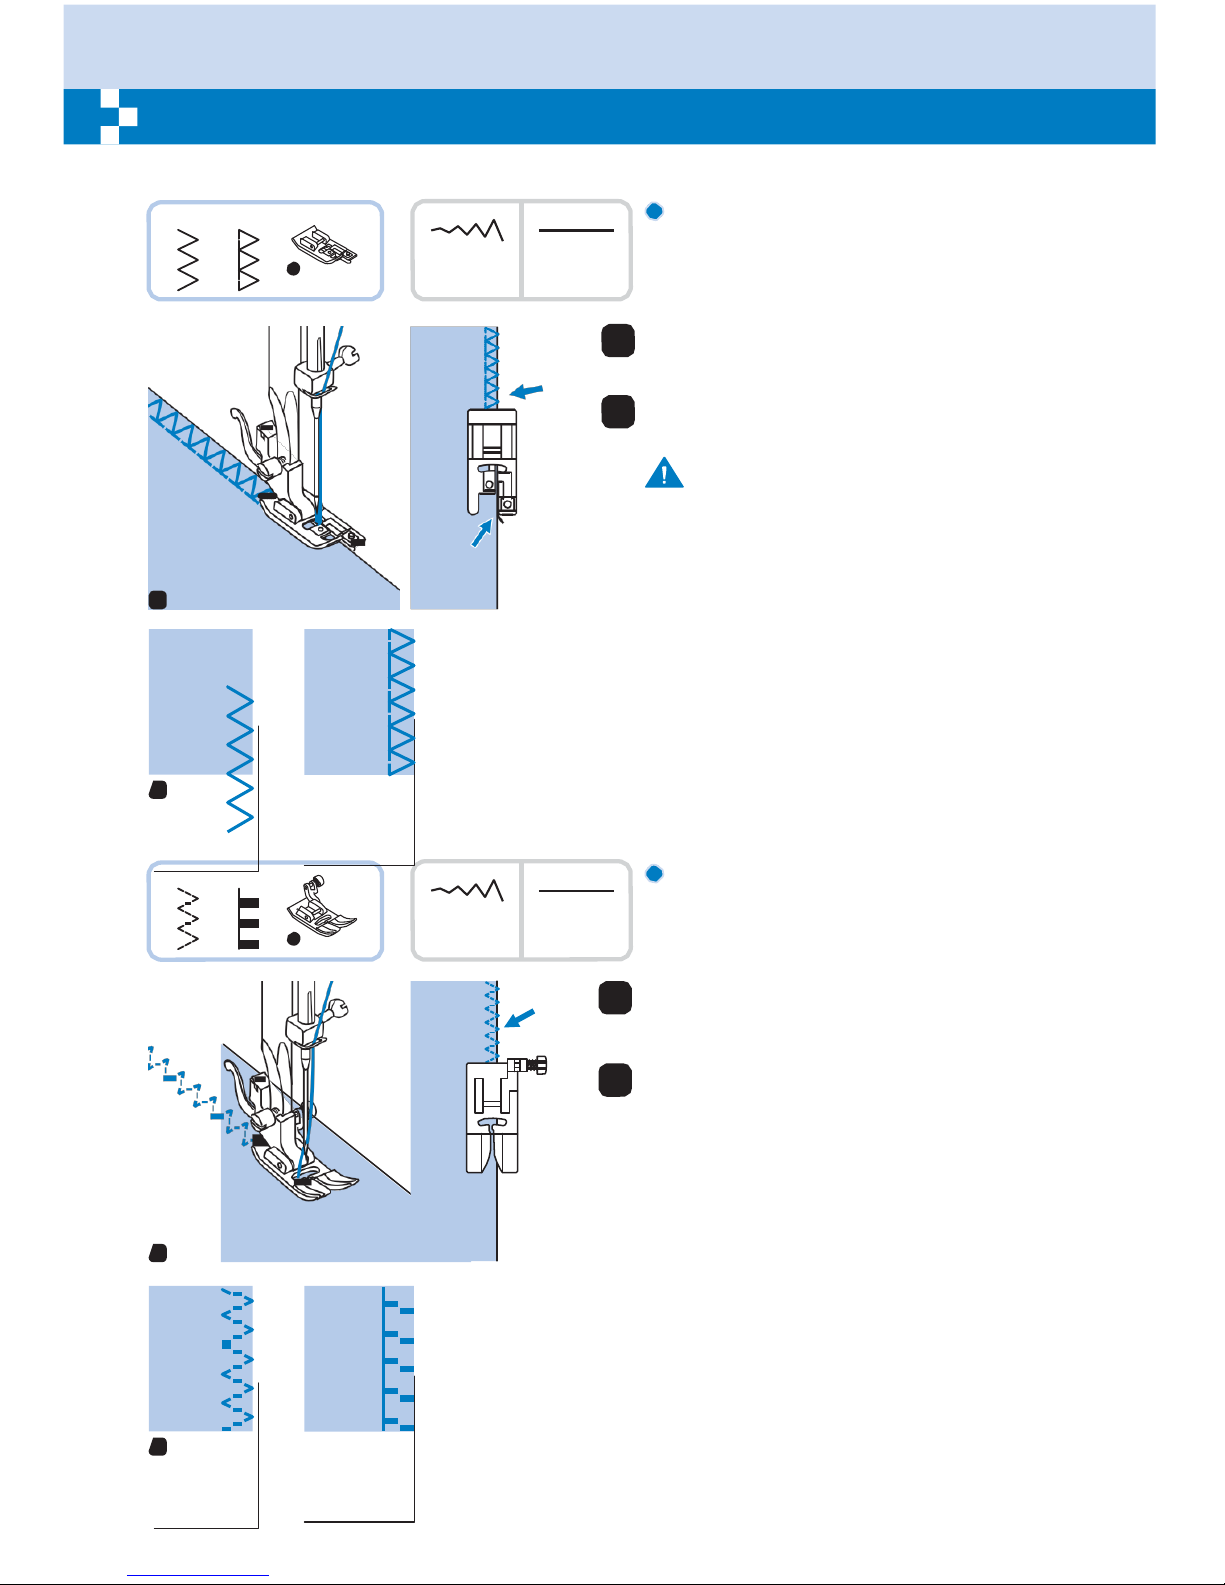
along the edges of fabric to prevent them from
fraying.
5 8
Using the
overcasting foot
E
5.0~7.0 2.0~3.0
1
Change the presser foot to the overcasting
foot (E).
2
Sew the fabric with the fabric edge against
the guide of the overcasting foot.
Attention:
The overcasting foot should be used to sew
with patterns 05 and 08 only and do not set
the stitch width narrower than "5.0". It is
possible that needle could hit the presser
1
foot and break when sewing other patterns
and width.
2
6 A-02
Using the all purpose
foot
T
2.5~4.5 2.0~3.0
1
Change the presser foot to the all purpose
foot (T) .
2
Sewing the overcasting along the edge of
the fabric so that the needle drops over the
edge of the fabric on the right side.
1
2
Page 41
33
Blind
hem
Secure the
bottoms
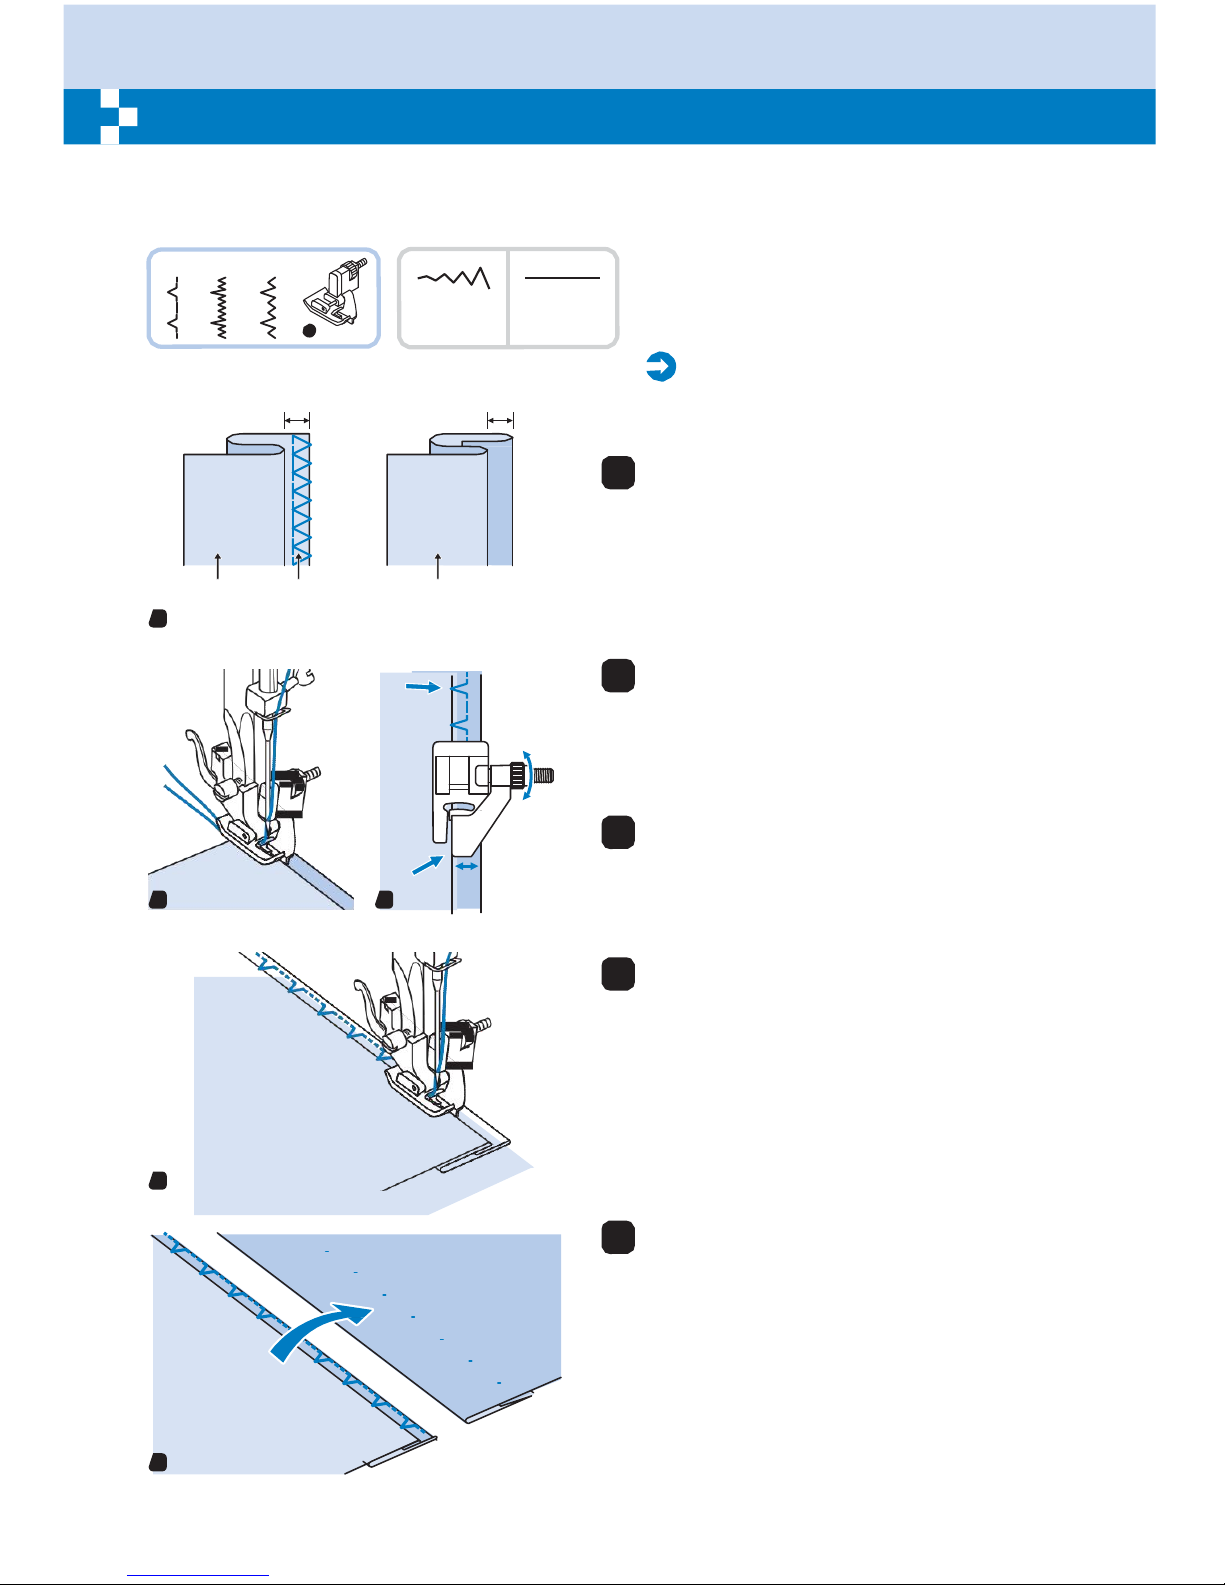
of skirts and pants with a blind hem, this stitch will sew
without stitches
showing
on right side of
fabric.
9 A-03 A-04
F
2.5~4.0 1.0~2.0
9: Blind hem for woven fabrics
A-03: Blind hem for stretch fabrics
A-04: Blind hem for stretch fabrics
Please
Note:
5mm 5mm
It takes practice to sew blind hems. Always
make a sewing test first.
1
Fold the fabric as illustrated with the wrong
side uppermost.
Reverse
1
side
Overcasting
stitches
Reverse
side
2
Place the fabric under the foot. Turn the
handwheel forwards by hand until the
needle swings fully to the left. It should just
a
pierce the fold of the fabric. If it does not,
adjust the stitch width accordingly.
2
3
b
3
Adjust the guide (b) by turning the knob (a)
so that the guide just rests against the fold.
4
Sew slowly, guiding the fabric carefully along
the edge of the guide.
4
5
Turn over the fabric.
5
Page 42
37
Button
sewing
2.5~4.5
1
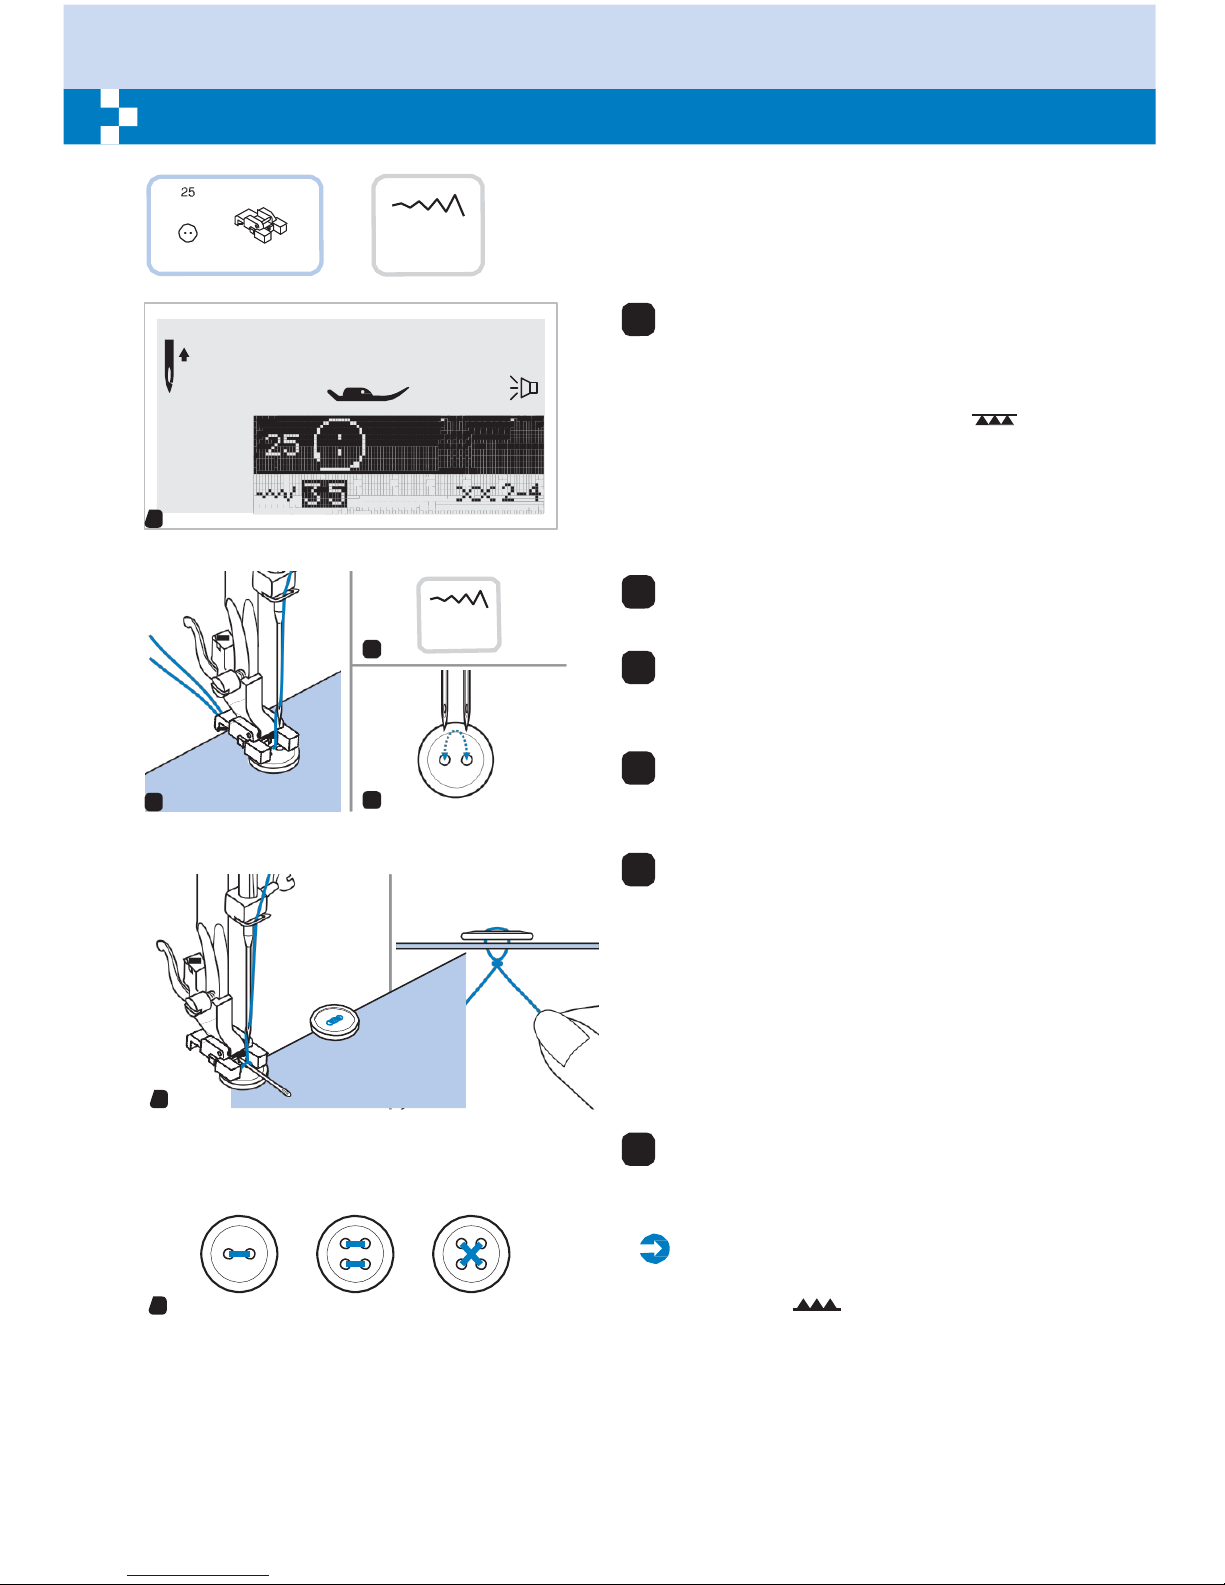
Select the pattern 25 from the Group
Patterns "A" to get the button sewing stitch.
Change the presser foot to the button
sewing foot.
Move the drop feed lever to " " to
lower the feed dogs.
1
2.
-4.
3
2
4
5
2
Position the work under the foot. Place the
button in the desired position, lower the foot.
3
Adjust the stitch width to " 2.5-4.5 "
according to the distance between the two
holes of the button.
4
Turn the handwheel to check that the
needle goes cleanly into the left and right
holes of the button.
5
Before sewing, press the Auto-lock button
to sew reinforcement stitches automatically
at the beginning and at the end of the stitch.
If a shank is required (ex. sew on coats or
jackets), place a darning needle on top of
the button and sew.
Pull end of the upper thread to the wrong
side of the fabric, then tie it with the bobbin
thread.
6
For buttons with 4 holes, sew through the
front two holes first, push work forward and
then sew through the back two holes.
Please
Note:
When you finish the work, move the drop
6
feed control to " " to raise the feed dogs.
Page 43
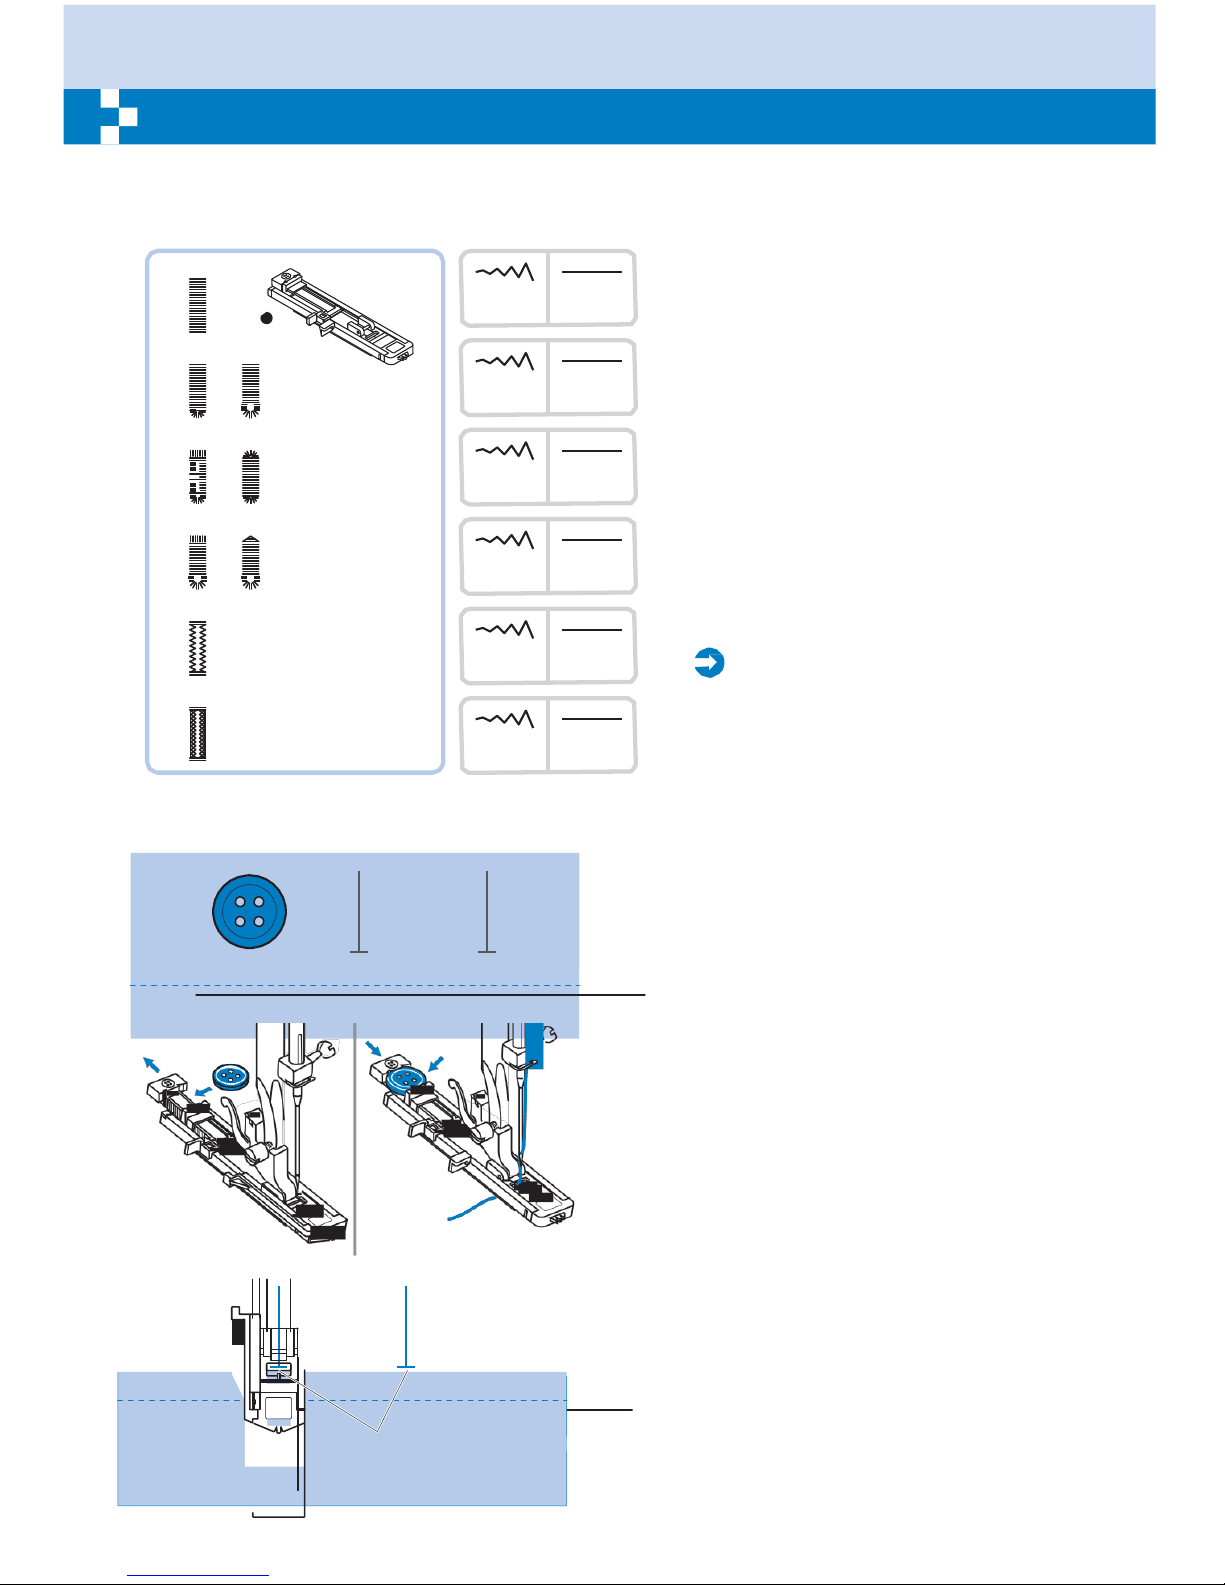
38
Buttonhole
stitching
Buttonhole
sewing to match the size of the button is
possible.
For stretch fabric or thin fabric, it is
recommended
to use a
stabilizer
for a better
buttonhole
finish.
0
A-14
A-16
A-18
D
A-15
A-17
A-19
2. -7.0 0.3- .0
3.0-7.0 0.3- .0
2. - . 0.3- .0
. -7.0 0.3- .0
0: For light to medium weight fabrics
A-14: For light or medium weight fabrics
A-15: For light or medium weight fabrics
A-16: For heavier weight fabrics
A-17: For light or medium weight fabrics
A-18: For heavy weight fabrics
A-19: For jeans or trousers
A-20: For jeans or stretch fabric with a
coarse weave
A-21: For stretch fabric
A-20
A-21
3.0-7.0
.0-2.0
3.0-7.0
.0-3.0
Please
Note:
Before sewing a buttonhole on your
project, practice on a scrap piece of the
same type of fabrics.
Mark the positions of the buttonhole on the
fabric. The maximum buttonhole length is 3cm
(1 3/16 inch). (Total of diameter + thickness of
button.)
Attach the buttonhole foot, then pull out the
button holder plate and insert the button.
The size of the buttonhole is determined by the
button inserted in the button plate.
The thread should be passed through the hole
in the presser foot, then be placed under the
foot.
Starting
point
Select the buttonhole stitch.
Adjust the stitch width and the stitch length to
the desired width and density.
Position the fabric under the presser foot with
the front end of the buttonhole mark aligned
with the center line on the buttonhole foot.
Page 44
39
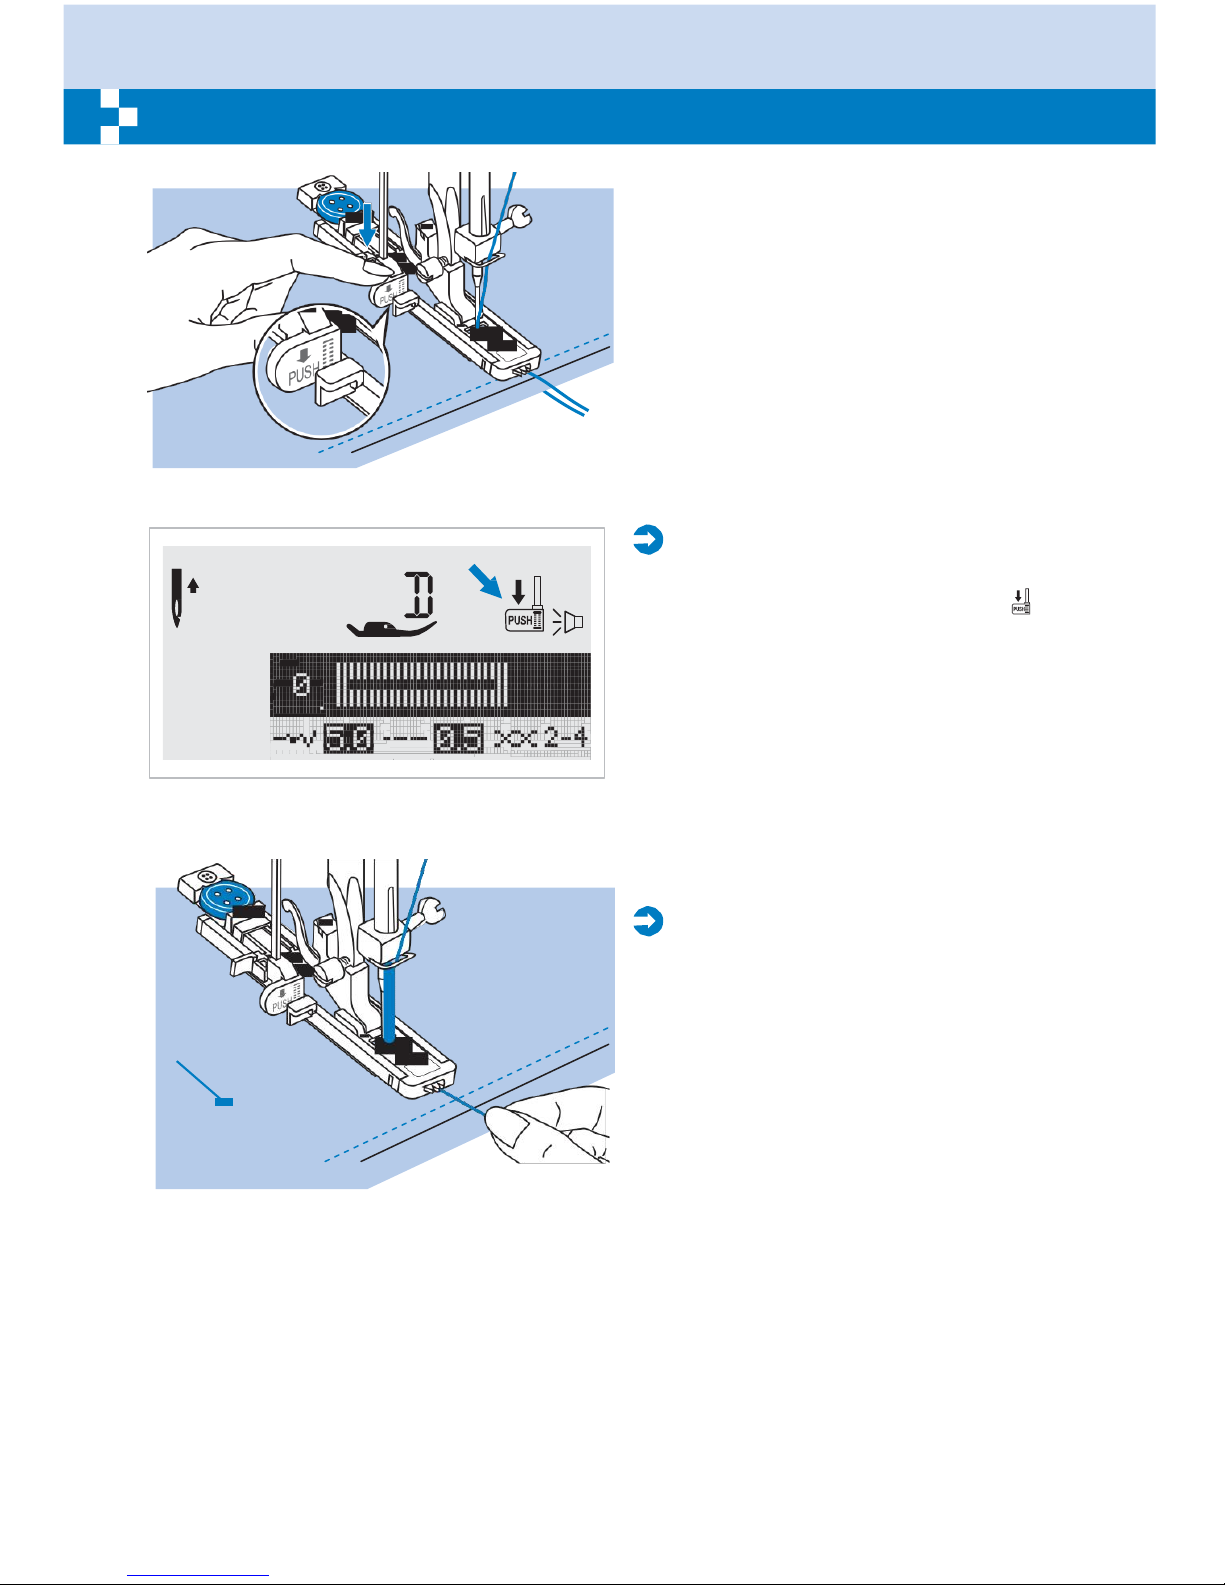
Buttonhole
stitching
Pull the buttonhole lever all the way down and
position it behind the bracket on the buttonhole
foot.
Please
Note:
When you select any buttonhole pattern, the
LCD screen will display the figure " ", to
remind you to lower the buttonhole lever.
Before sewing, please hold the thread by hand.
Please
Note:
Gently feed the fabric by hand.
Before stopping, the machine will automatically
sew a reinforcement stitch after the buttonhole
is sewn.
Page 45
40
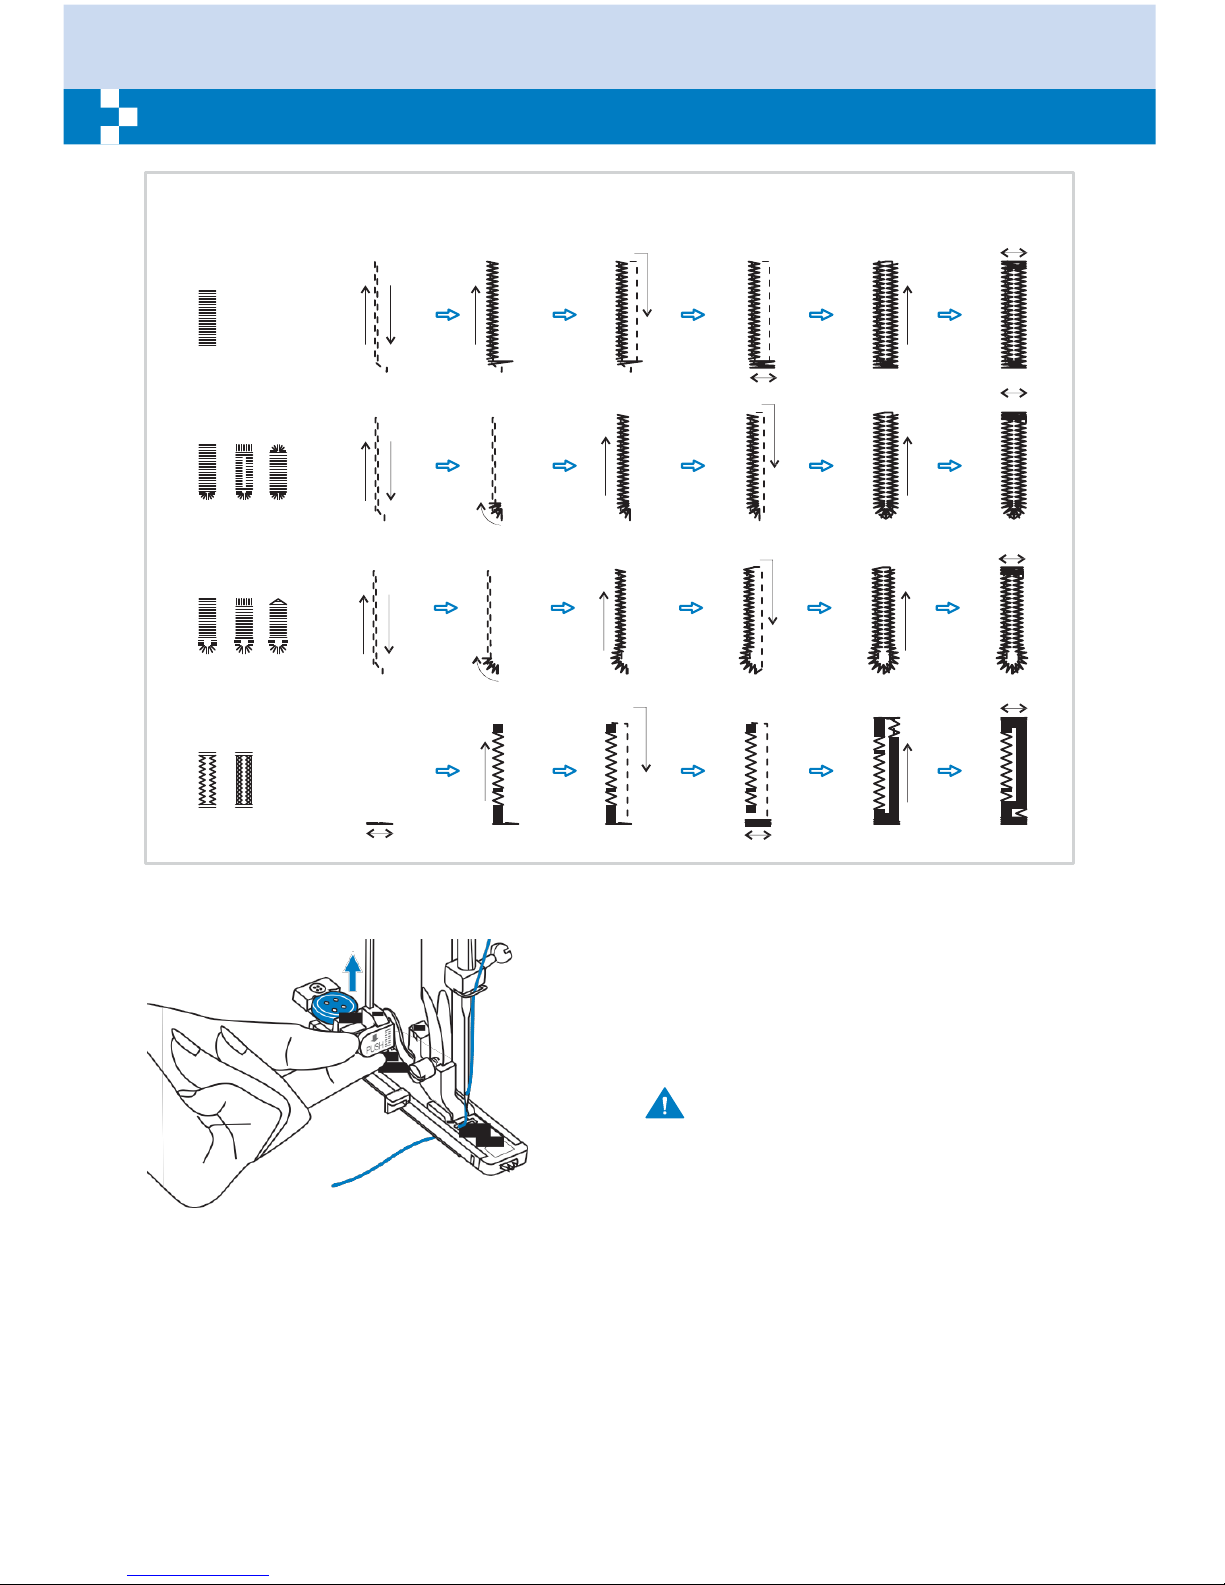
Buttonhole
stitching
*
Buttonholes
are
sewn from
the
front
of the
presser foot
to the
back,
as shown.
0
A-14
A-16 A-17
A-15
A-18 A-19
A-20
A-21
Raise the presser foot and cut thread.
To sew over same buttonhole, raise the
presser foot (will return to original position).
After sewing the buttonhole stitch, raise the
buttonhole lever until it stops.
Attention:
After sewing the buttonholes, raise the
buttonhole lever all the way up to its original
position for other sewing.
Page 46
41
Buttonhole
stitching
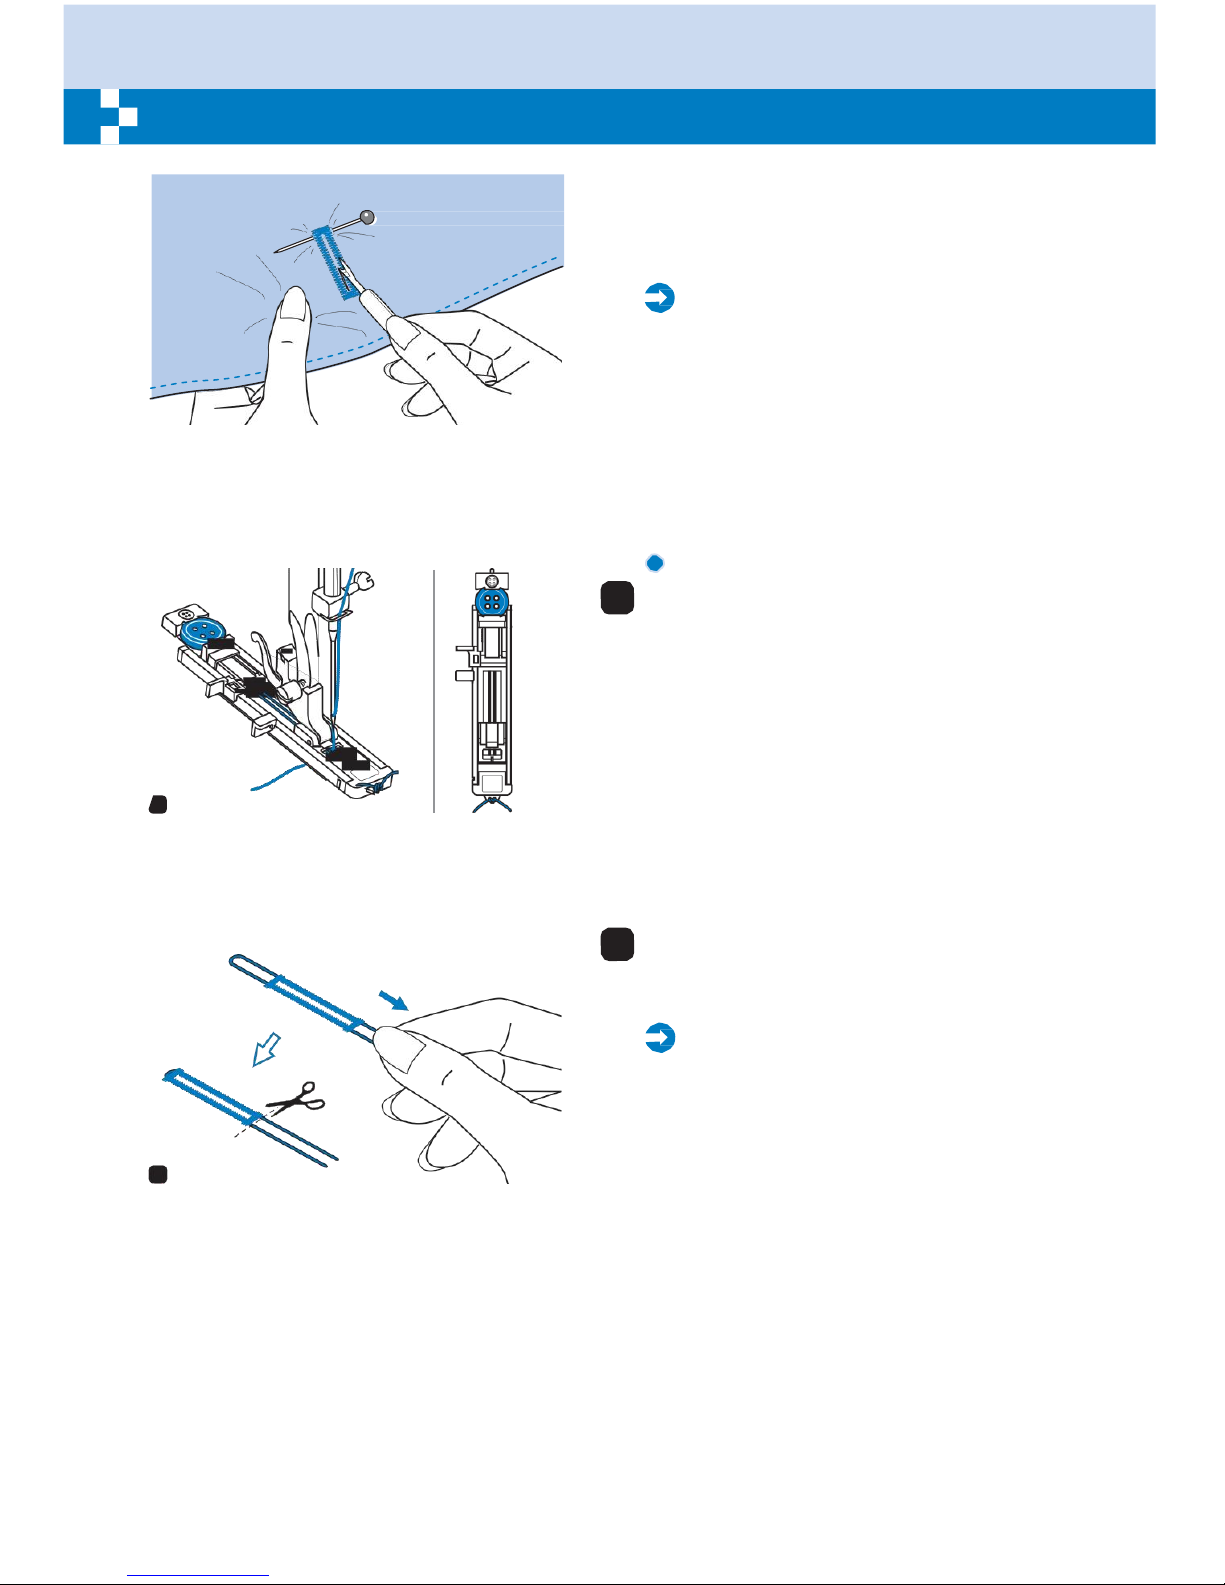
Cut the center of the buttonhole being
careful not to cut any stitches on either side.
Use a pin as a stopper at the bar tack so you
do not cut too much.
Please
Note:
When cutting the buttonhole with the seam
ripper, do not place your hands in the cutting
direction, otherwise injuries may result.
Making a
buttonhole
on stretch
fabrics
1
When sewing buttonholes on stretch fabric,
hook heavy thread or cord under the button-
hole foot.
Attach the buttonhole foot and hook the
gimp thread onto the back of the presser
foot.
Bring the two gimp thread ends to the front
of the foot and insert them into the grooves,
1
then temporarily tie them there. Lower the
presser foot and start sewing.
Set the stitch width to match the diameter of
the gimp thread.
2
Once sewing is completed, pull the gimp
thread gently to remove any slack, then trim
off any excess.
Please
Note:
It is suggested that you use interfacing on
the backside of the fabric.
2
Page 47
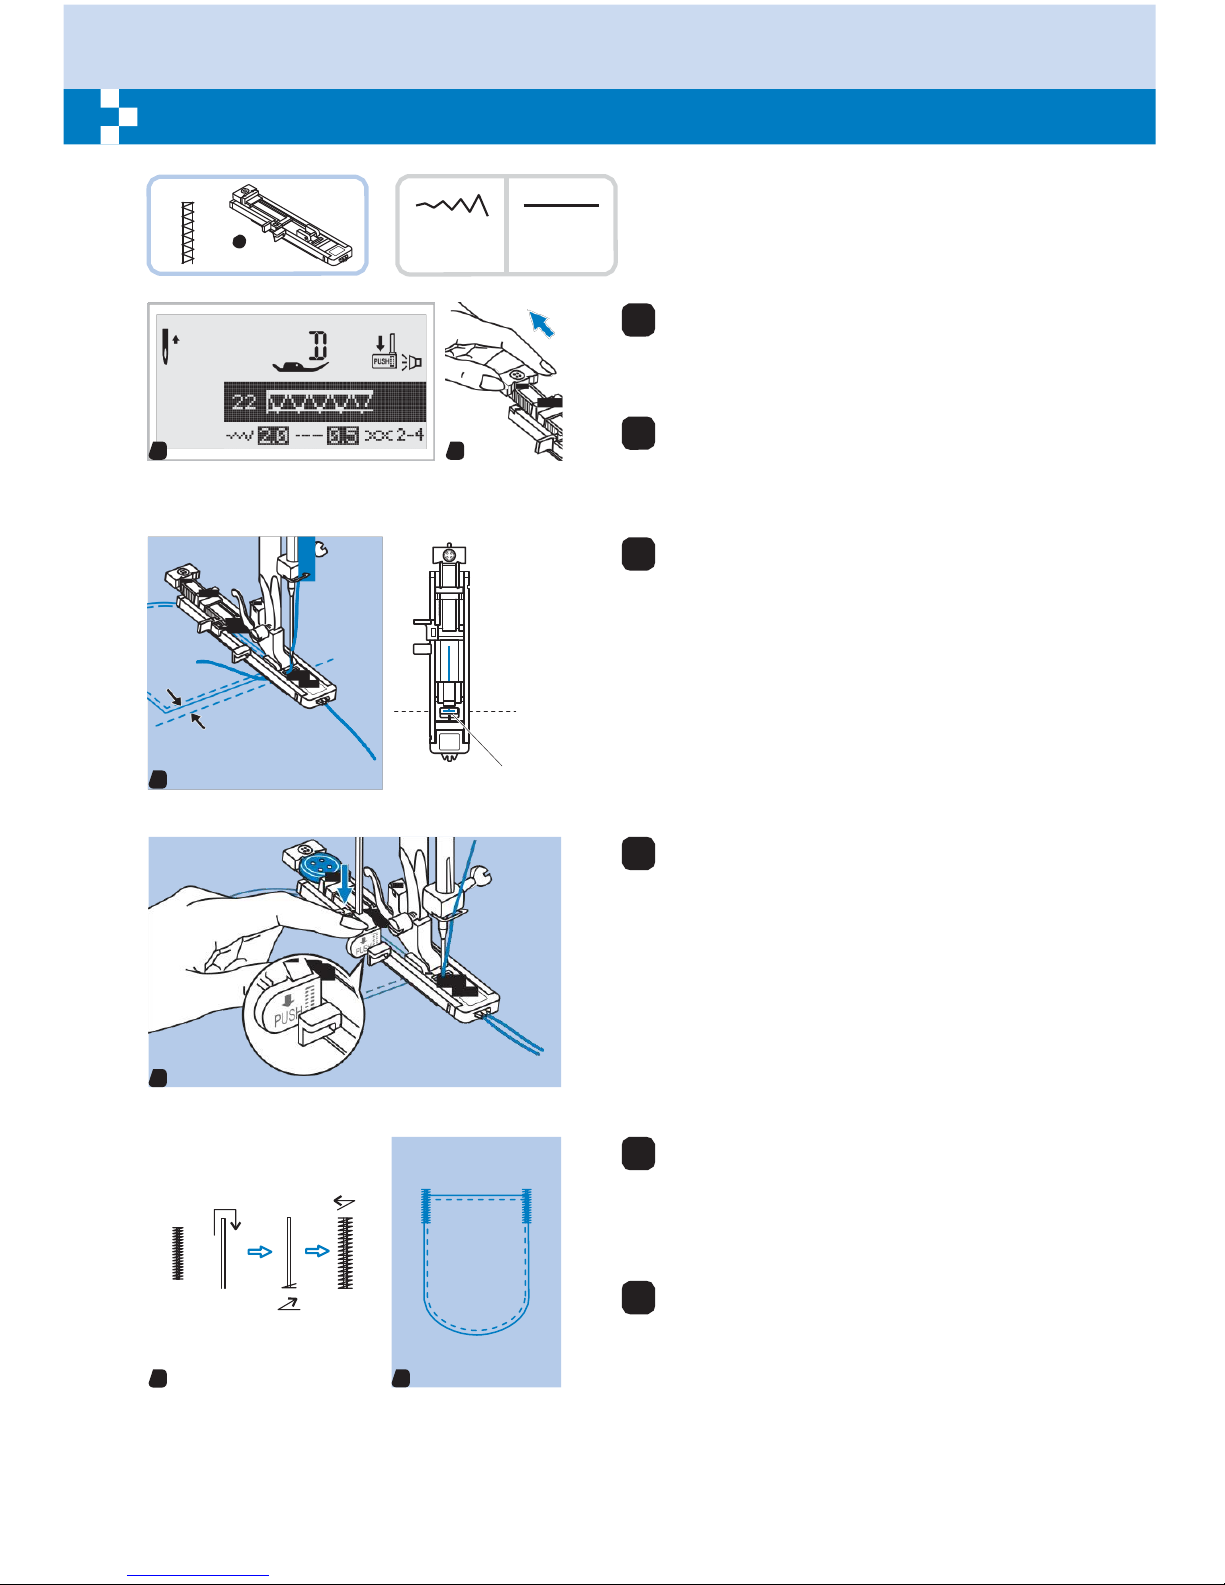
42
Bar tack
stitch
A-22
D
.0-3.0 0.3- .0
1
1 Select pattern 22 of from the Group
Patterns "A" to get the bar tack stitch.
Change the presser foot to the buttonhole
foot.
2
2 Pull the button holder to the rear. Set the
1
2
button guide plate on the buttonhole foot to
the desired length.
3
3 Position the fabric so that the needle is
2mm (1/16") in front of where you want the
sewing to start, and then lower the presser
foot.
2mm
3
Starting point
4
4 Pass the upper thread down through the
hole in the presser foot. Pull down the
buttonhole lever. The buttonhole lever is
positioned behind the bracket on the
buttonhole foot. Gently hold the end of the
upper thread in your left hand, and then
start sewing.
4
5
5 Bar tack stitches are sewn.
6
6 As an example, the illustration shows the
procedure for sewing bar tacks at pocket
corners.
5
6
6
6
Page 48
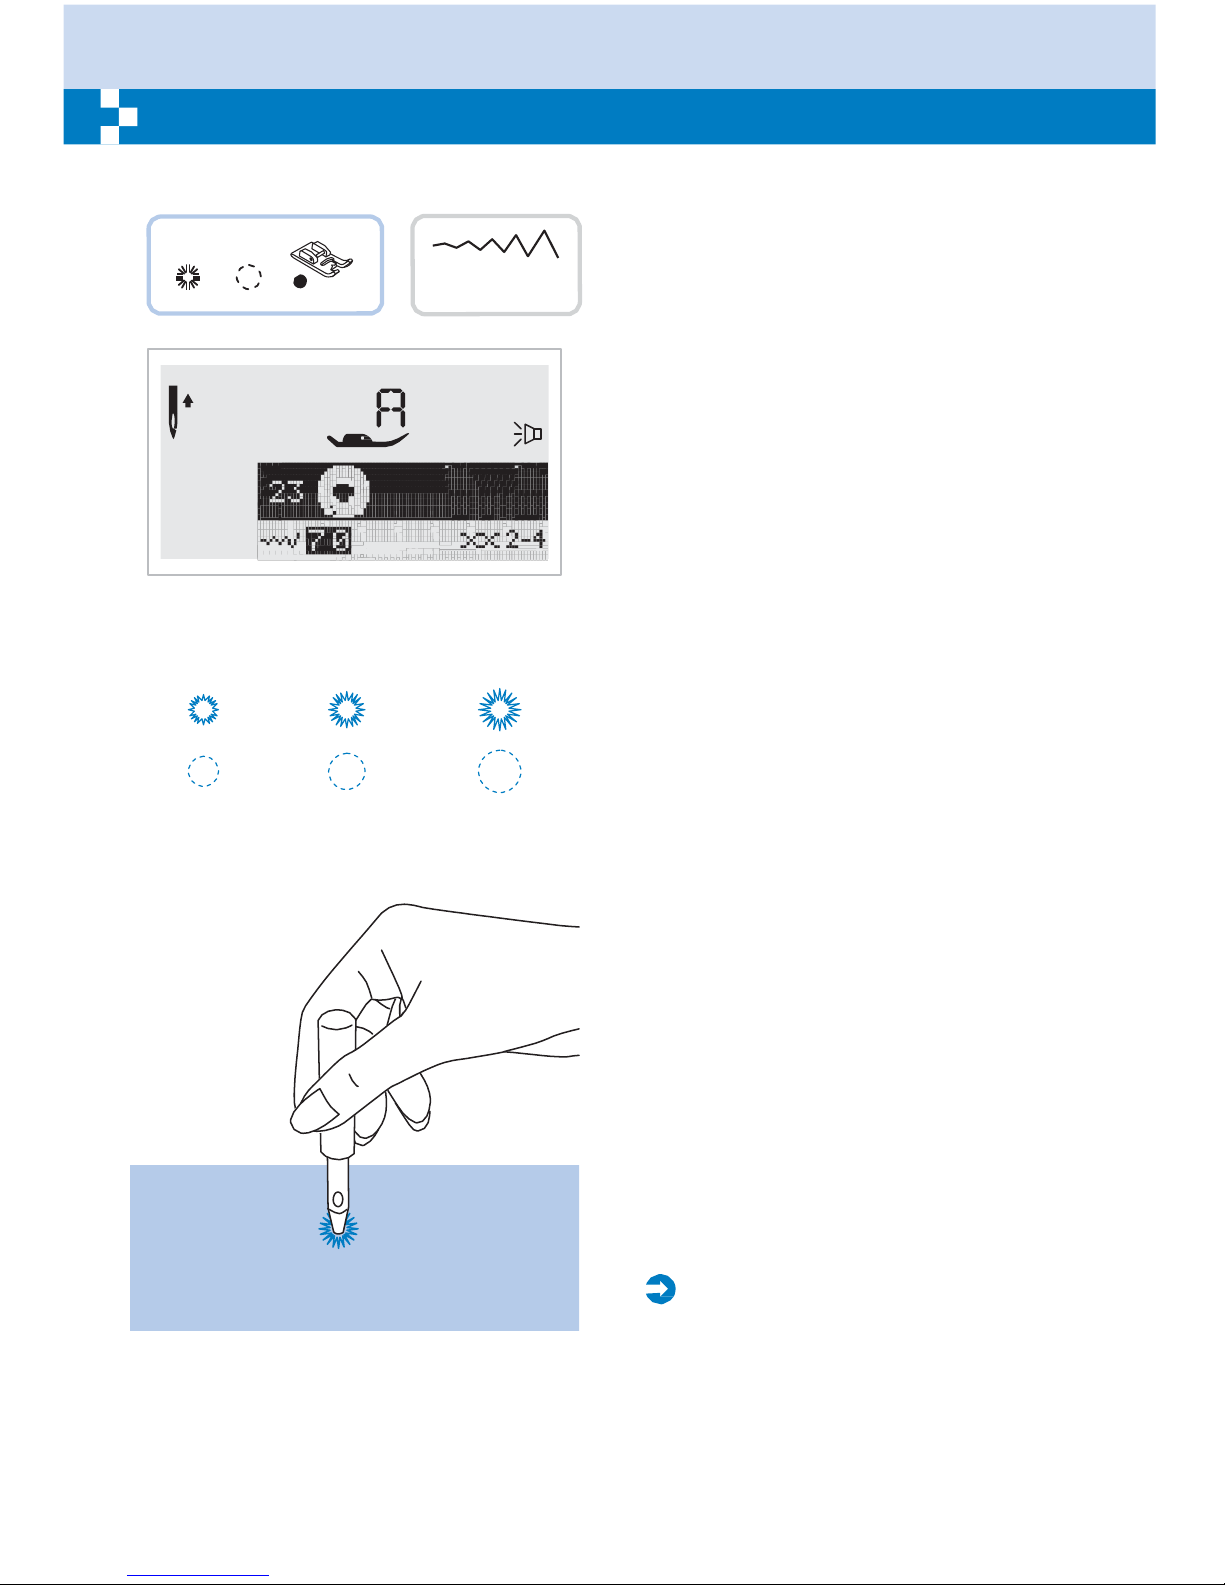
43
Eyelet
Stitch
Eyelet
stitches
are used for making belt holes and other similar
applications.
A-23 A-24
A
.0 6.0 7.0
A-23: Select for sewing eyelets on belts , etc
A-24: Select for sewing eyelets on belts , etc
Select pattern 23 or 24 from the Group
Patterns "A" to get the eyelet stitch. Attach
presser the foot "A".
–
A B C
Press the " " or "+" stitch width adjustment to
button select the eyelet size.
Size of eyelet.
A. Small: 5.0mm (3/16 inch).
B. Medium: 6.0mm (15/64 inch).
C. Large: 7.0mm (1/4 inch).
Lower the needle into the fabric at the
beginning of the stitching, and then lower the
presser foot lever.
Once sewing is completed, the machine
automatically sews reinforcement stitches, then
stops.
Make a hole at the center using an eyelet
punch.
* Eyelet punch is not included with the
machine.
Please
Note:
- When using the eyelet punch, place thick paper
or some other protective sheet under the fabric
before punching the hole in the fabric.
- If thin thread is used, the stitching may be
coarse. If this occurs, sew the eyelet twice
one on top of the other.
Page 49
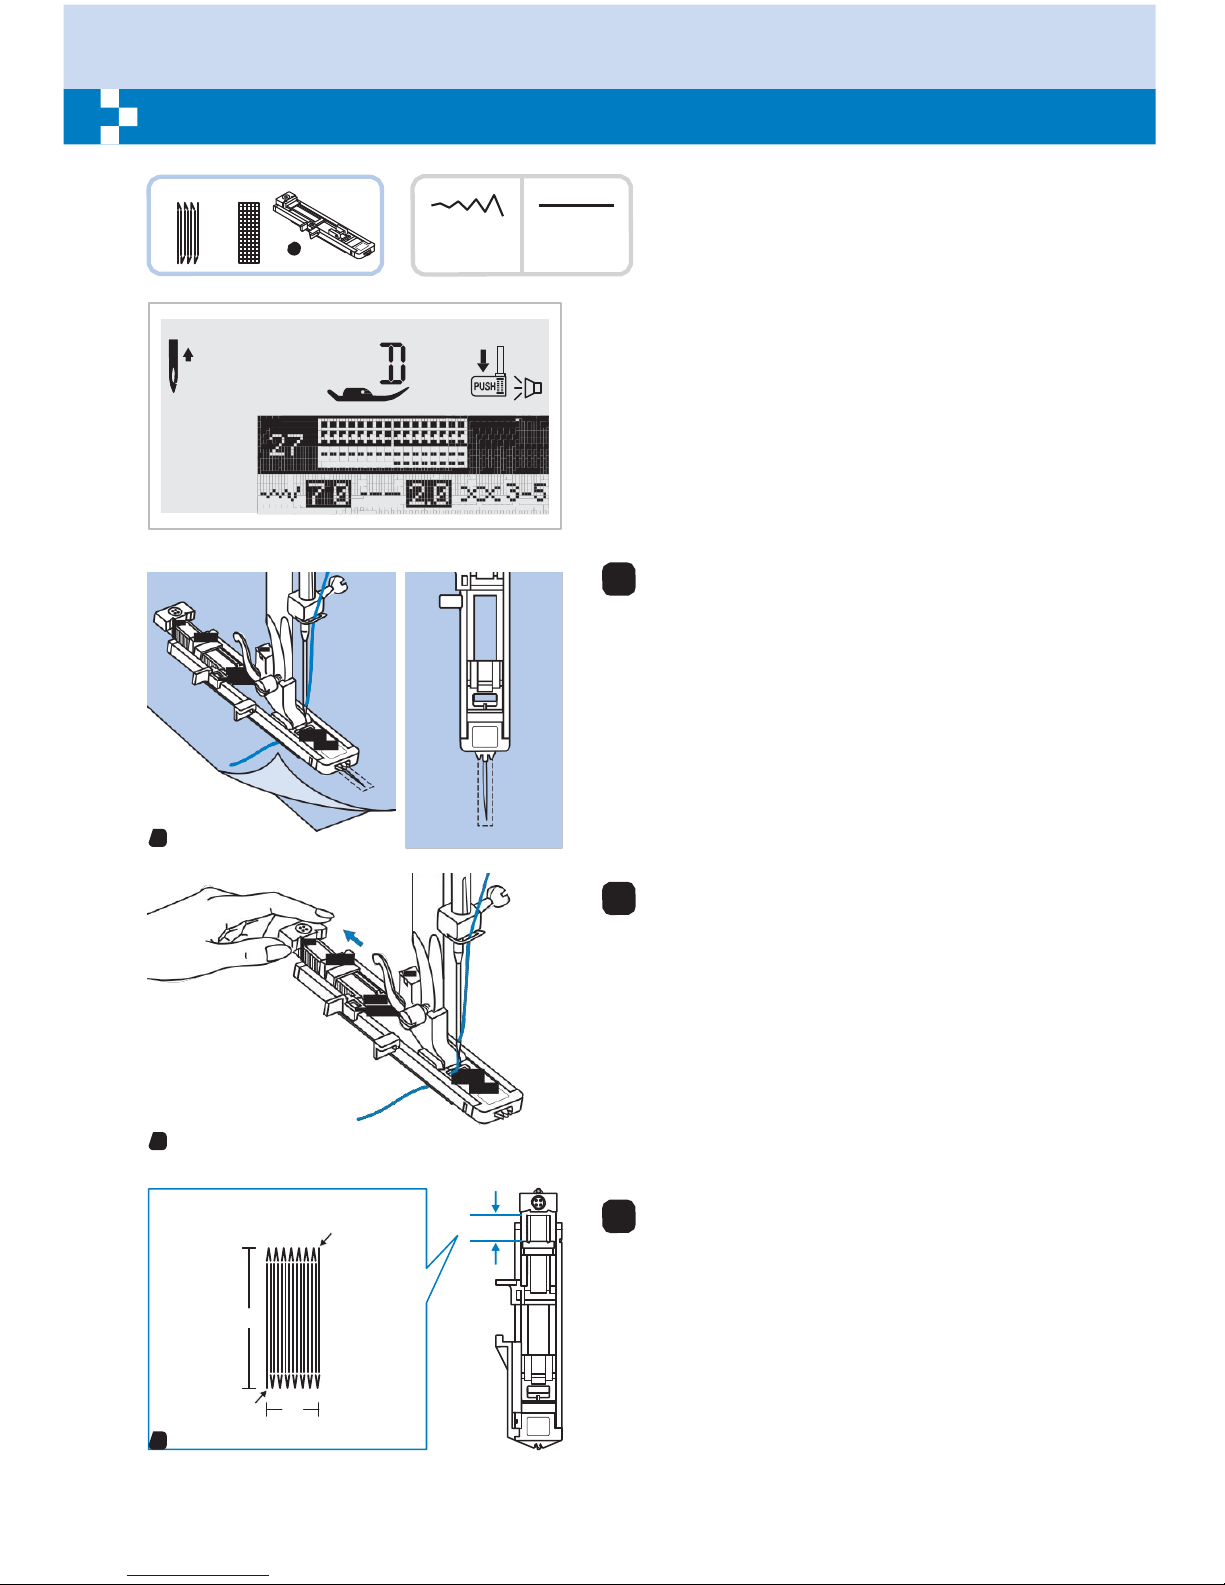
44
Darning
stsitch
A-26 A-27
D
3. -7.0
.0-2.0
Select pattern 26 or 27 from the Group
Patterns "A" to get the darning stitch.
Change the presser foot to the buttonhole
foot.
1
Baste the upper fabric and the under fabric
together. Select the needle position. Lower
the presser foot over the center of the tear.
1
2
Pull the button holder to rear.
Set the button guide plate on buttonhole foot
to the desired length.
2
a
Start
b
3
Stop
3
The size of one darn cycle is variable.
However, the maximum stitch length is
2.6cm (1 inch) and the maximum stitch width
is 7mm (9/32 inch).
a. The length of sewing.
b. The width of sewing.
Page 50
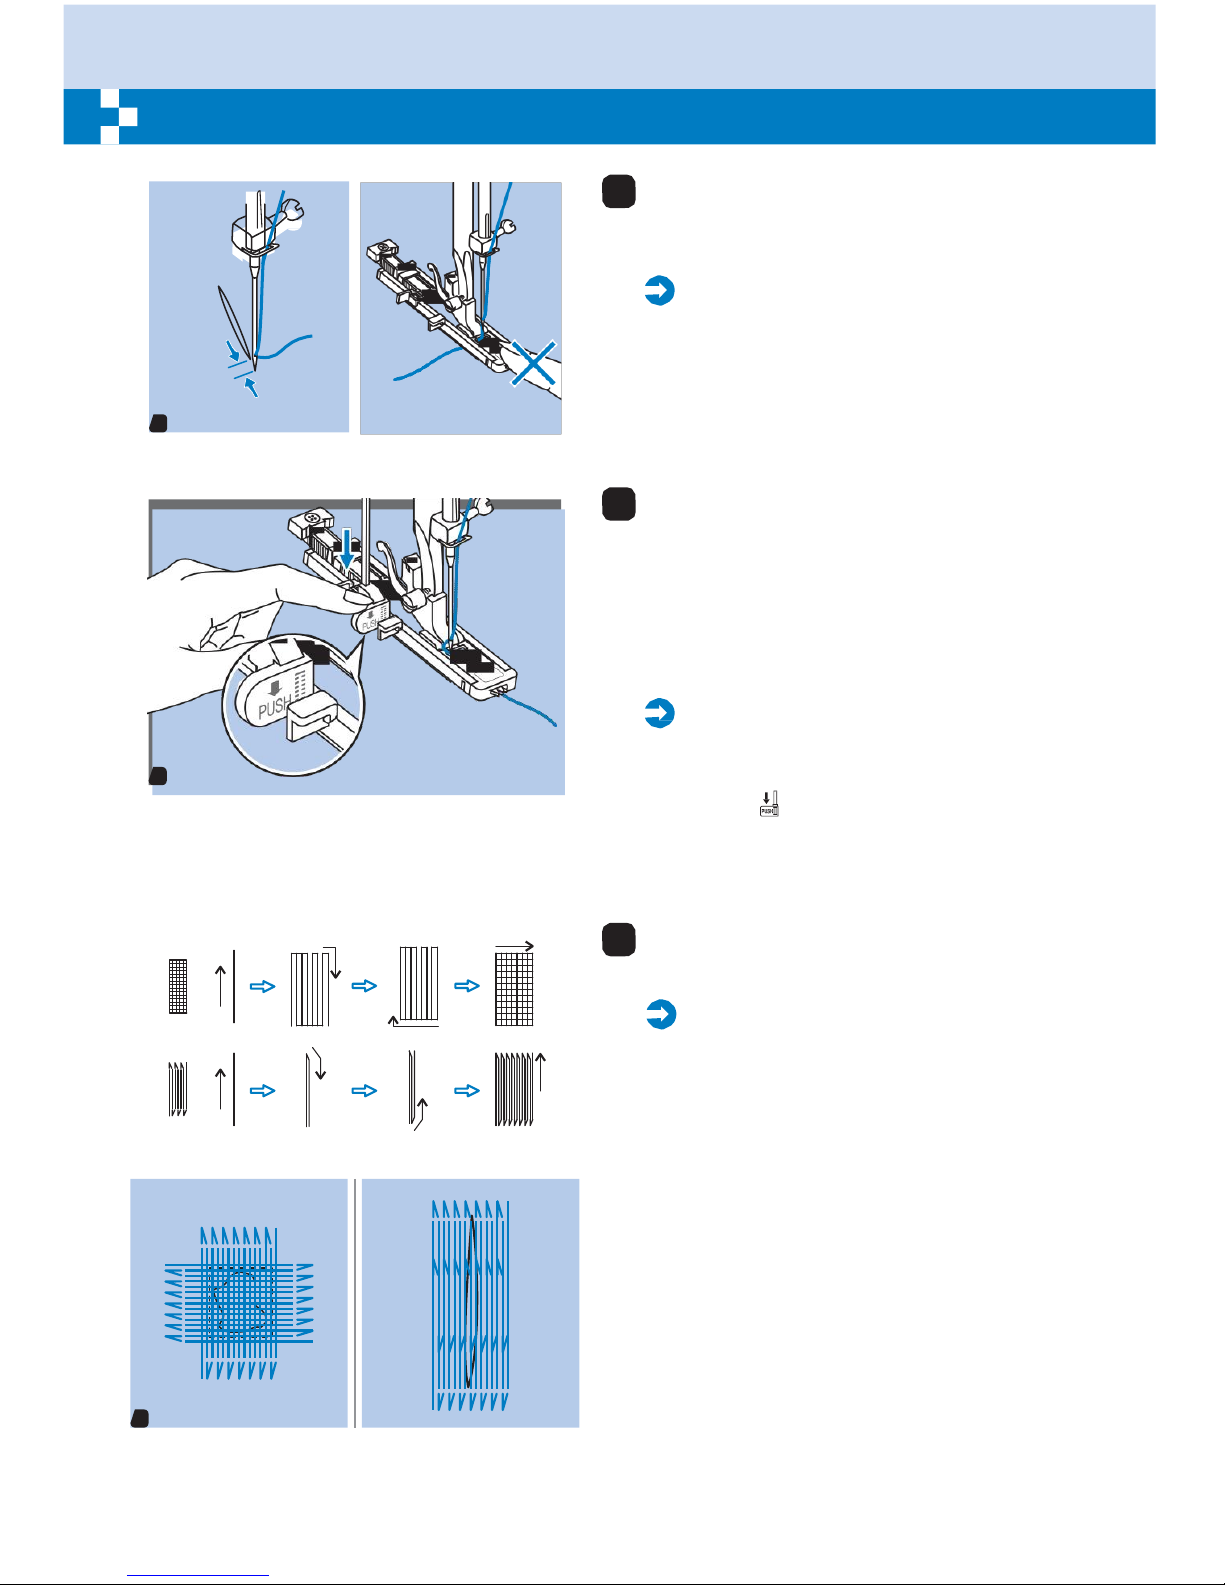
45
Darning
stitch
2mm
4
5
4
Position the fabric so that the needle is 2mm
(1/16 inch) in front of the area to be darned,
and then lower the presser foot lever.
Please
Note:
When lowering the presser foot, do not push
in the front of the presser foot, otherwise the
darning will not be sewn with the correct size.
5
Pass the upper thread down through the
hole in the presser foot.
Pull down the buttonhole lever. The
buttonhole lever is positioned behind the
bracket on the buttonhole foot.
Gently hold the end of the upper thread in
your left hand, and then start sewing.
Please
Note:
When you select any buttonhole pattern or
darning pattern, the LCD screen will display
the figure " " to remind you to lower the
buttonhole lever.
A-27
A-26
6
Darning stitches are sewn from the front of
the presser foot to the back, as shown.
Please
Note:
If the fabric does not feed, for example,
because it is too thick, increase the stitch
length.
If the sewing range is too big to sew, then
we suggest you can sew several times (or
cross sew) to get better sewing result.
6
Page 51
46
Zipper
insertion
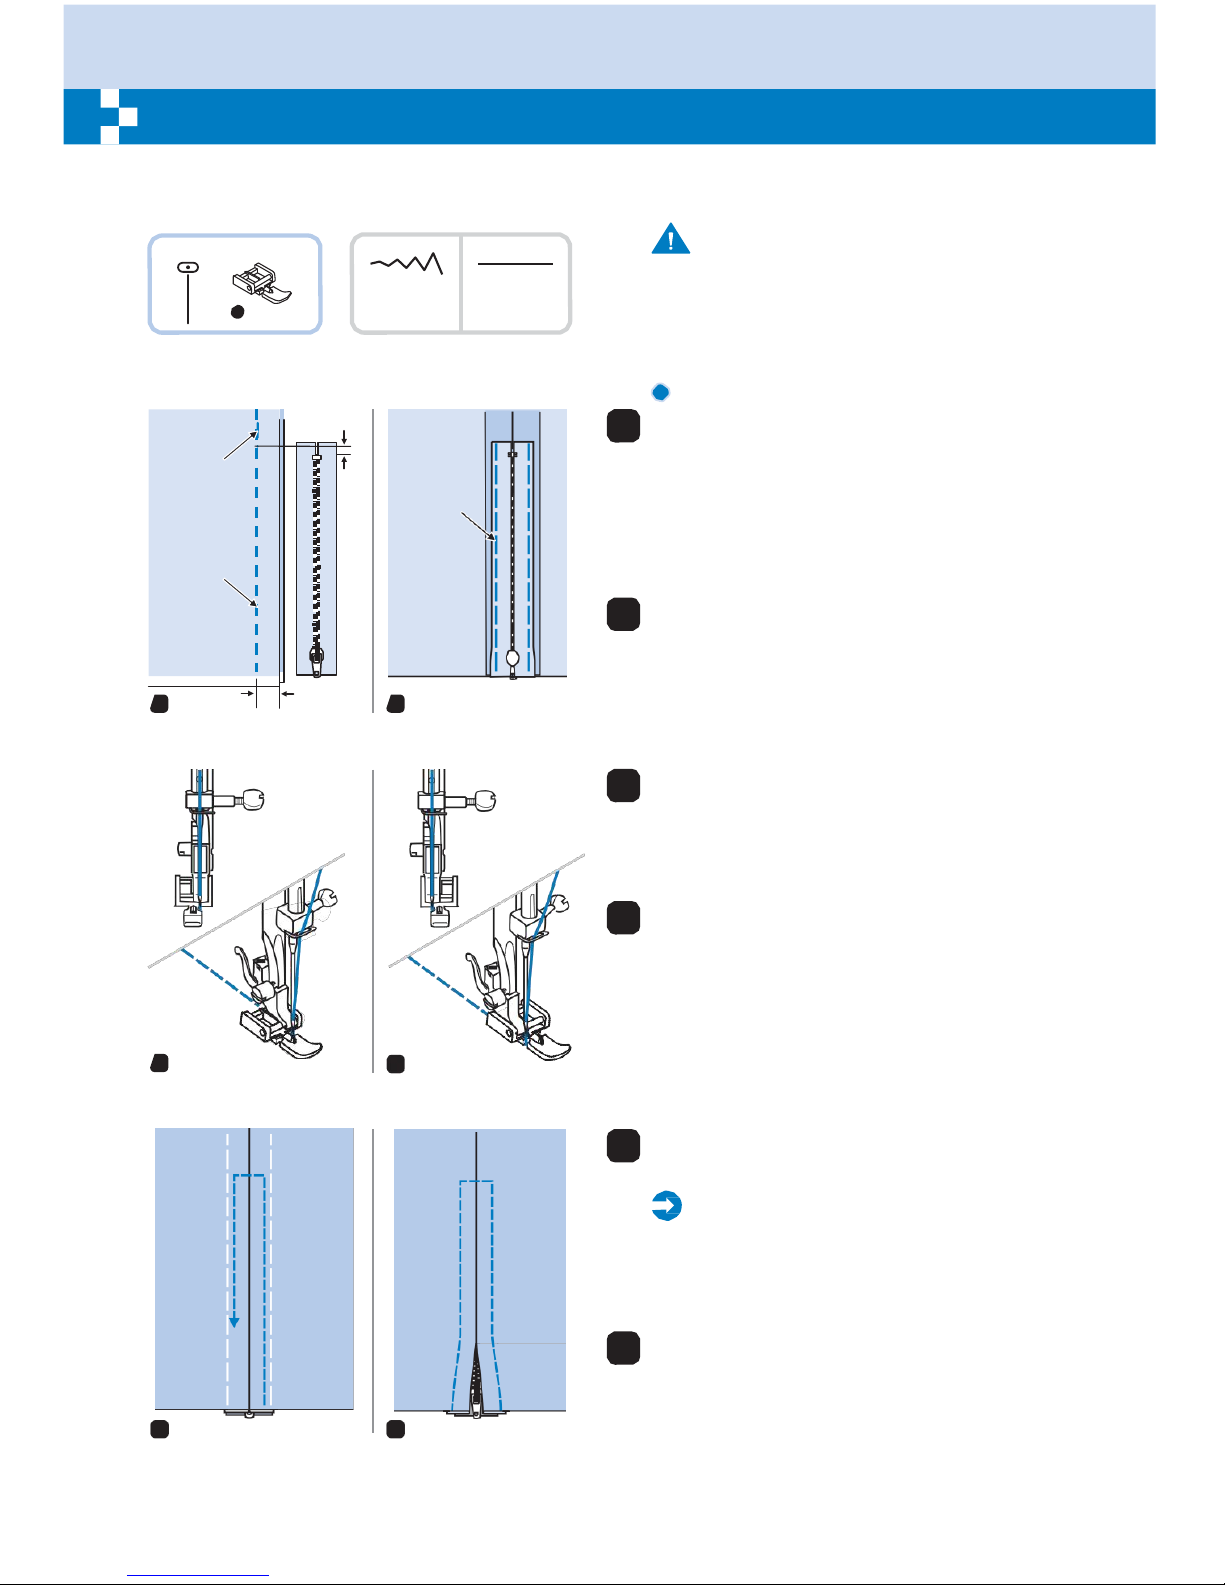
This foot can be set to sew on each side of the zipper, the The edge of the foot guides
the
zipper to ensure
straight placement.
1
I
3.5 1.5~3.0
5mm
Attention:
Zipper foot should be used for sewing width
center needle position straight stitch only. It
is possible that needle could hit the presser
foot and break when sewing other patterns.
Inserting
a centered
zipper
1
Place the right sides of the fabric together.
Sew a bottom seam 2cm from the right edge
Reverse
stitches
Basting
stitching
Reverse
side
Basting
stitching
Reverse
side
to the zipper bottom stop position. Sew a
few stitches in reverse to lock. Increase the
stitch length to maximum, set the tension
below 2, and baste the remaining length of
the fabric.
2
Press open the seam allowance. Place the
zipper face down on the seam allowance
with the teeth against the seam line. Baste
the zipper tape.
1
2cm
2
3
Attach the zipper foot. Attach the right side
of the presser foot pin to the holder when
sewing the left side of the zipper.
4
Attach the left side of the presser foot pin to
the presser foot holder when sewing the
right side of the zipper.
3
4
5
Stitching around the zipper.
Please
Note:
When sewing, be sure that the needle does
not touch the zipper, otherwise the needle
may bend or break.
6
Remove the basting and press.
5
6
Page 52
47
Zipper
insertion
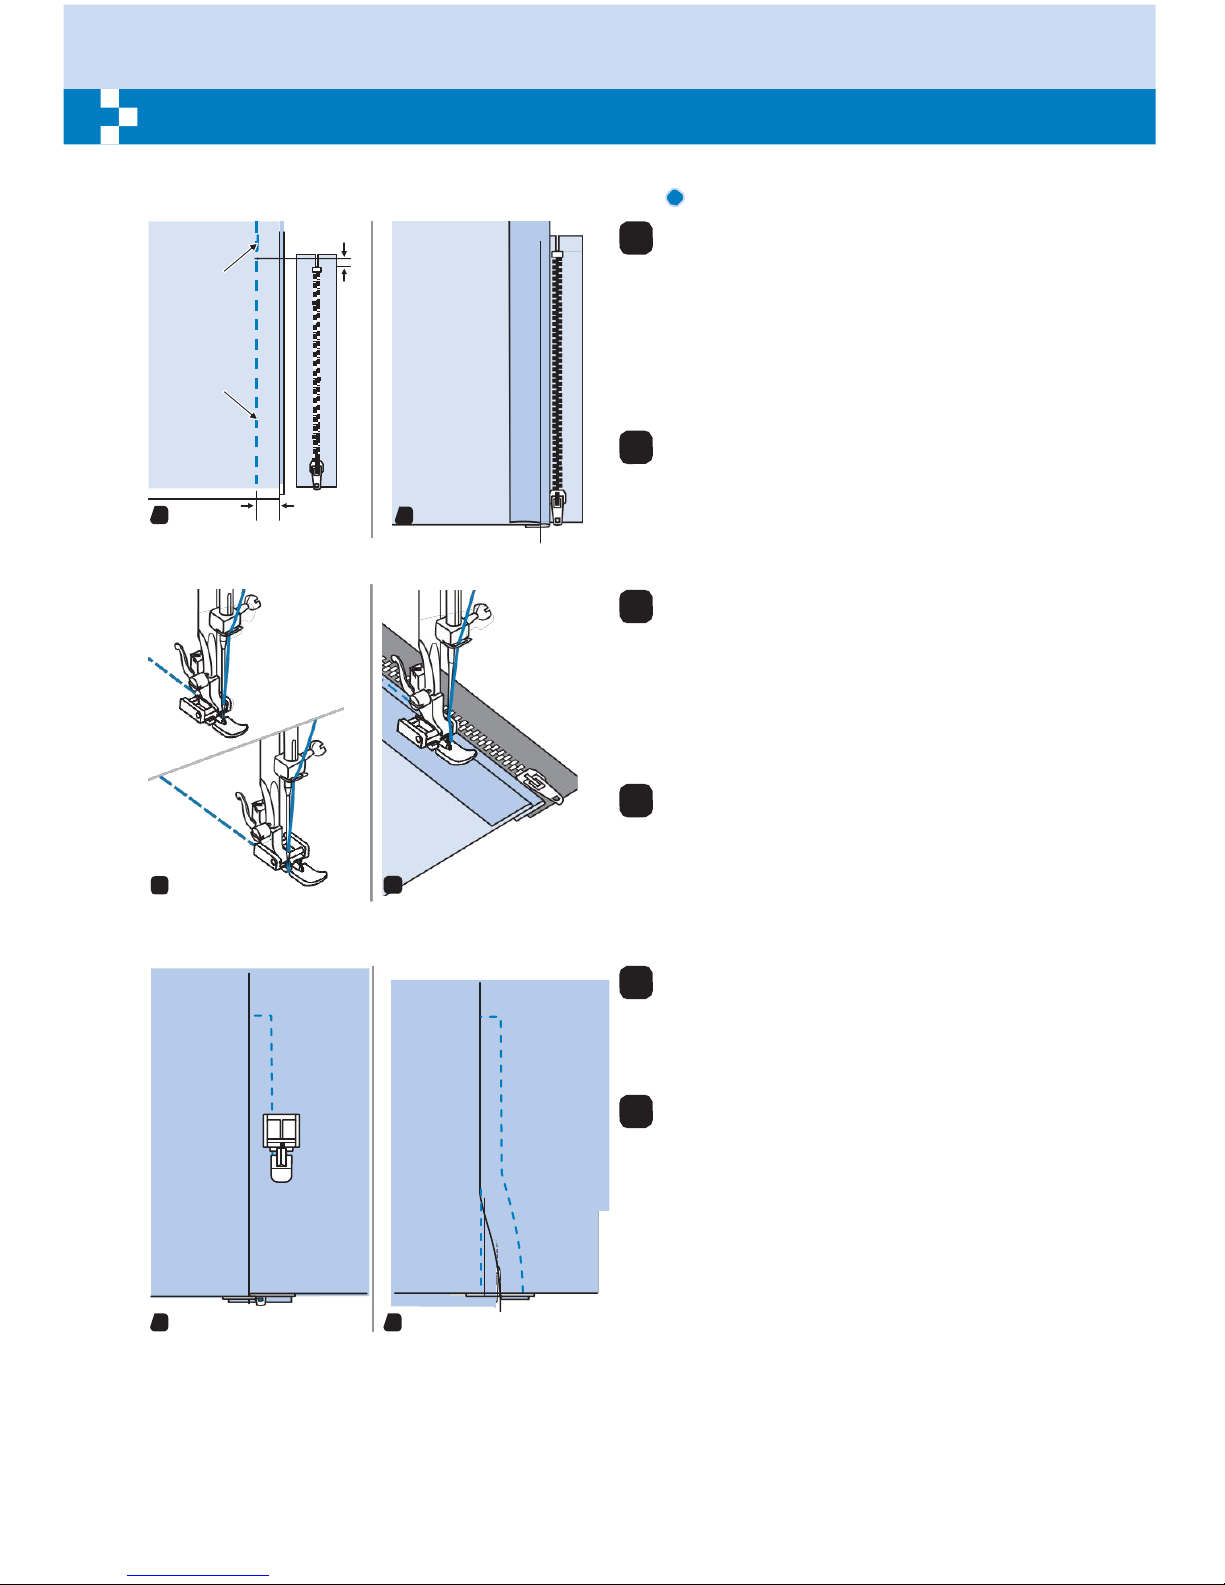
Reverse
stitches
Basting
stitching
5mm
Inserting
a side
zipper
1
Place the right sides of the fabric together.
Sew a bottom seam 2cm from the right edge
to the zipper bottom stop position. Sew a
few stitches in reverse to lock. Increase the
stitch length to maximum, set the tension
below 2, and baste the remaining length of
the fabric.
Reverse
side
1
2cm
2
2
Fold back to the left seam allowance.
Turn under the right seam allowance to form
3mm (1/8 inch) fold.
3
Attach the zipper foot. Attach the right side
of the presser foot pin to the holder when
sewing the left side of the zipper. Attach the
left side of the presser foot pin to the presser
foot holder when sewing the right side of the
zipper.
4
Stitch the left side of zipper from bottom to
top.
3
4
5
Turn the fabric right side out, stitch across
the lower end and right side of zipper.
6
Stop about 5cm (2 inches) from the top of
zipper. Remove the basting and open the
zipper. Stitch the remainder of the seam.
5
6
Page 53
48
Narrow
hemming
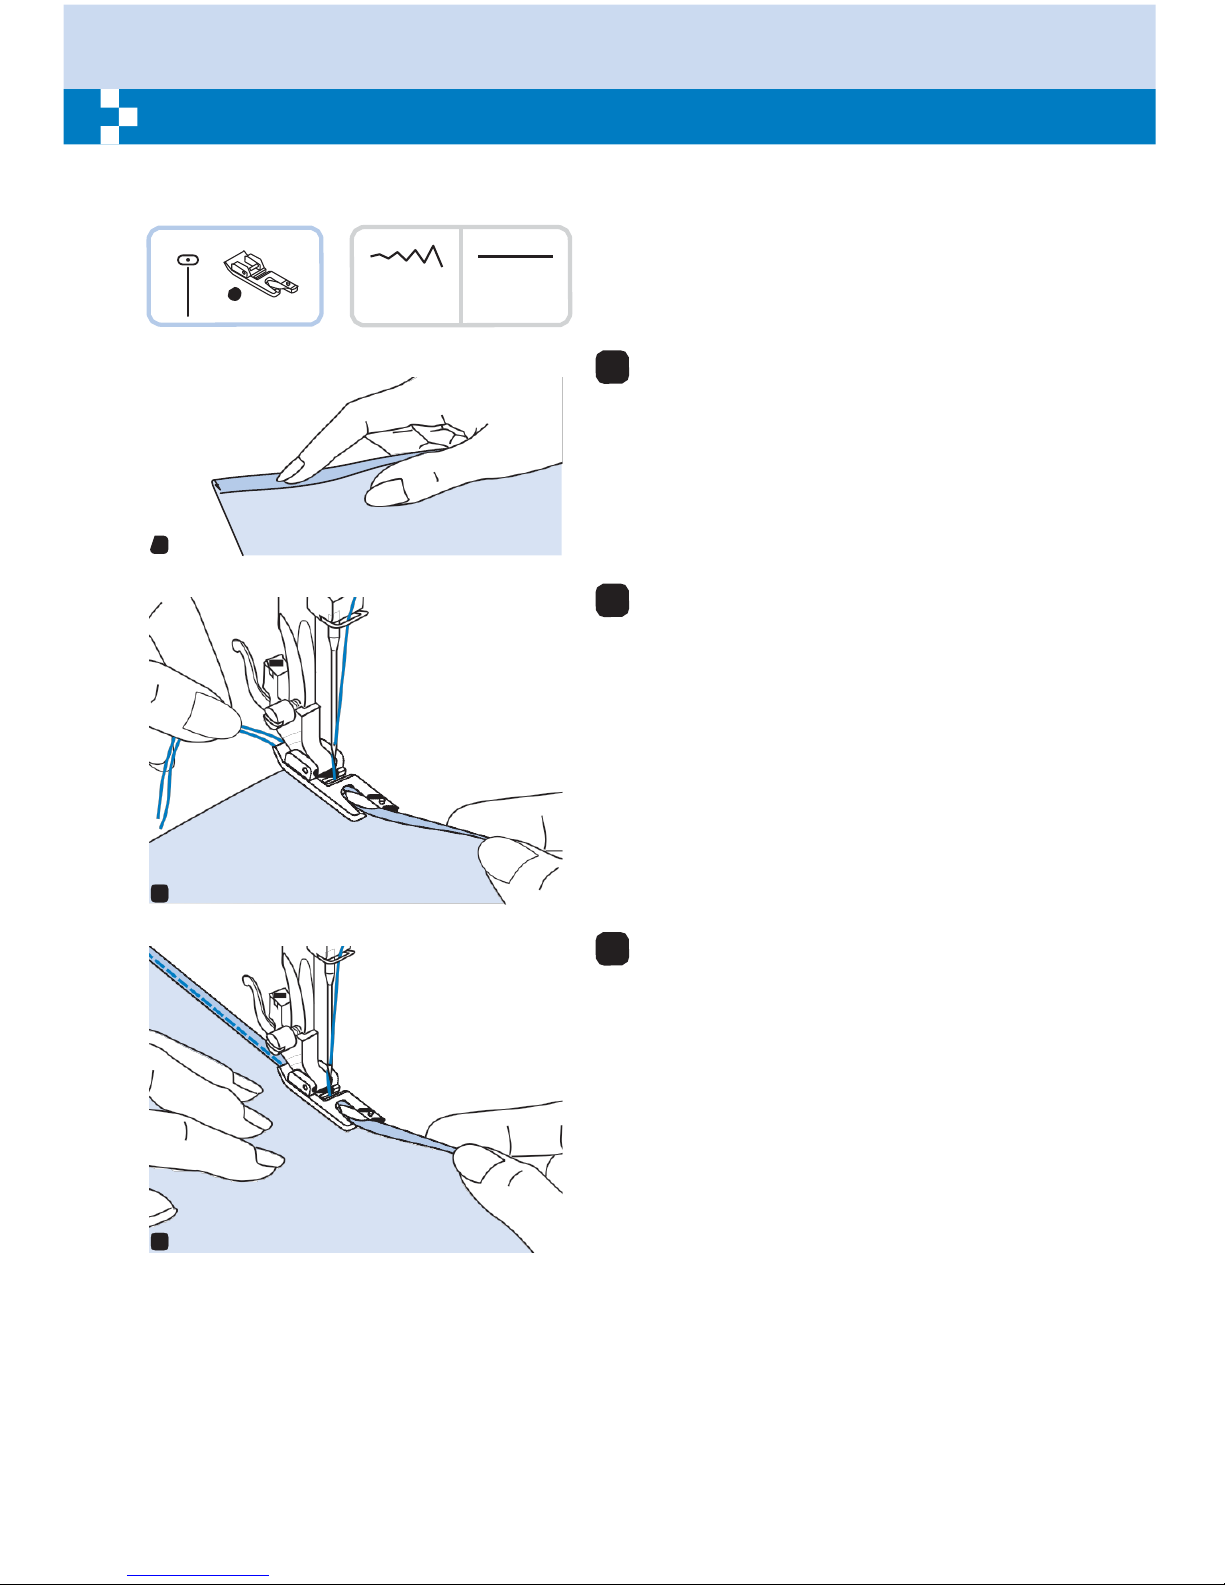
The hemmer foot is used to stitch the narrow rolled hems usually found on shirt tails, table
linens
and along the edge of
frills.
1
K
3.5 1.5~3.0
* The Hemmer foot accessory is optional. It
is not included with this machine.
1
Fold edge of fabric over about 3mm (1/8 inch),
then fold it over again 3mm (1/8 inch) for
about 5cm (2 inches) along the edge of the
fabric.
1
2
Insert the needle into the fold by rotating the
handwheel toward you, and lower the
presser foot. Sew several stitches and raise
the presser foot.
Insert the fabric fold into the spiral opening
of hemmer foot. Move fabric back and forth
until the fold forms a scroll shape.
2
3
Lower the presser foot and start sewing
slowly guiding the raw edge of the fabric in
front of the hemmer foot evenly into the
scroll of the foot.
3
Page 54
49
Cording
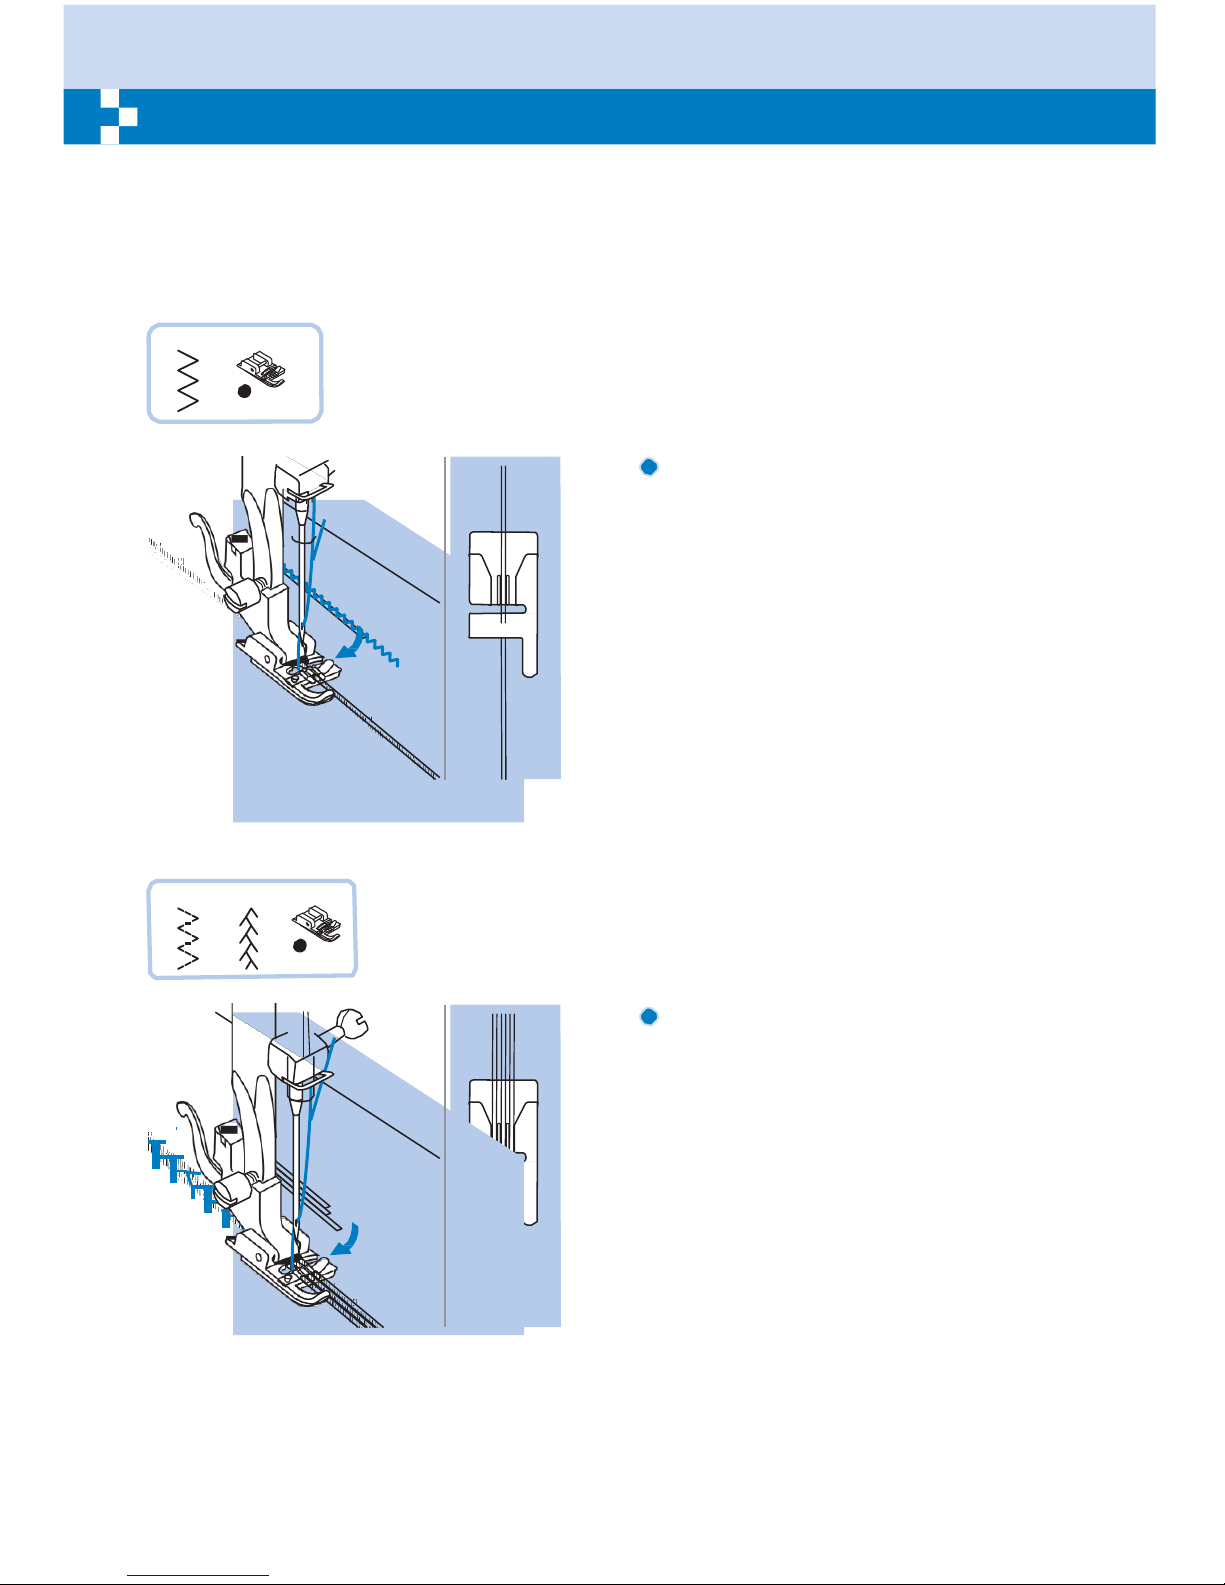
Used for
embellishing
1 to 3 cords or
decorative threads.
Sew over one strand of
cording
to create a pretty swirled design on a jacket or vest or
sew
over three strands of
cording
for border trims. Pearl cotton,
knitting
yarn,
embroidery floss,
lace thread, fine wool or lily yarn can be used for
cording.
* The cording foot accessory is optional. It is not included with this machine.
5
M
Single
cording
Mark the design on the fabric.
Insert the cord in the center groove of the
cording foot from the right side opening.
Place the cord under the grooves of the
cording foot and pull the cord about 5cm (2
inches) behind the foot.
The grooves under the foot will hold the length
of the cord in place while the stitches are being
form over the cord.
Select the stitch and adjust the stitch width so
that the stitches are just covering the cord.
Lower the foot and sew slowly, guiding the cord
over the design.
6 A-10
M
Triple
cording
Mark the design on the fabric.
Insert three cords into the grooves of the foot
from the right side opening.
Place the cord under the grooves of the
cording foot and pull the cord about 5cm (2
inches) behind the foot.
The grooves under the foot will hold the length
of the cord in place while the stitches are being
form over the cord.
Select the stitch and adjust the stitch width so
that the stitches are just covering the cord.
Lower the foot and sew slowly, guiding the cord
over the design.
Page 55
50
Satin stitch
sewing
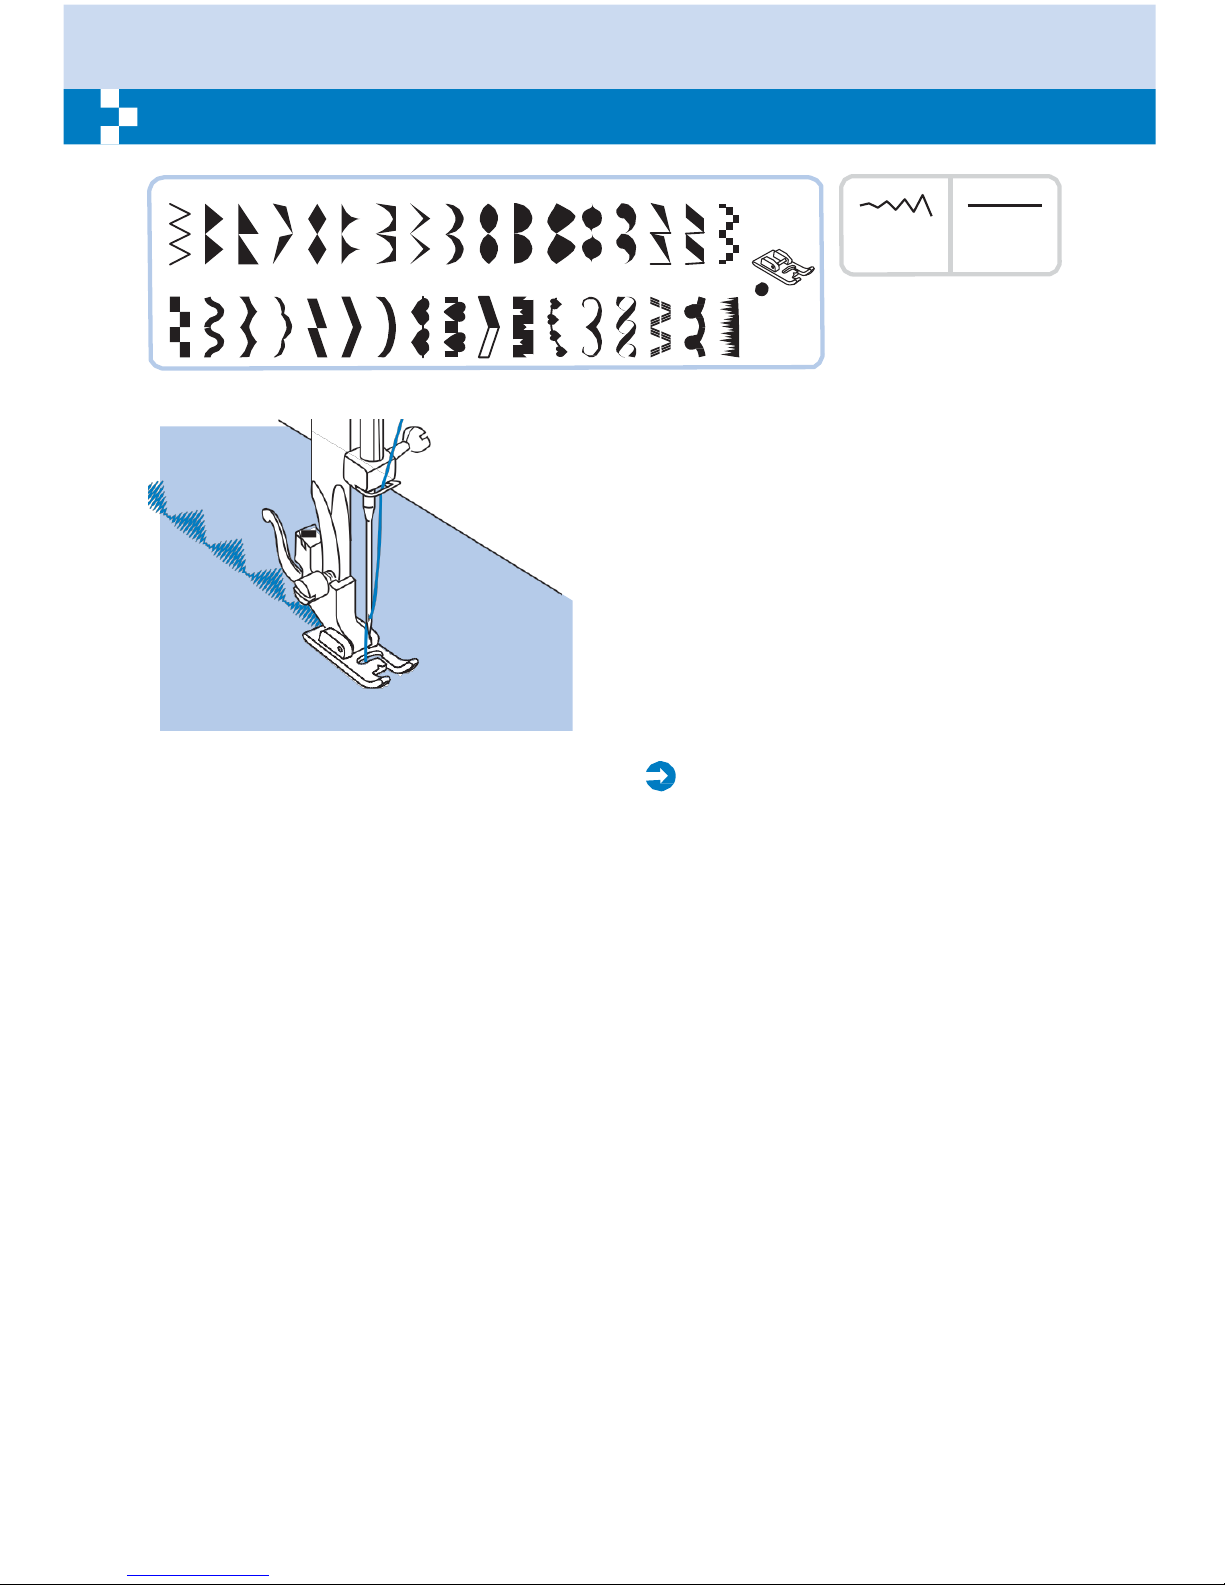
5 A-28 A-29 A-30 A-31 A-32 A-33 A-34 A-35 A-36 A-37 A-38 A-39 A-40 A-41 A-42 A-43
3. -7.0 0.
-2.0
A-44 A-45 A-46 A-47 A-48 A-49 A-50 A-51 A-52 A-53 A-54 A-55 A-56 A-57 A-58 A-59 A-60
A
Use the satin stitch foot for satin stitching
and sewing decorative stitches. This foot
has a full indentation on the underside to
allowed easy sewing over the thickness of
the stitches form by closely spaced zigzag
stitches, and even feeding of the fabric.
To tailor the satin or decorative stitch pattern,
you may adjust the length and width of the
pattern by pressing the stitch length and
width adjustment buttons. Experiment with
fabric scraps until you get the desired length
and width.
Please
Note:
When sewing very thin fabrics, it is
suggested that you use interfacing on the
backside of the fabric.
Page 56
51
Quilting
Sandwiching
batting between the top and bottom layers of fabric is call
"Quilting".
The top layer is usually formed by
multiple geometrically
shaped pieces of materials
joined
together
.
1
P
3.5 1.0~3.0
* The Quilting foot accessory is optional. It
is not included with this machine.
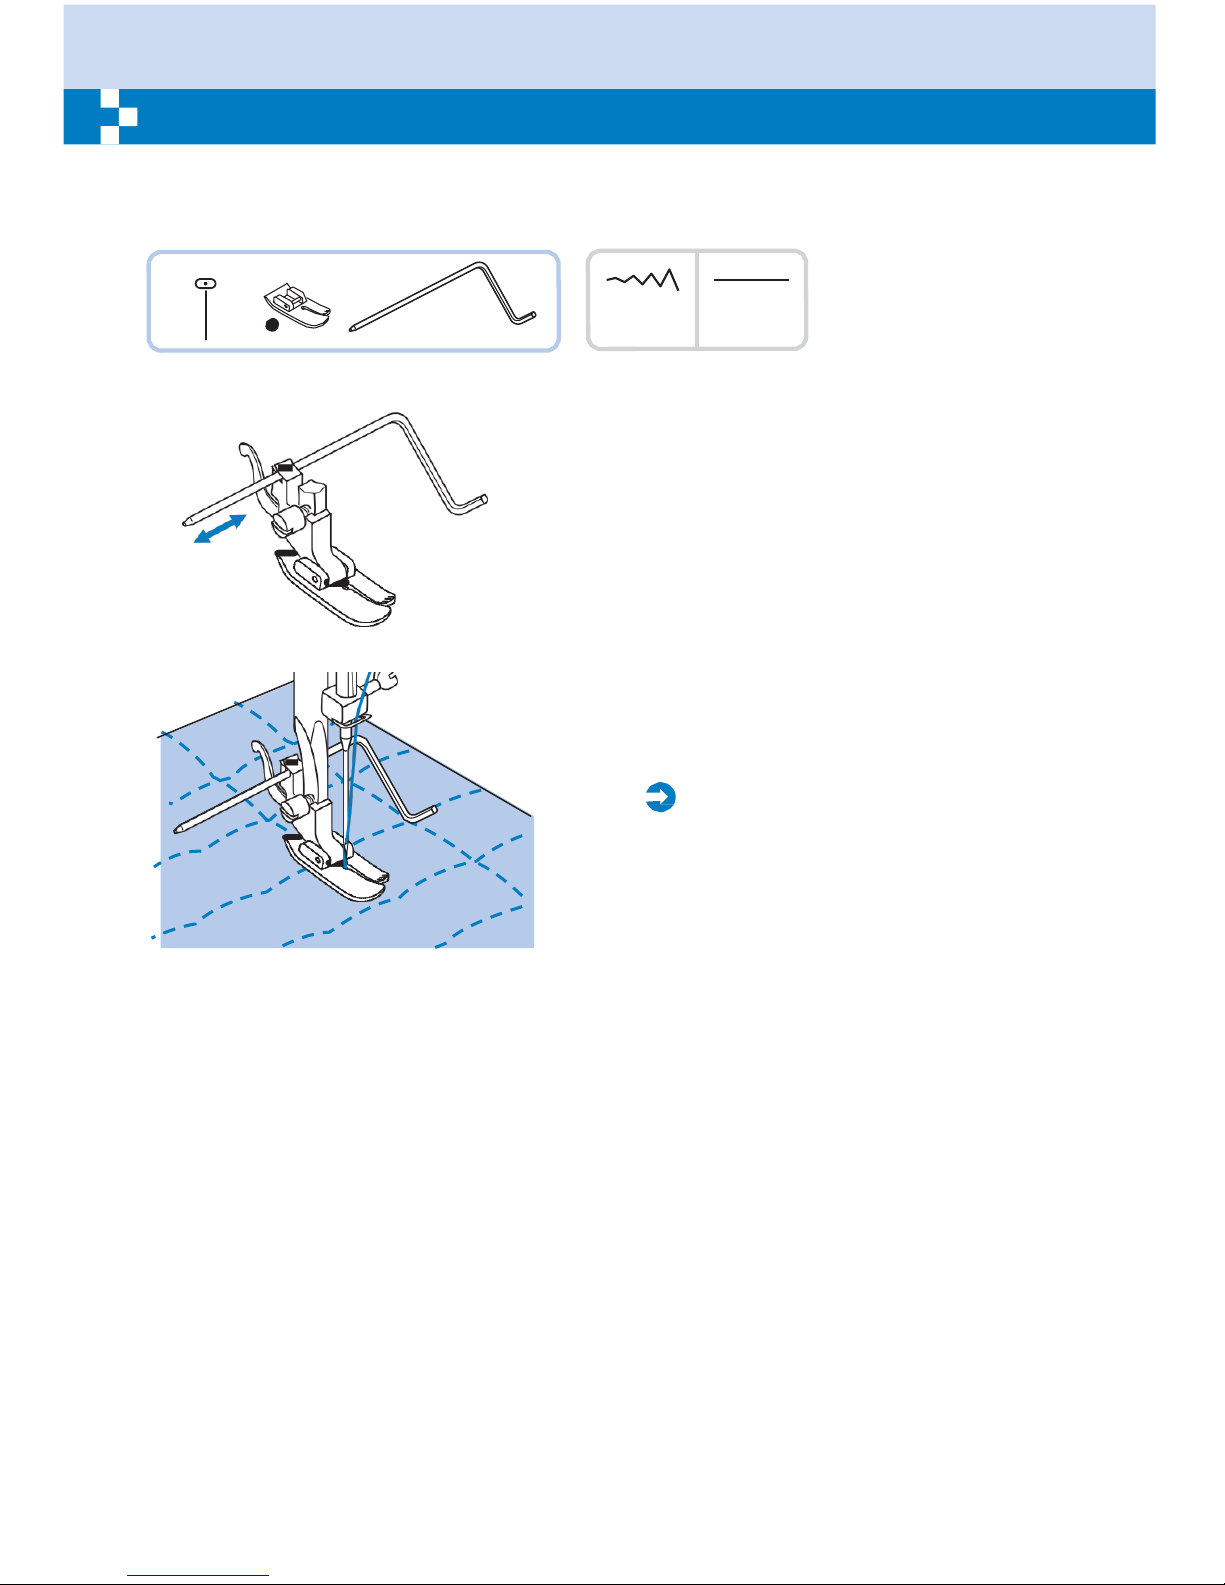
Insert the edge/quilting guide in the presser
foot holder as illustrated and set the space
as you desire.
Sew the first row and move over the fabric to
sew successive rows with the guide riding
along the previous row of stitching.
Please
Note:
When using the quilting foot, only use center
needle position stitches to prevent machine
damage.
Page 57
52
Gathering
The Gathering Foot is used for
gathering
fabrics. Ideal for
clothing
as well as home
decor
,
works best on thin to medium weight
fabrics.
1
3.5 4.5
* The Gathering foot accessory is optional. It is
not included with this machine.
Gathered
fabric
1
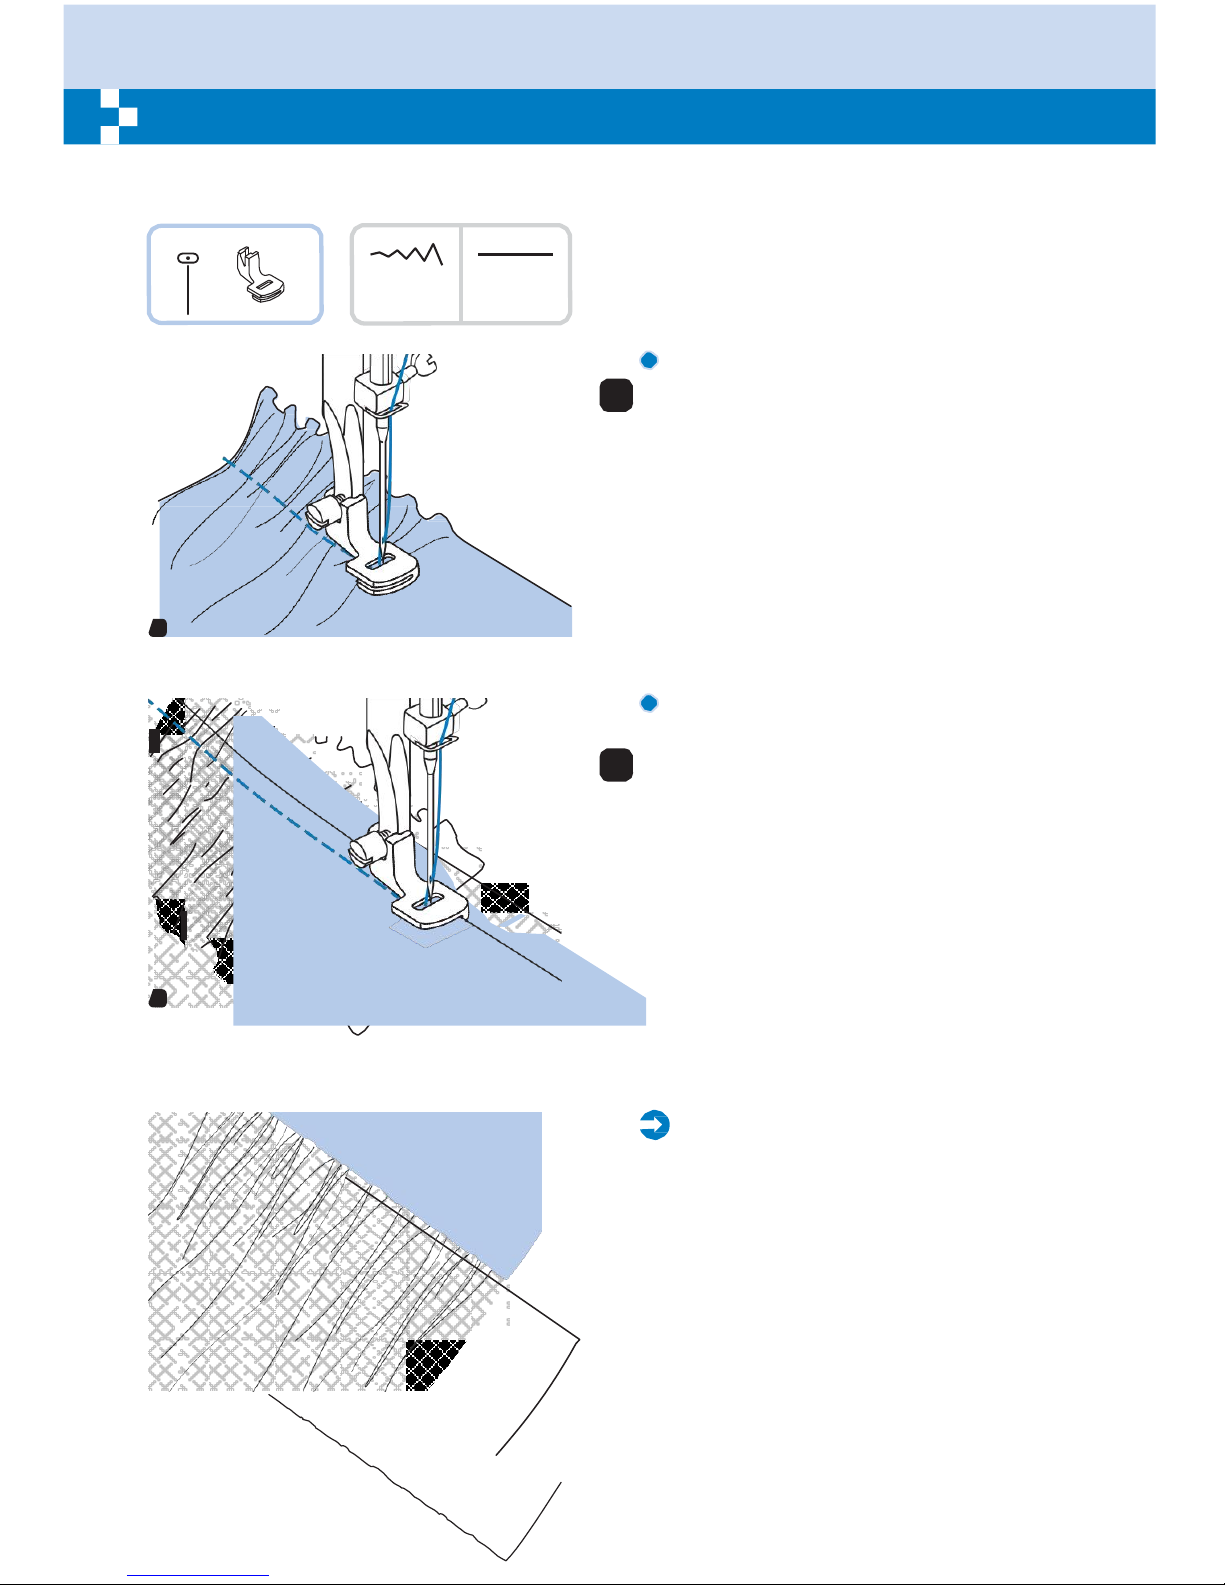
Remove the presser foot holder and attach the
gathering foot, lowering the tension setting to
below 2.
Place fabric to be gathered under presser foot
to the right of the presser foot.
Sew a row of stitching, keeping the raw edge of
fabric aligned with the right edge of foot. The
stitches automatically cause the fabric to gather.
Suitable for light to medium weight fabrics. If
1
your fabric is light, such as batiste or lace, you
will have more gathers.
To gather and attach gathered fabric
in
one
step
2
Look closely at the gathering foot to see a slot
on the bottom.
When using the slot, you can gather the bottom
layer of the fabric while attaching it to a flat top
layer, such as the waistband on a dress bodice.
- Remove the presser foot holder and attach
gathering foot.
- Place the fabric to be gathered with right side
up under the foot.
2
- Place top layer of the fabric right side down in
the slot.
- Guide the two layers as illustrated.
Please
Note:
- When testing machine for adjustments to
achieve desired fullness, work with 10"
increments of the fabric, trims or elastic. This
makes it easier to determine the adjustments
and how much change is needed for your
project. Always test on your project fabric and
on the same grainline as will be used in your
finished project.
- Sew slow to medium speed for better fabric
control.
Page 58
53
Smocking
The
decorative
stitch created by
stitching
or
embroidering
over gathers is called
"smocking". It
is used to decorate the front of blouses or cuffs. The
smocking
stitch adds texture
and
elasticity
to
fabric.
A-09 A-10
T
A
1
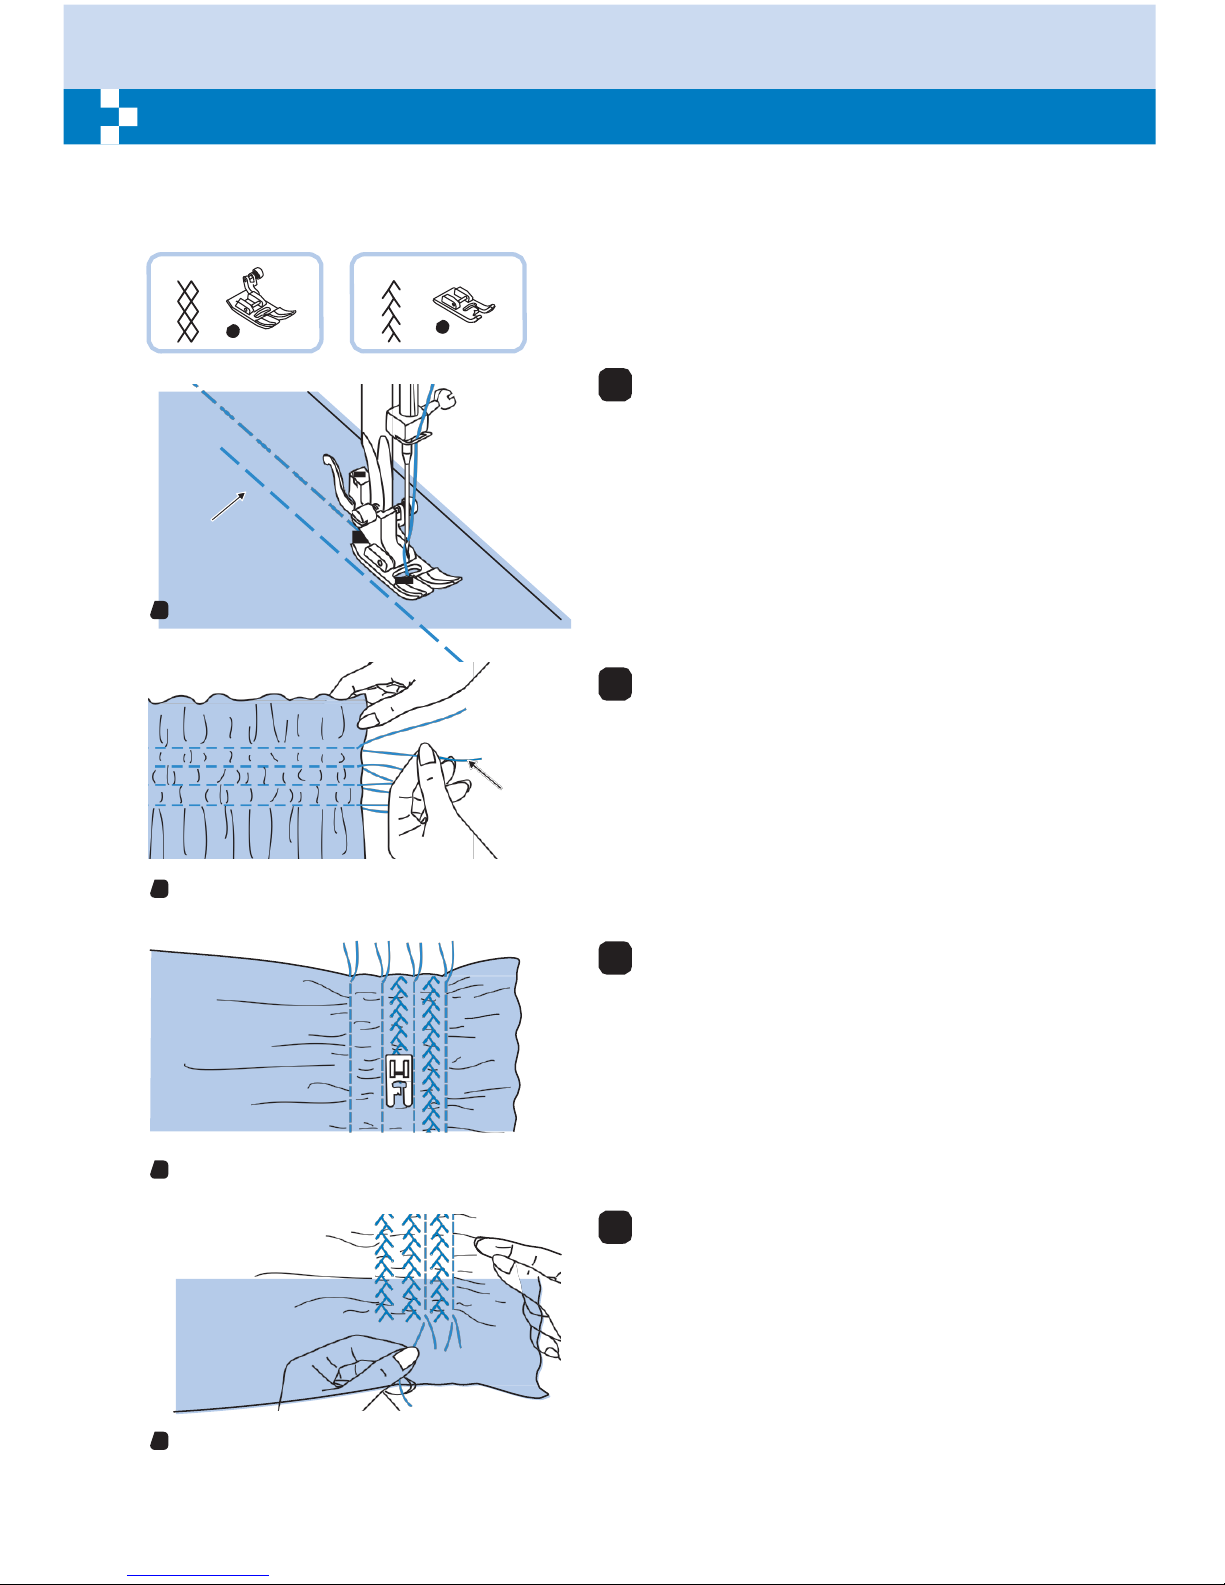
Use the all purpose foot to sew basting lines
1cm (3/8 inch) apart, across the area to be
smocked.
Basting
1
2
Knot the threads along one edge.
Pull the bobbin threads and distribute the
gathers evenly. Secure the threads at the
other end.
Bobbin
thread
2
3
Reduce the tension, if necessary and sew
decorative pattern stitches between the
straight seams.
3
4
Pull out the basting.
4
Page 59
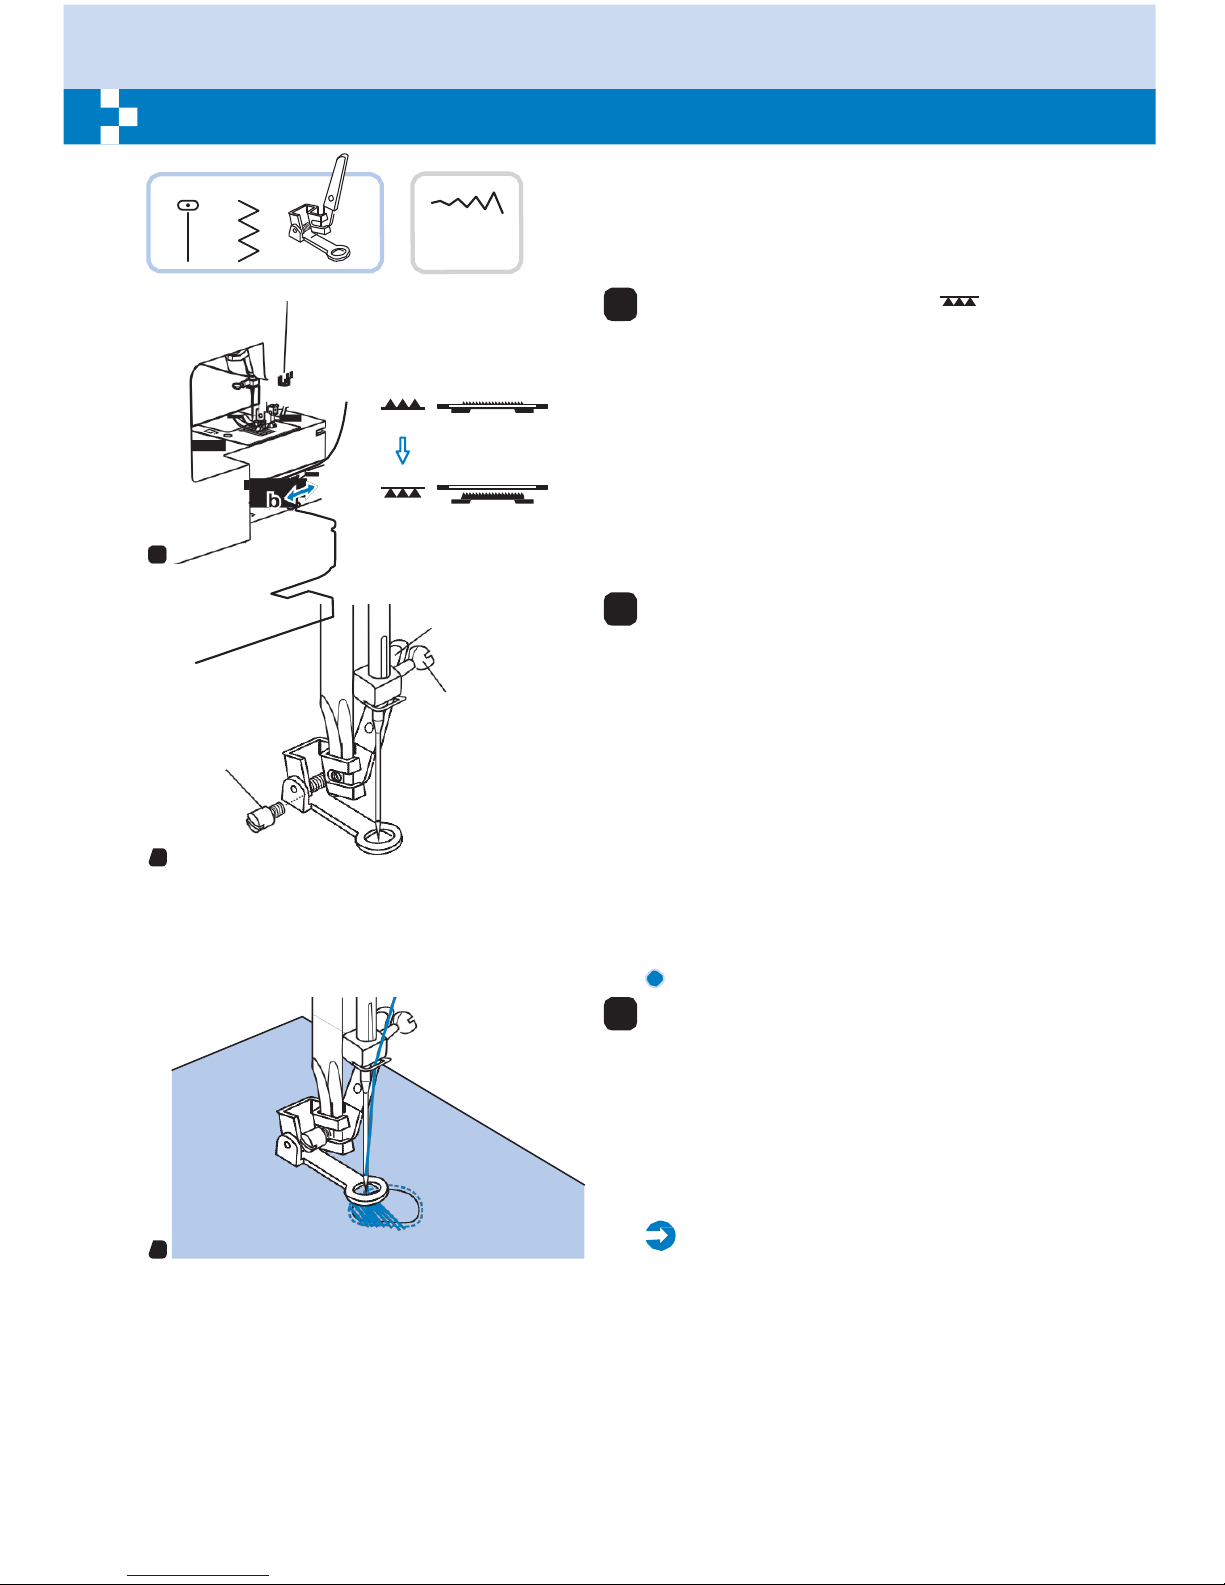
54
Free motion darning,
embroidery
and
monogramming
1 5
3.5~5.0
* The Darning/ Embroidery foot accessory is
optional. It is not included with this
machine.
1
Move the drop feed control to " " to lower
the feed dogs.
a
a b
1
2
Remove the presser foot holder, and attach
a
the darning foot to the presser foot holder bar.
The lever (a) should be behind the needle
clamp screw (b). Press the darning foot on
b
firmly from behind with your index finger and
tighten the screw (c).
c
2
Darning
3
First sew around the edges of the hole (to
secure the threads). Working from left to
right, sew over the hole in a constant and
continuous movement.
Turn the work by 1/4 and sew over the first
stitching moving the work slower over the
hole to separate the threads and not form
big gaps between the threads.
3
Please
Note:
Free motion darning is accomplished without
the sewing machine internal feed system.
Movement of the fabric is controlled by the
operator. It is necessary to coordinate sewing
speed and movement of fabric.
Page 60
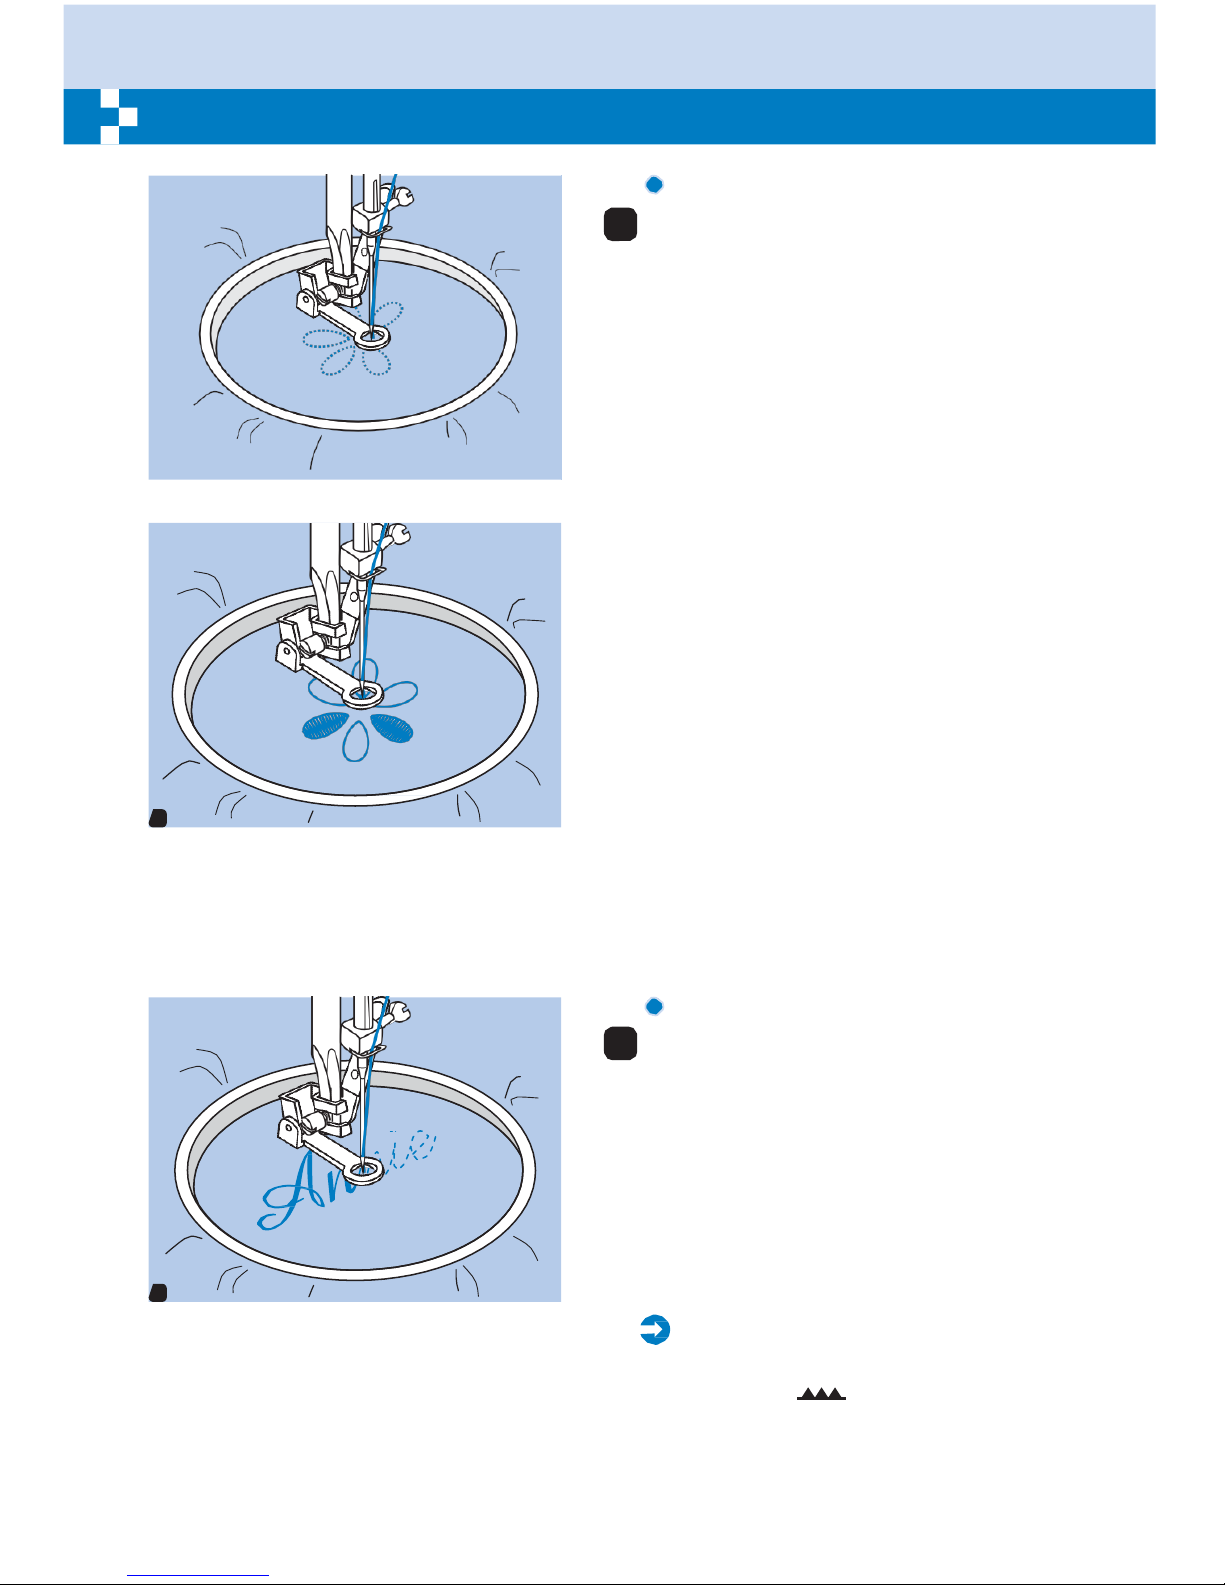
55
Free motion darning,
embroidery
and
monogramming
Embroidery
4
Select zigzag stitch pattern and adjust the
stitch width as desired.
Stitch along the outline of the design by
moving the embroidery hoop. Make sure to
maintain a constant speed.
Fill in the design working from the outline
towards the inside. Keep the stitches close
together.
You will get longer stitches by moving the
hoop faster and shorter stitches by moving
the hoop more slowly.
Secure with a reinforcement stitches at the
end by press Auto-lock button.
4
Monogramming
5
Select the zigzag stitch pattern and adjust
the stitch width as desired. Sew at a constant
speed, moving the hoop slowly along the
lettering.
When the letter is finished. Secure with a
reinforcement stitches at the end by press
Auto-lock button.
* Embroider hoop is not included with the
5
machine.
Please
Note:
When you finish the work, move the drop
feed control to " " to raise the feed dogs.
Page 61
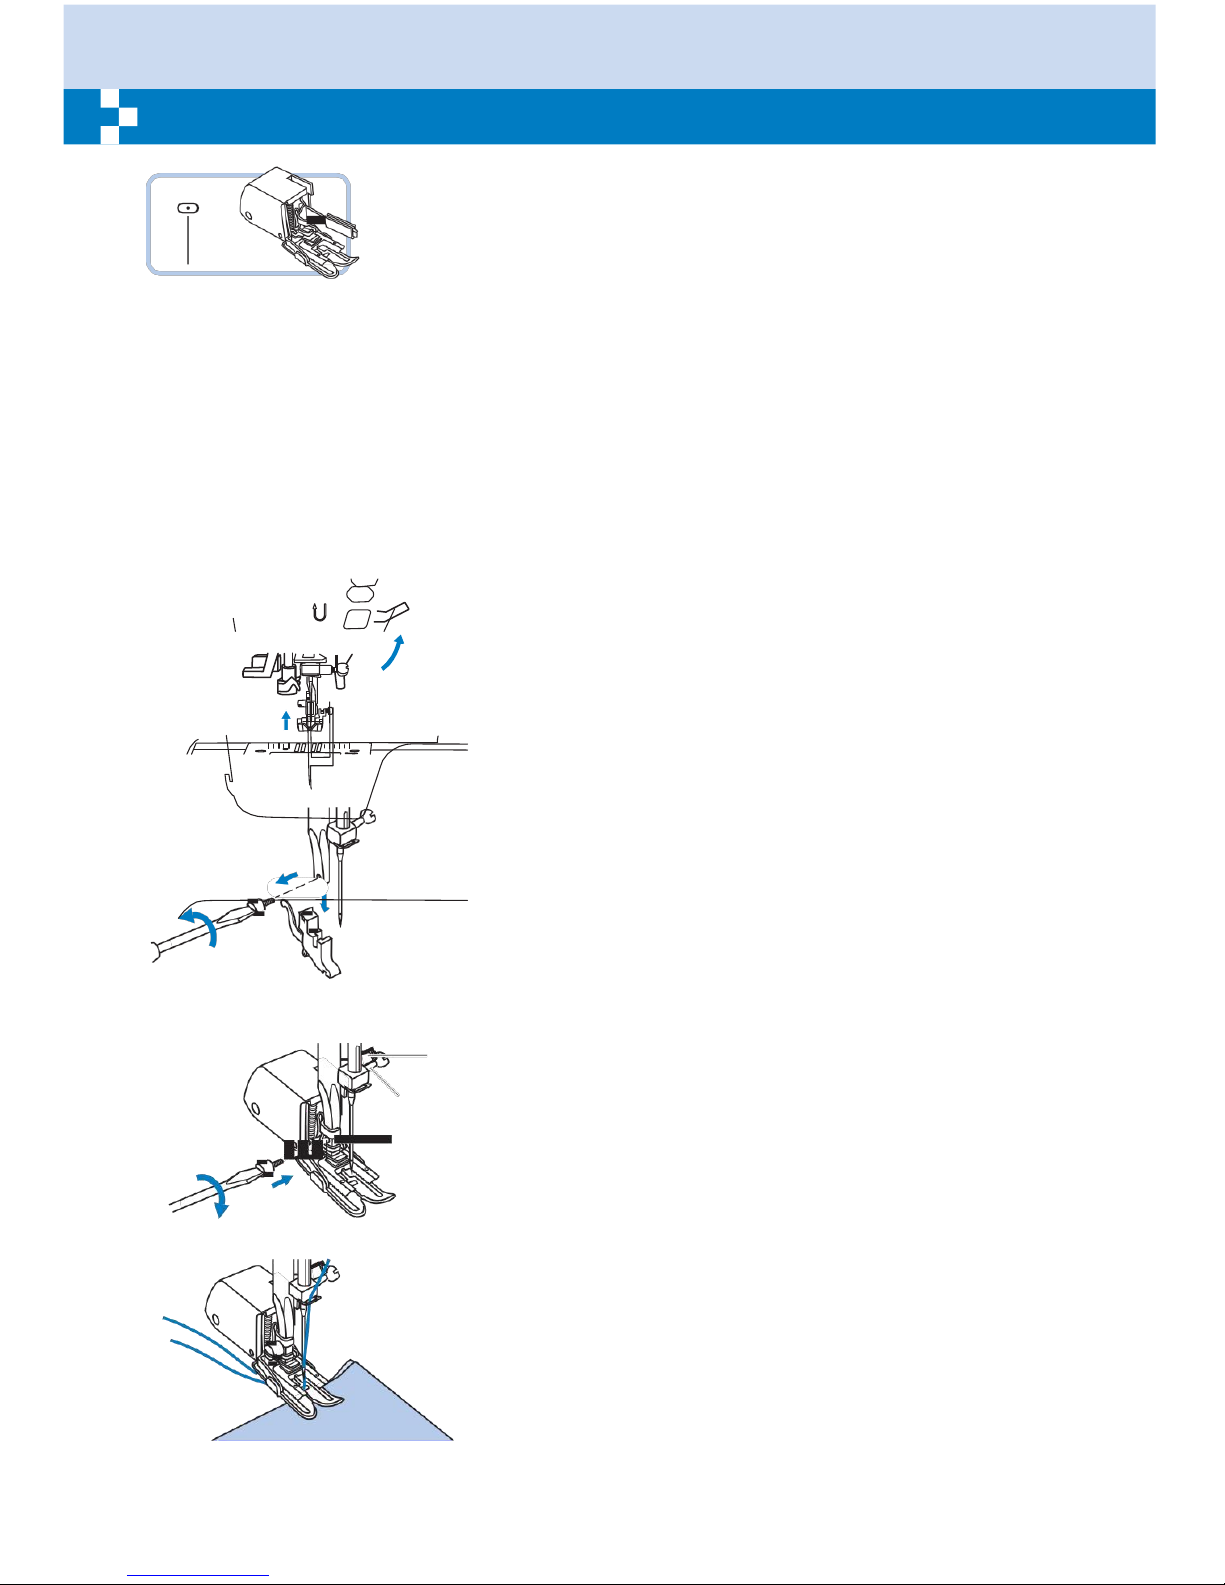
56
Walking
foot
1
* The walking foot accessory is optional. It is not included
with this machine.
Always try to sew first
without
the walking foot
accessory
which should be used
only
when
necessary
.
It is easier to guide the fabric and you have a better view of the seam when using the standard,
regular foot on your machine.
Your sewing machine offers excellent stitch quality on a wide range of fabrics from delicate chiffons
to multiple layers of denim.
The Walking Foot accessory equalizes the feeding of the upper and lower layers of fabric and
improves the matching of plaids, stripes and patterns. It also helps to prevent uneven feeding of
very difficult fabrics.
Lift the presser foot lifter to raise the presser foot bar.
Remove the presser foo t holder by unscrewing
(counterclockwise) the presser bar attaching screw.
a
Attach the Walking Foot to the machine as follows:
- The arm (a) should fit into above the needle screw and
b
clamp (b).
c
- Slide the plastic attaching head (c) from your left to right
so that it is fitted into the presser foot bar.
- Lower the presser foot bar.
- Replace and tighten (clockwise) the presser bar
attaching screw.
- Make sure both the needle screw and the presser bar
attaching screw are tightly secured.
Draw the bobbin thread up and place both the bobbin
thread and the needle thread behind the walking foot
attachment.
Page 62
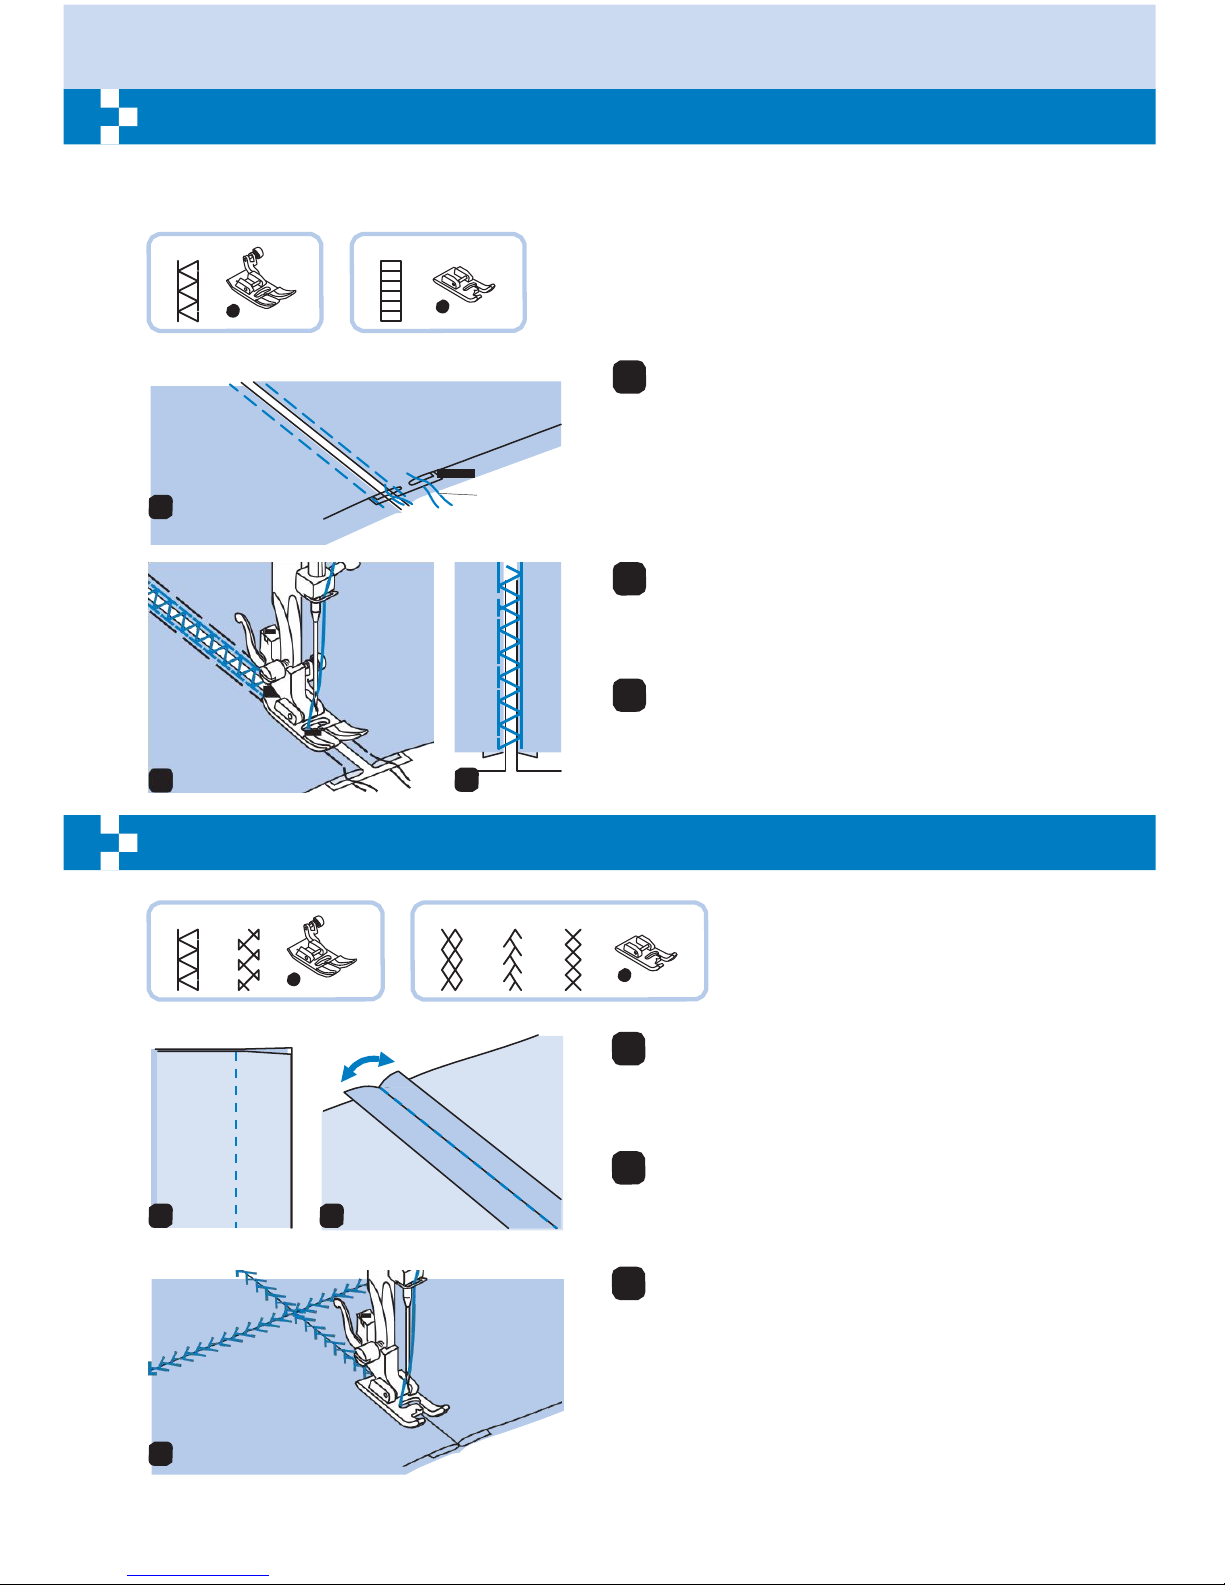
57
Fagoting
Stitching
across an open seam is called
"fagoting".
It is used on blouses and
children's
clothing.
This stitch is more
decorative
when thicker thread is
used.
A-08 A-06
T
A
Thin paper
1
Basting
1
Separate the folded edges of the fabric
pieces with a gap of 4mm (1/8 inch) and
baste them onto a piece of thin paper or
water-soluble stabilizer sheet.
2
Align the center of the presser foot with the
center of the two pieces of fabric and begin
sewing.
3
After sewing, remove the paper.
2
3
Patchwork
stitching
A-08 A-86 A-09 A-10 A-61
T
A
1
Place the two pieces of fabric with the right
side together and sew with the straight stitch.
2
Open the seam allowances and presses it
flat.
1
2
3
Place the center of the presser foot on the
seam line of the joined pieces of fabric and
sew over the seam.
3
Page 63
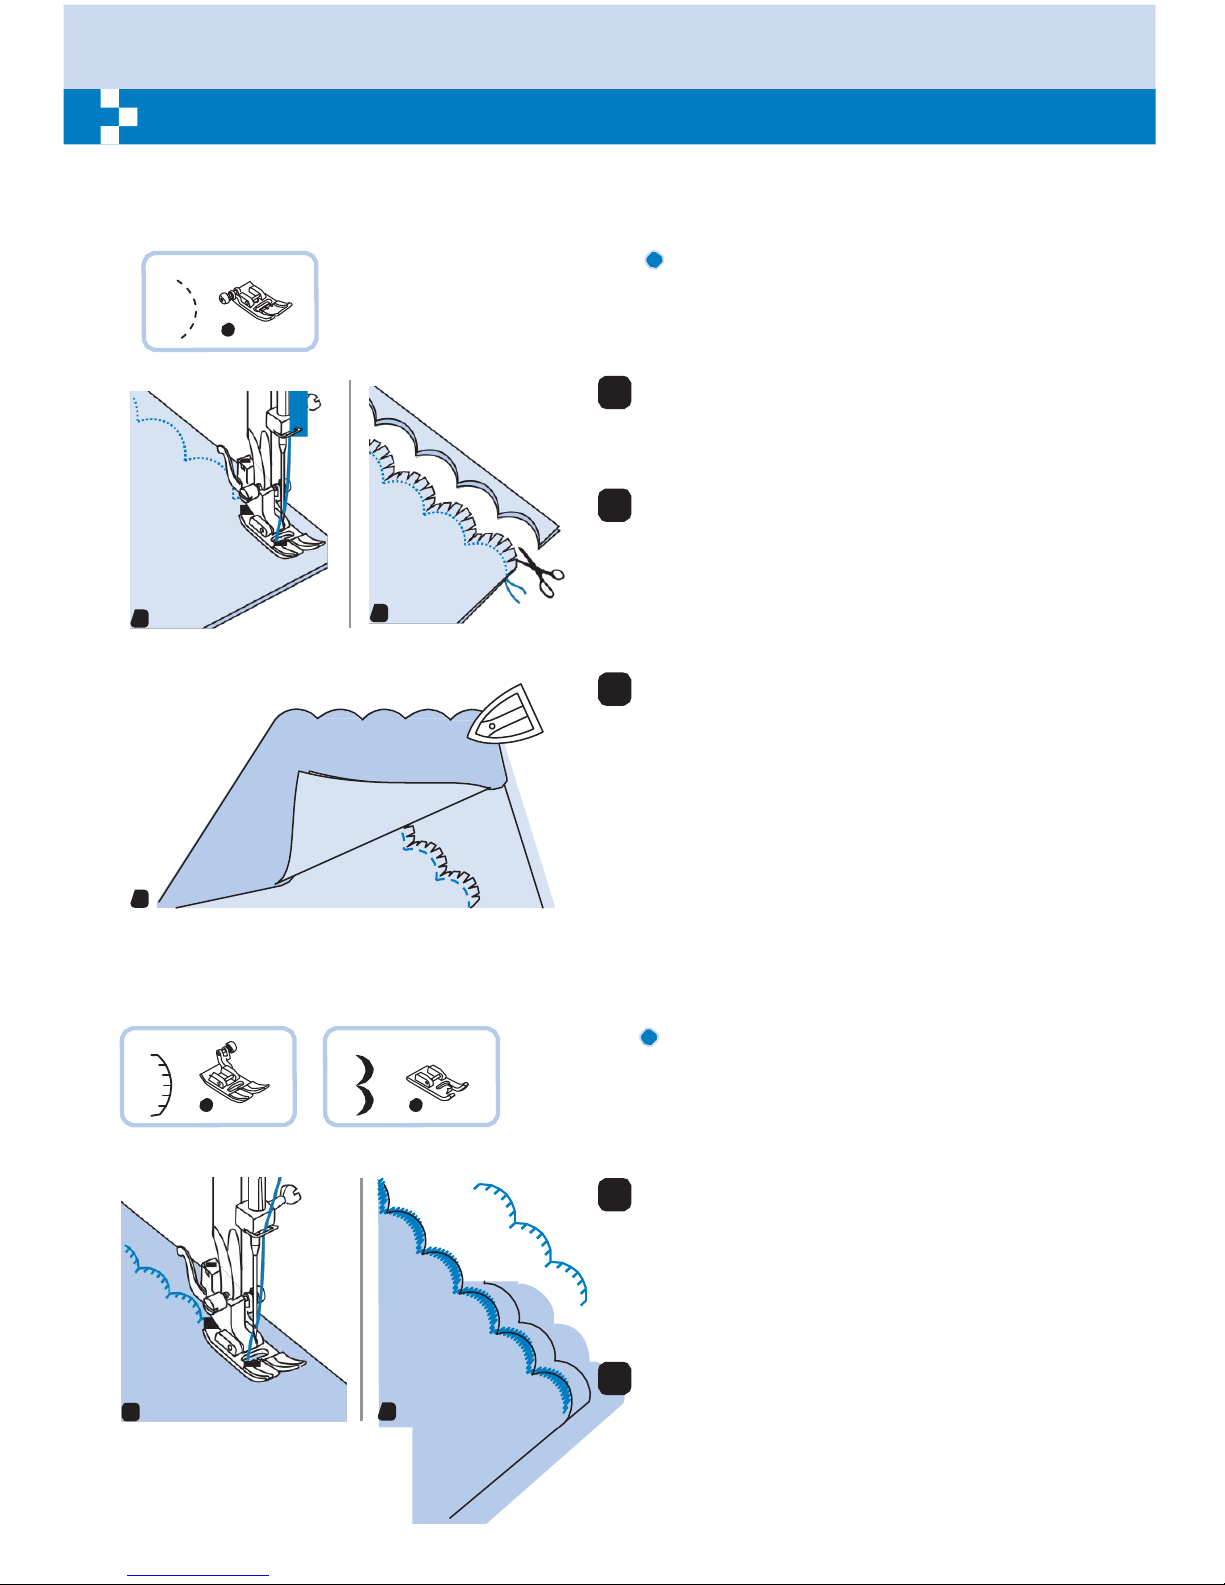
58
Scalloping
The wave-shaped repeating pattern that looks like shells is called
"scalloping".
It is used
on
the collars of blouses and to decorate the edges of
projects.
A-12
Scallop
hem
T
1
Fold the fabric right side together in and sew
along the edge.
Wrong
side
of
fabric
1
2
2
Cut the fabric along the seam leaving an
allowance of 3mm (1/8 inch) for seaming.
Notch the allowance.
3
Turn the fabric over and push out the curved
seam to the surface and iron it.
3
A-13 A-35
Scallop
edging
T
A
1
Stitch along the edge of the fabric, making
sure not to sew directly on the edge of the
fabric.
* For better results, apply spray starch
onto the fabric and press with a hot iron
before it is sewn.
1
Trim along the stitches.
1
2
* Be careful not to cut the stitches.
Page 64
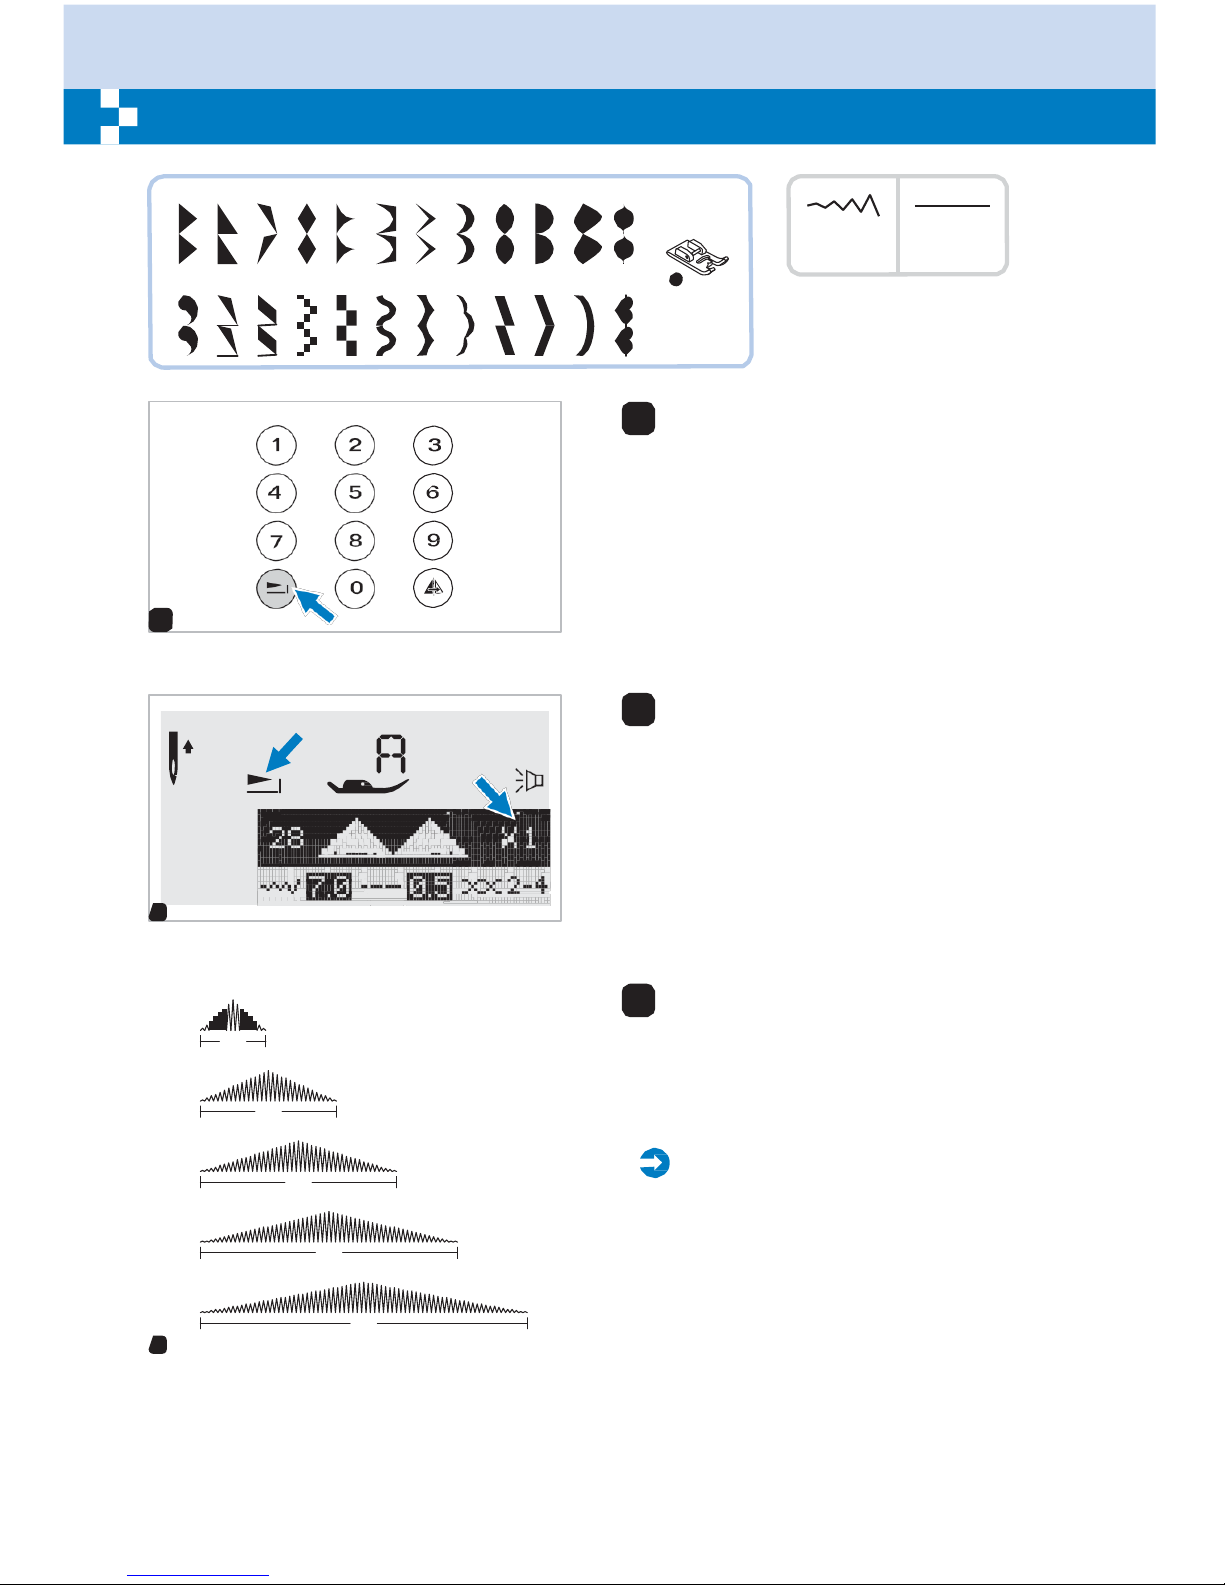
59
Elongation
A-28 A-29 A-30 A-31 A-32 A-33 A-34 A-35 A-36 A-37 A-38 A-39
A-40
A-41
A-42
A-43
A-44
A-45
A-46
A-47
A-48
A-49
A-50
A-51
A
2. -7.0 0.3- .0
1
1 The stitches shown in the diagram above
can be elongated up to five times the
normal length by pressing the elongation
button.
1
2
2 The LCD screen icon for elongation
imaging of the pattern appears.
2
x1 Normal
length
3
3 When the width or length of the stitch is
changed, a greater variety of the selected
pattern is available.
x2
Please
Note:
x3
Patterns from A Group 28-51 can be
elongated and mirrored simultaneously.
x4
x5
3
Page 65
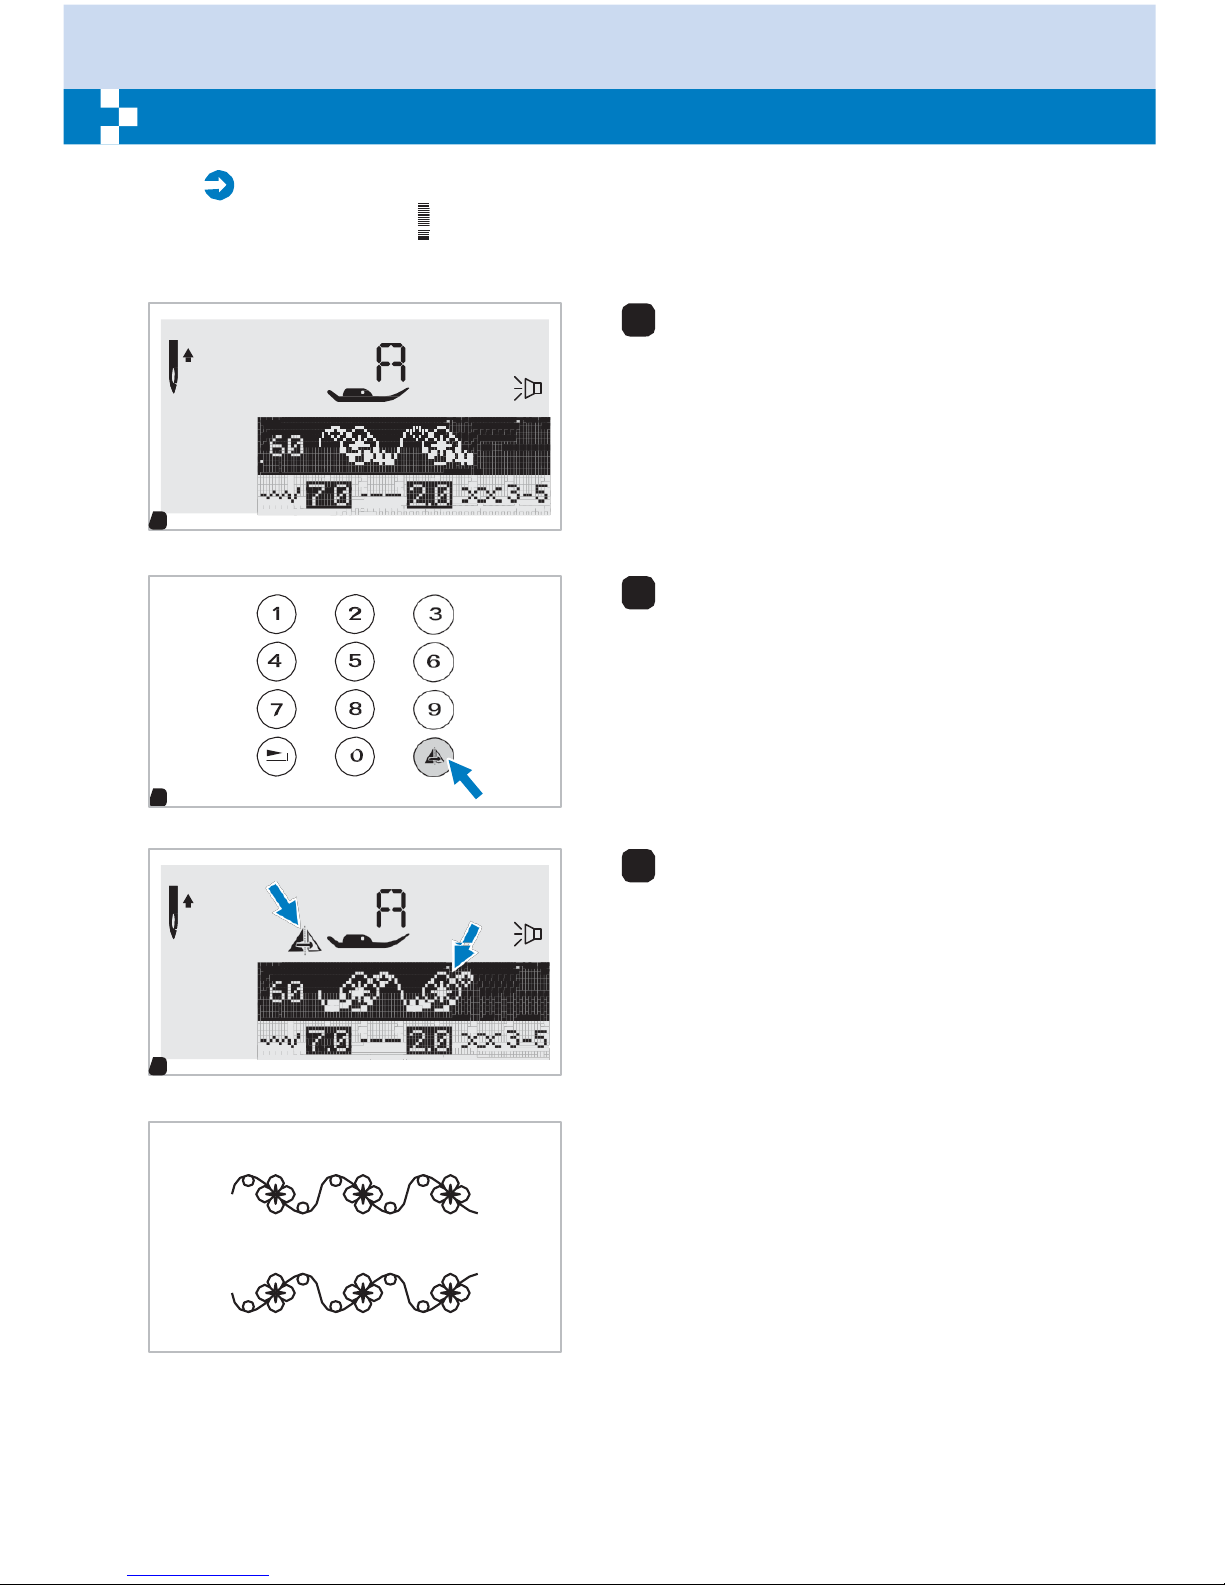
60
Mirror
image
Please
Note:
- The Direct Patterns " " and A Group Patterns 14-27 cannot be mirror imaged.
- Mirror imaged patterns can also be combined with other patterns.
1
1 Select the pattern.
1
2
2 Pressing the mirror button.
2
3
3 The LCD screen icon for mirror imaging of
the pattern appears.
3
A. Normal pattern sewing.
A
B. Mirror pattern sewing.
B
Page 66
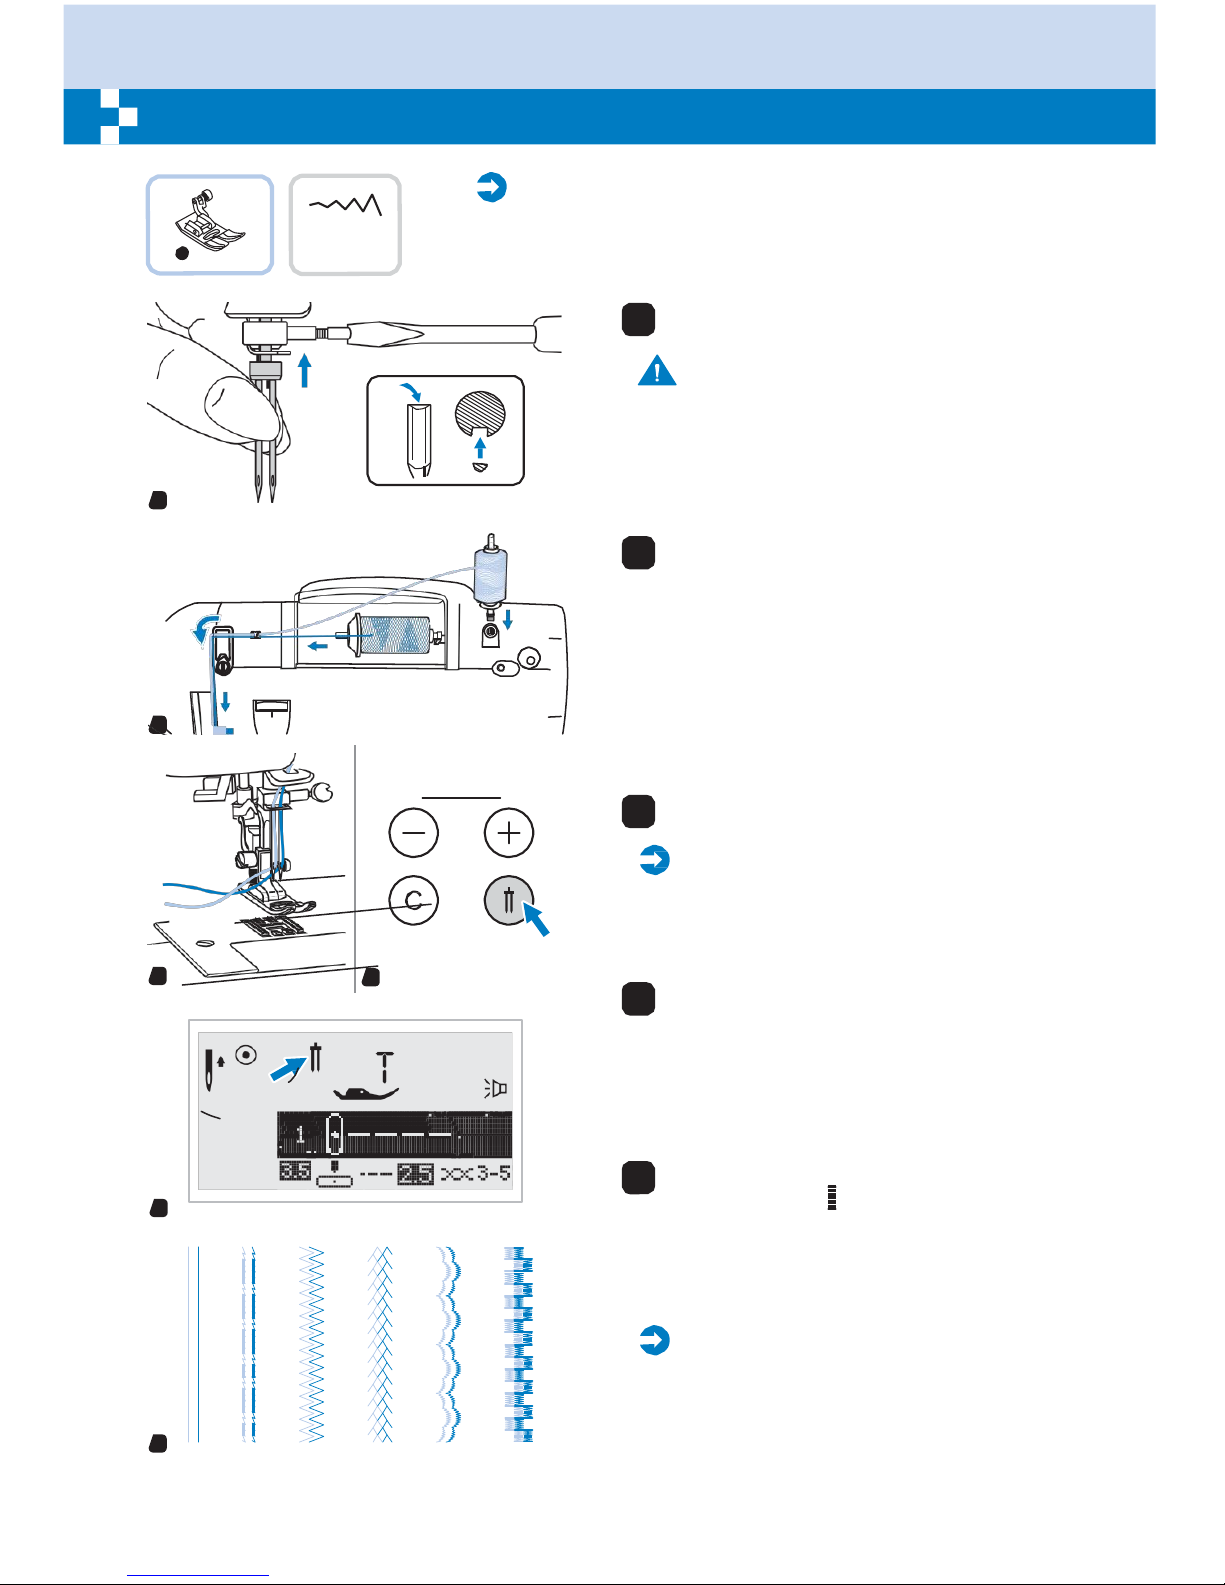
61
Using the twin
needle
T
2.0- .0
Please
Note:
When using twin needles, use the " T " presser foot regardless
of what kind of sewing will be carried out.
1
1 Insert the twin needle.
Attention:
When using twin needles, use the all purpose
foot (T) regardless of what kind of sewing foot
will be carried out.
Use only twin needle assemblies with max.
1
2mm needle distance.
2
2 Follow the instructions for single-needle
threading using the horizontal spool pin.
Thread through the left needle.
Set the second spool pin (included with
the accessories) into the hole on the top
of the machine. Thread through remaining
points, making certain to omit the thread
2
guide above the needle and pass thread
through the right needle.
3
3 Thread each needle separately.
Please
Note:
Make sure that the two threads used to
thread the twin needle are of the same
weight. You can use one or two colors.
3
4
4
4 Press the Twin needle button, and the
machine automatically reduces the
maximum width for twin needle sewing.
6
6 Select a pattern and start to sew. Except the
5
Direct patterns " " and A Group patterns
14-27, the other patterns can be used.
Two lines of stitching are sewn parallel to
each other.
Please
Note:
When sewing with twin needle, always
proceed slowly, and make sure to maintain a
6
6
6
low speed to insure quality stitching.
Page 67
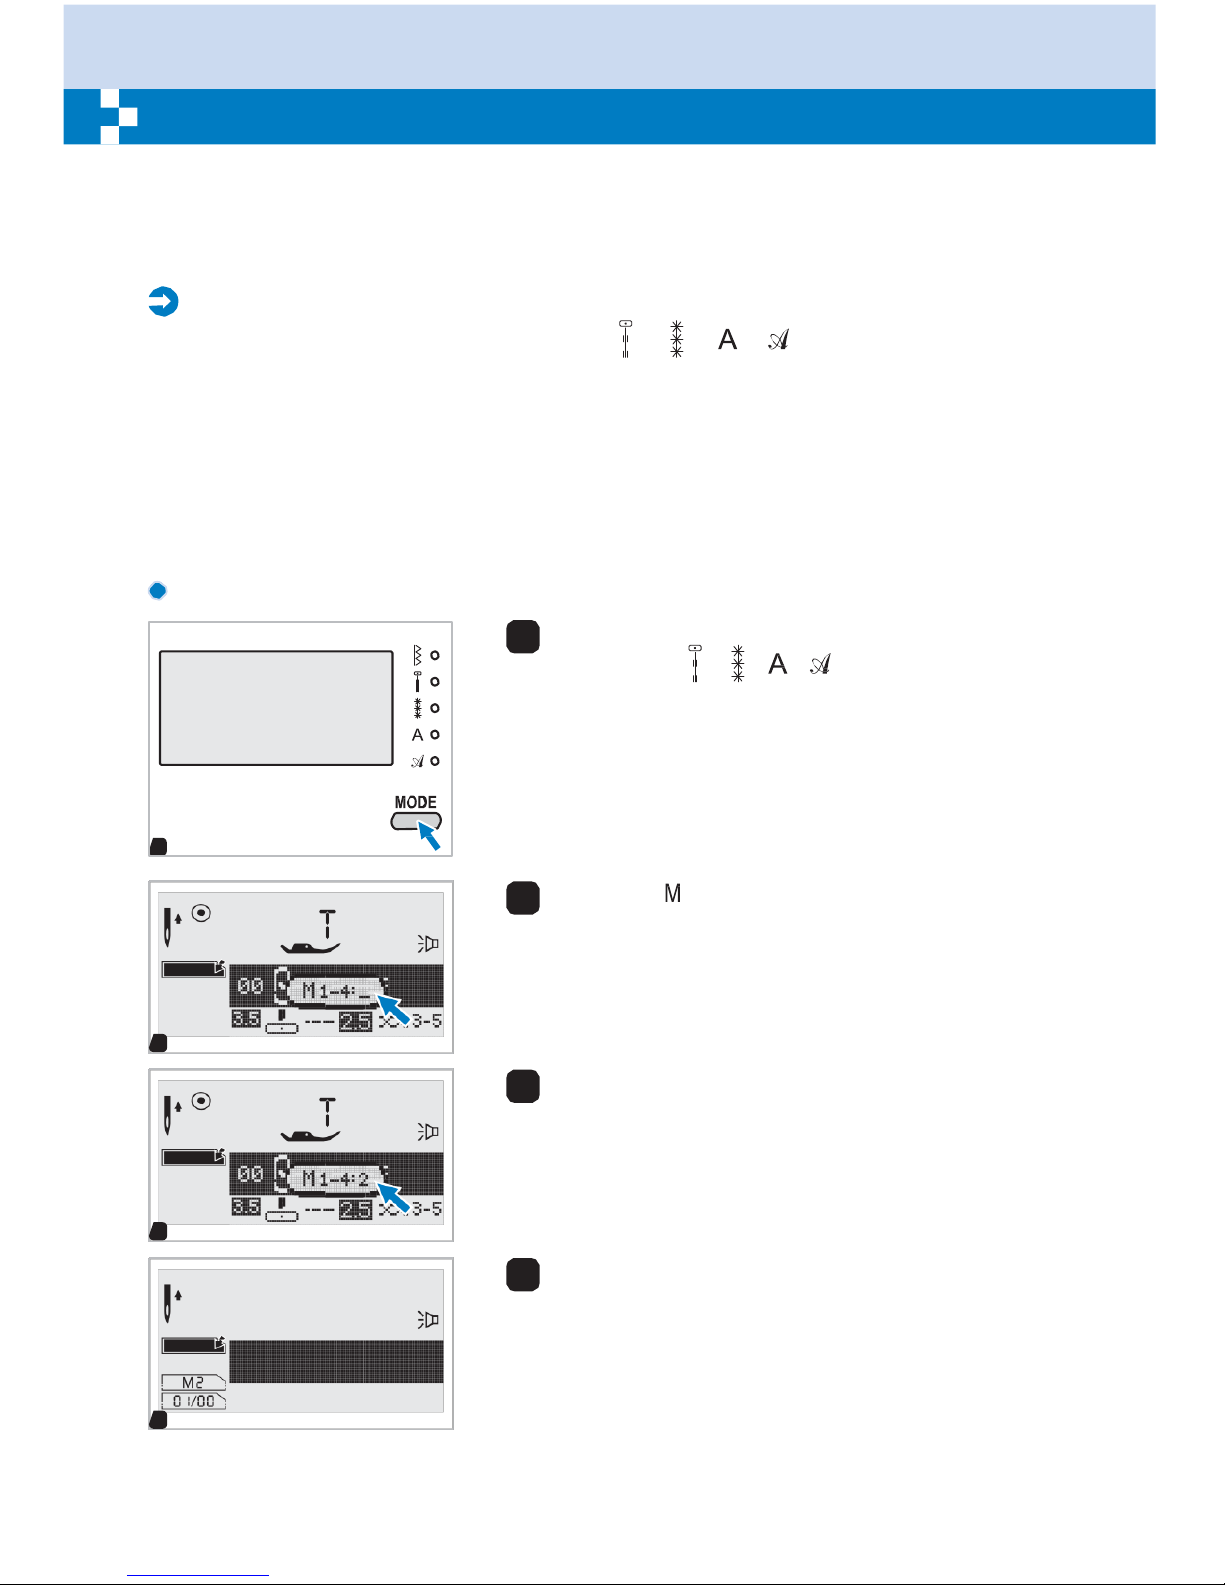
62
Memory
Combined patterns can be stored for later use. Since stored patterns are not lost after the sewing
machine is turned off, they can be recalled at any time. This is convenient for patterns such as
names, which may be used frequently.
Please
Note:
- Multiple patterns selecting from pattern modes , , , can be combined and sewn
together.
- This machine has 4 modules of program memory and each module can retain 20 units of stitches.
- The Direct mode patterns and the A Group Patterns 14-27 cannot be entered into memory.
- All the units in the memory can be edited to set its function such as Stitch length, Stitch width,
Elongation, Mirror, and Auto-lock.
Combining
patterns or
letters
1
Press " MODE " button to select any desired pattern
group among , , , on front cover.
The LED will indicate the selected group.
1
2
Press the " " button to open the memory mode and
then appears a sub-screen in the center. It is available
to select the number of the memory module when the
M
cursor start flashing.
2
3
Press number of memory module. (e.g. 2)
M
3
4
The memory screen appears automatically.
M
4
Page 68
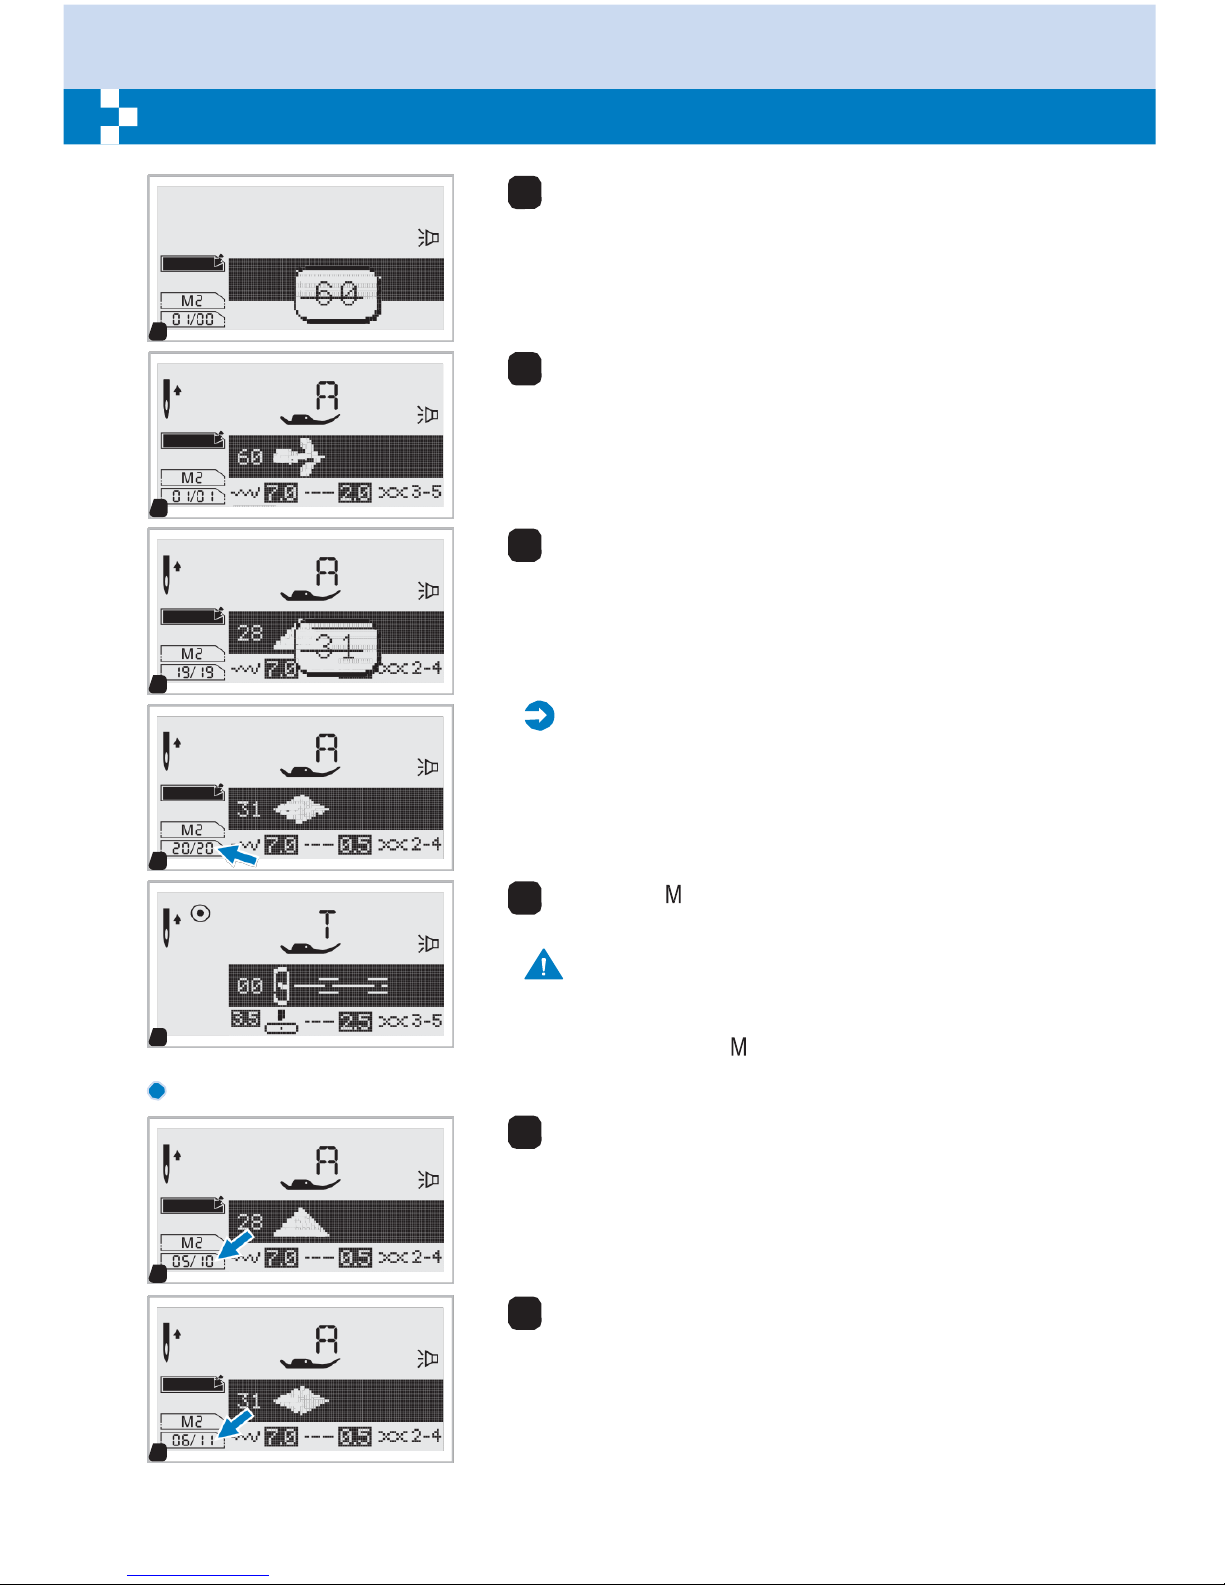
63
Memory
5
Press the desired pattern number. (e.g. 60)
M
5
6
The selected pattern displays on the LCD screen.
M
6
6
6
7
Repeat step 5, 6 for more patterns to be stored in the
memory.
M
7
7
7
Please
Note:
When the memory the full with 20 units of patterns,
the machine will beep to signal it.
M
7
8
9
Press the " " button to leave the memory mode and
return to the normal screen.
7
9
Adding patterns or
letters
M
Attention:
The selected pattern will be cleared from the
memory module after closing the machine if you do
not press the " " button again when you have
completed your selection.
1
While in the memory mode, press stitch width
adjustment button until the stitch number you have
selected is displayed, then add the new stitch.
1
2
Press pattern No. (e.g. 31) The selected pattern will be
inserted.
M
2
Page 69
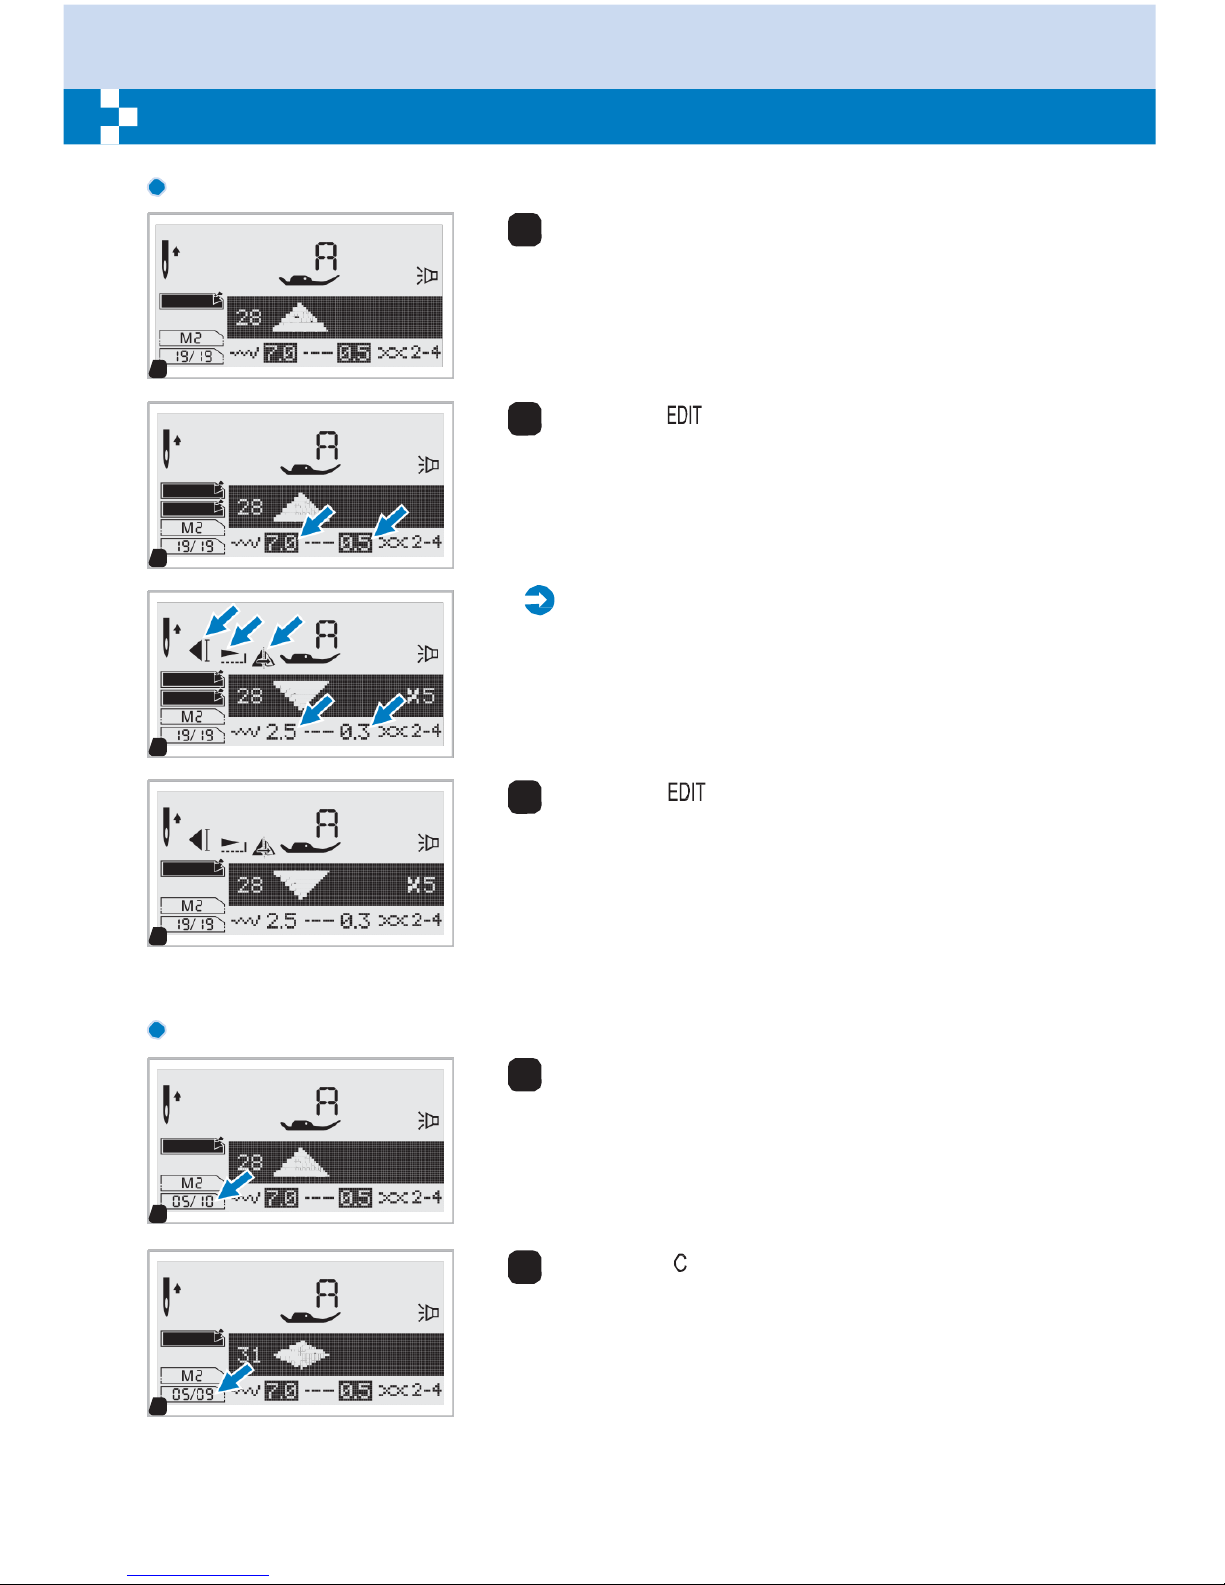
64
Memory
Editing
patterns
M
1
Use the stitch width adjustment button to select the
pattern that you wish to edit while in the memory
mode.
1
M
EDIT
2
Press the " " button to edit the pattern. The stitch
length, stitch width, Elongation, Mirror, and Auto-lock
of the patterns can be adjusted manually.
2
M
EDIT
Please
Note:
The stitch length, stitch width, Elongation, Mirror, and
Auto-lock of the patterns can be adjusted manually.
3
4
Press the " " button when complete and return to
browse status.
M
4
Clearing patterns or
letters
M
1
While in the memory mode, press stitch width
adjustment button to select the pattern that you want to
clear .
1
2
Press the " " button to delete the selected pattern
and the next pattern in the back will move forward.
M
2
Page 70
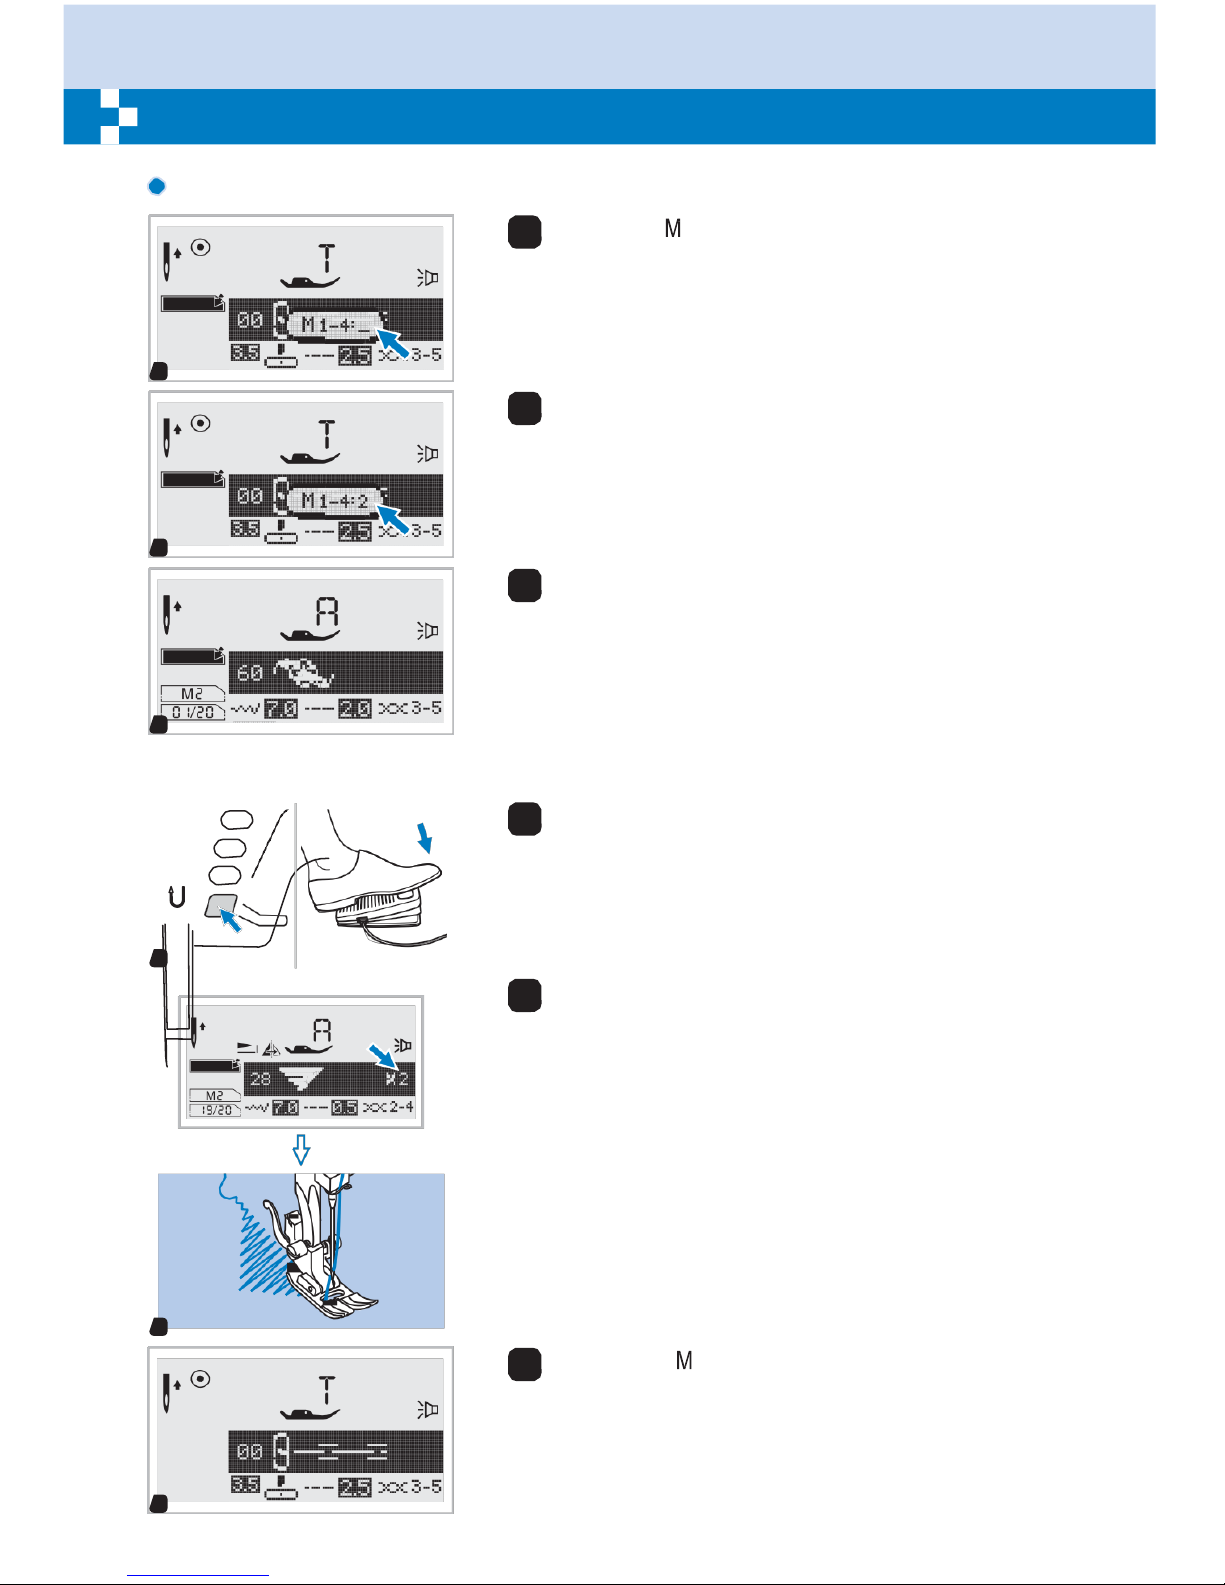
65
Memory
Recalling and sewing the memorized
pattern
1
Press the " " button to enter memory mode and then
input the number of memory module when the cursor
start flashing.
M
1
2
Input the number of memory module. (e.g. 2)
M
2
3
LCD sc–reen shows the first pattern of the selected
memory module.
Select or browse memory patterns by pressing stitch
M
width " " or " + " buttons.
3
4
Press on the foot control or press the start/stop button
to start the sewing machine.
4
5
The screen shows the current sewing pattern.
M
5
6
Press the " " button to leave memory mode and
return to the normal screen.
Page 71

66
Memory
6
6
6
Page 72
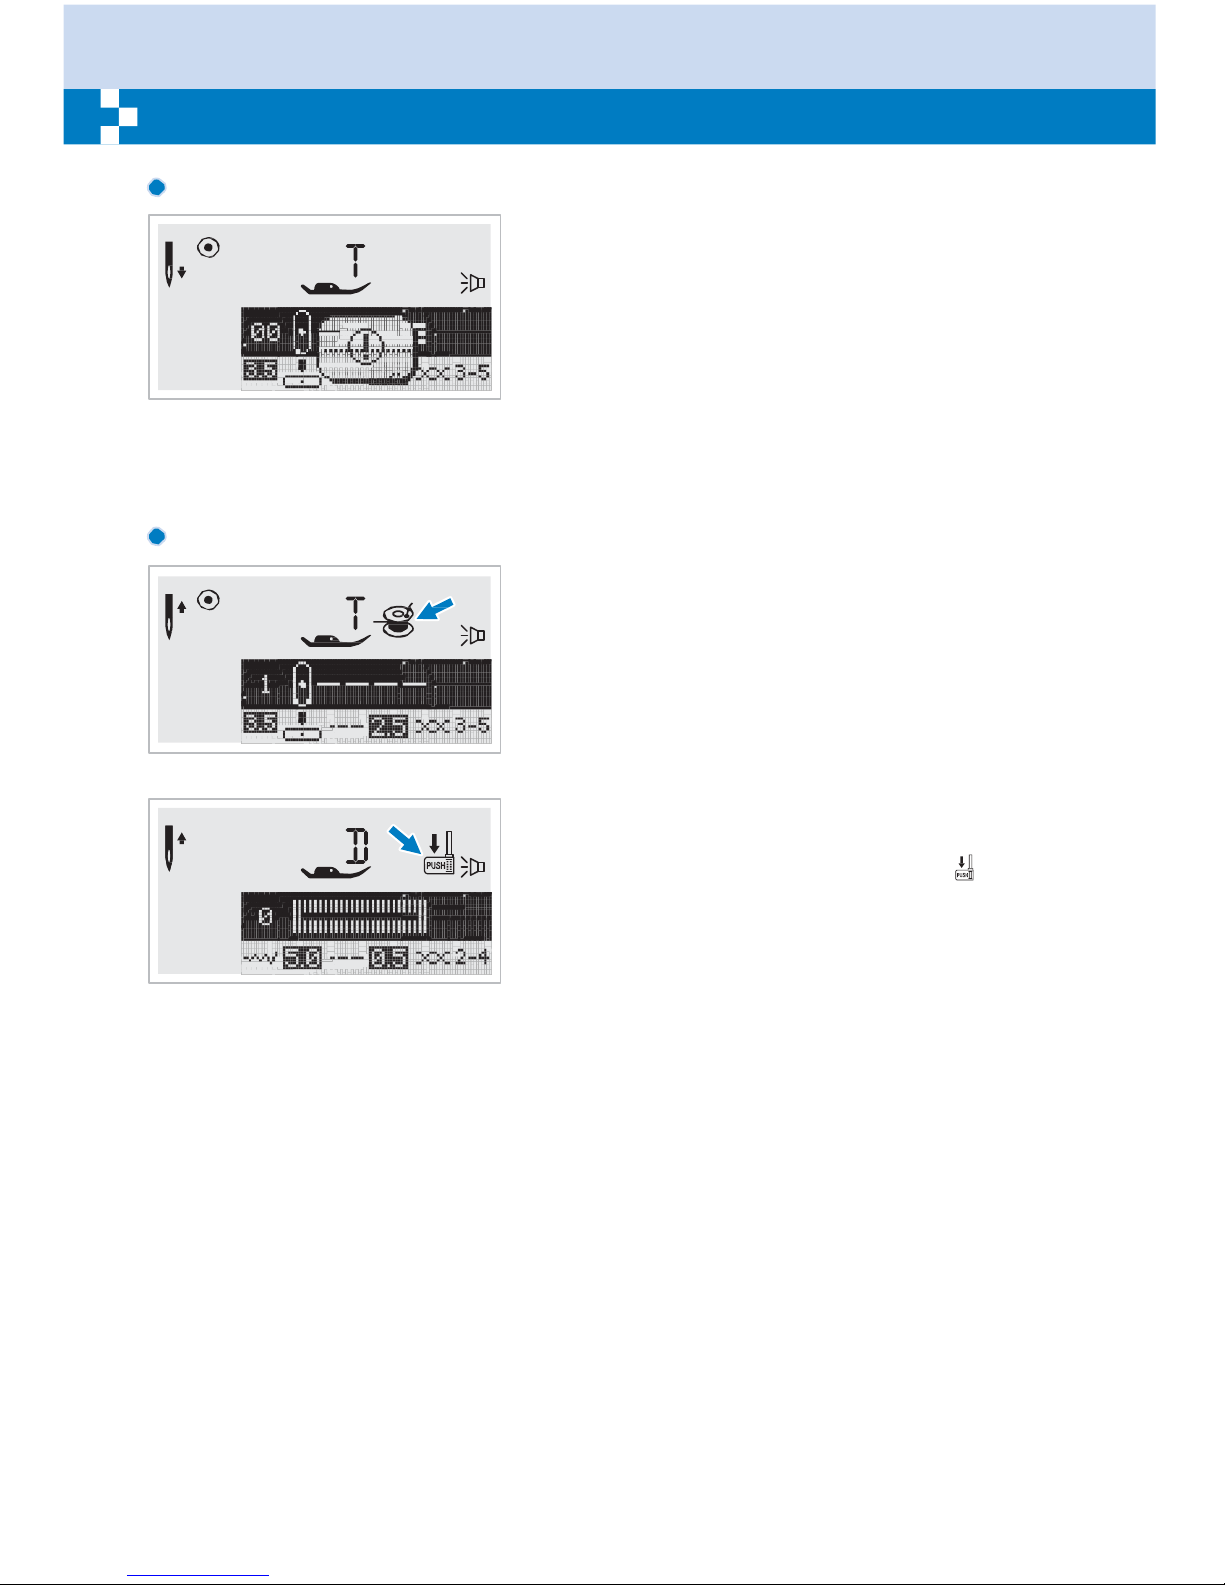
67
Warning
functions
Warning
animation
message
display
The sewing machine is
experiencing a problem
The animation message means that the thread is
twisted or jammed and the hand wheel axle cannot
move. Please look through the "Trouble shooting guide"
on page 71 or 72 to find the solution. After the problem
has been solved, the machine will continue to sew.
Instruction animation
message
display
Bobbin winding
The bobbin winder is winding the bobbin.
Lower the
buttonhole
lever
When you select any buttonhole or darning stitch, LCD
screen will be demonstrated the figure " ", it is to
remind you to lower the buttonhole lever.
Page 73
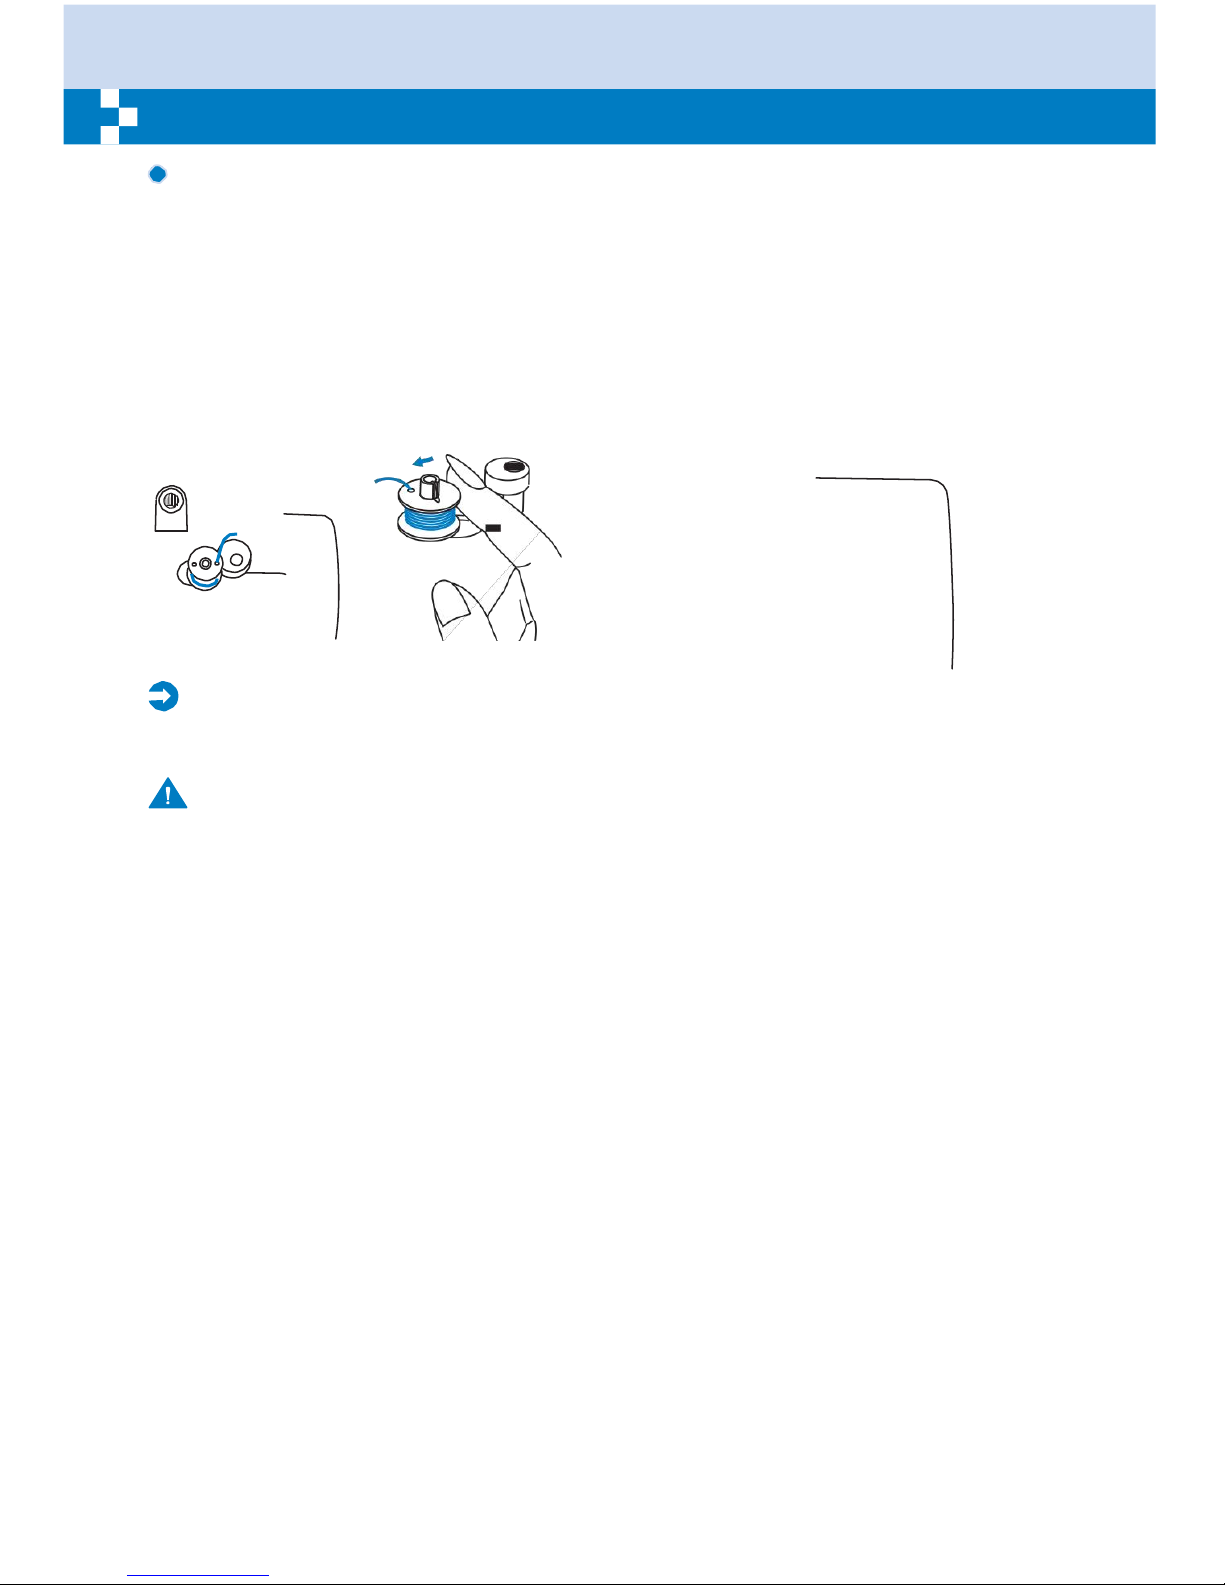
68
Warning
functions
Warning beeping
sound
- When operating correctly: 1 beep
- When operating incorrectly: 3-short beeps
- When the sewing machine is in trouble and can't sew: 3-short beeps
It means that the thread is twisted or jammed and the hand wheel axle can't move. Please look
through the "Trouble shooting guide" on page 71/72 to find the solution. After the problem has
been solved, the machine will continue to sew.
Return bobbin winder spindle to
left
If you press any button on the machine when
the bobbin is full or the bobbin winder spindle
is in the right position, then the machine will
beep 3 times as a warning.
Return the bobbin winder spindle to the left
position.
Please
Note:
If the problem is still not solved, please contact your local dealer.
Attention:
During the sewing, if the thread get jammed inside the hook stopping the needle from moving and
you continue pressing the foot control, the security switch will stop the machine completely. In
order to restart the sewing machine, you will have to turn the on/off switch to the OFF position and
then ON again.
Page 74
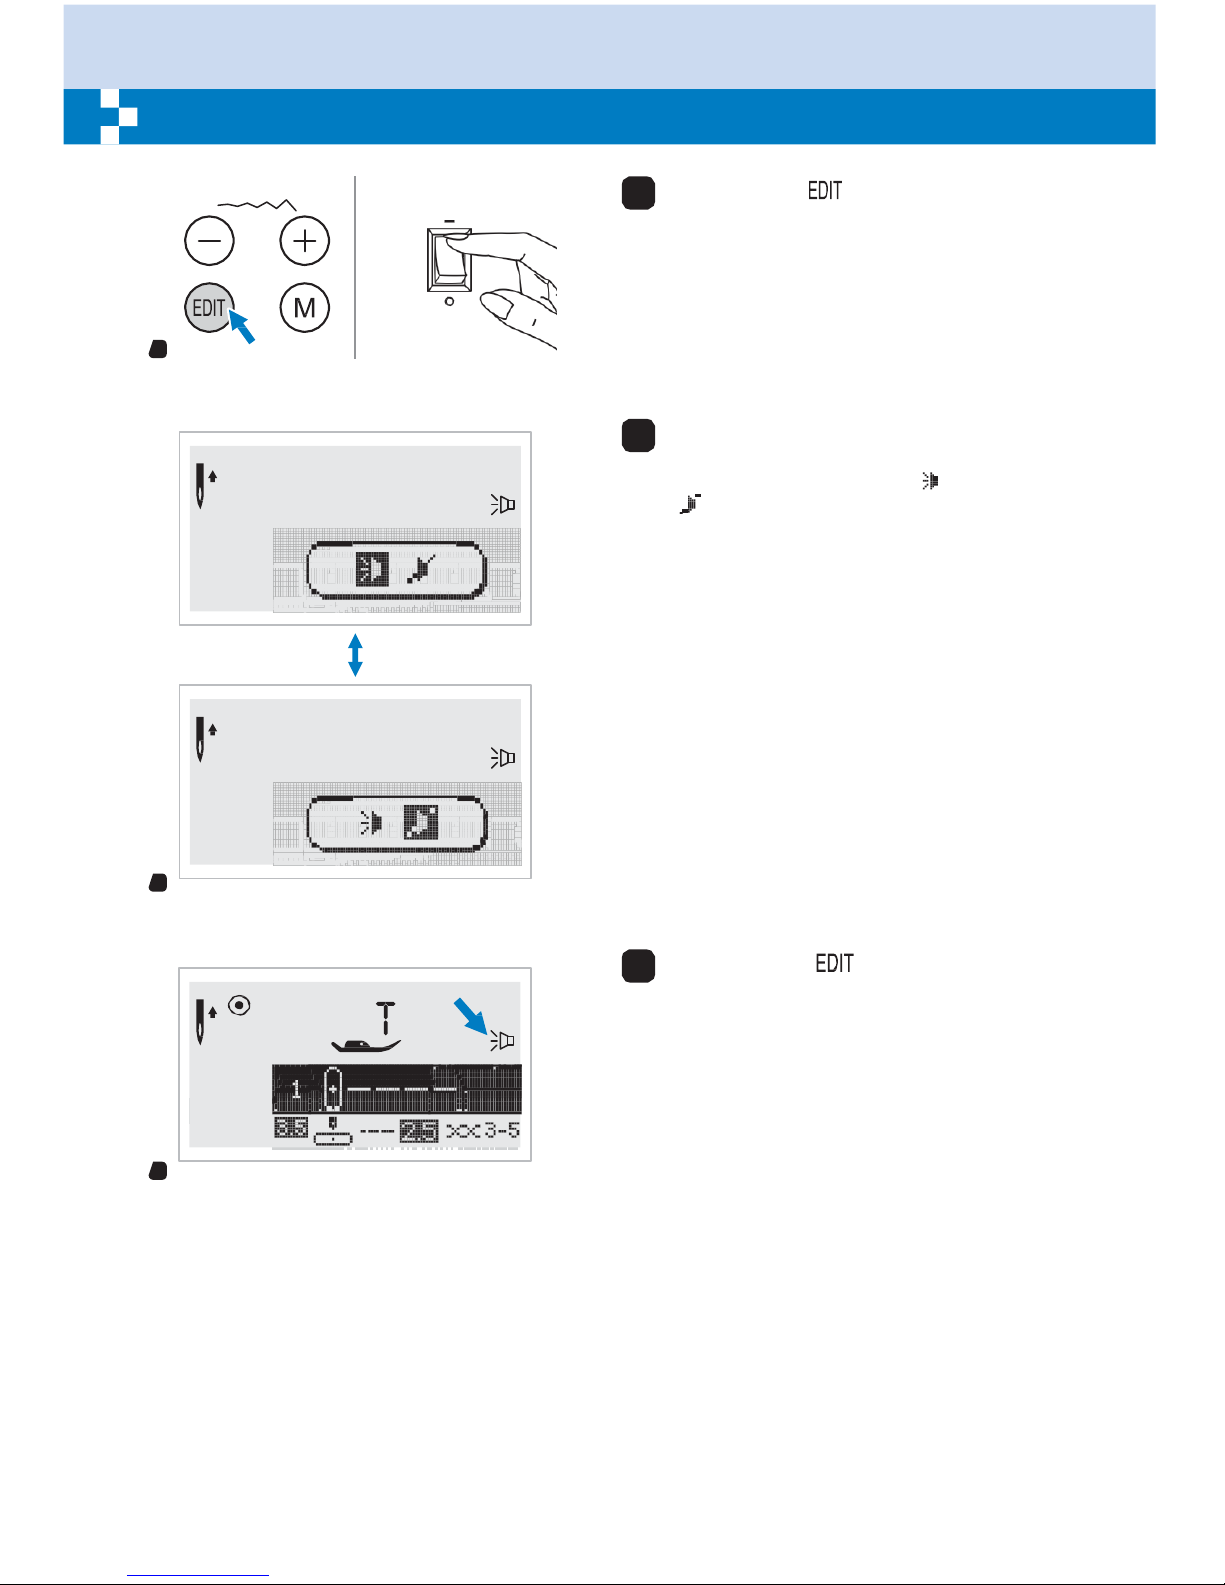
68
Buzzer
sound
ON
OFF
1
1 Press on the " " button and turn on the
power switch at the same time.
1
2
2 You can select the mode by pressing the
stitch width " + " or " - " button. Select
desired mode sound on " "or sound off
" ".
2
3
3 Pressing the " " button. The Buzzer
sound setting mark will appear on the LCD
screen when you have set it.
3
Page 75
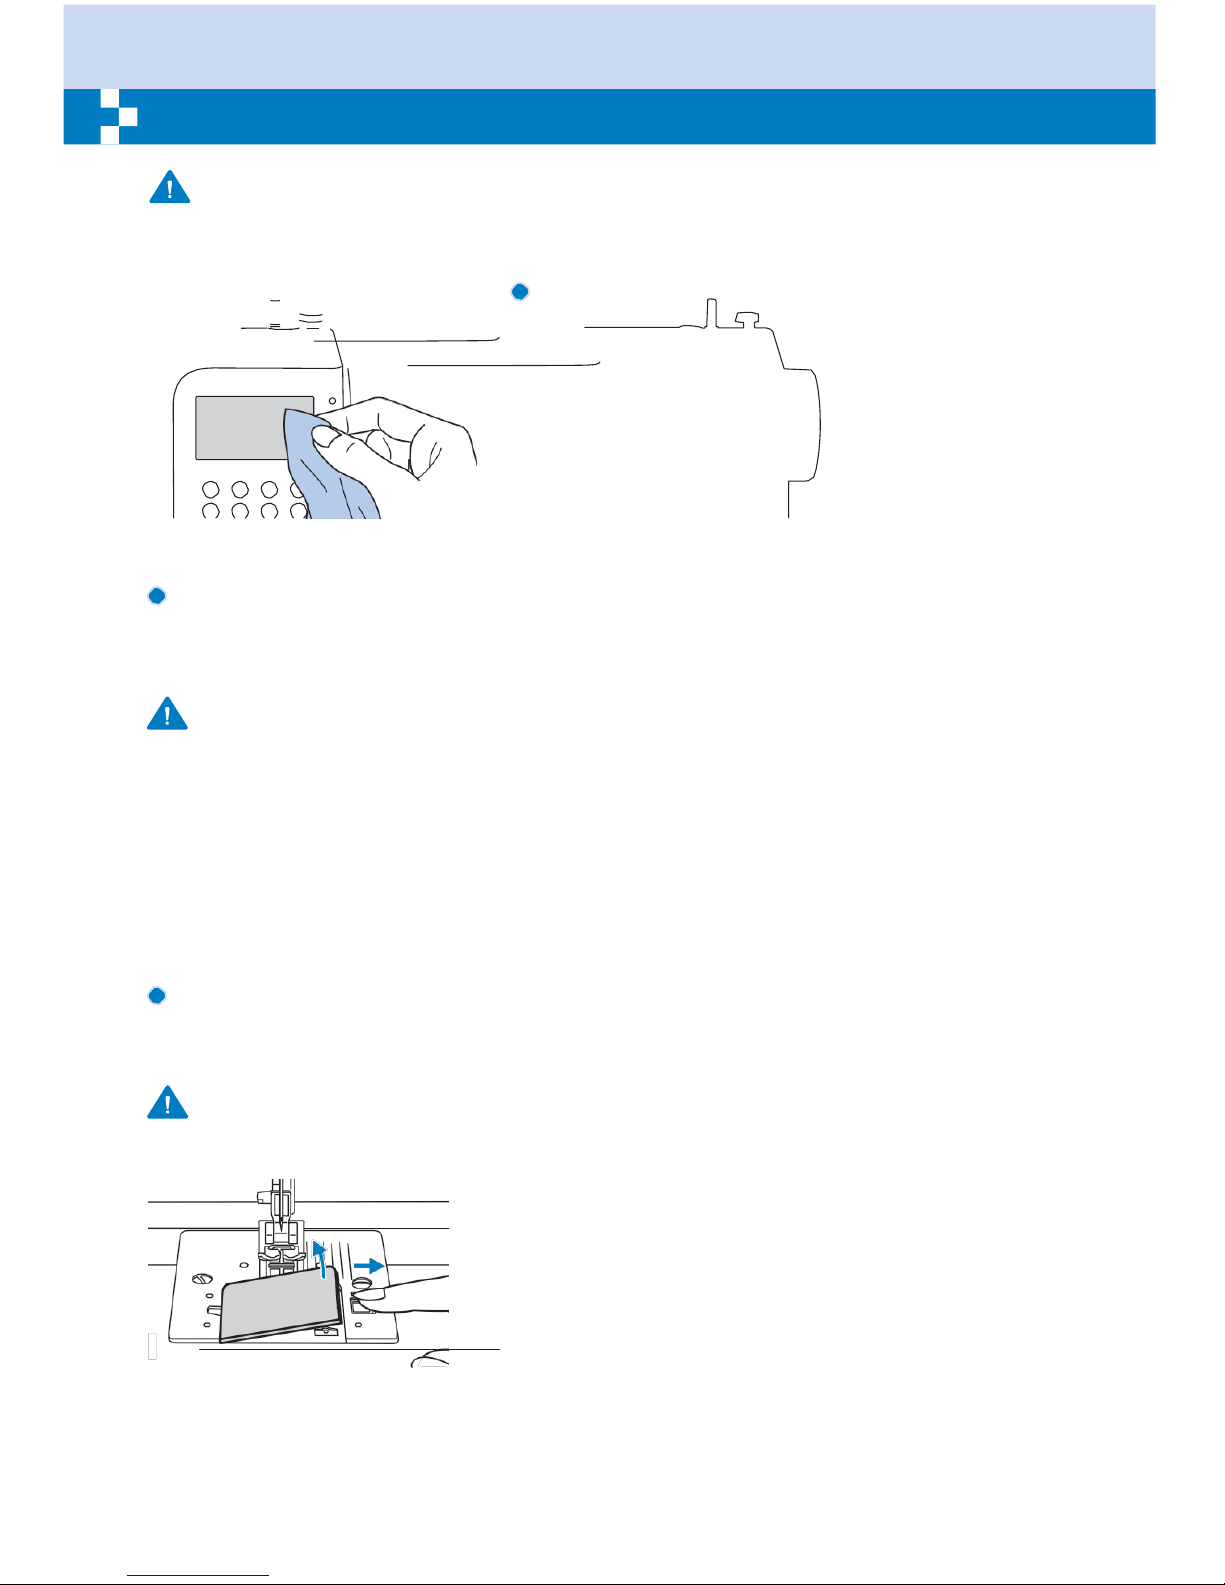
69
Maintenance
Attention:
Disconnect the power cord from the wall socket before cleaning the screen and sewing machine
surface, otherwise injury or electrical shock may result.
Cleaning the
screen
If the front panel is dirty, wipe it gently with a soft, dry cloth.
Do not use any organic solvents or detergents.
Cleaning the sewing machine
surface
If the surface of the sewing machine is dirty, lightly soak a cloth in mild detergent, squeeze it out
firmly and then wipe the surface. After cleaning it once in this way, wipe the surface again with a
dry cloth.
Attention:
This machine is equipped with a 100mW LED lamp. If lamp replacement is needed, please
contact nearest authorized retailer.
Cleaning the
hook
If lint and bits of thread accumulate in the hook, this will interfere with the smooth operation of the
machine. Check regularly and clean the stitching mechanism when necessary.
Attention:
Disconnect the machine from the wall outlet before carrying out any maintenance.
Remove the needle plate cover and bobbin.
Page 76
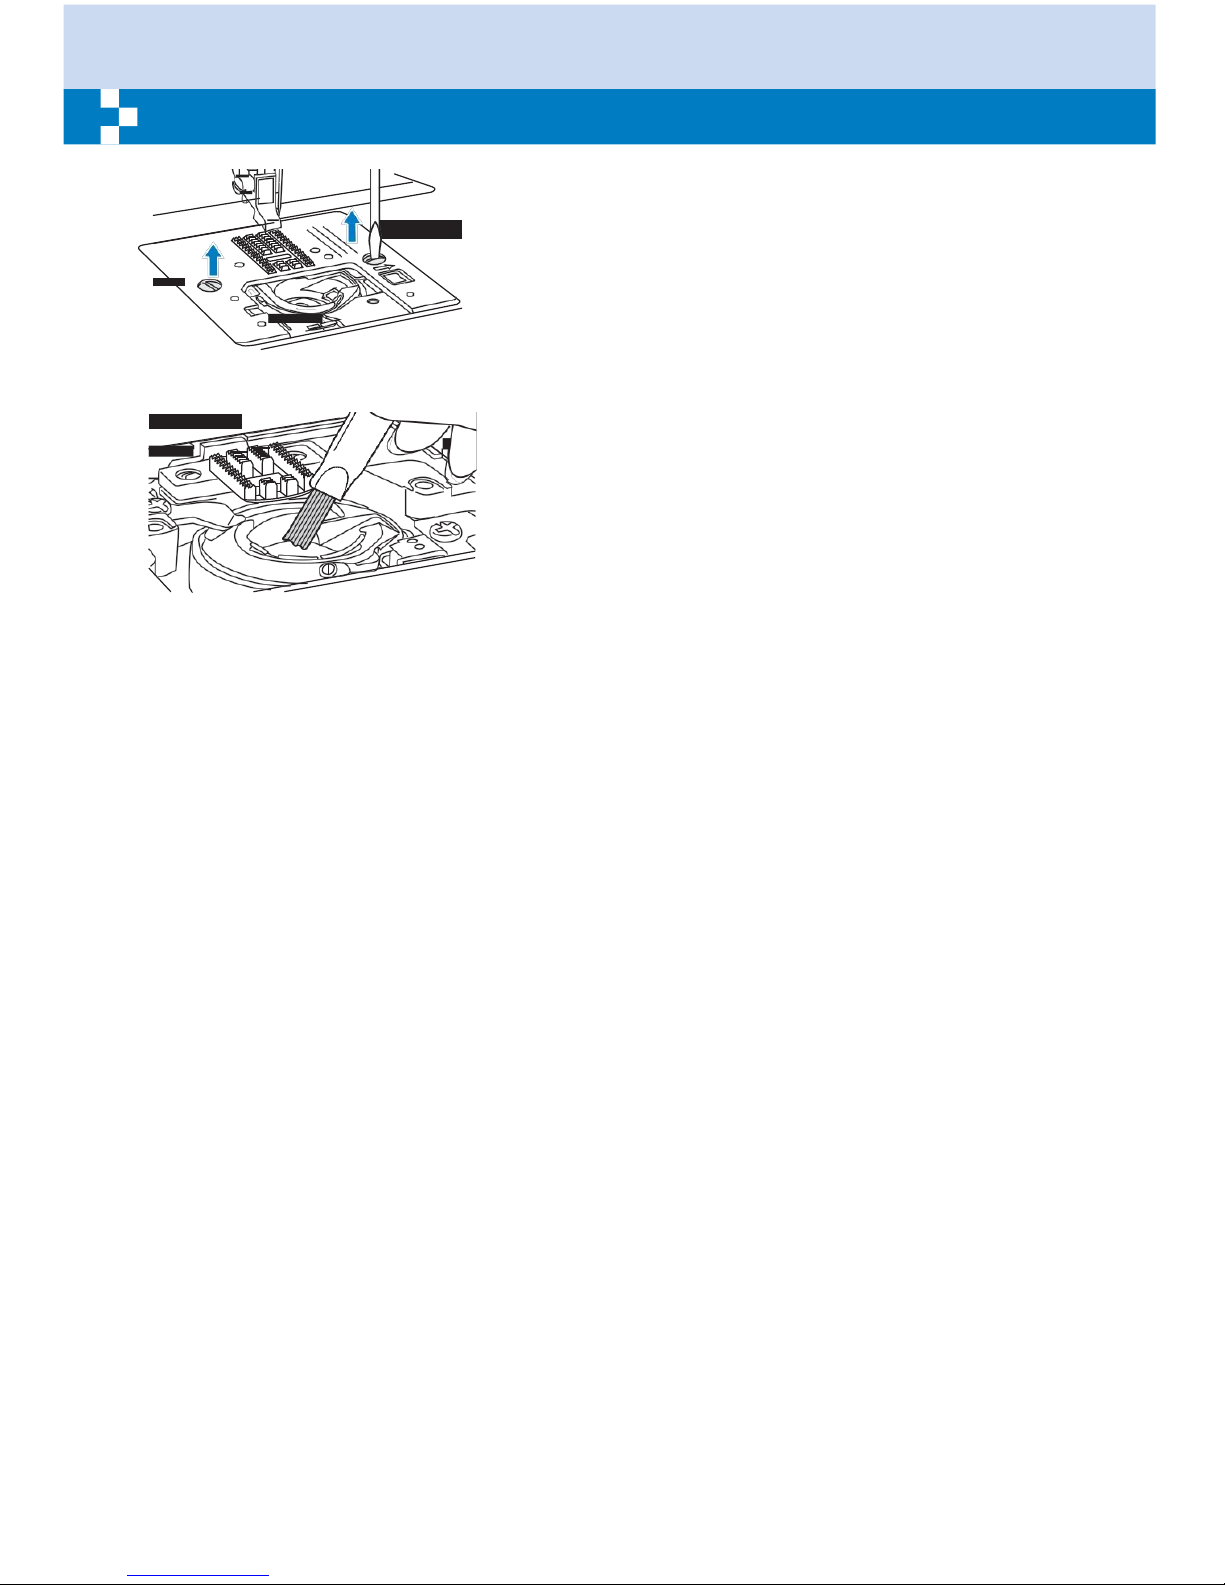
70
Maintenance
Remove the needle, presser foot and presser foot holder.
Remove the screw holding the needle plate and remove the
needle plate.
Clean the feed dog and bobbin case with a brush. Also
clean them, using a soft, dry cloth.
Page 77
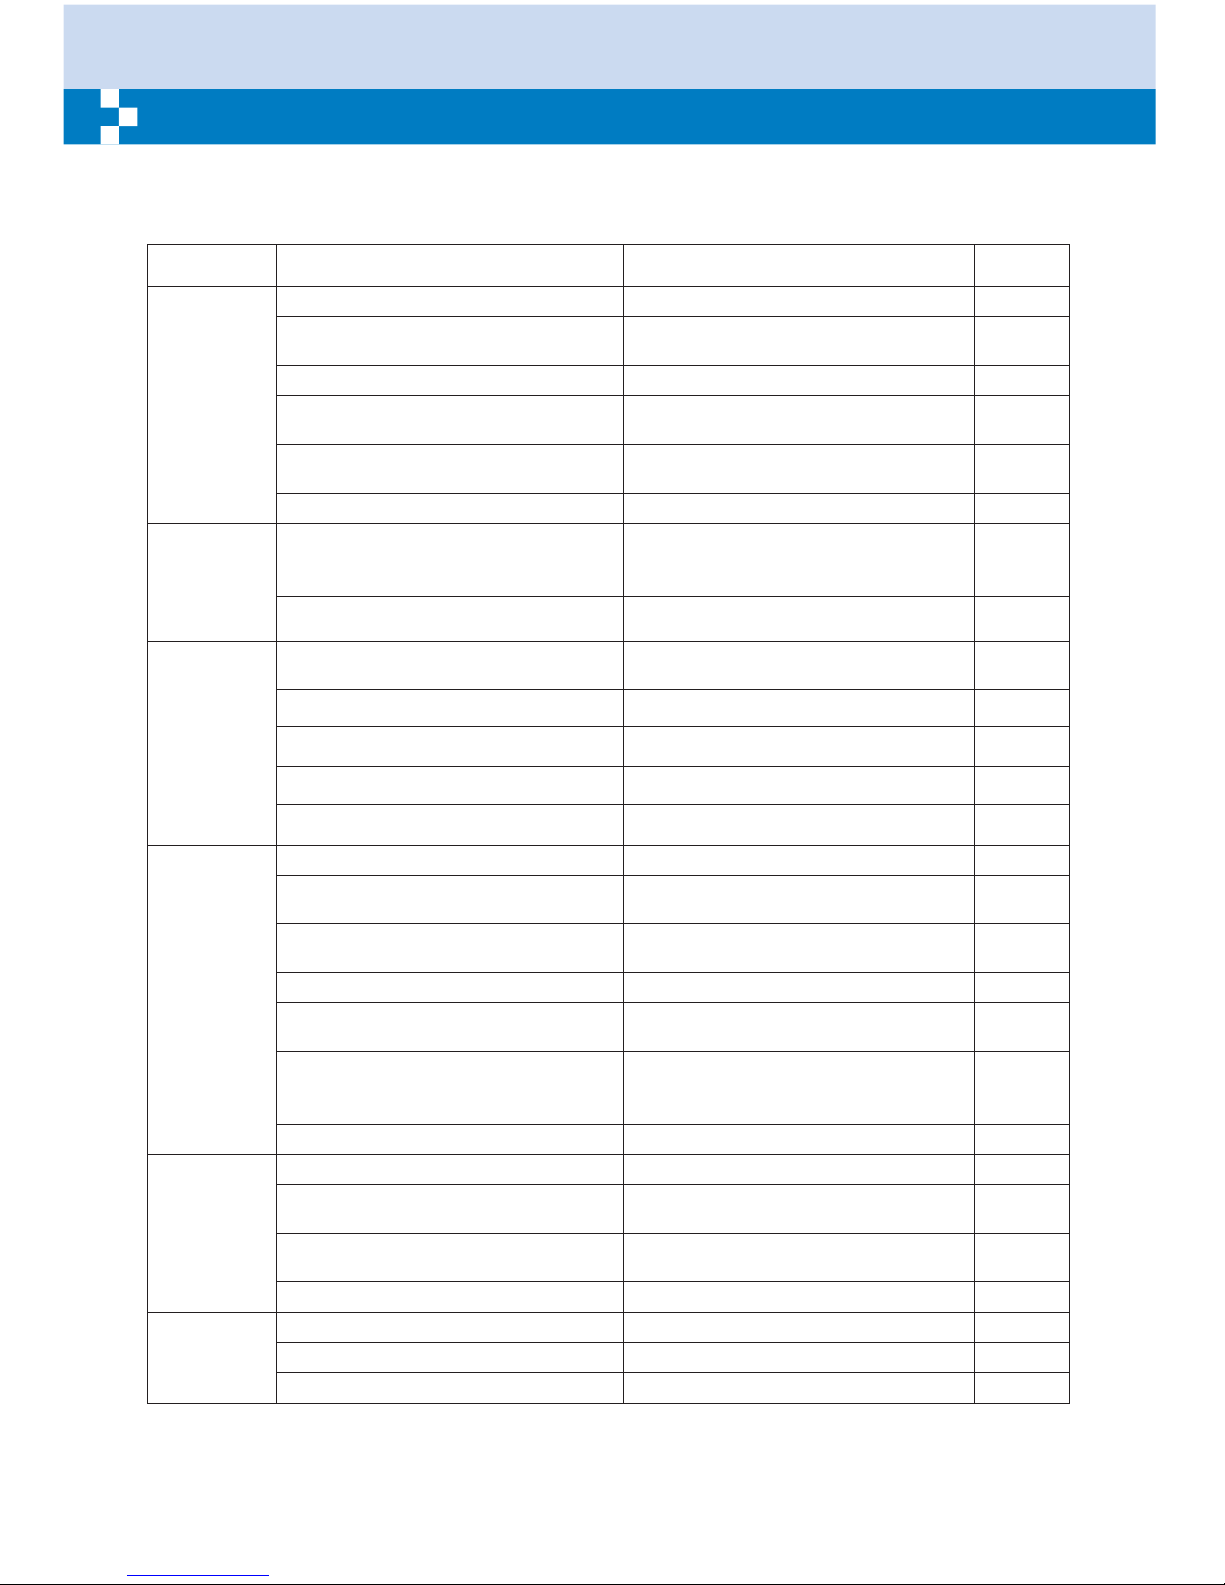
71
Trouble
shooting guide
Before calling for service, check the following items. If the problem still persists, contact the place
of purchase or your nearest authorized dealer.
Problem
Cause
Correction
Reference
Upper thread
breaks
1.The machine is not threaded correctly.
1.Rethread the machine.
Page 13
2.The thread tension is too tight.
2.Reduce the thread tension (lower
number).
Page 19
3.The thread is too thick for the needle.
3.Select a larger needle.
Page 22
4.The needle is not inserted correctly.
4.Remove and reinsert the needle (flat
side towards the back).
Page 23
5.The thread is wound around the spool
holder pin.
5.Remove the reel and wind thread onto
reel.
Page 13
6.The needle is damaged.
6.Replace the needle.
Page 23
Lower thread
breaks
1.The bobbin case is not inserted
correctly.
1.Remove and reinsert the bobbin case
and pull on the thread. The thread
should pull easily.
Page 12
2.The bobbin case is threaded wrong.
2.Check both bobbin and bobbin case.
Page 12
Skipped
stitches
1.The needle is not inserted correctly.
1.Remove and reinsert needle(flat side
towards the back).
Page 23
2.The needle is damaged.
2.Insert a new needle.
Page 23
3.The wrong size needle has been used.
3.Choose a needle to suit the thread.
Page 22
4.The foot is not attached correctly.
4.Check and attach correctly.
Page 20
5.The machine is not threaded correctly.
5.Rethread the machine.
Page 13
Needle breaks
1.The needle is damaged.
1.Insert a new needle.
Page 23
2.The needle is not correctly inserted.
2.Insert the needle correctly (flat side
towards the back).
Page 23
3.Wrong needle size for the fabric.
3.Choose a needle to suit the thread and
fabric.
Page 22
4.The wrong foot is attached.
4.Select the correct foot.
Page 73
5.The needle clamp screw is loose.
5.Use the screwdriver to firmly tighten
the screw.
Page 23
6.The presser foot that is used is not
appropriate for the type of stitch that
you wish to sew.
6.Attach the presser foot that is appropriate for the type of stitch that you
wish to sew.
Page 73
7.The upper thread tension is too tight.
7.Loosen the upper thread tension.
Page 19
Loose stitches
1.The machine is not correctly threaded.
1.Check the threading.
Page 13
2.The bobbin case is not correctly
threaded.
2.Thread the bobbin case as illustrated.
Page 12
3.Needle/fabric/thread combination is
wrong.
3.The needle size must suit the fabric
and thread.
Page 23
4.Thread tension is wrong.
4.Correct the thread tension.
Page 19
Seam
gather or
pucker
1.The needle is too thick for the fabric.
1.Select a finer needle.
Page 22
2.The stitch length is adjusted wrong.
2.Readjust the stitch length.
Page 27
3.The thread tension is too tight.
3.Loosen the thread tension.
Page 19
Page 78
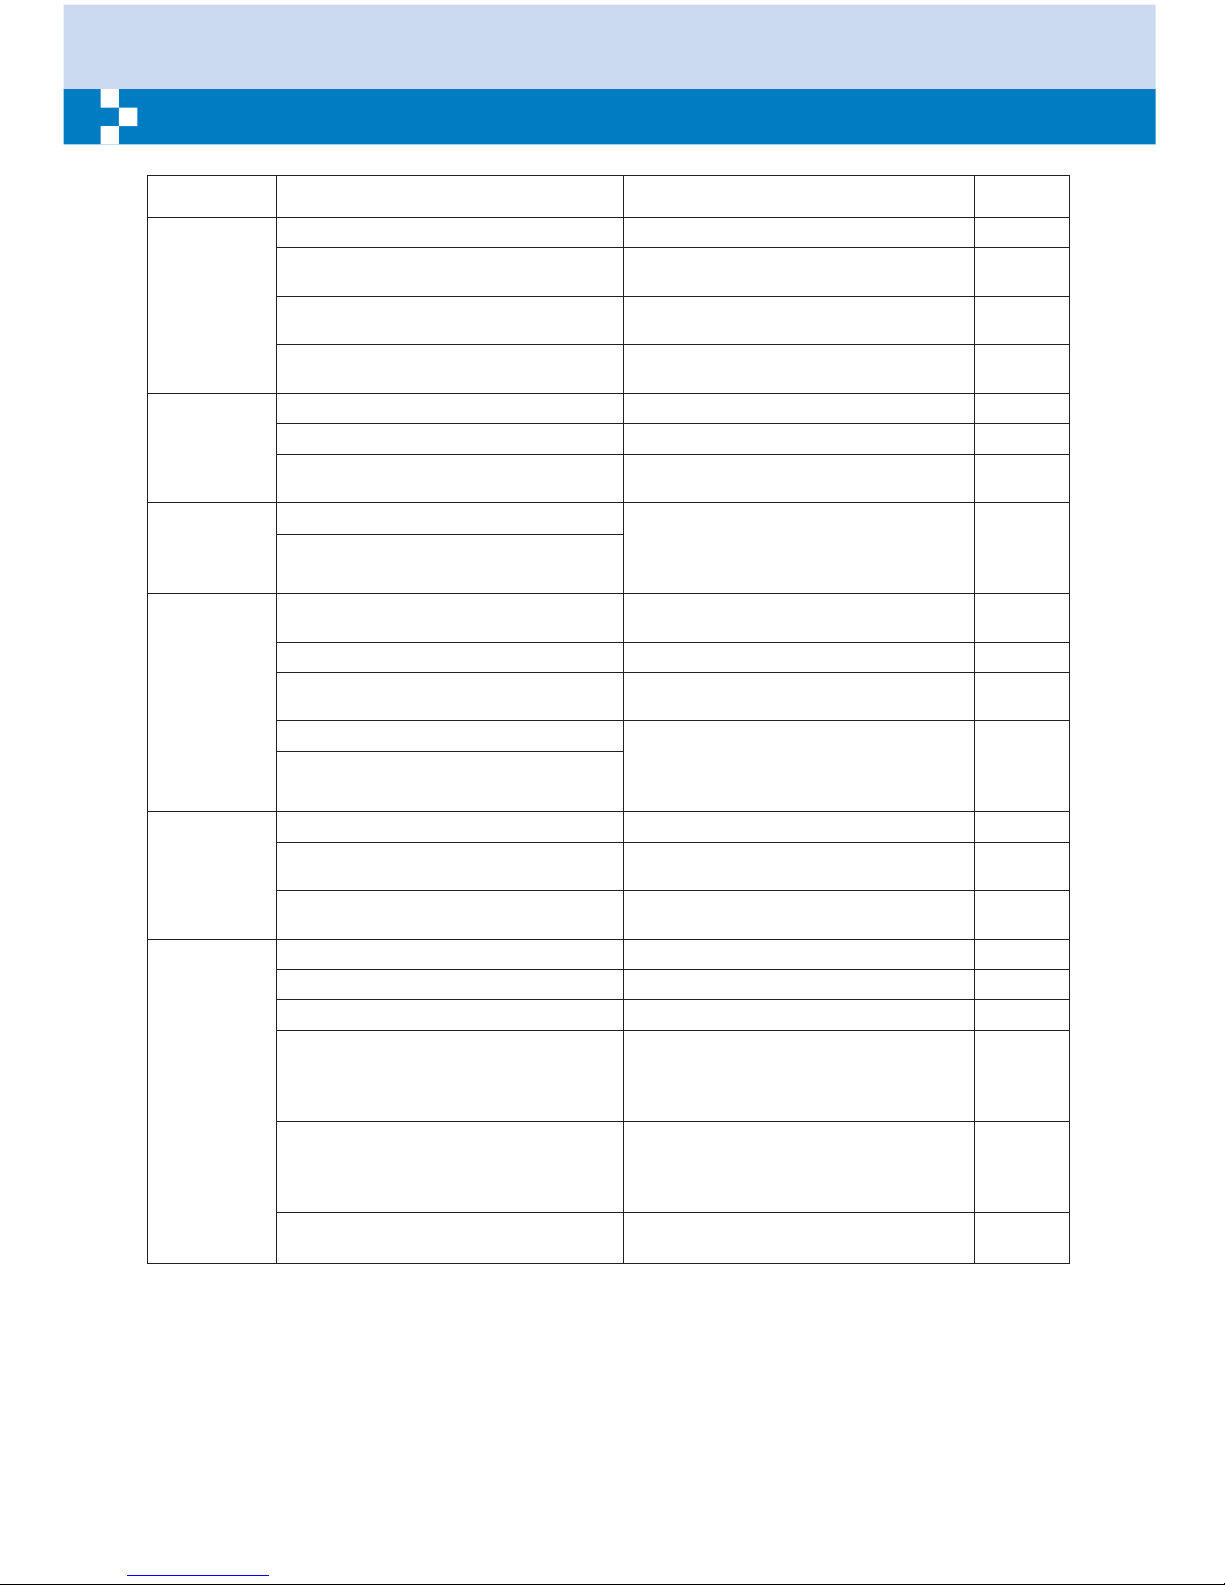
72
Trouble
shooting guide
Problem
Cause
Correction
Reference
Seam
puckering
1.The needle thread tension is too tight.
1.Loosen the thread tension.
Page 19
2.The needle thread is not threaded
correctly.
2.Rethread the machine.
Page 13
3.The needle is too heavy for the fabric
being sewn.
3.Choose a needle to suit the thread and
fabric.
Page 22
4.Shorten stitch length is too long for the
fabric.
4.Make stitch dense.
Page 27
Patterns are
distorted
1.The correct presser foot is not used.
1.Select the correct foot.
Page 73
2.The needle thread tension is too tight.
2.Loosen the thread tension .
Page 19
3.The stitch length is not suitable for the
fabric being sewn.
3.Make stitch adjustment.
Page 27
The machine
jams
1.Thread is caught in the hook.
Remove the upper thread and bobbin
case. Turn the handwheel backwards
and forwards by hand and remove the
thread remnants.
Page 69
2.The feed dogs are packed with lint.
The machine
is noisy
1.Lint or oil have collected on the hook or
needle bar.
1.Clean the hook and feed dog as
described.
Page 69
2.The needle is damaged.
2.Replace the needle.
Page 23
3.Slight humming sound coming from
internal motor.
3.Normal
--
4.Thread is caught in the hook.
Remove the upper thread and bobbin
case. Turn the handwheel backwards
and forwards by hand and remove the
thread remnants.
Page 69
5.The feed dogs are packed with lint.
Uneven
stitches,
uneven feed
1.Poor quality thread.
1.Select a better quality thread.
Page 22
2.The bobbin case is threaded wrong.
2.Remove the bobbin case, the thread
and reinsert correctly.
Page 12
3.Fabric has been pulled.
3.Do not pull on the fabric while sewing,
let it be taken up by the machine.
--
The sewing
machine
doesn't
operate
1.The machine is not turned on.
1.Turn on the machine.
Page 9
2.The Start/stop button was not pressed.
2.Press the Start/stop button.
Page 24
3.The presser foot lifter is raised.
3.Lower the presser foot lifter.
Page 17
4.The Start/stop button was pressed,
even through the foot controller is
connected.
4.Do not use Start/stop button when the
foot controller is con-nected. To use
Start/stop button, disconnect the foot
controller.
Page 24
5.A thread is caught in the hook race.
5.Remove the upper thread and bobbin
case. Turn the handwheel backwards
and forwards by hand and remove the
thread remnants.
Page 69
6.The machine is not plugged in.
6.Connect the power line plug to the
electric outlet.
Page 9
Page 79
PLEASE AFFIX YOUR PROOF OF PURCHASE/RECEIPT HERE
IN THE EVENT OF A CLAIM UNDER WARRANTY
THIS RECEIPT MUST BE PRODUCED
W A R R A N T Y
1. Home of Living Brands (Pty) Ltd (“Home of Living Brands”) warrants to the
original purchaser of this product (“the customer”) that this product will be free of
defects in quality and workmanship which under normal personal, family or
household use and purpose may manifest within a period of 1 (one) year from the
date of purchase (“warranty period”).
2. Where the customer has purchased a product and it breaks, is defective
or does not work properly for the intended purpose, the customer must notify the
supplier from whom the customer bought the product (“the supplier”) thereof
within the warranty period. Any claim in terms of this warranty must be
supported by a proof of purchase. If proof of purchase is not available, then
repair, and/or service charges may be payable by the customer to the supplier.
3. The faulty product must be taken to the supplier's service centre to
exercise the warranty.
4. The supplier will refund, repair or exchange the product in terms of this
warranty subject to legislative requirements. This warranty shall be valid only
where the customer has not broken the product himself, or used the product for
something that it is not supposed to be used for. The warranty does not include
and will not be construed to cover products damaged as a result of disaster,
misuse, tamper, abuse or any unauthorised modification or repair of the product.
5. This warranty will extend only to the product provided at the date of the
purchase and not to any expendables attached or installed by the customer.
6. If the customer requests that the supplier repairs the product and the
product breaks or fails to work properly within 3 (three) months of the repair and
not as a result of misuse, tampering or modification by or on behalf of the
customer, then the supplier may replace the product or pay a refund to the
customer.
7. The customer may be responsible for certain costs where products
returned are not in the original packaging, or if the packaging is damaged. This will
be deducted from any refund paid to the customer.
HOME OF LIVING BRANDS (PTY) LTD (JOHANNESBURG)
Page 80

JOHANNESBURG TEL NO. (011) 490-9600
CAPE TOWN TEL NO. (021) 552-5161
DURBAN TEL NO. (031) 792-6000
www.homeoflivingbrands.com
Do not dispose of electrical appliances as unsorted municipal waste, use separate
collection facilities. Contact your local government for information regarding the
collection systems available. If electrical appliances are disposed of in landfills or
dumps, hazardous substances can leak into the groundwater and get into the food
chain, damaging your health and well-being. When replacing old appliances with
new once, the retailer is legally obligated to take back your old appliance for
disposal at least for free of charge.
Page 81

Page 82

 Loading...