


Dress Maker 120A
INSTRUCTION MANUAL
FREE ARM SEWING MACHINE
your creative assistant

1
IMPORTANT SAFETY INSTRUCTIONS
When using an electrical appliance, basic safety precautions should
always be followed, including the following:
Read all instructions before using your household sewing
machine.
DANGER-To reduce the risk of electric shock:
Your household sewing machine should never be left unattended when
plugged in. Always unplug your machine from the electric outlet
immediately after using and before cleaning.
Change the light bulb only with the same type of bulb. Use a bulb 15W.
WARNING-to reduce: the risk of burns, fire, electric shock or injury
to persons
- Do not allow to be used as a toy. Close attention is necessary when
this sewing machine is used by or near children.
- Use this machine only for its intended use as described in this manual.
- Never operate this sewing machine if it has a damaged cord or plug, if
it is not working properly, if it has been dropped or damaged or
dropped into water. Return the sewing machine to the nearest
authorized dealer or service center for examination, repair, electrical or
mechanical adjustment.
- The supply cord cannot be replaced. If the supply cord connected with
foot controller is damaged the foot controller shall be scrapped.
- Never operate the sewing machine with any air openings blocked.
Keep ventilation openings of the sewing machine and foot controller
free from the accumulation of lint, dust and cloth.
- Never drop or insert any object into the opening.
- Do not use outdoors.
- Do not operate where aerosol (spray) products are being used or
where oxygen is being administered.
- Do not put anything on the foot controller because the machine may
accidentally start and the motor or the foot controller may overheat.
- To disconnect turn all controls to the off position, then remove plug
from outlet.
- Do not unplug by pulling on cord. To unplug, hold the plug, not the
cord.
- Keep fingers away from all moving parts. Special care is required
around the sewing needle.

2
- Always use the proper needle plate. The wrong plate can cause the
needle to break.
- Do not use bent needles.
- Do not pull or push fabric while stitching. It may deflect the needle.
- Switch the machine off when making any adjustments in the needle
area, such as threading needle, changing needle or changing presser
foot and the like.
- Always unplug the sewing machine from the electric outlet when
making any user servicing mentioned in the instruction manual.
- Use only identical replacement parts.
- This appliance can be used by children aged from 8 years and above
and persons with
reduced physical, sensory or mental capabilities or lack of experience
and knowledge if they
have been given supervision or instruction concerning use of the
appliance in a safe way and understand the hazards involved.
- Children shall not play with the appliance.
- Cleaning and user maintenance shall not be made by children without
supervision.
- Keep the instruction at a suitable place that close to the machine, and
hand it over if you give the machine to a third party.
- Don’t use the machine if it’s wet or in humid environment.
- Always unplug the machine if you leave it unattended, to avoid injury
by expediently switch on the machine.
SAVE THESE INSTRUCTIONS
Warning
When working close to the needle be very careful not to prick your
fingers. When you use the machine for the first time, put a piece of cloth
under the presser foot und run the machine without thread for some
minutes. Dry any oil spots which may appear.
Please use for your sewing machine the ZHEJIANG FOUNDER presser
foot, type KD-2902.
Power rating: 220 - 240V ~ , 50/60Hz
Current rating: 1.0A
Protection Class : II

3
CONTENTS
Name of parts ............................................................................................ 4-5
Accessories ................................................................................................... 6
Before sewing (Power supply and sewing lamp) .......................................... 7
Removing extension table ............................................................................. 8
Free-arm sewing ........................................................................................... 8
Winding the bobbin ....................................................................................... 9
Removing bobbin case and bobbin ............................................................. 10
Inserting bobbin into bobbin case ............................................................... 10
Inserting bobbin case into shuttle race ....................................................... 11
Threading upper thread & Twin needle threading ....................................... 12
Drawing up the bobbin thread ..................................................................... 13
Changing sewing directions ........................................................................ 13
Leveling the machine .............................................................................. 14
Adjusting thread tension ............................................................................. 15
Changing needle ......................................................................................... 16
Insert “darning plate“ ................................................................................... 16
Fabric-Thread-Needle-table ........................................................................ 17
Sewing (pattern selector) and operation table ............................................ 18
To start sewing ............................................................................................ 19
How to finish stitches .................................................................................. 20
Straight stitch .............................................................................................. 21
Zigzag sewing ............................................................................................. 21
Automatic embroidery ................................................................................. 21
Blind stitch .............................................................................................. 22-23
Button sewing ............................................................................................. 24
Binding ........................................................................................................ 24
Overcasting ................................................................................................. 24
Zipper sewing .............................................................................................. 25
Buttonhole sewing ....................................................................................... 26
Hemming ..................................................................................................... 27
Twin needle ................................................................................................. 28
Embroidery .................................................................................................. 28
Quilter ......................................................................................................... 29
Seam guide ................................................................................................. 29
Maintenance (Cleaning and oiling) ............................................................. 30
Checking performance problems-Troubleshooting ................................... 31
4
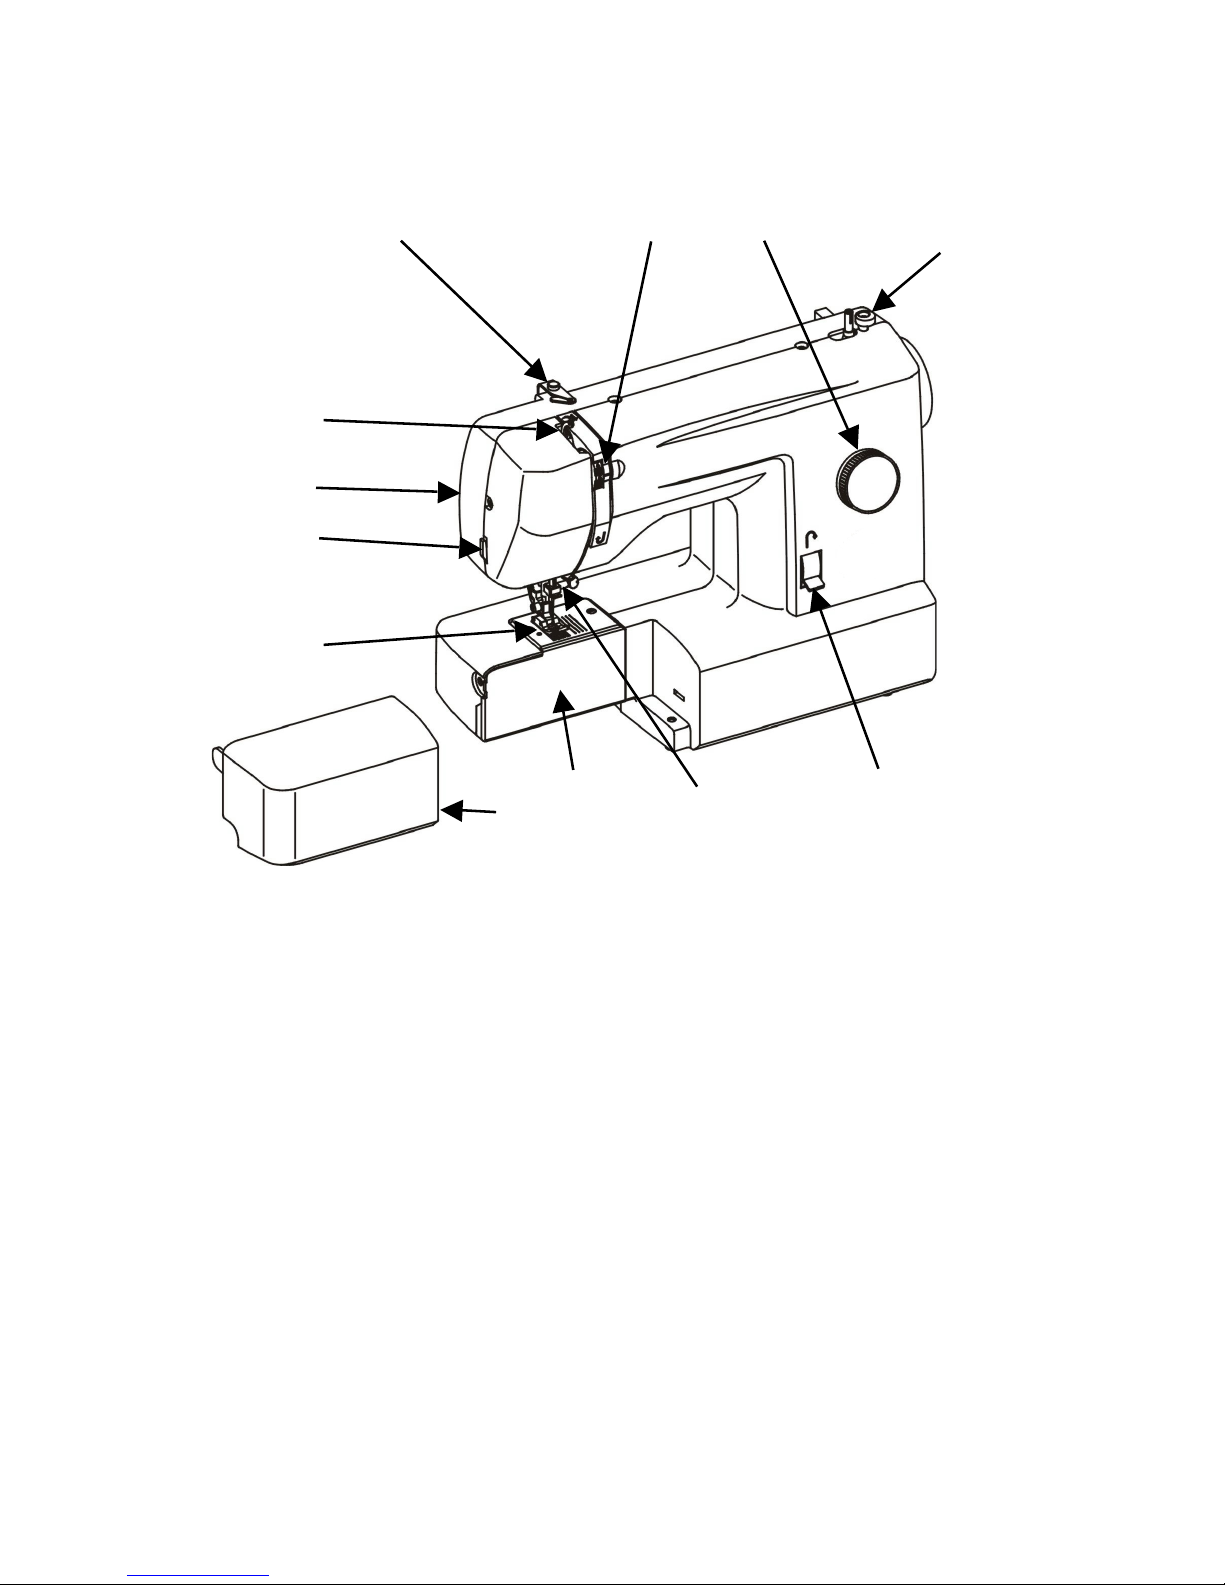
NAME OF PARTS (FRONT VIEW)
1. Thread tension dial
2. Pattern selector dial
3. Bobbin winder stopper
4. Reverse button
5. Thread guide and needle clamp
6. Shuttle cover
7. Extension table
8. Presser foot
9. Thread cutter
10. Face cover
11. Take up lever
12. Upper thread guide
2
3
4 5 7
6
8
1
10
11
12
9
5
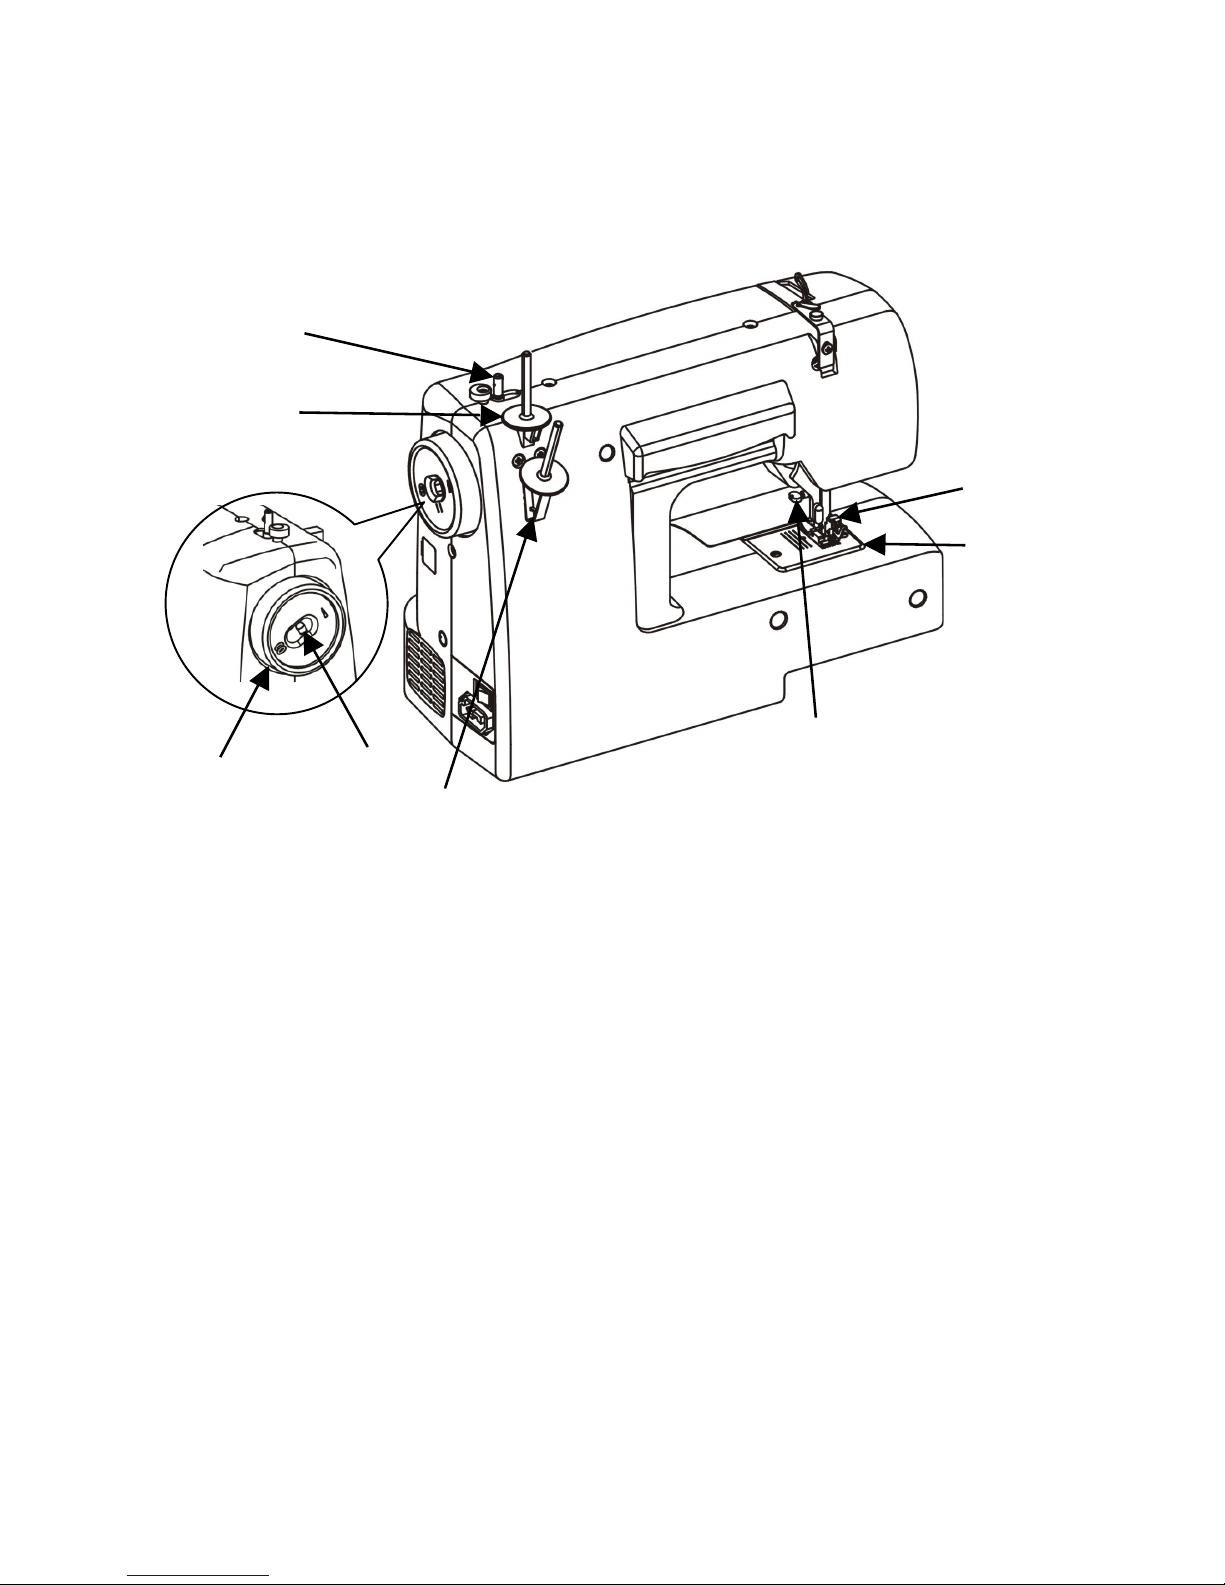
NAME OF PARTS (REAR VIEW)
1. Thumb screw
2. Needle plate
3. Presser foot lever
4. Spool pin (B) (Optional)
5. Clutch button
6. Hand wheel
7. Spool pin (A)
8. Bobbin winder spindle
5
3
1
2
8 7 4
6

6
ACCESSORIES
Needle plate
screw driver
Screw driver
Zipper foot
Needle
#14
Buttonhole cutter
Darning plate
Bobbin
Felt
Zigzag foot
(on machine)
Buttonhole foot
Spool pin (A)

7
BEFORE SEWING
1. Fit plug into the machine.
2. Insert plug into the main socket.
3. Sewing speed can be varied by the foot
control.
Warning: Please always unplug the power plug before you change the bulb or
perform maintenance work to the machine so that you prevent deadly
peril and electric shock.
Bulb replacement:
1. Open face cover in direction of arrow.
2. Remove bulb by unscrewing it
counter-clockwise.
3. Install a new bulb by screwing it in
clockwise.
4. Use a 15 watt bulb. (max)
Sew lamp
Power supply / Power supply plug
Speed Controller
Power supply
Plug receptacle
machine plug
8
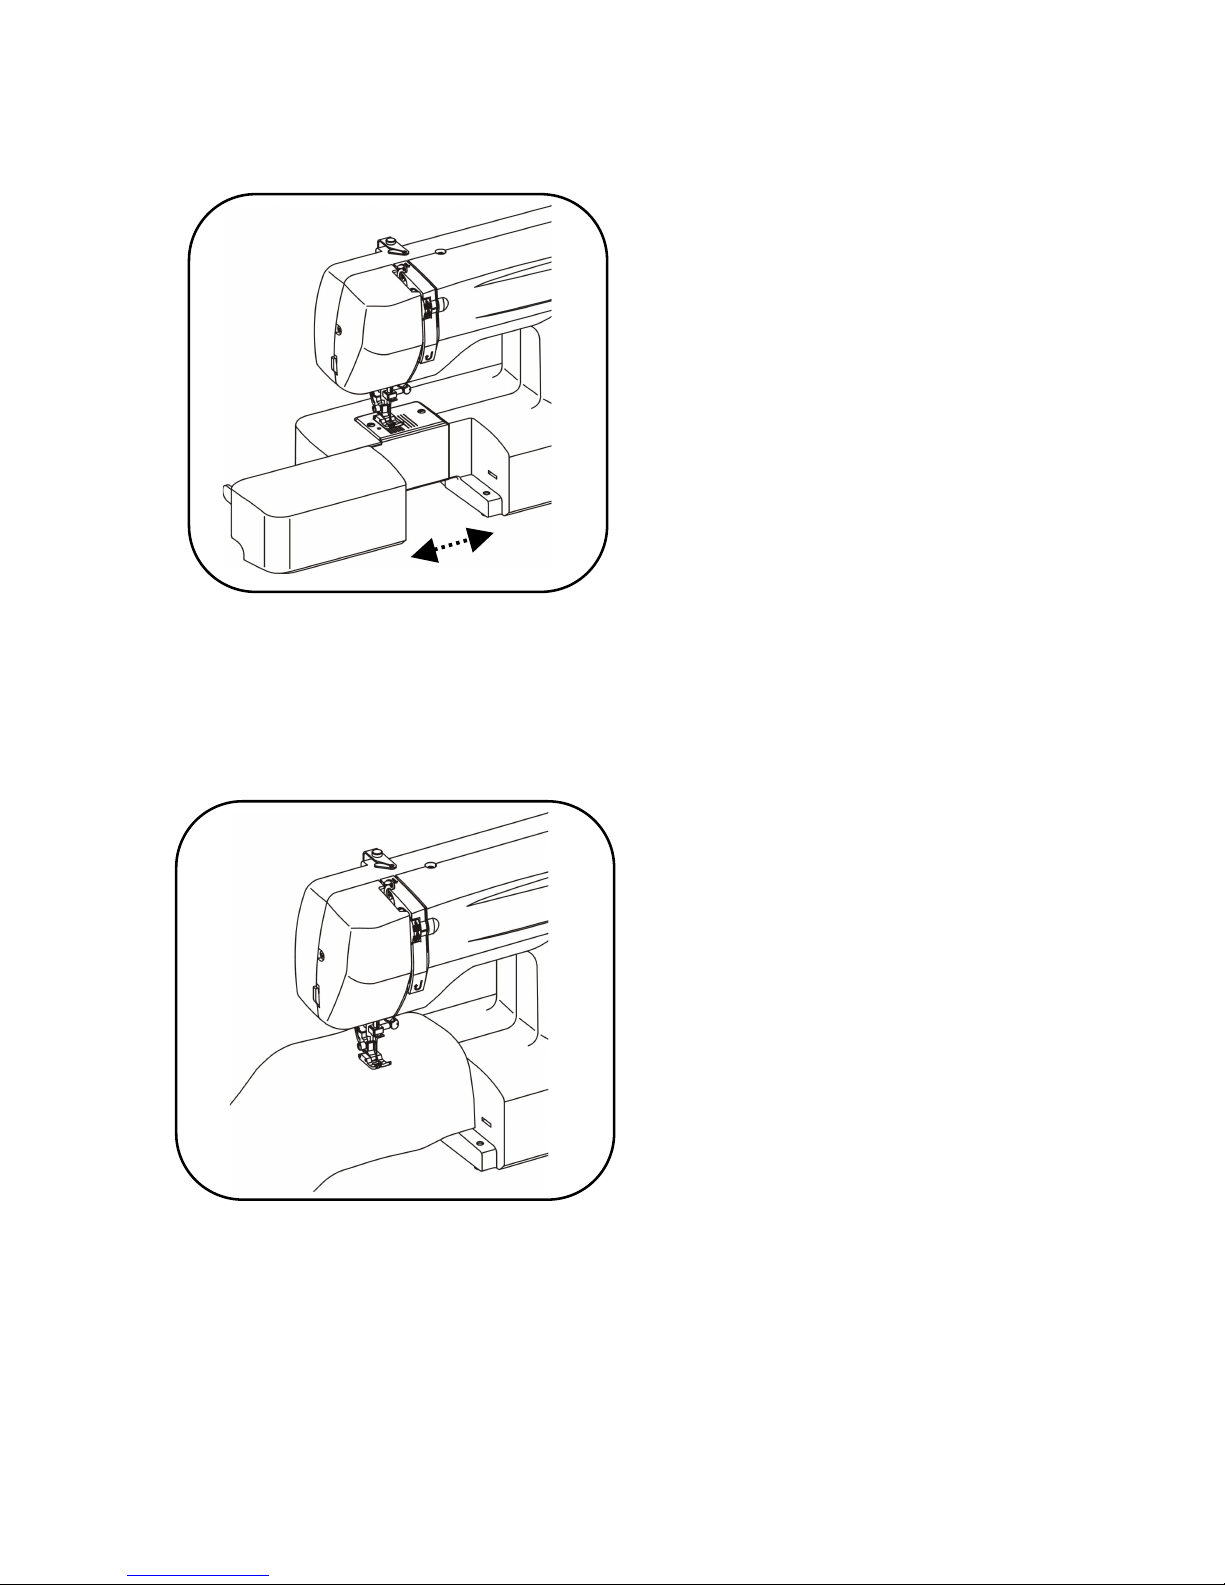
REMOVING EXTENSION TABLE
Hold the left end of the table and pull it
out in direction of the arrow.
FREE-ARM SEWING
1. This sewing machine can be used as
a flat bed machine but easily converts
to a free arm machine by removing
the extension table.
2. Especially useful for sewing sleeves,
pant legs, tubular fabrics etc. more
easily.
3. To sew tubular items just slip the
sleeve or leg of pants on the free arm
as shown on the illustration.

9
5 cm thread
Clutch button
WINDING THE BOBBIN
Push bobbin winder spindle in direction of
the arrow. When bobbin winding is
completed, return spindle to its original
position.
When bobbin winding is incorrect, release
the screw of the upper thread guide and
adjust up or down until bobbin the
winding is balanced.
Correct
Screw
Winder spindle
1. Release by pushing clutch button to
bobbin and lock by pushing it to
needle.
2. Push bobbin winder from left to right,
then it starts winding.
3. Push bobbin winder from right to left
and move clutch button to needle
sign, then it starts sewing.
10
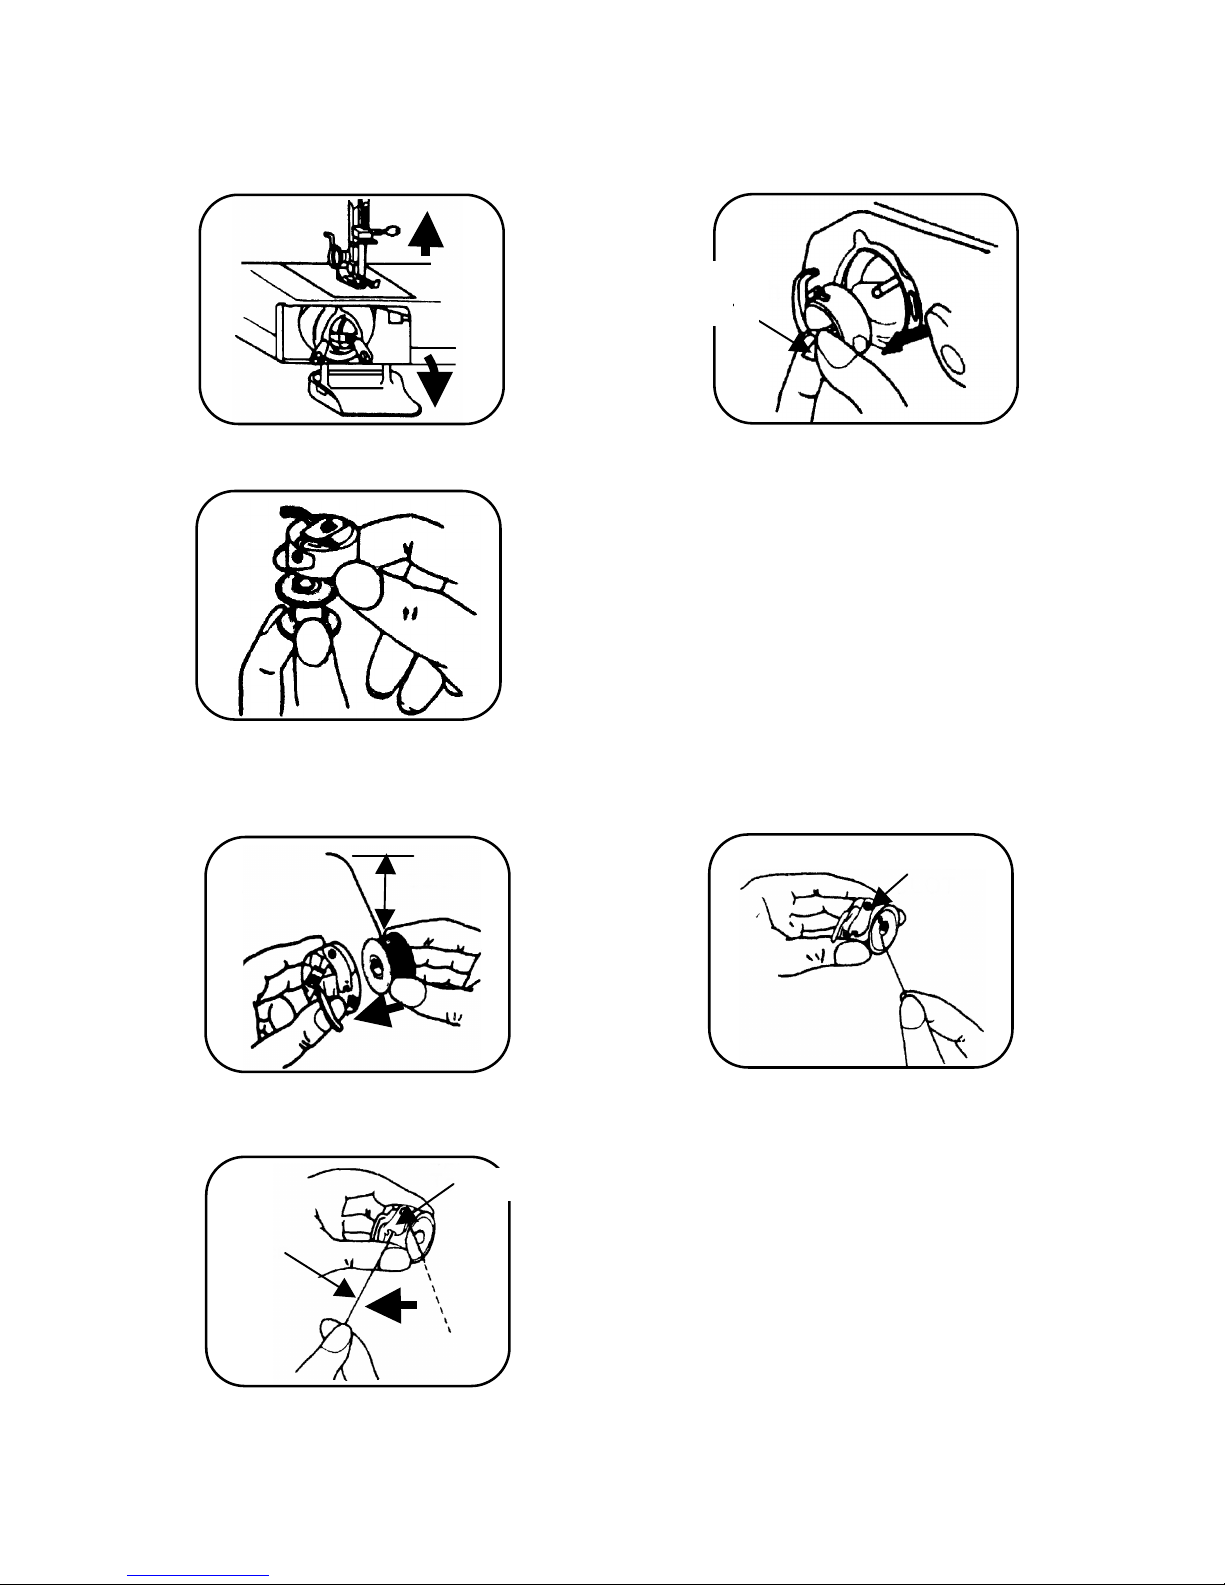
REMOVING BOBBIN CASE AND BOBBIN
1. Raise the needle to its highest
position and open shuttle race cover.
3. Release the latch and the bobbin will fall out
easily.
INSERTING BOBBIN INTO BOBBIN CASE
1. Pull 5 cm of thread from bobbin and
insert it into bobbin case as shown.
3. Pull the thread through the slot and under the
tension spring and draw out about 10 cm of
thread.
2. Open the hinged latch of the bobbin
case and pull the bobbin case out of
the machine.
Schl
itz
Slot
Gle
uf
Inte
rtice
2. Guide the end of thread into the slot.
Slot
Hinged latch
5 cm
10 cm
Tension spring

11
INSERTING BOBBIN CASE INTO SHUTTLE RACE
1. Raise the needle to its highest position. Pull the thread to the front, open the latch of
the bobbin case and hold it.
2. Holding the latch open, place bobbin case onto the center pin in the shuttle and
release latch.
Finger
Hinged latch
Insert

12
THREADING UPPER THREAD
Warning: Before contriving please adjust main control switch to (O).
Pass the thread from A to I as shown.
A B C
D G H
B
E
E I D
C
G
I
H
Twin needle threading.
Pass the thread from front to rear through needle and pull approx. 10 cm of thread through
eye of needle.
F
F

13
DRAWING UP THE BOBBIN THREAD
1. Hold the upper thread with left hand, turn the
hand wheel slowly towards you until the needle
goes down and comes up. Then stop the hand
wheel when the take up lever is at its highest
position.
Lightly draw up the upper thread, by which the
lower thread will be brought up in a loop.
2. Pull out both threads and place them together
under presser foot to the rear of the machine.
3. Place fabric under presser foot from the front,
lower presser foot.
4. Start to sew.
CHANGING SEWING DIRECTIONS
1. Lower needle down into fabric and
raise presser foot, pivot the fabric
around the needle to change direction
as desired.
LEVELING THE MACHINE
2. Lower the presser foot and start to sew.

14
Down
Up

15
ADJUSTING THREAD TENSION
Normal upper thread tension: 3– 5
Upper thread tension may be adjusted
by turning the thread tension dial.
Lower thread tension can be
increased by turning the screw of the
bobbin case slightly to the right
(clockwise). Turning it to the left
(counter -clockwise) decreases
tension.
Correct
Bobbin thread
Fabric
Upper thread
Incorrect
Inside of fabric
Upper thread

16
CHANGING NEEDLE
Warning: Before changing the pin please adjust main control switch to (O).
1. Raise the needle bar to its highest position.
2. Loosen needle clamp screw and remove the old needle.
3. With the flat side of the needle facing away from you, insert the needle as far up as it
will go.
4. Tighten the needle clamp screw securely.
INSERT “DARNING PLATE“
Sometimes you will want to control the feeding of fabric yourself. Turn the needle bar to its
highest position and raise the presser foot over the needle plate, aligning two pins of the
darning plate with holes of needle plate. You may then determine the movement of the fabric
by yourself. See page 24 for button sewing application.
Needle clamp screw
Tighten
Face flat side away from you
Loosen

17
FABRIC-THREAD-NEEDLE-TABLE
Please pay attention to the following list as a guide for sewing different types of fabric.
Fabric
Thread
Needle
Indication of
Upper Tension
Light
Nylon
80 Cotton
70 (10)
Tricot
60 S Fiber silk
Silk
50 Silk
Wool silk
50 S Fiber silk
80 (12)
Medium
Gingham
60-80 Cotton
80-90
(12-14)
Thin Jersey
60 S Fiber
80 (12)
Gabardine
50 Silk
Heavy
Denim
50 Cotton
90-100
(14-16)
Jersey
50 S Fiber
80-90
(12-14)
Tweed
50 Silk
80-90
(12-14)

18
SEWING (PATTERN SELECTOR) AND OPERATION TABLE
Stitch patterns
Presser foot
Darning plate
A-D
Straight stitch
E-H
Zigzag
I-K
Buttonhole
L
Automatic Embroidery
M
N
O
P
Blind hem
Q
Automatic Embroidery
R
Three step zigzag stitch
S
Blind stitch
T
Free-hand embroidery
Without

19
TO START SEWING
Important hints:
1. Raise the take-up lever to its highest position before starting and after stopping
sewing.
2. Hold both threads about 10 cms to the rear of the machine for the first two or three
stitches.
3. Sufficient fabric should be placed under needle before lowering the presser foot.
4. Depress foot/speed control and start to sew.
5. Test the machine stitches on a scrap of fabric you plan to use, adjusting the machine
for the length of the stitch and tension suitable to your fabric.
6. Separate the machine from the power system if you leave it unsupervised.
Attention:
1. When turning the balance wheel manually, always turn it toward you.
2. Guide the cloth gently with your hand.
3. To prevent breaking needles, always raise the needle out of the fabric when you stop
sewing.

20
HOW TO FINISH STITCHES
1. Sew to the edge of seam.
2. Push the reverse button and sew in reverse for about 3-4 cms.
3. Raise needle to its highest position.
4. Lift the presser foot and pull the fabric out of the back of the machine.
5. Cut threads as shown on the thread cutter.
Thread cutter

21
STRAIGHT STITCH
1. This type of stitching is used most frequently.
2. The zigzag presser foot can be used for both straight and zigzag sewing.
ZIGZAG SEWING
Pattern selector position
Satin stitching can be used for sewing
initials, patterns, appliqué, etc.
The zigzag stitch is a universal stitch. The
satin stitch pattern has short tense stitches
which can be used for sewing.
AUTOMATIC EMBROIDERY
These stitches have a wide range of
decorative and utility applications and are
particularly suitable for woven fabrics.
The Scallop stitch (L) is ideal for edging
collars, cuffs, tablecloths, serviettes etc. For
all the stitches.
With satin stitch a paper backing, will
improve the result.

22
BLIND STITCH
1. Fold fabric as shown.
2. Finish the seam as shown.

23
Adjust the width to obtain the correct seam.
Wrong: Needle is not piercing edge
to fold at all.
Correct seam.
Needle pierces the edge of fold too
much.

24
Match
BUTTON SEWING
Utilize the button presser foot. (Optional)
(Use Darning plate see page 16)
1. Place the darning plate properly.
2. Place button presser foot in position and attach it firmly.
3. Place the button between presser foot and fabric and lower the presser foot.
4. Manually turn hand wheel towards you, ensuring that the needle enters into both holes
of button without obstruction. (Increase or decrease width setting).
5. Sew about 7 stitches.
6. Pull both threads to the underside and tie them together.
BINDING
To sew fabrics edge select the multi-zigzag
stitch.
OVERCASTING
Use these stitches for oversewing rough
edges.

25
ZIPPER SEWING
Utilize the zipper foot.
Select straight stitch.
1. Zipper foot is designed to sew close to a raised edge,
thus preventing sewing on zipper.
2. Place zipper foot in position and attach firmly.
3. Fold the fabric about 2 cm and place the fabric
under foot.
1. To sew the left side of the zipper, set the zipper on
the right side of the needle.
2. To sew the right side of the zipper, set it on the left
side of the needle.
Sew as illustrated.

26
BUTTONHOLE SEWING
Utilise the foot of the buttonholes.
Set the stitch length dial.
Pattern selector dial
Steps
Setting
1. Set dial to “K“ position
2. Sew left side
3. Raise the needle
4. Set dial to “J“ position
5. Sew 5-6 stitches
6. Raise the needle
7. Set dial to “I“ position
8. Sew right side
9. Raise the needle
10. Set dial to “J“ position
11. Sew 5-6 stitches
12. Raise the needle
Before sewing, fit buttonhole foot as
shown.
Cut buttonhole along centre with cutter
as shown.

27
HEMMING (Optional)
1. Raise the foot and the needle to its highest position. Replace the foot with the picot foot.
2. Fold over the fabric edge by about 3 mm and place it under the foot. Secure the folded
edge with a few stitches. Slide the hem of your project into the picot foot by pulling the
threads.
3. Lower the foot and sew the hem.
4. While sewing fold the fabric to the left a little and guide it into the hemmer foot.
5. Make sure that the fabric does not move under the right half of the foot. The fabric must
be fed into the scroll of the hemmer sufficiently so that the project edge runs freely
through the groove under the foot.
Only suitable materials can be used and some practice may be necessary to achieve
the best results.
3 mm
1 mm
20 mm

28
TWIN NEEDLE (Optional)
Please place second spoon pin (B) into the position for twin needle sewing as page 5,
no. 4 pic.
Put in the twin needle with the flat side backwards.
Thread the machine for normal sewing, leading both threads to needle and passing
their ends separately through its eye.
Sewing width should not exceed the third widest stitch width, as this will break the
needles.
ATTENTION: When using the twin needle, adjust the stitch width to maximally 3.
Adjusting the stitch width to a higher number causes the needle to break.
EMBROIDERY
(Use Darning plate see page 16)
Remove the presser foot and attach the darning plate.
Lower feed dog and move the hooped fabric slowly in the desired direction until the
fabric has been embroidered.

29
QUILTER (Optional)
1. Slide the arm through the hole on top of the presser foot holder.
2. Move the quilter to the required stitch distance.
SEAM GUIDE (Optional)
1. Use the seam guide to sew long seams of an equal distance from the edge of the fabric.
2. Screw the guide on the right side of the needle plate and adjust the desired distance.
3. While sewing, the edge of the fabric must touch the guide.

30
MAINTENANCE
Warning: Please always unplug the power plug before you change the bulb or
perform maintenance work to the machine so that you prevent deadly
peril and electric shock.
Cleaning shuttle race
(A) Latch knob
(B) Shuttle race cover
(C) Shuttle hook
Open face cover and oil the parts indicated.
1. Raise needle to its highest position.
2. Take out the bobbin case.
3. Turn the latch knob A as illustrated.
4. Take off shuttle race cover.
5. Take out shuttle hook.
6. Clean and oil shuttle race and hook,
thereafter replace all parts in
reverse order.
Cleaning feed dog.
A
A B C

31
CHECKING PERFORMANCE PROBLEMS – TROUBLESHOOTING
Problem
Probable cause
What to do
Fabric does not
move
- Feed teeth down
- Raise feed teeth
Breaking needle
- Incorrect insertion of needle
- Bent needle
- Fabric is being pulled
- Needle, thread and fabric do
not match
- Re-insert needle
- Replace needle
- Do not pull fabric
- Use correct needle and thread
Breaking upper
thread
- Faulty adjustment of zigzag
width
- Improper threading
- Tight upper thread tension
- Bent needle
- Scratches or nicks on bobbin
case
- Re-adjust zigzag width
- Re-thread machine
- Reduce upper thread tension
- Replace needle
- Polish or replace bobbin case
Breaking bobbin
thread
- Tight bobbin thread tension
- Incorrect insertion of needle
- Improper threading
- Lint or thread in bobbin case
- Reduce bobbin thread tension
- Re-insert needle
- Rethread machine
- Clean bobbin case
Machine
jamming
- Excessive tension
- Needle, thread and fabric do
not match
- No oil
- Re-adjust tension
- Reduce proper needle and
thread according to type of
fabric
- Oil moving parts
Puckering
- Tension too tight
- Incorrect fabric, needle,
and thread
- Reset
- Use correct fabric, needle
and thread

32
STORING THE MACHINE
• Store the machine in its box or in a clean, dry place.
• Never wrap the power cord around the machine.
SERVICING THE MACHINE
If the unit is not operating correctly, please check the following:
• You have followed the instructions correctly.
• The wall socket is switched on.
• That the mains power supply is ON.
• That the plug is firmly in the mains socket.
If the machine still does not work after checking the above:
- Consult the retailer for possible repair or replacement. If the retailer fails to resolve the
problem and you need to return the machine, make sure that:
• The unit is packed carefully back into its original packaging.
• Proof of purchase is attached.
• A reason is provided for why it is being returned.
If the supply cord is damaged, it must be replaced by the manufacturer or an authorised
service agent, in order to avoid any hazard. If service becomes necessary within the
warranty period, the machine should be returned to an approved Home of Living Brands
(Pty) Limited service centre. Servicing outside the warranty period is still available, but
will, however, be chargeable.

33
PLEASE AFFIX YOUR PROOF OF PURCHASE/RECEIPT HERE
IN THE EVENT OF A CLAIM UNDER WARRANTY THIS RECEIPT MUST BE PRODUCED.
W A R R A N T Y
1. Home of Living Brands (Pty) Ltd (“Home of Living Brands”) warrants to the original
purchaser of this product (“the customer”) that this product will be free of defects in quality
and workmanship which under normal personal, family or household use and purpose
may manifest within a period of 1 (one) year from the date of purchase (“warranty
period”).
2. Where the customer has purchased a product and it breaks, is defective or does not work
properly for the intended purpose, the customer must notify the supplier from whom the
customer bought the product (“the supplier”) thereof within the warranty period. Any claim
in terms of this warranty must be supported by a proof of purchase. If proof of purchase is
not available, then repair, and/or service charges may be payable by the customer to the
supplier.
3. The faulty product must be taken to the supplier's service centre to exercise the warranty.
4. The supplier will refund, repair or exchange the product in terms of this warranty subject to
legislative requirements. This warranty shall be valid only where the customer has not
broken the product himself, or used the product for something that it is not supposed to be
used for. The warranty does not include and will not be construed to cover products
damaged as a result of disaster, misuse, tamper, abuse or any unauthorized modification
or repair of the product.
5. This warranty will extend only to the product provided at the date of the purchase and not
to any expendables attached or installed by the customer.
6. If the customer requests that the supplier repairs the product and the product breaks or
fails to work properly within 3 (three) months of the repair and not as a result of misuse,
tampering or modification by or on behalf of the customer, then the supplier may replace
the product or pay a refund to the customer.
7. The customer may be responsible for certain costs where products returned are not in the
original packaging, or if the packaging is damaged. This will be deducted from any refund
paid to the customer.
HOME OF LIVING BRANDS (PTY) LTD (JOHANNESBURG)
JOHANNESBURG TEL NO. (011) 490-9600
CAPE TOWN TEL NO. (021) 552-5161
DURBAN TEL NO. (031) 792-6000
www.homeoflivingbrands.co.za

34
120402001
A
15.03.27
 Loading...