

Page 1
WARNINGS
1. Neverremoveyourgogglewhileontheplayingeld.
2. Wearyourgogglewhenevershootingapaintballmarkerand
whenever in or near an area where paintball markers are
being shot.
3. Allpaintballmarkersmustbechronographedpriortoplay.
4. Donotplaywherepaintballvelocitiesexceed300fps.
5. Observeatalltimestherulesofsafeplayandtherulesofsafe
paintballmarkerhandling.
6. Wearearandfaceprotectioniftheyarenotintegralpartsofyour
goggle.
7. The goggle strap is not an ear protector.
8. Checkthelensbeforeandafteruseandreplacethelens
immediatelyifanycracksareobservedanywhereinthelens.
9. Replacethelensimmediatelyifthelensissubjectedtoadirect
impactfromapaintballfromadistanceunder10ft.
10.Replacethelensafterithasbeeninuseforoneyear.
11.Evenwithouroutstandinganti-fogcoating,foggingmayoccur.
12. Do not to use other substance(s) on the lens.
13. Only use our genuine replacement lenses.
14.Onlyuseahighqualityanti-fogsolutionsuchastheEmpireAnti-Fog
lens cleaner solution
15.HeadSize-AdjustableOneSize
16.Only68caliberpaintballsshouldbeusedwiththisgogglesystem
WARNING: Your lens has been treated with a state of the art ANTI-FOG
HARDCOAT which will provide excellent performance over an extended
period of time. To prolong the life of your lens, never expose it to extreme
heat or store in a airtight container that is extremely hot or highly humid
environment. This may result in damage to the coatings.
PROPER FITTING
Itisimperativethatyouproperlytyourgoggleeachtimeyouwearthem.
Thedualadjustmentbuckleslocatedontheheadstrapcombinedwiththe
triplesiliconebeadassuressecureeyeprotectionretentionwhenproperly
tted.
Adjustingthestrapissimple:
1. Placeheadstrapcenteredontherearmostpointofhead.
2. Usingbothhandspullforward(overeyeglassesifneeded).
3. Seatgoggleonfacesothatfoammakescontactwithforeheadand
cheeksandsealsaroundorbitalarea.
4. Usingbothhandspulladjustmentbucklesawayfromeachotheruntil
gogglesareinrmcontactwithfaceandheadstrapissnugagainsthead.
CLEANING & CARING
Likealleyeprotectivedevices,ourgogglewillserveyoulongerwhenproperly
cleanedandcaredfor.Thefollowingprocessshouldbefollowedaftereach
use:
1. Followingtheinstructionsforlensremoval,removethegogglelens.
2. Useadampmicro-berclothtowipeawayanydebrisfromlens
andframe.
3. Polishthelensoutsidewithadrymicro-bercloth.
4. Donottouchtheinsideofthelensunlessitisabsolutelyneccessary.
5. Rinseanddrytheframeifnecessary.DONOTrinsethelens.
6. Blotfoamuntilmostmoistureisremoved.
7. Allowgoggletocompletelyairdry(especiallythefoam)beforeputting
away.
8. Onlyuseadampmicro-berclothtocleanthelens.Keepyourgoggleina
protectivecontainertopreventscratchingofthelens.Replacelensafter
oneyearofuseoranytimethelensisimpactedfromlessthan10feet
distance.
STORAGE
Alwayscleananddryyourgogglesbeforestoringinacleantemperature
controlledareainsuchamannerastopreventaccidentalcontactwithother
objects,whichcouldresultindamagetothelens
Empire Paintball
11723LimeKilnRoad
Neosho,MO64850
1-800-220-3222
www.empirepaintball.com
EmpirePaintballisabrandofG.I.Sportz.
PATENT(S):Seewww.keeactionsports.com/patents©2016G.I.Sportz.All
rightsreserved.ThisG.I.SportzproductisprotectedbyoneormoreUnited
Statespatents.G.I.SportzTrademarks,DesignsandCopyrightsareprotectedbyoneormoreUnitedStatespatentsandInternationalLaw.Formore
informationcontactG.I.Sportzat[email protected]
WARNING!
PAINTBALL GUNS AND PAINTBALL GUN
ACCESSORIES ARE NOT TOYS!
- Carelessuseormisusemayresultinseriousbodilyinjuryordeath!
- Eyeprotectiondesignedforpaintballmustbewornbytheuserandallpersonswithinrange.
- Mustbe18yearsofageoroldertooperateorhandleanypaintballgunandpaintballgunaccessorieswithout
adultorparentalsupervision.
- Readandunderstandallcautions,warnings,andoperatingmanualsbeforeusinganypaintballgunor
paintball gun accessory.
- Donotaimpaintballgunateyesorheadofpeopleoratanimals.
- PaintballgunsaretobeusedwithPaintballsonly.
- Usecommonsenseandhavefun.
Anytamperingwiththeunitvoidsyourwarranty.
INNOEVENTSHALLSELLERBELIABLEFORANYDIRECT,INCIDENTALORCONSEQUENTIALDAMAGESOF
ANYNATURE,ORLOSSESOREXPENSESRESULTINGFROMANYDEFECTIVEPRODUCTORTHEUSEOFANY
PRODUCT.
GOGGLESAREFORPAINTBALLACTIVITIESONLYANDNOTFORINDUSTRIALUSE.
ATTENTION
1. Neretirezjamaisvotremasquelorsquevousêtessurleterraindejeu.
2. Portezvotremasqueàchaquefoisquevoustirezunmarqueurpaint ballet/ouchaquefoisquevousvoustrouvezdansouprèsd’une
zoneoùdesmarqueursdepaint-ballsontdesciblesdetir.
3. Touslesmarqueursdepaint-balldoiventêtrechronographiésavant
dejouer.
4. Nejouezpassilesvitessesdepaint-balldépassent300fps(91m/s).
5. Respecteztoujourslesrèglesdesécuritédujeuetlesrèglesde
manipulationsécuriséesdesmarqueursdepaint-ball.
6. Portezdesdispositifsdeprotectionduvisageetdesoreilless’ilsne
sontintégrésàvotremasquedeprotection.
7. Lasangledumasquen’estpasconçuepourprotégerlesoreilles.
8. Vériezleslentillesavantetaprèsutilisationetremplacezleslentilles
immédiatementsivousremarquezqu’ellessontssurées.
9. Remplacezleslentillesimmédiatementsiellesontsubiunimpact
directd’unpaint-ballàunedistanceinférieureà10piedsft(3m).
10. Remplacezlalentilleaprèsunand’usage.
11. Mêmeavecnotrerevêtementantibuéeexceptionnel,delabuéepeut
seformer.
12. Utilisezseulementunesolutionantibuéedehautequalitéconçue
pourleslentillesdemasquedepaint-ball,commelasolutionnet
toyanteantibuéepourlentillesEmpire
13. N’utilisezpasd’autre(s)substance(s)surlalentille.
14. Utilisezuniquementnoslentillesderechanged’origine.
15. Tailledelatête-Tailleréglable[taillesdetête21.25pces(54cm)à24.5
pces (62 cm)]
16. Seulsdesbillesdecalibre0,68doiventêtreutiliséesaveccesystème
decasque
ATTENTION : Votre lentille a été traitée avec un ENDUIT ANTIBROUILLARD
qui fournira d’excellentes performances sur une période de temps prolongée. Pour prolonger la vie de votre lentille, ne l’exposez pas à une chaleur
extrême et ne la rangez pas dans un récipient hermétique et extrêmement chaud ou dans un environnement très humide. Autrement le(s)
revêtement(s) pour s’endommager.
MONTAGE CORRECT
Ilestimpératifquevousinstalliezcorrectementvotremasqueàchaque
foisquevousleporte.Ledeuxbouclesderéglagesituéessurlasangle,
combinéesavecletriplecordondesiliconeassureunexationdeprotectionoculairesécuriséelorsqu’ilestcorrectementmonté.
Leréglagedelasangleestsimple:
1. Placezlasangledetêtecentréesurlepointleplusenarrière.
2. Aveclesdeuxmainstirezversl’avant(surlecasquesinécessaire).
3. Placezlemasquesurlevisagedesortequelamoussesoitencontact
aveclefrontetlesjouesetlesjointsautourdelazoneorbitaledes
yeux.
4. Aveclesdeuxmainstirezlesbouclesderéglageàl’opposéel’unede
l’autrejusqu’àcequelemasquesoitbienencontactaveclevisage,et
quelasangledetêtesoitbienplaquéecontrelatête.
NETTOYAGE ET ENTRETIEN
Commetouslesdispositifsdeprotectionoculaire,notremasquevousservira
pluslongtempslorsqu’ilestcorrectementnettoyéetentretenu.Leprocessus
suivantdoitêtrerespectéaprèschaqueutilisation:
1. Suivantlesinstructionsdedéposedelalentille,retirezlalentilledu
masquedesamonture.
2. Utilisezunchiffonmicrobreshumidepouressuyerlesimpuretésdela
lentilleetdelamonture.
3. Polissezlalentilleextérieureavecunchiffonmicrobressec.
4. Netouchezpasl’intérieurdelalentille,saufsicelaestabsolument
nécessaire.
5. Rincezetséchezlamonturesinécessaire.NErincezPASlalentille.
6. Épongezlamoussejusqu’àcequ’iln’yaitplusd’humidité
7. Laissezlemasqueséchercomplètementàl’airlibre(enparticulierla
mousse)avantdeleranger.
8. Utilisezuniquementunchiffonmicrobreshumidepournettoyerla
lentille.Gardezvotremasquedansunconteneurdeprotectionpour
éviterderayerlalentille.Remplacezlalentilleaprèsunand’utilisation
ouàtoutmomentsilalentilleesttouchéeàmoinsde10
piedsdedistance.
STOCKAGE
Nettoyeztoujoursetséchezvotremasqueavantdelerangerdansun
emplacementàtempératurecontrôléepropredefaçonàévitertoutcontact
accidentelavecd’autresobjets,cequipourraitendommagerlemasque.
Empire Paintball
11723LimeKilnRoad
Neosho,MO64850
1-800-220-3222
www.empirepaintball.com
EmpireestunemarquedeG.I.Sportz.
Brevet(s):Voirwww.keeactionsports.com/brevets©2016G.I.Sportz.Tous
droitsréservés.CetteG.I.Sportzproduitestprotégéparunouplusieurs
brevetsauxÉtats-Unis.KEEactionmarquesdesport,desdessinsetmodèles
etdroitd’auteursontprotégésparunouplusieursbrevetsauxÉtats-Uniset
ledroitinternation¬al.Pourplusd’informationscontactezsportsd’action
Keeau[email protected]protectora.
AVERTISSEMENT!
LES ARMES DE PAINTBALL ET LES ACCESSOIRES DES
ARMES DE PAINTBALL NE SONT PAS DES JOUETS
- Unemanipulationsansprécautionouunemauvaiseutilisationpeutprovoquerdeslésions
oulamort!
- Laprotectionoculaireconçuepourlepaintballdoitêtreportéeparl’utilisateuretpartoutes
lespersonnesquisetrouventàdistancedetir.
- Ceproduitn’estpasenventepourlesmoinsde18ans.
- Ilfautavoir18ansoupluspourmanipulerouutiliserunearmedepaintballetlesacce
soiresdesarmesdepaintballsanscontrôleparentaloulasupervisiond’unadulte.
- Lisezetcompreneztouteslesprécautions,avertissementsetmanuelsd’utilisationavant
d’utilisertoutearmedepaintballoutoutaccessoired’armedepaintball.
- Nevisezpaslesyeuxoulatêtedepersonnesoud’animauxavecl’armedepaintball.
- Lesarmesdepaintballdoiventêtreutiliséesavecdesbillesdepeinture.
- Faitespreuvedebonssensetamusez-vous.
Toutemodicationnonautoriséedel’unitéannulevotregarantie.
DANSAUCUNCASLEVENDEURN’ESTRESPONSABLEDEDOMMAGESDIRECTS,ACCIDENTELSOU
CONSÉCUTIFSD’AUCUNENATUREOUDEPERTESOUFRAISISSUSDETOUTPRODUITDEFFECTUEUXOU
DEL’UTILISATIONDETOUTPRODUIT.
LUNETTES SONT POUR LES ACTIVITÉS DE PAINTBALL SEULEMENT ET NON PAS POUR USAGE
INDUSTRIEL.
ADVERTENCIAS
1. Nuncaquitarselasgafasmientrasseencuentraenelcampo
dejuego.
2. Usarsusgafasmientrasdisparalasbalasdepinturay/ocuando
seencuentrecercadeláreadondelasmismasseestán
disparando.
3. Todaslasbalasdepinturadebentenercronógrafoantesdejugar.
4. Nojugardondelasvelocidadesdelpaintballexcedanlos91m/s.
5. Observarentodomomentolasreglasparaunjuegoymanejodea
pistoladepaintballseguros.
6. Utilizarprotectoresderostroyorejassiesquelosmismosno
estánincluidosenlasgafas.
7. Labandaelásticadelasgafasnoesprotectordeoídos.
8. Vericarloslentesantesydespuésdehaberlosutilizadoyen
casodeobservaralgunarajadurareemplazarlosinmediatamente.
9. Siloslenteshanrecibidounimpactodirectodeunabalade
pinturadesdeunadistanciamenoralos3mts,reemplazarlos
inmediatamente.
10. Despuésdeunañodeuso,reemplazarloslentes.
11. Aúnhabiendoutilizadonuestromagnícorevestimientoque
evitaelempañamientodeloslentes,puedeocurrir.
12. Utilizarúnicamenteunasolucióndiseñadaparaevitarel
empañamientodelasbalasdepinturaenloslentes,comoel
limpiadorEmpireAnti-Foglenscleaner.
13. No utilizar otras sustancias en los lentes.
14. Utilizarúnicamentenuestroslentesdereemplazooriginales.
15. Tamañodelacabeza–untalleajustableparamedidasdesde
54cm a 62cm.
16. Utilizarbalasdepinturacalibre.68únicamenteconeste
sistemadegafas.
ADVERTENCIA: Hemos aplicado a sus gafas una CAPA DURA ANTIVAHO
de tecnología avanzada que ofrece un excelente rendimiento durante un
largo periodo de tiempo. Para prolongar aún más la vida útil de sus gafas,
no las exponga nunca a un calor extremo ni las guarde en un envase hermético demasiado caliente, ni en un ambiente muy húmedo, ya que estas
condiciones podrían dañar el
recubrimiento.
AJUSTE ADECUADO
Esnecesariovolveraajustarlasgafasadecuadamentecadavezquelas
lleve.Lashebillasdedobleajustesituadasenlacorreadelacabeza,junto
conlatriplecapadesilicona,aseguranunabuenaretenciónyunaprotecciónadecuadaparalosojos,siemprequelasgafasesténconvenientementeajustadas.Elajustedelacorreasehacefácilmente:
1. Coloquelacorreaenlapartetraseradelacabeza.
2. Tirehaciadelanteusandoambasmanos(sillevaanteojos,pongalas
gafasdeseguridadporencimadeéstos).
3. Coloquelasgafasensurostrodemodoqueelprotetordeespumaesté
encontactoconlafrenteylospómulos,ysellebieneláreaalrededorde
losojos.
4. Tiredelashebillasdeajusteconambasmanosalavez,alejándolasuna
deotra,hastaquelasgafasesténrmementeencontactoconelrostroy
quelacorreaestéceñidaalacabeza.
LIMPIEZA Y CUIDADO
Nuestrasgafas,comocualquierprotectorparalosojos,lesseránútiles
durantemástiemposilaslimpiaycuidaadecuadamente.Porfavor,después
decadauso,sigalossiguientespasos:
1. Sigalasinstruccionesparaquitarlaslentes,yretirelaslentesdelas
gafas.
2. Useunpañodemicrobrahumedecidopararemoverlasuciedaddelas
lentesydelamontura.
3. Useunpañodemicrobrasecoparapulirlaparteexternadelaslentes.
4. Notoquelaparteinternadelaslentes,almenosqueseaabsolutamente
necesario.
5. Aclare y seque la montura si es necesario. NO aclare las lentes.
6. Sequeelprotectordeespumahastaeliminarprácticamentetodala
humedad.
7. Antesdeguardarlasgafas,dejequesesequenporcompletoalaire(en
particularelprotectordeespuma).
8. Paralimpiarlaslentes,sólouseunpañodemicrobrahumedecido.
Paraevitarrayarlaslentes,guardesusgafasdeseguridadenunacaja
protectora.Laslentesdebenserreemplazadastrasunañodeuso,ysi
hansidogolpeadasdesdeunadistanciamenora10pies.
GUARDADO
Siemprelimpiarysecarlasgafasantesdeguardarlasenunlugarlimpioy
contemperaturacontroladademaneratalquesepuedaprevenirelcontacto
accidentaldelasgafasconotrosobjetos,quepuedandañarloslentes.
Empire Paintball
11723LimeKilnRoad
Neosho,MO64850
1-800-220-3222
www.empirepaintball.com
EmpireesunamarcadeG.I.Sportz.
PATENTES(S):Verwww.keeactionsports.com/patentes©2016G.I.Sportz.
Todoslosderechosreservados.EsteproductoG.I.Sportzestáprotegido
porunaomáspatentesdeEstadosUnidos.KEEActionmarcasdeportivas,
diseñosyderechosdeautorestánprotegidosporunaomáspatentesde
EstadosUnidosyelDerechoInternacional.Paramásinformaciónpóngase
encontactoconKEEDeportesdeAcciónen[email protected]
¡ATENCIÓN!
¡LAS ARMAS DE PAINTBALL Y SUS ACCESORIOS NO
SON JUGUETES!
- Elusodescuidadoomalusopuedenresultarenlesionescorporalesgravesolamuerte!
- Proteccióndelosojosdiseñadosparapaintballdebenserusadosporelusuarioytodaslaspersonas
dentrodesualcance.
- Debetener18añosdeedadomásparaoperaromanejarcualquierarmadelpaintballpaintbally
accesoriosdearmassinadultoosupervisióndelospadres.
- Leerycomprendertodaslasprecauciones,advertenciasymanualesdeoperaciónantesdeusarcual
quierpistoladepaintballoaccesoriodepistoladepaintball.
- Noapuntelapistoladepaintballenlosojosolacabezadelaspersonasoporloanimales.
- Pistolasdepaintballdebenserutilizadossóloconbolasdepintura.
- Useelsentidocomúnydivertirse.
Cualquieralteracióndelaunidadanulalagarantía.
ENNINGÚNCASOELVENDEDORSERÁRESPONSABLEPORDAÑOSDIRECTOS,INDIRECTOSODERIVADOS
DENINGUNANATURALEZA,OPÉRDIDASOGASTOSDERIVADOSDECUALQUIERPRODUCTODEFECTUOSO
O DEL USO DE UN PRODUCTO.
GAFASSONPARAACTIVIDADESPAINTBALLYNOPARAUSOINDUSTRIAL.
Page 2
LENS REMOVAL & REPLACEMENT
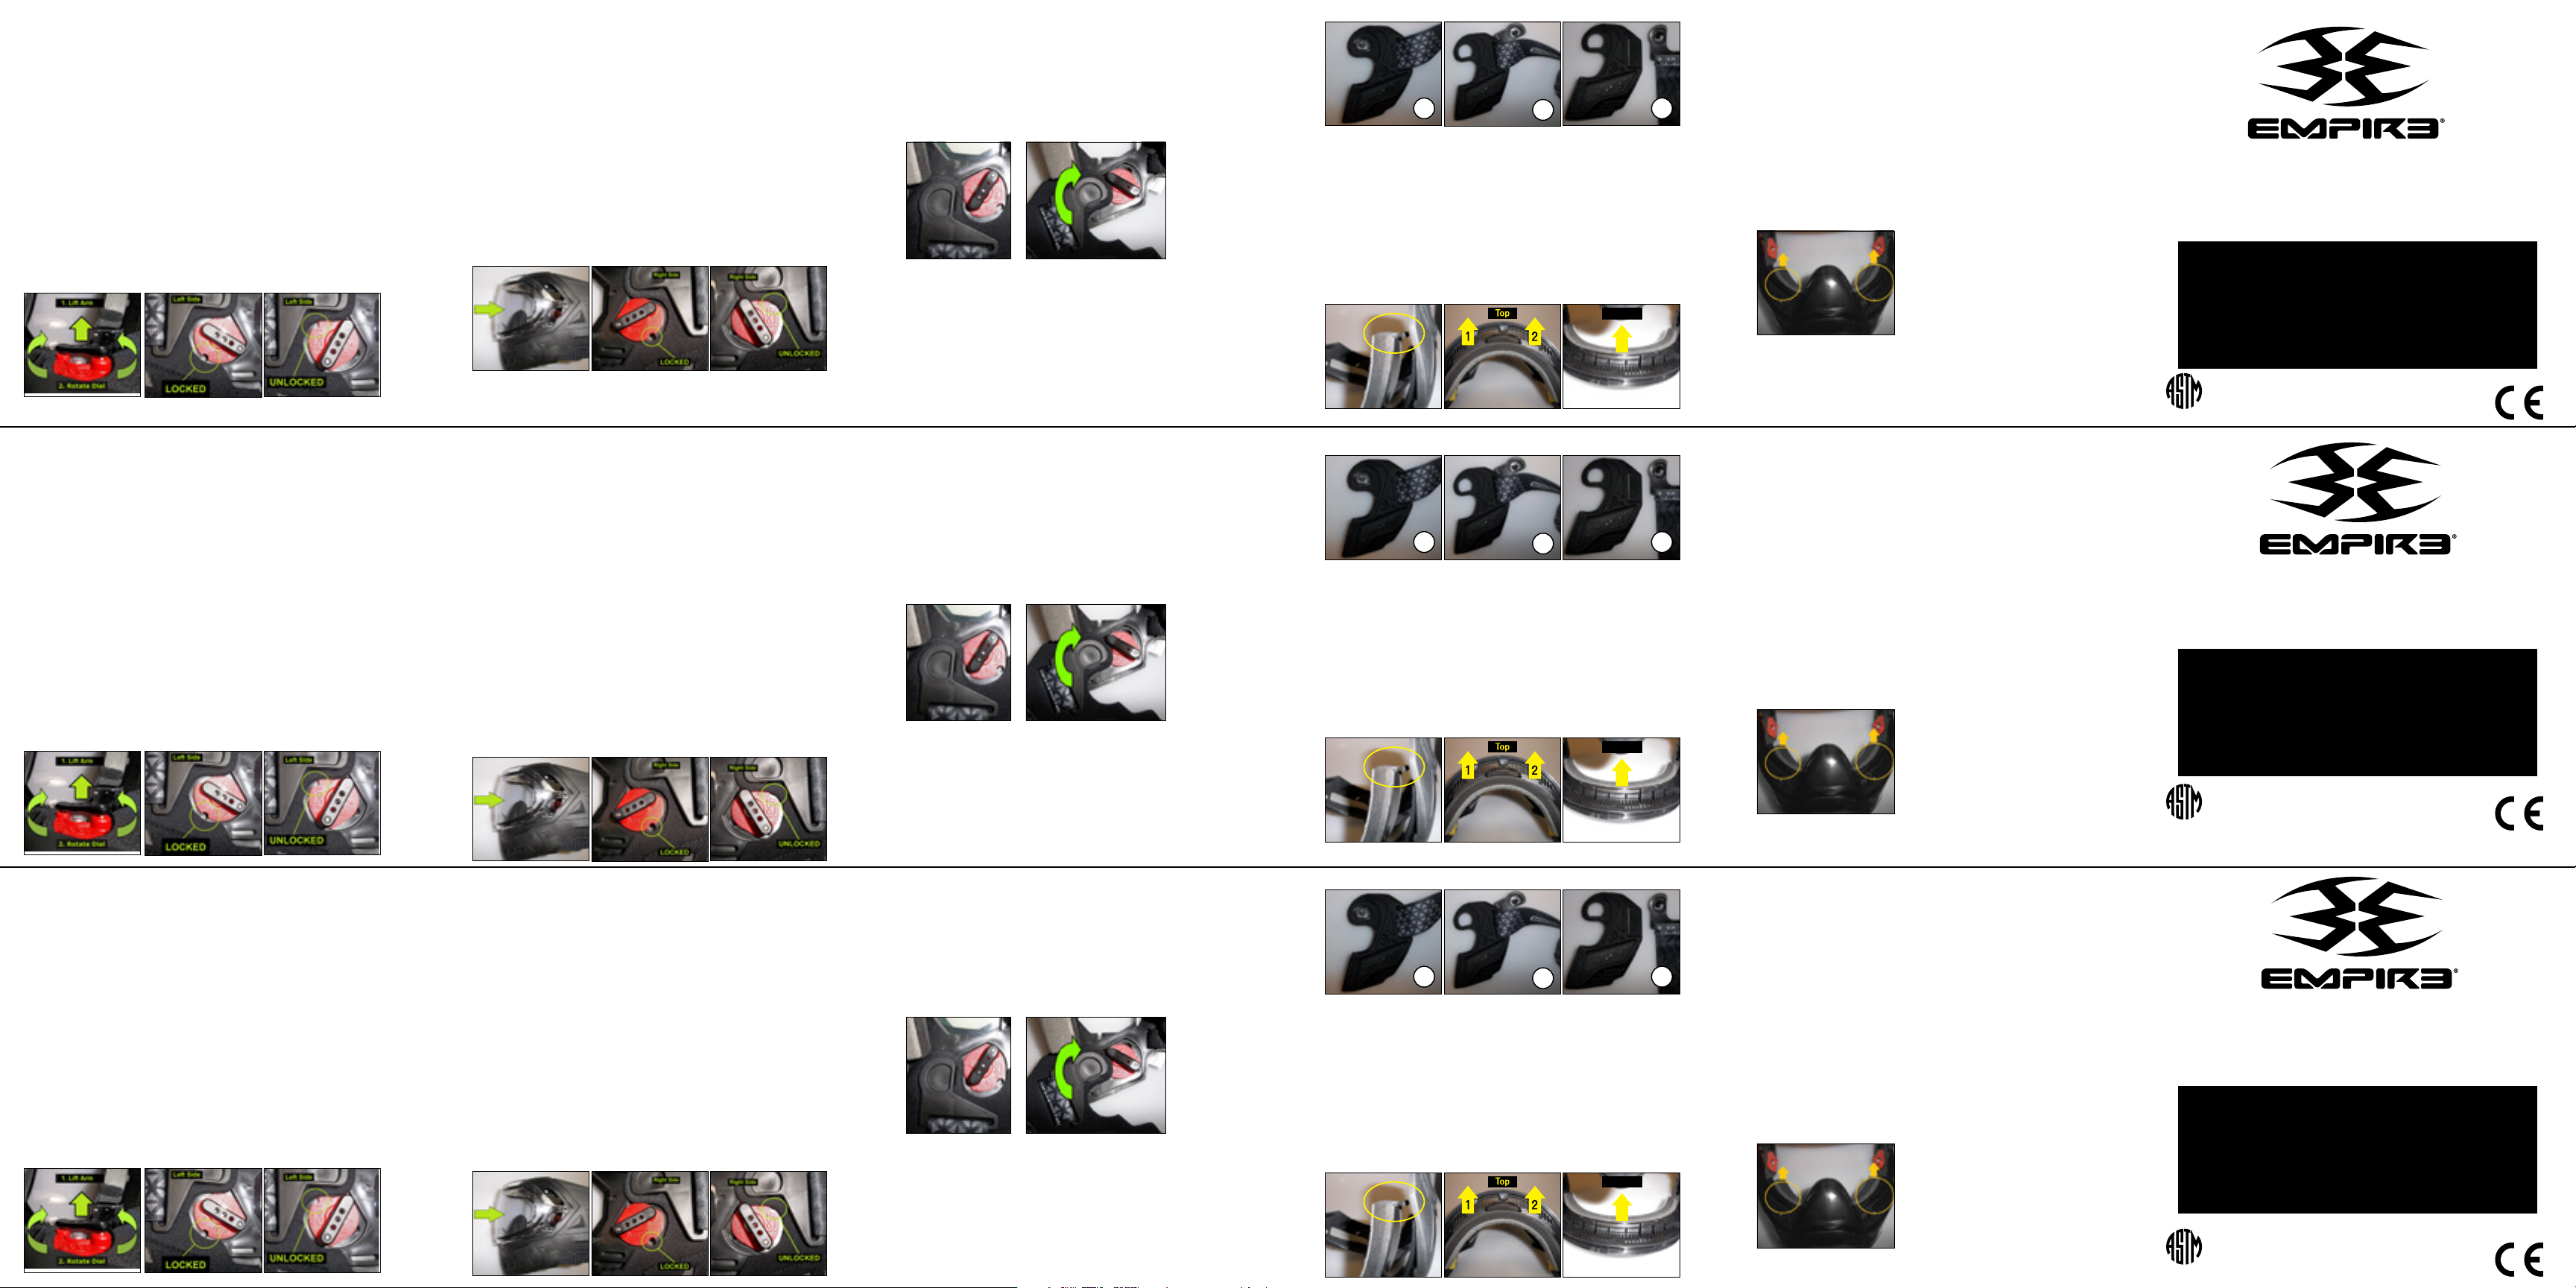
The goggle features a quick release lens system. This goggle comes with a
thermal double pane lens. To operate the lens retention system, follow these
steps:
LENS REMOVAL
1. Lengthenheadstrapasmuchaspossiblebyslidingtheadjusterstogether.
2. Locatethetwored-coloredLensLockingDialswithintheinteriorofthemask,locatedontheleft
andrightsidesoftheframe.
3. Choosetheright-handLockingDial(fromtheinsideofthegoggle)andgrasptheLensRelease
Armandpullitawayfromthedial.Whileholdingitraised,rotatethedialcounter-clockwiseuntil
itstopstounlockthatsideofthelens.Thedialcanonlymoveinonedirection.
4. Thelensisunlockedwhenthevisualindicatorhalf-moonisnolongerinlinewiththeholeinthe
frame.
5. Thenusingthesametechnique,turntheleft-handLockingDialclockwiseuntilitstopstounlock
thatsideofthelens.
6. Thelensisunlockedwhenthevisualindicatorhalf-moonisnolongerinlinewiththeholeinthe
frame.
7. Holdingthemaskpointingawayfromyou,pushthelensfreeoftheframeusingfromwithinthe
goggle,usingcarenottodamagetheinsidethermallens.
LENS INSTALLATION
1. Lengthenheadstrapasmuchaspossiblebyslidingadjusterstogether.
2. Holdmaskwithonehand&placethelensintotheslotsoneachsideoftheframe.
3. Pushlensfullyintothegoggleframe.Ensurethetabsaroundthelensedgefitintothematching
goggle grooves.
4. Locatethetwored-coloredLensLockingDialswithintheinteriorofthemask,locatedonthe
leftandrightsidesoftheframe.
5. Choosetheright-handLockingDialandgrasptheLensReleasearmandpullitawayfromthe
dial.Whileholdingthearmawayfromthedial,rotateitclockwiseuntilthedialstopstolock
thatsideofthelens.Thedialcanonlymoveinonedirection.
6. Thelensislockedwhenthevisualindicatorhalf-moonisinlinewiththeholeintheframe.
7. Choosethelef t-handLockingDialandgrasptheLensReleasearmandpullitawayfromthe
dial.Whileholdingthearmawayfromthedial,rotateitCounter-Clockwiseuntilitstopsto
lockthatsideofthelens.Thedialcanonlymoveinonedirection.
8. Thelensislockedwhenthevisualindicatorhalf-moonisinlinewiththeholeintheframe.
STRAP REMOVAL
1. NOTICE! Priortoremovingthestrap,thelensmustberemoved.Usetheinstructionslisted
previously in this manual to remove the lens. Removing the strap assembly prior to removing the
lenswillresultindamagetothestrapretainers.
2. Locatethetwostraplockingretainers,neartheredlensLockingDials.
3. FreetheEarProtectorsfromtheVelcrothatattachesthemtothegoggleskirt.
4. Choosetheright-handretainer,grasp&rotateitCounter-Clockwiseuntilitstops.
5. Therightretainercannowbepulledfreeofthegoggleframe.
6. Choosingtheleft-handretainer,graspandrotateitClockwiseuntilitstops
7. Theleftretainercannowbepulledfreeofthegoggleframeandthestrapassemblyisfree.
EAR PROTECTOR INSTALLATION
1. Theearprotectorsareremovablefromthegoggle;VelcroatthebottomoftheEarProtectorand
theStrapRetainerholdtheminplace.
2. NOTICE! TheLensandStrapassemblymustbothberemovedpriortoremovingtheEarProtectors.
Removingthestrapassemblypriortoremovingthelenswillresultindamagetothestrapretainers.
3. Oncethestrapretainershavebeenremovedfromthegoggleframe,theEarProtectorcanbe
pulledfreeofthestrapassembly.
1
FOAM REMOVAL
1. UPPER FOAM SECTION
a. Startingwiththeupperfoamsection,locatethetwotabsattheleftandrightendsofthe
foamholder.
b. Gentlypryoneofthetabsfreeofthegoggle.
c. Onceonesideofthefoamholderisfree,grabtheholderandpullitawayfromthegoggleuntil
onlytheoppositesidetabisstillattached.
d. Carefullyprytheremainingtabfreeofthegoggleframe.
2. LOWER FOAM SECTION
a. Grabthelowerfoamsectionandpullupandawayfromthegoggleframe.
b. Useananglethatfreestheoverlapofthefoamholderfromthelipofthe
goggleframe.
2
Bottom
3
3
FOAM INSTALLATION
1. UPPERFOAMSECTION
a. Locatethetwotabsattheleftandrightendsofthefoamholder.
b. Attachthetabsintothesmallholesofthegoggleframe.Theseholesarenearthetopofthe
goggle,abovetheLensLockingDialsandinfrontoftheearcovers.
c. Oncethetwotabsarelockedintoplace,manipulatethefoamholdersothetwosections
overlapthegoggleframeneartheventholes.Theyshouldbesecurelyinplacebeforemoving
onto the next step.
d. Oncethetoppartofthefoamholderissecure,lockthebottompartontothelipofthegoggle
frameundertheventholes.
e. Conrmthatthefoamholderissecurelyinplacepriortoplayingpaintball.
2. LOWERFOAMSECTION
a. Matchthenoseshapeofthefoamholdertotheinteriornoseshapeofthegoggleframe.
b. Slideeachofthefoamholdertabsoverthegoggleframeintheirrespectiveplaces.
c. Pressdownonthetopofthetabstoensuretheholderissecurelyinplace.
d. Pressalongthefoamtoensuretheholderissecurelyinthecorrectposition.
F-1776
EMPIRE™ GOGGLE SYSTEM
- - -
MANUAL
WARNING:
Failure to follow all instructions,
or adhere to all warnings contained
in this manual, or both, may result
in serious or permanent injury.
This model is certified by: SAI Global Assurance Services Ltd. Partis House, Ground
Floor, Davy Avenue, Knowlhill, Milton Deynes MK5 8HJ, United Kingdom
First Edition
Notified Body Number: 2056
DÉPOSE ET REMPLACEMENT DE LA LENTILLE
Le masque est équipé d’un système de dépose rapide de la lentille. Ce masque
est livré avec une double lentille de volet thermique. Pour actionner le système de
retenue de la lentille, suivez ces étapes :
DÉPOSE DE LA LENTILLE
1. Rallongezlasangleautantquepossibleenfaisantglisserlesdispositifsderéglageenmêmetemps.
2. Repérezlesdeuxmolettesdeverrouillagedecouleurrougedelalentilleàl’intérieurdumasque,
situéessurlescôtésgaucheetdroitdudelamonture.
3. Choisissezlecadrandeverrouillagededroite(depuisl’intérieurdelalunette),attrapezlelevierde
déblocagedelalentilleetdécrochez-leducadran.Toutenlemaintenantlevé,faitestournerle
cadrandanslesensinversedesaiguillesd’unemontrejusqu’àcequ’ilbloquepourdéverrouillerce
côtédelalentille.Lecadrannepeuttournerquedansuneseuledirection.
4. Lalentilleestdéverrouilléelorsquel’indicateurvisuelenformededemi-lunen’estplusalignéavec
letroudanslamonture.
5. Puis,enutilisantlamêmetechnique,tournezlecadrandeverrouillagedegauchedanslesensdes
aiguillesd’unemontrejusqu’àcequ’ilbloquepourdéverrouillercecôtédelalentille.
6. Lalentilleestdéverrouilléelorsquel’indicateurvisuelenformededemi-lunen’estplusalignéavec
letroudanslamonture.
7. Entenantlemasqueloindevous,poussezlalentillepourlalibérerdelamonturedel’intérieurdu
masque,enprenantsoindenepasendommagerlalentillethermiqueàl’intérieur.
QUITAR Y REEMPLAZAR LOS LENTES
Las gafas tienen un sistema rápido para quitar los lentes. Este gafas viene con
una lente de doble panel térmico. Para manejar el sistema de retención de los
lentes siga estos pasos:
QUITAR LOS LENTES
1. Estirarlabandadelacabezalomáximoposiblejuntandolashebillas.
2. Encontrarlosdosdialesdecierrerojosenelinteriordelamascara,ubicadosenamboslados
delmarco.
3. Escojaeldialdebloqueodelamanoderecha(desdeelinteriordelagafa)ysujeteelbrazode
desbloqueodelLenteyjalehaciaafueradeldial.Mientraslamantienelevantada,gireeldial
ensentidoantihorariohastaquesedetengaparadesbloqueareseladodellente.Eldialsólopuede
moverseenunadirección.
4. Ellenteestadesbloqueadocuandoelindicadorvisualdemedialunayanomuestraestarenlínea
coneloricioenelmarcodellente.
5. Luego,utilizandolamismatécnica,gireeldialdebloqueohacialamanoizquierdaenelsentido
horariohastaquesedetengaparadesbloqueareseladodellente..
6. Ellenteestadesbloqueadocuandoelindicadorvisualdemedialunayanomuestraestarenlínea
coneloricioenelmarcodellente.
7. Sostenerlamascaraapuntandohaciaafuera,ypresioneloslentesparaliberarlosdelmarcodesde
elladointernodelasgafas,concuidadodenodañarloslentestérmicosinternos.
INSTALLATION DE LA LENTILLE
1. Allongezlasangledetêteautantquepossibleenfaisantcoulisserlesystèmederéglage.
2. Tenezlemasqued’unemainetplacezlalentilledanslesfentesdechaquecôtédelamonture.
3. Poussezlalentilleàfonddanslecadredumasque.Assurez-vousleslanguettesautourdes
bordsdumasques’intègrentdanslesrainurescorrespondantesdumasque.
4. Repérezlesdeuxcadransdeverrouillagerougesàl’intérieurdumasque,situésàdroiteetà
gauchedelamonture.
5. Choisissezlecadrandeverrouillageàdroite,attrapezlelevierdedéblocagedelalentilleet
décrochez-leducadran.Toutenmaintenantlelevieréloignéducadran,faitestournerle
cadrandanslesensdesaiguillesd’unemontrejusqu’àcequ’ilbloquepourverrouillercecôté
delalentille.Lecadrannepeuttournerquedansuneseuledirection.
6. Lalentilleestverrouilléelorsquel’indicateurvisuelenformededemi-luneestalignéavecle
troudanslamonture.
7. Choisissezlecadrandeverrouillageàgauche,attrapezlelevierdedéblocagedelalentilleet
décrochez-leducadran.Toutenmaintenantlelevieréloignéducadran,faitestournerle
cadrandanslesensinversedesaiguillesd’unemontrejusqu’àcequ’ilbloquepourverrouiller
cecôtédelalentille.Lecadrannepeuttournerquedansuneseuledirection.
8. Lalentilleestverrouilléelorsquel’indicateurvisuelenformededemi-luneestalignéavecle
troudanslamonture.
9. Vériezquelalentilleestverrouilléeenessayantdelaretirerdelamonture,enprenantsoin
denepasendommagerlalentillethermiqueàl’intérieur.
10.Serrezlasanglepourbienlarégler.
COLOCACION DE LOS LENTES
1. Estirarlabandadelacabezalomáximoposiblejuntandolashebillas.
2. Sostenerlamascaraconunamanoycolocarloslentesenlosespaciosacadaladodelmarco.
3. Presionarloslentescompletamentealmarcodelasgafas.Asegurarquelaschasalrededor
delbordedeloslentesencajenenlasranurasdelasgafas.
4. Ubicarlosdialesdebloqueodelosdoslentesconcolorrojodentrodelinteriordelamáscara,
queseencuentraenlosladosizquierdoyderechadelmarcodellente..
5. Elijaeldialdebloqueodelamanoderechaysujeteelbrazodedesbloqueodellenteyjale
haciaafueradeldial.Mientrassostieneelbrazodeldial,gireensentidohorariohastaqueel
dialsedetengaparabloqueareseladodellente.Eldialsólopuedemoverseenunadirección.
6. Ellenteestabloqueadocuandoelindicadorvisualdemedialunamuestraestarenlíneacon
eloricioenelmarcodellente.
7. Elijaeldialdebloqueodelamanoderechaysujeteelbrazodedesbloqueodellenteyjale
haciaafueradeldial.Mientrassostieneelbrazoafueradeldial,gireensentidoantihorario
hastaqueeldialsedetengaparabloqueareseladodellente.Eldialsólopuedemoverseen
unadirección.
8. Ellenteestabloqueadocuandoelindicadorvisualdemedialunamuestraestarenlíneacon
eloricioenelmarcodellente.
9. Probarqueloslentesesténbloqueadostratandoderemoverlosdelmarco,concuidadodeno
dañarloslentestérmicosinternos.
10.Ajustarlabandaaunajusteadecuado
DÉPOSE DE LA SANGLE
1. REMARQUE!Avantderetirerlasangle,lalentilledoitêtreenlevée.Suivezlesinstructionsindiquées
précédemmentdanscemanuelpourretirerlalentille.Retirezlasangleavantderetirerlalentillepeut
endommagerlesdispositifsderetenuedelasangle.
2. Repérezlesdeuxretenuesdeverrouillagedelasangle,prèsdelamolettedeverrouillagedelalentille.
3. LibérezlesdispositifsdeprotectionsdesoreillesduVelcroquilesxentàlajupedemasque.
4. Prenezlesystèmederetenuedroit,saisissezetfaites-letournerdanslesensantihorairejusqu’àce
qu’ils’arrête.
5. Lesystèmederetenuedroitpeutmaintenantêtrelibérédelamonturedumasque.
6. Prenezlesystèmederetenuegauche,saisissezetfaites-letournerdanslesenshorairejusqu’àce
qu’ils’arrête.
7. Lesystèmederetenuegauchepeutmaintenantêtrelibérédelamonturedumasque.
INSTALLATION DE LA PROTECTION AUDITIVE
1. Lesprotectionsauditivespeuventêtreretiréesdumasque;leVelcroenbasdelaprotection
auditiveetlasanglederetenuequilesmaintiennentenplace.
2. REMARQUE!Lalentilleetlesystèmedesangledoiventtousdeuxêtreretirésavantd’enleverles
protectionsauditives.Retirezlesystèmedesangleavantderetirerlalentillepeutendommager
lesdispositifsderetenuedelasangle.
3. Unefoislesdispositifsderetenuedesanglesretirésdelamontureducasque,laprotection
auditivepeutêtreretiréedusystèmedesangle.
QUITAR LA BANDA
1. AVISO!Antesdequitarlabanda,sedebenquitarloslentes.Usarlasindicacionesantes
mencionadasenestemanualparaquitarloslentes.Quitarprimerolabandaydespuésloslentes
puedecausardañosenlossujetadoresdelabanda.
2. Ubicarlosdossujetadoresdelabanda,cercaalosdialesrojosdebloqueodeloslentes.
3. SoltarlosprotectoresdeorejasdelVelcroquelosunealafaldadelasgafas.
4. Tomarelsujetadorderecho,apretarloygirarlohacialaizquierdahastaquepare.
5. Elsujetadorderechoyasepuedequitardelmarcodelasgafas.
6. Tomarelsujetadorizquierdo,apretarloygirarlohacialaderechahastaquepare.
7. Elsujetadorizquierdoyasepuedequitardelmarcodelasgafasyelmontajedelabandaquedaliberada
COLOCACION DEL PROTECTOR DE OREJAS
1. Losprotectoresdeorejassonremoviblesdelasgafas.ElVelcroenlaparteinferiordelprotector
yelsujetadordelabandalosostienenensulugar.
2. AVISO!Elmontajedeloslentesylabandadebenquitarseantesderemoverlosprotectoresde
orejas.Quitarelmontajedelabandaantesqueloslentespuedecausardañosenlossujetadores
delabanda.
3. Unaquevezquitadoslossujetadoresdelmarcodelasgafas,elprotectordeorejaspuede
quitarsedelamonturadelabanda.
1
RETIRER LA MOUSSE
1. SECTION DE MOUSSE SUPÉRIEURE
a. Enpartantdelasectionsupérieuredemousse,repérezlesdeuxlanguettesauxextrémités
gaucheetdroitedusupportdemousse.
b. Soulevezdoucementl’unedeslanguettespourlesdétacherdumasque.
c. Unefoisuncôtédusupportdemousselibéré,saisissezlesupportetretirez-ledumasque
jusqu’àcequeseulelalanguettedecôtéopposésoitencoreattachée.
d. Retirezdélicatementlalanguetterestantedelamonturedumasque.
2. SECTIONDEMOUSSEINFERIEURE
a. Prenezlasectioninférieuredemousseettirezverslehautetloindelamontureducasque.
b. Adoptezunanglequilibèrelechevauchementdusupportdemousseduborddelamonture
ducasque.
2
Bottom
3
3
1
QUITAR LA ESPONJA
1. SECTOR SUPERIOR DE LA ESPONJA
a. Comenzandoporlapartesuperior,ubicarlasdossolapasalaizquierdayderechadelborde
delsujetadordelaesponja.
b. Suavementetirarunadelassolapasyquitarladelasgafas.
c. Unavezliberadalaesponjadeunlado,agarrarelsujetadoryretirarlodelasgafashastaque
únicamentelasolapaopuestaquedesujeta.
d. Conmuchocuidadotirarlasolapaquequedadelmarcodelasgafas.
2. SECTORINFERIORDELAESPONJA
a. Tomarelladoinferiorytirarhaciaarriba.
b. Usarunánguloqueliberelasuperposicióndelsujetadordelaesponjayelbordedelmarcode
lasgafas.
2
Bottom
3
3
INSTALLER LA MOUSSE
1. SECTION DE MOUSSE SUPÉRIEURE
a. Repérezlesdeuxlanguettesauxextrémitésgaucheetdroitedusupportdemousse.
b. Attachezleslanguettesdanslespetitstrousdelamontureducasque.Cestroussontprès
dusommetdumasque,au-dessusdesmolettesdeverrouillagedelalentilleenfacedes
protectionsauditives.
c. Unefoisquelesdeuxlanguettessontverrouillées,disposezlesupportdemoussedesorte
quelesdeuxsectionschevauchentlamontureducasqueprèsdesoricesdeventilation.
Ellesdoiventêtrebienenplaceavantdepasseràl’étapesuivante.
d. Unefoislapartiesupérieuredusupportdemoussesécurisée,verrouillezlapartieinférieure
surleborddelamontureducasquedanslestrousdeventilation.
e. Assurez-vousquelesupportdemousseestbienenplacéavantdejoueraupaint-ball.
2. SECTIONDEMOUSSEINFERIEURE
a. Placezlaformedunezdusupportdemoussedefaçonàcequ’elled’adapteàlaformedunez
intérieurdelamontureducasque.
b. Faitesglisserchacunedeslanguettesdesupportdemoussesurlamontureducasque.dans
leursemplacementsrespectifs.
c. Appuyezsurlehautdeslanguettespourvérierquelesupportestsolidementenplace.
d. Appuyezsurlamoussepourvérierquelesupportestsécurisédanslapositioncorrecte
COLOCACION DE LA ESPONJA
1. SECTOR SUPERIOR DE LA ESPONJA
a. Ubicarlasdossolapasalaizquierdayderechadelbordedelsujetadordelaesponja.
b. Sujetarlassolapasenlospequeñosoriciosdelmarcodelasgafas.Estosoriciosestán
cercaalapartesuperiordelasgafas,sobrelosdialesdecierredeloslentesyfrentealos
protectoresdeorejas.
c. Unavezqueambassolapasestánsujetasensulugar,manipularelsujetadordelaesponja
paraquelasdosseccionessesuperponganalmarcodelasgafascercadelosoriciosde
ventilación.Debenestaraseguradosensulugarantesdecontinuarconelsiguientepaso.
d. Unavezquelapartesuperiordelsujetadorestáasegurada,cerrarlaparteinferiorconla
lengüetadelmarcodelasgafasdebajodelosoriciosdeventilación.
e. Asegurarqueelsujetadordelaesponjahayaquedadoensulugarantesdejugar.
2. SECTORINFERIORDELAESPONJA
a. Juntarlapartedelanarizdelsujetadordelaesponjaconelinteriordelapartedelanarizdel
marcodelasgafas.
b. Deslizarcadaunadelassolapassobreelmarcodelasgafasasulugarcorrespondiente.
c. Presionarhaciaabajolapartesuperiordelassolapasparaasegurarqueelsujetadorhaya
quedadoensulugar.
d. Presionaralolargodelaesponjaparaasegurarqueelsujetadorestáenlaposicióncorrecta.
EMPIRE™ GOGGLE SYSTEM
- - -
MANUAL
ATTENTION:
Ne pas suivre les instructions suivantes
ou ignorer les mises en garde de
Ce manuel peut entrainer des blessures
graves et definitives;
First Edition
Este modelo está certificada por: SAI Global Assurance Services Ltd. Partis House,
F-1776
Ground Floor, Davy Avenue, Knowlhill, Milton Deynes MK5 8HJ, United Kingdom –
Número de organism notificado: 2056
EMPIRE™ GOGGLE SYSTEM
- - -
MANUEL
ADVERTENCIA:
El no seguir estas instrucciones, o el no seguir las
advertencias encontradas en este manual o ambas
puede resultar en una lesión seria y permanente.
First Edition
Ce modèle est certifiée par: SAI Global Assurance Services Ltd. Partis House,
Ground Floor, Davy Avenue, Knowlhill, Milton Deynes MK5 8HJ,
F-1776
United Kingdom- organisme notifié numéro: 2056
 Loading...