

Page 1
Page 2

Page 3

Important Safety Precautions and Explanation of Symbols
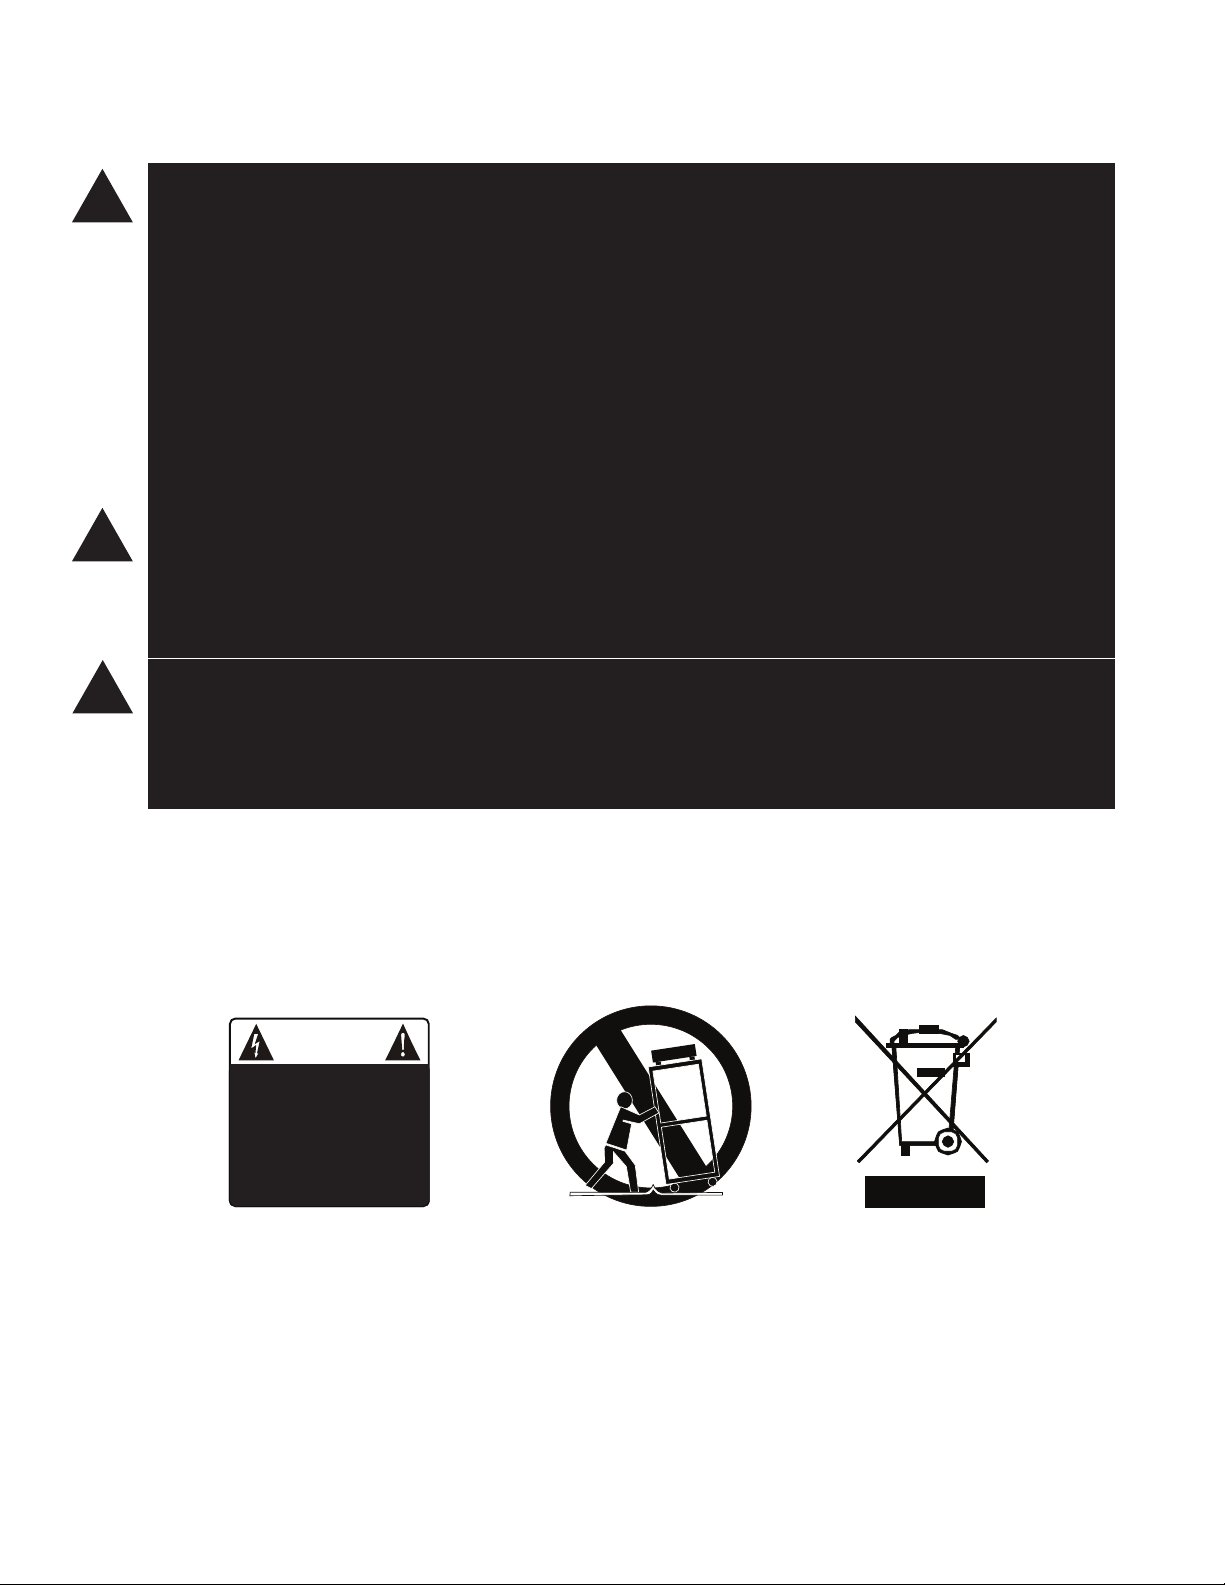
The exclamation point within an equilateral triangle is intended to alert the user to the presence of
important installation, operation, and service instructions in this manual.
!
The lightning ash with arrowhead symbol within an equilateral triangle is intended to alert the user to the
presence of uninsulated dangerous voltages within the enclosure that may be of sucient magnitude to
constitute a risk of electrical shock to the user.
Please read this manual thoroughly before attempting to install, congure, or operate the XPA Gen3
modular power amplier. After successful installation and conguration of the XPA Gen3 amplier, be sure
to retain this manual in a safe place for future reference.
Safety is a key component to a long lasting and trouble free installation. Please read and follow all
instructions and heed all warnings on the XPA Gen3 amplier and in this manual. The vast majority of the
subsequent safety precautions are common sense. If you are not comfortable with the installation of audio/
video entertainment equipment, you should seek the services of a qualied installation professional or call
us for help.
WARNING: TO REDUCE THE RISK OF FIRE OR ELECTRIC SHOCK, DO NOT USE THE XPA GEN3 AMPLIFIER
NEAR WATER OR IN WET LOCATIONS, DO NOT EXPOSE IT TO RAIN OR MOISTURE, DO NOT EXPOSE IT
!
TO DRIPPING OR SPLASHING FROM OTHER SOURCES, AND ENSURE THAT NO OBJECTS FILLED WITH
LIQUIDS SUCH AS VASES ARE PLACED ON IT. DOING SO MAY RESULT IN DAMAGE TO THE UNIT AND
THE RISK OF ELECTRIC SHOCK, WHICH MAY RESULT IN BODILY INJURY OR DEATH.
WARNING: TO REDUCE THE RISK OF ELECTRIC SHOCK, DO NOT REMOVE THE COVER FROM THE
XPA GEN3 AMPLIFIER. THERE ARE NO USERSERVICEABLE PARTS INSIDE THE UNIT. REFER ALL SERVICE
TO QUALIFIED SERVICE PERSONNEL.
Do not install the XPA Gen3 amplier near or above any heat sources such as radiators, heating vents, or
other apparatus’ that produce heat. Do not block any ventilation openings or heat sinks. Avoid installing
the unit directly above other heat-producing equipment unless sucient ventilation or forced-air cooling is
provided.
Do not install the XPA Gen3 amplier in locations without proper ventilation. The XPA Gen3 should not
be operated on a bed, sofa, rug, or similar surface that may block vents. The unit should not be installed
in an enclosed location such as a bookcase, cabinet, or closed equipment rack unless sucient forced-air
ventilation is provided.
Always install your XPA Gen3 amplier according to the manufacturer’s instructions and only use
attachments or accessories specied by the manufacturer.
Do not install the XPA Gen3 amplier on any stand, shelf, or other piece of furniture that is unable to
support its weight. If a cart is used to move the unit, use caution to avoid injury from tip-over.
Connect the XPA Gen3 amplier only to power sources of the correct voltage (as shown in this manual and
on the XPA Gen3 unit).
Protect power supply cables from being pinched, walked on, or otherwise damaged. Be especially careful
where the power cable enters the power outlet and the unit.
Only connect the XPA Gen3 amplier to an electrical outlet or extension cord of appropriate type and
rating.
DO NOT defeat the safety purpose of a grounding or polarized plug by removing ground pins or using
unsafe adapters. A polarized plug has two blades - one wider than the other. A grounding plug has a
third ground prong in addition to the two main conductors. The wide blade or third groundling prong is
provided for your safety. If the provided plug does not t your outlet, consult an electrician to replace your
obsolete outlet. If you replace the power cord, only use one of similar type and equal or greater current
rating.
Page 4
The power cable for the XPA Gen3 amplier should be unplugged from the outlet during severe electrical storms,
or when unused for a long period of time.
The XPA Gen3 should only be cleaned as directed in the manual. Avoid spraying liquids directly onto the unit and
NEVER spray liquids into the vents. Care should be taken so that small objects do not fall into the inside of the
!
unit.
You should seek service for your XPA Gen3 amplier by qualied service personnel if any of the following occur:
1. The power-supply cord or the plug has been damaged.
2. Objects or liquid have fallen or spilled into the vents.
3. The unit has been exposed to rain.
4. The unit exhibits a marked change in performance.
5. The unit has been dropped, or its enclosure or chassis is damaged.
NOTE: TO COMPLETELY DISCONNECT THE XPA Gen3 AMPLIFIER FROM THE AC POWER MAINS, DISCONNECT
THE AC POWER CORD FROM THE AC RECEPTACLE.
NOTE: THE POWER CORD ON THE XPA Gen3 AMPLIFIER MUST REMAIN READILY ACCESSIBLE AT ALL TIMES.
WARNING: EVEN THOUGH THE XPA Gen3 AMPLIFIER UNIT IS MODULAR, MODULES SHOULD ONLY BE ADDED,
!
REPLACED, OR RECONFIGURED BY AUTHORIZED SERVICE PERSONNEL. USERS SHOULD NOT ATTEMPT TO ADD,
REMOVE, OR RECONFIGURE MODULES INSIDE THE XPA Gen3 AMPLIFIER UNLESS EXPRESSLY AUTHORIZED
AND INSTRUCTED TO DO SO BY EMOTIVA OR ONE OF OUR AUTHORIZED REPRESENTATIVES. IMPROPER
INSTALLATION OR CONFIGURATION OF MODULES INSIDE THE UNIT MAY RESULT IN EQUIPMENT DAMAGE OR
PERSONAL INJURY.
WARNING: THE DIFFERENTIAL REFERENCE AMPLIFIER MODULES USED IN THE XPA-DR MODELS OF THE XPA
!
Gen3 AMPLIFIER ARE FULLY DIFFERENTIAL. BOTH OF THE SPEAKER OUTPUTS ON THESE MODULES CARRY AN
ACTIVE SIGNAL. DO NOT CONNECT THE BLACK (-) SPEAKER OUTPUT TERMINAL ON AN XPR-DR AMPLIFIER TO
GROUND, OR TO A POWERED SPEAKER OR SPEAKER SWITCH WHICH UTILIZES A COMMON GROUND. DOING SO
MAY RESULT IN SERIOUS DAMAGE TO THE AMPLIFIER OR YOUR OTHER EQUIPMENT.
CAUTION
CAUTION: TO REDUCE THE RISK
OF ELECTRICAL SHOCK, DO
NOT REMOVE COVER. NO USER
SERVICEABLE PARTS INSIDE.
REFER SERVICING TO QUALIFIED
SERVICE PERSONNEL.
Page 5

XPA Gen3
XPA Gen3 And XPA-DR Gen3 Modular Power Amplier
Contents
Important Safety Precautions and Explanation of Symbols
XPA Gen3 Modular Power Amplier ......................................................................... 1
Introduction ......................................................................................................................3
About This Manual .......................................................................................................... 4
Features ..............................................................................................................................5
Unpacking ..........................................................................................................................6
XPA Gen3 Front Panel ....................................................................................................7
XPA Gen3 Chassis Rear Panel ......................................................................................8
XPA Gen3 Amplier Chassis And Modules .......................................................... 10
High Powered Single Channel Amplier Module ............................................. 12
Dierential Reference Amplier Module ............................................................. 13
Stereo Amplier Module ........................................................................................... 14
Quick Start ...................................................................................................................... 15
Connections ................................................................................................................... 16
Conguration and Operation .................................................................................. 17
Care and Maintenance ............................................................................................... 18
Specications ................................................................................................................. 19
Troubleshooting ........................................................................................................... 26
Emotiva Audio Corporation Five-Year Limited Warranty ............................... 27
Notes ................................................................................................................................. 30
Page 1
Page 6

XPA Gen3
Page 2
Page 7

XPA Gen3
Introduction
Thank you for purchasing your new Emotiva XPA Gen3 modular power amplier.
The XPA Gen3 modular power amplier is the end result of many years of experience designing and
rening audiophile power amps, culminating in an amplier with the solid power and superb sound
quality necessary to be equally at home in any two channel audiophile sound system or top quality
home theater system.
The XPA Gen3 represents a fusion of the best aspects of both traditional and modern audio
amplier technologies - each chosen to provide the optimum combination of sound quality,
eciency, and functionality. The circuitry in each output module is based on the exceptional
sounding short signal path Class A/B output circuit we designed for our XPA Gen1 and Gen2
ampliers, combined with the enhanced eciency of the Optimized Class H™ power topology we
developed for our XPR series ampliers.
The enormous amount of power required to operate the output modules in the XPA Gen3 is
supplied by a massive Switched Mode Power Supply (SMPS). The SMPS we designed combines
high eciency, massive long term power capacity, and impressive short term dynamic power
reserves. Although we tend to think of switching supplies as modern technology, the controller
chip and basic circuit design used in our new SMPS have a long track record of reliably powering
commercial and even automotive devices, so we feel comfortable trusting it with the critical mission
of providing clean, reliable power for our new XPA Gen3 amps. Compared to the linear transformerbased power supplies used in our previous generation of ampliers, the new SMPS oers improved
electrical performance and reliability, while reducing the overall weight of the amplier by about
35%, which makes the new XPA Gen3 ampliers easier to ship and easier to install. It also seamlessly
detects and congures itself for any line voltage between 100 VAC and 250 VAC, and features a
convenient push-button circuit breaker for easy recovery from any power faults.
Another important aspect of the new XPA Gen3 amplier series is its modular construction. The
new XPA Gen3 amps all share a common chassis and power supply, optimized for either our HighPowered Single Channel Amplier Modules or our Dierential Reference Amplier Modules, and the
same microprocessor-controlled front panel. The XPA Gen3 can be ordered in a variety of dierent
congurations to fulll your current needs. Additional modules can be added later as you expand
your system and require more channels of high quality amplication.
And, nally, we’ve added the extra features that our customers expect from a high-end amplier....
a heavy-duty chassis with elegant styling; a trigger input and output; switchable front panel status
indicators; independent input selection for each channel; high quality chassis-mounted input
connectors; heavy duty speaker terminals.
Whether you think of our new XPA Gen3 modular power amplier as an impressive new product,
or simply as the obvious successor to an already impressive line of audiophile ampliers, we’re sure
you’ll be impressed with its performance, exibility, and sound quality.
Happy listening!
The Emotiva Team
Page 3
Page 8

XPA Gen3
About This Manual
This manual will provide you with the information you need to get started enjoying your
XPA Gen3 modular power amplier.
We suggest that you read through the entire manual; we kept things as short and direct as
possible. Even if you’re an expert user, you will probably nd some interesting information and
useful suggestions.
If you’re really in a hurry to get started, please read the Quick Start section (on page 15); you may
then read the remainder of the manual at your leisure.
You may wish to keep a copy of this manual with your records, and record serial numbers or other
purchase information on the Notes page at the back.
Page 4
Page 9

XPA Gen3
Features
The XPA Gen3 modular power amplier is an audiophile-grade power amplier that provides
up to fourteen channels of superb quality audio amplication. The XPA Gen3 features our fully
discrete, high-current, short signal path class A/B output section, combined with the Optimized
Class H™ power supply topology we developed for our iconic XPR ampliers, and our new,
powerful yet light weight and ecient, audiophile grade Switch Mode Power Supply.
Welcome to the XPA Gen3 modular power amplier. The XPA Gen3 is the next generation
of power amplication for the audiophile who wants it all: superb sound quality, modular
construction, and lasting value.
Features of the new XPA Gen3 modular power amplier:
• True audiophile-quality sound - as with all of our ampliers, the XPA Gen3 modular power
amplier was designed rst and foremost to sound superb in all types of audio systems.
• Great sounding Class A/B output stage - ensures smooth detailed sound and incredibly
natural imaging - without a trace of harshness or strain.
• Optimized Class H™ power supply topology - delivers improved eciency without
compromising audio performance.
• Switched Mode Power Supply (SMPS) - oers all of the performance of a traditional linear
power supply, while improving eciency and reliability, and reducing overall weight.
• Fully modular construction - allows you to purchase as many channels as you need today,
then add more channels later when and if you need them.
• Top quality parts and construction throughout - promise years of reliable service.
• Totally stable - designed for use in the real world, with real speakers.
• Heavy steel 4RU chassis with milled aluminum face plate - provide strength and rugged
good looks.
• Gold plated ve-way speaker binding posts with clear shields - allow you to use a wide
range of speaker cables with bare wires, lugs, or banana plugs.
• Solid machined gold-plated RCA input connectors - provide a reliable connection with a
wide variety of audio interconnects.
• Choice of balanced or unbalanced inputs - for maxumum exibility and compatibility with
a wide variety of other equipment.
• Remote trigger input and output - allow the XPA Gen3 to be turned on by trigger-enabled
equipment, and to activate other trigger-enabled equipment.
• Audiophile-grade fault protection - entirely transparent under normal conditions, yet
protects the amp and your other equipment from all common fault conditions.
• Universal AC line voltage operation - the XPA Gen3 operates on any line voltage between
100 VAC and 250 VAC; and is protected from faults by a rugged resettable circuit breaker.
• Standard IEC power inlet - ts all standard and audiophile IEC power cables.
• Fully ve year warranty - ensures that you’ll be able to enjoy your XPA Gen3 amplier for
years to come.
You can nd more information about the XPA Gen3 on our website at www.emotiva.com.
Page 5
Page 10

XPA Gen3
Unpacking
Your XPA Gen3 modular power amplier was carefully packed and should reach you in perfect
condition. If you notice any shipping damage or other issues when you unpack it, please contact
Emotiva immediately.
Gently remove your XPA Gen3 from the packing carton and remove all wrappings and shipping
material.
It is important to save the box and all packing materials in case your power amp ever needs to be
moved or shipped back to the factory for service.
We truly value customer feedback and would like to hear from you.
Page 6
Page 11
XPA Gen3
XPA Gen3 Front Panel
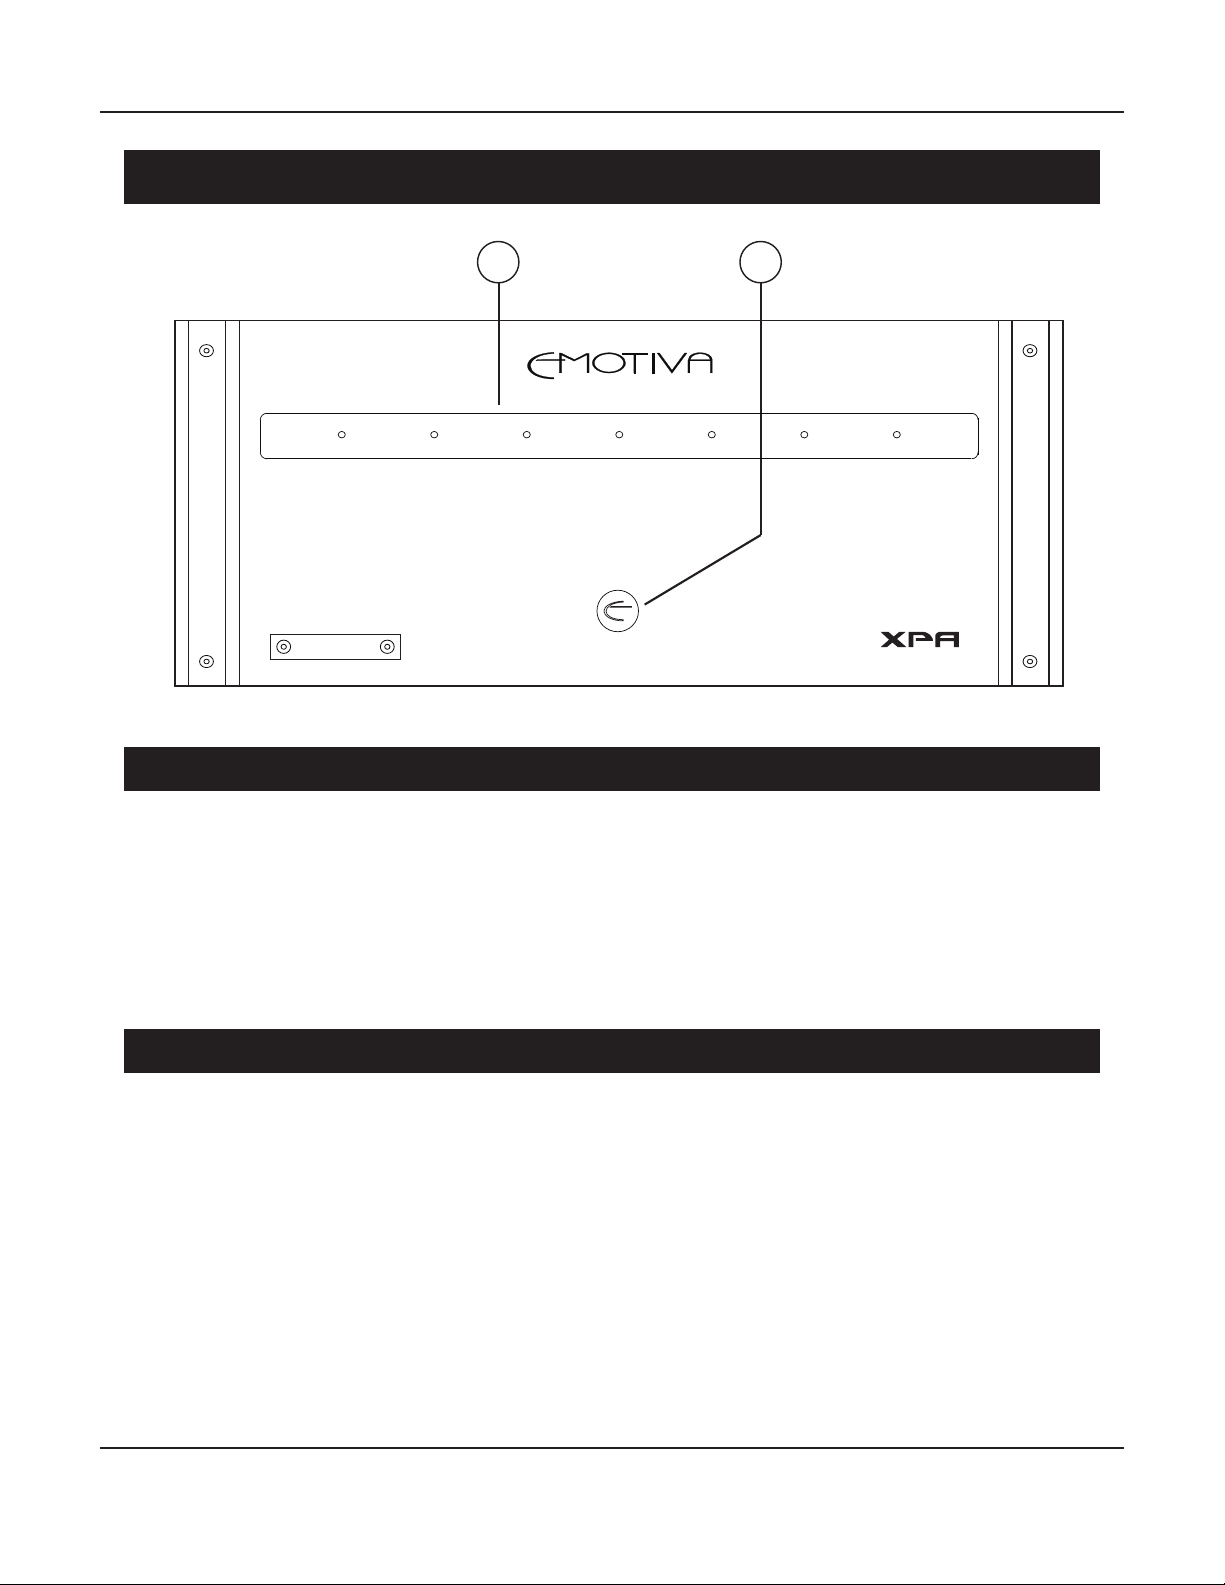
1 2
FIVE
STANDBY
G E N 3
1. Status Display Window
This window houses the status LEDs.
Note: The Status LEDs can be disabled by the Status Indicator switch on the rear panel.
Note: The Status LEDs illuminate red during startup; blue in normal operation; and ash red to
indicate a channel fault.
Note: On the XPA Gen3, each module has one corresponding Status LED, so the number of
Status LEDs on your XPA Gen3 will depend on the number of amplier modules installed.
2. Standby Button
Press to switch the amplier On; press again to return to Standby; the halo ring around the button
(and the “E” on the button) illuminate amber for Standby and blue for On.
Note: In order for the XPA Gen3 to operate, the rear panel AC Power Switch must rst be
turned On.
Page 7
Page 12
XPA Gen3
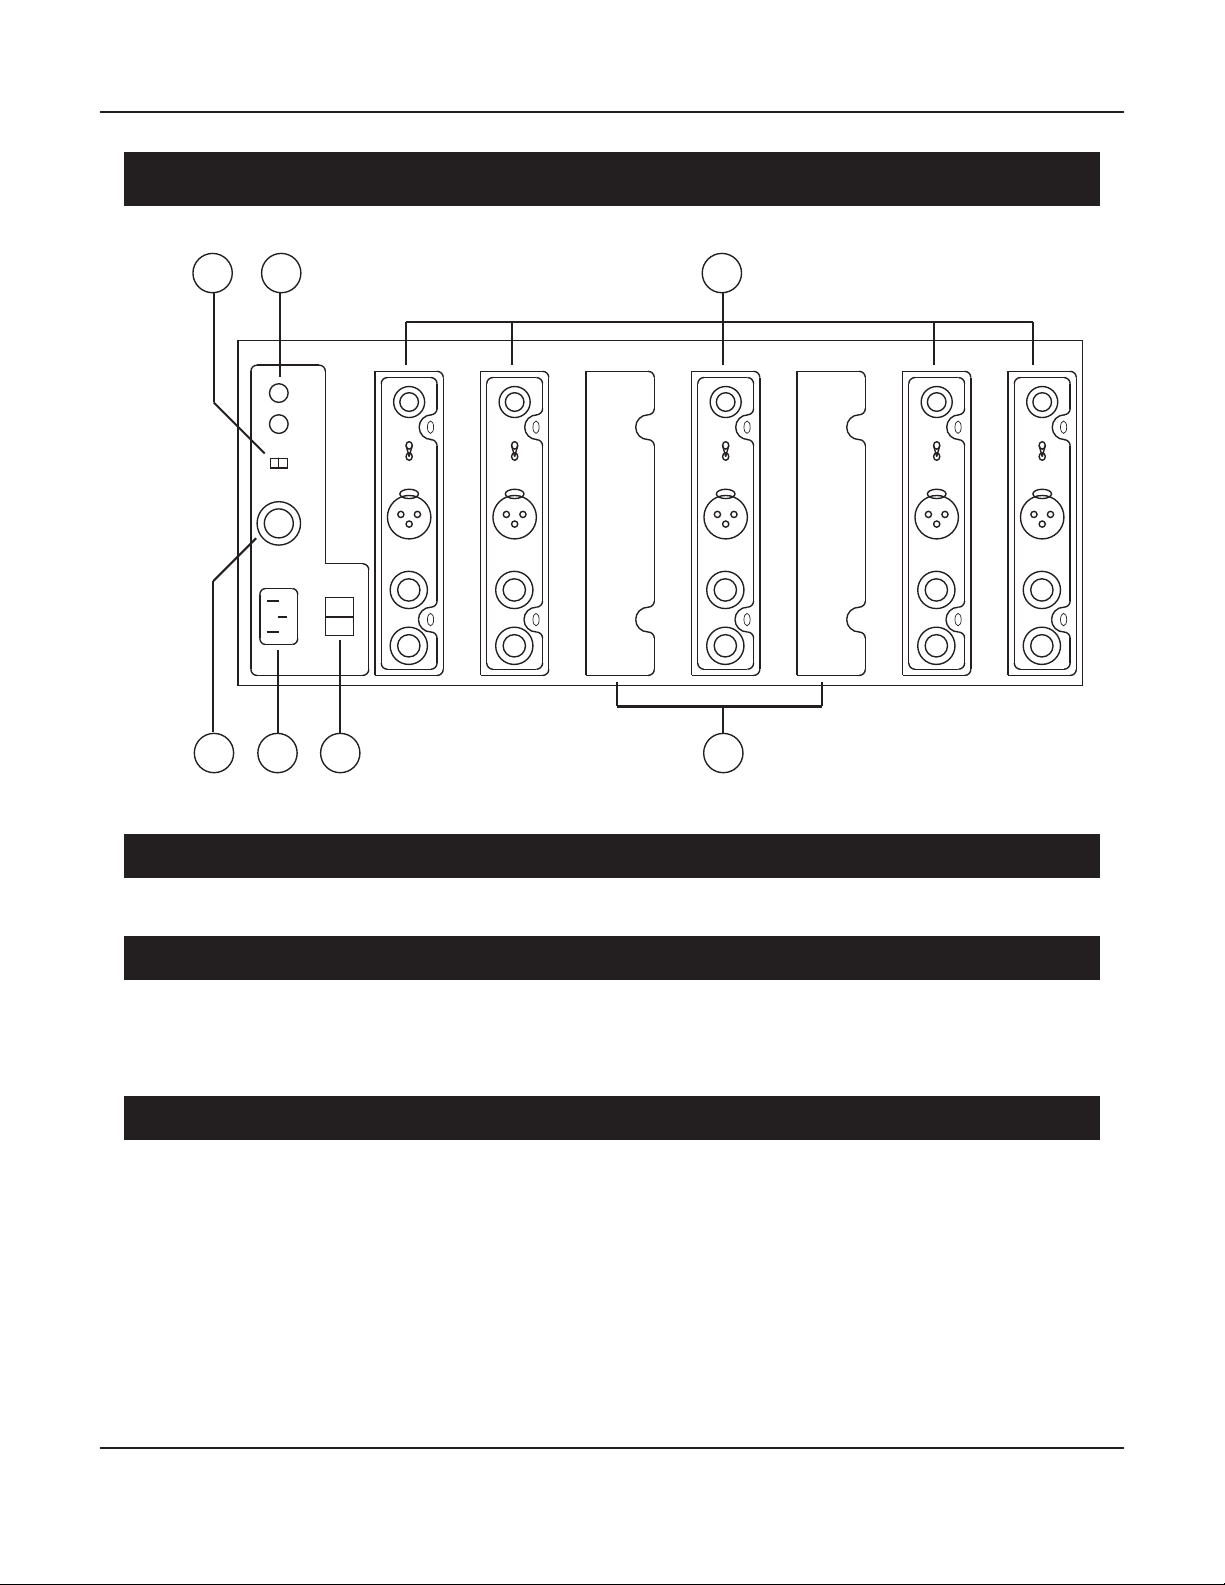
XPA Gen3 Chassis Rear Panel (XPA-5 Gen3 shown)
1 32
TRIGGER
INPUT
TRIGGER
OUTPUT
ON OFF
STATUS LEDS
CIRCUIT BREAKER
20A 125/250V~
POWER
INPUT SELECT
INPUT SELECT
+
+
INPUT SELECT
+
INPUT SELECT
+
INPUT SELECT
+
_
_
_
_
_
4 65 7
1. Status LEDs Switch
Disables the front panel status LEDs when set to O.
2. Trigger Input and Trigger Output
The XPA Gen3 is switched On (from Standby) when a trigger signal is presented at the Trigger
Input; the XPA Gen3 returns to Standby when the trigger signal is removed. When the XPA Gen3 is
on, a 12 VDC signal is sent from the Trigger Output to control other devices.
3. Amplier Modules (see next section for details)
The XPA Gen3 chassis can be congured with a variety of dierent amplier modules. All installed
amplier modules are powered by the XPA Gen3’s power supply, and controlled and monitored
by the XPA Gen3’s microprocessor-controlled front panel and Status LEDs.
Note: The XPA Gen3 can be upgraded after purchase by adding additional amplier modules.
The front panel controls and indicators will automatically congure themselves to work with
the number of amplier modules installed. Only the Status LEDs associated with the modules
currently installed will be illuminated.
Note: Amplier modules should only be serviced, removed, rearranged, or installed by Emotiva
or your local Emotiva authorized service center.
Page 8
Page 13

XPA Gen3
4. Circuit Breaker
The XPA Gen3 is protected by a heavy duty user-resettable Circuit Breaker. If a fault occurs, the
button on the Circuit Breaker will pop out. When the Circuit Breaker button is out, the XPA Gen3
will not operate, and none of the Status LEDs will be lit. To reset the Circuit Breaker, press the
button rmly in.
When the circuit breaker trips, the button will pop out and extend noticeably from the rear
panel. If this happens, try resetting the Circuit Breaker by pressing the button rmly in. If the
Circuit Breaker trips a second time, please contact Emotiva, or your nearest authorized Emotiva
service representative.
5. IEC Power Cord Receptacle
The XPA Gen3 can be powered by any receptacle that provides between 100 VAC and 250 VAC
at 50/60 Hz. This receptable accepts a standard removable IEC AC power cable (a high-quality
commercial power cable is included).
6. AC Power Switch
Switches the main AC power to the XPA Gen3 On and O. When this switch is O, no controls
operate (the XPA Gen3 cannot be turned On from the front panel or by a trigger signal).
7. Covers
Blank metal cover plates cover unoccupied expansion slots in the XPA Gen3 chassis.
Page 9
Page 14

XPA Gen3
XPA Gen3 Amplier Chassis And Modules
The XPA Gen3 modular amplier family includes several dierent options.
XPA Gen3 Chassis
The original XPA Gen3 amplier chassis contains seven slots, each of which can be populated
with one of two dierent modules. Each chassis can initially be congured with from two to seven
modules, and more modules can be added later - up to a total of seven modules. The orginal XPA
Gen3 chassis can be congured with any combination of High-Powered Signle Channel Amplier
Modules and Stereo Amplier Modules.
High-Powered Single Channel Amplier Module
Each individual High-Powered Single Channel Amplier Module delivers 300 watts RMS into
8 Ohms and 550 watts RMS into 4 Ohms when measured continuously. When measured with two
channels driven continuously, in a chassis with any number of channels installed, the
High-Powered Single Channel Amplier Module will deliver 300 watts/channel RMS into
8 Ohms and 490 watts/channel RMS into 4 Ohms. Although the continuous power rating is
slightly lower when more than two channels are driven simultaneously, the two-channels-driven
power rating is representative of what you will experience when reproducing dynamic content
like music.
Stereo Amplier Module
Each Stereo Amplier Module delivers two channels of audio at 65 watts/channel RMS into 8
Ohms and 100 watts/channel RMS into 4 Ohms when measured continuously with two channels
driven, in a chassis with any number of channels installed. Although the continuous power rating
is slightly lower when more than two channels are driven simultaneously, the two-channelsdriven power rating is representative of what you will experience when reproducing dynamic
content like music.
XPA-DR Gen3 Chassis
The XPA-DR Gen3 amplier chassis is optimized for our Dierential Reference Amplier Modules.
The main dierence is that the switch mode power supply is congured with the slightly lower rail
voltage appropriate for a fully balanced dierential amplier system. Each Dierential Reference
Amplier Module occupies two chassis slots; the XPA-DR Gen3 chassis can be populated with one,
two, or three Dierential Reference Amplier Channels.
Dierential Reference Amplier Module
Each individual Dierential Reference Amplier Modules delivers 650 watts RMS into
8 Ohms and 1000 watts RMS (1 kW) into 4 Ohms when measured continuously. Although the
continuous power rating is slightly lower in units with multiple channels when measured with
all channels driven, the one-channel-driven power rating is representative of what you will
experience when reproducing dynamic content like music.
Page 10
Page 15

XPA Gen3
Interchangeability
The original XPA Gen3 amplier chassis contains seven slots, each of which can be populated
with one of two dierent modules. Each chassis can initially be congured with from two to seven
modules, and more modules can be added later - up to a total of seven modules.
The original XPA Gen3 chassis can be populated with any combination of High-Powered Single
Channel Amplier Modules and Stereo Amplier Modules. This chassis is NOT compatible with the
Dierential Reference Amplier Modules.
The XPA-DR Gen3 amplier chassis contains seven slots. Each Dierential Reference Amplier
Module occupies two chassis slots, and the XPA-DR Gen3 chassis can be populated with one, two,
or three sets of Dierential Reference Amplier Modules (one slot remains unused). The XPADR Gen3 amplier chassis is NOT compatible with the High-Powered Single Channel Amplier
Modules or Stereo Amplier Modules.
Absolute Phase
The RCA Unbalanced inputs on all of the XPA Gen3 amplier modules preserve absolute phase
(a positive input signal voltage will result in a positive output voltage).
The XLR Balanced inputs on all of the XPA Gen3 amplier modules are wired according to the
European polarity/phase standard. If the absolute phase of the outputs on your XPA Gen3
amplier is dierent than the absolute phase on other equipment you may have, or if your
preamp or processor reports a phase inversion, this error can be eliminated by simply reversing
the plus and minus speaker connections at the output of the amplier. Alternately, the phase can
be reversed by using a balanced interconnect cable that reverses the connections between pin 2
and pin 3 at either end.
Note: DO NOT reverse the plus and minus speaker connections if you are connecting a
High-Powered Single Channel Amplier Module or a Stereo Amplier Module to a powered
speaker or speaker switch with a common ground. Doing so may result in damage to the
amplier or your other equipment.
Upgrades
Because of the complexity of these ampliers, modules may ONLY be installed, removed, or
changed by Emotiva or one of our authorized dealers or service representatives.
EMOTIVA DOES NOT PROVIDE AMPLIFIER MODULES FOR END USERS TO INSTALL!
MODULES INSTALLED OR REPLACED BY UNAUTHORIZED INDIVIDUALS WILL NOT BE COVERED
BY YOUR WARRANTY AND MAY DAMAGE YOUR AMPLIFIER OR VOID YOUR WARRANTY!
Page 11
Page 16
XPA Gen3
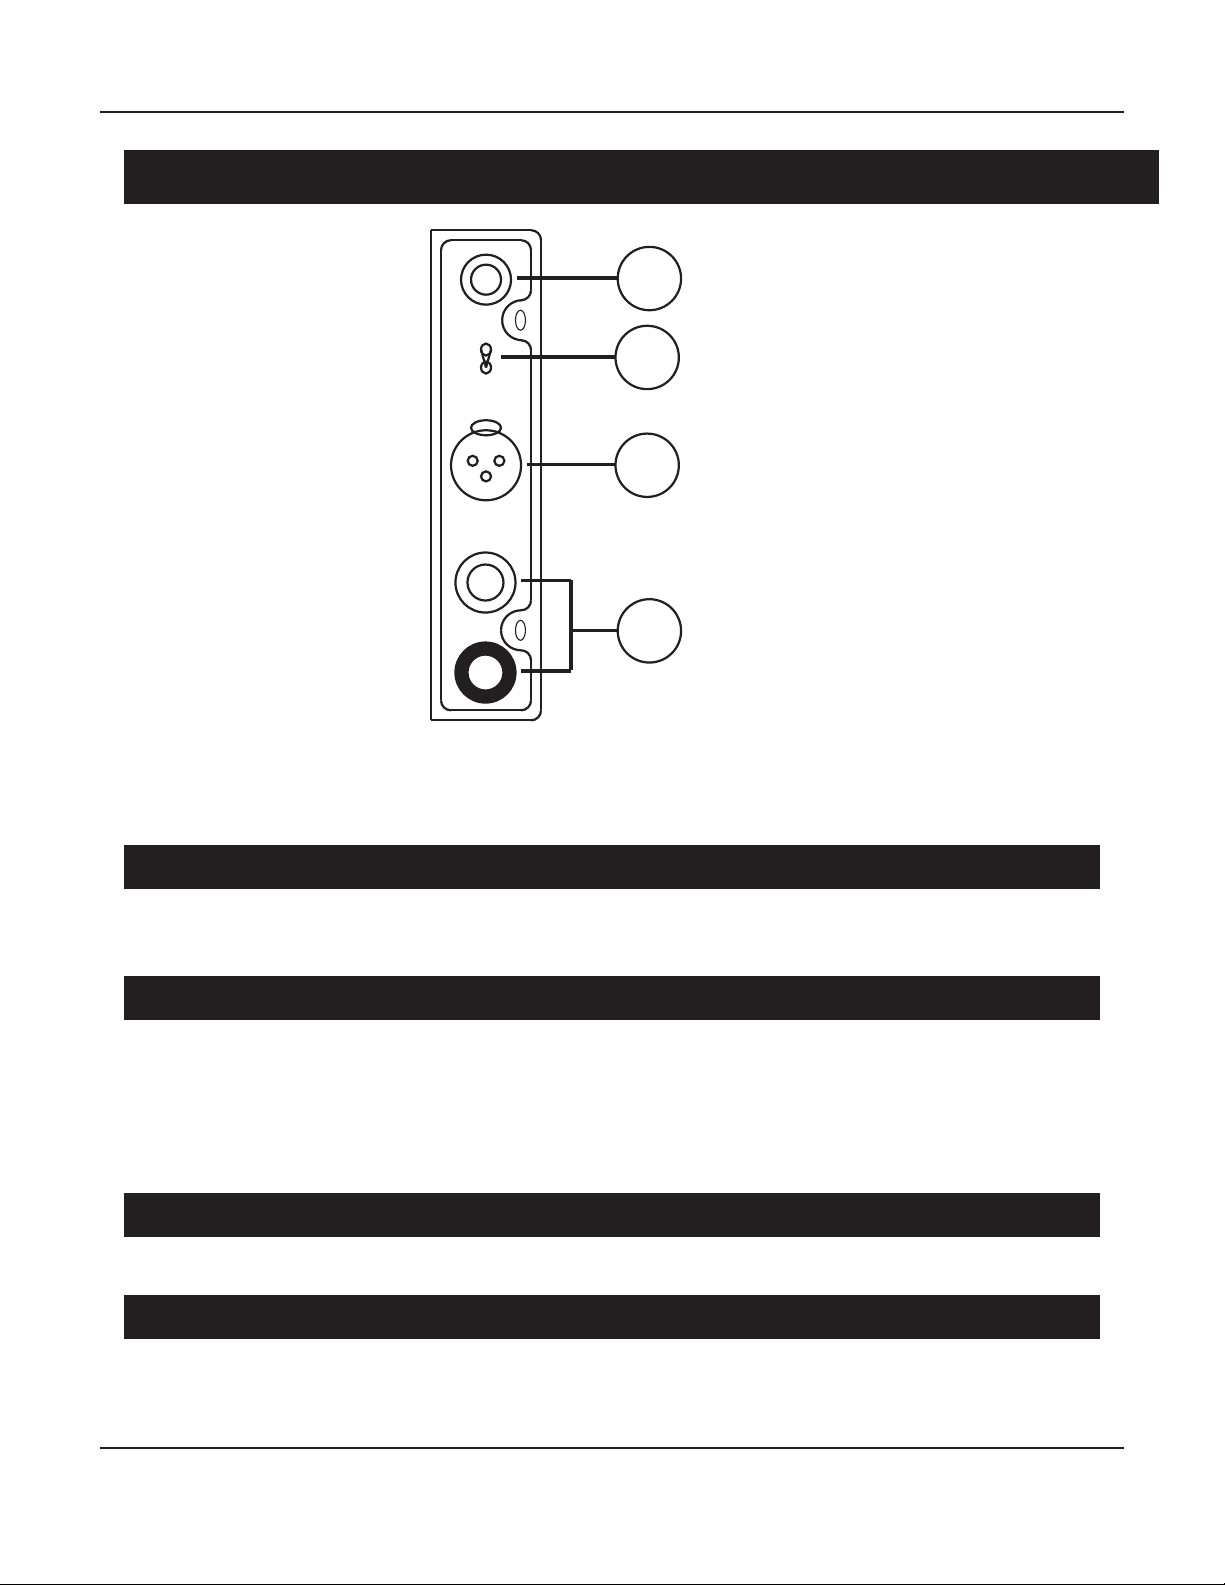
High Powered Single Channel Amplier Module
1
INPUT SELECT
2
3
+
4
_
Note: Each Amplier Module has a separate Balanced and Unbalanced input and an
independent Input Selector switch.
1. Unbalanced (RCA) Input
Audiophile quality gold plated machined RCA input connector (accepts a line level unbalanced
input).
2. Un-Balanced / Balanced Selector Switch
A high-quality metal toggle switch independently selects between the Unbalanced (RCA) and
Balanced (XLR) input for each channel. Up selects the Unbalanced input and Down selects the
Balanced input. Only one input can be used at once for each channel. (Both a balanced and an
unbalanced source may be connected at the same time, and the switch used to select between
them, but only one will be active at any given time.)
3. Balanced (XLR) Input
Standard XLR connector (accepts a line level balanced input).
4. Speaker Terminals
Heavy duty audiophile quality ve way binding posts with gold-plated contacts and clear covers
accept speaker wires with banana plugs, spade lugs, or bare wire terminations.
Page 12
Page 17
XPA Gen3
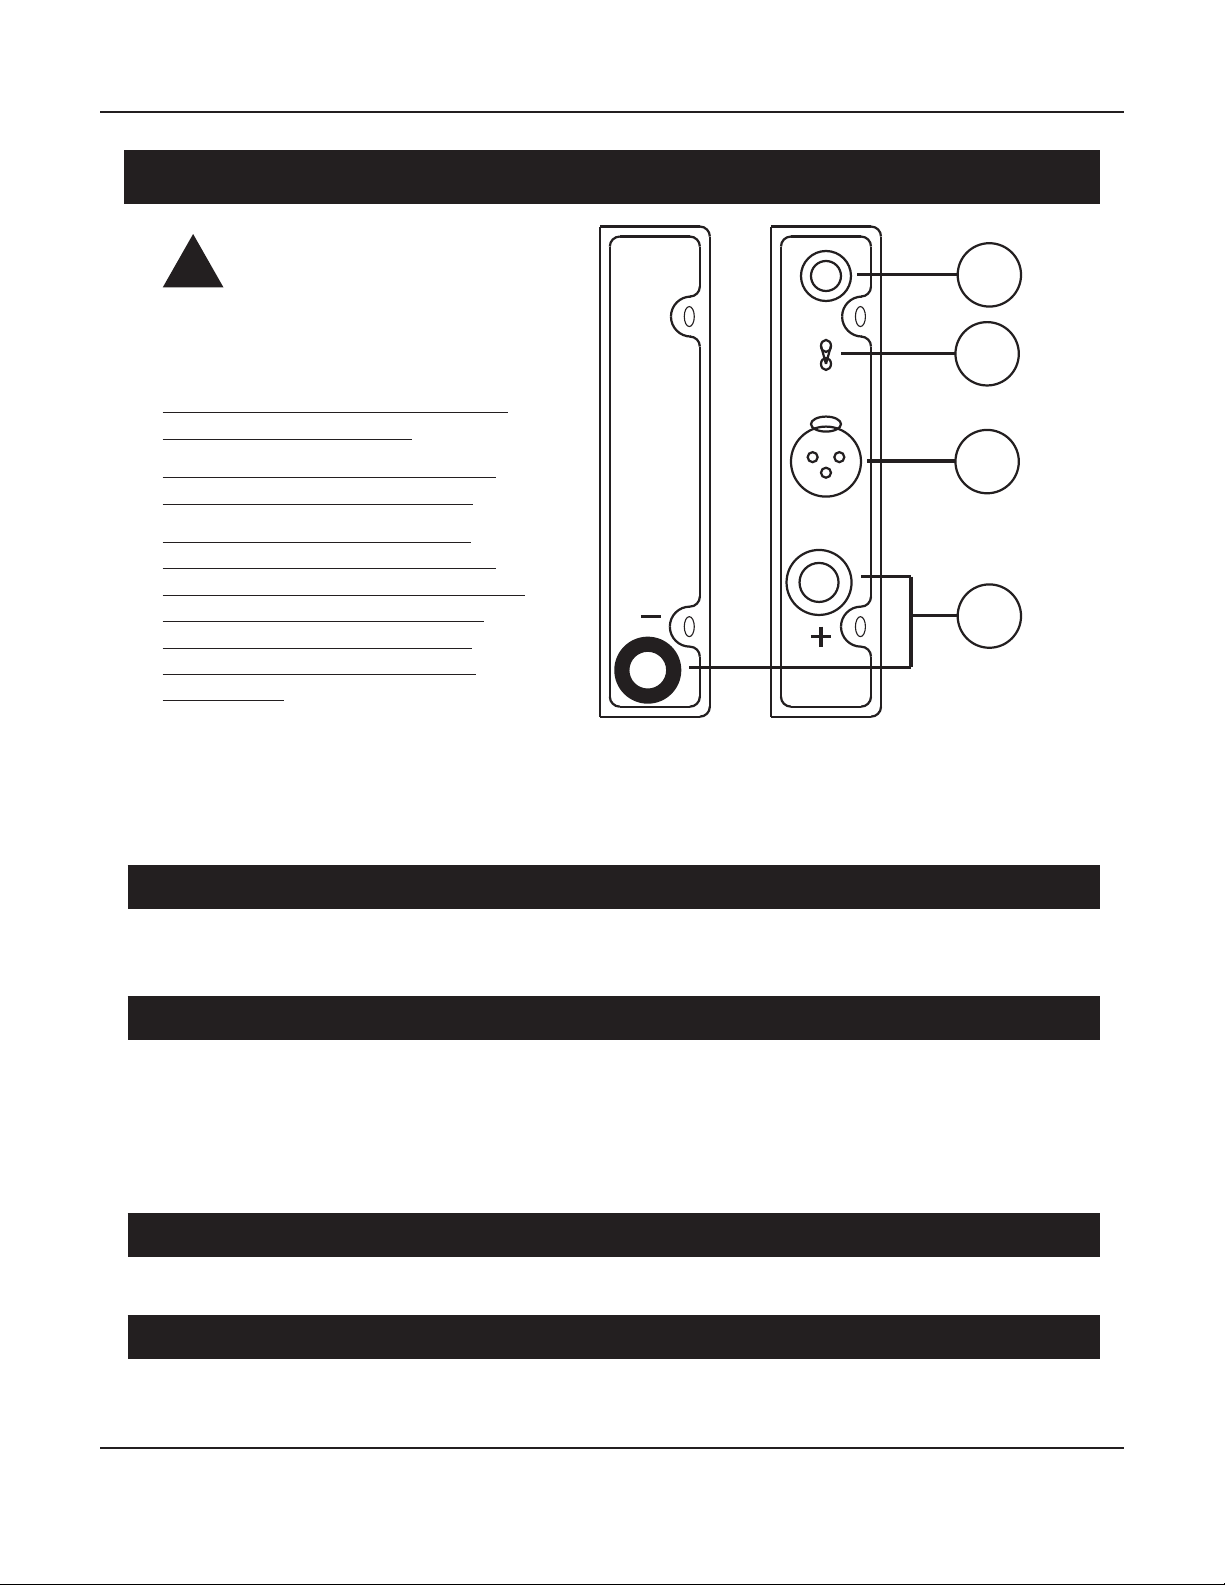
Dierential Reference Amplier Module
WARNING
!
EACH DIFFERENTIAL REFERENCE
AMPLIFIER CHANNEL IS FULLY
BALANCED.
BOTH SPEAKER OUTPUT TERMINALS
CARRY AN ACTIVE SIGNAL.
INPUT SELECT
1
2
DO NOT CONNECT THE (-) SPEAKER
OUTPUT TERMINAL TO GROUND.
DO NOT CONNECT THE SPEAKER
OUTPUT TO A SPEAKER SWITCH OR
POWERED SPEAKER WITH A COMMON
GROUND. DOING SO WILL RESULT
IN DAMAGE TO YOUR AMPLIFIER
OR TO YOUR SPEAKER OR OTHER
EQUIPMENT!
Note: Each Dierertial Reference Amplier channel has a separate Balanced and Unbalanced
input and an independent Input Selector switch.
__
3
4
1. Unbalanced (RCA) Input
Audiophile quality gold plated machined RCA input connector (accepts a line level unbalanced
input).
2. Un-Balanced / Balanced Selector Switch
A high-quality metal toggle switch independently selects between the Unbalanced (RCA) and
Balanced (XLR) input for each channel. Up selects the Unbalanced input and Down selects the
Balanced input. Only one input can be used at once for each channel. (Both a balanced and an
unbalanced source may be connected at the same time, and the switch used to select between
them, but only one will be active at any given time.)
3. Balanced (XLR) Input
Standard XLR connector (accepts a line level balanced input).
4. Speaker Terminals
Heavy duty audiophile quality ve way binding posts with gold-plated contacts and clear covers
accept speaker wires with banana plugs, spade lugs, or bare wire terminations.
Page 13
Page 18
XPA Gen3
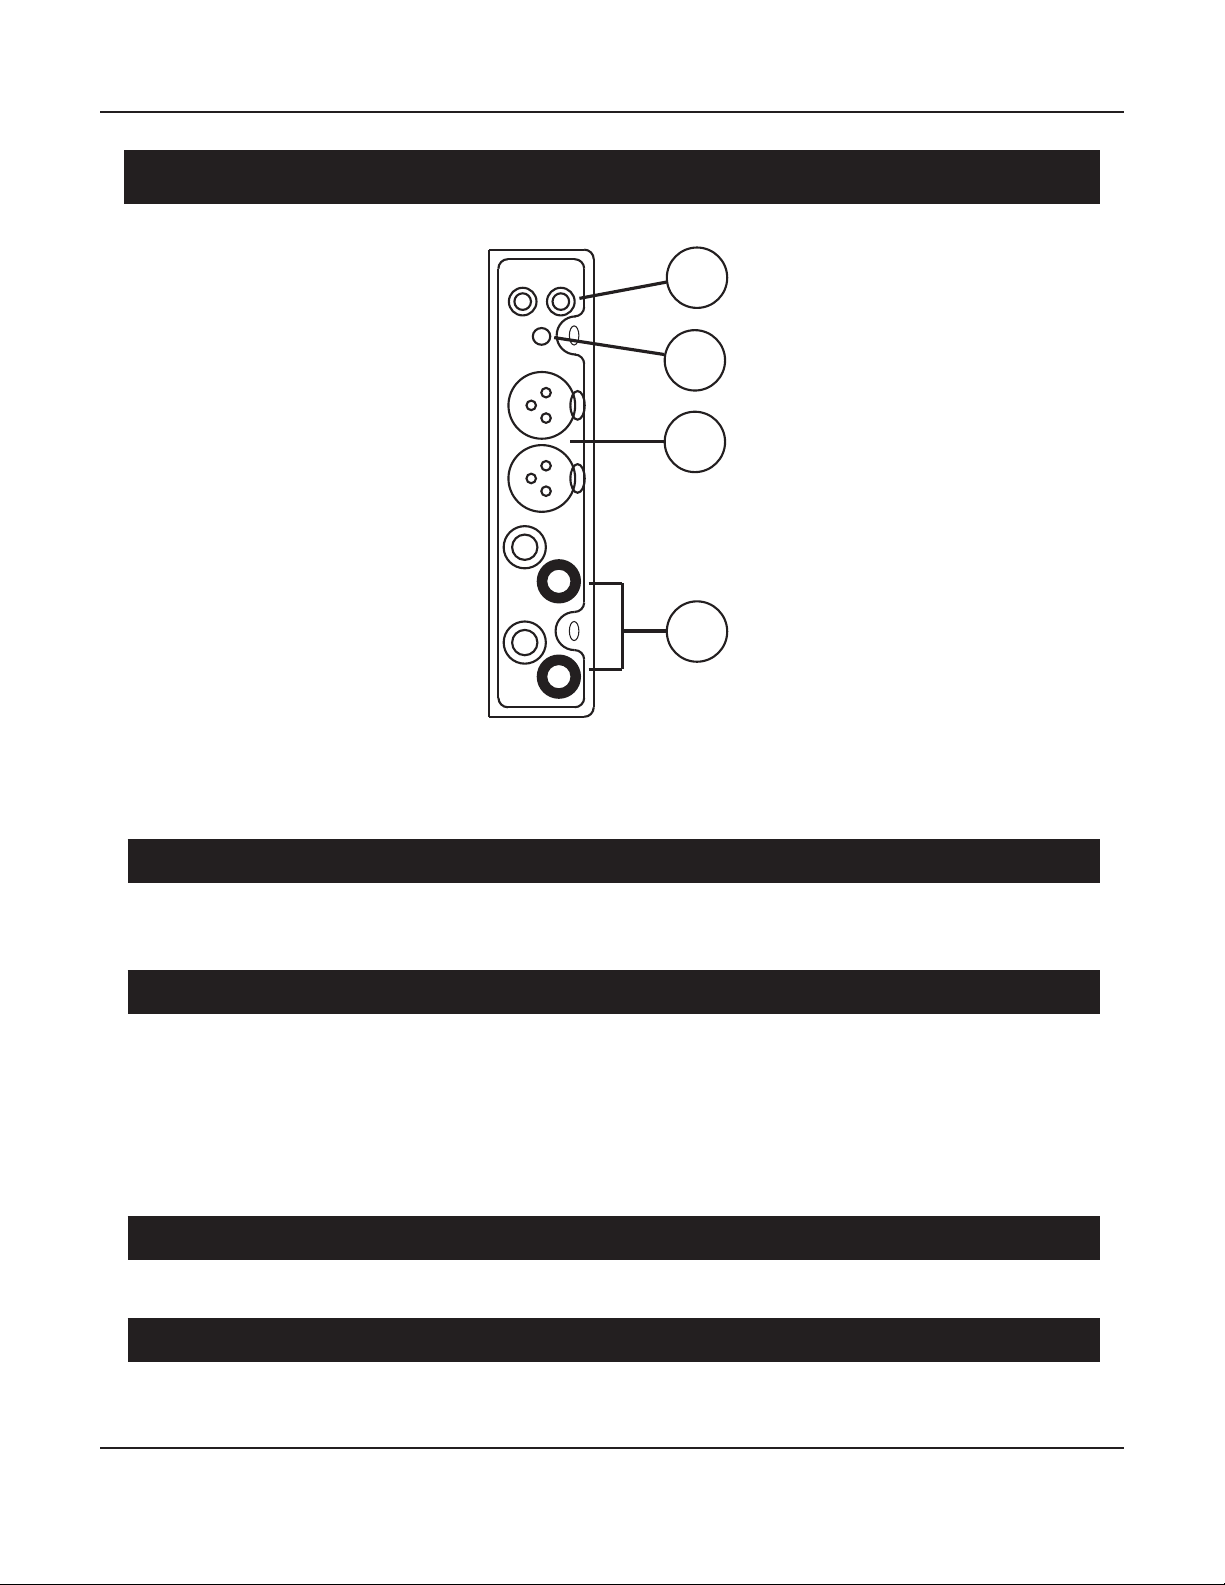
Stereo Amplier Module
L R
R
L
R
1
2
3
4
L
_
Note: Each Amplier Module has separate Balanced and Unbalanced inputs and an
independent Input Selector switch.
1. Unbalanced (RCA) Inputs
Audiophile quality gold plated machined RCA input connectors (accept line level unbalanced
inputs).
2. Un-Balanced / Balanced Selector Switch
A single latching pushbutton switch selects between the Unbalanced (RCA) and Balanced
(XLR) inputs for both channels on each module. When the button is In, the Balanced inputs are
selected; when the button is Out, the Unbalanced inputs are selected. Only one pair of inputs can
be used at once on each module. (Both balanced and unbalanced sources may be connected at
the same time, and the switch used to select between them, but only one source will be active at
any given time.)
3. Balanced (XLR) Inputs
Standard XLR connectors (accept line level balanced inputs).
4. Speaker Terminals
Heavy duty audiophile quality ve way binding posts with gold-plated contacts and clear covers
accept speaker wires with banana plugs, spade lugs, or bare wire terminations.
Page 14
Page 19

XPA Gen3
Quick Start
To get the most from your XPA Gen3 modular power amplier we urge you to read the entire
manual. If you just can’t wait to listen to it, this section will cover the basics you need to get
started.
• Find a secure location for your XPA Gen3.
• Connect your XPA Gen3 to a signal source.
• Set the Input Selector switches on each channel of your XPA Gen3 for the type of input you’re
using (unbalanced or balanced)
• Connect your XPA Gen3 to a set of speakers (4 ohm or 8 ohm) using reasonably heavy gauge
speaker wires (at least 16 gauge).
• Find some music you really like to listen to.
• Turn on the AC Power switch and turn up the volume a bit!
• Enjoy!
While you’re enjoying your XPA Gen3, it would be a great time to read the rest of the manual to
learn more about it.
Page 15
Page 20

XPA Gen3
Connections
Connecting speakers to your XPA Gen3
Your XPA Gen3 has no special connection requirements; audiophile grade ve-way binding posts
are provided for speaker connections.
• Always turn o the amplier before connecting or disconnecting speaker cables or signal
source interconnects.
• Always verify that your speaker cables are rmly attached, and not shorted to each other or
to any other cables, before powering up your XPA Gen3.
• Always use high-quality speaker wire; 16-gauge or heavier.
• If you must use thinner wire, try to keep the length as short as possible.
• Be careful to wire all speakers “in phase” (the plus/red terminal on each speaker to the plus/
red terminal on your amp).
• Try to use wires of equal length and gauge for both speakers in each pair (use the same gauge
and length for both fronts, or for both surrounds; don’t use a long 16-gauge wire for one
speaker and a short 10-gauge wire for the other).
• If you use stranded cables, use care to avoid short circuits (from stray strands touching).
• If you are planning to bi-amp your speakers, make sure to remove the bi-amp jumpers on the
input panel of each speaker. Failure to remove the jumpers will damage your amplier.
• (XPA-DR ONLY): The Dierential Reference Amplier Modules used in the XPA-DR Gen3
ampliers are fully dierential. Each of the speaker output terminals on each channel carries
an active signal, so you cannot connect the minus speaker output to ground, or connect the
amplier outputs to any powered speaker or speaker switch that uses a common ground.
Connecting an input source to your XPA Gen3
Your XPA Gen3 amplier has both balanced (XLR) and unbalanced (RCA) inputs; switches
independently select which input is active for each module. Be sure to set these switches
correctly. If your source component oers both types of outputs, a balanced connection is
generally preferred, especially for long cable runs and in noisy environments. We suggest using
reasonably high quality cables, keeping cables no longer than necessary, and avoiding running
signal cables near power cables and speaker cables whenever possible.
DO NOT connect a digital signal to the inputs of your XPA Gen3 (or you may damage your source
or your speakers).
Connecting the Trigger Input and Trigger Output
The Trigger Input accepts a 12 VDC (nominal) trigger signal from another device via a standard
1/8” mono plug. When the trigger is asserted, the XPA Gen3 will switch On; when the trigger is
removed, the XPA Gen3 will return to Standby mode. The Trigger Output sends out
12 VDC whenever the main power to the XPA Gen3 is On (and NOT when it is in Standby mode)
which can be used to switch on other units with trigger capabilities.
Page 16
Page 21

XPA Gen3
Conguration and Operation
Line Voltage
The XPA Gen3 can operate from any line voltage between 100 VAC and 250 VAC and from any line
frequency between 50 Hz and 60 Hz. The amplier will automatically detect which line voltage it
is connected to and congure itself accordingly.
AC Power Switch (rear panel)
The rear-panel AC Power switch controls the main AC power for your XPA Gen3. When this switch
is in the O position, the amplier will not operate. Turning it On will put the XPA Gen3 into
Standby mode.
AC Circuit Breaker (rear panel)
If an electrical power fault occurs, the button on the rear-panel Circuit Breaker will pop up. When
the Circuit Breaker button is up, the XPA Gen3 will not operate, and none of the Status LEDs will
be lit. The Circuit Breaker is reset by pressing the button rmly in.
Standby Switch (front panel push button)
Press to switch the amplier On; press again to return to Standby; the halo ring around the button
illuminates amber for Standby and blue for On.
Un-Balanced / Balanced Selector Switches
Independently switch between the Unbalanced (RCA) and Balanced (XLR) inputs for each module.
Only one input can be used at once for each channel. (Both a balanced and an unbalanced source
may be connected at the same time, and the switch used to select between them, but only one
will be active at a time.)
Status LED Switch
Disables the front panel status LEDs when set to O.
Trigger Input and Output
When a trigger cable is connected to the Trigger Input (on the rear panel), and a trigger signal
is received (between 5-20 V - AC or DC), the XPA Gen3 will switch from Standby to On; when the
trigger signal ceases, the XPA Gen3 will return to O.
The trigger is typically connected to the preamp or pre/pro that provides a signal source for the
XPA Gen3, and congured to turn the XPA Gen3 on when the preamp or pre/pro is turned on.
Whenever the XPA Gen3 is On, the Trigger Output will assert a 12 VDC signal, which may be used
to turn on other trigger-enabled equipment.
Page 17
Page 22

XPA Gen3
Care and Maintenance
Periodic Maintenance
Your XPA Gen3 requires no periodic maintenance or calibration.
Cleaning your XPA Gen3
• If necessary, the XPA Gen3 should be cleaned gently with a soft rag.
• If something sticky gets on the front panel or case of the XPA Gen3, it should be cleaned with
a mild cleaning solution applied to a soft rag, followed by wiping with a clean rag dampened
with plain water and drying with a soft dry rag or cloth.
Note: DO NOT spray water or cleaning solution directly onto the XPA Gen3 or into
the vents.
Page 18
Page 23

XPA Gen3
Specications
Modular Construction
The XPA Gen3 modular power amplier is comprised of a heavy-duty chassis, which houses the
oversized power supply, and provides slots for up to seven amplier modules.
The XPA Gen3 can be purchased with any combination of between two and seven HighPowered Single Channel Amplier Modules and Stereo Amplier Modules installed; or with any
conbination of one, two, or three Dierential Reference Amplier Modules installed. Additional
modules can then be added later until all available module slots are populated. The front panel
display and protection system are designed to work with the maximum number of channels, and
so need not be updated when the XPA Gen3 is expanded; on the rear panel, slots not occupied by
amplier modules will be covered with protective cover panels.
Note: To ensure that additional amplier channels are installed properly, and function to our
specications, additional amplier modules must be installed by Emotiva, or by your local
authorized Emotiva service representative.
A Word About Power Ratings
Music is, by its nature, dynamic. While it’s relatively common for the two main channels in a stereo
amplier to be asked to simultaneously deliver high power levels, it is very uncommon for more
than two channels to be called upon to deliver high power continuously at the same time, and
this almost never occurs outside of laboratory test conditions.
In order to deliver the most dynamic performance where it counts - with real music - we have
designed the XPA Gen3 modular power amplier with a single immense power supply, which is
able to deliver massive power continuously to any two channels, and to deliver huge amounts of
power dynamically to any number of channels when and if called upon to do so.
The power ratings for the XPA Gen3 modular power amplier are the same with both channels
driven continuously in the two-channel version of the amplier, and for any two channels driven
continuously in the versions with three or more channels. Likewise, the power rating for the
single channel XPA-DR Dierential Reference model is the same as the rating for the two or three
channel versions when measured with a single channel driven.
In addition to this, because we always aim to provide the most complete information possible, we
have also rated the power output of many of the other pre-congured versions of XPA Gen3 and
XPA-DR Gen3 amplier under laboratory test conditions, with all channels driven.
Also note that, while the exceptional sound quality of the XPA Gen3 modular power amplier, and
its two-channel continuous power rating, remain the same whether you choose to use a 120 VAC
line or a 230 VAC line, the multi-channel power ratings are somewhat higher when you power the
XPA Gen3 from a 230 VAC circuit. While the XPA Gen3 modular power amplier will provide plenty
of power for most home theater installations when run from a 120 VAC line, for the absolute best
possible performance when testing, we recommend operating the XPA Gen3 from a 230 VAC line.
Page 19
Page 24

XPA Gen3
Circuit Topology
The Emotiva XPA Gen3 is a fully modular audio power amplier with a high-eciency switch
mode power supply (SMPS), independent, fully discrete, dual dierential, high current, short
signal path Class A/B amplier modules, Optimized Class H™ power supply topology, and
microprocessor-controlled fault protection.
Minimum Recommended Load Impedance
4 Ohms; which equals one 4 Ohm load or two paralleled 8 Ohm loads.
Speaker Output Connections
Audiophile grade, gold plated, 5-way binding posts.
Power Supply
High eciency, audiophile grade, Switch Mode Power Supply (SMPS).
Power Requirements
Between 100 VAC and 250 VAC @ 50 / 60 Hz (automatically detected).
Front Panel Controls and Indicators
Standby; push button (halo ring changes color to indicate Standby or On).
Status LEDs; one per module or channel; blue.
Status LEDs change to red to indicate a fault condition.
Rear Panel Controls
AC Power switch; rocker switch (switches AC main power).
Status LEDs switch; disables front panel Status LEDs and dims Standby button halo.
Input selector switches (one per channel or module); select between balanced and unbalanced
inputs.
Circuit Breaker; press button to reset circuit breaker.
Protection
The XPA Gen3 is protected against excessive operating temperature, shorted speaker connections,
ground faults, and other common fault conditions.
Input Connections
Unbalanced (RCA); balanced (XLR); one each per channel, independently selectable.
Page 20
Page 25

XPA Gen3
Input Impedance
33 kohms (balanced).
23.5 kohms (unbalanced).
Trigger
Trigger Input: 5 - 12 V (AC or DC); <10 mA input current required.
Trigger Output: 12 VDC; can drive any load up to 120 mA.
Dimensions:
17” wide x 8” high x 19” deep (unboxed; including feet).
17” wide x 7” high x 19” deep (unboxed; without feet).
24-1/2” wide x 12” high x 24-3/4” deep (boxed).
Weight
The weight of each conguration is determined by how many physical modules are used.
Dierent types of physical modules weigh approximately the same amount.
1 High-Powered Single Channel Amplier Module (1 channel) = 1 physical module
1 Dierential Reference Amplier Module (1 channel) = 2 physical modules
1 Stereo Amplier Module (2 channels) = 1 physical module
Chassis with 2 physical modules: 35.5 lbs (unboxed) (XPA-2; XPA-DR1)
Chassis with 3 physical modules: 39 lbs (unboxed) (XPA-3)
Chassis with 4 physical modules: 42.5 lbs (unboxed) (XPA-DR2)
Chassis with 5 physical modules: 46 lbs (unboxed) (XPA-5)
Chassis with 6 physical modules: 49.5 lbs (unboxed) (XPA-DR3)
Chassis with 7 physical modules: 53 lbs (unboxed) (XPA-7; XPA-11)
* For boxed weight, add 5 lbs to the above weights
Page 21
Page 26

XPA Gen3
High-Powered Single Channel Amplier Module
Topology
The High-Powered Single Channel Amplier Module is a fully discrete, dual dierential,
high current, short signal path Class A/B amplier module, featuring Optimized Class H power
supply topology, audiophile grade input connectors and speaker terminals, and microprocessor
controlled fault protection. The High-Powered Single Channel Amplier Module may only be
installed in the XPA Gen3 chassis.
Electrical Specications
Power Output; one channel driven:
300 watts RMS per channel; 20 Hz - 20 kHz; THD < 0.1%; into 8 Ohms
550 watts RMS per channel; 20 Hz - 20 kHz; THD < 0.2%; into 4 Ohms
Power Output; two channels driven; 20 Hz - 20 kHz; THD <0.1%:
300 watts RMS per channel; THD < 0.1%; into 8 Ohms (120 VAC line).
490 watts RMS per channel; THD < 0.1%; into 4 Ohms (120 VAC line).
Power Output; chosen models; all channels driven; THD <0.1% ; 8 ohms:
XPA-2 Gen3: 300 watts RMS per channel
XPA-3 Gen3: 275 watts RMS per channel
XPA-4 Gen3: 260 watts RMS per channel
XPA-5 Gen3: 250 watts RMS per channel
XPA-6 Gen3: 225 watts RMS per channel
XPA-7 Gen3: 200 watts RMS per channel
Power Bandwidth (at rated power; 8 Ohm load):
20 Hz to 20 kHz (+ / – 0.1 dB).
Broad Band Frequency Response :
5 Hz to 80 kHz +0/-2 dB.
THD + noise:
< 0.005%; at 100 watts RMS; 1 kHz; 8 Ohms.
Signal to Noise Ratio (8 Ohm load):
> 115 dB; ref FTC rated power; unbalanced input (A-weighted).
> 86 dB; ref 1 watt; unbalanced input (A-weighted).
Page 22
Page 27

XPA Gen3
Damping Factor (8 Ohm load):
> 500.
Input Sensitivity (for rated power; 8 Ohm load):
1.5 V.
Gain:
29 dB.
Input Impedance:
33 kOhms (balanced).
23.5 kOhms (unbalanced).
Dierential Reference Amplier Module
Topology
Each Dierential Reference Amplier channel is a very high powered, fully discrete, fully
dierential, fully balanced, high current, short signal path Class A/B amplier, featuring Optimized
Class H power supply topology, audiophile grade input connectors and speaker terminals, and
microprocessor controlled fault protection. Each Dierential Reference Amplier channel consists
of two complete signal paths, one for each phase of the audio signal, in a fully symmetrical
balanced conguration, and occupies two module slots in the XPA-DR chassis. Dierential
Reference Amplier Modules may only be installed in the XPA-DR Gen3 chassis.
Electrical Specications
Power Output; one channel driven:
650 watts RMS; 20 Hz - 20 kHz; THD < 0.1%; into 8 Ohms
1000 watts RMS; 20 Hz - 20 kHz; THD < 0.2%; into 4 Ohms
Power Output; chosen models; all channels driven; THD <0.1% ; 8 ohms:
XPA-DR1 Gen3: 650 watts RMS per channel (one channel)
XPA-DR2 Gen3: 550 watts RMS per channel (two channels)
XPA-DR3 Gen3: 450 watts RMS per channel (three channels)
Power Bandwidth (at rated power; 8 Ohm load):
20 Hz to 20 kHz (+ / – 0.1 dB).
Broad Band Frequency Response :
20 Hz to 50 kHz +0/-2 dB.
THD + noise:
< 0.008%; at 100 watts RMS; 1 kHz; 8 Ohms.
Page 23
Page 28

XPA Gen3
Signal to Noise Ratio (8 Ohm load):
> 122 dB; ref FTC rated power; unbalanced input (A-weighted).
> 96 dB; ref 1 watt; unbalanced input (A-weighted).
Damping Factor (8 Ohm load):
> 500.
Input Sensitivity (for rated power; 8 Ohm load):
2.4 V.
Gain:
29 dB.
Input Impedance:
33 kOhms (balanced).
23.5 kOhms (unbalanced).
Stereo Amplier Module
Topology
The Stereo Amplier Module is a two-channel, fully discrete, dual dierential, high current, short
signal path Class A/B amplier module, featuring audiophile grade input connectors and speaker
terminals, and microprocessor controlled fault protection. The Stereo Amplier Module provides
two completely independent amplier channels in a module that occupies a single slot. The
Stereo Amplier Module may only be installed in the XPA Gen3 chassis.
Electrical Specications
Power Output; one channel driven:
65 watts RMS; 20 Hz - 20 kHz; THD < 0.1%; into 8 Ohms
100 watts RMS; 20 Hz - 20 kHz; THD < 0.2%; into 4 Ohms
Power Output; two channels driven; THD <0.1%:
65 watts RMS per channel; THD < 0.1%; into 8 Ohms (120 VAC line).
100 watts RMS per channel; THD < 0.1%; into 4 Ohms (120 VAC line).
Power Bandwidth (at rated power; 8 Ohm load):
20 Hz to 20 kHz (+ / – 0.1 dB).
Broad Band Frequency Response :
5 Hz to 80 kHz +0/-1.5 dB.
Page 24
Page 29

XPA Gen3
THD + noise:
< 0.02%; at 60 watts RMS; 1 kHz; 8 Ohms.
Signal to Noise Ratio (8 Ohm load):
> 105 dB; ref FTC rated power; unbalanced input (A-weighted).
> 85 dB; ref 1 watt; unbalanced input (A-weighted).
Damping Factor (8 Ohm load):
> 500.
Input Sensitivity (for rated power; 8 Ohm load):
0.8 V (800 mV).
Gain:
29 dB.
Input Impedance:
33 kOhms (balanced).
23.5 kOhms (unbalanced).
Page 25
Page 30

XPA Gen3
Troubleshooting
Your XPA Gen3 was carefully designed and manufactured from high-quality precision components
to ensure years of trouble free operation. We really doubt you’ll ever have any problems with your
XPA Gen3, but if you do, here are a few things you could try:
Problem: No output (nothing is lit).
Reason: You have no AC power.
• Verify that the rear panel AC Power switch is On.
• Verify that your circuit is live.
• Verify that the line cord on your XPA Gen3 is fully inserted and is tight.
• Verify that the Circuit Breaker hasn’t popped.
When the circuit breaker pops, the button will pop up and extend noticeably from the rear panel.
If this happens, try resetting the Circuit Breaker by pressing the button rmly in. If the Circuit
Breaker pops a second time, please contact Emotiva, or your nearest authorized Emotiva service
representative.
Problem: Your XPA Gen3 is operating normally, but none of the front panel Status
Leds is lit.
Reason: The front panel status LEDs are turned o.
• Set the Status LEDs switch on the rear panel to On.
Problem: No sound or distorted sound is heard; the Standby button halo is lit blue;
the status LEDs are lit blue.
Reason: Your XPA Gen3 is not indicating a fault condition.
• Check your source.
• Check your Balanced/Unbalanced Selector Switches.
• Check your speakers and speaker connections.
Problem: No sound is heard; one or more Status LEDs is ashing red.
Reason: Your XPA Gen3 is in Protect mode, which indicates a fault condition.
• Switch the rear panel AC Power switch O and On to clear the Fault condition.
• If the fault remains, look for a shorted speaker cable or damaged speaker.
• Check your sources and source connections (a bad interconnect, DC on the input,
or an otherwise bad source component can cause a fault).
Problem: The halo around the Standby button is lit amber and your XPA Gen3
fails to come on when triggered.
Reason: Your XPA Gen3 is in Standby mode and should respond to a valid trigger signal.
• Check your trigger cable.
• Check the trigger settings on your source equipment.
Page 26
Page 31

XPA Gen3
Emotiva Audio Corporation Five-Year Limited Warranty
What does this warranty cover?
Emotiva Audio Corporation (Emotiva) warrants its products against defects in materials and
workmanship. This warranty, and all rights provided hereunder, is granted to the original owner,
and may be transferred by the current owner to a new owner if the unit is gifted or sold. In
the event the original owner transfers ownership of the Product prior to the expiration of the
applicable term described below, this Warranty shall terminate at the end of the original term.
This Warranty only applies to Products purchased directly from Emotiva or any of its Authorized
Dealers or International Distributors.
Emotiva warrants any replacement product or part furnished hereunder against defects in
materials and workmanship for the longer of the following: (i) the amount of time remaining under
the original warranty, or (ii) 120 days from your receipt of the repaired or replaced product. The
duration described in this paragraph is hereinafter referred to as the “Term”.
TO THE FULLEST EXTENT PERMITTED BY LAW, ALL IMPLIED WARRANTIES RELATED TO THE ORIGINAL
PRODUCT AND ANY REPLACEMENT PRODUCT OR PARTS (INCLUDING IMPLIED WARRANTIES OF
MERCHANTABILITY AND FITNESS FOR A PARTICULAR PURPOSE) ARE EXPRESSLY LIMITED TO THE
TERM OF THIS LIMITED WARRANTY. SOME STATES DO NOT ALLOW LIMITATIONS ON HOW LONG AN
IMPLIED WARRANTY LASTS, SO THE ABOVE LIMITATION MAY NOT APPLY TO YOU.
The current owner must make a claim within the Term of the Warranty. A claim shall not be valid
(and Emotiva has no obligation related to the claim) if it is not made within the Term and if it is not
made in strict compliance with the requirements of the “How do you get service?” section.
How long does this coverage last?
The warranty on all XPA Gen3 and XPA-DR Gen3 Ampliers commences on the date of retail
purchase by the original retail purchaser and runs for a period of ve years thereafter. This
warranty may be transferred by the current owner to a new owner at any time during the original
term. Emotiva warrants any replacement product or part furnished hereunder against defects in
materials and workmanship for the longer of the following: (i) the amount of time remaining under
the original warranty, or (ii) 120 days from your receipt of the repaired or replaced product. The
duration described in this paragraph is hereinafter referred to as the “Term”.
What will Emotiva do?
Emotiva will, at its option, either: (i) repair the product, or (ii) replace the product with a new
consumer product which is identical or reasonably equivalent (in Warrantor’s sole discretion) to the
product. In the event Warrantor, in its sole discretion, is unable to replace or repair the Product or
it is not commercially practicable to do so, then: (i) if the claim was submitted during the rst 365
days of the Term, Warrantor shall refund to you the purchase price that you paid for the Product;
and (ii) if the claim was submitted after the rst 365 days of the Term, Emotiva shall issue you a
credit, which may used for the purchase of merchandise from Emotiva, but cannot be used for
freight charges.
Page 27
Page 32

XPA Gen3
When a Product or part is repaired or replaced, any replacement item becomes your property
and the replaced item becomes Emotiva’s property. When a refund or credit is given, the Product
for which the refund or credit is provided must be returned to Emotiva and becomes Emotiva’s
property.
What is not covered by this warranty?
This warranty does not apply: (i) to damage caused by use with products not manufactured
by Emotiva, where the non-Emotiva product is the cause of the damage; (ii) to damage caused
by service or maintenance performed by anyone who is not a representative of Emotiva; (iii) to
damage caused by accident, abuse, misuse, ood, re, earthquake or other external causes; (iv) to
a product or part that has been modied after its retail purchase, where the modication caused
or contributed to the damage; (v) to consumable parts, such as batteries or failure of or damage
to the Product caused by batteries; (vi) if any Emotiva serial number has been removed or defaced
on the product; (vii) glass or plastic panels, cabinetry, trim or other appearance items; (viii)
cosmetic wear or damage to remote controls by user.
EMOTIVA SHALL NOT BE LIABLE FOR ANY INCIDENTAL OR CONSEQUENTIAL DAMAGES ARISING
FROM OR RELATED TO ANY DEFECTS IN OR DAMAGES TO ITS PRODUCTS. SOME STATES DO NOT
ALLOW THE EXCLUSION OR LIMITATION OF INCIDENTAL OR CONSEQUENTIAL DAMAGES, SO THE
ABOVE LIMITATION OR EXCLUSION MAY NOT APPLY TO YOU.
How do you get service?
In order to make a claim under the Warranty, you must:
1. Call or e-mail a customer service representative at 1-877-EMO-TECH (1-877-366-8324) or
[email protected]. You must provide a description of your problem, the serial number of the
Product for which the warranty claim is being made, and the original purchase date.
2. Then, you will be provided with a warranty service authorization number (“WS”).
3. Next, you must ship the Product to the following address, with the WS written in large, bold
numbers on the outside of the box, and with the letters “WS” written before the number, for
example: WS1234. Parcels arriving without a WS number on the outside of the box will be refused.
The customer pays for the shipping to Warrantor. Warrantor pays for the shipping back to the
customer within the continental United States only. Customer is responsible for shipping charges
on all other warranty claims.
Emotiva Audio Corporation
Attn: Repair Department
139 Southeast Parkway Court
Franklin, TN 37064
Page 28
Page 33

XPA Gen3
Units will be refused by Emotiva for the following:
Product was sent without the WS#
Product was sent with inadequate packaging.
Product was damaged in transit.
Product was shipped collect for shipping charges.
How does state law apply?
This warranty gives you specic legal rights, and you may also have other rights which vary from
state to state.
What if my product is damaged on the way to you?
Emotiva is not liable for damages that may incur while an item is in transport to us. Please
purchase insurance when you ship your item. If your Product was not adequately packaged, we
will refuse receipt and the damaged package will be returned to you at your cost. If you do not
have the original Emotiva Audio packaging, please check with our sales department to purchase
replacement-shipping cartons.
How does the Warranty and service apply to international orders?
The Product Warranty is only valid in the country where the Emotiva product was originally
shipped via an authorized dealer, distributor, or direct from the Emotiva factory. The Warranty
is subject to change at any time depending on the laws and regulations within your specic
country. Please check with your distributor for a complete understanding of the warranty in your
country.
If you purchased your Emotiva Product outside of the USA and wish to have it serviced at the
factory, all freight charges are your responsibility. If you do not have an authorized distributor
or repair center in your country, your Product must come back to the Emotiva USA factory for
warranty service.
Page 29
Page 34

Notes
All information contained in this manual is accurate to the best of our knowledge at the
time of publication. In keeping with our policy of ongoing product improvement, we reserve the
right to make changes to the design and features of our products without prior notice.
User Manual Revision 3.2 April 2018
Page 35

Page 36

 Loading...