

Page 1
Page 2

Page 3

Important Safety Precautions and Explanation of Symbols
The exclamation point within an equilateral triangle is intended to alert the user to the presence of
important installation, operation, and service instructions in this manual.
!
The lightning ash with arrowhead symbol within an equilateral triangle is intended to alert the user to the
presence of uninsulated dangerous voltages within the enclosure that may be of sucient magnitude to
constitute a risk of electrical shock to the user.
Please read this manual thoroughly before attempting to install, congure, or operate the BasX MC1
Surround Sound Processor. After successful installation and conguration of the MC1, be sure to retain this
manual in a safe place for future reference.
Safety is a key component to a long lasting and trouble free installation. Please read and follow all
instructions and heed all warnings on the MC1 and in this manual. The vast majority of the subsequent
safety precautions are common sense. If you are not comfortable with the installation of audio/video
entertainment equipment, you should seek the services of a qualied installation professional or call us for
help.
WARNING: TO REDUCE THE RISK OF FIRE OR ELECTRIC SHOCK, DO NOT USE THE MC1 NEAR WATER OR
IN WET LOCATIONS, DO NOT EXPOSE IT TO RAIN OR MOISTURE, DO NOT EXPOSE IT TO DRIPPING OR
!
SPLASHING FROM OTHER SOURCES, AND ENSURE THAT NO OBJECTS FILLED WITH LIQUIDS SUCH
AS VASES ARE PLACED ON IT. DOING SO MAY RESULT IN DAMAGE TO THE UNIT AND THE RISK OF
ELECTRIC SHOCK, WHICH MAY RESULT IN BODILY INJURY OR DEATH.
WARNING: TO REDUCE THE RISK OF ELECTRIC SHOCK, DO NOT REMOVE THE COVER FROM THE
MC700. THERE ARE NO USERSERVICEABLE PARTS INSIDE THE UNIT. REFER ALL SERVICE TO
QUALIFIED SERVICE PERSONNEL.
Do not install the MC1 near or above any heat sources such as radiators, heating vents, or other apparatus’
that produce heat. Do not block any ventilation openings or heat sinks. Avoid installing the unit directly
above other heat-producing equipment unless sucient ventilation or forced-air cooling is provided.
Do not install the MC1 in locations without proper ventilation. The MC1 should not be operated on a bed,
sofa, rug, or similar surface that may block vents. The unit should not be installed in an enclosed location
such as a bookcase, cabinet, or closed equipment rack unless sucient forced-air ventilation is provided.
Always install your MC1 according to the manufacturer’s instructions and only use attachments or
accessories specied by the manufacturer.
Do not install the MC1 on any stand, shelf, or other piece of furniture that is unable to support its weight. If
a cart is used to move the unit, use caution to avoid injury from tip-over.
Connect the MC1 only to power sources of the correct voltage (as shown in this manual and on the
MC1 unit).
Protect power supply cables from being pinched, walked on, or otherwise damaged. Be especially careful
where the power cable enters the power outlet and the unit.
Only connect the MC1 to an electrical outlet or extension cord of appropriate type and rating.
DO NOT defeat the safety purpose of a grounding or polarized plug by removing ground pins or using
unsafe adapters. A polarized plug has two blades - one wider than the other. A grounding plug has a
third ground prong in addition to the two main conductors. The wide blade or third groundling prong is
provided for your safety. If the provided plug does not t your outlet, consult an electrician to replace your
obsolete outlet. If you replace the power cord, only use one of similar type and equal or greater current
rating.
The power cable for the MC1 should be unplugged from the outlet during severe electrical storms, or when
unused for a long period of time.
Only replace the fuse(s) in the MC1 with fuse(s) of proper value and voltage rating.
Page 4

The MC1 should only be cleaned as directed in the manual. Avoid spraying liquids directly onto the unit and
NEVER spray liquids into the vents. Care should be taken so that small objects do not fall into the inside of the
!
unit.
You should seek service for your MC1 by qualied service personnel if any of the following occur:
!
1. The power-supply cord or the plug has been damaged.
2. Objects or liquid have fallen or spilled into the vents.
3. The unit has been exposed to rain.
4. The unit exhibits a marked change in performance.
5. The unit has been dropped, or its enclosure or chassis is damaged.
NOTE: TO COMPLETELY DISCONNECT THE MC1 FROM THE AC POWER MAINS, DISCONNECT THE AC POWER
CORD FROM THE AC RECEPTACLE.
NOTE: THE POWER CORD ON THE MC1 MUST REMAIN READILY ACCESSIBLE AT ALL TIMES.
CAUTION
CAUTION: TO REDUCE THE RISK
OF ELECTRICAL SHOCK, DO
NOT REMOVE COVER. NO USER
SERVICEABLE PARTS INSIDE.
REFER SERVICING TO QUALIFIED
SERVICE PERSONNEL.
Electric service
equipment
Ground clamps
NEC - National Electrical Code
Ground clamp
Antenna lead-in wire
Antenna discharge unit
(NEC section 810-20)
Grounding conductors
(NEC section 810-20)
Power service grounding
electrode system
(NEC art 250, part H)
Page 5

FCC Interference Statement
1. This device complies with Part 15 of the FCC Rules. Operation is subject to the following two conditions:
(1) This device may not cause harmful interference, and
(2) This device must accept any interference received, including interference that may cause undesired
operation.
2. Changes or modications not expressly approved by the party responsible for compliance could void the
user’s authority to operate the equipment.
NOTE: This equipment has been tested and found to comply with the limits for a Class B digital device,
pursuant to Part 15 of the FCC Rules. These limits are designed to provide reasonable protection against
harmful interference in a residential installation.
This equipment generates uses and can radiate radio frequency energy and, if not installed and used in
accordance with the instructions, may cause harmful interference to radio communications. However, there
is no guarantee that interference will not occur in a particular installation. If this equipment does cause
harmful interference to radio or television reception, which can be determined by turning the equipment o
and on, the user is encouraged to try to correct the interference by one or more of the following measures:
• Reorient or relocate the receiving antenna.
• Increase the separation between the equipment and receiver.
• Connect the equipment into an outlet on a circuit dierent from that to which the receiver is
connected.
• Consult the dealer or an experienced radio/TV technician for help.
Radiation Exposure Statement
This equipment complies with FCC radiation exposure limits set forth for an uncontrolled environment. This
equipment should be installed and operated with minimum distance of
20 cm between the radiator & your body.
Page 6

Page 7

BasX MC1 Cinema Processor
BasX MC1 13.2 Channel Cinema Processor
Contents
Important Safety Precautions and Explanation of Symbols
FCC Interference Statement
BasX MC1 13.2 Channel Cinema Processor ...................................................................... 1
Introduction ................................................................................................................................ 3
About This Manual .................................................................................................................... 4
Features ........................................................................................................................................ 5
Unpacking .................................................................................................................................... 6
Getting Started........................................................................................................................... 7
Special Features ......................................................................................................................... 9
BasX MC1 Front Panel ............................................................................................................ 10
BasX MC1 Rear Panel .............................................................................................................. 12
BasX MC1 Remote Control ................................................................................................... 16
BasX MC1 Front Panel Display And Menu System .......................................................20
EMO-Q Advanced Automatic Room Correction ..........................................................31
Sound Fields .............................................................................................................................. 32
Care and Maintenance ..........................................................................................................33
Installing Firmware Updates ...............................................................................................33
Specications ............................................................................................................................34
Emotiva Audio Corporation Three-Year Limited Warranty ....................................... 36
Notes ............................................................................................................................................ 40
Page 1
Page 8

BasX MC1 Cinema Processor
Page 2
Page 9

BasX MC1 Cinema Processor
Introduction
Thank you for purchasing our new BasX MC1 Cinema Processor.
Our BasX product line is dedicated to the philosophy that high-quality products that deliver true
audiophile sound quality do not need to be expensive to buy or complicated to congure and
enjoy. Every model in the BasX line oers all of the essential features you need to maximize your
listening enjoyment.
The BasX MC1 is a high performance cinema surround sound processor that supports 4k UHD video,
including HDR and Dolby Vision, enhanced ARC (eARC), and the latest Dolby Atmos® and DTS:X™
immersive surround sound formats. The MC1 features six HDMI 2.0b video inputs, all of which
support 4k UHD HDR video, and includes support for enhanced ARC (eARC). The MC1 also oers
multiple analog and digital audio inputs, including an internal high performance Bluetooth input,
where you can attach all of your other audio sources.
The intuitive menu system makes the MC1 simple to congure and operate using either the front
panel controls, and the large bright blue front panel VFD display, or the included illuminated
infrared remote control, and the clear concise on-screen display. The MC1 can also be controlled
by most programmable universal remote controls and whole home automation systems via either
infrared commands or wired commands received by its RS-232 interface.
Like every product in the BasX series, the MC1 includes two critical features that you will not nd in
most other components in its price range: really great audio and video performance and excellent
build quality. The BasX MC1 is a true audiophile component, designed and built by professionals to
deliver the outstanding performance that both audiophiles and casual listeners can appreciate. The
MC1 also features precision high-speed video switches that route video directly from the selected
input to the output without any extraneous processing, ensuring that you’ll continue to get the
absolute best possible picture quality from your HD and 4k UHD video sources, and supports both
ARC and Enhanced eARC.
The MC1 delivers a truly stellar audio and video experience.
Enjoy!
The Emotiva Team
Page 3
Page 10

BasX MC1 Cinema Processor
About This Manual
This manual will provide you with the information you need to get started enjoying your
BasX MC1 Cinema Processor.
We suggest that you read through the entire manual; we kept things as short and direct as
possible. Even if you are an expert user, you will probably nd some interesting information and
useful suggestions.
If you are really in a hurry to get started, please read the Getting Started section (on page 7); you
may then read the remainder of the manual at your leisure.
You may wish to keep a copy of this manual with your records, and record serial numbers or other
purchase information on the Notes page at the back.
Page 4
Page 11

BasX MC1 Cinema Processor
Features
The BasX MC1 is a high performance 13.2 channel surround sound cinema processor that includes
support for 4k UHD video with HDR, enhanced ARC (eARC), and the latest Dolby Atmos® and
DTS:X™ immersive surround sound formats. It features six HDMI 2.0b video inputs, all of which
support 4k UHD HDR video, as well as HDR10, HDR10+, and Dolby Vision. The MC1 also includes
support for enhanced ARC (eARC), which allows you to enjoy the full range of sound features and
formats oered by the apps on your smart TV. The MC1 also oers multiple analog and digital
audio inputs, including an internal high performance Bluetooth input, and advanced EMO-Q
Automatic Room Correction.
Features Of The New BasX MC1:
The Emotiva BasX MC1 cinema processor combines simplicity of operation, outstanding video
and audio performance, and incredible value. Here are just some of the exciting features oered
by the MC1:
• Support for current surround sound and immersive audio formats, including Dolby
TrueHD, DTS HD Master Audio, Dolby Atmos®, and DTS:X™. The MC1 supports up to
thirteen main and surround sound channels plus up to two subwoofers.
• Exceptional video quality, with fast error free switching for up to six HDMI inputs, all
of which support HDMI 2.0b and HDCP 2.2, 4k UHD video, and HDR (including HDR10,
HDR10+, and Dolby Vision).
• An internal Bluetooth receiver for streaming audio from your smart phone and other
mobile audio sources.
• Support for both standard ARC (Audio Return Channel) and eARC (Enhanced ARC).
• Emo-Q™ Advanced Automatic Room Correction System automatically calibrates the
MC1 for optimal sound quality with your system in your listening room (calibrated
measurement microphone with internal buer amplier included).
• Superb sound quality delivered by advanced surround sound decoders and highly
optimized analog audio circuitry.
• Real time status information provided by a front panel VFD display and a convenient onscreen display.
• Convenient control options, including a full function illuminated infrared remote control,
front panel menu navigation buttons, and a real front panel Volume knob.
• Included infrared remote control provides direct one-button selection of audio and
video sources, access to the MC1 Menu System, and features illuminated soft touch
buttons.
• Multiple remote control options - including RS-232.
• Firmware update via USB stick - no computer connection required.
• Compact form factor and modern aesthetics make it easy to nd a home for the MC1 in
virtually any room or audio rack.
• Full Emotiva Three Year warranty.
Page 5
Page 12

BasX MC1 Cinema Processor
Unpacking
Your BasX MC1 13.2 Channel Surround Sound Cinema Processor was carefully packed and should
reach you in perfect condition. If you notice any shipping damage or other issues when you
unpack it, please contact Emotiva immediately.
Gently remove your MC1 from the packing carton and remove all wrappings and shipping
material.
It is important to save the box and all packing materials in case your MC1 ever needs to be moved
or shipped back to the factory for service.
We truly value customer feedback and would like to hear from you.
Page 6
Page 13

BasX MC1 Cinema Processor
Getting Started
To get the most from your MC1 we urge you to read the entire manual.
If you cannot wait to listen to some music or watch a few movies, there are only a few things you
really need to do in order to get started, but we do suggest that you at least read all of this Getting
Started section so you don’t miss anything important.
1. Find a secure location for your BasX MC1.
2. Connect your MC1 to your ampliers and speakers. The MC1 supports surround sound
systems with up to 13.2 channels, but you can start with a simpler 5.1 or 7.1 channel
conguration, or even a simple two channel setup.
3. Connect your MC1 to your powered subwoofer if you have one. The MC1 will normally
handle Bass Management so, if you have a choice, use the LFE or line level input on your
sub, and bypass your sub’s crossover, or set it to its highest frequency.
Note: The MC1 has a Subsonic Filter that, by default, will block all frequencies below
approximately 20 Hz from reaching your subwoofer. If you wish to disable this you will
nd it under Crossover settings in the Speaker Setup menu.
4. Connect your MC1 to your projector or TV set. The MC1 has two HDMI outputs, both of
which deliver the same HDMI signal, but only HDMI Output #1 supports eARC.
5. Connect some high quality video and / or audio sources to your MC1.
6. Make sure to have your TV or projector set to the correct HDMI input.
7. Congure your MC1 for the speakers you have connected. You will nd these settings in
the Menu under Setup | Speaker Setup.
• Select your speaker setup and how many speakers you have under Speaker Layout.
Note: If you have a two channel system, select 3.1 as your Speaker Layout, and set
Center to None. If you don’t have a subwoofer, select the appropriate Speaker Layout for your
other speakers, then set Subwoofer to None.
• Select whether your height speakers are Reective or Ceiling mounted speakers under
Height SPKR Type. Select Ceiling if you have direct radiating height speakers mounted
high on the wall.
• Congure the Distance to each speaker from your primary listening position. If you
have a large seating area then set the distance from each speaker to the center of your
listening area. If your room is more or less symmetrical then it’s best to also arrange your
speakers symmetrically.
Note: The distance value will move by one inch each time you press the button; if you hold the
button down the value will jump by feet.
Page 7
Page 14

BasX MC1 Cinema Processor
• Congure the Level for each speaker - as measured from your primary listening position.
These will be set by the EMO-Q Automatic Room Correction if you run it later. For now,
you want to set the levels so each speaker is heard at the same level from your primary
listening position. Levels can be set by ear but you will achieve more accurate results if
you use a sound level meter or sound level measurement app on your phone. If you are
setting this by ear, and your room is symmetrical, you should end up with the left and
right speakers in each pair set to about the same level.
Note: When setting speaker levels the goal is to congure the system so that each speaker
plays at the same level. The actual level at which the test tones play will vary depending on
the gain of your ampliers and the eciency of your speakers. The level of the test tones is
controlled by the system’s Volume control. If the test tones seem to be playing too quietly or
too loudly, you may simply exit the Setup Menu, adjust the Volume control, and reenter the
Level Test/Adjust Menu.
• The default Bass Management settings on the MC1 will work well for most systems so
there is no need to adjust them at this time.
Note: By default, if you have one or more subwoofers, then all of your other speakers are
congured with a Bass Management crossover of 80 Hz, and a 12 dB/octave crossover
slope. By default, if you have no no subwoofer, then your Front Left and Front Right speakers
are assumed to be full range, and their crossover frequency is set to Bypass, while the Bass
Management crossover on all of your other speakers is set to 80 Hz.
Note: The MC1 does not designate speakers as “large” or “small”. To congure one or more
sets of speakers as “large” or “full range”, go into the Speaker Setup | Crossover menu, and set
the Crossover Frequency for those speakers to Bypass.
Note: While these settings will work well in most systems you may of course change them to
suit your system and your personal listening preferences. For example, many people with a
pair of large front speakers choose a lower Bass Management Crossover setting for that pair.
While your BasX MC-1 has many features and settings you can use to customize it to your
particular preferences, and advanced EMO-Q Automatic Room Correction, all of that can wait until
later. At this point you have made all of the basic conguration settings you need to play a movie
or listen to some music and have it sound great.
Enjoy!
Page 8
Page 15

BasX MC1 Cinema Processor
Special Features
The BasX MC1 is highly congurable. However there are a few important features that are
especially noteworthy.
1. Enhanced ARC Support (eARC)
The MC1 provides full support for standard ARC (Audio Return Channel) for devices that don’t
have eARC support.
For devices that support the new eARC (Enhanced ARC) standard the MC1 will detect this and
enable eARC support.
Note: Only HDMI Output #1 on the MC1 supports ARC and eARC.
Note: On most TV sets only one HDMI Input supports eARC, so be sure and connect the MC1 to
that input. In addition to this, on many TV sets, eARC must specically be enabled, so be sure
that eARC is enabled in your TV’s conguration menu.
2. Active HDMI Output Switching
As dened in the HDMI standard, if you have two devices with dierent video capabilities
connected to the two outputs on the MC1, and both are on, your video source will negotiate a
video format supported by both, and the MC1 will send that same video signal to both devices.
So, for example, if you have a 4k TV, and a 1080p TV, and only the 4k TV is turned on, it will receive
a 4k signal; however, if both TVs are turned on, then both will receive a 1080p video signal
(because that is the highest resolution format that both TVs support). The same requirement is
also true for some other features - like HDR.
Unfortunately, many modern TVs and projectors do not report their status correctly to the
processor and source device. As a result of this, for example, you may nd that you don’t get 4k
video on your 4k TV set unless the 1080p TV set is physically disconnected (unplugged).
The MC1 has a special feature that enables you to avoid this sort of problem. On the MC1 you
have the option to temporarily disable each HDMI Output individually. So, in the example above,
by disabling the HDMI Output connected to the 1080p TV set when that set isn’t in use, you can
prevent it from limiting the 4k video signal being sent to your 4k set.
3. Advanced EMO-Q Automatic Room Correction
The MC1 includes the latest and most advanced version of our EMO-Q Automatic Room
Correction System. EMO-Q now displays a visual interface which includes graphs of both the
measured and corrected room response. Channels can now also be tested individually and the
results adjusted individually.
Page 9
Page 16
BasX MC1 Cinema Processor
BasX MC1 Front Panel
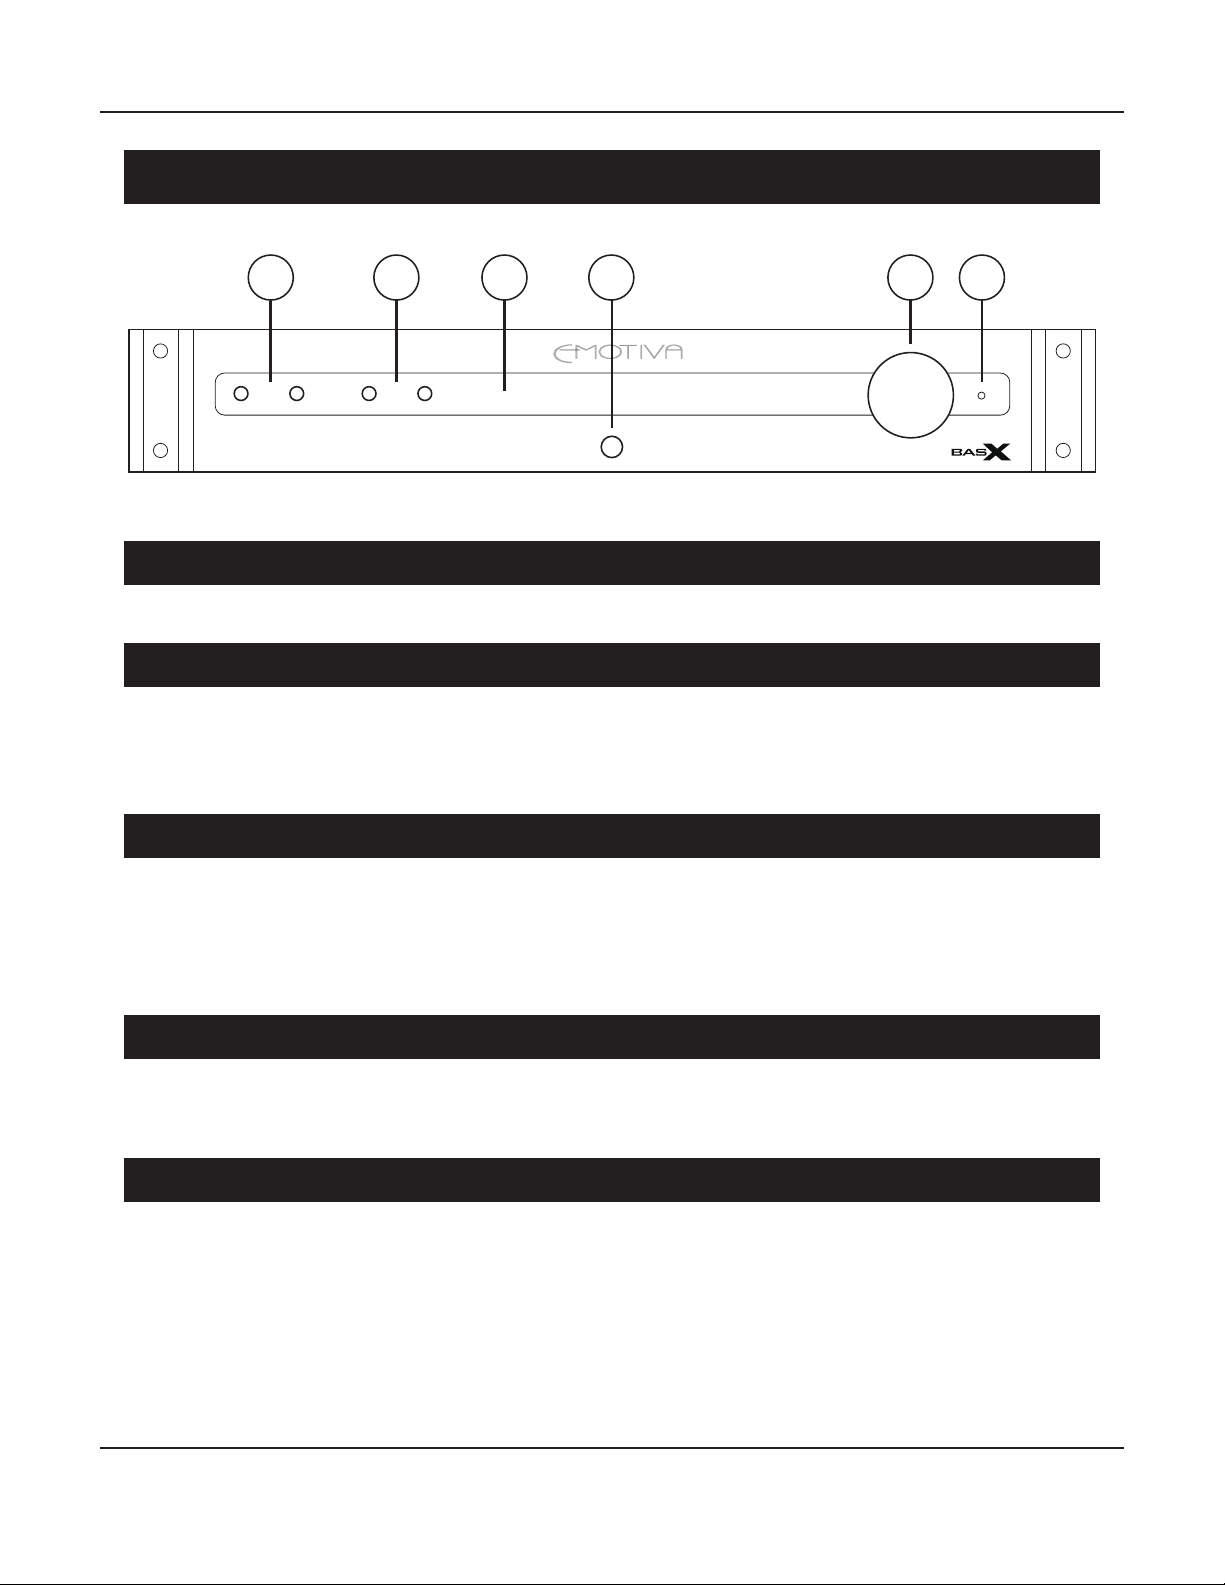
4 651 2 3
INPUTS MODE
MC1
1. Input Select Buttons
Use these buttons to select between inputs on the MC1.
2. Mode Select Buttons
Use these buttons to select the audio Playback Mode.
Note: By default the MC1 will automatically choose the best playback mode to use based on the
incoming audio content.
3. Front Panel VFD Display
The front panel display shows the current status of the MC1.
Note: By default this display shows the selected audio source, the Volume setting, and the
status of the incoming audio and video signals. The information that is shown, and the
brightness of the display itself, can be congured in the Setup Menu.
4. Power / Standby Button
This button is used to toggle the MC1 between Standby and On modes.
Note: In order for the MC1 to be turned On the rear panel AC Power Switch must be On.
5. Volume Knob
This knob is used to control the Volume on the MC1.
Pressing the knob also toggles the Mute function On and O.
Page 10
Page 17

BasX MC1 Cinema Processor
6. Status LED
The front panel Status LED shows the current operating status of the MC1.
This LED will be illuminated amber when the MC1 is in Standby Mode with the AC Power On.
Note: The Status LED will ONLY be lit when the MC1 has AC Power On and is in Standby Mode.
This LED is NOT lit when the unit is On.
SETUP MENU
Although most users will nd it more convenient to navigate the Setup Menu using the remote
control, the front panel Input Select Buttons, Mode Select Buttons, and Volume Control can also
be used to enter and navigate the Setup Menu.
In order to do so:
• Press and HOLD the Volume Knob for several seconds to enter the Setup Menu.
• Use the Input Select Buttons to move Up and Down in the Setup Menu.
• Use the Mode Select Buttons to move Left and Right in the Setup Menu.
• Pressing the Volume Knob momentarily is equal to the OK Button.
• Press and HOLD the Volume Knob for several seconds to exit the Setup Menu.
Page 11
Page 18
BasX MC1 Cinema Processor
BasX MC1 Rear Panel
4 65 7 8 10
SW1 BAL SW2 BAL BT ANTENNA EMO-Q MIC IRINTRIG
SW1 SW2 RRH RMH RFH RBS RS RF C LF LS LBS LFH LMH LRH
13.2 ANALOG
OUTPUTS
L
ANALOG
INPUTS
R
AN1 AN2 AN3 AN4
(RW) (LW)
11
CO1
OPT1
CO2
2 1 (eARC) 1 2 3 4 5 6
OPT2
DIGITAL INPUTS HDMI OUTPUTS HDMI INPUTS
12
OUT
UPDATE USB RS232
13 14
91 2 3
POWER
AC INPUT
15
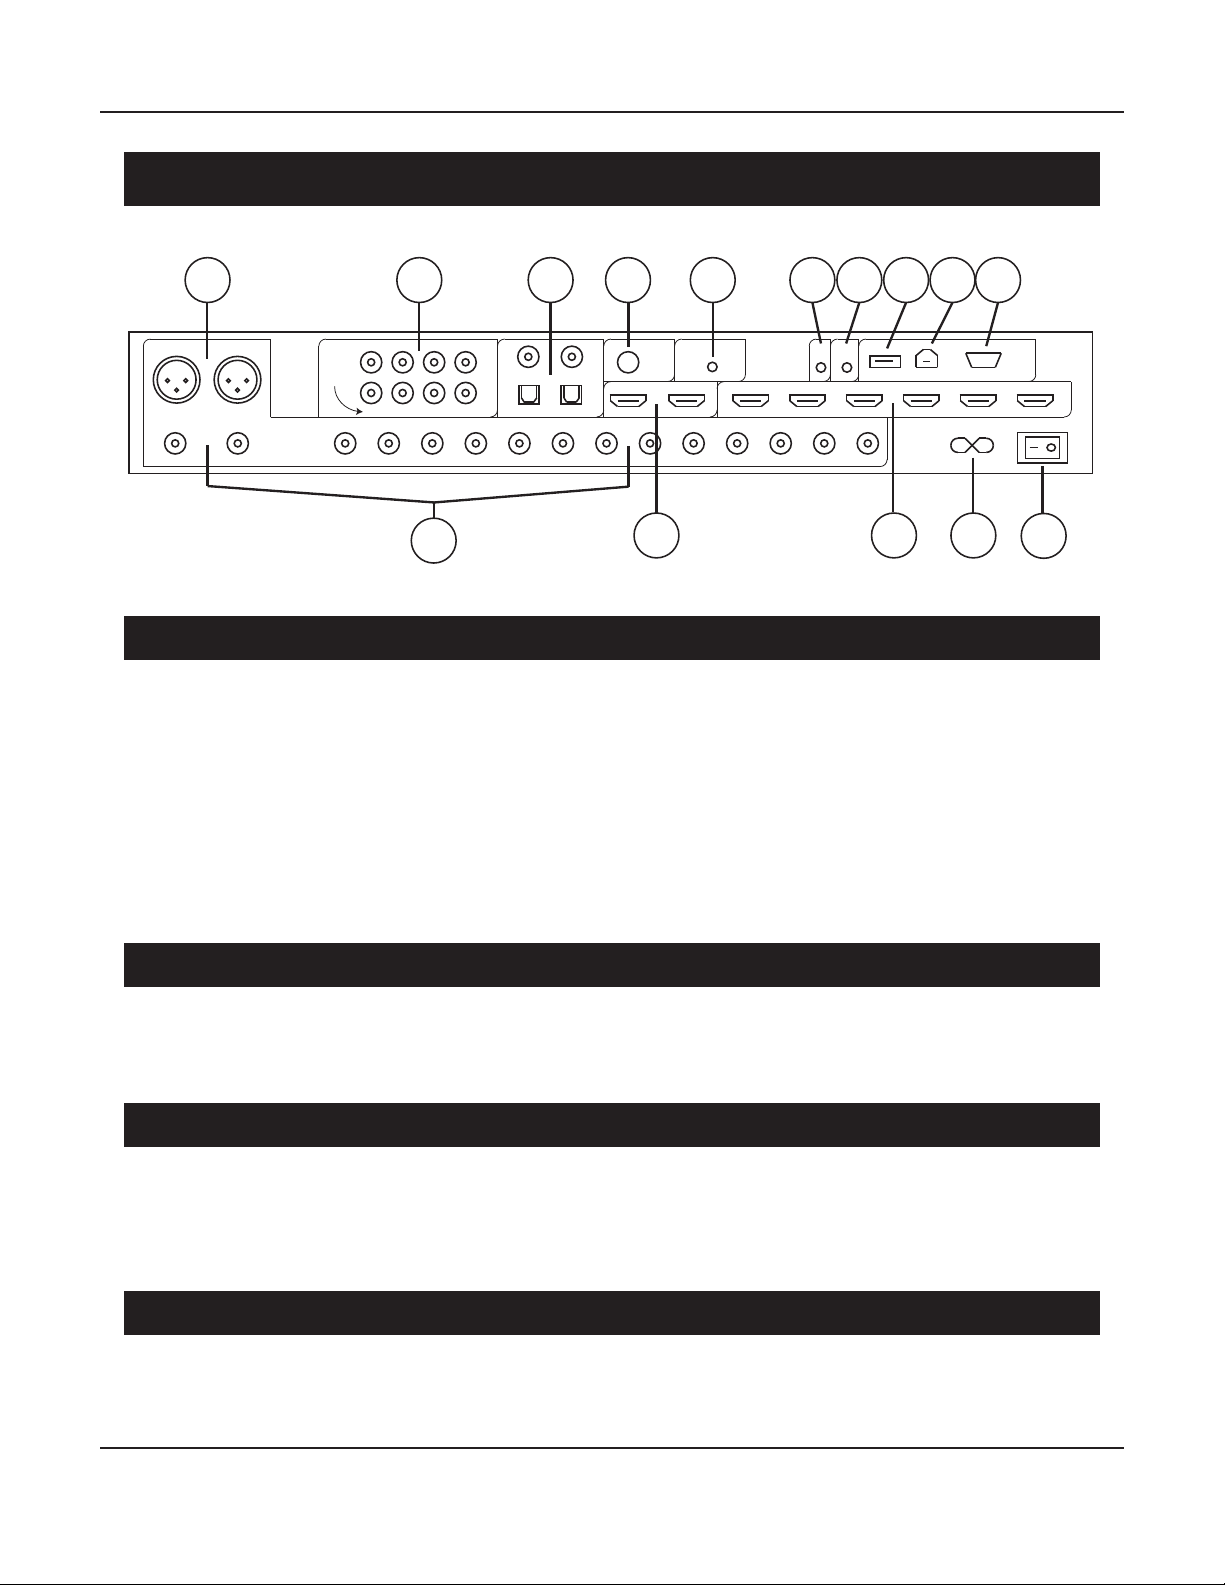
1. Subwoofer Outputs
The MC1 has two Balanced Subwoofer Outputs and two Unbalanced Subwoofer Outputs.
All four subwoofer outputs deliver the same audio information.
However there are independent Level Trim and Distance settings for SW1 and SW2.
Note: For either SW1 or SW2 both the Balanced and Unbalanced Subwoofer Outputs are active
at the same time.
Note: If you congure the MC1 to have Two Subwoofers then both the SW1 and SW2 Outputs
will be active. If you congure the MC1 to have One Subwoofer then ONLY the SW1 Outputs will
be active.
2. Stereo Analog Inputs
Use these inputs to connect your analog stereo sources. They might be used to connect the
output of a phono preamp or tuner, or you could connect the analog output of a phone or music
player to one of these inputs with the appropriate adapter cable.
3. Digital Audio Inputs
Use these inputs to connect a digital audio source. The MC1 includes two electrical S/PDIF (Coax)
inputs and two optical S/PDIF (Toslink) inputs. These inputs accept stereo audio at sample rates
up to 24/192k and low bandwidth digital surround sound formats like Dolby Digital and DTS
Digital Surround.
4. Bluetooth Antenna
This is the antenna for the internal Bluetooth receiver in the MC1, which supports the latest
Bluetooth and AptX audio standards.
Page 12
Page 19

BasX MC1 Cinema Processor
5. Microphone Input (For EmoQ Automatic Room Correction)
Connect the provided calibrated microphone to this input when you are preparing to run the
EmoQ Automatic Room Correction feature in the MC1. You should always use the calibrated
microphone provided with the MC1. If you use a dierent microphone it may produce unusual
results, or even damage your microphone or the MC1.
Note: You should connect the microphone before starting EmoQ. You do not need to leave the
microphone connected except when you’re planning to run EmoQ.
6. IR Remote Input
Use the IR Remote Input to connect the signal from an external IR remote control repeater or hub.
Note: This input requires an active signal from an IR repeater or hub.
7. Trigger Output
A 12 VDC signal is sent from the Trigger Output of the MC1 to turn on other devices when the
MC1 is turned on. This signal can be used to turn on other trigger-enabled audio equipment such as a power amplier.
Note: We recommend using the Trigger Output on the MC1 to turn on your ampliers
automatically when you power on the MC1. This will prevent any noises from being sent to your
speakers as the circuitry in the MC1 starts up. (If the MC1 is left in Standby Mode, rather than
fully powered O, the muting circuitry in the MC1 will ensure that it starts up silently.)
8. USB Update Input
This input is used to update the rmware on the MC1 from a rmware update le on a USB stick.
Note: This USB port CANNOT be used to play audio or video les from a USB stick.
9. USB Audio (DAC) Input
This input can accept a stereo PCM USB audio input, at sample rates of either 16/44k or 16/48k,
from any device that can be connected to “an external USB DAC”. Most Windows and Apple
computers, some tablets and phones, and some USB streamers, can be connected directly to this
input. Some other devices, including some iPhones and IPads, may require the use of a special
adapter.
Note: The MC1 has a standard USB Audio Class 1 (UAC1) input and will not require you to install
any extra drivers on your player device. When you connect the MC1 to a compatible device, it
will appear on that device’s list as a USB audio output device. The exact name under which the
MC1 appears will vary depending on the device you’re using.
Note: On some devices, the MC1 may appear as “a USB headset”, and may also add an option
in the device list under “input devices”. This references a feature that is not enabled on the MC1
and so should be ignored.
Page 13
Page 20

BasX MC1 Cinema Processor
Note: Most computers and streaming devices will automatically detect the USB audio
capabilities of the MC1 and set themselves appropriately. This will enable you to seamlessly
play les and other audio sources at sample rates above those directly supported by the
USB Audio Input on the MC1. If you receive an error message when attempting to play highresolution les on the MC1 via USB you may need to adjust the audio output settings on your
source device.
Note: In order to ensure that the USB Audio Input on the MC1 initializes properly, and is
recognized by your computer, make sure that your computer is connected and powered On
before turning on your MC1.
10. RS-232 Serial Remote Control Input
This input accepts control signals from an RS-232 Serial remote control device.
11. Main 13.2 Channel Unbalanced Analog Audio Outputs
This is the main 13.2 channel audio output on the MC1. The main, surround, and height channels
should be connected to the inputs on the appropriate power ampliers driving your speakers
using high quality unbalanced audio interconnect cables. The subwoofer outputs should be
connected to the LFE or line level input on your subwoofer(s).
Note: If your power amplier only oers balanced inputs, then you may connect the outputs
of the MC1 to those inputs using passive unbalanced-to-balanced adapters or adapter cables,
with no loss of audio quality.
Note: The SW1 and SW2 Unbalanced Subwoofer Outputs carry the same signals as the SW1 Bal
and SW2 Bal Subwoofer Outputs. Both sets of subwoofer outputs are active at the same time.
Note: If you select One Sub in the Setup Menu then only the SW1 and Bal SW1 Outputs will be
active.
12. Main HDMI Outputs
These are the main HDMI Outputs on the MC1 and should be connected to your TV and/or
projector. Both HDMI outputs carry the same video signal, and the On-Screen Display Menu
will be visible on both, but HDMI #1 is considered to be the primary output, and only HDMI #1
supports ARC and eARC.
Note: ONLY HDMI OUTPUT #1 SUPPORTS ARC AND ENHANCED ARC (eARC). Therefore, if you
plan to use ARC or eARC with a certain TV, then that TV MUST be connected to HDMI Output #1.
Note: ARC / eARC is a separate AUDIO input on the MC1. If you wish to listen to audio from an
App on your TV via ARC or eARC then you MUST select the ARC / eARC Input on the MC1.
(The MC1 will NOT switch to playing the ARC or eARC signal automatically when it is present.)
NOTE: The MC1 has a special feature that enables you to select which HDMI Outputs are active.
This feature is provided to prevent compatibility issues that sometimes arise with certain TV
sets and projectors. Refer to the Special Features section for more details.
Page 14
Page 21

BasX MC1 Cinema Processor
13. Main HDMI Inputs
These are the main HDMI Inputs on the MC1. Use these to connect your HDMI sources. All six
HDMI Inputs on the MC1 support HDMI 2.0b and HDCP 2.2, with full support for 4k UHD video up
to 4k/60, including HDR, HDR+, and Dolby Vision.
14. Power Cable Receptacle
The MC1 uses a standard removable power cable. A high quality commercial power cable is
provided with your MC1.
15. AC Power Switch
Switches the main AC power to the MC1 On and O. When this switch is O, no controls operate,
and the MC1 cannot be turned On from the front panel or with the remote control.
Page 15
Page 22
BasX MC1 Cinema Processor
BasX MC1 Remote Control
1
OFF ONDIM
2
3
4
5
6
7
HDMI 2 HDMI 3
HDMI 1
HDMI 5 HDMI 6
HDMI 4
ARC USB BT
OPT 2 COAX 1
OPT 1
COAX 2 ANA 2ANA 1
ANA 4ANA 3
MODE
OK
INFO
VOL
HT+
HT-
HDMI
OUT
SW+
SW-
SR+C+
SR-C-
9
10
11
12
13
14
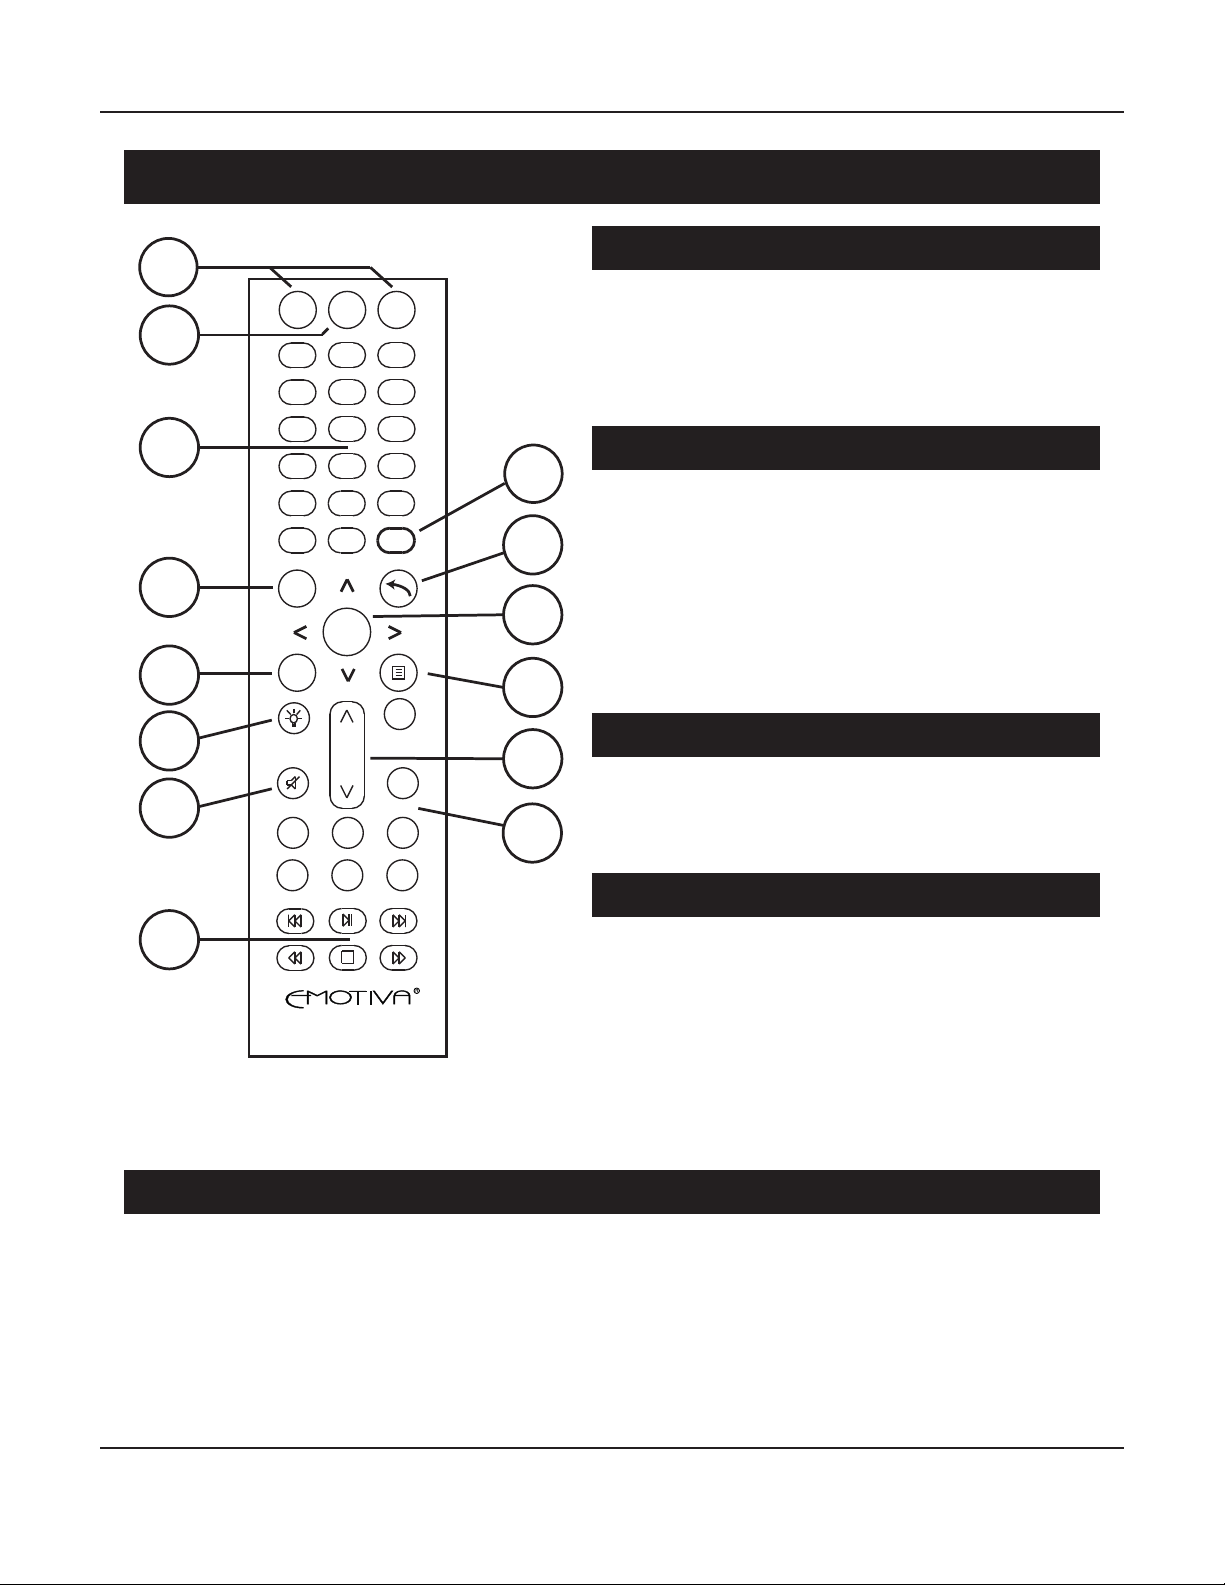
1. Power On / O Buttons
These buttons turn the MC1 On and O.
Note: The Remote Control will only operate when
the AC Power Switch on the rear panel of the
MC1 is On.
2. Dim Button
This button controls the brightness of the front
panel display, cycling through ten dierent
brightness levels.
Note: When the Dim level is set to 0, the front
panel display will remain totally dark, but will
light briey when you press a button or make a
selection.
3. Direct Input Select Buttons
These buttons provide direct access to each of the
HDMI video and audio inputs on the MC1. These
buttons can be congured in the Setup menu.
4. Mode Button
8
BMR-2
The Mode Button allows you to cycle through the
available surround sound modes for a particular
source or movie.
Note: Only certain surround sound modes are
valid with each specic type of input signal. The
Mode Button will only allow you to select modes
that are valid for the input signal that is currently
selected.
5. Info Button
Pressing the Info Button causes the on-screen display to appear, showing information about the
current source, and current playback mode. Pressing this button a second time may also cause
additional information to be displayed in some situations. (For example, if the front panel display
is entirely dimmed, pressing this button a second time will cause it to display information briey.)
Page 16
Page 23

BasX MC1 Cinema Processor
6. Remote Control Light Button
Pressing this button will cause the back light on the remote control to light.
(The back light on the remote control will also illuminate when any other button is pressed.)
7. Mute Button
Press this button to mute the audio output on the MC1; press it again to return the audio to its
previous level.
8. Transport Buttons
These buttons will enable you to control transport functions like Play, Rewind, and Fast Forward
on some CEC-enabled disc players and possibly on some other CEC-enabled devices. The
Navigation Buttons on the MC1 remote control may also enable you to operate the Disc Menu on
certain CEC-enabled disc players.
9. HDMI Output Button
This button enables you to choose whether one or both of the HDMI outputs on the MC1 is active.
This can help resolve certain conicts that may arise when you have two dierent HDMI devices
with dierent capabilities connected to the two HDMI outputs on the MC1.
Pressing this button once will display the current status; pressing it repeatedly will cycle through
the available options.
Note: When one of the HDMI outputs on the MC1 is disabled using this option it will act as
if it is physically disconnected. THE TV OR DISPLAY CONNECTED TO THE DISABLED OUTPUT
WILL SHOW A BLANK SCREEN OR NO SIGNAL and its capabilities will not be considered
when negotiating the best video mode between your source device and the TV or projector
connected to the active output.
10. and 11. Return Button and Menu Navigation Buttons
These buttons are used to navigate the Setup Menu on the MC1.
12. Menu Button
Press this button once to enter the Menu System on the MC1; press it again to exit the Menu.
Note: While the Setup Menu on the MC1 can be navigated using the front panel controls and
display, the information shown on the Front Panel Display is limited, and the operation of
the front panel buttons is less intuitive than the remote control. Therefore we STRONGLY
recommend using the remote control, and the on-screen display, when making conguration
changes to the MC1.
Page 17
Page 24

BasX MC1 Cinema Processor
13. Volume Control
The Up and Down arrows on the ends of the Volume Control enable you to turn the Volume on
the MC1 up and down from the remote control.
14. Trim Buttons
The Trim Buttons enable you to temporarily adjust the Volume on various sets of speakers. These
adjustments, which are intended to allow you to customize the audio content from a particular
movie or audio program to your personal listening taste, will not be retained after you switch to a
dierent source. (Use the Setup Menu to make adjustments that will be retained.)
NOTE: The remote control keyboard will illuminate when any button is pressed. The
illumination will shut o a few seconds after the last button is pressed to preserve battery life.
If you wish to light the remote control without entering a command, you can do so by pressing
the Light Button.
Page 18
Page 25

BasX MC1 Cinema Processor
Basic Operation
Once you’ve congured a few things on your MC1 (refer to the Getting Started section) basic
operations like selecting sources and making trim adjustments are very simple.
Turning the MC1 On and O
Once the rear panel AC Power Switch is turned on, and the MC1 has had a few seconds to boot up,
you can use the front panel Standby Button to toggle between On and Standby, or or you can use
the On and O buttons on the remote control to switch between On and Standby modes.
Raising and Lowering Volume / Muting Audio
To raise or lower the Volume using the front panel controls:
Simply turn the front panel Volume knob up or down.
To Mute the Volume using the front panel controls: press the Volume knob briey.
Pressing the Volume knob a second time will toggle Mute o.
Mute will be displayed on the front panel display when muting is engaged.
To raise or lower the Volume using the remote control:
Use the Up and Down arrows on the Volume button on the remote control.
To Mute the Volume using the remote control:
Press the Mute button on the remote control to toggle muting on and o.
Selecting an Input
To select an Input using the front panel controls:
Use the two front panel Input Buttons to step through the available inputs to the one you want.
To select an Input using the remote control:
Press the appropriate button on the remote control to directly select your input.
Note: By default, if you select an audio-only input on the MC1, the video output will display a
blank screen. You can congure the MC1 to display video from a video source when an audioonly input is selected in the Source Setup Menu.
Changing Audio Modes
To change audio modes using the front panel controls:
Use the two front panel Mode Buttons to step through the available modes to the one you want.
To change audio modes using the remote control:
Use the Mode Button to step through the available modes.
Note: When cycling through the list of available audio modes the MC1 will only oer modes
that are valid for the particular type of input signal you are currently listening to.
Level Trims
The Level Trim Buttons on the remote control allow you to make direct temporary adjustments to
the levels of individual sets of speakers.
Page 19
Page 26
BasX MC1 Cinema Processor
BasX MC1 Front Panel Display And Menu System
The BasX MC1 has several ways of presenting you with information:
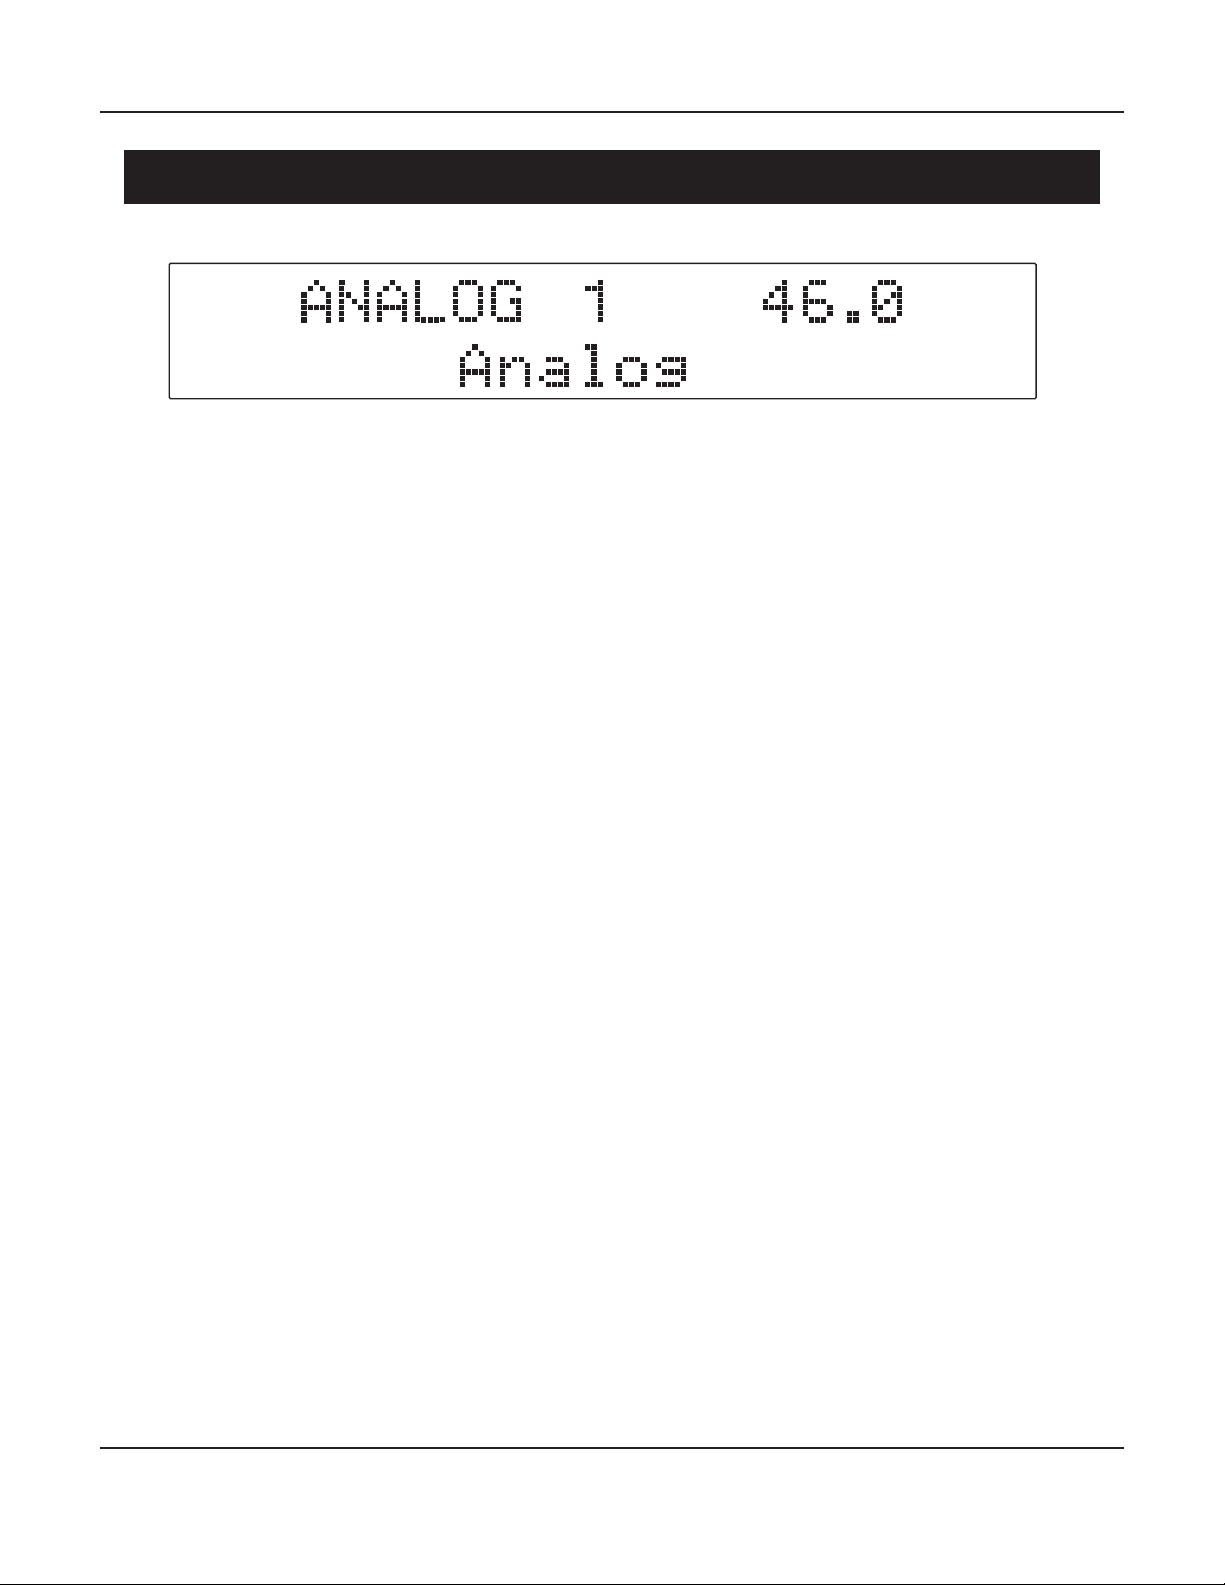
• A large bright front panel VFD display that displays basic information like what Input you
have selected, what audio Mode is selected, and the current Volume level.
• A simple on-screen information panel which pops up momentarily on your TV screen to
display information like the current Volume setting and the current audio Mode when
something changes. (By default it pops up when you change the Volume, or change
the Input selection, or when something like the audio mode or video resolution of your
source content changes.)
• An in-depth Setup Menu which is displayed on your TV screen when you activate the
Setup Menu.
NOTE: Most parts of the Setup Menu can be navigated using the front panel display and
controls. However, the amount and type of information that can be shown on the front panel
display is limited, and the front panel controls oer limited control capability, so we STRONGLY
suggest that you use the on-screen display and the remote control when using the Setup Menu.
When you rst enter the Menu System on the MC1 you will be presented with the Top Menu
screen which consists of ve main sections: Source, SoundField, Trims, EMO-Q, and Setup. When
you rst enter the Menu System the text in one of the tabs will be displayed double-size and the
tab will be highlighted. This is the currently selected tab.
Note: On most diplays highlighted text will be shown as bold white text on a blue background.
However, on some displays, especially in various HDR formats, other colors may be used.
We have changed some of the colors in the manual for better viewing clarity in the printed
illustrations.
Page 20
Page 27

BasX MC1 Cinema Processor
In the rst illustration we have pressed the Menu Button to enter the Main Menu.
The Setup tab is highlighted, with larger text, showing that we are in the Setup Menu.
SOURCE SOUNDFIELD TRIMS EMO-Q
SETUP
Source Setup
Audio Mode
Speaker Setup
EQ Setup
Option
Save and Recall
About
From there we’re going to press the Down Arrow to enter the Setup Menu.
The Source Setup option is now highlighted.
The Right Arrow indicates that there are conguration options for this choice.
We’re going to enter the Source Setup sub-menu by pressing the OK or Right Arrow buttons.
SOURCE SOUNDFIELD TRIMS EMO-Q
Source Setup
Audio Mode
Speaker Setup
EQ Setup
Option
Save and Recall
About
SETUP
1 HDMI 1
2 HDMI 2
3 HDMI 3
4 HDMI 4
5 HDMI 5
6 HDMI 6
7 eARC/ARC
8 OPTICAL 1
Page 21
Page 28
BasX MC1 Cinema Processor
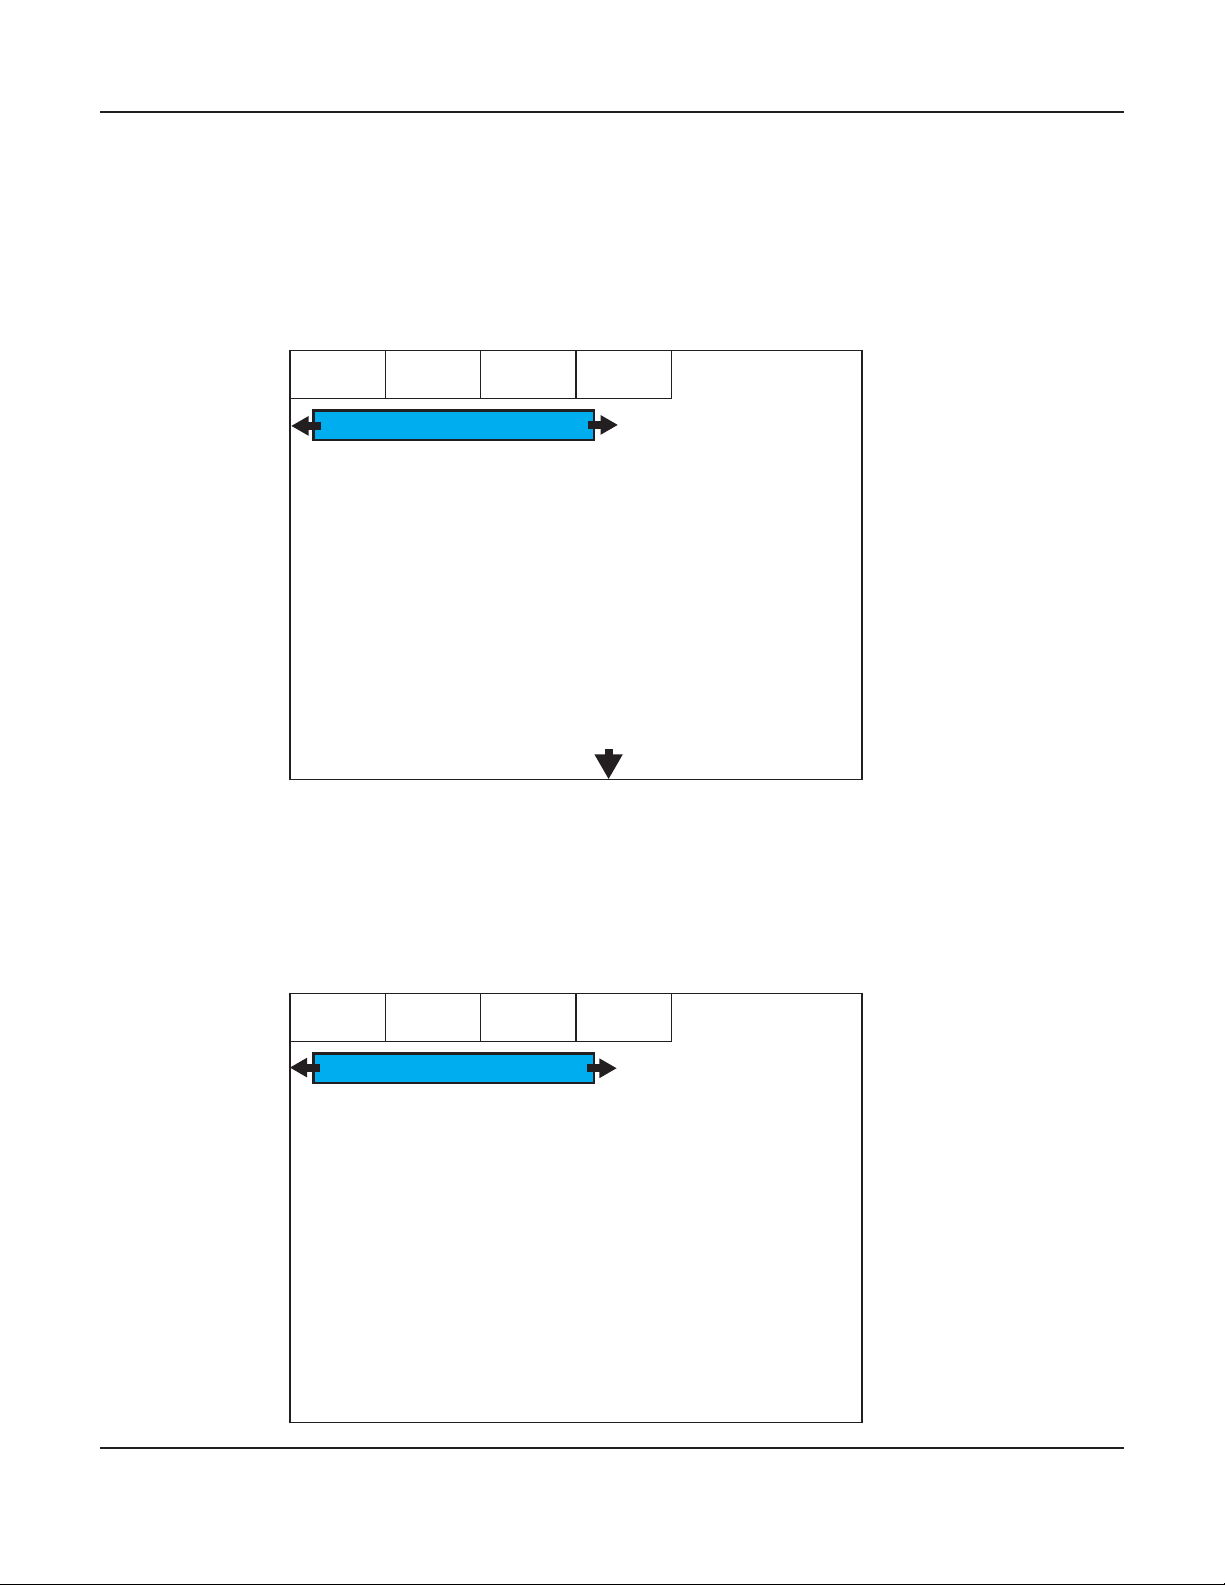
We are now in the Source Setup sub-menu of the Setup Menu.
The rst item in that menu is currently highlighted by default (HDMI 1).
The Right Arrow indicates that there are further conguration options for this choice.
The Left Arrow indicates that we can go up a menu level by pressing the Left Arrow button.
The Down Arrow at the bottom indicates that the list of items continues...
(If you scroll down past the bottom the list will scroll upwards to display more items.)
SOURCE SOUNDFIELD TRIMS EMO-Q
1 HDMI 1
2 HDMI 2
3 HDMI 3
4 HDMI 4
5 HDMI 5
6 HDMI 6
7 eARC/ARC
8 OPTICAL 1
We’re going to enter the HDMI 1 sub-menu by pressing the OK or Right Arrow buttons.
We are now in the Source Setup for HDMI 1 sub-menu.
The rst item in that menu is currently highlighted by default (Enable).
The Right Arrow indicates that there are further conguration options for this choice.
The Left Arrow indicates that we can go up a menu level by pressing the Left Arrow button.
SETUP
Enable
Rename
Video Source
Audio Source
EQ Select
Volume Mode
Trigger Out
Default
SOURCE SOUNDFIELD TRIMS EMO-Q
Enable
Rename
Video Source
Audio Source
EQ Select
Volume Mode
Trigger Out
Default
Page 22
SETUP
ON
Page 29

BasX MC1 Cinema Processor
We’re going to enter the Enable sub-menu by pressing the OK or Right Arrow buttons.
We are now in the Enable option of the Source Setup for HDMI 1 sub-menu.
ON is highlighted in RED indicating that it is the currently selected option.
The Left Arrow indicates that we can go up a menu level by pressing the Left Arrow button.
SOURCE SOUNDFIELD TRIMS EMO-Q
Enable
Rename
SETUP
OFF
ON
Video Source
Audio Source
EQ Select
Volume Mode
Trigger Out
Default
IF WE EXIT THE MENU AT THIS POINT NO CHANGES WILL BE MADE.
To make a change:
Move the highlight to your desired choice using the Up and Down arrows.
When you move the highlight the new selection will be displayed in bright white text.
IN ORDER TO ACCEPT THIS NEW SETTING YOU MUST PRESS THE OK BUTTON.
Once you press the OK button the new selection will become highlighted in RED.
This indicates that the change has been committed to the conguration of the MC1.
At this point you may use the Menu Button to exit the menu.
You may also use the Left Arrow button to navigate up one level in the menu.
In general, when you are in the Menu System, the navigation arrow buttons will move you
around in the menu, arrows will be displayed to indicate directions in which you can move,
and the currently selected option will be highlighted in RED.
On some screens, like the Trims and EMO-Q menu screens, there will be options that include
increasing or decreasing values. In these cases arrows will be displayed to indicate which
Navigation Buttons should be used to change the indicated value.
Note: It is possible to navigate the Menu System using the front panel controls. If you do so
then pressing the Volume knob while in the Menu System acts as the OK button, and the
other pairs of buttons on the front panel act as the Up, Down, Left, and Right buttons.
WHEN YOU ARE DONE USING THE SETUP MENU PRESS THE MENU BUTTON TO EXIT THE
MENU SYSTEM.
Page 23
Page 30

BasX MC1 Cinema Processor
THE SOURCE MENU
You can use the Source Menu to select your Input Source.
Use the Up and Down arrows to move the highlight to the input you wish to select.
Press OK to accept your choice.
(After you accept your choice your new selection will be highlighted in RED.)
THE SOUNDFIELD MENU
By default the MC1 will choose what Sound Field to use to play each source based on the number
of channels and audio format of the incoming audio signal. This menu enables you to temporarily
override the default choice for your current audio content.
Remember - When this option is O the option you choose is considered to be temporary. When
this is set to On the MC1 will attempt to use the option you choose the next time it receives a
similar source signal.
THE TRIMS MENU
The Trims Menu enables you to set individual trim levels for each speaker channel and congure
Dolby Range Control and Lipsynch Delay options.
Channel Levels - The Trims Menu allows you to individually set the level of each speaker.
DRC - Allows you to set Dolby Range Control to On, O, or Auto.
Lipsynch - Allows you to manually enter a value for Lip Synch Delay. The default setting is Auto,
which is the best choice for most systems.
THE EMO-Q MENU
The EMO-Q Menu gives you access to the EMO-Q Advanced Automatic Room Correction System
in the MC1.
EMO-Q Calibration - This option engages the EMO-Q Automatic Room Correction System, which
will automatically measure your room, and your system, and congure the MC1 to deliver the best
possible sound quality.
Individual Test - This option allows you to use the measurement capabilities of the EMO-Q
Automatic Room Correction System to take individual test measurements.specic tests on
individual engages the EMO-Q Automatic Room Correction system, which will automatically
measure your room, and your system, and congure the MC1 to deliver the best possible sound
quality.
REFER TO THE EMO-Q ADVANCED AUTOMATIC ROOM CORRECTION SECTION FOR MORE
DETAILS ABOUT RUNNING EMO-Q.
Page 24
Page 31

BasX MC1 Cinema Processor
THE SETUP MENU
The Setup Menu is where you access most of the advanced conguration options on the MC1. The
Setup Menu is divided into several sections, each of which have several options:
• SETUP - SOURCE SETUP
• SETUP - AUDIO MODE
• SETUP - SPEAKER SETUP
• SETUP - EQ SETUP
• SETUP - OPTIONS
• SETUP - SAVE AND RECALL
• SETUP - ABOUT
SETUP - SOURCE
This menu enables you to congure several options individually for each input on the MC1.
Enable - This option allows you to disable inputs which are not being used.
Rename - This option allows you to change the name associated with the Input.
Video Source - With HDMI Inputs the video that is displayed always comes from the selected
HDMI input. With Audio Inputs, you may choose to display a blank video screen, or video from a
dierent Video Input.
Note: In this Menu the “Input Name” refers to the INPUT (button) DESIGNATION.
On the MC1 you MAY assign the same PHYSICAL HDMI SOURCE to multiple “HDMI Inputs”.
For example, you MAY congure “HDMI 1” to have Video Source = HDMI 1 and
Audio Source = HDMI (also HDMI 1), and ALSO congure “HDMI 2” to have its
Video Source = HDMI 1, but with a dierent Audio Source.
Audio Source - This option allows you to associate audio from a dierent audio source with a
specic HDMI Input. The default setting for HDMI sources is “HDMI”, which assigns the current
HDMI signal as the Audio Source. Options include audio from the selected HDMI signal or from
any other valid Audio Input. (You cannot select to associate audio from a dierent HDMI input.)
EQ Select - This option allows you to select which set of EQ settings are associated with the input.
Options include EMO-Q EQ settings, three Manual EQ settings, and Bypass, which allows you to
listen to the original audio signal with no EQ applied.
Volume Mode - When you turn the MC1 O it remembers the current Volume setting and returns
to that setting when the MC1 is turned back on. However, there are several more advanced
options that modify how the MC1 treats the Volume setting when individual inputs are selected.
The default setting is Unied. The Volume is simply treated as being the same for all inputs; and
the Volume doesn’t specically change when you change inputs. If you set this to Individual, the
MC1 remembers the Volume setting for each input separately, and when you select an input the
MC1 returns to the Volume setting that was last used FOR THAT INPUT. If you set this to Additional,
the MC1 returns to the individual Volume last used for that input, BUT THAT SETTING IS MODIFIED
BY THE SPECIFIC AMOUNTS YOU SPECIFY.
Page 25
Page 32

BasX MC1 Cinema Processor
Note: For example, if you set the Volume Mode for HDMI 1 to Additional -10 dB, the next time
you select the HDMI 1 input, the MC1 will determine the Volume setting that was in eect the
last time that input was used, adjust it according to the value specied in the Additional eld,
and automatically set the system Volume to that setting. (So, with the values in this example,
the next time you select HDMI 1, the MC1 will automatically set the Volume to 10 dB lower than
it was set to the last time you used the HDMI 1 Input.)
Trigger Out - This option allows you to decide whether the Trigger Output on the MC1 will be
active when this Input is selected.
Default - Selecting this option will reset the conguration options FOR THE CHOSEN INPUT to
their factory default values.
Note: This Default option only aects the Input you are currently conguring.
Note: The Default option takes eect when you press the OK or Right Arrow button.
(You will NOT be asked to conrm your decision.)
SETUP - AUDIO MODE
By default the MC1 will automatically select the best Audio Mode (Sound Field) to use based
on the format of the incoming audio signal. The SoundField Menu, and the Mode Button on the
remote control, allow you to temporarily select dierent modes to use with the content you are
currently playing.
This menu enables you to change the default SoundField modes that the MC1 will use with
various types of input signals.
SETUP - SPEAKER SETUP
This menu enables you to congure the MC1 to work with the specic number and type of
speakers you have, set speaker distances and levels, and adjust several other options.
Speaker Layout - Use this option to inform the MC1 about how many speakers you have.
Note: The rst and last digits in each system choice describe the total number of main,
surround, and height speakers you have. The left hand digit shows the total of your main and
surround speakers; the middle digit shows how many subwoofers you have; the right hand
digit shows how many height speakers you have. Some of the values shown here will change
when you later change the settings in the Center and Subwoofer options.
Note: How certain system congurations are displayed and congured depends on settings in
both this option and others. If you have a 2.1 channel system, you should select a 3.1 channel
system here, and set Center to None. If you have a 2.0 channel system, you should select a 3.1
channel system here, set Center to None, and set Subwoofer to None.
Center - Set this to Yes if you have a center channel speaker.
Subwoofer - Set this to how many subwoofers you have (one or two). Select None if you have no
subwoofer connected.
Page 26
Page 33

BasX MC1 Cinema Processor
Note: The MC1 has two subwoofer outputs - SW1 and SW2. Both the balanced and unbalanced
outputs carry the same audio signal and are active at the same time. When you select One Sub
both SW1 and SW1 Bal will be active. When you select Two Subs, all four outputs will be active,
SW1 and SW1 Bal will carry the same signal, and SW2 and SW2 Bal will carry the same signal.
Height SPKR Type - If you have height speakers this option will allow you to congure whether
they are Ceiling or Reective speakers. If you have direct radiating height speakers mounted high
on the walls you should select Ceiling here.
Level Test / Adjust - When you select this option you will be able to manually set the relative
levels of your speakers using an internal test tone generated by the MC1. As each speaker is
selected the test tone will play from that speaker and you will be able to adjust its level.
Note: When setting speaker levels the goal is to congure the system so that each speaker plays
at the same level as heard from your primary listening position. The actual level at which the
test tones play will vary depending on the gain of your ampliers and the eciency of your
speakers. The level of the test tones is controlled by the system’s Volume control. If the test
tones seem to be playing too quietly or too loudly, you may simply exit the Setup menu, adjust
the Volume control, and reenter the menu.
Distance - Use this option to set the distance from each speaker to your listening position.
Note: Congure the Distance to each speaker from your primary listening position. If you have
a large seating area then set the distance from each speaker to the center of your listening
area. If your room is more or less symmetrical then it’s best to also arrange your speakers
symmetrically.
Note: The distance value will move by one inch each time you press the button; if you hold the
button down the value will move in one foot increments.
Crossover - This option enables you to set the Bass Management options on the MC1. The default
Bass Management settings on the MC1 will work well in most surround sound situations so there
is no need to adjust them.
Note: By default, if you have one or more subwoofers, then all of your other speakers are
congured with a Bass Management crossover of 80 Hz, and a 12 dB/octave crossover slope.
By default, if you have no no subwoofer, then your Front Left and Front Right speakers are
assumed to be full range, while the Bass Management crossover on all of your other speakers is
set to 80 Hz.
Note: The MC1 does not designate speakers as “large” or “small”. To congure one or more
sets of speakers as “large” or “full range”, go into the Crossover menu, and set the Crossover
Frequency for those speakers to Bypass.
Note: While these settings will work well in most systems you may of course change them to suit
your system and your personal listening preferences.
Filter Slope - This option allows you to set the lter slopes on the Bass Management crossovers
for each set of speakers and the subwoofer. The default setting is 24 dB/octave for the subwoofers,
and 12 dB/octave for all your other speakers, and should work well for most systems.
Page 27
Page 34

BasX MC1 Cinema Processor
SETUP - EQ SETUP
This menu enables you to congure the overall EQ settings for the MC1.
EQ 1, EQ 2, EQ 3, EmoQ, EQ Bypass - These options determine the EQ settings which will be used
on the MC1. The selected option will be shown highlighted in red.
Note: This option congures the DEFAULT choice for which set of EQ parameters will be applied
to each input on the MC1. The option you select here will be used for each input UNLESS YOU
HAVE CONFIGURED THAT PARTICULAR INPUT TO USE A DIFFERENT EQ OPTION.
The MC1 has three sets of manual EQ settings (EQ 1, EQ 2, and EQ 3.)
Each of these sets oers several parametric equalizer lters for each set of speakers.
And each of those parametric EQ lters has a congurable center frequency, bandwidth, and gain.
Once you have highlighted one of the EQ lter sets, you can either select it by pressing OK, or you
can enter into the settings for the individual PEQ lters inside that lter set by pressing the Right
Arrow button. You can then navigate further into the EQ Setup menu to make changes to the
individual lter settings. You will also have the option to engage the test signal generator built
into the MC1, view a visual result of the resulting measurements on a graph, enter your choices
into the lter settings, and Save and Load some of your settings.
NOTE: You DO NOT have to connect the calibrated microphone included with your MC1 in order
to manually enter values here. However, if you wish to take measurements, you must make sure
that the microphone is connected before doing so.
NOTE: The microphone included with the MC1 is calibrated for “zero degree orientation”. This
means that, in order to obtain the most accurate results, the front of the microphone should
be faced towards the speaker you are measuring. Hold the microphone as steadily as you can,
WITH THE POINT OF THE CONE TOWARDS THE SPEAKER YOU ARE MEASURING, and ensure that
there are no obstructions between the microphone and the speaker you are measuring.
Prompts on the measurement screen will guide you through the process of taking measurements,
viewing the results, and saving those results in the manual EQ set you are calibrating.
Selecting the EMO-Q option here will enable you to view and edit the EQ settings created and
stored by the EMO-Q Automatic Room Correction System the last time it was run.
You can also select EQ Bypass here to set the system default to not apply ANY EQ to the selected
input.
Note: If you select the Bypass option, the system default will be NO EQ, and EQ will only be
applied to each selected input if an EQ option other than Default was congured for that input
in the Setup Input options.
NOTE: When you receive your MC1, and after resetting the unit to Factory Defaults, the Default
EQ option will be set to Bypass. After running EMO-Q this default will be set to point to the
EMO-Q EQ settings.
Page 28
Page 35

BasX MC1 Cinema Processor
SETUP - OPTION
This menu gives you access to several conguration options for various features on the MC1.
Startup State - This option allows you to congure how the MC1 starts up when AC power
is applied to the unit. The MC1 can be congured to start up On, or in Standby, or to start in
whatever state it was in when it was powered O.
Volume Options - This is where you can congure the Power On Volume, Maximum Volume, and
Volume Step settings for the MC1. You can also congure whether the MC1 displays Volume as a
number from 0-80 (with 80 the highest volume) or as Real Gain (expressed in -dB).
HDMI Options - This menu oers several options related to HDMI operation. Options include
which HDMI Outputs are enabled, whether the MC1 will continue to pass video to the TV when
in Standby, some detailed choices about how the MC1 responds to HDMI-CEC commands from
other devices, and allows you to congure whether specic HDMI inputs support Enhanced HDMI
or not. (Most users will not need to use these options unless instructed to by Emotiva Technical
Support.)
Information Display - This is where you can congure how the on-screen display (OSD) appears
and set the default brightness for the front panel display.
No Signal Standby - This is where you can congure how long the MC1 will wait before switching
into Standby when it sees no input signal on the selected input.
Trigger Output - This is where you can congure the default operation of the Trigger Output
on the MC1. You may congure the Trigger Output to remain O, to remain On when the MC1 is
turned On, or to be controlled according to the Trigger option settings for each individual input.
Unit - This is where you congure your MC1 to display various values in Metric or Standard
notation. The default is Standard.
U Driver Log - This options turns on special system diagnostic logs. (You should NOT enable this
option unless instructed to do so by Emotiva Technical Support.)
SETUP - SAVE AND RECALL
This menu enables you to save the current conguration settings on your MC1, restore previously
saved settings, and reset the unit to its factory default conguration.
Save to Backup - Saves the current conguration of the MC1. Settings are saved to internal
memory inside the MC1.
Load From Backup - Loads settings that have previously been saved in the MC1.
Factory Reset - Resets your MC1 to its factory default settings.
Note: Conguration settings are saved to an internal memory location inside the MC1. Saved
settings are retained when you turn o the MC1 or do a Factory Reset.
Page 29
Page 36

BasX MC1 Cinema Processor
SETUP - ABOUT
This menu gives you access to a variety of information about the various rmware modules
currently installed on your MC1 and some of the devices connected to your MC1.
Software Update - This option is used to update the rmware on your MC1.
Note: Firmware is updated by placing the rmware update le on a USB stick, formatted with a
standard FAT32 format, and inserting the stick into the rear panel Update USB port.
Firmware update may be initiated by either:
1. Inserting the USB stick containing the rmware update le into the rear panel Update port
while the MC1 is powered O, then turning the MC1 On. At this point the MC1 will detect the
rmware le automatically and install it.
2. Inserting the USB stick containing the rmware le while the MC1 is powered On and then
selecting Software Update from this menu.
NOTE: The rmware update will take several minutes and will display a progress indicator.
DO NOT DISCONNECT POWER TO THE MC1 OR REMOVE THE STICK DURING THE UPDATE.
You will see a message when the update is completed, and your MC1 may return to either On
or Standby mode - depending on how the update was initiated. You will NOT be required to
update your MCA to factory defaults after most updates.
MCU Version, DSP Version, OSD Version - These items display useful information about the
rmware modules installed on the MC1.
Bluetooth Name - Displays the Bluetooth Name that will be associated with the MC1 when other
devices are paired with it. You MAY change the name that the MC1 displays to other Bluetooth
enabled devices.
Bluetooth MAC - This item displays the network hardware address of the Bluetooth network
receiver inside the MC1.
TV Connect 1, TV Connect 2 - This item displays some useful information about the HDMI
devices currently connected to the HDMI outputs of the MC1.
Page 30
Page 37

BasX MC1 Cinema Processor
EMO-Q Advanced Automatic Room Correction
The EMO-Q Advanced Automatic Room Correction System in the MC1 calibrates the MC1 to
produce the best possible sound, in your listening room, with your speakers and the rest of your
system.
Calibration is initiated via the Setup Menu by selecting EMO-Q Calibration. Once you have
initiated the EMO-Q calibration, the MC1 will play a series of test tones, measure the results,
calculate the necessary corrections, display both the results of the measurements and its
corrections on your TV screen in visual form, and save those corrections into the EMO-Q EQ
settings on your MC1.
After this, the MC1 will set the EMO-Q EQ set to be the default EQ for your MC1. This will then be
used for all of your inputs except those for which for which you have specied a dierent EQ set.
NOTE: THE EMO-Q TEST SEQUENCE WILL START AS SOON AS YOU ENTER THE EMO-Q
CALIBRATION OPTION. THEREFORE YOU SHOULD MAKE SURE THAT YOU HAVE ATTACHED
YOUR CALIBRATED MICROPHONE TO YOUR MC1 *BEFORE* SELECTING THIS MENU ITEM.
WARNING: THE EMO-Q ROOM CORRECTION SYSTEM ON THE MC1 IS DESIGNED TO BE USED
WITH THE PROVIDED CALIBRATED MICROPHONE. ATTEMPTNG TO CONNECT A DIFFERENT
MICROPHONE TO YOUR MC1 MAY RESULT IN DAMAGE TO THE MC1 OR YOUR MICROPHONE.
NOTE: THE CALIBRATED MICROPHONE PROVIDED WITH YOUR MC1 WILL DELIVER THE MOST
ACCURATE RESULTS IF THE FRONT OF THE MICROPHONE IS FACING TOWARDS EACH SPEAKER
AS IT IS BEING TESTED. The front of the microphone is the tip of the cone. Therefore, as each
speaker is tested, your should hold the microphone as steadily as you can, and point the tip of
the cone towards the speaker that is playing the test tone. You also need to be careful to ensure
that the microphone has an unobstructed line of sight to each speaker as it is tested. (You may
hold the microphone over your head, or turn your body while holding the microphone in front
of you, but be sure that neither your body, nor any furniture, blocks the path between the
microphone and each speaker as it is being tested.
Page 31
Page 38

BasX MC1 Cinema Processor
Sound Fields
The SoundField options in the MC1 were chosen to oer the best combination of sound quality
and exibility with the widest variety of audio sources. By default the MC1 will select the best
SoundField to use, based on the format of the incoming audio signal, and the number and type of
speakers you have.
Pure - applies the least possible processing to both analog and digital sources.
Bass Management and distance correction are still applied with digital sources, but not with
analog sources, and EQ is bypassed.
Direct - delivers the source signal with minimum modication, while still applying system
equalization, and room correction, to both analog and digital sources.
Stereo - converts all incoming signals into a stereo signal. Bass management and system
equalization are applied in Stereo mode.
All Stereo - convertes all incoming signals into stereo, then plays the resulting stereo signal from
all speakers. Bass management and system equalization are applied in Stereo mode. This mode
is sometimes called “party mode” because it plays the source through all of your speakers and so
does a good job of lling a large room with sound.
Page 32
Page 39

BasX MC1 Cinema Processor
Care and Maintenance
Periodic Maintenance
Your BasX MC1 requires no periodic maintenance or calibration.
Cleaning your MC1
• If necessary, the MC1 should be cleaned gently with a soft rag.
• If something sticky gets on the front panel or case of the MC1, it should be cleaned with
a mild cleaning solution applied to a soft cloth, followed by wiping with a clean cloth
dampened with plain water and drying with a soft dry rag or cloth.
Note: DO NOT spray water or cleaning solution directly onto the front or rear panel
of the MC1.
Installing Firmware Updates
From time to time Emotiva may issue rmware updates for your MC1. We strongly recommend
that you only install rmware that was downloaded from the ocial Emotiva website, or that you
received from Emotiva Technical Support sta.
To install a rmware update on your MC1:
1) Download the rmware le from our website or the link or e-mail attachment provided by our
Technical Support representative.
2) Place the rmware update le on a USB stick formatted with the Fat32 operating system
(any commercial USB stick formatted to work on both Apple and Windows computers should
work ne). Place the le into the main or root directory of the stick.
Note: If the rmware update is provided in the form of an archive, such as a Zip le, extract the
rmware update le from the archive onto the stick.
3) Plug the USB stick into the rear panel USB connector labelled Update.
Note: There are two dierent ways to initiate the rmware update. With both, once the update
starts, the front panel will display the status of the update. Depending on which method you
use, after the update completes, the MC1 may turn On or return to Standby.
4a) While the USB stick remains inserted, power the MC1 O, allow it to remain o for twenty
seconds, then power it back On. The MC1 will recongize that a rmware update is available and
will proceed to perform the update.
4b) With the MC1 On, go into the Setup Menu, and select Setup | About | Software Update.
Select Yes when prompted whether you want to do a software update.
WARNING: *DO NOT* unplug the USB stick or turn the MC1 O during the rmware update.
Page 33
Page 40

BasX MC1 Cinema Processor
Specications
Technical Specications
Rated Output Voltage:
+6 dBV (2 VRMS)
Frequency Response:
20 Hz to 20 kHz +/- 0.05 dB
Total Harmonic Distortion:
< 0.0025% @ 1 kHz
< 0.05% from 20 Hz to 20 kHz
Signal to Noise Ratio:
> 100 dB @ 1 kHz
Crosstalk:
< 85 dB @ 10 kHz
Connectivity
Video Inputs and Outputs:
(6) HDMI 2.0b compliant HDMI video inputs
(all with full support for 4k UHD video, HDCP 2.2, HDR10, HDR10+, and Dolby Vision).
(2) HDMI 2.0b compliant HDMI video outputs
(primary output supports both ARC and eARC).
Audio Inputs:
(4) stereo unbalanced analog audio inputs.
(2) S/PDIF coaxial digital audio inputs.
(2) Toslink (optical) digital audio inputs.
(1) USB Audio (DAC) input.
(1) Bluetooth audio input (internal with rear panel antenna).
Audio Outputs:
(1) set of 13.2 channel unbalanced audio main outputs.
(2) balanced subwoofer outputs (same as main sub outputs).
Other Inputs and Outputs:
(1) IR remote control signal input.
(1) RS-232 serial remote control input.
(1) Trigger output (programmable).
(1) USB data input (reserved for rmware updates).
Page 34
Page 41

Audio Formats and Modes Supported
Surround Sound Audio Formats:
Dolby Atmos
Dolby TrueHD
Dolby Surround
DTS:X
DTS HD Master Audio
DTS
Surround Sound Upmixers:
Dolby Surround Upmixer (DSU)
DTS Neural:X
Sound Field and Processing Options:
Pure
Direct
Stereo
Multi-Channel
Dolby Upmix
DTS Neural:X
Room Correction
Automatic Room Correction:
EmoQ Second Generation Automatic Room Correction (with graphical interface).
Manual Room Correction (EQ):
Three Separate Manual Speaker Presets - Each Of Which Oers...
11 Bands of Full Parametric EQ: Left Front and Right Front.
11 Bands of Full Parametric EQ: Center Channel.
7 Bands of Full Parametric EQ: Surround Channels.
7 Bands of Full Parametric EQ: Top Channels.
5 Bands of Full Parametric EQ: Subwoofers.
Environmental
Power Requirements:
100 VAC to 240 VAC @ 50 / 60 Hz (automatically detected).
Dimensions:
17” wide x 3-1/8” high x 13” deep (without connectors).
Weight:
10 lbs (net).
15 lbs (boxed).
Page 42

Emotiva Audio Corporation Three-Year Limited Warranty
What does this warranty cover?
Emotiva Audio Corporation (Emotiva) warrants its products against defects in materials and
workmanship. This warranty, and all rights provided hereunder, is granted to the original owner,
and may be transferred to a single new owner once during the initial one year of ownership. In
the event the original owner transfers ownership of the Product during the rst year of ownership,
this Warranty shall terminate at the end of the original applicable term. In the event the original
owner transfers ownership of the Product AFTER the end of the rst year of ownership, but
prior to the expiration of the applicable term described below, this Warranty shall terminate
immediately upon transfer of ownership.
This Warranty only applies to Products purchased directly from Emotiva or any of its Authorized
Dealers or International Distributors.
Emotiva warrants any replacement product or part furnished hereunder against defects in
materials and workmanship for the longer of the following: (i) the amount of time remaining
under the original warranty, or (ii) 120 days from your receipt of the repaired or replaced product.
The duration described in this paragraph is hereinafter referred to as the “Term”.
TO THE FULLEST EXTENT PERMITTED BY LAW, ALL IMPLIED WARRANTIES RELATED TO THE
ORIGINAL PRODUCT AND ANY REPLACEMENT PRODUCT OR PARTS (INCLUDING IMPLIED
WARRANTIES OF MERCHANTABILITY AND FITNESS FOR A PARTICULAR PURPOSE) ARE EXPRESSLY
LIMITED TO THE TERM OF THIS LIMITED WARRANTY. SOME STATES DO NOT ALLOW LIMITATIONS
ON HOW LONG AN IMPLIED WARRANTY LASTS, SO THE ABOVE LIMITATION MAY NOT APPLY TO
YOU.
The original owner must make a claim within the Term of the Warranty. A claim shall not be valid
(and Emotiva has no obligation related to the claim) if it is not made within the Term and if it is not
made in strict compliance with the requirements of the “How do you get service?” section.
How long does this coverage last?
This warranty commences on the date of retail purchase by the original retail purchaser and
runs for a period of three years thereafter, with the exception of accessories, cables, and remote
controls*. In the event the original owner transfers ownership of the Product during the rst
year of ownership, this Warranty shall terminate at the end of the original applicable term. In the
event the original owner transfers ownership of the Product AFTER the end of the rst year of
ownership, but prior to the expiration of the applicable term, or ownership is transferred a second
time, this Warranty shall terminate immediately upon transfer of ownership.
Emotiva warrants any replacement product or part furnished hereunder against defects in
materials and workmanship for the longer of the following: (i) the amount of time remaining
under the original warranty, or (ii) 120 days from your receipt of the repaired or replaced product.
The duration described in this paragraph is hereinafter referred to as the “Term”.
*Accessories, cables, and remote controls have a one-year warranty to the original owner.
Page 43

What will Emotiva do?
Emotiva will, at its option, either: (i) repair the product, or (ii) replace the product with a new
consumer product which is identical or reasonably equivalent (in Warrantor’s sole discretion) to
the product. In the event Warrantor, in its sole discretion, is unable to replace or repair the Product
or it is not commercially practicable to do so, then: (i) if the claim was submitted during the rst
365 days of the Term, Warrantor shall refund to you the purchase price that you paid for the
Product; and (ii) if the claim was submitted after the rst 365 days of the Term, Emotiva shall issue
you a credit equal to the purchase price that you paid for the product. The credit may only be
used for the purchase of merchandise from Emotiva, and cannot be used for freight charges.
When a Product or part is repaired or replaced, any replacement item becomes your property
and the replaced item becomes Emotiva’s property. When a refund or credit is given, the Product
for which the refund or credit is provided must be returned to Emotiva and becomes Emotiva’s
property.
What is not covered by this warranty?
This warranty does not apply: (i) to damage caused by use with products not manufactured
by Emotiva, where the non-Emotiva product is the cause of the damage; (ii) to damage caused
by service or maintenance performed by anyone who is not a representative of Emotiva; (iii) to
damage caused by accident, abuse, misuse, ood, re, earthquake or other external causes; (iv) to
a product or part that has been modied after its retail purchase, where the modication caused
or contributed to the damage; (v) to consumable parts, such as batteries or failure of or damage
to the Product caused by batteries; (vi) if any Emotiva serial number has been removed or defaced
on the product; (vii) glass or plastic panels, cabinetry, trim or other appearance items; (viii)
cosmetic wear or damage to remote controls by user.
EMOTIVA SHALL NOT BE LIABLE FOR ANY INCIDENTAL OR CONSEQUENTIAL DAMAGES ARISING
FROM OR RELATED TO ANY DEFECTS IN OR DAMAGES TO ITS PRODUCTS. SOME STATES DO NOT
ALLOW THE EXCLUSION OR LIMITATION OF INCIDENTAL OR CONSEQUENTIAL DAMAGES, SO THE
ABOVE LIMITATION OR EXCLUSION MAY NOT APPLY TO YOU.
How do you get service?
In order to make a claim under the Warranty, you must:
1. Call or e-mail a customer service representative at 1-877-EMO-TECH (1-877-366-8324) or
[email protected]. You must provide a description of your problem, the serial number of the
Product for which the warranty claim is being made, and the original purchase date.
2. Then, you will be provided with a warranty service authorization number (“WS”).
Page 44

3. Next, you must ship the Product to the following address, with the WS written in large, bold
numbers on the outside of the box, and with the letters “WS” written before the number, for
example: WS1234. Parcels arriving without a WS number on the outside of the box will be refused.
The customer pays for the shipping to Warrantor. Warrantor pays for the shipping back to the
customer within the continental United States only. Customer is responsible for shipping charges
on all other warranty claims.
Emotiva Audio Corporation
Attn: Repair Department
139 Southeast Parkway Court
Franklin, TN 37064
Units will be refused by Emotiva for the following:
Product was sent without the WS#
Product was sent with inadequate packaging.
Product was damaged in transit.
Product was shipped collect for shipping charges.
How does state law apply?
This warranty gives you specic legal rights, and you may also have other rights which vary from
state to state.
What if my product is damaged on the way to you?
Emotiva is not liable for damages that may incur while an item is in transport to us. Please
purchase insurance when you ship your item. If your Product was not adequately packaged, we
will refuse receipt and the damaged package will be returned to you at your cost. If you do not
have the original Emotiva Audio packaging, please check with our sales department to purchase
replacement-shipping cartons.
How does the Warranty and service apply to international orders?
The Product Warranty is only valid in the country where the Emotiva product was originally
shipped via an authorized dealer, distributor, or direct from the Emotiva factory. The Warranty is
subject to change at any time depending on the laws and regulations within your specic country.
Please check with your distributor for a complete understanding of the warranty in your county.
If you purchased your Emotiva Product outside of the USA and wish to have it serviced at the
factory, all freight charges are your responsibility. If you do not have an authorized distributor
or repair center in your country, your Product must come back to the Emotiva USA factory for
warranty service.
Page 45

Dolby, Dolby Atmos, Dolby Audio, Dolby Vision,
and the double-D symbol are registered
trademarks of Dolby Laboratories Licensing
Corporation. Manufactured under license from
Dolby Laboratories.
The terms HDMI and HDMI High-Denition Multimedia Interface, and the
HDMI Logo are trademarks or registered trademarks of HDMI Licensing LLC in
the United States and other countries..
This item incorporates copy protection technology that is protected by U.S.
patents and other intellectual property rights of Rovi Corporation. Reverse
engineering and disassembly are prohibited
For DTS patents, see http://patents.dts.com.
Manufactured under license from DTS, Inc.
(for companies headquartered in the
U.S./Japan/Taiwan) or under license from DTS
Licensing Limited (for all other companies).
DTS, DTS:X, and the DTS:X logo are registered
trademarks or trademarks of DTS, Inc. in the
United States and other countries. 2020 DTS,
Inc. ALL RIGHTS RESERVED.
Page 46

Notes
All information contained in this manual is accurate to the best of our knowledge at the
time of publication. In keeping with our policy of ongoing product improvement, we reserve the
right to make changes to the design and features of our products without prior notice.
MC1 User Manual Revision 1.1 December 2021
Page 47

Page 48

 Loading...