

Page 1
Page 2

Page 3

Important Safety Precautions and Explanation of Symbols
The exclamation point within an equilateral triangle is intended to alert the user to the presence of
important installation, operation, and service instructions in this manual.
!
The lightning ash with arrowhead symbol within an equilateral triangle is intended to alert the user to the
presence of uninsulated dangerous voltages within the enclosure that may be of sucient magnitude to
constitute a risk of electrical shock to the user.
Please read this manual thoroughly before attempting to install, congure, or operate the BASX power
amplier. After successful installation and conguration of the BASX power amplier, be sure to retain this
manual in a safe place for future reference.
Safety is a key component to a long lasting and trouble free installation. Please read and follow all
instructions and heed all warnings on the BASX amplier and in this manual. The vast majority of the
subsequent safety precautions are common sense. If you are not comfortable with the installation of audio/
video entertainment equipment, you should seek the services of a qualied installation professional or call
us for help.
WARNING: TO REDUCE THE RISK OF FIRE OR ELECTRIC SHOCK, DO NOT USE THE BASX AMPLIFIER
NEAR WATER OR IN WET LOCATIONS, DO NOT EXPOSE IT TO RAIN OR MOISTURE, DO NOT EXPOSE IT
!
TO DRIPPING OR SPLASHING FROM OTHER SOURCES, AND ENSURE THAT NO OBJECTS FILLED WITH
LIQUIDS SUCH AS VASES ARE PLACED ON IT. DOING SO MAY RESULT IN DAMAGE TO THE UNIT AND
THE RISK OF ELECTRIC SHOCK, WHICH MAY RESULT IN BODILY INJURY OR DEATH.
WARNING: TO REDUCE THE RISK OF ELECTRIC SHOCK, DO NOT REMOVE THE COVER FROM THE
BASX AMPLIFIER. THERE ARE NO USERSERVICEABLE PARTS INSIDE THE UNIT. REFER ALL SERVICE TO
QUALIFIED SERVICE PERSONNEL.
Do not install the BASX amplier near or above any heat sources such as radiators, heating vents, or other
apparatus’ that produce heat. Do not block any ventilation openings or heat sinks. Avoid installing the
unit directly above other heat-producing equipment unless sucient ventilation or forced-air cooling is
provided.
Do not install the BASX amplier in locations without proper ventilation. The BASX amplier should not
be operated on a bed, sofa, rug, or similar surface that may block vents. The unit should not be installed
in an enclosed location such as a bookcase, cabinet, or closed equipment rack unless sucient forced-air
ventilation is provided.
Always install your BASX amplier according to the manufacturer’s instructions and only use attachments
or accessories specied by the manufacturer.
Do not install the BASX amplier on any stand, shelf, or other piece of furniture that is unable to support its
weight. If a cart is used to move the unit, use caution to avoid injury from tip-over.
Connect the BASX amplier only to power sources of the correct voltage (as shown in this manual and on
the BASX amplier unit).
Protect power supply cables from being pinched, walked on, or otherwise damaged. Be especially careful
where the power cable enters the power outlet and the unit.
Only connect the BASX amplier to an electrical outlet or extension cord of appropriate type and rating.
DO NOT defeat the safety purpose of a grounding or polarized plug by removing ground pins or using
unsafe adapters. A polarized plug has two blades - one wider than the other. A grounding plug has a
third ground prong in addition to the two main conductors. The wide blade or third groundling prong is
provided for your safety. If the provided plug does not t your outlet, consult an electrician to replace your
obsolete outlet. If you replace the power cord, only use one of similar type and equal or greater current
rating.
Page 4

The power cable for the BASX amplier should be unplugged from the outlet during severe electrical storms, or
when unused for a long period of time.
Only replace the fuse(s) in the BASX amplier with fuse(s) of proper value and voltage rating.
The BASX should only be cleaned as directed in the manual. Avoid spraying liquids directly onto the unit and
!
NEVER spray liquids into the vents. Care should be taken so that small objects do not fall into the inside of the
unit.
You should seek service for your BASX amplier by qualied service personnel if any of the following occur:
!
1. The power-supply cord or the plug has been damaged.
2. Objects or liquid have fallen or spilled into the vents.
3. The unit has been exposed to rain.
4. The unit exhibits a marked change in performance.
5. The unit has been dropped, or its enclosure or chassis is damaged.
NOTE: TO COMPLETELY DISCONNECT THE BASX AMPLIFIER FROM THE AC POWER MAINS, DISCONNECT THE AC
POWER CORD FROM THE AC RECEPTACLE.
NOTE: THE POWER CORD ON THE BASX AMPLIFIER MUST REMAIN READILY ACCESSIBLE AT ALL TIMES.
CAUTION
CAUTION: TO REDUCE THE RISK
OF ELECTRICAL SHOCK, DO
NOT REMOVE COVER. NO USER
SERVICEABLE PARTS INSIDE.
REFER SERVICING TO QUALIFIED
SERVICE PERSONNEL.
Page 5

BASX A1 / A2 / A2mini / A3 / A4 / A5 / A6 / A7
BASX Power Ampliers
Contents
Important Safety Precautions and Explanation of Symbols
BASX Power Ampliers .................................................................................................1
Introduction ......................................................................................................................3
About This Manual .......................................................................................................... 4
Features ..............................................................................................................................5
Unpacking ..........................................................................................................................7
BASX Amplier Family ................................................................................................... 8
BASX A1 / A2 / A3 / A4 / A5 / A6 / A7 Front Panel ...............................................9
BASX A1 / A2 / A3 / A4 / A5 / A6 / A7 Rear Panel .............................................. 10
BASX A2mini Front Panel .......................................................................................... 12
BASX A2mini Rear Panel ............................................................................................ 13
BASX A2mini Headphone Output .......................................................................... 15
Quick Start ...................................................................................................................... 16
Connections ................................................................................................................... 17
Care and Maintenance ............................................................................................... 18
Specications ................................................................................................................. 19
Troubleshooting ........................................................................................................... 22
Emotiva Audio Corporation Three-Year Limited Warranty ............................ 23
Notes ................................................................................................................................. 26
Page 1
Page 6

BASX A1 / A2 / A2mini / A3 / A4 / A5 / A6 / A7
Page 2
Page 7

BASX A1 / A2 / A2mini / A3 / A4 / A5 / A6 / A7
Introduction
Thank you for purchasing one of our new Emotiva BASX ampliers.
Our BASX product line is dedicated to the philosophy that high-quality products that deliver true
audiophile sound quality don’t need to be expensive to buy or complicated to congure and enjoy.
Our BASX ampliers give you great sound quality, excellent technical performance, and outstanding
value.
The BASX A1, A2, A3, A4, A5, A6, and A7 ampliers all use a “classical audiophile architecture”,
centered around a heavy-duty linear power supply, class A/B amplication, and the high current
capability you need to get great sound with even dicult to drive speakers. We’ve paid special
attention to important details like heavy-duty audiophile grade binding posts and carefully laid out
signal paths. And we’ve also included important high-end features like dierential inputs, automatic
line voltage detection, and microprocessor controlled status indicators and fault protection.
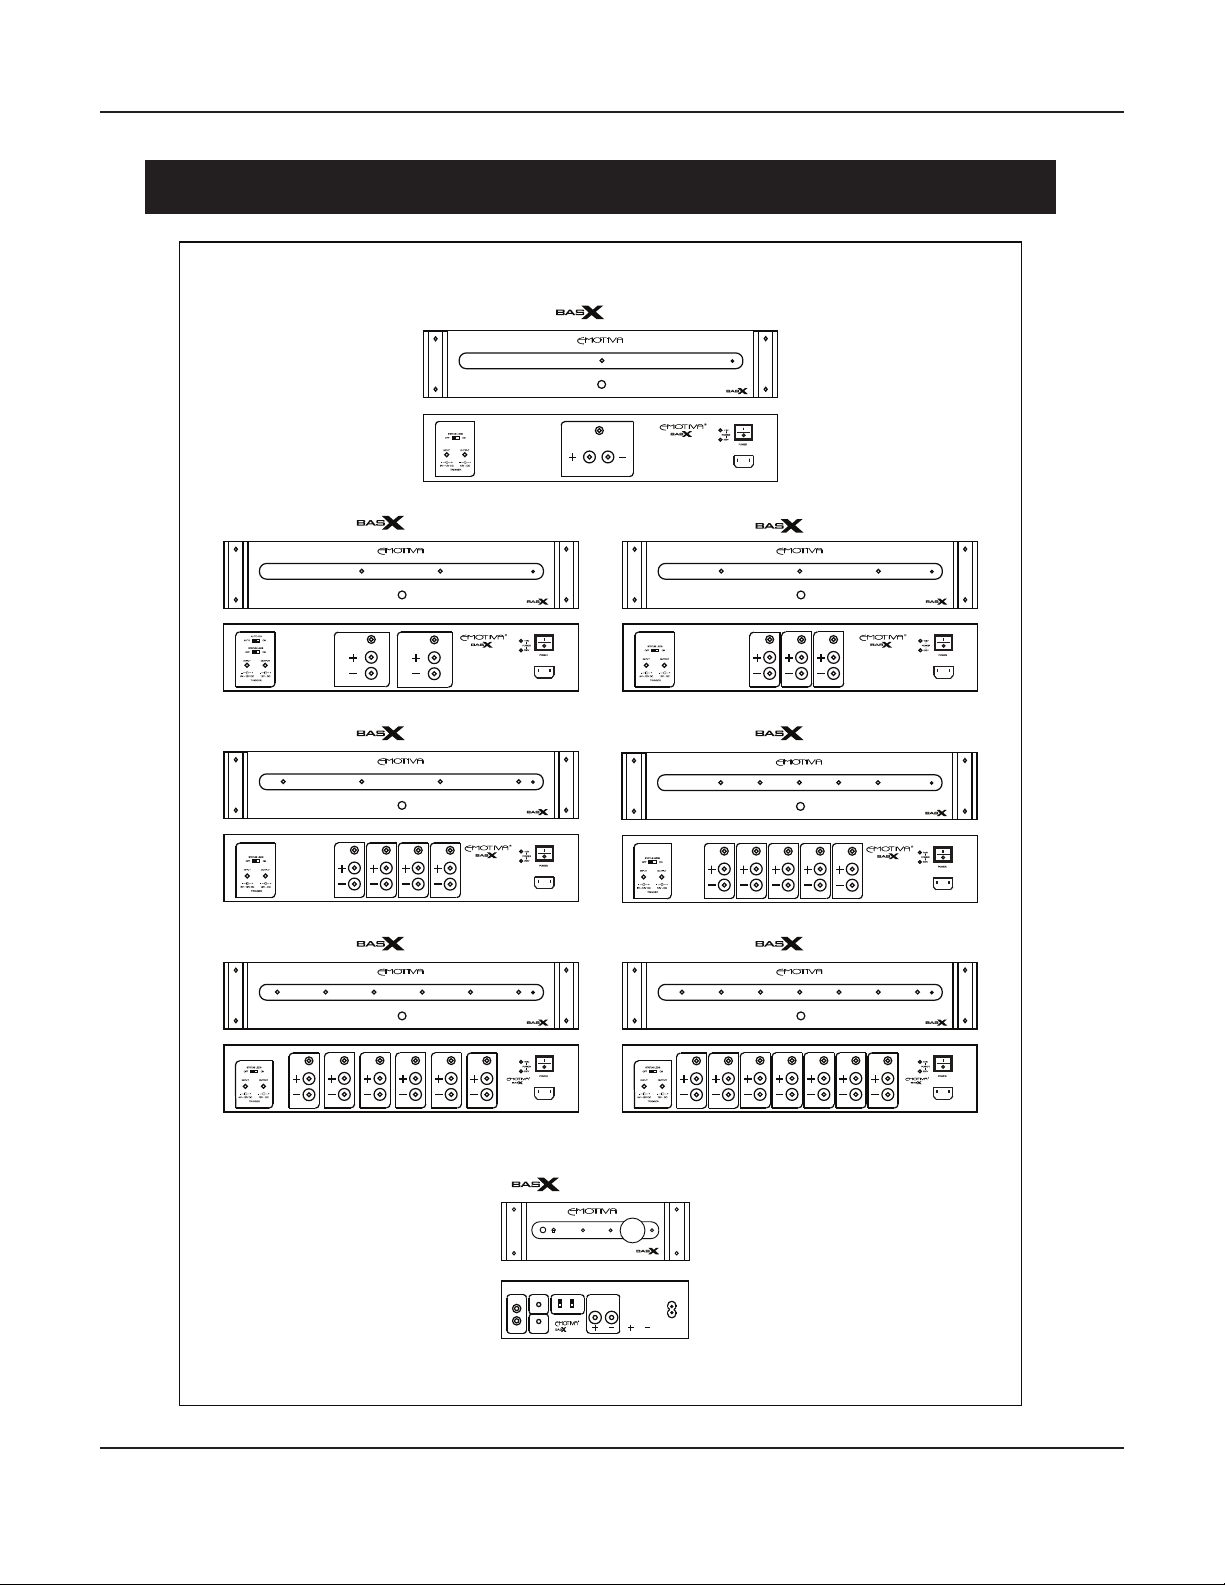
The BASX A1 is a true monoblock and the range of other models will enable you to purchase the
exact number of high quality audio channels you need - whether you’re building a new system or
adding extra surrounds or height channels to an existing system.
The BASX A2mini oers some special features that set it apart from the other members of the BASX
amplier family. The amplier section of the A2mini oers the same class A/B performance and
sound quality as the other BASX amps. However, the A2mini oers a choice of xed or variable gain,
via a front panel Volume control, and a full-sized 1/4” front panel headphone jack. The BASX A2mini
is housed in a compact half-rack-width chassis, and uses a high performance switch mode power
supply, rather than the linear power supplies used in the other BASX model amps.
The BASX A2mini also oers another special feature which serious headphone acionados will
appreciate: A headphone output which is derived from the main amplier outputs via a set of high
quality, low noise, series resistors. This enables the A2mini to oer the same listening experience
that headphone lovers prize in high-end vintage equipment, only with the vastly improved
performance made possible by the modern circuitry in the A2mini. These series resistors can also
be bypassed by installing a pair of jumpers, allowing owners of high impedance headphones
or extremely low eciency planars the ability to connect the headphone output directly to the
outputs of the main ampliers, for even better damping and more extreme output capabilities.
If you need superb sound, excellent build quality, and outstanding value, then you’ve come to the
right place - Emotiva BASX.
Happy listening!
The Emotiva Team
Page 3
Page 8

BASX A1 / A2 / A2mini / A3 / A4 / A5 / A6 / A7
About This Manual
This manual will provide you with the information you need to get started enjoying your
BASX power amplier.
We suggest that you read through the entire manual; we kept things as short and direct as
possible. Even if you’re an expert user, you will probably nd some interesting information and
useful suggestions.
If you’re really in a hurry to get started, please read the Quick Start section (on page 16); you may
then read the remainder of the manual at your leisure.
You may wish to keep a copy of this manual with your records, and record serial numbers or other
purchase information on the Notes page at the back.
Page 4
Page 9

BASX A1 / A2 / A2mini / A3 / A4 / A5 / A6 / A7
Features
All of the ampliers in our BASX family are true audiophile-grade power ampliers. Each model is
designed to sound superb and provide years of trouble-free listening enjoyment.
Our BASX A1, A2, A3, A4, A5, A6, and A7 all feature our fully discrete, high-current, short signal
path class A/B output section, and heavy duty linear power supplies. The A1 oers you the
performance and exibility of a true high quality monoblock. The A2 is the ideal choice if you
need two channels of high quality amplication. The A5 and A7 are ideal if you need a great
sounding economical amplier to power a 5.1 or 7.1 channel sytem. The A3 provides exactly the
number of channels you need to upgrade a two channel system to 5.1 channel surround sound.
And the A4 and A6 are perfect choices for powering two or three pairs of height speakers.
The A2mini oers the same audiophile quality class A/B output section as our other BASX amps,
in a more compact form factor, and powered by a highly ecient precision switch mode power
supply. The A2mini also adds several extra features, including the choice of either xed or variable
gain, a front panel Volume control, and a full-sized 1/4” headphone output with some special
capabilities that will be especially appreciated by true headphone acionados.
Welcome to the BASX series of ampliers... proof that you can still get true audiophile sound
quality, all the power you need to get great sound from even dicult to drive speakers,
and real value... all in an aordable, attractive, well made package.
Features of the new BASX series power ampliers:
• True audiophile-quality sound - as with all of our ampliers, the BASX ampliers were
designed rst and foremost to sound superb in all types of audio systems.
• Great sounding Class A/B output stage - ensures smooth detailed sound and incredibly
natural imaging without a trace of harshness or strain.
• Heavy duty linear power supply (A1, A2, A3, A4, A5, A6, and A7) - with an oversized
toroidal power transformer and plenty of current capacity to drive even dicult speakers.
• Top quality parts and construction throughout - promise years of reliable service.
• Totally stable - designed for use in the real world, with real speakers.
• Heavy steel chassis with milled aluminum face plate - provide strength and rugged good
looks.
• Heavy duty insulated ve-way speaker binding posts - allow you to use a wide range of
speaker cables with bare wires, lugs, or banana plugs.
• Remote trigger input and output - allow the BASX power amps to be turned on by triggerenabled equipment, and to activate other trigger-enabled equipment.
• Audiophile-grade fault protection - entirely transparent under normal conditions, yet
protects the amp and your other equipment from all common fault conditions.
• Universal AC line voltage operation - the BASX ampliers are designed to operate on
either 115 VAC or 230 VAC at 50/60 Hz, and automatically detect and congure themselves to
operate with your local line voltage.
Page 5
Page 10

BASX A1 / A2 / A2mini / A3 / A4 / A5 / A6 / A7
• Auto-On Power Switching (only on the A2 and A2mini)- enables you to congure the BASX
A2 and A2m to automatically turn on when an audio input is detected.
• Standard IEC power inlet (A1, A2, A3, A4, A5, A6, and A7)- ts all standard and audiophile
IEC power cables.
• Full three year warranty - ensures that you’ll be able to enjoy your BASX power amp for
years to come.
Features unique to the BASX A2mini:
• Classic style headphone output - driven from the main amplier outputs via a set of
high-quality series resistors; delivers the same sound signature as the highly-prized
headphone outputs on high-end vintage equipment.
• Direct headphone output option - allows you to route the main speaker outputs of the
A2m directly to the headphone jack to drive both high impedance headphones and
low-eciency planars with even better damping and more extreme output capabilities.
• Highly ecient precision SMPS (switch mode power supply) - delivers plenty of power, in
a compact form factor, and oers cool ecient operation.
• Flexible power switching - allows you to congure the A2mini to remain on or to switch
on automatically when it detects an incoming audio signal or a trigger signal from your
processor or AVR.
• Choice of xed or variable gain - allow you to congure the A2mini as either a xed gain
power amplier or a variable gain “integrated amplier”. The BASX A2mini features a precision
digitally controlled analog ladder network Volume control that combines low noise and
distortion with excellent channel tracking.
• Front panel volume control - features a knurled aluminum knob which operates a precision
digitally controlled analog ladder network Volume control that combines low noise and
distortion with excellent channel tracking.
You can nd more information about the entire BASX line of products on our website at
www.emotiva.com - which you can also access by scanning the QR code below.
Page 6
Page 11

BASX A1 / A2 / A2mini / A3 / A4 / A5 / A6 / A7
Unpacking
Your BASX amplier was carefully packed and should reach you in perfect condition. If you notice
any shipping damage or other issues when you unpack it, please contact Emotiva immediately.
Gently remove your BASX amp from the packing carton and remove all wrappings and shipping
material.
It is important to save the box and all packing materials in case your power amp ever needs to be
moved or shipped back to the factory for service.
We truly value customer feedback and would like to hear from you.
Page 7
Page 12
BASX A1 / A2 / A2mini / A3 / A4 / A5 / A6 / A7
BASX Amplier Family
A1
A1
CH 1
A2
A2
CH 2
CH 1
STEREO POWER AMPLIFIER
BASX A2
A4
A4
CH 4
CH 3 CH 2
CH 1
MULTI-CHANNEL POWER AMPLIFIER
BASX A4
A6
MONOBLOCK POWER AMPLIFIER
A3
A5
BASX A1
A3
CH 3
CH 2 CH 1
MULTI-CHANNEL POWER AMPLIFIER
BASX A3
A5
CH 4
CH 5
CH 3 CH 2
CH 1
MULTI-CHANNEL POWER AMPLIFIER
BASX A5
A7
A6
CH 4
CH 5
CH 6
CH 3 CH 2
CH 1
MULTI-CHANNEL
POWER AMPLIFIER
BASX A6
A7
CH 4
CH 5
CH 6
CH 7
CH 3 CH 2
CH 1
MULTI-CHANNEL
POWER AMPLIFIER
BASX A7
A2mini
A2m
VAR ON
TRIG IN
ANALOG IN
L
R
FIXED AUTO
TRIG OUT
CH1 (LF)CH1 (RF)
AC INPUT
Page 8
Page 13
BASX A1 / A2 / A2mini / A3 / A4 / A5 / A6 / A7
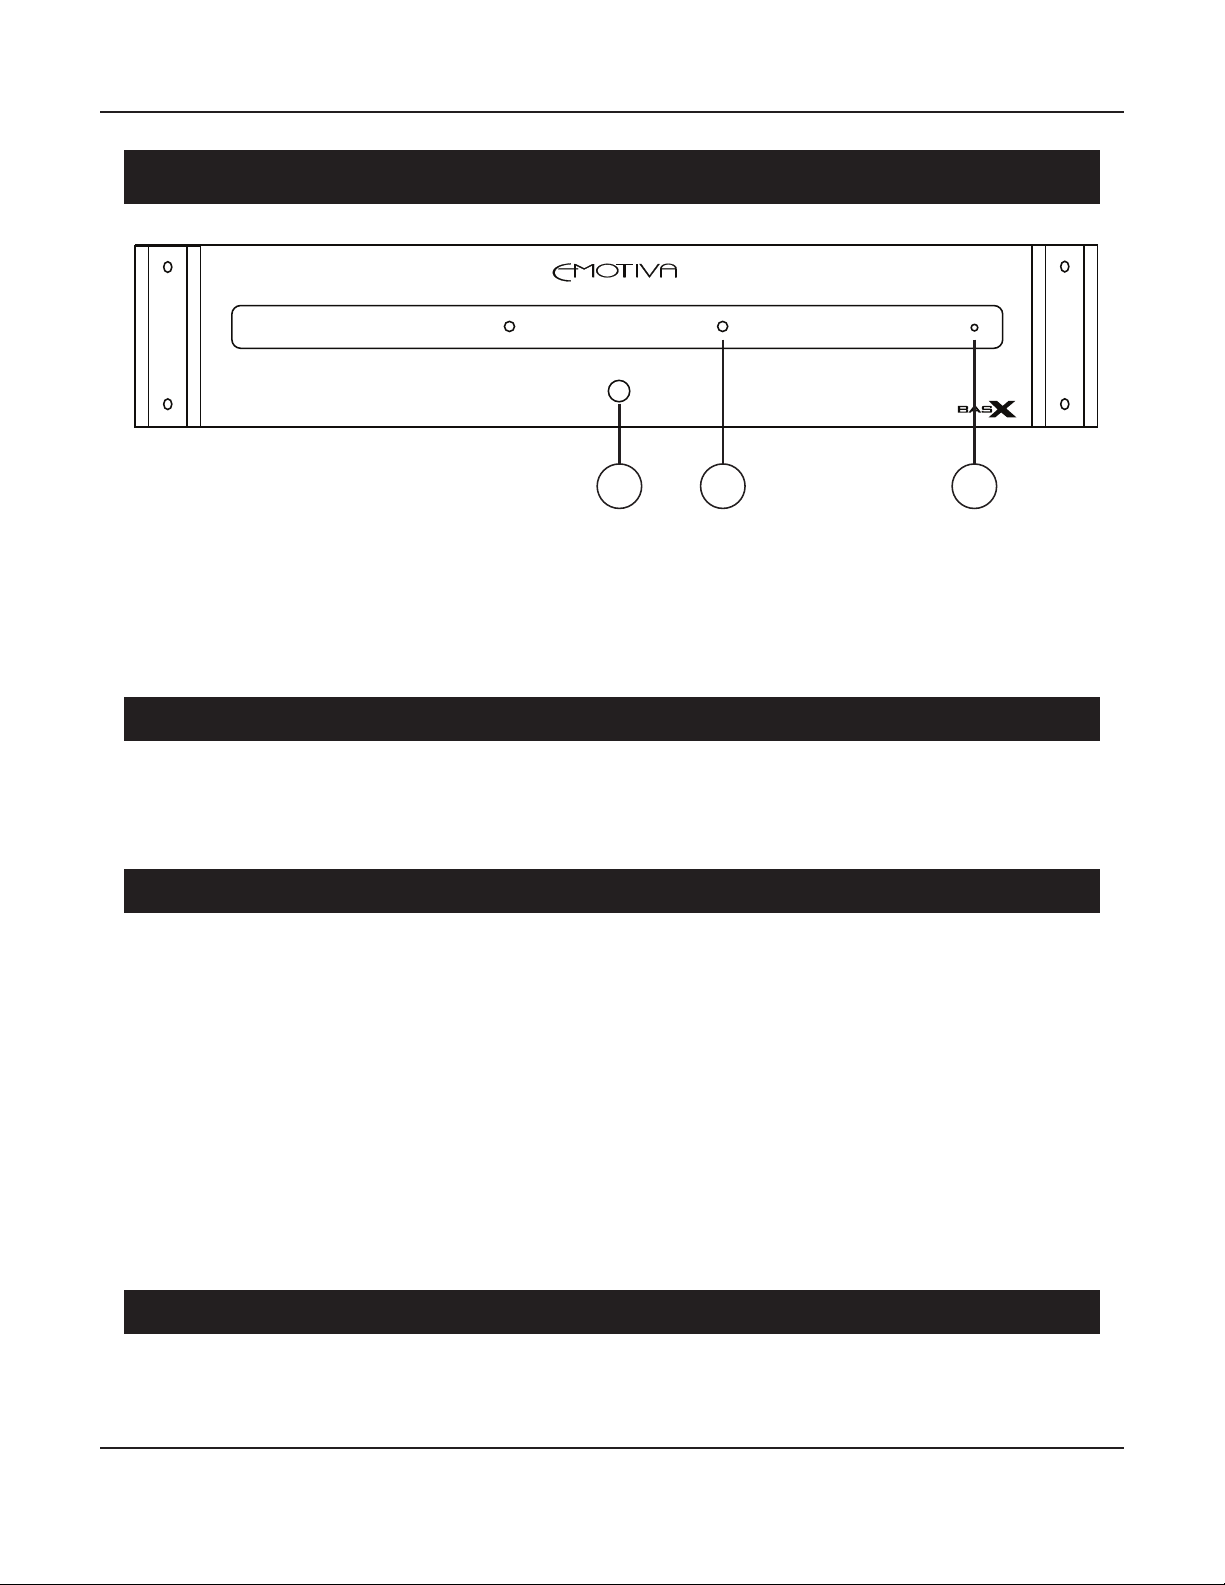
BASX A1 / A2 / A3 / A4 / A5 / A6 / A7 Front Panel
A2
1 2
Note:
The BASX A1, A2, A3, A4, A5, A6, and A7 all have similar front panels.
The only dierence is the number of Status LEDs on each (one for each channel).
The BASX A2 is shown here for illustration.
3
1. Standby Button
Press to switch the amplier On; press again to return to Standby.
Note: In order for the BASX amplier to operate, the rear panel AC Power Switch must rst be
turned On.
2. Status Display Window And Status LEDs
This window houses the Standby LED and Status LEDs.
When the Amplier is OFF no LEDs will be illuminated.
When the Amplier is ON, and in Standby Mode, only the Standby LED will be lit amber.
When the Amplier is ON, and NOT in Standby Mode, the Standby LED will NOT be lit.
When the rear panel Status LED Switch is set to ON when the Amplier is ON and running the Status LEDS will be illuminated blue.
When the rear panel Status LED Switch is set to OFF when the Amplier is ON and running the Status LEDS will NOT be lit (NO LEDs will be lit).
When the Amplier experiences a Fault condition the Status LEDs will ash red while the
Standby LED ashes amber.
3. Standby LEDThis window houses the status LEDs.
This LED illuminates amber when the amplier is powered ON and in Standby Mode.
Page 9
Page 14
BASX A1 / A2 / A2mini / A3 / A4 / A5 / A6 / A7
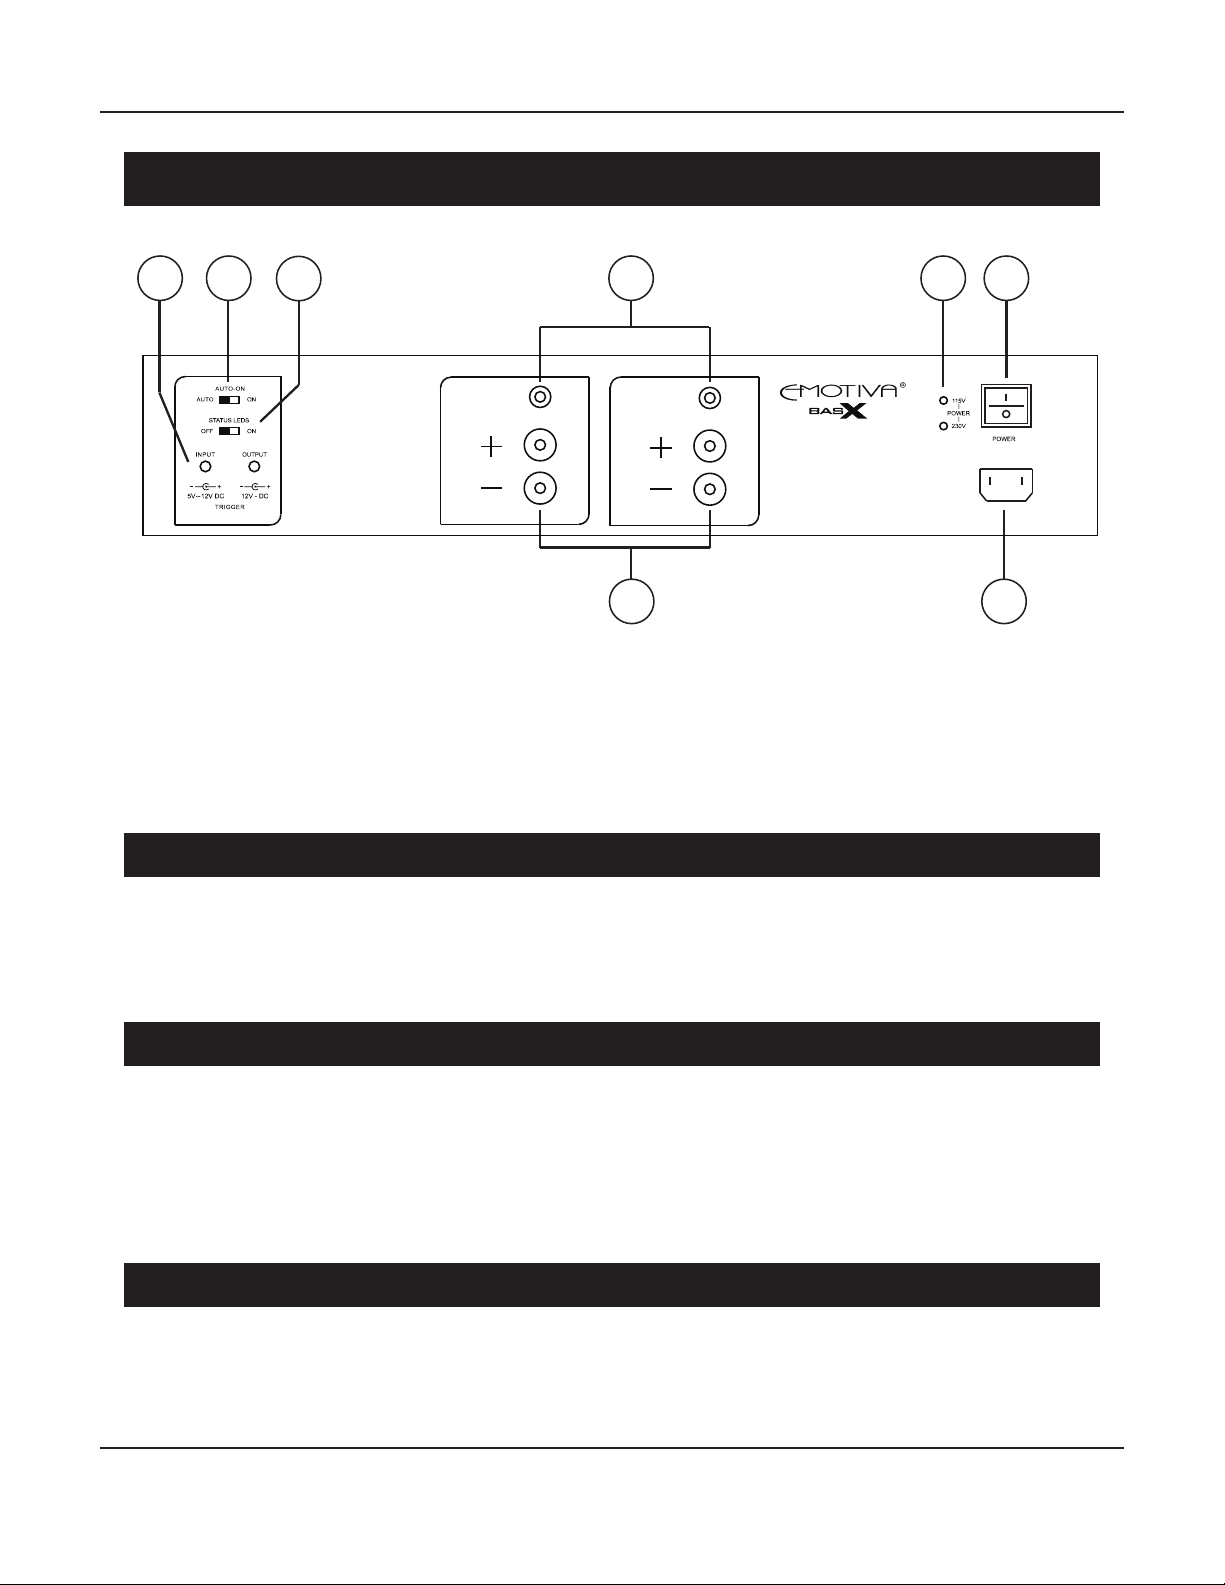
BASX A1 / A2 / A3 / A4 / A5 / A6 / A7 Rear Panel
1 42
3
CH 2
CH 1
STEREO POWER AMPLIFIER
BASX A2
5
7
Note:
Most of the features and controls on the rear panel of each BASX amplier model are the same.
Each model has one Unbalanced RCA Input and one Speaker Output per channel.
HOWEVER ONLY THE BASX A2 INCLUDES THE CONTROL SWITCH FOR THE AUTO-ON FEATURE.
The BASX A2 is shown here for illustration.
6
8
1. Trigger Input and Trigger Output
The BASX power amplier is switched On (from Standby) when a trigger signal is presented at
the Trigger Input; the BASX power amp returns to Standby when the trigger signal is removed.
When the BASX power amp is on, a 12 VDC signal is sent from the Trigger Output to turn on other
devices.
2. Auto-On Switch
Note:
ONLY THE BASX A2 OFFERS THE AUTO-ON FEATURE.
This switch enables the amplier’s Auto-On feature. When this feature is enabled, and the
amplier is in Standly, the amplier will switch ON when an audio signal is detected, and switch
OFF again after a brief delay when the audio signal is no longer present.
3. Status LEDs Switch
Disables the front panel status LEDs when set to O.
Page 10
Page 15

BASX A1 / A2 / A2mini / A3 / A4 / A5 / A6 / A7
4. Unbalanced Inputs
The BASX power amplier has independent unbalanced inputs for each channel.
Note: All of the channels on each BASX power amp are the same, so you may assign any
channel on the amplier to any audio channel you nd convenient.
5. AC Power Voltage LEDs
The BASX power amps are designed to operate on either 115 VAC or 230 VAC, and automatically
detect and congure themselves to operate with your local line voltage. These LEDs tell you
which line voltage the BASX amplier has detected.
6. AC Power Switch
Switches the main AC power to the BASX power amp On and O. When this switch is O, no
controls operate (the BASX power amp cannot be turned On from the front panel or by a trigger
signal).
7. Speaker Terminals
The speaker outputs on the BASX power amp are heavy duty ve-way binding posts, which
accept a variety of speaker cables - including those with banana plugs, spade lugs, or bare ends.
8. IEC Power Cord Receptacle
The BASX power amp can be powered by any receptacle that provides either 115 VAC or 230 VAC
at 50/60 Hz. This receptacle accepts a standard removable IEC AC power cable (a high-quality
commercial power cable is included).
Page 11
Page 16
BASX A1 / A2 / A2mini / A3 / A4 / A5 / A6 / A7
BASX A2mini Front Panel
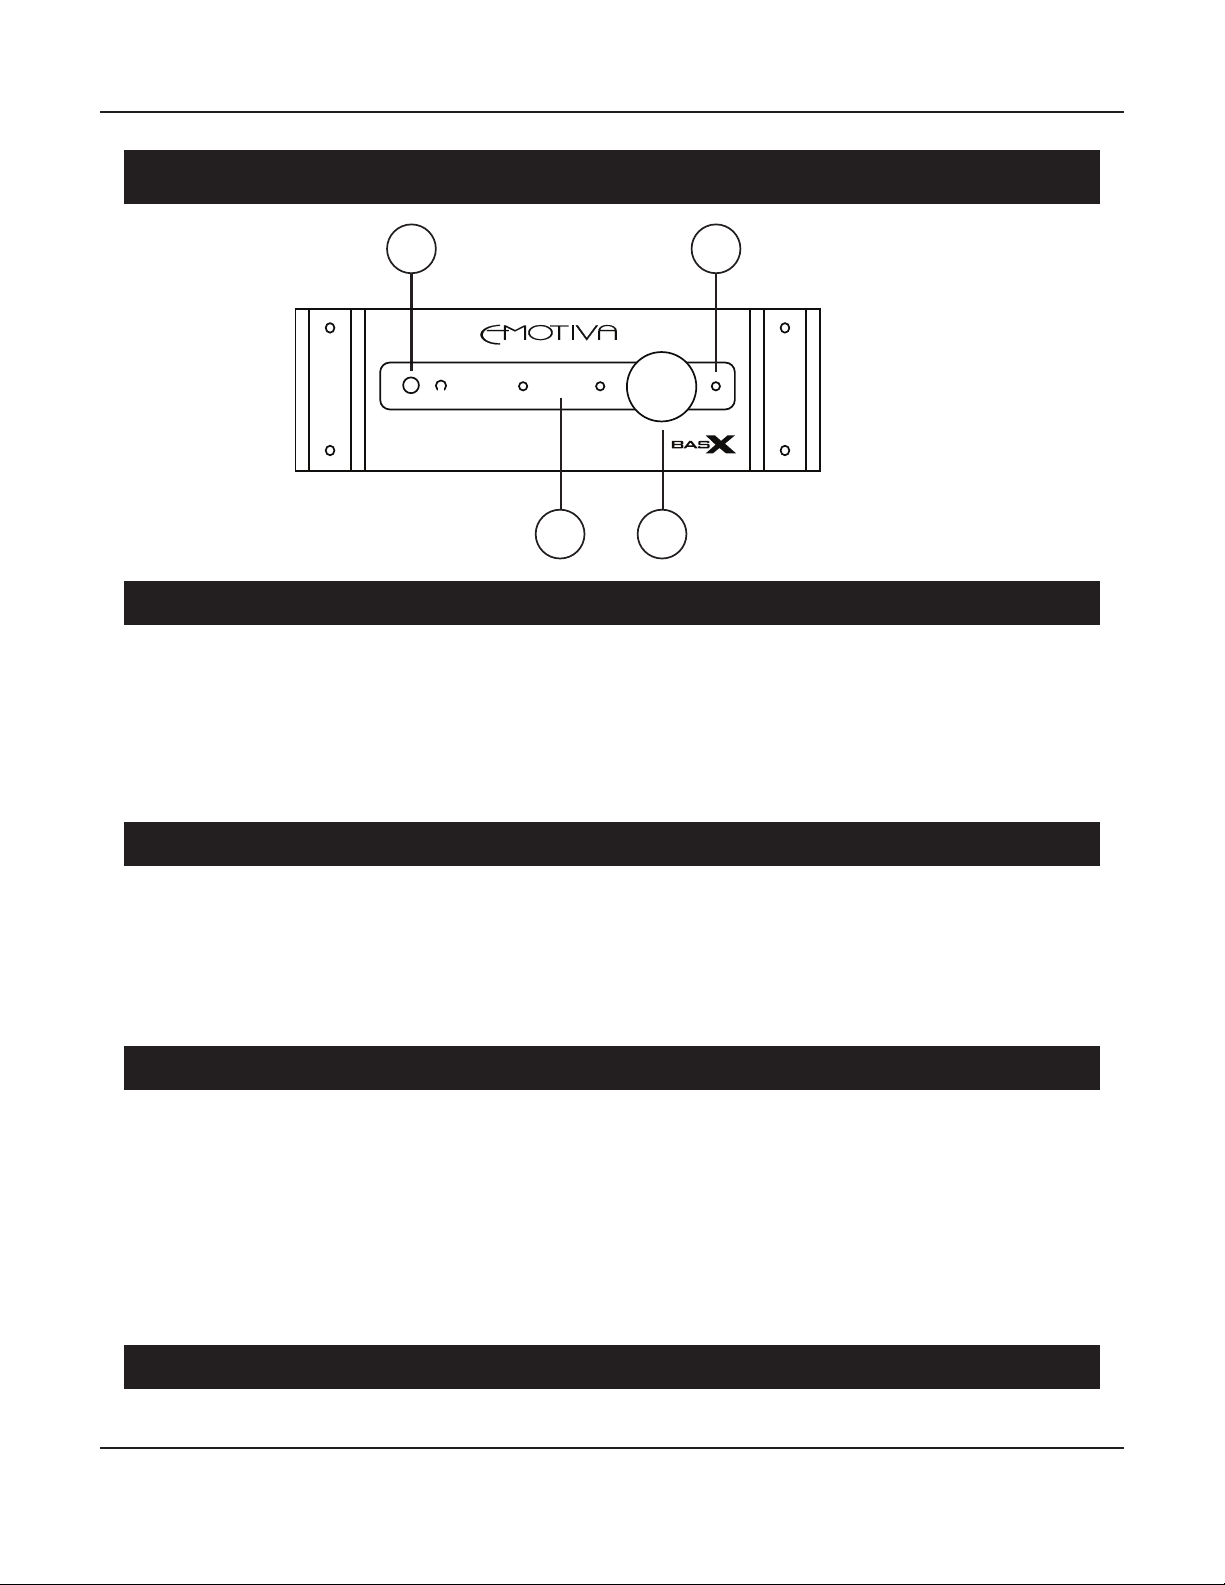
1
A2mini
2
4
3
1. Headphone Output
Use this headphone output to connect a pair of high quality headphones.
Note: The main speaker output is disabled when headphones are inserted into the
headphone output.
Note: Please see BASX A2mini Headphone Output for important information about the
headphone output on the A2mini.
2. Status LEDs
When the Amplier is OFF or in STANDBY the Status LEDs will not be lit.
When the Amplier is ON, the Status LEDs and the Volume knob accent will glow blue.
When the Amplier is ON, but MUTED, the Status LEDs will pulsate blue.
When a FAULT condition occurs the Status LEDs will ash red.
3. Volume / Mute Control
The Volume Control is used to adjust both the main and headphone output volume.
Press the Volume knob once to MUTE the output; press it again to UNMUTE the output.
Note: The setting of the Volume knob controls the levels of BOTH THE MAIN OUTPUTS AND
HEADPHONE OUTPUTS when the rear panel Var / Fixed switch is set to VARIABLE. When the rear
panel Var / Fixed switch is set to Fixed, the A2mini has a xed gain of 29 dB, and the Volume
control has no eect. However, if you change the setting of the Volume knob while the A2mini
is set to Fixed Volume, that setting will take eect when you switch the A2mini back to Variable.
4. Standby LEDThis window houses the status LEDs.
The Standby LED glows amber when the BASX A2mini is in STANDBY.
Page 12
Page 17
BASX A1 / A2 / A2mini / A3 / A4 / A5 / A6 / A7
BASX A2mini Rear Panel
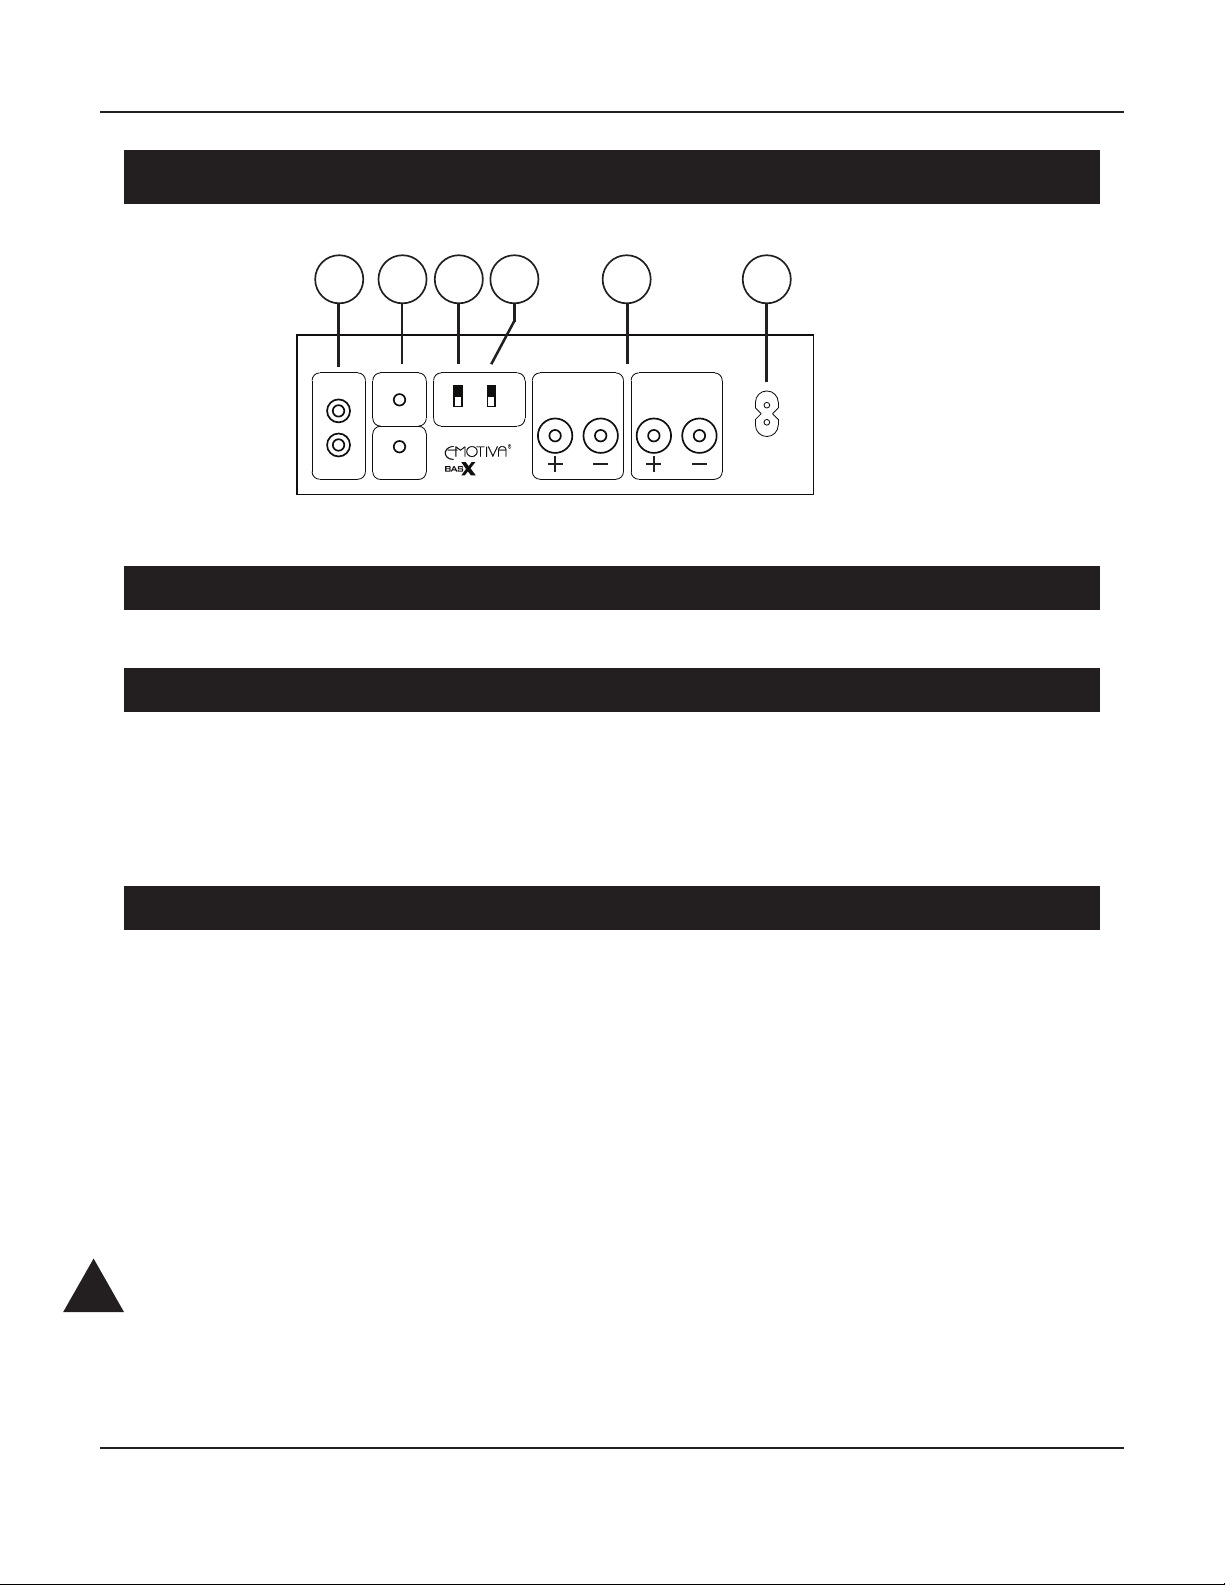
1 2 3
ANALOG IN
L
R
TRIG IN
TRIG OUT
4 5 6
VAR ON
FIXED AUTO
CH1 (LF)CH1 (RF)
AC INPUT
1. Line Level Stereo Input
Use this input to connect any line level stereo source to the BASX A2mini.
2. Trigger Input and Trigger Output
When the BASX A2mini is in Auto Mode, the A2mini will turn On when it senses an audio signal
on its input, or when a trigger signal is presented at the Trigger Input. The A2mini will return to
Standby when the trigger signal is removed and no audio has been present for several minutes.
When the BASX power amp is on, a 12 VDC signal is sent from the Trigger Output to turn on other
trigger-enabled devices.
3. Variable / Fixed Level Switch
When this switch is in the FIXED position the BASX A2mini has a xed gain of 29 dB
(the same as our other BASX power amps).
When this switch is in the VARIABLE position the output level of the A2mini is controlled by the
front panel Volume control.
Note: When the rear panel Var / Fixed switch is set to the VARIABLE setting the Volume knob
controls the levels of BOTH THE MAIN OUTPUTS AND THE HEADPHONE OUTPUTS. When
the rear panel Var / Fixed switch is set to Fixed, the A2mini has a xed gain of 29 dB, and the
Volume control has no eect on either. However, if you change the setting of the Volume knob
while the A2mini is set to Fixed Volume, that setting will take eect when you switch the A2mini
back to Variable.
WARNING! WHEN THE A2mini IS SWITCHED TO FIXED MODE IT OFFERS A FIXED GAIN OF 29 dB.
!
WHEN SWITCHED TO VARIABLE MODE, THE LEVEL WILL JUMP IMMEDIATELY TO THE LEVEL SET
BY THE VOLUME CONTROL, WHERE THE GAIN MAY BE ANYWHERE BETWEEN 0 AND 32.
BE ESPECIALLY CAREFUL WHEN USING HEADPHONES - PARTICULARLY IF YOU ARE USING THE
HIGH POWER JUMPER OPTION ON THE HEADPHONE OUTPUTS.
Page 13
Page 18

BASX A1 / A2 / A2mini / A3 / A4 / A5 / A6 / A7
4. Auto-On Switch
This switch enables the amplier’s Auto-On feature. When this switch is set to ON the amplier will
remain On. When this switch is set to AUTO, the amplier will normally remain in Standby, but will
switch ON when an audio signal is detected, and switch OFF again after a brief delay when the
audio signal is no longer present.
5. Speaker Outputs
The speaker outputs on the BASX A2mini use heavy duty audiophile grade ve-way binding
posts. They accept speaker cables terminated with banana plugs, spade lugs, or bare wire.
6. Power Cord Receptacle
Use this receptacle to attach the included power cable for the BASX A2mini.
Page 14
Page 19
BASX A1 / A2 / A2mini / A3 / A4 / A5 / A6 / A7
BASX A2mini Headphone Output
The BASX A2mini has very special headphone circuitry, which will be of particular interest to
headphone acionados and lovers of classic vintage equipment.
The headphone output on the BASX A2mini is powered by the main output ampliers, after
being passed through a set of high-quality series resistors. This circuit topology is typical of the
headphone outputs in highly prized vintage audio equipment, and oers a slightly dierent
listening experience from modern headphone ampliers. Because this classic output topology is
powered by the advanced circuitry of the A2mini, with its extremely low noise and distortion, the
end result is a smooth yet detailed sound signature rarely available anywhere else - at any price.
The A2mini also oers another very special option that will be of particular interest to owners
of dicult to drive high impedance headphones and low eciency planars. In order to deliver
optimum performance, many such headphones must be driven directly by “a speaker amplier”.
Because the sound quality and power output of the A2mini are ideal for use with these
headphones, we’ve included an option to bypass the series resistors on the headphone output,
and connect the front panel headphone output directly to the speaker outputs.
Because this is a special option, and must be used carefully, it can only be accessed by installing a
pair of internal jumpers inside the BASX A2mini.
WARNING! WHEN JUMPERS ARE INSTALLED, THE FULL SPEAKER OUTPUT SIGNAL WILL BE
!
ROUTED TO THE FRONT PANEL HEADPHONE OUTPUT. This is equivalent to connecting
your headphones directly to the speaker outputs. While this is appropriate for driving high
impedance headphones and low eciency planar headphones, EXTREME CAUTION should
be used when adjusting the volume on the A2mini when these jumpers are in place. EMOTIVA
ASSUMES NO LIABILITY FOR HEADPHONES DAMAGED BY USING THIS OPTION!
ALWAYS DISCONNECT AC POWER CABLE FROM THE BASX A2mini BEFORE REMOVING COVER!
!
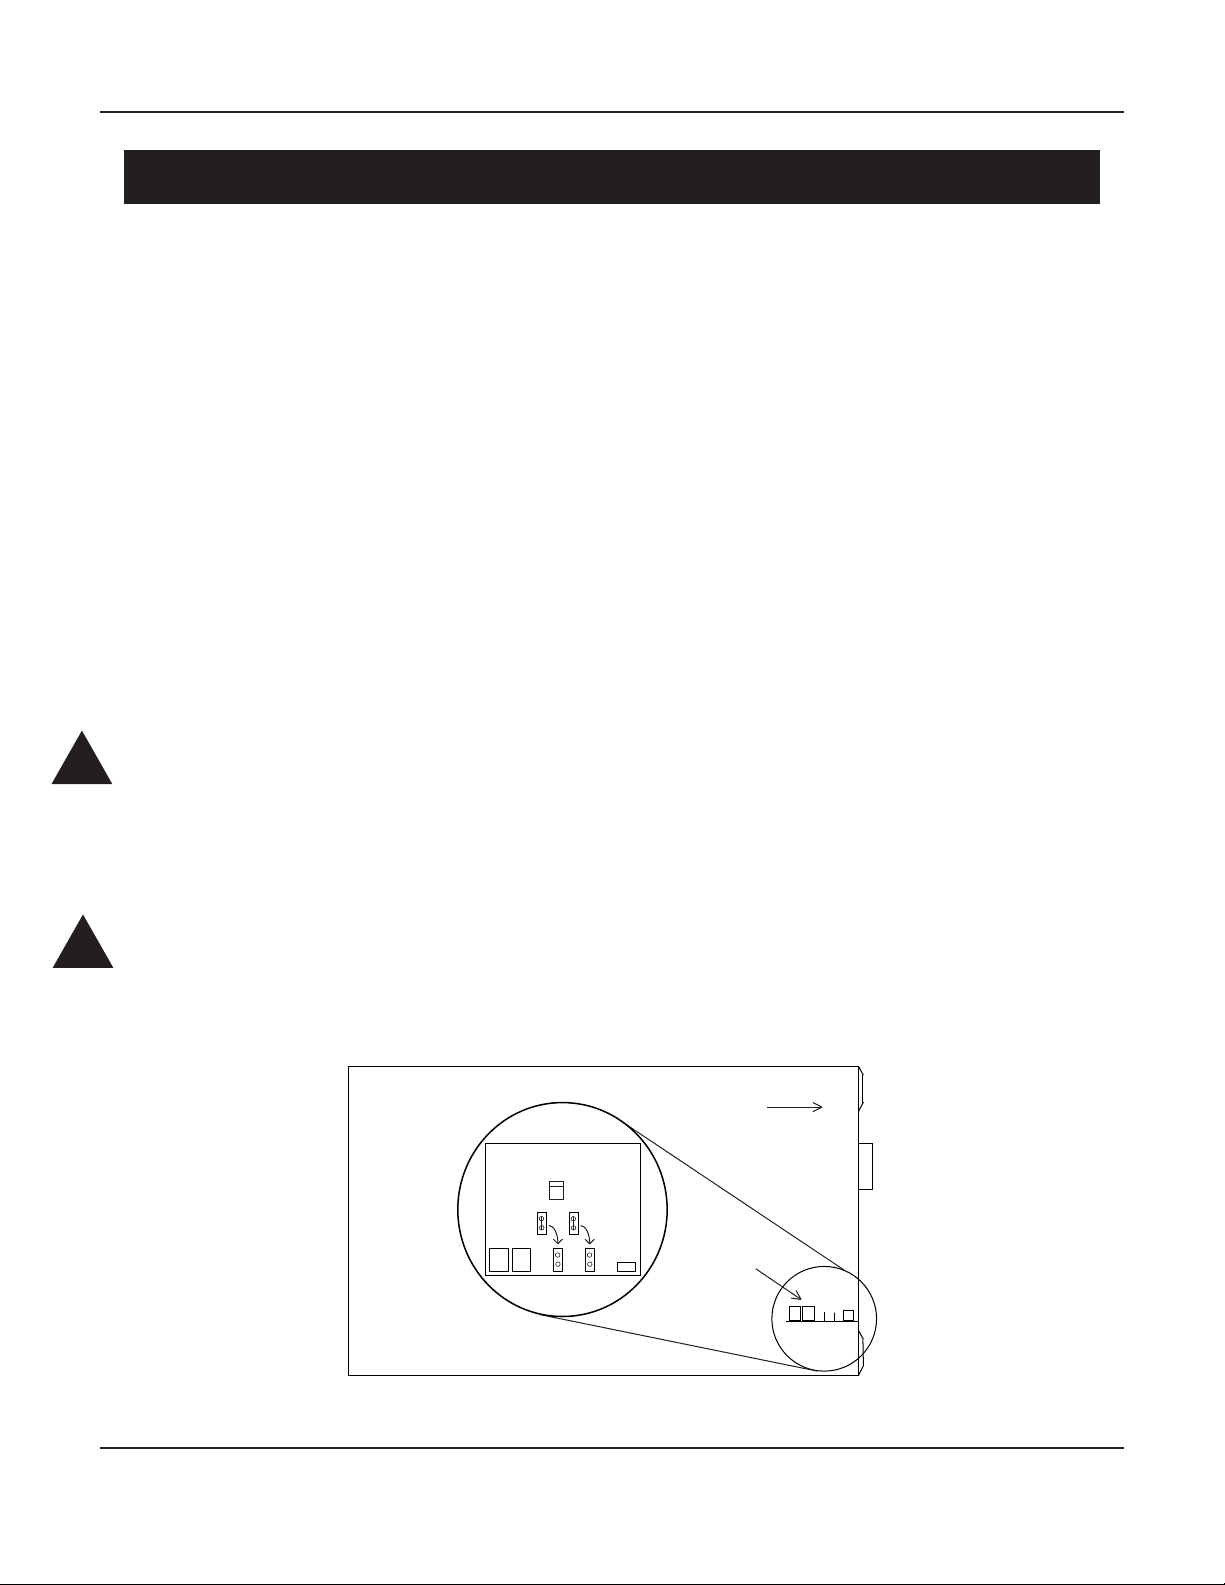
To congure the Direct High Power Headphone Mode on the BASX A2mini, insert the included
jumpers over the header pins as shown in the diagram (we suggest using tweezers or needle
nosed pliers).
BASX
A2mini
INSTALL
JUMPERS
OVER PINS
HEADPHONE
INTERFACE
BOARD
FRONT
TOP
VIEW
Page 15
Page 20

BASX A1 / A2 / A2mini / A3 / A4 / A5 / A6 / A7
Quick Start
To get the most from your BASX power amplier we urge you to read the entire manual. If you just
can’t wait to listen to it, this section will cover the basics you need to get started.
• Find a secure location for your BASX power amplier.
• Connect your BASX power amplier to a signal source.
• Connect your BASX power amplier to a set of speakers (4 ohm or 8 ohm) using reasonably
heavy gauge speaker wires (at least 16 gauge).
• Find some music you really like to listen to.
• Turn on the AC Power switch and turn up the volume a bit!
• Enjoy!
While you’re enjoying your BASX power amplier, it would be a great time to read the rest of the
manual to learn more about it.
Page 16
Page 21

BASX A1 / A2 / A2mini / A3 / A4 / A5 / A6 / A7
Connections
Connecting speakers to your BASX power amplier
Your BASX power amplier has no special connection requirements; audiophile grade ve-way
binding posts are provided for speaker connections.
• Always turn o the amplier before connecting or disconnecting speaker cables or signal
source interconnects.
• Always verify that your speaker cables are rmly attached, and not shorted to each other or
to any other cables, before powering up your BASX power amplier.
• Always use high-quality speaker wire; 16-gauge or heavier.
• If you must use thinner wire, try to keep the length as short as possible.
• Be careful to wire all speakers “in phase” (the plus/red terminal on each speaker to the plus/
red terminal on your amp).
• Try to use wires of equal length and gauge for both speakers in each pair (use the same gauge
and length for both fronts, or for both surrounds; don’t use a long 16-gauge wire for one
speaker and a short 10-gauge wire for the other).
• If you use stranded cables, use care to avoid short circuits (from stray strands touching).
Connecting an input source to your BASX power amplier
Your BASX power amplier uses unbalanced (RCA) inputs. We suggest using reasonably high
quality cables, keeping cables no longer than necessary, and avoiding running signal cables near
power cables and speaker cables whenever possible.
DO NOT connect a digital signal to the inputs of your BASX power amplier (or you may damage it
or your speakers).
Connecting the Trigger Input and Trigger Output
The Trigger Input accepts a 12 VDC (nominal) trigger signal from another device via a standard
1/8” mono plug. When the trigger is asserted, the BASX power amplier will switch On; when
the trigger is removed, the BASX power amp will return to Standby mode. The Trigger Output
sends out 12 VDC whenever the main power to the BASX power amp is On (and NOT when it is in
Standby mode) which can be used to switch on other units with trigger capabilities.
Line Voltage
The BASX power amp can be powered by any receptacle that provides either 115 VAC or 230 VAC
at 50/60 Hz. The BASX power amp will automatically detect the correct line voltage. A pair of LED
indicators on the rear panel of the BASX A1, A2, A3, A4, A5, A6, and A7 will indicate which line
voltage the BASX power amp has detected.
Page 17
Page 22

BASX A1 / A2 / A2mini / A3 / A4 / A5 / A6 / A7
Care and Maintenance
Periodic Maintenance
Your BASX amplier requires no periodic maintenance or calibration.
Cleaning your BASX amplier
• If necessary, the BASX amplier should be cleaned gently with a soft rag.
• If something sticky gets on the front panel or case of the BASX amp, it should be cleaned with
a mild cleaning solution applied to a soft rag, followed by wiping with a clean rag dampened
with plain water and drying with a soft dry rag or cloth.
Note: DO NOT spray water or cleaning solution directly onto the BASX amplier or into
the vents.
Changing the internal power fuse (BASX A2mini ONLY)
The BASX A2mini has an internal power supply fuse located on the power supply circuit board.
If this fuse blows it should only be replaced with a 4A T type fuse (time delay / slo-blo).
Page 18
Page 23

BASX A1 / A2 / A2mini / A3 / A4 / A5 / A6 / A7
Specications
Note: The following specications apply to all models (BASX A1, A2, A2mini, A3, A4, A5, A6, A7)
unless otherwise noted.
Power Output
Power Output Per Channel; ALL channels driven:
A-1: 200 watts RMS / channel; 20 Hz - 20 kHz; THD < 0.05%; into 8 Ohms
350 watts RMS / channel; 1 kHz; THD <0.1%; into 4 Ohms
A-2: 160 watts RMS / channel; 20 Hz - 20 kHz; THD < 0.1%; into 8 Ohms
250 watts RMS / channel; 1 kHz; THD <1%; into 4 Ohms
A-2mini: 50 watts RMS / channel; 20 Hz - 20 kHz; THD < 0.1%; into 8 Ohms
90 watts RMS / channel; 1 kHz; THD <1%; into 4 Ohms
A-3: 140 watts RMS / channel; 20 Hz - 20 kHz; THD < 0.1%; into 8 Ohms
200 watts RMS / channel; 1 kHz; THD <1%; into 4 Ohms
A-4: 100 watts RMS / channel; 20 Hz - 20 kHz; THD < 0.1%; into 8 Ohms
130 watts RMS / channel; 1 kHz; THD <1%; into 4 Ohms
A-5: 95 watts RMS / channel; 20 Hz - 20 kHz; THD < 0.02%; into 8 Ohms
130 watts RMS / channel; 1 kHz; THD <1%; into 4 Ohms
A-6: 90 watts RMS / channel; 20 Hz - 20 kHz; THD < 0.02%; into 8 Ohms
125 watts RMS / channel; 1 kHz; THD <1%; into 4 Ohms
A-7: 90 watts RMS / channel; 20 Hz - 20 kHz; THD < 0.02%; into 8 Ohms
125 watts RMS / channel; 1 kHz; THD <1%; into 4 Ohms
Power Output Per Channel; TWO channels driven:
A-3: 150 watts RMS / channel into 8 Ohms; 250 watts RMS / channel into 4 Ohms
A-4: 100 watts RMS / channel into 8 Ohms; 175 watts RMS / channel into 4 Ohms
A-5: 120 watts RMS / channel into 8 Ohms; 175 watts RMS / channel into 4 Ohms
A-6: 120 watts RMS / channel into 8 Ohms; 175 watts RMS / channel into 4 Ohms
A-7: 120 watts RMS / channel into 8 Ohms; 175 watts RMS / channel into 4 Ohms
Input Sensitivity (for rated power; 8 Ohm load)
A1: 1.6 V.
A2, A4, A5, A6, and A7: 1.2 V.
A2mini: 0.7 V (Fixed); <0.5 V (Variable)
A3: 1.25 V.
Gain
ALL MODELS (includinges BASX A2mini in Fixed Volume mode): 29 dB.
BASX A2mini (in Variable Volume mode): up to 32 dB.
Page 19
Page 24

BASX A1 / A2 / A2mini / A3 / A4 / A5 / A6 / A7
Power Bandwidth (at rated power; 8 Ohm load)
20 Hz to 20 kHz (+ / - 0.07 dB) or better.
Broad Band Frequency Response
5 Hz to 80 kHz (+ 0 / - 1.8 dB).
THD + noise
< 0.02% (A-weighted); at rated power; 1 kHz; 8 Ohms.
Signal to Noise Ratio (8 Ohm load)
> 112 dB or better; referenced to rated power (A-weighted).
> 95 dB; referenced to 1 watt (A-weighted).
Load Impedance
Minimum Load Impedance: 4 Ohms; which equals one 4 Ohm load or two paralleled 8 Ohm loads.
Rated Load Impedance: 8 Ohms.
Damping Factor (8 Ohm load)
> 500.
Speaker Output Connections
Audiophile grade 5-way binding posts.
Power Supply
A1, A2, A3, A4, A5, A6, and A7: Linear power supply with heavy duty toroidal transformer.
A2mini: High eciency SMPS (switch mode power supply).
Input Connections
Unbalanced (RCA); one each per channel.
Input Impedance
27 kOhms.
Trigger
Trigger Input: 5 - 12 V (AC or DC); <10 mA input current required.
Trigger Output: 12 VDC; can drive any load up to 120 mA.
Page 20
Page 25
BASX A1 / A2 / A2mini / A3 / A4 / A5 / A6 / A7
Power Requirements
A1, A2, A3, A4, A5, A6, and A7: 115 VAC or 230 VAC @ 50 / 60 Hz (automatically detected).
A2mini: 100 VAC - 240 VAC @ 50/60 Hz.
Protection
The BASX amplier is protected against excessive operating temperature, shorted speaker
connections, ground faults, and other common fault conditions.
Dimensions:
BASX A1, A2, A3, A4, A5, A6, and A7:
17” wide x 4-1/4” high x 15-1/2” deep (unboxed; including feet).
17” wide x 3-1/2” high x 15-1/2” deep (unboxed; without feet).
BASX A2mini:
8-1/4” wide x 3” high x 14-1/4” deep (unboxed; including feet).
8-1/4” wide x 2-1/2” high x 14-1/4” deep (unboxed; without feet).
BASX A1, A2, A3, A4, A5, A6, and A7:
21” wide x 21” deep x 8” high (boxed)
Weight
BASX A1: 22 lbs (unboxed)
BASX A2: 25.2 lbs (unboxed)
BASX A2mini: 7.5 lbs (unboxed)
BASX A3, A4, and A5: 25.2 lbs (unboxed)
BASX A6 and A7: 28 lbs (unboxed)
* For boxed weight, add 7 lbs to the above weights
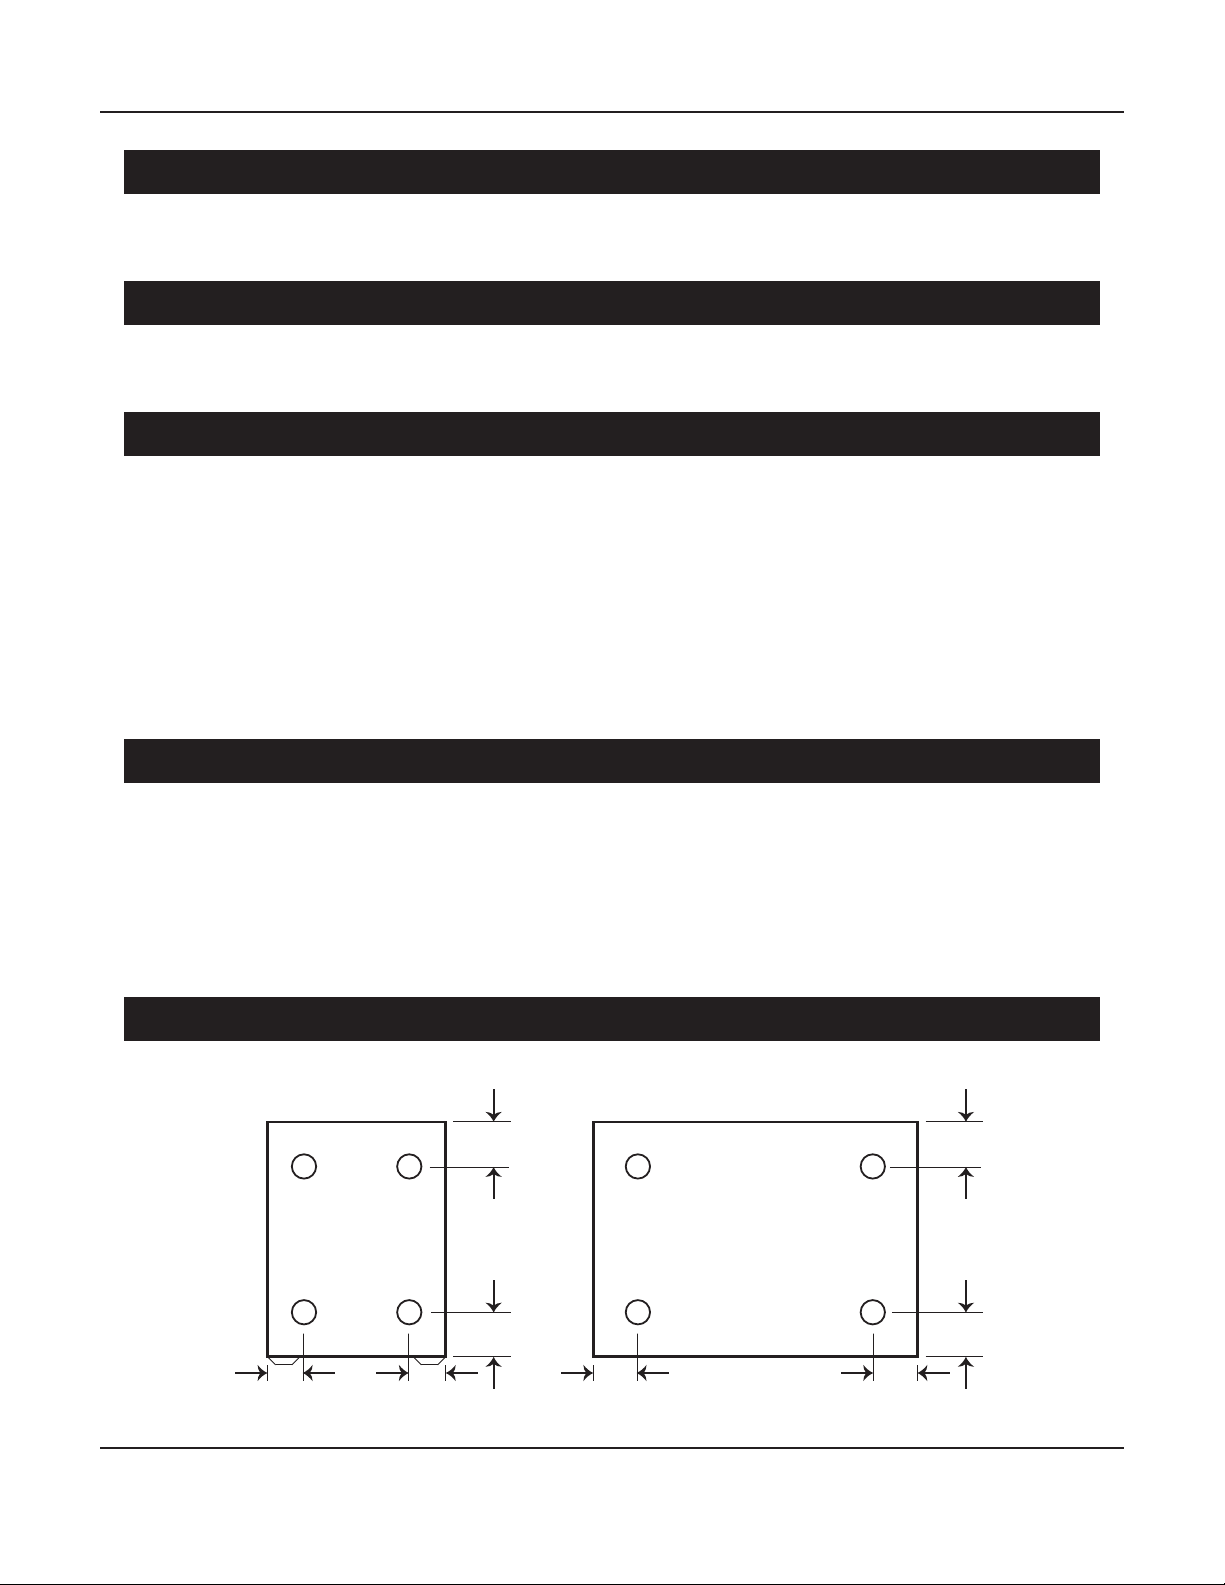
Mounting / Feet
REAR
Foot Diameter = 7/8”
Foot Height = 1/2”
1-3/8”
BASX A1, A2, A3, A4, A5, A6, A7BASX A2mini
REAR
Foot Diameter = 1-1/4”
Foot Height = 3/4”
2-3/8”
FRONT
1-5/8”
7/8”7/8”
FRONT
1-3/4”1-3/4”
2-1/4”
Page 21
Page 26

BASX A1 / A2 / A2mini / A3 / A4 / A5 / A6 / A7
Troubleshooting
Your BASX amplier was carefully designed and manufactured from high-quality precision
components to ensure years of trouble free operation. We really doubt you’ll ever have any
problems with your BASX amp, but if you do, here are a few things you could try:
Problem: No output (nothing is lit).
Reason: You have no AC power.
• Verify that the rear panel AC Power switch is On.
• Verify that your AC power circuit is live.
• Verify that the line cord on your BASX amp is fully inserted and is tight.
• Check the internal AC power fuse (A2m only).
Problem: Your BASX amplier is operating normally, but none of the Status LEDs is lit.
Reason: The front panel status LEDs are turned o (all BASX models except A2m).
• Set the Status LEDs switch on the rear panel to On.
Problem: No sound or distorted sound is heard but there are NO ashing LEDs.
Your BASX amplier is not indicating a fault condition.
• Check your source.
• Check your speakers and speaker connections.
• If there is NO sound, verify that you have AC power, and that the AC Power Switch is ON.
Problem: There is no sound; the Status LEDs are ashing.
Reason: Your BASX amplier is in Protect mode, which indicates a fault condition.
• Switch the rear panel AC Power switch O and On to clear the Fault condition.
(On the BASX A2m disconnect the power cord from the AC outlet for a few seconds.)
• If the fault remains, look for a shorted speaker cable or damaged speaker.
• Check your sources and source connections (a bad interconnect, DC on the input,
or an otherwise bad source component can cause a fault).
Problem: There is no sound; the blue Status LEDs are PULSATING slowly (A2m only).
Reason: Your BASX A2m is Muted.
• Press the Volume knob to toggle Mute Mode O.
Problem (A2 and A2mini only): The Standby LED is lit amber, the BASX A2 or A2mini is
set to Auto-On, and your BASX amplier fails to come on when the source is playing.
Your BASX amplier is NOT turning on when it senses an input signal.
• Check your source and cables.
• Verify that the Auto-On Switch is set to the correct position.
• Try using a Trigger Cable.
Page 22
Page 27

BASX A1 / A2 / A2mini / A3 / A4 / A5 / A6 / A7
Emotiva Audio Corporation Three-Year Limited Warranty
What does this warranty cover?
Emotiva Audio Corporation (Emotiva) warrants the BASX A1, BASX A2, BASX A2mini, BASX A3,
BASX A4, BASX A5, BASX A6, and BASX A7 against defects in materials and workmanship. This
warranty, and all rights provided hereunder, covers the original owner for a full three years, and
may be transferred to a new owner by the original owner during the rst year of ownership. In
the event the original owner transfers ownership of the Product after the rst year of ownership,
but prior to the expiration of the applicable term described below, this Warranty shall terminate
immediately upon such transfer of ownership.
This Warranty only applies to Products purchased directly from Emotiva or any of its Authorized
Dealers or International Distributors.
Emotiva warrants any replacement product or part furnished hereunder against defects in
materials and workmanship for the longer of the following: (i) the amount of time remaining
under the original warranty, or (ii) 120 days from your receipt of the repaired or replaced product.
The duration described in this paragraph is hereinafter referred to as the “Term”.
TO THE FULLEST EXTENT PERMITTED BY LAW, ALL IMPLIED WARRANTIES RELATED TO THE
ORIGINAL PRODUCT AND ANY REPLACEMENT PRODUCT OR PARTS (INCLUDING IMPLIED
WARRANTIES OF MERCHANTABILITY AND FITNESS FOR A PARTICULAR PURPOSE) ARE EXPRESSLY
LIMITED TO THE TERM OF THIS LIMITED WARRANTY. SOME STATES DO NOT ALLOW LIMITATIONS
ON HOW LONG AN IMPLIED WARRANTY LASTS, SO THE ABOVE LIMITATION MAY NOT APPLY TO
YOU.
The original owner must make a claim within the Term of the Warranty. A claim shall not be valid
(and Emotiva has no obligation related to the claim) if it is not made within the Term and if it is not
made in strict compliance with the requirements of the “How do you get service?” section.
How long does this coverage last?
This warranty commences on the date of retail purchase by the original retail purchaser and runs
for a period of three years thereafter. This warranty may be transferred once by the original owner
during the initial one year of ownership, and is non-transferable thereafter to the original or
subsequent owner during the Term. Emotiva warrants any replacement product or part furnished
hereunder against defects in materials and workmanship for the longer of the following: (i) the
amount of time remaining under the original warranty, or (ii) 120 days from your receipt of the
repaired or replaced product. The duration described in this paragraph is hereinafter referred to as
the “Term”.
What will Emotiva do?
Emotiva will, at its option, either: (i) repair the product, or (ii) replace the product with a new
consumer product which is identical or reasonably equivalent (in Warrantor’s sole discretion) to
the product. In the event Warrantor, in its sole discretion, is unable to replace or repair the Product
or it is not commercially practicable to do so, then: (i) if the claim was submitted during the rst
Page 23
Page 28

BASX A1 / A2 / A2mini / A3 / A4 / A5 / A6 / A7
365 days of the Term, Warrantor shall refund to you the purchase price that you paid for the
Product; and (ii) if the claim was submitted after the rst 365 days of the Term, Emotiva shall issue
you a credit equal to the purchase price that you paid for the product. The credit may only be
used for the purchase of merchandise from Emotiva, and cannot be used for freight charges.
When a Product or part is repaired or replaced, any replacement item becomes your property
and the replaced item becomes Emotiva’s property. When a refund or credit is given, the Product
for which the refund or credit is provided must be returned to Emotiva and becomes Emotiva’s
property.
What is not covered by this warranty?
This warranty does not apply: (i) to damage caused by use with products not manufactured
by Emotiva, where the non-Emotiva product is the cause of the damage; (ii) to damage caused
by service or maintenance performed by anyone who is not a representative of Emotiva; (iii) to
damage caused by accident, abuse, misuse, ood, re, earthquake or other external causes; (iv) to
a product or part that has been modied after its retail purchase, where the modication caused
or contributed to the damage; (v) to consumable parts, such as batteries or failure of or damage
to the Product caused by batteries; (vi) if any Emotiva serial number has been removed or defaced
on the product; (vii) glass or plastic panels, cabinetry, trim or other appearance items; (viii)
cosmetic wear or damage to remote controls by user.
EMOTIVA SHALL NOT BE LIABLE FOR ANY INCIDENTAL OR CONSEQUENTIAL DAMAGES ARISING
FROM OR RELATED TO ANY DEFECTS IN OR DAMAGES TO ITS PRODUCTS. SOME STATES DO NOT
ALLOW THE EXCLUSION OR LIMITATION OF INCIDENTAL OR CONSEQUENTIAL DAMAGES, SO THE
ABOVE LIMITATION OR EXCLUSION MAY NOT APPLY TO YOU.
How do you get service?
In order to make a claim under the Warranty, you must:
1. Call or e-mail a customer service representative at 1-877-EMO-TECH (1-877-366-8324) or
[email protected]. You must provide a description of your problem, the serial number of the
Product for which the warranty claim is being made, and the original purchase date.
2. Then, you will be provided with a warranty service authorization number (“WS”).
3. Next, you must ship the Product to the following address, with the WS written in large, bold
numbers on the outside of the box, and with the letters “WS” written before the number, for
example: WS1234. Parcels arriving without a WS number on the outside of the box will be refused.
The customer pays for the shipping to Warrantor. Warrantor pays for the shipping back to the
customer within the continental United States only. Customer is responsible for shipping charges
on all other warranty claims.
Emotiva Audio Corporation
Attn: Repair Department
139 Southeast Parkway Court
Franklin, TN 37064
Page 24
Page 29

BASX A1 / A2 / A2mini / A3 / A4 / A5 / A6 / A7
Units will be refused by Emotiva for the following:
Product was sent without the WS#
Product was sent with inadequate packaging.
Product was damaged in transit.
Product was shipped collect for shipping charges.
How does state law apply?
This warranty gives you specic legal rights, and you may also have other rights which vary from
state to state.
What if my product is damaged on the way to you?
Emotiva is not liable for damages that may incur while an item is in transport to us. Please
purchase insurance when you ship your item. If your Product was not adequately packaged, we
will refuse receipt and the damaged package will be returned to you at your cost. If you do not
have the original Emotiva Audio packaging, please check with our sales department to purchase
replacement-shipping cartons.
How does the Warranty and service apply to international orders?
The Product Warranty is only valid in the country where the Emotiva product was originally
shipped via an authorized dealer, distributor, or direct from the Emotiva factory. The Warranty is
subject to change at any time depending on the laws and regulations within your specic country.
Please check with your distributor for a complete understanding of the warranty in your county.
If you purchased your Emotiva Product outside of the USA and wish to have it serviced at the
factory, all freight charges are your responsibility. If you do not have an authorized distributor
or repair center in your country, your Product must come back to the Emotiva USA factory for
warranty service.
Page 25
Page 30

BASX A1 / A2 / A2mini / A3 / A4 / A5 / A6 / A7
Notes
All information contained in this manual is accurate to the best of our knowledge at the
time of publication. In keeping with our policy of ongoing product improvement, we reserve the
right to make changes to the design and features of our products without prior notice.
BASX Power Amplier A1 / A2 / A2mini / A3 / A4 / A5 / A6 / A7 User Manual Revision 1.6 April 2022
Page 26
Page 31

Page 32

 Loading...