

Page 1
PowerSmart Socket
POWER QUALITY METER
Installation Manual
BG0549 Rev. A1
Page 2

DANGER
This symbol indicates the presence of dangerous voltage within and outside the
product enclosure that may constitute a risk of electric shock, serious injury or death
to persons if proper precautions are not followed.
CAUTION
This symbol alerts the user to the presence of hazards that may cause minor or
moderate injury to persons, damage to property or damage to the device itself, if
proper precautions are not followed.
NOTE
This symbol directs the user’s attention to important installation, operating and
maintenance instructions.
LIMITED WARRANTY
The manufacturer offers the customer a 24-month functional warranty on the instrument for
faulty workmanship or parts from date of dispatch from the distributor. In all cases, this
warranty is valid for 36 months from the date of production. This warranty is on a return to
factory basis.
The manufacturer does not accept liability for any damage caused by instrument malfunction.
The manufacturer accepts no responsibility for the suitability of the instrument to the
application for which it was purchased.
Failure to install, set up or operate the instrument according to the instructions herein will void
the warranty.
Only a duly authorized representative of the manufacturer may open your instrument. The unit
should only be opened in a fully anti-static environment. Failure to do so may damage the
electronic components and will void the warranty.
NOTE
The greatest care has been taken to manufacture and calibrate your instrument. However,
these instructions do not cover all possible contingencies that may arise during installation,
operation or maintenance, and all details and variations of this equipment are not covered by
these instructions.
For additional information regarding installation, operation or maintenance of this instrument,
contact the manufacturer or your local representative or distributor.
ii
Page 3

DANGER
Failure to observe the following instructions may result in severe injury or death.
Read the instructions in this manual before performing installation, and take note of
the following precautions:
1. Ensure that all incoming AC power and other power sources are turned OFF before
performing any work on the instrument. Failure to do so may result in serious or even fatal
injury and/or equipment damage.
2. Before connecting the instrument to the power source, check the labels on the front of
the instrument to ensure that your instrument is equipped with the appropriate power supply
voltage, input voltages and currents for your application.
3. Do not connect the ins trument to a power source if it is damaged.
4. Do not expose the instrument to rain or moisture.
5. The secondary of an external current transformer must never be allowed to be open
circuit when the primary is energized. An open circuit can cause high voltages, possibly
resulting in equipment damage, fire and even serious or fatal injury. Ensure that the current
transformer wiring is made through shorting switches and is secured using an external strain
relief to reduce mechanical strain on the screw terminals, if necessary.
6. Only qualified personnel familiar with the instrument and its associated electrical
equipment must perform setup procedures.
7. DO NOT open the instrument under any circumstances.
Read this manual thoroughly before connecting the meter to the current carrying
circuits. During operation of the meter, hazardous voltages are present on input
terminals. Failure to observe precautions can result in serious or even fatal injury
or damage to equipment.
iii
Page 4

Table of Contents
Chapter 1 Introduction ................................
About This Manual
About This Manual ................................
About This ManualAbout This Manual
................................................................
................................................................
About The PowerSmart Socket PQM................................
Socket Meter Overview ................................
Chapter 2 Installation ................................
Mechanical Install
Mechanical Installation
Mechanical InstallMechanical Install
ation ................................
................................................................
ationation
................................................................
Physical Description................................
Device Structure................................
Optional Modules location ................................
Meter External connections ................................
................................................................
................................................................
Electrical Installation................................
Voltage Inputs ................................
Current Inputs ................................
Ground Input ................................
Typical Installation................................
FORM 5/35/6/36/9 Wiring Configurations ................................
Input / Output ports options ................................
Communications options ................................
Auxiliary Power Supply ................................
................................................................
................................................................
................................................................
................................................................
................................................................
................................................................
Chapter 3 Communications................................
................................................................
................................................................
................................................................
................................................................
...............................................................
................................................................
................................................................
................................................................
................................................................
................................................................
................................................................
................................................................
................................................................
................................................................
................................................................
................................................................
................................................................
................................................................
................................................................
................................................................
................................................................
................................................................
................................................................
................................................................
................................................................
................................................................
................................................................
................................................................
................................................................
................................................................
................................................................
................................................................
................................................................
................................................................
................................................................
................................................................
................................................................
................................................................
................................................................
................................................................
...............................................
................................................................
......................................................
................................................................
.................................................
................................................................
............................................................
................................................................
............................................................
................................................................
.........................................................
................................................................
..........................................................
................................................................
.................................................
................................................................
.................................................
................................................................
....................................................
................................................................
...........................................................
................................................................
......................................................
................................................................
..............................................................
................................................................
................................................................
................................................................
........................................
................................................................
............... 1111
..............................
......................................
................................................................
............................... 1111
..............................................................
...................... 3333
............................................
................. 4444
..................................
................................ 5555
................................................................
............................ 6666
........................................................
..............................................
................................................................
............................6666
........................................................
.........................7777
..................................................
.......................... 8888
....................................................
....................8888
........................................
.........................................
................................................................
...........................8888
......................................................
...................... 13
............................................
.............................. 18
............................................................
....................................23
................................................................
......1111
............
..............6666
............................
.................8888
..................................
.................8888
..................................
.........8888
..................
........ 25
................
13
1313
18
1818
23
2323
25
2525
Chapter 4 Replacing the Battery................................
Appendix: Technical Specifications................................
Inputs Ratings
Inputs Ratings................................
Inputs RatingsInputs Ratings
Power Supply
Power Supply................................
Power SupplyPower Supply
Input/Output ports
Input/Output ports ................................
Input/Output portsInput/Output ports
Communication ports
Communication ports ................................
Communication portsCommunication ports
Console Display Unit
Console Display Unit ................................
Console Display UnitConsole Display Unit
Real Time Clock
Real Time Clock................................
Real Time ClockReal Time Clock
Log Memory
Log Memory................................
Log MemoryLog Memory
Environmental Conditions
Environmental Conditions................................
Environmental ConditionsEnvironmental Conditions
Construction
Construction ................................
ConstructionConstruction
Standards Compliance
Standards Compliance ................................
Standards ComplianceStandards Compliance
Measurement Specifications
Measurement Specifications................................
Measurement SpecificationsMeasurement Specifications
................................................................
................................................................
................................................................
................................................................
................................................................
................................................................
................................................................
................................................................
................................................................
................................................................
................................................................
................................................................
................................................................
................................................................
................................................................
................................................................
................................................................
................................................................
................................................................
................................................................
................................................................
................................................................
................................................................
................................................................
................................................................
................................................................
................................................................
................................................................
..............................................................
................................................................
.........................................................
................................................................
................................................................
................................................................
................................................................
................................................................
................................................................
................................................................
................................................................
................................................................
................................................................
................................................................
............................................................
................................................................
................................................................
................................................................
........................................................
................................................................
.............................................
................................................................
..............................................
................................................................
................................................
................................................................
...............................................
................................................................
.............................. 26
............................................................
.......................................
................................................................
..................................
................................................................
...................................
................................................................
..........................................
................................................................
................................ 31
................................................................
26
2626
......................... 27
..................................................
............. 27
..........................
.............. 28
............................
..........31
....................
................ 31
................................
............................ 31
........................................................
...............31
..............................
........................ 33
................................................
27
2727
27
2727
28
2828
....... 28
28
..............
2828
.. 30
30
....
3030
... 31
31
......
3131
31
3131
31
3131
31
3131
31
3131
31
3131
33
3333
iv
Page 5

FIGURES
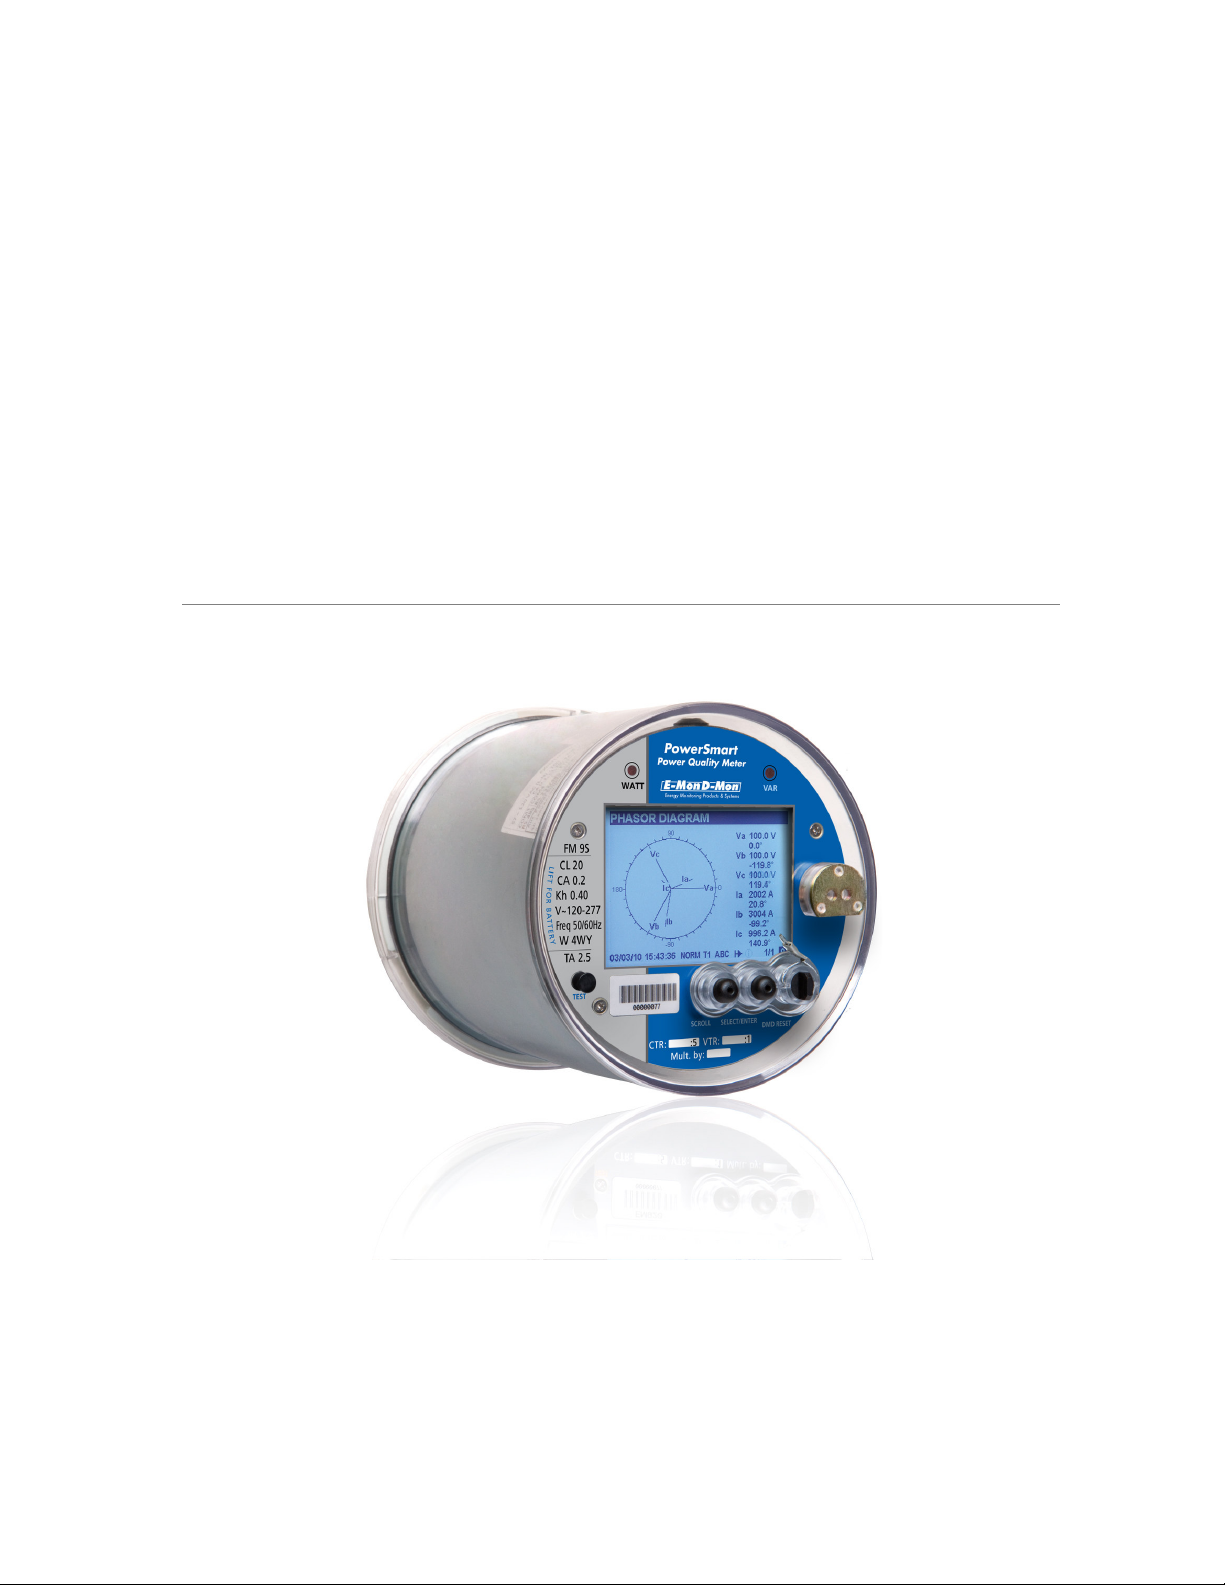
Figure 1: Front view - Nameplate description................................
Figure 2: PowerSmart Socket PQM - FORM 9S Dimensions ................................
Figure 3: PowerSmart Socket PQM internal structure ................................
Figure 4: PowerSmart Socket PQM internal structure ................................
Figure 5:Meter Base – rear view................................
Figure 6: FORM 9 Typical Electrical Installation................................
Figure 7: Applicable FORMS ................................
Figure 8: Four Wire WYE Connection No PTs Using 3CTs - Wiring Setup:
4Ln3 ................................
................................................................
................................................................
Figure 9:Four Wire WYE Connection Using 3 PTs and 3(4) CTs - Wiring
Setup: 4Ln3................................
Figure 10: Four Wire DELTA Connection Using no PTs and 3(4) CTs -
Wiring Setup: 4LL3 ................................
Figure 11: Four Wire DELTA Connection Using 3 PTs and 3 CTs - Wiring
Setup: 4LL3 ................................
Figure 12: Three Wire DELTA Connection Using no PTs and 2 CTs -
Wiring Setup: 3OP3 ................................
Figure 13: Three Wire DELTA Connection Using 2 PTs and 2 CTs - Wiring
Setup: 3OP3 ................................
Figure 14:LOGIC/DISPLAY Cable ................................
Figure 15: 2DI LOGIC/DISPLAY STATUS Input Connection ................................
Figure 16: 8DI Cable................................
Figure 17: 8DI module STATUS Input Connection................................
Figure 18: 6RO Connection ................................
Figure 19: 4AO Connection ................................
Figure 20: TRM module – Transient Recorder ................................
Figure 21: Infrared Communication port – COM1................................
Figure 22: Serial Communication Network Connection – RS-485 COM3................
Figure 23: USB connection................................
Figure 24: GSM/GPRS module – SIM card assembly ................................
Figure 25: ETHERNET module ................................
Figure 26: MODEM module................................
Figure 27: Serial Communication Network Connection – RS-485 COM4................
Figure 28: Serial Communication Connection – RS-232 COM4................................
Figure 29: ETHERNET connection ................................
Figure 30: MODEM connection................................
Figure 31: AC/DC APS module ................................
Figure 32: RS-232 Simple 3-wire Connection , 25-pin or 9-pin PC COM
Port ................................
................................................................
................................................................
Figure 33: RS-485 Multidrop Connection, 25-pin or 9-pin PC COM Port ................
Figure 34: Memory Backup - Lithium Battery Replacement ................................
................................................................
................................................................
................................................................
................................................................
................................................................
................................................................
................................................................
................................................................
................................................................
................................................................
................................................................
................................................................
................................................................
................................................................
................................................................
................................................................
................................................................
................................................................
................................................................
................................................................
................................................................
................................................................
................................................................
................................................................
................................................................
................................................................
................................................................
................................................................
................................................................
................................................................
................................................................
................................................................
................................................................
................................................................
................................................................
................................................................
................................................................
................................................................
................................................................
................................................................
................................................................
................................................................
................................................................
................................................................
................................................................
................................................................
................................................................
................................................................
................................................................
................................................................
................................................................
................................................................
................................................................
................................................................
................................................................
................................................................
.................................................
................................................................
.................................................
................................................................
..........................................................
................................................................
.............................................................
................................................................
................................................................
................................................................
..............................................
................................................................
................................................................
................................................................
...................................................
................................................................
................................................................
................................................................
..................................................
................................................................
................................................................
................................................................
........................................................
................................................................
...............................................
................................................................
.........................................................
................................................................
................................................................
................................................................
................................................................
................................................................
................................................................
................................................................
..........................................................
................................................................
................................................................
................................................................
....................................................
................................................................
...............................................................
................................................................
................................................................
................................................................
........................................................
................................................................
..............................................................
................................................................
.............................................................
................................................................
................................................
................................................................
....................................3333
................................................................
........................................
................................................................
..........................7777
....................................................
.............................8888
..........................................................
..................................
................................................................
....................................10
................................................................
....................................11
................................................................
................................12
................................................................
........................13
................................................
......................................
................................................................
.........................14
..................................................
...................................
................................................................
...................................
................................................................
....................................17
................................................................
..........................18
....................................................
.....................................
................................................................
...............................20
..............................................................
.....................................
................................................................
....................................22
................................................................
........................22
................................................
.............................. 23
............................................................
.............................23
..........................................................
.......................................
................................................................
........5555
................
.................6666
..................................
.................6666
..................................
..8888
....
..............9999
............................
10
1010
...................10
......................................
..................11
....................................
...............14
..............................
................18
................................
....................19
........................................
................21
................................
................25
................................
................25
................................
10
1010
11
1111
11
1111
12
1212
13
1313
......13
13
............
1313
14
1414
14
1414
...15
15
......
1515
...16
16
......
1616
17
1717
18
1818
18
1818
.....19
19
..........
1919
19
1919
20
2020
.....21
21
..........
2121
21
2121
22
2222
22
2222
23
2323
23
2323
25
2525
25
2525
.......22226666
..............
TABLES
Table 1: Wiring Configuration................................
Table 2: 4AO – Output Curent setting................................
................................................................
................................................................
................................................................
................................................................
...............................................................
................................................................
................................................
................................................................
...............................9999
..............................................................
................15
................................
v
15
1515
Page 6

Page 7

Chapter 1 Introduction
About This Manual
This manual is intended to assist the user in the installation of the PowerSmart Power
Quality Meter unit. The term ‘PowerSmart Socket PQM’’ is used herein to refer to all models in
the series.
This chapter gives an overview of this manual and an introduction to the PowerSmart Socket
PQM.
Chapter 2, Installation, provides instructions for mechanical and electrical installation.
Chapter 3, Communications, provides drawings for communications connections and
instructions for printing electrical parameter readings.
Technical Specifications for the PowerSmart Socket PQM are found in the Appendix.
About The PowerSmart Socket PQM
The PowerSmart Socket PQM series is a of state-of-art multi-microprocessor-based digital
instrument, socket meter base, that incorporate the capabilities of a power quality analyzer,
energy meter, fault and data recorder and programmable controller, oriented for substation,
industrial and commercial areas. These instruments provide three-phase measurements of
electrical quantities in power distribution systems, monitoring external events, operating
external equipment via relay contacts, fast and long-term on-board recording of measured
quantities, transient voltages measurements up to 2KV, fault recording of currents up to 50A,
harmonic analysis and disturbance recording. The PowerSmart Socket PQM has current classes
of 10 A and 20 A and offers precise active and reactive energy metering in 4 quadrants, Power
Quality Analyzer according to EN50160 Standard, all the basic metering, control, and fault and
event recording capabilities
The PowerSmart Socket PQM socket meter is designed to fit into S-Base meter sockets
and A-to-S Base adapters. The meter supports form factors 9S/9A.
Feat u r es
The PowerSmart Socket PQM combines in a single enclosure:
• Precise Class 0.2 Active Energy and Power Demand Meter and better, Multiple Tariffs &
Time-Of-Use (TOU, 16 Summary energy and demand registers for substation energy
management, accumulation of energy pulses from external watt-meters, block and sliding
demands), transformer and line losses, unique anti-tampering and self-test functions
• State of the art Power Quality Recorder (onboard PQ analyzer according to EN50160;
programmable thresholds with hysteresis; ready-for-use reports; sags/swells,
interruptions, frequency variations; flicker, temporary overvoltages, transient overvoltages,
voltage unbalance, harmonic and interharmonics voltages)
• Digital Fault Recorder (onboard fault detector - programmable fault, up to 50 Amps fault
currents, zero-sequence currents and volts, current and volt unbalance; under-voltage,
neutral current;
• Event Recorder for logging internal diagnostics events, control events and I/O operations
• Four fast Waveform Recorders; selectable AC sampling rate of 32 - 1024 samples per
cycle; 20 pre-fault cycles, 1-ms resolution for digital inputs monitoring; up to 3 min of
continuous recording with an 8 M-byte onboard memory at a rate of 32 samples per cycle,
expandable up to 16 M-byte at meter shop
• Sixteen fast Data Recorders (from ½ cycle RMS to 2-hour RMS envelopes; up to 20 pre-
fault cycles; programmable data logs on a periodic basis and on any internal and external
trigger)
• Programmable Controller (32 control setpoints, OR/AND logic, extensive triggers,
programmable thresholds and delays, relay control, event-driven data recording)
• High-Class 3-phase Power meter (true RMS of volts and amps, powers, power factors,
neutral current)
• Demand Meter (amps, volts, harmonic demands)
• Harmonic Analyzer (to 128’Th harmonic volts and amps, power harmonics and power
factor, phasor, symmetrical components)
• 16 programmable timers from ½ cycle to 24 hours for periodic recording and triggering
operations on a time basis
• Isolated Three-Phase Power Supply unit from the measured voltage inputs, according to
the voltage measurement input range:
Chapter 1 Introduction
1
Page 8

− Low Range measurement input nominal rating – "U" Model: 57.7V AC to 120V AC (L-
N)
− High Range measurement input nominal rating – standard Model: 120V AC to 277V AC
(L-N)
• On board 2 Digital optically isolated Fast Inputs and 1 KYZ relay output.
• Auxiliary power supply option – AC/DC and Low DC options are available in "U" model only
• High resolution 4’ Graphic LCD display
• Four slots for option modules
AC / D C I n p ut s
• Three AC voltage inputs - up to 480VAC direct line-to-line input voltage, for feeding and
measurement; high impedance input (>10MΩ)
• Four AC voltage inputs - up to 2KV peak direct line-to-ground and neutral-to-ground input
voltage
• Three standard isolated AC current inputs (FORM 9) and optional fourth current input, 5A
nominal input currents and up to 50 A fault overload current
• Optional isolated AC/DC power supply input – up to 4KV AC insulation withstanding
• Optional isolated low DC power supply input – up to 4KV AC insulation withstanding
In p u t /O u t pu t s
The PowerSmart Socket PQM is equipped with two fast digital inputs (DI), in the basic
instrument, eight digital inputs (8DI module) and six digital outputs (6RO module) optional
modules
• DI (basic) – 2 Digital inputs – optically isolated input; dry contact, programmable de-
bounce time from 1 ms to 1 sec; free linkage to Sequence-of-Events Recorder, Fault
Recorder, control setpoints, pulse counters for Energy/TOU subsystem)
• 8DI (optional module)– 8 Digital inputs – optically isolated input; dry contact,
programmable sampling rate from ½ cycle to 1 sec; control setpoints, pulse counters for
Energy/TOU subsystem)
• KYZ relay output (basic)
• 6RO (optional module) – 2 relay types: 2 x Electromechanic Relays – EMR FORM A and 4 x
Solid State Relays – SSR Form C, unlatched, latched and pulse operations, failsafe
operation for alarm notifications; programmable pulse width; direct remote relay control
through communications
• 4AO (optional module), 4 Analog Outputs with 5 basic current options (0-20mA, 4-20mA,
0-1mA and ± 1mA)
• TRM (optional module), analyzing transient voltage between phase and ground, up to 2 kV
and sampling rate up to 1024 samples per cycle
Co m m un i c at i on s
The PowerSmart Socket PQM has extensive communications capabilities:
• On-board Infrared port, isolated RS-485 port and USB Device port (MODBUS RTU/ASCII
and DNP3.0 protocols)
• ETH (optional module), including:
− Versatile RS-232/485 universal serial communications port (up to 115,200 bps,
MODBUS RTU/ASCII and DNP3.0 protocols)
− Ethernet 10/100 Base-T port (MODBUS/TCP or DNP3.0/TCP protocols, up to five non-
intrusive simultaneous connections, Telnet service port)
− 1-ms satellite-synchronized clock - IRIG-B format time-code input
• Cellular GPRS modem (MODBUS/TCP or DNP3.0/TCP protocols)
• Dial Up MODEM (optional module), including:
− Versatile RS-232/485 universal serial communications port (up to 115,200 bps,
MODBUS RTU/ASCII and DNP3.0 protocols)
− PSTN MODEM port (MODBUS/RTU, MODBUS/TCP or DNP3.0, DNP3.0/TCP protocols, up
to five non-intrusive simultaneous connections, Telnet service port)
− 1-ms satellite-synchronized clock - IRIG-B format time-code input
U p g r a de a b le Fi r m wa r e
The PowerSmart Socket PQM uses flash memory for storing device firmware that allows future
upgrading of the device without replacing any hardware component. The new features can be
easily added to your device by simply replacing the firmware through a local RS-232/RS-485,
USB port or Ethernet port.
2
Chapter 1 Introduction
Page 9
Socket Meter Overview
Figure 1: Front view - Nameplate description
Chapter 1 Introduction
3
Page 10

Chapter 2 Installation
The PowerSmart Socket PQM Socket meter is designed to mount into a standard
meter socket. Follow the Installation summary below, to ensure that the unit is
installed securely. The PowerSmart Socket PQM series can be mounted outside or in
an enclosed and protected environment, such as in a switchgear cabinet. You may
install a switch or circuit breaker nearby and label it clearly as the monitor’s
disconnecting mechanism.
Pr e l i m in a ry in s ta l l at i o n
Examine the labels to verify that the meter you are installing is the correct form factor
and service type. Make sure that the socket and meter current class ratings are
compatible.
• Make sure that all communication and auxiliary power wiring is accessible in case
disconnection is required for any reason.
• Before applying power to the meter, install batteries if not installed at the factory and
check the connections if they are installed. POWER MUST BE OFF TO INSTALL THE
INTERNAL BATTERY!
See Replacing Battery paragraph to install the Internal Battery
• Before inserting or unplugging meter to/from socket POWER must be denergized.
• Insert the meter into the socket, making sure that the unit blades are firmly within the
jaws of the socket.
• The meter installation must be installed far enough (at least 3ft) from the high power
line busses
4
Chapter 2 Installation
Page 11
Mechanical Installation
Mechanical Installation
Mechanical Installation Mechanical Installation
Refer to the figures provided in this section to properly perform the mechanical installation.
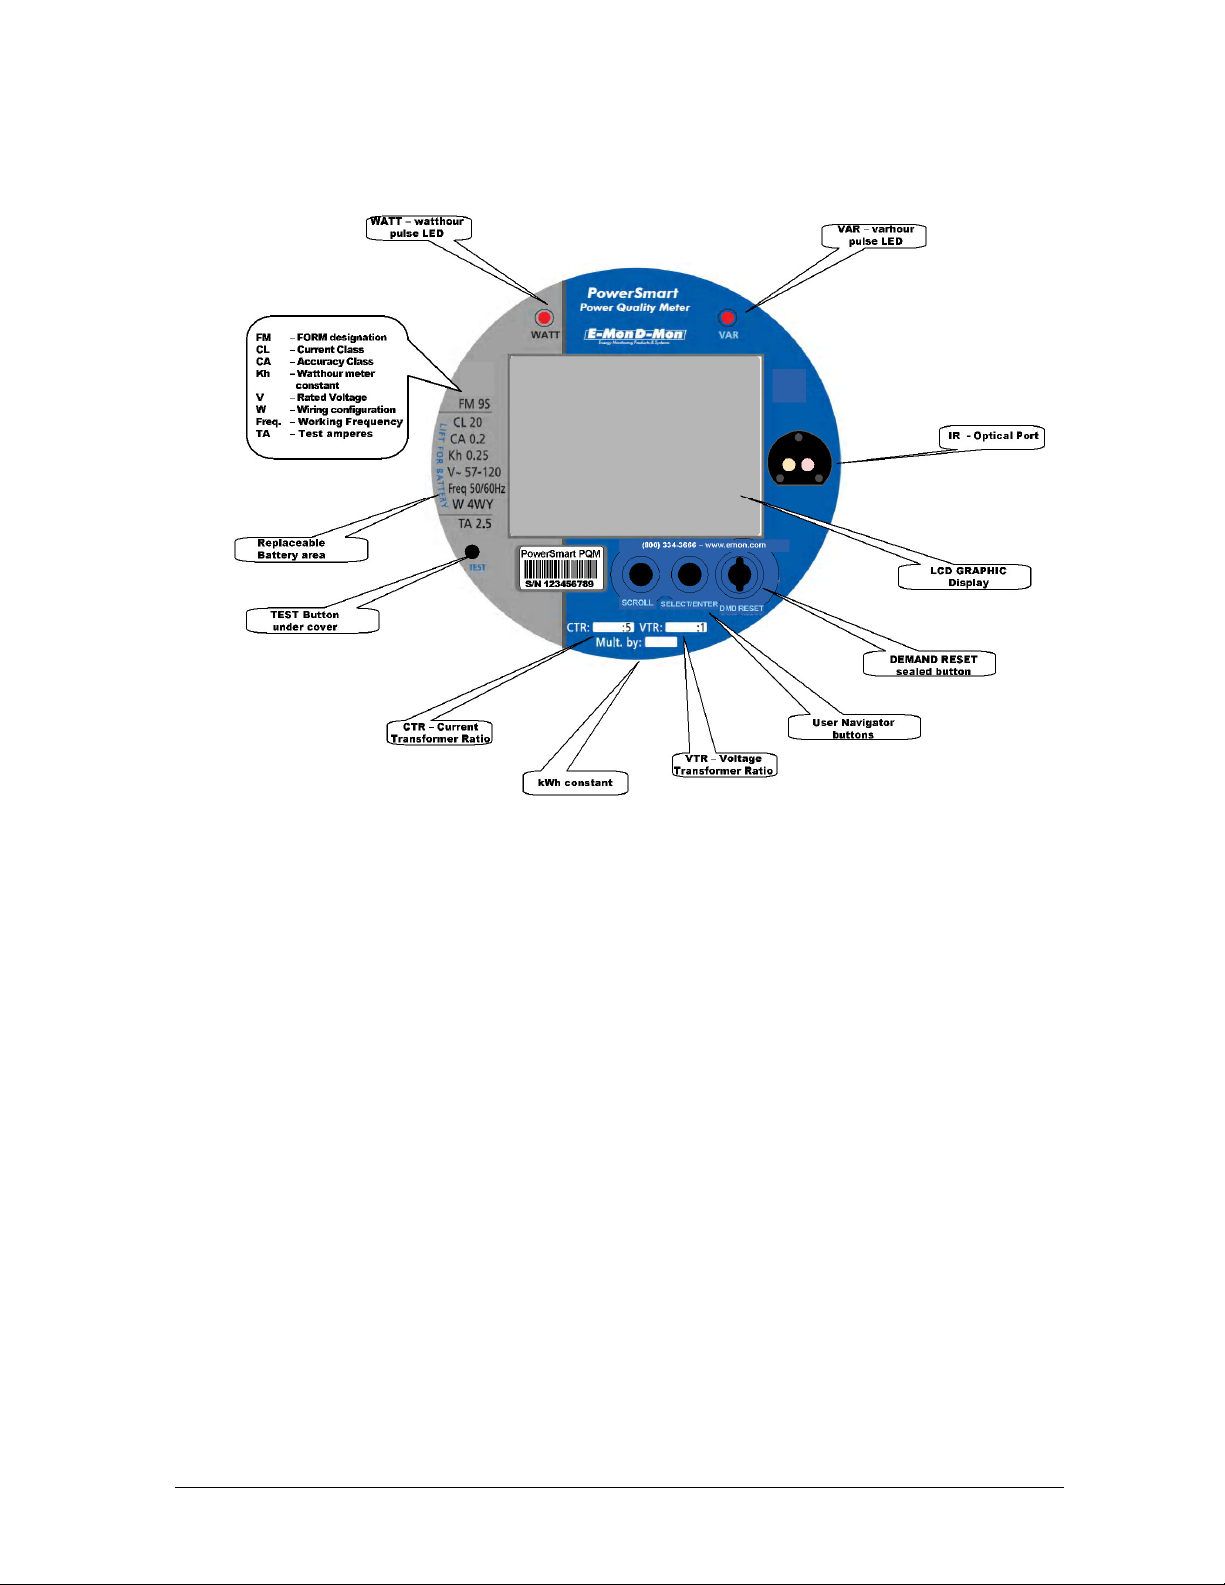
Figure 2: PowerSmart Socket PQM - FORM 9S Dimensions
Chapter 3 Communication 5
Page 12
Physical Description
Device Str u ctu r e
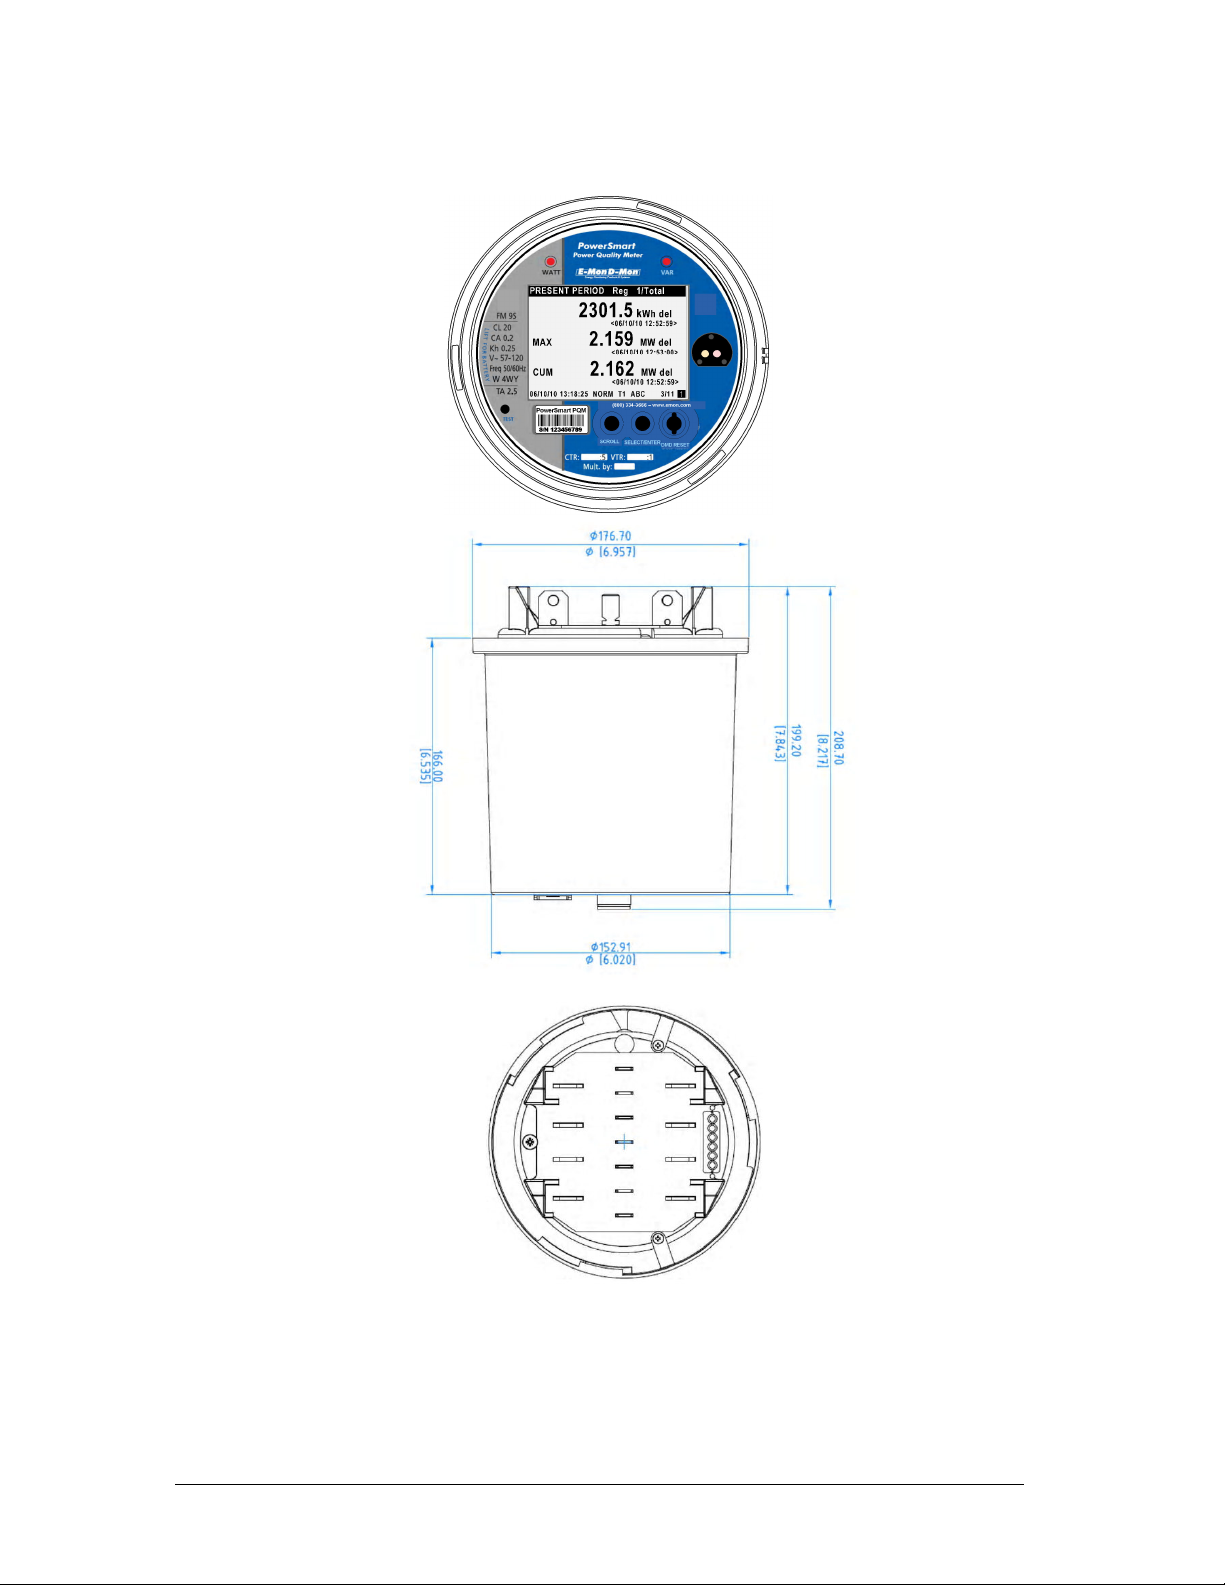
Fig u r e 3 : P o w er S ma r t S o ck e t P Q M i n te r na l s t r u ct u re
Option a l M o d ul e s l o ca t i on
Fig u r e 4 : P o w er S ma r t S o ck e t P Q M i n te r na l s t r u ct u re
6
Chapter 2 Installation
Page 13

Meter E x ter na l co n n ec t i ons
Fi g u r e 5 : Me t e r B as e – r e ar vi e w
Chapter 3 Communication 7
Page 14

Electrical Installation
Before installing, ensure that all incoming power sources are
shut OFF. Failure to observe this practice can result in serious
or even fatal injury and damage to equipment.
Voltag e I n p ut s
There are 3 AC Y-connected voltage inputs of 100-480 VAC (phase-to-phase) and neutral,
via socket meter blades.
The PowerSmart Socket PQM Power Supply Inputs are the same as the Voltages Inputs
Curre n t I n p ut s
There are 4 current inputs up to 50A, connected to external CT’s via socket meter blades.
Groun d In p u t
Make sure the PowerSmart Socket PQM socket is properly connected to ground
Typic a l In s tal lati on
Before installing, ensure that all incoming power sources are
shut OFF and are protected with a slow blow fuse of 2A (SW1
and SW3), and short the current inputs (SW2)
Figure 6: FORM 9 Typical Electrical Installation
FORM 5 / 35 / 6 / 36/ 9 Wi r ing Con f i gur ati o n s
Available wiring modes are listed in the following table, See parameter setup
instructions in the Operation Manual.
Figure 7: Applicable FORMS
8
Chapter 2 Installation
Page 15

W i r i n g C o n fi g u ra t io n Wiring Setup FORM factor
CTs
4-wire WYE 3-element using 3 CTs 4Ln3 9S
4-wire WYE 3-element connection using 3 PTs, 3 CTs 4Ln3 9S
4-wire 3-element delta using 3 CTs 4LL3 9S
4-wire 3-element delta connection using 3 PTs, 3 CTs 4LL3 9S
3-wire 2½-element Open Delta connection using 3 CTs 3OP3 5S/35S
3-wire 2½-element Open Delta connection using 2 PTs, 3
3-wire 2-element Open Delta using 2 CTs 3OP2
4-wire WYE 2½-element connection using 3 CTs 3Ln3 6S/36S
4-wire WYE 2½-element connection using 2 PTs, 3 CTs 3Ln3 6S/36S
4-wire 2½-element delta connection using 2 PTs, 3 CTs 3LL3
Tab l e 1: Wi r i ng Co n fi g ur a t i on
NOTE
In 4LN3 and 3LN3 wiring modes, the voltage readings for volt demands represent line-to-neutral
voltages; otherwise, they will be line-to-line voltages. The voltage waveforms and harmonics in
4LN3 and 3LN3 wiring modes represent line-to-neutral voltages; otherwise, they will be line-to-line
voltages
3OP3 5S/35S
Fi g u r e 8 : F o ur W ir e WY E C o n ne c ti o n N o P T s U si n g 3 C T s - Wi r in g Se t u p:
4Ln 3
Chapter 3 Communication 9
Page 16

Fi g u re 9 : Fo u r W i re WY E Co n ne c ti o n U s in g 3 P T s a n d 3 (4 ) CT s - Wi r i ng
Set u p : 4 L n 3
Fi g u r e 1 0 : F ou r Wi r e D EL T A C o nn e ct i o n U si n g n o P T s a n d 3 ( 4) C Ts -
Wi r i n g S e tu p : 4 L L 3
10
Chapter 2 Installation
Page 17

Fi g u re 1 1: F ou r Wi r e D EL T A C o nn e ct i o n U si n g 3 PT s an d 3 C T s - Wi ri n g
Set u p : 4 L L 3
Fig u r e 1 2 : T hr e e Wi r e D EL T A C o nn e c ti o n U si ng n o P T s a n d 2 CT s - W ir i n g
Set u p : 3 O P3
Chapter 3 Communication 11
Page 18

Fi g u r e 1 3 : T hr e e Wi re D EL T A C o nn e c ti on U si ng 2 PT s an d 2 CT s - W i ri n g
Set u p : 3 O P3
12
Chapter 2 Installation
Page 19

Input / O u t put p or t s o p tio n s
Before I/O Module installation ensure that all incoming power
sources are shut OFF. Failure to observe this practice can
result in serious or even fatal injury and damage to
equipment.
On b o ar d I /O p or t s
LO G I C/ D I S PL A Y
The PowerSmart Socket PQM LOGIC/DISPLAY board is equipped with two fast Dry contact
detector – Digital Inputs 2DI unit, providing wet contact voltage of 24VDC, RS-485
communication port COM3 and USB device port.
Fi g u re 1 4: L O GI C / DI S PL A Y C a b le
2D I
Two On Board optically isolated digital inputs are provided for status monitoring and
external synchronization of power demand period and time. Dry contacts may be connected
to these inputs, as shown in Figures 15
For ratings, see Appendix: Technical Specifications.
Fi g u r e 1 5 : 2D I LO G IC / D IS P LA Y ST A T US I n p ut Co n n ec t i on
K Y Z r e la y
The meter includes one Form C relayl output. It can be used to send KYZ pulsing
information to third party system equipment, accessible from meter base blades
contacts.
For ratings, see Appendix: Technical Specifications
Chapter 3 Communication 13
Page 20

Opt i o na l I / O m od ul e s
8D I
The 8DI module consists of eight status inputs detection.
To install the 8DI module follow instructions:
1) Remove the plastic cover
2) Remove the body shield
3) Plug-in the module in the I/O slot and attach it to bracket using the two screws
4) Connect the 8DI cable and pass it through the device base window cables
5) Mount back the body shield
6) Mount back the plastic cover
The 8DI module is factory or Meter Shop plugged-in at the I/O slot
Fi g u r e 1 6 : 8D I Ca b l e
Eight optically isolated digital inputs are provided for status monitoring and external
synchronization of power demand period and time. Dry contacts may be connected to these
inputs, as shown in Figures 17
For ratings, see Appendix: Technical Specifications.
Fi g u r e 1 7 : 8 D I m od u le S TA T U S I np u t C o nn e ct i o n
14
Chapter 2 Installation
Page 21

R e l a y O u tp u t s ( 6 RO – o pt i o na l m o d ul e )
The 6RO module consists of: four FORM C (SSR) and two FORM A (EMR) relay outputs.
To install the 6RO module follow instructions:
7) Remove the plastic cover
8) Remove the body shield
9) Plug-in the module in the I/O slot and attach it to bracket using the two screws
10) Connect the 6RO cable and pass it through the device base window cables
11) Mount back the body shield
12) Mount back the plastic cover
The 6RO module is factory or Meter Shop plugged-in at the I/O slot
External control loads can be connected to the contacts relay as shown in Figures 18.
For ratings, see Appendix: Technical Specifications
Fi g u r e 1 8 : 6R O Co n ne c ti o n
An a l o g Ou t p ut s ( 4 AO – o pt i on al m od ul e )
The PowerSmart Socket PQM analog output (AO) expansion module provides:
• 4 optically isolated analog outputs with an internal power supply;
• Options for 0-20mA, 4-20mA, 0-1mA, and ± 1mA output; 1-cycle update time.
To install the 4AO module follow instructions:
1) Remove the plastic cover
2) Remove the body shield
3) Set SW1 and SW2 for the proper Analog Output current according
to following table
Analog Output
Current
1 2 1 2-5
± 1mA ON ON OFF OFF
0-20mA OFF ON ON ON
0-1mA OFF OFF ON OFF
4-20mA ON OFF ON ON
Tab l e 2: 4A O – O u tp u t C u re n t s et t i ng
4) Plug-in the module in the I/O slot and attach it to bracket using the two screws
5) Connect the 4AO cable and pass it through the device base window cables
6) Mount back the body shield
7) Mount back the plastic cover
The 4AO module is factory or Meter Shop plugged-in at the I/O slot
For ratings, see Appendix: Technical Specifications
SW1
setting
SW2
setting
Chapter 3 Communication 15
Page 22

Fi g u r e 1 9 : 4A O Co n ne c ti o n
It is recommended to connect unused Analog output channels
to Common terminal.
The 4AO module TERMINAL is for use only with equipment which
has no live parts which are ACCESSIBLE
The RATING of the insulation of the external equipment for use with
the 4AO module, shall comply according to Installation Category III
for insulation to be suitable for SINGLE FAULT CONDITION
• The external equipment TERMINAL connection type is
⇒
normally terminal block for wire size 14 AWG (up to 1.5
mm2)
The type of equipment that might be connected to the TERMINAL
is:
Programmable Logic Controller for automation – PLC
Digital or Analog meter
16
Chapter 2 Installation
Page 23

Tr a n si e n ts Re c or d er Mo d ul e ( T RM – op t io n al mo d u le )
The PowerSmart Socket PQM Transients Recorder module provides four input voltages
transient measurement related to ground: V1 (L1-G), V2 (L2-G), V3 (L3-G) and VN
(N-G)
To install the TRM module follow instructions:
1) Remove the plastic cover
2) Remove the body shield
3) Plug-in the module in the TRM slot and attach it to bracket using the two
screws
4) Mount back the body shield
5) Mount back the plastic cover
The TRM module is factory or Meter Shop plugged-in at the TRM slot.
See parameter setup instructions in the Operation Manual.
For ratings, see Appendix: Technical Specifications
Fig u r e 2 0 : T RM m od u l e – Tr a n si e nt Re c or d er
Chapter 3 Communication 17
Page 24

Commu n i c at i o ns opti o ns
The PowerSmart Socket PQM has several communication alternatives depending on your
ordering preferences. All communications ports, of different type, can be used
simultaneously.
The basic PowerSmart Socket PQM is equipped with one standard optical communication
port (COM1), an optically isolated RS-485 communication port (COM3) and an USB Device
Type A.
Other COM ports are available as optional module.
On B o ar d C o mm u ni ca t i on p o rt
In f r a re d Co m mu n ic a t io n po rt ( C OM 1 )
Mount an optical probe cable (not included), at the instrument front panel, to communicate
between the meter optical port and a PC serial port
Fi g u r e 2 1 : I n fr a re d Co m mu ni c at i o n p or t – C O M1
R S - 4 8 5 C o mm u ni ca t i o n p or t (C O M 3 – o n b o ar d )
The RS-485 Communication port – COM3 is provided by the LOGIC/DISPLAY board.
The RS-485 connection is provided by the LOGIC/DISPLAY cable with three wires as shown
in figure 22
Fi g u r e 2 2 : S er i a l C o mm un i c at i o n N et w or k Co n n ec t io n – R S- 4 8 5 C O M3
18
Chapter 2 Installation
Page 25

U S B C o mm un i c at i on po r t (U S B – o n bo a rd )
The PowerSmart Socket PQM provides a standard full speed USB DEVICE port.
The USB DEVICE port connection is provided by the LOGIC/DISPLAY cable terminated with
a standard USB type A connector as shown in figure 23
Fig u r e 2 3 : U SB c on n e ct i on
Opt i o na l C o mm u ni c at i on po r ts
Wi r e l es s Co m mu n i ca t i on po r t – GS M / GP R S m od u le (C O M 2 –
o p t i o na l m o du l e )
The Wireless Communication port – COM2 is provided by optional module: GSM/GPRS
module.
Before plugging-in the GSM/GPRS module to the meter, insert the SIM card into the SIM
card carrier, then pull the slide to lock the SIM card as shown in figure 24.
1) Push down the SIM carrier slide
2) Insert the SIM card into SIM carrier
3) Push up the SIM carrier slide to lock the SIM card
Fi g u r e 2 4 : G SM / G PR S mo du l e – S IM c ar d a s se m bl y
To install the GSM/GPRS module follow instructions:
1) Remove the plastic cover
2) Remove the body shield
Chapter 3 Communication 19
Page 26

3) Plug-in the module in the COM slot and attach it to bracket using the two
screws
4) Connect the GSM/GPRS antenna cable expander and pass it through the
device base window cables
5) Mount back the body shield
6) Mount back the plastic cover
The GSM/GPRS module is factory or Meter Shop plugged-in at the COM slot
1) Apply power to the meter
2) After one minute the "LNK" GREEN
LED is flashing until it lights "ON"
continuously
3) The "RSSI" ORANGE LED will light
"ON" or blinks, the flashing rate is
proportional to the RF receive level
E T H E R NE T o r MO D E M o pt i o na l m o du l e
The Communication port – COM4 and IRIG-B interface input are provided by optional
modules: ETHERNET and MODEM.
To install the ETHERNET or MODEM module follow instructions:
1) Remove the plastic cover
2) Remove the body shield
3) Plug-in the module in the COM slot and attach it to bracket using the two
screws
4) Connect the ETH or MODEM cable and pass it through the device base window
cables
5) Mount back the body shield
6) Mount back the plastic cover
The ETHERNET or MODEM module is factory or Meter Shop plugged-in at the COM slot
(RSSI), if RF receive level is high then
the led is "ON" continuously, if RF
receive level is poor then the led is
blinking
20
Fi g u re 2 5: E TH E RN E T mo d ul e
Chapter 2 Installation
Page 27

Fi g u r e 2 6 : M OD E M m o du l e
R S - 4 8 5/ 2 3 2 C o mm un i ca t i on po r t ( C O M4 – E T H o r M O DE M
o p t i o na l m o du l e s)
The RS-485/232 Communication port – COM4 is provided by ETH optional module.
Each module with Communication port – COM4, provides two
indication GREEN LEDS:
"RX" GREEN LED, blinking led shows receiving data at COM4
"TX" GREEN LED, blinking led shows sending data at COM4
R S - 4 8 5 m o de
In the RS-485 mode, the 485/232 wire must be left opened as shown in figure 27
Fi g u r e 2 7 : S er i a l C o mm un i c at i o n N et w or k Co n n ec t io n – R S- 4 8 5 C O M4
Chapter 3 Communication 21
Page 28

R S - 2 3 2 m o de
In the RS-232 mode, the 485/232 wire must be tied to GND wire as shown in figure 28
Fig u r e 2 8 : Se r i al C om m un i c at i on C on n ec t i o n – R S -2 3 2 C O M4
IR I G -B
1-ms satellite-synchronized clock from a GPS satellite clock that has an IRIG-B time code
output connected to the IRIG-B input port.
Connect the GPS receiver IRIG-B output to the IRIG-B/GND wires respectively.
E T H E R NE T C o m mu n ic a t io n p o rt ( ET H – o pt i o na l m o d ul e )
The 10/100Base T Ethernet port – ETH is provided by optional module: ETHERNET module.
The ETHERNET Communication port is terminated with RJ45 connector, as shown in
figure 29.
Fig u r e 2 9 : E T HE R NE T co n ne c ti o n
The ETH module provides additionally to COM4 indication
GREEN LEDS, ETHERNET indication leds :
"LNK" GREEN LED/ "ACT" ORANGE LED, when "LNK" is "ON"
continuously and "ACT" is blinking, it shows that the
ETHERNET is active
MO D E M C o m mu n ic a ti o n P S T N p or t (M O DE M – o pt i on a l m o du l e )
The Telephone Line MODEM PSTN port – MODEM is provided by optional module: MODEM
module.
The MODEM Communication port is terminated with RJ11 connector, as shown in
figure 30.
22
Chapter 2 Installation
Page 29

Fig u r e 3 0 : M O DE M c o nn e c ti on
The MODEM module provides additionally to COM4 indication
GREEN LEDS, MODEM indication leds :
"LNK" GREEN LED/ "ACT" ORANGE LED, when "LNK" is "ON"
continuously and "ACT" is blinking, it shows that the MODEM
is active
Auxil i a r y P ower Su p ply
AC/ D C A ux i l ia r y P ow e r S up p ly
The PowerSmart Socket PQM- 120V model only, can be equipped with additional power
supply to redundant the built-in power supply (Auxiliary Power Supply – APS).
To install the APS module follow instructions:
1) Remove the plastic cover
2) Remove the body shield
3) Plug-in the module in the APS slot and attach it to bracket using the two
screws
4) Connect the APS pigtail cable and pass it through the device base window
cables
5) Mount back the body shield
6) Mount back the plastic cover
The APS module is factory or Meter Shop plugged-in at the APS slot
The APS module is connected to an external AC/DC Voltage source with a three-wire pigtail
cable as shown in figure 31, see Appendix: Technical Specifications
Fig u r e 3 1 : A C/ D C A P S m o du l e
Chapter 3 Communication 23
Page 30

The AC/DC APS module provide one indication GREEN LED:
"PWR" GREEN
LED:
is "OFF" if AC/DC APS cable is disconnected or
no power source is applied to it
is "ON" if power is applied to AC/DC APS cable
24
Chapter 2 Installation
Page 31

Chapter 3 Communications
1. Communications
Compu t er Con n ect i ons – R S- 2 32
Fi g u r e 3 2 : R S- 2 3 2 S im p le 3- w i r e C o nn ec t i on , 2 5- p i n o r 9 - p in P C C OM P or t
Compu t er Con n ect i ons – R S- 4 85
Fig u r e 3 3 : R S- 4 8 5 M u lt i d ro p C o n ne c ti o n, 2 5 -p i n o r 9 - p in PC CO M Po rt
Chapter 3 Communication 25
Page 32

Chapter 4 Replacing the Battery
When the battery level drops below the minimum allowed threshold, the LCD graphic display, on
the front of the device, shows: , indicating that the battery should be replaced.
Use the following procedure:
1) Remove the plastic cover
2) Lift the Name-plate where indicated, as shown in figure 28 below
3) Remove the battery by pulling the red ribbon and replace it, insure the proper
polarity, (+) on the top
4) Leave the Name-plate back to cover the battery area
5) Mount back the plastic cover
Fi g u re 3 4: M em o r y B ac k up - L i th i u m B a tt e ry R ep la c e me n t
IMPORTANT
• Use a ½AA lithium 3.6 volts battery.
• In order not to lose data stored in the memory, use Power Software to upload data
(see PowerSmart Socket PQM Operation Manual, Chapter 12) to a PC BEFORE
changing the battery; OR, make sure you replace the battery while the power is ON. If
you replace the battery while power is off, you will lose all data currently stored in the
memory.
26 Chapter 4 Replacing the Battery
Page 33

Appendix: Technical Specifications
(39 optional)
Inputs Ratings
AC Voltage
inputs
Reference voltage
Un 120V up to 277V
L-N (direct)
standard
Reference voltage
Un 57.73V up to
120V L-N (via PT)
optional
Voltage/Current
inputs
Ground input Terminals for wires size According to Socket meter
AC Current inputs 3 (4 optional) Galvanic isolated Inputs
Va, Vb, Vc and Vref - 50/60Hz High input
impedance = 10MΩΩΩΩ
Voltage rating:
120 up to 277 Volts (L-N), 207 to 480 Volts (L-L)
Voltage range
Crest factor >2 [V
Maximum Line to Line voltage 1152 V r.m.s
Temporary over voltage between live conductors and
earth
Transient over voltage between live conductors and
earth (TRM optional module, from 15 µs up to ms)
Starting voltage 0.1%Un
Burden per phase < 0.5 VA
Overload withstand for 1 minute phase-to-ground
(ANSI C12.1 & IEC 62053-22, protective class II)
Rated impulse voltage
(ANSI C12.1 & IEC 62052-11, protective class II)
Voltage rating:
57.73 up to 120 Volts (L-N), 100 to 207 Volts (L-L)
Voltage range
Crest factor >2 [V
Maximum Line to Line voltage 500 V r.m.s
Temporary over voltage between live conductors and
earth
Transient over voltage between live conductors and
earth (TRM optional module, from 15 µs up to ms)
Starting voltage1 0.1%Un
Burden per phase < 0.2 VA
Overload withstand for 1 minute phase-to-ground
(ANSI C12.1 & IEC 62053-22, protective class II)
Rated impulse voltage
(ANSI C12.1 & IEC 62052-11, protective class II)
Terminals for wires size Blades (Socket meter
x 1.2 x 2]
L-N
x 1.2 x 2]
L-N
0 -332 V r.m.s,
peak up 665V (for PQ)
1500 V r.m.s
6 kV peak, 2kV
measurement
4000V r.m.s
6000V peak
0 -144 V r.m.s,
peak up 288V (for PQ)
240 V r.m.s
1.5 kV peak
4000V r.m.s
6000V peak
standard – C12.10)
standard – C12.10
Reference Current
Basic model In = 5
A
(TA = 2.5A)
Current class Imax 10A & 20A
Maximum measurable short circuit current (Isc) 10 x In
Burden per phase (In = 5 A) < 0.2 VA
Starting current (I1, I2, I3) – average
Starting current (I1, I2, I3) – real time
Over current withstand for 1 s non-recurring 50 x In
Isolation 4000V r.m.s
Terminals for wires size Blades (Socket meter
3 (4 optional) Galvanic isolated Inputs FORM 9
0.2% In
1.0% In
standard – C12.10)
1
Starting voltage, interruptions and dips measurement applicable only with installed APS
Appendix: Technical Specifications 27
Page 34

28
Power Supply
Power supply Supplied from Monitored Voltage inputs
480V model
standard
(direct)
120 V model optional
(via PT)
Auxiliary AC/DC Power supply1
AC/DC
Optional module
Three Phase PS, Rated Inputs (L-N) 50/60 Hz 120 – 277V AC ± 20%
Operating voltage range 96 – 550V AC
Insulation Dielectric withstand 2500V AC @ 1mn
Operating Temperature range -40ºC to + 75ºC
Output voltage +12V DC ± 5%
Burden per phase 6VA
Three Phase PS, Rated Inputs 50/60 Hz 57.73 – 120V AC ± 20%
Operating voltage range 47 – 250V AC
Insulation Dielectric withstand 2500V AC @ 1mn
Operating Temperature range -40ºC to + 75ºC
Output voltage +12V DC ± 5%
Burden per phase (w/o AUX. PS)
Burden per phase (w. AUX. PS)
Operating Temperature range -40ºC to + 75ºC
Rated Input, 0-400 Hz 50-288V AC, 90-290V DC
Isolation 2500V AC @ 1mn
Output voltage +12V DC ± 5%
6VA
<0.1VA
Burden 6VA
Terminals for wires size 3 x 2.5 mm2 pig-tail cable
Battery for RTC
and SRAM
Total reserve capacity shall be not less than 2000h –
More than 10 years service battery life (According to AS
Minimum operation reserve 48 h. – if no use of battery
(According to AS 1284.7/IEC 1038)
with use of battery. (According to AS 1284.7/IEC 1038)
1284.7/IEC 1038)
Input/Output ports
Fast Status input Digital Input optically isolated
2DI basic
8DI
Optional module2
RELAY OUTPUT
Relay Output - KYZ
basic
Dry contacts, internally wetted 24V DC
Resistance of open contact sensing > 1Mohm
Resistance of closed contact sensing < 100 Ohm
Sampling rate 1 ms
Insulation Dielectric withstand 2500V AC @ 1mn
Terminals for wires size 10 x 2.5 mm2 cable
Digital output – SSR optically isolated 1
1 relay (Form C) 0.5A @ 250V AC/DC
Operation time
Release time
Insulation Dielectric withstand 2500V AC @ 1mn
1 ms
1 ms
Up to 3 years
1
Available in 120V model option only
2
Factory/Meter shop installable
Appendix: Technical Specifications
Page 35

Terminals for wires size Blades (Socket meter standard –
Relay Output Digital output – combined SSR + EMR 4 x FORM C + 2 x FORM A
C12.10)
6RO
Optional module1
Analog Outputs Analog output galvanic isolated 4
4AO
Optional module1
SSR – 4 relays (FORM C) 0.15A @ 250V AC/DC
Operation time
Release time
Insulation Dielectric withstand 2500V AC @ 1mn
EMR – 2 relays (FORM A), ½ cycle operation
Operation time
Release time
Insulation resistance of open contacts > 2 MΩ or 1000V @ 1mn
Insulation Dielectric withstand 2500V AC @ 1mn
Terminals for wires size 16 x 2.5 mm2 cable
Type of Outputs
Non-linearity 0.2%
Load for 20 mA <510 Ω
Accuracy 0.5%
Power supply Internal
Insulation Dielectric withstand 2500V AC @ 1mn
Terminals for wires size 5 x 2.5 mm2 cable
1 ms
1 ms
5A @ 250V AC
5-7 ms + ½ cycle
5-7 ms + ½ cycle
4-20 mA default
0-20 mA option
0-1 mA (2mA max.) option
± 1 mA (±2mA max.)option
1
Factory/Meter shop installable
Appendix: Technical Specifications 29
Page 36

30
Communication ports
COM1 Built-in Infra Red communication port DISPLAY unit
IR port
Basic
COM2 Plug-in modules isolated communication port
GSM/GPRS
MODEM
Optional module
COM3 Built-in serial communication port
basic
COM4
ETH-TX
MODEM
Optional module1
10/100Base-T
ETH-TX
Optional module1
USB – FS device
basic
1
Factory/Meter shop installable
RS232 communication, TTL level, max baud rate 19.2 kb/s
Protocols MODBUS RTU/ASCII and DNP3.0
Optically isolated 2500V AC @ 1mn
Optical port per ANSI C12.18 Type 2
RS232 communication, TTL level, max baud rate 115.2 kb/s
1
Isolation 2500V AC @ 1mn
GSM/GPRS module Quad Band GPRS class10
Antenna connection Coax cable terminated with SMA
Protocols MODBUS/TCP or DNP3.0/TCP
MODEM module Telephone Line according to FCCp.68
Line connection RJ11
Protocols MODBUS/RTU, MODBUS/TCP or
RS-485 isolated 115.2 kb/s
Isolation 2500V AC @ 1mn
Protocols MASTER/SLAVE MODBUS RTU/ASCII
Terminals for wires size 2 x 2.5 mm2 shielded twisted cable
Plug-in modules isolated communication port
Versatile RS-232/RS-485
Max. Baud rate 115.2 kb/s
Isolation 2500V AC @ 1mn
Protocols MODBUS RTU/ASCII and DNP3.0
Terminals for wires size 5 x 2.5 mm2 shielded twisted cable
Plug-in modules network communication port
Wired LAN communication port with autonegotiation
Ethernet port Baud rate 10/100 Mb/s
Protocols MODBUS/TCP or DNP3.0/TCP
ETH port Isolation 2500V AC @ 1mn
ETH connector ETH cable terminated with Standard
Communication port Basic
USB communication port Full speed Device
USB port Baud rate 12 Mb/s
Protocols MODBUS RTU/ASCII and DNP3.0
connector
and TBR21
DNP3.0, DNP3.0/TCP
and DNP3.0
IEEE 802.3
protocols and IEC 61850-8-1, up to
five non-intrusive simultaneous
connections, Telnet service port
RJ-45 connector
Appendix: Technical Specifications
Page 37

USB connector Cable terminated with USB type A
IRIG-B
ETH-TX
MODEM
Optional module1
Input Isolation 2500V AC @ 1mn
Time code signal Demodulated (pulse-width coded)
Signal Level Unbalanced 5V
Terminals for wires size 2 x 2.5 mm2 twisted cable
Recommended cable 51Ohm low loss - RG58A/U (Belden
8219 or equivalent), TNC connector
Recommended GPS time code generator Masterclock GPS-200A
Console Display Unit
Display Panel
Display
LEDs Energy LED Pulsing 2 x RED (WATT & VAR)
Communication IR port, COM1 ANSI C12.18
Navigator buttons
LCD graphic bright display Multiple screens display
Resolution 340 x 220 dots
Size 4'
Operational temperature -20°C to + 70°C
Backlit LCD display screen Timeout operation
Accessible Buttons – SCROLL,
SELECT/ENTER
Sealed Button – DEMAND RESET 1
Under cover Button – TEST mode 1
2
Real Time Clock
5 ppm Accuracy @ 25°C
RTC backup data retention 5 years
2.7 minute / year
Log Memory
Non-volatile memory
(20years Data retention)
For energy and tariff registers logging,
EV-PQ-DATA-WV log
16 MB
Environmental Conditions
Operational temperature -40 ºC to 75 ºC
Optional LCD Operational temperature -20 ºC to 70 ºC
Storage temperature -40 ºC to 85 ºC
Humidity 0 to 95% non-condensing
Construction
Enclosure
With sealing cover
Socket Meter base enclosure ANSI C12.10 for electronic meter
Size:
Weight 4 lb
Mounting ANSI C12.10 – FORM 9S/9A
∅ 6" x L 7" x base ∅ 7"
Standards Compliance
EMC ANSI C12.1 Reference: IEC 61000
1
Factory/Meter shop installable
Appendix: Technical Specifications 31
Page 38

32
Immunity
Surge – IEEE C62.41.2-2002
100kHz ring wave
1.2/50 µs – 8/20 µs
Magnetic field – ANSI C12.1
6kV / 0.5kA
6kV / 3kA
FTB – IEC 61000-4-4, level 4 4kV – measuring inputs
SWC – IEEE C37.90.1 2.5kV – measuring inputs, I/O an
Electromagnetic RF Fields – ANSI C12.1 20V/m @ 200kHz – 10GHz
ESD - IEC61000-4-2 15KV – air
Emission Radiated / Conducted - FCC/CFR 47 p.15 Class B
ANSI C12.1 Safety
Insulation, ANSI C12.1 2.5 KV r.m.s. @ 1mn
Environment
Measurements
and Accuracy
Power Quality
Mechanical Shock - IEC 60068-2-27 :1987 / ANSI
C12.1: 2008
Mechanical Vibration - IEC 60068-2-6 :1987 /
ANSI C12.1: 2008
Transportation drop and vibration – ISTA 1A /
ANSI C12.1
Operational temperature – ANSI C12.1 -40 ºC to 75 ºC
Storage temperature – ANSI C12.1 -40 ºC to 85 ºC
Humidity – ANSI C12.1
ANSI C12.1
Active Energy measurement - ANSI C12.20 class
10/20
PQ methods – IEC 61000-4-30 Class A
Harmonics & Interharmonics measurements – IEC
61000-4-7
Flicker measurements – IEC 61000-4-15 Class I
Report – EN50160
2kV – I/O and com.
com.
15g @ 11ms
0.5g @ 30-350 Hz
Class 0.2S
Class I
Appendix: Technical Specifications
Page 39

Measurement Specifications
Input Range
Voltage V1-V3
(L-n)
Voltage V1-V3
(L-n)
Voltage V1-V3
(L-n)
Line current I1- I3 CT primary current ±0.06 ±0.06 1% up to 200%In 0 up to 20,000 A
Line current I1- I3 CT primary current ±0.1 ±0.06 200% up to 400% 0 up to 20,000 A
Line Fault current
I1- I3
Active power
Reactive power
Apparent power
Power factor 1.000 ±0.2 |PF| ≥ 0.5, I ≥ 2% FSI -0.999 to +1.000
Total Harmonic
Distortion, THD
V (I), %Vf (%If)
Total Demand
Distortion, TDD, %
Active energy
Import & Export
Reactive energy
Import & Export
Apparent energy Class 0.2 under conditions as per IEC 62053-
Symmetrical
components
Phasor angles ±1 degree
*
@ 80% to 120% of voltage FS, 2% to 200% of current FS, and frequency 50/60 Hz
PT - external potential transformer ratio
CT - primary current rating of external current transformer
FSV - voltage full scale
FSI - current full scale
Vf - fundamental voltage
If - fundamental current
NOTES
1. Accuracy is expressed as ± (percentage of reading + percentage of full scale) ± 1 digit. This does not
include inaccuracies introduced by the user's potential and current transformers. Accuracy calculated at
1second average.
2. Specifications assume: voltage and current waveforms with THD ≤ 5% for kvar, kVA and PF, and
reference operating temperature 20°C - 26°C.
3. Measurement error is typically less than the maximum error indicated
277 x PT ratio
@ 277V
120 x PT ratio @
120V
69 x PT ratio ±0.05
CT primary current ±1.0 - 400%- 1000% In 0 up to 100,000 A
3xV FS×CT/1000
3xV FS×CT/1000
3xV FS×CT/1000
50 Hz - ±0.02 40-65 Hz 40.00 up to 64.99 Hz Frequency
60 Hz - ±0.02 45- 70 Hz 45.00 up to 69.99 Hz
999.9 ±1.5 ±0.1
100 ±1.5
ANSI C12.20, Class 10/20, Acc. Class 0.2 0 to 999,999.999 MWh
Class 0.5Sunder conditions as per IEC 62053-
Voltage FS
Current FS
Current FS
Accuracy Parameter Full Scale @
%
Reading % FS Conditions
±0.05 ±0.1 1% up to 120% 0 up to 999,000 V
±0.05 ±0.1 1% up to 140% 0 up to 999,000 V
±0.2 ±0.02
±0.3 ±0.04
±0.2 ±0.02
23:2003
22:2003
±1.0
±1.0
±3.0
±0.1 1% up to 140% 0 up to 999,000 V
|PF| ≥ 0.5 *
|PF| ≤ 0.9 *
|PF| ≥ 0.5 *
THD ≥ 1%,
V (I) ≥ 10% FSV (FSI)
TDD ≥ 1%,
I ≥ 10% FSI
10% - 120% FS
10% - 400% FS
200% - 1000%FS
Range
-10,000,000 kW to
+10,000,000 kW
-10,000,000 kvar to
+10,000,000 kvar
0 to 10,000,000 kVA
0 to 999.9
0 to 100
0 to 999,999.999 Mvarh
0 to 999,999.999 MVAh
Appendix: Technical Specifications 33
Page 40

34
Appendix: Technical Specifications
 Loading...