

Page 1

Page 2

2
Page 3

CONTENTS
1. Safety precautions 4
2. Overview of the phone 6
3. Getting started 8
4. Brief description of the phone functions 14
5. Description of the basic operations 27
6. Overview of the available functions from the Main menu 32
7. Accessories 71
8. Common faults 74
9. Technical specifications 76
Contents of the packaging
Phone, Battery, Travel Charger, Data cable, User Guide, Second B attery (Optional Accessory), Battery
Charging Stand (Optional Accessory), Headset (Optional Accessory), St ylus (Optional Accessory), Case
(Optional Accessory)
3
User Guide
Page 4

1. Safety precautions
Please read the following instructions before using your mobile phone to ensure safe and efficient use.
Do not use near chemical plants, petrol stations, flammable liquid storage or similar areas where an
electrical discharge may cause fire.
Keep the phone out of reach of children.
Use the hands free kit for calls while driving. DO NOT USE the phone while driving at high speeds.
Do not use the phone in an aircraft. Check if the function of the automatic switch on is switched off or
if the SIM card is switched off before boarding an aircraft.
Do not use in hospitals or health care facilities. It may interfere with medical devices and endanger
the health of patients. It may interfere with the function of medical devices, especially pacemakers,
hearing aids or similar electronic devices.
Always keep the device more that 20 cm from the pacemaker when the phone is turned on. While
calling, hold the device to ear opposite the pacemaker to minimize the potential for interference.
Non-original devices used in connection with the phone are not covered by the warranty.
Do not tamper with the device in any way. Should this product fail to operate properly, please contact
our authorized service.
Do not charge the phone without a battery. Please switch off the phone before removing the battery.
The data saved in the memory may be damaged.
Charge the phone in areas with sufficient air circulation, away from explosives and highly flammable
materials.
Keep away from objects sensitive to magnetic fields, e.g. credit cards.
4
Page 5

Your phone is not water-resistant. Keep it dry.
Do not use the phone in areas with extreme temperatures. Keep away from direct sunlight or areas
with high humidity.
Do not use a wet cloth or strong detergents to clean the surface of the phone.
Your phone enables you to record photos and sounds. Use these functions according to the general
regulations and restrictions. Taking photos and recording sounds without approval can be penalized
by law or regulations.
Protect the device from dropping or knocking. This type of handling can damage the surface and
technical components inside.
Dispose of used batteries according to guidelines and instructions for the safe disposal of this kind of
waste
Notice:
Our company does not assume any responsibility for any loss and damage relating to this device if not used in accordance with the
above-mentioned recommendations. With regards to ongoing device development and improvements, the text of this User Guide
can be modified. Our company reserves the right to make changes in the text of this User guide without prior notice.
5
Page 6
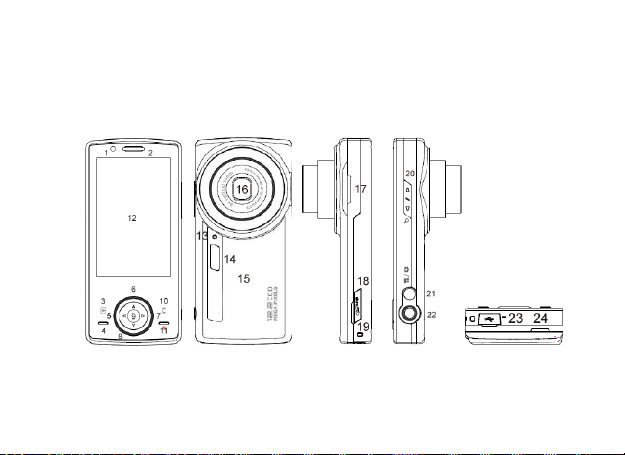
2. Overview of the phone
The device has 11 keys, touch screen, ambient light sensor, slot for memory c ard ( microSD), USB port and
12.2 Mpix CCD image area sensor.
Overview of the phone:
6
Page 7

1. Light sensor 13. LED Indicator
2. Loudspeaker 14. Xenon flash
3. Play key 15. Back cover
4. Call key 16. Camera lens
5. Left key 17. Loudspeaker
6. Up key 18. microSD memory card slot
7. Right key 19. Eyelet for strap
8. Down key 20. Volume/Zoom button
9. “OK” key 21. Camera/Video Recorder button
10. “C” key 22. Shutter button
11. End Call/Power On key 23. USB connector (for PC, Headset, Charger, TV-OUT)
12. LCD Touch screen 24. Groove for finger pick (to open up the battery cover)
Note: Do not press the LCD display forcibly. Doing this may cause irreversible damage! Use only tender touch, the display is
sensitive enough.
7
Page 8

3. Getting started
Installing the SIM card, battery and memory card
If you want to fully use the phone, you h ave t o insert the card of your mobile operator, the batter y and the
storage card a s optional accessory. With the memory card, you enlarge th e basic memory of the d evice and
then you can take pictures and make videos of high quality (and size). Protect the SIM card and the memory
card from bending or scratches. Protect them from stat ic electricity, dust or water. I f you lose your card,
immediately contact your mobile operator with a request for help.
Switch off the phone before inserting the SIM card. Insert the SIM card from the backside of the device, the
memory card from the side of the phone.
Make sure t he phone is turned off before you remove the battery pack. Do not r emove the battery when the
phone is switched on, as this may damage the phone.
You can insert and remove the memory card when the phone is switched on. Even though, when you need to
remove th e storage card while the phone is on, it is recommended that you switch off the phone to avoid
unexpected card damage.
Note: The SIM card and the microSD card are small objects. Keep it out of the reach of children. If swallowed, it can cause injury or
serious health-problems.
8
Page 9
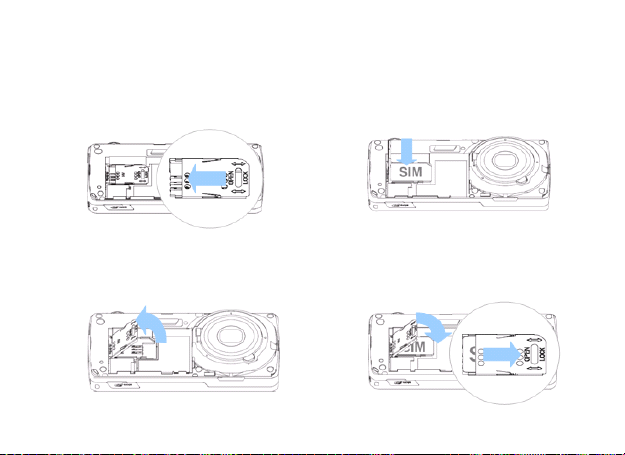
Insert the SIM card:
1. Remove the back cover and follow the arrow 3. Insert the SIM card into the card socket.
when sliding the lid of the SIM card holder. Ensure the chamfered corner is in the correct
position.
2. When lifting up the lid of the SIM card holder, follow the arrow. 4. Push down the lid of the SIM card holder.
9
Slide the lid in the arrow direction and get it
be locked.
Page 10
Insert and remove the battery:
1. Align the copper contacts of the battery 3. Make sure the phone is turned off.
with the battery contact pins inside the Locate the battery grip at the top edge of the
battery compartment. battery compartment.
2. Insert the contact side of the battery first and 4. Follow the arrow when lifting the battery
then gently push the battery into the battery from the finger groove to remove it.
compartment.
10
Page 11
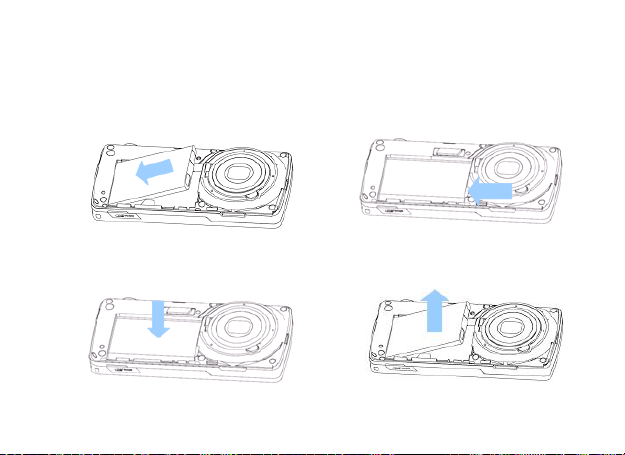
Insert and remove the memory card:
1. Pull out the cap for the memory card from the cabinet. 3. Pull out the cap for the memory card from
2. Insert the memory card into the cabinet with 4. Remove the memory card form the
it`s gold contacts facing up. cabinet.
the cabinet. Press the card towards the
cabinet to release the card from the lock
inside.
11
Page 12

PIN for the SIM card
PIN: It is a personal identification code which helps protect your SIM card against unauthorized use. If the card
protection with the PIN code is acti vated, the text “Input PIN” appears on the display after switch on th e phone
module. When you enter the PIN, the star character (“*“) a ppears on the display. You get the PIN from th e
mobile operator.
PIN2: It is a personal identification code which is required for so me special functions, e.g. charges in the
mobile operator network, etc.
PUK and PUK2 (8 digits):
If the P IN code is blocked (e.g. if t he code was entered incorrectly se veral times), it is required to change the
PIN code. In this case it i s required to enter the PUK code. The PUK2 code is required to change the PIN2
code. If the codes are not supplied with your SIM card, contact the local service of your mobile operator for the
codes
Warning: If the PIN is entered incorrectly three times, the SIM card is automatically blocked. Contact your mobile operator for
help. In case you incorrectly unlock the SIM card, the card may be permanently damaged.
Charging the battery
The new battery achieves its optimal capacit y after a few full charge and discharge cycles. Charge only, if the
battery is completely discharged. Overcharging may shorten its lifetime. Remove the plastic cover and connect
the charger to the connector at the bottom. When fully charged, unplug the charger from the wall plug and then
disconnect from the phone. W hen charging, the c harging indicator appears on the display. When the charging
12
Page 13

process is finished, the charging animation stops.
The battery warms up during the charging process. This is a normal effect. Do not remove the battery from the
phone while you are charging it using an adapter.
Use of the battery
The operating time of the batter y is influenced by several factors, e.g. configuration of wireless network, signal
strength, normal temperature of the mobile phone, used functions, settings, accessories, or mode of audio and
data services or other services.
You achieve the optimal duration of operating activity with the fully charged battery if you follow these
instructions:
New or older batteries which were not used for a prolonged period need relatively longer time till they
are fully charged.
During the charging process, the te mperature of the battery should be at room temperature or a little
bit higher.
It is normal that the longer the operating time, the longer the charging time. If the operating time after
a full recharge is reduced and the time needed for a full recharge increases, it is probably necessar y
to buy a new original battery. Use of improper accessories with the phone may cause not only
damage to the device, but also to your health.
If the battery has not been used for a prolonged period, it can take some ti me until current data
appears on the display.
13
Page 14

Note: To ensure your safety and to protect the environment, please dispose of old batteries as permitted by law. Any short-circuit in
the device or battery may cause explosion, fire, or injury
4. Brief description of phone functions
Keypad lock
The device can be locked manually or after set time. To unlock it, follow the information on the display.
Volume/Zoom button
During a call, use the Volume button to adjust the volume, or in the Camera mode, it can be used for zoom
in/out.
Shutter button
It is used in Camera mode. Half Press: focus, Full Press: take a picture; or in Video recording mode, start/stop
recording. Used to start or stop voice memo.
Camera/Video Recorder button
It is used to switch take a picture and video shooting in Camera mode.
Play key
It is used to activate photos and videos playback.
14
Page 15

“C” key
It is used to clear characters when editing text or numbers; and to clear documents or other entities in lists
both in phone mode and camera mode. The “C” key is not used for back stepping or exiting.
Call key
It is used to make phone call from the SIM card (after dialing phone number or if the phone number is saved in
the contact list). With this key, you can also pick up incoming phone calls. After pressing this key in the standby
mode of the device, the Dial screen displays.
End Call/Power On key
To end a call, to stepping back to the standby screen and to switch on or off the phone.
Left/Up/Right/Down/OK key
In the standby mode, the navigation key can be used to switch the standby screen mode or display.
Left: to change the standby screen mode (to switch between clock mode, wallpaper and application
icons).
Up: in the same standby screen mode, to change the display appearance (to switch between the
analog clock and digital clock).
Right: to change the standby screen mode (to switch between clock mode, wallpaper and application
icons).
Down: in the same standby screen mode, to change the display appearance (to switch between the
15
Page 16

analog clock and digital clock)
OK: to enter in the Main Menu
The Up key, Down key, Left key and Right key can be used to move cursors for menu option selection or
message writing.
Note: If you press the Call key and then press and hold the “1“ key in t he standby mode, your voice mailbox number in the centre
of voice messages will be called. It is usually used as a speed dialing number. The number of the centre of voice messages is
entered in the phone according to the particular mobile operator.
When you press the Call key and then press and hold in the standby mode the “*”, the “P”,“+”,“W”or “*”characters will be input. The
“P”and “W”characters are used for simplification of calls through Direct Dial-In. The “+”character is used for international calls.
The “W” and “P”characters are different. The “P” character sends a DTMF signal after a 3 second period, but the “W” character
shows a display with a question, if the user wants to send DTMF signal.
Indicators on the display
Indicator Description
Vertical bars indicate the signal strength of the GSM network signal. Five bars indicate
the full signal.
Vertical bars indicate the energy capacity of the rechargeable battery pack. Five bars
indicate that your current battery has the full energy capacity.
Indicates that EDGE service is available.
Indicates that GPRS service is available.
Roaming.
16
Page 17

The phone is in the Silent mode.
The phone is in the Vibration mode.
The headset is connected to your phone.
The Alarm function is activated.
The Bluetooth function is activated.
Missed call.
Call Divert function is activated.
Unread new SMS.
Unread new MMS.
Unread new e-mail.
Unread new PUSH message.
E-Cult MP3 Player is playing in the background.
FM radio is playing in the background.
17
Page 18

Icons on the standby screen
Icon Description
Click to activate the Dial function
Click to activate the Phonebook function
Click to activate the Call function
Click to activate the Camera function
Click to activate the Flexaret (photo) function
Click to activate the Profile function
Click to activate the Album function
Click to activate the Sharing function
Click to activate the Messages function.
18
Page 19
Click to activate the SMS function
Click to activate the Settings function
Click to activate the MMS function
Click to activate the Email function
Click to activate the Recent Contacts function
Click to activate the Networks function
Click to activate the Explorer function
Click to activate the E-Cult (MP3 Player) function
Click to activate the Video function
Click to activate the Sound Rec. function
19
Page 20

Click to activate the Radio function.
Click to activate the Calendar function
Click to activate the Tasks function
Click to activate the Calculator function
Click to activate the Alarm function
Click to activate the Clock function
Click to activate the Java function
Customizing the Standby screen
You are allowed to customize the standby screen on your preference. You can combine the standby mode with
the clock mode, wallpaper or application icon mode and you can change screens with application icons. .
In the Standby Mode, use your finger to swipe of slide horizontally across the top of the screen to
switch. You can use the Left and Right key to make switches as well.
20
Page 21

In the Standby Mode, use your finger to swipe of slide horizontally across the middle part of the
screen to switch the application icon pages.
To arrange the application icons in the standby mode
You are allowed to arrange icons on the screen on your preference.
In the Standby Mode, touch and hold on the application icon until the Movement Mode of the
selected icon is activated. When this mode is activated, the icon will be enlarged.
When the movement mode of a selected icon is activated, keep touching on the enlarged icon and
drag it to the desire location and release you finger from the screen. The phone will align the
application icons automatically in a proper way.
Note: In the Standby Mode, there are two types of the alignment of appl ication icons on the screen: 3x3 a lignment and 2X3
alignment. The default alignment type is 3X3. You could change the alignment type in the Application Icon Management mode.
Clock mode
In the clock mode, use your finger to swipe of s lide vertically across the top of th e screen where the digital
clock or the analog clock is displayed. You can also use the Up and Down key to switch between them.
Wallpaper mode
You are allowed to change wallpaper on your preference.
In the wallpaper mode, use your finger to swipe of slide vertically across the top part of t he screen
21
Page 22

where the wallpaper is displayed. You can use the Up and Down key to make switches as well.
In the wallpaper mode, use your finger to swipe of slide horizontally across the top part of t he screen
to select the desire w allpaper. You can use the Left and Right key to select photo as well. To add
wallpaper, swipe across the “+” icon and select new picture.
When a picture is selected, click on the selected p icture or press the “OK ” key to confirm your
selection. The wallpaper will be changed to the one selected.
Note: You can choose from12 wallpaper.
Application icon management mode
You are allowed to change icons and their order on the screen on your preference.
In the Application icon Management mode, use your finger to swi pe of slide vertically across the top
part of the screen. You can use the Up and Down key to make switches as well.
To select the required icon, use your f inger to swipe of slide horizontally across the top part of the
screen. You can also use the Left and Right key.
To position the selected icon on the screen, touch and hold on the icon until the movement mode is
activated. When this mode is activated, the icon will be enlarged.
When the movement mode of a selected icon is activated, keep to uching on the enlarged icon a nd
drag it to the desire location on the screen and release you finger from the screen. The phone wi ll
align the application icons automatically in a proper way.
To remove the icons from the screen into application icons, repeat two last steps but in the opposite
22
Page 23

way.
Click on the alignment type icon (first one) to change the alignment of icons from 3x3 to 2x3.
Note: On the standby screen mode, there are in total up to 18 application icons displayed. When the screen is full of icons, you are
not able to add one more icon. You are not allowed to add the Alignment type icon to the screen and to remove the Dial icon from the
screen.
Using the Main menu
In the standby mode, press the “OK” key to get into the Main menu. In the Main Menu, all the functions are
categorized into four categories: Setting & Tools, Phone, Entertainment, and Internet. In the menu, you can
use these keys:
Use the Left, Up, Right, Down and OK keys to view the particular functions.
Click on the [Back] key at the right bottom corner on the screen or press the End Call/Power On key
to go back to the standby screen.
Press the “OK” key to select function in the Main menu or click on the [Select] key at the left bottom
corner on the screen.
To change the category, click on the particular bookmark.
Click on the function icon to select function.
23
Page 24
Description of icons in the Main menu
Icon Function Functionalities/Applications
Links
Settings
Organizer
Tools
Phonebook
Call center
24
Phone setup
Personalize setup
Network setup
Security setup
System info
Calendar
Tasks
Alarm
World clock
Calculator
Stopwatch
Ebook reader
Family
Business
Friends
VIP
Others
All calls
Call settings
Call cost
Page 25

Advance settings
Write message
Messages
Recent contact
Flexaret
Multimedia
Java
File manager
Services
Messages
Chat
Email
Voicemail server
Flexaret (photo)
Camera
Album
Photo editor
E-Cult (MP3 Player)
Video player
Sound recorder
FM radio
Java
Java settings
Java default security
Phone
Memory card
SIM Toolkit
Internet
Data account
25
Page 26
Networks
Media Sharing
Phone
GPRS
Bluetooth
26
Page 27

5. Description of basic operations
Switching the device on
To switch the device on, press and hold the End Call/Power On key. On the display, there appears a question,
if you want to activate th e phone module. If you want to use only multimedia functions (Camera, Video
recorder, MP3 Player) answer “No”. If you answer “Yes”, the phone will be act ivated. If the SIM card and the
phone are not protected by a password, th e sta ndby screen displays and the automatic search for a signal
starts. Then the phone registers in the mobile network w ith t he operator’s name or code display. I f the text
“Insert the SIM card!” appears on the display, switch the phone off and check if the SIM card was inserted in
the correct way. After you insert the SIM card, the phon e checks the possibility of its use and displays the texts
in following chronology:
1.“Input phone lock code“ – in the case that the protection of the phone is setup (predefined code is 0000).
2. “Input PIN“ – in the case that the protection with PIN code for SIM1 is setup.
3. “No ser vice“ – information about an unsuccessful attempt to register in the network. Only emergency calls
with the phone number 112 or other numbers are available.
4. “SOS“ – the phone is registered in the network of another operator; you can only call the phone number 112
or the number of another emergency service.
5. “Search“ – search for an appropriate mobile network
Note: If you forgot the PIN code of the SIM card, contact your mobile operator.
27
Page 28

Switching the device off
To switch the phone off, press and hold the End Call/Power On ke y until the display is turned off. Never switch
the device off by removing the battery. Doing this may cause damage to the SIM card and/or the phone.
Calls
Local calls
The easiest way to make a call is to click on the Dial icon and enter the phone number on the
keypad and then press the Ca ll key. If you want to modify the entered phone number, press the “C”
key or use the appropriate icon. The entered c haracter will be deleted and you can replace it with
another. After the call was connected, the information about the calling process and the call duration
appears on the display.
To terminate the call, press the End Call/Power On key.
Phone number dialing for local calls: You can enter only a 9-digit number or before th is number, also
a country dialing code (e.g. +420 for CZ).
International calls
To make an international call, press repeatedl y the “*“ke y until the “+“character for the international
calls is displayed. Then enter a country dialing code (e.g. +49 for Germany).
After you enter a country dialing code, enter the whole phone number in an international form.
Calling process: “+“country dialing code + the whole phone number with the prefix of the region and
the Call key.
28
Page 29

Calling a line in a Private Branch Exchange
To call some phone nu mbers, you may have to dial a phone number of a Pr ivate Branch E xchange
and then the number of the particular line. In this case, enter the phone number of a Private B ranch
Exchange, enter a gap (by holding the “*“key – on the display there appears the “P“character) and
then enter the number of the particular line. The phone dials the first part of the entered number until
the “P“ character and after a 3-second pause, finishes the call by dialing the number of the particular
line.
Calling procedure to a fixed phone line: ent er the phone number + “P“ + the number of the line a nd
the Call key.
Calling a number from phone book
Find the phone number you want to call in the phone book and press the Call key.
Recall the last dialed phone number
Go to the Main menu and click on [Phone] > [Call log] or in the standby scre en, click on the Dial icon
and click on the left lower icon. Find the phone number you want to call i n the log and press the call
key.
Emergency call: In every country with the GSM network and in a place with signal coverage (you can check the strength of the
receiving signal in the left corner of the display); you shall have the possibility to make emergency calls free of charge. If your mobile
operator does not offer roaming services in the particular country, the text “SOS“ – restriction of calls, only emergency calls possible appears on the display. This service is available in the places with signal coverage of any mobile operator and you can also use it in
the case the phone is without any SIM card. The phone number 112 is usually used in many coun tries for emergency calls
regardless of the mobile operator. Before you travel abroad, ask your home mobile operator and check the emergency phone
number and its availability!
29
Page 30

Adjusting the volume
To adjust the volume during a call, press the Volume/Zoom button.
Answering a call
If you are called by someone, the phone can announce it in different ways which depend on the settings of
active ringing profile.
To answer a call, press the Call key.
To reject a call, press the key “Reject” or press the End Call/Power On key.
If you do not want to reject a call, but you want to stop the ringing, click on the very right key on the screen or if
the option [Advance setting] > [Flip to mute] is activated, you can stop the ringing by turning the phone with the
display facing to a table.
If the called person has activated the program of caller identification, his phone number appears on the
display. If you s aved this phone number in list of contacts, the caller name appears instead of the p hone
number
Speed display of messages
To quickly display messages on the standby screen, click on the key “View”.
Speed display of missed calls
To quickly display the list of missed calls, press the “View” key
30
Page 31

Speed dialing
Your phone enables you to define 8 speed dialing options. Each of them represents one p hone number (more
information in the part “Phonebook”). Whenever you want to use one of these speed dialing options, click on
the Dial icon and press and hold one of the 2-9 key. The “1”key is reserved for calls to the voice mailbox. F irst
you have to set it up.
DTMF signal sending
If you activate the function of DTMF signal sending while calling, the entered digits and “*“and “#“characters
will be sent with DTMF signal. If this function is not activated, it is not possible to call the intern line with Direct
Dial-In.
Voice mailbox calls
Your phone enables you to divert your incoming calls to the voice mailbox. You receive a message after the
message of the c aller has been saved. (To use this s ervice, first enter the number of the voice messages
centre.)
31
Page 32

6. Overview of the available functions from the Main menu
Settings & Tools
Homepage shortcuts
To configure th e application i cons. You can activate the same function when you go to application icon mode
on the standby screen.
Phone Setup
Time and date
Auto update of date and time – when activated and supported b y the operator, the date and time is
automatically updated when the phone is switched on and logged in the network.
Set home city – select the town or region where you are.
Set time/date – to set up the time and date manually or if the option [Auto update of date and time] is
switched off.
Set format – to set up the format of the time and date.
Update time with time zone – when activated, the setting of [Set home city] is also taken into
account.
Language
English – to set up English as the language of the phone menu.
Deutsch – to set up German as the language of the phone menu.
32
Page 33

Čeština – to set up Czech as the language of the phone menu.
Writing language
English – to set English characters for writing.
Deutsch – to set German characters for writing.
Čeština – to set Czech characters for writing.
Font size
Small – to set up the small font size in the phone menu.
Medium – to set up the meium font size in the phone menu.
Large – to set up the large font size in the phone menu.
Screen alignment
To align th e coordinates of the touch screen. It is recommended in cases when the touch commands are not
exact or the response of the LCD display false. To align the coordinates with the delivered stylus.
Schedule power on/off
This function allows you set up 4 sets of scheduled power on/off time.
Advance setting
Touch feedback – when activated, the phone vibrates every time when you touch the screen.
33
Page 34

Flip to mute – wh en activated, you can mute the r inging of an inco ming call by flipping the p hone
180° with the display facing to a desk.
Personalize Setup
User profiles
Normal – a normal ringing profile which you can edit on your preference.
Silent – a ringing profile which does not vibrate, beep or ring.
Vibration – a ringing profile which rings only.
Outdoor – a ringing profile which is set to maximum.
Headset – a ringing profile which is activated only with the connected headset.
Bluetooth – a ringing profile which is automatically activated only with the connected Bluetooth
headset.
Themes
Theme 1 – first theme. The background of the theme can be changed by Left and Right key.
Theme 2 – second theme. The background of the theme can be changed by Left and Right key.
Homepage photo
Image 1 – first picture of the image on the standby screen.
Image 2 – second picture of the image on the standby screen.
Image 3 – third picture of the image on the standby screen.
34
Page 35

Image 4 – Image 12 – you can add other image pictures.
Greeting text
When activated, this text is displayed when you switch the phone on.
Display Setting
Brightness – to adjust the brightness of your display. When the [Auto adjust] is activated, the
brightness of your display will be adjust by an ambient light sensor which is on the front of the phone.
Idle time (sec.) – time in seconds, after that the device will automatically turn off the screen backlight
and lock th e keypad. If the automatic lock is not activated, it is the ti me, after that the display goes
out and than turns off.
Auto Lock – If activated, the keypad is locked at the time set in the item above.
Lock image – you could choose with the option [Select] your personal picture which displays when
the keypad locks. You can choose from pre-defined pictures or your personal pictures.
Network Setup
Network selection
New search – if you chose manually an operator and lost his signal, you can refresh the network
connection.
Select network – to list the supported n etworks in accordance to your network subscription. Because
of some restrictions on your SIM card, you cannot connect to all of them.
35
Page 36

Auto-select – If activated, the phone itself chooses appropriate operators according to your SIM
card. If you choose the option [Select network] to connect manually to an operator, this option wi ll be
deactivated.
Preferences
The preferred networks list saved on the SIM card. You can add your network to the list or delete it or change
its priority.
Security Setup
SIM lock - If activated, you will be asked about the PIN when switching the phone on. You can switch
the SIM lock off by inputting the current PIN code.
Phone lock – If activated, you will be asked about the phone password when switching the phone on.
To switch the phone lock on or off, you need to enter the current phone password. (The default
password is 0000).
Fixed dial
Function switch – this function has to be supported b y the operator. To activate it, you have to enter
the PIN2.
Fixed dial list – list of phone numbers which you can call. All other numbers cannot be called.
36
Page 37

Change password
PIN – to change the PIN code.
PIN2 – to change the PIN2 code.
Phone password – to change the phone password (predefined code is 0000).
Restore default settings
After entering the phone password (predefined code is 0000), the default settings of the phone will be
restored. No data will be deleted.
Factory restore
After entering the phone password (predefined code is 0 000), the whole phone will be restored and initialized.
The phone will be in the same condition when it left the factory.
Warning: All data will be completely deleted (contacts, SMS, MMS, Emails, personal pictures etc.)!
System Info
This function provides you wit h the information about firmware version, time, operator, battery capacity and
storage space.
Organizer
Calendar – here you can enter three event types (Reminder, Meeting and Course) and you can set
the type of display, go to specific date, display current or all events. The calendar cannot be
37
Page 38

synchronized or backed up.
Tasks – here you can enter three task t ypes (Date, Call and Anniversary) and you can go to date,
display unfinished tasks, send them or save them in a file.
Alarm – you can setup 5 sets of alarm with several options.
World Clock – you can have u p to 4 cities, which you add to the list. You can change or edit them.
One of them can be set as home city.
Tools
Calculator – a simple calculator for arithmetic operations.
Stopwatch – a common stopwatch. You can save times and the maximum number of intervals is 20.
Ebook reader – it supports electronic books in TXT format and some of books in PDB format. To read
them, you have to copy TXT or PDB files and copy them t o the Ebook folder. If the displayed text is
illegible, you have to set the right encoding. Here is overview of settings:
Font style – it is possible to change the font style in a text file.
Font size – it is possible to change the font size in a text file.
Scroll by – settings to scroll in a text.
Auto scroll – activate automatical scrolling of pages/lines.
Scroll speed – valid when the option [Auto scroll] is activated.
Encoding – if the displayed text is illegible, change this option.
Alignment – settings for text alignment in a text file.
Select storage – to set the source of text files (TXT/PDB have to be in the Ebook folder).
38
Page 39

Phone
Phonebook
Your phonebook is saved either on the SIM car d’s memory or phone’s memory. You could save your contacts
in both. You could save 1000 contacts in the phone memor y. The contact storage capacity in yo ur SIM card is
up to the service provided from your service provider. In the phonebook, the full text search is not possible.
When you enter the first alphabet, your device will sort out the result of the search in accordance to the
alphabet or number tapped in. You can enter up to 5 characters for the search.
To each contact in the ph on e, you can assign, apart from the name and number, caller picture (the picture can
be already taken or you can take a p icture when e nt ering the contact), a caller group (Family, Business,
Friends, VIP and Others), home number, company name, email address, the office number, fax number,
birthday i nf ormation and caller ringtone (from pre-defined tones). If you choose to save contact in the SIM
card, you can save only the name and phone number.
You can send, edit, delete, copy contacts and you can also select to display the contact stored either in SIM
card only or in phone memory only, and in both. The phonebook has also its own settings:
Caller groups – there are five default groups on the phone. You could assign a ringtone to a specific
caller group as the caller group ringtone. If you assign a ringtone to a c aller group, the option [Caller
ringtone] when creating the contact, will be ignored.
Memory status – the memory status of the storage both in phone memory and SIM card.
Preferred storage – you can choose the preferred storage location when adding a new contact.
My vCard
Edit my vCard – you can fill in your contact information in the vCard which you can then send.
39
Page 40

Sen my vCard – the vCard which is filled i n, can be send in t hree ways or you can save it in a
Call center
All Calls
Here you can check all rec ords of calls. It is possible to view, call and edit each contact, save it to contacts,
send an SMS or MMS to it, delete it or delete the whole call record. To display the call record clearly arranged
to dialed calls, missed calls or received c alls, click on the Dial icon on the standby screen and then on th e
lower left icon. You will see the same list when you have a missed call – on the standby screen, there will be a
note.
Call settings
Caller ID
Set by network – it depends on the settings of your network, if your identity is presented.
Hide ID – if allowed by the operator, your identity will be hidden.
Send ID – if allowed by the operator, your identity will be sent.
file.
40
Page 41

Call waiting
This function allows you to notify another caller, during an existing call. This function has to be supported by
the operator.
Call divert
You can set the call condition by which calls are diverted to another number.
Call barring
This function allows you to set the call condition b y which calls are restricted. Your operator provides you with
a password which is required for this function.
Closed user group
This function allows you to set the limited call gr oup. Only the person in the specific group is a llowed to make
call to and receive call from members of the group.
Call Cost
Call timers
Lass call – call time of the last call.
Dialed calls – the amount of call time of all dialed calls.
Received calls – the amount of call time of all received calls.
Reset all – to reset to call timer in this section.
41
Page 42

Call Cost
Last call cost – cost of the last call.
Total cost – total cost of all calls made.
Reset cost – to reset cost in this section.
Max cost – to s et the maximum c ost. When this cost is reached, it is no more possible to call. You
may be required to enter PIN2*# code to activate this function.
Price per unit – to s et the price according to your flat price. You may be required to enter PIN2 code
to activate this function. Usually, the price per unit is 0.1 *#
* This function has to be supported by the operator (this function is called AoC). Your operator also provides you with a price which
you have to fill in. (it is not price per minute, but it is a coefficient of the price).
# E.g. „Kc” can be set as a unit for Czech koruna. The function is supported only for subscribed cards, not for contract cards.
Text message counter
Sent – the number of message you have sent.
Received – the number of message you have received.
GPRS counter
Last sent – the size of data, in bytes, sent of the last transfer.
Last received – the size of data, in bytes, received of the last transfer.
All sent – the size of the data all sent.
All received – the size of the data all received.
Reset counter – to reset the data size counter in this section.
42
Page 43

Advance settings
Black List
Reject from list – to switch on or off this functionality to reject the calls from the registered numbers in
the black list.
Black list numbers – the default amount of the numbers in the black list is 20. You w ill not be
informed about a call from these numbers and the callers will hear busy tone.
Auto redial
If the called number is busy, the number will be redialed in still longer inter vals. There are maximum 10
attempts. If the called person does not answer the call till this time, the dialing will be canceled.
Speed dial
Status – to switch on or off this function. It allows you to speed dial up to 8 pre-def ined numbers. On
the standby screen, click on the Dial icon and then press and h old one of “2” – “9” numbers; the predefined number will be dialed.
Set number – assign a number to the contacts saved in your pho nebook. The “1“key is reserved for
calls to the voice mailbox.
Background sound
Select when make call – before dialing a number, you can select background sound which will be
played during a call.
43
Page 44

Playback settings
Volume – to set the volume of the background sound.
Play mode – to set which background sound should be played.
Sounds list – you can choose from ten pre-defined sound and you can add ten others. So there are
20 background sounds available altogether.
Call time reminder
Off – to switched off the call time reminder.
Single – at a set time, it reminds you of the length of the call.
Periodic – at a set time, it reminds you periodically of the length of the call.
Messages
To write message
Text message – when choosing this option, t he touch screen keypad with a f ie ld for text input
will display on the screen. When you click on the “Shift” key once, you type the first letter as a
capital letter; by clicking twice, you type only capital letters. You can also switch to the mode
which allows you to type on the display. However, this method is slower. To switch the input
methods, use k eys “abc/123”,“123/@#*”, “@#*/abc”. When you click on th e key of the Earth,
you can change input languages. When finishing the message composition, click on [Back]
and th en on [Enter number] to input the phone number dir ectly, or click on “+” to add the
phone number from the phonebook. Then click on “Send”. You can in sert an object (picture,
44
Page 45

animation, melody and predefined ringtone) in the text message or use one of ten templates.
Text message – when choosing this option, t he touch screen keypad with a field for text input
will display on the screen. When you click on the “Shift” key o nce, you type the first letter as a
capital letter; by clicking twice, you t ype only capital letters. You can also switch to the mode
which allows you to type on the display. However, this method is slower. To switch the input
methods, use k eys “abc/123”,“123/@#*”, “@#*/abc”. When you click on th e key of the Earth,
you can change input languages. When finishing the message composition, click on [Back]
and then on [ Add recipients] to input the phone number direct ly, or click on “+” to ad d the
phone number from the pho nebook. If you want to insert another object in the message, click
on a [Options] > [Insert o bject] and insert an atta chment. You can also fill in the subject of the
MMS. Before sending, you can have a look at the message when you choose [Options] >
Messages
[View]. When you finish, click on “Send” “.
This screen is di vid ed into four parts: Inbox (all incoming messages), Sent messages (all sent
messages), Drafts (to store your message and work on it later) and Outbox (Messages failed
and to be sent). On this screen, you can cr eate SMS, MMS, answer or forward messages,
copy them or set them.
o Text message
Profile settings – to set the profile of SMS s ervic e center. Your operator provides yo u
with the phone number.
Common settings – you may select whether to enable or disable the delivery report
45
Page 46

and activate the same SMS service center for reply.
Me mor y status – to display the memory status.
Preferred storage – you are allowed to set up the preferre d storage location for your
messages.
Preffered connection – you are allowed to set up the preferred method of transfer.
The selected transfer has to be supported by the operator.
o Multimedia message
Edit profile – to select the data profile for sending and receiving MMS. In t he phone,
there are pre-defined profiles of all three Czech operators. The default profile is the
Vodafone CZ profile.
Common settings – other settings for creating, sending and receiving MMS and for
Chat – to create SMS chat which enables you to chat with many people at once. You can c hoose
from two chatting rooms. In every room you have to set in options [Chat room info] (phone number of
person who you want to start chatting with and your nickname). Then only select [Chat options] >
[Start new] and you can chat.
Email – to send and receive email messages with or without atta chments. You can configure several
email accounts, but only one c an be active in on e moment. The def ault profile for sending and
displaying the memory status.
Note: The message size of multimedia message is limited to 300KB. However, the limitation could vary,
depending on your operator.
46
Page 47

receiving emails is the Vodafone CZ profile.
Voicemail server – For quick access to voice messages a nd for setting the voice mailbox. Select
[Options] > [Edit] and enter the n ame of the voice mailbox and a phone number for calling the voice
mailbox of your operator. After entering those parameters an d activating th e voice mailbox by the
operator, select [Options] > [Call voicemail] or press “1“ key for speed dial (if permitted).
Recent conact
In this menu, you can view statistical overview of activities of particular phone nu mbers. It means all calls and
all text messages. When you click on the record, oth er details will be displayed. You can reset ca ll counter in
the menu „Ca ll center “, [Options] > [Delete all]. You are not allowed to reset the SMS counter, because it
varies automatically according to your operations with messages.
Entertainment
Flexaret/Camera
Flexaret/Camera – the device is equipped with a professional camera which is equivalent to a
compact camera. This device comprises a 12.2Mpix CCD sensor and a telescopic three times optical
zoom lens. To turn the camera on, click on th e ico n on the standby screen or press and hold the
Camera/Video recorder b utton. To exit the camera functions, press and hold the C amera/Video
recorder button or End Call/Power On ke y. Pictures and videos are saved in the folder DCIM on the
memory card.
47
Page 48

Note: When camera is switched on, the screen will be atomically turned to the landscape mode. To operate the camera
functions, please insert the memory card first. When battery is discharged, you a re not allowed to operate t he camera.
When the device is connected to a computer via USB cable, you are not allowed to operate camera. When camera i s
switched on but standing by for a while, the camera will be switched off automatically after 3 minutes .
Shutter Button
The shutter button can work only during the camera application is switched on. Half Press: to focus;
Full Press: to take a shot/to start or end video recording and voice memo in the album.
Camera/Video Recorder button
Press and hold to switch o n the camera. In the camera mode, press to switch the video recorder on,
when pressing again, switch back to the camera mode.
Left/Up/Right/Down/OK key (in the horizontal position)
Press the Left/Right keys to move the cursor horizontally in the menu or to zoom in/out.
Press the Up/Down keys to mo ve the cursor vertically in the menu or show/hide the histogram,
composition guide lines or other information.
Press the “OK” key to confirm the selection in the menu.
Volume/Zoom button
To zoom in or out the taken object.
48
Page 49

Play key
Press to enter the Album mode to view photos and watch videos.
“C” key
Press to delete photos or videos.
End Call/Power On key
Press to close the camera mode.
Indicators on the display in the Camera mode
49
Page 50

1. Camera Functions 7. Scene 13. Image Quality
Panorama
Anti-Shake
Kids & Pets
Self Portrait
Smile Detection
2. Camera Functions
Flash
Macro
Scene
Focus Mode
Menu
3. Shooting Mode
Normal
Burst
Multi Burst
SCN
Auto
P-Mode
Smart Scene
Sport
Landscape
Night Landscape
Portrait
Night Portrait
Museum
Snow
Sunset
Beach
Party
Foliage
Aquarium
Best
Better
Good
14. White Balance
Auto
Sunny
Tungsten
Fluorescent
Cloudy
15. ISO Speed
Auto
ISO 80
ISO 100
ISO 200
ISO 400
50
Page 51

Panorama
Frame
4. Image resolution
12 M
11 M(3:2)
9 M(16:9)
8 M
5 M
3 M
2 M(16:9)
2 M
VGA
5. Flash
Auto Flash
Flash ON
Flash OFF
Copy
Backlight
Food
Candle Light
Backlight Portrait
8. Focus Mode Spot
Auto
Face Detection
Touch Shot
9. Macro
10. Battery indicator Low
10% ~ 20% Capacity
20% ~ 35% Capacity
35% ~ 50% Capacity
50% ~ 65% Capacity
65% ~ 80% Capacity
51
ISO 800
ISO 1600
ISO 3200
16. AE Metering
Matrix
Center-Weighted
17. Sharpness
High
Normal
18. Saturation
High
Normal
Low
19. Contrast
Page 52

6. Self-Timer
10 secs x 2
10 secs.
2 secs.
OFF
Note: Be fore you take pictures, read first the whole menu and make yourself fa miliar with whole functions and their possibilies
which the device offers.
To use the camera
Switch on the camera, and then select a scene. Ha lf press the shutter button, and your device will focus the
object and adjust the exposure automatically. After focusing and th e exposure a dj ustment, the focus indicator
will turn to green. Full press the sh utter button to take the photo. The taken photo will be stored in the memory
card automatically. Your device will pr esent the quick view of the taken p hoto and after saving, it goes back to
the live view for next shot.
Note: If there is an incoming call, SMS or MMS when the camera application is running, device will notify you on the screen.
80% ~ 100%
Capacity
11. Focus Zone Normal
Multi-Zone
Center
12. Zoom
21. Image Counter 9999
52
High
Low
20. EV
-2.0EV ~+2.0EV
Page 53

Zoom in and out
The device is equipped with a 3-times optical zoom lens which allows you to zoom in and out the target object.
Press the Volume/Zoom button or the Left and Right key to zoom in and out the target object.
Note: In the camera s etup menu, you could activate the digital zoo m function. Your device supports 5-times digital z oom. In
combination of the 3-times optical zoom and 5-times digital zoom, you can zoom in the target object to 15 times. When u sing the
digital zoom, some interfering elements can occur.
Panorama
In the Panorama mode, you could take the wide angle photo by stitching 3 photos into a panorama photo
manually or automatically.
Manual Panorama
Click on the Panorama icon on the screen, and then click on the [Manual].
You could click on the From left t o right or the From right to l eft icon, to define the direction of taking
photos.
There will be displayed an indicator to indicate the number of photo.
Point your device to the target scene and then full press the Shutter button to take the first photo.
Your device will give you a quick view of the first photo and then pr esent you the stitching portion of
the first photo.
Follow the way you take the first photo to take the second and third. Please be reminded to overlap
the stitching portion of the photo when taking the second a nd third. You could press the Back key to
53
Page 54

take the new first photo.
After three photos are taken, your device will stitch them into a panorama photo.
Press the Play key to watch the panorama photo.
Note: If there are only two photos taken, you can press the “C” key to stitch them together.
Auto Panorama
Click on the Panorama icon on the screen, and then click on the [Manual].
You could click on the From left t o right or the From right to l eft icon, to define the direction of taking
photos.
There will be displayed an indicator to indicate the number of photo.
Point your device to the target scene and then full press the Shutter button to take the first photo.
Your device will give you a quick view of the first p hoto and then d isp la y the green guiding arrows to
move in the auto panorama.
Follow the guiding arrow to sweep your device; the guiding arrow will get shorter gradually. When the
arrow disappears, your device will take the s econd photo automatically. Follow the way you took the
second photo to take the third one.
After three photos are taken, your device will stitch them into a panorama photo.
Press the Play key to watch the panorama photo.
Note: If there are only two photos taken, you can press the “C” key to stitch them together.
54
Page 55

Anti-Shake
To pr eve nt defocusing while taking pictures, click on the Ant i-S hake icon to turn on the anti-shake function.
Click on this icon again to turn this function off.
To take photos of kids and pets
You can use this function to take photos of vivid and naught y kids and pets when clicking on the Kids and pets
icon. Click on this icon again to switch off this function.
Self-Portrait
Click on the Anti-Shake icon on the screen.
When the Self-Portrait function is activated, the red LED indicator lights.
Point t he camera lens of your device to your face. Your device focuses your face, gives you an
audible notification and the red LED will flash. Your portrait photo will be taken auto mat ica ll y and you
do not n eed to press the Shutter button to take the photo. Click on t he icon aga in to switch off this
function.
Note: Th is function would work in any kinds of flash mode. When the Self-Portrait is activated, you are not able to operate the
Shooting mode, Macro and Self-timer functions.
Smile Detection
Click on the Smile Detection icon to take pictures of people. When your device detects the human face, there
55
Page 56

will be a white focusing frame displayed on the screen and your device will follow the face detected. Click on
the icon again to switch off this function.
Macro
The Macro mode is used for a close shot. Click on the Marco icon to turn on the function. Click on the icon
again to switch off this function. The minimum distance for taking pictures in the Macro mode is 5 cm.
Scene
The device supports 20 scenes w hich enable to ta ke appropriate shots in different lighting conditions and
surrounding environment. In each scene, the appropriate photo taking parameters are configured by your
device automatically. When the Mode [S mart Scene] is switched on, your device will choose the appropriate
scene for the best shot automatically. If you select [P-Mode] as a scene mode, you can set up by your self
other parameters (White balance, ISO Speed etc.)
Face Detection
Click on the Focus Mode icon on the screen, and then click on the Face Detection icon.
When your device detects human faces, there will be white frames embracing the detected faces
displayed on the screen.
When there are faces detected, half press the Shutter button, the focusing fra me turns to green; your
device will focus the target object and adjust the exposure.
Full press the Shutter button, your device will take the photo, and store it into the memory card.
56
Page 57

Note: Your device can detect up to 10 faces simultaneously.
Touch Shot
In addition to other f ocus functions, the de vice also supports the Touch Shot function. You can use your finger
to click on the object in the live view and get the designated area on the screen to be focused.
Click on the Focus mode icon on the screen, and then click on the Touch Shot icon.
There will be a To uch Shot frame presented on the screen.
Point yo ur device to the objects and use your finger to click on the target object in the live view
screen. The device will focus th e object and take a picture auto matically. The photo will be stored
into the memory card automatically.
Burst and Multi-Burst
The Burst function makes you able to take continuous shots before you release the full pressed Shutter button.
The Multi-Burst function enables you to take consecutive 16 photos in VGA (640x480) resolution in a shot.
Click on the Settings icon on the screen, and then click on the [Burst] icon or the [Multi-Burst] icon.
You can click on the Back icon to exit the selected shooting mode.
To use frame for a shot
In the Frame mode, you could take the frame composite shot. There are in total 9 default frames.
Click on the Settings icon on the screen and then select the [Frame] icon.
57
Page 58

You can click on the Back icon to exit the selected shooting mode.
To record a video
You can use the device to record a video. Your d evice supports two types of video resolution: 640x480 and
320x240. You can record the video until the video file size is less than 4GB. You can switch on the Video
recording by pressing the Camera/Video Recorder button in t he Camera mode. When your device is r ecording
a video, the red LED indicator will light. Press the Shutter button to start or end the video recording.
Indicators on the display in the Video recording mode
58
Page 59

1. Back
2. Menu
3. Video Resolution 20% ~ 35% Capacity
640x480
320x240
4. Self-timer 65% ~ 80% Capacity
10 secs
2 secs
OFF
5. Recording time Sunny
Elapsed time 00:00:00 Tungsten
6. Zoom
Cloudy
7. Battery indicator 9. Saturation
10% ~ 20% Capacity
35% ~ 50% Capacity
50% ~ 65% Capacity
80% ~ 100%
Capacity
8. White Balance Low
Auto
Fluorescent
59
High
Normal
Low
10. Contrast
High
Normal
Color
Sepia
Black and white
Color
Vivid
Page 60

Setup
Shutter – To c hoose the sound of the shutter.
Digital Zoom – To turn the digital zoom function on.
Quick View – To view the photo that you have just taken.
File No. – To reset the file number to 0001 or to set the file numbers in continuous order.
USB Mode – To set up the USB mode, this displays in the option [DSC USB mode] when connecting
to the computer.
Video Out – To adjust the video output, depending on the type of your TV (for the EU, select PAL).
Date Stamp – To adjust the format in which the date will appear on each photo or video.
Format – To de lete irreversibly all data on the memory card. Formatting a memor y card deletes a ll
data on the memory card. As you cannot retrieve the deleted data, exercise adequate caution before
formatting the memory card.
Reset – To reset the camera to the original factory default settings.
60
Page 61

Album
This function allows you to watch the photos and vide os. You can quickly start this funct ion by pressing the
Play key. To change the view, use t he Left and Right key or slide yo ur finger on the screen. If you rotate the
device to 90°, the photo in view will be rotate d as well. Click on the Play key to exit this function. You could set
the photo in view as the homepage photo, screen saver (lock image) or caller picture. You can send, delete,
select the digital pr int order f ormat, operate the slide show, protect the pictures from being deleted or record a
voice me mo of the photo. During the pause of a video play, you can press the Shutter button to store the
present frame of video film as a photo. When watching a picture ta ken in the Multi-Burst mode, the device will
display the multi-burst photos from No.1 to No.16 sequentially. To record and save a voice memo of a picture,
go to Settings and select [Voice memo]. Then press the Shutter button to start or save the voice memo.
If you want to watch pictures and videos on TV, connect the U SB (TV-Out) c abl e to the device a nd then to the
computer. When watching the TV, nothing will be displayed on the screen of the device.
Press the Volume/Zoom button to magnify the picture.
To transfer the photos and videos to a computer, connect the phone wit h the computer via the USB cable and
select [Mass storage] (both memories will be displayed on the screen) or [DSC USB mode] (memory card will
be displayed on the screen). In the File manager in Windows, go to the folder DCIM.
You can also edit pictures in other options of the menu.
Note: The frame composite could only be applied on the photos with the resolution higher than 3 Mpix. The frame composite could
not be applied on the clipped and rotated photos. After applying the frame composite, the resolution of altered photo is 3 Mpix.
61
Page 62

Entertainment
Photo Editor
All images from MM S, EMS and WAP can be reviewed and edited with this function. You can also edit your
images (both from the DCIM folder and from Images folder). Then you can view, edit, use, send or delete your
pictures and operate a slide show. The pictures are presented with the th umbnails of the images of photos.
You can edit a selected picture with several effects and functions in the menu [Options] > [Edit].
Note: To send the photo or image out to Flickr via (Bluetooth/GPRS), you need to install the Emgeton Flexaret Mini Media Center
program. Use this program to configure your Flickr ac count and for authorization into the phone. Then you can use this function.
E-Cult (MP3 Player)
The phone h as an integrated E-Cult MP3 Pl ayer. You can enjoy listening by using a headset, Bluetooth
headset with A2DP profile or via the integrated loudspeaker. You can q uic kly select from the list, change the
playing mode or equalizer. Following audio file formats are supported: MP3, AAC, AAC+, WAV, MIDI and AMR.
Settings
Player Settings
o Pre. play l ist – To define the play list from the storage location. Music files have to be
stored in the folder My Music. The device d oes not recognize items; they will be ignored
and all files will be displayed. After choosing this function, all files will be indexed. The
return to the main scre en can take few minutes. The indexing time depends on the
number and types of particular music files. So wait until it is finished and then you can
62
Page 63

play. If you add new files later on, it is recommended to use [Options] > [Refresh list] – the
files will be indexed aga in in order to display new added f il es as well. If yo u add new files
but do not restore the list, these files will not be displayed in the MP3 P layer interface until
they will be indexed. The Playlist is created by the phone and it is not poss ible to use
playlists created by other applications. The files are sorted by date/time of adding, not by
alphabet.
o Background play – when activated, the pla yer will play also after leaving the main screen
of the player. If you want to finish it, click on the icon Pause.
Sound effects
o Audio effect – to choose from some default effects and equalizers. Some settings function
only when the headset is connected.
o Bass enhance ment – you can activate this function to add low frequency to accent t he
bass part of the sound. Some settings function only when the headset is connected.
o Play speed – to set up the speed for playing MP3 files. It there is another speed than
[Normal] the sound can be distorted.
Bluetooth settings
o BT stereo h eadset – if the Bluetooth stereo headset is connected to the device and you
start playing, the sound will be automatically played in the headset. If you want to connect
the Bluetooth headset, find and pair them with this function. Then the sound will be played
in this headset.
63
Page 64

Video Player
The phone has an integrated Video Player. You can enjoy listening by using a headset, Bluetooth headset with
A2DP profile or via the integrated loudspeaker. The device supports only video file formats converted into MP4
with following parameters:
Video codec: H.263 Sound codec: AAC LC
Picture size: 176x144 Sample rate: 48000Hz
Number of pictures per second: 30 Bitrate of the sound: 256Kbps
Bitrate of the picture: 9600 Kbps
To convert, you can use the SUPER © program or you can use another program where you can set the same
parameters. It is not possible to play a video which is not converted. The video can not be played on TV via
cable – it can be played only on the display of the phone. Store converted files into the Videos folder.
Note: Parameters to convert the video are the maximum poss ible . The lower quality of the output, the smaller is the converted file.
External subtitles are not supported. The ratio of the converted video will be set up to 11 :9 (ratio corresponding to the size 176x144).
Sound recorder
The sound can be recorded by microphone. You c an also record a ph one call – to acti vat e the function, click
on the appropriate icon while calling. The recorded audio file can be attached to an MM S or an email or send
via Bluetooth.
64
Page 65

Settings
Storage – ch oose, in which stor age the recordings should be stored. The recordings are
stored in the Audio folder.
File format – AMR has lower quality and do not need a lot of space, WAV has better q uality but
needs more space.
Audio quality – the higher the sound quality, the bigger the file size.
FM Radio
This function enables to listen to the favorite radio channel. A headset needs to be attached to the device for
the FM radio to function properly. It is also used as an antenna. So please unwind it completely. W hile listening
to the radio, you can record or plan an automatical recording.
Options
Manual input – to set manually the required frequency.
Save Channel – a manually s et chan nel can be assign to a number of channel preference
which you defined.
Background play – when acti vated, t he radio will also play when you leave the main screen. If
you want to quit the radio, click on [Back]. You can save up to 9 channel preferences.
Auto search – to start automatic tuning of the whole frequency; found channels will be stored
to the list of channel preferences. With the function [Save Channel], later on, you can change
the name of the channel tuned in this way.
Record settings
65
Page 66

o Record format – AMR has lower qualit y and do not need a lot of space, WAV has better
quality but needs more space.
o Audio quality – the higher the sound quality, the bigger the file size.
o Record storage – choose, in which storage the recor di ngs should b e stored. The
recordings are stored in the Audio folder.
Schedule FM record – It is possible to set up to 4 times, when th e planned recording shall
start. Please note, that to make also this recording, you have t o have the headset connected
which is also used as an antenna. So please unwind it completely.
Schedule Record History – here is the whole recording log and the status.
File list – list of all recordings, both from the radio and the sound recorder.
Java
The device enables to download and install Java games or applications. You can inst all the Java games and
applications by two methods: installation of the internet or installation of the phone memory or memory card.
You start the application by the option [Java]. To delete the application or make ot her operations, touch it with
the cursor and select [Options].
Note: The AncientTreasures game is preloaded in your phone. You are not a llowed to delete t his preloaded game. Files with JAD
and JAR extensions are supported. If you want to use Opera Mini browser, go to the folder Opera Mini 5 and install it.
Java Settings
Java audio – to switch on/off the audio in Java.
66
Page 67

Java vibration – to switch on/off the vibration in Java.
Java network – to set up the data profile which should be us ed when a Java application needs
an access to the internet. When selected [Default], the profile which is activated in [Services] >
[Internet] is used.
Heap size – size of the memory.
Java default security – to set up default parameters for particular operation w hich are made
File manager
File manager allows you to ma na ge files stored in the phone memory and/or on the memory card. You can
create and open folders; copy, move and delete files, start files, install Java applications or format the memory
card. Formatting a memory card deletes a ll data o n the memory card. Exercise adequate caution before
formatting the memory card!
Overview of folders in the phone to make you orientation easier:
Audio – all recordings recorded by sound recorder or radio
Ebook – ebooks in the TXT and PDB formats
Images – pictures which you did not take by the camera
My Music – music files
Received – files received via Bluetooth
Videos – converted movies
DCIM – pictures and videos which you took by the camera/video recorder
when Java runs.
67
Page 68

Internet
Services
SIM Toolkit – this option is not displayed if your operator or the SIM card do not support it.
Internet – WAP browser, which enables to view WAP and some simple internet pages.
Homepage – connection to the page which is entered as homepage.
Bookmarks – to go to saved bookmarks.
Recent pages – last visited web pages.
Offline pages – to view the recent visited pages you have saved.
Input address – to display a field to enter an address.
Service inbox – list of PUSH messages which you have received.
Settings
o Edit account – list of data accounts which are used for the connection. The default profile
for the internet browser is the profile of Vodafone CZ operator.
o Browser options
Timeout – time in seconds – the phone will stop the browser if not connected within
the set time.
Show i mages – if disabled, the loading is fast er but images are not displayed
o Service message settings – additional settings for PUSH messages.
o Clear cache – to clear the cache of the browser.
o Clear cookies – to clear cookies of the browser.
o Trusted certificates – list of all trusted certificates.
68
Page 69

Data account – to access the internet, you need data connection. Here, you can define new
connections. [GSM data] is a slow dialed connection; [GPRS] is a fast data connection. In the phone,
there are pre-defined profiles of all Czech operators. All profiles are set to contract SIM cards.
Note: If you have another card configuration, activate o nly profiles of pa rticula r cards. If y ou have a subscribed card
and not contract, APN has to be changed (the operator provides you with actual APN se ttings for subscribed cards)
Networks
Phone – use when you wa nt to deactivate the GSM module of the phone (either because of a local
regulation or you do not want to use the GSM module). The part of the phone which operates phone
functions will be deactivated.
GPRS – if you switch it off, you cannot use any data service (MMS, Internet, sending of pictures and
videos to Flickr/YouTu be). In [Settings] you can specify other options.
Bluetooth – to switch on and off the Bluetooth module. Bluetooth is a wireless communication
technology capable of exchanging information over a distance of about 1 0 meters without requiring a
physical connection. But Bluet ooth wireless connections may be interfered because of such barriers
as the wall or other electronic equipment. You c an sa ve battery power b y turning the Bluetooth off
while it is not in use. In [Settings] you can specify other options:
Power – to switch Bluetooth module on or off.
Audio device – to connect to a compatible au dio device (to find handsfree device, select the
option “My device”).
My device – to find all available Bluetooth devices.
69
Page 70

Active devices – to display all active connected devices.
Settings – here you can edit following Bluetooth settings:
o Visibility – to make your phone either visible or invisible for other devices. I f it is off, other
devices cannot find it.
o Change device name – to change the name of your phone.
o Authentication – before connecting, it always asks if you really want to connect to the new
device.
o Audio path – to choose where to send the audio.
o Block list – list of blocked devices.
o Storage – to select the storage for new received files via Bluetooth.
About – to display device information.
Note: The phone supports the following Bluetooth profiles: HFP, HSP, SPP, DUN, OPP, FTP, A2DP and AVRCP.
Media sharing
This function enables to watch pictures and videos and allows you to send them (after configuration in
Emgeton Flexaret Mini Media Center program) to online services Fickr and YouTube. Before using these
functions you have to set the phone using this program. After installing this program, connect the phone to the
USB port and select the option [Mass storage]. Then follow the instructions on the screen. When you
successfully finish the configuration, you can use this function.
70
Page 71

This function offers following options:
View – it displays the selected picture and enables to send it.
To Flickr (Bluetooth) – to upload the photo to Flickr via B luet ooth connection with your computer. The
Emgeton Flexaret Mini Media Center program has to ba activated.
To Flickr (GPRS) – to upload the photo to the web and to use all configuration data you set before.
Upload Status – for those photos with uploading failure, you could upload them in this option again.
Settings
Description – any name for identification on the web.
Public – if you allow, you make photos/videos public to not registered users of the web.
Photo Album – to change the folder that is use d for viewing or sending. If you ch ang e the folder into
a folder where you saved photos you h ave taken, the loading of thumbnails of the images can take
several minutes (according to the number of photos and their resolution). Because of their size, you
can load videos only via Bluetooth and an application in the computer.
7. Accessories
Use of USB cable and Emgeton Flexaret Mini Phone Suite program
You can use the USB cable to connect the phone to a computer. With this connection you can enter
to the memory of the phone and to the memor y card (mode [Mass stor age]). If you want to use t he
Emgeton Flexaret Mini Phone Suite program (after installation from CD) or connect to the int ernet or
manage memory, connect via cable (select the mode [COM port]) or via virtual Bluetooth COM port.
After the installation of drivers*, when connected via cable or Bluetooth, the virtual COM port will be
71
Page 72

assigned and you h ave to set the same port number in the Emgeton Flexaret Mini Phone Suite
program.
If you want to disconnect from USB, always use the function of safe remo ving of hardware which is a
part of Windows. If you do not do so, the memory of the phone or the memory card can be damaged.
If you are connected in the mode [COM port], you do not need to use this function.
Do not format the memory card in Windows! Always use the appropriate option in the phone.
*After installing the Emgeton Flexaret Mini Phone Suite program, drivers are in th e installation folder of the
program. Before you start the progra m, connect the phone, select th e mode [COM port] and after asking to
install drivers, install them manually. Then run the program and select the COM Port number in Settings.
Use of the battery
If the battery is new or was not used for a long time, the charging ti me is longer than when it is used regularly.
Use only batteries recommended by the manufacturer. Use of other batteries (other than those recommended
by the manufacturer) can be dangerous and it can also be a r eason for the manufacturer/dealer to decline the
warranty. Dispose of old batteries according to valid regulations.
Use of the charger
Before you start t he charging process, make sure the batter y is inserted in the right wa y. Use the charger in a
dry area. Protect from liquids. If not, you may cause damage to your phone, and you may even cause a fire.
72
Page 73

Use only th e charger r ec ommended by the manufacturer. Use of other chargers, other than those
recommended by the manufacturer, can be dangerous and it can also be a reason for the manufacturer/dealer
to rescind from the guarantee. If you connect the charger t o the phone wh ich i s sw itched off, wait until the
charging graphic displays and THEN you can switch the phone on.
Use of the Headset
The phone is supplied w ith earphones which ca n be used as a Headset or for listening MP3, video or radio. If
you listen to the radio, the Headset is also used as an antenna – it has to be fully unwound t o have the
optimum reception.
When using the Headset, do not t urn the volume up t o the maximum for a long time – you can seriously i njure
your hearing.
73
Page 74

8. Common faults
Demonstration of the faults Possible causes
Phone cannot be switched on
SIM error
Bad quality of network
connection
Outgoing calls not possible
1. Check if the battery is charged.
2. Check if the battery is inserted in the right way.
3. Remove the battery and insert it again in the phone.
1. Dirty SIM card contacts. Clean them with alcohol.
2. Remove the SIM card from the phone and insert it again.
3. SIM card damaged. Exchange the SIM card for the new one.
Check the indicator of signal's quality on the display. 5 marks, the signal
is strong. Less than 2 marks, the signal is too weak.
1. It is possib le that the function for hiding a caller pho ne number is
switched on, but it is not supported by the network of the mobile operator.
2. Other surrounding devices may cause the interference of the signal.
3. The function for restriction of your outgoing calls is activated.
4. Second line for the same SIM card is activated, but the network of your
mobile operator does not support this function.
74
Page 75

Charging error
No network connection
Too dark photos taken by the
camera
Fuzzy photos taken by the
camera
Blurred photos taken by the
camera
Menu with the offer of
services is not displayed
1. Battery totally discharged. After connecting the phone to the charger, it
takes several minutes before the charging process starts.
2. The capacity of the battery has deteriorated significantly. You should
exchange it.
1. Signal too weak or other surrounding devices may cause its
interference.
2. Although the SIM card has been correctly inserted, the contact with the
telephone is of a bad quality or the SIM card is damaged. If the card is
damaged, contact your mobile operator.
1. The picture was taken when the camera was faced to direct light.
2. The surroundings of the taken object were to dark.
1. A mo ving object was taken.
2. When triggering, the phone moved.
The object taken was very close to the camera lens.
Your SIM card does not support this function or it is forbidden by the
operator.
75
Page 76

9. Technical specifications
GSM band 900/18001900 MHz
SIM card SIM card of any operator
Memory
LCD / Camera 3“ 262 000 colors TFT, touch / 12.2Mpix CCD Panasonic
Battery Li-Ion 3.7V 1020 mAh
GPRS / EDGE Class 12
MMS / WAP 2.0 Yes / Yes
Bluetooth Yes, 2.1+EDR
microSD slot Yes, microSDHC for up to 32GB
USB port Yes
Dwell time
Size
Weight
* According to laboratory tests
Up to 1000 contacts in the phone + contacts from SIM
Internal memory aprox. 70MB
Standby time: 350 hours*
Talk time: 10 hours *
52×112×19 mm
145 g (with battery)
76
Page 77

Hereby, Bell Technology spol. s r.o. declares that this product is in c omp liance with the essential requirements
and other relevant provi sions of Directive 1999/5/EC/.The crossed-out “wheelie b in” symbol means that within
the European Union the product must be taken for separate collection at the pr oduct’s end-of-life. This applies
to your device but also to a ny accessories marked with this s ymbol. Do not dispose of these products as
unsorted municipal waste!
THIS MOBILE DE VICE MEETS GUIDELINES FOR EXPOSURE TO RADIO WAVES. This mobile device is a
radio transmitter and receiver. I t is designed not to exceed the limits for exposure t o radio waves
recommended by international guidelines. These guidelines were developed by t he independent scientific
organization ICNIRP and include safety margins designed to assure the protection of all persons, regardless of
age and health. The exposure guidelines for mobile devices e mploy a unit of measurement known as t he
Specific Absorption Rate or SAR. The SAR limit stated in the ICNIRP guidelines is 2,0 watts/kilogram ( W/kg)
averaged over 10 grams of tissue. Tests for SAR are conducted using standard operating positions with the
device transmitting at its highest certified power level in all tested frequency bands. The actual SAR level of an
operating device c an be below the maximum value because the device is des igned to us e only the power
required to reach the network. That amount changes depending on a number of factors such as how close you
are to a network base station. The highest SAR value under the ICNIRP guidelines for use of the device at the
ear is 0,567 W/kg. Use of device accessories and enhancements may result in different SAR values. SAR
values may vary depending on national reporting and testing requirements and the network band.
DECLARATION OF CONFORMITY
CERTIFICATION INFORMATION (SAR)
77
Page 78

The WEEE logo (shown at the left) on the product or on its box indicates that this
product must not b
e disposed of or d umped with your other household waste. You are
liable to dispose of all your electronic or electrical waste equipment by relocating over
to the specified collection point for recycling of such hazardous waste. Isolated
er recovery of your electronic a nd electrical waste equipment at the
time of disposal will allow us to help conserving nat ural resources. Moreover, proper
recycling of the electronic and electrical waste equipment will ens ure safety of human
collection and prop
health and environment.
78
Page 79

INHALT
1. Sicherheitshinweise 80
2. Telefo nbeschreibung 82
3. Erste Schritte 84
4. Kurze Beschreibung der Funktionen 90
5. Beschreibung der Grundoperationen 103
6. Übesicht über die verfügbaren Funktionen 109
7. Zubehör 154
8. Übliche Fehler 157
9. Technische Spezifikation 159
Inhalt der Verpackung
Telefon, Akku, Reiseladegerät, Datenkabel, Bedienungsanleitung, zweiter Akku (optionales Zubehör),
Ladestation (optionales Zubehör), Headset (optionales Zubehör), Stylus (optionales Zubehör), Hülle
(optionales Zubehör).
79
Bedienungsanleitung
Page 80

1. Sicherheitshinweise
Bitte lesen Sie vor der Verwendung Ihres Telefons folgende Anweisungen, die Ihnen eine sichere und effektive
Bedienung ermöglichen.
Benutzen Sie das Telefon nicht in der Nähe von chemischen Betrieben, an Tankstellen,
Brennstofflagern oder ähnlichen Orten, wo elektrische Entladung einen Brand auslösen könnte.
Bewahren Sie das Te lefo n außerhalb der Reichweite von Kindern auf.
Aus Sicherheitsgründen benutzen Sie beim Autofahren das Headset. Benutzen Sie das Telefon
NICHT bei hohen Geschwindigkeiten.
Benutzen Sie das Telefon nicht im Flugzeug. Bevor Sie in ein Flugzeug einsteigen, kontrollieren Sie,
ob die SIM-Karte oder automatisches Einschalten deaktiviert wurden.
Verwenden Sie das Telefon nicht in Krankenhäusern. Medizinische Geräte könnten gestört werden
und dadurch die Gesundheit der Patienten bedroht werden. Es könnten vor allem Herzschrittmacher,
Hörgeräte oder ähnliche elektronische Geräte gestört werden.
Personen mit einem Herzschrittmacher sollten immer einen Mindestabstand von 20cm zwischen
dem Telefon und dem Herzschrittmacher einhalten, wenn das Telefon eingeschaltet ist. Das Telefon
an das dem Herzschrittmacher entfernte Ohr halten, um die Gefahr möglicher Störungen zu
verringern.
Die Garantiebedingungen erstrecken sich nicht auf nicht originales Gerätezubehör.
Öffnen Sie das Gerät nicht. Sollte es nicht funktionieren, wenden Sie sich an unseren autorisierten
Kundenservice.
Das Telefon ohne Akku nicht aufladen. Wenn Sie den Akku herausnehmen wollen, schalten Sie das
80
Page 81

Gerät zuerst aus. Die gespeicherten Daten könnten sonst beschädigt werden.
Aufladen nur in einer Umgebung mit ausreichender Luftzirkulation und Wärmeabfuhr, außer
Reichweite von Sprengstoffen oder leichtentzündlichen Materialien.
Das Gerät fern von magnetisch empfindlichen Gegenständen, z.B. Kreditkarten, halten.
Ihr Telefon ist nicht wasserdicht. Halten Sie es trocken.
Benutzen Sie das Telefon nicht in Gebieten mit extremen Temperaturen und schützen Sie es vor
direkter Sonneneinstrahlung oder enormer Feuchtigkeit.
Um die Oberfläche des Telefons zu reinigen, kein nasses Tuch oder starke Reinigungsmittel
benutzen.
Ihr Telefon ermöglicht es, Fotos und Tonaufnahmen zu machen. Benutzen Sie diese Funktionen
unter Berücksichtigung der allgemein geltenden Regeln und Beschränkungen. Foto- und
Tonaufnahmen ohne Berechtigung können rechtswidrig sein.
Das Gerät vor einem Fall oder Stoß schützen. Seine Oberfläche oder technische Komponenten
könnten beschädigt werden.
Entsorgen Sie die gebrauchten Akkus zufolge der Richtlinien und Anweisungen für diese Sorte
Abfall.
Hinweis:
Unsere Gesellschaft trägt keine Verantwortung für einen Verlust oder Schaden an diesem Gerät, falls es nicht in Übereinstimmung
mit den obenerwähnten Empfehlungen benutzt wurde. In Hinsicht auf andauernde Entwicklung und Verbesserung des Gerätes kann
der Text dieser Bedienungsanleitung von der Wirklichkeit abweichen. Unsere Gesellschaft behält sich das Recht vor, Änderungen im
Text dieser Bedienungsanleitung zu machen, ohne diese im Voraus bekannt zu geben.
81
Page 82

2. Telefonbeschreibung
Das Gerät hat 11 Tasten, Touch-Screen, Umgebungslichtsensor, microSD-Slot, USB-Anschluss und SpitzenFlexaret-Kamera mit CCD-Sensor mit einer Auflösung von 12.2 Mpix.
Telefonbeschreibung:
82
Page 83

1. Lichtsensor 13. Leuchtdiode
2. Lautsprecher 14. Xenonblitz
3. Taste „Wiedergeben“ 15. Rückseitiges Cover
4. Taste „Anrufen“ 16. Kameralinse
5. Taste „Links“ 17. Lautsprecher
6. Taste „Oben“ 18. microSD-Slot
7. Taste „Rechts“ 19. Loch für Handyanhäger
8. Taste „Unten“ 20. Taste „Lautstärke/Zoom“
9. Taste „OK“ 21. Taste „Fotoapparat/Kamera“
10. Taste „C“ 22. Taste „Auslöser“
11. Taste „Anruf beenden/Einschalten“ 23. USB-Anschluss (für PC, Headset, Ladegerät, TV-OUT)
12. LCD-Touch-Screen 24. Rille für Finger (zum Aufmachen des rückseitigen Covers)
Hinweis: Drücken Sie auf das LCD-Display nicht mit viel Kraft. Es könnte unwiederbringlich beschädigt werden! Um das Telefon
zu steuern, berühren Sie das Te lefo n nur leicht, das Display ist empfindlich genug.
83
Page 84

3. Erste Schritte
Einlegen der SIM-Karte, des Akkus und der microSD-Karte
Wenn Sie das Telefon mit allen Funktionen benutzen w ollen, müssen Sie darin die SIM-Karte Ihres Betreibers,
den Akku und optional auch die Speicherkarte einlegen. Mit Hilfe der Speicherkarte erweitern Sie den
Grundspeicher des Gerätes und somit k önnen Sie F otos und Videos h oher Qualität (großem Speicherbedarf)
aufnehmen. Schützen Sie die SIM-Karte und Speicherkarte vor Kratzern und Verbiegen. Schützen Sie sie vor
statischer Elektrizität, Staub oder Wasser. Falls Sie Ihre SI M-K ar te verlieren, wenden Sie sich unverzüglich an
Ihren Betreiber mit der Bitte um Hilfe.
Bevor Sie die SIM-Karte oder Speicherkarte einlegen, schalten Sie zuerst das G erät aus. Die SIM-Karte wird
von der Hinterseite des Geräts und die Speicherkarte von der Seite des Geräts eingelegt.
Bevor Sie den Akku herausnehmen, überprüfen Sie, ob das Telefon ausgeschaltet ist. Nehmen Sie den Akku
nicht heraus, wenn das Gerät eingeschaltet ist, da es beschädigt werden könnte.
Die Spe icherkarte können Sie einlegen und herausnehmen, auch wenn das Gerät in Betrieb ist. Falls Sie
jedoch die Speicherkarte herausnehmen müssen, wenn das Te lefo n eingeschaltet i st, empfehlen wir, das
Gerät vorher auszuschalten, um einer Beschädigung der Karte vorzubeugen.
Hinweis: Di e SIM-Karte und Speicherkarte sind kleine Gegenstände. Bewahren Sie sie außerhalb der Reichweite von Kindern
auf. Falls sie verschluckt werden, können sie Verletzungen oder ernsthafte Gesundheitsprobleme verursachen.
84
Page 85

Einlegen der SIM-Karte:
1. Entnehmen Sie das rückseitige Cover und 3. Legen Sie die SIM-Karte in richtiger
schieben Sie das SIM-Cover in Pfeilrichtung. Richtung in die Halterung (abgeschrägte
Kante der Karte) ein.
2. Heben Sie das SIM-Cover in Pfeilrichtung. 4. Drücken Sie das SIM-Cover nach unten
85
und schieben Sie es in Pfeilrichtung, bis es
einrastet .
Page 86

Einlegen und herausnehmen des Akkus:
1. Legen Sie die Kupferkontakte des Akkus 3. Kontrollieren Sie, ob das Te lefo n
passend mit den Kontaktstiften in dem Akkuschacht. ausgeschaltet ist und finden Sie die Rille für
Finger auf der oberen Kante des
Akkuschachtes.
2. Zuerst legen Sie die Akkuseite mit Kontakten 4. Halten Sie den Akku an der Rille für Finger
ein und dann drücken Sie leicht den Akku in den und heben Sie ihn in Pfeilrichtung heraus.
Akkuschacht.
86
Page 87

Einlegen und herausnehmen der Speicherkarte:
1. Öffnen Sie das Cover des Speicherkartenslots. 3. Öff nen Sie das Cover des
2. Legen Sie die Speicherkarte mit den Goldkontakten 4. Nehmen Sie die Speicherkarte heraus.
nach oben in den Slot ein.
Speicherkartenslots. Drücken Sie auf die
Karte, um sie zu entriegeln.
87
Page 88

PIN für SIM-Karte
PIN: Es handelt sich um einen persönlichen Identifizierungscode, der das Verwenden der SIM-Karte nur durch
den berechtigten Benutzer ermöglicht. Falls der Schutz der SIM-Karte durch den PIN-Code aktiviert wurde,
zeigt sich nach dem Einschalten des Telefonmoduls eine Aufforderung „PIN eingeben“. Wenn Sie die PIN
eingeben, zeigen sich statt Zeichen Sternchen („*“). Die PIN erhalten Sie von dem Betreiber.
PIN2: Es handelt sich um einen persönlichen Identifizierungscode, der zur Nutzung der speziellen F unktionen
nötig ist, z.B. Tarif für Telefongespräche im Rahmen eines Netzwerksbetreibers u.a.
PUK und PUK2 (8 Zahlen):
Wenn der PIN-Code (z.B. wegen wiederholt f alscher Eingabe) gesperrt wurde, ist e s nötig, ihn zu ändern. In
so einem Fall wird der PUK-Code verlangt. Wenn PIN2 geändert werden soll, verwenden Sie P UK2. Falls Sie
diese zwei Codes nicht zusa mmen mit Ihren SIM-Karten erhalten haben, bitten Sie um sie in dem nächsten
Geschäft Ihres Netzwerkbetreibers.
Warnung: Wenn Sie den PIN-Code dreimal nacheinander falsch eingeben, wird die SIM-Karte automatisch gesperrt. Wenden Sie
sich an den Betreiber und bitten Sie ihn um Hilfe. Im Falle des falschen Entsperrungsversuches der SIM-Karte, kann s ie auf Dauer
entwertet werden.
Aufladen des Akkus
Der neue Akku erreicht seine optimale Kapazität, nachdem er dreimal voll aufgeladen und entladen worden ist.
Laden Sie ihn nur im Falle, wenn er entladen ist. Das Ü berladen kann die Leb ens dauer des Akkus verkürzen.
Entnehmen Sie das Plastikcover und schließen Sie das Ladegerät an den unteren Anschluss an. Wenn der
Akku voll aufgeladen wurde, trennen Sie zuerst das Ladegerät vom Netz und dann den Anschluss vom
88
Page 89

Telefon. Während des Ladevorgangs wird das Ico n des Ladezustandes angezeigt. Nachdem der Ladevorgang
beendet worden ist, verschwindet die Animation.
Während des Ladevorgangs wird das Gerät ein bisschen warm. Es handelt sic h um e in normales Ereignis.
Entfernen Sie den Akku nicht aus dem Telefon, wenn Sie ihn gerade mit Hilfe des Netzadapters aufladen.
Benutzen des Akkus
Die Betriebszeiten des Akkus werden von verschiedenen Faktoren beeinflusst, z.B. von der Konfiguration des
drahtlosen Netzwerkes, S ignalstärke, Betriebstemperatur d es Telefones, den benutzten Funktionen und
Einstellungen, dem benutzten Zubehör oder de m Voicemail- oder Datendienstmodus oder dem Modus
anderer Dienste.
Eine optimale Betriebslänge mit dem vollgeladenem Akku erreichen Sie, wenn Sie folgende Regeln einhalten:
Neue oder ältere Akkus, die lange Zeit nicht benutzt wurden, erreichen den vollen L adezustand erst
nach längerer Aufladung.
Während des Ladevorgangs sollte die Temperatur des Akkus der Zi mmertemperatur entsprechen
oder ein bisschen höher sein.
Je länger die Betriebszeit des Akkus ist, desto länger ist d ie Ladezeit. Das ist so üblich. Wenn sich
jedoch die Betriebeszeit nach vollem Aufladen verkürzt, wird es vielleicht nötig, einen neuen
Originalakku zu kaufen. Nicht zugelassenes Zubehör des Telefons kann nicht nur das Telefon
beschädigen, sondern auch Ihrer Gesundheit schaden.
Wurde der Akku länger nicht benutzt, kann es einen gewisse Zeit dauern, bis übliche Angaben auf
dem Display angezeigt werden.
89
Page 90

Hinweis: Um Ihre Sich erheit und Umweltschutz zu gewährleisten, müssen Akkus ordnungsgemäß entsorgt w erden. Ein
Kurzschluss im Gerät oder Akku kann zu einer Verletzung, Explosion oder einem Brand führen.
4. Kurze Beschreibung der Funktionen
Tastensperre
Das Gerät kann manuell oder nach Ablauf einer e ingegebenen Zeit g esperrt werden. E in e Infor mation z um
Entsperren wird auf dem Display angezeigt.
Taste „Lautstärke/Zoom“
Zum Einstellen der Lautstärke während des Gesprächs oder zum Vergrößern/Verringen im Kameramodus.
Taste „Auslöser“
Sie w ird im K ameramodus benutzt. Halb drücken: scharf stellen; vollständig drücken: fotografieren od er im
Videoaufnahmemodus Anfang/Ende des Aufnehmens. Auch Anfang/Ende der Sprechnotiz.
Taste „Fotoapparat /Kamera“
Zum Umschalten zwischen Fotografieren und Videoaufnehmen im Fotoapparatmodus.
Taste „Wiedergeben“
90
Page 91

Zur Wiedergabe von Fotos oder Videos.
Taste „C“
Zum Löschen der Zeichen, wenn Sie einen Text oder Zahlen bearbeiten oder zum Löschen Dokumente o der
anderer Objekte in Listen sowohl im Telefonmodus, als au ch im Fotoapparatmodus. Sie wird nicht zum
Rückkehr oder Beenden verwendet.
Taste „Anrufen“
Zum Anrufen von der SIM-Karte (falls Sie die Nummer der angerufenen Person eingegeben haben oder sie in
dem Telefonbuch gespeichert haben). Mit dieser Taste können Sie auch eingehende Anrufe e mpfangen. I m
Standardmodus des Gerätes wird nach Drücken dieser Taste der „Wählen“-Bildschirm angezeigt.
Taste „Anruf beenden/Einschalten“
Zum Beenden des gerade verlaufenden Gesprächs, zur Rückkehr zum Standby-Bi lds chirm und zu m Ein- und
Ausschalten des Te lefo ns.
Taste „Links/Oben/Rechts/Unten/OK“
Im Standby-Modus kann die Navigationstaste z um Umschalten zwischen de m Standby-Modus d es
Bildschirmes und dem Display benutzt werden.
Links: Sie ändern den Standby-Modus des Bildschirmes (Sie schalten zwischen der Uhranzeige,
dem Hintergrundbild und Anwendungssymbolen um).
91
Page 92

Oben: Sie ändern das Aussehen des Displays in dem gleichen Standby-Modus des Bildschirmes
(Sie schalten zwischen Analog- und Digitaluhr um).
Rechts: Sie ändern den Standby-Modus des Bildschirmes (Sie schalten zwischen der Uhranzeige,
dem Hintergrundbild und Anwendungssymbolen um).
Unten: Sie ändern das Aussehen des Displays in dem gleichen Standby-Modus des Bildschirmes
(Sie schalten zwischen Analog- und Digitaluhr um)
OK: zum Eingang ins Hauptmenü
Um eine Option im Men ü auszuwählen oder eine Mitteilung zu schreiben, können Sie mit Hilfe der „L inks“-,
„Oben“-, „Rechts“- und „Unten“- Taste n den Cursor bewegen.
Hinweis: Wenn Sie im Standby-Modus die „Anrufen“-Taste d rücken und dann lange die „1“-Taste, wird die Nummer Ihres
Voicemailservers im Voicemailcenter gewählt. Es handelt sich um eine üblich benutzte Kurzwahlnummer. Die Nummer des
Voicemailservers muss je nach dem Betreiber ins Telefon eingegeben werden.
Wenn Sie im Standby-Modus die „Anrufen“-Taste drücken und dann lange die „*“-Taste, werden „P“-, „+“-, „ W“- oder „ *“-Zeichen
eingegeben. Die „ P“ - und „W“-Zeichen werden benutzt um einfacher mit Hilfe der Durchwahl zu telefonieren. Das „+“-Zeichen w ird
für internationale Anrufe verwendet.
Die „ W“- und „ P“ -Zeichen sollen unterschieden werden. Das „P“-Zeichen sendet das DTMF-Signal nach einer Zeitspanne von 3
Sekunden, dagegen initialisiert „W“ die Frage, ob der Be nutzer das DTMF-Signal senden möchte.
92
Page 93

Symbole auf dem Display
Symbol Beschreibung
Senkrechte Striche zeigen die Signalstärke des GSM-Netzwerkes an. Fünf Striche
bedeuten die volle Signalstärke.
Senkrechte Striche zeigen den Akku-Ladezustand an. Fünf Striche bedeuten, dass der
Akku voll aufgeladen ist.
EDGE-Netz steht zur Verfügung.
GPRS-Netz steht zur Verfügung.
Roaming.
Das Telefon ist lautlos.
Das Telefon ist im Modus „Treffen“.
Das Headset ist an das Telefon angeschlossen.
Alarm ist aktiv.
Bluetooth ist aktiv.
Anruf in Abwesenheit.
Rufumleitung aktiv.
Neue ungelesene SMS.
Neue ungelesene MMS.
Neue ungelesene E-Mail.
Neue ungelesene PUSH-Mitteilung.
93
Page 94

E-Cult-MP3-Player spielt im Hintergrund.
Radio spielt im Hintergrund.
Symbole auf dem Standby-Bildschirm
Symbol Beschreibung
Durch Klicken wird die Funktion Wählen aktiviert
Durch Klicken wird die Funktion Kontaktliste aktiviert
Durch Klicken wird die Funktion Anrufe aktiviert
Durch Klicken wird die Funktion Kamera aktiviert
Durch Klicken wird die Funktion Flexaret (Fotoapparat) aktiviert
Durch Klicken wird die Funktion profile aktiviert
Durch Klicken wird die Funktion Album aktiviert
94
Page 95

Durch Klicken wird die Funktion Freigeben aktiviert
Durch Klicken wird die Funktion Nachrichten aktiviert
Durch Klicken wird die Funktion SMS aktiviert
Durch Klicken wird die Funktion Einstell. aktiviert
Durch Klicken wird die Funktion MMS aktiviert
Durch Klicken wird die Funktion E-Mail aktiviert
Durch Klicken wird die Funktion Letz. Kontakt aktiviert
Durch Klicken wird die Funktion Netzwerke aktiviert
Durch Klicken wird die Funktion Datei-Man. aktiviert
Durch Klicken wird die Funktion E-Cult (MP3 player) aktiviert
95
Page 96

Durch Klicken wird die Funktion Video aktiviert
Durch Klicken wird die Funktion Diktaphon aktiviert
Durch Klicken wird die Funktion Radio aktiviert
Durch Klicken wird die Funktion Kalender aktiviert
Durch Klicken wird die Funktion Aufgaben aktiviert
Durch Klicken wird die Funktion Rechner aktiviert
Durch Klicken wird die Funktion Wecker aktiviert
Durch Klicken wird die Funktion Uhr aktiviert
Durch Klicken wird die Funktion Java aktiviert
96
Page 97

Anpassung des Standby-Bildschirmes
Sie können den Standby-Bildschirm je nach Ihrem Wunsch anpassen. Der Standby-Modus kann mit der Uhr,
dem Hintergrundbild oder Anwendungssymbolen kombiniert werden und es können Bildschirme mit
Anwendungssymbolen geändert werden.
Im Standby-Modus streichen Sie horizontal mit einem Finger über den oberen Teil des Bildschirms
um umzuschalten. Zum Umschalten können Sie auch die „Links“ und „Rechts“-Tasten benutzen.
Im Standby-Modus streichen Sie horizontal mit einem Finger über den mittleren Teil des Bildschirms
um Seiten mit Anwendungssymbolen umzuschalten.
Ordnen der Anwendungssymbolen im Standby-Modus
Die Abfolge der Symbole auf dem Bildschirm kann je nach Ihrer Präferenz geändert werden.
Im Standby-Modus berühren Sie lange ein Anwendungssymbol, bis der Modus zum Verschieben des
Symbols aktiviert wird. Wenn dieser Modus aktiviert ist, vergrößert sich das Symbol.
In dem aktiven Modus halten Sie das vergrößerte Symbol, schieben Sie es auf den gewünschten
Platz auf dem Bildschirm und erheben Sie den Finger. Das Telefon ordnet automatisch die
Anwendungssymbole je nach dem neuen Platz des verschobenen Symbols.
Hinweis: Im Stand by-Modus gibt es zwei Typen der Ordnung der Symbole auf dem Bildschirm: 3x3 Ordnung und 2 x3 Ordnung.
Standardordnung ist 3x3. Die Ordnung kann im Modus der Anwendungsymbole geändert werden.
97
Page 98

Uhr-Modus
Im Uhr-Modus streichen Sie vertikal mit e inem Finger üb er den oberen Teil des Bildschirms, wo die Digitaloder Analoguhr angezeigt wird. Zum Umschalten können Sie auch die „Oben“- und „Unten“-Tasten
verwenden.
Hintergrundbild-Modus
Hintergrundbilder können je nach Ihrer Präferenz gewechselt werden.
Im Hintergrundbild streichen Sie vertikal mit einem Finger über den oberen Teil des Bildschirms, wo
der Hintergrundbild angezeigt wird. Zum Ums cha lten können Sie auch d ie „Oben“- und „Unten“Tasten verwenden“.
Im Hintergrundbild streichen Sie horizontal mit einem Finger über d en oberen Teil des Bildschirms
um ein gewünschtes Hintergrundbild auszuwählen. Zur Auswahl können Sie auch die „Links“- und
„Rechts“-Tasten verwenden. Wenn Sie ein neues Hintergrundbild hinzufügen wollen, streichen Sie
über das „+“-Symbol und wählen Sie ein neues Bild aus.
Wenn Sie mit Ihrer Wahl zufriede n sind, klicken Sie auf das ausgewählte Bild und drücken Sie die
„OK“-Taste um es zu bestätigen. Das Hi ntergrundbild auf dem Standby-Bildschirm wird z u de m
gerade Ausgewählten gewechselt.
Hinweis: Man kann aus 12 Hintergrundbilder auswählen.
98
Page 99

Anwendungssymbole-Modus
Symbole auf dem Bildschirm und ihre Abfolge können je nach Ihrer Präferenz geändert werden.
Im Anwendungssymbole streichen Sie vertikal mit einem F in ger über den oberen Teil des
Bildschirms. Zum Umschalten können Sie auch die „Oben“- und „Unten“-Tasten verwenden“.
Um ein g ewünschtes Symbol auszuwählen, streichen Sie horizontal mit einem Finger über den
oberen Tei l des Bildschirms. Zur Steuerung können Sie auch die „Links“- und „Rechts“-Ta sten
verwenden.
Um das a usgewählte Symbol auf den Bildschirm zu platzieren, berühren Sie lange das
Anwendungssymbol, bis der Modus zum Verschieben des Symbols aktiviert wird. Wenn dieser
Modus aktiviert ist, vergrößert sich das Symbol.
In dem aktiven Modus halten Sie das vergrößerte Symbol, schieben Sie es a uf d en gewünschten
Platz auf dem Bildschirm und erheben Sie den Finger. Das Telefon ordnet automatisch die
Anwendungssymbole je nach dem neuen Platz des verschobenen Symbols.
Um die Symbole von dem Bildschirm zu entfernen und zurück zu den Anwendungssymbolen
zuzuordnen, folgen Sie die letzte zwei Schritte in der umgekehrten Reihenfolge.
Wenn Sie auf das Symbol der Ordnung (das erste) k licken, können Sie die Ordnung d er Symbole
von 3x3 zu 2x3 wechseln.
Hinweis: Im Standby-Modus befinden sich bis zu 18 Anwendungssymbole auf dem Bildschirm. Wenn der Home-Bildschirm voll
von Symbolen ist, können weitere nicht hinzugefügt werden. Auf den Bildschirm kann nicht das Symbol fü r Änderung der
Symbolordnung hinzugefügt werden. Aus dem Bildschirm kann das Symbol des Wählens nicht entfernt we rden.
99
Page 100

Arbeit im Hauptmenü
Um das Hauptmenü z u öffnen, drücken Sie „OK“ im Standby-Modus. Im Hauptmenü sind alle Funktionen in
vier Kategorien geteilt: Einstellungen/Werkzeug, Telefon, Unterhaltung und Internet. Im Menü können folgende
Tasten benutzt werden:
Um einzelne Funktionen anzuzeigen, verwenden Sie die „Links“-, „Oben“-, „Rechts“-, „Unten“- und
„OK“-Tasten.
Um auf den Standby-Bildschirm zurückzukehren, klicken Sie auf die Option [Zurück] in dem rechten
unteren Ecke des Bildschirms oder drücken Sie die „Anruf beenden/Einschalten“-Taste.
Um eine Funktion im Hauptmenü zu wählen, drücken Sie „OK“ oder klicken Sie auf die Option
[Auswählen] in dem linken unteren Ecke des Bildschirms.
Um die Kategorie zu wechseln, klicken Sie auf den entsprechenden Lesezeichen.
Um eine Funktion auszuwählen, drücken Sie einfach auf ihr Symbol.
100
 Loading...