

Page 1

PO BOX 4394
SANTA ROSA, CA
95402 USA
0230-0254A
P (707) 525-9941
F (707) 575-7046
EMGPICKUPS.COM
INSTALLATION INFORMATION
EMG MODEL: ACS SOUNDHOLE PICKUP
SPECIFICATIONS
Resonant Frequency 14KHz
Output Noise -96dbV
Output Impedance (Ohms) 2K
Output Voltage 0.5V
Current Requirement @ 6 Volts (Microamps) 220
Maximum Supply (Volts DC) 27
Installation notes:
This is a very simple installation. Connectors are used throughout so soldering is not required. Once the installation is complete the EMG-ACS
can be removed and reinstalled easily. Velcro is used to attach the pickup cable out of sight when the pickup is removed.
General Operation
The EMG-ACS is a full bandwidth pickup. For best performance it should be played through a full bandwidth system using a direct box with the
signal sent directly to the mixing board. If you use an amplifier on stage it should be full bandwidth. Results from amplifiers “tuned” for piezo
style pickups will yield poor results. Since the ACS is a magnetic pickup, you might find the best result is a simple guitar amplifier designed for
magnetic pickups. The ACS also features a volume control.
String choices/ Pole pieces:
The EMG-ACS features adjustable pole pieces to compensate for different choices of strings. Typically a wound G String will have a smaller core
than the B String, so the unwound B and E strings will be louder. The Pole pieces can be lowered for better string balance or they can be
removed entirely.
tools required:
Electric Drill
31/64” Brad Point Drill
1/2” Ream
1/16” , 3/32” Hex Wrenches (Included)
3.515
(89.3)
Dimensions:
ACS Soundhole Pickup
3.280
(83.3)
1.200
(30.5)
.175
(4.44)
1.015
(25.7)
Warranty
All EMG Pickups and accessories are warranted for a period of two years. This warranty does not cover failure due to improper installation, abuse or damage. If
upon examination the pickup is determined to be defective, a replacement will be made. Warranty replacement products are covered by this same warranty. This
warranty covers only those pickups and accessories sold by authorized EMG Dealers. This warranty is not transferable.
© 2012 Copyright EMG INC. All Rights Reserved.
Page 2
Installation Instructions:
EMG Model: ACS
General Notes:
1) Remove the Strings.
2) Output Jack Installation:
A 31/64 inch (12mm) hole is required for the output jack.
The hole should be no larger than 1/2 inch in diameter.
It is recommended that this hole be drilled by someone with the
proper tools and skill to maintain the finish of your guitar.
Read the following instructions before you proceed.
If your instrument does not have a strap button you can simply drill the 31/64” hole
using the brad point drill. No pilot hole is required. If your instrument already has a
strap button, remove it. Fill the strap button hole with a piece of wood doweling to
provide a solid/flat surface for the brad point drill. Then drill the 31/64“ hole, the
dowel will be drilled out during the process. Remove the sawdust from the instrument
and proceed.
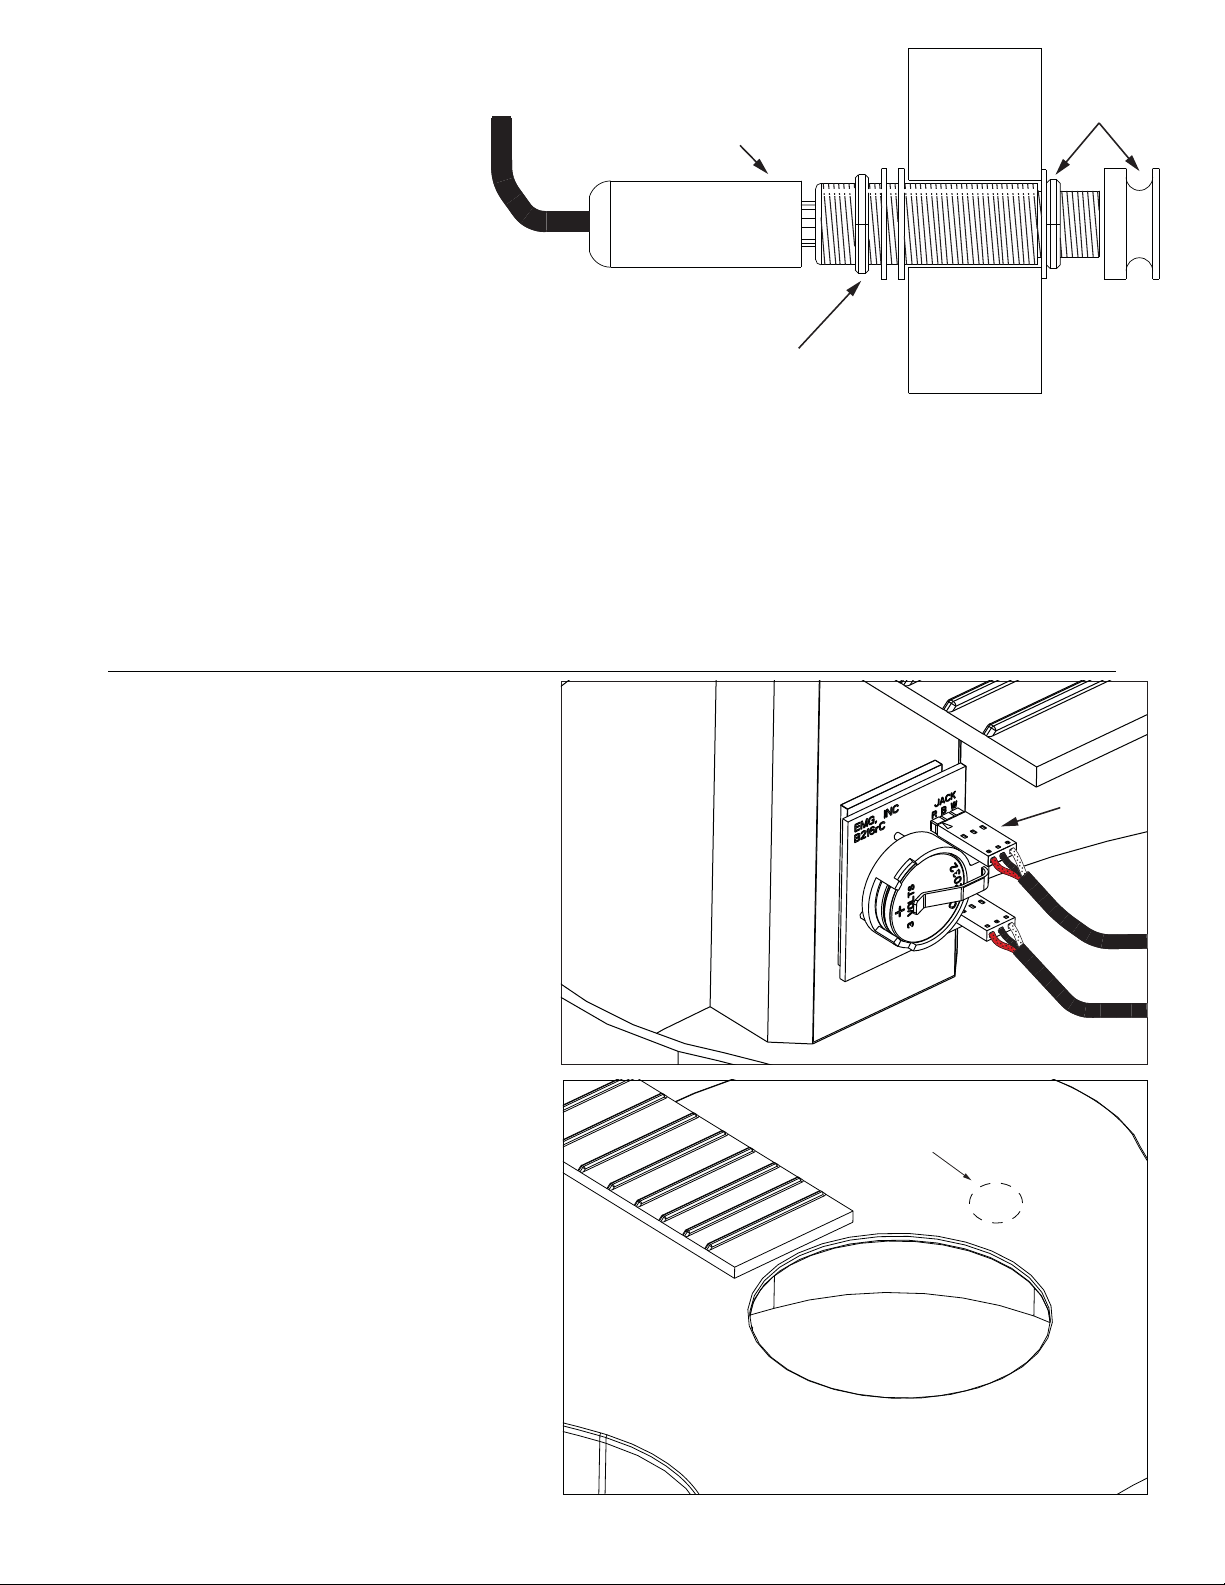
3) Refer to diagram #1
A) Remove the strap button, nut and finish washer from the jack.
B) Insert the jack through the soundhole, then through the end block of the guitar.
At this point you will need to adjust the rear hex nut to allow for the thickness of the
endblock. The rear hexnut should be adjusted allowing you to tighten the outer nut to
get the jack nice and snug.
C) Re-attach the washer and nut and tighten into place then screw the strap peg on.
D) Thread the Shield cover onto the jack and tighten. The cable will be connected in
the next step.
Diagram #1
Step D
Step B
Guitar
End Block
Steps A and C
Battery Board Installation:
1) Install 2 CR2032 Lithium Cell Batteries into the battery holder
as shown in Diagram #2. The positive (+) side of both batteries
should be facing out, towards you.
Plug the output jack cable onto the 3-pin header marked JACK on the
battery board. with the terminals facing up as shown. Also, plug
the pickup cable (the end without the velcro) onto the 3-pin header
marked PICKUP. The terminals on the pickup cable should also be
facing up.
Before installing the battery board, be sure the neck block is clean
and dust free. Remove the adhesive backing from the dual-lock
fastener and adhere the entire battery assembly to the neck block.
It takes about 24 hours to fully adhere.
Install the Velcro Coin:
Diagram #3 shows the Velcro coin installed on the inside of the guitar
top. It’s provided for convenience and not a necessary part of the
installation. It makes it easy to affix the pickup cable if you remove
the pickup for visibility reasons, or for travel. Remove any dust from
the inside top of the guitar, remove the adhesive backing and fix the
coin to the inside top of the instrument.
The matching piece of velcro is on the pickup cable.
Diagram #2
Neck Block
Connector
Terminals
Visible
Output Jack
Cable
Pickup Cable
Velcro Coin
ACS PICKUP Page 2
Diagram #3
Page 3

Install the cable holders:
Before installing the pickup it’s a good idea to install the adhesive
backed cable holders in the guitar. Refer to Diagram #6 below.
It’s easiest to slide the cable holders onto the cable, remove the
adhesive backing and then place them as needed to prevent the cable(s)
from banging around inside the guitar.
Install the ACS Pickup cable onto the pickup with the Velcro side up
as shown in Diagram #4.
Loosen the two mounting screws by using the 1/16” Hex wrench included.
It’s not necessary to remove the bracket. Place the pickup in the
soundhole towards the neck with the bracket on the underside
of the soundboard and tighten the screws. See Diagram #5 below.
Diagram #5
Diagram #4
Loosen the two mounting screws
Velcro Piece
And finally:
Restring the guitar. Loosen the pickup mounting screws,
align the pickup’s pole pieces under the strings and tighten the screws.
Plug the guitar into an amplifier, turn the volume control up and
make sure the pickup is working. As mentioned before it will
probably be necessary to adjust the B and E Pole pieces to achieve
good string balance. When adjusting the poles, be sure to turn down
your amplifier.
Be sure to unplug your guitar when you’re not using to conserve battery power.
That’s it, play on.
Diagram #6
ACS PICKUP Page 3
 Loading...