

Page 1
VSG/VSSG compact logix PLC
Operation manual
FOR UNITS BUILT BEFORE JULY 1, 2013
Page 2

Page 3
Important Note
Before applying power to the control panel, all wiring to the panel shall be installed per NEC. Specifically
check for proper voltage and that the neutral is grounded at the source. An equipment ground should also
be run to the panel.
*See Wiring Instructions and Diagrams before proceeding.
NOTES:
• Before start-up you need to enter all system values and options, see section on Setpoint Values.
• Power circuits entry on left side of enclosure
• Instrument circuits entry on right side of enclosure
Electrical installation shall be completed by a licensed electrician qualified in field wiring
located in Class 1 Div 2 Hazardous Locations per the National Electric Code (NEC).
VSG/VSSG • Compact Logix PLC Manual •Vilter/Emerson • 35391CL
3
Page 4

4/Blank
VSG/VSSG • Compact Logix PLC Manual •Vilter/Emerson • 35391CL
Page 5

Table of Contents
Important Note .................................................................................................3
VSG/VSSG STANDARD VILTER WARRANTY STATEMENT ...................................... 6
Operational Flow Charts .................................................................................... 7
Main Screen ..................................................................................................... 15
Log On Screen .................................................................................................16
Set Up Screen .................................................................................................. 17
Vilter Only Screen ............................................................................................19
Menu Screen ................................................................................................... 20
Compressor Alarm and Trip .............................................................................24
Compressor Timer Setpoints ...........................................................................26
Compressor Control Setpoints ......................................................................... 28
Additional Compressor Controls ...................................................................... 33
Compressor Setpoints and Alarms ................................................................... 34
Motor Speed Setpoints & Control Screen ......................................................... 36
Diagnostics Force Output ................................................................................ 38
Instrument Calibration ....................................................................................39
Oil Mixing Valve ............................................................................................... 45
Unit Start Screen (Start / Stop Logic) ................................................................ 48
Device Names ..................................................................................................51
Calibration Procedure of Optical Actuators ...................................................... 52
Calibration Procedure of Optical Actuators ...................................................... 53
Calibration Procedure of Optical Actuators ...................................................... 54
Installation Instructions For Replacement Of Optical Actuator ......................... 56
Slide Valve Actuator Theory of Operation ........................................................ 57
Slide Valve Actuator Troubleshooting Guide ....................................................58
Command Shaft Rotation and Travel ................................................................ 60
Safety Failure Message .................................................................................... 62
Version Screen .................................................................................................65
Trend Charts .................................................................................................... 66
Captured Data at Shutdown ............................................................................69
VSG/VSSG • Compact Logix PLC Manual •Vilter/Emerson • 35391CL
5
Page 6

VSG/VSSG STANDARD VILTER WARRANTY STATEMENT
Seller warrants all new single screw gas compression units and bareshaft single screw compressors
manufactured by it and supplied to Buyer to be free from defects in materials and workmanship for a period
of (a) eighteen (18) months from the date of shipment or (b) twelve (12) months from the date of
installation at the end user’s location, whichever occurs first.
If within such period any such product shall be proved to Seller’s satisfaction to be defective, such product
shall be repaired or replaced at Seller’s option. Such repair or replacement shall be Seller’s sole obligation
and Buyer’s exclusive remedy hereunder and shall be conditioned upon (a) Seller’s receiving written notice
of any alleged defect within ten (10) days after its discovery, (b) payment in full of all amounts owed by
Buyer to Seller and (c) at Seller’s option, Buyer shall have delivered such products to Seller, all expenses
prepaid to its factory. Expenses incurred by Buyer in repairing or replacing any defective product
(including, without limitation, labor, lost refrigerant or gas and freight costs) will not be allowed except by
written permission of Seller. Further, Seller shall not be liable for any other direct, indirect, consequential,
incidental, or special damages arising out of a breach of warranty.
This warranty is only applicable to products properly maintained and used according to Seller’s
instructions. This warranty does not apply (i) to ordinary wear and tear, damage caused by corrosion,
misuse, overloading, neglect, improper use or operation (including, without limitation, operation beyond
rated capacity), substitution of parts not approved by Seller, accident or alteration, as determined by Seller
or (ii) if the product is operated on a gas with an H2S level above 100 PPM. In addition, Seller does not
warrant that any equipment and features meet the requirements of any local, state or federal laws or
regulations. Products supplied by Seller hereunder which are manufactured by someone else are not
warranted by Seller in any way, but Seller agrees to assign to Buyer any warranty rights in such products
that Seller may have from the original manufacturer. Labor and expenses for repair are not covered by
warranty.
THE WARRANTY CONTAINED HEREIN IS EXCLUSIVE AND IN LIEU OF ALL OTHER REPRESENTATIONS AND
WARRANTIES, EXPRESS OR IMPLIED, AND SELLER EXPRESSLY DISCLAIMS AND EXCLUDES ANY IMPLIED
WARRANTY OF MERCHANTABILITY OR IMPLIED WARRANTY OF FITNESS FOR A PARTICULAR PURPOSE.
Any description of the products, whether in writing or made orally by Seller or Seller’s agents,
specifications, samples, models, bulletins, drawings, diagrams, engineering sheets or similar materials used
in connection with Buyer’s order are for the sole purpose of identifying the products and shall not be
construed as an express warranty. Any suggestions by Seller or Seller’s agents regarding use, application or
suitability of the products shall not be construed as an express warranty unless confirmed to be such in
writing by Seller.
6
VSG/VSSG • Compact Logix PLC Manual •Vilter/Emerson • 35391CL
Page 7
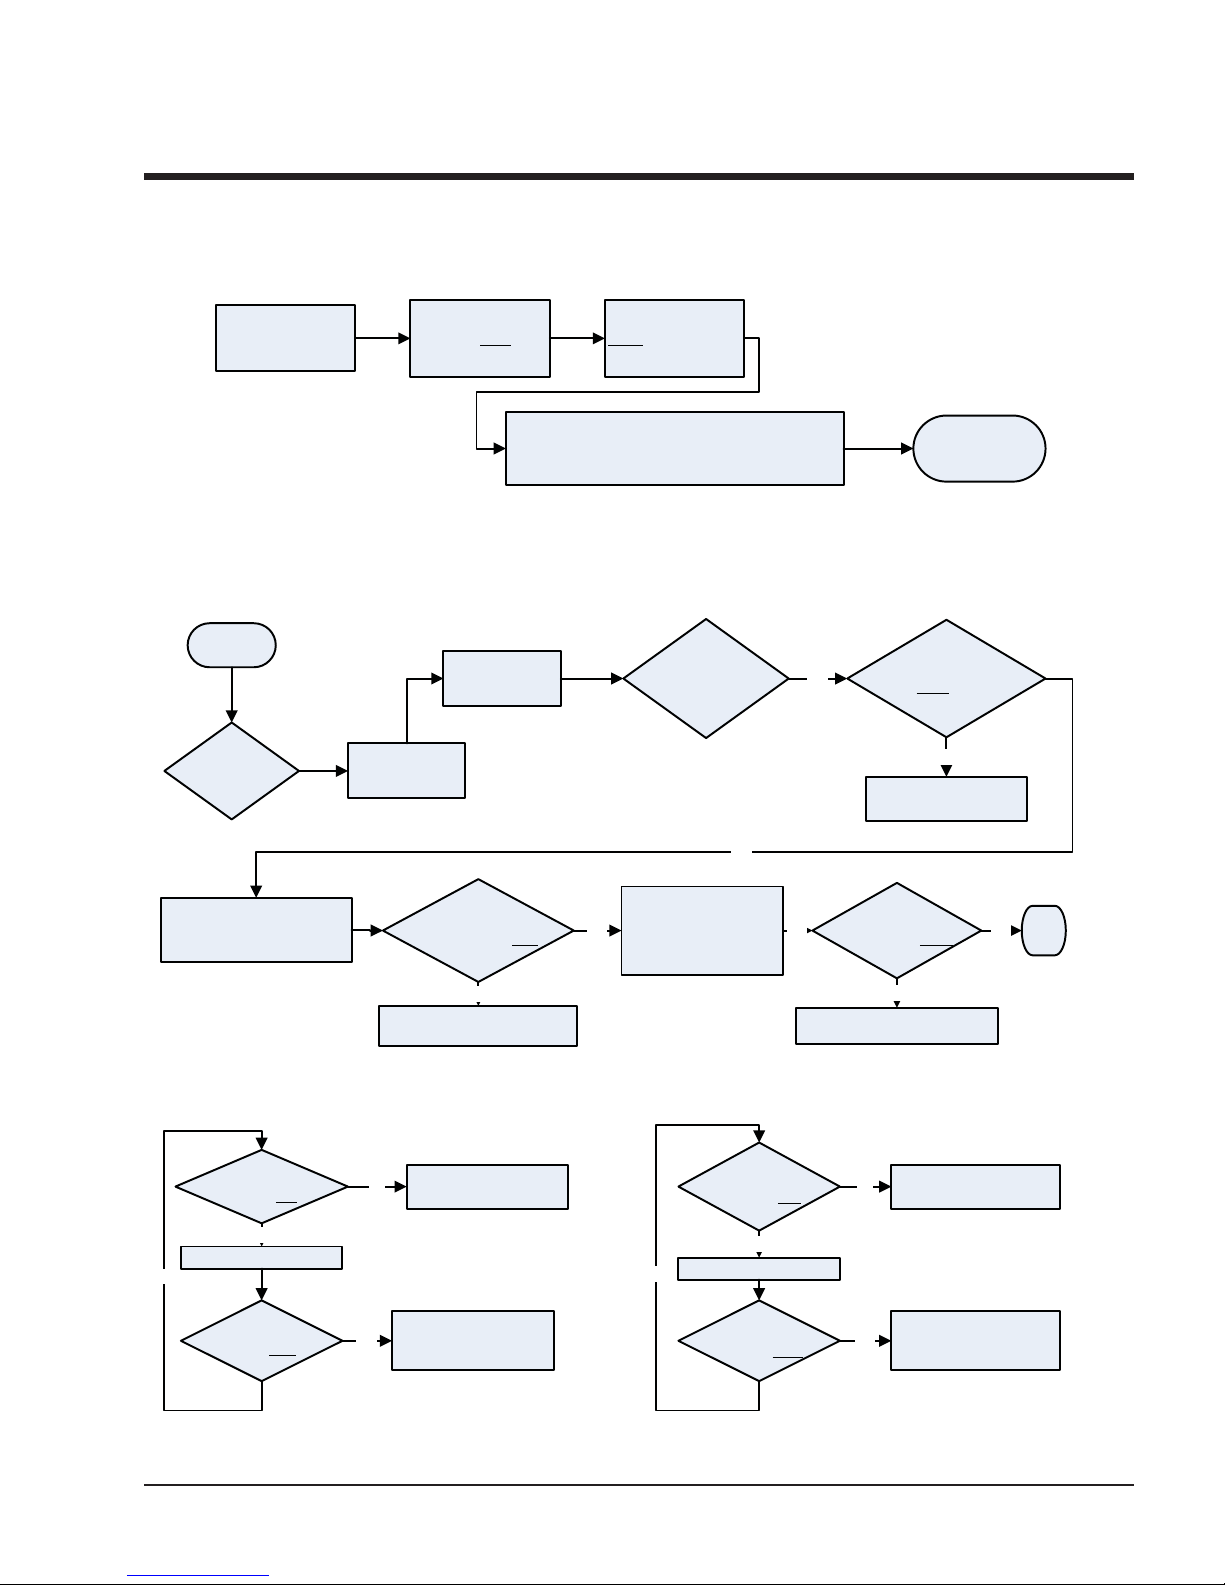
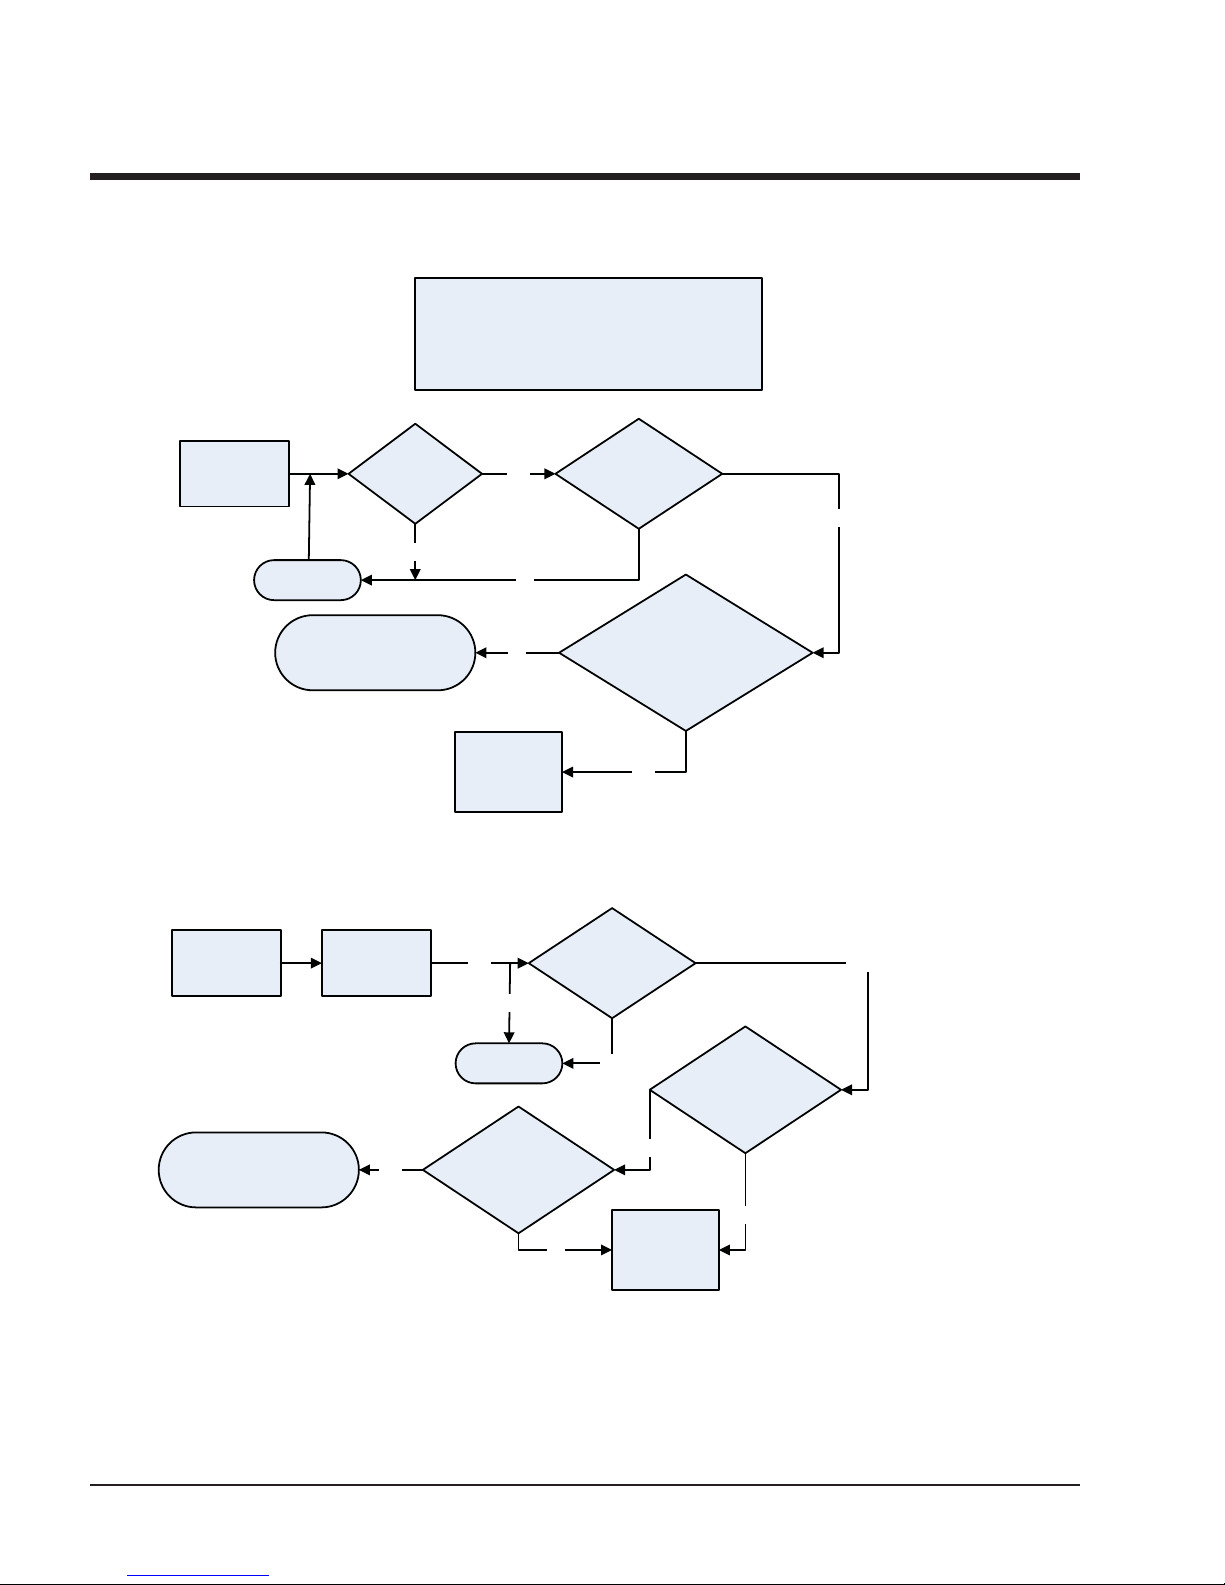
Requirements to Start Compressor
Operational Flow Charts
Volume and
Capacity slides are
less than 5 %.
Oil Separator Temp
> Oil Sep Start
Trip
Setpt.
Oil Pump On: Prelub Oil Press is > Prelub Oil
Press Reset Setpt for “Min Compressor Prelub
Timer” setting (Default 7 Seconds)
Critical Compressor Run Logic @ Compressor Start
Start
Compressor
Compressor
Start Mode
Prelube 5
Seconds
Satified Oil
Pressure
Filter Diff Press <
Filter Diff
Start
Trip Setpt
Is Run Oil Press >
Run Oil Press setpt?
Yes
Yes
Start Compressor
Is
Run Oil Press >
Run Oil Press
setpt?
Reset
(Default 40 PSI)
No
Run Oil Press Failure
“Filter Diff Press Safety
Changeover” timer expires
(60 sec after start).
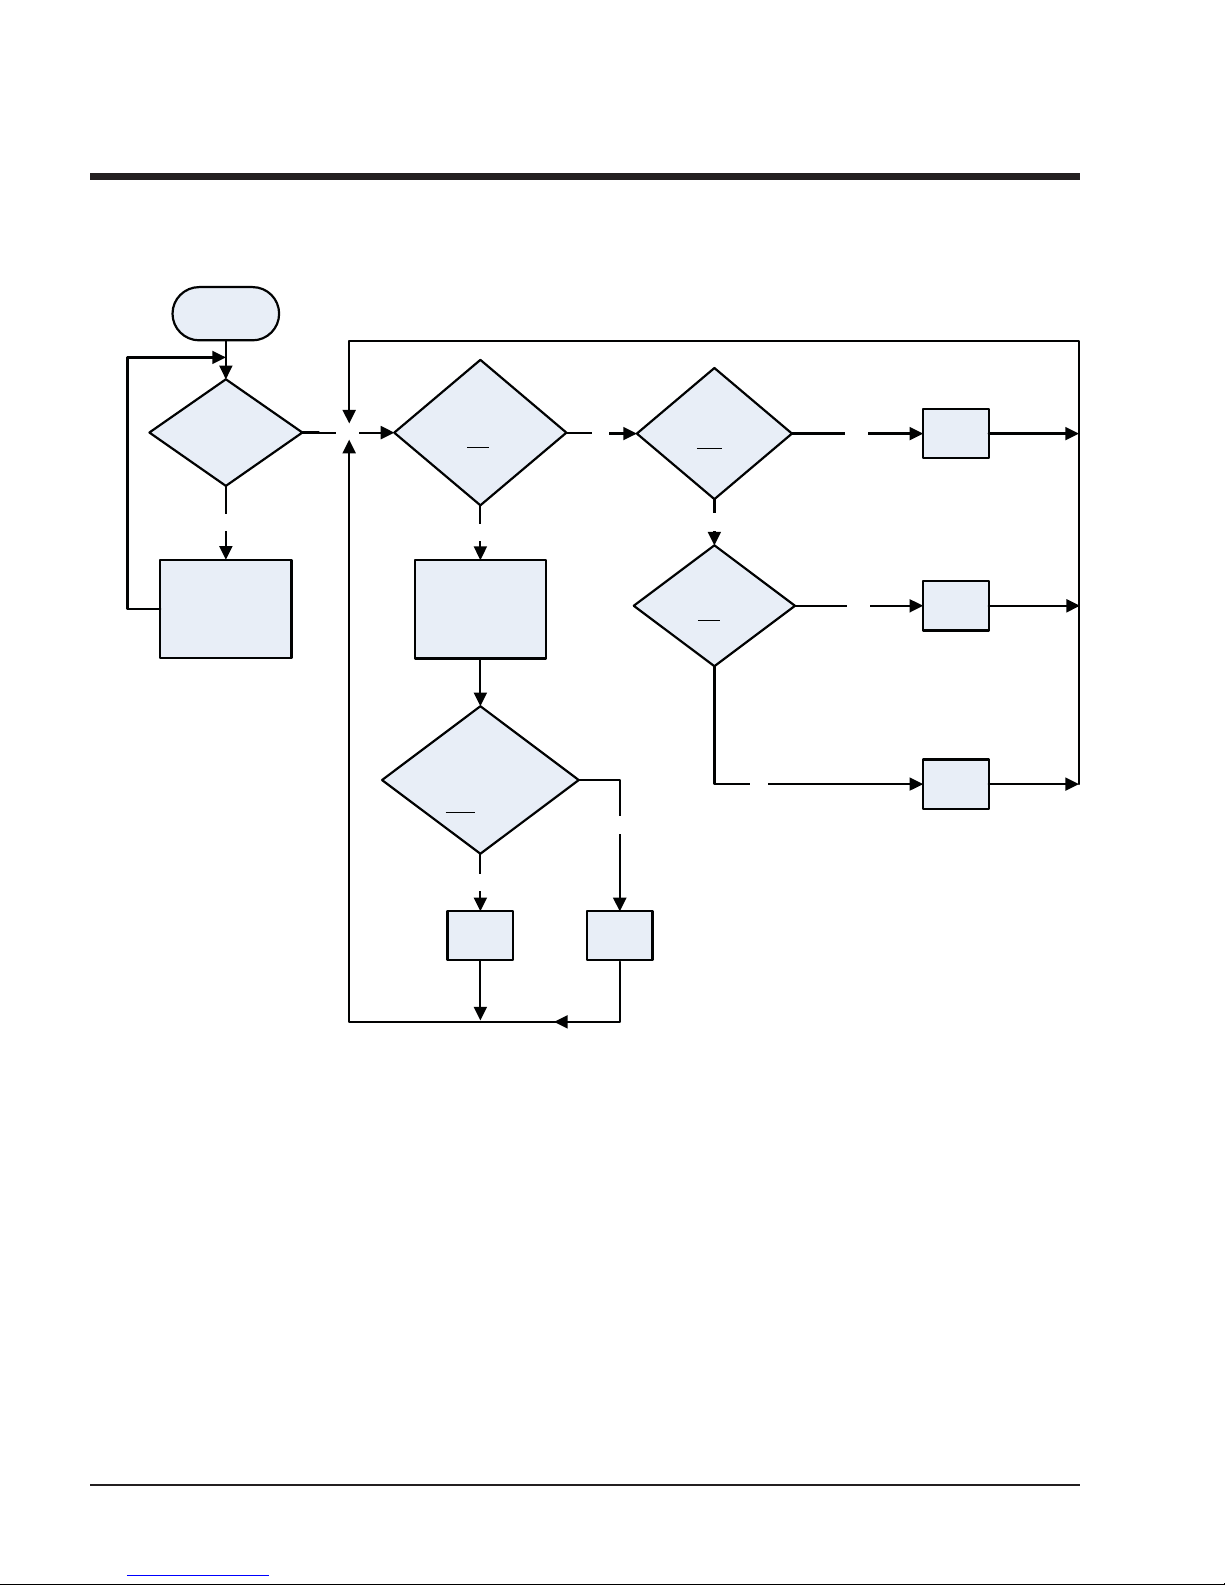
Compressor Amperage Load Limiting
Is
Motor Amps >
FLA (ON
)
Setpt?
Yes
No
Capacity INC Disabled
No
Is
Motor Amps >
Max (OFF
Setpt?
Yes
)
Is
Filter Diff < Hi Filter
Diff Press Run Trip
setpt?
No
Oil Separator Temp
Safety Changeover
Yes Yes
Timer expires. (5 min
after start)
Is
Oil Sep Temp > Lo
Oil Sep Run Reset
setpt:?
No
Run Filter Diff Press Failure Lo Run Oil Sep Temp Failure
High Disch Pressure Load Limit
Is
Normal Loading &
Unloading
Disch Press >
Cutin (ON
)
Normal Loading &
No
Unloading
Setpt?
Yes
Capacity INC Disabled
No
Capacity Decrease
until Amps < FLA x
1.0625
Is
Disch Press >
Cutout (OFF
Setpt?
)
Capacity Decrease until
Yes
DischPress < ON Setpt x
1.0625
Yes
Run
VSG/VSSG • Compact Logix PLC Manual •Vilter/Emerson • 35391CL
7
Page 8

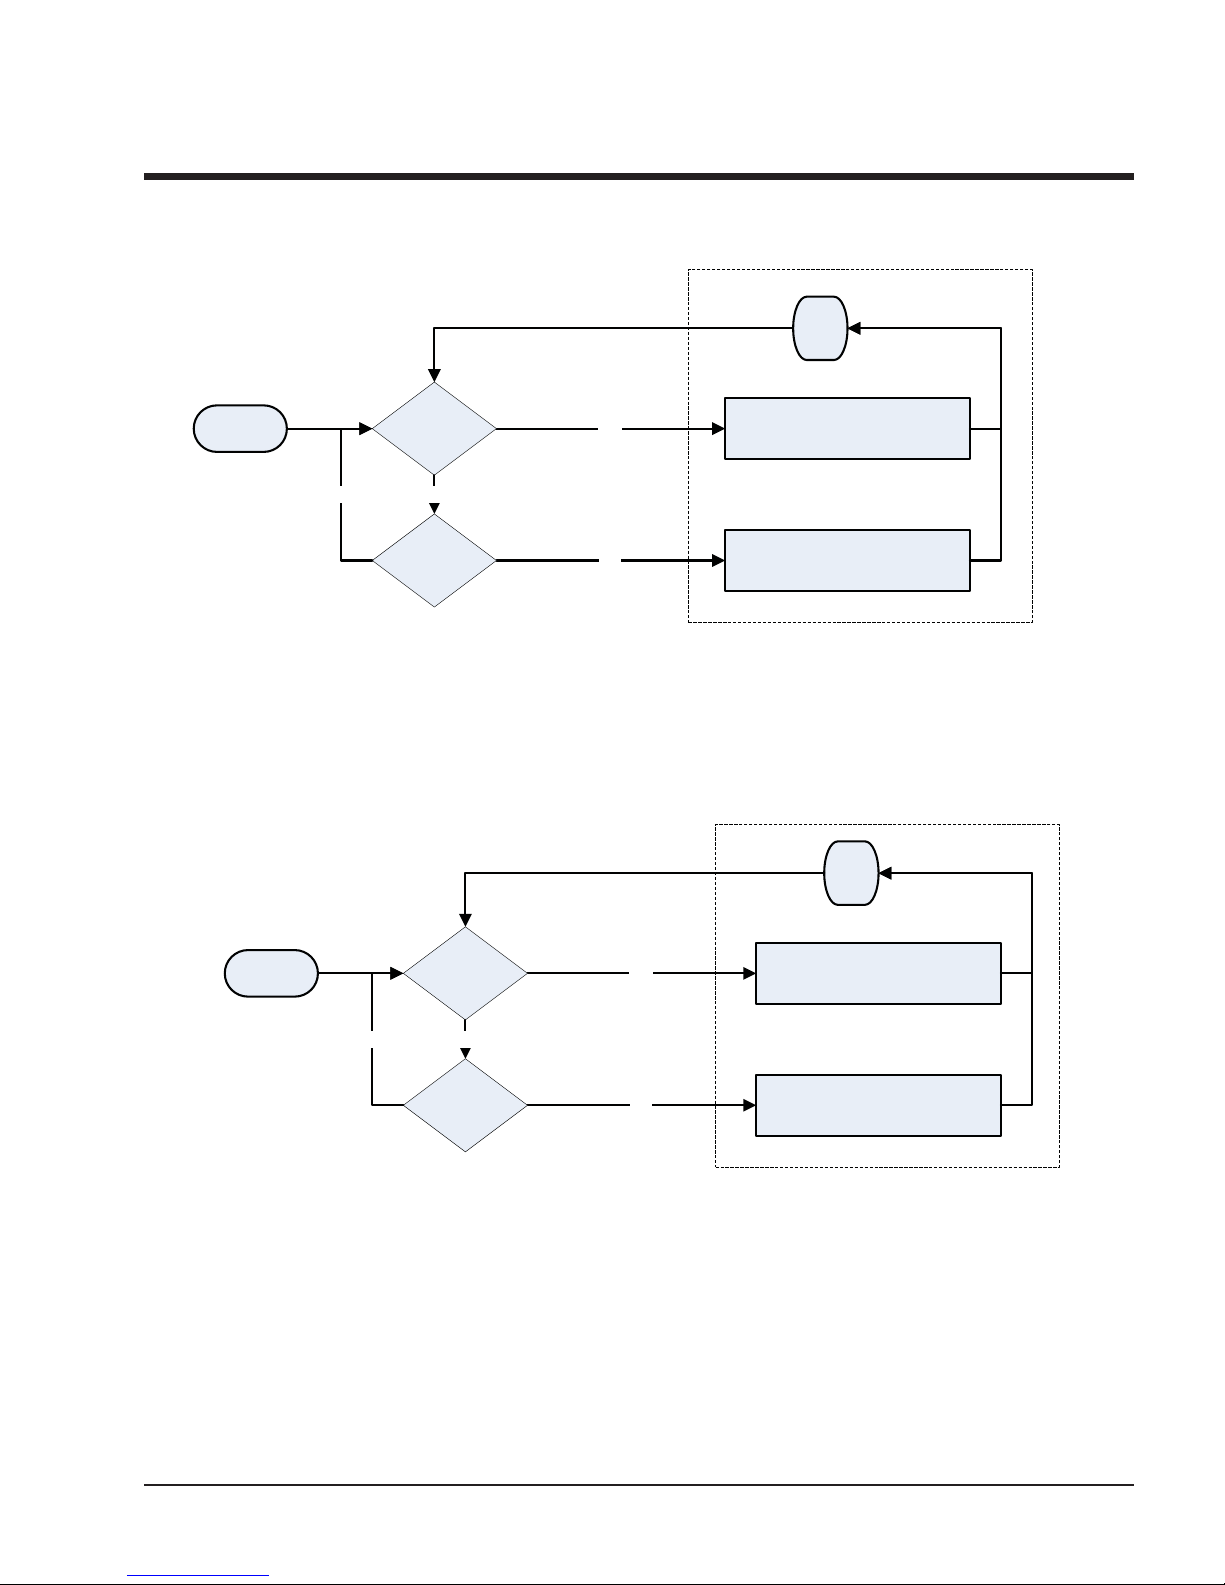
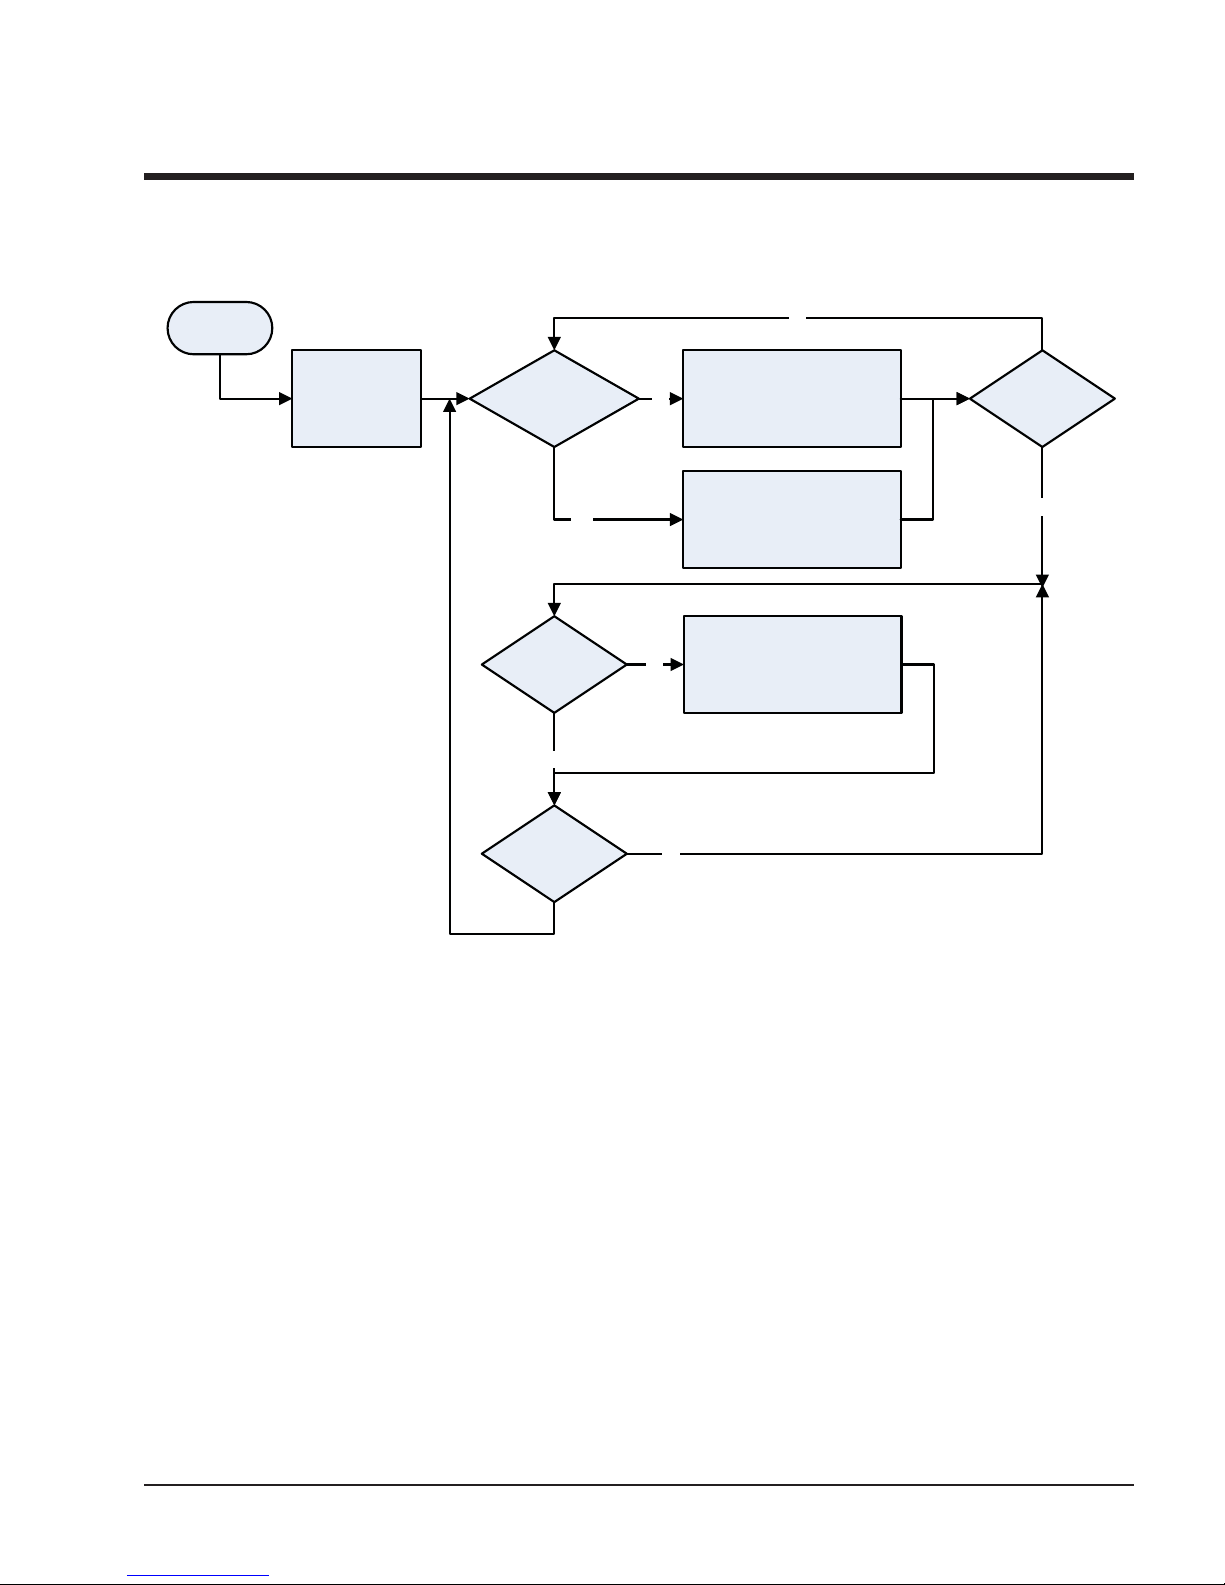
Suction Pressure Control
Operational Flow Charts
Is
Suction Press >
Suct Press Cap Inc
Setpt?
No
No
Is
Suction Press <
Suct Press Cap
Dec Setpt?
Suction Pressure Safety
Capacity Inc
No No
Yes Yes Yes
Is Cap Inc ON Timer
Timed Out?
No
WAIT
Is Cap Inc OFF Timer
Timed Out?
Capacity Dec
Is Cap Dec. ON Timer
Yes Yes Yes
Timed Out?
Is Cap Dec. OFF Timer
Timed Out?
No
Reset Cap Inc Timers
Reset Cap Dec Timers
Suct Press Alarm
No
Is
Suction Press <
Setpt?
No
Is
Suction Press <
Suct Press Trip
Setpt?
Yes
Yes
Lo Suction Press
Alarm
Lo Suction Press
Failure
8
VSG/VSSG • Compact Logix PLC Manual •Vilter/Emerson • 35391CL
Page 9
Operational Flow Charts
Oil Cooler Fan Control
(Selectable Control Optional)
Oil Cooler
Unit Start
outlet temp >
set pt?
Oil Cooler
outlet temp <
set pt?
Oil Temperature Control Valve
PID Control
30 sec
delay
Yes
NoNo
Yes
Increase Speed
Decrease Speed
PID Control
Unit Start
Oil injection
temp > set pt?
No No
Oil injection
temp < set pt?
Yes
Yes
30 sec
delay
Modulate valve
Modulate valve
VSG/VSSG • Compact Logix PLC Manual •Vilter/Emerson • 35391CL
9
Page 10
Operational Flow Charts
Delayed Lockout Timers
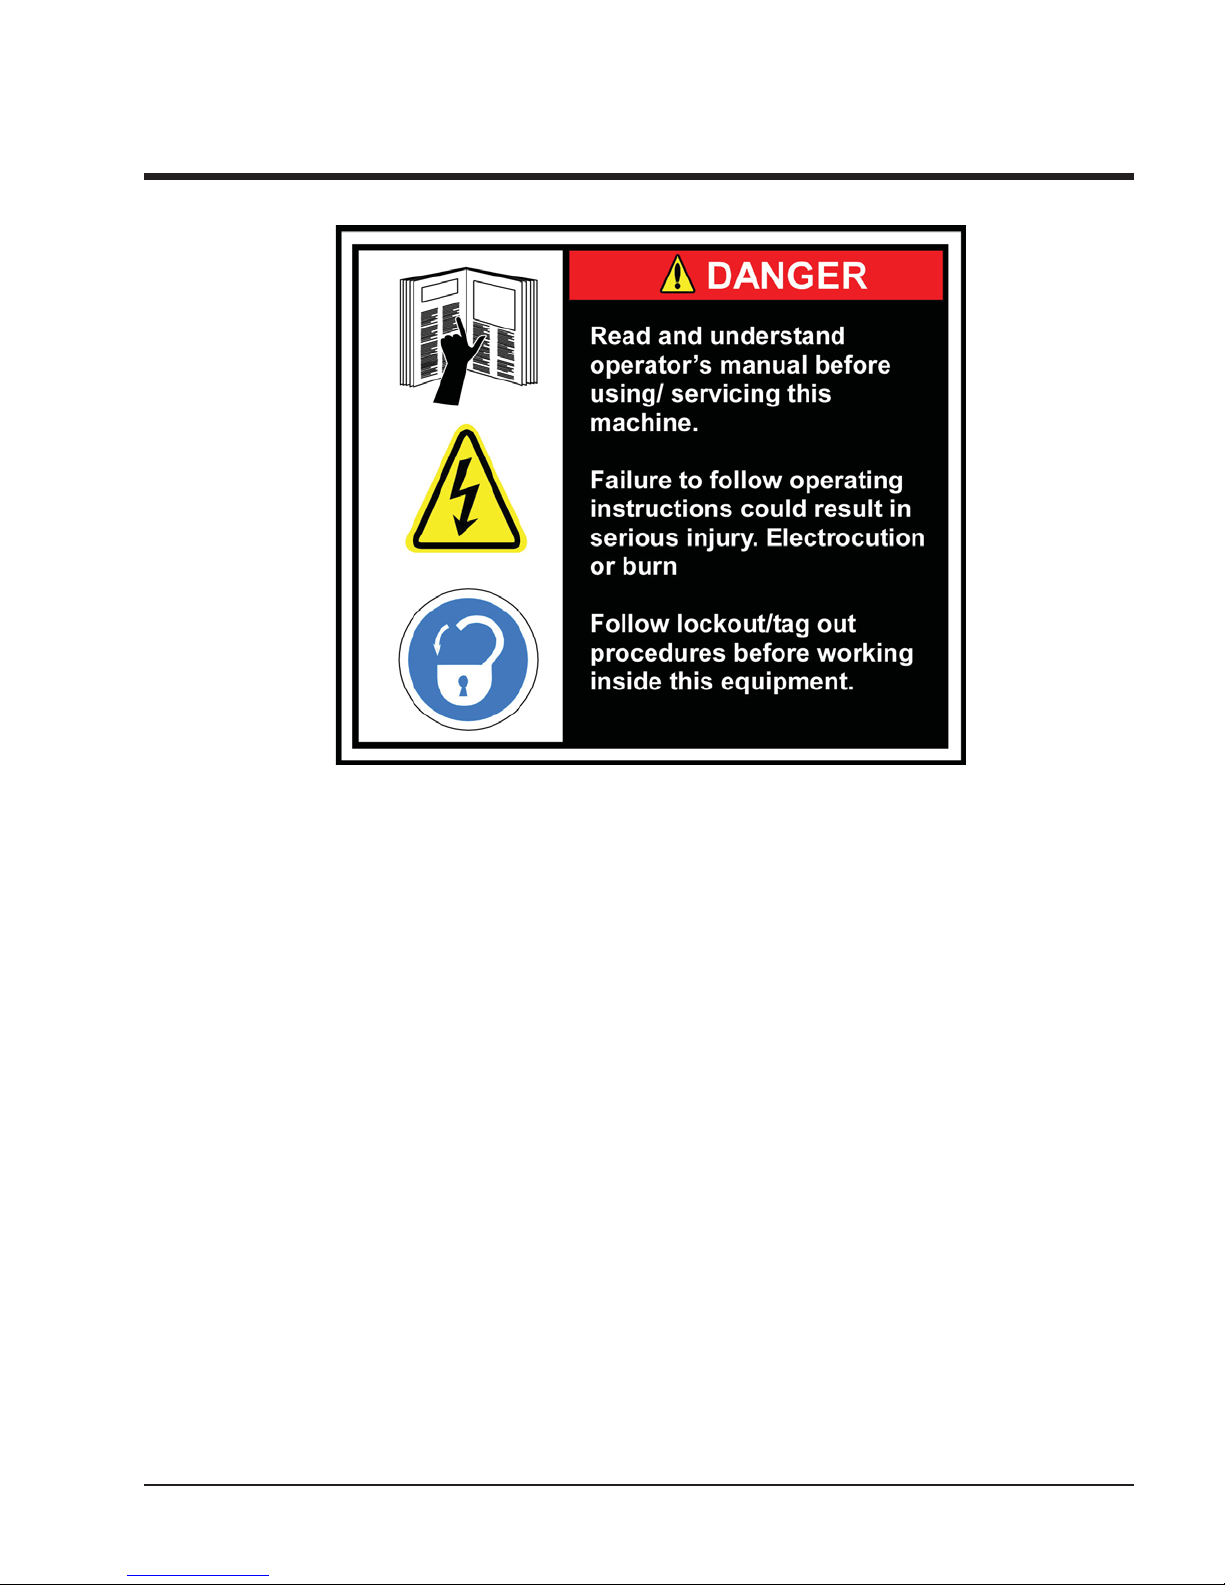
WARNING: FOR THE FOLLOWING SHUTDOWNS, A DELAYED RESTART MAY OCCUR:
High Discharge Pressure Failure
High Compressor Discharge Temp Failure
High Package Outlet Temp Failure
High Oil Injection Temp Failure
Shutdown due to
Operational
Failure
1 min Delay
Auto Restart if All Other Values
Are In Range
WARNING: INCASE OF A POWER FAILURE A DELAYED RESTART MAY OCCUR:
Shutdown Due
to Power Failure
Power Re-
establishing
Is
Shutdown Value
Below Reset
Value?
No
Yes
No
No
Lockout
Requires
Manual Restart
Yes Yes
No
Has
It been *H1
Hours Since
Shutdown?
Have
There Been 3 Shutdowns of “Any
of the Above Failure Conditions”
in H2 Hours
Yes
Has
It been *H3
Hours Since
Shutdown?
H1= Timer Set Between .5-6 Hours.
Default Value= .5 Hours
Yes
H2= Timer Set Between 4-100 Hours.
Minimum and Default Value= 4 Hours
H2 must be equal to or greater than 4 x H1
H3= Timer Set Between .5-6 Hours.
Default Value= .5 Hours
Auto Restart if All Other Values
Are In Range
Yes
10
1 min Delay
Was Compressor
Running During Power
Failure?
No
VSG/VSSG • Compact Logix PLC Manual •Vilter/Emerson • 35391CL
No
No
Lockout
Requires
Manual Restart
Have
There Been 3 Shutdowns
of This Same Condition
in H4 Hours
H4= Timer Set Between 4-100 Hours.
Minimum and Default Value= 4 Hours
H4 must be equal to or greater than 4 x H3
Yes
Page 11

Operational Flow Charts
Capacity Control Using Suction Pressure Control Setpoints
Start
Has
Decrease at Start
(Expired 15
sec.)
No
Wait
Are Motor
Amps >
Motor Amps Load
Yes No No Yes Yes
Motor Amp Load Limit
Setpt?
Limit ON
(Time Delay
10 sec)
Yes
Disable Cap Inc
Are Motor
Amps >
Setpt?
OFF
Yes
Dec Cap
(Timer)
No Change No Change
Is Disch
Press > High Disch
Press Unload
OFF
Setpt?
Yes
Disable Cap Inc
Is Disch
Press > High Disch
Press Unload
Setpt?
ON
Yes
Dec Cap
(Timer)
Is Capacity
> Min Run Cap
OFF
Setpt?
No
Increase Cap
(Timer)
Is Suct
Press > Cap Inc
ON
Setpt?
No
Is Suct Press< Cap
Setpt?
Dec ON
Yes
Dec Cap
(Timer)
No
Inc Cap
(Timer)
VSG/VSSG • Compact Logix PLC Manual •Vilter/Emerson • 35391CL
11
Page 12
Operational Flow Charts
Capacity Control Using Discharge Pressure Control Setpoints
Start
Are Motor
Has
Decrease at Start
(Expired 15 sec.)
Yes
Amps >
Motor Amps Load
Limit ON
Setpt?
(Time Delay
10 sec)
No
Is Disch Press > Cap
Dec ON
Setpt?
Yes
Dec Cap
(Timer)
No
Wait
Yes
Disable Cap Inc
Are Motor
Amps >
Motor Amp Load Limit
OFF
Setpt?
Yes
Dec Cap
(Timer)
No
No
Change)
No
Is Disch Press < Cap
Inc ON
Setpt
No
Yes
Inc Cap
(Timer)
No
change
12
VSG/VSSG • Compact Logix PLC Manual •Vilter/Emerson • 35391CL
Page 13
Operational Flow Charts
Compressor Operation with VFD Drive
Start
Compressor
Start VFD at
Minimum Speed
(30 Hz Typ.)
Is Control Press.
Within Setpt
Deadbands?
Yes
Check/Adjust VFD
Is Control Press @
Setpoint?
Yes
Is Motor Speed @
Min?
Check/Adjust Capacity Slide
No
Increase or Decrease the
Compressor Capacity Slides to
No
No
No
Match Setpoints
Increase or Decrease the
Compressor Capacity Slides to
Match Setpoints
Increase or Decrease Motor Speed
@ Rate Defined by VFD PID
Parameters
Is Capslide @
100%
Yes
VSG/VSSG • Compact Logix PLC Manual •Vilter/Emerson • 35391CL
13
Page 14

14/Blank
VSG/VSSG • Compact Logix PLC Manual •Vilter/Emerson • 35391CL
Page 15

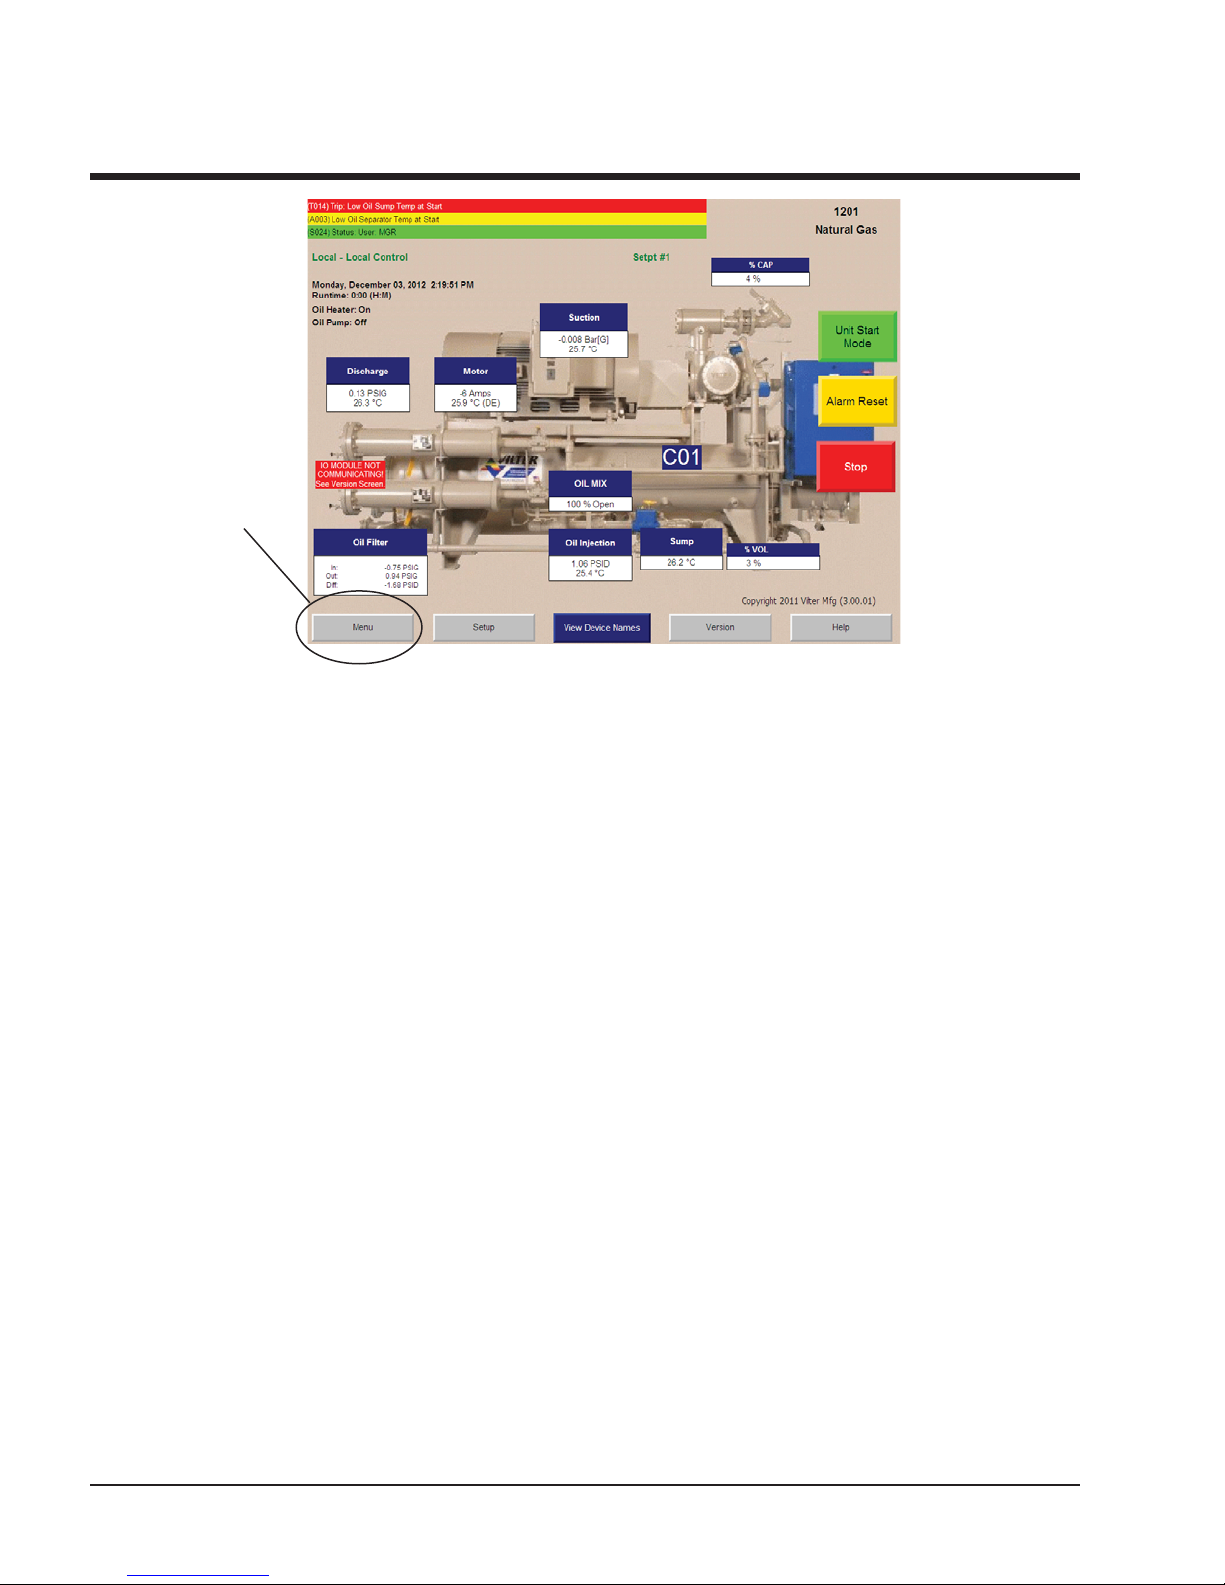
Main Screen
Main Screen
This screen has been designed to give the operator
an overall view of all operating parameters affecting the compressor package. This screen should
always be displayed when maintenance items and
setpoint items are not being performed.
Status information such as Alarms and Trips are
displayed on the screen.
This screen contains buttons to navigate to setpoint
setup screens.
Status information on the compressor, oil pump,
oil heater and run mode.
Start/Stop buttons.
Hour meter.
Motor amperage.
Compressor operating conditions.
VSG/VSSG • Compact Logix PLC Manual •Vilter/Emerson • 35391CL
15
Page 16

Log On or Off
Log On Screen
Press Log on Button and the below screen will appear. When altering setpoints, log on is necessary.
Select appropriate user name and enter password
to change/access setpoints.
To Log On: Enter your User Name (case sensitive)
and Password (case sensitive) then touch the <_|
enter key.
To Log Off: Touch the Log Off button. This will return
to the DEFAULT low-level user. The DEFAULT user
may navigate to most screens but cannot change
settings.
Note: An operator will be automatically
logged off after 10 minutes of inactivity.
Note: The machine can be run and monitored without logging on. To change the
setup or parameters of the machine, the
operator must log on.
16
VSG/VSSG • Compact Logix PLC Manual •Vilter/Emerson • 35391CL
Page 17

Set Up Screen
From the Main screen, touch the Setup button. After
entering an authorized user name and password, the
screen pictured below will appear.
Pressure units,Temperature units and Suction/
Discharge Pressure control configurations are list
selectable.
To choose a configuration from a list: 1.) Touch the
list. 2.) Touch the Up or Down Arrow to move the
green cursor “>” along side of the desired configuration. 3.) Touch the Enter button. This will highlightgreen the chosen configuration.
Touch Here
VSG/VSSG • Compact Logix PLC Manual •Vilter/Emerson • 35391CL
17
Page 18

Set Up Screen
· Setpoint #1/#2 Select – The operator can select
the compressor to run with setpoint #1 or #2
settings.
· Oil Pump Selection – The operator can select
the compressor to use either oil pump #1 or #2
when compressor has a second oil pump.
· Pressure Units – Select units of measure for pres-
sure readings. Choices are PSIG, PSIA, kPa [A],
kPa [G], kg/cm² [A], kg/cm² [G], Hg (vac) [G], WC
[A], WC [G], Bar [A], Bar [G], Torr [A], Torr [G].
· Temperature Units – Select units of measure
for temperature. Choices are Fahrenheit or Celsius, Kelvin and Rankine.
· Anti-Recycle – The operator can select from the
following Anti-Recycle options: True, Accumulative, Modified, or Hot Starts. These select the
strategy used to prevent excessive start/stop
cycles of the compressor. Timers and counters
used to enforce anti-recycling are adjusted and
monitored in the Compressor Timer Settings
screen, reached from the Menu screen. Help
for the Timer Settings screen explains how the
different settings and strategies operate.
channel.
· Min Run Capacity – When enabled, the Minimum
Run Capacity setting on the Addition Compressor Setpoints screen operates as described in the
help for that screen. When multiple compressor
sequencing is used, selecting Disable here does
not interfere with use of the Min Run Capacity
setting in the sequencing logic.
· Oil Pump Option #1 – The operator can choose
the method the compressor oil pump operates.
· Suction Pressure Sensor Mode – The operator
can select local or remote sensor mode. Remote
sensor mode is typically used when compressors
are installed in parallel.
· Compressor Control Via – Operator can choose
the method or mode of compressor control.
This determines which measured variable is used
in making loading (capacity control) decisions.
The choice selected here determines which
setpoints are made available for adjustment on
the Compressor Control Setpoints screen.
· Capacity & Volume Slide Non-Movement – Alarm
enable and disable buttons permit selecting
whether an alarm should be generated when
failure of slides to move is detected.
· Reset After Power Fail – When Auto is selected,
the compressor will attempt to restart on powering up if it was running in ‘Auto’ when powered
down and enabling conditions are met. When
‘Manual’ is selected, the compressor powers up
into the ‘Stop’ mode and an explicit command
to run is required from an operator or comms
18
VSG/VSSG • Compact Logix PLC Manual •Vilter/Emerson • 35391CL
Page 19
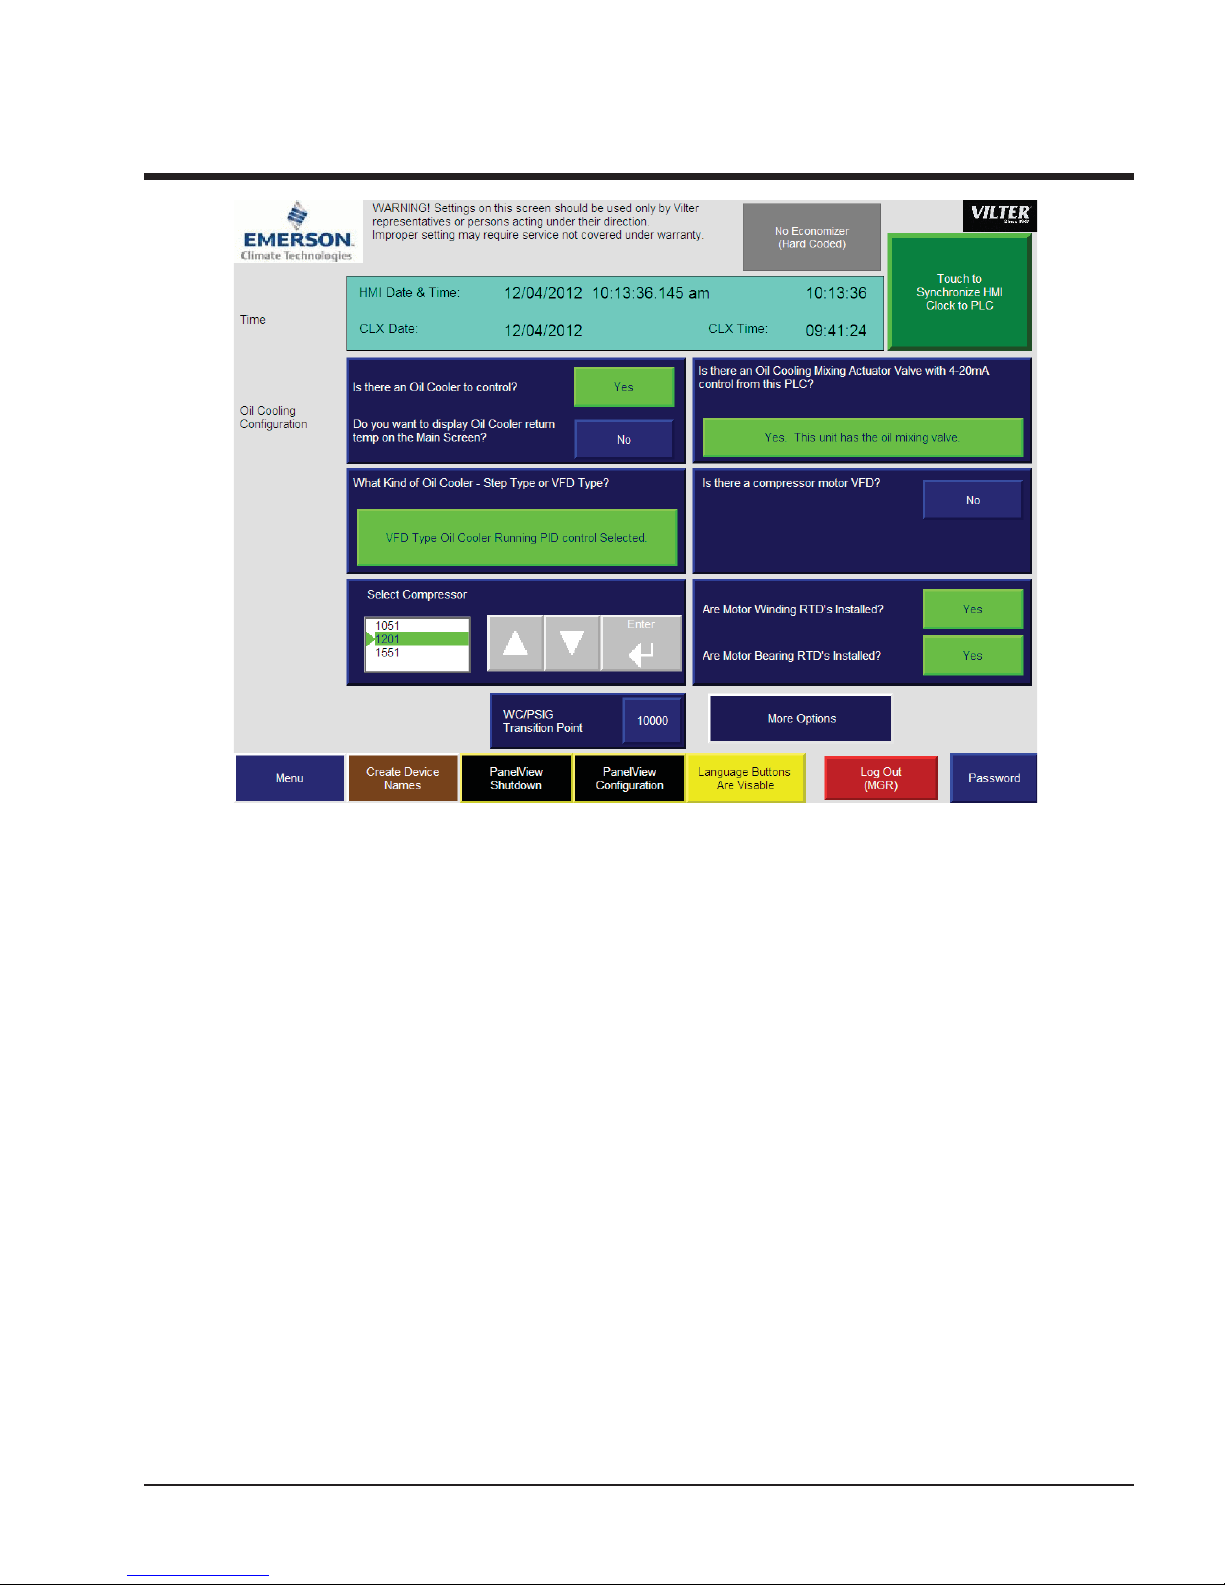
Vilter Only Screen
To synchronize the PanelView date and time to the Conrol Logix date and time:
1. Display the Vilter Only Screen (This screen has restricted access).
2. Touch the “Touch to Synchronize HMI Clock to PLC” button.
VSG/VSSG • Compact Logix PLC Manual •Vilter/Emerson • 35391CL
19
Page 20
Menu Screen
Touch Here
At the bottom of the Main screen touch the Menu button to bring up the screen shown in Figures below.
Use this screen to navigate to the other setpoint screens contained within the program. Each screen has a help
button to describe the function of the screen.
There are several buttons that are common for all menu screens:
Return to Menu – This button always returns you to the Menu screen
Log On – The user is allowed to view data at all screen levels but cannot edit data until a login has occurred.
Refer to the Log on/off Instructions on page 16.
Set – To change a value, the operator must first press the SET button and then the text field of the value they
want to modify. A number pad will pop up for ease in entry.
Help – This screen will provide more information to the user about the operation of the microprocessor.
Event List – provides a chronological event listing.
Chart – Provides a line graph showing process values over a range of time.
Auto – Places the capacity slides into automatic mode. In automatic mode, the capacity slide moves according
to control setpoint information.
Manual – Places the capacity slides into manual mode. In manual mode, the capacity slide moves moves based
on input from the operator.
20
VSG/VSSG • Compact Logix PLC Manual •Vilter/Emerson • 35391CL
Page 21
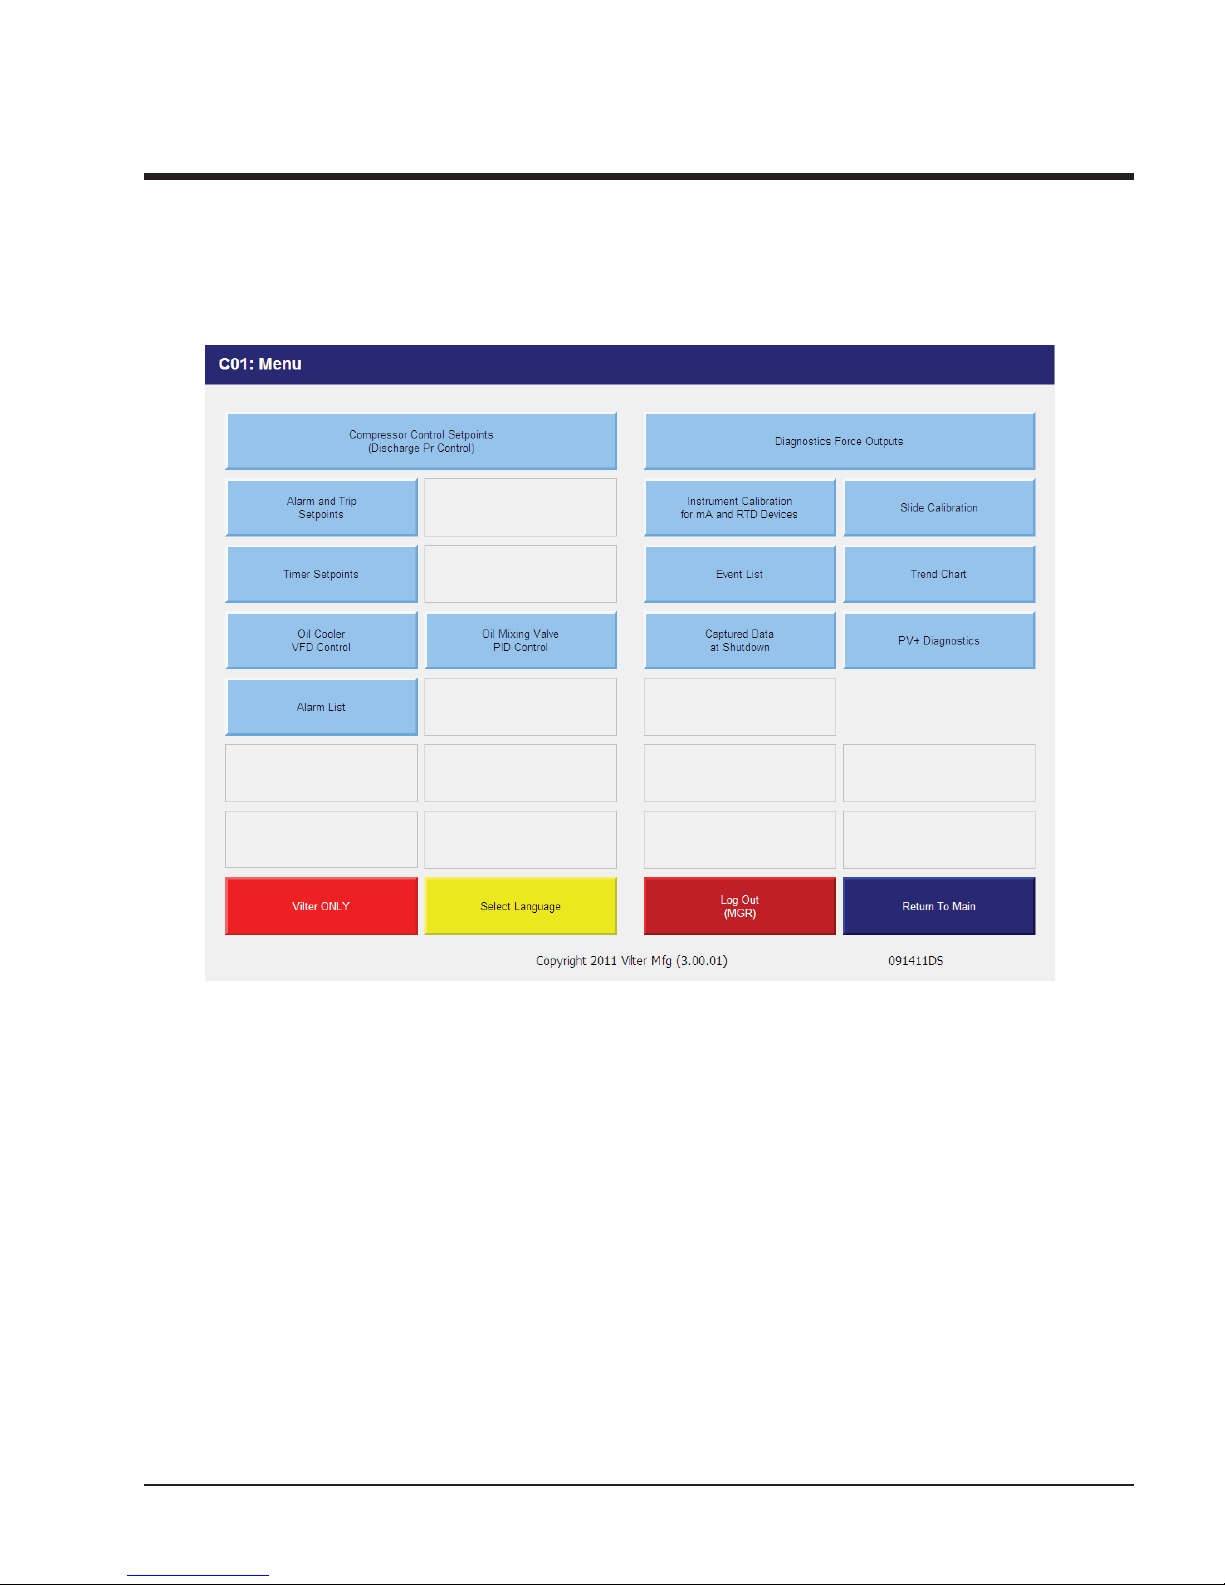
Menu Screen
There are three options for the Compressor Control Setpoints:
VSG/VSSG • Compact Logix PLC Manual •Vilter/Emerson • 35391CL
Discharge Pressure Control
21
Page 22
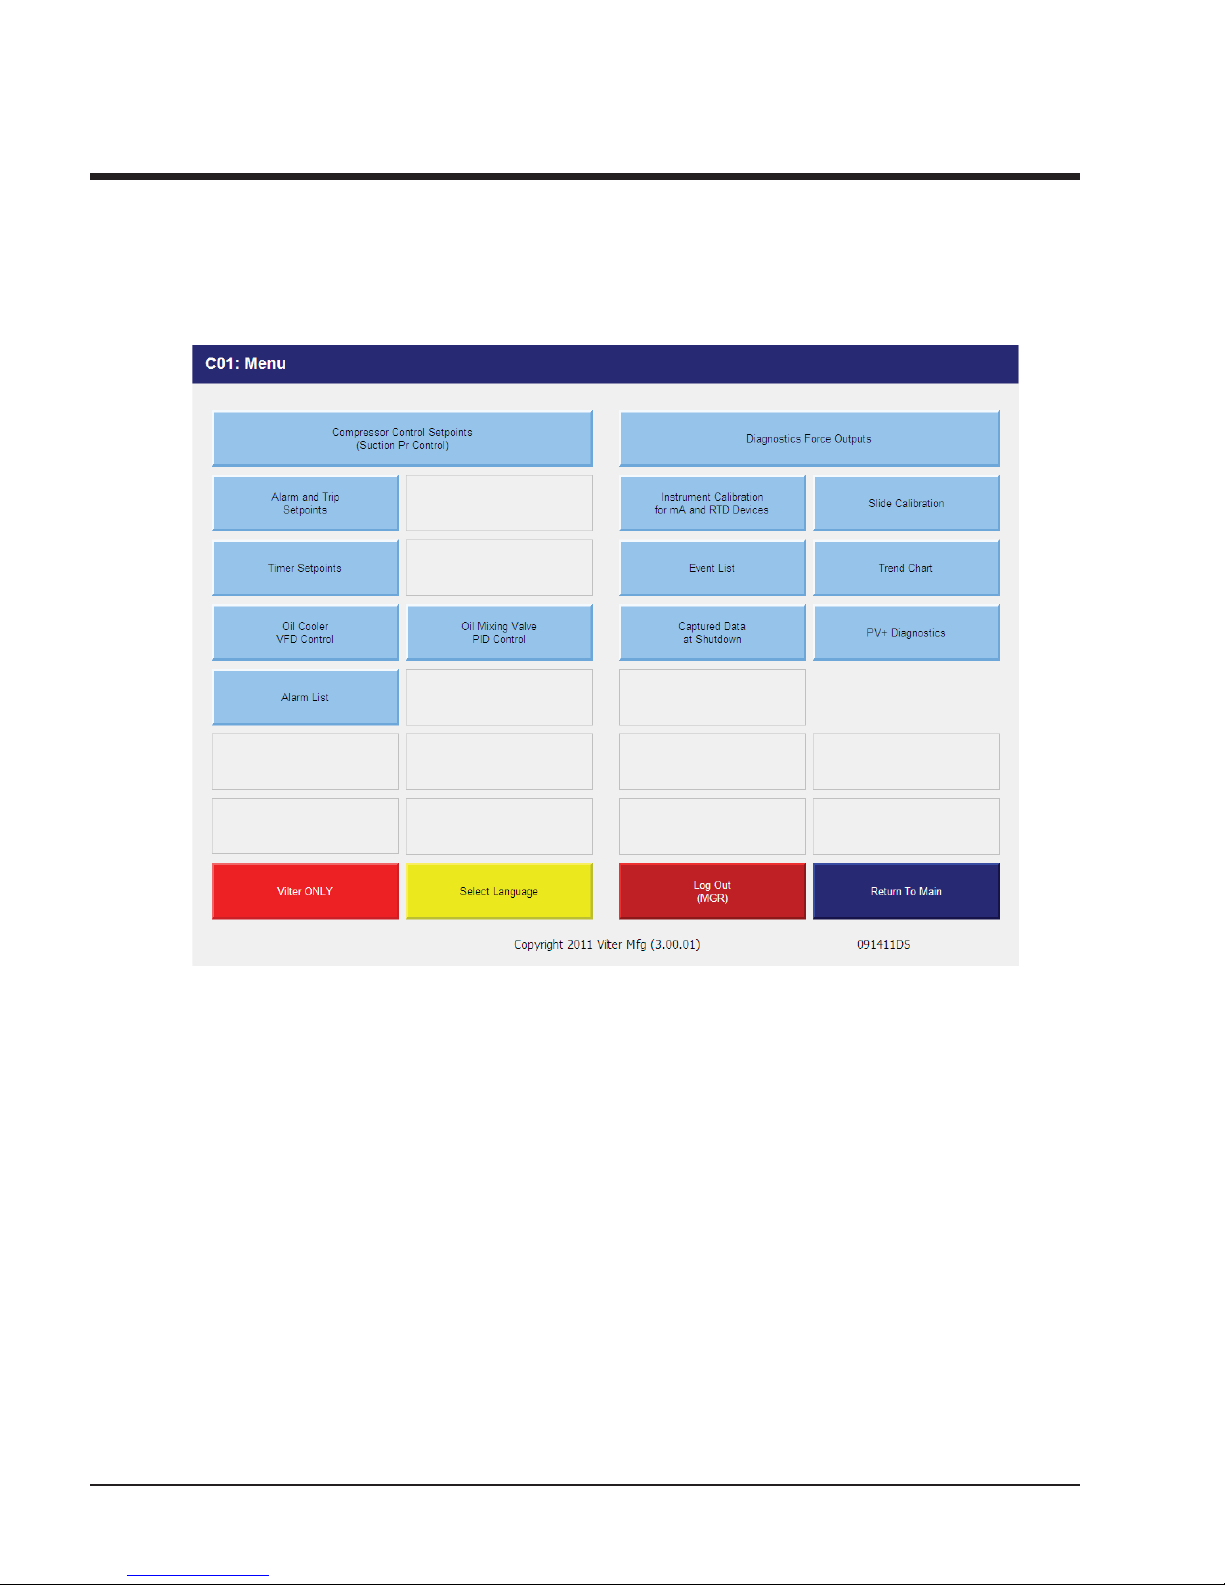
Menu Screen
22
Suction Pressure Control
VSG/VSSG • Compact Logix PLC Manual •Vilter/Emerson • 35391CL
Page 23

Menu Screen
VSG/VSSG • Compact Logix PLC Manual •Vilter/Emerson • 35391CL
Process Temperature Control
23
Page 24

Compressor Alarm and Trip
· Low Suction Pressure Setpoints 1&2 – This is
the low suction pressure safety. This safety is
active in both temperature and pressure control
modes. An alarm or trip will be active on a drop
in suction pressure below the setpoint value.
· High Discharge Pressure Setpoints 1&2 This is
the high discharge pressure safety. The alarm or
trip will be active on a rise in discharge pressure
above the setpoint value.
· Low Suction Temperature – This is the lowest
allowable Suction temperature. The compressor will not be allowed to run if the Suction
Temperature is below the trip setting.
· High Discharge Temperature – This is the high
discharge temperature safety. The alarm or
trip will be active if the discharge temperature
should rise above the setpoint value.
· Low Oil Separator Start Temperature – This is the
starting low oil separator temperature safety.
The compressor is prevented from starting or
running if the oil in the separator is below the
trip value. After a time delay (Oil Separator
Temperature Safety Changeover), this safety is
deactivated and the Lo Oil Separator Run Temperature is the active setpoint.
· Low Oil Separator Run Temperature – This is the
running low oil separator temperature safety.
After a time delay (Oil Separator Temperature
Safety Changeover), the Lo Oil Separator Start
Temperature is bypassed and Lo Oil Separator
Run Temperature is the active setpoint. The
alarm or trip will be active if the oil temperature
of the separator drops below the setpoint value.
· Low Oil Injection Temperature – This is the low
oil injection safety. The alarm or trip will be
active if oil injection temperature drops below
setpoint value after a time delay (Oil Injection
Temperature Safety Changeover).
· High Oil Injection Temperature – This is the high
oil injection temperature safety. The alarm or
trip will be active on a rise in oil injection temperature above the setpoint value.
· Low Control Temperature – This is the low
process temperature safety. The alarm or trip
will be active on a drop in control temperature
below the setpoint (only in process temperature
mode).
· High Control Temperature – This is the high
process temperature safety. The alarm or trip
will be active on a rise in control temperature
above the setpoint (only in process temperaure
mode).
24
VSG/VSSG • Compact Logix PLC Manual •Vilter/Emerson • 35391CL
Page 25

Compressor Setpoints and Alarms
· Prelube Oil Pressure – This is the low Prelube
Oil Pressure safety. The Trip will be active if the
compressor is in Pre-lube and the Oil Pressure
drops below the set-point value.
· Low Oil Pressure – This is the Low Oil Pressure
Safety. The Alarm and Trip will occur if the Oil
Pressure drops below the set-point(s) value.
· High Filter Differential Pressure – Start – This is
the High Filter Differential Pressure (at compressor Start) Safety. The Alarm and Trip will occur
if the Oil Differential Pressure (Filter Inlet Pressure – Manifold Pressure) at Compressor Start
is above the set-point(s).
· High Filter Differential Pressure – Run – This is
the High Filter Differential Pressure (while the
compressor is running) Safety. The Alarm and
Trip will occur if the Oil Differential Pressure (Filter Inlet Pressure – Manifold Pressure) while the
Compressor is running above the set-point(s).
· High Motor Amps – This is the High Motor Amps
Safety. The Alarm and Trip will occur if the Motor
Amps exceed the set-point(s).
· Motor Winding Temperature - This is the High
Winding Temperature Safety. The Alarm and
Trip will occur if the Motor Winding Temperature is above the set-point(s). These set-points
are only active when the compressor has been
selected to have Motor Winding Temperature
RTDs.
· Motor Bearing Temperature - This is the High
Bearing Temperature Safety. The Alarm and Trip
will occur if the Motor Bearing Temperature is
above the set-point(s). These set-points are only
active when the compressor has been selected
to have Motor Winding Temperature RTDs.
VSG/VSSG • Compact Logix PLC Manual •Vilter/Emerson • 35391CL
25
Page 26

Compressor Timer Setpoints
To change a timer setting, a user with high
access level must be
logged on.
· Capacity Decrease At Start – At compressor
startup, the capacity motor is held at minimum
position for this time period. After the timer
expires, the slide is free to move in accordance
to the system demands.
· Compressor Starter Auxiliary Contact Bypass –
This timer is used to bypass the motor amperage
input at start. After the timer times out, the
program determines if the motor starter has
pulled in by testing the amperage channel. If
the program determines that the starter did not
“pull in”, then the compressor will fail on “Motor
Starter Fail” message.
· Volume Slide Adjustment Timer – This timer
determines the intervals the volume slide is
adjusted. If the volume slide is between 2½% &
7% away from the desired volume ratio, the motor is pulsed once toward the desired volume.
26
If the volume slide is more than 7% away from
the desired value, the volume slide motor is
continuously energized until the valve is within
2½% of the desired value. If the actual position
is within 2½% of the desired value, no adjustment will be made.
· Minimum Compressor Prelube Timer – This is
the length of time the oil pump will run after
establishing the Prelube Oil Pressure, to prime
oil circuit before starting the compressor.
· Oil Pressure Bypass At Compressor Start – This
timer bypasses the Low Oil Pressure limits.
The timer starts when the compressor starts.
After the timer has cycled, the Low Oil Pressure
setpoint is active.
· Prelube Oil Pump Time Limit – This timer puts
a limit on how long the prelube oil pump is allowed to run without establishing the Prelube
Oil Pressure.
VSG/VSSG • Compact Logix PLC Manual •Vilter/Emerson • 35391CL
Page 27

Compressor Timer Setpoints
· Filter Differential Pressure Safety Changeover
– This timer bypasses the Hi Run Filter Differential Pressure setting during start, to allow the
Hi Start Filter Differential Pressure to protect
against High Filter Differential during start. After the timer has cycled, the Hi Run Differential
Pressure Safety is active.
· Low Oil Separator Level Bypass Timer – This
timer bypasses the low oil level switch for momentary drops in the oil level. If the switch is still
open after the Low Oil Separator Level Bypass
Timer has timed out, the compressor will be shut
down and an alarm will be displayed. This timer
is available if the unit is equipped with a low oil
separator float switch. The oil level switch is
standard on all liquid injection units and optional
on all others.
· Auto Restart After Power Failure – This timer
forces the microprocessor to wait for the set
time period after a power failure before starting the compressor unit. By staggering the
time settings, the compressors can be allowed
to start automatically, one at a time, after a
power failure. This prevents excessive loads on
the power system that could be caused by all of
the equipment coming online at the same time.
The Power-Up Auto Start operator option must
be selected on the Setup screen for this option
to be active.
· Oil Separator Temperature Safety Changeover
– This timer allows Low Oil Separator Start
Temperature Safety setpoint to protect the
compressor against cold oil during starting.
After the timer has cycled, the Low Oil Separator
Run Temperature is then active.
· Low Oil Injection Temperature Bypass – This
timer bypasses the Low Oil Injection Temperature Safety Setpoint during start-up. After the
timer cycles, the Low Oil Injection Temperature
Safety is set.
· Hot Starts / Hr Counter – This counter counts
compressor starts. After every start, a one-hour
timer is reset and starts timing. If the timer
times out, the hot starts counter is reset. When
the counter reaches it’s preset value, it will not
allow another compressor start until the onehour timer times out and resets the counter.
In other words, the hot starts counter will be
reset when the time between compressor starts
total one hour. This counter allows repetitive
compressor starts, but once the counter has
reached its set point, it requires a one-hour
window between compressor starts in order
for the counter to be reset. Note: if this option
is chosen an arrow will appear alongside its
current value. When active a point will appear.
· True Anti-Recycle Timer – Once the compressor
turns off, the timer will keep the compressor
off for the setting of True Anti-Recycle Timer.
This timer is used to prevent short cycling of the
compressor. Note: if this option is chosen an
arrow will appear alongside its current value.
When active a point will appear.
· Accumulative Anti-Recycle Timer – This timer
also forces a specified time between compressor starts. When the compressor starts, the
timer resets then starts timing and accumulates
running time. Once the compressor shuts
down, it will not be allowed to restart for the
remainder of the time left on the Accumulative Anti-Recycle Timer. Unlike the True AntiRecycle Timer, if the compressor has run for a
time period that exceeds the setpoint of the
Accumulative Anti-Recycle Timer, then when
the compressor shuts down, it will be allowed
to restart immediately. The compressor restart
options (Hot Starts or Anti-Recycle Timers) are
selected from the Setup screen. One additional
Anti-Recycle Timer that can be selected from
the Setup screen is the Modified Anti-Recycle
Timer. Note: if this option is chosen an arrow
will appear alongside its current value. When
active a point will appear.
VSG/VSSG • Compact Logix PLC Manual •Vilter/Emerson • 35391CL
27
Page 28

Compressor Control Setpoints
From the Menu screen, press the Compressor Control setpoints button. The compressor control setpoints
screen will be shown.
These screens enable the operator to view and adjust settings that affect compressor control.
From the Setup screen, the operator can choose the method or mode of compressor control:
Compressor Control Via:
1. Discharge Pressure
2. Suction Pressure
3. Process Temperature Control
Once the method is chosen, the appropriate setpoints are then displayed on the Compressor Control Setpoints
screen.
The compressor will decide when to increase or decrease capacity by comparing the controlled variable to
the setpoints. The maximum on time and minimum off time settings for slide actuator motors can be used
to reduce hunting or improve response time. The default settings of 3 and 20 seconds respectively, provide
good operation over a wide range of conditions.
Level 1 Access – Compressor Control Setpoints
From the Menu screen, press the Compressor Control setpoints button. The compressor control setpoints
screen will be shown.
28
VSG/VSSG • Compact Logix PLC Manual •Vilter/Emerson • 35391CL
Page 29

Compressor Control Setpoints
Discharge Pressure Control
Setpoints on this screen:
· Discharge Pressure On/Off – The compressor will automatically cycle ON and OFF at the setpoints entered.
Discharge Pressure On/Off control is only active if the Compressor Control Via Discharge Pressure option
is selected on the Setup screen. If a compressor shutdown is desired on a discharge pressure drop and a
manual reset is required, set the OFF value below the Low Discharge Pressure Safety Trip value. This will
shut down the unit and a reset will be required to restart it.
· Discharge Pressure Capacity Increase – The capacity of the compressor will increase when suction pressure
is at or above the Increase ON setpoint, and the increase “off” timer has cycled. Capacity will continue to
increase until the Discharge Pressure Capacity Increase OFF setpoint is reached. If closer system control
is desired, set the ON and OFF setpoints at the same values. This will essentially eliminate any differential
between the ON and OFF setpoints.
· Discharge Pressure Capacity Decrease – The capacity of the compressor will decrease when discharge
pressure is at or below the ON setpoint, and the decrease “off” timer has cycled. Capacity will continue
to decrease until the Discharge Pressure Capacity Decrease OFF setpoint is reached. If closer system
control is desired, set the ON and OFF setpoints at the same values. This will essentially eliminate any
differential between the ON and OFF setpoints. While this setting is only available for adjustment on the
Control Setpoints screen when the Compressor Control Via Suction Discharge option is selected on the
Setup screen, it has an override effect when control is via process temperature as described below.
VSG/VSSG • Compact Logix PLC Manual •Vilter/Emerson • 35391CL
29
Page 30

Compressor Control Setpoints
Suction Pressure Control
Setpoints on this screen:
· Suction Pressure On/Off – The compressor will automatically cycle ON and OFF at the setpoints entered.
Suction Pressure On/Off control is only active if the Compressor Control Via Suction Pressure option is
selected on the Setup screen. If a compressor shutdown is desired on a suction pressure drop and a
manual reset is required, set the OFF value below the Low Suction Pressure Safety Trip value. This will
shut down the unit and a reset will be required to restart it.
· Suction Pressure Capacity Increase – The capacity of the compressor will increase when suction pressure
is at or above the Increase ON setpoint, and the increase “off” timer has cycled. Capacity will continue to
increase until the Suction Pressure Capacity Increase OFF setpoint is reached. If closer system control is
desired, set the ON and OFF setpoints at the same values. This will essentially eliminate any differential
between the ON and OFF setpoints.
· Suction Pressure Capacity Decrease – The capacity of the compressor will decrease when suction pressure
is at or below the ON setpoint, and the decrease “off” timer has cycled. Capacity will continue to decrease
until the Suction Pressure Capacity Decrease OFF setpoint is reached. If closer system control is desired,
set the ON and OFF setpoints at the same values. This will essentially eliminate any differential between
the ON and OFF setpoints. While this setting is only available for adjustment on the Control Setpoints
screen when the Compressor Control Via Suction Pressure option is selected on the Setup screen, it has
an override effect when control is via process temperature as described below.
30
VSG/VSSG • Compact Logix PLC Manual •Vilter/Emerson • 35391CL
Page 31

Compressor Control Setpoints
Process Temperature Control
Setpoints on this screen:
· Process Temperature Control – Provides for a Suction Pressure Override feature. If the suction pressure
should drop below the Suction Pressure Capacity Decrease OFF setpoint, the Suction Pressure Capacity
Decrease OFF setpoint will override the Capacity Control F Increase and prevent the compressor capacity
from increasing (loading). If the suction pressure should continue to decrease below the Suction Pressure Capacity Decrease ON setpoint, the compressor capacity will be forced to decrease until the suction
pressure is just above the Suction Pressure Capacity Decrease ON setpoint. This will help stabilize the
suction pressure, allowing for the process temperature to be gradually pulled down. The Suction Pressure Capacity Decrease ON and OFF setpoints can viewed or adjusted by temporarily selecting “Processor
Control Via Suction Pressure” on the Setup screen.
Note: Capacity Control for Refrigeration Only.
· Capacity Control °F On/Off – The compressor will automatically cycle ON and OFF at the setpoints entered.
Capacity Control °F On/Off is only active if the Compressor Control Via Process Temperature option is
selected on the Setup screen. If compressor shutdown is desired on a process temperature drop and a
manual reset is required, set the OFF value below the Low Control Temperature Safety trip valve. This
will shut down the unit and a reset will be required to restart.
VSG/VSSG • Compact Logix PLC Manual •Vilter/Emerson • 35391CL
31
Page 32

Compressor Control Setpoints
· Capacity Control °F Increase – The capacity of the compressor will increase when process temperature is at
or above the ON setpoint, and the increase “off” timer has cycled. Capacity will continue to increase until the
Capacity Control °F Increase OFF setpoint is reached. If closer system control is desired, set the ON and OFF
setpoints at the same values. This will essentially eliminate and difference between the ON and OFF setpoints.
Process temperature control of the capacity is active only if the Compressor Control Via Process Temperature
option is selected on the Setup screen.
· Capacity Control °F Decrease – The capacity of the compressor will decrease when process temperature is at
or below the ON setpoint, and the increase “off” timer has cycled. Capacity will continue to decrease until the
Capacity Control °F Decrease OFF setpoint is reached. If closer system control is desired, set the ON and OFF
setpoints at the same values. This will essentially eliminate and difference between the ON and OFF setpoints.
Process temperature control of the capacity is active only if the Compressor Control Via Process Temperature
option is selected on the Setup screen.
32
VSG/VSSG • Compact Logix PLC Manual •Vilter/Emerson • 35391CL
Page 33

Additional Compressor Controls
· High Discharge Pressure Unloading Setpoints
– Active in Suction Pressure or Process Temperature Capacity Control mode. These setpoints
limit the compressor from loading at high
discharge pressure conditions. They override
the Suction Pressure or Process Temperature
Capacity Control setpoints. The capacity of the
compressor will decrease when the discharge
pressure is at or above the ON set point. When
the OFF setpoint is reached, the compressor will
stop from unloading any further.
· Motor Amp. Load Limit Setpoints – This control
limit is the motor full load current draw and the
maximum current draw. This control limit will
only prevent the compressor from loading and
does not shut down the compressor if the maximum current draw setpoint is exceeded. The
actual values entered may depend on particular
circumstances. The function of the setpoint is
as follows:
If the motor is operating at the full load amperage (FLA) setting, the compressor is prevented
from loading. If the motor amps exceed the
MAX setpoint, the compressor is forced to unload until the current is at 1.0625 times above
the FLA setting. If the motor being used has a
service factor below 1.0625, use a value for the
FLA that is 10% lower than the MAX value.
· Oil Separator Heater Temperature – This con-
trol limit determines when the oil separator
heater is energized. A decrease in oil separator
temperature below the ONsetpoint energizes
the oil separator heater. On an increase in oil
separator temperature above the OFF setpoint,
the oil heater is de-energized.
· Oil Pump Restart – To determine the ON and
OFF values for the pressure ratios, take the absolute discharge pressure (PSIA), and divide it
by the absolute suction pressure (PSIA). If the
pressure ratio is below the ON setpoint value,
the oil pump will restart and stay on until the
pressure ratio increases above the OFF setpoint.
This enables a high stage compressor with a part
time oil pump to temporarily operate under
conditions requiring a full time oil pump.
EXAMPLE: To calculate the OFF value, if the
absolute discharge pressure is 200 PSIA and the
desired absolute suction pressure of the cut-out
point is 67 PSIA, the discharge pressure is divided
by the suction pressure. The result is a OFF value
of approximately 3.0. This would then be entered
for the OFF pressure. Now determine the ON value,
take the absolute discharge pressure (200 PSIA) and
divide this by the desired absolute suction pressure
(71 PSIA). This results in a ON valve of 2.8.
· Capacity Slide Adjustment Range – This control
limit determines the capacity range the Capacity Slide Adjustment factor will be active. The
factor will be active from 0% capacity and will be
deactivated when the OFF setpoint is reached.
On a decrease in capacity below the ON set
point, the factor will be active.
VSG/VSSG • Compact Logix PLC Manual •Vilter/Emerson • 35391CL
33
Page 34

Additional Compressor Controls
· Minimum Run Capacity – The Minimum Run
Capacity is the minimum capacity the compressor will be allowed to run at. When the
compressor is started, it will be loaded to the
Minimum Run Capacity control setpoint minus
5%. This is done to prevent the capacity control
from hunting if the load is not great enough to
keep the compressor capacity at the Minimum
Run Capacity setpoint. On a call for unloading,
the compressor will unload until it reaches the
Minimum Run Capacity control setpoint. It will
remain there until the suction pressure reduces
and the compressor cycles off on the Suction
Pressure On/Off control setpoint.
· Volume Slide Adjustment Factor – This value is
normally zero (0) and will not require changing.
However, if the system operating conditions
show the volume ratio is not at the optimum
value for the system, this value can be adjusted
up or down to permit the most efficient positioning of the volume slide valves. To determine the
value to enter, first ensure that the system is in
a steady operating state and place the volume
side in manual. NOTE: The volume position setting and increase the volume side position slowly
until the lowest amperage level is achieved. If the
amperage level rises instead of falls, decrease the
volume slide position until the lowest amperage
is achieved.
Record the differential from the original position.
This will then be adjustment factor to enter for
our system. NOTE: Negative numbers can be
used for this setting. This setpoint is active on a
drop in capacity below the Capacity Slide Adjustment Range cut-in (ON) setting. The adjustment
is disabled when capacity rises above the Adjustment Range OFF setting. Normally, the “ON-Off”
set points should both be set at 100%, so the
volume side adjustment factor will be applied
over the full range of 0 to 100%
· Low Suction Pressure Load Limit – Active in
Discharge Pressure Capacity Control mode only.
These setpoints limit the compressor from loading at low suction pressure conditions. They
override the discharge pressure capacity control
setpoints. When the OFF setpoint is reached
(at or below setpoint), the compressor will not
be allowed to load any further. If the suction
pressure continues to fall, the capacity of the
compressor will decrease when the suction
pressure is at or below the ON set point. It will
stop decreasing when the suction pressure rises
to a point that is just below the ON set point.
· Forced Unload – Capacity Decrease (%/sec) –
This is the rate at which the Main Motor VFD will
drop when there is a Forced Unload condition
present in the Compressor.
· Forced Unload – VFD Transition Point to Capacity
Decrease (%/sec) – This is VFD speed at which
the physical capacity slide will begin to decrease
while there is a Forced Unload condition present
in the Compressor.
· Current Transformer Ratio – The value entered
must agree with the Current Transformer Ratio
on the current transformer being used. The
current transformer is mounted in the compressor motor conduit box. The ratio is stated as
the ratio of measured current to a nominal full
scale current in the secondary of 5 amps; only
the first of these is entered. For example, if the
ratio reads 250/5, enter 250.
34
VSG/VSSG • Compact Logix PLC Manual •Vilter/Emerson • 35391CL
Page 35

VSG/VSSG • Compact Logix PLC Manual •Vilter/Emerson • 35391CL
Blank/35
Page 36

Motor Speed Setpoints & Control Screen
VFD SCREEN SETTINGS
Settings:
Auto Button:
Choosing Auto will do the following:
1. While the fan is off the Output Mode will be forced to Manual Mode.
2. When the fan starts, it will remain in Manual Mode at the Initial Speed for the period defined as
Delay Auto.
3. After the Delay Auto time expires, the Output Mode will change to Auto Mode.
4. In Auto Mode, the VFD is enabled to increase and decrease speed to maintain the temperature set-
tings.
5. Increase At: High setting where an increase of speed is desired.
6. Decrease At: Low setting where a decrease of speed is desired
7. Initial Speed: Desired forced speed to start the fan at as described above. Note: The PLC will auto-
matically keep this value to at least the Minimum Speed setting.
36
VSG/VSSG • Compact Logix PLC Manual •Vilter/Emerson • 35391CL
Page 37

Motor Speed Setpoints & Control Screen
8. Max Speed Detect: Setting for PLC program detection of maximum speed. This setting will not limit
the speed of the VFD. Generally, this setting is useful only when sequencing of multiple devices is
used.
9. Minimum Speed: This is the minimum speed that the PLC will send to the VFD. This is active in
Manual Mode and in Auto Mode.
Adjustment Limit: This is the maximum amount of change in speed per adjustment. If the Calculated Adjust-
ment is greater than the Adjustment Limit value, the PLC output will only change the amount of the Adjust-
ment Limit. If the Calculated Adjustment is less than the Adjustment Limit value, the PLC output will change
the amount of the Calculated Adjustment. The Adjustment Limit is used in conjunction with the Gain to
prevent target overshooting.
10. Gain: This value is factory set to 2.50 but may be set from 0.1 to 99. For VFDs, Gain is a multiplica-
tion factor used in a calculation to determine an adjustment to the speed each set interval. This
interval is defined as the Increase Rate or Decrease Rate. Factory settings for Increase Rate and De-
crease Rate are 2 to 5 seconds.
Manual Button:
Choosing Manual will do the following:
1. The fan Output Mode will remain Manual Mode.
2. Manual Speed: This setting becomes accessible only when the Manual Button is chosen. Enter the
desired speed (%) for the VFD.
VSG/VSSG • Compact Logix PLC Manual •Vilter/Emerson • 35391CL
37
Page 38

Diagnostics Force Output
WARNING: Be sure to remove all outputs from Forced-On mode before exiting this screen!
To force an output, a user with high level access must be logged on first. Without sufficient access, the outputs display without force buttons. Touch the Logon button or Set button to prompt the Logon screen. At
the Logon screen, enter the user name (case sensitive) then the user’s password (case sensitive) then press
the <-| enter button. The currently logged in user’s name displays on the Logon screen, on the Logon button
(on the main menu and on the Setup screen.
Once a user with sufficient access is logged on, force buttons appear.
To force an output on, touch its button. The “Main Compressor Motor Starter*” button and “Starter Reset”
button are momentary-on buttons while the others are maintained buttons. Forced-on buttons display green.
On/Off output status displays to the right of each button.
Return all maintained buttons to their off (grey color) state before exiting this screen. Exiting this screen does
not automatically remove forces.
38
VSG/VSSG • Compact Logix PLC Manual •Vilter/Emerson • 35391CL
Page 39

Instrument Calibration
To calibrate, a user with high level access must be logged on first. Without sufficient access, the raw input
values and calibrated values display without “Calibrate” buttons. Touch the Logon button or Set button to
prompt the Logon screen. At the Logon screen, enter the user name (case sensitive) then the user’s password
(case sensitive) then press the <-| enter button. The currently logged in user’s name displays on the Logon
screen, on the Logon button (on the main menu and on the Setup screen.
Once a user with sufficient access is logged on, Calibrate buttons appear.
The following items can be calibrated from this screen: Suction Pressure Transducer, Discharge Pressure
Transducer, Oil Manifold Pressure Transducer, Oil Filter Inlet Pressure Transducer, Motor Amperage, Oil Cooling Fan Feedback, Suction Temperature RTD, Discharge Temperature RTD, Oil Separator Temperature RTD,
Oil Injection RTD.
The “Calibrated Values” reflect the values used for control of the system. The user can perform calibration by
pressing the respective Calibrate button alongside the value prompting the Calibration screen.
Calibration Instructions are provided on each Instrument Calibration screen.
VSG/VSSG • Compact Logix PLC Manual •Vilter/Emerson • 35391CL
39
Page 40

Instrument Calibration
40
VSG/VSSG • Compact Logix PLC Manual •Vilter/Emerson • 35391CL
Page 41

Instrument Calibration Pressures
Confirm the “mA Reading” value (the raw mA value at the analog module) is correct and stable.
If not already done, set the Minimum mA to 4.00
If not already done, set the Maximum mA to 20.00
Set the Minimum Pressure to the actual minimum pressure at 4mA as marked on the transducer.
Set the Maximum Pressure to the actual maximum pressure at 20mA as marked on the transducer.
Set the Offset to zero unless required otherwise. The offset value adds to the resultant linearly scaled value
and results in the Calibrated Value which is used for control. Alternatively, set the Target Value to desired/
actual Pressure. This will calculate the offset based on actual vs desired pressure.
VSG/VSSG • Compact Logix PLC Manual •Vilter/Emerson • 35391CL
41
Page 42

Instrument Calibration Motor Amps
Confirm the “mA Reading” value (the raw mA value at the analog module) is correct and stable.
If not already done, set the Minimum mA to 4.00. This is the minimum mA expected from the current
transmitter at 0 motor amps.
If not already done, set the Maximum mA to 20.00. This is the maximum mA possible from the current
transmitter.
Set the Minimum Ratio value of the current transformer. Enter a 0 for zero amps.
Set the Maximum Ratio value of the current transformer. For example, if the CT has a 250:5 rating, enter
250 as the Maximum Ratio value.
Set the Offset to zero unless required otherwise. The offset value adds to the resultant linearly scaled value
and results in the Calibrated Value which is used for control.
42
VSG/VSSG • Compact Logix PLC Manual •Vilter/Emerson • 35391CL
Page 43

Instrument Calibration Temperatures
All RTDs are 100 ohm Pt and are scaled as such via hard-coded configuration in the PLC input module. The
Raw T Reading is defined as the scaled value from the RTD input module.
Set the Offset to zero unless required otherwise. The offset value adds to the raw temperature reading
scaled value to result in the Calibrate Value is used for control.
VSG/VSSG • Compact Logix PLC Manual •Vilter/Emerson • 35391CL
43
Page 44

Instrument Calibration Temperatures
Optional Temperature Transducers can be used in place of standard RTDs.
Confirm the “mA Reading” value (the raw mA value at the analog module) us correct and stable.
If not already done, set the Minimum mA to 4.00
If not already done, set the Maximum mA to 20.00
Set the Minimum Temperature to the actual minimum temperature at 4mA as marked on the transducer.
Set the Maximum Temperature to the actual maximum temperature at 4mA as marked on the transducer.
Set the Offset to zero unless required otherwise. The offset value adds to the resultant linearly scaled value
and results in the Calibrated Value which is used for control.
44
VSG/VSSG • Compact Logix PLC Manual •Vilter/Emerson • 35391CL
Page 45

Oil Mixing Valve
Various types of oil coolers can be used to maintain the oil injection temperature, usually either a water-cooled
shell-&-tube heat exchanger mounted locally or a remotely located air-cooled fan-coil unit. In either case, the oil
temperature control valve operates the same.
A two-way ball valve is located in the main oil line between the oil separator and the compressor. The oil cooler
is piped in parallel to the oil temperature control valve, which acts as a by-pass valve.
1.0 Installation & Position Indication
1.1 The ball valve is installed with the ball closed.
1.2 The actuator mounts on the ball valve stem. Flats on the ball valve stem indicate the position of the ball:
OPEN – stem flats are with the flow
CLOSED – stem flats are across the flow
1.3 On smaller valves, the ball valve stem flats are nearly hidden between the stem extension and the stem
lock nut. The locking tabs on the stem lock nut are across the flow.
1.4 The actuator position indicator stem flats are oriented in the same direction as the ball valve stem flats.
1.5 There is a mechanical position indicator on the top of the actuator cover.
NOTE: The oil temperature control valve comes from the vendor already assembled with the ball closed and the
actuator in the CLOSED position.
2.0 Control Action
2.1 The ball valve can rotate through a full 360° arc.
2.2 The actuator restricts the ball to a 90° arc of travel.
2.3 The actuator is powered (120V or 24V) all the time.
2.4 The position target signal from the compressor controller is a 4-20mA analog value.
2.5 There is no feedback position from the actuator.
VSG/VSSG • Compact Logix PLC Manual •Vilter/Emerson • 35391CL
45
Page 46

Oil Mixing Valve
3.0 Initial Position
3.1 With the electrical power to the valve de-energized, the valve is set to its initial position by ensuring that
the ball is in the closed position and that the actuator indicator displays CLOSED.
3.2 When the electrical power to the valve is energized, the valve should rotate to fully OPEN.
4.0 Operation
4.1 When initially installed, the ball must be in the closed position.
4.2 When electrically energized, if the compressor is not running, the compressor
controller will turn the valve fully open (100%).
4.3 When the compressor starts, the valve remains fully open (100%) until the oil injection
temperature rises above the control setpoint.
4.4 When the oil injection temperature rises above the control setpoint, the oil
temperature control valve will begin to close.
4.5 The hot oil from the oil separator begins to divert to the oil cooler, mixing the hot and
cooled oil flow streams together downstream of the oil temperature control valve. The
valve can fully close (0%) diverting the entire oil flow stream to the oil cooler.
4.6 As the oil injection temperature drops below the setpoint, the oil temperature control
valve begins to open so that the oil injection temperature does not become too cold.
4.7 When the compressor stops, the valve returns to fully open (100%).
5.0 Fail Position
The actuator remains in its last position when power is removed.
6.0 Screen Display
The oil temperature control valve, identified as “OIL MIX” on the main HMI display screen, shows a
numerical value with “%” as units. This is to be understood as “% OPEN.” It is a direct indication of the
position of the ball valve.
6.1 100% OPEN
Oil flow stream is entirely bypassing the oil cooler
6.2 99% to 1% OPEN
Oil flow stream is partially by-passing the oil cooler and partially diverted to the oil
cooler
6.3 0% OPEN
Oil flow stream is entirely diverted to the oil cooler
7.0 Control Settings
The oil temperature control setpoints are entered on the compressor controller screen “Oil Mixing Valve
PID (Oil Return from Cooler)”.
8.0 Rotating the Actuator for Convenience of Installation
The actuator can be rotated to any one of four positions.
8.1 Remove both 120V and 24V power from the actuator.
46
VSG/VSSG • Compact Logix PLC Manual •Vilter/Emerson • 35391CL
Page 47

Oil Mixing Valve
8.2 Disconnect electrical leads at actuator.
8.3 Remove four cap screws that fasten the actuator to the valve mounting bracket.
8.4 Lift the actuator off the valve stem.
8.5 Rotate the actuator to the desired position.
8.6 Slide actuator down on the valve stem.
8.7 Secure the actuator to the valve mounting bracket with four cap screws.
8.8 Re-connect the electrical leads at the actuator.
8.9. Restore 120V and 24V power to the actuator.
NOTE: The ball valve and the actuator must always be assembled in the CLOSED position. See Section
3.0 Calibration above.
CAUTION: Be careful not to move the ball stem during this operation. Turning the ball valve 90° in
either direction will reverse the control action of the valve and the compressor will experience high oil
temperature within minutes. Turning the ball valve 180° has no detrimental effect.
9.0 Manual Override
The actuator has a handwheel that can be engaged to override the electrically determined position of
the ball valve.
Push and rotate to engage.
Push a second time to de-clutch.
VSG/VSSG • Compact Logix PLC Manual •Vilter/Emerson • 35391CL
47
Page 48

Unit Start Screen (Start / Stop Logic)
Unit Start Button
Pressing this button will invoke a floating button panel, called Unit Start. The operational
mode of the compressor unit can be selected from the Unit Start button panel. The
compressor unit does not start when the green Unit Start button, on the main screen, is
pressed.
Unit Start Window
Local Button
The Local button is used to put the compressor controller into Local mode. This is the default
mode for the compressor controller. In Local mode the compressor unit must be operated in
Auto or Manual mode.
UNIT START LOCAL
START IN
AUTO
48
VSG/VSSG • Compact Logix PLC Manual •Vilter/Emerson • 35391CL
Page 49

Unit Start Screen (Start / Stop Logic)
Start In Auto Button
In this mode the compressor will respond to its on-board settings for start, stop, load and
unload commands.
UNIT START LOCAL
START IN
MANUAL
Start In Manual Button
In this mode the compressor will respond to operator inputs from the HMI screen. They
Capacity and Volume Slide Valve Position can be adjusted by the up and down arrows that
appear on the main screen. The Position is a value 0% to 100%.
UNIT START LOCAL
AUTO
START IN
MANUAL
Remote Digital Button
The Compressor Controller must be in Local-Auto in order to activate Remote mode. In
Remote Digital Mode the compressor is controlled by digital input signals.
1. Remote Start Input: Permissive Start/Stop for the compressor.
2. Remote Increase Input: Increases the Capacity Slide Valve.
3. Remote Decrease Input: Decrease the Capacity Slide Valve.
UNIT START LOCAL
Remote Capacity Hold Button
From Local mode, Remote Caphold button can be pressed to put the compressor controller in
Central mode. Central mode allows for external capacity control via communications link.
Central Mode
The remote PLC must maintain the Central mode operation by setting a tag in the compressor
controller memory at least every 60 seconds. If the Central mode signal is lost during
operation, the compressor controller reverts to Local Auto mode.
VSG/VSSG • Compact Logix PLC Manual •Vilter/Emerson • 35391CL
REMOTE
CAPHOLD
49
Page 50

Unit Start Screen (Start / Stop Logic)
Stop Button
Pressing this button will stop the compressor unit. If the compressor unit is in Central mode
when the Stop button is pressed, the compressor controller enters Local-Stop-Lock mode.
The central system controller will no longer be able to command the compressor controller.
To return to any operational mode, see the description of Local-Stop-Lock Release Button
below.
NOTE: If the compressor unit does not stop, use the Emergency Stop button which is
hardwired to the compressor controller. If this does not stop the compressor, then the main
power disconnect must be opened.
Local-Stop-Lock Release Button
If the Stop key is pressed when in Central mode, the controller goes into Local-Stop-Lock
mode. In Local-Stop-Lock the controller prevents the compressor from being remotely
started. Press Local-Stop-Lock Release to take the Controller out of Local-Stop-Lock mode.
The controller must then be set to the desired mode from the Unit Start button.
Alarm Reset Button
Pressing this button will reset the Alarms.
Exit Button
Pressing this button will close the Unit Start box.
Help Button
Pressing this button will open an additional help screen.
50
VSG/VSSG • Compact Logix PLC Manual •Vilter/Emerson • 35391CL
Page 51

Device Names
To change Device Name, go into the “Vilter Only” screen and press “Create Device Names.”
From the Device Name Screen, press the corresponding text window to change the name of
the device.
VSG/VSSG • Compact Logix PLC Manual •Vilter/Emerson • 35391CL
51
Page 52

Calibration Procedure of Optical Actuators
ACTUATOR MOTOR CONTROL MODULE CALIBRATION PROCEDURE
1. Open the plastic cover of the capacity motor by removing the four #10 screws. Cau-
tion: there are wires attached to the connector on the plastic cover. Handling the
cover too aggressively could break the wires.
2. Gently lift the cover and tilt it toward the Turck
connectors. Raise the cover enough to be
able to press the blue calibrate button and be
able to see the red LED on the top of assembly.
3. Press “Menu” on the main screen and then press
the “Slide Calibration” button, to enter the slide
calibration screen. Logging on with high-level access will prompt the following buttons to appear:
Press to Calibrate, Inc. and Dec. (Capacity and
Volume.) Touch the Press to Calibrate button – it
turns green and states “Calibrate.” Set Min and
Set Max buttons appear (Capacity and Volume.)
If you are re-installing a new optical actuator reconnect the yellow and gray cables.
4. Press INC and DEC to move the slide valve and
check for the correct rotation. See Table 1 for Actuator/command shaft rotation specifications.
5. Note: If the increase and decrease buttons
do not correspond to increase or decrease
shaft rotation, swap the blue and brown
wires of the “power cable”. This will reverse
the rotation of the actuator/command shaft.
6. Quickly press and release the blue push
button on the actuator one time. This places the actuator in calibration mode. The
red LED will begin flashing rapidly.
7. Note: When the actuator is in calibration mode,
it outputs 0V when the actuator is running and
5V when it is still. Thus, as stated earlier, the
actuator voltage will fluctuate during calibration. After the actuator has been calibrated, 0V
output will correspond to the minimum position
and 5V to the maximum position.
52
VSG/VSSG • Compact Logix PLC Manual •Vilter/Emerson • 35391CL
Page 53

Calibration Procedure of Optical Actuators
8. Note: The “Slide calibration” screen on the Control Panel has a “Current” window, which displays
twice the actuator output voltage. This value,
(the % volume and the % capacity) displayed in
the “Current Vol” and Current Cap” Windows are
meaningless until calibration has been completed.
9. Use the DEC button on the Control panel to drive
the slide valve to its minimum “mechanical stop”
position. Do not continue to run the actuator in
this direction after the slide valve has reached
the stop. Doing so may cause damage to the
actuator or the slide valve.
Press down on the photochopper shaft to disen-
gage the brake, releasing tension from the motor
mount. Use the INC button to pulse the actuator
to where the slide is just off of the mechanical
stop and there is no tension on the motor shaft.
10. Quickly press and release the blue button on the
actuator again. The red LED will now flash at a
slower rate, indication that the minimum slide
valve position (zero position) has been set.
11. Use the INC button on the Control Panel panel
to drive the slide to its maximum “mechanical
stop” position. Do not continue to run the ac-
tuator in this direction after the slide valve has
reached the stop. Doing so may cause damage to the actuator or the slide valve. Press
down on the photochopper shaft to disengage
the brake, releasing tension from the motor
mount. Use the DEC button to pulse the actuator to where the slide is just off of its mechanical
stop and there is no tension on the motor shaft.
Remove Cover
Press Down On
Phot ochopper
Do not touch wires, may cause an
electrical shock!
12. Quickly press and release the blue button on the
actuator one more time. The red LED will stop
flashing. The actuator is now calibrated and
knows the minimum and maximum positions
of the slide valve it controls. Now the capacity
or volume channel of the PLC can be calibrated.
13. Use the DEC button to move the actuator towards its minimum position while watching the
millivolt readout on the Control Panel screen.
Discontinue pressing the DEC button when the
millivolt reading the “Current” window above
the “Set Min” button is approximately 500 millivolts.
14. Now use the DEC and INC buttons to posi-
tion the slide valve until a value close to 300
millivolts is on the screen. Then, press the
“Set Min” button in the capacity or volume
slide valve window to tell the controller that
this is the minimum millivolt position. Note:
The value in the “Current Cap” or “Current
Vol” window has no meaning right now.
VSG/VSSG • Compact Logix PLC Manual •Vilter/Emerson • 35391CL
53
Page 54

Calibration Procedure of Optical Actuators
15. Use the INC button to rotate the actuator
towards its maximum position while watching the millivolt readout on the controller
screen. Discontinue pressing the INC button
when the millivolt reading in the “Current”
window is approximately 4800 millivolts. You
are nearing the mechanical stop position.
16. Pulse the INC button to carefully move the slide
valve until the millivolt readout “saturates”,
or stops increasing. This is around 4800 millivolts Record millivolt maximum reading.
17. Pulse the DEC button until the millivolts just
start to decrease. (This is the point where
the channel drops out of saturation). Adjust millivolt value to 300 millivolts below
recorded maximum millivolts in step #17.
18. Press the “Set Max” button.
19. Press the “Main” button to complete calibration and exit the “Slide Calibration” screen.
The controller will automatically energize
the actuator and drive it back to its minimum position (below 5%) for pre-start-up.
20. Note: Now the “Current Cap” or the “Current
Vol” value will be displayed in the window on the
“Main” screen and the “Slide Calibration” screen.
21. Gently lower the plastic cover over the top
of the actuator to where it contacts the
base and O-ring seal. After making sure the
cover is seated properly, gently tighten the
four #10 screws. Caution: The plastic cover
will crack if the screws are over tightened.
22. Enable the “Slide Non-Movement Alarm” by going to the “Setup” menu and choosing “Alarm
Enable” for the “Slide Non-Movement Option”.
23. This completes the calibration for this channel either capacity or volume. Repeat the
same procedure to the other channel.
54
VSG/VSSG • Compact Logix PLC Manual •Vilter/Emerson • 35391CL
Page 55

Compressor
Model
VSSG 291
VSSG 341
VSSG 451
VSSG 601
VSG 301
VSG361
VSG 401
VSG 501
VSG 601
VSG 701
VSG 751
VSG 901
VSG 791
VSG 891
VSG 1051
VSG 1201
VSG 1551
VSG 1851
VSG 2101
VSG 2401
VSG 2601
VSG2801
VSG 3001
Command Shaft Rotation and Travel
Command Shaft Rotation No. of Turns/Rotation Angle/Slide Travel
Capacity Volume Capacity Volume
INC DEC INC DEC Turns Degrees Travel Turns Degrees Travel
CW CCW CW CCW 0.91 328 3.568” 0.52 187 2.045”
CW CCW CW CCW 0.80 288 3.141” 0.45 162 1.767”
CCW CW CCW CW 0.91 328 3.568” 0.52 187 2.045”
CCW CW CCW CW 1.09 392 4.283” 0.63 227 2.473”
CCW CW CCW CW 1.22 439 4.777” 0.74 266 2.889”
CCW CW CCW CW 1.48 533 5.823” 0.87 313 3.433”
CCW CW CCW CW 1.80 648 7.072” 1.36 490 5.341”
*The large gear on the command shaft has 50 teeth. The teeth are counted when moving the command shaft from
the minimum stop position to the maximum stop position.
The manual operating shaft on the gear motor should be turned the opposite direction of the desired command
shaft rotation.
The capacity and volume control motors are equipped with a brake, if it is necessary to operate the control motors
manually, the brake must be disengaged. The brake can be disengaged by pushing on the motor shaft on the cone
end. The shaft should be centered in its travel. Do not use excessive force manually operating the motor or damage
may result.
VSG/VSSG • Compact Logix PLC Manual •Vilter/Emerson • 35391CL
55
Page 56

Installation Instructions For Replacement Of Optical Actuator
CAUTION: WHEN INSTALLING THE OPTICAL SLIDE
MOTOR, LOOSEN LOCKING COLLAR BEFORE SLIDING THE COLLAR DOWN THE SHAFT. DO NOT USE
A SCREWDRIVER TO PRY LOCKING COLLAR INTO
POSITION.
OVERVIEW
Calibration of an optical slide valve actuator is
a two step process that must be done for each
actuator installed on the compressor. The steps
are as follows.
1. The actuator motor control module, located
inside the actuator housing, is calibrated so
that it knows the minimum and maximum rotational positions of the slide valve it controls.
The calibrated actuator will output 0 VDC at the
minimum position and 5 VDC at maximum position.
2. After the actuator motor control module has been
calibrated for 0-5 Volts, the controlling channel
corresponding to the actuator motor (either the
capacity or volume) has to be calibrated. This instructs the PLC to learn the rotational 0% position
& rotation 100% position of the slide valve travel.
Please Note:
Because there is an optical sensor on this motor,
DO NOT attempt to calibration in direct sunlight.
3. Before applying power to the PLC disconnect the
gray and yellow cable.
4. Power the PLC back on.
5. Refer to Calibration Procedure of Optical Actua-
tors.
56
VSG/VSSG • Compact Logix PLC Manual •Vilter/Emerson • 35391CL
Page 57

Slide Valve Actuator Theory of Operation
Slide Valve Actuator Theory of Operation
The slide valve actuator is a gear-motor with a position sensor. The motor is powered in the forward
and reverse directions from the main computer in
the control panel. The position sensor tells the main
computer the position of the slide valve. The main
computer uses the position and process information
to decide where to move the slide valve next.
The position sensors works by optically counting
motor turns. On the shaft of the motor is a small
aluminum “photochopper.” It has a 180 degree
fence that passes through the slots of two slotted
optocouplers. The optocouplers have an infrared
light emitting diode (LED) on one side of the slot and
a phototransistor on the other. The phototransistor
behaves as a light controlled switch. When the photochopper fence is blocking the slot, light from the
LED is prevented from reaching the phototransistor
and the switch is open. When photochopper fence
is not blocking the slot, the switch is closed.
This scheme is not foolproof. If the motor is moved
manually while the power is off or the motor brake
has failed, allowing the motor to free wheel for too
long after the position sensor looses power, the
actuator will become lost.
A brake failure can sometimes be detected by the
position sensor. If the motor never stops turning
after a power loss, the position sensor detects this,
knows it will be lost, and goes immediately into
calibrate mode when power is restored.
As the motor turns, the photochopper fence alternately blocks and opens the optocoupler slots,
generating a sequence that the position sensor microcontroller can use to determine motor position
by counting. Because the motor is connected to the
slide valve by gears, knowing the motor position
means knowing the slide valve position.
During calibration, the position sensor records the
high and low count of motor turns. The operator
tells the position sensor when the actuator is at the
high or low position with the push button. Refer to
the calibration instructions for the detailed calibration procedure.
The position sensor can get “lost” if the motor is
moved while the position sensor is not powered. To
prevent this, the motor can only be moved electrically while the position sensor is powered. When
the position sensor loses power, power is cut to the
motor. A capacitor stores enough energy to keep
the position sensor circuitry alive long enough for
the motor to come to a complete stop and then save
the motor position to non-volatile EEPROM memory.
When power is restored, the saved motor position
is read from EEPROM memory and the actuators
resumes normal function
VSG/VSSG • Compact Logix PLC Manual •Vilter/Emerson • 35391CL
57
Page 58

Slide Valve Actuator Troubleshooting Guide
Problem Reason Solution
The actuator cannot be calibrated or
exit calibration mode
The actuator goes into calibration
mode spontaneously
Dirt or debris is blocking one or both
optocoupler slots
The photochopper fence extends
less than about half way into the
optocoupler slots
The white calibrate wire in the grey
Turck cable is grounded
Dirt and/or condensation on the
position sensor boards are causing it
to malfunction
The calibrate button is stuck down Try to free the stuck button.
The position sensor has failed
Push button is being held down for
more that ¾ second when going
through the calibration procedure
The white calibrate wire in the
grey Turck cable is grounding
intermittently
A very strong source of electromagnetic interference (EMI), such as a
contactor, is in the vicinity of the actuator or grey cable
Clean the optocoupler slots with a
Q-Tip and rubbing alcohol.
Adjust the photochopper so that
the fence extends further into the
optocoupler slots. Make sure the
motor brake operates freely and
the photochopper will not contact
the optocouplers when the shaft is
pressed down.
Tape the end of the white wire in the
panel and make sure that it cannot
touch metal
Clean the boards with an electronics
cleaner or compressed air.
Replace the actuator.
Depress the button quickly and then
let go. Each ¾ second the button is
held down counts as another press.
Tape the end of the white wire in the
panel and make sure that it cannot
touch metal.
Tape the end of the white wire in the
panel and make sure that it cannot
touch metal.
Install additional metal shielding material between the EMI source and
the actuator or cable.
The actuator goes into calibration
mode every time power is restored
after a power loss
The actuator does not transmit the
correct position after a power loss
58
There is an intermittent failure of the
position sensor
The motor brake is not working properly (see theory section above.)
The motor was manually moved
while the position sensor was not
powered.
The motor brake is not working
properly
The position sensor’s EEPROM
memory has failed
VSG/VSSG • Compact Logix PLC Manual •Vilter/Emerson • 35391CL
Replace the actuator.
Get the motor brake to where it
operates freely and recalibrate.
Recalibrate.
Get the motor brake to where it operates freely and then recalibrate.
Replace the actuator.
Page 59

Slide Valve Actuator Troubleshooting Guide
Problem Reason Solution
The motor was manually moved
while the position sensor was not
powered.
Recalibrate.
The actuator does not transmit the
correct position after a power loss
There is a rapid clicking noise when
the motor is operating
The motor operates in one direction
only
The motor will not move in either
direction
The motor runs intermittently, several minutes on, several minutes off
The motor brake is not working
properly
The position sensor’s EEPROM
memory has failed
The photochopper is misaligned
with the slotted optocouplers
The photochopper is positioned too
low on the motor shaft.
A motor bearing has failed Replace the actuator.
There is a loose connection in the
screw terminal blocks
There is a loose or dirty connection
in the yellow Turck cable
The position sensor has failed Replace the actuator.
There is a broken motor lead or
winding
The thermal switch has tripped because the motor is overheated
Any of the reasons listed in “The motor operates in one direction only”
The command shaft is jammed Free the command shaft.
Broken gears in the gearmotor Replace the actuator.
Motor is overheating and the thermal switch is tripping
Get the motor brake to where it operates freely and then recalibrate.
Replace the actuator.
Try to realign or replace the actuator.
Adjust the photochopper so that
the fence extends further into the
optocoupler slots.
Tighten.
Clean and tighten.
Replace the actuator.
The motor will resume operation
when it cools. This could be caused
by a malfunctioning control panel.
Consult the factory.
See above.
This could be caused by a malfunctioning control panel. Consult the
factory.
The motor runs sporadically
The motor runs but output shaft will
not turn
VSG/VSSG • Compact Logix PLC Manual •Vilter/Emerson • 35391CL
Bad thermal switch Replace the actuator.
Any of the reasons listed in “The motor will not move in either direction”
Stripped gears inside the gear
motor or the armature has come unpressed from the armature shaft
See above.
Replace the actuator.
59
Page 60

*=ON
_=OFF
Slide Valve Actuator LED Blink Codes*
Flash Pattern Meaning
*_*_*_*_*_*_*_*_*_*_*_
*___*___*___*___*___
*__*________________
Calibration step 1
Calibration step 2
This indicates a zero span. This error can only occur during calibration. The typical cause is forgetting to move the actuator when setting the upper limit of the
span. If this is the case, press the blue button to restart the calibration procedure. This error can also occur if either or both of the slotted optocouplers are
not working. If this is the case, the slide valve actuator will have to be replaced.
The operation of the slotted optocouplers is tested as follows:
1. Manually rotate the motor shaft until the aluminum photochopper fence is
not blocking either of the optocoupler slots.
2. Using a digital multi-meter, measure the DC voltage between terminal 3 of
the small terminal block and TP1 on the circuit board (see Note 1). You should
measure between 0.1 and 0.2 Volts.
3. Next, measure the DC voltage between terminal 3 and TP2 on the circuit
board. You should measure between 0.1 and 0.2 Volts.
This indicates a skipped state in the patterns generated by the optocouplers as
the motor moves. This error means that the slide valve actuator is no longer
transmitting accurate position information. The actuator should be recalibrated
as soon as possible. This code will not clear until the actuator is recalibrated.
This code can be caused by:
*__________________
1. The motor speed exceeding the position sensors ability to measure it
at some time during operation. A non-functioning motor brake is usually to
blame.
2. The actuator is being operated where strong infrared light can falsely
trigger the slotted optocouplers, such as direct sunlight. Shade the actuator
when the cover is off for service and calibration. Do not operate the actuator
with the cover off.
60
VSG/VSSG • Compact Logix PLC Manual •Vilter/Emerson • 35391CL
Page 61

Flash Pattern Meaning
*__*__*____________
Slide Valve Actuator LED Blink Codes*
The motor has overheated. The actuator motor will not run until it cools. Once
the motor cools, the actuator will resume normal operation.
Motor overheating is sometimes a problem in hot and humid environments
when process conditions demand that the slide valve reposition often. Solutions
are available; consult your Vilter authorized distributor for details.
Another possible cause for this error is a stuck motor thermal switch. The thermal switch can be tested by measuring the DC voltage with a digital multi-meter
between the two TS1 wire pads (see Note 2). If the switch is closed (normal
operation) you will measure 0 Volts.
The 24V supply is voltage is low. This will occur momentarily when the actuator
is powered up and on power down.
********************
If the problem persists, measure the voltage using a digital multi-meter between terminals 3 and 4 of the small terminal block. If the voltage is >= 24V,
replace the actuator.
The EEPROM data is bad. This is usually caused by loss of 24V power before the calibration procedure was completed. The actuator
will not move while this error code is displayed. To clear the error,
_*******************
calibrate the actuator. If this error has occurred and the cause was
not the loss of 24V power during calibration, possible causes are:
1. The EEPROM memory in the micro-controller is bad.
2. The large blue capacitor is bad or has a cracked lead.
*****____*__________ Micro-controller program failure. Replace the actuator.
*There are two versions of slide valve actuators, version A and B. Only version B is able to display LED blink codes. Slide valve actuator version B can
be distinguished by only having a single circuit board as supposed to two circuit boards in version A.
Note 1: TP1 and TP2 are plated-thru holes located close to the slotted optocouplers on the board. They are clearly marked on the board silkscreen
legend.
Note 2: The TS1 wire pads are where the motor thermal switch leads solder into the circuit board. They are clearly marked on the board silkscreen
legend and are oriented at a 45 degree angle.
VSG/VSSG • Compact Logix PLC Manual •Vilter/Emerson • 35391CL
61
Page 62

Safety Failure Message
Suction Pressure SP#1 Fail -
This message will appear when the suction pressure falls below the safety setting of the Lo Suction Pressure
Trip Setpoint No. 1. In addition, this message will appear when the suction pressure reading rises above
300 PSI, indicating an open transducer or bad analog channel.
Suction Pressure SP#2 Fail -
This message will appear when the suction pressure falls below the safety setting of the Lo Suction Pressure
Trip Setpoint No. 2. In addition, this message will appear when the suction pressure reading rises above
300 PSI, indicating an open transducer.
Discharge Pressure SP#1 Fail –
This message will appear when the discharge pressure exceeds the safety setting of the Hi Dsch Press Trip
Setpoint No. 1 . In addition, this message will appear when the discharge pressure reading falls below 30”
Hg, indicating a shorted transducer.
Discharge Pressure SP#2 Fail –
This message will appear when the discharge pressure exceeds the safety setting of the Hi Dsch Press Trip
Setpoint No. 2 . In addition, this message will appear when the discharge pressure reading falls below 30”
Hg, indicating a shorted transducer.
Suction Temp Fail –
This message will appear when the suction temperature falls below the safety setting of the Low Suction
Temperature Trip setpoint. In addition, this message will appear when the suction temperature rises above
400 degrees, indicating an open RTD.
Discharge Temp Fail –
This message will appear when the discharge temperature rises above the safety setting of the High Dis-
charge Temperature Trip setpoint. In addition, this message will appear when the discharge temperature
falls below -30 degrees, indicating a shorted RTD.
62
VSG/VSSG • Compact Logix PLC Manual •Vilter/Emerson • 35391CL
Page 63

Safety Failure Message
Oil Separator Start Temp Fail –
This message will appear when the Oil Separator Temp is below the Low Oil Separator Start Temp Trip
setpoint. In addition this message will appear after the Oil Separator Temp Safety Changeover timer times
out and the Oil Separator temperature fails to rise above the Low Oil Separator Start Temp Reset after the
compressor is started.
Oil Separator Run Temp Fail –
This message will appear when the Oil Separator Temp is below the Low Oil Separator Run Temp Reset
setpoint after the Oil Separator Temp Safety Changeover timer times out.
Percent Capacity Fail –
This message will appear if the percent capacity reading exceeds 300% or goes below –15%.
Percent Volume Fail –
This message will appear if the percent volume reading exceeds 300% or goes below –15%.
Low Control Temperature Fail –
This message will appear when the Process Control Temperature falls below the safety setting of the Lo
Control Temperature Trip Setpoint. In addition, this message will appear when the Process Control Temperature rises above 300 degrees F, indicating an open RTD.
Low Start Oil Pressure Fail –
This message will appear with the Prelube Oil Pressure (Manifold minus Discharge) has remained below the
Prelube Oil Pressure Reset setpoint. The Prelube Oil Pressure must be above the Prelube Oil Pressure for a
time period of the Minimum Compressor Prelube time. It will continue to try to do this for a time period
of the Prelube Oil Pump Time Limit. When the Prelube Oil Pressure fails to achieve this, then the failure
message will occur.
Low Oil Pressure Fail –
This message will appear when the Running Oil Pressure (Manifold minus Suction) has remained below the
low Oil Pressure Reset setpoint when the Oil Pressure Bypass at Compressor Start timer times out. This
message will also appear when the Running Oil Pressure falls below the Low Oil Pressure trip setpoint after
the Oil Pressure Bypass at Compressor Start timer times out.
Low Oil Injection Temp Fail –
This message will appear when the Oil Injection temperature falls below the Low Oil Injection Temperature
trip setpoint. This message will also appear when the Oil Injection temperature fails to rise above the Low
Oil Injection Temperature reset setpoint after the Low Oil Injection Temp Bypass timer times out.
Hi Oil Injection Temp Fail –
This message will appear when the Oil Injection temperature rises above the High Oil Injection Temperature
trip setpoint.
Manifold Pressure Fail –
This message will appear with the manifold pressure rises above 300 PSI or falls below 30” Hg.
VSG/VSSG • Compact Logix PLC Manual •Vilter/Emerson • 35391CL
63
Page 64

Safety Failure Message
Filter Inlet Pressure Fail –
This message will appear with the manifold pressure rises above 300 PSI or falls below 30” Hg.
Start Filter Diff Press Fail –
This message will appear if the Filter Differential pressure rises above the High Fltr Diff Press – Start
setpoint before the Filter Differential Pressure Safety Changeover timer times out.
Run Filter Diff Press Fail –
This message will appear if the Filter Differential pressure rises above the High Fltr Diff Press Run
setpoint after the Filter Differential Pressure Safety Changeover timer times out.
Maximum Amperage Fail –
This message will appear if the motor amperage rises above the Hi Motor Amps trip setpoint.
Motor Starter Aux Contact Fail –
This message will appear if the Motor Auxiliary contact fails to close before the Compressor Starter
Auxiliary Contact Bypass timer times out. Refer to wiring diagram.
Auxiliary Safety#1 Input Fail –
This message will appear when power is removed from the input module that is designated as “Aux-
iliary #1 Safety” (please refer to your wiring diagram).
Low Oil Separator Level Fail –
This message may appear when power is removed from the input module that is designated as “Low
Separator Oil Level Trip” (please refer to your wiring diagram). This safety has an associated delay.
The associated delay timer is the Low Oil Separator Level Bypass Timer. This safety will activate only
after the oil level has been low after the timer times out.
64
VSG/VSSG • Compact Logix PLC Manual •Vilter/Emerson • 35391CL
Page 65

Version Screen
This screen lists a hard-coded version description of the PanelView-Plus HMI file and active information
regarding the ControlLogix processor.
Active Logix processor information are real-time statuses via the Ethernet link between the HMI and
the Logix processor.
Logix processor information displayed:
1. Processor Name: Name assigned by Vilter to the Logix processor
2. Mode: Remote Run, Run, Program
3. Revision: Revision of the processor
4. Status: OK, Faulted
Date and Time of both the PanelView Plus unit and of the Logix processor are displayed here for operator or service technician use. Confirm that the dates and times of the HMI and Logix processor are
equal. If unequal, follow instructions for setting the date and time from the Vilter Only screen.
Note: Access to the Vilter Only screen is password protected.
VSG/VSSG • Compact Logix PLC Manual •Vilter/Emerson • 35391CL
65
Page 66

Trend Charts
The trend analysis screens display historic data of the last 300,000 records of analog values.
The following historical chart periods are available by touching the buttons along the right side of the
screen: 3 minutes, 15 minutes, 30 minutes, 1 hour, 2 hours, 6 hours, 12 hours, 1 day, 2.5 days, 5 days. *
Back button: Displays chart of previous period. For example, if the current 1 hour period is displayed and
the time is 11AM, pressing the Back button will display the logged data from 9AM to 10AM.
Forward button: Displays the chart of the next period. For example, if the 1 hour period of 4PM to 5PM
is displayed, pressing the Forward button will display the data of 5PM to 6PM provided that data exists.
Home button: Returns display from any displayed period to current period time with current time
oriented to the left side of the chart. For example, if the real time is 7 PM and the chart is displaying the
period of 7PM to 8PM. After pressing the End button, the chart will continue to update.
End button: Returns display from any displayed period to current period with current time oriented to
the right side of the chart. For example, if the real time is 7PM and the chart is displaying the period of
1PM to 2PM, pressing the End button will display the period of 6PM to 7PM. After pressing the End button, the chart will continue to update with the time period moving later per real time.
Pause button: freezes the chart of period at the current time. Touch the Pause button again to activate
the chart to update at the real time.
Next Pen button: Displays the individual scaling of each pen along the Y-axis of the chart. The scaling is
colored the same as the pens which are shown on the chart legend. This is useful on Page 2 of the chart
of motor amperage, capacity, and volume since the amp scale would typically require a larger range
than 0-100 whereas the capacity and volume will remain within 0 to 100 (%.) This allows the viewer to
easily observe the relationship between data.
66
VSG/VSSG • Compact Logix PLC Manual •Vilter/Emerson • 35391CL
Page 67

Trend Charts
The standard values recorded are:
Pressures - displayed on page 1:
Suction Pressure Displayed as a bold, solid blue line
Discharge Pressure Displayed as a bold, solid bright-green line
Oil Injection Differential Pressure Displayed as a bold, solid red line
Oil Filter Differential Pressure Displayed as a bold, solid pink line
Temperatures - displayed on page 1:
Suction Temperature Displayed as a dashed, white line
Discharge Temperature Displayed as a dashed, dark-grey line
Oil Separator Temperature Displayed as a dashed, yellow line
Oil Injector Temperature Displayed as a dashed, dark-green line
Other Values - displayed on page 2:
Compressor Motor Amperage Displayed as a bold, solid blue line
Capacity (%) Displayed as a bold, solid bright-green line
Volume (%) Displayed as a bold, solid red line
* As a standard, values of 11 analog items are recorded every 15 seconds. This allocates 27,272
records of each item producing 4.73 days worth of historical data. Addition of items will decrease
the total record period. Historical data is stored in the flash memory card located in the back of the
PanelView HMI.
VSG/VSSG • Compact Logix PLC Manual •Vilter/Emerson • 35391CL
67
Page 68

Troubleshooting:
Problem: Trend charts no longer display historical data but only update with real-time data which reinitializes each time the chart is displayed.
Cause: Time and/or Date of HMI was changed so logged data file cannot be sensible.
Solution: From the Vilter Only screen (password protected) Clear the log files of the PanelView.
a. Touch or scroll to the File Management field then touch the Enter button.
b. Touch or scroll to the Delete Files field, then touch the Enter button
c. Touch or scroll to the Delete Log Files field and touch the Enter button.
DO NOT DELETE APPLICATIONS! DO NOT DELETE FONTS!
d. Touch “Yes” to delete the log files.
e. Touch the Close button twice to return to the Terminal Settings screen.
f. Touch the Close button again to exit the Terminal Settings screen.
g. Touch the Reset button then the Yes button to reset the PanelView
68
VSG/VSSG • Compact Logix PLC Manual •Vilter/Emerson • 35391CL
Page 69

Captured Data at Shutdown
The Captured at Shutdown screen shows data captured prior to compressor
VSG/VSSG • Compact Logix PLC Manual •Vilter/Emerson • 35391CL
shutdown.
69
Page 70

70/Blank
VSG/VSSG • Compact Logix PLC Manual •Vilter/Emerson • 35391CL
Page 71

Page 72

35391CL Rev. 8 (8/13) Emerson and Vilter are trademarks of Emerson Electric Co. or one of its affi liated companies. © 2013 Emerson Climate Technologies, Inc. All rights reserved. Printed in the USA.
 Loading...