

Page 1
VSG/VSSG compressor unit
Installation, operation & maintenance manual
Page 2

Page 3

VSG/VSSG Standard Vilter Warranty Statement
Seller warrants all new single screw gas compression units and bareshaft single screw compressors
manufactured by it and supplied to Buyer to be free from defects in materials and workmanship for a period
of (a) eighteen (18) months from the date of shipment or (b) twelve (12) months from the date of
installation at the end user’s location, whichever occurs fi rst.
If within such period any such product shall be proved to Seller’s satisfaction to be defective, such product
shall be repaired or replaced at Seller’s option. Such repair or replacement shall be Seller’s sole obligation
and Buyer’s exclusive remedy hereunder and shall be conditioned upon (a) Seller’s receiving written notice
of any alleged defect within ten (10) days after its discovery, (b) payment in full of all amounts owed by
Buyer to Seller and (c) at Seller’s option, Buyer shall have delivered such products to Seller, all expenses
prepaid to its factory. Expenses incurred by Buyer in repairing or replacing any defective product
(including, without limitation, labor, lost refrigerant or gas and freight costs) will not be allowed except by
written permission of Seller. Further, Seller shall not be liable for any other direct, indirect, consequential,
incidental, or special damages arising out of a breach of warranty.
This warranty is only applicable to products properly maintained and used according to Seller’s
instructions. This warranty does not apply (i) to ordinary wear and tear, damage caused by corrosion,
misuse, overloading, neglect, improper use or operation (including, without limitation, operation beyond
rated capacity), substitution of parts not approved by Seller, accident or alteration, as determined by Seller
or (ii) if the product is operated on a gas with an H2S level above 100 PPM. In addition, Seller does not
warrant that any equipment and features meet the requirements of any local, state or federal laws or
regulations. Products supplied by Seller hereunder which are manufactured by someone else are not
warranted by Seller in any way, but Seller agrees to assign to Buyer any warranty rights in such products
that Seller may have from the original manufacturer. Labor and expenses for repair are not covered by
warranty.
THE WARRANTY CONTAINED HEREIN IS EXCLUSIVE AND IN LIEU OF ALL OTHER REPRESENTATIONS AND
WARRANTIES, EXPRESS OR IMPLIED, AND SELLER EXPRESSLY DISCLAIMS AND EXCLUDES ANY IMPLIED WARRANTY
OF MERCHANTABILITY OR IMPLIED WARRANTY OF FITNESS FOR A PARTICULAR PURPOSE.
Any description of the products, whether in writing or made orally by Seller or Seller’s agents,
specifi cations, samples, models, bulletins, drawings, diagrams, engineering sheets or similar materials used
in connection with Buyer’s order are for the sole purpose of identifying the products and shall not be
construed as an express warranty. Any suggestions by Seller or Seller’s agents regarding use, application or
suitability of the products shall not be construed as an express warranty unless confi rmed to be such in
writing by Seller.
VSG/VSSG • Installation, Operation and Maintenance Manual •Vilter/Emerson • 35391SSG
i
Page 4

Important Message
READ CAREFULLY BEFORE INSTALLING AND STARTING YOUR COMPRESSOR.
The following instructions have been prepared to assist in installation, operation and removal of Vilter Single Screw
Compressors. Following these instructions will result in a long life of the compressor with satisfactor y operation.
The entire manual should be reviewed before attempting to install, operate, service or repair the compressor.
A compressor is a positive displacement machine. It is designed to compress gas. The compressor must
not be subjected to liquid carry over. Care must be exercised in properly designing and maintaining the
system to prevent conditions that could lead to liquid carry over. Vilter Manufacturing is not responsible
for the system or the controls needed to prevent liquid carry over and as such Vilter Manufacturing cannot
warrant equipment damaged by improperly protected or operating systems.
Vilter screw compressor components are thoroughly inspected at the factory. However, damage can occur
in shipment. For this reason, the equipment should be thoroughly inspected upon arrival. Any damage
noted should be reported immediately to the Transportation Company. This way, an authorized agent
can examine the unit, determine the extent of damage and take necessary steps to rectify the claim with
no serious or costly delays. At the same time, the local Vilter representative or the home office should be
notified of any claim made.
All inquires should include the Vilter sales order number, compressor serial and model number. These can be
found on the compressor name plate on the compressor.
All requests for information, services or parts should be directed to:
Vilter Manufacturing LLC
Customer Service Department
P.O. Box 8904
5555 South Packard Ave
Cudahy, WI 53110-8904 USA
Telephone: 1-414-744-0111
Fax:1-414-744-3483
e-mail: info.vilter@emerson.com
Equipment Identification Numbers:
Vilter Order Number: _______________________Compressor Serial Number: _________________
Vilter Order Number: _______________________Compressor Serial Number: _________________
Vilter Order Number: _______________________Compressor Serial Number: _________________
Vilter Order Number: _______________________Compressor Serial Number: _________________
ii
VSG/VSSG • Installation, Operation and Maintenance Manual •Vilter/Emerson • 35391SSG
Page 5

Table of Contents
Section Title Section Number
VSG/VSSG Standard Vilter Warranty Statement ..................................................................................... i
Important Message................................................................................................................................ii
Section 1 • General Information
How To Use This Manual .........................................................................................................................1-1
Gas Compressor Unit Model Designations ..............................................................................................1-2
System Unit Identification .....................................................................................................................1-3
Compressor Unit Component Identification ........................................................................................... 1-4
Piping & Identification Component Tags ................................................................................................. 1-7
Symbols and Identification .....................................................................................................................1-8
Section 2 • Theory of Operation
Gas Flow ................................................................................................................................................2-1
Oil Life and Oil Flow ................................................................................................................................2-1
Oil Pressure Regulating ..........................................................................................................................2-2
Control System ......................................................................................................................................2-2
RTDs and Pressure Transducers .............................................................................................................. 2-2
Section 3 • Installation
Delivery Inspection ................................................................................................................................3-1
Rigging and Lifting ................................................................................................................................. 3-1
Short Term Storage Recommendations ..................................................................................................3-2
Long Term Storage Recommendations ...................................................................................................3-2
Compressor Motor .....................................................................................................................3-2
Air Cooled Oil Coolers ................................................................................................................ 3-3
Compressor Unit Inspections Prior to Stoarge or Installation .................................................................. 3-3
Recommended Onsite Tools .................................................................................................................. 3-3
Long Term Storage Log ..........................................................................................................................3-4
Foundation ............................................................................................................................................3-5
Piping ..................................................................................................................................................3-10
Header Piping and Drains ...........................................................................................................3-10
Remote Air Cooled Oil Cooler Piping ..........................................................................................3-10
General Installation Guideline for Multiple Air Coolers Installed in a Common Area ................................ 3-12
Free Flow ...................................................................................................................................3-12
One Fan Diameter ...................................................................................................................... 3-12
Intake Velocity ...........................................................................................................................3-12
Hot Air Recirculation ..................................................................................................................3-14
Pressure Testing ..................................................................................................................................... 3-16
Initial Oil Charging .................................................................................................................................3-16
Using Non-Vilter Oils .................................................................................................................. 3-16
Unit Oil Charging and Priming .................................................................................................... 3-16
Priming Oil Cooler (Shell and Tube)and Piping............................................................................3-16
Priming Compressor and Oil Filters ............................................................................................ 3-18
Priming Remote Oil Cooler and Piping (Initial Oil Charging) ........................................................3-20
Priming Compressor and Oil Filters ............................................................................................ 3-21
Pre Start-Up ...........................................................................................................................................3-22
Start-Up .................................................................................................................................................3-24
VSG/VSSG • Installation, Operation and Maintenance Manual •Vilter/Emerson • 35391SSG
TOC - 1
Page 6

Table of Contents
Section Title Section Number
Section 4 • Operation
Oil Inspection ........................................................................................................................................4-1
Dual Oil Filters........................................................................................................................................4-1
Control System Calibration ....................................................................................................................4-2
Starting, Stopping and Restarting the Compressor ................................................................................4-2
Calibrate Slide Valve Actualors ...............................................................................................................4-2
Oil Temperature Control Valve (Oil Mixing Valve) Operation ...................................................................4-7
Manual Override ........................................................................................................................4-8
Purging with Dry Nitrogen ..................................................................................................................... 4-9
Purging with Dry Gas .............................................................................................................................4-11
Coalescing Oil Return Line Setup ............................................................................................................ 4-14
Section 5 • Maintenance/Service
Maintenance and Service Schedule ........................................................................................................ 5-1
Maintaining Proper Operation ................................................................................................................5-2
Compressor Unit Isolation for Maintenance/Service ...............................................................................5-3
Compressor Unit Leak Check ..................................................................................................................5-3
Oil System Components ......................................................................................................................... 5-4
Oil Sampling...............................................................................................................................5-4
Oil Charging ...............................................................................................................................5-5
Oil Draining ................................................................................................................................5-6
Oil Filter Replacement ................................................................................................................5-6
Coalescing Oil Filter Replacment ................................................................................................. 5-8
Oil Pump Strainer .......................................................................................................................5-9
Drive Coupling (Form-Flex BPU) Installation ...........................................................................................5-10
Drive Center Member (Form-Flex BPU) Installation and Alignment .........................................................5-11
Drive Coupling (Form-Flex BPU) Removal ............................................................................................... 5-13
Drive Coupling (Type C Sure-Flex) Replacement ..................................................................................... 5-13
Compressor Replacement ...................................................................................................................... 5-14
Compressor Bearing Float Inspections ...................................................................................................5-16
Gate Rotor Float and Gate Rotor Bearing Float Inspection .......................................................................5-17
Gate Rotor and Support Clearance ......................................................................................................... 5-19
Gate Rotor Assembly Replacement (All VSG & VSSG Compressors Except VSG 301-701 Compressors) .... 5-21
Gate Rotor Assembly Replacement (VSG 301-701 Compressors ONLY) ...................................................5-24
Gate Rotor Disassembly .........................................................................................................................5-26
Gate Rotor Blade Removal/Installation ....................................................................................... 5-26
Gate Rotor Thrust Bearing Removal/Installation .........................................................................5-27
Gate Rotor Roller Bearing Removal/Installation ........................................................................... 5-27
Slide Valve Actuator Assembly Replacement .......................................................................................... 5-28
Command Shaft Assembly Replacement ................................................................................................5-29
Command Shaft Seal Replacement .........................................................................................................5-29
Section 6 • Troubleshooting
Table 6-1. Slide Valve Actuator Troubleshooting Guide ........................................................................... 6-1
Table 6-2. Slide Valve Actuator LED Blink Codes ......................................................................................6-3
Table 6-3. Troubleshooting Guide - General Problems & Solutions ..........................................................6-5
TOC - 2
VSG/VSSG • Installation, Operation and Maintenance Manual •Vilter/Emerson • 35391SSG
Page 7

List of Tables and Figures
Section Title Section Number
Section 7 • Warranty and Parts
Warranty Claim Processing .................................................................................................................... 7-1
On Site Service Support ......................................................................................................................... 7-1
Remanufactured Bare Shaft Compressors Process ..................................................................................7-2
Explanation of Rebuild Levels .....................................................................................................7-2
Bare Shaft Compressor Description ............................................................................................7-2
Appendices
Appendix A Torque Specifications ......................................................................................................A
Appendix B Motor (Compressor) General Storage Instructions .......................................................... B
Appendix C Oil Analysis Report .......................................................................................................... C
Appendix D Recommended Header Piping ........................................................................................D
Appendix E Recommended Remote Air Cooled Oil Cooler Piping .......................................................E
Table/Figure Section Number
Tables
Table 3-1. Long Term Storage Compressor Hardware .............................................................................3-2
Table 3-2. Maximum Allowable Flange Loads ......................................................................................... 3-11
Table 4-1. Command Shaft Rotation Specifi cations ................................................................................4-6
Table 5-1. Maintenance/Service Schedule ..............................................................................................5-1
Table 5-2. Oil Filter Elements and Compressor Models ............................................................................5-6
Table 5-3. Shaft and Hub Distances ........................................................................................................5-10
Table 5-4. Hub Clamp Bolt and Set Screw Torque Specifi cations ............................................................. 5-12
Table 5-5. Disc Pack Installation Torque Specifi cations ...........................................................................5-12
Table 5-6. Clamping Bolts and Set Screw Torque Specifi cations..............................................................5-14
Table 5-7. Maximum Bearing Float (Compressor Shaft) ..........................................................................5-17
Table 5-8. Gate Rotor Float .....................................................................................................................5-18
Table 5-9. Gate Rotor Tool Sets ...............................................................................................................5-21
Table 6-1. Slide Valve Actuator Troubleshooting Guide (1 of 2) ...............................................................6-1
Table 6-2. Slide Valve Actuator LED Blink Codes* (1 of 2) ........................................................................6-3
Table 6-3. Troubleshooting Guide - General Problems & Solutions (1 of 3) ..............................................6-5
Figures
Figure 1-1. Gas Compressor Unit Model Designation .............................................................................1-2
Figure 1-2. Gas Compressor Unit Components .......................................................................................1-4
Figure 2-1. Gas Compressor Unit P&ID ...................................................................................................2-1
Figure 3-1. Rigging and Lifting Points .....................................................................................................3-1
Figure 3-2. Concrete Pad with Compressor Unit Dimensions - Side View ................................................3-5
Figure 3-3. Concrete Pad with Compressor Unit Dimensions - Front View ...............................................3-6
Figure 3-4. Interior Foundation Isolation ................................................................................................ 3-6
Figure 3-5. Foundation with Housekeeping Pads Dimensions - Top View ................................................3-7
Figure 3-6. Housekeeping Pad Dimension Detail - Top View ...................................................................3-9
Figure 3-7. Level Compressor Unit Using Top Surface of Spherical Washers ............................................3-9
Figure 3-8. Concrete Pad Housekeeping Detail .......................................................................................3-10
Figure 3-9. Maximum Allowable Flange Loads ........................................................................................3-11
Figure 3-10. Installation of Coolers - One Fan Diameter Next to Building ................................................ 3-12
Figure 3-11. Leg Height ..........................................................................................................................3-13
VSG/VSSG • Installation, Operation and Maintenance Manual •Vilter/Emerson • 35391SSG
TOC - 3
Page 8

List of Tables and Figures
Table/Figure Section Number
Figure 3-12. Installation of Coolers - Next to Buildling ............................................................................3-13
Figure 3-13. Discharge Elevation of Coolers ............................................................................................ 3-15
Figure 3-14. Cooler Placement and Spacing ............................................................................................ 3-15
Figure 3-15. Oil Operating Levels ...........................................................................................................3-17
Figure 3-16. Suction Oil Charging Valve, Oil Cooler Drain and Oil Filter Shut-Off Valves ...........................3-17
Figure 3-17. Priming Oil Cooler (Shell & Tube) and Piping .......................................................................3-18
Figure 3-18. Priming Compressor (with Shell & Tube Oil Cooler) and Piping ............................................ 3-19
Figure 3-19. Priming Remote Oil Cooler and Piping ................................................................................3-20
Figure 3-20. Priming Compressor and Oil Filters ..................................................................................... 3-21
Figure 4-1. Oil Operatiing Levels ............................................................................................................. 4-1
Figure 4-2. Actuator Assembly ............................................................................................................... 4-3
Figure 4-3. Menu Screen and Slide Calibraiton Button (Compact Logix PLC) ...........................................4-4
Figure 4-4. Slide Valve Calibraiton Screen (Compact Logix PLC) .............................................................. 4-5
Figure 4-5. Photo-chopper .....................................................................................................................4-5
Figure 4-6. Oil Temperature Control Valve (Oil Mixing Valve) .................................................................. 4-8
Figure 4-7. PLC Main Screen ................................................................................................................... 4-9
Figure 4-8. Suction Bypass Valve and Equalizing Solenoid ....................................................................... 4-10
Figure 4-9. Suction Oil Charging Valve and Discharge Bleed Valve .......................................................... 4-10
Figure 4-10. Customer Purge Line .......................................................................................................... 4-11
Figure 4-11. PLC Main Screen ................................................................................................................. 4-12
Figure 4-12. Suction Bypass Valve and Equalizing Solenoid ..................................................................... 4-13
Figure 4-13. Suction Oil Charging Valve .................................................................................................4-13
Figure 4-14. Coalescing Oil Return Line .................................................................................................. 4-14
Figure 5-1. Suction Bypass Valve (Manual) Location (1 of 2) .................................................................... 5-2
Figure 5-1. Suction Bypass Valve (Equalizing Solenoid) Location (2 of 2) .................................................5-3
Figure 5-2. Oil Analysis Kit ...................................................................................................................... 5-4
Figure 5-3. Suction Oil Charging, Oil Cooler Drain Valve and Oil Filter Shut-Off Valves ............................5-5
Figure 5-4. Oil Filter Assemblies (Single and Dual) ..................................................................................5-6
Figure 5-5. Oil Filter Drain, Vent and Shut-Off Valves .............................................................................. 5-7
Figure 5-6. Oil Separator Manhole Cover and Coalescing Filter Assembly ................................................5-8
Figure 5-7. Oil Pump Strainer and Drain Valve ........................................................................................ 5-9
Figure 5-8. Hub Distance (Axial Spacing) ................................................................................................5-11
Figure 5-9. Angular Alignment and Parallel Offset ..................................................................................5-12
FIgure 5-10. Compressor Replacement and Hardware Assembly (Models 2401-3001 Shown) ................5-15
FIgure 5-11. Bearing Axial Float Inspection (Compressor) .......................................................................5-16
FIgure 5-12. Bearing Radial Float Inspection (Compressor) .....................................................................5-17
FIgure 5-13. Gate Rotor Float ................................................................................................................. 5-17
FIgure 5-14. Gate Rotor Bearing Float ..................................................................................................... 5-18
FIgure 5-15. Gate Rotor and Support Clearance - Minimum Clearances .................................................. 5-19
FIgure 5-16. Gate Rotor and Support Clearance - Measuring ................................................................... 5-20
FIgure 5-17. Gate Rotor Assembly Removal and Tools ............................................................................5-22
FIgure 5-18. Gate Rotor Assembly Removal ............................................................................................5-22
FIgure 5-19. Gate Rotor Assembly and Tools ...........................................................................................5-23
FIgure 5-20. Gate Rotor and Shelf Clearance ........................................................................................... 5-23
FIgure 5-21. Gate Rotor Assembly Breakdown ........................................................................................5-24
FIgure 5-22. Gate Rotor Thrust Bearing .................................................................................................. 5-25
FIgure 5-23. Gate Rotor and Shelf Clearance ........................................................................................... 5-25
FIgure 5-24. Gate Rotor Blade Assembly .................................................................................................5-26
FIgure 5-25. Gate Rotor Blade Installation .............................................................................................. 5-26
FIgure 5-26. Gate Rotor Thrust Bearing .................................................................................................. 5-27
FIgure 5-27. Thrust Bearing Installation .................................................................................................. 5-27
FIgure 5-28. Roller Bearing Assembly ..................................................................................................... 5-28
FIgure 5-29. Command Shaft Seal ..........................................................................................................5-29
FIgure 5-30. Command Shaft Seal Installation ........................................................................................5-30
TOC - 4
VSG/VSSG • Installation, Operation and Maintenance Manual •Vilter/Emerson • 35391SSG
Page 9

Section 1 • General Information
How To Use This Manual
This manual contains instructions for gas compressor
units. It has been divided into eight sections:
Section 1: General Information
Section 2: Theory of Operation
Section 3: Installation
Section 4: Operation
Section 5: Maintenance & Service
Section 6: Troubleshooting
Section 7: Warranty and Parts
Appendices
It is highly recommended that the manual be reviewed
prior to servicing system parts.
Figures and tables are included to illustrate key concepts.
Safety precautions are shown throughout the manual.
They are defi ned as the following:
NOTICE - Notice statements are shown when there are
important information that shall be followed. Not following such notices may result in void of warranty, serious fi nes, serious injury and/or death.
WARNING - Warning statements are shown when there
are hazardous situations, if not avoided, will result in serious injury and/or death.
CAUTION - Caution statements are shown when there
are potentially hazardous situations, if not avoided, will
result in damage to equipment.
NOTE - Notes are shown when there are addtional information pertaining to the instructions explained.
Additional installation, operation and maintenance instructions can be found in the associated software manual and bareshaft compressor manual.
VSG/VSSG • Installation, Operation and Maintenance Manual •Vilter/Emerson • 35391SSG
1 – 1
Page 10

Section 1 • General Information
Gas Compressor Unit Model Designations
The compressor unit model designation can be found on the nameplate. For nameplate location, see Component
Identifi cation on section page 1-4.
VSG-601-VVR-L-HP-VFD-36H-NEC-ST-WTR
1234567 8 9 10
Figure 1-1. Gas Compressor Unit Model Designation
1. Compressor Model
VSG = Vilter Single Screw Compressor
VSSG = Vilter Single Screw Compressor
(Compressor models 291, 341, 451 & 601 -
these are 240mm diameter rotors with
counter clockwise rotation)
VRSG = Vilter Twin Screw
2. Size
CFM - Nominal CFM displacement of the compressor at
3600 rpm
3. Slide Arrangement
VVR = Variable Volume Ratio; Parallex™
4. Gas Compressed
L = Landfi ll Gas
D = Digester Service Site Application
N = Natural Gas (Primarily Methane)
G = Other Gas Type
5. Application
HP = High Stage with Oil Pump
HN = High Stage no Oil Pump
7. Separator Type
16 = 16 inch diameter 36 = 36 inch diameter
20 = 20 inch diameter 42 = 42 inch diameter
24 = 24 inch diameter 48 = 48 inch diameter
30 = 30 inch diameter 54 = 54 inch diameter
H = Horizontal V = Vertical
SH = Special Horizontal SV = Special Vertical
8. Economizer
NEC = No Economizer, Economizer Ports Plugged
HEC = Holes drilled in Economizer Plug for Oil
or Unloading
9. Oil Cooler
PLT = Plate
ST = Shell and Tube
REM = Remote
10. Oil Cooling Medium
REF = Refrigerant
WTR = Water
GL = Glycol
AIR = Air
6. Driver
VFD = Variable Frequency Drive
EMD = Electric Motor Drive
ENG = Engine Drive
1 – 2
VSG/VSSG • Installation, Operation and Maintenance Manual •Vilter/Emerson • 35391SSG
Page 11
Section 1 • General Information
System Unit Identifi cation
To keep defi nitions of units simple and consistent, Vilter has defi ned the following three:
• Bare Shaft Compressor
• Compressor Unit
• Package Unit
Bare Shaft Compressor
A bare shaft compressor is just the compressor with no coupling and motor nor foundation.
Compressor Unit
A compressor unit consists of the bare shaft compressor with the coupling, motor, oil separator, frame, micro-controller system and oil system. A compressor unit typically a single screw compressor unit, is not mounted on a structural
steel base.
Package Unit
A package unit is a complete system mounted on a structural steel base with interconnecting piping.
VSG/VSSG • Installation, Operation and Maintenance Manual •Vilter/Emerson • 35391SSG
1 – 3
Page 12
Section 1 • General Information
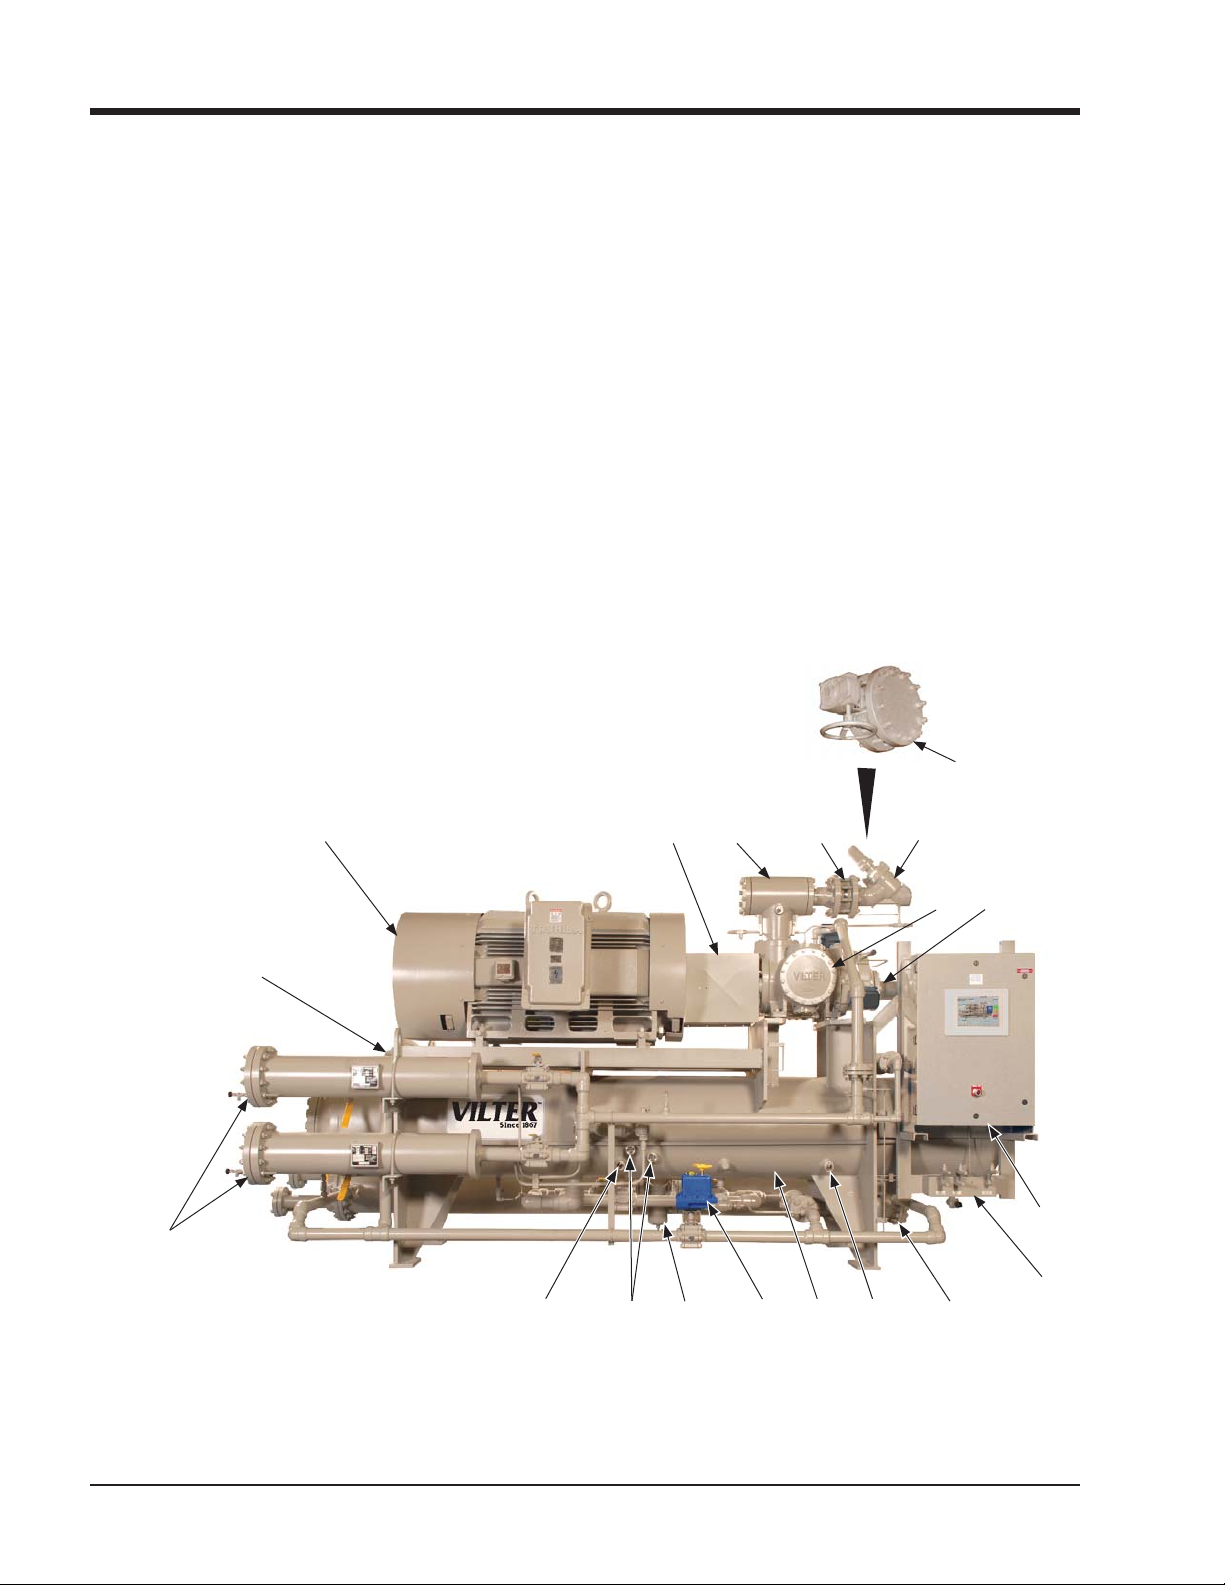
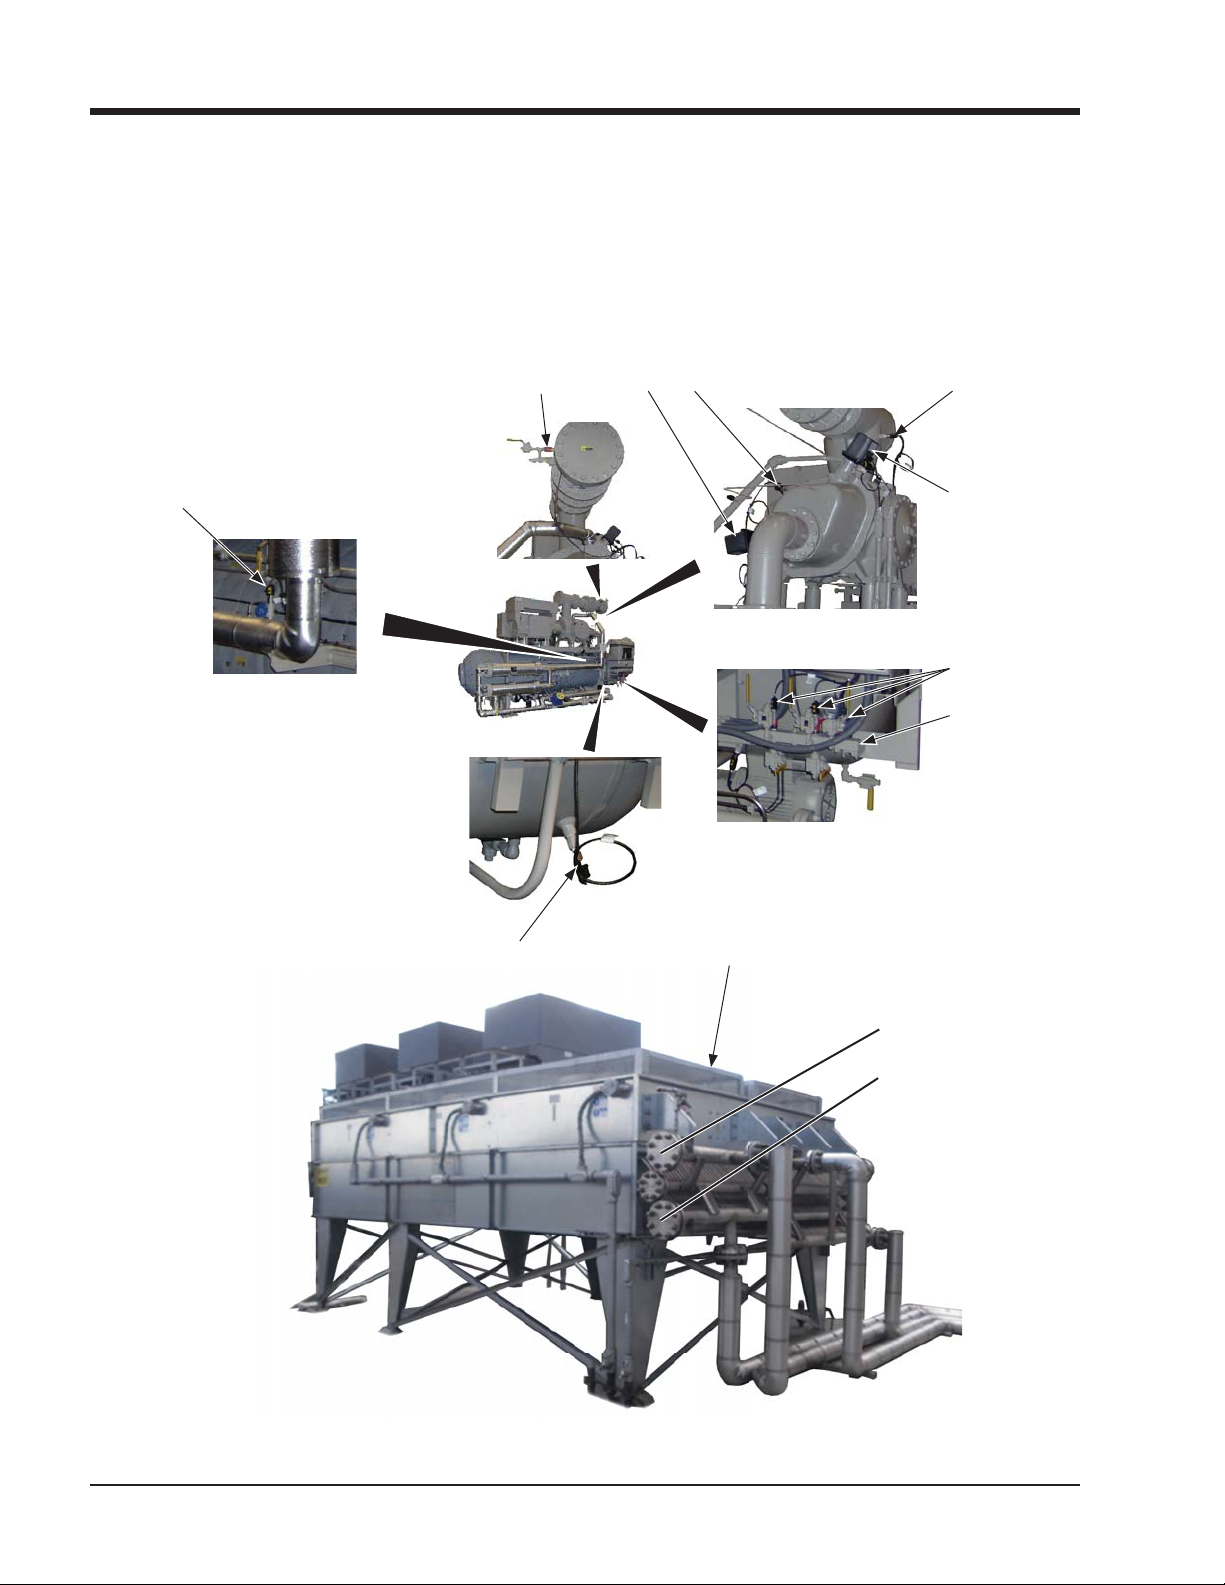
Compressor Unit Component Identifi cation
Each gas compressor unit may differ, but below are typical components that can be found on each unit.
1 - Motor
2 - Coupling
3 - Suction Strainer
4 - Suction Check Valve
5a - Suction Stop Valve
5b - Suction Stop Butterfl y Valve
(Typically Shipped Loose)
6 - Compressor
7 - Discharge Pipe
8 - PLC Panel
1
9 - Block & Bleed Assembly
10 - Oil Pump
11 - Oil Heater
12 - Oil Separator
13 - Oil Temperature Control Valve
(Oil Mixing Valve)
14 - Oil Pump Strainer
15 - Oil Sight Glass
16 - Oil Filter
(Optional Dual Oil Filters Shown)
23 4 5a
17 - Discharge Connection
18 - Oil Separator Inspection Port
19 - Thermal/Acoustic Oil Separator
Blanket
(Optional Per Application)
20 - Nameplate
21 - Heat Trace Insulation
(Optional Per Application)
22 - Frame
23 - Oil Cooler (Shell and Tube Heat
Exchanger)
5b
16
17
Figure 1-2. Gas Compressor Unit Components (1 of 3)
6
7
8
9
1112141511
1013
1 – 4
VSG/VSSG • Installation, Operation and Maintenance Manual •Vilter/Emerson • 35391SSG
Page 13
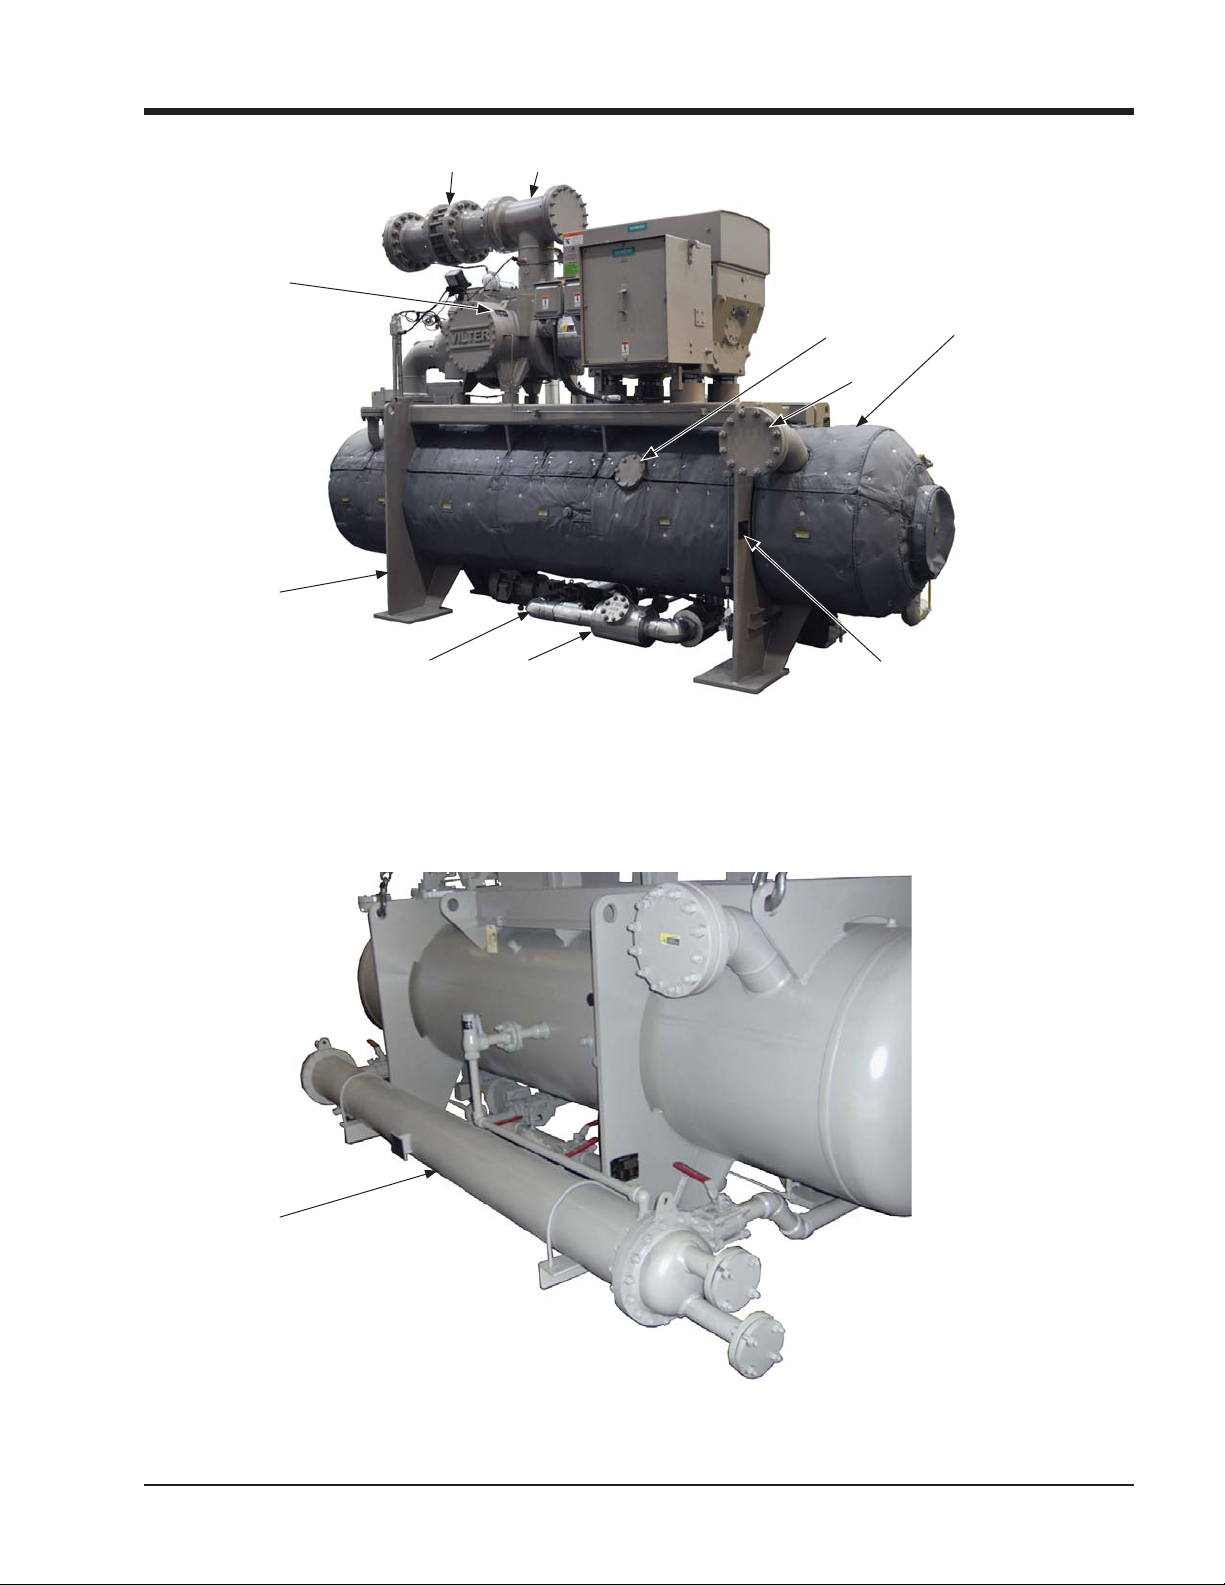
Section 1 • General Information
20
34
22
14
18
19
17
2021
23
Figure 1-2. Gas Compressor Unit Components (2 of 3)
VSG/VSSG • Installation, Operation and Maintenance Manual •Vilter/Emerson • 35391SSG
1 – 5
Page 14
Section 1 • General Information
Component Identifi cation (Continued)
24 - RTD (Oil Filter Outlet)
25 - Pressure Transducer (Oil Injection
Temperature)
26 - Volume Slide Valve Actuator
27 - RTD (Discharge)
24
28 - RTD (Suction)
29 - Capacity Slide Valve Actuator
30 - Pressure Transducers
(Discharge, Oil Filter Inlet and
Outlet)
25 27 28
26
31 - Block & Bleed Assembly
32 - Remote Oil Cooler (Finned Fan
Heat Exchanger)
33 - RTD (Oil Separator)
29
30
31
1 – 6
33
32
Figure 1-2. Gas Compressor Unit Components (3 of 3)
VSG/VSSG • Installation, Operation and Maintenance Manual •Vilter/Emerson • 35391SSG
OUTLET
INLET
Page 15

Section 1 • General Information
Piping & Identifi cation Component Tags
Use this list to identify components shown in the Piping & Identifi cation Diagram.
A Atmosphere
AN Anode - Sacrifi cial
AV Angle Valve
BFV Butterfl y Valve
BDV Automatic Blowdown
Valve
BV Ball Valve
C Compressor
CPL Coupling
CRR Cooling Refrigerant Liquid
Return
CRS Cooling Refrigerant Liquid
Supply
CS Carbon Steel or Cold Side
CV Check Valve
CWR Cooling Water Return
CWS Cooling Water Supply
D Drive Motor or Drain
E Heat Exchanger
EQ Equalizing Line
F Fan
FC Fail Closed or Flow
Controller
FG Flow Switch Indicator or
Glass
FI Flow Indicator
FIT Flow Indicating
Transmitter
FO Fail Open
FSI Flow Sight Indicator
FT Flow Transmitter (Blind)
FV Flow Control Valve
(Pneumatic Actuator)
GLV Globe Valve
GTV Gate Valve
HS Hand Switch or Hot Side
HEV Hand Expansion Valve
HV Hand Valve
IA Instrument Air
II Current Indicator
IT Current Transmitter
JB Electrical Terminal Box or
Junction Box
LC Level Control
LE Level Probe
LI Level Indicator or Gauge
LIT Liquid Level Indicating
Transmitter
LO Lube Oil or Lock Open
LP Local Panel
LSH Level Switch High
LSHH Level Switch Shutdown
High High
LSL Level Switch Low
LSLL Level Switch Shutdown
Low Low
LV Level Control Valve -
Pneumatic Actuator
MCC Motor Control Center or
Motor Starter
MV Motor Operated Valve
MGV Manifold Gauge Valve
MI Moisture Indicator
N Nitrogen
NC Normally Closed
NO Normally Open
NV Needle Valve
P Pump or Process
PDI Differential Pressure
Indicator - Gauge
PDIT Differential Pressure
Indicating Transmitter
PDSH Differential Pressure
Switch High
PDSHH Differential Pressure
Switch Shutdown High
High
PDSL Differential Pressure
Switch Low
PDSLL Differential Pressure
Switch Shutdown Low
Low
PDT Differential Pressure
Transmitter - Blind
PDV Differential Pressure
Control Valve - Pneumatic
Actuator
PI Pressure Indicator or
Gauge
PIT Pressure Indicating
Transmitter
PSH Pressure Switch High
PSHH Pressure Switch
Shutdown High High
PSL Pressure Switch Low
PSLL Pressure Switch
Shutdown Low Low
PSV Pressure Safety Relief
Valve
PT Pressure Transmitter
- Blind
PV Pressure Control Valve
QE Heater Element -
Immersion Heater
R Refrigerant
RD Rupture Disc
SDV Automatic Shut-off Valve
SG Sight Glass
SS Stainless Steel or Heat
Exchanger Shell Side
STR Strainer
SV Safety Relief or Slide Valve
SW Selector Switch
TE Temperature Element -
RTD or Thermocouple
VSG/VSSG • Installation, Operation and Maintenance Manual •Vilter/Emerson • 35391SSG
1 – 7
Page 16
Section 1 • General Information
TI Temperature Indicator or
Thermometer
TIT Temperature Indicator
Transmitter
TRV Transfer Valve - 3-way or
6-way Valve
TS Heat Exchanger Tube Side
TSH Temperature Switch High
TSHH Temperature Switch
Shutdown High High
TTSL Temperature Switch Low
TSLL Temperature Switch
Shutdown Low Low
TT Temperature Transmitter
- Blind
TV Temperature Control
Valve
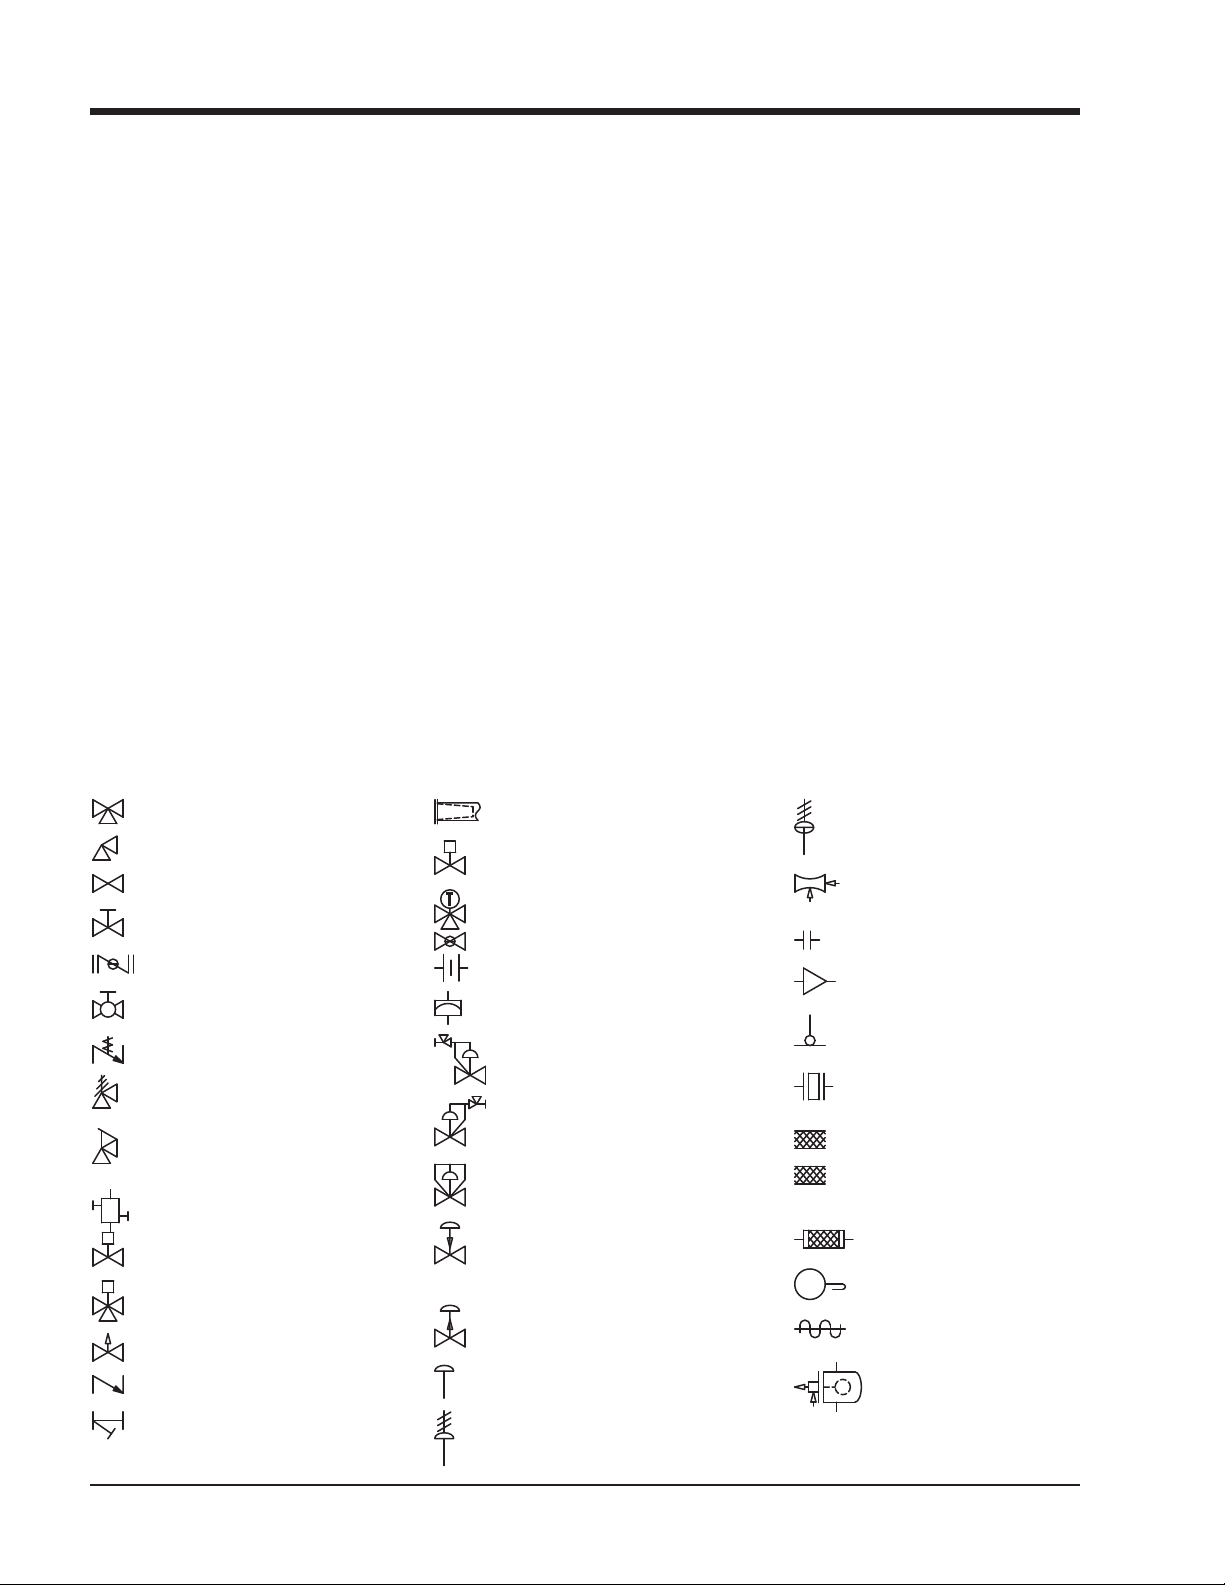
Symbols and Identifi cations
TW Thermowell
V Vent
VG Gauge Valve
VTRI Venturi
VLV Stop Valve
XV Solenoid Valve
YE Vibration Probe
YSH Vibration Switch High
YSHH Vibration Switch
Shutdown High High
YT Vibration Transmitter
YU Vibration Monitoring
System
YZE Axial Proximitor Probe -
Axial Displacement
YZT Axial proximitor
Transmitter - Axial
Displacement
YZU Axial Proximitor
Monitoring System
ZE Position Element
- Positioner
ZI Position Indicator
ZIT Position Indicating
Transmitter
ZT Position Transmitter
- Blind
Use this list to identify components shown in the Piping & Identifi cation Diagram.
3-Way Valve
Angle Valve
Globe Valve
Gate Valve
Butterfl y Valve
Ball Valve
Schrader Valve
Pressure Safety Relief
Valve
Spring-Closing Drain
Valve
Block & Bleed Manifold
S
Solenoid Valve
S
3-Way Solenoid Valve
Needle Valve
Suction Strainer
M
Motorized Valve
T
3-Way Thermostatic Valve
Hand Expansion Valve
Restriction Orifi ce
Rupture Disc
Inlet Pressure Regulating
Valve
Outlet Pressure
Regulating Valve
Differential Pressure
Regulating Valve
Pneumatic Actuator
Control Valve Fail Close
Pneumatic Actuator
Control Valve Open
Diaphragm
Pressure-Balanced
Vilter Venturi Injector
Nozzle
Flange Set
Pipe Reducer
TW
Thermowell
Drive Coupling
C
Insulation Not by Vilter
V
Insulation by Vilter
Vibration Absorber
QE
Heater
Heat Trace
1 – 8
Check Valve
Strainer
Diaphragm Actuator
Diaphragm
Low Side Float Valve
Spring-Opposed
VSG/VSSG • Installation, Operation and Maintenance Manual •Vilter/Emerson • 35391SSG
Page 17
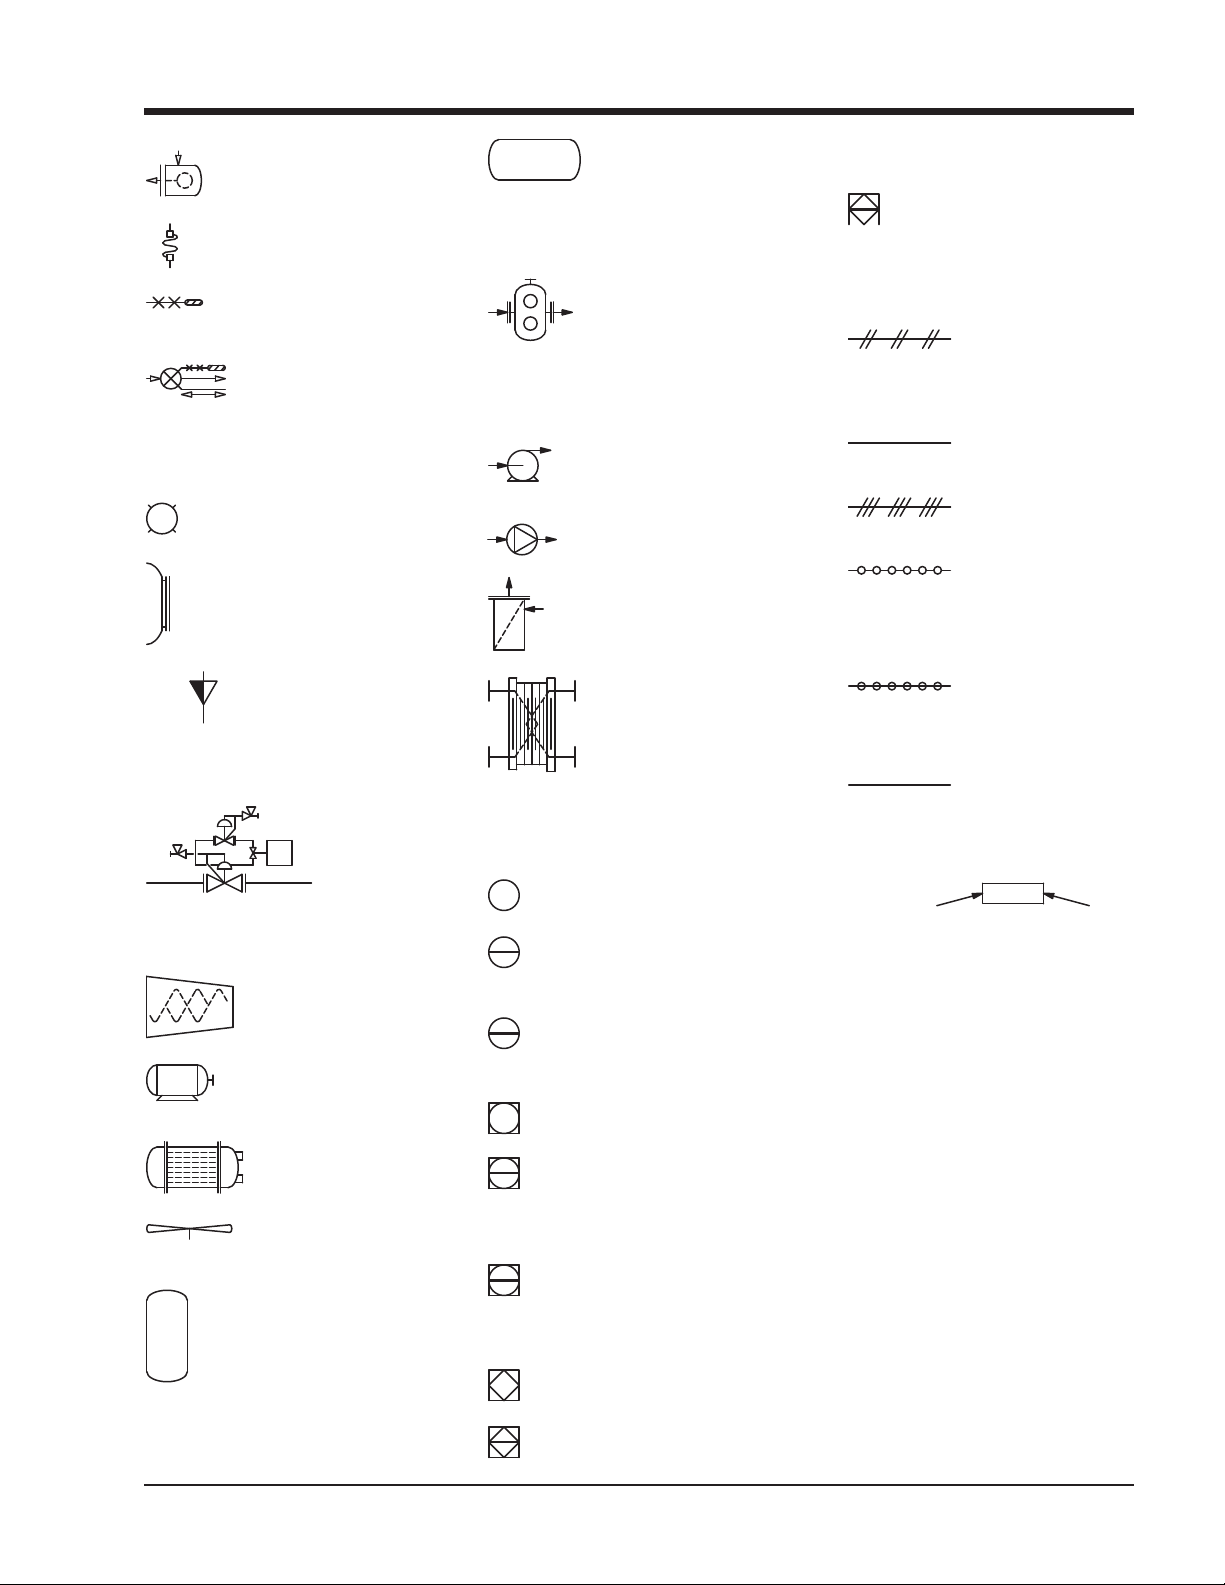
Section 1 • General Information
High Side Float Valve
Steady-Mount
Bulb & Capillary
Horizontal Tank/Drum
Positive Displacement
Vessel
Pump
Control Panel, Normally
Accessible to Operator
Programmable Logic
Control, Local Control
Panel, Normally
Accessible to Operator
Pneumatic Signal
Thermostatic Expansion
Valve
Pilot Light (Color Inside)
G
MW
Man-Way Cover
BY VILTER BY OTHERS
Scope of Supply
SV
E1
Economizer Regulator
Compressor
Motor
Heat Exchanger
Fan
Vertical Tank/Drum Vessel
Centrifugal Pump
Rotary Pump
Filter
Plate & Frame Heat
Exchanger
Discrete Instrument, Field
Mounted
Discrete Instrument,
Remote, Mount, Normally
Accessible to Operator
Discrete Instrument, Local
Rack Mounted, Normally
Accessible to Operator
Shared Display/Control,
Field Mounted
Shared Display/Control,
DCS or Remote Control
Panel Normally Accessible
to Operator
Shared Display/Control,
Local Control Panel
Normally Accessible to
Operator
Programmable Logic
Control, Field Mounted
Programmable Logic
Control, DCS or Remote
XXXXX
Capillary Tube
Electrical Signal
Internal System Link
(Software or Data Link)
Mechanical Link
LLLLL
Hydraulic Signal
EQUIPMENT TYPE
V100
SERIES NUMBER
Equipment Number
Identifi cation
VSG/VSSG • Installation, Operation and Maintenance Manual •Vilter/Emerson • 35391SSG
1 – 9
Page 18

1 – 10 / Blank
VSG/VSSG • Installation, Operation and Maintenance Manual •Vilter/Emerson • 35391SSG
Page 19
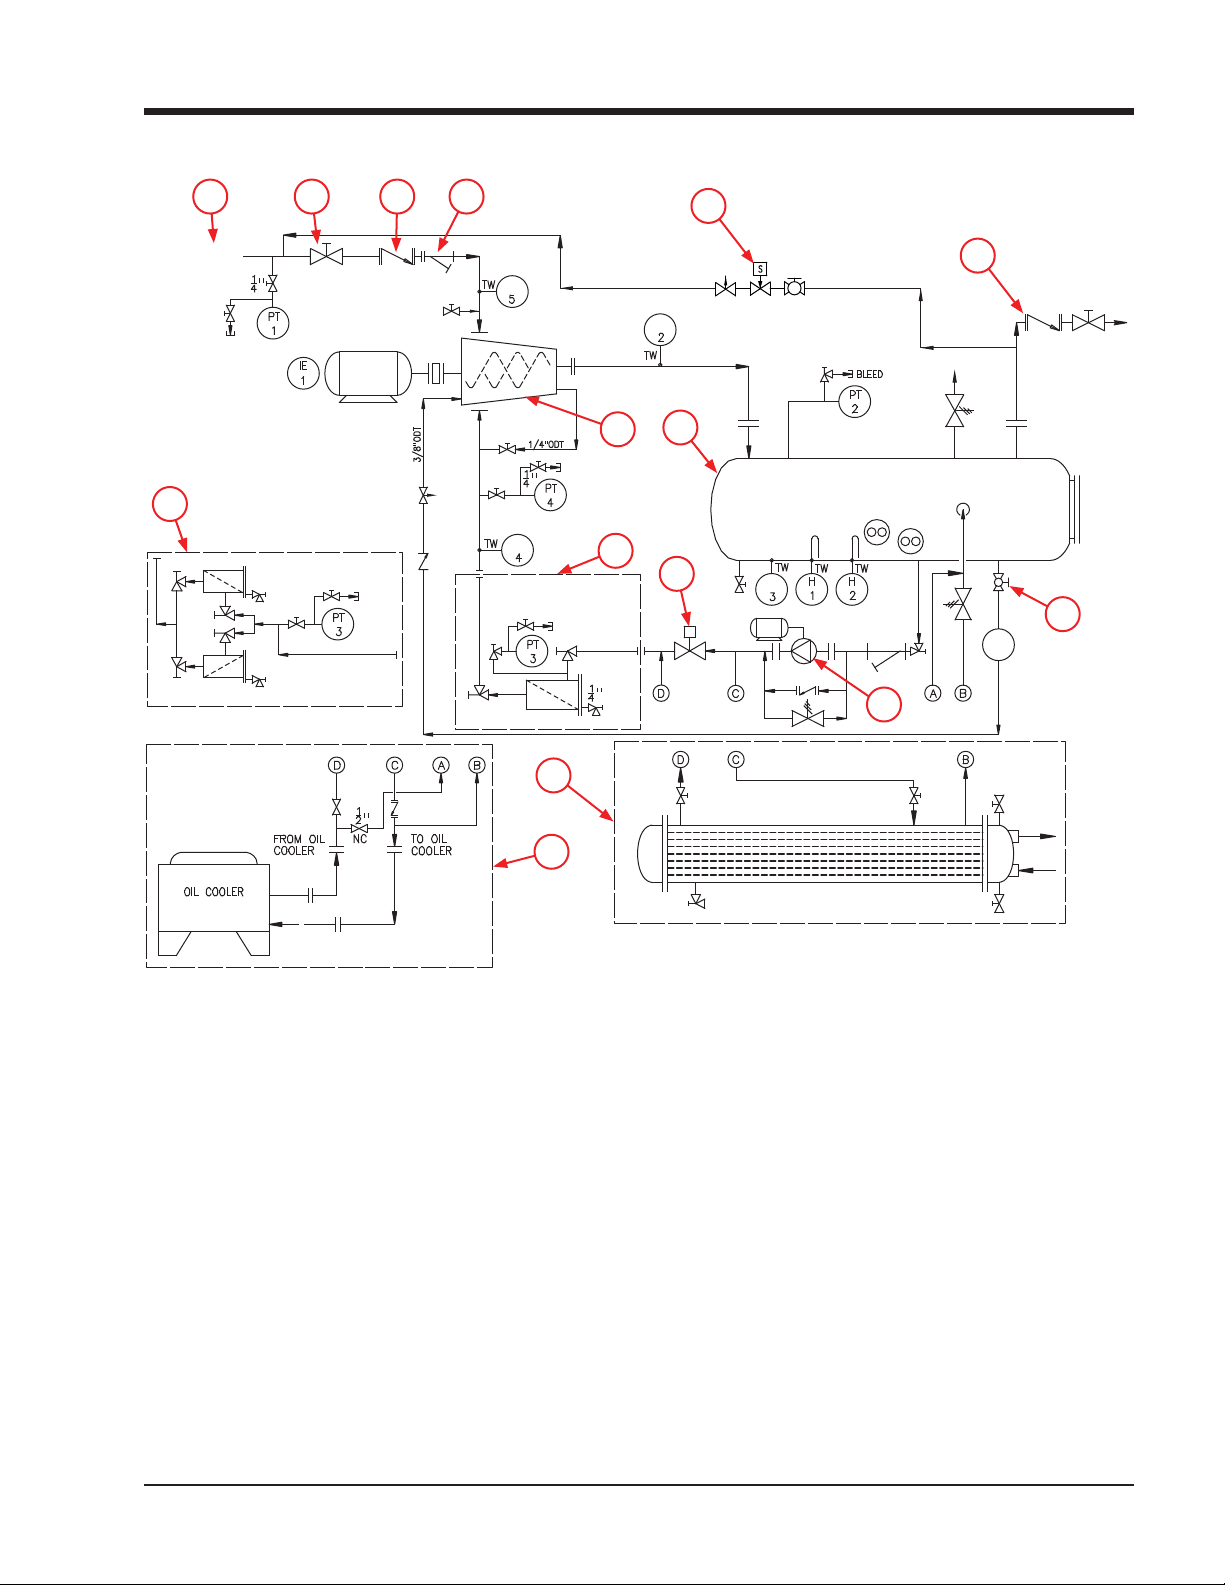
Section 2 • Theory of Operation
1 2 3 4
SUCTION GAS
1/4” OIL CHARGING
BLEED
MOTOR
15
FILTER
DRAIN
FILTER
DRAIN
OPTIONAL DUAL OIL FILTERS
BLEED
TE
COMPRESSOR
BLEED
TE
STANDARD SINGLE
OIL FILTER
FILTER
12
BLEED
DRAIN
10
14
5
6
DISCHARGE
CHECK
STOP VALVE
VALVE
TE
1/4”
13
OIL SEPARATOR
11
M
DRAIN
TE
MOTOR
PUMP
100#
7
FG
1
8
OIL COOLER
VENT
9
OPTIONAL REMOTE AIR COOLED OIL COOLER
Figure 2-1. Gas Compressor Unit P&ID
The gas and oil systems work in unison, but each one
will be explained separately. Reference Figure 3 - Gas
Compressor Unit P&ID for gas and oil fl ow descriptions.
Gas Flow
The gas compression process begins as processed gas
enters the suction inlet (1). The processed gas fl ows
through a stop valve (2), check valve (3) then through
a suction line strainer (4) to the compressor (14). The
processed gas is then pressurized through the compressor and discharged as high pressure gas vapor into the
oil separator (13). In the oil separator, the oil is then
separated from the discharged gas vapor by impingement separation. The high pressure gas fl ows out to
OIL
DRAIN
STANDARD WATER COOLED OIL COOLER
DRAIN
the aftercooler and scrubber for cooling while the oil is
pumped or syphoned back to the compressor.
Moreover, check valves (3) and (6) are provided between
the oil separator to prevent gas vapor or liquid from fl ow-
ing back to the compressor during shutdown periods.
An equalizing line is also installed between the high
pressure side (oil separator) and low pressure side (suc-
tion) to allow .
Oil Life and Oil Flow
The life of the oil is directly affected by the quality of the
gas. Proper separation of any liquids must be accomplished to prevent droplets of liquid at the compressor
VSG/VSSG • Installation, Operation and Maintenance Manual •Vilter/Emerson • 35391SSG
2 – 1
Page 20

Section 2 • Theory of Operation
suction. The discharge temperature of the compressor
must be kept a minimum of 30°F (or 17°C) above the discharge gas dew point to prevent the condensing of liquids in the oil separator. The oil separator shell and legs
must be insulated when the gas stream has a high probability of having condensables.
Oil in the gas compressor unit serves three primary purposes. They are compressor lubrication, sealing clearances between moving parts, and heat removal resulting from heat of compression and friction. Initially, oil
fl ow is driven by a mechanical gear pump (7). Once the
system reaches design conditions, the oil pump is shut
off and oil fl ow is maintained by differential pressure in
the gas system.
As the oil is separated from the gas in the oil separator,
it is pumped or syphoned through an oil cooler (9), then
fi ltered through a single (11) or dual oil fi lters (15) and
back to the injection port of the compressor (14). The
standard oil cooler is a shell and tube water cooled heat
exchanger (9). The other option is to air cool oil remotely
through a fi nned fan heat exchanger (8).
Furthermore, to collect oil from the coalescing side of
the oil separator (12), a line is installed between the oil
separator and the compressor. By opening the shut-off
valve (6), this will allow oil dripping off the coalescing fi l-
ters to be fed back to the compressor. In addition, the oil
cooler (8 or 9) is piped in parallel to the oil temperature
control valve (oil mixing vlave) (10), which acts as a bypass valve.
On units with a full-time oil pump, oil pressure is regulated by the oil pressure regulator (12). It controls upstream pressure to the compressor bearings and should
be adjusted to hold the oil pressure at 20 psig above suction pressure. Excess oil not required for bearing lubrication is passed through the regulator and back into the oil
separator (13).
This is a continuous cycle.
RTDs and Pressure Transducers
Resistance Thermometers (RTDs) and pressure transducers are instruments used to measure temperatures
and pressures at specifi c locations on the gas compressor
unit, see Figure 1-2. Gas Compressor Unit Components.
RTDs are typically mounted on the suction pipe, discharge pipe, oil separator and oil fi lter outlet pipe.
Pressure transducers are typically mounted on the block
and bleed assembly and directly on the suction pipe. The
pressure transducers measure suction pressure, inlet
and outlet oil pressure, and oil separator pressure.
Control System
The gas compressor unit is controlled by a Programmable
Logic Controller (PLC) panel. This PLC panel’s main function is to control the gas compression system from the
data that it receives from the sensors around the unit.
Refer to Compact Logix PLC manual (35391CL) for additional information.
2 – 2
VSG/VSSG • Installation, Operation and Maintenance Manual •Vilter/Emerson • 35391SSG
Page 21
Section 3 • Installation
Delivery Inspection
All equipment supplied by Vilter are thoroughly inspected at the factory. However, damage can occur in shipment. For this reason, the units should be thoroughly
inspected upon arrival, prior to off-loading. Any damage noted should be photographed and reported immediately to the transportation company. This way, an
authorized agent can examine the unit, determine the
extent of damage and take necessary steps to rectify the
claim with no serious or costly delays. At the same time,
the local Vilter representative or the home offi ce should
be notifi ed of any claims made within ten (10) days after
its discovery. Refer to long term storage for additional
recommendations.
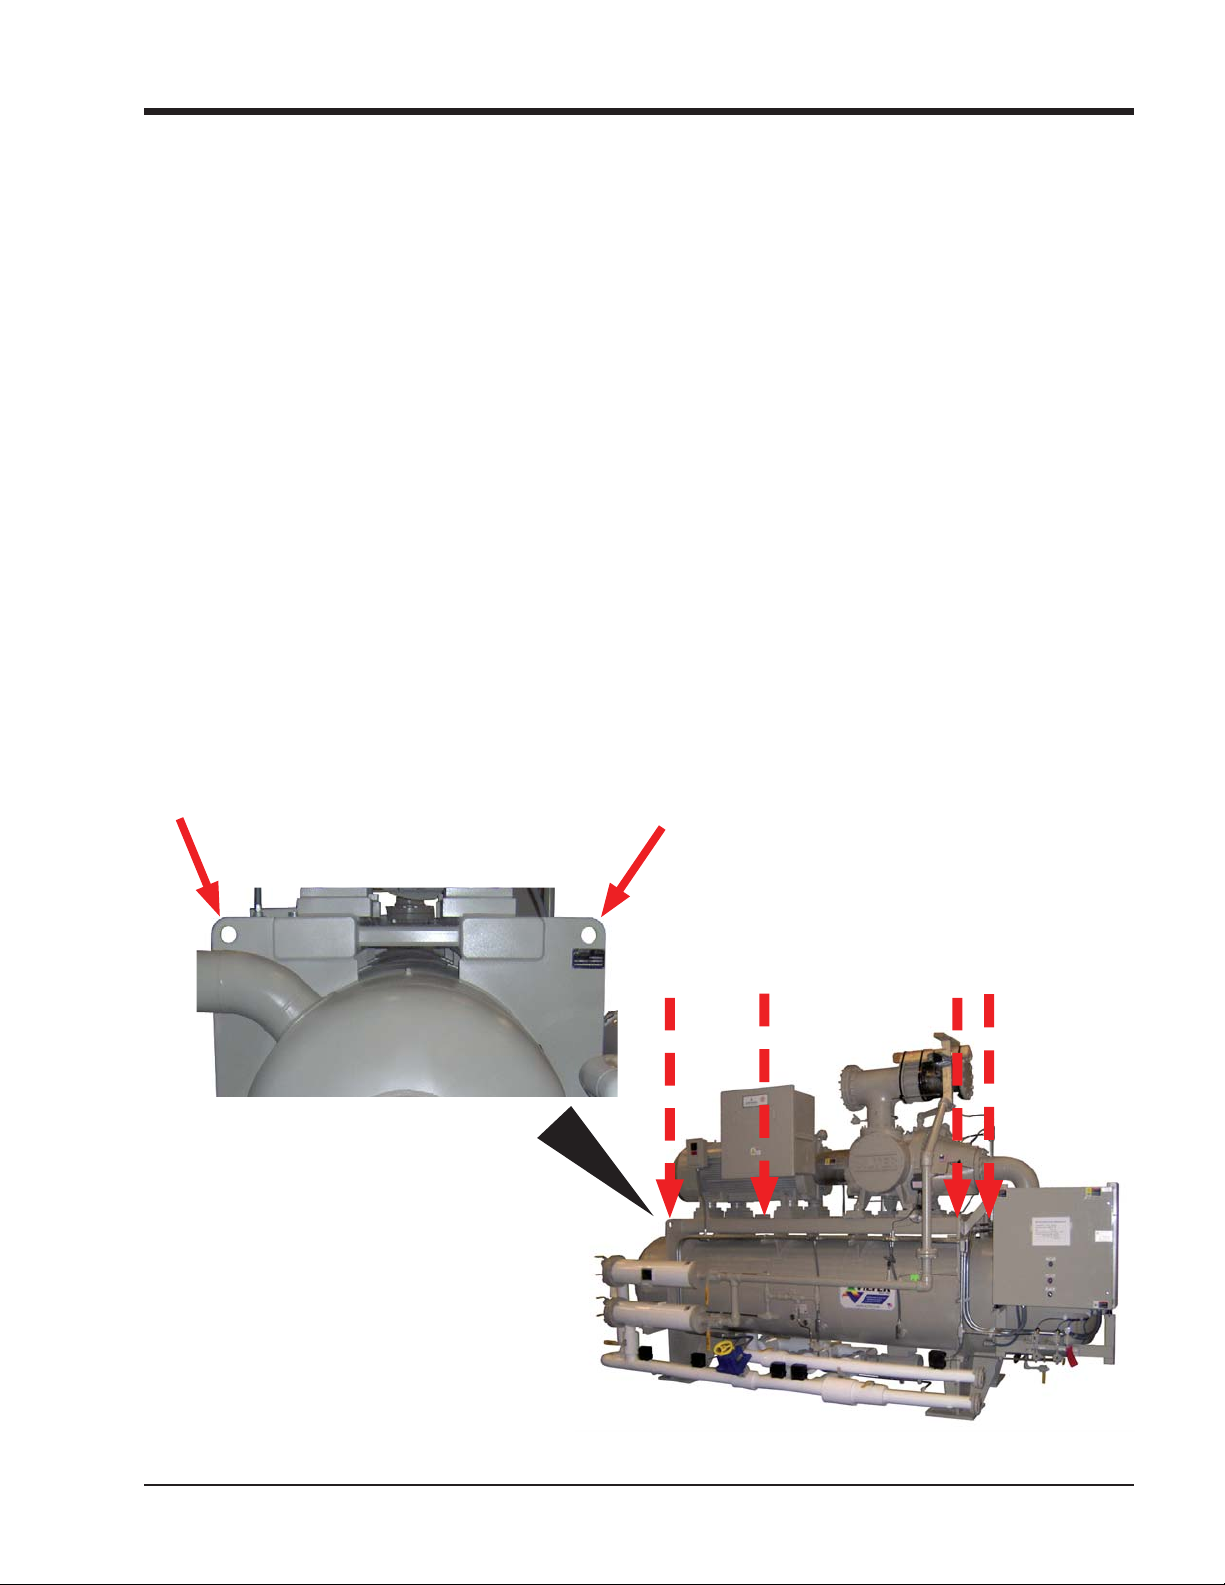
Rigging and Lifting of Compressor
Unit
WARNING
When rigging and lifting a compressor unit, use proper
lifting device capable of lifting and maneuvering the
weight and size of the compressor unit. Use only
qualifi ed personnel and additional personnel and
lifting equipment (i.e. spreader bar) as required.
Failure to comply may result in death, serious injury
and/or damage to equipment.
Only qualifi ed personnel shall operate rigging and lift-
ing equipment. Ensure that the lifting device is capable
of lifting the weight of the compressor unit, refer to the
supplied Vilter General Assembly (GA) drawing.
To lift the compressor unit, use lifting points on compressor unit frame to attach the lifting device, see Figure
3-1. There are a few points to consider prior to moving
the unit:
• Ensure that the weight is evenly distributed amongst
the lifting device (i.e. lifting chains and spreader bar)
prior to lifting.
• Ensure that the lifting device is not obstructed by any
parts of the compressor unit to prevent damage to
components.
• Use additional personnel as needed to spot and aid in
maneuvering the compressor unit.
• Ensure there is plenty of space to maneuver the compressor unit and a clear path to its location.
Lifting Point
Use lifting chains/straps and spreader bar. Evenly
distribute weight. Keep lifting chains and spreader
bar clear of components to prevent damage.
Figure 3-1. Rigging and Lifting Points
VSG/VSSG • Installation, Operation and Maintenance Manual •Vilter/Emerson • 35391SSG
3 – 1
Page 22

Section 3 • Installation
Long Term Storage Recommendations
The procedure described is a general recommendation
for long term storage (over one month of no operation)
of Vilter compressor units. It is the responsibility of the
installation fi rm and end user to address any unusual
conditions. Use the supplied long term storage log sheet
to help with record keeping, see section page 3-3.
Warranty of the system remains in effect as described at
the beginning of this manual, section page i.
The following are recommendations regarding long
term storage:
• If the unit is designed for indoor duty, it must be
stored in a heated building.
• If the unit is designed for outdoor duty and is to be
stored outdoors, a canvas tarp is recommended
for protection until installation. Adequate drainage
should be provided. Place wood blocks under the
base skid so that water does not collect inside the
base perimeter or low spots in the tarp.
• All compressor stop valves are to be closed to isolate
the compressor from the remainder of the system.
All other valves, except those venting to atmosphere,
are to be open. The unit is shipped with dry nitrogen
holding charge of approximately 5 psi above atmospheric pressure. It is essential that the nitrogen holding charge be maintained.
• The nitrogen or clean dry gas holding charge in the
system and compressor are to be monitored on a
regular basis for leakage. If not already installed, it is
required that a gauge is to be added to help monitor the nitrogen holding charge pressure. If a drop in
pressure occurs, the source of leakage must be found
and corrected. The system must be evacuated and
recharged with dry nitrogen to maintain the package
integrity.
• Cover all bare metal surfaces (coupling, fl ange faces,
etc.) with rust inhibitor.
• Desiccant is to be placed in the control panel. If the
panel is equipped with a space heater, it is to be energized. Use an approved electrical spray-on corrosion
inhibitor for panel components (relays, switches,
etc.)
• All pneumatic controllers and valves (Fisher, Taylor,
etc.) are to be covered with plastic bags and sealed
with desiccant bags inside.
COMPRESSOR MOTOR
The following are general recommendations. Refer to
specifi c motor manufacturer instructions for storage
recommendations.
• Remove the condensation drain plugs from those
units equipped with them and insert silica-gel into
the openings. Insert one-half pound bags of silicagel (or other desiccant material) into the air inlets and
outlets of drip-proof type motors.
NOTE
Bags must remain visible and tagged, so they will be
noticed and removed when the unit is prepared for
service.
• Cover the motor completely to exclude dirt, dust,
moisture, and other foreign materials.
• If the motor can be moved, it is suggested that the
entire motor be encased in a strong, transparent plastic bag. Before sealing this bag, a moisture indicator
should be attached to the side of the motor and several bags of silica-gel desiccant be placed inside the
bag around the motor. When the moisture indicator
shows that the desiccant has lost its effectiveness, replace desiccants.
• Whenever the motor cannot be sealed, space heaters must be installed to keep the motor at least 10°F
above the ambient temperature.
• Rotate motor and compressor shafts several revolutions (approximately 6) per month to eliminate fl at
spots on the bearing surfaces. For motors utilizing
anti-friction bearings, the shaft should be rotated
once every 30 days by hand at 30 RPM for 15 seconds
in each direction. Bearings should also be re-lubricated at 2-year intervals using the grease specifi ed on
the motor lubrication nameplate.
• If the compressor unit is installed, wired and charged
with oil, open all oil line valves and run the oil pump
for 10 seconds prior to rotating the compressor shaft.
Continue running the oil pump while the compressor
shaft is being turned to help lubricate the surfaces of
the shaft seal.
For additional storage information, refer to Appendices.
3 – 2
VSG/VSSG • Installation, Operation and Maintenance Manual •Vilter/Emerson • 35391SSG
Page 23

Section 3 • Installation
AIR COOLED OIL COOLERS
The following are general recommendations. Refer to
specifi c air cooled oil cooler manufacturer instructions
for storage recommendations.
• If the coolers are to be stored or not operated for an
extended period of time, the fan motors may ingress
moisture if they are not protected or operated regularly. In severe cases, the moisture will reduce the insulation level of the windings or cause rusting of the
bearings necessitating removal for repairs at a motor
repair facility. This is a common problem with large
generating installations when the coolers are often
ready but commissioning of the main turbine-generator is delayed for several months.
• The simplest remedy for installed coolers is to operate the fan motors for a few hours every week during the downtime period until regular operation
resumes. The fan motors on stored coolers must be
protected from the elements by covering them with
waterproof tarps.
Compressor Unit Inspections Prior to
Storage or Installation
The compressor unit must be inspected prior to installation since components could have come loose and/or
damaged during shipment or moving.
• Check for loose bolts, particularly the compressor
and motor mounting nuts.
• Check for bent or damaged components. The compressor unit should have also been inspected prior to
off-loading, see Delivery Inspection.
• Check that the nitrogen pressure is still holding pressure. The pressure gauge is located at the discharge
bleed valve on the block and bleed assembly. Any
leaks must be fi xed and the system purged and re-
charged with dry nitrogen.
Recommended Onsite Tools
The tools recommended to have on site are important
for troubleshooting, inspections and compressor unit
operation. Besides general mechanic tools, these tools
are recommended:
• Oil Pump (maximum of 2-3 GPM with motor approved for Division 1 or Division 2 and with ability to
overcome suction pressure)
• Infrared Heat Gun
• Torque Wrenches (with ranges from 0 to 600 ft-lbs)
• Sockets and wrenches up to 2-1/2” (63.5 mm)
• Voltmeter
VSG/VSSG • Installation, Operation and Maintenance Manual •Vilter/Emerson • 35391SSG
3 – 3
Page 24

Section 3 • Installation
LONG TERM STORAGE LOG
Date: _______________________________
Name: _______________________________ Intial:_______________
Company:
Vilter Order No. _____________________________________________
Compressor Serial Number: ________________________________________________________
Was Compressor Shaft Rotated? _______YES _______ NO HOW OFTEN? __________
Was Air Cooled Oil Cooler Rotated? _______YES _______ NO HOW OFTEN? __________
Was Compressor Motor Rotated? _______YES _______ NO HOW OFTEN? __________
Was Compressor Motor Lubricated? _______YES _______ NO HOW OFTEN? __________
What was the Nitrogen pressure? _______PSIG
Was it necessary to recharge with Nitrogen? ________YES _______NO
If unit needed recharging, was the leak found? ________YES _______NO
Please briefly explain nature of leak:
Is compressor stored in a building that is heated and insulated to prevent condensation of moisture and freezing of Equipment?
___________YES _________NO
Are all machined surfaces exposed to atmosphere coated with a light grease to prevent rusting (compressor shaft)?
__________YES _________NO
Compressor has been placed in operation as of: DATE ______________
3 – 4
VSG/VSSG • Installation, Operation and Maintenance Manual •Vilter/Emerson • 35391SSG
Page 25

Section 3 • Installation
Foundation
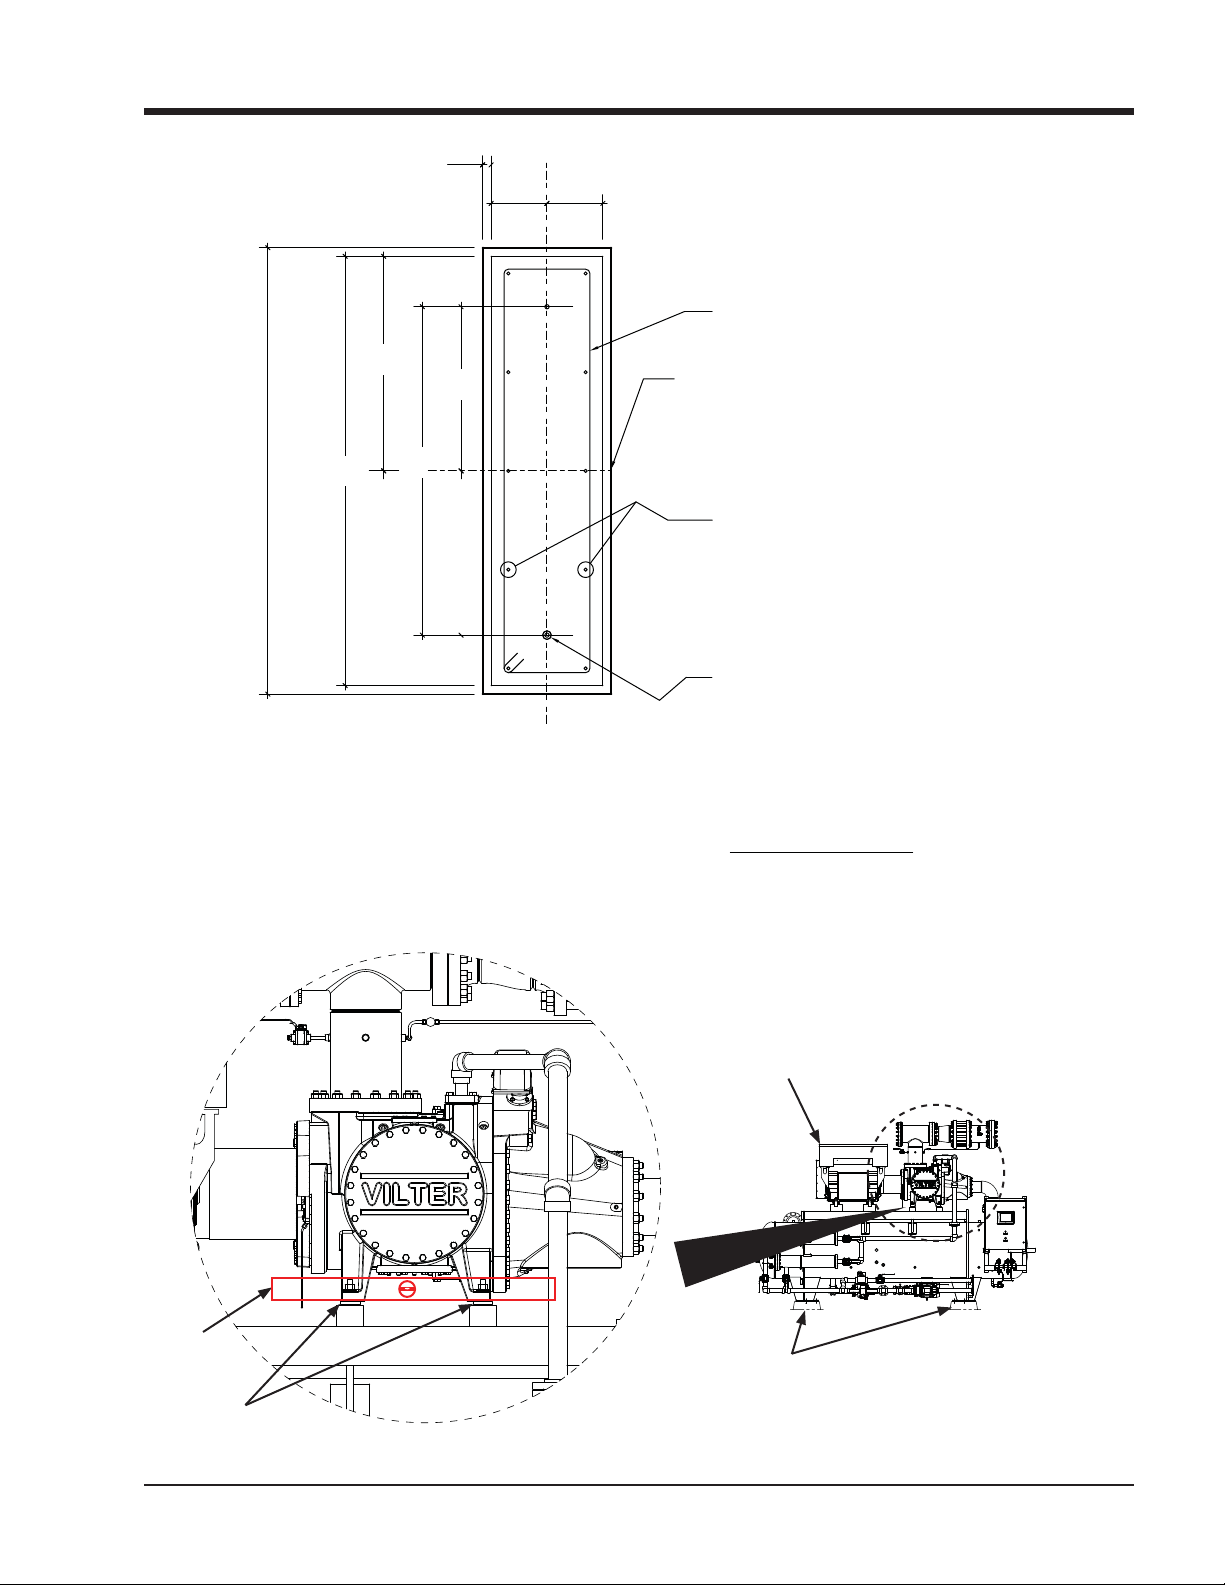
Vilter Single Screw compressor units are low vibration machines. Under most conditions, no elaborate
foundation is necessary. However a sound foundation
maintains motor alignment and proper elevation, and
is therefore required. Provided are recommendations
for the foundation and anchoring of the compressor
unit. The Vilter foundation supports the entire operating
weight of the unit and is suitable for years of continuous
duty. Included are specifi cations for concrete, rebar, ag-
gregate, anchors and grout.
Considerations Prior to Starting
Consult professionals, such as building inspectors,
structural engineers, geotechnical engineers and/or
construction contractors prior to starting. Below are a
few points to consider:
Site Characteristics:
• Soil information
• Site drainage
• Wind data
• Seismic zone
• Ingress and egress
• Power and power lines
Site Layout:
• Plant elevations, grading, drainage and erosion
• Accessibility to compressors for service
• Location of surrounding buildings
• Property lines and roadways
• Power
• Fire safety
Safety:
NOTE
Always check with a safety engineer before proceeding.
• Arranging equipment with adequate access space for
safe operation and maintenance
• Wherever possible, arrange equipment to be served
by crane. If not feasible, consider other handling
methods
• Make all valves and devices safely accessible
• Use special bright primary color schemes to differentiate service lines
• Lightening protection for outdoor installations
• Relief valve venting
Foundation Materials
Materials needed to build the foundation are forms,
concrete, sand, rebar, wire, grout, anchor bolts, expansion board and shims. A set of concrete forms will
need to be acquired; generally, these can be rented or
constructed from dimensional lumber. There should
be enough 4,000 psi concrete with one inch aggregate
to build the foundation. Also, there should be enough
sand to provide a base of compacted sand four inches
thick for the foundation to rest on, see Figure 1 - Concrete Pad with Compressor Unit Dimensions - Side
View. The rebar required is ASTM 615, grade 60, sizes
#4 and #6. Wires will also be needed to tie the rebar
together. The recommended grout is Masterfl ow 648CP
high performance non-shirk grout to provide at least
a 1” thick pad under each foot. The recommended anchors are 5/8” Diameter HILTI HAS SS threaded rod for
outdoor installations or HAS-E rods for indoor installations. Anchor bolts shall have a fi ve inch projection and
12-3/8” embedment. The required adhesive is HIT-ICE/
HIT/HY 150 anchoring system. There should be enough
one inch expansion boards to go around the perimeter
of the foundation. Finally there should be enough shim
stock and extra anchor bolt nuts to level the compressor unit.
Building the Foundation
Use the Vilter General Arrangement (GA) and foundation drawings to help secure a building permit and
foundation construction. The Vilter GA drawing will
have the necessary dimensions required to determine
the overall foundation size and where to locate the
compressor unit on the foundation. It will also show the
dimensions required to form up the housekeeping piers
that the compressor unit rests on. The Vilter foundation
drawing lists the necessary information to construct a
suitable foundation. It includes the rebar requirements
and locations. It also shows anchor bolt locations,
grouting and the concrete specifi cations. Using the
Vilter GA drawing, Vilter foundation drawing and the
information from site characteristics, site layout and
safety studies will provide enough data to allow building the foundation to proceed.
The foundation is to be cast and permanently exposed
against the earth. Therefore, if constructing on an existing fl oor, typically indoors, the fl oor will need to be bro-
ken up to get to the earth. If starting from undisturbed
soil, it must be also be prepared accordingly. In either
case, these are some check points to consider:
• Check the depth of your frost line to ensure
the foundation extends below it
• Ensure the foundation rests entirely on natural rock
or entirely on solid earth, but never on a combination
VSG/VSSG • Installation, Operation and Maintenance Manual •Vilter/Emerson • 35391SSG
3 – 5
Page 26
Section 3 • Installation
of both
• Check the ability of the soil to carry the load
• Check wet season and dry season soil characteristics
for static loading limits and elasticity
• Check local codes for Seismic Design requirements
For examples of foundation diagrams, see to Figure 3-2
and Figure 3-3.
G.A.
trolled level and a surface texture etched in place. Leave
the concrete to cure for at least 28 days.
Compressor Unit Installation
Once the foundation has cured, the compressor unit
can be placed on the foundation, see Figure 3-5 and
Figure 3-6. With the appropriate material handling
equipment, lift the compressor unit by locations shown
on the Vilter GA drawing and slowly place it on the
G.A.
COMPRESSOR UNIT
CENTER LINE OF
GAS COMPRESSION
SYSTEM
1'-0"
6"
EL. TOP OF
GRADE
3" CLR. 2" CLR.
# 6 @ 12"
EACH WAY
TOP & BOTTOM
2" (TYP.)
2" (TYP.)
Figure 3-2. Concrete Pad with Compressor Unit Dimensions - Side View
NOTE
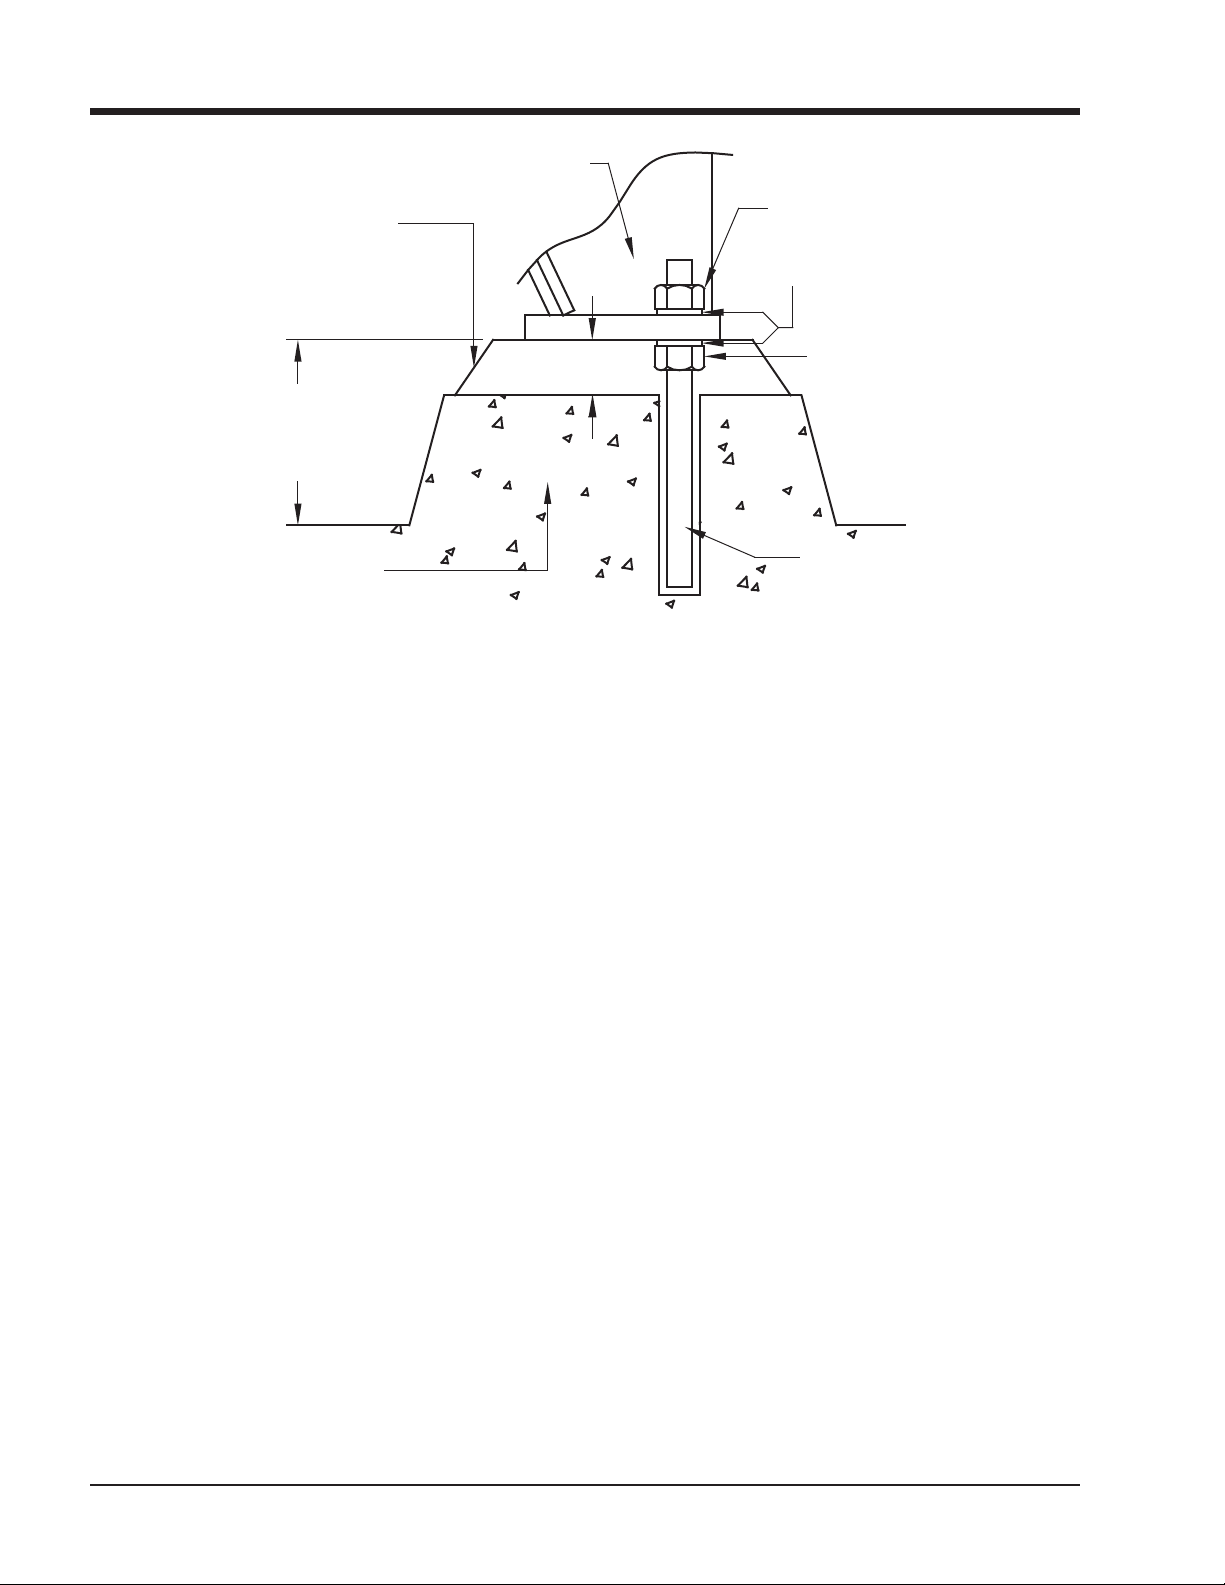
In Figures 3-3 and 3-8, the recommended
housekeeping height of 6” is to allow maintenance/
service of the oil strainer and oil pump.
Once the site has been excavated and prepared, place
four inches of sand down on the bed where the foundation will rest. The sand must be compacted before placing the forms and rebar. After the sand is compacted,
use the Vilter GA drawing to construct the forms for
the foundation. With forms in place, install expansion
boards on the inside of the forms, for example, see
Figure 3-4. Next, place your rebar in the forms as per the
Vilter foundation drawing. When all rebars are in place
the concrete can be poured. The concrete must then be
4" COMPACTED
SAND
EXCAVATE TO FROST DEPTH AS REQ'D AND BACKFILL
WITH CLSM OR NON-FROST SUSCEPTIBLE FILL
foundation housekeeping piers. As per the Vilter GA
drawing, ensure the compressor unit is correctly placed
on the foundation. Once placed, use the spherical washers directly under the compressor as the surface to level
the compressor unit, see Figure 3-7. Place shims under
the feet of the compressor unit, as needed, until it is
leveled, see Figure 3-8. Select the correct drill bit and
drill thru the anchor bolt hole in the mounting feet of
the compressor unit to the depth called for on the Vilter
foundation drawing. Finally using the HILTI instructions,
put your anchor bolts in place and wait for them to cure.
Then place the nuts on the anchor bolts to fi nger tight
and prepare to grout.
3 – 6
VSG/VSSG • Installation, Operation and Maintenance Manual •Vilter/Emerson • 35391SSG
Page 27
Section 3 • Installation
Leveling and Grouting
The unit should be level in all directions. Wet the
concrete pad according to the grout manufacturer’s
directions. Mix a suffi cient amount of grout. The grout
must be an expanding grout rather than shrinking to
provide a tighter bond. Follow the manufacturer’s
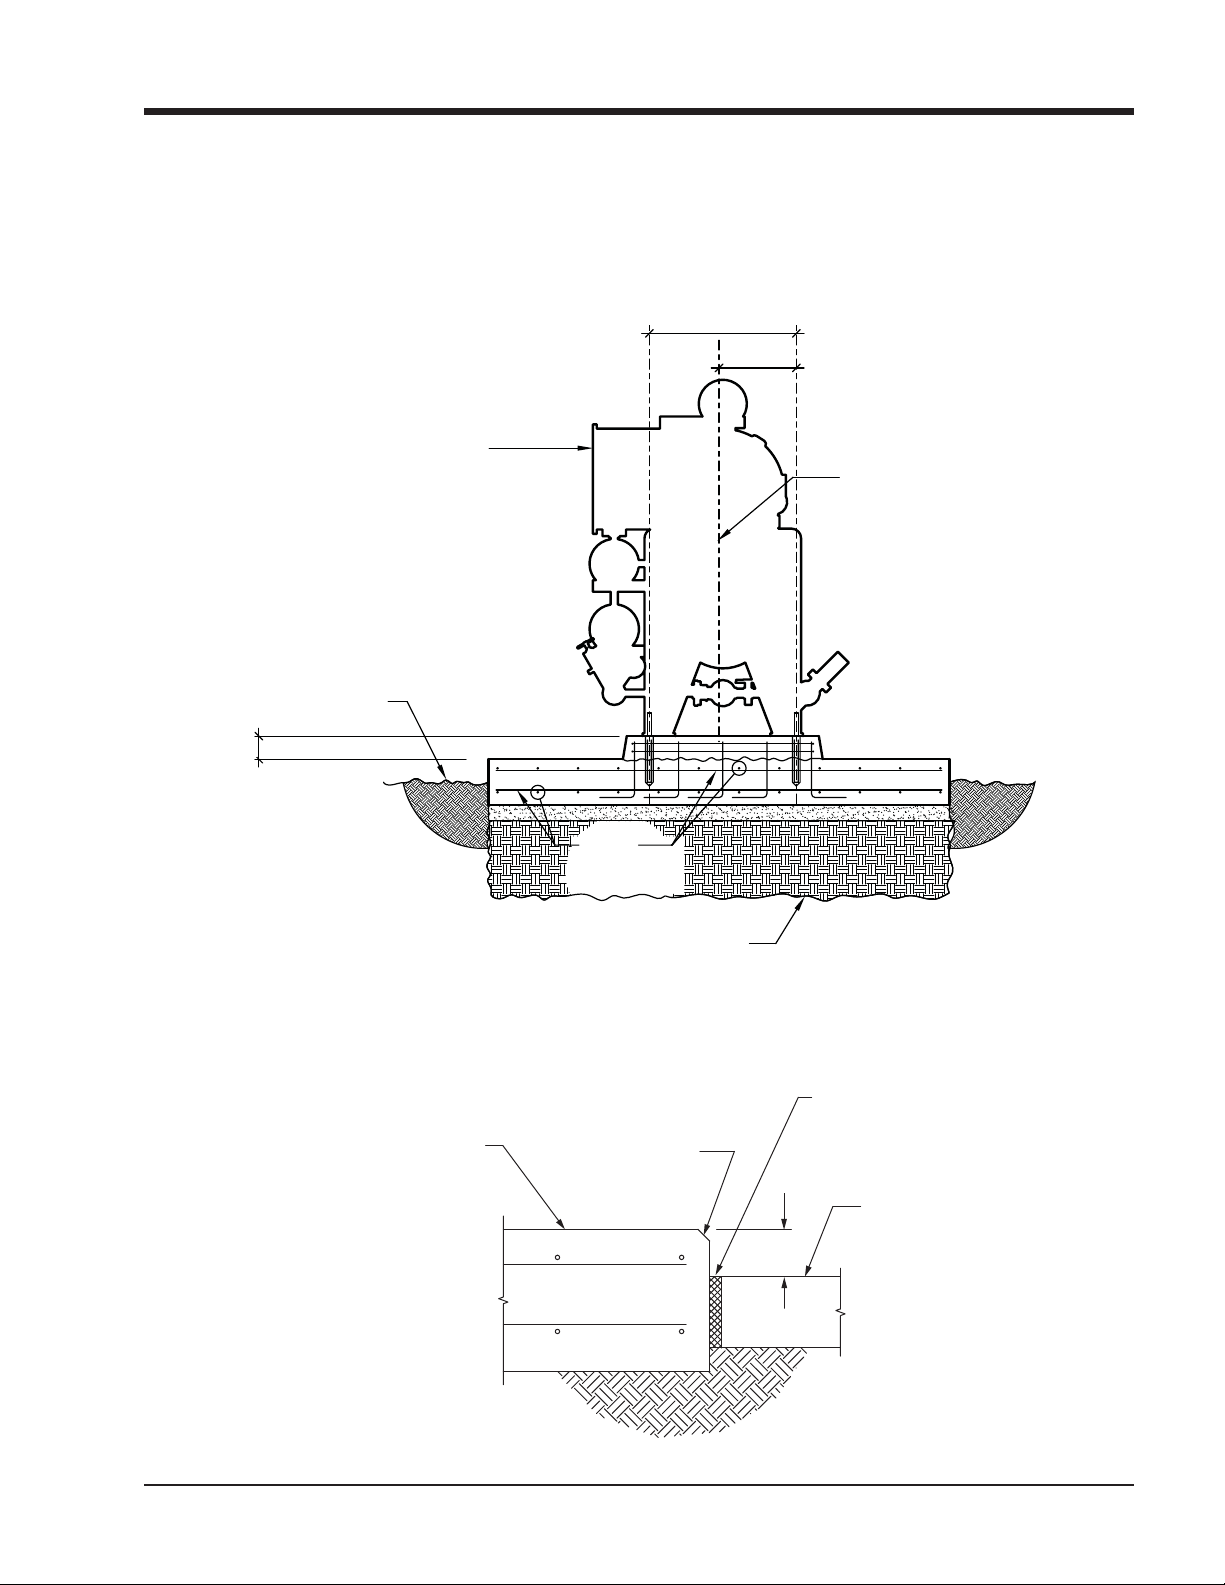
COMPRESSOR UNIT
EL. TOP OF
GRADE
6"
recommendations for setting, precautions, mixing, and
grout placement, fi nishing and curing. The grout must
be worked under all areas of the feet with no bubbles or
voids. If the grout is settled with a slight outside slope,
oil and water can run off of the base. Once the grout has
cured, torque the anchor bolts as per HILTI instructions.
G.A.
G.A.
CENTER LINE OF
GAS COMPRESSION
SYSTEM
# 6 @ 12"
EACH WAY
TOP & BOTTOM
EXCAVATE TO FROST DEPTH AS REQ'D AND BACKFILL
WITH CLSM OR NON-FROST SUSCEPTIBLE FILL
Figure 3-3. Concrete Pad with Compressor Unit Dimensions - Front View
ISOLATION JOINT,
1" MINIMUM
COMPRESSOR UNIT
CHAMFER EDGE
THICKNESS
FOUNDATION
6”
CONCRETE
SLAB IN
BUILDING
Figure 3-4. Interior Foundation Isolation
VSG/VSSG • Installation, Operation and Maintenance Manual •Vilter/Emerson • 35391SSG
3 – 7
Page 28
Section 3 • Installation
Additional Information
Codes and Standards
Vilter followed the following codes and standards when
designing your foundation:
• ACI
• ASTM
• ASCE 7
• IBC 2006
Operation and Performance
The foundation was designed for:
• Outside environment severe exposure
• Ambient temperature -10 degrees F to 105 degrees F
• Unit weight 20,000 lbs
• RPM 3600
• Soil bearing capacity 1,500 lbs/sq.ft.
• Wind speed 120 MPH
• Exposure factor D
• Wind importance factor 1.15
• Concrete poured on and permanently cast against
the earth
General Design Requirements
The compressor foundation is designed to:
• Maintain the compressor in alignment and at proper
elevation.
• Minimize vibration and prevents its transmission to
other structures
• Provide a permanently rigid support
• Provide suffi cient depth to dampen vibrations.
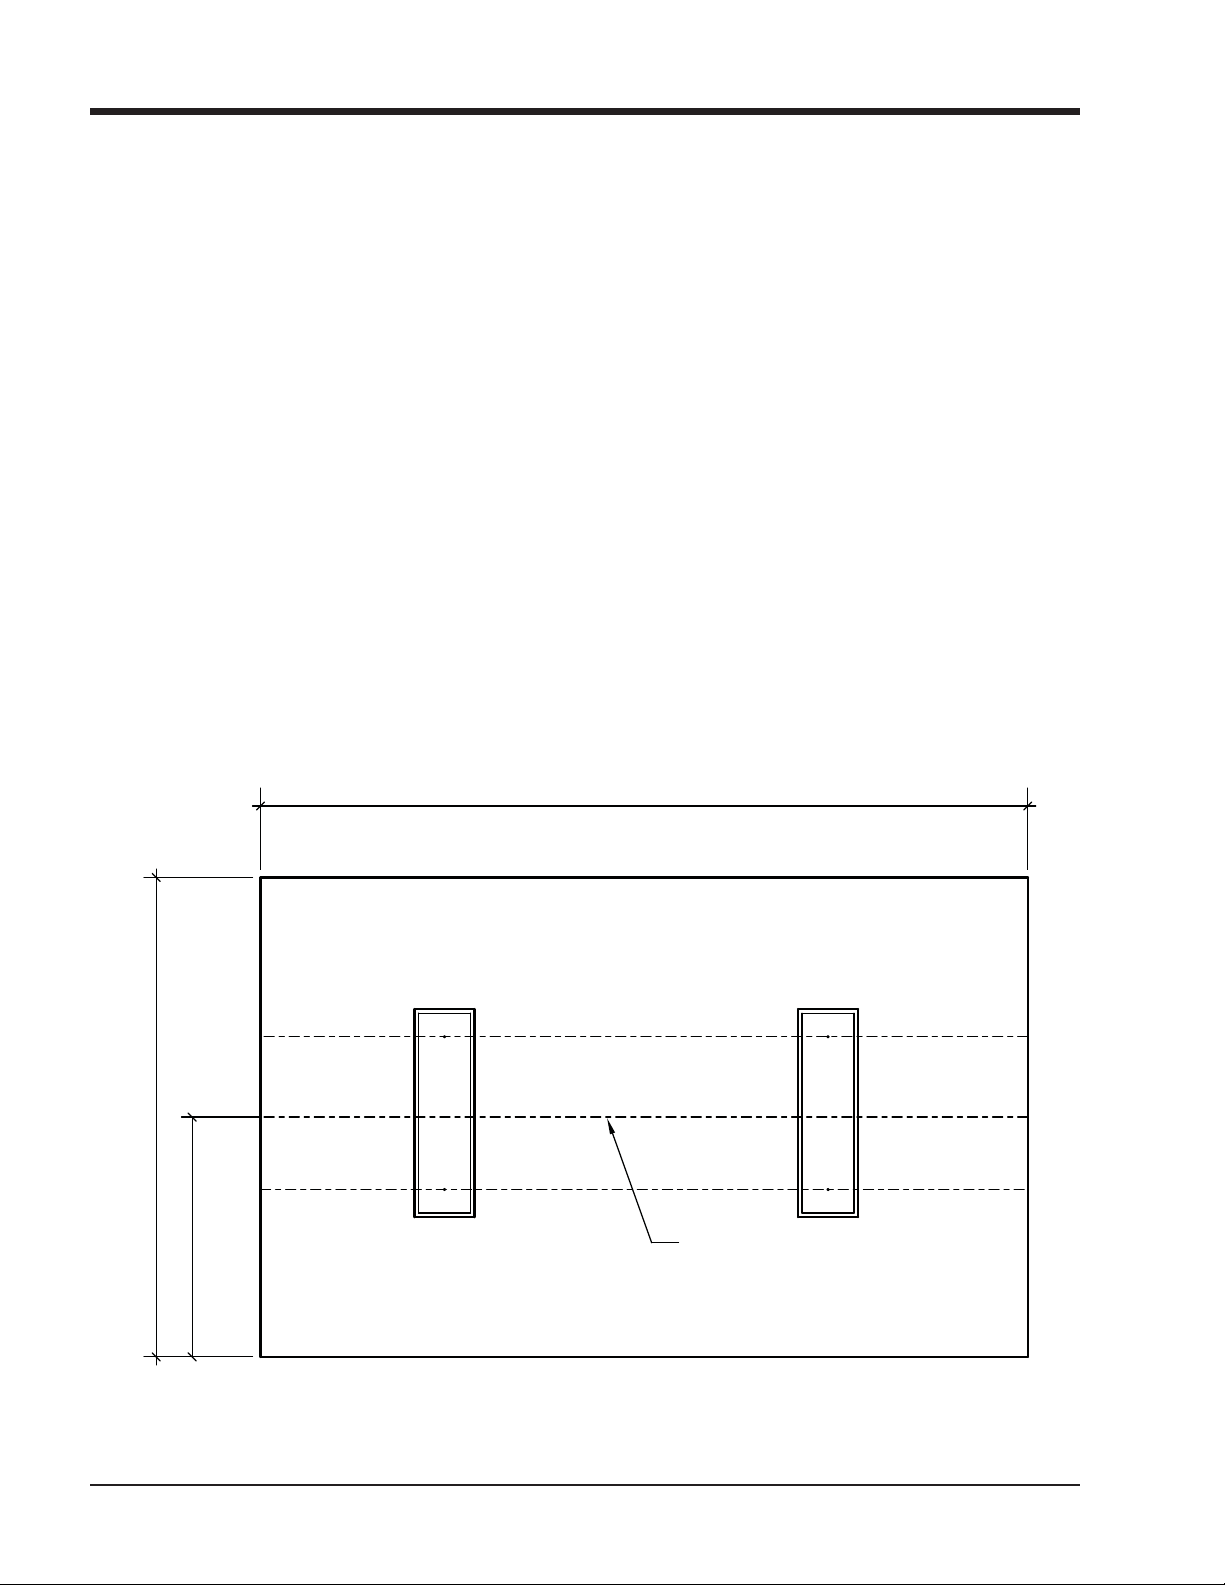
10'-0"
5'-0"
OVER ALL G.A. LENGTH + 4'-0"
CENTER LINE GAS
COMPRESSION
SYSTEM
3 – 8
Figure 3-5. Foundation with Housekeeping Pads Dimensions - Top View
VSG/VSSG • Installation, Operation and Maintenance Manual •Vilter/Emerson • 35391SSG
Page 29
Section 3 • Installation
1" (TYP.)
G.A.
G.A.
G.A.G.A.
(2) - # 4
CLOSED TIES
CENTER LINE
G.A. + 2"
G.A.
G.A.
(5) - # 6 VERT.
WITH STD. 90° HOOK
AT BOTTOM EACH
FAC E
5/8" DIA. HILTI HAS SS THREADED ROD
(HAS-E RODS ARE ACCEPTABLE FOR INTERIOR
INSTALLATIONS) INSTALLED USING
HIT-ICE/HIT-HY 150 ADHESIVE ANCHORING
SYSTEM.
(5" PROJECTION, 12 3/8" EMBEDMENT.)
HOLES TO BE INSTALLED WITH HAMMER DRILL.
DO NOT DIAMOND CORE.
Figure 3-6. Housekeeping Pad Dimension Detail - Top View
(TYP.)
COMPRESSOR UNIT
LEVEL
HOUSEKEEPING PADS
SPHERICAL
WASHERS
Figure 3-7. Level Compressor Unit Using Top Surface of Spherical Washers
VSG/VSSG • Installation, Operation and Maintenance Manual •Vilter/Emerson • 35391SSG
3 – 9
Page 30
Section 3 • Installation
70+6.')
010Ä5*4+0-
'21:;)4176
4'%1//'0&'&
(14
*175'-''2+0)
%10%4'6'
$#5'
Figure 3-8. Concrete Pad Housekeeping Detail
Piping
The ideal load applied to fl anges of the compressor unit
is zero. However, it’s not practical to expect that no loads
will be applied to unit connections. Thermal, dead, live,
wind & seismic loads must be considered and even tolerated. Well supported external piping connected to the
compressor will still result in some loads applying forces
and moments in three axes to unit fl anges.
The most important issue is the motor-compressor misalignment caused by external forces (F in lbf) and moments (M in ft-lbf) imposed by plant piping. In Figure
3-9 and Table 3-2, are the maximum allowable forces
and moments that can be applied to compressor fl anges
when the compressor is mounted on an oil separator.
It must be noted that it is necessary to check for compressor shaft movement when the job is complete. In
no case shall the attached piping be allowed to cause
more than 0.002” movement at the compressor shaft.
If more than 0.002” movement is detected the piping
must be adjusted to reduce the compressor shaft movement to less than 0.002”. For example, the compressor
shaft should not move more than 0.002” when piping is
removed or connected to the compressor.
IMPORTANT – piping elements shall be supported per
the requirements of ASME B31.5 / B31.3 as applicable.
See guidelines below, particularly with concern to minimizing loads on check valves.
3 – 10
VSG/VSSG • Installation, Operation and Maintenance Manual •Vilter/Emerson • 35391SSG
*1.&&190076
9#5*'4
/+0
Header Piping and Drains
Header drains should also be installed to allow drainage
of liquids from the discharge and suction headers. See
Appendices for Recommended Header Piping.
.'8'.+0)076
#0%*14$1.6
CAUTION
Accumulated liquid in the suction header can damage
the compressor if not drained. Always drain headers
(suction and discharge headers) prior to start-ups.
Failure to comply may result in damage to equipment.
Remote Air Cooled Oil Cooler Piping
If equipped with a remote air cooled oil cooler, it is important that the piping be installed correctly to and from
the compressor unit and remote air cooled oil cooler.
See Appendices for Recommended Air Cooled Oil Cooler
Piping.
Page 31

Section 3 • Installation
Table 3-2. Maximum Allowable Flange Loads
Nozzle Dia. (in.) Fz (lbf) Fy (lbf) Fx (ft-lbf) Mzz (ft-lbf) Myy (ft-lbf) Mxx (ft-lbf)
4 400 400 400 300 300 300
6
8 900 900 900 1000 1000 1000
10 1200 1200 1200 1200 1200 1200
12 1500 1500 1500 1500 1500 1500
14 2000 2000 2000 2000 2000 2000
600 600 600 500 500 500
HANGER
CUSTOMER SUPPORTS
WHEN CHECK VALVE
IS MOUNTED HERE
5 PIPE
DIAMETERS
5 PIPE
DIAMETERS
5 PIPE
DIAMETERS
CUSTOMER
SUPPORT
CHECK
VALV E
Y
DISCHARGE
LINE
3-4 PIPE
DIAMETERS
SUCTION
LINE
Z
X
Y
X
Z
CUSTOMER
SUPPORT
Figure 3-9. Maximum Allowable Flange Loads
VSG/VSSG • Installation, Operation and Maintenance Manual •Vilter/Emerson • 35391SSG
3 – 11
Page 32

Section 3 • Installation
General Installation Guideline for
Multiple Air Coolers Installed in a
Common Area
NOTE
This general installation guideline applies to all air
coolers on site, whether if they are supplied by or
not supplied by Vilter.
The purpose of this guideline is providing design information when multiple air cooled heat exchangers are
installed in a common area. There are two main focal
points of this guideline. One area is free fl ow area which
addresses how much free area is required to prevent air
fl ow “starvation” of the units. The second item provides
a guideline as to how multiple air cooled heat exchangers should be arranged to minimize the potential of hot
air recirculation due to the environment.
FREE FLOW
There are two basic guidelines that we follow to address
free fl ow area when multiple designs are being installed
in a common area.
• Air coolers should be placed at least 1 fan diameter
away from the nearest obstruction. This is based on
the largest fan diameter in the bay of coolers.
• Intake area to the air cooler should have an intake
velocity equal to or below 500FPM as the as the discharge velocity is above 500FPM.
We will look at each rule and provide pictorials and
calculations for each guideline. Let’s assume the following coolers are being installed in a common area:
• Cooler 1 - 7’ wide x 10’ long with a 6’ fan moving
55,000CFM of air. Face velocity is 785FPM.
• Cooler 2- 8’ wide x 12’ long with a 7’ fan moving
72,000CFM of air. Face velocity is 750FPM.
• Cooler 3- 10’ wide x 16’ long with a 9’ fan moving
120,000CFM of air. Face velocity is 750FPM.
ONE FAN DIAMETER
In order to keep the leg height of the installation to a
minimum we want to install the coolers at least 1 fan diameter from the nearest obstruction. Referring to Figure
3-10, the nearest obstruction is the building.
Based on the information above, the largest fan diameter in the installation is 9ft. Therefore, the coolers should
be placed at least 9’ away from the building.
INTAKE VELOCITY
Based on the information above, we are going to solve
for the leg height that will provide an intake velocity of
500FPM. We know the following:
• The total airfl ow of the installation is 247,000CFM
• We have an intake perimeter of 82’ for all 4 sides
based on the cooler placement.
• Our intake velocity guideline is 500FPM
3 – 12
PREFERRED
TOTAL INTAKE PERIMETER = 82 FEET
Figure 3-10. Installation of Coolers - One Fan Diameter Next to Building
VSG/VSSG • Installation, Operation and Maintenance Manual •Vilter/Emerson • 35391SSG
Page 33

Section 3 • Installation
Intake Velocity
More
Less
Figure 3-11. Leg Height
The equation used to calculate the leg height in Figure
3-11 is as follows:
Leg Height = (Total Airfl ow/Intake velocity)/Intake Perimeter
Leg Height = (247,000CFM/500FPM)/82ft
Leg Height = 6ft
In this particular case the calculated minimum height is
6 feet to maintain an intake velocity of 500FPM or less
based on having the coolers place 1 fan diameter away
from the nearest obstruction. Let’s look at an installation where the coolers need to be placed next to the
building as in Figure 3-12.
Based on the information above, we are going to solve
for the leg height that will provide an intake velocity of
500FPM. We know the following:
NOT PREFERRED
• The total airfl ow of the installation is 247,000CFM
• We have an intake perimeter of 3 sides 16ft, 16ft, and
25ft which totals 57’
• Our intake velocity guideline is 500FPM
The equation used to calculate the leg height in Figure
3-11 is as follows:
Leg Height = (Total Airfl ow/Intake velocity)/Intake Perimeter
Leg Height = (247,000CFM/500FPM)/57ft
Leg Height = 8.667ft
We would round the leg height up to 9ft for this particular situation.
TOTAL INTAKE PERIMETER = 57 FEET
Figure 3-12. Installation of Coolers - Next to Buildling
VSG/VSSG • Installation, Operation and Maintenance Manual •Vilter/Emerson • 35391SSG
3 – 13
Page 34

Section 3 • Installation
HOT AIR RECIRCULATION
There are two situations where hot recirculation could
occur.
• Intake velocity of the cooler is higher than the discharge velocity
• Environmental issues such as strong cross winds
which is installation specifi c
We addressed how to minimize the opportunity for hot
air recirculation involving the operation of the air coolers under the guidelines for the Free Flow section above.
However, environmental hot air recirculation is something that is outside of the control of the cooler manufacturer. If the site has the potential for strong cross
winds or tunneling then you may want to consider the
following items to minimize the potential of hot air recirculation due to the environment.
• All air coolers should discharge at the same elevation.
• If feasible all of the air coolers in a common area
should be placed as close to the next cooler as
possible.
This is especially critical if all of the air coolers are not
place as close together as possible.
Cooler Placement and Spacing
The concern about cooler placement as far as proximity
from one another has to do with the potential for hot
air recirculation due to cross winds. Let’s look at only
having coolers 1 and 3 in the same area. The leg height
requirement of cooler 1 is 3.23ft so we would use a 4ft
leg height. The leg height requirement for cooler 3 is
4.61ft but we would put a 7 foot leg height on the cooler
due to size and for serviceability. Figure F. shows this
installation.
In this case, if you get a strong cross wind from left to
right there is the potential that the discharge coming
from the top of cooler 1 could easily be pushed into the
intake of cooler 3. Thus, in Figure 3-14, the not preferred
confi guration is more susceptible to the potential of hot
air recirculation due to the environment and is not recommended. The preferred confi guration is the recom-
mended installation of the coolers with a space between
them.
Unfortunately this comes with a cost. By reducing the intake perimeter available, the leg height increases, which
is a cost. In addition there is no guarantee that hot air
recirculation can be eliminated due to environmental
issues.
Discharge Elevation
In order to minimize the potential for hot air recirculation, it is recommended to install the air coolers so that
they all discharge at the same elevation. This is important because not all air coolers have the same plenum
heights. You can satisfy the leg height requirements by
the calculation above but not satisfy the requirements
for discharge elevation. Based on the size of the coolers above, cooler 1 has a plenum height of 36”, cooler
2 has a plenum height of 42”, and cooler 3 has a plenum
height of 54”. Plenum heights are calculated from the
standard of a 45 degree dispersion angle in API 661. If
you would like more details on this calculation please
contact engineering.
As you can see in Figure 3-13 in the not preferred confi guration. the leg height requirement in the fi rst cal-
culation is satisfi ed. However, the coolers are not at the
same discharge elevation. This could be an issue if there
is a cross wind from left to right. Cooler 3 could block the
discharge air fl ow from coolers 1 and 2 and recirculate it
back down to the intake of the coolers. The best way to
address this is to increase the leg heights on coolers 1
and 2 as shown in the preferred confi guration.
All of the information provided is a general guideline for
installing multiple air coolers in a common area. If you
minimally follow all of the Free Flow requirements and
keep the air coolers discharging at the same elevation
then you have a good basis for site layout.
Sometimes due to extenuating circumstances, the
above guidelines cannot be followed. Please contact engineering to discuss remedies to accommodate different
confi gurations.
3 – 14
VSG/VSSG • Installation, Operation and Maintenance Manual •Vilter/Emerson • 35391SSG
Page 35

Section 3 • Installation
NOT PREFERRED PREFERRED
Figure 3-13. Discharge Elevation of Coolers
NOT PREFERRED
PREFERRED
Figure 3-14. Cooler Placement and Spacing
VSG/VSSG • Installation, Operation and Maintenance Manual •Vilter/Emerson • 35391SSG
3 – 15
Page 36

Section 3 • Installation
f
Pressure Testing
CAUTION
Do not hydro test compressur unit. Failure to comply
may result in damage to equipment.
CAUTION
The compressor unit along with other system units
contain many components with various pressure
ratings. Pressure relief protection provided considers
the design pressure of a system components.
Before replacing a pressure relief valve with a relie
valve having a higher presure setting, all system
components must be evaluated for acceptability.
Pressure test in compliance with Chapter VI of the ASME
B31.3 Process Piping Code.
Initial Oil Charging
Using Non -Vilter Oils
CAUTION
Do not mix oils. Failure to comply may result in
damage to equipment.
NOTICE
Vilter does not approve non-Vilter oils for use with
Vilter compressors. Use of oils not specifi ed or
supplied by Vilter will void the compressor warranty.
Due to the need for adequate lubrication, Vilter recommends only the use of Vilter lubricants, designed specifi cally for Vilter compressors. With extensive research
that has been performed, we are able to offer gas compression lubricating oils. Use of oil not specifi ed or sup-
plied by Vilter will void the compressor warranty.
Please contact your local Vilter representative or the
Home Offi ce for further information.
Unit Oil Charging and Priming
WARNING
Avoid skin contact with oil. Wear rubber gloves and a
face shield when working with oil. Failure to comply
may result in serious injury or death.
NOTICE
Failure to follow these instructions will result in
bearing damage and compressor seizing and will void
any and all warranties that may apply.
Typically, the compressor unit is shipped from Vilter with
no oil charge. The normal operating level is between the
two sight glasses on the oil separator, see Figure 3-15.
Refer to supplied GA drawing for unit specifi c oil charge
requirement.
For regular oil charging and draining procedures, see
Section 5.
Tool Required:
• Oil Pump, Maximum 2-3 GPM with Motor approved
for Division 1 or Division 2 and with ability to overcome suction pressure.
(Reference Figure 3-17)
1. At initial start up, compressor unit must be off and
depressurized prior to initial oil charging.
2. Using a properly selected oil pump, connect oil
pump to oil separator drain valve (4). For oil separator drain valve location, see Figure 3-16.
3. Open oil separator drain valve (4) and fi ll oil separa-
tor (3) to Maximum NON-Operating Level.
4. Once Maximum NON-Operating Level has been
reached, shut off oil pump, close oil separator drain
valve (4) and remove oil pump.
5. If equipped with remote oil cooler, refer to Priming
Remote Oil Cooler and Piping procedure.
PRIMING OIL COOLER (SHELL AND TUBE) AND PIPING
If equipped with a shell and tube oil cooler, continue
with the following steps:
6. Close shut-off valve (8) at oil fi lter inlet. Do the same
for second oil fi lter, if equipped with dual oil fi lters.
For shut-off valve location, see Figure 3-16.
7. Open oil bypass shut-off valve (5). For oil cooler by-
pass valve location, see Figure 3-16.
8. Energize compressor unit.
9. Close oil mixing valve (oil temp. control valve) (7) via
control panel. In Manual Mode, change “Manually
Open (%)” value to “0”.
NOTE
The oil cooler is considered primed when the oil
level in the separator is constant.
10. Run the oil pump (6) twice for 1-2 minutes. Repeat
this step until the oil level (9) is constant.
3 – 16
VSG/VSSG • Installation, Operation and Maintenance Manual •Vilter/Emerson • 35391SSG
Page 37

Section 3 • Installation
Normal Operating Level
Maximum NON-Operating Level
View Rotate 180°
Oil Filter
Shut-Off Valves
Figure 3-15. Oil Operating Levels
Suction Oil
Charging Valve
Minimum Operating Level
Oil Drain Valve
(Oil Separator)
Bypass Valve
(Oil Cooler)
View From Back - View Rotate 180°
Figure 3-16. Suction Oil Charging Valve, Oil Cooler Drain Valve and Oil Filter Shut-Off Valves
VSG/VSSG • Installation, Operation and Maintenance Manual •Vilter/Emerson • 35391SSG
3 – 17
Page 38

Section 3 • Installation
PRIMING COMPRESSOR AND OIL FILTERS
NOTE
Running the compressor oil pump at this point will
help lubricate the compressor bearings and shaft
seal surfaces.
(Reference Figure 3-19)
11. Open shut-off valve(s) (8) at oil fi lter inlet(s).
12. Close oil bypass shut-off valve (5).
13. Open oil mixing valve (7) via control panel. In Manual
Mode, change “Manually Open (%)” value to “100”.
14. Run oil pump (6) for approximately 20 seconds only.
15. Stop oil pump (6) and wait for a minimum of 30 minutes. This will allow oil in the compressor (2) to drain
and oil level (9) in separator (2) to settle.
SUCTION INLET
OIL CHARGE
1
PT
001
BLEED
PRESSURE
MOTOR
EQUALIZING LINE
NOTE
Oil mixing valve can remain in Manual Mode since
the setpoint will change the mode to Auto when
reached. For further details, see PLC Compact Logix
manual.
16. Refer to Pre Start-Up Checklist and ensure all items
are ready prior to starting the compressor.
17. When ready, run compressor unit and allow it to
reach normal operating temperature.
18. Using a properly selected oil pump, connect oil
pump to suction oil charging valve (1). For suction
oil charging valve location, see Figure 3-16.
19. Open suction oil charging valve (1) and fi ll oil separa-
tor (3) to Normal Operating Level.
20. Once the Normal Operating level has been reached,
shut off the oil pump and close the suction oil charging valve (1). Disconnect and remove oil pump.
DISCHARGE OUTLET
DISCHARGE OUTLET
TE
002
TE
001
TE
004
RETURN
SUPPLY
COOLING
WATER
DRAINVENT
COMPRESSOR
FG
001
COALESCING OIL RETURN LINE
OIL FILTER
OIL FILTER
Figure 3-17. Priming Oil Cooler (Shell & Tube) and Piping
2
PT
002
BLEED
9
LG
001
OIL
1000W 1000W 1000W
QE
TE
101
005
8
CLOSE
OIL MIXING
OIL SEPARATOR
LG
002
QE
102
CLOSE
QE
103
6
VALVE
7
CLOSE
8
PT
004
BLEED
OIL COOLER
4
DRAIN
5
MOTOR
OIL PUMP
3
DRAIN
OPEN
DRAIN
3 – 18
VSG/VSSG • Installation, Operation and Maintenance Manual •Vilter/Emerson • 35391SSG
Page 39

Section 3 • Installation
NOTE
Oil separator does not need to be fi lled again until oil
level reaches Minimum Operating Level.
Every size of compressor will hold different amounts
of oil, so amount of oil draining back into oil
separator will vary.
21. More accurate fi ll levels can be accomplished by
marking the level on the oil separator (2) after correct levels have been achieved during the unit operation and when the compressor unit has been down
for 1 hour.
SUCTION INLET
OIL CHARGE
1
PT
001
BLEED
PRESSURE
EQUALIZING LINE
MOTOR
DISCHARGE OUTLET
DISCHARGE OUTLET
TE
002
TE
001
TE
004
RETURN
SUPPLY
COOLING
WATER
DRAINVENT
COMPRESSOR
2
OIL COOLER
4
DRAIN
5
MOTOR
OIL PUMP
3
CLOSE
FG
001
COALESCING OIL RETURN LINE
OIL FILTER
OIL FILTER
PT
002
BLEED
LG
002
QE
102
OPEN
OIL SEPARATOR
QE
103
6
9
LG
001
OIL
1000W 1000W 1000W
QE
TE
101
005
8
OPEN
OIL MIXING
VALVE
7
OPEN
8
PT
004
BLEED
Figure 3-18. Priming Compressor (with Shell & Tube Oil Cooler) and Piping
DRAIN
DRAIN
VSG/VSSG • Installation, Operation and Maintenance Manual •Vilter/Emerson • 35391SSG
3 – 19
Page 40

Section 3 • Installation
Priming Remote Oil Cooler and Piping
(Initial Oil Charging)
WARNING
Avoid skin contact with oil. Wear rubber gloves and a
face shield when working with oil. Failure to comply
may result in serious injury or death.
NOTICE
Failure to follow these instructions will result in
bearing damage and compressor seizing and will void
any and all warranties that may apply.
NOTE
This procedure is for remote oil coolers only.
Piping of oil must enter bottom connection of
remote oil cooler and leave from top connection.
For remote air cooled oil cooler piping, see Piping
section.
SUCTION INLET
PT
001
1
BLEED
OIL CHARGE
001
(Reference Figure 3-19)
1. Verify oil level (8) is at Maximum Non-Operating Oil
Level in separator (3). If oil level is not at Maximum
Non-Operating Oil Level, add oil, see Initial Oil
Charging - Unit Oil Charging procedure.
2. Close shut-off valve(s) (7) at oil fi lter inlet(s).
3. Open oil bypass shut-off valve (4).
4. Energize compressor unit.
5. Close oil mixing valve (oil temp. control valve) (6) via
control panel. In Manual Mode, change “Manually
Open (%)” value to “0”.
NOTE
The oil cooler is considered primed when the oil
level in the separator is constant.
6. Run oil pump (5) for a minimum of 5 minutes and as
long as needed to purge all gas from oil cooler and
piping.
7. When all gas is purged, stop oil pump.
DISCHARGE OUTLET
TE
002
TE
TE
004
REMOTE
OIL COOLER
PRESSURE
EQUALIZING LINE
FG
001
COALESCING OIL RETURN LINE
OIL FILTER
OIL FILTER
MOTOR
COMPRESSOR
TE
007
VENT
2
PT
002
BLEED
8
LG
001
OIL
1000W 1000W 1000W
QE
TE
101
005
7
CLOSE
OIL MIXING
CLOSE
7
OIL SEPARATOR
LG
002
QE
102
CLOSE
VALVE
PT
004
BLEED
QE
DRAIN
103
4
5
OPEN
MOTOR
OIL PUMP
6
QE
007
3
DRAIN
DRAIN
TE
003
3 – 20
Figure 3-19. Priming Remote Oil Cooler and Piping
VSG/VSSG • Installation, Operation and Maintenance Manual •Vilter/Emerson • 35391SSG
Page 41

Section 3 • Installation
PRIMING COMPRESSOR AND OIL FILTERS
NOTE
Running the compressor oil pump at this point will
help lubricate the compressor bearings and shaft
seal surfaces.
(Reference Figure 3-20)
8. Open shut-off valve(s) (7) at oil fi lter inlet(s).
9. Close oil bypass shut-off valve (4).
10. Open oil mixing valve (6) via control panel. In Manual
Mode, change “Manually Open (%)” value to “100”.
11. Run oil pump (5) for approximately 20 seconds only.
12. Stop oil pump and wait for a minimum of 30 minutes. This will allow oil in the compressor (2) to drain
and oil level (8) in separator (3) to settle.
NOTE
Oil mixing valve can remain in Manual Mode since
the setpoint will change it to Auto mode. For further
details, see PLC Compact Logix manual.
13. Refer to Pre Start-Up Checklist and ensure all items
are ready prior to starting the compressor.
SUCTION INLET
PT
001
OIL CHARGE
1
BLEED
14. When ready, run compressor unit and allow it to
reach normal operating temperature.
15. Using a properly selected oil pump, connect oil
pump to suction oil charging valve (1). For suction
oil charging valve location, see Figure 3-16.
16. Open suction oil charging valve (1) and fi ll oil separa-
tor (3) to Normal Operating Level.
17. Once the Normal Operating level has been reached,
shut off the oil pump and close the suction oil charging valve (1). Disconnect and remove oil pump.
NOTE
Oil separator does not need to be fi lled again until oil
level reaches Minimum Operating Level.
Every size of compressor will hold different amounts
of oil, so amount of oil draining back into oil
separator will vary.
18. More accurate fi ll levels can be accomplished by
marking the level on the oil separator (2) after correct levels have been achieved during the unit operation and when the compressor unit has been down
for 1 hour.
TE
002
TE
001
TE
004
DISCHARGE OUTLET
REMOTE
OIL COOLER
PRESSURE
EQUALIZING LINE
FG
001
COALESCING OIL RETURN LINE
OIL FILTER
OIL FILTER
MOTOR
COMPRESSOR
2
PT
002
BLEED
8
LG
001
OIL
1000W 1000W 1000W
QE
TE
101
005
7
OPEN
OIL MIXING
OPEN
7
OIL SEPARATOR
LG
002
QE
102
OPEN
VALVE
6
PT
004
BLEED
QE
DRAIN
103
4
CLOSE
5
OIL PUMP
Figure 3-20. Priming Compressor and Oil Filters
MOTOR
TE
007
QE
007
3
DRAIN
VENT
DRAIN
TE
003
VSG/VSSG • Installation, Operation and Maintenance Manual •Vilter/Emerson • 35391SSG
3 – 21
Page 42

Section 3 • Installation
Pre Start-Up
The following check list is to help prepare the equipment before the Vilter technician arrives at the jobsite. Vilter
recommends that a trained technician go through the following tasks. The operating manuals provided by Vilter can
be referenced for any type of questions or special instructions.
Every gas compressor unit includes a Vilter start-up (confirm on P.O.). The following tasks are not included in the
Vilter start-up provided in your equipment purchase. Any tasks below that are done by the Vilter technician will take
away from the pre-determined time that was provided with the equipment purchase. Vilter suggests that the Vilter
technician’s time be used during the start-up of the system and not for the below system preparation.
NOTICE
Each item below must be checked-off, signed and
returned to Vilter Service Department. Failure to do
so will “Null & Void” future warranty considerations.
Pre Start-Up Checklist
Name (Please Print): Signature:
Company: Vilter Sales Order Number:
Equipment Description: Date (M/D/Y):
1. The unit should be leveled and secured to the concrete pad foundation.
2. Proper electric supply and grounding need to be supplied to the unit. All power and control lines should be
wired to unit. Electric supply to be verifi ed at each device requiring power.
3. Verify any type of level switches that are on a vessel before the compressor are hardwired and able to shut
off the compressor (should be wired to “Aux” on micro-controller and starter).
4. The suction and discharge line must be piped and properly supported independent of the unit.
5. The discharge stop and check valve is shipped loose and must be installed. During off periods, liquid can
condense in the line downstream of the discharge stop and check valve. It is recommended that the stop and
check valve be located horizontally to minimize the quantity of liquid that can accumulate downstream of the
check valve.
6. A dual safety relief valve is shipped loose for fi eld installation. A connection is provided on the oil separator
for the relief valve. Refer to ASME Code for proper sizing of relief valves and vent lines.
7. On water cooled oil coolers, the water lines must be connected to the front head of the oil cooler. Water
regulating and solenoid valves are recommended.
3 – 22
(Continued on next page)
VSG/VSSG • Installation, Operation and Maintenance Manual •Vilter/Emerson • 35391SSG
Page 43

Section 3 • Installation
8. On air cooled oil coolers, the oil lines from the compressor must be connected to the air cooled oil cooler. Oil
cooler fans will need to be wired and checked for proper rotation. Refer to supplied GA drawing for connection
points and piping sizes.
9. The oil separator should be charged with oil to the Maximum NON-Operating Level.
10. The center member of the compressor is shipped loose to help facilitate fi nal fi eld alignment and allow for
motor rotation check.
11. Both the compressor and motor hubs should be checked for concentricity and perpendicularity.
12. The motor should be checked and shimmed for a soft foot prior to attempting fi nal alignment.
13. The motor should be checked to make sure that it is lubricated properly. Proper re-lubrication amounts/
types are provided on the motor’s lubrication plate. These instructions should be closely followed to achieve
optimum bearing life and to avoid consequential damage to the bearings and motor.
14. The center section of the coupling should be left out to allow the start-up technician to verify the fi nal
alignment and motor rotations.
15. Verify that all valves are in the open position.
16. Verfi y that the visual indicator on the Oil Temperature Control Valve (Oil Mixing Valve) position corresponds
with “% OPEN” on the control panel. CLOSE position is 0% OPEN, OPEN position is 100% OPEN.
17. A system load should be available at the time of start-up.
18. The unit should be pressure tested and purged with a dry gas. Care should be taken to not pressurize excessively from the suction end of the compressor, as this will drive the compressor in a forward motion without
lubrication and may cause damage.
19. Have a qualifi ed electrician present to verify wiring during start-up.
20. Keep a hard copy of the fi nal set points in case the micro-controller gets corrupted or if they are required by
Vilter technicians for troubleshooting.
VSG/VSSG • Installation, Operation and Maintenance Manual •Vilter/Emerson • 35391SSG
3 – 23
Page 44

Section 3 • Installation
Start-Up
The following check list is to help verify and check equipment prior to start-up. This is the responsibility of the Vilter
Technician.
1. Review pre start-up checklist.
2. Check oil pump rotation. This can be done by using the “Diagnostic Force Outputs” from Main Menu. Refer
to Compact Logix PLC Software Manual.
3. Check compressor motor rotation (CCW or CW rotation facing compressor shaft). This can be done by using
the “Diagnostic Force Outputs” from Main Menu. Refer to Compact Logix PLC Software Manual.
4. Cold and hot alignment. Verify with manufacturer’s limits.
5. Verify capacity slide calibration and correct command shaft rotation, even though it is factory calibrated.
6. Verify volume slide calibration and correct command shaft rotation, even though it is factory calibrated.
7. Check motorized oil mixing valve for proper setup.
8. Starter set up by vendor technician.
9. Blower set up by vendor technician.
10. Verify correct direction of fl ow for the oil line check valve.
11. Run oil pump to pre-lube the compressor (oil level in the oil separator should drop as lines are fi lled).
12. Calibrate transducers to atmosphere.
13. Verify operation of all safeties.
14. Set scaling for main motor amps in PLC.
15. Record running data and fi nal set points on data sheets.
16. Instruct Operators.
3 – 24
VSG/VSSG • Installation, Operation and Maintenance Manual •Vilter/Emerson • 35391SSG
Page 45

Section 4 • Operation
Operation
All operation (setpoint adjustments, calibrations,
monitoring) of the compressor unit is done through
the Compact Logix PLC. For additional procedural
information, refer to Compact Logix PLC Software
Manual (35391CL).
Oil Inspection
WARNING
When working with LFG, NG or other dangerous
or fl ammable gases, ensure there are adequate
ventilation and vapor detectors. Refer to national fi re
and building codes. Failure to comply may result in
serious injury or death.
WARNING
Avoid skin contact with any condensate or oil. Wear
rubber gloves and a face shield when working with
condensate or oil. Failure to comply may result in
serious injury or death.
separator, see Figure 4-1. Oil Operating Levels. Drain or
ll oil as required. For oil draining and fi lling procedure,
fi
see Oil Charging and Oil Draining in Section 5.Oil Flow
with Dual Oil Filters
Dual Oil Filters
On compressor units equipped with dual oil fi lters, only
one fi lter should be in operation at a time.
NOTE
During operation, both oil fi lter outlet shut-off valves
should be open. This will help minimize the sudden loss
of oil pressure when switching between oil fi lters for
servicing.
Refer to Oil Filter Replacement in Section 5 for further
details.
Inspect oil level through sight glasses on the oil
Normal Operating Level
Maximum NON-Operating Level
Minimum Operating Level
Figure 4-1. Oil Operating Levels
VSG/VSSG • Installation, Operation and Maintenance Manual •Vilter/Emerson • 35391SSG
4 – 1
Page 46

Section 4 • Operation
Control System Calibration
Equipped for automatic operation, the screw compressor unit has safety controls to protect it from irregular
operating conditions, an automatic starting and stopping sequence, capacity and volume ratio control
systems.
Check all pressure controls with a remote pressure
source, to assure that all safety and operating control limits operate at the point indicated on the microprocessor.
The unit is equipped with block and bleed valves that
are used to recalibrate the pressure transducers. To use
the block and bleed valves to recalibrate the pressure
transducers, the block valve is shut off at the unit and
the pressure is allowed to bleed off by opening the bleed
valve near the pressure transducer enclosure. The transducer can then be calibrated at atmospheric pressure (0
psig), or an external pressure source with an accurate
gauge may be attached at the bleed valve.
The discharge pressure transducer cannot be isolated
from its pressure source, so it is equipped with only a
valve to allow an accurate pressure gauge to be attached
and the pressure transducer calibrated at unit pressure.
Recheck the transducers periodically for any drift of calibration, refer to maintenance/service interval table in
Section 5.
Stopping/Restarting
Stopping the compressor unit can be accomplished a
number of ways. Any of the safety setpoints will stop
the compressor unit if an abnormal operating condition
exists. The compressor unit “On-Off” or stop button
will turn the compressor unit off as will the low pressure
setpoint. If any of these conditions turns the compressor unit off, the slide valve motors will immediately
energize to drive the slide valves back to 5% limit. The
control motors will be de-energized when the respective slide valve moves back below 5%. If there is a power
failure, the compressor unit will stop. If the manual
start on power failure option is selected (see appropriate Microprocessor Instruction Manual), restarting from
this condition is accomplished by pushing the reset button to insure positive operator control. If the auto start
on power failure option is selected (see Compact Logix
PLC manual), the compressor unit will start up after
a waiting period. With both options, the compressor
slide valves must return below their respective 5% limits
before the compressor unit can be restarted.
NOTE
Wait a minimum of 20 minutes (to allow the
compressor unit to equalize to suction pressure)
between pre-lubing or pushing the start button.
Starting, Stopping and Restarting the
Compressor
Starting
Before the screw compressor unit can start, certain
conditions must be met. All of the safety setpoints must
be in a normal condition, and the suction pressure must
be above the low suction pressure setpoint to ensure a
load is present. When the “ON/OFF” switch or “ManualAuto” button is pressed, the oil pump will start. When
suffi cient oil pressure has built up and the compressor
capacity control and volume ratio slide valves are at or
below 10%, the compressor unit will start.
NOTE
The amount of oil pressure that needs to be achieved
before compressor start is at least 6 psig above the
discharge pressure. For additional information on
Low Oil Pressure at Start, see Troubleshooting Guide -
General Problems and Solutions in Section 6.
If the compressor is in the automatic mode, it will now
load and unload and vary the volume ratio in response
to the system demands.
Calibrate Slide Valve Actuators
Slide valve actuators must be installed prior to calibration. Refer to Slide Valve Actuator Installation procedure. The following steps pertain to calibrating one slide
valve actuator. Repeat procedure to calibrate other slide
valve actuator.
WARNING
After stopping the compressor, allow the compressor
and surrounding components to cool down prior
to servicing. Failure to comply may result in serious
injury.
CAUTION
Do not calibrate in direct sunlight. Failure to comply
may result in damage to equipment.
Both the capacity and volume slide actuators should be
calibrated when one or more of these have occurred:
• Compressor unit starting up for the fi rst time.
• A new actuator motor has been installed.
4 – 2
VSG/VSSG • Installation, Operation and Maintenance Manual •Vilter/Emerson • 35391SSG
Page 47

Section 4 • Operation
Actuator
Assembly
Actuator
Plastic Cover
View Rotate 180°
Red LED
Blue
Calibrate
Button
Figure 4-2. Actuator Assembly
• There is an error code fl ashing on the actuator’s
circuit board - an attempt to recalibrate should be
made.
• The range of travel is not correct and the command
shaft travel is physically correct.
• The compressor is pulling high amperage, the calibration of the volume slide should be checked.
• An actuator does not unload below 5%, or an actuator that doesn’t move.
• Something is not working properly such as the actuators, RTDs or transducers.
To calibrate optical actuators, continue with the following steps:
1. Stop compressor unit and allow to cool.
2. Remove screws securing actuator cover to actuator
assembly. As a reference see Figure 4-2.
CAUTION
Wires are attached to the connector on the actuator
cover. Handle actuator cover with care to prevent
damage to wires. Failure to comply may result in
damage to equipment.
3. Carefully lift actuator cover from actuator assembly
and tilt towards Turck connectors. Raise cover high
enough to be able to press the blue calibration button and be able to see the red LED on the top of
assembly.
4. On the main screen of the PLC, press “Menu” then
press the “Slide Calibration” button to enter the
slide calibration screen, see Figure 4-3.
5. Logging on with high-level access will prompt the
Calibrate button to appear, see Figure 4-4.
6. Press Calibrate button to initiate calibration mode.
The Calibrate button turns green and Set Max and
Set Min buttons appear.
NOTE
If the INC (increase) and DEC (decrease) buttons do not
correspond to increase or decrease shaft rotation, swap
the blue and brown wires of the “power cable”. This will
reverse the rotation of the actuator/command shaft.
7. Press INC and DEC to move the slide valve and
check for the correct rotation, see Table 4-1.
NOTE
When the actuator is in calibration mode, it outputs
0V when the actuator is running and 5V when it is
still. Thus, as stated earlier, the actuator voltage will
fl uctuate during calibration. After the actuator has been
calibrated, 0V output will correspond to the minimum
position and 5V to the maximum position.
VSG/VSSG • Installation, Operation and Maintenance Manual •Vilter/Emerson • 35391SSG
4 – 3
Page 48

Section 4 • Operation
4 – 4
Figure 4-3. Menu Screen and Slide Calibration Button (Compact Logix PLC)
VSG/VSSG • Installation, Operation and Maintenance Manual •Vilter/Emerson • 35391SSG
Page 49

R
Section 4 • Operation
Figure 4-4. Slide Valve Calibration Screen (Compact Logix PLC)
8. Quickly press and release the blue push button on
the actuator one time. This places the actuator in
calibration mode. The red LED will begin fl ashing
rapidly.
Press down on
Photo-chopper
CAUTION
DO NOT CONTINUE TO ENERGIZE THE ACTUATO
MOTOR AFTER THE SLIDE HAS REACHED THE
MECHANICAL STOP. Doing so may cause mechanical
damage to the motor or shear the motor shaft
key. When the slide has reached the mechanical
stop position, press the button in the center of the
photochopper to release the brake, and thereby
release the tension on the actuator motor.
NOTE
The “Slide calibration” screen on the Control Panel has
a “Current” window, which displays twice the actuator
output voltage. This value, (the % volume and the %
capacity) displayed in the “Current Vol” and Current
Cap” Windows are meaningless until calibration has
been completed.
9. Use the DEC button on the Control panel to drive
the slide valve to its minimum “mechanical stop”
position. Do not continue to run the actuator in this
direction after the slide valve has reached the stop.
Doing so may cause damage to the actuator or the
slide valve. Press down on the photo-chopper shaft
to disengage the brake, releasing tension from the
motor mount, see Figure 4-5. Use the INC button
VSG/VSSG • Installation, Operation and Maintenance Manual •Vilter/Emerson • 35391SSG
10. Quickly press and release the blue button on the ac-
Figure 4-5. Photo-chopper
to pulse the actuator to where the slide is just off of
the mechanical stop and there is no tension on the
motor shaft.
tuator again. The red LED will now fl ash at a slower
rate, indication that the minimum slide valve position (zero position) has been set.
4 – 5
Page 50

Section 4 • Operation
Table 4-1. Command Shaft Rotation Specifi cations*
Command Shaft Rotation No. of Turns/Rotation Angle/Slide Travel
Capacity Volume Capacity Volume
Compressor
Model
INC DEC INC DEC Turns Degrees Travel Turns Degrees Travel
VSSG 291
VS
SG 341
VSSG 451
VSSG 601
VSG 301
VSG361
VSG 401
VSG 501
VSG 601
VSG 701
VSG 751
VSG 901
VSG 791
VSG 891
VSG 1051
VSG 1201
VSG 1301
VSG 1551
VSG 1851
VSG 2101
VSG 2401
VSG 2601
VSG 2801
VSG 3001
CW CCW CW CCW 0.91 328 3.568” 0.52 187 2.045”
CW CCW CW CCW 0.80 288 3.141” 0.45 162 1.767”
CCW CW CCW CW 0.91 328 3.568” 0.52 187 2.045”
CCW CW CCW CW 1.09 392 4.283” 0.63 227 2.473”
CCW CW CCW CW 1.22 439 4.777” 0.74 266 2.889”
CCW CW CCW CW 1.48 533 5.823” 0.87 313 3.433”
CCW CW CCW CW 1.80 648 7.072” 1.36 490 5.341”
*The large gear on the command shaft has 50 teeth. The teeth are counted when moving the command shaft from
the minimum stop position to the maximum stop position.
The manual operating shaft on the gear motor should be turned the opposite direction of the desired command shaft
rotation.
The capacity and volume control motors are equipped with a brake, if it is necessary to operate the control motors
manually, the brake must be disengaged. The brake can be disengaged by pushing on the motor shaft on the cone
end. The shaft should be centered in its travel. Do not use excessive force manually operating the motor or damage
may result.
4 – 6
VSG/VSSG • Installation, Operation and Maintenance Manual •Vilter/Emerson • 35391SSG
Page 51

Section 4 • Operation
11. Use the INC button on the Control panel to drive
the slide to its maximum “mechanical stop” position. Do not continue to run the actuator in this direction after the slide valve has reached the stop.
Doing so may cause damage to the actuator or the
slide valve. Press down on the photo-chopper shaft
to disengage the brake, releasing tension from the
motor mount. Use the DEC button to pulse the actuator to where the slide is just off of its mechanical
stop and there is no tension on the motor shaft.
12. Quickly press and release the blue button on the
actuator one more time. The red LED will stop
fl ashing. The actuator is now calibrated and knows
the minimum and maximum positions of the slide
valve it controls. Now the capacity or volume channel of the PLC can be calibrated.
13. Use the DEC button to move the actuator towards
its minimum position while watching the mV
readout on the Control Panel screen. Discontinue
pressing the DEC button when the mV reading the
“Current” window above the “Set Min” button is
approximately 500 mV.
14. Now use the DEC and INC buttons to position the
slide valve until a value close to 300 mV is on the
screen. Then, press the “Set Min” button in the capacity or volume slide valve window to tell the controller that this is the minimum mV position. Note:
The value in the “Current Cap” or “Current Vol” window has no meaning right now.
15. Use the INC button to rotate the actuator towards
its maximum position while watching the mV readout on the controller screen. Discontinue pressing the INC button when the mV reading in the
“Current” window is approximately 4800 mV. You
are nearing the mechanical stop position.
16. Pulse the INC button to carefully move the slide
valve until the mV readout “saturates”, or stops increasing. This is around 4800 mV Record mV maximum reading.
17. Pulse the DEC button until the mV just start to decrease. (This is the point where the channel drops
out of saturation). Adjust mV value to 300 mV below recorded maximum mV.
18. Press the “Set Max” button.
19. Press the “Main” button to complete calibration
and exit the “Slide Calibration” screen. The controller will automatically energize the actuator and
drive it back to its minimum position (below 5%) for
pre-start-up.
NOTE
Now the “Current Cap” or the “Current Vol” value will
be displayed in the window on the “Main” screen and
the “Slide Calibration” screen.
20. Gently lower the plastic cover over the top of the
actuator to where it contacts the base and O-ring
seal. After making sure the cover is seated properly, gently tighten the four #10 screws. Caution:
The plastic cover will crack if the screws are over
tightened.
21. Enable the “Slide Non-Movement Alarm” by going
to the “Setup” menu and choosing “Alarm Enable”
for the “Slide Non-Movement Option”.
22. Repeat procedure to calibrate other slide valve
actuator.
Oil Temperature Control Valve (Oil
Mixing Valve) Operation
Initial Position
The temperature control valve is in the closed position
when initially installed.
With the temperature control valve de-energized, the
valve is set to its initial position. The temperature control valve will be in the closed position with the actuator
indicator displaying CLOSED.
When the temperature control valve is energized, the
valve will rotate to fully OPEN.
Operation
With the compressor not running, when electrically energized, the PLC will turn the temperature control valve
to fully open (100%).
When the compressor starts, the valve remains fully
open (100%) until the oil injection temperature rises
above the control setpoint. When the oil injection temperature rises above the control setpoint, the oil temperature control valve will begin to close. The hot oil from
the oil separator begins to divert to the oil cooler, mixing the hot and cooled oil fl ow streams together down-
stream of the oil temperature control valve. The valve
can fully close (0%) diverting the entire oil fl ow stream
to the oil cooler.
As the oil injection temperature drops below the setpoint, the oil temperature control valve begins to open
so that the oil injection temperature does not become
too cold.
When the compressor stops, the valve returns to fully
open (100%).
VSG/VSSG • Installation, Operation and Maintenance Manual •Vilter/Emerson • 35391SSG
4 – 7
Page 52

Section 4 • Operation
Fail Position
The temperature control valve remains in the last position when power is removed.
Screen Display
The oil temperature control valve, identifi ed as “OIL MIX”
on the main PLC display screen, shows a numerical value
with “%” as units. This is to be understood as “% OPEN.”
It is a direct indication of the position of the ball valve.
100% OPEN
Oil fl ow stream is entirely bypassing the oil cooler.
99% to 1% OPEN
Oil fl ow stream is partially bypassing the oil cooler and
partially diverted to the oil cooler.
0% OPEN
Oil fl ow stream is entirely diverted to the oil cooler.
MANUAL OVERRIDE
The actuator of the oil temperature control valve has a
handwheel that can be engaged to override the electrically determined position of the ball valve.
1. Push handwheel down and rotate to engage internal slot with fl ats, see Figure 4-6.
NOTE
Actuator does not have mechanical stops. Do Not
rotate past open or close position. Use visual indicator
to position actuator.
2. Once engaged, push down handwheel a second
time to disengage gear train and rotate CLOCKWISE
to OPEN or COUNTER CLOCKWISE to CLOSE.
3. To return actuator to normal operation, fi rst check
“% OPEN” on control panel. If value is 100%, return
actuator to OPEN position as shown on the visual
indicator. If value is 0%, return actuator to CLOSE
position as shown on the visual indicator.
Handwheel Visual Indicator
Actuator
4 – 8
Figure 4-6. Oil Temperature Control Valve (Oil Mixing Valve)
VSG/VSSG • Installation, Operation and Maintenance Manual •Vilter/Emerson • 35391SSG
Page 53

Section 4 • Operation
Purging with Dry Nitrogen
Purging is recommended if the compressor will be
inactive for 12 hours or more. For additional long
term storage information, refer to Long Term Storage
Recommendations in Section 3.
PREPARATION
WARNING
When working with LFG, NG or other dangerous
or fl ammable gases, ensure there are adequate
ventilation and vapor detectors. Refer to national fi re
and building codes. Failure to comply may result in
serious injury or death.
WARNING
When working pressured systems, always wear
safety glasses and/or face shield. Failure to comply
may result in serious injury.
1. Press “Stop” button to stop compressor unit, see
Figure 4-7.
2. If equipped with equalizing solenoid, allow pressure in compressor unit to equalize to suction pressure, see Figure 4-8.
3. If equipped with manual suction bypass valve and
it is not open, open suction bypass valve. Allow
pressure in compressor unit to equalize to suction
pressure.
4. Close suction and discharge shut-off valves to
isolate the compressor unit from house system.
Lockout/tagout valves.
5. Slowly open suction oil charging valve to depressurize compressor unit to atmosphere, see Figure
4-8. Keep valve in open position.
NOTE
Plugs are installed on bleed valves. Remove and install
plugs prior to and after bleeding. Ensure to keep valves
closed when removing and installing plugs.
6. Open discharge bleed valve to allow nitrogen to
purge through compressor unit, see Figure 4-8.
7. Refer to PLC main screen for discharge pressure
when purging.
PURGE
CAUTION
Do not purge compressor unit with oxygen. Failure to
comply may result in damage to equipment.
CAUTION
Do not allow compressor to spin while purging.
Regulate purging pressure as needed. Failure to
comply may result in damage to equipment.
8. Connect purging hose from nitrogen cylinder to
suction oil charging valve.
Discharge
Status
Figure 4-7. PLC Main Screen
VSG/VSSG • Installation, Operation and Maintenance Manual •Vilter/Emerson • 35391SSG
Stop Button
4 – 9
Page 54

Section 4 • Operation
NOTE
Purging is performed through the suction oil charging
valve so that trapped gas can be pushed out of the
compressor. This will help minimize metal surface
oxidation of the compressor (due to the gas) while not
in service.
9. Purge compressor unit for 5 minutes. Check discharge pressure on PLC main screen to make sure
pressure is increasing.
10. Close discharge bleed valve while still purging.
11. Observe discharge pressure through the PLC main
screen. Allow pressure to build to approximately 10
psig.
View Rotate 180°
12. Once pressure is reached, stop purging and close
suction oil charging valve. If pressure is greater
than 10 psig, crack open discharge bleed valve,
as needed, to slowly bleed the system to approximately 10 psig.
13. Wait 10 minutes to make sure there are no leaks
and that the pressure is holding.
14. Remove purging hose from suction oil charging
valve.
Equalizing Solenoid
for Suction Bypass
Suction Bypass Valve
(Manual)
View Rotate 180°
Figure 4-8. Suction Bypass Valve and Equalizing Solenoid
Suction Oil
Charging Valve
Discharge
Bleed Valve
4 – 10
Figure 4-9. Suction Oil Charging Valve and Discharge Bleed Valve
VSG/VSSG • Installation, Operation and Maintenance Manual •Vilter/Emerson • 35391SSG
Page 55

Section 4 • Operation
Purging with Dry Gas
Purging is recommended if the compressor will be
inactive for 12 hours or more. For additional long
term storage information, refer to Long Term Storage
Recommendations in Section 3.
PREPARATION
WARNING
When working with LFG, NG or other dangerous
or fl ammable gases, ensure there are adequate
ventilation and vapor detectors. Refer to national fi re
and building codes. Failure to comply may result in
serious injury or death.
WARNING
When working pressured systems, always wear
safety glasses and/or face shield. Failure to comply
may result in serious injury.
NOTICE
To purge the compressor unit using a dry gas (i.e.
methane), a purge line must be installed. If there is
not enough purge pressure, connect purge line to a
lower pressure line or to atmosphere. The purge line,
associated valves and gauges are not provided from the
factory and must be installed by the customer.
1. Refer to Figure 4-10 for recommended purge line
design.
2. Press “Stop” button to stop compressor unit, see
Figure 4-11.
3. If equipped with equalizing solenoid, allow pressure in compressor unit to equalize to suction pressure, see Figure 4-12.
4. If equipped with manual suction bypass valve and
it is not open, open suction bypass valve. Allow
pressure in compressor unit to equalize to suction
pressure.
5. Close suction and discharge shut-off valves to
isolate the compressor unit from house system.
Lockout/tagout valves.
To Lower Pressure Line or
Atmosphere. See NOTICE.
Shut-off Valve
Check Valve
Drain Valve
SUCTION INLET
PI
002
PURGE LINE
PRESSURE
EQUALIZING LINE
FG
001
COALESCING OIL RETURN LINE
Pressure Indicator
Shut-off Valve
PI
002
DRAIN
OIL CHARGE
PT
001
BLEED
MOTOR
TE
005
TE
001
LG
001
1000W 1000W 1000W
QE
101QE102QE103
PT
002
BLEED
OIL SEPARATOR
LG
002
TE
004
COMPRESSOR
QE
007
DRAIN
DISCHARGE OUTLET
TE
002
REMOTE
OIL COOLER
TE
007
VENT
TE
003
DRAIN
Figure 4-10. Customer Purge Line
VSG/VSSG • Installation, Operation and Maintenance Manual •Vilter/Emerson • 35391SSG
4 – 11
Page 56

Section 4 • Operation
NOTE
Plugs are installed on bleed valves. Remove and install
plugs prior to and after bleeding. Ensure to keep valves
closed when removing and installing plugs.
6. Slowly open suction oil charging valve and bleed
remaining pressure in compressor unit to atmosphere, see Figure 4-13. Leave suction oil charging
valve in open position.
7. If equipped with pressure indicator on purge line,
open shut-off valve to pressure indicator.
8. If not equipped with pressure indicator, refer to PLC
main screen for discharge pressure when purging.
PURGE
CAUTION
Do not purge compressor unit with oxygen. Failure to
comply may result in damage to equipment.
CAUTION
Do not allow compressor to spin while purging.
Regulate purging pressure as needed. Failure to
comply may result in damage to equipment.
9. Connect purging hose from gas cylinder to suction
oil charging valve.
NOTE
Purging is performed through the suction oil charging
valve so that trapped gas can be pushed out of the
compressor. This will help minimize metal surface
oxidation of the compressor (due to the gas) while not
in service.
10. Purge compressor unit for 4 minutes. Check pressure indicator or discharge status on PLC main
screen to make sure pressure is increasing.
11. Close shut-off valve on purge line while still purging.
12. Observe discharge pressure of compressor unit
through the PLC main screen.
13. Allow pressure to build to approximately 10 psig in
the compressor unit.
14. Once pressure is reached, stop purging and close
suction oil charging valve.
15. Wait 10 minutes to make sure there are no leaks
and that the pressure is holding.
16. Remove purging hose from suction oil charging
valve.
Discharge
Status
Stop Button
Figure 4-11. PLC Main Screen
4 – 12
VSG/VSSG • Installation, Operation and Maintenance Manual •Vilter/Emerson • 35391SSG
Page 57

Section 4 • Operation
Suction Bypass Valve
(Manual)
Figure 4-12. Suction Bypass Valve and Equalizing Solenoid
View Rotate 180°
Equalizing Solenoid
for Suction Bypass
Suction Oil
Charging Valve
View Rotate 180°
Figure 4-13. Suction Oil Charging Valve
VSG/VSSG • Installation, Operation and Maintenance Manual •Vilter/Emerson • 35391SSG
4 – 13
Page 58

Section 4 • Operation
Coalescing Oil Return Line Setup
Over time, oil will accumulate on the coalescing side
of the oil separator. As a result, an oil return line with a
shut-off valve, sight-glass, check valve and needle valve
are installed between the coalescing side and compressor to return this oil back to the compressor.
To adjust the return fl ow, proceed with the follow
procedure:
NOTE
Do not fully open the needle valve unless directed by
Vilter Customer Service. Leaving the needle valve fully
open will reduce effi ciency of the compressor unit.
1. Open shut-off valve on coalescing side of oil separator, see Figure 4-14.
2. While the unit is in operation, crack open needle
valve and observe oil fl ow through sight-glass.
3. Slowly open needle valve more until a small amount
of oil is seen in the sight-glass.
NOTE
The sight-glass should never be full with oil.
4. Periodically check oil in the sight-glass and ensure
that there is fl ow.
Needle
Valve
Coalescing Oil Return Line
Figure 4-14. Coalescing Oil Return Line
Check Valve
Sight-Glass
Shut-Off
Valve
4 – 14
VSG/VSSG • Installation, Operation and Maintenance Manual •Vilter/Emerson • 35391SSG
Page 59

Section 5 • Maintenance/Service
Maintenance and Service Schedule
Follow this table for maintaining and servicing the compressor unit at hourly intervals.
60,000
55,000
50,000
45,000
40,000
)
¹
(
35,000
30,000
25,000
Service Interval (Hours)
Table 5-1. Maintenance/Service Schedule
(Based on dry clean gas)
(2)
Inspection/
Maintenance
20,000
15,000
10,000
5,000
2,500
200
Oil Change Replace oil based on oil analysis report or visual contamination.
Oil sampling is recommended every 2 to 3 months for the fi rst year. Thereafter, as required, increase
sampling time period if contamination of oil is unlikely or decrease sampling time period if contami-
Oil Analysis
----R--R--R--R
nation of oil is evident. Take an oil sample any time during operation If there’s reason to believe that
the oil is contaminated. For additional information on oil, refer to Oil and Oil Flow operation.
(3)
Oil Strainer IIIIIIIIIIIIII
Oil Filters
Coalescing Filter ----R--R--R--R
Coalescing Drain Line IIIIIIIIIIIIII
IIIIIIIIIIIIII
Suction Screen I - - I - I - I - I - I - I
Coupling Alignment
and Integrity
Motor (Compressor) See Motor Manual for proper lubrication procedures and service intervals.
Transducers IIIIIIIIIIIIII
RTDs IIIIIIIIIIIIII
-I-I-I-I-I-I-I
Slide valve calibration should be inspected monthly. Inspections can be performed through the
control panel. If a Non-Movement Alarm appears, calibrate immediately.
(6)
Compressor
Bearings -------------I
Slide Valve Motors
Group
Oil Circuit
VSG/VSSG • Installation, Operation and Maintenance Manual •Vilter/Emerson • 35391SSG
Unit
Compressor
(4) (5)
Control
Calibration
Compressor
I = Inspect S = Sampling R = Replace
(1) Vilter recommends that a Preventative Maintenance Program be developed by Vilter GC (Gas Compression) Service Center.
(2) Daily records should be kept on suction, discharge, oil pressures & temperatures, along with ensuring Temp Leaving Oil Separator is above Dew Point.
(3) Replace oil fi lters when pressure drop reaches 7 PSID (maximum allowable pressure drop is 15 PSID).
(4) The life of the compressor will be increased by purging the compressor unit with dry nitrogen or sweet, dry natural gas at shutdown.
(5) Header drains should periodically be drained for liquid build-up to prevent compressor damage, see Piping in Section 3.
(6) Inspections include: gate rotor inspection, backlash measurement, shelf clearance, end play measurement (main rotor & gate rotor), gate rotor fl oat, slide valve inspection.
5 – 1
Page 60

Section 5 • Maintenance/Service
Maintaining Proper Operation
To ensure proper operation, the following items should
be checked:
• Calibrate all transducer and RTDs.
• Check capacity and volume actuator calibration.
• Check fuses in the PLC panel.
• Check for loose wiring connections in the PLC panel.
• Check relay and contact operation for relays in the
PLC panel.
• Verify the operation of the suction and discharge
check valves.
• Check for correct rotation of all motors on the package (compressor, oil pump, and fan motors).
• Check that the piping to the oil cooler is correct.
• Check setup of soft starts and VFDs.
• Verify set points in the PLC.
• Check oil heater operation.
• Verify oil line check valve is installed for correct fl ow .
• Check for loose bolts on the compressor unit. Tighten
any loose bolts.
Compressor Unit Isolation for
Maintenance/Service
WARNING
When working with LFG, NG or other dangerous
or fl ammable gases, ensure there are adequate
ventilation and vapor detectors. Refer to national fi re
and building codes. Failure to comply may result in
serious injury or death.
WARNING
Avoid skin contact with any condensate or oil. Wear
rubber gloves and a face shield when working with
condensate or oil. Failure to comply may result in
serious injury or death.
WARNING
At shutdown, open any other valves that may trap
liquids to prevent serious injury and/or damage to
equipment.
WARNING
Follow local lockout/tagout procedure. Failure to
comply may result in serious injury, death and/or
damage to equipment.
NOTICE
Recover or transfer all gas vapor in accordance with
local ordinances before opening compressor unit to
atmosphere.
The compressor unit must be isolated and depressurized
to atmosphere prior to servicing.
1. Shut down the compressor unit, refer to Stopping/
Restarting procedure in Section 4.
Suction By-Pass Valve
5 – 2
Figure 5-1. Suction By-Pass Valve Location (Manual) (1 of 2)
VSG/VSSG • Installation, Operation and Maintenance Manual •Vilter/Emerson • 35391SSG
Page 61

Section 5 • Maintenance/Service
2. If equipped with equalizing solenoid to control suction by-pass, allow solenoid to remain open until
pressures equalize, see Figure 5-1 (2 of 2).
3. Turn motor and oil pump starter disconnect switches into the OFF position. Lockout/tagout disconnect switches.
4. If equipped with manual suction by-pass valve and
it is not open, open suction by-pass valve to allow
oil separator pressure to vent to low-side system
pressure, see Figure 5-1 (1 of 2). Close suction bypass valve when complete.
5. Isolate the compressor unit by closing all valves to
the house system. Lockout/tagout valves.
NOTE
If drain valves are installed on suction and discharge
headers, open these valves too to remove build up
of liquid during shut-down periods.
6. Open any other valves that may trap liquid. Lockout/
tagout valves.
7. Recover or transfer all gas vapors.
8. Open discharge pressure bleed valve at block and
bleed assembly and allow remaining pressure in oil
separator to equalize to atmospheric pressure.
9. Servicing the compressor unit can proceed at this
point. After servicing, ensure to perform a leak
check, see Compressor Unit Leak Check procedure.
Compressor Unit Leak Check
The compressor unit must be checked for leaks after servicing to ensure a tight system.
CAUTION
Do not hydro test compressur unit. Failure to comply
may result in damage to equipment.
1. If servicing the compressor unit was completed,
proceed to step 2. Otherwise, isolate the compressor unit from the house system, see Compressor
Unit Isolation procedure.
2. Slowly pressurize compressor unit through suction
oil charging port.
3. Check for leaks.
4. Typically, no evacuation is required for open loop
systems. If dry nitrogen was used, it can be bled off
to atmosphere.
5. If evacuation is required, evacuate from suction oil
charging port.
6. Open all valves previously closed and close all
valves previously opened. Remove tags as per the
local lockout/tagout procedure.
7. Turn the motor and oil pump disconnect switches
to the ON position.
8. The compressor unit can now be started, refer to
Start-Up procedure in Section 4.
Line
from Oil
Separator
Shut-off
Line from Oil Separator
to Shut-off Valve
Line from Needle
Valve to Suction
Figure 5-1. Suction By-Pass Valve Location (Equalizing Solenoid) (2 of 2)
VSG/VSSG • Installation, Operation and Maintenance Manual •Vilter/Emerson • 35391SSG
Valve
Line to
Suction
Solenoid
Needle
Valve
5 – 3
Page 62

Section 5 • Maintenance/Service
Oil System Components
Oil Sampling
WARNING
When working with LFG, NG or other dangerous
or fl ammable gases, ensure there are adequate
ventilation and vapor detectors. Refer to national fi re
and building codes. Failure to comply may result in
serious injury or death.
WARNING
Avoid skin contact with any condensate or oil. Wear
rubber gloves and a face shield when working with
condensate or oil. Failure to comply may result in
serious injury or death.
Use Vilter Oil Analysis Kit (VPN 3097A) to collect an oil
sample for analysis. For an example, see Figure 5-2. Fill
out label for bottle. Place in mailing tube and seal with
the preaddressed mailing label. Below are a few points
to remember when taking a sample:
• Sample running compressor units, not cold units.
• Sample upstream of the oil fi lter.
• Create specifi c written procedures for sampling.
• Ensure sampling valves and devices are thoroughly
fl ushed prior to taking a sample.
• Ensure samples are taken as scheduled in the
Maintenance and Service Schedule.
• Send samples immediately to the oil analysis lab after
sampling, do not wait 24 hours.
NOTE
A copy of the oil analysis report is also sent to Vilter. See
Appendices for a sample of the oil analysis report.
An oil analysis report will show the physical properties of
the oil, such as:
• Water content
• Viscosity
• Acid number
• Particle count
• Antioxidant level
• Wear metals
• Contaminate/additive metals
5 – 4
Figure 5-2. Oil Analysis Kit
VSG/VSSG • Installation, Operation and Maintenance Manual •Vilter/Emerson • 35391SSG
Page 63

Section 5 • Maintenance/Service
Oil Charging
WARNING
Avoid skin contact with oil. Wear rubber gloves and a
face shield when working with oil. Failure to comply
may result in serious injury or death.
CAUTION
Do not add oil to the coalescent side of the oil
separator. Failure to comply may result in damage to
equipment.
Normal oil level operating range must be maintained for
optimum performance and to prevent damage to equipment. See Figure 4-1. for normal operating levels. There
are a couple of ways to maintain oil, while the compressor unit is in operation and during shutdown.
Tool Required:
• Oil Pump, Maximum 2-3 GPM with Motor approved
for Division 1 or Division 2 and with ability to overcome suction pressure.
1. Using a properly selected oil pump, connect oil
pump to suction oil charging valve, see Figure 5-3.
2. Open suction oil charging valve and fi ll oil separator
to Normal Operating Level.
3. Once the Normal Operating Level has been reached,
shut off the oil pump and close the valve. Disconnect
and remove oil pump.
Charging During Shutdown:
During shutdown, if oil is to be added, charging can be
performed through the drain valve located underneath
the oil separator, see Figure 5-3. During shutdown, oil
can be added to the Maximum Non-Operating Level.
For shutdown procedure, see Compressor Unit Isolation
procedure.
1. Using a properly selected oil pump, connect oil
pump to oil separator drain valve.
2. Open oil separator drain valve and fi ll oil separator to
Maximum NON-Operating Level.
3. Once Maximum NON-Operating Level has been
reached, shut off oil pump, close oil separator drain
valve and remove oil pump.
Charging During Operation:
During operation, if the oil level is low, add oil to the
operating compressor through the suction oil charging
valve, see Figure 5-3. Pump oil into the compressor until
the oil level reaches the normal operating level. Watch
this level carefully to maintain proper operation. Never
allow the oil to reach a level higher than the Maximum
Operating Level, since this may impair the operation and
effi ciency.
Suction Oil
Charging Valve
View Rotate 180°
Oil Drain Valve
(Oil Separator)
Oil Drain Valve
(Oil Cooler)
Oil Filter
Shut-Off Valves
Figure 5-3. Suction Oil Charging Valve, Oil Cooler Drain Valve and Oil Filter Shut-Off Valves
VSG/VSSG • Installation, Operation and Maintenance Manual •Vilter/Emerson • 35391SSG
View From Back - View Rotate 180°
5 – 5
Page 64

Section 5 • Maintenance/Service
Oil Draining
WARNING
Do not drain oil from drain valve while the compressor
unit is running. Shutdown the unit and allow pressures
to equalize to suction pressure prior to draining.
Failure to comply may result in serious injury.
The compressor unit must be shut down prior to draining
due to high pressures in the oil system, see Compressor
Unit Isolation procedure.
Draining can be performed through the drain valve located underneath the oil separator, see Figure 5-3. A
drain valve is also provided underneath the shell and
tube oil cooler.
Draining of the remote oil cooler can be performed at
the remote oil cooler drain valves. If equipped with lower
level drains on the supply and return lines, these too can
be utilized for draining. For additional information, see
Recommended Remote Air Cooled Oil Cooler Piping in
Appendices.
Oil Filter Replacement
NOTE
Ensure to check the oil pressure drop and record it
daily.
If the compressor unit is equipped with only a single oil
fi lter, the compressor unit must be shut down prior to
servicing, see Stopping/Restarting procedure in Section
4.
If the compressor unit is equipped with dual oil fi lters,
then one oil fi lter can be isolated and serviced one at a
time during operation. Each oil fi lter can have single or
dual oil fi lter elements depending on the size of com-
pressor used, see Table 5-2 and Figure 5-4.
Table 5-2. Oil Filter Elements and Compressor Models
Oil Filter Element Qty. VSG/VSSG Models
Single Element 301 - 701
Dual Elements 751 - 3001
To replace an oil fi lter element, continue with the follow-
ing steps:
Parts Required:
• Oil Filter Element (VPN 1833G)
WARNING
Avoid skin contact with oil. Wear rubber gloves and a
face shield when working with oil. Failure to comply
may result in serious injury or death.
Change the oil fi lter as outlined in the Maintenance and
Service Interval, see Table 5-1. Maintenance & Service
Interval.
Single Oil Filter Assembly Dual Oil Filter Assembly
Cover Flange
Spring Plate
Element
Canister
Outlet
Inlet
Figure 5-4. Oil Filter Assemblies (Single and Dual)
Cover Flange
REMOVAL
NOTE
Both outlet shut-off valves should be open. If the
outlet valve is closed for the oil fi lter that is not in
operation, slowly open the outlet shut-off valve until
fully open. This will help reduce a sudden pressure
drop when switching oil fi lters for servicing.
Elements
Spring Plate
Element
Inlet
Centering
Piece
Canister
Outlet
5 – 6
VSG/VSSG • Installation, Operation and Maintenance Manual •Vilter/Emerson • 35391SSG
Page 65

Section 5 • Maintenance/Service
Vent Valve
Drain Valve
Vent Valve
Drain Valve
Inlet Shut-Off Valves
Figure 5-5. Oil Filter Drain, Vent and Shut-Off Valves
1. If equipped with dual oil fi lters, open inlet shut-off
valve for non-operating oil fi lter to put it into opera-
tion, see Figure 5-5.
2. To isolate oil fi lter for servicing, close inlet and out-
let shut-off valves for the oil fi lter.
NOTE
To reduce unwanted oil splash from a vent or drain
valve, connect a hose to the valve port and direct
the gas and oil into a drain pan.
3. Slowly release pressure in the oil fi lter canister by
opening the vent valve. Allow pressures to equalize
to atmosphere.
INSTALLATION
Ensure oil fi lter element on the outlet side is fully
9. If equipped with single oil fi lter element, install oil
10. If equipped with dual oil fi lter elements, install two
11. Position spring plate in orientation noted during
NOTICE
Dispose of the oil in a appropriate manner following
all Local, State and Federal ordinances regarding the
disposal of used oil.
4. Using an drain pan, open drain valve and allow the
oil to completely drain from the oil fi lter canister.
NOTE
Note orientation of components to aid in installation.
5. Remove bolts and nuts securing cover fl ange to the
oil fi lter canister. Remove cover fl ange and spring
plate. Retain spring plate.
6. If equipped with a single oil fi lter element, remove
fi lter element from oil fi lter canister.
7. If equipped with dual oil fi lter elements, remove
two fi lter elements and fi lter element centering
piece from oil fi lter canister. Retain fi lter element
centering piece.
8. Thoroughly clean the oil fi lter canister, spring
plate and centering piece. Inspect spring plate and
VSG/VSSG • Installation, Operation and Maintenance Manual •Vilter/Emerson • 35391SSG
12. Tighten nuts, see Appendix A.
13. Using dry nitrogen gas, pressurize oil fi lter canister
14. Close the vent valve and drain valve.
15. Open outlet shut-off valve for the oil fi lter that is not
16. Repeat for second oil fi lter, as required.
Outlet Shut-Off Valves
centering piece, if damaged, replace as required.
seated on the outlet pipe when installed.
fi lter element in canister in orientation noted during removal.
oil fi lter elements and centering piece in orientation
noted during removal.
removal and install bolts and nuts to secure cover
fl ange to oil fi lter canister.
through vent valve and check for leaks.
in operation.
NOTE
5 – 7
Page 66

Section 5 • Maintenance/Service
f
Oil Separator Vessel
Oil Separator
Manhole Cover
Pipe Stub
Coalescing Filter
Centering Strap
Flat Washer
Flat Washer
Nuts
Figure 5-6. Oil Separator Manhole Cover and Coalescing Filter Assembly
Coalescing Filter Replacement
WARNING
Use appropriate lifting devices and additional
personnel when lifting heavy components. Ensure
lifting devices are capable of lifting the weight o
the component. Use lifting points (i.e. bolt holes
designated for lifting eye bolts) that are provided
on the component. Failure to comply may result in
serious injury.
WARNING
Avoid skin contact with any condensate or oil. Wear
rubber gloves and a face shield when working with
condensate or oil. Failure to comply may result in
serious injury or death.
NOTE
For coalescing oil fi lters (11-7/8 in. O.D.), a tubing
(3/4 in. O.D. x 6 ft. long ) can be used to aid in
removal and installation of the element.
REMOVAL
1. Isolate the compressor unit, see Compressor Unit
Isolation procedure.
5 – 8
VSG/VSSG • Installation, Operation and Maintenance Manual •Vilter/Emerson • 35391SSG
Hold-Down Rod
3/4 in. O.D.
Tubing, 6 ft. long
2. If required, install lifting eyes on oil separator manhole cover, see Figure 5-6.
3. Secure appropriate lifting device to oil separator
manhole cover.
4. Remove all bolts except top four bolts securing oil
separator manhole cover to oil separator vessel.
5. Adjust lifting device as needed to hold weight of oil
separator manhole cover.
6. Remove remaining four bolts and oil separator
manhole cover from oil separator vessel.
7. Remove nuts, fl at washer and cover plate securing
coalescing oil fi lter to hold-down rod.
8. With assistance of second person, remove coalescing fi lter from oil separator vessel.
9. Repeat steps 7 and 8 to remove additional coalescing fi lters, as required.
INSTALLATION
10. Install tubing over hold-down rod. Position tubing
as far back as possible.
11. With assistance of second person, position coalescing element over tubing and through hole of centering strap.
12. Push coalescing fi lter into vessel until fully seated
Page 67

Section 5 • Maintenance/Service
on pipe stub.
13. Remove tubing.
14. Position cover plate and fl at washer on hold-down
rod on end of the coalescing fi lter.
15. Install nut to secure fl at washer and cover plate to
coalescing fi lter. Tighten nut to 25 ft-lbs.
16. Install second nut to prevent fi rst nut from moving.
17. Repeat steps 10 to 16 for installing additional coalescing fi lters.
18. Position oil separator manhole cover on oil separator vessel.
19. Install bolts to secure oil separator manhole cover
to oil separator vessel.
20. Tighten bolts, see Appendix A.
21. Perform Compressor Unit Leak Check procedure.
Oil Pump Strainer
NOTICE
Dispose of the oil in a appropriate manner following
all Local, State and Federal ordinances regarding the
disposal of used oil.
To clean the oil pump strainer, proceed with the following steps.
WARNING
At shutdown, open any other valves that may trap
liquids to prevent serious injury and/or damage to
equipment.
WARNING
Follow local lockout/tagout procedure. Failure to
comply may result in serious injury, death and/or
damage to equipment.
WARNING
Avoid skin contact with any condensate or oil. Wear
rubber gloves and a face shield when working with
condensate or oil. Failure to comply may result in
serious injury or death.
1. Shut down the compressor unit, refer to Stopping/
Restarting procedure in Section 4.
2. Turn disconnect switches to the OFF position for
the compressor unit and oil pump motor starter, if
equipped.
3. Close shut-off valves located before the strainer
and at the oil fi lter(s) inlet.
4. Position drain pan under drain valve.
5. Open strainer drain valve and allow oil to completely drain, see Figure 5-7.
6. Remove bolts securing strainer cover to strainer.
Remove strainer cover, gasket and element. Retain
gasket.
7. Inspect gasket for damage, replace as required.
8. Wash element in solvent and blow it with clean air.
9. Inspect element for damage, replace as required.
10. Clean strainer cavity with clean lint-free cloth.
11. Install in reverse order of removal. For torque specifi cations, see Appendix A.
12. Close strainer drain valve.
13. Open shut-off valves.
14. Check replaced components for leaks.
15. Turn disconnect switches to the ON position for
the compressor unit and oil pump motor starter, if
equipped.
16. Start compressor unit.
View From Back of Oil Pump Strainer
Bolts Strainer CoverNuts
Strainer
Drain Valve
VSG/VSSG • Installation, Operation and Maintenance Manual •Vilter/Emerson • 35391SSG
Oil Pump
Strainer
Figure 5-7. Oil Pump Strainer and Drain Valve
5 – 9
Page 68

Section 5 • Maintenance/Service
Drive Coupling (Form-Flex BPU) Hub
Installation
On all single screw units, the coupling assembly is
shipped loose and will have to be installed and aligned
on site. This is to allow a check of proper electrical phasing and direction of motor rotation. The motor and
compressor have been aligned from the factory with the
coupling hubs already installed. Using a dial indicator for
aligning is recommended.
NOTE
Drive coupling type and size can be determined
by the information on the compressor nameplate
when ordering; Order Number and Compressor
Model Number.
To install the coupling, proceed with the following steps:
WARNING
Follow local lockout/tagout procedure. Failure to
comply may result in serious injury, death and/or
damage to equipment.
1. Ensure disconnect switches are in the OFF position
for the compressor unit and oil pump motor starter, if equipped.
2. If hubs are already installed on motor shaft and
compressor shaft, proceed to Drive Center Member
Installation and Alignment procedure.
3. If coupling assembly is already assembled, the lock
nuts are not torqued. Remove lock nuts and bolts
securing hubs to disc packs. Remove both hubs.
Leave the disc packs attached to center member.
4. Clean hub bores and shafts. Remove any nicks
or burrs. If bore is tapered, check for good contact pattern. If bore is straight, measure bore and
shaft diameters to ensure proper fi tment. The keys
should have a snug side-to-side fi t in the keyway
with a small clearance over the top.
NOTE
If hub position on shaft does not allow enough room
to install bolts, install bolts and disc pack before
mounting hub on shaft.
Hubs come in two different types, straight bore and
tapered bore. Tapered bore hubs have additional
hardware. Typically, a compressor will have a
tapered shaft and therefore use a tapered bore hub.
STRAIGHT BORE HUBS
5. For straight bore hubs, install key in keyway of shaft.
6. Install hub on shaft. If installing straight bore hubs
on motor and compressor shafts, allow 1/16” gap
between the outer face of the hub to the outer face
of the shaft for both hub installation. This will allow
some play when installing the spacer. If installing
a straight bore hub and a taper bore hub, allow a
1/8” gap between the outer face of the straight
bore hub to the outer face of the straight shaft, see
Table 5-3.
7. Install clamping bolts in hub.
8. Tighten clamping bolts, see Table 5-4.
9. Install set screw in hub to secure key.
10. Tighten set screw, see Table 5-4. Repeat steps for
second straight bore hub.
TAPERED BORE HUBS
11. For taper bore hubs, install key in keyway of shaft.
12. Install hub on shaft.
13. If lock washers are being used, install hub cap, lock
washers and bolt on shaft.
14. If locking tab is being used, install hub cap, locking
tab and bolt on shaft.
15. Tighten bolt and draw hub up shaft to a stop.
5 – 10
Coupling
Size
BP38U
BP41U
BP47U
BP54U
BP54U
BP56U
Table 5-3. Shaft and Hub Distances
Shaft Gap for Tapered
Compressor &
Straight Motor Shaft
Combination
6.25”
(158.75 mm)
VSG/VSSG • Installation, Operation and Maintenance Manual •Vilter/Emerson • 35391SSG
Shaft Gap for Straight
Compressor &
Straight Motor Shaft
Combination
5.125”
(130.18 mm)
Distance
Between Hub
Faces
5.00”
(127 mm)
Page 69

Section 5 • Maintenance/Service
16. If locking tab is being used, bend locking tabs in
gap towards shaft and around bolt.
17. Install set screw in hub cap to secure key in keyway
of shaft.
18. Tighten set screw, see Table 5-4.
Drive Center Member Installation and
Alignment
NOTE
Always adjust motor to the compressor. The
compressor is aligned to the frame.
19. Adjust motor position as needed to obtain a distance of 5” between both hub faces.
20. Soft Foot. The motor must sit fl at on its base (+/-
0.002”). Any soft foot must be corrected prior to
center member installation.
NOTE
If the driver or driven equipment alignment
specifi cation is tighter than these recommendations,
the specifi cation should be used. Also, be sure
to compensate for thermal movement in the
equipment. The coupling is capable of approximately
four time the above shaft alignment tolerances.
However, close alignment at installation will provide
longer service with smoother operation.
The fl ex disc pack is designed to an optimal thickness
and is not to be used for axial adjustments.
21. Axial Spacing. The axial spacing of the shafts should
be positioned so that the fl ex disc packs are fl at
when the equipment is running under normal operating conditions. This means there is a minimal
amount of waviness in the fl ex disc pack when
viewed from the side. This will result in a fl ex disc
pack that is centered and parallel to its mating
fl ange faces. Move the motor to obtain the correct
axial spacing, see Table 5-3 and Figure 5-8.
22. Angular Alignment. Rigidly mount a dial indicator on
one hub or shaft, reading the face of the other hub
fl ange. Rotate both shafts together, making sure
the shaft axial spacing remains constant. Adjust the
motor by shimming and/or moving so that the indicator reading is within 0.002” per inch of coupling
fl ange, see Figure 5-9.
23. Parallel Offset. Rigidly mount a dial indicator on one
hub or shaft, reading the other hub fl ange outside
diameter. Indicator set-up sag must be compensated for. Rotate both shafts together. Adjust the
equipment by shimming and/or moving so that the
indicator reading is within 0.002” per inch of the
axial length between fl ex disc packs, see Figure 5-9.
With the coupling in good alignment the bolts will fi t
through the holes in the fl anges and the disc packs more
easily.
NOTE
All bolt threads should be lubricated. A clean motor
oil is recommended. On size 226 and larger, a link
must be put on bolt fi rst. Remove the disc pack
alignment bolt. Proceed to mount the second disc
pack to the other hub in the same way.
Ensure that the beveled part of the washer is against
Hub Distance
Figure 5-8. Hub Distance (Axial Spacing)
VSG/VSSG • Installation, Operation and Maintenance Manual •Vilter/Emerson • 35391SSG
5 – 11
Page 70

Section 5 • Maintenance/Service
Angular Alignment Parallel Offset
Figure 5-9. Angular Alignment and Parallel Offset
the disc pack.
24. Install bolts and locking nuts to secure both disc
packs to center member.
25. Tighten locking nuts.
26. If room is required to install center member, adjust
hub position accordingly. If both the motor and
compressor hubs are straight bores, adjust either
hubs. If one hub is tapered and the other a straight,
adjust the straight bore hub.
27. Using additional supports supporting center member. Install bolts and locking nuts to secure center
member to compressor hub.
28. Tighten locking nuts.
29. Position hubs, ensure distance between face of
both hubs is 5”.
NOTE
If there is waviness with the disc pack installed, adjust
Table 5-4. Hub Clamp Bolt and Set Screw Torque Specifi cations
Coupling
Series/Size
BH38U 4 1/4-28 12 (16) 3/8 10 (13)
BH41U
BH47U 4 3/8-24 49 (66) 1/2 20 (27)
BH54U 4 7/16-20 78 (106) 1/2 20 (27)
BH56U 4 1/2-20 120 (163) 5/8 40 (54)
DP42 4 1/2-20 120 (163) 1/2 20 (27)
# Bolts Size-Pitch
4 5/16-24 23 (31) 3/8 10 (13)
Clamping Bolt Set Screw
distance accordingly until disc pack is straight.
30. Install bolts and locking nuts to secure disc pack to
motor hub.
31. Tighten locking nuts, see Table 5-4.
Table 5-5. Disc Pack Installation Torque
Specifi cations
Coupling
Size
BP38U 5/16-24 22 (30)
BP41U
BP47U 9/16-18 120 (163)
BP54U 9/16-18 120 (163)
BP56U 9/16-18 120 (163)
Torque
ft-lbs (Nm)
Lock Nut
Size
7/16-20 55 (75)
Size
Tightening
Torque
ft-lbs (Nm)
Torque
ft-lbs (Nm)
5 – 12
VSG/VSSG • Installation, Operation and Maintenance Manual •Vilter/Emerson • 35391SSG
Page 71

Section 5 • Maintenance/Service
32. Perform hot alignment. Run compressor unit and
allow to warm up completely.
33. Power down compressor unit and re-check alignments. Loosen motor mounting nuts to add shims
or to adjust alignments as required.
34. Install coupling guard.
Drive Coupling (Type C Sure-Flex)
Replacement
Drive couplings that are the Type C Sure-Flex type, are
always installed with a C-fl ange between the compres-
sor and motor. The coupling assembly alignments are
built into the design and therefore, should not require
alignment.
Drive Coupling (Form-Flex BPU)
Center Member and Hub Removal
Drive coupling type and size can be determined
To remove coupling assembly, proceed with the following steps:
WARNING
At shutdown, open any other valves that may trap
liquids to prevent serious injury and/or damage to
equipment.
by the information on the compressor nameplate
when ordering; Order Number and Compressor
REMOVAL
To remove Type C Sure-Flex coupling, proceed with the
following steps:
WARNING
WARNING
Follow local lockout/tagout procedure. Failure to
comply may result in serious injury, death and/or
damage to equipment.
At shutdown, open any other valves that may trap
liquids to prevent serious injury and/or damage to
WARNING
NOTE
Drive coupling type and size can be determined
by the information on the compressor nameplate
when ordering; Order Number and Compressor
Model Number.
1. Shut down the compressor unit, refer to Stopping/
Restarting procedure in Section 4.
2. Turn disconnect switches to the OFF position for
the compressor unit and oil pump motor starter, if
equipped.
3. Allow compressor, motor and surrounding components to cool prior to servicing.
4. Remove coupling guard.
5. Remove lock nuts and bolts securing disc pack to
hub on compressor shaft.
6. If additional room is required to remove the center
member, loosen clamping bolts on straight bore
hub(s).
7. Move straight bore hub on shaft as required to allow center member removal.
8. Remove lock nuts and bolts securing disc pack to
hub on motor shaft. Remove center member.
9. For straight bore hubs, remove clamping bolts and
hub from shaft.
10. For tapered bore hubs, remove bolt, lock washers,
large washer and hub from shaft.
VSG/VSSG • Installation, Operation and Maintenance Manual •Vilter/Emerson • 35391SSG
Follow local lockout/tagout procedure. Failure to
comply may result in serious injury, death and/or
damage to equipment.
1. Shut down the compressor unit, refer to Stopping/
Restarting procedure in Section 4.
2. Turn disconnect switches to the OFF position for
the compressor unit and oil pump motor starter, if
equipped.
3. Allow compressor, motor and surrounding components to cool prior to servicing.
4. Remove C-fl ange access cover.
Mark locations of hubs prior to removal.
5. Loosen set screw in motor hub securing key in
keyway.
6. Loosen clamping bolts securing hub to motor shaft.
7. Pry hub up motor shaft for space to remove coupling sleeve.
8. Remove coupling sleeve from hub.
9. Remove hub and key from motor shaft.
10. Loosen set screw in compressor hub securing key
in keyway.
11. Loosen clamping bolts securing hub from
NOTE
Model Number.
equipment.
NOTE
5 – 13
Page 72

Section 5 • Maintenance/Service
compressor shaft.
12. Remove hub and key from compressor shaft.
INSTALLATION
13. Install key and hub on compressor shaft as noted
during removal.
14. Install set screw in compressor hub to secure key in
keyway, see Table 5-6,
15. Install clamping bolts to secure hub on compressor
shaft. Tighten clamping bolts, see Table 5-6,
16. Install key and hub on motor shaft as noted during
removal. Allow gap to install coupling sleeve.
17. Install coupling sleeve on hubs. Position hub on
motor shaft on coupling sleeve as noted during
removal.
18. Install set screw in compressor hub to secure key in
keyway. Tighten set screw, see Table 5-6,
19. Install clamping bolts to secure hub to motor shaft.
Tighten clamping bolts, see Table 5-6.
Table 5-6. Clamping Bolts and Set
Screw Torque Specifi cations
Type C
Coupling
Size
6 13 (18)
7
8 23 (31)
9 23 (31)
10 50 (68)
11 50 (68)
ft-lbs (Nm)
Clamping
Bolts
13 (18)
Key Set
Screw
13 (18)
Compressor Replacement
Notify Vilter prior to performing a compressor replacement. See Warranty instructions in Section 7.
REMOVAL
To replace a compressor on a unit, proceed with the following steps:
NOTICE
Dispose of the oil in a appropriate manner following
all Local, State and Federal ordinances regarding the
disposal of used oil.
1. Shut down and isolate the compressor unit, see
Compressor Unit Isolation for Maintenance and
Service procedure.
NOTE
Note location of cables to aid in installation.
2. Disconnect all cables from sensors on compressor
and actuators.
3. Remove drive coupling, see appropriate Drive
Coupling Replacement procedure.
4. If equipped with C-fl ange, remove bolts securing
C- fl ange to compressor.
5. Remove center member, see Drive Coupling
Removal procedure.
6. Using appropriate drain pan, drain oil by removing
drain plugs from under compressor housing and
discharge manifold. Allow oil to completely drain.
7. Remove all oil lines from the compressor.
8. Support suction line with appropriate supporting
equipment.
9. Remove nuts and bolts securing suction strainer/
check valve assembly to suction stop valve and
compressor.
10. Using appropriate lifting device, remove suction
strainer/check valve assembly from compressor.
11. Remove nuts and bolts securing discharge pipe to
compressor and oil separator, see Figure 5-10.
12. Remove discharge pipe and gaskets from compressor and oil separator.
13. Remove nuts, fl at washers, lock washers and studs
securing compressor to frame.
14. Remove any additional lines and/or components to
allow removal of compressor as required.
15. Install appropriate lifting eyes on top of compressor.
16. Using appropriate lifting device and additional
5 – 14
VSG/VSSG • Installation, Operation and Maintenance Manual •Vilter/Emerson • 35391SSG
Page 73

Section 5 • Maintenance/Service
personnel, remove compressor from frame.
17. Remove shims and spherical washers from compressor mounting locations.
18. Inspect shims and spherical washers for damage,
replace as required.
INSTALLATION
19. Install shims and spherical washers on compressor
mounting locations, see Figure 5-10.
20. Install appropriate lifting eyes on top of compressor.
21. Using appropriate lifting device, position compressor on compressor mounting locations on frame.
22. Loosely install studs, lock washers, fl at washers and
nuts to secure compressor to frame until alignment
is correct.
23. Check compressor for soft foot. Add or remove
shims as required until measurements are within
+/- 0.002”.
24. Tighten nuts to secure compressor to frame, refer
to Appendix A.
25. If equipped with C-fl ange, install bolts to se-
cure C-fl ange to compressor. Tighten bolts, see
Appendix A.
26. If equipped with C-fl ange, install C-fl ange coupling,
refer to C-fl ange Coupling Replacement procedure.
27. Install coupling, see Drive Coupling Installation and
Alignment procedure .
28. Install coupling guard.
29. Install nuts and bolts to secure discharge pipe to oil
separator and compressor.
30. Tighten nuts on ‘discharge pipe-to-compressor
fl ange’ fi rst, then tighten nuts on ‘discharge pipe-
to-oil separator fl ange’, see Appendix A.
31. Install nuts to secure suction strainer/check valve
assembly to compressor and suction stop valve.
32. Tighten nuts on ‘suction strainer/check valve assembly-to-compressor’ fi rst, then tighten nuts on
‘suction strainer/check valve assembly-to-suction
stop valve’, refer to Appendix A.
33. Install all lines to compressor.
34. Install all cables to sensors on compressor and
actuator.
35. Perform leak check, see Compressor Unit Leak
Check procedure.
Compressor
Nut
Lock Washer
Flat Washer
Frame
Shim
Stud
Flat Washer
Lock Washer
Nut
Spherical
Washer
Assembly
Figure 5-10. Compressor Replacement and Hardware Assembly (Models 2401-3001 Shown)
VSG/VSSG • Installation, Operation and Maintenance Manual •Vilter/Emerson • 35391SSG
5 – 15
Page 74

Section 5 • Maintenance/Service
Compressor Shaft Bearing Float
Inspections
If fl oat measurements are out of tolerance, contact Vilter
Customer Service for further assistance.
BEARING AXIAL FLOAT INSPECTION
CAUTION
When taking the measurements, do not exceed
300 lbs of force at point of contact or damage may
result to the bearings.
DETERMINE MAXIMUM APPLIED FORCE
To determine maximum applied force, take maximum
applied force at hub/shaft multiplied by length of A
and divide by length B. This is the maximum force that
should be applied on the lever.
(Applied Force x A)/B = Applied Force (Maximum)
So, using a 36” (or 1 m) lever with pivot space of 6” (or
15 cm) would make the maximum applied force to be 60
lbf (or 235 N). Calculation is as follows:
(300 lbf x 6”)/30” = 60 lbf (Max. Applied Force)
(1335 N x 15 cm)/85 cm = 235 N (Max. Applied Force)
Force at
Applied
Force
BA
Hub/Shaft
Lever
motor and use the lever arm to push the input shaft
towards the compressor. Record measurement
5. Add both measurements. If measurement is out of
allowable tolerance shown in Table 5-7, the bearing
may need to be replaced. Contact Vilter Customer
Service.
BEARING RADIAL FLOAT INSPECTION
6. Install dial indicator to the compressor frame and
zero indicator, see Figure 5-12.
NOTE
Do not exceed maximum applied force. For
maximum applied forces of all compressor models,
see Table 5-7.
7. Place lever arm and fulcrum underneath hub and
push hub upwards. Record measurement.
8. If measurement is out of allowable tolerance shown
in Table 5-7, the bearing may need to be replaced.
Contact Vilter Customer Service.
Top Vie w
Shaft being pushed by use of lever.
Direction of
shaft movement.
Rigidly attach dial indicator.
Position on axis of compressor.
Wooden Block
Pivot Point
or Fulcrum
As a quick reference, Table 5-7 shows maximum applied
forces for 36” lever with 6” pivot for all compressor
models.
MEASURE
To inspect bearing axial fl oat, proceed with the following
steps:
1. Remove center member, see appropriate Drive
Coupling Replacement procedure.
2. Install dial indicator to the compressor frame and
zero indicator, see Figure 5-11.
3. Place lever arm and fulcrum behind compressor
coupling half and push the coupling towards the
motor. Record measurement.
4. Re-zero indicator, now position the fulcrum on the
5 – 16
VSG/VSSG • Installation, Operation and Maintenance Manual •Vilter/Emerson • 35391SSG
Applied Force
Shaft being pushed by use of lever.
Rigidly attach dial indicator.
Position on axis of compressor.
Direction of
shaft movement.
Wooden block
or fulcrum
Top Vie w
Small wooden block or fulcrum.
Applied Force
Figure 5-11. Bearing Axial Float Inspection
Page 75

Section 5 • Maintenance/Service
Table 5-7. Maximum Bearing Float
Max.
Force
at Hub/
Shaft
lbf (N)
300
(1335)
100
(444)
150
(667)
150
(667)
200
(890)
300
(1335)
400
(1780)
600
(2670)
Compressor
Model
All
151, 181, 201,
152, 182, 202,
301, 361, 401
501, 601, 701
291, 341, 451,
601
751, 901
791, 891,
1051, 1201,
1301
1501, 1551,
1801, 1851,
2101
2401, 2601,
2801, 3001
Max.
Axial
Float
in. (mm)
0.002
(0.051)
-
Max.
Radial
Float
in. (mm)
-
0.006
(0.152)
0.007
(0.178)
0.007
(0.178)
0.006
(0.152)
0.006
(0.152)
0.007
(0.178)
0.006
(0.152)
Max.
Applied
Force
(36” Lever, 6”
Pivot)
lbf (N)
60
(267)
20
(89)
30
(133)
30
(133)
40
(178)
60
(267)
80
(356)
120
(534)
Gate Rotor Float and Gate Rotor
Bearing Float Inspection
GATE ROTOR FLOAT INSPECTION
To inspect gate rotor fl oat and bearing fl oat, proceed
with the following steps:
1. Remove center member, see appropriate Drive
Coupling Replacement procedure.
2. Remove the side covers from compressor.
3. Position gate rotor blade and damper pin at 90° to
the main rotor, see Figure 5-13.
Dial Indicator
Gate Rotor
Gate Rotor Blade
Support
Side View
Shaft being pushed by use of lever.
Rigidly attach dial indicator.
Direction of shaft
movement.
Applied Force
Figure 5-12. Bearing Radial Float Inspection
Damper Pin
and Bushing
Main Rotor
Damper Pin
Bushing
Float
Figure 5-13. Gate Rotor Float
VSG/VSSG • Installation, Operation and Maintenance Manual •Vilter/Emerson • 35391SSG
5 – 17
Page 76

Section 5 • Maintenance/Service
NOTE
Measurements can be an additional 0.020” higher
than fl oat dimensions on Table 5-8. If measurement
is an additional 0.030” greater than fl oat dimensions,
contact Vilter for further assistance.
Total movement of damper pin in bushing is the
gate rotor fl oat.
4. Using dial indicator, take measurement of gate rotor fl oat. Measurement should not exceed values as
noted above.
Table 5-8. Gate Rotor Float
Model
VSSG 291-601 0.045 (1.143)
VSG 301-401
VSG 501-701 0.045 (1.143)
VSG 751-901 0.055 (1.397)
VSG 1051-1301 0.060 (1.524)
VSG 1551-2101 0.060 (1.524)
VSG 2401-3001 0.060 (1.524)
Some movement between blade and support is
necessary to prevent damage to the compressor
blade; however at no time should the blade uncover
the support.
5. Inspect main rotor and gate rotor for abnormal
wear due to dirt or other contaminants. If damaged, replace gate rotor and/or main rotor.
Float
in. (mm)
0.045 (1.143)
NOTE
GATE ROTOR BEARING FLOAT INSPECTION
6. Using dial indicator, position a dial indicator on the
gate rotor, see Figure 5-14.
Side View
Gate rotor bearing float being measured.
Wooden block to prevent
damage to gate rotor blade.
Direction of rotor movement.
Axial force at gate rotor to not
exceed 100 lbs.
Applied
Force
Rigidly attach dial indicator.
Use bolt for fulcurm.
Figure 5-14. Gate Rotor Bearing Float
7. Use a lever arm pivoting on a bolt with a small block
of wood against the gate rotor blade to protect the
blade.
8. Gently apply pressure to lever and take measurement. Maximum amount of gate rotor bearing fl oat
should not exceed 0.002” (0.051 mm).
9. Install gate rotor cover.
10. Install center member, see Drive Coupling
Replacement procedure.
11. Perform compressor unit leak check, see
Compressor Unit Leak Check procedure.
5 – 18
VSG/VSSG • Installation, Operation and Maintenance Manual •Vilter/Emerson • 35391SSG
Page 77

Section 5 • Maintenance/Service
Gate Rotor and Support Clearance
When measuring, push the gate rotor against the pin to
remove fl oat.
1. Place a straight edge along the side of the gate rotor, see Figure 5-16.
2. Measure the gap from the straight edge to the peak
of the gate rotor support. For minimum distance,
see Figure 5-15.
3. Repeat steps 1 to 2 to check gap along entire gate
rotor edge on both sides.
Figure 5-15. Gate Rotor and Support Clearance - Minimum Clearances
VSG/VSSG • Installation, Operation and Maintenance Manual •Vilter/Emerson • 35391SSG
5 – 19
Page 78

Section 5 • Maintenance/Service
Gate Rotor
Support
Gate Rotor
Gate Rotor
Support
Straight Edge
Gate Rotor
Gate Rotor
Support
Gate Rotor
Straight Edge
Straight Edge
5 – 20
Figure 5-16. Gate Rotor and Support Clearance - Measuring
VSG/VSSG • Installation, Operation and Maintenance Manual •Vilter/Emerson • 35391SSG
Page 79

Section 5 • Maintenance/Service
Gate Rotor Assembly Replacement
(All VSG & VSSG Compressors Except
the shim pack.
9. Hold gate rotor support with a suitable wrench on
the fl ats provided near the roller bearing housing.
VSG 301-701 Compressors)
10. Remove the inner retainer bolts and retainer.
The following table lists the gate rotor tool sets needed
to remove and install gate rotor assemblies.
Table 5-9. Gate Rotor Tool Sets
Model Tool Set VPN
VSSG 291-601 A25205B
VSG 301-401 N/A
VSG 501-701 A25205B
VSG 751-1301 A2520 5C
VSG 1551-2101 A25205E
VSG 2401-3001 A25205F
REMOVAL
1. Remove center member, see appropriate Drive
Coupling Replacement procedure.
NOTE
All parts must be kept with their appropriate side
and not mixed when the compressor is reassembled.
2. Remove two upper bolts from side cover
3. Install guide studs in holes.
NOTE
There will be some oil drainage when the cover is
removed.
4. Remove remaining bolts and side cover.
5. Turn main rotor so a driving edge of any one of the
main rotor grooves is even with the back of the gate
rotor support.
NOTE
The gate rotor stabilizer is designed to hold the gate
rotor support in place and prevent damage to the
gate rotor blade as the thrust bearings and housing
is being removed.
6. Insert gate rotor stabilizer. The side rails are not required on VSSG 291 thru 601. For the VSG 751 thru
901 and VSG 1051 thru 1301 compressors, use the
side rails and assemble to the gate rotor stabilizer
as stamped. For the VSG 1551 thru 2101, use the
side rails and assemble to the gate rotor stabilizer.
7. Remove hex head bolts and socket head bolts from
thrust bearing cover.
8. Re-install two bolts into the threaded jacking holes
to assist in removing thrust bearing cover. Retain
VSG/VSSG • Installation, Operation and Maintenance Manual •Vilter/Emerson • 35391SSG
11. To remove the thrust bearing housing, install thrust
bearing removal and installation tool with smaller
puller shoe. Turn the jacking screw clockwise. The
thrust bearings and housing assembly will be pulled
off the shaft and out of the frame.
12. Remove bolts from roller bearing housing.
13. Re-install two bolts into jack bolt holes provided in
housing to aid in removal.
14. To remove the gate rotor support, carefully move
support in the opposite direction of rotation and
tilt roller bearing end towards the suction end of
the compressor. The compressor input shaft may
have to be turned to facilitate the removal of the
gate rotor support. On dual gate compressor units,
repeat the procedure for the remaining gate rotor
support assembly.
INSTALLATION
15. Install gate rotor support by carefully tilting the
roller bearing end of the gate rotor support towards
the suction end of the compressor. The compressor
input shaft may have to be rotated to facilitate the
installation of the gate rotor support. Install gate
rotor stabilizer. The gate rotor stabilizer (901) will
hold the gate rotor support in place as the thrust
bearing housing is being installed. If the gate rotor
support is not restricted from moving, the gate rotor blade may be damaged.
16. Install the roller bearing housing (112) with a new
O-ring (141).
17. Tighten bolts (152), see Appendix A.
18. When installing the thrust bearing housing (113), a
new O-ring (142) must be used when the housing
is installed, see Figure 5-19. Lubricate the outside
of the housing and bearings with clean compressor oil to aid in the installation. Due to the fi t of the
bearings on the gate rotor shaft, the thrust bearing
removal and installation tool with the pusher shoe
must be used. Turn the jacking screw clockwise.
This will push the thrust bearings onto the shaft
and push the housing assembly into the frame.
Install the inner retainer (115) and bolts (151) using Loctite® 242 thread locker. Tighten bolts, see
Appendix A.
19. Set clearance between gate rotor blade and shelf.
20. Place a piece of 0.003”-0.004” shim stock between
gate rotor blade and shelf.
5 – 21
Page 80

Section 5 • Maintenance/Service
For VSSG 291-601
compressors, do not
use side rails.
901A
For VSG 751/901 and
1051-1301compressors, use
side rails and assemble gate
rotor stabilizer as stamped.
901B
901C
NOTE
This measurement determines the amount of shims
needed for the correct clearance.
21. Measure depth from top of compressor case to top
of thrust bearing housing.
22. Use factory installed shim pack (106) and bearing
housing cover (116) without the O-ring (143).
NOTE
Replacement blades are precisely the same
dimensionally as blades installed originally at
factory: Therefore, the same amount of shims will
be required for replacement blades.
Use fl ats provided on
gate rotor support to
prevent rotation when
removing bearing
retainer.
Position leading edge of main rotor groove
fl ush with or slightly below back of gate
rotor support.
Figure 5-17. Gate Rotor Assembly Removal
and Tools
5 – 22
VSG/VSSG • Installation, Operation and Maintenance Manual •Vilter/Emerson • 35391SSG
Figure 5-18. Gate Rotor Assembly Removal
Page 81

Section 5 • Maintenance/Service
23. Check the clearance between the entire gate rotor
blade and the shelf, rotate the gate rotor to fi nd the
tightest spot. It should be between 0.003-0.004“
(0.076-0.102 mm). Make adjustments, if necessary. It is preferable to shim the gate rotor blade
looser rather than tighter against the shelf, see
Figure 5-20.
24. After clearance has been set install a new O-ring
(143) on bearing housing cover, install cover and
tighten the bolts to the recommended torque
value.
25. Install side cover with a new gasket. Tighten the
bolts to the recommended torque value. The unit
can then be evacuated and leak checked.
Check for 0.003-0.004” (0.076- 0.102 mm) clearance between
gate rotor blade and partition.
Figure 5-19. Gate Rotor Assembly and Tools
VSG/VSSG • Installation, Operation and Maintenance Manual •Vilter/Emerson • 35391SSG
Figure 5-20. Gate Rotor and Shelf Clearance
5 – 23
Page 82

Section 5 • Maintenance/Service
Gate Rotor Assembly Replacement
(VSG 301-701 Compressors ONLY)
REMOVAL
The removal of the gate rotor assembly for the VSG 301701 compressors is similar for the VSG 901- 2101 compressors except that the inner races are secured to the
stationary bearing spindle.
1. Remove center member, see appropriate Drive
Coupling Replacement procedure.
2. Remove the upper bolt from the side cover and install a guide stud in the hole.
3. Remove remaining bolts and side cover. There will
be some oil drainage when the cover is removed.
4. The side cover that contains the suction strainer
should have the suction line properly supported
before the bolts securing the line to the cover can
be removed. After the line is removed, the cover
can be removed per paragraph B.
5. Turn the main rotor so the driving edge of the
groove is between the top of the shelf or slightly
below the back of the gate rotor support. At this
point install the gate rotor stabilizing tool.
6. Remove plug on the thrust bearing housing. Loosen
the socket head cap screw that is located underneath the plug. This secures the inner races of the
thrust bearings to the spindle.
7. Remove bolts that hold the thrust bearing housing
to the compressor. Insert two of the bolts into the
threaded jacking holes to assist in removing the
bearing housing from the compressor. When the
housing is removed, there will be shims between
the spindle and thrust bearings. These control the
clearance between the shelf and gate rotor blades.
These must be kept with their respective parts for
that side of the compressor.
8. Remove the bolts from the roller bearing housing.
After the bolts have been removed, the housing
can be removed from the compressor.
9. To remove the gate rotor support, carefully move
the support opposite the direction of rotation and
tilt the roller bearing end towards the suction end
of the compressor. The compressor input shaft may
have to be turned to facilitate the removal of the
gate rotor support. On dual gate versions, repeat
the procedure for the remaining gate rotor support
assembly.
bearing end of the gate rotor support towards the
suction end of the compressor. The compressor
input shaft may have to be rotated to facilitate the
installation of the gate rotor support.
11. Install the roller bearing housing with a new O-ring.
Tighten the bolts to the recommended torque
value.
12. Install the spindle with shims and O-ring, tighten
bolts, see Appendix A. Measure the clearance between the shelf and blade.
13. Check the clearance between the entire gate rotor blade and the shelf, rotate the gate rotor to
fi nd the tightest spot. It should be between 0.003-
0.004“ (0.076-0.102 mm). Make adjustments, if
INSTALLATION
10. Install the gate rotor support. Carefully tilt the roller
5 – 24
VSG/VSSG • Installation, Operation and Maintenance Manual •Vilter/Emerson • 35391SSG
Figure 5-21. Gate Rotor Assembly Breakdown
Page 83

Section 5 • Maintenance/Service
necessary. It is preferable to shim the gate rotor
blade looser rather than tighter against the shelf.
14. Once the clearance is set remove the spindle. Install
new O-ring, apply Loctite 242 thread locker to the
socket head cap screw clamping the thrust bearings to the spindle. Torque all bolts, see Appendix
A.
15. Install side covers with new gaskets. Tighten bolts,
see Appendix A. The unit can now be evacuated
and leak checked.
Check for 0.003-0.004” (0.076- 0.102 mm) clearance between
gate rotor blade and partition.
Figure 5-23. Gate Rotor and Shelf Clearance
Figure 5-22. Gate Rotor Thrust Bearing
VSG/VSSG • Installation, Operation and Maintenance Manual •Vilter/Emerson • 35391SSG
5 – 25
Page 84

Section 5 • Maintenance/Service
Gate Rotor Disassembly
1. To perform gate rotor disassembly, remove
gate rotor from compressor, see Gate Rotor
Assembly Replacement procedure (All VSG-VSSG
Compressors Except VSG 301-701 Compressors)
or Gate Rotor Assembly procedure (VSG 301-701
Compressors ONLY).
GATE ROTOR BLADE REMOVAL
2. Remove the snap ring and washer from the gate rotor assembly. Lift gate rotor blade assembly off the
gate rotor support, see Figure 5-24.
3. Check damper pin and bushing for excessive wear.
Replace if required.
GATE ROTOR BLADE INSTALLATION
4. Install damper pin bushing (120) in gate rotor blade
(111) from the back side of the blade. Be sure bushing is fully seated.
5. Place blade assembly on gate rotor support.
Locating damper over pin.
6. Install washer (119) and snap ring (130) on gate rotor assembly. The bevel on the snap ring must face
away from the gate rotor blade. After the gate rotor
blade and support are assembled, there should be
a small amount of rotational movement between
the gate rotor and support.
5 – 26
Figure 5-25. Gate Rotor Blade Installation
Figure 5-24. Gate Rotor Blade Assembly
VSG/VSSG • Installation, Operation and Maintenance Manual •Vilter/Emerson • 35391SSG
Page 85

Section 5 • Maintenance/Service
GATE ROTOR THRUST BEARING REMOVAL
For removal of thrust bearings on VSG units:
7. Remove bolts (150) from the clamping ring (114),
see Figure 5-26.
8. Remove thrust bearing clamping ring.
9. Remove thrust bearings (126) from housing (113).
For removal of thrust bearings on VSSG units:
10. Remove retaining ring from gate rotor support.
11. Remove bearings from support.
12. Remove bearing retainer from inner race.
sides of the inner races are placed together. A light
application of clean compressor lubricating oil
should be used to ease the installation of the bearings into the gate rotor support.
17. Install the bearing retaining snap ring.
Figure 5-26. Gate Rotor Thrust Bearing
GATE ROTOR THRUST BEARING INSTALLATION
For installation of thrust bearings on VSG and VSSG units:
13. Install thrust bearings (126) in the housing so the
bearings are face to face. The larger sides of the inner races are placed together. A light application
of clean compressor lubricating oil should be used
to ease the installation of the bearings into the
housing.
14. Center the bearing retainer ring on housing, use
Loctite® 242-thread locker and evenly tighten the
bolts to the recommended torque value, see Figure
5-27.
For installation of thrust bearings on VSG 301- 701 units:
15. Install retainer in the back of the inner race of one
of the thrust bearings. The back of the inner race is
the narrower of the two sides.
16. The bearing with the retainer should be placed in
the housing fi rst, retainer towards the support.
Install the second bearing. The bearings should be
positioned face to face. This means that the larger
Figure 5-27. Thrust Bearing Installation
GATE ROTOR ROLLER BEARING REMOVAL
18. Remove the snap ring (131), which retains the roller bearing in the bearing housing, see Figure 5-28.
19. Remove the roller bearing (125) from the bearing
housing (112).
20. Use a bearing puller to remove the roller bearing
race (125) from the gate rotor support (110).
GATE ROTOR ROLLER BEARING INSTALLATION
21. Match up the part numbers on the inner race to
the part numbers outer race. Press the bearing race
(numbers visible) onto the gate rotor support.
22. Install the outer bearing into the bearing housing
so the numbers match the numbers on the inner
race. Install the snap ring retainer in the housing.
VSG/VSSG • Installation, Operation and Maintenance Manual •Vilter/Emerson • 35391SSG
5 – 27
Page 86

Section 5 • Maintenance/Service
The bevel on the snap ring must face away from the
roller bearing.
Figure 5-28. Roller Bearing Assembly
Restarting procedure in Section 4.
2. Turn disconnect switches to the OFF position for
the compressor unit and oil pump motor starter, if
equipped.
3. Allow compressor, motor and surrounding components to cool prior to servicing.
4. Disconnect connectors from actuator.
NOTE
Note orientation of components to aid in installation.
5. Remove screws and lock washers securing actuator
assembly to actuator mount.
6. Remove actuator assembly from actuator mount.
INSTALLATION
CAUTION
When installing the slide valve actuator assembly,
loosen locking collar down the shaft. Do not use a
screwdriver to pry locking collar into position.
Slide Valve Actuator Assembly
Replacement
To replace slide valve actuator assembly, proceed with
the following steps:
REMOVAL
WARNING
At shutdown, open any other valves that may trap
liquids to prevent serious injury and/or damage to
equipment.
WARNING
Follow local lockout/tagout procedure. Failure to
comply may result in serious injury, death and/or
damage to equipment.
NOTE
This procedure is applicable to both capacity and
volume slide valve actuator assemblies.
7. Position actuator assembly on mount as noted in
removal.
8. Install lock washers and screws to secure actuator
assembly to actuator mount.
9. Tighten screws, see Appendix A.
10. Connect connectors to actuator assembly.
11. Calibrate actuator assembly, see Slide Valve
Calibration procedure in Section 4.
1. Shut down the compressor unit, refer to Stopping/
5 – 28
VSG/VSSG • Installation, Operation and Maintenance Manual •Vilter/Emerson • 35391SSG
Page 87

Section 5 • Maintenance/Service
Command Shaft Assembly
Replacement
REMOVAL
NOTE
The following steps can be used to remove or install
either the capacity or volume command shaft
assemblies.
1. Shut down and isolate compressor unit, see
Compressor Unit Shutdown and Isolation
procedure.
2. Remove actuator, see Actuator Assembly
Replacement procedure.
3. Remove four socket head cap screws (457) and
Nord-Lock washers (477) securing mounting plate
(415) to manifold.
4. The command shaft and mounting plate may now
be removed from the compressor.
cover.
5. Seal with stationary carbon face (219B) and rotating mirror face (219C).
INSTALLATION
5. Install the command shaft assembly with a new
O-ring (446) on the manifold. Make sure that the
command shaft tongue is engaged in the cross
shaft slot. Rotate the bearing housing so the vent
holes point down, this will prevent water and dust
from entering the vents.
6. Install the actuator mounting plate with the four
socket head cap screws and Nord-Lock washers securing it with proper torque.
7. Perform leak check, see Compressor Unit Leak
Check procedure.
Command Shaft Seal Replacement
REMOVAL
1. Remove bolts (281) holding the shaft seal cover
(218). Insert two of the bolts into the threaded
jacking holes to assist in removing the cover. There
will be a small amount of oil drainage as the cover
is removed.
2. Remove the rotating portion of the shaft seal
(219C).
3. Remove oil seal (230) from cover.
4. Remove the stationary portion of the shaft seal
(219B) from the seal cover using a brass drift and
hammer to tap it out from the back side of the seal
Figure 5-29. Command Shaft Seal
INSTALLATION
CAUTION
Care must be taken when handling the shaft seal and
mirror face so it is not damaged. Do not touch the
carbon or mirror face as body oil and sweat will cause
the mirror face to corrode.
NOTE
When replacing the stationary members of the seal
on the VSSG 291 thru VSSG 601 the roll pin in the
cover is used only with the seal assembly having a
stationary mirror face. If a seal assembly with a
stationary carbon face is installed, the roll pin must
be removed.
6. To install the carbon cartridge part of the seal in the
seal cover; clean the seal cover, remove protective
plastic from the carbon cartridge, do not wipe or
touch the carbon face. Lubricate the sealing O-ring
with clean compressor lubricating oil. If applicable,
align the hole on the back of the carbon cartridge
with the dowel pin in the seal cover. Install cartridge using seal installation tool or similar (see tool
lists).
7. Wipe clean, the compressor input shaft and the
VSG/VSSG • Installation, Operation and Maintenance Manual •Vilter/Emerson • 35391SSG
5 – 29
Page 88

Section 5 • Maintenance/Service
shaft seal cavity in the compressor housing. Apply
clean compressor oil to the shaft seal seating area
on input shaft.
8. Lubricate the inside area of the rotating seal with
clean compressor lubricating oil, do not wipe or
touch the face of the rotating portion of the seal.
Align the slot in the rotating seal with the drive pin
on the compressor input shaft, see Figure 5-30.
Carefully push the seal on, holding onto the outside area of the seal until the seal seats against the
shoulder on the input shaft. Make sure the seal is
seated against the shoulder. If the seal is not fully
seated against the shoulder, the shaft seal carbon
will be damaged when the seal cover is installed.
5 – 30
Figure 5-30. Command Shaft Seal Installation
VSG/VSSG • Installation, Operation and Maintenance Manual •Vilter/Emerson • 35391SSG
Page 89

Section 6 • Troubleshooting
Table 6-1. Slide Valve Actuator Troubleshooting Guide (1 of 2)
Problem Reason Solution
The actuator cannot be calibrated or
exit calibration mode
The actuator goes into calibration
mode spontaneously
Dirt or debris is blocking one or both
optocoupler slots
The photochopper fence extends
less than about half way into the
optocoupler slots
The white calibrate wire in the grey
Turck cable is grounded
Dirt and/or condensation on the
position sensor boards are causing it
to malfunction
The calibrate button is stuck down Try to free the stuck button.
The position sensor has failed
Push button is being held down for
more that ¾ second when going
through the calibration procedure
The white calibrate wire in the
grey Turck cable is grounding
intermittently
A very strong source of electromagnetic interference (EMI), such as a
contactor, is in the vicinity of the actuator or grey cable
Clean the optocoupler slots with a
Q-Tip and rubbing alcohol.
Adjust the photochopper so that
the fence extends further into the
optocoupler slots. Make sure the
motor brake operates freely and
the photochopper will not contact
the optocouplers when the shaft is
pressed down.
Tape the end of the white wire in the
panel and make sure that it cannot
touch metal
Clean the boards with an electronics
cleaner or compressed air.
Replace the actuator.
Depress the button quickly and then
let go. Each ¾ second the button is
held down counts as another press.
Tape the end of the white wire in the
panel and make sure that it cannot
touch metal.
Tape the end of the white wire in the
panel and make sure that it cannot
touch metal.
Install additional metal shielding material between the EMI source and
the actuator or cable.
There is an intermittent failure of the
position sensor
The actuator goes into calibration
mode every time power is restored
after a power loss
The actuator does not transmit the
correct position after a power loss
VSG/VSSG • Installation, Operation and Maintenance Manual •Vilter/Emerson • 35391SSG
The motor brake is not working properly (see theory section above.)
The motor was manually moved
while the position sensor was not
powered.
The motor brake is not working
properly
The position sensor’s EEPROM
memory has failed
Replace the actuator.
Get the motor brake to where it
operates freely and recalibrate.
Recalibrate.
Get the motor brake to where it operates freely and then recalibrate.
Replace the actuator.
6 – 1
Page 90

Section 6 • Troubleshooting
Table 6-1. Slide Valve Actuator Troubleshooting Guide (2 of 2)
Problem Reason Solution
The motor was manually moved
while the position sensor was not
powered.
Recalibrate.
The actuator does not transmit the
correct position after a power loss
There is a rapid clicking noise when
the motor is operating
The motor operates in one direction
only
The motor will not move in either
direction
The motor runs intermittently, several minutes on, several minutes off
The motor brake is not working
properly
The position sensor’s EEPROM
memory has failed
The photochopper is misaligned
with the slotted optocouplers
The photochopper is positioned too
low on the motor shaft.
A motor bearing has failed Replace the actuator.
There is a loose connection in the
screw terminal blocks
There is a loose or dirty connection
in the yellow Turck cable
The position sensor has failed Replace the actuator.
There is a broken motor lead or
winding
The thermal switch has tripped because the motor is overheated
Any of the reasons listed in “The motor operates in one direction only”
The command shaft is jammed Free the command shaft.
Broken gears in the gearmotor Replace the actuator.
Blown relay or fuse.
Motor is overheating and the thermal switch is tripping
Get the motor brake to where it operates freely and then recalibrate.
Replace the actuator.
Try to realign or replace the actuator.
Adjust the photochopper so that
the fence extends further into the
optocoupler slots.
Tighten.
Clean and tighten.
Replace the actuator.
The motor will resume operation
when it cools. This could be caused
by a malfunctioning control panel.
Consult the factory.
See above.
Check and replace blown relay and/
or fuse.
This could be caused by a malfunctioning control panel. Consult the
factory.
The motor runs sporadically
The motor runs but output shaft will
not turn
6 – 2
Bad thermal switch Replace the actuator.
Any of the reasons listed in “The motor will not move in either direction”
Stripped gears inside the gear
motor or the armature has come unpressed from the armature shaft
VSG/VSSG • Installation, Operation and Maintenance Manual •Vilter/Emerson • 35391SSG
See above.
Replace the actuator.
Page 91

Section 6 • Troubleshooting
Slide Valve Actuators communicate problems discovered by internal diagnostics via LED blink codes. Only one blink
code is displayed, even though it is possible that more than one problem has been detected.
Table 6-2. Slide Valve Actuator LED Blink Codes* (1 of 2)
Flash Pattern Meaning
*=ON
_=OFF
*_*_*_*_*_*_*_*_*_*_*_
*___*___*___*___*___
*__*________________
Calibration step 1
Calibration step 2
This indicates a zero span. This error can only occur during calibration. The typical cause is forgetting to move the actuator when setting the upper limit of the
span. If this is the case, press the blue button to restart the calibration procedure. This error can also occur if either or both of the slotted optocouplers are
not working. If this is the case, the slide valve actuator will have to be replaced.
The operation of the slotted optocouplers is tested as follows:
1. Manually rotate the motor shaft until the aluminum photochopper fence is
not blocking either of the optocoupler slots.
2. Using a digital multi-meter, measure the DC voltage between terminal 3 of
the small terminal block and TP1 on the circuit board (see Note 1). You should
measure between 0.1 and 0.2 Volts.
3. Next, measure the DC voltage between terminal 3 and TP2 on the circuit
board. You should measure between 0.1 and 0.2 Volts.
This indicates a skipped state in the patterns generated by the optocouplers as
the motor moves. This error means that the slide valve actuator is no longer
transmitting accurate position information. The actuator should be recalibrated
as soon as possible. This code will not clear until the actuator is recalibrated.
This code can be caused by:
*__________________
VSG/VSSG • Installation, Operation and Maintenance Manual •Vilter/Emerson • 35391SSG
1. The motor speed exceeding the position sensors ability to measure it
at some time during operation. A non-functioning motor brake is usually to
blame.
2. The actuator is being operated where strong infrared light can falsely
trigger the slotted optocouplers, such as direct sunlight. Shade the actuator
when the cover is off for service and calibration. Do not operate the actuator
with the cover off.
6 – 3
Page 92

Section 6 • Troubleshooting
Table 6-2. Slide Valve Actuator LED Blink Codes (2 of 2)
Flash Pattern Meaning
The motor has overheated. The actuator motor will not run until it cools. Once
the motor cools, the actuator will resume normal operation.
Motor overheating is sometimes a problem in hot and humid environments
when process conditions demand that the slide valve reposition often. Solutions
*__*__*____________
are available; consult your Vilter authorized distributor for details.
Another possible cause for this error is a stuck motor thermal switch. The thermal switch can be tested by measuring the DC voltage with a digital multi-meter
between the two TS1 wire pads (see Note 2). If the switch is closed (normal
operation) you will measure 0 Volts.
The 24V supply is voltage is low. This will occur momentarily when the actuator
is powered up and on power down.
********************
If the problem persists, measure the voltage using a digital multi-meter between terminals 3 and 4 of the small terminal block. If the voltage is >= 24V,
replace the actuator.
The EEPROM data is bad. This is usually caused by loss of 24V power before the calibration procedure was completed. The actuator
will not move while this error code is displayed. To clear the error,
_*******************
calibrate the actuator. If this error has occurred and the cause was
not the loss of 24V power during calibration, possible causes are:
1. The EEPROM memory in the micro-controller is bad.
2. The large blue capacitor is bad or has a cracked lead.
*****____*__________ Micro-controller program failure. Replace the actuator.
*There are two versions of slide valve actuators, version A and B. Only version B is able to display LED blink codes. Slide valve actuator version B can
be distinguished by only having a single circuit board as supposed to two circuit boards in version A.
Note 1: TP1 and TP2 are plated-thru holes located close to the slotted optocouplers on the board. They are clearly marked on the board silkscreen
legend.
Note 2: The TS1 wire pads are where the motor thermal switch leads solder into the circuit board. They are clearly marked on the board silkscreen
legend and are oriented at a 45 degree angle.
6 – 4
VSG/VSSG • Installation, Operation and Maintenance Manual •Vilter/Emerson • 35391SSG
Page 93

Section 6 • Troubleshooting
Table 6-3. Troubleshooting Guide - General Problems & Solutions (1 of 3)
Problem Solution
• After failing to start compressor with “Prelube Oil Pump Inhibit”, fi rst allow
Discharge pressure, Oil Filter In pressure and Out pressure to equalize. Then
restart compressor. If compressor fails to start due to low oil pressure, continue troubleshooting with items below.
• Reset Prelube Oil Pressure Setpoint in Alarms and Trip Setpoints screen to
lowest recommended setpoints.
• Check calibration of oil manifold transducer, discharge pressure transducer,
and suction transducer.
Low Oil Pressure at Start
Low Run Oil Pressure
Oil fl ow or oil pressure
problems
• Check for correct oil pump motor rotation and operation.
• Ensure transducer isolation valves are open.
• Verify that the correct transducer ranges are selected.
• Check to see all oil line valves are open except the oil dump valve used to fi ll
the lines and oil cooler.
• Check oil strainer for dirt.
• Check oil fi lter pressure drop.
• Check “Prelube Oil Pump Time Limit” setpoint is suffi cient in Compressor
Timer Setpoints screen.
• Prelube pressure is manifold pressure minus discharge pressure.
• Check solutions in “Low Oil Pressure at Start”.
• Check that there is proper discharge pressure ratio to create differential pressure, otherwise oil pressure can’t be maintained. Oil pressure is manifold oil
pressure minus the suction pressure. It is a net pressure.
• If the oil pump is selected to be a part time oil pump in the “Setup” menu,
then ensure that it only shuts off at an appropriate pressure ration that takes
into account pressure drops through the oil cooler. This is a set point in the
“Compressor Control Setpoints” menu called “Oil Pump Restart.” It is a pressure ratio. (discharge pressure in psia/suction pressure in psia) Default ratio
is a pressure ratio of 3.00:1 that stops the pump and 2.80:1 that restarts the
pump. This ratio can be increased. Do not decrease without consulting Vilter.
• Clean oil strainer screen.
• Change oil fi lter, maybe plugged or collapsed.
• Oil pump gears worn internally, excessive end-clearance.
• Oil priming valve used on air-cooled cooler units is open.
• Relief in-line check valve stuck open.
• Pressure ratio too low, oil pump should be on.
• Check that the correct pressure or temperature range is selected in the
Instrument Calibration menu.
Faulty pressure or temperature
readings
VSG/VSSG • Installation, Operation and Maintenance Manual •Vilter/Emerson • 35391SSG
• Check cable connections at device, terminal strips, and PLC input card for
correct wiring and shielding (RF noise).
• Check calibration of RTDs and transducers.
6 – 5
Page 94

Section 6 • Troubleshooting
Table 6-3. Troubleshooting Guide - General Problems & Solutions (2 of 3)
Problem Solution
• Oil return line from coalescing side of oil separator to suction is closed, not
open enough (.75 turns should be suffi cient), or plugged with debris
• The check valve in the oil return line could be stuck closed or the fl ow is in the
wrong direction
• There may be water in the oil affecting the coalescing elements
• Coalescent elements in need of replacement due to age or damage (water
Oil Loss Issues
High oil temperature (liquid
injection)
Capacity/Volume Slide
Actuator Alarms/Trips/
Symptoms:
contamination)
• The operating conditions are not correct (too high of suction and/or too low
discharge pressure) This creates increased gas fl ow which could make the oil
separator too small
• The suction or discharge check valve is not working correctly causing oil to
escape when the unit stops
• Viscosity of oil incorrect; send sample for testing
• There is an oil leak somewhere in the system
• Check for correct setting of all manual values.
• Check for correct operation of 2-way automatic oil mixing valve.
• In the “Vilter Only” menu, ensure that you select “Yes this unit has the oil
mixing valve” to enable it.
• If your are controlling a step type oil cooler or a VFD oil cooler, verify the
correct one is selected in the “Vilter Only” menu and the amount of steps are
entered in the menu screen “Oil Cooler Step Control” menu.
• Check the oil cooler and associated piping to make sure it is full of oil before
starting.
• Check the oil strainer for debris and clean if necessary.
• Verify that the volume slide actuator is functioning correctly and that the
correct compressor size (type) is selected in the “Vilter Only” menu.
• Check that all fans are working.
• Check for correct fan rotation on the oil cooler.
• Check that your operating conditions are within the “As Sold” design
conditions.
• Calibration method not correct
• Actuator or Gear motor not working, or off on overload
• Slide valve carriage assembly out of position, slides binding
• Cross-shaft gears, broken pins
• Command shaft broken
• Slide valve rack or rack shaft damaged
• Check balance piston movement
• Reference Slide Valve Actuator Troubleshooting Guide
• Check I/O fusing
6 – 6
VSG/VSSG • Installation, Operation and Maintenance Manual •Vilter/Emerson • 35391SSG
Page 95

Section 6 • Troubleshooting
Table 6-3. Troubleshooting Guide - General Problems & Solutions (3 of 3)
Problem Solution
High Amp Draw • Check Main Motor Amps scaling and PLC.
• Check that unit is leveled and secured to mounting pad or fl oor.
• Check supported pipes (i.e. suction and discharge pipe) and make sure they
Vibration
are adequately supported.
• Check for loose bolts and nuts.
• Check condition of compressor and motor (i.e. alignments)
Excessive Motor Backspin
• If there is more than normal motor backspin at shutdown, check suction
check valve for proper operation.
VSG/VSSG • Installation, Operation and Maintenance Manual •Vilter/Emerson • 35391SSG
6 – 7
Page 96

6 – 8 / Blank
VSG/VSSG • Installation, Operation and Maintenance Manual •Vilter/Emerson • 35391SSG
Page 97

Section 7 • Warranty and Parts
Warranty Claim Processing
This section explains how the warranty claim is processed and to help clear any questions that may arise
prior to contacting customer service. For additional warranty information, refer to the VSG/VSSG Standard Vilter
Warranty Statement on page i. Vilter contact information can be found on page ii.
1. The warranty process starts with contacting a Vilter
Service and Warranty (S&W) department representative. Ensure to have the original Vilter sales order
number for the equipment available to better assist
you.
2. Our Vilter S&W representative will confi rm if the
equipment is within the warranty time frame as described in the warranty statement.
If the equipment (Part/Compressor/Compressor Motor)
is within the warranty time frame, proceed to the following section regarding the type of equipment:
PAR T
1. Submit a Purchase Order (PO) to procure the replacement part:
• The correct Vilter part number and the
quantity.
• The original Vilter sales order for the
equipment.
2. Request a Return Material Authorization (RMA)
number:
• Please provide as much information describing the mode of failure to be recorded on the
RMA document. This will assist us with providing a quicker review once we have received
the warranty part (ex. Part does not calibrate,
part does not read correct temperature, etc.).
• Any additional parts returned on the RMA
that is not listed, will be returned freight collect or scrapped. The RMA is valid for 60 days
from the RMA request date.
3. After replacing the warranty part:
• Ship the part to Vilter per the instructions on
the RMA document.
• Please include a copy of the RMA document
in the box for identifi cation purposes when
the part is received.
4. Part to be evaluated.
5. Warranty Consideration:
• Acceptance – A credit will be provided for the
customer part sales order.
• Denial – Notifi cation of denial will be provid-
ed to the customer.
COMPRESSOR
• Due to the site specifi c nature of compressor warran-
ty, all warranty responses must be mitigated through
a Vilter S&W department representative.
COMPRESSOR MOTOR
The warrany is a pass through warranty as stated in the
equipment warranty and as such will be determined by
the manufacturer. All extraneous expenses (i.e. shipping,
removal/installation, alignment) are not covered by Vilter’s
nor the manufacturer’s warranty.
1. The motor will need to be taken to the nearest
Electrical Apparatus Service Association (EASA) repair facility or motor manufacturer approved repair
facility.
2. The motor shop will provide the motor manufac-
turer with the failure analysis.
3. The motor manufacturer will make the warranty
disposition.
On Site Service Support
If on site support is required, contact a Vilter S&W department representative to start this process.
Warranty does not cover labor and extraneous expenses.
1. A quote, a service rate sheet, and the service terms
and conditions will be provided.
2. Submit a PO.
3. Schedule the service visit.
VSG/VSSG • Installation, Operation and Maintenance Manual •Vilter/Emerson • 35391SSG
7 – 1
Page 98

Section 7 • Warranty and Parts
Remanufactured Gas Bare Shaft
Compressor Process
These instructions are an overview of how the process
works when a bare shaft compressor is in need of being
remanufactured. This is to help clear any questions that
may arise prior to contacting customer service.
The process begins by contacting Vilter’s Customer
Service Department. Vilter contact information can be
found on page ii.
• Request a “VSG Single Screw Compressor Rebuild
Form”.
• Submit the Rebuild Form and a Purchase Order
(PO) for the inspection. A fee is required for the initial inspection and teardown report; contact Vilter
Customer Service representative for the latest fee.
• A Return Material Authorization (RMA) number will
be provided.
• Send the compressor to Vilter in the condition as
stated on the Rebuild Form (i.e. no oil in the compressor). Charges may apply if conditions are not met.
• A report will be sent to you after the inspection has
been completed explaining what level of rebuild is
necessary along with the cost.
NOTE
Inspection and rebuild times will vary, contact Vilter
Customer Service representative for further details.
• Submit a new PO for the amount that will be needed
for the rebuild. The inspection cost will be waived
upon receipt of the new PO. Make sure to provide
your “Ship to Address” and “Billing Address”.
Level 3 - Current Reman Compressor requires complete
rebuilding and re-conditioning to “as-new” condition.
All the components listed in Level 2 are replaced plus all
hardware, slide assemblies, pistons, and a main rotor (if
damaged) and/or gate rotor supports.
NOTE
A Level 1 and Level 2 rebuild will include washing
the housing and repainting over the current paint.
A Level 3 rebuild will include blasting all the current
paint off before repainting.
BARE SHAFT COMPRESSOR DESCRIPTION
Single Screw Bare Shaft Compressor features include:
• Cast grey iron frame with cast ductile iron discharge
manifold and gate rotor covers with discharge connection horizontal.
• Standard drive shaft is tapered.
• Standard slide assembly.
• Viton shaft seal O-rings.
• Crating with Purge & Gauge.
• Does not include handwheels or slide valve motors.
EXPLANATION OF REBUILD LEVELS
Level 1
Compressor is in good condition. Replace bearings, gaskets, shaft seal and o-rings. All hardware is intended to
be re-used (when possible). Parts are organized in part
kit form.
Level 2
Compressor is in good condition, but requires new gate
rotor blades. Replace all items in Level 1 plus new gate
rotor blades and bushings.
7 – 2
VSG/VSSG • Installation, Operation and Maintenance Manual •Vilter/Emerson • 35391SSG
Page 99

Appendix A • Torque Specifications
Torque Specifications (ft-lbs)
Type
Bolt
SAE Grade 2
Coarse (UNC)
SAE Grade 5
Coarse (UNC)
SAE Grade 5
Coarse (UNC)
SAE Grade 8
Coarse (UNF)
Socket Head
Cap Screw
(ASTM A574)
Coarse (UNC)
1) Torque values in this table are not to override other specifi c torque specifi cations when supplied.
2) When using loctite, torque values in this table are only accurate if bolts are tightened immediately after
loctite is applied.
* The proof strength of Grade 2 bolts is less for sizes 7/8 and above and therefore the torque values are less
than smaller sizes of the same grade.
Head
Markings
#10 1/4 5/16 3/8 7/16 1/2 9/16 5/8 3/4 7/8
- 5 10 18 29 44 63 87 155 150*
- 8 16 28 44 68 98 135 240 387
--18-------
- 11 22 39 63 96 138 191 338 546
5 13 26 46 73 112 115 215 380 614
Nominal Size Numbers or Inches
Torque Specifications for 17-4 Stainless Steel Fasteners (ft-lbs)
Type
Bolt/Nut
Hex & Socket
Head Cap Screws
Nut -8-25-----
NOTE: Continue use of red loctite #271 (VPN 2205E) on currently applied locations. Use blue loctite #243
(VPN 2205F or 2205G) on all remaining locations.
VSG/VSSG • Installation, Operation and Maintenance Manual •Vilter/Emerson • 35391SSG
Head
Markings
#10 1/4 5/16 3/8 7/16 1/2 9/16 5/8 3/4
3 8 14 25 40 60 101 137 245
Nominal Size Numbers or Inches
A
Page 100

Appendix B • Motor (Compressor) - General Storage Instructions
Short Term Storage
If the equipment is not put into immediate use it should
be stored in a clean, dry location. For all Weather
Protected Type II (WPII) motors, motor heaters should
be activated upon arriving at the jobsite to prevent condensation. This is required for warranty considerations.
Care should be taken to keep the equipment covered
when moving from a cold location to a warm location,
otherwise condensation may occur. If condensation
does occur, and the equipment is moist, allow it to dry
thoroughly before applying power.
Long Term Storage
1. Cover machined metal parts with weatherproof cover,
but leave ventilating area exposed.
2. Make certain unpainted portions are covered and retouch any scratches or fl aked areas.
3. If condensate plugs or drain plugs have been used,
make sure they are operative.
4. Cover completely with plastic cover and insert silicagel bags inside the cover for moisture control.
5. If motor is equipped with space heaters make sure
space heaters are properly connected and operative.
The motor interior temperature should be maintained
approximately 10 °F (5.6 °C) above ambient.
6. For all Weather Protected Type II (WPII) motors, motor
heaters should be activated upon arriving at the jobsite
to prevent condensation. This is required for warranty
considerations.
7. A systematic inspection and maintenance schedule
should be established. If rotating apparatus is to be
stored for 6 months or longer, it should, in addition to
the minor precautions above, be given a megger test every 3 to 6 months. A minimum reading of 10 megohoms
is recommended. A record of insulation values, temperature, time, humidity and length of voltage application
should be recorded to show winding conditions prior to
start up.
8. If windings are designed for outdoor operation, they
will not be affected by extreme or sudden temperature
changes or inclement weather in general. However a
weather proof cover with provisions for adequate ventilation should be used to guard against intrusion of salt,
dust, or other abrasive or corrosive material.
9. It is recommended that the rotor be turned every
month to redistribute the lubricant in the bearings and
oil or grease be added every 6 six months.
10. Preferably, storage would be in a warehouse or enclosed building but the same precautions should be
followed.
Lubrication
Refer to manufacturer’s lubrication instructions.
B
VSG/VSSG • Installation, Operation and Maintenance Manual •Vilter/Emerson • 35391SSG
 Loading...