

Page 1
Vission Control Manual
Page 2

2
Page 3

Important Note
Before applying power to the VISSION MicroController panel, all wiring to the panel should be per NEC.
Specifically check for proper voltage and that the neutral is grounded at the source. An equipment ground
should also be run to the panel.
*See W iring Instructions and Diagrams before proceeding.
Before start-up you need to enter all system values and options, see section on Setpoint Values.
“Before powering the Vission control panel down”, it is a good idea to Backup Control Settings to insure
that all previously changed setpoints have been properly saved. See section on saving changes. After backing up the setpoints DO NOT power down the V ission panel for at least 1 minute. This will allow adequate
time for all setpoints to be properly saved.
Note: The screen shots depicted in this manual represent the screens corresponding to
Vission program version # 2.4.41, the current version at time of printing. In our effort
to continuously improve the functionality and ease-of-use of the Vission Micro-controller, the look of some screens may differ slightly than the representations shown
here.
Equipment Indentification Numbers:
Vilter Order Number: __________________________Serial Number: _____________
Vilter Order Number: __________________________Serial Number: _____________
Vilter Order Number: __________________________Serial Number: _____________
3
Page 4

4
Page 5

Table of Contents
Important Note ............................................................................................................3
STANDARD VILTER WARRANTY STATEMENT .............................................6
Operational Flow Chart ............................................................................................. 8
Operational Flow Chart (cont.).................................................................................9
Wiring Instructions ...................................................................................................11
Wiring Instructions For Vission Only .....................................................................1 2
Wiring Diagram For Vission Only..........................................................................2 0
Main Screen...............................................................................................................22
Set Up Screen .............................................................................................................23
Version Screen ...........................................................................................................25
Maintenance Screen .................................................................................................26
Menu Screen ..............................................................................................................28
Common Buttons .......................................................................................................29
Compressor Control .................................................................................................30
Additional Compressor Controls ............................................................................32
Compressor Alarm and Trip....................................................................................35
Compressor Setpoints and Alarms ..........................................................................37
Miscellaneous Screens (Condenser Control) ........................................................41
Compressor Sequencing (Max 5 Compressors) .................................................... 4 3
Vilter Only Screen .....................................................................................................47
Diagnostics Force Output ........................................................................................48
Instrument Calibration .............................................................................................49
Calibration Procedure of Optical Actuators ..........................................................5 1
Installation Instructions For Replacement Of Optical Actuator .........................5 4
Slide Valve Actuator Troubleshooting Guide ......................................................... 5 5
Slide Wiring Diagram for Models Vission VSM-91 To VSS-601 ........................5 9
Slide Wiring Diagram for Models Vission VSS-751 To VSS-1801 .....................6 0
Command Shaft Rotation and Travel.....................................................................61
Calibration For Earlier Style Mechanical Gearmotor/Potentiometers ............. 6 2
Trend Chart ............................................................................................................... 6 4
Data Select Screen....................................................................................................65
Event List ...................................................................................................................66
Trouble Shooting Flowchart (Vission Only) ..........................................................6 8
5
Page 6

Safety Failure Message ............................................................................................70
Supressor Kit Installation ........................................................................................ 7 3
Flash Card Installation Instructions.......................................................................74
Back Light Installation Instructions .......................................................................76
System Setpoints Alarms and Trips Work Sheet .................................................. 8 0
System Control Limit Values Work Sheet ..............................................................8 1
System Timer Values ................................................................................................. 8 2
Spare Parts ................................................................................................................84
Modifications for Analog Board (Vission/Vantage after July 2003) ...................8 5
Danfoss Liquid Injection Valves ..............................................................................87
Who to Contact .........................................................................................................88
6
Page 7

STANDARD VILTER WARRANTY
STATEMENT
Seller warrants the products it manufactures to be free from defects in material and workmanship for a period of eighteen
(18) months from the date of shipment from Seller s manufacturing plant or twelve (12) months from date of installation at
the initial end users location, whichever occurs first. In addition, Seller provides the following extended warranties: (a)
three (3) years from the date of shipment on single screw compressor internal rotating parts, (b) two (2) years from the
date of shipment on reciprocating compressors and single screw and reciprocating compressor parts, and (c) two (2)
years on all other parts on a single screw compressor unit. Such warranties do not apply to ordinary wear and tear.
Seller does not warrant that the product complies with any particular law or regulation not explicitly set forth in the
specifications, and Buyer is responsible for ensuring that the product contains all features necessary to safely perform
in Buyers and its customers plants and operations. Buyer must notify Seller of any warranty claim within ten (10) days
after such claim arises, otherwise Buyer waives all rights to such claim. Products supplied by Seller, which are manufactured by others, are not warranted by Seller, but rather Seller merely passes through the manufacturers warranty to
Buyer.
SELLER EXPRESSL Y DISCLAIMS ALL OTHER W ARRANTIES, WHETHER EXPRESS OR IMPLIED, INCLUDING
THE IMPLIED W ARRANTIES OF MERCHANT ABILITY AND FITNESS FOR A P ARTICULAR PURPOSE.
Unless otherwise agreed in writing, Buyers sole remedy for breach of warranty is, at Sellers option, the repair of the
defect, the correction of the service, or the providing a replacement part FOB Sellers office. Seller will not be responsible
for costs of dismantling, lost refrigerant, reassembling, or transporting the product. Further, Seller will not be liable for
any other direct, indirect, consequential, incidental, or special damages arising out of a breach of warranty. THESE
W ARRANTY REMEDIES ARE EXCLUSIVE AND ALL OTHER WARRANTY REMEDIES ARE EXCLUDED. Products
or parts for which a warranty claim is made are to be returned transportation prepaid to Sellers factory. Any improper
use, corrosion, neglect, accident, operation beyond rated capacity, substitution of parts not approved by Seller, or any
alteration or repair by others which, in Sellers judgement, adversely affects the Product, shall void all warranties and
warranty obligations. Further, Seller shall not be liable under the above warranties should Buyer be in default of its
payment obligations to Seller under this Agreement or any credit agreement.
7
Page 8
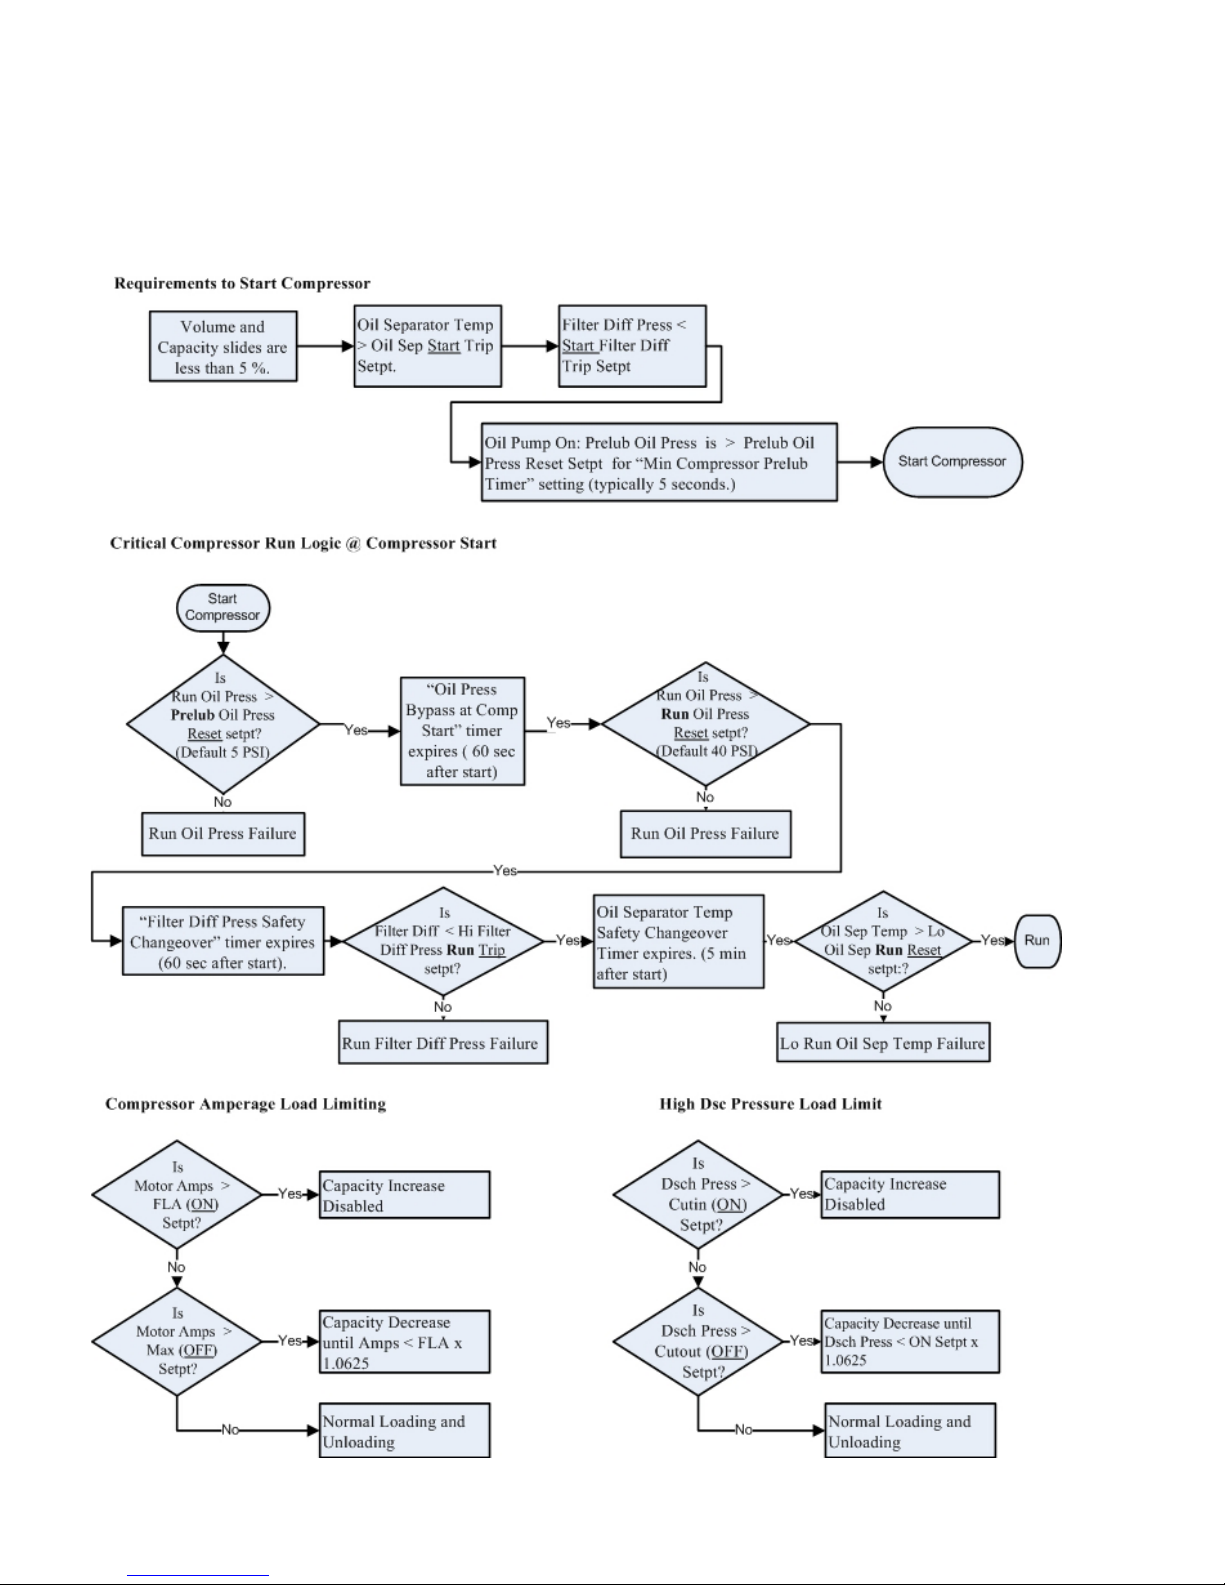
Operational Flow Chart
8
Page 9

Operational Flow Chart (cont.)
9
Page 10

10
Page 11

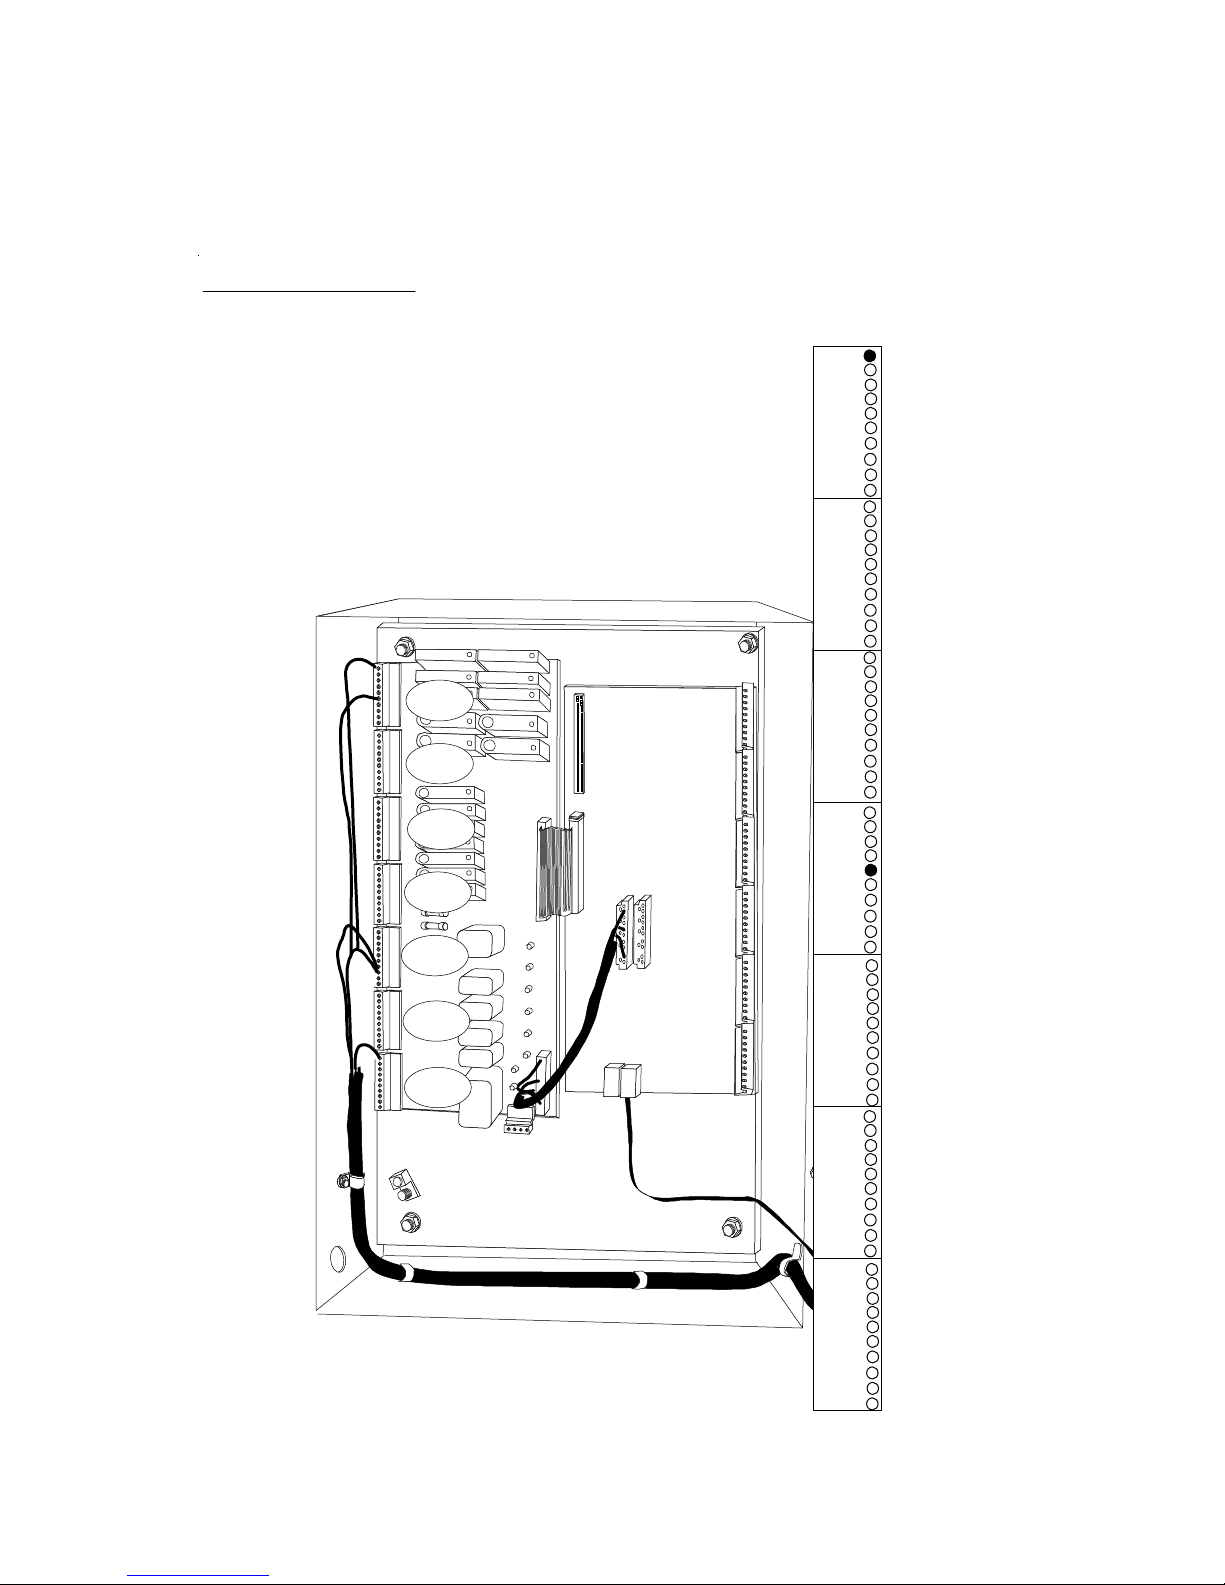
Wiring Instructions
11
Page 12
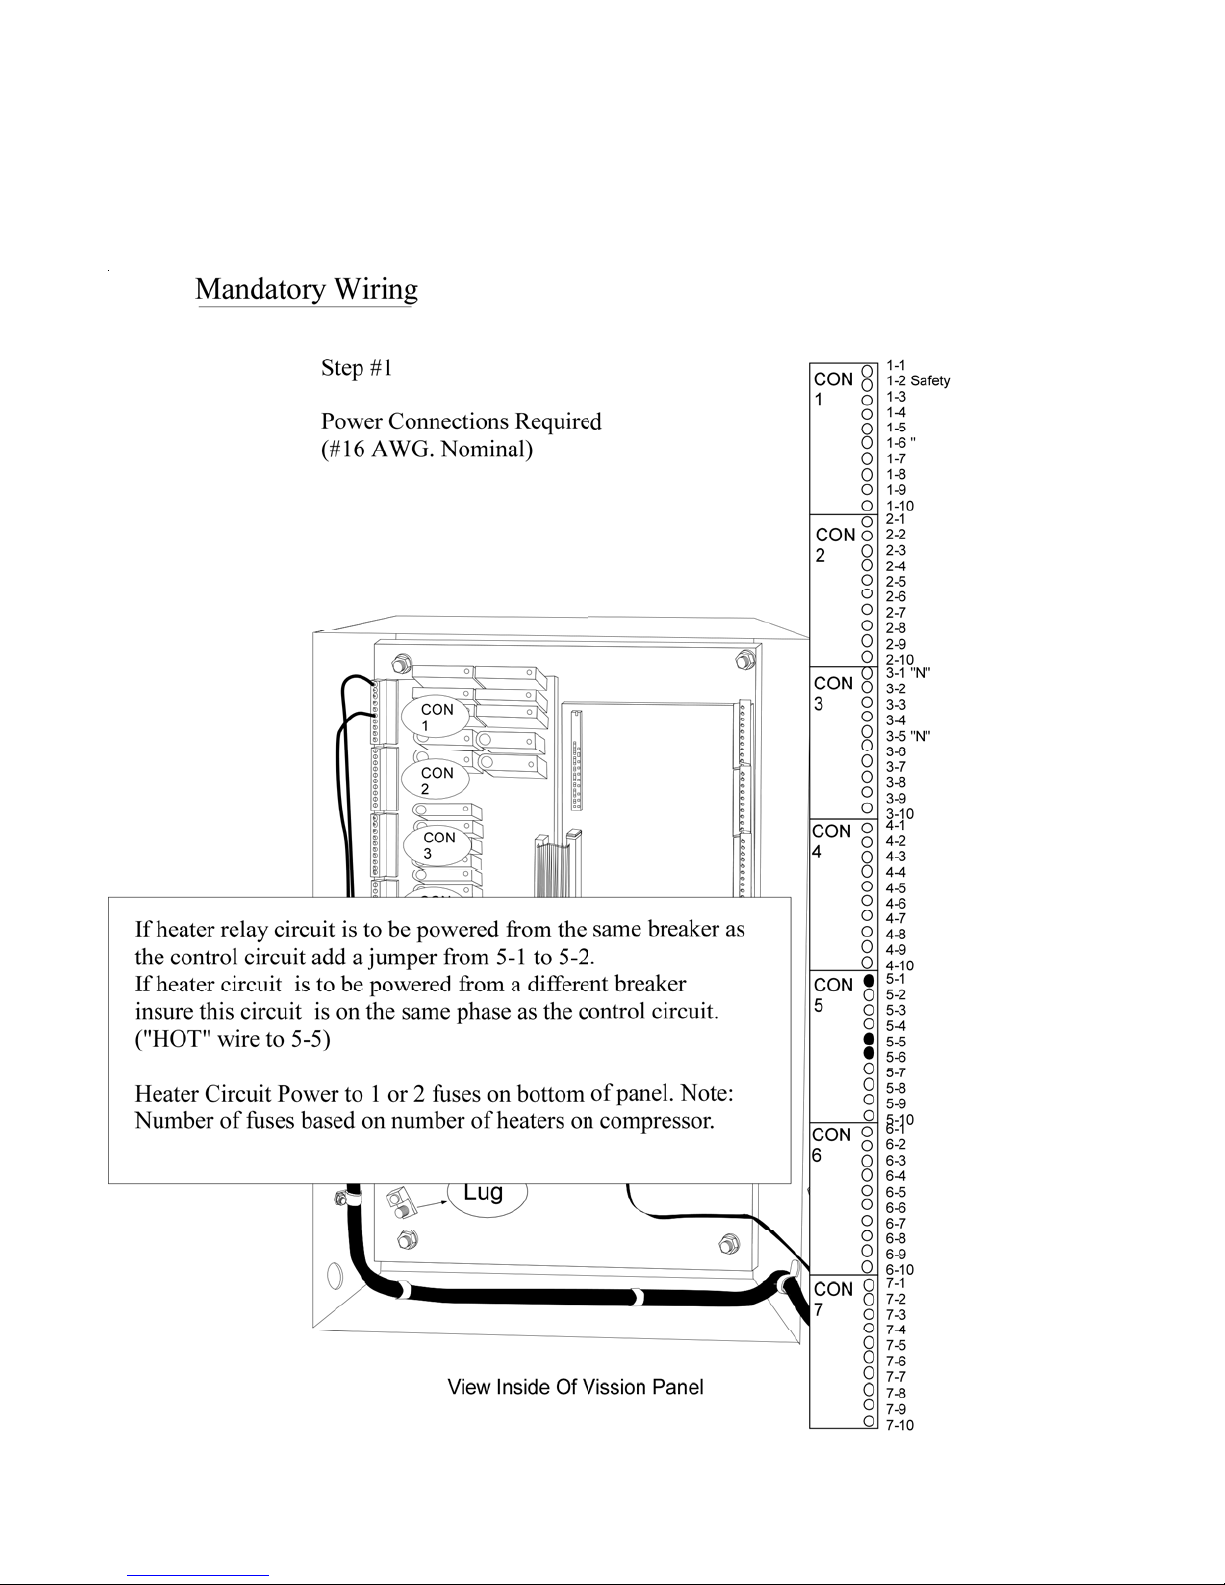
Wiring Instructions For Vission Only
5-1= Main Power to Panel
5-2= Heater #1 power
5-5= Heater #2 Power
12
Page 13
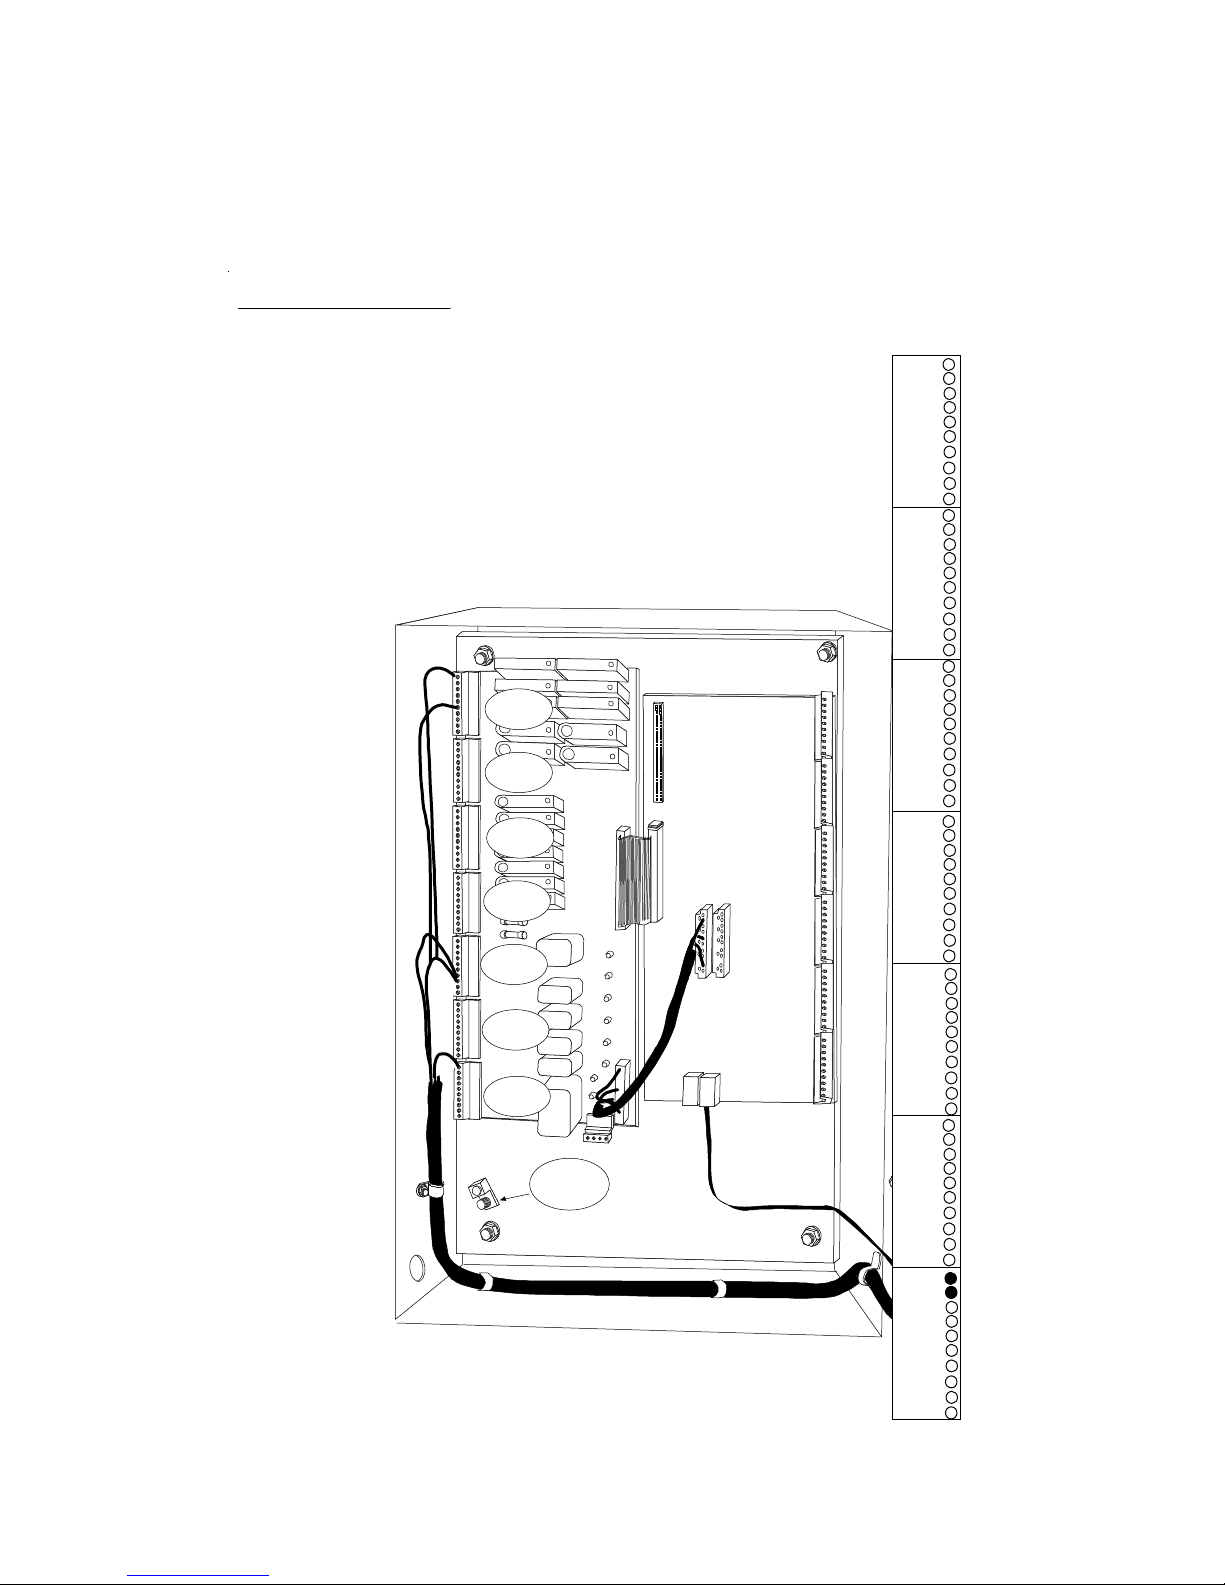
Wiring Instructions For Vission Only
Mandatory Wiring
Step #2
Motor Starter Contactor Connection
The contact to the pull in the motor starter contactor is a dry
contact, place a "HOT" wire from the starter circuit on 7-1.
Place the wire to energize the starter contactor on 7-2.
CON
1
CON
2
CON
3
CON
4
CON
5
CON
6
CON
7
Lug
View Inside Of Vission Panel
CON
1
CON
2
CON
3
CON
4
CON
5
CON
6
CON
7
1-1
1-2 Safety
1-3
1-4
1-5
1-6 "
1-7
1-8
1-9
1-10
2-1
2-2
2-3
2-4
2-5
2-6
2-7
2-8
2-9
2-10
3-1 "N"
3-2
3-3
3-4
3-5 "N"
3-6
3-7
3-8
3-9
3-10
4-1
4-2
4-3
4-4
4-5
4-6
4-7
4-8
4-9
4-10
5-1
5-2
5-3
5-4
5-5
5-6
5-7
5-8
5-9
5-10
6-1
6-2
6-3
6-4
6-5
6-6
6-7
6-8
6-9
6-10
7-1
7-2
7-3
7-4
7-5
7-6
7-7
7-8
7-9
7-10
13
Page 14
Wiring Instructions For Vission Only
Mandatory Wiring
Step #3
Motor St a rter Auxila ry C o nt a c t
"HOT" to 4-5
Wire to en e r g ize to 1-1
CON
1
CON
2
CON
3
CON
4
CON
5
CON
6
CON
7
View Inside Of Vission Panel
CON
1
CON
2
CON
3
CON
4
CON
5
CON
6
CON
7
1-1
1-2 Safety
1-3
1-4
1-5
1-6 "
1-7
1-8
1-9
1-10
2-1
2-2
2-3
2-4
2-5
2-6
2-7
2-8
2-9
2-10
3-1 "N"
3-2
3-3
3-4
3-5 "N"
3-6
3-7
3-8
3-9
3-10
4-1
4-2
4-3
4-4
4-5
4-6
4-7
4-8
4-9
4-10
5-1
5-2
5-3
5-4
5-5
5-6
5-7
5-8
5-9
5-10
6-1
6-2
6-3
6-4
6-5
6-6
6-7
6-8
6-9
6-10
7-1
7-2
7-3
7-4
7-5
7-6
7-7
7-8
7-9
7-10
14
Page 15

Wiring Instructions For Vission Only
Mandatory Wiring
Step #4
Oil Pump Starter Connection
"HOT" to 6-1
Wire to energize on 6-2
CON
1
CON
2
CON
3
CON
4
CON
5
CON
6
CON
7
View Inside Of Vission Panel
CON
1
CON
2
CON
3
CON
4
CON
5
CON
6
CON
7
1-1
1-2 Safety
1-3
1-4
1-5
1-6 "
1-7
1-8
1-9
1-10
2-1
2-2
2-3
2-4
2-5
2-6
2-7
2-8
2-9
2-10
3-1 "N"
3-2
3-3
3-4
3-5 "N"
3-6
3-7
3-8
3-9
3-10
4-1
4-2
4-3
4-4
4-5
4-6
4-7
4-8
4-9
4-10
5-1
5-2
5-3
5-4
5-5
5-6
5-7
5-8
5-9
5-10
6-1
6-2
6-3
6-4
6-5
6-6
6-7
6-8
6-9
6-10
7-1
7-2
7-3
7-4
7-5
7-6
7-7
7-8
7-9
7-10
15
Page 16
Wiring Instructions For Vission Only
Optional Wiring
Step #5
Auxiliary / Safety Wiring
A determination by the user is to be made if this option will
be used. If it is
not
used, insure that a jumper is insta l led
between L 2-1 and 1-2
If this option is used, remove the jum per 2-1 to 1-2 and
place the high level cutout (typically, other cutouts or an E-stop
could be used) common wire on 2-1 and the normally closed
wire to 1-2.
CON
1
CON
2
CON
3
CON
4
CON
5
CON
6
CON
7
Lug
View Inside Of Vission Panel
CON
1
CON
2
CON
3
CON
4
CON
5
CON
6
CON
7
1-1
1-2 Safet y
1-3
1-4
1-5
1-6 "
1-7
1-8
1-9
1-10
2-1
2-2
2-3
2-4
2-5
2-6
2-7
2-8
2-9
2-10
3-1 "N"
3-2
3-3
3-4
3-5 "N"
3-6
3-7
3-8
3-9
3-10
4-1
4-2
4-3
4-4
4-5
4-6
4-7
4-8
4-9
4-10
5-1
5-2
5-3
5-4
5-5
5-6
5-7
5-8
5-9
5-10
6-1
6-2
6-3
6-4
6-5
6-6
6-7
6-8
6-9
6-10
7-1
7-2
7-3
7-4
7-5
7-6
7-7
7-8
7-9
7-10
16
Page 17

Wiring Instructions For Vission Only
Optional Wiring
Step #6
Remote Start Wiri n g
A determination by the user is to be made if this option will
be used. If it is
not
used, insure that a jumper is installed
between L 2-1 and 1-5.
If this option is used, remove the jum pe r 2-1 to 1-5 and
place the dry remote start contact common wire on 2-1
and the normally open wire to 1-5.
CON
1
CON
2
CON
3
CON
4
CON
5
CON
6
CON
7
Lug
View Inside Of Vission Panel
CON
1
CON
2
CON
3
CON
4
CON
5
CON
6
CON
7
1-1
1-2 Safety
1-3
1-4
1-5
1-6 "
1-7
1-8
1-9
1-10
2-1
2-2
2-3
2-4
2-5
2-6
2-7
2-8
2-9
2-10
3-1 "N"
3-2
3-3
3-4
3-5 "N"
3-6
3-7
3-8
3-9
3-10
4-1
4-2
4-3
4-4
4-5
4-6
4-7
4-8
4-9
4-10
5-1
5-2
5-3
5-4
5-5
5-6
5-7
5-8
5-9
5-10
6-1
6-2
6-3
6-4
6-5
6-6
6-7
6-8
6-9
6-10
7-1
7-2
7-3
7-4
7-5
7-6
7-7
7-8
7-9
7-10
17
Page 18

Wiring Instructions For Vission Only
Optional Wiring
Step #7
Setpoint #1/#2 Selection W iring
A determination by the user is to be made if this option will
be used. This optional input does not need to be closed for
the compressor to run no jumper is required. If this option is
to be used, Place the dry contact common wire on L 2-7 and
normally open on 1-3
CON
1
CON
2
CON
3
CON
4
CON
5
CON
6
CON
7
Lug
View Inside Of Vission Panel
CON
1
CON
2
CON
3
CON
4
CON
5
CON
6
CON
7
1-1
1-2 Safety
1-3
1-4
1-5
1-6 "
1-7
1-8
1-9
1-10
2-1
2-2
2-3
2-4
2-5
2-6
2-7
2-8
2-9
2-10
3-1 "N"
3-2
3-3
3-4
3-5 "N"
3-6
3-7
3-8
3-9
3-10
4-1
4-2
4-3
4-4
4-5
4-6
4-7
4-8
4-9
4-10
5-1
5-2
5-3
5-4
5-5
5-6
5-7
5-8
5-9
5-10
6-1
6-2
6-3
6-4
6-5
6-6
6-7
6-8
6-9
6-10
7-1
7-2
7-3
7-4
7-5
7-6
7-7
7-8
7-9
7-10
18
Page 19

Note Page
19
Page 20
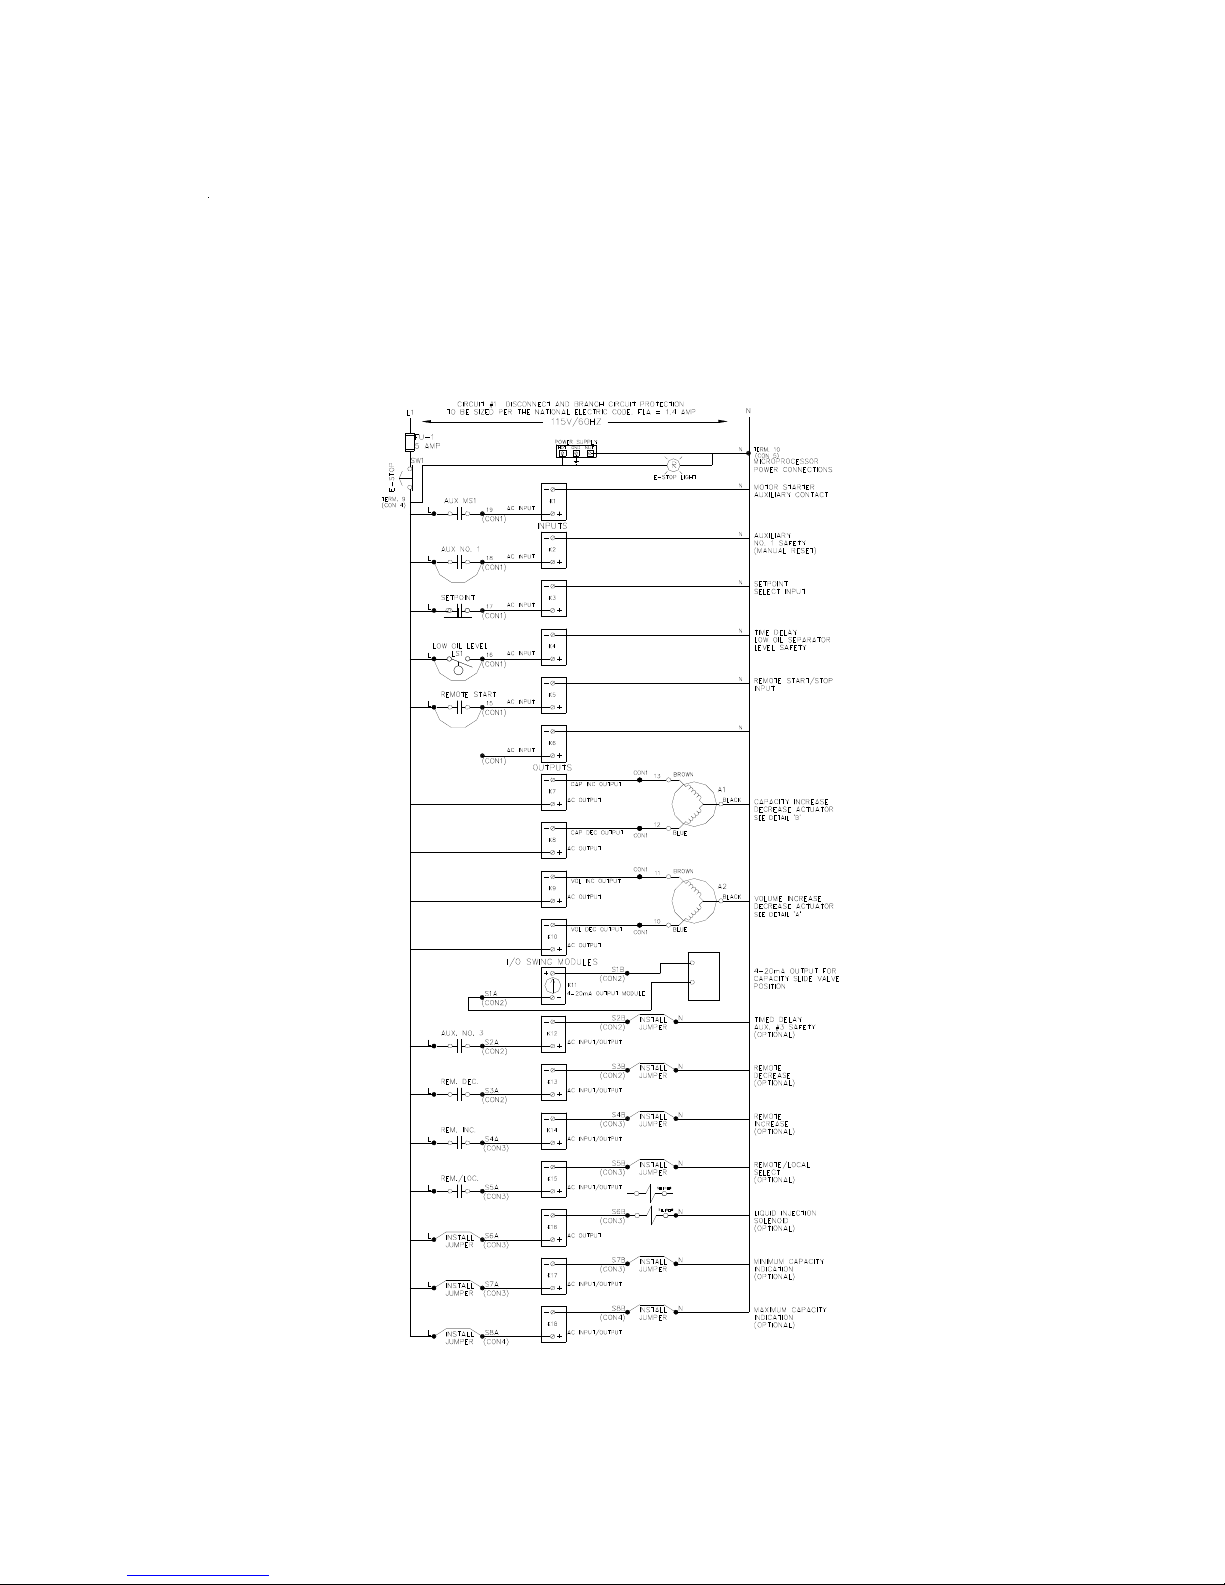
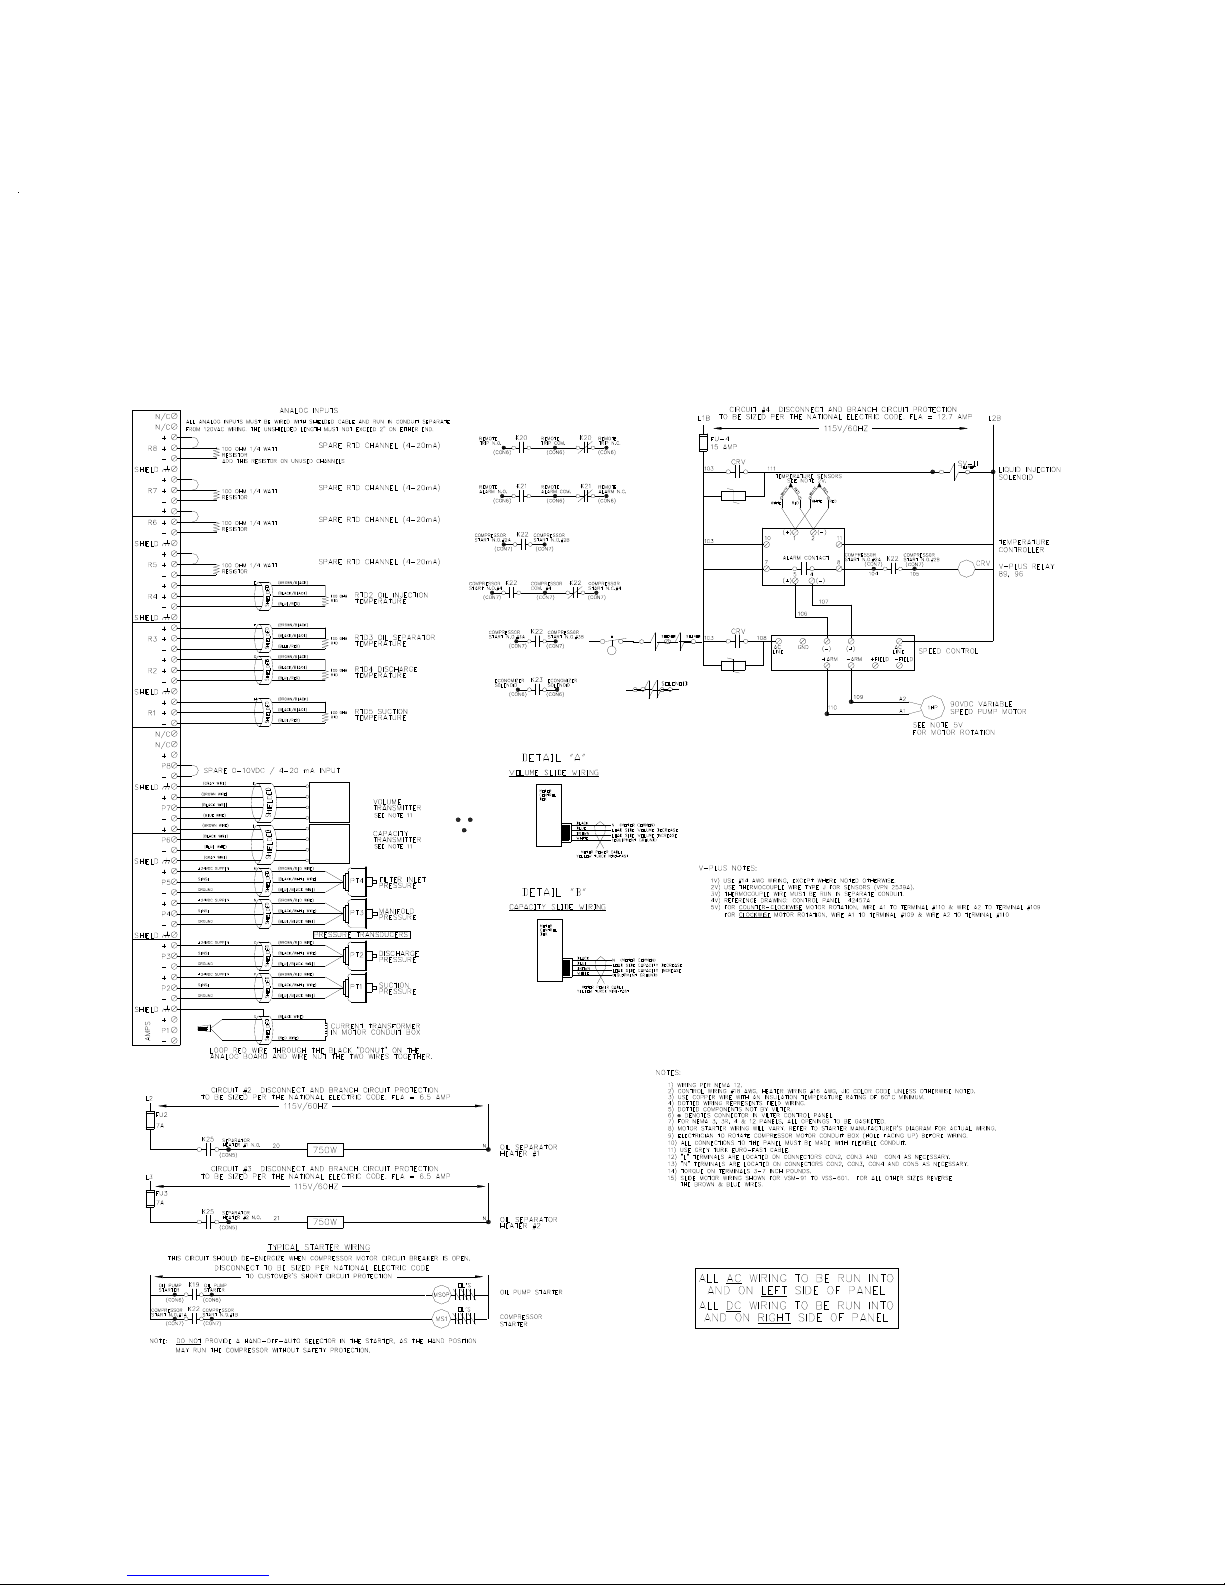
Wiring Diagram For
Vission Only
20
Page 21
Wiring Diagram For
Vission Only
21
Page 22

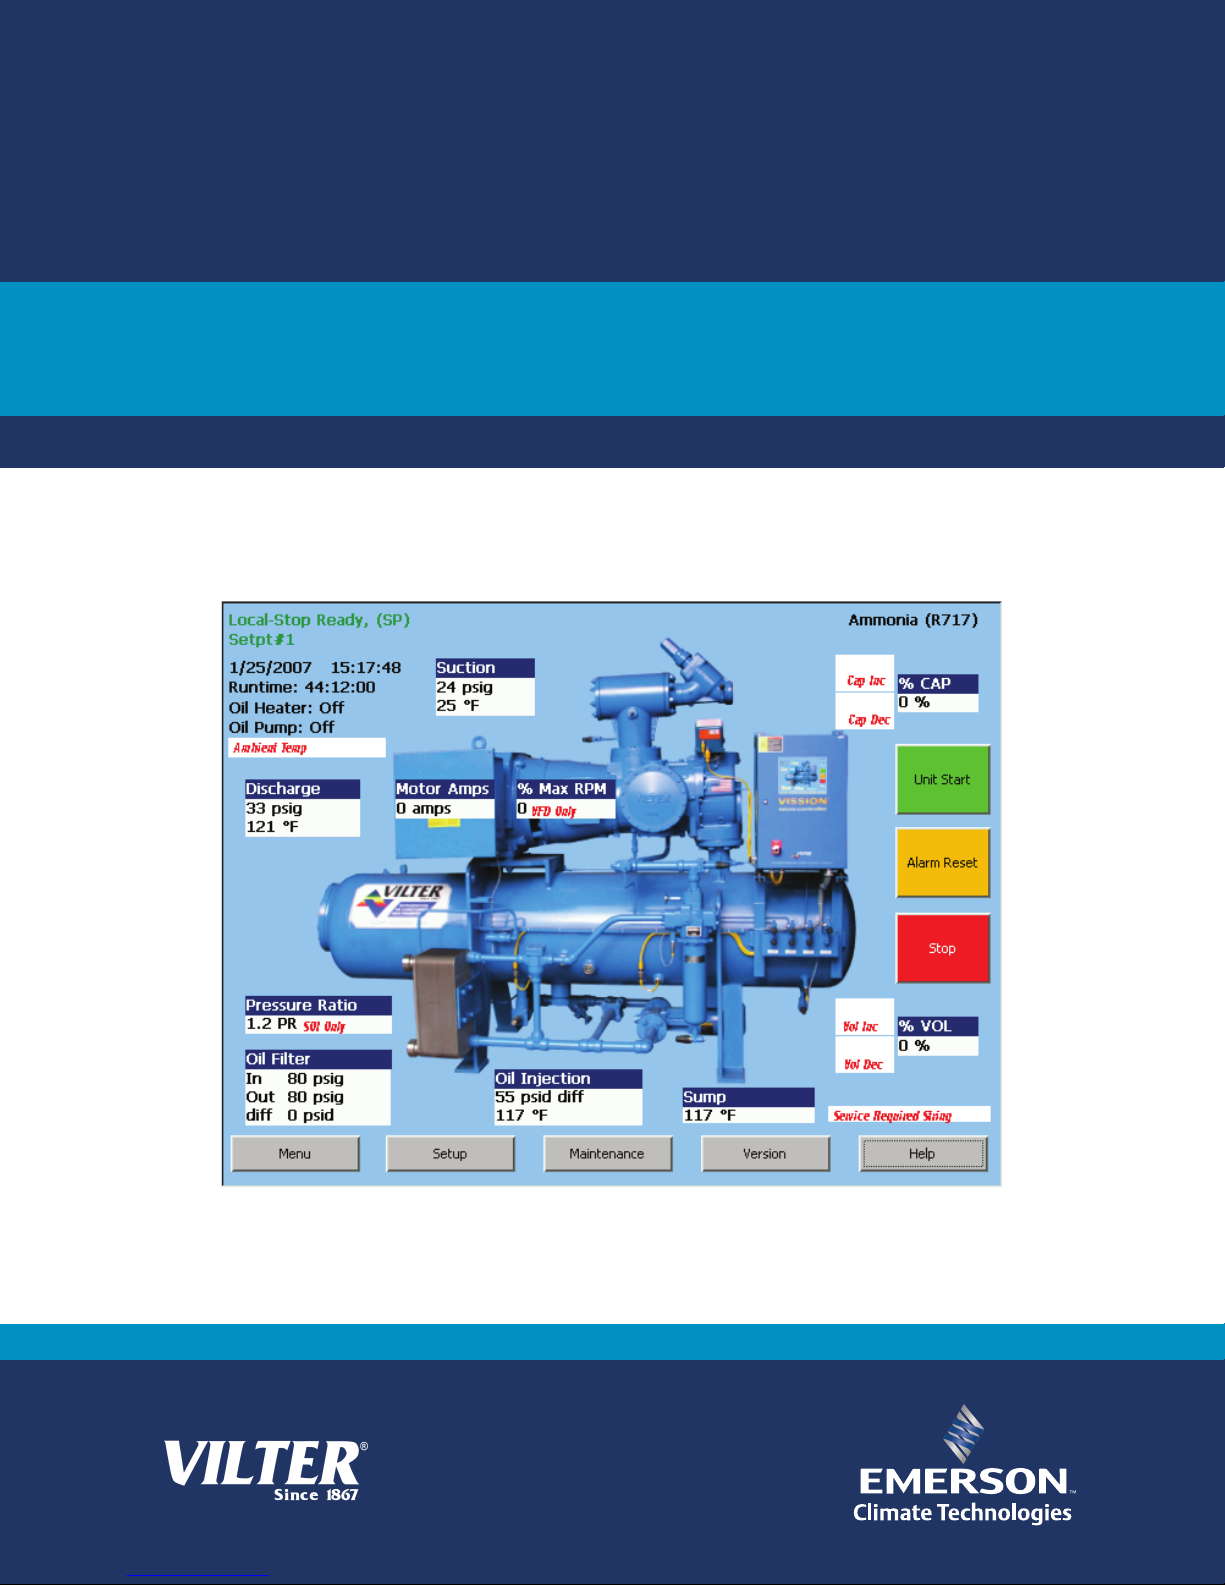
The Main Screen
Main Screen
This screen has been designed to give
the operator an overall view of all operating
parameters affecting the compressor package. This screen should always be displayed
when maintenance items and setpoint items
are not being performed. The date on the
screen is updated every ½ second. Status
information such as Alarms and Trips are
displayed on the screen.
This Screen contains buttons to navigate
to setpoint, setup and maintenance screens.
Status information on the compressor, oil pump,
oil heater and run mode.
Start/Stop buttons.
Hour meter.
Motor amperage.
Refrigerant.
Real time compressor
and package operating conditions.
Volume and Capacity Slide locations.
22
Page 23
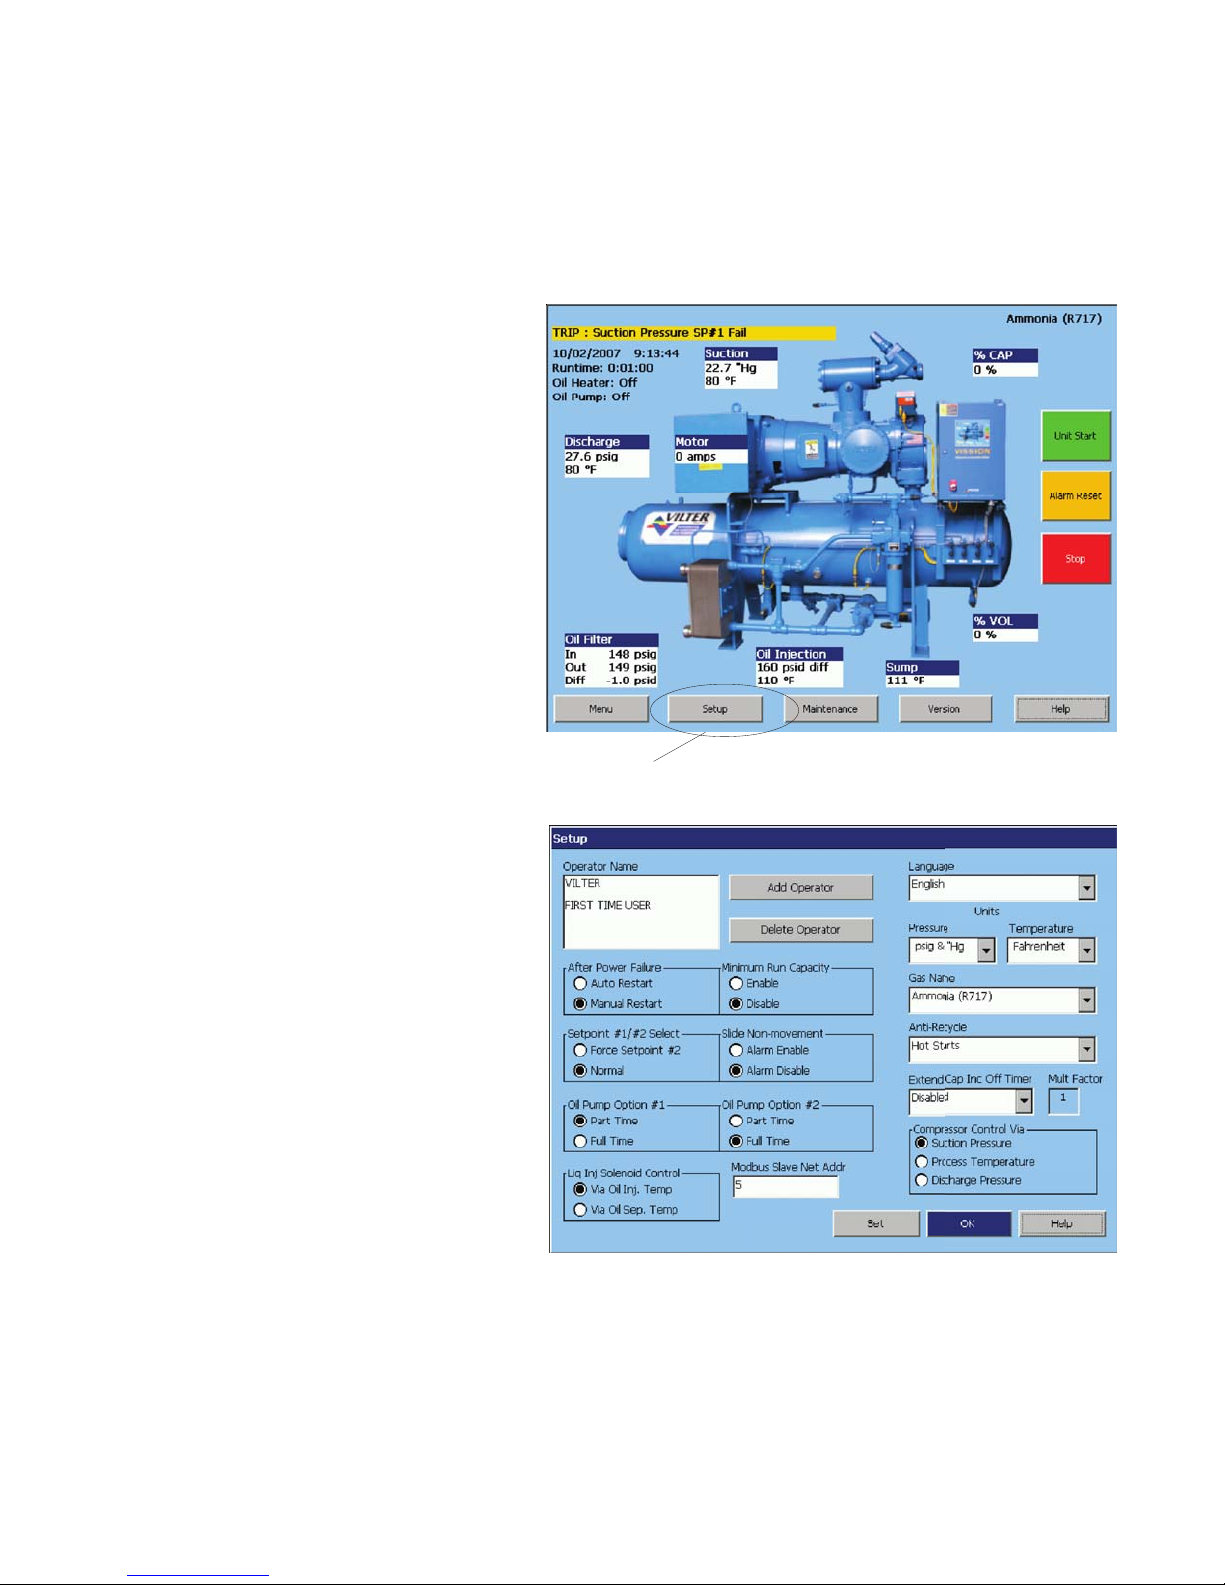
From the Main screen, touch the Setup but-
ton. After entering an authorized user name
password, the screen pictured below will appear.
·Operator Name – This is the same list that
appears in the login dialog. Names in this list
can be selected for deletion. To change a
name or password, you delete the name and
enter a new name/password pair. The
VILTER operator name cannot be deleted.
Emergency passwords provided by a Vilter
representative for the VILTER name are
good only on the date for which they are
issued. They are intended to permit navigation to this screen for setup or repair of
this list.
Set Up Screen
·Language – The user screens can be seen
in English, French, and Spanish, depend
ing on the option selected. Some text will
still display in English even when another
language is selected.
·Pressure Units – Select units of measure
for pressure readings. Choices are psi, kg
cm2 and kPa. This section only, affects
pressures displayed on main screen. On all
other screens, units are displayed in psi. On
the main screen with psi selected, negative
gauge pressures will display as inches of
mercury vacuum with the unit “Hg. On
other screens, negative numbers are scaled
as “psi”.
·Temperature Units – Select units of mea
sure for temperature. Choices are Fahren
heit or Celsius.
·Refrigerant – The choice R717 (Ammonia).
T ouch Here
23
Page 24

Set Up Screen
· Anti-Recycle – The operator can select from
the following AntiRecycle options: True, Accumulative, Modified, or Hot Starts. These
select the strategy used to prevent excessive
start/stop cycles of the compressor. Timers
and counters used to enforce anti-recycling
are adjusted and monitored in the Compressor Timer Settings screen, reached from the
Menu screen. Help for the Timer Settings
screen explains how the different settings and
strategies operate.
· Compressor Control Via – Operator can
choose the method or mode of compressor
control. This determines which measured variable is used in making loading (capacity control) decisions. The choice selected here determines which setpoints are made available
for adjustment on the Compressor Control
Setpoints screen.
· Delete Operator – Operator can choose to
delete operator names from the authorized operator listing. A name in the list is selected by
touching it. The selected name will be deleted
from the list when this button is pushed. If
you delete all the names (besides VIL TER), be
sure you add at least one before leaving this
screen.
· Add Operator – The button opens a dialog
for entry of a new name/password pair. Nothing (leaving the password text box blank) is a
legal password. The password is not obscured as it is typed in, so untrusted parties
should not be permitted to view the screen
during entry. The password is not confirmed
with a repeat entry, so verify it visually before
pressing okay. Up to 25 name/password pairs
can be added. The Operator Name list box will
acquire a scroll bar when it fills.
·
Slide Non-Movement – Alarm enable and disable buttons permit selecting whether an alarm
should be generated when failure of slides to
move is detected.
· Setpoint #1 Oil Pump #2 Oil Pump – For
single stage and high stage operation, part
time or normal oil pump fuction are used. The
oil pump shuts off after discharge pressure
has risen sufficiently to drive oil injection. Oil
pump operating mode is independently
settable for setpoint groups # 1 and # 2.
· Modbus Slave Network Address – When mul-
tiple MicroControllers are connected on a
Modbus Network, each controller must have
a unique address from the other
MicroControllers on the network. Duplicate
node addresses are not allowed. The node
address of each V ission is determined through
the SETUP menu. The MicroController that
will initiate all conversation on the network
MUST be defined as node 100 (this is defined
as the “master” node). All other node numbers should be in the range of 101 through
174.
This must be set when the extra special port
(Com4) is used to control or monitor the compressor via Modbus. It also must be set when
the multi-compressor sequencing feature is
used. Even though Ethernet is used for the
comms, this address establishes the
compressor’s identity and role in the sequencing logic.
· Reset After Power Fail – When Auto is se-
lected, the compressor will attempt to restart
on powering up if it was running in ‘Auto’
when powered down and enabling conditions
are met. When ‘Manual’ is selected, the compressor powers up into the ‘Stop’ mode and
an explicit command to run is required from
an operator or comms channel.
· Min Run Capacity – When enabled, the Mini-
mum Run Capacity setting on the Addition
Compressor Setpoints screen operates as described in the help for that screen. When
multiple compressor sequencing is used, selecting Disable here does not interfere with
use of the Min Run Capacity setting in the sequencing logic.
24
Page 25

Log On, Off,or Save Changes
Set Up Screen
Press Log on/Save Button and the above screen will appear. When altering setpoints, log on is necessary. Select
appropriate user name and enter password to change setpoints. This screen is also used to backup and save setpoints
by pressing (Backup Settings).
After performing a “Back up Setting” operation, DO NOT power down the Vission/Vantage panel for atleast 1
minute. This will allow adequate time to insure all setpoints have been properly stored.
Version Screen
T o View if a customized program has been installed in your unit, go to the main screen and press VERSION, a
screen will appear with the program version and the make model of the unit.
25
Page 26

Maintenance Screen
T ouch Here
From the Main screen touch the Maintenance button.
“Service Item Required” message indicates that the compressor runtime hours has accumulated to a value - or a
point- where service Maintenance is required.
>From the main screen, press the “Maintenance” button. A chart will be shown to indicate what service is required
- based on the number of hours the compressor has run.
After the all required service work has been accomplished, press the “Service” button located on the Maintenance
screen. A “Services Completed” screen will appear. Press on each service that has been completed. A “check” will
appear next to each item that has been pressed. When all required services have been completed, and the appropriate
box has been checked in the “Services Completed” screen, then the “Service Item Required” message will disappear
on the main screen.
Note: All of the service items listed for that interval must be checked before the “Servicing Item Required” message
will disappear.
26
Page 27

Maintenance Screen
This screen shows the chart of routine maintenance to be performed on the machine at hourly intervals from 200 hours
to 120,000 hours.
The Service Button from the Maintenance Screen will bring you to this screen.
When entering service items that were completed, make sure to check all items that are listed to be done at that
service interval.
27
Page 28

At the bottom of the Main screen touch the
Menu button to bring up the screen shown in
Figure below .
Use this screen to navigate to the other setpoint
screens contained within the program. Each
screen has a help button to describe the func-
tion of the screen.
T ouch Here
Menu Screen
28
Page 29

Common Buttons
A. Common Buttons
There are several buttons that are common for all menu screens:
· Return to Menu – This button always returns you to the Menu screen
· Logon To Edit – The user is allowed to view data at all screen levels but cannot edit data until a login has
occurred. In order to logon, press the arrow next to user name, select user then press the abc button, the key pad
screen will appear. Enter your password and hit OK.
· Set – T o change a value, the operator must first press the SET button and then the text field of the value they want
to modify. A number pad will pop up for ease in entry.
· Help – This screen will provide more information to the user about the operation of the microprocessor .
29
Page 30

Compressor Control
Level 1 Access – Compr essor Control Setpoints
From the Menu screen , press the Compressor Control setpoints button. The compressor control setpoints screen
will be shown.
These screens enable the operator to view and
adjust settings that affect compressor control.
From the Setup screen, the operator can choose
the method or mode of compressor control:
Compressor Control V ia
Suction Pressure
Process T emperature
Discharge Pressure
Once the method is chosen, the appropriate
setpoints are then displayed on the Compressor Control Setpoints screen.
The compressor will decide when to increase
or decrease capacity by comparing the controlled variable to the setpoints. The maximum on time and minimum off time settings
for slide actuator motors can be used to reduce
hunting or improve response time. The de-
fault settings of 3 and 20 seconds respectively, provide good operation over a wide range of conditions.
Also on this screen, the following buttons are displayed:
· Event List – Provides a chronological event list-
ing.
· Chart – Provides a line graph showing process
values over a range of time.
· Auto – Places the capacity slides into automatic
mode. In automatic mode, the capacity slide
moves according to control setpoint information.
· Manual – Places the capacity slides into manual
mode. In manual mode, the capacity slide
moves based on input from the operator.
30
Page 31

Setpoints on this screen:
Compressor Control
· Suction Pressure On/Off – The compressor
will automatically cycle ON and OFF at the
setpoints entered. Suction Pressure On/Off
control is only active if the Compressor Control Via Suction Pressure option is selected
on the Setup screen. If a compressor shutdown is desired on a suction pressure drop
and a manual reset is required, set the OFF
value below the Low Suction Pressure Safety
Trip value. This will shut down the unit and
a reset will be required to restart it.
· Suction Pressure Capacity Increase – The
capacity of the compressor will increase when
suction pressure is at or above the Increase
ON setpoint, and the increase “off” timer has
cycled. Capacity will continue to increase
until the Suction Pressure Capacity Increase
OFF setpoint is reached. If closer system
control is desired, set the ON and OFF
setpoints at the same values. This will essentially eliminate any differential between
the ON and OFF setpoints.
· Suction Pressure Capacity Decrease – The
capacity of the compressor will decrease
when suction pressure is at or below the ON
setpoint, and the decrease “off” timer has
cycled. Capacity will continue to decrease
until the Suction Pressure Capacity Decrease
OFF setpoint is reached. If closer system
control is desired, set the ON and OFF
setpoints at the same values. This will essentially eliminate any differential between
the ON and OFF setpoints. While this setting is only available for adjustment on the
Control Setpoints screen when the Compressor Control Via Suction Pressure option is
selected on the Setup screen, it has an override effect when control is via process temperature as described below .
· Capacity Control °F On/Off – The compres-
sor will automatically cycle ON and OFF at
the setpoints entered. Capacity Control °F
On/Off is only active if the Compressor Control via Process Temperature option is selected on the Setup screen. If compressor
shutdown is desired on a process temperature drop and a manual reset is required, set
the OFF value below the Low Control T em-
perature safety trip value. This will shut down
the unit and a reset will be required to restart
it.
· Capacity Control °F Increase – The capac-
ity of the compressor will increase when process temperature is at or above the ON
setpoint, and the increase “off” timer has
cycled. Capacity will continue to increase until
the Capacity Control °F Increase OFF setpoint
is reached. If closer system control is desired,
set the ON and OFF setpoints at the same values. This will essentially eliminate any differential between the ON and OFF setpoints.
Process temperature control of the capacity is
active only if the Compressor Control V ia Process Temperature option is selected on the
Setup screen.
· Process Temperature Control – Provides for
a Suction Pressure Override feature. If the
suction pressure should drop below the Suction Pressure Capacity Decrease OFF setpoint,
the Suction Pressure Capacity Decrease OFF
setpoint will override the Capacity Control °F
Increase and prevent the compressor capacity from increasing (loading). If the suction
pressure should continue to decrease below
the Suction Pressure Capacity Decrease ON
setpoint, the compressor capacity will be
forced to decrease until the suction pressure
is just above the Suction Pressure Capacity
Decrease ON setpoint. This will help stabilize
the suction pressure, allowing for the process
temperature to be gradually pulled down. The
Suction Pressure Capacity Decrease ON and
OFF setpoints can be viewed or adjusted by
temporarily selecting “Processor Control V ia
Suction Pressure” on the Setup screen.
· Capacity Control °F Decrease – The capac-
ity of the compressor will decrease when the
process temperature is at or below the ON
setpoint and the decrease “off” timer has
cycled. Capacity will continue to decrease
until the Capacity Control °F Decrease OFF
setpoint is reached. If closer system control
is desired, set the ON and OFF setpoints at
the same values. This will essentially eliminate any differential between the ON and OFF
31
Page 32

Additional Compressor Controls
· High Discharge Pressure Unloading
Setpoints 1&2 – Active in Suction Pressure or
Process T emperature Capacity Control mode.
These setpoints limit the compressor from
loading at high discharge pressure conditions.
They override the Suction Pressure or Process
T emperature Capacity Control setpoints. The
capacity of the compressor will decrease when
the discharge pressure is at or above the ON
set point. When the OFF setpoint is reached,
the compressor will stop from unloading any
further.
· Motor Amp. Load Limit Setpoints 1&2 – This
control limit is the motor full load current draw
and the maximum current draw. This control
32
limit will only prevent the compressor from
loading and does not shut down the compressor if the maximum current draw setpoint is
exceeded. The actual values entered may
depend on particular circumstances. The
function of the setpoint is as follows:
If the motor is operating at the full load amperage (FLA) setting, the compressor is prevented from loading. If the motor amps exceed the MAX setpoint, the compressor is
forced to unload until the current is at 1.0625
times above the FLA setting. If the motor
being used has a service factor below 1.0625,
use a value for the FLA that is 10% lower
than the MAX value.
Page 33

Compressor Control
· Oil Separator Heater T emperature – This con-
trol limit determines when the oil separator
heater is energized. A decrease in oil separator
temperature below the ONsetpoint energizes the
oil separator heater. On an increase in oil separator temperature above the OFF setpoint, the
oil heater is de-energized.
· Oil Pump Restart – To determine the ON and
OFF values for the pressure ratios, take the absolute discharge pressure (PSIA), and divide it
by the absolute suction pressure (PSIA). If the
pressure ratio is below the ON setpoint value,
the oil pump will restart and stay on until the
pressure ratio increases above the OFF setpoint.
This enables a high stage compressor with a part
time oil pump to temporarily operate under conditions requiring a full time oil pump.
EXAMPLE: To calculate the OFF value, if
the absolute discharge pr essure is 200 PSIA and
the desired absolute suction pr essure of the cutout point is 67 PSIA, the discharge pr essure is
divided by the suction pressur e. The result is a
OFF value of approximately 3.0. This would
then be entered for the OFF pressure. Now
determine the ON value, take the absolute discharge pressure (200 PSIA) and divide this by
the desired absolute suction pr essure (71 PSIA).
This results in a ON valve of 2.8.
· Capacity Slide Adjustment Range – This con-
trol limit determines the capacity range the Capacity Slide Adjustment factor will be active.
The factor will be active from 0% capacity and
will be deactivated when the OFFsetpoint is
reached. On a decrease in capacity below the
ON set point, the factor will be active.
Capacity setpoint. On a call for unloading, the
compressor will unload until it reaches the Minimum Run Capacity control setpoint. It will remain there until the suction pressure reduces and
the compressor cycles off on the Suction Pressure On/Off control setpoint.
Volume Slide Adjustment Factor – This value is
normally zero (0) and will not require changing.
However, if the system operating conditions show
the volume ratio is not at the optimum value for
the system, this value can be adjusted up or down
to permit the most efficient positioning of the volume slide valves. T o determine the value to enter ,
first ensure that the system is in a steady operating
state and place the volume side in manual. NOTE:
The volume position setting and increase the volume side position slowly until the lowest amperage level is achieved. If the amperage level rises
instead of falls, decrease the volume slide position until the lowest amperage is achieved. Record
the differential from the original position. This will
then be adjustment factor to enter for our system.
NOTE: Negative numbers can be used for this
setting. This setpoint is active on a drop in capacity below the Capacity Slide Adjustment Range
cut-in (ON) setting. The adjustment is disabled
when capacity rises above the Adjustment Range
OFF setting. Normally, the “ON-Off” set points
should both be set at 100%, so the volume side
adjustment factor will be applied over the full range
of 0 to 100%
· Economizer Solenoid – This control limit deter-
mines when the economizer solenoid is energized.
When the percentage of compressor capacity reduces below the Economizer Solenoid OFFset
point, the solenoid is energized.
· Minimum Run Capacity – The Minimum Run
Capacity is the minimum capacity the compressor will be allowed to run at. When the compressor is started, it will be loaded to the Minimum Run Capacity control setpoint minus 5%.
This is done to prevent the capacity control from
hunting if the load is not great enough to keep
the compressor capacity at the Minimum Run
· Current Transformer Ratio – The value entered
must agree with the Current Transformer Ratio
on the current transformer being used. The current transformer is mounted in the compressor motor conduit box. The ratio is stated as the ratio of
measured current to a nominal full scale current
in the secondary of 5 amps; only the first of these
is entered. For example, if the ratio reads 250/5,
enter 250.
33
Page 34

· Low Suction Pressure Load Limit – Active in Dis-
charge Pressure Capacity Control mode only . These
setpoints limit the compressor from loading at low
suction pressure conditions. They override the discharge pressure capacity control setpoints. When
the OFF setpoint is reached (at or below setpoint),
the compressor will not be allowed to load any further. If the suction pressure continues to fall, the
capacity of the compressor will decrease when the
suction pressure is at or below the ON set point. It
will stop decreasing when the suction pressure rises
to a point that is just below the ON set point.
34
Page 35

Compressor Alarm and Trip
· Low Suction Pressure Setpoints 1&2 – This
is the low suction pressure safety . This safety
is active in both temperature and pressure
control modes. An alarm or trip will be active on a drop in suction pressure below the
setpoint value.
· High Discharge Pressure Setpoints 1&2
This is the high discharge pressure safety.
The alarm or trip will be active on a rise in
discharge pressure above the setpoint value.
Low Oil Separator Temperature – This is
the lowest allowable oil separator temperature. The compressor will not be allowed to
run if the Oil Separator Temperature is below the trip setting. After the compressor
starts, the alarm or trip will be active if the
oil temperature in the separator drops below
the setpoint value.
· High Discharge Temperature – This is the
high discharge temperature safety . The alarm
or trip will be active if the discharge temperature should rise above the setpoint value.
· Low Oil Separator Start Temperature – This
is the starting low oil separator temperature
safety. The compressor is prevented from
starting or running if the oil in the separator is
below the trip value. After a time delay (Oil
Separator Temperature Safety Changeover),
this safety is deactivated and the Lo Oil Separator Run Temperature is the active setpoint.
· Low Oil Separator Run Temperature – This
is the running low oil separator temperature
safety. After a time delay (Oil Separator T emperature Safety Changeover), the Lo Oil Separator Start Temperature is bypassed and Lo
Oil Separator Run Temperature is the active
35
Page 36

Compressor Alarm and Trip
setpoint. The alarm or trip will be active if
the oil temperature of the separator drops below the setpoint value.
· Low Oil Injection Temperature – This is the
low oil injection safety. The alarm or trip will
be active if oil injection temperature drops
below setpoint value after a time delay (Oil
Injection T emperature Safety Changeover).
· High Oil Injection T emperature – This is the
high oil injection temperature safety. The
alarm or trip will be active on a rise in oil injection temperature above the setpoint value.
· Low Control Temperature – This is the low
control temperature safety. This safety is active when process temperature control has
been selected in the Setup screen. An alarm
or trip will be active on a drop in process temperature below the setpoint value.
· High Control T emperature – This is the high
control temperature safety. This safety is active when the temperature control has been
selected in the Setup screen. An alarm will
be active on an increase in process temperature above the setpoint value.
36
Page 37

Compressor Setpoints and Alarms
· Prelube Oil Pressure – If the oil pressure does
not rise above the reset setting for a time exceeding the Minimum Compressor Prelube Time and
the pump runs longer than the Prelube Pump Time
Limit, an alarm or trip will occur. These time
limits are set on the Compressor Timer Setpoints
screen. Prelube oil pressure is defined as the
amount that the oil pump drives manifold pressure above the discharge pressure.
· Low Oil Pressure – This is the running oil pres-
sure safety. An alarm or trip will be active if the
oil pressure should drop below the setpoint value.
This occurs once the Oil Pressure Bypass timer
has expired. The time limit is set on the Compressor Timer Setpoints screen. For the single
screw compressor, oil pressure is defined as manifold pressure minus suction pressure.
· High Filter Differential Pressure Start – This
safety setpoint is active when the compressor is
in the start cycle. An alarm or trip will be active
if the filter inlet pressure exceeds the filter outlet pressure by the setpoint value.
· High Filter Differential Pressure Run – This
safety setpoint is active when the compressor is
in the run cycle. An alarm or trip will be active
if the filter inlet pressure exceeds the filter outlet pressure by the setpoint value.
· High Motor Amps – This safety setpoint is ac-
tive after the Volume Decrease At Start Timer
expires. This timer is not user settable, and in
standard applications, is 15 seconds. A trip will
occur if the motor amperage exceeds the safety
setpoint value. The setpoint should be set at
125% of the motor full load amperage.
37
Page 38

Compressor Timer Setpoints
To change a timer setting,
you must “Logon to Edit”
first. Push the “Set”
button then push on the
timer setpoint value you
wish to change. After the
setpoint is changed, press
the “Refresh” button.
This will refresh the
“Current” window, which
shows the elapsed time of
the timers.
· Capacity Decrease At S tart – At compressor startup,
the capacity motor is held at minimum position for
this time period. After the timer expires, the slide is
free to move in accordance to the system demands.
· Compressor Starter Auxiliary Contact Bypass – This
timer is used to bypass the motor amperage input at
start. After the timer times out, the program determines if the motor starter has pulled in by testing the
amperage channel. If the program determines that
the starter did not “pull in”, then the compressor will
fail on “Motor Starter Fail” message.
38
· Volume Slide Adjustment Timer – This timer de-
termines the intervals the volume slide is adjusted.
If the volume slide is between 2½% & 7% away
from the desired volume ratio, the motor is pulsed
once toward the desired volume. If the volume
slide is more than 7% away from the desired value,
the volume slide motor is continuously energized
until the valve is within 2½% of the desired value.
If the actual position is within 2½% of the desired
value, no adjustment will be made.
Page 39

Compressor Timer Setpoints
· Minimum Compressor Prelube Timer – This is the
length of time the oil pump will run after establishing the Prelube Oil Pressure, to prime oil circuit
before starting the compressor.
· Oil Pressure Bypass At Compressor Start – This
timer bypasses the Low Oil Pressure limits. The
timer starts when the compressor starts. After the
timer has cycled, the Low Oil Pressure setpoint is
active.
· Prelube Oil Pump Time Limit – This timer puts a
limit on how long the prelube oil pump is allowed
to run without establishing the Prelube Oil Pressure.
· Filter Differential Pressure Safety Changeover –
This timer bypasses the Hi Run Filter Differential
Pressure setting during start, to allow the Hi Start
Filter Differential Pressure to protect against High
Filter Differential during start. After the timer has
cycled, the Hi Run Differential Pressure Safety is
active.
· Low Oil Separator Level Bypass Timer – This timer
bypasses the low oil level switch for momentary
drops in the oil level. If the switch is still open
after the Low Oil Separator Level Bypass Timer
has timed out, the compressor will be shut down
and an alarm will be displayed. This timer is available if the unit is equipped with a low oil separator
float switch. The oil level switch is standard on all
liquid injection units and optional on all others.
· Oil Separator T emperature Safety Changeover
– This timer allows Low Oil Separator Start
T emperature Safety setpoint to protect the compressor against cold oil during starting. After
the timer has cycled, the Low Oil Separator Run
T emperature is then active.
· Low Oil Injection T emperature Bypass – This
timer bypasses the Low Oil Injection T emperature Safety Setpoint during start-up. After the
timer cycles, the Low Oil Injection Temperature Safety is set.
· Hot Start s / Hr Counter – This counter counts
compressor starts. After every start, a one-hour
timer is reset and starts timing. If the timer times
out, the hot starts counter is reset. When the
counter reaches it’s preset value, it will not allow another compressor start until the one-hour
timer times out and resets the counter. In other
words, the hot starts counter will be reset when
the time between compressor starts total one
hour. This counter allows repetitive compressor starts, but once the counter has reached its
set point, it requires a one-hour window between
compressor starts in order for the counter to be
reset.
· True Anti-Recycle Timer – Once the compres-
sor turns off, the timer will keep the compressor off for the setting of True Anti-Recycle
Timer. This timer is used to prevent short cycling of the compressor.
· Auto Restart After Power Failure – This timer
forces the microprocessor to wait for the set time
period after a power failure before starting the compressor unit. By staggering the time settings, the
compressors can be allowed to start automatically,
one at a time, after a power failure. This prevents
excessive loads on the power system that could be
caused by all of the equipment coming online at the
same time. The Power-Up Auto Start operator option must be selected on the Setup screen for this
option to be active.
· Accumulative Anti-Recycle Timer – This timer
also forces a specified time between compressor starts. When the compressor starts, the timer
resets then starts timing and accumulates running time. Once the compressor shuts down, it
will not be allowed to restart for the remainder
of the time left on the Accumulative Anti-Recycle Timer. Unlike the True Anti-Recycle
Timer , if the compressor has run for a time period that exceeds the setpoint of the Accumulative Anti-Recycle Timer, then when the compressor shuts down, it will be allowed to restart
immediately.
39
Page 40

Compressor Timer Setpoints
The compressor restart options (Hot Starts or
Anti-Recycle Timers) are selected from the
Setup screen. One additional Anti-Recycle
Timer that can be selected from the Setup screen
is the Modified Anti-Recycle T imer.
· Modified Anti-Recycle Timer – Normally, this
anti-recycle timer will function as a True AntiRecycle Timer . However , if the operator presses
the stop button, or if a failure occurs, the antirecycle timer switches functions and acts as an
accumulative type anti-recycle timer. It will allow the compressor to restart when the accumulated runtime and the present off time meets or
exceeds the setting of this timer.
40
Page 41

Miscellaneous Screens (Condenser Control)
This screen is designed for customized functions only, thus maybe placed as a view only screen.
Note: Changing variables on this screen will not have any effect unless you have a customized program for your unit.
To View if a customized program has been installed in your unit, go to the main screen and press VERSION, a screen
will appear with the program version and the make model of the unit.
41
Page 42

Miscellaneous Screens (Motor Speed)
This screen is designed for customized functions only, thus maybe placed as a view only screen.
Note: Changing variables on this screen will not have any effect unless you have a customized program for your unit.
To View if a customized program has been installed in your unit, go to the main screen and press VERSION, a screen
will appear with the program version and the make model of the unit.
42
Page 43

Compressor Sequencing (Max 5 Compressors)
From the Main Menu (press sequencing), this screen will appear.
Y ou must clear the IP
Address before
entering a new one.
43
Page 44

Compressor Sequencing (Max 5 Compressors)
Note: Sequencing and Remote/Start-Stop can NOT fuction at the same time- Sequencing will over-ride
remote start/stop!
This screen allows the operator to setup a sequencing network. Currently, the MicroController is capable of sequencing 5 compressors. In order for a
MicroController to participate on the network, it must
have a unique address from the other Controllers on
the network. Duplicate node addresses are not allowed. The node address of each is done through
the Setup menu.
The MicroController which will initiate all conversation on the network MUST be defined as node 100.
This is defined as the “master” node. All other node
numbers should be in the range of 101 through 174.
Ethernet Peer To Peer – In addition to having
unique node addresses, all compressors on the
Ethernet network must have unique IP addresses
and unique names. These are entered from the
IP Address/Name screen, accessed from the
VILTER ONLY screen. The Ethernet IP addresses of each of the five compressors listed
are required to be:
Equipment: Ethernet IP Address
Cmp#1: 10.8.0.73
Cmp#2: 10.8.0.74
Cmp#3: 10.8.0.75
Cmp#4: 10.8.0.76
Cmp#5: 10.8.0.77
Note: IP addresses must be set prior to
themicrocontrollers being connected together.
The Compressor Sequencing screen only needs to
be setup on the “Master” node. The elements of this
screen are:
· Equipment – Allows the operator to select the
size of each compressor. This information is
used to make sequencing decisions based on the
CFM of the compressor. A valid size MUST be
chosen for a compressor to participate in sequencing. This field also allows the operator to
change the name of each of the five compressors listed.
44
Page 45

Compressor Sequencing (Max 5 Compressors)
· Node – These node address fields tell the se-
quencing algorithm which the MicroController
will be participating in the sequencing network. Input the node addresses of each Controller, participating on the network, in these
fields.
NOTE:
The node addresses for each panel are defined and
entered under the Setup screen at each individual
panel.
· Central Off/On Buttons – These buttons in-
dicate whether the compressor has been selected to operate under Central Control. If
the button reads “On”, the compressor will be
included in the Central Control System. If the
button reads “Off”, the compressor will not
be included in the Central Control system.
Pushing once on the button will toggle the
button between “Off” and “On”.
· Priority – The Priority fields are used to as-
sign the compressor priority for Central Control. The lower the priority number, the greater
the priority of the compressor. Priority #1
compressor is the highest priority compressor. Compressors with higher priority numbers will be lag compressors. A compressor
with a priority of 1 will be considered the
“lead” compressor. The suction pressure of
priority #1 compressor is used to control the
system pressure.
·
Step – This field sets the amount of capacity
change that will occur when a compressor is
loading or unloading.
NOTE:
Because of the method used to position the slide
valve, and the method used to determine when
the slide valve position is “close enough” to the
target value, the step value should never be less
than 5%.
· Min Cap – The Minimum Capacity is the lowest
capacity , in percentages, that this compressor is
allowed to reach during operation. If the system
needs to remove additional system capacity, it
may shut a compressor off.
·
Max Cap – The Maximum Capacity is the highest capacity , in percentage, that this compressor
is allowed to reach during operation. If the system needs to increase capacity after this compressor has reached its maximum, it may turn on
another compressor.
·
Stop Tmr – The Stop Timer (in seconds) is the
amount of time the system must hold a compressor at minimum capacity before the compressor
can be shut off.
PRESSURE SETPOINTS:
The 7 pressure setpoints are used to control the
system pressure. W ith the exception of the Start #1
and Start Lag setpoints, all other setpoints must be
in decreasing pressures from the previous value.
·
Start #1 – The Start #1 pressure setpoint is the
system pressure at which the Priority 1 compressor will be started.
·
Start Lag – The Start Lag pressure setpoint will
only start the lag compressor, and only after the
lead compressor has reached the Max Cap value,
and the Machine Start Timer has timed out. The
Lead compressor is normally priority , unless it is
not available to start due to waiting hot starts,
safety trips, etc.
·
Load Rate 2 – If the system pressure exceeds
the Load Rate 2 pressure setpoint for the time
specified in the Load Rate 2 Timer , Central Control will attempt to increase the capacity of the
system.
·
Load Rate 1 – If the system pressure exceeds
the Load Rate 1 pressure setpoint for the time
specified in the Load Rate 1 Timer , Central Control will attempt to increase the capacity of the
system.
45
Page 46

Compressor Sequencing (Max 5 Compressors)
· Unload Rate 1 – If the system pressure falls be-
low the Unload Rate 1 pressure setpoint for the
time specified in the Unload Rate 1 Timer , Central
Control will attempt to decrease the capacity of
the system.
·
Unload Rate 2 – If the system pressure fails below the Unload Rate 2 pressure setpoint for the
time specified in the Unload Rate 2 Timer , Central
Control will attempt to decrease the capacity of
the system.
·
Stop – If the system pressure falls below the S top
setpoint, Central Control will immediately try to
shut down the lowest priority lag compressor. If
there is only one compressor running, Central Control will shut down.
·
CAP Load Timers – These timers are directly related to the setpoint values described above. The
timers are the minutes and seconds that theCentral
Control algorithm will hold before deciding on an
action. The CAP Load Rate Timers are related to
the appropriate Load 1 and 2 increase setpoints
described above.
·
CAP Unload T imers – The Capacity Unload Rate
Timers are similar to the timers described above,
however, they work to decrease system capacity.
The CAP Unload Rate Timers are related to the
appropriate Unload Rate 1 and 2 decrease setpoints
described previously .
·
Machine Start Time – This timer is the time the
system will wait until another compressor is started
in an attempt to increase capacity .
·
Force Priority 1 Compressor On Checkbox When checked this will override other sequencing
logic and priority 1 compressor will always run.
Pressing the box alternating checks and unchecks
it.
46
Page 47

Vilter Only Screen
WARNING: Settings on these screens should be used only by Vilter representatives or persons acting under their direction. Improper setting may result in
loss of vital data and require service NOT covered under warranty.
47
Page 48

Diagnostics Force Output
· On/Off – This will turn the force outputs option On/Off. The force outputs that can be modified are as follows:
Main Motor Starter, Oil Pump, Economizer Solenoid, Remote Alarm/T rip, Liquid Injection Solenoid, Capacity
Increase Motor, Capacity Decrease Motor, Volume Increase Motor and Volume Decrease Motor. You can
choose the forced output by pressing the down arrow in the control labeled Available Outputs.
48
Page 49

Instrument Calibration
The current values reflect the values presently maintained by the system. The user can perform a one-point calibration
by entering an offset value into the respective column. This will automatically adjust the current value and zero out the
offset value. Giving max and min values for a respective current value can perform a two-point calibration. The
program will automatically adjust the calibration line to meet those values.
The following items can be calibrated at this screen: Discharge Pressure Transducer, Suction Pressure Transducer,
Manifold Pressure, 0-10v Input, Oil Filter Inlet Pressure Transducer , Discharge Temperature RTD, Suction Temperature
RTD, Oil Injection T emperature R TD, Oil Separator R TD, Process T emperature R TD and Motor Amperage.
49
Page 50

Instrument Calibration
Instrument calibration menu displays the Input channels that can be calibrated to represent the actual values at the
sampling points.
The current values reflect the values presently maintained by the system. The user can perform a one point calibration
by entering an offset value into the respective column. This will automatically adjust the current value and zero out the
offset value.
The following items can be calibrated at this screen: three (3) spare RTDs and two (2) 0-10 volt input.
50
Page 51

Calibration Procedure of Optical Actuators
* If you are replacing or reinstalling a new optical actuator see: page 63 first.
ACTUATOR MOTOR CONTROL MODULE
CALIBRA TION PROCEDURE
1. Disable the Slide Non-Movement Alarm by
going to the “Setup” menu on the Vission/
Vantage and choosing “Alarm Disable” for the
Slide Non Movement Option.
2. Open the plastic cover of the capacity motor by
removing the four #10 screws. Caution: there
are wires attached to the connector on the
plastic cover. Handling the cover too aggressively could break the wires.
3. Gently lift the cover and tilt it toward the Turck
connectors. Raise the cover enough to be able
to press the blue calibrate button and be able to
see the red LED on the top of assembly.
4. Press “Menu” on the main screen and then press
the “Slide Calibration” button, to enter the slide
calibration screen. If you are re-installing a new
optical actuator re-connect the yellow and gray
cables.
5. Press INC and DEC to move the slide valve and
check for the correct rotation. See Table 1 for
Actuator/command shaft rotation specifications.
6. Note: If the increase and decrease buttons do
not correspond to increase or decrease shaft
rotation, swap the blue and brown wires of the
“yellow power cable”. This will reverse the
rotation of the actuator/command shaft.
51
Page 52

Calibration Procedure of Optical Actuators
7. Quickly press and release the blue push
button on the actuator one time. This places
the actuator in calibration mode. The red
LED will begin flashing rapidly.
8. Note: When the actuator is in calibration
mode, it outputs 0V when the actuator is
running and 5V when it is still. Thus, as
stated earlier, the actuator voltage will
fluctuate during calibration. After the
actuator has been calibrated, 0V output will
correspond to the minimum position and 5V
to the maximum position.
9. Note: The “Slide calibration” screen on
the V ission/Vantage has a “Current”
window, which displays twice the actuator
output voltage. This value, (the % volume
and the % capacity) displayed in the
“Current Vol” and Current Cap” Windows
are meaningless until calibration has been
completed.
10. Use the DEC button on the Vission/Vantage
panel to drive the slide valve to its minimum
“mechanical stop” position. Do not
continue to run the actuator in this
direction after the slide valve has reached
the stop. Doing so may cause damage to
the actuator or the slide valve.
Remove Cover
Press Down On
Photochoppe r
Press down on the photochopper shaft to
disengage the brake, releasing tension
from the motor mount. Use the INC
button to pulse the actuator to where the
slide is just off of the mechanical stop
and there is no tension on the motor
shaft.
11. Quickly press and release the blue button
on the actuator again. The red LED will
now flash at a slower rate, indication that
the minimum slide valve position (zero
position) has been set.
12. Use the INC button on the Vission/
Vantage panel to drive the slide to its
maximum “mechanical stop” position.
Do not continue to run the actuator in
this direction after the slide valve has
reached the stop. Doing so may cause
damage to the actuator or the slide
valve. Press down on the photochopper
shaft to disengage the brake, releasing
tension from the motor mount. Use the
DEC button to pulse the actuator to
where the slide is just off of its mechanical stop and there is no tension on the
motor shaft.
13. Quickly press and release the blue
button on the actuator one more time.
The red LED will stop flashing. The
actuator is now calibrated and knows the
minimum and maximum positions of the
slide valve it controls. Now the capacity
or volume channel of the Vission/
Vantage can be calibrated.
Do not touch wires, may cause an
electrical shock!
52
14. Use the Dec button to move the actuator
towards its minimum position while
watching the millivolt readout on the
V ission/Vantage screen. Discontinue
pressing the DEC button when the
millivolt reading the “Current” window
above the “Set Min” button is approximately 500 millivolts.
Page 53

Calibration Procedure of Optical Actuators
15. Now use the DEC and INC buttons to position
the slide valve until a value close to 300
millivolts is on the screen. Then, press the “Set
Min” button in the capacity or volume slide
valve window to tell the controller that this is
the minimum millivolt position. Note: The
value in the “Current Cap” or “Current Vol”
window has no meaning right now.
16. Use the INC button to rotate the actuator
towards its maximum position while watching
the millivolt readout on the controller screen.
Discontinue pressing the INC button when the
millivolt reading in the “Current” window is
approximately 9200 millivolts (7900 millivolts
for the 2783J qualified analog boards applies to
only VISSION). You are nearing the mechanical stop position.
17. Pulse the INC button to carefully move the
slide valve until the millivolt readout “saturates”, or stops increasing. This is around 9500
millivolts (8400 millivolts for 2783 qualified
analog boards applies to only VISSION).
Record millivolt maximum reading.
22. Gently lower the plastic cover over the
top of the actuator to where it contacts the
base and o-ring seal. After making sure
the cover is seated properly , gently
tighten the four #10 screws. Caution:
The plastic cover will crack if the
screws are over tightened.
23. Enable the “Slide Non-Movement
Alarm” by going to the “Setup” menu and
choosing “Alarm Enable” for the “Slide
Non-Movement Option”.
24. This completes the calibration for this
channel either capacity or volume.
Repeat the same procedure to the other
channel.
18. Pulse the DEC button until the millivolts just
start to decrease. (This is the point where the
channel drops out of saturation).
Adjust millivolt value to 300 millivolts below
recorded maximum millivolts in step #17.
19. Press the “Set Max” button.
20. Press the “Main” button to complete calibration and exit the “Slide Calibration” screen.
The controller will automatically energize the
actuator and drive it back to its minimum
position (below 5%) for pre-start-up.
21. Note: Now the “Current Cap” or the “Current
Vol” value will be displayed in the window on
the “Main” screen and the “Slide Calibration”
screen.
53
Page 54

Installation Instructions For Replacement Of Optical Actuator
CAUTION: WHEN INSTALLING THE
OPTICAL SLIDE MOTOR, LOOSEN
LOCKING COLLAR BEFORE SLIDING
THE COLLAR DOWN THE SHAFT . DO
NOT USE A SCREWDRIVER TO PRY
LOCKING COLLAR INTO POSITION.
OVERVIEW
Calibration of an optical slide valve actuator is a
two step process that must be down for each actuator installed on the compressor. The steps are as follows.
1. The actuator motor control module,
located inside the actuator housing, is
calibrated so that it knows the minimum
and maximum rotational positions of the
slide valve it controls. The calibrated act
uator will output 0 VDC at the minimum
position and 5 VDC at maximum position.
2. After the actuator motor control module has
been calibrated for 0-5 Volts, the controll
ing channel corresponding to the actuator
motor ( either the capacity or volume) has
to be calibrated. This instructs the V ission/
V antage control panel to learn the rotational
0% position & rotation 100% position of
the slide valve travel.
Please Note:
Because there is an optical sensor on this motor, DO
NOT attempt to calibration in direct sunlight.
3. Before appling power to the V ission/Van
tage disconnect the gray and yellow cable.
4. Power the V ission/Vantage back on.
5. Refer to Calibration Procedure of
Optical Actuators (page 60-62).
54
Page 55

Slide Valve Actuator Troubleshooting Guide
Slide Valve Actuator Theory of Operation
The slide valve actuator is a gear-motor with a position sensor. The motor is powered in the forward and
reverse directions from the main computer in the control panel. The position sensor tells the main computer the position of the slide valve. The main computer uses the position and process information to decide where to move the slide valve next.
The position sensors works by optically counting motor turns. On the shaft of the motor is a small aluminum “photochopper”. It has a 180 degree fence that
passes through the slots of two slotted optocouplers.
The optocouplers have an infrared light emitting diode (LED) on one side of the slot and a phototransistor
on the other. The phototransistor behaves as a light
controlled switch. When the photochopper fence is
blocking the slot, light from the LED is prevented from
reaching the phototransistor and the switch is open.
When photochopper fence is not blocking the slot, the
switch is closed.
As the motor turns, the photochopper fence alternately
blocks and opens the optocoupler slots, generating a
sequence that the position sensor microcontroller can
use to determine motor position by counting. Because
the motor is connected to the slide valve by gears,
knowing the motor position means knowing the slide
valve position.
manually while the power is off or the motor brake has
failed, allowing the motor to free wheel for too long
after the position sensor looses power, the actuator will
become lost.
A brake failure can sometimes be detected by the position sensor. If the motor never stops turning after a
power loss, the position sensor detects this, knows it
will be lost, and goes immediately into calibrate mode
when power is restored.
During calibration, the position sensor records the high
and low count of motor turns. The operator tells the
position sensor when the actuator is at the high or low
position with the push button. Refer to the calibration
instructions for the detailed calibration procedure.
The position sensor can get “lost” if the motor is moved
while the position sensor is not powered. To prevent
this, the motor can only be moved electrically while
the position sensor is powered. When the position sensor loses power, power is cut to the motor . A capacitor
stores enough energy to keep the position sensor circuitry alive long enough for the motor to come to a
complete stop and then save the motor position to nonvolatile EEPROM memory. When power is restored,
the saved motor position is read from EEPROM
memory and the actuators resumes normal function
This scheme is not foolproof. If the motor is moved
55
Page 56

Slide Valve Actuator Troubleshooting Guide
The actuator cannot be calibrated
Dirt or debris is blocking one or both
optocoupler slots
The photochopper fence extends less
than about half way into the
optocoupler slots
The white calibrate wire in the grey
Turck cable is grounded
Dirt and/or condensation on the position sensor boards are causing it to
malfunction
The calibrate button is stuck down
The position sensor has failed
Push button is being held down for
more that ¾ second when going
through the calibration procedure
Clean the optocoupler slots with
a Q-Tip and rubbing alcohol.
Adjust the photochopper so that
the fence extends further into the
optocoupler slots. Make sure the
motor brake operates freely and
the photochopper will not contact
the optocouplers when the shaft
is pressed down.
T ape the end of the white wire in
the panel and make sure that it
cannot touch metal
Clean the boards with an electronics cleaner or compressed air.
Try to free the stuck button.
Replace the actuator.
Depress the button quickly and
then let go. Each ¾ second the
button is held down counts as
another press.
The actuator goes into calibration mode spontaneously
The actuator goes into calibration mode every time power is
restored after a power loss
56
The white calibrate wire in the grey
Turck cable is grounding intermittently
A very strong source of electromagnetic interference (EMI), such as a
contactor, is in the vicinity of the actuator or grey cable
There is an intermittent failure of the
position sensor
The motor brake is not working properly (see theory section above.)
T ape the end of the white wire in
the panel and make sure that it
cannot touch metal.
Increase the distance between the
EMI source and the actuator.
Install additional metal shielding
material between the EMI source
and the actuator or cable.
Replace the actuator.
Get the motor brake to where it
operates freely and recalibrate.
Replace the actuator
Page 57

Slide Valve Actuator Troubleshooting Guide
The actuator does not transmit
the correct position after a
power loss
There is a rapid clicking noise
when the motor is operating
The motor operates in one direction only
The motor was manually moved
while the position sensor was not
powered.
The motor brake is not working
properly
The position sensor’s EEPROM
memory has failed
The photochopper is misaligned
with the slotted optocouplers
The photochopper is positioned too
low on the motor shaft.
A motor bearing has failed
There is a loose connection in the
screw terminal blocks
There is a loose or dirty connection
in the yellow Turck cable
Recalibrate.
Get the motor brake to where it operates freely and then recalibrate.
Replace the actuator.
Try to realign or replace the actuator.
Adjust the photochopper so that the
fence extends further into the
optocoupler slots.
Replace the actuator.
Tighten.
Clean and tighten.
The motor will not move in either direction
The motor runs intermittently,
several minutes on, several minutes off
The position sensor has failed
There is a broken motor lead or
winding
The thermal switch has tripped because the motor is overheated
Any of the reasons listed in “The
motor operates in one direction
only”
The command shaft is jammed
Broken gears in the gearmotor
Motor is overheating and the thermal switch is tripping
Replace the actuator.
Replace the actuator.
The motor will resume operation
when it cools. This could be caused
by a malfunctioning control panel.
Consult the factory .
See above.
Free the command shaft.
Replace the actuator.
This could be caused by a malfunctioning control panel. Consult the
factory.
57
Page 58

Slide Valve Actuator Troubleshooting Guide
The motor runs sporadically
The motor runs but output shaft
will not turn
Bad thermal switch
Any of the reasons listed in “The motor will not move in either direction”
Stripped gears inside the gear motor
or the armature has come un-pressed
from the armature shaft
Replace the actuator.
See above.
Replace the actuator.
58
Page 59

Slide Wiring Diagram for Models Vission VSM-91 To VSS-601
59
Page 60

Slide Wiring Diagram for Models Vission VSS-751 To VSS-1801
60
Page 61

Command Shaft Rotation and Travel
COMMAND SHAFT ROT A TION NO. OF TURNS / ROT A TION ANGLE / SLIDE TRAVEL
COMP . CAP ACITY V OLUME CAP ACITY VOLUME
MODEL INC DEC INC D EC TURNS/ANGLE/TRAVEL TURNS/ANGLE/TRAVEL
VSR 111 CW CCW CW CCW 0.91 / 328 / 3.568" 0.52 / 187 / 2.045"
VSR 151 CW CCW CW CCW 0.91 / 328 / 3.568" 0.52 / 187 / 2.045"
VSR 221 CW CCW CW CCW 0.91 / 328 / 3.568" 0.52 / 187 / 2.045"
VSR 301 CW CCW CW CCW 0.91 / 328 / 3.568" 0.52 / 187 / 2.045"
VSS 451 CW CCW CW CCW 0.91 / 328 / 3.568" 0.52 / 187 / 2.045"
VSS 601 CW CCW CW CCW 0.91 / 328 / 3.568" 0.52 / 187 / 2.045"
VSS 751 CCW CW CCW CW 1.09 / 392 / 4.283" 0.63 / 227 / 2.473"
VSS 901 CCW CW CCW CW 1.09 / 392 / 4.283" 0.63 / 227 / 2.473"
VSS 1051 CCW CW CCW CW 1.22 / 439 / 4.777" 0.74 / 266 / 2.889"
VSS 1201 CCW CW CCW CW 1.22 / 439 / 4.777" 0.74 / 266 / 2.889"
VSS 1501 CCW CW CCW CW 1.36 / 490 / 5.325" 0.82 / 295 / 3.200"
VSS 1801 CCW CW CCW CW 1.36 / 490 / 5.325" 0.82 / 295 / 3.200"
VSM 71 CW CCW CW CCW 0.80 / 288 / 3.141" 0.45 / 162 / 1.767"
VSM 91 CW CCW CW CCW 0.80 / 288 / 3.141" 0.45 / 162 / 1.767"
VSM 101 CW CCW CW CCW 0.80 / 288 / 3.141" 0.45 / 162 / 1.767"
VSM 151 CW CCW CW CCW 0.80 / 288 / 3.141" 0.45 / 162 / 1.767"
VSM 181 CW CCW CW CCW 0.80 / 288 / 3.141" 0.45 / 162 / 1.767"
VSM 201 CW CCW CW CCW 0.80 / 288 / 3.141" 0.45 / 162 / 1.767"
VSM 301 CW CCW CW CCW 0.80 / 288 / 3.141" 0.45 / 162 / 1.767"
VSM 361 CW CCW CW CCW 0.80 / 288 / 3.141" 0.45 / 162 / 1.767"
VSM 401 CW CCW CW CCW 0.80 / 288 / 3.141" 0.45 / 162 / 1.767"
VSM 501 CCW CW CCW CW 0.91 / 328 / 3.568" 0.52 / 187 / 2.045"
VSM 601 CCW CW CCW CW 0.91 / 328 / 3.568" 0.52 / 187 / 2.045"
VSM 701 CCW CW CCW CW 0.91 / 328 / 3.568" 0.52 / 187 / 2.045"
Note:These refer to the old stlye gear mototrs and DO NOT apply to the optical motors.
NOTES:
a) The large gear on the command shaft has 50 teeth. The teeth are counted when moving the command shaft from the minimum stop position to
the maximum stop position.
b) The manual operating shaft on the gear motor should be turned the opposite direction of the desired command shaft rotation.
c) The capacity and volume control motors are equipped with a brake, if it is necessary to operate the control motors manually, the brake must be
disengaged. The brake can be disengaged by pushing on the motor shaft on the cone end. The shaft should be centered in its travel. Do not
use excessive force manually operating the motor or damage may result.
T able 1
61
Page 62

Calibration For Earlier Style Mechanical Gearmotor/Potentiometers
· Capacity Slide V alve Potentiometer Calibration – Move the capacity slides to their mini-
mum position. This can be accomplished by
either electrically actuating the slide valve
motor through the Force Outputs On or by
manually actuating the slide valve motor. T o
manually actuate the motor, release the brake
and turn the hex nut on the gear motor in the
proper direction to move the capacity slides
to their minimum position (see Table 1).
IMPORTANT
After the slide valves have contacted the internal stop, release the tension in the mechanism
by actuating the brake and then manually turn
the command shaft back one tooth on the command shaft gear . Failure to do so may result in
premature failure of the gear motor.
Remove one of the ¼” socket head cap
screws from the potentiometer bracket,
loosen the other and turn the potentiometer
shaft until a millivolt reading of between 900
and 1100 is displayed in the Current window
above the Set Min button. Mesh the potentiometer gear with the command shaft gear and
replace the ¼” socket head cap screw. The
millivolt reading must remain between 900
and 1100 millivolts. Without changing the
gear mesh, remove one ¼” screw, and apply
Loctite #242 to the threads. Reinstall the
screw finger tight, then repeat the procedure
on the remaining screw (do not change the
orientation of the lockwashers on the screws).
The gear lash must be adjusted so there is no
side load on the potentiometer shaft. Tighten
and torque the ¼” socket head cap screw to
16 ft/lbs. Recheck the millivolt reading. It
must be between 900 and 1100 millivolts. If
not, the gear mesh will have to be readjusted.
At this point, press the Set Min button in
the Capacity Slide V alve Potentiometer window. Realize that the Current Cap window
will show a value, but it has no meaning at
this point. Now turn the command shaft to
the fully loaded position. With the slide
valve against the mechanical stop, release
the tension in the mechanism by actuating
the brake and manually turn the command
shaft back one tooth on the command shaft
gear. This is the maximum millivolt position. Now press the Set Max button. Calibration of the slide is completed AFTER
pressing the Main button, to exit the Slide
Calibration Screen. Now if you re-enter the
Slide Calibration Screen, the correct value
will be displayed in the Current Cap window and on the Main screen.
· Volume Slide Potentiometer Calibration –
Move the volume slides to their minimum
position. This can be accomplished by either electrically actuating the slide valve
motor through the Slide Calibration Screen
INC and DEC buttons, or by manually actuating the slide valve motor. To manually
actuate the motor, release the brake and turn
the hex nut on the gear motor in the proper
direction to move the volume slides to their
minimum position (see Table 1).
IMPORTANT
After the slide valves have contacted the internal stop, release the tension in the mechanism
by actuating the brake and then manually turn
the command shaft back one tooth on the command shaft gear . Failure to do so may result in
premature failure of the gear motor.
Remove one of the ¼” socket head cap
screws from the potentiometer bracket and
loosen the other. Turn the potentiometer
shaft until a millivolt reading of between 900
and 1100 is displayed. Mesh the potentiometer gear with the command shaft gear and
replace the ¼” socket head cap screw. The
millivolt reading must remain between 900
62
Page 63

Calibration For Earlier Style Mechanical Gearmotor/Potentiometers
and 1100 millivolts. W ithout changing the gear
mesh, remove one ¼” screw, and apply Loctite
#242 to the threads. Reinstall the screw finger
tight, then repeat the procedure on the remaining screw (do not change the orientation of the
lockwashers on the screws). The gear lash must
be adjusted so there is no side load on the potentiometer shaft. Tighten and torque the ¼”
socket head cap screw to 16 ft/lbs. Recheck
the millivolt reading. It must be between 900
and 1100 millivolts. If not, the gear mesh will
have to be readjusted.
At this point, press the Set Min button in the
Volume Slide Valve Potentiometer window.
Realize that the Current Vol window will show
a value, but it has no meaning at this point.
Now turn the command shaft to the fully
loaded position. W ith the slide valve against
the mechanical stop, release the tensions in
the mechanism by actuating the brake and
manually turn the command shaft back one
tooth on the command shaft gear. This is the
maximum millivolt position. Now press the
Set Max button. Calibration of the slide is
completed AFTER pressing the Main button,
to exit the Slide Calibration Screen. Now if
you re-enter the Slide Calibration Screen, the
correct value will be displayed in the Current
Vol window and on the Main screen.
Upgrading from Old Style Gear
Motors to Optical Actuators.
Refer to the installation instructions that are
supplied with the new Optical Actuators.
(VPN 25972A)
63
Page 64

Trend Chart
The trend analysis screen shows recorded data for a logging range of either 60 minutes or 120 hours. Additionally,
selections can be made to display segments of the logged data.
T o view which selections are being shown hit the data select button.
Note: When the panel is powered down, and powered back up, the “Trend Screen” will default to 120 hours even if
you have chosen 60 minutes. Trend data is not retained.
64
Page 65

Data Select Screen
The user has the ability to select which value they would like to see displayed on the graph. Only four selections can
be chosen at once to view, even though all data is being accumulated.
65
Page 66

Event List
T ouch Here
From the Menu screen, touch the Event List button. The screen on the next page will appear .
66
Page 67

Event List
The Event List will give a chronological record of the last 40 events recorded by the controller. These events can be
filtered by selecting the Filter box on the upper left of the screen.
67
Page 68

Trouble Shooting Flowchart (Vission Only)
Check to make sure 120V AC is run to “L1” on the Relay board.
This is the board on the inside left back of the panel. “L1” is
the fifth connector down from the top and the top terminal.
The neutral should be brought to any “N” on the relay board.
MicroController does not boot up, no
lights on any boards.
MicroController appears to be
booted, lights seen on boards and Estop switch, but no touch screen is
evident.
MicroController boots up but all data
temperatures and pressures are
zeroed and do not update.
Check F1 fuse on relay board.
Check F1 fuse on the power supply, located on the front of the
door. If all of the above is okay , the power supply may be bad.
Check DC voltages on the single board computer interface
board, which is the big green board above the power supply.
Along the right edge of this board, just above the power supply connector J14, are test points. If proper voltages are not
located at these test points, the power supply may be faulty.
Check cable connections located on the LCD Inverter board.
This board is located inside the door on the LCD touch screen
back plane above the single board computer. The connector
with the pink and white wires, located on the left center of the
board is the power supply to the board. The connector on the
top right of the board with the black wires has the data wires.
If these are inserted correctly, the problem could be bad solder
joint on the LCD Inverter board or a component failure.
Check Analog board jumpers J41 & J46. They should be on
pins 1 & 2 (center and right pins).
Check the upper DIP switch on the analog board. This identi
fies the node address of the Analog board. Only switch #1
should be on, the rest off.
The MicroController has (2) boards running separate programs.
The Analog board located inside the panel on the back right
calculates pressures, temperatures, amps and monitors inputs.
The single board computer requests this data for action and
display. The single board computer will instruct the Analog
board to activate outputs or relays as needed. Communica
tion between the boards is RS-485 running at 115200 baud.
The cable is basically phone cable with phone jack style con
nectors. The connector to the single board computer is on the
touch screen back panel and is labeled RS-485 Com2 to Ana
log Bd. The connector on the Analog board is located on the
bottom of the board. There are 2 connectors on the analog
board, either one can be used.
68
If this cable is open or disconnected, there will be no communications between the boards. The top two green lights on the
Analog board (D10 & D11), located on the bottom left of the
board, will be off. The pressures and temperatures will not
update. Ensure the cable is plugged in correctly. T ry rebooting
again. If the problem persists, try moving the cable on the
Analog board to the other connector. If not successful, try a
different cable on the Analog board to the other connector on
the board. If not successful, try a different cable. Any phone
style cord should work. If neither of these help, contact the
Vilter Home Office.
Page 69

Trouble Shooting Flowchart (Vission Only)
A bank of pressure or temperature
channels no longer function.
There are four fuses on the Analog board that limit the
current on the 24VDC to the Analog channels. The fuses
are 500 milliamp, located near the power supply connectors and brown in color. LEDs next to the fuses give a
visual indication of the status of the fuse, however, it is
best to pull the fuse and check them with an ohmmeter. If
any are blown, find the shorted device that is responsible
for the blown fuse and replace.
F1 protects the +24VDC supply to the pressure transducers and relays.
F2 protects the –12VDC supply which is subregulated to
5VDC required for multiplexers, analog to digital converts
and temperature channels.
F3 protects the +12VDC supply, which is subregulated to
+5VDC, required for multiplexers, analog to digital converters, and temperature channel.
F4 protects the main +5VDC supply required for most of
the components on the analog board.
A pressure channel reads a negative
number over -140
A temperature channel reads a large
negative value over -400°
Screen Cursor will not retain calibration.
If F1 blows, the pressure transducers will produce erroneous readings and the relays on the relay board will drop out
(de-energize). If F2, F3 or F4 blows, all analog readings
will be affected.
This indicates the transducer wiring or transducer is either
open or shorted. Check wiring to print.
Check fuses F1, F2, F3 and F4 on analog board.
This indicates the RTD wiring or RTD is open. Check
wiring to print.Check fuses F1, F2, F3 & F4 on analog
board.
Calibrate the screen cursor, TWICE, per the instructions
provided in the manual.
Go to “IP Address” screen and clear IP Address. Re-enter
the same IP address
Go to Change Date/Time and clear both. Re-enter
appropriate date and time.
Save changes and backup settings.
Power off the panel.
Power on the panel.
Verify the screen cursor follows the fingertip correctly.
69
Page 70

Safety Failure Message
Suction Pressure SP#1 Fail - This message will appear when the suction pressure falls below the
safety setting of the Lo Suction Pressure Trip Setpoint No.1. In
addition, this message will appear when the suction pressure reading
rises above 300 PSI, indicating an open transducer or bad analog
channel.
Suction Pressure SP#2 Fail - This message will appear when the suction pressure falls below the
safety setting of the Lo Suction Pressure Trip Setpoint No.2. In
addition, this message will appear when the suction pressure reading
rises above 300 PSI, indicating an open transducer.
Discharge Pressure SP#1 Fail – This message will appear when the discharge pressure exceeds the
safety setting of the Hi Dsch Press Trip Setpoint No. 1 . In addition,
this message will appear when the discharge pressure reading falls
below 30” Hg, indicating a shorted transducer.
Discharge Pressure SP#2 Fail – This message will appear when the discharge pressure exceeds the
safety setting of the Hi Dsch Press Trip Setpoint No. 2 . In addition,
this message will appear when the discharge pressure reading falls
below 30” Hg, indicating a shorted transducer
Suction T emp Fail – This message will appear when the suction temperature falls below the
safety setting of the Low Suction Temperature Trip setpoint. In addition,
this message will appear when the suction temperature rises above 400
degrees, indicating an open RTD.
Discharge Temp Fail – This message will appear when the discharge temperature rises above
the safety setting of the High Discharge Temperature Trip setpoint. In
addition, this message will appear when the discharge temperature falls
below -30 degrees, indicating a shorted RTD.
Oil Separator Start T emp Fail – This message will appear when the Oil Separator Temp is below the
Low Oil Separator Start Temp Trip setpoint. In addition this message
will appear after the Oil Separator Temp Safety Changeover timer times
out and the Oil Separator temperature fails to rise above the Low Oil
Separator Start Temp Reset after the compressor is started.
Oil Separator Run Temp Fail – This message will appear when the Oil Separator Temp is below the
Low Oil Separator Run Temp Reset setpoint after the Oil Separator
T emp Safety Changeover timer times out.
Percent Capacity Fail – This message will appear if the percent capacity reading exceeds 300%
or goes below –15%.
70
Page 71

Safety Failure Message
Percent Volume Fail – This message will appear if the percent volume reading exceeds 300% or
goes below –15%.
Lo Control T emperature Fail – This message will appear when the Process Control Temperature falls
below the safety setting of the Lo Control Temperature Trip Setpoint. In
addition, this message will appear when the Process Control Temperature
rises above 300 degrees F, indicating an open RTD.
Lo Start Oil Pressure Fail – This message will appear with the Prelub Oil Pressure (Manifold minus
Discharge) has remained below the Prelub Oil Pressure Reset setpoint.
The Prelub Oil Pressure must be above the Prelub Oil Pressure for a time
period of the Minimum Compressor Prelub time. It will continue to try to
do this for a time period of the Prelub Oil Pump Time Limit. When the
Prelub Oil Pressure fails to achieve this, then the failure message will
occur.
Lo Oil Pressure Fail – This message will appear when the Running Oil Pressure (Manifold minus
Suction) has remained below the low Oil Pressure Reset setpoint when the
Oil Pressure Bypass at Compressor Start timer times out. This message
will also appear when the Runnning Oil Pressure falls below the Low Oil
Pressure trip setpoint after the Oil Pressure Bypass at Compressor Start
timer times out.
Lo Oil Injection Temp Fail – This message will appear when the Oil Injection temperature falls below
the Low Oil Injection Temperature trip setpoint. This message will also
appear when the Oil Injection temperature fails to rise above the Low Oil
Injection Temperature reset setpoint after the Low Oil Injection Temp
Bypass timer times out.
Hi Oil Injection Temp Fail – This message will appear when the Oil Injection temperature rises above
the High Oil Injection Temperature trip setpoint.
Manifold Pressure Fail – This message will appear with the manifold pressure rises above 300 PSI
or falls below 30” Hg.
Filter Inlet Pressure Fail – This message will appear with the manifold pressure rises above 300 PSI
or falls below 30” Hg.
Start Filter Diff Press Fail – This message will appear if the Filter Differential pressure rises above the
High Fltr Diff Press – Start setpoint before the Filter Differential Pressure
Safety Changeover timer times out.
71
Page 72

Safety Failure Message
Run Filter Diff Press Fail – This message will appear if the Filter Differential pressure rises above the
High Fltr Diff Press – Run setpoint after the Filter Differential Pressure
Safety Changeover timer times out.
Maximum Amperage Fail – This message will appear if the motor amperage rises above the Hi Motor
Amps trip setpoint.
Motor Starter Aux Contact Fail – This message will appear if the Motor Auxiliary contact fails to close
before the Compressor Starter Auxiliary Contact Bypass timer times out.
Refer to wiring diagram.
Auxiliary Safety#1 Input Fail – This message will appear when power is removed from the input module
that is designated as “Auxiliary #1 Safety” (please refer to your wiring
diagram).
Lo Oil Separator Level Fail – This message may appear when power is removed from the input module
that is designated as “Lo Separator Oil Level Trip” (please refer to your
wiring diagram). This safety has an associated delay. The associated
delay timer is the Lo Oil Separator Level Bypass Timer. This safety will
activate only after the oil level has been low after the timer times out.
72
Page 73

Supressor Kit Installation
73
Page 74

Flash Card Installation Instructions
Note: Bef ore Powering Down To Repl ace F lash ca rd, You Must
Copy Down All Setpoints As These Will Need To Be Re-entered
When New Flashcard Is Installed.
Hit The Emergency Stop Botton
Located In Front Of the Panel
Verify Unit is Shut Down Completely
VANTAGE/V ISSION
EMERGENCY
STOP BUTTON
Discon n e ct t he Connec t o r An d
Ribbon A s Shown
Verify Lockout Disconnect On Compressor Start.
This Ensures Compressor Does Not Start.
Proceed As Follows
View Inside Of Door
Remove (4) S cre ws, One In
Each Corner Of Board
74
Flip Board Over To
View Flash Card
Page 75

Flash Card Installation Instructions
Remove Flashcard And Replace
Press Latch To Release Flashcard
Flip Board Back Into Posti on
Secure Board To Mounts
With Previously Removed Screws
Reconnect Connectors and Ribbons
Note: You Must Re-enterSetpoints And Reca librate SlideVa lves.
See Section On Setpoint Values And the S ection On Optical Actuators.
75
Page 76

Back Light Installation Instructions
Remove (Four) Nut s
Remove Board
Flip Board Over
Unplug Connector
Dis c on ne ct Ri bb on
Remove (Fo ur) Screws And
Turn Board Over
76
Page 77

Back Light Installation Instructions
Remove Small Screw
And Slide Back Light
Out As Shown
Sli d e Ne w Back Li gh t In And
Secu re W i t h P r evi ou s l y Removed S crew
77
Page 78

Back Light Installation Instructions
r
d
n
t
n
d
Connect Ribbon An d Plug
Connecto r B a ck In
Place Boa
Back I
o Postion A
Secure
Place Board Back Onto Back Of Panel And
Secure W it h Pr eviously Removed Nuts
78
Page 79

Transducer Wiring
79
Page 80

System Setpoints Alarms and Trips Work Sheet
SAFETY SYSTEM VALUES VALUE LIMITS DEFAULT VALUES
SETPOINTS ALARM TRIP RESET ALARM TRIP RESET ALARM TRIP RESET
LO SUCTION TEMP -99/300 -99/300 -99/300 -45 -50 -40
HI DISCHARGE TEMP -30/260 -30/260 -30/260 205 210 200
LO OIL SEP START TEMP 50/200 50/200 50/200 75 70 80
LO OIL SEP RUN TEMP 50/200 50/200 50/200 105 100 110
LO OIL INJECT TEMP 50/160 50/160 50/160 95 90 100
HI OIL INJECT TEMP -99/160 -99/160 -99/160 140 145 135
LO CONTROL TEMP (3) (2) -99/210 -99/210 -99/210 -50 -55 -45
HI CONTROL TEMP (3) (2) -99/210 - - - - - - 100 - - - - - -
LO SUCT PRESS
SETPOINT #1 30”/300 30”/300 30”/300 3” 4” 3”
SETPOINT #2 30”/300 30”/300 30”/300 1” 2” 1”
HI DISCHARGE PRESS
SETPOINT #1 30”/350 30”/350 30”/350 210 220 205
SETPOINT #2 30”/350 30”/350 30”/350 220 230 215
PRELUB OIL PRESSURE - - - 4/300 4/300 - - - 4 5
LO OIL PRESSURE (2) 18/300 18/300 18/300 38 35 40
HI START FLTR DIFF PR 30”/50 30”/50 30”/50 50 50 25
HI OIL RUN FILTER DIFF PR(1) 30”/40 30”/40 30”/40 12 15 10
HI AMPS LIMIT (4)(5) 0/1000 0/1000 0/1000 15 15 - - -
NOTES:
(1) If your unit is equipped with new style filters (Vilter Part #3109B or 3110B), the Alarm should be set at 37 psig, T rip at 4 0 psig and Reset
at 35 psig.
(2) For boosters, set Alarm at 28 psig, Trip at 25 psig, Reset at 30 psig.
(3) Set Alarm at 60% and Trip at 70% of full load motor nameplate amps. Only if Process Temp Control
(4) Set Alarm at 120% and Trip at 125% of full load motor nameplate amps.
80
Page 81

System Control Limit Values Work Sheet
SYSTEM CONTROL LIMIT VALUES WORKSHEET
CONTROL SYSTEM VALUES VALUE LIMITS DEF AUL T VALUES
LIMITS CUT IN CUT OUT CUT IN CUTOUT CUT IN CUT OUT
SUCTION PRESSURE ON/OFF (1)
SETPOINT #1 30”/150 30”/150 10 6
SETPOINT #2 30”/150 30”/150 15 11
SUCT PR CAP INCREASE (1)
SETPOINT #1 30”/150 30”/150 20 25
SETPOINT #2 30”/150 30”/150 20 25
SUCT PR CAP DECREASE (1)
SETPOINT #1 30”/150 30”/150 18 23
SETPOINT #2 30”/150 30”/150 18 23
HIGH DSCH PRESS UNLD (1)
SETPOINT #1 0/300 0/300 200 190
SETPOINT #2 0/300 0/300 210 200
LIQ INJECTION SOLENOID CONTROL ON OFF ON OFF
TEMP VIA:
OIL INJECTION TEMPERATURE 200°F 50°F 120°F 105°F
OIL SEPARATOR TEMPERATURE 200°F 50°F 120°F 105°F
OILPMP RESTART (D/S) 1.0/8.0 1.0/8.0 2.8 3.0
OIL S EPARA T OR H EATER 80/130 80/130 95 105
CAP CTRL °F ON/OFF (2)
SETPOINT #1 -99/200 -99/200 20 10
SETPOINT #2 -99/200 -99/200 25 15
CAP CTRL °F INCR (2)
SETPOINT #1 -99/300 -99/300 28 27
SETPOINT #2 -99/300 -99/300 33 32
CAP CTRL °F DECR (2)
SETPOINT #1 -99/200 -99/200 24 25
SETPOINT #2 -99/200 -99/200 29 30
LAG, CAPACITY STEP (3) 0/100 - - - 10 - - VOL SLIDE ADJ FACTOR -100/100 - - - 0% - - MINIMUM RUN CAPACITY 10% / 90% - - - 30 - - LEAD, MAXIMUM CAP FLAG (3) 50/100 50/100 95 90
ECONOMIZER SOLENOID 0% / 100% 0% / 100% 80% 75%‘
VOL ADJ CAP RANGE 0/100 - - - 100% 100%
LOW SUCTION PRESS LOAD LIMIT
SETPOINT #1
SETPOINT #2
LOW SUCTION PRESSURE LOAD LIMIT ON OFF ON O FF
SETPOINT #1 30 35
SETPOINT #2 40 45
MOTOR AMPS LOAD LIMIT (4)
SETPOINT #1 0/999 0/999 5 10
SETPOINT #2 0/999 0/999 5 10
CURRENT TRANSFORMER (1) 100-1000/AMPS 100/5 AMPS
C/T RATIO C/T RATIO C/T RATIO
NOTES:
(1) Must be field set.
(2) Set only if temperature is used for capacity control.
(3) Set only if Lead/Lag option is selected.
(4) Set FLA at nameplate amps, MAX at nameplate + service factor.
81
Page 82

System Timer Values
The values or options in the screen displays shown must be entered before start-up.
SYSTEM CONTROL LIMIT VALUES WORKSHEET
TIMER V ALUES SYSTEM V ALUES V ALUE LIMITS DEFAULT V ALUES
A T ST ART CAPACITY DECREASE 0/999 SEC 15 SEC
CAP ACITY INCREASE MOTOR ON 0/255 SEC 2 SEC
CAP ACITY DECREASE MOT OR ON 0/255 SEC 2 SEC
CMP STARTER AUX CONTACT BYPASS 0/255 SEC 10 SEC
CAP INCREASE MOTOR OFF 0/255 SEC 20 SEC
CAP DECREASE MOTOR OFF 0/255 SEC 10 SEC
VOL SLIDE ADJ TIMER 0/255 SEC 20 SEC
MINIMUM CAP PRELUB TIME 0/255 SEC 5 SEC
RUN CYCLE OIL PRESS BYPASS 0/90 SEC 60 SEC
PRELUB PUMP TIME LIMIT 0/255 SEC 255 SEC
FL TR DIFF PR SAFETY CHANGEOVER 0/999 SEC 60 SEC
LO OIL SEP LEVEL BYPASS TIMER 0/120 SEC 60 SEC
AUTO REST AR T AFTER POWER FAIL 1/240 MIN 5 MIN
OIL SEP TEMP SAFETY CHANGEOVER 0/15 MIN 5 MIN
LO OIL INJ TEMP SFTY CHANGEOVER 0/15 MIN 6 MIN
ANTIRECYCLE STRT TIMER (MIN) (1) 0/30 MIN 20 MIN
FORCE START LAG COMP (MIN) (2) 0/60 MIN 30 MIN
HOT STRTS/HR COUNTER (COUNTS) (1) 1/10 COUNTS 3 COUNTS
NOTES:
(1) Must be field set.
(2) Set only if Lead/Lag option is selected.
82
Page 83

DOOR LAYOUT
VISSION
micro-controller
STOP
EMERGENCY
SUBPANEL LAYOUT
SEE DETAIL-A
SEE DETAIL-B
DETAIL-B
STANDARD JUMPER SETTINGS
TRANSDUCER JUMPER CONFIGURATION
4-20 mA
EXTERNAL
DETAIL-A
RTD JUMPER CONFIGURATION
STANDARD JUMPER SETTINGS
4-20 mA
INTERNAL
RTD
83
Page 84

Spare Parts
PART DESCRIPTION VILTER PART NUMBER QTY.
Analog Board (VISSION PANEL) 3011A 1
Analog & Relay Board (VANTAGE PANEL) 3011C1 1
Control Relay, 4PDT 3011B1 1
Control Relay, DPDT 3011A1 1
Control Relay, SPDT 3011Z 1
Input Module 2895M (120v) 1
Output Module 2895N (120v) 1
Output Module Fuse 2895P 1
Panel Fuse, ½ Amp 3011V 1
Panel Fuse, 10 Amp 3011W 1
Panel Fuse, 4 Amp 2895P 1
Power Supply 3011K 1
Relay Board (VISSION) 3011B 1
Pressure Transducer 2783J 1
Resistance Temperature Detector 2611G 1
Fuse Kit (VISSION PANEL) 3011F 1
Fuse Kit (VANTAGE PANEL) 3011F1 1
VISSION SBC Sub-Assembly 3011ML 1
Modbus Cable 3011X 1
VISSION Cable Kit 3011Y 1
RTD/Transducer Cable 3122B 1
Cable Kit (VANTAGE PANEL) 3011Y1 1
Modbus Cable Kit (VANTAGE PANEL) 3011X1 1
CORD SET
RK4T-4/ 5618Turk 3122B 1
64m Flashcard 3011FC-1 1
Lighted Emergancy Switch 3011H 1
Snubbers 3030C 1
Supressor Kit KT785 1
*Supplied with 120VAC. input& output modules.
84
Page 85

Modifications for Analog Board (Vission/Vantage after July 2003)
Using Danfoss T ransducers with 2783J qualified
boards
The analog boards used in the Vission and Vantage
panels after July 2003 have been modified to accommodate the use of Danfoss transducers (VPN
2783J). These analog boards are denoted as “2783J
qualified” boards. The use of 2783J qualified boards
with Danfoss transducers require that scaling factors for the Danfoss pressure transducers be checked
and modified if necessary.
The scale factors for all transducers are located at a
specific Index location in V ission/V antage database.
Refer to Figure 1. This table shows the proper scale
factors for each type of transducer as well as the
Index location of the scaling factor for each transducer.
Vission and Vantage (VSS and SOI units) Vission (VRS units)
Transducer Index Value* Transducer Index Value*
Suction N658 3950 Suction N658 3950
Discharge N659 3950 Discharge N659 3950
Man/Filter Out N660 3950 Manifold N660 3950
Filter In N661 3950 Filter Inlet N661 3950
Filter Outlet (Retrofit) N664 3950
Vission and Vantage (Cool Compression units) Vantage (Recip)
Transducer Index Value* Transducer Index Value*
Suction N658 3950 Suction N658 3950
Discharge N659 3950 Discharge#1 N659 3950
Man/Filter Out N660 3950 Filter Out N660 3950
Filter Inlet N661 3950
Discharge#2 N662 3950
Oil Manifold N663 3950
Crankcase N664 3950
Figure 1. Transducer Index Table and Scale Factors
N660 3950
Value* : The value 3950 shown is the Scale Factor for transducers manufactured by Ametek and
Setra. This does NOT include Danfoss transducers. If Danfoss transducers are being used with
2783J qualified boards, the “Value” at the Indexes shown above needs to be modified to 4297.
The procedure on the next page describes how to modify the scaling factor.
85
Page 86

Modifications for Analog Board (Vission/Vantage after July 2003)
The procedure to Change Scale Factors on 2783J
Qualified Board
1. From the Main Screen, press the Menu button.
2. From the Menu Screen, press the V ilter ONLY
screen.
3. Logon
4. From the Vilter ONLY screen, press the Raw
Data Screen button.
You will now see a screen labeled “Data
T est”, containing 4 columns, 2 labeled
“Index” and 2 labeled “Value”.
5. Press the “Set” button and then press one of the
blank boxes under either one of the Index columns.
6. A keypad will be displayed. Now type in
“N658” (without the quote marks). Press the OK
button. (Per the table, this is the Index for the
Suction Pressure transducer.)
7. Y ou are now returned to the “Data T est” screen.
Y ou will see “N658” in the box that you touched,
and you will see the value 3950 in the corresponding “Value” box. This is the scale factor
that will be changed.
8. Now press the “Set” button again, and press the
“Value” box that contains the value 3950. A
numeric keypad will now be visible.
9. Press the Clear button. Now press the buttons
4297, followed by pressing the “Enter” button.
You will now be returned to the “Data Test”
screen, and the Value field that previously contained 3950 now contains the Value 4297. Per
the table below, you have now corrected the
scaling factor for the Suction Pressure transducer.
10. Continue this process, entering in “Index” values and changing the scaling factors for all transducers. (Reference Figure 1 below.)
11. When completed, press the OK button and return back to the main screen.
12. Now go to the LOGON screen and perform a
“BACKUP SETTINGS”. After a minute or so,
the new scale factors will be “active”.
13. You may now need to recalibrate your transducers again, as the new scale factors will affect the current readings of the transducers. If
you have gauges on your system, you can do
this using your gauge readings. When you have
completed re-calibration of all your transducers, do another “BACKUP SETTINGS”.
2895A 3011A Vission 3011C1 Vantage 3011A Vission 3011C1 Vantage
Ametek Yes Yes Yes Yes Yes
VPN 2783G
Danfoss No* No No Yes-Rescale Yes-Rescale
VPN 2783J
Setra Yes Yes Yes Yes Yes
VPN 2783K
Table II The acceptable mix of analog boards and transducers.
No* = this combination of board and transducer will result in a very slight scaling error (2 percent error over entire
0-300 PSIG range of transducer). Vilter does not recommend using the Danfoss transducer with a 2895A board.
Warning -If a Danfoss Transducer is used with a non-qualified 2783J Analog Board, the transducer will not
properly read pressures over 165 PSIG.
86
(2783J qualified) (2783J qualified)
Page 87

Setup Screen
Danfoss Liquid Injection Valves
1. Press “Setup”
2 . Select “Enable” for Liquid Pos. Valve
3. Press “OK”
4 . Press “Vilter Only”, you will be prompted to Log In
5 . Press “Liquid Inj. Temp Control” then you will see the
screen as in the attached picture “Liquid Inj. Control”,
the values you see there are default and can be changed
according to your application.
Vilter Only Screen
NOTE:
Consult the VSS / VSM / VSR Unit Manual for proper
Danfoss ICM valve setup procedure.
Liquid Inj. Temp Control Screen
87
Page 88

Who to Contact
If service is required, first contact your equipment distributor or contact
A Vilter Technical Service Representative at:
V ilter Manufacturing LLC
5555 South Packard Ave.
PO Box 8904
Cudahy , WI 53110-8904
T el: 414-744-011 1
Fax: 414-744-1769
e-mail: info.vilter@emerson.com
www.vilter.com
Note: It will be necessary to have your V ilter order number available
when contacting Vilter Manufacturing Corporation for service support.
Disclaimer: Specifications are subject to change without notification.
88
Page 89

89
Page 90

EmersonClimate.com
Vilter Manufacturing LLC
P.O. Box 8904
Cudahy, WI 53110-8904
P 414 744 0111
F 414 744 1769
www.vilter.com
Vilter Manufacturing LLC are trademarks of Emerson Electric Co. or one of its affi liated companies.
©2011 Emerson Climate Technoligies, Inc. All rights reserved. Printed in the USA.
35391SA Rev 06
 Loading...