

Page 1
Reference Manual
00809-0100-4793, Rev CA
August 2004
Rosemount 8742C Magnetic Flowmeter
Transmitter with F
OUNDATION
™
Fieldbus and
8700 Series Magnetic Flowmeter Flowtube
www.rosemount.com
Page 2

Page 3

Reference Manual
00809-0100-4793, Rev CA
August 2004
Rosemount 8742C
Rosemount 8742C Magnetic
Flowmeter Transmitter with
F
OUNDATION
™
Fieldbus and 8700
Series Magnetic Flowmeter
Flowtube
NOTICE
Read this manual before working with the product. For personal and system safety, and for
optimum product performance, make sure you thoroughly understand the contents before
installing, using, or maintaining this product.
Within the United States, Rosemount Inc. has two toll-free assistance numbers:
Customer Central
Technical support, quoting, and order-related questions.
1-800-999-9307 (7:00 am to 7:00 pm CST)
North American Response Center
Equipment service needs.
1-800-654-7768 (24 hours—includes Canada)
Outside of the United States, contact your local Rosemount representative.
www.rosemount.com
The products described in this document are NOT designed for nuclear-qualified
applications. Using non-nuclear qualified products in applications that require
nuclear-qualified hardware or products may cause inaccurate readings.
For information on Rosemount nuclear-qualified products, contact your local Rosemount
Sales Representative.
Rosemount, the Rosemount logotype, Fisher-Rosemount, Managing the Process Better,
PlantWeb, and SMART FAMILY are registered trademarks of Rosemount Inc.
DeltaV is a trademark of the Fisher-Rosemount group of companies.
HART is a registered trademark of the HART Communication Foundation.
Tefzel and Teflon are registered trademarks of E.I. du Pont de Nemours & Co.
Ryton is a registered trademark of the Phillips Petroleum Co.
Fluoraz is a registered trademark of Greens, Tweed & Co., Inc.
Hastelloy C and Hastelloy C-22 are registered trademarks of Haynes International,
OUNDATION is a trademark of the Fieldbus Foundation.
F
Cover photo: 8742h0002
Page 4

Page 5

Reference Manual
00809-0100-4793, Rev CA
August 2004
Rosemount 8742C
Table of Contents
SECTION 1
Introduction
SECTION 2
Installation
System Description . . . . . . . . . . . . . . . . . . . . . . . . . . . . . . . . . . . . . . . 1-1
Safety Messages . . . . . . . . . . . . . . . . . . . . . . . . . . . . . . . . . . . . . . . . . 1-3
Return of Materials . . . . . . . . . . . . . . . . . . . . . . . . . . . . . . . . . . . . . . . 1-3
Safety Information . . . . . . . . . . . . . . . . . . . . . . . . . . . . . . . . . . . . . . . . 2-1
Transmitter Symbols . . . . . . . . . . . . . . . . . . . . . . . . . . . . . . . . . . . . . . 2-2
Pre-Installation. . . . . . . . . . . . . . . . . . . . . . . . . . . . . . . . . . . . . . . . . . . 2-2
Identify Options and Configurations . . . . . . . . . . . . . . . . . . . . . . . . 2-2
Hardware Switches. . . . . . . . . . . . . . . . . . . . . . . . . . . . . . . . . . . . . 2-2
Simulate Enable . . . . . . . . . . . . . . . . . . . . . . . . . . . . . . . . . . . . . . . 2-2
Transmitter Security . . . . . . . . . . . . . . . . . . . . . . . . . . . . . . . . . . . . 2-2
Changing Hardware
Switch Settings . . . . . . . . . . . . . . . . . . . . . . . . . . . . . . . . . . . . . . . . 2-3
Rotate Transmitter Housing . . . . . . . . . . . . . . . . . . . . . . . . . . . . . . 2-3
Wiring. . . . . . . . . . . . . . . . . . . . . . . . . . . . . . . . . . . . . . . . . . . . . . . . . . 2-4
Conduit Ports and Connections . . . . . . . . . . . . . . . . . . . . . . . . . . . 2-4
Conduit Connections . . . . . . . . . . . . . . . . . . . . . . . . . . . . . . . . . . . 2-4
Conduit Cables . . . . . . . . . . . . . . . . . . . . . . . . . . . . . . . . . . . . . . . . 2-5
Transmitter Coil Input . . . . . . . . . . . . . . . . . . . . . . . . . . . . . . . . . . . 2-5
Installation Category. . . . . . . . . . . . . . . . . . . . . . . . . . . . . . . . . . . . 2-6
Overcurrent Protection . . . . . . . . . . . . . . . . . . . . . . . . . . . . . . . . . . 2-6
Transmitter Communication Input . . . . . . . . . . . . . . . . . . . . . . . . . 2-6
Power Conditioning . . . . . . . . . . . . . . . . . . . . . . . . . . . . . . . . . . . . 2-6
Field Wiring. . . . . . . . . . . . . . . . . . . . . . . . . . . . . . . . . . . . . . . . . . . 2-6
Transmitter Wiring Connection . . . . . . . . . . . . . . . . . . . . . . . . . . . . 2-7
Transmitter to
Flowtube Wiring . . . . . . . . . . . . . . . . . . . . . . . . . . . . . . . . . . . . . . . 2-8
Flowtube to Remote Mount Transmitter Connections . . . . . . . . . . 2-9
Flowtube to Integral Mount Transmitter Connections. . . . . . . . . . 2-10
www.rosemount.com
Page 6

Rosemount 8742C
Reference Manual
00809-0100-40793, Rev CA
August 2004
SECTION 3
Flowtube Installation
Safety Messages . . . . . . . . . . . . . . . . . . . . . . . . . . . . . . . . . . . . . . . . . 3-1
Flowtube Handling . . . . . . . . . . . . . . . . . . . . . . . . . . . . . . . . . . . . . . . . 3-3
Flowtube Mounting . . . . . . . . . . . . . . . . . . . . . . . . . . . . . . . . . . . . . . . 3-4
Upstream/Downstream
Piping . . . . . . . . . . . . . . . . . . . . . . . . . . . . . . . . . . . . . . . . . . . . . . . 3-4
Flowtube Orientation . . . . . . . . . . . . . . . . . . . . . . . . . . . . . . . . . . . 3-4
Flow Direction. . . . . . . . . . . . . . . . . . . . . . . . . . . . . . . . . . . . . . . . . 3-6
Installation (Flanged Flowtube) . . . . . . . . . . . . . . . . . . . . . . . . . . . . . . 3-7
Gaskets . . . . . . . . . . . . . . . . . . . . . . . . . . . . . . . . . . . . . . . . . . . . . 3-7
Flange Bolts . . . . . . . . . . . . . . . . . . . . . . . . . . . . . . . . . . . . . . . . . . 3-7
Installation
(Wafer Flowtube) . . . . . . . . . . . . . . . . . . . . . . . . . . . . . . . . . . . . . . . . 3-10
Gaskets . . . . . . . . . . . . . . . . . . . . . . . . . . . . . . . . . . . . . . . . . . . . 3-10
Flange Bolts . . . . . . . . . . . . . . . . . . . . . . . . . . . . . . . . . . . . . . . . . 3-11
Installation
(Sanitary Flowtube) . . . . . . . . . . . . . . . . . . . . . . . . . . . . . . . . . . . . . . 3-12
Gaskets . . . . . . . . . . . . . . . . . . . . . . . . . . . . . . . . . . . . . . . . . . . . 3-12
Alignment and Bolting. . . . . . . . . . . . . . . . . . . . . . . . . . . . . . . . . . 3-12
Grounding . . . . . . . . . . . . . . . . . . . . . . . . . . . . . . . . . . . . . . . . . . . . . 3-12
Process Leak Protection (Optional) . . . . . . . . . . . . . . . . . . . . . . . . . . 3-15
Standard Housing Configuration . . . . . . . . . . . . . . . . . . . . . . . . . 3-16
Relief Valves. . . . . . . . . . . . . . . . . . . . . . . . . . . . . . . . . . . . . . . . . 3-16
Process Leak Containment . . . . . . . . . . . . . . . . . . . . . . . . . . . . . 3-17
SECTION 4
Configuration
Calibration . . . . . . . . . . . . . . . . . . . . . . . . . . . . . . . . . . . . . . . . . . . 4-1
Quick Start-Up . . . . . . . . . . . . . . . . . . . . . . . . . . . . . . . . . . . . . . . . . . . 4-2
Flowtube Calibration Number . . . . . . . . . . . . . . . . . . . . . . . . . . . . . 4-2
Assigning Device Tag and Node Address . . . . . . . . . . . . . . . . . . . . . . 4-2
AI Block . . . . . . . . . . . . . . . . . . . . . . . . . . . . . . . . . . . . . . . . . . . . . . . . 4-3
Arithmetic Block . . . . . . . . . . . . . . . . . . . . . . . . . . . . . . . . . . . . . . . . . . 4-3
Integrator . . . . . . . . . . . . . . . . . . . . . . . . . . . . . . . . . . . . . . . . . . . . . . . 4-3
PID Block . . . . . . . . . . . . . . . . . . . . . . . . . . . . . . . . . . . . . . . . . . . . . . . 4-4
Configuring Links and Scheduling Block Execution. . . . . . . . . . . . . . . 4-5
Advanced Applications . . . . . . . . . . . . . . . . . . . . . . . . . . . . . . . . . . 4-6
Cascade Control. . . . . . . . . . . . . . . . . . . . . . . . . . . . . . . . . . . . . . . 4-7
Resource Block . . . . . . . . . . . . . . . . . . . . . . . . . . . . . . . . . . . . . . . . . . 4-8
FEATURES and FEATURES_SEL . . . . . . . . . . . . . . . . . . . . . . . . 4-8
MAX_NOTIFY. . . . . . . . . . . . . . . . . . . . . . . . . . . . . . . . . . . . . . . . . 4-9
PlantWeb
™
Alarms . . . . . . . . . . . . . . . . . . . . . . . . . . . . . . . . . . . . . 4-9
TOC-2
Page 7

Reference Manual
00809-0100-4793, Rev CA
August 2004
Rosemount 8742C
SECTION 5
Operation and
Maintenance
SECTION 6
Troubleshooting
APPENDIX A
Reference Data
Safety Information . . . . . . . . . . . . . . . . . . . . . . . . . . . . . . . . . . . . . . . . 5-1
Software Operation . . . . . . . . . . . . . . . . . . . . . . . . . . . . . . . . . . . . . . . 5-1
Local Display Configuration . . . . . . . . . . . . . . . . . . . . . . . . . . . . . . 5-2
Calibration . . . . . . . . . . . . . . . . . . . . . . . . . . . . . . . . . . . . . . . . . . . 5-2
Electronics Trim . . . . . . . . . . . . . . . . . . . . . . . . . . . . . . . . . . . . . . . 5-2
Auto Zero Trim . . . . . . . . . . . . . . . . . . . . . . . . . . . . . . . . . . . . . . . . 5-4
Configuring the Advanced Diagnostics and Empty Pipe . . . . . . . . 5-4
Learning Empty Pipe . . . . . . . . . . . . . . . . . . . . . . . . . . . . . . . . . . . 5-4
Diagnostics . . . . . . . . . . . . . . . . . . . . . . . . . . . . . . . . . . . . . . . . . . . 5-6
Diagnostic Information . . . . . . . . . . . . . . . . . . . . . . . . . . . . . . . . . . 5-6
Diagnostic Counter . . . . . . . . . . . . . . . . . . . . . . . . . . . . . . . . . . . . . 5-9
Hardware Maintenance . . . . . . . . . . . . . . . . . . . . . . . . . . . . . . . . . . . . 5-9
Replacing the F
Replacing the F
Replacing the F
Step 1: Function Block Errors . . . . . . . . . . . . . . . . . . . . . . . . . . . . . . . 6-3
Step 2: Diagnostic Messages . . . . . . . . . . . . . . . . . . . . . . . . . . . . . . . 6-3
Step 3: Wiring Errors . . . . . . . . . . . . . . . . . . . . . . . . . . . . . . . . . . . . . . 6-3
Step 4: Process Noise . . . . . . . . . . . . . . . . . . . . . . . . . . . . . . . . . . . . . 6-3
Step 5: Installed Flowtube Tests . . . . . . . . . . . . . . . . . . . . . . . . . . . . . 6-3
Step 6: Uninstalled Flowtube Tests . . . . . . . . . . . . . . . . . . . . . . . . . . . 6-5
Rosemount 8742C Transmitter Specifications . . . . . . . . . . . . . . . . . .A-1
Functional Specifications . . . . . . . . . . . . . . . . . . . . . . . . . . . . . . . . A-1
Foundation Fieldbus Specifications . . . . . . . . . . . . . . . . . . . . . . . . A-3
Performance Specifications . . . . . . . . . . . . . . . . . . . . . . . . . . . . . . A-4
Physical Specifications . . . . . . . . . . . . . . . . . . . . . . . . . . . . . . . . . . A-5
Rosemount 8705 and 8707 Flowtubes Specifications. . . . . . . . . . . . . A-5
Functional Specifications . . . . . . . . . . . . . . . . . . . . . . . . . . . . . . . . A-5
Performance Specifications . . . . . . . . . . . . . . . . . . . . . . . . . . . . . . A-8
Physical Specifications . . . . . . . . . . . . . . . . . . . . . . . . . . . . . . . . . . A-8
Rosemount 8711 Wafer Flowtube Specifications . . . . . . . . . . . . . . . A-11
Functional Specifications . . . . . . . . . . . . . . . . . . . . . . . . . . . . . . . A-11
Performance Specifications . . . . . . . . . . . . . . . . . . . . . . . . . . . . . A-12
Physical Specifications . . . . . . . . . . . . . . . . . . . . . . . . . . . . . . . . . A-12
Rosemount 8714D Specifications . . . . . . . . . . . . . . . . . . . . . . . . . . . A-14
Functional Specifications . . . . . . . . . . . . . . . . . . . . . . . . . . . . . . . A-14
Performance Specifications . . . . . . . . . . . . . . . . . . . . . . . . . . . . . A-14
Physical Specifications . . . . . . . . . . . . . . . . . . . . . . . . . . . . . . . . . A-14
Dimensional Drawings . . . . . . . . . . . . . . . . . . . . . . . . . . . . . . . . . . . . A-15
Ordering Information . . . . . . . . . . . . . . . . . . . . . . . . . . . . . . . . . . . . . A-22
Rosemount 8742C . . . . . . . . . . . . . . . . . . . . . . . . . . . . . . . . . . . . A-22
Rosemount 8705 . . . . . . . . . . . . . . . . . . . . . . . . . . . . . . . . . . . . . A-24
Rosemount 8707 . . . . . . . . . . . . . . . . . . . . . . . . . . . . . . . . . . . . . A-28
Rosemount 8711 . . . . . . . . . . . . . . . . . . . . . . . . . . . . . . . . . . . . . A-30
Rosemount 8714 . . . . . . . . . . . . . . . . . . . . . . . . . . . . . . . . . . . . . A-31
OUNDATION
OUNDATION
OUNDATION
™
Fieldbus Electronics Housing. . . . . . 5-9
™
Fieldbus Terminal Block in the Housing5-10
™
Fieldbus Electronics Boards. . . . . . 5-10
TOC-3
Page 8

Rosemount 8742C
Reference Manual
00809-0100-40793, Rev CA
August 2004
APPENDIX B
Product Certifications
APPENDIX C
Resource Block
APPENDIX D
Transducer Block
Approved Manufacturing Locations . . . . . . . . . . . . . . . . . . . . . . . . B-1
European Directive Information . . . . . . . . . . . . . . . . . . . . . . . . . . . . . . B-1
ATEX Directive . . . . . . . . . . . . . . . . . . . . . . . . . . . . . . . . . . . . . . . . B-1
European Pressure Equipment Directive (PED) (97/23/EC) . . . . . B-1
Electro Magnetic Compatibility (EMC) (89/336/EEC) . . . . . . . . . . .B-2
Low Voltage Directive (93/68/EEC) . . . . . . . . . . . . . . . . . . . . . . . .B-2
Other important guidelines . . . . . . . . . . . . . . . . . . . . . . . . . . . . . . .B-2
Hazardous Location Certifications . . . . . . . . . . . . . . . . . . . . . . . . . . . . B-3
Transmitter Approval Information . . . . . . . . . . . . . . . . . . . . . . . . . B-3
Flowtube Approval Information. . . . . . . . . . . . . . . . . . . . . . . . . . . . B-7
Definition. . . . . . . . . . . . . . . . . . . . . . . . . . . . . . . . . . . . . . . . . . . . .C-1
Parameters and Descriptions . . . . . . . . . . . . . . . . . . . . . . . . . . . . . . .C-1
Resource Block Errors. . . . . . . . . . . . . . . . . . . . . . . . . . . . . . . . . . . . .C-5
Modes . . . . . . . . . . . . . . . . . . . . . . . . . . . . . . . . . . . . . . . . . . . . . . . . . C-5
Alarm Detection . . . . . . . . . . . . . . . . . . . . . . . . . . . . . . . . . . . . . . .C-6
Status Handling . . . . . . . . . . . . . . . . . . . . . . . . . . . . . . . . . . . . . . .C-6
VCR . . . . . . . . . . . . . . . . . . . . . . . . . . . . . . . . . . . . . . . . . . . . . . . .C-6
Troubleshooting . . . . . . . . . . . . . . . . . . . . . . . . . . . . . . . . . . . . . . . . . .C-6
Definition. . . . . . . . . . . . . . . . . . . . . . . . . . . . . . . . . . . . . . . . . . . . .D-1
Parameters and Descriptions . . . . . . . . . . . . . . . . . . . . . . . . . . . . . . .D-2
Flow-Specific Block Configuration Values . . . . . . . . . . . . . . . . . . . . . .D-3
Transducer Block Errors . . . . . . . . . . . . . . . . . . . . . . . . . . . . . . . . . . .D-4
Transducer Block Diagnostics . . . . . . . . . . . . . . . . . . . . . . . . . . . . . . .D-5
Modes . . . . . . . . . . . . . . . . . . . . . . . . . . . . . . . . . . . . . . . . . . . . . . . . . D-5
Alarm Detection . . . . . . . . . . . . . . . . . . . . . . . . . . . . . . . . . . . . . . .D-5
Status Handling . . . . . . . . . . . . . . . . . . . . . . . . . . . . . . . . . . . . . . .D-6
Troubleshooting . . . . . . . . . . . . . . . . . . . . . . . . . . . . . . . . . . . . . . . . . .D-6
APPENDIX E
Field-Removable
Electrodes
TOC-4
Safety Messages . . . . . . . . . . . . . . . . . . . . . . . . . . . . . . . . . . . . . . . . . E-1
Remove the Electrode Assembly. . . . . . . . . . . . . . . . . . . . . . . . . . . . . E-1
Replace the Electrode Assembly. . . . . . . . . . . . . . . . . . . . . . . . . . . . . E-2
Page 9

Reference Manual
00809-0100-4793, Rev CA
August 2004
Section 1 Introduction
System Description . . . . . . . . . . . . . . . . . . . . . . . . . . . . . . page 1-1
Safety Messages . . . . . . . . . . . . . . . . . . . . . . . . . . . . . . . . . page 1-3
Return of Materials . . . . . . . . . . . . . . . . . . . . . . . . . . . . . . . page 1-3
Rosemount 8742C
SYSTEM DESCRIPTION The Rosemount
separate flowtube and transmitter units, and measures volumetric flow rate by
detecting the velocity of a conductive liquid that passes through a magnetic
field. Magnetic Flowmeter Systems consist of a flowtube and a transmitter.
There are three Rosemount magnetic flowmeter flowtubes:
• Flanged Rosemount 8705
• Flanged High-Signal Rosemount 8707
• Wafer-Style Rosemount 8711
• Sanitary 8721
There are three Rosemount magnetic flowmeter transmitters:
• Rosemount 8712D/H
• Rosemount 8732C
• Rosemount 8742C
The flowtube is installed in-line with process piping — either vertically or
horizontally. Coils located on opposite sides of the flowtube create a magnetic
field. A conductive liquid moving through the magnetic field generates a
voltage at the two electrodes that is proportional to the flow velocity.
The transmitter drives the coils to generate a magnetic field and electronically
conditions the voltage detected by the electrodes. The transmitter then
amplifies and conditions the electrode signal to provide a flow signal. The
transmitter can be integrally mounted or remotely mounted from the flowtube.
®
8700 Series Magnetic Flowmeter System combines
www.rosemount.com
This manual is designed to assist in the installation and operation of
Rosemount 8742C Magnetic Flowmeter Transmitter with F
fieldbus and 8700 Series Magnetic Flowmeter Flowtubes.
Attempting to install and operate the Rosemount 8705, 8707 High-Signal,
or 8711 Magnetic Flowmeter Flowtubes with the Rosemount 8712D/H,
8732, or 8742 Magnetic Flowmeter Transmitter without reviewing the instructions
contained in this manual could result in personal injury or equipment damage.
OUNDATION
™
Page 10

Rosemount 8742C
00809-0100-4793, Rev CA
Section 2: Installation
• Transmitter Commissioning
• Wiring Flowmeter to a Flowtube
Section 3: Flowtube Installation
• Handling
• Mounting
• Installation of a Flanged, Wafer, and Sanitary Flowtube
Section 4: Configuration
• Assigning Device Tag
• Configuring Blocks
• Configuring Links and Scheduling Block Execution
Section 5: Operation and Maintenance
• Software Operation
• Hardware Maintenance
• Replacing the F
OUNDATION
™
fieldbus Electronics Housing
Reference Manual
August 2004
Section 6: Troubleshooting
• Troubleshooting Procedures
• Electrical Circuit Diagrams
Appendix A: Reference Data
• Specifications for Rosemount 8742 Transmitter
and 8700 Series Flowtubes
• Ordering Tables
• Dimensional Drawings
Appendix B: Product Certifications
• Transmitter Approval Information
• Flowtube Approval Information
Appendix C: Resource Block
• Parameters and Descriptions
• Modes
Appendix D: Transducer Block
• Parameters and Descriptions
• Modes
Appendix E: Field-Removable Electrodes
• Electrode Assembly
1-2
Page 11

Reference Manual
00809-0100-4793, Rev CA
August 2004
Rosemount 8742C
SAFETY MESSAGES Procedures and instructions in this manual may require special precautions to
ensure the safety of the personnel performing the operations. Refer to the
safety messages listed at the beginning of each section before performing
any operations.
RETURN OF MATERIALS To expedite the return process outside the United States, contact the nearest
Rosemount representative.
Within the United States and Canada, call the North American Response
Center using the 800-654-RSMT (7768) toll-free number. The Response
Center, available 24 hours a day, will assist you with any needed information
or materials.
The center will ask for product model and serial numbers, and will provide a
Return Material Authorization (RMA) number. The center will also ask for the
name of the process material to which the product was last exposed.
Mishandling products exposed to a hazardous substance may result in death
or serious injury. If the product being returned was exposed to a hazardous
substance as defined by OSHA, a copy of the required Material Safety Data
Sheet (MSDS) for each hazardous substance identified must be included with
the returned goods.
The North American Response Center will detail the additional information
and procedures necessary to return goods exposed to hazardous
substances.
See “Safety Information” on page 4-1 for complete warning information.
1-3
Page 12

Reference Manual
00809-0100-4793, Rev CA
August 2004
Rosemount 8742C
1-4
Page 13
Reference Manual
00809-0100-4793, Rev CA
August 2004
Section 2 Installation
Safety Information . . . . . . . . . . . . . . . . . . . . . . . . . . . . . . . page 2-1
Transmitter Symbols . . . . . . . . . . . . . . . . . . . . . . . . . . . . . page 2-2
Pre-Installation . . . . . . . . . . . . . . . . . . . . . . . . . . . . . . . . . . page 2-2
Wiring . . . . . . . . . . . . . . . . . . . . . . . . . . . . . . . . . . . . . . . . . . page 2-4
This section covers the steps required to physically install the magnetic
flowmeter. Instructions and procedures in this section may require special
precautions to ensure the safety of the personnel performing the operations.
Please refer to the following safety messages before performing any
operation in this section.
Rosemount 8742C
SAFETY INFORMATION
Failure to follow these installation guidelines could result in death or serious injury:
Installation and servicing instructions are for use by qualified personnel only. Do not
perform any servicing other than that contained in the operating instructions, unless
qualified. Verify that the operating environment of the flowtube and transmitter is
consistent with the appropriate FM or CSA approval.
Do not connect a Rosemount 8742C to a non-Rosemount flowtube that is located in an
explosive atmosphere.
The flowtube liner is vulnerable to handling damage. Never place anything through the
flowtube for the purpose of lifting or gaining leverage. Liner damage can render the
flowtube useless.
To avoid possible damage to the flowtube liner ends, do not use metallic or
spiral-wound gaskets. If frequent removal is anticipated, take precautions to protect the
liner ends. Short spool pieces attached to the flowtube ends are often used for
protection.
Correct flange bolt tightening is crucial for proper flowtube operation and life. All bolts
must be tightened in the proper sequence to the specified torque limits. Failure to
observe these instructions could result in severe damage to the flowtube lining and
possible flowtube replacement.
www.rosemount.com
Page 14

Rosemount 8742C
Reference Manual
00809-0100-4793, Rev CA
August 2004
TRANSMITTER
SYMBOLS
Caution Symbol — Check product documentation for details.
Protective conductor (grounding) terminal.
PRE-INSTALLATION Before installing the Rosemount 8742C Magnetic Flowmeter Transmitter,
there are several pre-installation steps that should be completed to make the
installation process easier. They include identifying the options and
configurations that apply to your application, setting the hardware switches if
necessary, and consideration of physical requirements.
The mounting site for the 8742C should provide enough room for secure
mounting, easy access to the conduit ports, and full opening of the transmitter
covers.
To ensure maximum transmitter life, avoid excessive heat and vibration.
Typical problem areas include high-vibration lines with integrally mounted
transmitters, warm-climate installations in direct sunlight, and outdoor
installations in cold climates. To avoid potential problems, remotely mounted
transmitters may be installed in the control room. This protects the electronics
from the harsh environment and provides easy access for configuration or
service.
The Rosemount 8742C transmitter requires external power regardless of
whether it is mounted remotely or integrally to the flowtube. Access to a
suitable power source must be ensured.
Identify Options and
Configurations
The standard application of the Rosemount 8742C includes a FOUNDATION
fieldbus output. Be sure to identify options and configurations that apply to
your situation, and keep a list of them nearby for consideration during the
installation and configuration procedures.
Hardware Switches The Rosemount 8742C electronics board is equipped with two
user-selectable hardware switches. These switches set Simulate Enable and
Transmitter Security. The standard configurations for these switches when
shipped from the factory are as follows:
Simulate Enable: Off
Transmitter Security: Off
Definitions of these switches and their functions are provided below. The
switches are located on the outerboard of the electronics transmitter stack.
See Figure 2-1 on page 2-3.
Simulate Enable The simulate enable switch is used in conjunction with the Analog Input (AI)
function block. The switch is used to enable flow measurement simulation.
The switch is also used as a lock-out feature for the AI function block. To
enable the simulate enable feature, the switch must transition form OFF to
ON after power is applied to the transmitter, preventing the transmitter from
being accidentally left in simulate mode.
Transmitter Security After you configure the transmitter, you may want to protect the configuration
data from unwarranted changes. Each transmitter is equipped with a security
switch that can be positioned ON to prevent the accidental or deliberate
change of configuration data.
2-2
Page 15

Reference Manual
00809-0100-4793, Rev CA
August 2004
Figure 2-1. Hardware Switches
Rosemount 8742C
Instructions for changing the hardware switches are provided in “Changing
Hardware Switch Settings” on page 2-3.
Simulate
Enable
Transmitter
Security
8742-1002H01A
Changing Hardware
Switch Settings
Rotate Transmitter
Housing
In most cases, it is not necessary to change the setting of the hardware
switches. If you need to change the switch settings, complete the steps
outlined below:
NOTE
The hardware switches are located on the electronics board and changing
their settings requires opening of the electronics housing. If possible, carry out
these procedures away from the plant environment in order to protect the
electronics.
1. Disconnect power to the transmitter.
2. Unscrew and remove the electronics cover.
3. Identify the location of the switch.
4. Change the setting of the desired switches with a small screwdriver.
Refer to Figure 2-1.
5. Screw and tighten the electronics cover.
The electronics housing can be rotated on the flowtube in 90° increments by
loosening the four mounting bolts on the bottom of the housing, rotating the
housing, and reinstalling the bolts. Refer to Figure 2-2 on page 2-4. When the
housing is returned to its original position, be sure the surface is clean and
there is no gap between the housing and the flowtube.
See “Safety Information” on page 2-1 for complete warning information.
2-3
Page 16

Rosemount 8742C
Figure 2-2. Rosemount 8742C
Transmitter Dimensional
Drawing
5.10
(130)
10.5
(267)
3.00
(76)
1.94
(49)
7.49 (190)
6.48 (165)
LOI Cover
8.81
(224)
3.07
(78)
Reference Manual
00809-0100-4793, Rev CA
August 2004
3
/4”-14 NPT Electrical
Conduit Connections
(2 places)
3.43
(87)
3
/4”-14 NPT
Flowtube Conduit
Connections
(2 places)
11.02
(280)
WIRING Correct cable preparation is important for a successful installation. The
conduit connections needed for installation depend on transmitter location. A
conduit run between the flowtube and transmitter is not required if the
transmitter is integrally mounted on the flowtube.
Conduit Ports
and Connections
Both the flowtube and transmitter junction boxes have ports for ¾-inch NPT
conduit connections. These connections should be made in accordance with
local or plant electrical codes. Unused ports should be sealed with metal
plugs. Housing damage will result if metal plugs
are overtightened.
Proper electrical installation is necessary to prevent errors due to electrical
noise and interference. Before making any electrical connections to the
Rosemount 8742C, consider the following standards and be sure to have
proper power supply, conduit, and other accessories. Shielded cable must be
used for best results in electrically noisy environments.
Conduit Connections The transmitter has ports for ¾–inch NPT conduit connections. If the port is
not being used, conduit seals should to be installed. In some cases, conduits
may also require drainage if moisture could build up in the line.
2-4
Page 17

Reference Manual
00809-0100-4793, Rev CA
August 2004
Rosemount 8742C
Conduit Cables Run the appropriate size cable through the conduit connections in your
magnetic flowmeter system. Run the power cable from the power source to
the transmitter. Run the coil drive and electrode cables between the flowmeter
and transmitter.
Prepare the ends of the coil drive and electrode cables as shown in Figure
2-3. Limit the unshielded wire length to 1-inch on both the electrode and coil
drive cables.
NOTE
Excessive lead length or failure to connect cable shields can create electrical
noise resulting in unstable meter readings.
Figure 2-3. Cable Preparation
Detail
1.00
(26)
NOTE
Dimensions are in
Cable Shield
inches (millimeters).
8705-0041B
Transmitter Coil Input The Rosemount 8742C Magnetic Flowmeter Transmitter is a four-wire device.
This wiring section covers supplying power to the flowtube coils through the
transmitter. The transmitter coil input power sends a pulsed DC frequency to
the flowtube.
Wire the transmitter according to local electrical requirements. Ground the
transmitter cage via the threaded conduit connection. For ac power
applications, connect ac Neutral to terminal N and connect ac Line to terminal
L1. For dc power applications, properly connect the positive and negative
terminals. Units powered by 15-50 V dc power supply may draw up to 1 amp
of current. In addition, follow the supply wire and disconnect requirements
below:
1.0
0.75
0.5
0.25
0
15
20
Supply Current (Amps)
I = 10/V
I = Supply current requirement (Amps)
V = Power supply voltage (Volts)
Power Supply (Volts)
30
40
50
2-5
Page 18

Reference Manual
00809-0100-4793, Rev CA
Rosemount 8742C
August 2004
Supply Wire Requirements
Use 12 to 18 AWG wire rated for the proper temperature application. For
connections in ambient temperatures above 140 °F (60 °C), use a wire
rated for 176 °F (80 °C). For ambients greater than 176 °F (80 °C), use a
wire rated for 230 °F (110 °C).
Disconnects
Connect the device through an external disconnect or circuit breaker.
Clearly label the disconnect or circuit breaker and locate it near
the transmitter and per local electrical control.
Installation Category The installation category for the Rosemount 8742C is
(Overvoltage) Category II.
Overcurrent Protection The Rosemount 8742C Flowmeter Transmitter requires overcurrent
protection of the supply lines. Maximum ratings of overcurrent devices are as
follows:
Power System Fuse Rating Manufacturer
110 V ac 250 V; 1 Amp, Quick Acting Bussman AGCI or Equivalent
220 V ac 250 V; 0.5 Amp, Quick Acting Bussman AGCI or Equivalent
Transmitter
Communication Input
The FOUNDATION fieldbus communication requires a minimum of
9 V dc and a maximum of 32 V dc at the transmitter communication terminals.
NOTES
• Do not exceed 32 V dc at the transmitter communication terminals.
• Do not apply ac line voltage to the transmitter
communication terminals.
Improper supply voltage can damage the transmitter.
Power Conditioning Each fieldbus power supply requires a power conditioner to decouple the
power supply output from the fieldbus wiring segment.
Field Wiring Power independent of the coil power supply must be supplied for FOUNDATION
fieldbus communications. Use shielded, twisted pair for best results. For new
installations or to get maximum performance, twisted pair cable designed
especially for fieldbus should be used. Table 2-1 details cable characteristics
and ideal specifications.
Table 2-1.
Ideal Cable Specifications
for Fieldbus Wiring
Characteristic Ideal Specification
Impedance 100 Ohms ± 20% at 31.25 kHz
Wire Size 18 AWG (0,8 mm2)
Shield Coverage 90%
Attenuation 3 db/km
Capacitive Unbalance 2 nF/km
2-6
See “Safety Messages” on page 2-1 for complete warning information.
Page 19

Reference Manual
00809-0100-4793, Rev CA
August 2004
Rosemount 8742C
NOTE
The number of devices on a fieldbus segment is limited by the power supply
voltage, the resistance of the cable, and the amount of current drawn by
each device.
Transmitter Wiring
Connection
Figure 2-4. Rosemount 8742C
Transmitter Field Wiring
To make the transmitter communication wiring connection, remove the end
cover on the electronics housing. Connect the power leads to the positive (+)
and negative (–) fieldbus communication terminals. The communication
terminals are polarity insensitive: the polarity of the dc power leads does not
matter when connecting to the power terminals.
When wiring to screw terminals, crimped lugs are recommended. Tighten the
terminals to ensure adequate contact.
Both transmitter covers must be fully engaged to meet explosion proof
requirements. Do not remove the transmitter covers in an explosive
atmosphere when the transmitter is powered
6234 ft (1900 m) max
(depending upon cable
Integrated
Power
Conditioner
and Filter
Segment
Power
Supply
(Trunk)
(1)
Terminators
Fieldbus
.
(The power supply,
filter, first terminator,
and configuration tool
are typically located
in the control room.)
*Intrinsically safe installations may
allow fewer devices per I.S. barrier.
(1) Pending final approval.
OUNDATION
F
Fieldbus
Configuration
Too l
(Spur)
Devices 1 through 11*
(Spur)
8742-8742_01A
2-7
Page 20

Rosemount 8742C
Figure 2-5. Power Connections
Input Power 90–250 V ac
Reference Manual
00809-0100-4793, Rev CA
August 2004
Grounding
Lugs
Fieldbus Outputs
8742-1002F01A
Transmitter to
Flowtube Wiring
Figure 2-6. Conduit Preparation
Wrong Correct
Power
Outputs
Power
Outputs
Flanged and wafer flowtubes have two conduit ports as shown in Figures
3-13, 3-14, 3-15, and 3-16. Either one may be used for both the coil drive and
electrode cables. Use the stainless steel plug that is provided to seal the
unused conduit port.
A single dedicated conduit run for the coil drive and electrode cables is
needed between a flowtube and a remote transmitter. Bundled cables in a
single conduit are likely to create interference and noise problems in your
system. Use one set of cables per conduit run. See Figure 2-6 for proper
conduit installation diagram and Table 2-2 for recommended cable. For
integral and remote wiring diagrams refer to Figure 2-7 and Figure 2-8.
Coil Drive
and
Electrode
Cables
Power
Outputs
Power
Outputs
Coil Drive and
Electrode
Cables
2-8
Page 21
Reference Manual
00809-0100-4793, Rev CA
August 2004
Table 2-2. Cable Requirements
Rosemount 8742C
Description Part Number
Signal Cable (20 AWG) Belden 8762, Alpha 2411 equivalent 08712-0061-0001
Coil Drive Cable (14 AWG) Belden 8720, Alpha 2442 equivalent 08712-0060-0001
Combination Signal and Coil Drive Cable (18 AWG)
Belden 9368 equivalent
(1) Combination signal and coil drive cable is not recommended for
high-signal magmeter system. For remote mount installations, combination signal and coil drive
cable should be limited to less than 100 ft. (30 m).
(1)
Remote transmitter installations require equal lengths of signal and coil drive
cables. Integrally mounted transmitters are factory wired and do not require
interconnecting cables.
Lengths from 5 to 1,000 feet (1.5 to 300 meters) may be specified, and will be
shipped with the flowtube.
08712-0750-0001
Flowtube to Remote
Mount Transmitter
Connections
Figure 2-7. Wiring Diagram
Connect coil drive and electrode cables as shown in Figure 2-7.
Do not connect ac power to the flowtube or to terminals 1 and 2 of the
transmitter, or replacement of the electronics board will be necessary.
8742b_07a
2-9
Page 22

Rosemount 8742C
Table 2-3. Flowtube to Remote
Mount Transmitter
Reference Manual
00809-0100-4793, Rev CA
August 2004
Rosemount 8712D/H Transmitters Rosemount 8705/8707/8711 Flowtubes
11
2 2
17 17
18 18
19 19
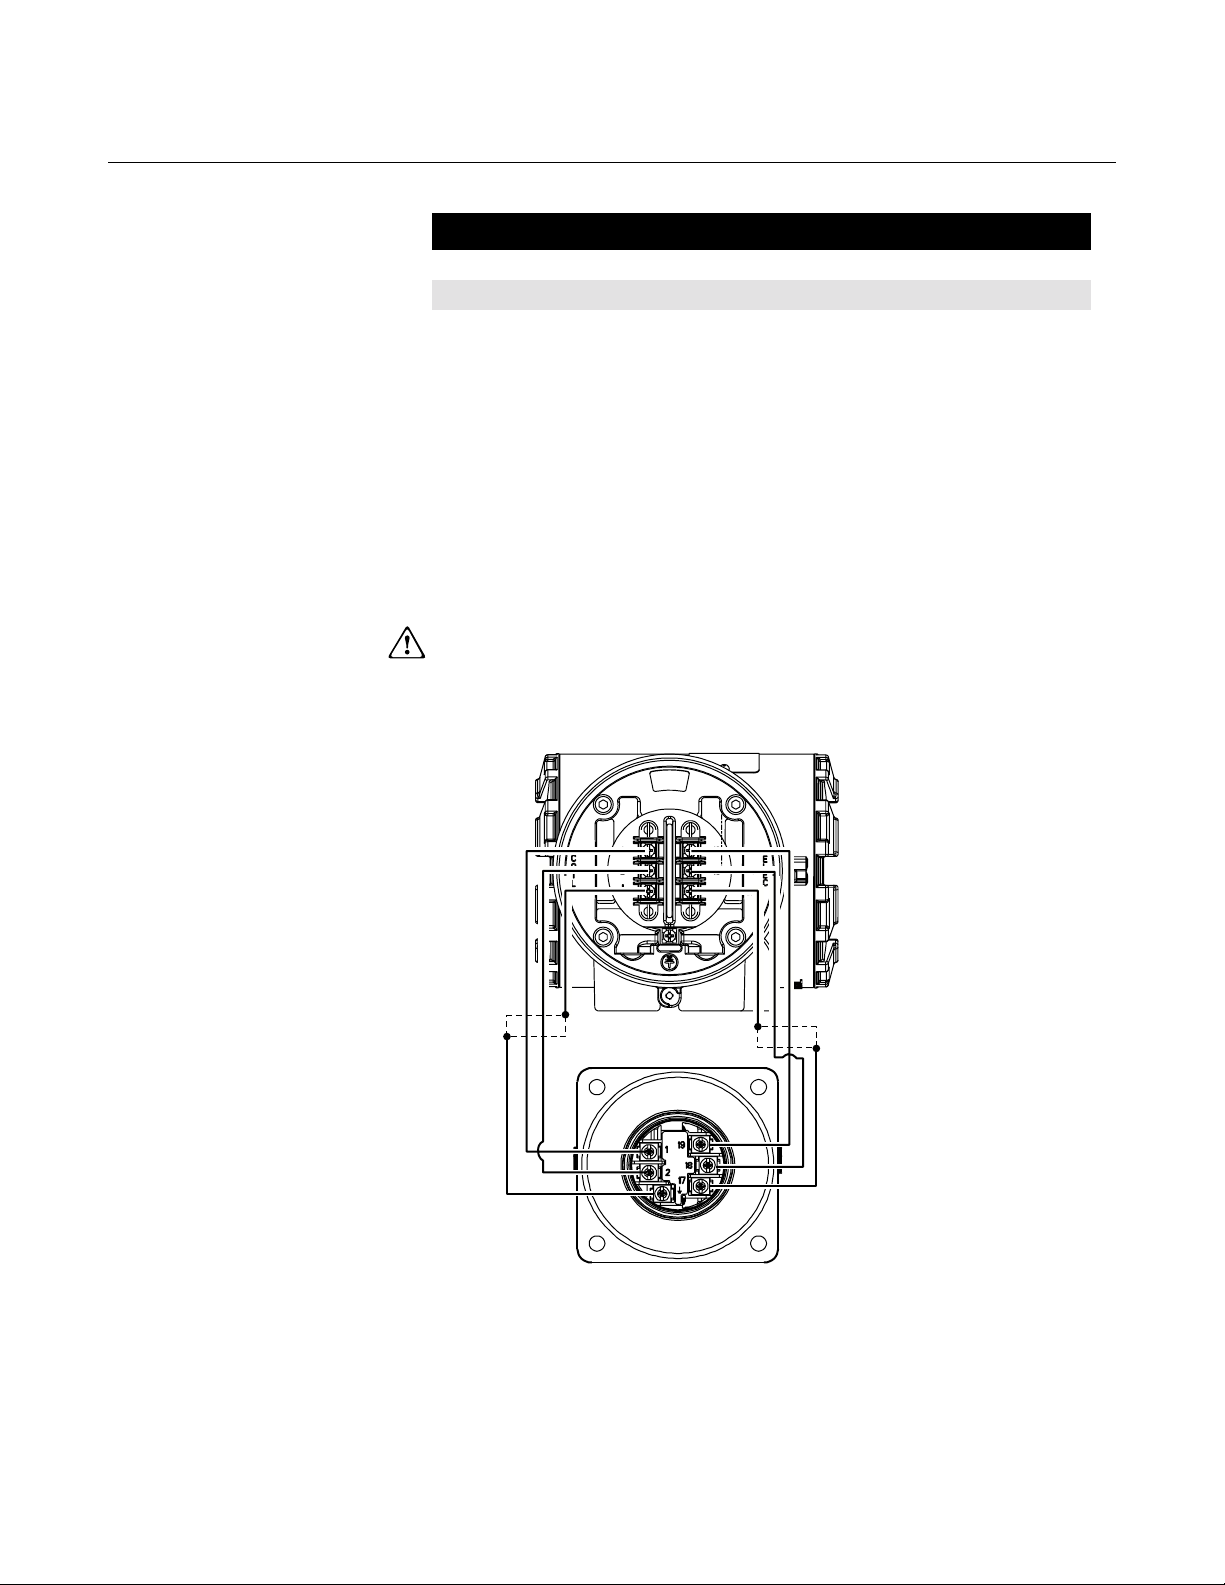
Flowtube to Integral
Mount
Transmitter Connections
Figure 2-8. Wiring Diagram to
Rosemount 8732C/8742C
Transmitter
Connect coil drive and electrode cables as shown in Figure 2-8.
Do not connect ac power to the flowtube or to terminals 1 and 2 of the
transmitter, or replacement of the electronics board will be necessary.
Electronics
Board
Table 2-4. Flowtube to Integral
Mount Transmitter
2-10
8732-8732B01A
Rosemount 8732C/8742C Rosemount 8705/8711 Flowtubes
11
2 2
17 17
18 18
19 19
Page 23
Reference Manual
00809-0100-4793, Rev CA
August 2004
Rosemount 8742C
Section 3 Flowtube Installation
Safety Messages . . . . . . . . . . . . . . . . . . . . . . . . . . . . . . . . . page 3-1
Flowtube Handling . . . . . . . . . . . . . . . . . . . . . . . . . . . . . . . page 3-3
Flowtube Mounting . . . . . . . . . . . . . . . . . . . . . . . . . . . . . . . page 3-4
Installation (Flanged Flowtube) . . . . . . . . . . . . . . . . . . . . . page 3-7
Installation (Wafer Flowtube) . . . . . . . . . . . . . . . . . . . . . . . page 3-10
Installation (Sanitary Flowtube) . . . . . . . . . . . . . . . . . . . . . page 3-12
Grounding . . . . . . . . . . . . . . . . . . . . . . . . . . . . . . . . . . . . . . page 3-12
Process Leak Protection (Optional) . . . . . . . . . . . . . . . . . page 3-15
This section covers the steps required to physically install the magnetic
flowtube. For electrical connections and cabling see Section 2: Installation.
Instructions and procedures in this section may require special precautions to
ensure the safety of the personnel performing the operations. Please refer to
the following safety messages before performing any operation in this section.
SAFETY MESSAGES This symbol is used throughout this manual to indicate that special attention
to warning information is required.
Failure to follow these installation guidelines could result in death or serious injury:
Installation and servicing instructions are for use by qualified personnel only. Do not perform
any servicing other than that contained in the operating instructions, unless qualified. Verify
that the operating environment of the flowtube and transmitter is consistent with the
appropriate hazardous area approval.
Do not connect a Rosemount 8742C to a non-Rosemount flowtube that is located in an
explosive atmosphere.
www.rosemount.com
Page 24

Rosemount 8742C
Reference Manual
00809-0100-4793, Rev CA
August 2004
Explosions could result in death or serious injury:
Installation of this transmitter in an explosive environment must be in accordance with the
appropriate local, national, and international standards, codes, and practices. Please review
the approvals section of the 8742C reference manual for any restrictions associated with a
safe installation.
Before connecting a HART-based communicator in an explosive atmosphere, make sure
the instruments in the loop are installed in accordance with intrinsically safe or
non-incendive field wiring practices.
Electrical shock can result in death or serious injury
Avoid contact with the leads and terminals. High voltage that may be present on leads can
cause electrical shock.
The flowtube liner is vulnerable to handling damage. Never place anything through the
flowtube for the purpose of lifting or gaining leverage. Liner damage can render the flowtube
useless.
To avoid possible damage to the flowtube liner ends, do not use metallic or spiral-wound
gaskets. If frequent removal is anticipated, take precautions to protect the liner ends. Short
spool pieces attached to the flowtube ends are often used for protection.
Correct flange bolt tightening is crucial for proper flowtube operation and life. All bolts must
be tightened in the proper sequence to the specified torque limits. Failure to observe these
instructions could result in severe damage to the flowtube lining and possible flowtube
replacement.
3-2
Page 25

Reference Manual
00809-0100-4793, Rev CA
August 2004
Rosemount 8742C
FLOWTUBE HANDLING Handle all parts carefully to prevent damage. Whenever possible, transport
the system to the installation site in the original shipping containers.
®
Te fl on
mechanical damage and normal unrestrained distortion. Remove the end
covers just before installation.
Flanged 6- through 36-inch flowtubes come with a lifting lug on each flange.
The lifting lugs make the flowtube easier to handle when it is transported and
lowered into place at the installation site.
Flanged ½- to 4-inch flowtubes do not have lugs. They must be supported
with a lifting sling on each side of the housing.
Figure 3-1 shows flowtubes correctly supported for handling and installation.
Notice the plywood end pieces are still in place to protect the flowtube liner
during transportation.
Figure 3-1. Rosemount 8705
Flowtube Support for Handling
-lined flowtubes are shipped with end covers that protect it from both
½- through 4-Inch
Flowtubes
See ”Safety Messages” on pages 3-1 and 3-2 for complete warning information.
8732-0281B02AB, C02AB
6-Inch and Larger
Flowtubes
3-3
Page 26
Reference Manual
00809-0100-4793, Rev CA
Rosemount 8742C
August 2004
FLOWTUBE MOUNTING Physical mounting of a flowtube is similar to installing a typical section of pipe.
Conventional tools, equipment, and accessories (bolts, gaskets, and
grounding hardware) are required.
Upstream/Downstream
Piping
To ensure specification accuracy over widely varying process conditions,
install the flowtube a minimum of five straight pipe diameters upstream and
two pipe diameters downstream from the electrode plane (see Figure 3-2).
Figure 3-2. Upstream and
Downstream
Straight Pipe Diameters
5 Pipe Diameters
FLOW
2 Pipe Diameters
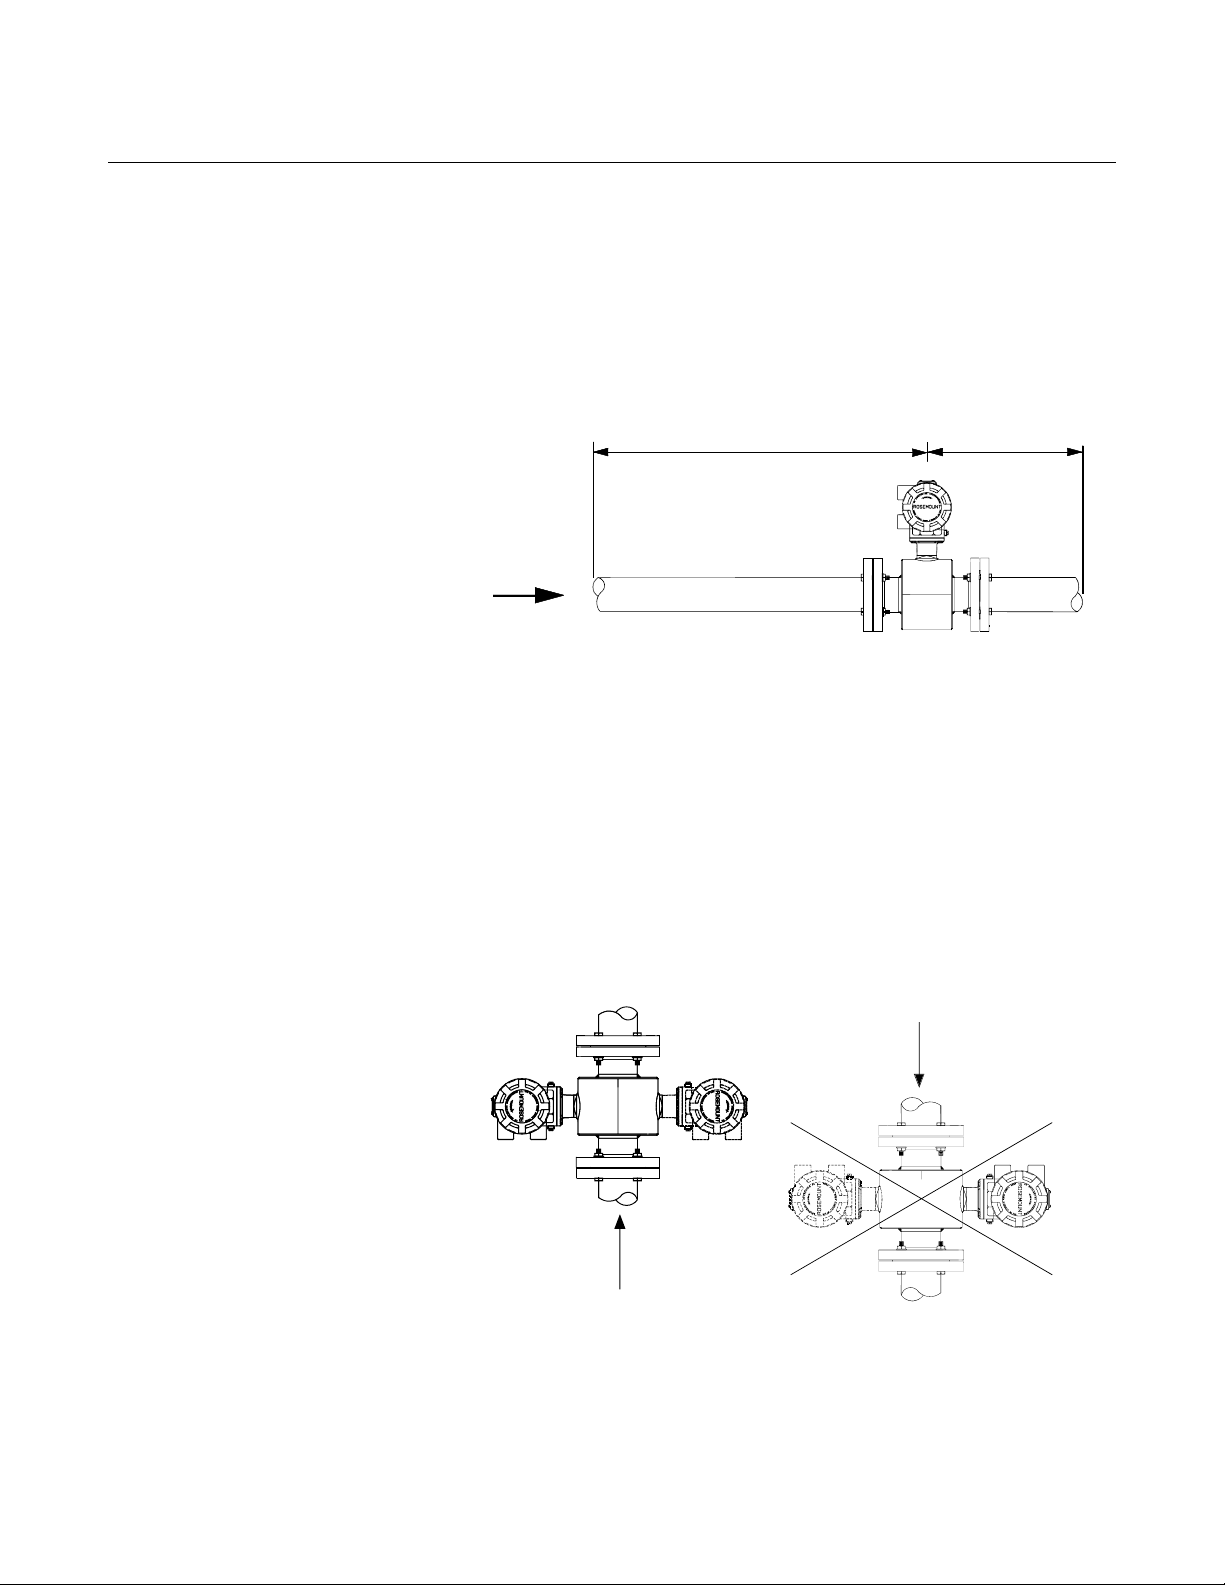
Flowtube Orientation The flowtube should be installed in a position that ensures the flowtube
remains full during operation. Figures 3-3, 3-4, and 3-5 show the proper
flowtube orientation for the most common installations. The following
orientations ensure that the electrodes are in the optimum plane to minimize
the effects of entrapped gas.
Vertical installation allows upward process fluid flow and is generally
preferred. Upward flow keeps the cross-sectional area full, regardless
of flow rate. Orientation of the electrode plane is unimportant in vertical
installations. As illustrated in Figures 3-3 and 3-4, avoid downward flows
where back pressure does not ensure that the flowtube remains full at all
times.
8732-0281G02A
Figure 3-3. Vertical Flowtube
Orientation
3-4
A
FLOW
B
FLOW
8735-0005A01AB, 0005A01BB
Page 27

Reference Manual
00809-0100-4793, Rev CA
August 2004
Figure 3-4. Incline or Decline
Orientation
Rosemount 8742C
A
B
FLOW
Figure 3-5. Horizontal Flowtube
Orientation
FLOW
Horizontal installation should be restricted to low piping sections that are
normally full. Orient the electrode plane to within 45 degrees of horizontal in
horizontal installations. A deviation of more than 45 degrees of horizontal
would place an electrode at or near the top of the flowtube thereby making it
more susceptible to insulation by air or entrapped gas at the top of the
flowtube.
FLOW
The electrodes in the Rosemount 8711 are properly oriented when the top
of the flowtube is either vertical or horizontal, as shown in Figure 3-6. Avoid
any mounting orientation that positions the top of the flowtube
at 45° from the vertical or horizontal position.
8732-0005A01EB, 0005A01FB
8732-0005A01C
3-5
Page 28

Rosemount 8742C
Figure 3-6. Rosemount 8711
Mounting Position
Reference Manual
00809-0100-4793, Rev CA
August 2004
45° Electrode Plane
45° Electrode Plane
Flow Direction The flowtube should be mounted so that the FORWARD end of the flow
arrow, shown on the flowtube identification tag, points in the direction of flow
through the tube (see Figure 3-7).
Figure 3-7. Flow Direction
FLOW
8711-8711-E01AB, 8711-8711-F01A
8712-0281H02FD
3-6
Page 29

Reference Manual
00809-0100-4793, Rev CA
August 2004
Rosemount 8742C
INSTALLATION
(FLANGED FLOWTUBE)
The following section should be used as a guide in the installation of the
flange-type Rosemount 8705 and Rosemount 8707 High-Signal Flowtubes.
Refer to page 3-10 for installation of the wafer-type Rosemount 8711
Flowtube.
Gaskets The flowtube requires a gasket at each of its connections to adjacent devices or
piping. The gasket material selected must be compatible with the process fluid and
operating conditions. Metallic or spiral-wound gaskets can damage the
liner. If the gaskets will be removed frequently, protect the liner ends. All other
applications (including flowtubes with lining protectors or a grounding
electrode) require only one gasket on each end connection, as shown in
Figure 3-8. If grounding rings are used, gaskets are required on each side of
the grounding ring, as shown in Figure 3-9.
Figure 3-8. Gasket Placement
Gasket (Supplied by user)
Figure 3-9. Gasket Placement
with Non-attached Grounding
Rings
Gasket (Supplied by user)
Grounding Ring
Gasket (Supplied by user)
Flange Bolts Suggested torque values by flowtube line size and liner type are listed in
Table 3-1 on page 3-8 for ASME B16.5 (ANSI) flanges and Table 3-2 and
Table 3-3 for DIN flanges. Consult the factory for other flange ratings. Tighten
flange bolts in the incremental sequence as shown in Figure 3-10. See
Table 3-1 and Table 3-2 for bolt sizes and hole diameters.
8705-0040E
8705-0038D
See ”Safety Messages” on pages 3-1 and 3-2 for complete warning information.
3-7
Page 30

Rosemount 8742C
Reference Manual
00809-0100-4793, Rev CA
August 2004
NOTE
Do not bolt one side at a time. Tighten each side simultaneously. Example:
1. Snug left
2. Snug right
3. Tighten left
4. Tighten right
Do not snug and tighten left and then snug and tighten right. Failure to do so
will result in liner damage.
Always check for leaks at the flanges after tightening the flange bolts. Failure
to use the correct flange bolt tightening methods can result in severe damage.
All flowtubes require a second torquing twenty-four hours after initial flange
bolt tightening.
Table 3-1. Flange Bolt Torque Specifications for
Rosemount 8705 and 8707 High-Signal Flowtubes
Teflon/Tefzel liner Polyurethane liner
Size Code Line Size
005
010 1 inch (25 mm) 8 12 — —
015 1
020 2 inch (50 mm) 19 17 14 11
030 3 inch (80 mm) 34 35 23 23
040 4 inch (100 mm) 26 50 17 32
060 6 inch (150mm) 45 50 30 37
080 8 inch (200 mm) 60 82 42 55
100 10 inch (250 mm) 55 80 40 70
120 12 inch (300 mm) 65 125 55 105
140 14 inch (350 mm) 85 110 70 95
160 16 inch (400 mm) 85 160 65 140
180 18 inch (450 mm) 120 170 95 150
200 20 inch (500 mm) 110 175 90 150
240 24 inch (600 mm) 165 280 140 250
300 30 inch (750 mm) 195 415 165 375
360 36 inch (900 mm) 280 575 245 525
1
/2-inch (15 mm) 8 8 — —
1
/2 inch (40 mm) 13 25 7 18
Class 150
(pound-feet)
Class 300
(pound-feet)
Class 150
(pound-feet)
Class 300
(pound-feet)
See ”Safety Messages” on pages 3-1 and 3-2 for complete warning information.
3-8
Page 31

Reference Manual
00809-0100-4793, Rev CA
August 2004
Table 3-2. Flange Bolt Torque and Bolt Load Specifications for Rosemount 8705
Tef lon/ Tefz e l li n er
Size
Code
005
010 1 inch (25 mm) 13 6983 13 6983 13 6983 13 8816
015 1
020 2 inch (50 mm) 25 10420 25 10420 25 10420 25 14457
030 3 inch (80 mm) 14 5935 14 5935 18 7612 18 12264
040 4 inch (100 mm) 17 7038 17 7038 30 9944 30 16021
060 6 inch (150mm) 23 7522 32 10587 60 16571 60 26698
080 8 inch (200 mm) 35 11516 35 11694 66 18304 66 36263
100 10 inch (250 mm) 31 10406 59 16506 105 25835 105 48041
120 12 inch (300 mm) 43 14439 82 22903 109 26886 109 51614
140 14 inch (350 mm) 42 13927 80 22091 156 34578 156 73825
160 16 inch (400 mm) 65 18189 117 28851 224 45158 224 99501
180 18 inch (450 mm) 56 15431 99 24477 — — — 67953
200 20 inch (500 mm) 66 18342 131 29094 225 45538 225 73367
240 24 inch (600 mm) 104 25754 202 40850 345 63940 345 103014
Line Size (Newton-meter) (Newton) (Newton-meter) (Newton) (Newton-meter) (Newton) (Newton-meter) (Newton)
1
/2-inch (15 mm) 7 3209 7 3809 7 3809 7 4173
1
/2 inch (40 mm) 24 9983 24 9983 24 9983 24 13010
PN10 PN 16 PN 25 PN 40
Rosemount 8742C
Figure 3-10. Flange Bolt
Torquing Sequence
4-Bolt
8-Bolt
20-Bolt
Torque the flange bolts
in increments according to
the above numerical sequence.
12-Bolt
14-Bolt
8701-0870G02A
3-9
Page 32

Reference Manual
00809-0100-4793, Rev CA
Rosemount 8742C
Table 3-3. Flange Bolt Torque and Bolt Load Specifications for Rosemount 8705
Polyurethane Liner
Size
Code
005
010 1 inch (25 mm) 2 119 1 3 1890 5 2958 10 5555
015 1
020 2 inch (50 mm) 6 2535 10 4021 15 6294 26 10831
030 3 inch (80 mm) 5 2246 9 3563 13 5577 24 19998
040 4 inch (100 mm) 7 3033 12 4812 23 7531 35 11665
060 6 inch (150mm) 16 5311 25 8425 47 13186 75 20829
080 8 inch (200 mm) 27 8971 28 9487 53 14849 100 24687
100 10 inch (250 mm) 26 8637 49 13700 87 21443 155 34547
120 12 inch (300 mm) 36 12117 69 19220 91 22563 165 36660
140 14 inch (350 mm) 35 11693 67 18547 131 29030 235 47466
160 16 inch (400 mm) 55 15393 99 24417 189 38218 335 62026
200 20 inch (500 mm) 58 15989 114 25361 197 39696 375 64091
240 24 inch (600 mm) 92 22699 178 36006 304 56357 615 91094
Line Size
1
/2-inch (15 mm) 1 521 1 826 2 1293 6 3333
1
/2 inch (40 mm) 5 1960 7 3109 12 4867 20 8332
(Newton-meter) (Newton) (Newton-meter) (Newton) (Newton-meter) (Newton) (Newton-meter) (Newton)
PN 10 PN 16 PN 25 PN 40
August 2004
INSTALLATION
(WAFER FLOWTUBE)
The following section should be used as a guide in the installation of the
Rosemount 8711 Flowtube. Refer to page 3-7 for installation of the
flange-type Rosemount 8705 and 8707 High-Signal flowtube.
Gaskets The flowtube requires a gasket at each of its connections to adjacent devices
or piping. The gasket material selected must be compatible with the process
fluid and operating conditions. Metallic or spiral-wound gaskets can
damage the liner. If the gaskets will be removed frequently, protect the
liner ends. If grounding rings are used, a gasket is required on each side of
the grounding ring.
Alignment and Bolting
1. On 11/2 - through 8-inch (40 through 200 mm) line sizes, place
centering rings over each end of the flowtube. The smaller line sizes,
0.15- through 1-inch (4 through 25 mm), do not require centering
rings.
2. Insert studs for the bottom side of the flowtube between the pipe
flanges. Stud specifications are listed in Table 3-4. Using carbon
steel bolts on smaller line sizes, 0.15- through 1-inch
(4 through 25 mm), rather than the required stainless steel bolts,
will degrade performance.
3-10
Page 33

Reference Manual
00809-0100-4793, Rev CA
August 2004
Rosemount 8742C
Table 3-4. Stud Specifications
Nominal Flowtube Size Stud Specifications
0.15 – 1 inch (4 – 25 mm) 316 SST ASTM A193, Grade B8M
Class 1 threaded mounted studs
11/2 – 8 inch (40 – 200 mm) CS, ASTM A193, Grade B7, threaded mounting studs
3. Place the flowtube between the flanges. Make sure that the centering
rings are properly placed in the studs. The studs should be aligned
with the markings on the rings that correspond to the flange you are
using.
4. Insert the remaining studs, washers, and nuts.
5. Tighten to the torque specifications shown in Table 3-5. Do not
overtighten the bolts or the liner may be damaged.
NOTE
On the 4- and 6-inch PN 10–16, insert the flowtube with rings first and then
insert the studs. The slots on this ring scenario are located on the inside of the
ring.
Figure 3-11. Gasket Placement
with Centering Rings
Centering Rings
Installation, Studs
Nuts and Washers
Customer-supplied
Gasket
FLOW
Flange Bolts Flowtube sizes and torque values for both Class 150 and Class 300 flanges
are listed in Table 3-5. Tighten flange bolts in the incremental sequence,
shown in Figure 3-10.
Always check for leaks at the flanges after tightening the flange
bolts. All flowtubes require a second torquing 24 hours after initial flange bolt
tightening.
8732-0002A1A
3-11
Page 34

Rosemount 8742C
INSTALLATION
(SANITARY FLOWTUBE)
Reference Manual
00809-0100-4793, Rev CA
August 2004
Table 3-5. Flange bolt Torque Specifications of Rosemount 8711 Flowtubes
Size Code Line Size Pound-feet Newton-meter
15F 0.15 inch (4 mm) 5 6.8
30F 0.30 inch (8 mm) 5 6.8
005
010 1 inch (25 mm) 10 13.6
015 1
020 2 inch (50 mm) 25 34.1
030 3 inch (80 mm) 40 54.6
040 4 inch (100 mm) 30 40.1
060 6 inch (150 mm) 50 68.2
080 8 inch (200 mm) 70 81.9
1
/2-inch (15 mm) 5 6.8
1
/2 inch (40 mm) 15 20.5
Gaskets
The flowtube requires a gasket at each of its connections to adjacent devices
or piping. The gasket material selected must be compatible with the process
fluid and operating conditions. Gaskets are supplied with all Rosemount 8721
Sanitary flowtubes except when the process connection is an IDF sanitary
screw type.
Alignment and Bolting Standard plant practices should be followed when installing a magmeter with
sanitary fittings. Unique torque values and bolting techniques are not
required.
Figure 3-12. Rosemount 8721
Sanitary Installation
User supplied clamp
User supplied gasket
If ordered manufacturer
supplied clamp and gasket.
8721_A_06.EPS
GROUNDING Process grounding the flowtube is one the most important details of flowtube
installation. Proper process grounding ensures that the transmitter amplifier is
referenced to the process. This creates the lowest noise environment for the
transmitter to make a stable reading. Use Table 3-6 to determine which
grounding option to follow for proper installation.
3-12
Page 35

Reference Manual
00809-0100-4793, Rev CA
August 2004
NOTE
Consult factory for installations requiring cathodic protection or situations
where there are high currents or high potential in the process.
The flowtube case should always be earth grounded in accordance with
national and local electrical codes. Failure to do so may impair the protection
provided by the equipment. The most effective grounding method is direct
connection from the flowtube to earth ground with minimal impedance.
The Internal Ground Connection (Protective Ground Connection) located in
side the junction box is the Internal Ground Connection screw. This screw is
identified by the ground symbol:
Table 3-6. Grounding Installation
Grounding Options
Type of Pipe No Grounding Options Grounding Rings Grounding Electrodes Lining Protectors
Conductive Unlined Pipe See Figure 3-13 Not Required Not Required See Figure 3-14
Conductive Lined Pipe Insufficient Grounding See Figure 3-14 See Figure 3-13 See Figure 3-14
Non-Conductive Pipe Insufficient Grounding See Figure 3-15 See Figure 3-16 See Figure 3-15
Rosemount 8742C
Figure 3-13. No Grounding
Options or Grounding Electrode
in Lined Pipe
Earth
Ground
8705-0040C
3-13
Page 36

Rosemount 8742C
Figure 3-14. Grounding with
Grounding Rings or Lining
Protectors
Reference Manual
00809-0100-4793, Rev CA
August 2004
Earth
Ground
Figure 3-15. Grounding with
Grounding Rings or Lining
Protectors
Grounding Rings or
Lining Protectors
Earth
Ground
Grounding Rings
8705-038C
8711-0360A01B
3-14
Page 37

Reference Manual
00809-0100-4793, Rev CA
August 2004
Figure 3-16. Grounding with
Grounding Electrodes
Rosemount 8742C
Earth
Ground
8711-0360A01A
PROCESS LEAK
PROTECTION
(OPTIONAL)
The Rosemount 8705 Flowtube housing is fabricated from carbon steel to
perform two separate functions. First, it provides shielding for the flowtube
magnetics so that external disturbances cannot interfere with the magnetic
field and thus affect the flow measurement. Second, it provides the physical
protection to the coils and other internal components from contamination and
physical damage that might occur in an industrial environment. The housing is
completely welded and gasket-free.
The three housing configurations are identified by the W0, W1, or W3 in the
model number option code when ordering. Below are brief descriptions of
each housing configuration, which are followed by a more detailed overview.
• Code W0 — sealed, welded coil housing (standard configuration)
• Code W1 — sealed, welded coil housing with a relief valve capable of
venting fugitive emissions to a safe location (additional plumbing from
the flowtube to a safe area, installed by the user, is required to vent
properly)
• Code W3 — sealed, welded coil housing with separate electrode
compartments capable of venting fugitive emissions (additional
plumbing from the flowtube to a safe area, installed by the user, is
required to vent properly)
3-15
Page 38

Rosemount 8742C
Reference Manual
00809-0100-4793, Rev CA
August 2004
Standard Housing
Configuration
Figure 3-17. Standard Housing
— Configuration Sealed Welded
Housing (Option Code W0)
The standard housing configuration is identified by a code W0 in the model
number. This configuration does not provide separate electrode
compartments with external electrode access. In the event of a process leak,
these models will not protect the coils or other sensitive areas around the
flowtube from exposure to the pressure fluid (Figure 3-17).
¾–14 NPT Conduit
(no relief valve)
Connection
8705-1002A05D
Relief Valves The first optional configuration, identified by the W1 in the model number
option code, uses a completely welded coil housing. This configuration does
not provide separate electrode compartments with external electrode access.
This optional housing configuration provides a relief valve in the housing to
prevent possible overpressuring caused by damage to the lining or other
situations that might allow process pressure to enter the housing. The relief
valve will vent when the pressure inside the flowtube housing exceeds 5 psi.
Additional piping (provided by the user) may be connected to this relief valve
to drain any process leakage to safe containment (see Figure 3-18).
Figure 3-18. Coil-Housing
Configuration — Standard
Welded Housing With Relief
Valve (Option Code W1)
Optional:
Use drain port to
plumb to a safe area
(Supplied by user)
¼'' NPT – 5 psi
Pressure Relief Valve
¾–14 NPT Conduit
Connection
3-16
8705-0021A05B
Page 39

Reference Manual
00809-0100-4793, Rev CA
August 2004
Rosemount 8742C
Process Leak
Containment
Figure 3-19. Housing
Configuration — Sealed
Electrode Compartment (Option
Code W3)
The second optional configuration, identified as option code W3 in the model
number, divides the coil housing into three compartments: one for each
electrode and one for the coils. Should a damaged liner or electrode fault
allow process fluid to migrate behind the electrode seals, the fluid is contained
in the electrode compartment. The sealed electrode compartment prevents
the process fluid from entering the coil compartment where it would damage
the coils and other internal components.
The electrode compartments are designed to contain the process fluid at full
line pressure. An o-ring sealed cover provides access to each of the electrode
compartments from outside the flowtube; drainports are provided in each
cover for the removal of fluid.
NOTE
The electrode compartment could contain full line pressure and it must be
depressurized before the cover is removed.
Fused Glass Seal
O-Ring Seal
Sealed Electrode Compartment
1
/2 - 27 NPT
Optional:
Use drain port to
plumb to a safe area
Grounding Electrode Port
(Supplied by user)
If necessary, capture any process fluid leakage, connect the appropriate
piping to the drainports, and provide for proper disposal
(see Figure 3-19).
8705-0007ADGB
3-17
Page 40

Reference Manual
00809-0100-4793, Rev CA
August 2004
Section 4 Configuration
Quick Start-Up . . . . . . . . . . . . . . . . . . . . . . . . . . . . . . . . . . . page 4-2
Assigning Device Tag and Node Address . . . . . . . . . . . . page 4-2
AI Block . . . . . . . . . . . . . . . . . . . . . . . . . . . . . . . . . . . . . . . . page 4-3
Arithmetic Block . . . . . . . . . . . . . . . . . . . . . . . . . . . . . . . . . page 4-3
Integrator . . . . . . . . . . . . . . . . . . . . . . . . . . . . . . . . . . . . . . . page 4-3
PID Block . . . . . . . . . . . . . . . . . . . . . . . . . . . . . . . . . . . . . . . page 4-4
Configuring Links and Scheduling Block Execution . . . page 4-5
Resource Block . . . . . . . . . . . . . . . . . . . . . . . . . . . . . . . . . . page 4-8
This section covers basic operation, software functionality, and basic
configuration procedures for the Rosemount 8742C Magnetic Flowmeter
Transmitter with F
F
OUNDATION fieldbus technology and the function blocks used in the
OUNDATION
transmitter, refer to Appendix C: Resource Block, Appendix D: Transducer
Block, and Appendix E: Field-Removable Electrodes.
™
fieldbus. For more information about the
Rosemount 8742C
Calibration Rosemount flowtubes are wet calibrated at the factory. They do not need
further calibration during installation.
Figure 4-1 illustrates how the flow signal is channeled through the transmitter.
Figure 4-1. Functional Block Diagram for the Rosemount 8742C Flowmeter with F
Function Blocks
•AI
•PID
•Integrator
OUNDATION fieldbus
F
Compliant
Communications
Stack
• Arithmetic
Resource Blocks
• Physical Device
Information
Analog-to-Digital
Signal Conversion
OUNDATION fieldbus
Transducer Block
•Damping
• Diagnostics
• Engineering Units
Input-to-Output
Galvanic Isolation
8732-8732_01A
www.rosemount.com
Page 41

Reference Manual
00809-0100-4793, Rev CA
Rosemount 8742C
Each FOUNDATION fieldbus configuration tool or host device has a different
way of displaying and performing configurations. Some will use Device
Descriptions (DD) and DD Methods to make configuring and displaying data
consistent across host platforms. There is no requirement that a configuration
tool or host support these features. This section describes how to reconfigure
the device manually.
August 2004
QUICK START-UP Once the magnetic flowmeter system is installed and communication is
established, configuration of the transmitter must be completed. The standard
transmitter configuration, without Option Code C1, Custom Configuration, is
shipped with the following parameters:
Engineering Units: ft/s
Tube Size: 3-in.
Flowtube Calibration Number: 100000501000000
Flowtube
Calibration Number
ASSIGNING DEVICE TAG
AND NODE ADDRESS
A unique flowtube calibration number, imprinted on the flowtube tag, enables
any Rosemount flowtube to be used with any Rosemount transmitter without
further calibration. Rosemount flow lab tests determine individual flowtube
output characteristics. The characteristics are identified by a 16-digit
calibration number.
The 16-digit calibration number can be programmed into the Rosemount
8712D/H or 8732C transmitter using the Local Operator
Interface (LOI) or the 375 Field Communicator. Refer to the appropriate
transmitter product manual for complete instructions. In a F
fieldbus environment, the 8742C can be configured using the DeltaV
configuration tool or another F
The calibration number is more than a correction factor, or K- factor, for the
flowtube. The first five digits represent the low frequency gain. The ninth
through thirteenth digits represent the high frequency gain. Both numbers are
normalized from an ideal number of 10000. Standard configurations use the
low frequency gain, but in noisy applications it may be worthwhile to switch to
the higher frequency. An additional transmitter procedure, called Auto Zero, is
required to perform at the higher coil drive frequency. The seventh and eighth
digits represent the zero offset at both frequencies where the nominal value
is 50. Empty pipe functionality is a transmitter feature that is controlled by a
parameter in the transducer block. To turn off this feature, see Section 4:
Operation and Maintenance, “Learning Empty Pipe” on page 4-5.
The 8742C Magnetic Flowmeter Transmitter is shipped with a blank tag and a
temporary address to allow a host to automatically assign an address and a
tag. If the tag or address need to be changed, use the features of the
configuration tool. The tools do the following:
• Change the tag to a new value.
• Change the address to a new address.
OUNDATION fieldbus configuration device.
OUNDATION
™
4-2
When the device is at a temporary address, only the tag and address can be
changed or written to. The resource, transducer, and function blocks are all
disabled.
Page 42

Reference Manual
00809-X0100-4793, Rev CA
August 2004
Rosemount 8742C
AI BLOCK The Analog Input (AI) function block provides the primary interface of the
measurement to the control and/or monitoring systems. To properly configure
the device, three parameters must be set in order to correctly interface
between the AI block and transducer block.
1. The CHANNEL parameter defines which transducer block
measurement is used by the AI block. In the 8742C Magnetic
Flowmeter Transmitter, only one channel is available: AI1.CHANNEL
= 1 (Flow).
2. The second parameter is the XD_SCALE.UNITS_INDX. The default
configuration is feet per second (ft/s). Other units are available and
listed in Appendix D: Table D-3.
3. Finally, since the flow measurement from the transducer block is in
the correct units, L_TYPE is configured as Direct. L_TYPE can be
either Direct or Indirect.
NOTE
Refer to the F
00809-0100-4783, for more details on configuring and troubleshooting the AI
Block.
OUNDATION fieldbus Block product manual, document
ARITHMETIC BLOCK The Arithmetic function block provides the ability to configure a range
extension function for a primary input and applies the nine (9) different
arithmetic types as compensation to or augmentation of the range extended
input. All operations are selected by parameter and input connection.
The nine (9) arithmetic functions are Flow Compensation Linear, Flow
Compensation Square Root, Flow Compensation Approximate, Btu Flow,
Traditional Multiply and Divide, Average, Summer, Fourth Order Polynomial,
and Simple HTG Compensate Level.
This Arithmetic function block supports mode control (Auto, Manual, and Out
of service). There is no standard alarm detection in this block.
NOTE
Refer to the F
00809-0100-4783, for more details on configuring and troubleshooting the
Arithmetic Block.
OUNDATION fieldbus Block product manual, document
INTEGRATOR The Integrator (INT) function block integrates one or two variables over time.
The block compares the integrated or accumulated value to pre-trip and trip
limits and generates discrete output signals when the limits are reached.
The Integrator function block supports mode control, demand reset, a reset
counter, and signal status calculation. There is no process alarm detection in
the block.
NOTE
Refer to the F
00809-0100-4783, for more details on configuring and troubleshooting the
Integrator Block.
OUNDATION fieldbus Block product manual, document
4-3
Page 43

Reference Manual
00809-0100-4793, Rev CA
Rosemount 8742C
August 2004
PID BLOCK The PID function block combines all of the necessary logic to perform
proportional/integral/derivative (PID) control. The block supports mode
control, signal scaling and limiting, feedforward control, override tracking,
alarm limit detection, and signal status propagation.
The block supports two forms of the PID equation: Standard and Series. You
can choose the appropriate equation using the FORM parameter. The
Standard ISA PID equation is the default selection.
s
1
-----------------
Standard Out GAIN e 1
Series Out GAIN e× 1
Where
GAIN: proportional gain value
τ
: integral action time constant (RESET parameter) in seconds
r
s: laplace operator
τ
: derivative action time constant (RATE parameter)
d
α: fixed smoothing factor of 0.1 applied to RATE
F: feedforward control contribution from the feedforward input (FF_VAL parameter)
e: error between setpoint and process variable
× F+×=
s1+
τ
r
1
×
+
-------
+ F+=
τ
s
r
τ
d
----------------------------++
ατ
s1+×
d
τ
s1+
d
----------------------------
ατ
s1+×
d
To further customize the block for use in your application, you can configure
filtering, feedforward inputs, tracking inputs, setpoint and output limiting, PID
equation structures, and block output action.
NOTE
Refer to the F
OUNDATION fieldbus Block product manual, document
00809-0100-4783, for more details on configuring and troubleshooting the
PID Block.
4-4
Page 44

Reference Manual
00809-X0100-4793, Rev CA
August 2004
Rosemount 8742C
CONFIGURING LINKS
AND SCHEDULING
BLOCK EXECUTION
Figure 4-2. Measurement
Configuration
Without configuring the links between blocks and scheduling the blocks to
execute in the proper order, the application will not work correctly. Most hosts
and/or configuration tools make this task a simple matter by using a Graphical
User Interface (GUI).
Transducer
Block
Flow
Macro Cycle
AI
AI Block
In
FBUS_48A
4-5
Page 45

Rosemount 8742C
Advanced Applications
Figure 4-3. Control
Configuration
Reference Manual
00809-0100-4793, Rev CA
August 2004
Transducer
Block
Flow
In
AI Block
AI1
Out
In
Macro Cycle
PID
PID Block
Out
Analog Output
Block (AO)
CAS_IN
BKCAL_OUT
AO
FBUS_47A
4-6
Page 46

Reference Manual
00809-X0100-4793, Rev CA
August 2004
Rosemount 8742C
Cascade Control Cascade control applications require two inputs. The configuration is to link
the output of one AI block into the PID block in the 8742C transmitter and to
link the AI block of a second 8742C transmitter into the PID block of that
transmitter. Another set of links between the second PID and the AO block,
located in the control valve, is required (see Figure 4-4).
Figure 4-4. Cascade Control
Configuration
Transducer
Block
Flow
AI
Block 1 (AI1)
IN
AI
Block 2 (AI2)
from second
8742C
Transmitter
IN
OUT
OUT
Macro Cycle
PID Block 1
(PID1)
IN
BKCAL_IN
OUT
PID Block 2
(PID2) from
second 8742C
Transmitter
IN
OUT
CAS_IN
BKCAL_IN
BKCAL_OUT
AO Block
CAS_IN
BKCAL_OUT
AI1
AI2
PID
PID2
AO
FBUS_46A
4-7
Page 47

Rosemount 8742C
RESOURCE BLOCK
Reference Manual
00809-0100-4793, Rev CA
August 2004
FEATURES and
FEATURES_SEL
The parameters FEATURES and FEATURE_SEL determine optional
behavior of the Rosemount 8742C.
FEATURES
The FEATURES parameter is read only and defines which features are
supported by the Rosemount 8742C. Below is a list of the FEATURES the
Rosemount 8742C supports.
UNICODE
All configurable string variables in the Rosemount 8742C, except tag names,
are octet strings. Either ASCII or Unicode may be used. If the configuration
device is generating Unicode octet strings, you must set the Unicode option
bit.
REPORTS
The Rosemount 8742C supports alert reports. The Reports option bit must be
set in the features bit string to use this feature. If it is not set, the host must
poll for alerts.
SOFT W LOCK and HARD W LOCK
Inputs to the security and write lock functions include the hardware security
switch, the hardware and software write lock bits of the FEATURE_SEL
parameter, the WRITE_LOCK parameter, and the DEFINE_WRITE_LOCK
parameter.
The WRITE_LOCK parameter prevents modification of parameters within the
device except to clear the WRITE_LOCK parameter. During this time, the
block will function normally updating inputs and outputs and executing
algorithms. When the WRITE_LOCK condition is cleared, a WRITE_ALM
alert is generated with a priority that corresponds to the WRITE_PRI
parameter.
The FEATURE_SEL parameter enables the user to select a hardware or
software write lock or no write lock capability. To enable the hardware security
function, enable the HW_SEL bit in the FEATURE_SEL parameter. When this
bit has been enabled the WRITE_LOCK parameter becomes read only and
will reflect the state of the hardware switch. In order to enable the software
write lock, the SW_SEL bit must be set in the FEATURE_SEL parameter.
Once this bit is set, the WRITE_LOCK parameter may be set to “Locked” or
“Not Locked.” Once the WRITE_LOCK parameter is set to “Locked” by either
the software or the hardware lock, all user requested writes as determined by
the DEFINE_WRITE_LOCK parameter shall be rejected.
The DEFINE_WRITE_LOCK parameter allows the user to configure whether
the write lock functions (both software and hardware) will control writing to all
blocks, or only to the resource and transducer blocks. Internally updated data
such as process variables and diagnostics will not be restricted by the
security switch.
Table 4-1 displays all possible configurations of the WRITE_LOCK parameter.
4-8
Page 48

Reference Manual
00809-X0100-4793, Rev CA
August 2004
Table 4-1. WRITE_LOCK Parameter
FEATURE_SEL
HW_SEL bit
0 (off) 0 (off) NA 1 (unlocked) Read only NA All
0 (off) 1 (on) NA 1 (unlocked) Read/Write NA All
0 (off) 1 (on) NA 2 (locked) Read/Write Physical Function
0 (off) 1 (on) NA 2 (locked) Read/Write Everything None
1 (on) 0 (off)
1 (on) 0 (off) 1 (locked) 2 (locked) Read only Physical Function
1 (on) 0 (off) 1 (locked) 2 (locked) Read only Everything None
(1) The hardware and software write lock select bits are mutually exclusive and the hardware select has the highest priority. When the HW_SEL bit if set to 1
(on), the SW_SEL bit is automatically set to 0 (off) and is read only.
FEATURE_SEL
SW_SEL bit
(1)
SECURITY SWITCH WRITE_LOCK
0 (unlocked) 1 (unlocked) Read only NA All
WRITE_LOCK
Read/Write
FEATURES_SEL
FEATURES_SEL is used to turn on any of the supported features. The default
setting of the Rosemount 8742C does not select any of these features.
Choose one of the supported features if any.
Rosemount 8742C
DEFINE_WRITE_LOCK
Write access
to blocks
Blocks only
Blocks only
MAX_NOTIFY The MAX_NOTIFY parameter value is the maximum number of alert reports
that the resource can have sent without getting a confirmation, corresponding
to the amount of buffer space available for alert messages. The number can
be set lower, to control alert flooding, by adjusting the LIM_NOTIFY
parameter value. If LIM_NOTIFY is set to zero, then no alerts are reported.
PlantWeb™ Alarms The Resource Block will act as a coordinator for PlantWeb alarms.
There will be three alarm parameters (FAILED_ALARM,
MAINT_ALARM, and ADVISE_ALARM) which will contain
information regarding some of the device errors which are
detected by the transmitter software. There will be a
RECOMMENDED_ACTION parameter which will be used to
display the recommended action text for the highest priority alarm.
FAILED_ALARM will have the highest priority followed by MAINT_ALARM
and ADVISE_ALARM will be the lowest priority.
FAILED_ALARMS
A failure alarm indicates a failure within a device that will make the device or
some part of the device non-operational. This implies that the device is in
need of repair and must be fixed immediately. There are five parameters
associated with FAILED_ALARMS specifically, they are described below.
FAILED_ENABLED
This parameter contains a list of failures in the device which makes the
device non-operational that will cause an alarm to be sent. Below is a list
of the failures with the highest priority first.
1. Output Board Electronics Failure
2. Sensor Board Electronics Failure
3. Output Board NV Memory Failure
4. Coil Drive Open Circuit Failure
4-9
Page 49

Rosemount 8742C
Reference Manual
00809-0100-4793, Rev CA
August 2004
FAILED_MASK
This parameter will mask any of the failed conditions listed in
FAILED_ENABLED. A bit on means that the condition is masked out from
alarming and will not be reported.
FAILED _PRI
Designates the alarming priority of the FAILED_ALM. The default is 0 and
the recommended value are between 8 and 15.
FAILED_ACTIVE
This parameter displays which of the alarms is active. Only the alarm with
the highest priority will be displayed. This priority is not the same as the
FAILED_PRI parameter described above. This priority is hard coded within
the device and is not user configurable.
FAILED _ALM
Alarm indicating a failure within a device which makes the device
non-operational.
MAINT_ALARMS
A maintenance alarm indicates the device or some part of the device needs
maintenance soon. If the condition is ignored, the device will eventually fail.
There are five parameters associated with MAINT_ALARMS, they are
described below.
MAINT_ENABLED
The MAINT_ENABLED parameter contains a list of conditions indicating
the device or some part of the device needs maintenance soon. If the
condition is ignored, the device will eventually fail.
Below is a list of the conditions with the highest priority first.
1. Auto Zero Failure
2. NV Writes Deferred
3. Reverse Flow Detected
4. Electronics Trim Failure
5. Empty Pipe
6. PWA Simulate Active
7. PV Range Exceeded
MAINT_MASK
The MAINT_MASK parameter will mask any of the failed conditions listed
in MAINT_ENABLED. A bit on means that the condition is masked out
from alarming and will not be reported.
MAINT_PRI
MAINT_PRI designates the alarming priority of the MAINT_ALM. The
default is 0 and the recommended values is 3 to 7.
MAINT_ACTIVE
The MAINT_ACTIVE parameter displays which of the alarms is active.
Only the condition with the highest priority will be displayed. This priority is
not the same as the MAINT_PRI parameter described above. This priority
is hard coded within the device and is not user configurable.
4-10
Page 50

Reference Manual
00809-X0100-4793, Rev CA
August 2004
Rosemount 8742C
MAINT_ALM
An alarm indicating the device needs maintenance soon. If the condition is
ignored, the device will eventually fail.
Advisory Alarms
An advisory alarm indicates informative conditions that do not have a direct
impact on the device's primary functions There are five parameters
associated with ADVISE_ALARMS, they are described below.
ADVISE_ENABLED
The ADVISE_ENABLED parameter contains a list of informative
conditions that do not have a direct impact on the device's primary
functions. Below is a list of the advisories with the highest priority first.
1. Primary Value Degraded
2. Electrode Signal Fault
3. High Process Noise
4. Grounding/Wiring Fault
ADVISE_MASK
The ADVISE_MASK parameter will mask any of the failed conditions listed
in ADVISE_ENABLED. A bit on means the condition is masked out from
alarming and will not be reported.
ADVISE_PRI
ADVISE_PRI designates the alarming priority of the ADVISE_ALM. The
default is 0 and the recommended values are 1 or 2.
ADVISE_ACTIVE
The ADVISE_ACTIVE parameter displays which of the advisories is
active. Only the advisory with the highest priority will be displayed. This
priority is not the same as the ADVISE_PRI parameter described above.
This priority is hard coded within the device and is not user configurable.
ADVISE_ALM
ADVISE_ALM is an alarm indicating advisory alarms. These conditions do
not have a direct impact on the process or device integrity.
4-11
Page 51

Rosemount 8742C
Table 4-2.
RB.RECOMMENDED_ATION
Reference Manual
00809-0100-4793, Rev CA
August 2004
Recommended Actions for PlantWeb Alarms
RECOMMENDED_ACTION
The RECOMMENDED_ACTION parameter displays a text string that will
give a recommended course of action to take based on which type and
which specific event of the PlantWeb alarms is active.
Failed/Maint/Advise
Alarm Type
NONE None No action required
FAILED
MAINTENANCE
ADVISORY
Active Event
1. Output Board
Electronics Failure
2. Sensor Board
Electronics Failure
3. Output Board NV
Memory Failure
4. Coil Drive Open
Circuit Failure
1. Auto Zero Failure Re-run the auto zero procedure. This function
2. NV Writes Deferred Wait for deferred data to be saved in next 6hr
3. Reverse Flow
Detected
4. Electronics Trim
Failure
5. Empty Pipe If this diagnostic is unexpected, perform
6. PWA Simulate Active Disable simulation to return to process
7. PV Range Exceeded Reduce Flow.
1. Primary Value
Degraded
2. Electrode Signal
Fault
3. High Process Noise Increase the transmitter coil drive frequency.
4. Grounding/Wiring
Fault
Recommended Action
Text String
Replace the Fieldbus Electronics Module
Assembly.
Cycling power may correct memory problems.
If problem persists, replace board stack.
Reset the device then download the device
configuration.
Verify transmitter is working properly with flow
tube simulator and/or verify flow tube
resistance values are valid with multimeter.
is suggested, but not required, when
increasing the coil drive frequency.
period.
Verify the flowtube is mounted properly. Verify
terminal block wiring is correct.
Re-run the electronics trim procedure with an
8714D calibrator. If failure message still
appears, replace electronics.
flowtube resistance checks as described in
the manual.
monitoring and control.
Reduce Flow.
Verify moisture is not in flow tube junction box.
Perform flow tube resistance checks as
described in the manual.
Verify that the magmeter is grounded properly.
Check the recommended grounding and
wiring practices as detailed in the product
manual.
4-12
Page 52

Reference Manual
00809-X0100-4793, Rev CA
August 2004
Rosemount 8742C
Simulation
Simulation replaces the channel value coming from the transducer block for
testing purposes.
The following procedure is used to simulate a DI output.
To change the output value place the Target Mode of the block to Manual
and then change the OUT_D.VALUE to the desired value.
To simulate both the value and status do the following:
1. If the Simulate Switch is in the OFF position, move it to ON. If the
Simulate switch is already in the ON position, you must move it to Off
an place it back in to the ON position.
NOTE
As a safety measure, the switch must be reset every time power is interrupted
to the device in order to enable SIMULATE. This prevents a device that is
tested on the bench from getting installed in the process with SIMULATE still
active.
2. To change both the OUT_D.VALUE and OUT_D.STATUS of the DI
Block, set the TARGET MODE to AUTO.
3. Set SIMULATE_D.ENABLE_DISABLE to ‘Active’.
4. Enter the desired values for SIMULATE_D. SIMULATE_VALUE and
SIMULATE_D. SIMULATE_STATUS.
If errors occur when performing the above steps, be sure that the SIMULATE
jumper has been reset after powering up the device.
4-13
Page 53

Reference Manual
00809-0100-4793, Rev CA
August 2004
Rosemount 8742C
Section 5 Operation and Maintenance
Safety Information . . . . . . . . . . . . . . . . . . . . . . . . . . . . . . . page 5-1
Software Operation . . . . . . . . . . . . . . . . . . . . . . . . . . . . . . . page 5-1
Hardware Maintenance . . . . . . . . . . . . . . . . . . . . . . . . . . . . page 5-9
This section covers basic operation and maintenance instructions such as
configuring empty pipe and other diagnostics, rotating the housing and local
display, and performing replacement of some parts. Instructions and
procedures in this section may require special precautions to ensure the
safety of the personnel performing the operations. Please read the following
safety messages before performing any operation described in this section.
Refer to these warnings when appropriate throughout this section.
SAFETY INFORMATION
SOFTWARE OPERATION
Failure to follow these installation guidelines could result in death or serious
injury:
Installation and servicing instructions are for use by qualified personnel only. Do not
perform any servicing other than that contained in the operating instructions, unless
qualified. Verify that the operating environment of the flowtube and transmitter is
consistent with the appropriate FM or CSA approval.
Do not connect a Rosemount 8742C to a non-Rosemount flowtube that is located in an
explosive atmosphere.
Instructions and procedures listed here are specific to the Rosemount 8742C
Transmitter. The examples use Delta V
configuration tools can be used by consulting the index numbers in
Appendix D: Transducer Block.
™
as the host system, but other
www.rosemount.com
Page 54

Rosemount 8742C
Reference Manual
00809-0100-4793, Rev CA
August 2004
Local Display
Configuration
The local display can be configured in four languages: English, Spanish,
French, and German. The display language can be changed by changing the
transducer block parameter, DISPLAY_MODE. Table 5-1 lists the phrase,
along with the text shown on the display.
Table 5-1. Local Display screens for Rosemount 8742C Magnetic Flowmeter Transmitter with F
OUNDATION
™
fieldbus
Definition English Spanish French German
Model number of transmitter 8742C Magmeter Caud. Mag. 8742C Trans Mag 8742C 8742C MID
Good status, no error messages Status: Good Estado: Bien Measure Bonne Messung OK
Grounding/Wiring Fault detected Grnd Wire Fault Falla Cabl Tierr Défaut Terre Fehler Erde/Verk
High transmitter temperature detected High 8742 Temp Temp 8742 Alta Temp 8742C Haute Hochtemp 8742
High process noise detected Hi Process Noise Ruid Proces Alto Bruits Détectés Proz Rauschen
Empty Pipe detected Empty Pipe Tubo Vacío Tube Vide Décelé Leitung Leer
Electronics Trim Failure detected Trim Failure Falla Ajuste Défaut Trim Trim Fehler
PV status is uncertain Status: Uncertain Estado: Incierto Mesure Douteuse Mesung Unsicher
Auto Zero Trim Failure detected AutoZero Failure Fallo AutoCero Défaut Autozéro AutoNull Fehler
Flow rate is over sensor range Flow > 12 m/s Caudal > 12 m/s Vitesse > 12 m/s Flow Zu Hoch
Transducer block mode is out of service Out of Service Fuera de Servic. BT Hors Service Ausser Betrieb
PV status is bad Status: Bad Estado: Mal Mesure Mauvaise Messung Schlecht
Electrode fault detected Electrode Fault Falla Electrodo Défaut Electrode Elecktrode Fehler
Flow rate is over sensor limit Flow > 13.2 m/s Caudal > 13.2 m/s Vitesse > 13,2 m/s Flow Zu Hoch
Coil drive open circuit detected Coil Drive Open Bobina Abierta Défaut Bobines Spule Defekt
Electronics failure detected Electronics Fail Falla Electrónic Panne Electroniq Elekronikdefekt
Electronics trim is in progress (two lines)
Auto Zero Trim in progress (two lines)
Learn Empty Pipe in progress (two lines)
(1) The “In Progress” string must be a maximum of 14 characters. The 16th character on the 2nd line of the display is reserved for a special character during
the trim functions.
(1)
(1)
(1)
Electronic Trim Ajust Electrónic Réglage Electron Elektronik Trim
In Progress En Progreso En Cours Läuft
Auto Zero Auto Cero Réglage Autozéro AutoNull
In Progress En Progreso En Cours Läuft
Learn E Pipe Detec. Tubo Vacío Réglage TubeVide Leitung Leer Erk
In Progress En Progreso En Cours Läuft
Calibration Pulsed DC magnetic flowmeters do not typically require periodic calibration.
There are no moving parts in a magnetic flowmeter flowtube or transmitter.
However, it is possible to do an electronics trim on the transmitter. If a
magmeter is not performing properly, refer to Section 5: Troubleshooting.
Electronics Trim Electronics trim is the function by which the factory calibrates the transmitter.
This procedure is rarely needed by customers. It is only necessary if you
suspect the Rosemount 8742C is no longer accurate. A Rosemount 8714
Calibration Standard is required to complete an electronics trim. Attempting
an electronics trim with out a Rosemount 8714 may result in an inaccurate
transmitter or an error message. Electronics trim must be performed only with
the coil drive mode set to 5 Hz and with a nominal flowtube calibration number
stored in the memory.
NOTE
Attempting an electronics trim without a Rosemount 8714D may result in an
inaccurate transmitter, or a “TRIM FAILURE” message may appear. If this
message occurs, no values were changed in the transmitter. Simply power
down the Rosemount 8742C to clear the message.
To simulate a nominal flowtube with the Rosemount 8714D, you must change
the following four parameters in the Rosemount 8742:
5-2
Page 55

Reference Manual
00809-0100-4793, Rev CA
August 2004
Rosemount 8742C
1. Tube Calibration Number - 1000015010000000
2. Units - ft/s
3. Coil Pulse Mode - 5 Hz
The instructions for changing these parameters are located in the parameter
descriptions in this section.
Set the loop to manual, if necessary, before you begin. Complete the following
steps:
1. Power down the transmitter.
2. Connect the transmitter to a Rosemount 8714D flowtube simulator.
3. Power up the transmitter with the Rosemount 8714D connected and
read the flow rate. The electronics need about a 30-minute warm-up
time to stabilize.
4. Initiate an electronics trim through the transducer block. Click on the
transducer block, select calibrate, and then select Electronics Trim.
The electronics trim takes about two minutes to complete. No transmitter
adjustments are required. A symbol appears in the lower right-hand corner of
the local display to indicate the process is running.
5-3
Page 56

Reference Manual
00809-0100-4793, Rev CA
Rosemount 8742C
August 2004
Auto Zero Trim The auto zero trim function initializes the transmitter for use with the 37.5 Hz
coil drive mode only. Run this function only with the transmitter and flowtube
installed in the process. The flowtube must be filled with process fluid at zero
flow. Before running the auto zero function, be sure the coil drive mode is set
to 37.5 Hz.
Configuring the
Advanced Diagnostics
and Empty Pipe
Set the loop to manual if necessary and begin the auto zero procedure. Click
on the transducer block. The transmitter completes the procedure
automatically in about two minutes. A symbol appears in the lower right-hand
corner of the display to indicate that the procedure is running.
This screen allows the user to selectively turn on/off the magmeter
diagnostics. When a diagnostic check is turned off, the user will not be notified
via the status pages, or the PV status parameter if the selected condition has
been detected. To get to this screen, click on the transducer block properties
and then go to the diagnostics tab.
Learning Empty Pipe Empty pipe functionality is very useful for batch applications or a process
where the piping often runs empty. The Rosemount 8742C transmitter learns
empty pipe functionality by measuring the resistance across the electrodes.
The flowtube must be completely full of process fluid when configuring empty
pipe. This procedure also describes how to turn on or off the empty pipe
functionality.
5-4
Page 57

Reference Manual
00809-0100-4793, Rev CA
August 2004
Rosemount 8742C
1. Right-click on the Transducer400 icon to initiate the empty pipe
learning function. This will bring up the Transducer block menu items.
From this menu, select Calibrate-Learn Empty Pipe, as shown in the
diagram below.
2. The initial screen describes the process to be performed and any
configuration requirements. The entire two-minute process will be
performed. This is the last opportunity to cancel the opportunity and
return to normal status. To start the process, click Next.
3. The transmitter will be put in Out of Service mode. The coil drive will
be set to 5 Hz. The learning mode in 5 Hz mode is a 60 second
process. A countdown clock is shown in the window. No intervention
is required.
4. The transmitter will then automatically change to 37.5 Hz coil drive
frequency and repeat the same process as in the 5 Hz coil drive
mode.
5. After both sets of data are written to the device, a check is made on
both the coil frequency and the mode. If the starting coil frequency
was 5 Hz, the method will return it to 5 Hz. Likewise, if the starting
mode was not Out of Service, the method will return the device to
Auto mode. Clicking Finish from the final screen will exit the method.
5-5
Page 58

Reference Manual
00809-0100-4793, Rev CA
Rosemount 8742C
August 2004
Diagnostics The magmeter specific diagnostics appear on the detailed status screen.
Click on the Transducer Block, select status, and move over to the detailed
status tabs (See Figure 5-1). The advanced diagnostics (High Process Noise,
Electrode Signal Fault, and Grounding/Wiring Fault) and empty pipe will not
be activated unless the transmitter has been configured to signal these
diagnostics. If the diagnostic has been triggered, the button next to the
diagnostic will turn red and the bottom line of the local display will display the
error message. For applicable diagnostics, a numeric value appears on the
right side of the window.
Figure 5-1. Transducer Detailed
Status
Diagnostic Information If a diagnostic has been triggered, the Rosemount 8742 transmitter can
supply additional information to resolve the issue. By clicking on the question
mark in the upper right hand window and then selecting a diagnostic, an
informative help screen appears. The first sentence of the help screen
describes the symptom. The second sentence describes the probable cause.
Corrective actions follow. Transmitters with the optional local display will also
show the diagnostic status.
The second line on the local display provides a short description of a triggered
diagnostic. If the PV status is uncertain, the error message alternates with the
PV on the top line. The probable causes and corrective actions of all the
diagnostics are listed in Table 5-2. These messages are available in an
™
AMS
/ Delta V™ environment by clicking on the question mark in the
Transducer block and then clicking on a particular diagnostic.
5-6
Page 59

Reference Manual
00809-0100-4793, Rev CA
August 2004
Table 5-2. Triggered Diagnostics
Symptom Probable Cause Corrective Action
Primary Range Value
Exceed
Sensor High Limit
Exceeded
Reverse Flow
Detected
Empty Pipe Detected The flowtube is not full or fluid. The process variable is
High Process Noise
Detected
Coil Drive Open
Circuit
The process variable (flow rate) is greater than 12 m/s
(40 ft/s).
The process variable (flow rate) is greater than 13.2
m/s (44 ft/s).
The transmitter is measuring a reversed flow signal.
The following actions can be taken if reverse flow is
unexpected.
zero. The following actions can be taken if empty pipe
detection is unexpected.
The signal to noise ratio is less than 25.
Transmitter has detected an open coil circuit condition.
• Lower the process rate.
• Increase the flowtube line sizes.
• Lower the process flow rate.
• Increase the flowtube line size.
• Verify flowtube is not installed backwards. Check flow
direction arrow on the flowtube. Confirm the direction of
process flow.
• Confirm the wiring between the flowtube and the
transmitter on the flowtube is not reversed.
Corresponding terminal block numbers in the flowtube
and transmitter must be connected.
• Verify twisted shielded cable is being used.
• Siphon effect or leaky valve may cause reverse flow.
• Verify flowtube is full.
• Increase process fluid conductivity above 50
microsiemens/cm.
• Properly connect the wiring between the flowtube and
the transmitter on the flowtube. Corresponding terminal
block numbers in the flowtube and transmitter must be
connected.
• Perform flowtube electrical resistance tests. Confirm the
resistance reading between coil ground (ground symbol)
and coil (1 and 2) is infinity. Confirm the resistance
reading between electrode ground (17) and an electrode
(18 or 19) is greater than 2 kohms and rises. For more
detailed information, consult the flowtube product
manual.
To turn off empty pipe diagnostic, go to the diagnostic screen
in the transducer block properties.
• Increase transmitter coil drive frequency to 37.5 Hz and,
if possible, perform Auto Zero function.
• Verify flowtube is electrically connected to the process
with grounding electrode, grounding rings with grounding
straps, or lining protector with grounding straps.
• If possible, redirect chemical additions downstream of
the magmeter.
• Verify process fluid conductivity is above 10
microsiemens/cm.
To turn off high process noise detection, go to the diagnostic
screen in the transducer block properties.
• Perform flowtube electrical resistance tests. Confirm the
resistance reading between coil ground (ground symbol)
and coil (1 or 2) is infinity. Confirm the resistance reading
between electrode ground (17) and an electrode (18 or
19) is greater than 2 kohms and rises. For more detailed
information, consult the flowtube product manual.
• Verify transmitter electronics with Rosemount 8714
reference standard. The dial on the 8714 should be set
at 9.1 m/s (30 ft/s). The transmitter should be set up with
the nominal flowtube calibration number
(1000015010000000) and 5 Hz coil drive frequency.
• Properly connect the wiring between the flowtube and
the transmitter on the flowtube. Corresponding terminal
block numbers in the flowtube and transmitter must be
connected.
Rosemount 8742C
5-7
Page 60

Rosemount 8742C
Table 5-2. Triggered Diagnostics
Symptom Probable Cause Corrective Action
Electrode Signal
Fault Detected
Grounding/ Wiring
Fault
Electronics Failure The electronics board stack has failed.
Electronics Trim
Failure
Auto Zero Failure The Auto Zero process has been interrupted or failed.
The flow signal has been compromised. The process
variable is likely reading less than expected.
The transmitter detected high levels of 50/60 Hz noise
caused by improper wiring or poor process grounding.
The transmitter calibration process has been
interrupted or failed. No internal calibration parameters
have been modified.
No internal Auto Zero parameters have been modified.
• Remove any moisture or contamination in the flowtube
terminal block or, if applicable, the sealed electrode
compartments.
WARNING: The electrode compartment may contain line
pressure. Removing the cover before depressurizing may
result in death or serious injury.
• Perform flowtube electrical resistance tests. Confirm the
resistance reading between coil ground (ground symbol)
and coil (1 or 2) is infinity. Confirm the resistance reading
between electrode ground (17) and an electrode (18 or
19) is greater than 2 kohms and rises. For more detailed
information, consult the flowtube product manual.
• Verify flowtube is electrically connected to the process
with grounding electrode, grounding rings with grounding
straps, or lining protector with grounding straps.
• Verify transmitter electronics with Rosemount 8714
reference standard. The dial on the 8714 should be set
at 9.1 m/s (30 ft/s). The transmitter should
(1000015010000000) and 5 Hz coil drive frequency.
• Properly connect the wiring between the flowtube and
the transmitter on the flowtube. Corresponding terminal
block numbers in the flowtube and transmitter must be
connected.
To turn off electrode signal fault detection, go to the
diagnostic screen in the transducer block properties.
• Connect ground rings, grounding electrode, lining
protector, or grounding straps. Grounding diagrams are
included in the flowtube product manual.
• verify flowtube is full.
• Verify wiring between flowtube and transmitter is
prepared properly. Shielding should be stripped back
less than 2.5 cm (1 in).
• Use separate shielded twisted pairs for wiring between
flowtube and transmitter.
• Properly connect the wiring between the flowtube and
the transmitter on the flowtube. Corresponding terminal
block numbers in the flowtube and transmitter must be
connected.
To turn off grounding/ wiring diagnostic, go to the diagnostic
screen in the transducer block properties.
• Replace the electronics board stack or complete
transmitter.
• If electronics trim performed inadvertently, cycle
transmitter power to clear message.
• Verify transmitter electronics with Rosemount 8714
reference standard. The dial on the 8714 should be set
at 9.1 m/s (30 ft/s). The transmitter should
(10000015010000000) and 5 Hz coil drive frequency.
• If Auto Zero performed inadvertently, cycle transmitter
power to clear message.
• Repeat Auto Zero process with a full pipe and no flow.
• Verify transmitter electronics with Rosemount 8714
reference standard. The dial on the 8714 should be set
at 9.1 m/s (30 ft/s). The transmitter should
(10000015010000000) and 5 Hz coil drive frequency.
Reference Manual
00809-0100-4793, Rev CA
August 2004
5-8
Page 61

Reference Manual
00809-0100-4793, Rev CA
August 2004
Rosemount 8742C
Diagnostic Counter The status tab in the Transducer Block window has a diagnostic counter that
counts the number of times the particular diagnostic was detected during the
life of the transmitter. The values can not be changed in the field.
HARDWARE
MAINTENANCE
Replacing the
F
OUNDATION
™
Fieldbus
Electronics Housing
The 8742C Magnetic Flowmeter Transmitter has no moving parts and
requires a minimum amount of scheduled maintenance. The transmitter
features a modular design for easy maintenance. If you suspect a
malfunction, check for an external cause before performing the diagnostics
presented below.
Rosemount flowtubes do not have any parts that require calibration or
maintenance. To confirm the working condition of the flowtube, refer to
Section 5: Troubleshooting.
The following procedures will help you disassemble and assemble the 8742C
hardware if you have followed the troubleshooting guide earlier in this section
of the manual and determined that hardware components need to be
replaced.
The Rosemount 8742C Magnetic Flowmeter Transmitter electronics housing
can be replaced easily when necessary. The procedure is the same for
integral or remote mount units. Use the following procedure:
Remove the Electronics Housing
1. Turn off and disconnect electric power to the transmitter.
2. Disconnect the wires and conduit from the housing.
5-9
Page 62

Rosemount 8742C
Figure 5-2. Transmitter Attached
to Flowtube Pedestal
Reference Manual
00809-0100-4793, Rev CA
August 2004
Flowtube
Pedestal
Figure 5-3. Transmitter
Removed from Flowtube
Pedestal
Replacing the
F
OUNDATION
™
Fieldbus
Terminal Block in the
Housing
Grounding
Lug
3. Use a wrench to loosen the housing from the flowtube pedestal by
turning the bolts clockwise (inward).
4. Slowly pull the electronics housing no more than 1.5 in. from the
flowtube pedestal. See Figure 5-3.
5. Using a screwdriver, disconnect all wiring between the wiring
assembly and the flowtube.
The Rosemount 8742C terminal block is permanently attached to the
electronics housing. It is not possible to remove the terminal block from the
electronics house without damaging the transmitter.
8742-1002A03A
8742-1002A03B
Replacing the
F
OUNDATION
™
Fieldbus
Electronics Boards
See “Safety Information” on page 5-1 for complete warning information.
5-10
The 8742C Magnetic Flowmeter Transmitter FOUNDATION™ fieldbus
electronics boards may need to be replaced if they are
damaged or nonfunctional. Use the following procedures to replace
electronics boards in the Rosemount 8742C. You will need a small,
flat-head screwdriver.
NOTE
The electronics boards are electrostatically sensitive. Be sure to observe
handling precautions for static-sensitive components.
Remove the Electronics Boards
1. Turn off and disconnect all electric power to the transmitter.
2. Unscrew and remove the electronics board compartment cover.
Page 63

Reference Manual
00809-0100-4793, Rev CA
August 2004
Figure 5-4. Electronics Board
Assembly
Rosemount 8742C
Electronics Boards
8742-8742P01A
3. Loosen the three captive screws that anchor the electronics.
4. Slowly pull the electronics boards out of the housing.
Install the Electronics Boards
1. Verify that all electric power to the Rosemount 8742C Magnetic
Flowmeter Transmitter is disconnected.
2. Align the three electronics boards over the captive screw holes in the
housing.
3. Slowly press the boards into place. Do not force the boards down.
Check the screw alignment if they do not glide into place.
4. Tighten the captive screws to anchor the three electronics boards.
5. Screw and tighten the electronics board compartment cover.
Local Display Rotation
1. Turn off and disconnect all electric power to the transmitter.
2. Unscrew and remove the extended LCD meter cover.
3. Loosen the three captive screws that anchor the local display to the
electronics board stack.
4. Slowly pull the local display away from the electronics board stack.
The indicator may be rotated in 90° increments for easy viewing. The
20-pin connector can be placed in any of the 4 locations on the back
of the local display, but the connector must line up with receptors on
the electronics board stack.
5. Rotating the local display may require moving one or two screws from
their previous position. Move screws to align with the standoffs on the
electronics board stack.
6. Slowly press the 20-pin connector into the electronics board stack.
Tighten the captive screws to anchor the local display into the
electronics board stack.
7. Screw and tighten the extended LCD meter cover.
See “Safety Information” on page 5-1 for complete warning information.
5-11
Page 64

Reference Manual
00809-0100-4793, Rev CA
August 2004
Rosemount 8742C
5-12
Page 65

Reference Manual
00809-0100-4793, Rev CA
August 2004
Section 6 Troubleshooting
Step 1: Function Block Errors . . . . . . . . . . . . . . . . . . . . . . page 6-3
Step 2: Diagnostic Messages . . . . . . . . . . . . . . . . . . . . . . page 6-3
Step 3: Wiring Errors . . . . . . . . . . . . . . . . . . . . . . . . . . . . . page 6-3
Step 4: Process Noise . . . . . . . . . . . . . . . . . . . . . . . . . . . . page 6-3
Step 5: Installed Flowtube Tests . . . . . . . . . . . . . . . . . . . . page 6-3
Step 6: Uninstalled Flowtube Tests . . . . . . . . . . . . . . . . . . page 6-5
This section covers basic transmitter and flowtube troubleshooting. Problems
in the magnetic flowmeter system are usually indicated by incorrect output
readings from the system, error messages, or failed tests. Consider all
sources when identifying a problem in your system. If the problem persists,
consult your local Rosemount representative to determine if the material
should be returned to the factory.
Instructions and procedures in this section may require special precautions to
ensure the safety of the personnel performing the operations. Please read the
following safety messages before performing any operation described in this
section. Refer to these warnings when appropriate throughout this section.
Rosemount 8742C
Failure to follow these installation guidelines could result in death or serious
injury:
Installation and servicing instructions are for use by qualified personnel only. Do not
perform any servicing other than that contained in the operating instructions, unless
qualified. Verify that the operating environment of the flowtube and transmitter is
consistent with the appropriate FM or CSA approval.
Do not connect a Rosemount 8742C to a non-Rosemount flowtube that is located in an
explosive atmosphere.
Mishandling products exposed to a hazardous substance may result in death or serious
injury. If the product being returned was exposed to a hazardous substance as defined
by OSHA, a copy of the required Material Safety Data Sheet (MSDA) for each
hazardous substance identified must be included with the returned goods.
The Magnetic Flowmeter Transmitter performs self diagnostics on the entire
magnetic flowmeter system: the transmitter, the flowtube, and the
interconnecting wiring. By sequentially troubleshooting each individual piece
of the magmeter system, it becomes easier to pin point the problem and make
the appropriate adjustments.
If there are problems, Table 6-1 lists the most common magmeter problems
and corrective actions.
www.rosemount.com
Page 66

Reference Manual
00809-0100-4793, Rev CA
Rosemount 8742C
Table 6-1. Quick
Troubleshooting Guide
Symptom Potential Cause Corrective Action
Reading does not appear to be
within rated accuracy
Noisy process Chemical additives upstream of
Meter output is unstable Electrode incompatibility Check the Magnetic Flowmeter Material Selection Guide
Transmitter, control system, or other
receiving device not configured
properly
Electrode coating Use bulletnose electrodes in the Rosemount 8705 Flowtube.
Air in line Move the flowtube to another location in the process line to
Flow rate is below 1 ft/s
(specification issue)
Insufficient upstream/downstream pipe
diameter
Cables for multiple magmeters run
through same conduit
Auto zero was not performed when the
coil drive frequency was changed from
5 Hz to 37.5 Hz
Flowtube failure—shorted electrode See “Step 2: Diagnostic Messages” on page 6-3.
Flowtube failure—shorted or open coil See “Step 2: Diagnostic Messages” on page 6-3.
Transmitter failure Replace the electronics boards.
Transmitter wired to correct flowtube Check wiring
magnetic flowmeter
Sludge flows—mining/coal/sand/
slurries (other slurries with hard
particles)
Styrofoam or other insulating particles
in the process
Electrode coating Use bulletnose electrodes in the Rosemount 8705 Flowtube.
Air in the line Move the flowtube to another location in the process line to
Improper grounding See “Step 2: Diagnostic Messages” on page 6-3.
High local magnetic or electric fields Move the magnetic flowmeter (5 ft away is usually acceptable).
Sticky valve (Look for periodic
oscillation of meter output)
Check all configuration variables for the transmitter, flowtube,
communicator, and/or control system.
Check these other transmitter settings:
Flowtube calibration number
Units
Line size
Downsize the flowtube to increase the flow rate above 3 ft/s.
Periodically clean the flowtube.
ensure that it is full under all conditions.
See the accuracy specification for specific transmitter and
flowtube.
Move flowtube to location where 5 pipe diameters upstream
and 2 pipe diameters downstream is possible
Run only one conduit cable between each flowtube and
transmitter
Perform the auto zero function with full pipe and no flow.
Complete the possible solutions listed under “Step 4: Process
Noise” on page 6-3.
Move the injection point downstream of the magnetic flowmeter,
or move the magnetic flowmeter.
Decrease the flow rate below 10 ft/s.
Complete the possible solutions listed under “Step 4: Process
Noise” on page 6-3.
Consult the factory.
Use a smaller flowtube to increase the flow rate above 3 ft/s.
Periodically clean the flowtube.
ensure that it is full under all conditions.
(00816-0100-3033) for chemical compatibility with electrode
material located on www.rosemount.com.
Correct valve sticking.
August 2004
6-2
Page 67

Reference Manual
00809-0100-4793, Rev CA
August 2004
Rosemount 8742C
STEP 1: FUNCTION
BLOCK ERRORS
STEP 2: DIAGNOSTIC
MESSAGES
STEP 3: WIRING
ERRORS
STEP 4: PROCESS
NOISE
Specific transmitter software troubleshooting for resource block errors and
transducer block diagnostics are presented in the appendices.
Messages on the local display or diagnostics with a red light in the detailed
status of the transducer block also provide guidance in troubleshooting
problems. Refer to Section 5: Operation and Maintenance for details.
The most common magmeter problem is wiring between the flowtube and the
transmitter in remote mount installations. The signal wire and coil drive wire
must be twisted shielded cable: 20 AWG twisted shielded cable for the
electrodes and 14 AWG twisted shielded cable for the coils. Ensure that the
cable shield is connected at both ends of the electrode and coil drive cables.
Signal and coil drive wires must have their own cables. The single conduit that
houses both the signal and coil drive cables should not contain any other
wires. For more information on proper wiring practices, refer to Section 2:
Installation, “Wiring” on page 2-4.
In some circumstances, process conditions rather than the magmeter can
cause the meter output to be unstable. Possible solutions for addressing a
noisy process situation are given below. When the output attains the desired
stability, no further steps are required.
The Auto Zero function describes on page 5-4 how to initializes the
transmitter for use with the 37.5 Hz coil drive mode only. Run this function
only with the transmitter and flowtube installed in the process. The flowtube
must be filled with process fluid with zero flow rate. Before running the auto
zero function, be sure the coil drive mode is set to 37.5 Hz.
STEP 5: INSTALLED
FLOWTUBE TESTS
Set the loop to manual if necessary and begin the auto zero procedure. The
transmitter completes the procedure automatically in about two minutes. A
symbol appears in the lower right-hand corner of the display to indicate that
the procedure is running.
1. Change the coil drive to 37.5 Hz.
Complete the Auto Zero function, if possible.
2. Increase the damping.
Consult your Rosemount sales representative about using a high-signal
magnetic flowmeter system.
If a problem with an installed flowtube is identified, the following chart can
assist in troubleshooting the flowtube. Before performing any of the flowtube
tests, disconnect or turn off power to the transmitter. To interpret the results,
the hazardous location certification for the flowtube must be known.
Applicable codes for the Rosemount 8705 are N0, N5, and KD. Applicable
codes for the 8707 are N0 and N5. Applicable codes for the 8711 are N0, N5,
E5, and CD. Always check the operation of test equipment before each test.
If possible, take all readings from inside the flowtube junction box. If the
flowtube junction box is inaccessible, take measurements as close as
possible. Readings taken at the terminals of remote-mount transmitters that
are more than 100 feet away from the flowtube may provide incorrect or
inconclusive information and should be avoided. A flowtube circuit diagram is
provided in Figure 6-1.
6-3
Page 68

Rosemount 8742C
Ω∞Ω
Reference Manual
00809-0100-4793, Rev CA
August 2004
Test equipment (such as Fluke Model 25, 27, 83, 85, 87, or 8060A multimeter
and a B&K Model 878 LCR meter or equivalent) is needed to conduct these
tests. Same of the tests will require measuring conductance (nS,
nanosiemens), the reciprocal of resistance. It is possible to test a LCR meter
by selecting the units nS and holding the leads apart. The value should be
less than one, while touching the leads together should result in an overload
value. The LCR meter may be used with flow in the flowtube.
Tes t
A. Flowtube
Coil
B. Shields to
Case
C. Coil Shield
to Coil
D. Electrode
Shield to
Electrode
Flowtube
Location
Installed or
Uninstalled
Installed or
Uninstalled
Installed or
Uninstalled
Installed LCR (Set to
Required
Equipment
Multimeter 1 and 2 = R
Multimeter 17 and
Multimeter 1 and
Resistance
and 120 Hz)
Measuring at
Connections
and case
ground
17 and case
ground
2 and
18 and 17 = R
19 and 17 = R
Expected Value Potential Cause Corrective Action
2Ω R18Ω≤≤
0.2Ω<
(< 1nS)
∞
(< 1nS)
R1 and R2 should be stable
1
NO:
2
N5, E5, CD,
ED:
R1R–
R1R–21500Ω≤
300Ω≤
2
• Open or
Shorted Coil
• Moisture in
terminal block
• Leaky electrode
• Process behind
liner
• Process behind
liner
• Leaky electrode
• Moisture in
terminal block
• Unstable R1 or
values
R
2
confirm coated
electrode
•Shorted
electrode
• Electrode not in
contact with
process
• Empty Pipe
• Low conductivity
• Remove and
replace flowtube
• Clean terminal
block
•Remove
flowtube
•Remove
flowtube and dry
• Clean terminal
block
• Confirm with
flowtube coil
test
• Remove coating
from flowtube
wall
• Use bulletnose
electrodes
• Repeat
measurement
6-4
Page 69

Reference Manual
00809-0100-4793, Rev CA
August 2004
Figure 6-1.
Flowtube Circuit Diagram
Rosemount 8742C
68.1k (not applicable for
flowtubes with N0 hazardous
certification approval option
code)
68.1k
Flowtube Housing
STEP 6: UNINSTALLED
FLOWTUBE TESTS
8712-0007E04A
An uninstalled flowtube can also be used for flowtube troubleshooting. To
interpret the results, the hazardous location certification for the flowtube must
be known. Applicable codes for the Rosemount 8705 are N0, N5, and KD.
Applicable codes for the Rosemount 8707 are N0 and N5. Applicable codes
for the Rosemount 8711 are N0, N5, E5, and CD.
A flowtube circuit diagram is provided in Figure 6-1. Take measurements from
the terminal block and on the electrode head inside the flowtube. The
measurement electrodes, 18 and 19, are on opposite sides in the inside
diameter. If applicable, the third grounding electrode is in between the other
two electrodes. On 8711 flowtubes, electrode 18 is near the flowtube junction
box and electrode 19 is near the bottom of the flowtube (Figure 6-2). The
different flowtube models will have slightly different resistance readings.
Flanged flowtube resistance readings are in Table 6-2 while wafer flowtube
resistance readings are in Table 6-3.
See “Safety Information” on page 4-1 for complete warning information.
6-5
Page 70

Rosemount 8742C
Figure 6-2. 45° Electrode Plane
Reference Manual
00809-0100-4793, Rev CA
August 2004
8711-8711F01A
To insure accuracy of resistance readings, zero out multimeter by shorting
and touching the leads together. If any of these tests fail, refer to “Return of
Materials” on page 1-3 or contact your Rosemount representative to interpret
the results.
Table 6-2. Uninstalled Rosemount 8705/ 8707 Flanged Flowtube Tests
Hazardous Location Certifications
Measuring at Connections
18 and Electrode
19 and Electrode
17 and Grounding Electrode
17 and Ground Symbol
17 and 18 Open Open
17 and 19 Open Open
17 and 1 Open Open
(1) It is difficult to tell from visual inspection alone which electrode is wired to which number terminal in
the terminal block. Measure both electrodes. One electrode should result in an open reading, while the
other electrode should be less than 275 .
(1)
(1)
Ω
N0 N5, KD
275≤Ω
275≤Ω
0.3≤Ω 0.3≤Ω
0.3≤Ω 0.3≤Ω
61kΩ R75k≤≤ Ω
61kΩ R75k≤≤ Ω
Table 6-3. Uninstalled Rosemount 8711 Wafer Flowtube Tests
Hazardous Location Certification
Measuring at Connections
18 and Electrode
19 and Electrode
17 and Grounding Electrode
17 and Grounding Symbol
17 and 18 Open Open
17 and 19 Open Open
17 and 1 Open Open
(1) Measure the electrode closest to the junction box
(2) Measure the electrode farthest away from the junction box.
(1)
(2)
N0 N5, E5, CD
0.3≤Ω
275≤Ω
0.3≤Ω 0.3≤Ω
0.3≤Ω 0.3≤Ω
61kΩ R75k≤≤ Ω
61kΩ R75k≤≤ Ω
6-6
Page 71

Reference Manual
00809-0100-4793, Rev CA
August 2004
Appendix A Reference Data
Rosemount 8742C Transmitter Specifications . . . . . . . .page A-1
Rosemount 8705 and 8707 Flowtubes Specifications . . page A-5
Rosemount 8711 Wafer Flowtube Specifications . . . . . .page A-11
Rosemount 8714D Specifications . . . . . . . . . . . . . . . . . . . page A-14
Dimensional Drawings . . . . . . . . . . . . . . . . . . . . . . . . . . . .page A-15
Ordering Information . . . . . . . . . . . . . . . . . . . . . . . . . . . . .page A-22
ROSEMOUNT 8742C
TRANSMITTER
SPECIFICATIONS
Rosemount 8742C
Functional
Specifications
Flowtube Compatibility
Compatible with Rosemount 8705, 8711, and 8721 flowtubes.
Conductivity Limits
Process liquid must have a conductivity of 5 microsiemens/cm (5
micromhos/cm) or greater for 8742C. Excludes the effects of interconnecting
cable length in remote mount transmitter installations.
Flowtube Coil Resistance
25 maximum
Flow Rate Range
Capable of processing signals from fluids that are traveling between 0 and 40
ft/s (0 to 12 m/s) for both forward and reverse flow in all flowtube sizes.
Power Supply
90–250 V ac, 50–60 Hz, 15–50 V dc
www.rosemount.com
Page 72

Rosemount 8742C
Reference Manual
00809-0100-4793, Rev CA
August 2004
Supply Current Requirements
Units powered by 15-50 V dc power supply may draw up to 1 amp of
current.
1.0
0.75
0.5
0.25
0
15
20
Supply Current (Amps)
I = 10/V
I = Supply current requirement (Amps)
V = Power supply voltage (Volts)
Power Supply (Volts)
Installation Coordination
Installation (overvoltage) Category II
30
40
50
Power Consumption
10 watts maximum
Ambient Temperature Limits
Operating
–40 to 165 °F (–40 to 74 °C) without local operator interface
–13 to 147 °F (–25 to 65 °C) with local operator interface
Storage
–40 to 185 °F (–40 to 85 °C)
Humidity Limits
0–100% RH to 150 °F (65 °C)
Enclosure Rating
NEMA 4X CSA Type 4X, IEC 60529, IP67 (transmitter),
Pollution Degree 2
Output Signal
Manchester-encoded digital signal that conforms to IEC 1158-2 and ISA 50.02
A-2
Page 73

Reference Manual
00809-0100-4793, Rev CA
August 2004
Rosemount 8742C
FOUNDATION Fieldbus
Specifications
Schedule Entries
Seven (7)
Links
Twenty (20)
Virtual Communications Relationships (VCRs)
One (2) predefined (F6, F7)
Nineteen (18) configurable (see Table A-1)
Table A-1. Block Information
Block Base Index Execution Time (Milliseconds)
Resource (RB) 300 —
Transducer (TB) 400 —
Analog Input (AI) 1,000 15
Proportional/Integral / Derivative (PID) 10,000 25
Intergrator 12,000 20
Reverse Flow
Detects and reports reverse flow
Software Lockout
A write-lock switch and software lockout are provided in the resource function
block.
Turn - o n Time
30 minutes to rated accuracy from power up;
10 seconds communication from power interruption
Start-up Time
0.2 seconds from zero flow
Low Flow Cutoff
Adjustable between 0 and 1 ft/s. Below selected value, output is driven to the
zero flow rate.
Overrange Capability
Signal output continues to 110% of upper range value setting, then remains
constant. Messages are supplied to the fieldbus network.
Damping
Adjustable between 0 and 255 seconds
A-3
Page 74

Rosemount 8742C
Reference Manual
00809-0100-4793, Rev CA
August 2004
Performance
Specifications
(System specifications are given using the unit at referenced conditions.)
Accuracy
Rosemount 8742C Transmitter with
8705 and 8721 Flowtubes
System accuracy is ±0.5% of rate from 1 to 40 ft/s (0.3 to 12 m/s);
includes combined effects of linearity, hysteresis, repeatability, and
calibration uncertainty; below 1.0 ft/s (0.3 m/s), the system has an
accuracy of ±0.005 ft/s (0.0015 m/s).
Rosemount 8742C Transmitter with 8711 Flowtube
System accuracy is ±0.5% of rate from 3 to 40 ft/s (0.9 to 12 m/s);
includes combined effects of linearity, hysteresis, repeatability, and
calibration uncertainty; below 3 ft/s (0.9 m/s), the system has an accuracy
of ±0.015 ft/s (0.005 m/s).
Vibration Effect
IEC 60770-1
Repeatability
±0.1% of reading
Response Time
0.2 seconds maximum response to step change in input
Stability
±0.1% of rate over six months
Ambient Temperature Effect
±0.25% of rate over operating temperature range
EMC Compliance
EN61326-1 1997 + A1/A2 3(Industrial) electromagnetic compatibility (EMC)
for process and laboratory apparatus.
Transient Protection
The 8742C transmitter prevents damage to the flowmeter from transients
compliant to:
IEC 6100 – 4-4 (for burst currents)
IEC 6100 – 4-5 (for surge currents)
Mounting Position Effect
None when installed to ensure flowtube remains full
A-4
Page 75

Reference Manual
00809-0100-4793, Rev CA
August 2004
Physical Specifications Materials of Construction (Transmitter)
Housing
Low-copper aluminum
Paint
Polyurethane
Cover Gasket
Rubber
Electrical Connections
Two ¾–14 NPT with number 8 screw terminal connections are provided for
electrical wiring. PG13.5 and CM20 adapters are available. Screw terminals
provided for all connections. Power wiring connected to transmitter only.
Integrally mounted transmitters are factory wired to the flowtube.
Mounting
Integrally mounted transmitters do not require interconnecting cables. The
local display and transmitter can be rotated in 90° increments. Remote
mounted transmitters require only a single conduit connection to the flowtube.
Rosemount 8742C
ROSEMOUNT 8705 AND
8707 FLOWTUBES
SPECIFICATIONS
Functional
Specifications
Weight
Approximately 7 pounds (3.2 kg). Add 0.5 pounds (0.5 kg) for local display.
Service
Conductive liquids and slurries
Line Sizes
1
/2–36 inch (15–900 mm) for Rosemount 8705
3–36 inch (80–600 mm) for Rosemount 8707
Interchangeability
Rosemount 8705 Flowtubes are interchangeable with 8712D, 8732, and
8742C Transmitters. Rosemount 8707 High-Signal Flowtubes are
interchangeable with 8712H High-Signal Transmitters. System accuracy is
maintained regardless of line size or optional features. Each flowtube
nameplate has a sixteen-digit calibration number that can be entered into a
transmitter through the Local Operator Interface (LOI) or the HART
Communicator on the 8712H and the 8732C. In a F
environment, the 8742C can be configured using the DeltaV
configuration tool or another F
further calibration is necessary.
OUNDATION fieldbus configuration device. No
OUNDATION
™
fieldbus
™
fieldbus
Upper Range Limit
30 ft/s (10 m/s)
A-5
Page 76

Rosemount 8742C
Reference Manual
00809-0100-4793, Rev CA
August 2004
Process Temperature Limits
Teflon (PTFE) Lining
–20 to 350 °F (–29 to 177 °C)
Tefzel (ETFE) Lining
–20 to 300 °F (–29 to 149 °C)
PFA Lining
-20 to 350 °F (-29 to 177°C)
Polyurethane Lining
0 to 140 °F (–18 to 60 °C)
Neoprene Lining
0 to 185 °F (–18 to 85 °C)
Linatex Lining
0 to 158 °F (–18 to 70°C)
Ambient Temperature Limits
–30 to 150 °F (–34 to 65 °C)
Pressure Limits
See Table A-2 and Table A-4
Vacuum Limits
Teflon (PTFE) Lining
Full vacuum to 350 °F (177 °C) through 4-inch (100 mm) line sizes.
Consult factory for vacuum applications with line sizes of 6 inches (150
mm) or larger.
All Other Standard Flowtube Lining Materials
Full vacuum to maximum material temperature limits for all available line
sizes.
Submergence Protection
IP 68. Continuous to 30 feet (10 meters)
Recommended with sealed cable glands
Conductivity Limits
Process liquid must have a conductivity of 5 microsiemens/cm (5
micromhos/cm) or greater for 8705. Process liquid must have a conductivity of
50 microsiemens/cm (50 micromhos/cm) for 8707 when used with 8712H, 5
microsiemens/cm when used with other transmitters. Excludes the effect of
interconnecting cable length in remote mount transmitter installations.
A-6
Page 77

Reference Manual
00809-0100-4793, Rev CA
August 2004
Rosemount 8742C
Table A-2. Temperature vs. Pressure Limits
Flowtube Temperature vs. Pressure Limits for ASME B16.5 Class Flanges (1/2- to 36-inch line sizes)
Flange Material Flange Rating
Class 150 285 psi 260 psi 230 psi 215 psi
Carbon Steel
304 Stainless Steel
(1) Liner temperature limits must also be considered. Polyurethane, Linatex, and Neoprene have temperature limits of 140°F, 158°F, and 185°F, respectively.
(2) 30- and 36-inch AWWA C207 Table A-3 Class D rated to 150 psi at atmospheric temperature.
(3) Option Code C6
(4) Option Code C7
(5) Option Code S6
(6) Option Code S7
Class 300 740 psi 675 psi 655 psi 645 psi
Class 600
Class 600
Class 900 2220 psi
Class 150 275 psi 235 psi 205 psi 190 psi
Class 300 720 psi 600 psi 530 psi 500 psi
Class 600
Class 600
Class 900 2160 psi
(3)
(4)
(5)
(6)
Table A-3. Temperature vs. Pressure Limits
Flowtube Temperature vs. Pressure Limits for AS2129 Table D and E Flanges (4- to 24-inch line sizes)
Flange Material Flange Rating
Carbon Steel
(1) Liner temperature limits must also be considered. Polyurethane, Linatex, and Neoprene have temperature limits of 140°F, 158°F, and 185°F, respectively.
D 101.6 psi 101.6 psi 101.6 psi 94.3 psi
E 203.1 psi 203.1 psi 203.1 psi 188.6 psi
(1)
(2)
Pressure
@ -20 to 100 °F
(-29 to 38 °C)
1000 psi 800 psi 700 psi 650 psi
1480 psi NA NA NA
1000 psi 800 psi 700 psi 650 psi
1440 psi NA NA NA
(1)
@ -200 to 50 °F
(-320 to 122 °C)
@ 200 °F
(93 °C)
@ 100 °F
(212 °C)
@ 300 °F
(149 °C)
Pressure
@ 150°F
(302 °C)
@ 350 °F
(177 °C)
@ 200 °F
(392 °C)
Table A-4. Temperature vs. Pressure Limits
Flowtube Temperature vs. Pressure Limits for DIN Flanges (15 to 600 mm line sizes)
Flange Material Flange Rating
PN 10 10 bar 10 bar 9.7 bar 9.5 bar
Carbon Steel
304 Stainless Steel
(1) Liner temperature limits must also be considered. Polyurethane, Linatex, and Neoprene have temperature limits of 140°F, 158°F, and 185°F, respectively.
PN 16 16 bar 16 bar 15.6 bar 15.3 bar
PN 25 25 bar 25 bar 24.4 bar 24.0 bar
PN 40 40 bar 40 bar 39.1 bar 38.5 bar
PN 10 9.1 bar 7.5 bar 6.8 bar 6.5 bar
PN 16 14.7 bar 12.1 bar 11 . 0 ba r 10.6 bar
PN 25 23 bar 18.9 bar 17.2 bar 16.6 bar
PN 40 36.8 bar 30.3 bar 27.5 bar 26.5 bar
(1)
@ -196 to 50 °C
(-320 to 122 °F)
@ 100 °C
(212 °F)
Pressure
@ 150°C
(302 °F)
@ 175°C
(347 °F)
A-7
Page 78

Rosemount 8742C
Reference Manual
00809-0100-4793, Rev CA
August 2004
Performance
Specifications
(System specifications are given using the frequency output and with the unit
at referenced conditions.)
Accuracy
Rosemount 8705 with 8712D, 8732C, or 8742C
±0.5% of rate from 1 to 30 ft/s (0.3 to 10 m/s). Includes combined effects
of linearity, hysteresis, repeatability, and calibration uncertainty. Accuracy
is ±0.005 ft/s (±0.0015 m/s) from low-flow cutoff to 1.0 ft/s (0.3 m/s).
Rosemount 8707 with 8712D/H, 8732C, or 8742C
±0.5% of rate from 3 to 30 ft/s (1 to 10 m/s). Include combined effects of
linearity, hysteresis, repeatability and calibration uncertainty. Accuracy is
±0.015 ft/s (±0.0045 m/s) from low-flow cutoff to 3.0 ft/s (1 m/s).
Vibration Effect
IEC 60770-1
Mounting Position Effect
None when installed to ensure flowtube remains full
Physical Specifications Non-Wetted Materials
Flowtube
AISI Type 304 SST
Flanges
Carbon steel, AISI Type 304/304L SST,
or Type 316/316L SST
Housing
Welded steel
Paint
Polyurethane
Process Wetted Materials
Lining
PFA, Teflon (PTFE), Tefzel (ETFE), polyurethane, neoprene, Linatex
Electrodes
316L SST, Hastelloy C-276, tantalum, 90% platinum-10% iridium, titanium
Process Connections
ASME B16.5 (ANSI) Class 150, Class 300,
Class 600, or Class 900
0.5- to 30-inch (Class 150)
0.5- to 24-inch (Class 300)
0.5- to 10-inch (Class 600 derated to 1000 psi max)
1- to 8-inch (Full rated Class 600 and 900)
A-8
Page 79

Reference Manual
00809-0100-4793, Rev CA
August 2004
Rosemount 8742C
AWWA C207 Table 3 Class D
30- and 36-inch
DIN PN 10, 16, 25, and 40
PN10: Not available for flange sizes from 15 to 150 mm
PN16: Not available for flange sizes from 15 to 80 mm
PN 25: Not available for flange sizes from 15 to 150 mm
PN40: Available for all flange sizes
AS 2129 Table D and E
0.5- to 36 inch
AISI Type 304 SST Sanitary Tri-Clover
3-A-compliant quick disconnect ferrule-mounted to ASME B16.5 (ANSI)
Class 150 flange; 0.5- to 3-inch.
Electrical Connections
Two ¾–14 NPT connections with number 8 screw terminals are provided in
the terminal enclosure for electrical wiring.
Grounding Electrode
A grounding electrode is installed similarly to the measurement electrodes
through the flowtube lining on 8705 flowtubes. It is available in all electrode
materials.
Grounding Rings
Grounding rings are installed between the flange and the tube face on both
ends of the flowtube. Single ground rings can be installed on either end of the
flowtube. They have an I.D. slightly larger than the flowtube I.D. and an
external tab to attach ground wiring. Grounding rings are available in 316L
SST, Hastelloy-C, titanium, and tantalum.
Lining Protectors
Lining protectors are installed between the flange and the tube face on both
ends of the flowtube. The leading edge of lining material is protected by the
lining protector; lining protectors cannot be removed once they are installed.
Lining protectors are available in 316L SST, Hastelloy-C, and titanium.
Dimensions
See Figure 2, Figure 3, and Figure 4 and Table A-7, Table A-8, and Table A-9.
Weight
See Table A-9 and Table A-10
A-9
Page 80

Rosemount 8742C
Table A-5. Flowtube Weight (ASME)
Flowtube Flange Rating
Nominal Line Size
(1) 30- and 36-inch AWWA C207 Table 2 Class D rated to 150 psi at atmospheric temperature.
(1)
Inches (mm)
½ (15)
½ (15)
1 (25)
1 (25)
1½ (40)
1½ (40)
2 (50)
2 (50)
3 (80)
3 (80)
4 (100)
4 (100)
6 (150)
6 (150)
8 (200)
8 (200)
10 (250)
10 (250)
12 (300)
12 (300)
14 (350)
16 (400)
18 (450)
20 (500)
24 (600) 150 PN 10 1,000 (454)
30 (750)
36 (900)
ASME B16.5 (ANSI) DIN
150
300
150
300
150
300
150
300
150
300
150
300
150
300
150
300
150
300
150
300
150
150
150
150
150
125
Reference Manual
00809-0100-4793, Rev CA
August 2004
Flowtube Weight
lb (kg)
PN 40 20 (9)
PN 40 20 (9)
PN 40 22 (10)
PN 40 26 (12)
PN 40 40 (18)
PN 16 48 (22)
PN 16 81 (37)
PN 10 110 (50)
PN 10 220 (98)
PN 10 330 (150)
PN 10
PN 10
PN 10
PN 10
-
-
22 (10)
22 (10)
24 (11)
28 (13)
47 (21)
65 (30)
93 (42)
162 (74)
300 (136)
435 (197)
370 (168)
500 (227)
600 (272)
680 (308)
1,747 (792)
1,975 (898)
Table A-6. Flowtube weights (AS2129)
Nominal Line Size Inches (mm) AS2129 Flowtube Weight lb (kg)
4 (100)
4 (100)
6 (150)
6 (150)
8 (200)
8 (200)
10 (250)
10 (250)
12 (300)
12 (300)
14 (350)
14 (350)
16 (400)
16 (400)
18 (450)
18 (450)
20 (500)
20 (500)
24 (600)
24 (600)
A-10
D
E
D
E
D
E
D
E
D
E
D
E
D
E
D
E
D
E
D
E
33 (15)
37 (17)
66 (30)
71 (32)
86 (39)
88 (40)
187 (85)
201 (91)
273 (124)
284 (129)
293 (133)
317 (144)
386 (175)
430 (195)
516 (234)
569 (258)
569 (258)
626 (284)
855 (388)
974 (442)
Page 81

Reference Manual
00809-0100-4793, Rev CA
August 2004
ROSEMOUNT 8711
WAFER FLOWTUBE
SPECIFICATIONS
Rosemount 8742C
Functional
Specifications
Service
Conductive liquids and slurries
Line Sizes
0.15- through 8-inch (4 through 200 mm)
Interchangeability
Rosemount 8711 Flowtubes are interchangeable with 8732 and 8742C
Transmitters. System accuracy is maintained regardless of line size or
optional features. Each flowtube nameplate has a sixteen-digit calibration
number that can be entered into a transmitter through the Local Operator
Interface (LOI) or the HART Communicator on the Rosemount 8712H and the
8732C. In a F
using the DeltaV fieldbus configuration tool or another F
configuration device. No further calibration is necessary.
Upper Range Limit
30 ft/s (10 m/s)
Process Temperature Limits
Tefzel (ETFE) Lining
–20 to 300 °F (–29 to 149 °C) for 0.5- through 8-inch
(15–200 mm) line sizes
–20 to 200 °F (–29 to 93 °C) for 0.15- and 0.3-inch
(4 and 8 mm) line sizes
OUNDATION fieldbus environment, the 8742C can be configured
OUNDATION fieldbus
Teflon (PTFE) Lining
-20 to 350 °F (-29 to 177 °C)
Ambient Temperature Limits
–30 to 150 °F (–34 to 65 °C)
Maximum Safe Working Pressure at 100 °F (38 °C)
Tefzel (ETFE) Lining
Full vacuum to 740 psi (5.1 MPa) for 0.5- through 8-inch
(15 through 200 mm) flowtubes
285 psi (1.96 MPa) for 0.15- and 0.30-inch (4 and 8 mm) flowtubes
Teflon (PTFE) Lining
Full vacuum through 4-inch (100 mm) line sizes. Consult factory for
vacuum applications with line sizes of 6 inches (150 mm) or larger.
Conductivity Limits
Process liquid must have a conductivity of 5 microsiemens/cm (5
micromhos/cm) or greater for 8711. Excludes the effect of interconnecting
cable length in remote mount transmitter installations.
A-11
Page 82

Rosemount 8742C
Reference Manual
00809-0100-4793, Rev CA
August 2004
Performance
Specifications
(System specifications are given using the frequency output and with the unit
at referenced conditions.)
Accuracy
Rosemount 8711 with 8712D, 8732C, or 8742C Transmitters
±0.5% of rate from 3 to 30 ft/s (1 to 10 m/s)
±0.015 ft/s (0.0045 m/s) from low-flow cutoff to 3 ft/s (1 m/s)
Vibration Effect
IEC 60770-1
Mounting Position Effect
No effect when installed to ensure flowtube remains full
Physical Specifications Non-Wetted Materials
Flowtube
303 SST (ASTM A-743)
Coil Housing
Investment cast steel (ASTM A-27)
Paint
Polyurethane
Process-Wetted Materials
Lining
Tefzel (ETFE), Teflon (PTFE)
Electrodes
316L SST, Hastelloy C-276, tantalum,
90% platinum—10% iridium, titanium
Process Connections
Mounts between these Flange Configurations
ASME B16.5 (ANSI): Class 150, 300
DIN: PN 10 and 25
BS: 10 Table D, E, and F
A-12
Page 83

Reference Manual
00809-0100-4793, Rev CA
August 2004
Rosemount 8742C
Studs, Nuts, and Washers
ASME B16.5 (ANSI)
0.15- through 1-inch (4 through 25 mm):
316 SST, ASTM A193, Grade B8M, Class 1 threaded mounting studs;
ASTM A194, Grade 8M heavy hex nuts; SAE per ANSI B18.2.1, Type A,
Series N flat washers.
1.5- through 8-inch (40 through 200 mm):
CS, ASTM A193, Grade B7, Class 1 threaded mounting studs; ASTM
A194, Grade 2H heavy hex nuts; SAE per ANSI B18.2.1, Type A, Series
N flat washers; all items clear, chromate zinc-plated.
DIN
4 through 25 mm (0.15- through 1-inch):
316 SST ASTM A193, Grade B8M Class 1 threaded mounting studs;
ASTM A194, Grade 8M, DIN 934 H=D, metric heavy hex nuts; 316 SST,
A4, DIN 125 flat washers.
40 through 200 mm (1.5- through 8-inch):
CS, ASTM A193, Grade B7 threaded mounting studs; ASTM A194,
Grade 2H, DIN 934 H=D, metric heavy hex nuts; CS, DIN 125 flat
washers; all items yellow zinc-plated.
Electrical Connections
Two ¾–14 NPT connections with number 8 screw terminals are provided in
the terminal enclosure for electrical wiring.
(1)
Grounding Electrode
A grounding electrode is installed similarly to the measurement electrodes
through the flowtube lining. It is available in all electrode materials.
Grounding Rings
Grounding rings are installed between the flange and the tube face on both
ends of the flowtube. They have an I.D. slightly larger than the flowtube I.D.
and an external tab to attach ground wiring. Grounding rings are available in
316L SST, Hastelloy C-276, titanium, and tantalum.
Dimensions and Weight
See Figure 5, Figure 6, and Table A-10
(1) 0.15 and 0.30 inch (4 and 80 mm) flowtubes mount between 1/2-inch flange.
A-13
Page 84

Rosemount 8742C
ROSEMOUNT 8714D
SPECIFICATIONS
Reference Manual
00809-0100-4793, Rev CA
August 2004
Functional
Specifications
Performance
Specifications
Ambient Temperature Limits
Operating
–30 to 140 °F (–34 to 60 °C)
Storage
–40 to 140 °F (–40 to 60 °C)
Humidity Limits
0 to 95% relative humidity
Accuracy
±0.05% of rate at 30 ft/s at 25°C
±0.10% of rate at 10 ft/s and 3 ft/s
Warm-up Time
30 minutes
Ambient Temperature Effect
< 0.015% of rate per 10 °F (< 0.027% per 10 °C)
Humidity Effect
No effect from 0 to 60% relative humidity
< 0.10% of rate from 60 to 90% relative humidity
Long-Term Stability
< 0.10% of rate shift in one year
Physical Specifications Electrical Connections
Electrical connections are compatible with 8712D or 8732C terminal blocks.
Electrical connections are not compatible with 8712H terminal block.
Mounting
Any position is acceptable
Materials of Construction
Housing
Extruded aluminum
Covers
Stamped aluminum, silk-screened
Paint
Polyurethane
Weight
Approximately 3 lb (2 kg)
A-14
Page 85

Reference Manual
00809-0100-4793, Rev CA
August 2004
DIMENSIONAL
DRAWINGS
10.5
(267)
5.10
(130)
FIGURE 1. Rosemount 8742C Transmitter
7.49 (190)
6.48 (165)
1.94
(49)
3.00
(76)
LOI Cover
8.81
(224)
3.07
(78)
Rosemount 8742C
3
/4”-14 NPT Electrical
Conduit Connections
(2 places)
3.43
(87)
3
/4”-14 NPT
Flowtube Conduit
Connections
(2 places)
11.02
(280)
5.82
(148)
Note
Dimensions in inches (millimeters)
8742-8742_06A, 8742_06B, 1002G01A
A-15
Page 86

Reference Manual
00809-0100-4793, Rev CA
Rosemount 8742C
FIGURE 2. Rosemount 8705 and 8707 Flowtubes, Typical of 0.5- through 4-inch (15 through 100 mm) Line Sizes
4.02
(102)
2.00
(50.8)
5.00
(127)
August 2004
2.6
(66)
3
/4-14 NPT
Conduit
Connection
Relief
Valve
Notes
Dimensions are in inches (millimeters)
See Table A-8 and Table A-9 for variable dimensions
W1 Housing Configuration (Sealed, welded housing with pressure relief valve)
A
1.8
(46)
H
C
L
FIGURE 3. Rosemount 8705 and 8707 Flowtubes, Typical of 6- through 36-inch (150 through 900 mm) Line Sizes
4.02
(102)
2.6
(66)
2.00
(51)
1.8
(46)
5.00
(127)
2.66
(66)
2.6
(66)
8705-1002A05A, 1002B05A
A-16
H
C
W3 Housing
Configuration
L
A
D
Notes
Dimensions are in inches (millimeters)
See Table A-8 and Table A-9 for variable dimensions
W3 Housing Configuration (Sealed welded housing with
separate electrode compartments)
8705-1002A06A, 1002B06A
Page 87

Reference Manual
00809-0100-4793, Rev CA
August 2004
FIGURE 4. Rosemount 8705 Sanitary Flowtubes, Typical of 1/2- through 3-inch (15 through 86 mm) Line Sizes
(102)
2.00
(50.8)
2.6
(66)
4.02
1.8
(46)
Rosemount 8742C
5.00
(127)
2.6
(66)
3
/4-14 NPT
Conduit
Connection
Notes
Dimensions are in inches (millimeters)
See Table A-9 for available dimensions
W0 Housing Configuration (Sealed welded housing)
E
C
Table A-7. Sanitary Rosemount 8705 Flowtube Dimensions in inches (millimeters)
Line Size and Flange Rating
0.5–150 lb. 1.00 (25) 1.75 (44) 8.88 (226) 13.78 (350)
1–150 lb. 1.50 (40) 2.13 (54) 8.88 (226) 13.78 (350)
1.5–150 lb. 2.00 (50) 2.50 (64) 9.50 (242) 13.78 (350)
2–150 lb. 3.00 (80) 3.00 (76) 9.50 (242) 13.78 (350)
3–150 lb. 4.00 (100) 3.75 (95) 12.50 (318) 13.78 (350)
Dimensions with ASME B16.5 (ANSI) Flanges and Tri-Clamp Adapters.
Nominal Tri-Clamp
Diameter
Process Flange Rad. “B” Body Height “C” Max Overall Flowtube Length “L”
Grounding
Clamp
L
8705-1002A05A, 1002B05D
A-17
Page 88

Rosemount 8742C
Reference Manual
00809-0100-4793, Rev CA
August 2004
Table A-8. Rosemount 8705 and 8707 Dimensions in Inches (Millimeters) (Dimensions with ASME B16.5 (ANSI)
Flanges)
Line Size
Flange Rating
(1) AS2129 Table D and E flange dimensions match ANSI 150# dimensions.
(2) 30- and 36-inch AWWA C207 Table 2 Class D rated to 150 psi at 150 °F.
(3) When 2 grounding rings are specified, add 0.25 inch (6.35 mm) for 0.50- through 14-inch (15 through 350 mm) flowtubes, add 0.50 inch (12.7 mm) for
(1)
Refer to Dimensional Drawings, Figure 2, Figure 3, and Figure 4
(2)
and
0.5–150
0.5–300
0.5–600
1–150
1–300
1–600
1–900
1.5–150
1.5 –300
1.5–600
1.5–900
2–150
2–300
2–600
2–900
3–150
3–300
3–600
3–900
4–150
4–300
4–600
4–900
6–150
6–300
6–600
6–900
8–150
8–300
8–600
8–900
10–150
10–300
10–600
12–150
12–300
14–150
14–300
16–150
16–300
18–150
18–300
20–150
20–300
24–150
24–300
30
36
16-inch (400 mm) and larger. When lining protectors are specified, add 0.25 inch (6.35 mm) for ½- through 12-inch (15 through 300 mm) flowtubes, add
0.50 inch (12.7 mm) for 14- through 36-inch (350 through 900 mm) flowtubes.
Body Height
“H”
6.75 (171)
6.75 (171)
6.75 (171)
6.75 (171)
6.75 (171)
6.75 (171)
6.75 (171)
7.10 (180)
7.10 (180)
7.10 (180)
7.10 (180)
7.10 (180)
7.10 (180)
7.10 (180)
7.10 (180)
8.10 (206)
8.10 (206)
8.10 (206)
8.10 (206)
8.45 (215)
8.45 (215)
8.45 (215)
8.45 (215)
9.45 (240)
9.45 (240)
9.45 (240)
9.45 (240)
10.42 (265)
10.42 (265)
10.42 (265)
10.42 (265)
11.78 (299)
11.78 (299)
11.78 (299)
12.86 (327)
12.86 (327)
13.92 (354)
13.92 (354)
14.93 (379)
14.93 (379)
16.19 (411)
16.19 (411)
17.20 (437)
17.20 (437)
19.48 (495)
19.48 (495)
22.23 (565)
26.10 (663)
Liner Face
Diameter
“A”
1.38 (35)
1.38 (35)
1.38 (35)
2.00 (51)
2.00 (51)
1.62 (41)
1.62 (41)
2.88 (73)
2.88 (73)
2.88 (73)
2.50 (64)
3.62 (92)
3.62 (92)
3.62 (92)
3.25 (83)
5.00 (127)
5.00 (127)
5.00 (127)
4.63 (118)
6.19 (157)
6.19 (157)
6.19 (157)
5.81 (148)
8.50 (216)
8.50 (216)
8.50 (216)
8.00 (203)
10.62 (270)
10.62 (270)
10.62 (270)
10.00 (254)
12.75 (324)
12.75 (324)
12.75 (324)
15.00 (381)
15.00 (381)
16.25 (413)
16.25 (413)
18.50 (470)
18.50 (470)
21.00 (533)
21.00 (533)
23.00 (584)
23.00 (584)
27.25 (692)
27.25 (692)
33.80 (859)
40.27 (1023)
Overall Flowtube
Length
(3)
“L”
7.88 (200)
7.88 (200)
8.67 (220)
7.88 (200)
7.88 (200)
8.67 (220)
9.66 (245)
7.88 (200)
7.88 (200)
8.63 (219)
9.52 (242)
7.88 (200)
7.88 (200)
8.78 (223)
10.26 (261)
7.88 (200)
8.63 (219)
12.4 (315)
12.8 (326)
9.84 (250)
10.88 (276)
12.83 (326)
13.89 (353)
11.81 (300)
13.06 (332)
14.23 (361)
15.51 (394)
13.78 (350)
15.60 (396)
16.72 (428)
18.47 (469)
15.00 (381)
17.13 (435)
19.54 (496)
18.00 (457)
20.14 (512)
21.00 (533)
23.25 (591)
24.00 (610)
26.25 (667)
27.00 (686)
30.12 (765)
30.00 (762)
33.25 (845)
36.00 (914)
39.64 (1007)
37.25 (946)
40.88 (1038)
Flange Diameter
“D”
3.50 (89)
3.75 (95)
3.75 (95)
4.25 (108)
4.88 (124)
4.88 (124)
5.88 (149)
5.00 (127)
6.12 (155)
6.12 (155)
7.00 (178)
6.00 (152)
6.50 (165)
6.50 (165)
8.50 (216)
7.50 (191)
8.25 (210)
8.25 (210)
9.50 (241)
9.00 (229)
10.00 (254)
10.75 (273)
11.50 (292)
11.00 (279)
12.50 (318)
14.00 (356)
15.00 (381)
13.50 (343)
15.00 (381)
16.50 (419)
18.50 (470)
16.00 (406)
17.50 (444)
20.00 (508)
19.00 (483)
20.50 (52)
21.00 (533)
23.00 (584)
23.50 (597)
25.50 (648)
25.00 (635)
28.00 (711)
27.50 (698)
30.50 (774)
32.00 (813)
36.00 (914)
38.75 (984)
46.00 (1168)
Liner Thickness Inside Diameter
0.09 (2.3)
0.09 (2.3)
0.09 (2.3)
0.09 (2.3)
0.09 (2.3)
0.09 (2.3)
0.13 (3.3)
0.12 (3.1)
0.12 (3.1)
0.13 (3.3)
0.13 (3.3)
0.12 (3.1)
0.12 (3.1)
0.13 (3.3)
0.13 (3.3)
0.15 (3.8)
0.15 (3.8)
0.13 (3.3)
0.13 (3.3)
0.15 (3.8)
0.15 (3.8)
0.13 (3.3)
0.13 (3.3)
0.19 (4.8)
0.19 (4.8)
0.19 (4.8)
0.16 (4.1)
0.19 (4.8)
0.17 (4.3)
0.17 (4.3)
0.17 (4.3)
0.26 (6.5)
0.26 (6.5)
0.26 (6.5)
0.26 (6.7)
0.26 (6.7)
0.19 (4.8)
0.19 (4.8)
0.19 (4.8)
0.19 (4.8)
0.19 (4.8)
0.19 (4.8)
0.19 (4.8)
0.19 (4.8)
0.19 (4.8)
0.19 (4.8)
0.19 (4.8)
0.19 (4.8)
0.49 (12.5)
0.49 (12.5)
0.49 (12.5)
0.91 (23)
0.91 (23)
0.91 (23)
0.80 (20)
1.44 (37)
1.44 (37)
1.36 (35)
1.25 (32)
1.91 (49)
1.91 (49)
1.82 (46)
1.69 (43)
2.96 (75)
2.96 (75)
2.76 (70)
2.37 (60)
3.96 (101)
3.96 (101)
3.72 (95)
3.37 (86)
5.98 (152)
5.69 (144)
5.69 (144)
4.86 (123)
7.94 (202)
7.64 (194)
7.64 (194)
6.65 (169)
9.87 (251)
9.48 (241)
9.21 (234)
11. 87 (3 01)
11. 48 (2 92)
13.16 (334)
12.79 (325)
15.12 (384)
14.75 (375)
17.09 (434)
16.35 (415)
18.96 (482)
18.21 (463)
22.94 (583)
22.06 (560)
28.75 (730)
29.08 (739)
A-18
Page 89

Reference Manual
00809-0100-4793, Rev CA
August 2004
Table A-9. Rosemount 8705 Flowtube Dimensions with DIN Flanges in Millimeters (Inches)
Rating
(1)
Body Height
“H”
Liner Face
Diameter
“A”
Overall Flowtube
Length “L”
(2)
Flange Diameter
Line Size
and Flange
15 mm PN 10–40 171 (6.75) 45 (1.77) 200 (7.88) 95 (3.74) 2.3 (0.09) 12.5 (.49)
25 mm PN 10–40 171 (6.75) 68 (2.68) 200 (7.88) 115 (4.53) 2.3 (0.09) 23.1 (.91)
40 mm PN 10–40 180 (7.10) 88 (3.46) 200 (7.87) 150 (5.91) 3.1 (0.12) 37 (1.44)
50 mm PN 10–40 180 (7.10) 102 (4.02) 200 (7.87) 165 (6.50) 3.1 (0.12) 49 (1.91)
80 mm PN 10–40 206 (8.10) 138 (5.43) 200 (7.87) 200 (7.87) 3.8 (0.15) 75.2 (2.96)
100 mm PN 10–16 215 (8.45) 162 (6.38) 250 (9.84) 220 (8.66) 3.8 (0.15) 100.6 (3.96)
100 mm PN 25–40 215 (8.45) 162 (6.38) 250 (9.84) 235 (9.25) 3.8 (0.15) 100.6 (3.96)
150 mm PN 10 240 (9.45) 212 (8.35) 300 (11.81) 285 (11.22) 4.7 (0.19) 152 (5.98)
150 mm PN 16 240 (9.45) 215 (8.46) 300 (11.81) 220 (8.66) 4.7 (0.19) 152 (5.98)
150 mm PN 25 240 (9.45) 218 (8.58) 300 (11.81) 300 (11.81) 4.7 (0.19) 152 (5.98)
150 mm PN 40 240 (9.45) 218 (8.58) 332 (13.07) 300 (11.81) 4.7 (0.19) 144 (5.67)
200 mm PN 10 265 (10.42) 268 (10.55) 350 (13.78) 240 (13.39) 4.9 (0.19) 202 (7.94)
200 mm PN 16 265 (10.42) 268 (10.55) 350 (13.78) 340 (13.39) 4.9 (0.19) 202 (7.94)
200 mm PN 25 265 (10.42) 278 (10.94) 350 (13.78) 360 (14.17) 4.9 (0.19) 202 (7.94)
200 mm PN 40 265 (10.42) 285 (11.22) 396 (15.60) 375 (14.76) 4.3 (0.17) 194 (7.64)
250 mm PN 10 299 (11.78) 320 (12.60) 381 (15.00) 395 (15.55) 6.6 (0.26) 251 (9.88)
250 mm PN 16 299 (11.78) 320 (12.60) 381 (15.00) 405 (15.94) 6.6 (0.26) 251 (9.88)
250 mm PN 25 299 (11.78) 335 (13.19) 381 (15.00) 425 (16.73) 6.6 (0.26) 251 (9.88)
250 mm PN 40 299 (11.78) 345 (13.58) 435 (17.13) 450 (17.72) 6.6 (0.26) 240 (9.45)
300 mm PN 10 327 (12.86) 370 (14.57) 457 (18.00) 445 (17.52) 6.6 (0.26) 302 (11.87)
300 mm PN 16 327 (12.86) 378 (14.88) 457 (18.00) 460 (18.11) 6.6 (0.26) 302 (11.87)
300 mm PN 25 327 (12.86) 395 (15.55) 457 (18.00) 485 (19.09) 6.6 (0.26) 302 (11.87)
300 mm PN 40 327 (12.86) 410 (16.14) 512 (20.14) 515 (20.28) 6.6 (0.26) 292 (11.48)
350 mm PN 10 354 (13.92) 430 (16.93) 534 (21.03) 505 (19.88) 7.4 (0.19) 334 (13.16)
350 mm PN 16 354 (13.92) 438 (17.24) 534 (21.03) 520 (20.47) 7.4 (0.19) 334 (13.16)
350 mm PN 25 354 (13.92) 450 (17.72) 534 (21.03) 555 (21.85) 7.4 (0.19) 334 (13.16)
350 mm PN 40 354 (13.92) 465 (18.31) 591 (23.25) 580 (22.83) 7.4 (0.19) 12.79 (325)
400 mm PN 10 379 (14.93) 482 (18.98) 610 (24.00) 565 (22.24) 7.4 (0.19) 384 (15.12)
400 mm PN 16 379 (14.93) 490 (19.29) 610 (24.00) 580 (22.83) 7.4 (0.19) 384 (15.12)
400 mm PN 25 379 (14.93) 505 (19.88) 610 (24.00) 620 (24.41) 7.4 (0.19) 384 (15.12)
400 mm PN 40 379 (14.93) 535 (21.06) 667 (26.25) 660 (25.98) 7.4 (0.19) 375 (14.75)
500 mm PN 10 437 (17.20) 585 (23.03) 762 (30.00) 670 (26.38) 7.4 (0.19) 482 (18.96)
500 mm PN 16 437 (17.20) 610 (24.02) 762 (30.00) 715 (28.15) 7.4 (0.19) 482 (18.96)
500 mm PN 25 437 (17.20) 615 (24.21) 762 (30.00) 730 (28.74) 7.4 (0.19) 482 (18.96)
500 mm PN 40 437 (17.20) 615 (24.21) 845 (33.25) 755 (29.72) 7.4 (0.19) 463 (18.21)
600 mm PN 10 495 (19.48) 685 (26.97) 914 (36.00) 780 (30.71) 7.4 (0.19) 583 (22.94)
600 mm PN 16 495 (19.48) 725 (28.54) 914 (36.00) 840 (33.07)) 7.4 (0.19) 583 (22.94)
600 mm PN 25 495 (19.48) 720 (28.35) 914 (36.00) 845 (33.27) 7.4 (0.19) 581 (22.87)
Dimensions with DIN Flanges
(1) Consult factory for larger line sizes.
(2) When 2 grounding rings are specified, add 6.35 mm (0.25 in.) for 15 mm through 350 mm (½- through 14 in.) flowtubes or 12.7 mm (0.50 in.) for 400 mm
(16 in.) and larger. When lining protectors are specified, add 6.35 mm (0.25 in.) for 15 mm through 300 mm (½- through 12-in.) flowtubes, 12.7 mm (0.50
in.) for 350 mm through 900 mm (14- through 36-in.) flowtubes.
Rosemount 8742C
“D”
Liner Thickness Inside Diameter
A-19
Page 90

Rosemount 8742C
FIGURE 5. Rosemount 8711 Dimensional Drawings (0.15-inch through 1-inch line sizes)
4.02 (102)
1.8
2.6
(46)
(66)
¾–14 NPT
Conduit
Connection
(2 places)
NOTE
Dimensions are in
inches (millimeters)
See Table A-10 for
variable dimensions
C
Reference Manual
00809-0100-4793, Rev CA
August 2004
5.00
(127)
Grounding
A
B”
Flow
D
Clamp
8711-1012B03B, 1012A03B
FIGURE 6. Rosemount 8711 Dimensional Drawings (1.5-inch through 8-inch line sizes)
4.02 (102)
1.8
2.6
(46)
(66)
¾–14 NPT
Conduit
Connection
(2 places)
C
NOTE
Dimensions are in inches (millimeters)
See Table A-10 for variable
5.00
(127)
B
A
Flow
D
Grounding
Clamp
8711-1012B04B, 1012A04B
A-20
Page 91

Reference Manual
00809-0100-4793, Rev CA
August 2004
Table A-10. Rosemount 8711 Flowtube Dimensions and Weight
Nominal
Line Size
Inches (mm)
(1)
0.15
(1)
0.30
0.5
1
1.5
2
3
4
6
8
(1) 0.15 and 0.30 inch (4 and 8 mm) flowtubes mount between ½-inch (13 mm) flange.
(4)
(8)
(15)
(25)
(40)
(50)
(80)
(100)
(150)
(200)
“A” Max. “B” “C”
4.00
4.00
4.00
4.31
4.42
4.64
5.26
5.87
6.97
8.00
Flowtube Housing Dimensions
(102)
(102)
(102)
(109)
(112)
(118)
(134)
(149)
(177)
(2003)
5.44
5.44
5.44
6.06
7.41
7.94
9.19
10.41
12.60
14.66
(138)
(138)
(138)
(154)
(188)
(202)
(233)
(264)
(320)
(372)
3.56
3.56
3.56
4.50
3.28
3.91
5.16
6.38
8.56
10.63
FIGURE 7. Rosemount 8714D Calibration Standard
2.69
(68.3)
(90)
(90)
(90)
(114)
(83)
(99)
(131)
(162)
(217)
(270)
Rosemount 8742C
Flowtube Length
“D”
2.17
2.17
2.17
2.17
2.73
3.26
4.68
5.88
6.87
8.86
(55)
(55)
(55)
(55)
(69)
(83)
(119)
(149)
(174)
(225)
Inside Diameter
.150
.300
.593
.970
1.50
1.92
2.79
3.70
5.825
7.875
(4)
(7)
(15)
(24)
(38)
(50)
(76)
(99)
(148)
(200)3560
Weight
lb (kg)
4
4
4
5
5
7
13
22
(2)
(2)
(2)
(2)
(2)
(3)
(6)
(10)
(16)
(27)
7.19
(182.6)
Note:
The Rosemount 8714D is shipped with
both the 8712D and 8732C Connector
Typ es
4.13
(104.9)
Rosemount 8732C
Connector Type
Rosemount 8712D Connector Type
8714-8714A
A-21
Page 92

Reference Manual
00809-0100-4793, Rev CA
Rosemount 8742C
ORDERING
INFORMATION
Rosemount 8742C
Model Product Description Availability
8742C Magnetic Flowmeter Transmitter with FOUNDATION fieldbus (flowtube ordered separately) •
Code Transmitter Output
F FOUNDATION fieldbus protocol, comes with standard Analog Input Integrator Function block and
Backup LAS
Code Power Supply Voltage
AC 90–250 V ac, 50–60 Hz •
DC 15-50 V dc •
Code Product Certifications
N0 Factory Mutual (FM) Class I, Division 2, Class II/III Division 1, approval for nonflammable fluids;
Canadian Standards Association (CSA) Class I, Division 2 Approval
CE Marking;
N5 Factory Mutual (FM) Class I, Division 2, Class II/III Division 1, approval for flammable fluids •
E1 EEx de IIB + H2 T6, Hydrogen •
(1)
E5
ED ATEX EEx d IIB T6, Flame-proof approval •
K0 Factory Mutual (FM) Class I, Division 2, Class II/III Division 1, approval and
K1 ATEX EEx de [ia] IIB + H2 T6
(1)
K5
KD ATEX EEx d [ia] IIB T6, Flame-proof approval with intrinsically safe Fieldbus output and FISCO compliant •
Code Options
A01 Proportional/Integral/Derivative (PID) function blocks •
D01 Product and process diagnostics: grounding/wiring diagnostic, electrode fault diagnostic,
D11 Product diagnostic: grounding/wiring diagnostic and electrode fault diagnostic •
D21 Process diagnostic: high process noise detection •
B4 Remote Mount for 2” Pipe Mount Bracket (transmitter junction box and mounting bracket included)
C1 Custom Configuration (completed configuration data sheet (CDS) required with order) •
D1 High Accuracy Calibration [0.25% of rate from 3 to 30 ft/s (0.9 to 10m/s)] matched flowtube •
DT Heavy Duty Tagging •
J1 CM 20 Conduit Adapter •
J2 PG 13.5 Conduit Adapter •
M5 Local Display •
(2)
GE
(2)
GM
Factory Mutual (FM) Class I, Division 1, Class II/III Division 1, explosion proof approval •
Canadian Standards Association (CSA) Class 1, Division 2,
Class II/III Division 1 with intrinsically safe fieldbus output
Hydrogen gas flameproof approval with intrinsically safe fieldbus output and FISCO compliant
Factory Mutual (FM) Class I, Division 1, Explosion Proof with intrinsically safe Fieldbus output •
PlantWeb Software Functions •
and high process noise detection
Transmitter Options •
(1)
Conduit Electrical Connector
M12, 4-pin, Male Connector (eurofast®)
A size Mini, 4-pin, Male Connector (minifast®)
Continued on Next Page
August 2004
•
•
•
•
•
•
A-22
Page 93

Reference Manual
00809-0100-4793, Rev CA
August 2004
Code Quick Installation Guide (QIG) Language Options (Default is English)
YA Danish QIG •
YD Dutch QIG •
YF French QIG •
YG German QIG •
YH Finnish QIG
YI Italian QIG •
YN Norwegian QIG •
YP Portuguese QIG •
YS Spanish QIG
YW Swedish QIG •
Typical Model Number: 8742C F AC N 0 A 0 1
(1) Only available with Rosemount 8711 Integral Mount flowtube
(2) Not available with certain hazardous location certifications. Contact a Rosemount representative for details.
Rosemount 8742C
A-23
Page 94

Reference Manual
00809-0100-4793, Rev CA
Rosemount 8742C
August 2004
Rosemount 8705
Code Product Description Availability
8705 Magnetic Flowmeter Flowtube •
Code Lining Material
A PFA •
T Te fl on (PTFE) •
F Te fz el (ETFE) •
P Polyurethane •
N Neoprene •
L Linatex natural rubber •
Other lining materials available upon request. Consult factory. For availability by Line Size; see chart below •
Code Electrode Material / Electrode Type
Two Measurement Electrodes
SA 316L Stainless Steel •
HA Hastelloy C-276 •
TA Tantalum •
PA 90% Platinum—10% Iridium •
NA Titanium •
Two Measurement Electrodes + Third Grounding Electrode
(Not available with W3 on electrode housing configuration on 8” (200 mm) and under line sizes.)
SE 316L Stainless Steel •
HE Hastelloy C-276 •
TE Tantalum •
PE 90% Platinum—10% Iridium •
NE Titanium •
Two Bulletnose Measurement Electrodes
(Available in 2-inch (50 mm) and larger sizes only)
SB 316L Stainless Steel •
HB Hastelloy C-276 •
Two Removable Measurement Electrodes
(Available in 2-inch (50 mm) and larger sizes only); requires W3 option
SR 316L Stainless Steel •
HR Hastelloy C-276 •
Other electrode materials and types available upon request. Consult factory.
Lining Material (from above)
Code Line Size Code A Code T Code F Code P
005 ½ inch (15 mm) NA • • NA NA
010 1 inch (25 mm) • • • • •
015 1½ inch (40 mm) • • • • •
020 2 inch (50 mm) • • • • •
030 3 inch (80 mm) • • • • •
040 4 inch (100 mm) • • • • •
060 6 inch (150 mm) • • • • •
080 8 inch (200 mm) • • • • •
100 10 inch (250 mm) • • • • •
120 12 inch (300 mm) • • • • •
140 14 inch (350 mm) NA • • • •
160 16 inch (400 mm) NA • • • •
180 18 inch (450 mm) NA • NA • •
200 20 inch (500 mm) NA • NA • •
240 24 inch (600 mm) NA • NA • •
300 30 inch (750 mm) NA • NA • •
360 36 inch (900 mm) NA • NA • •
Continued on Next Page
N, and L
Code
A-24
Page 95

Reference Manual
00809-0100-4793, Rev CA
August 2004
Code Flange Material, Type, and Rating Availability
C1 Carbon Steel, ASME B16.5 (ANSI) Class 150 (30- and 36-inch AWWA C207 Table 3 Class D Flat Face) •
C2 Carbon Steel, MSS SP44 Class 150 (30-inch [750 mm] only) •
C3 Carbon Steel, ASME B16.5 (ANSI) Class 300 •
C6 Carbon Steel, ASME B16.5 (ANSI) Class 600
(maximum pressure: 1000 psig; available in 0.5- through 10-inch [15 through 250 mm])
C7 Carbon Steel, ASME B16.5 (ANSI) Class 600
(with lining material codes P, N, and L only; available in 1- through 8-inch [25 through 200 mm])
C9 Carbon Steel, ASME B16.5 (ANSI) Class 900
(with lining material codes, P, N, L only, available in 1- through 8- [25 through 200mm])
S1 304 Stainless Steel, ASME B16.5 (ANSI) Class 150
(30- and 36-inch AWWA C207 Table 3 Class D Flat Face)
S2 304 Stainless Steel, MSS SP44 Class 150 (30- through 36-inch [750 through 900 mm] only) •
S3 304 Stainless Steel, ASME B16.5 (ANSI) Class 300 •
S6 304 Stainless Steel, ASME B16.5 (ANSI) Class 600
(maximum pressure: 1000 psig; available in 0.5- through 10-inch [15 through 250 mm])
S7 304 Stainless Steel, ASME B16.5 (ANSI) Class 600
(lining material codes P, N, and L only; available in 1- through 8-inch [25 through 200 mm])
S9 304 Stainless Steel, ASME B16.5 (ANSI) Class 900
(with lining material codes, P, N, L only, available in 1- through 8- [25 through 200mm])
P1 316 Stainless Steel, ASME B16.5 (ANSI) Class 150
1
/2- and 24-inch AWWA C207 Table 2 Class D Flat Face), pipe and flange
(
P3 316 Stainless Steel, ASME B16.5 (ANSI) Class 300, pipe and flange •
CD Carbon Steel, DIN PN 10 (not available for flange sizes 15 to 150 mm) •
CE Carbon Steel, DIN PN 16 (not available for flange sizes 15 to 80 mm) •
CF Carbon Steel, DIN PN 25 (not available for flange sizes 15 to 150 mm) •
CH Carbon Steel, DIN PN 40 (not available for flange sizes 750 to 900 mm) •
CK Carbon Steel, AS2129 Table D (available flange sizes 15 to 900 mm)
CL Carbon Steel, AS2129 Table E (available flange sizes 15 to 900 mm)
SD Stainless Steel, DIN PN 10 (not available for flange sizes 15 to 150 mm) •
SE Stainless Steel, DIN PN 16 (not available for flange sizes 15 to 80 mm) •
SF Stainless Steel, DIN PN 25 (not available for flange sizes 15 to 150 mm) •
SH Stainless Steel, DIN PN 40 (not available for flange sizes 750 to 900 mm) •
Other flange materials, types, and ratings available upon request. Consult factory.
Code Electrode Housing Configuration
W0 Sealed, welded housing •
W1 Sealed, welded housing with pressure relief •
W3 Sealed, welded housing with separate electrode compartments •
Code Product Certifications
N0 Factory Mutual (FM) Class I, Division 2 Approval for nonflammable fluids;
Canadian Standards Association (CSA) Class I, Division 2 Approval,
CE Marking
N5 Factory Mutual (FM) Class I, Division 2 Approval for flammable fluids •
(5)
E1
ATEX EEx e ia IIC T3...T6, Increased Safety Approval (with intrinsically safe electrode) •
KD ATEX EEx e ia IIC T3...T6, Increased Safety Approval (with intrinsically safe electrode) •
N1 ATEX EEx nA [L] IIC Type n Approval •
(1)
(2)
(2) (3)
(1)
(2)
(2) (3)
(4)
(4)
Continued on Next Page
Rosemount 8742C
•
•
•
•
•
•
•
•
•
•
•
A-25
Page 96

Rosemount 8742C
Reference Manual
00809-0100-4793, Rev CA
August 2004
Code Options Continued Availability
Optional Grounding Rings
G1 316L SST Grounding Rings •
G2 Hastelloy C-276 Grounding Rings (0.5- through 12-inch (15 through 300 mm) flowtube line sizes) •
G3 Titanium Grounding Rings (0.5- through 12-inch (15 through 300 mm) flowtube line sizes) •
G4 Tantalum Grounding Rings (0.5- through 8-inch (15 through 200 mm) flowtube line sizes) •
G5 Single 316L SST Grounding Ring •
G6 Single Hastelloy C-276 Grounding Ring (0.5- through 12-inch (15 through 300 mm) flowtube line sizes) •
G7 Single Titanium Grounding Ring (0.5- through 12-inch (15 through 300 mm) flowtube line sizes) •
G8 Single Tantalum Grounding Ring (0.5- through 8-inch (15 through 200 mm) flowtube line sizes) •
Optional Lining Protectors
L1 316L SST Lining Protectors •
L2 Hastelloy C-276 Lining Protectors (0.5- to 12-inch (15 to 300 mm) flowtube line sizes) •
L3 Titanium Lining Protectors (0.5- to 12-inch (15 to 300 mm) flowtube line sizes) •
Optional Sanitary Connections
A3 Sanitary 3-A (0.5- to 3-inch (15 to 80 mm) sizes only);
ASME B16.5 (ANSI) Class 150 to Tri-Clamp Adapter
A4 Sanitary 3-A (2.5-inch (64 mm) sizes only); ASME B16.5 (ANSI) Class 150 to Tri-Clamp Adapter •
A5 Cherry Burrell Sanitary I-line (0.5- to 3-inch (15 to 80 mm) sizes only);
ASME B16.5 (ANSI) Class 150 to I-line Adapter
A6 Cherry Burrell Sanitary I-line (2.5-inch (64 mm) sizes only);
ASME B16.5 (ANSI) Class 150 to I-Line Adapter
(6)
(6)
(7)
•
•
•
Continued on Next Page
A-26
Page 97

Reference Manual
00809-0100-4793, Rev CA
August 2004
Code Options Continued
Other Options
B3 Integral Mount with Rosemount 8732C/8742C Transmitter •
D1 High Accuracy Calibration [0.25% of rate from 3-30 ft/s (0.9-10 m/s)]
matched flowtube and transmitter system
DT Heavy Duty Tagging •
DW NSF Drinking Water Certification 24 inch (600mm) (0.5- to 24-inch [15 to 600 mm] sizes only)
PTFE Teflon or ETFE liners (0.5- through 24-inch [15 through 600mm]),
SS electrode material
(9)
H1 Rosemount 8701 flowtube lay length (available for 0.5- to 12-inch (15 to 300 mm) line sizes);
spool piece or spacer: ASME B16.5 (ANSI) Class 150 or Class 300 flange and 304 stainless steel pipe
H2 Rosemount 8701 Flowtube lay length (available for 0.5- to 16-inch (15-400 mm) line sizes.) •
H5 Foxboro® Model 2800 lay length (available for 3.0 to 18 inch (80 to 450mm line sizes)) spool piece: ASME
B16.5 (ANSI) Class 150 flange and 304 stainless steel pipe.
H7 ABB Fischer & Porter® Model CopaX and MagX lay length (available for 0.5 to 12in (15 to 3000 mm line
sizes)) spool piece: ASME B16.5 (ANSI) Class 150 flange and 304 stainless steel pipe.
J1 CM20 Conduit Adapter •
J2 PG13.5 Conduit Adapter •
Q4 Inspection Certificate-Calibration Data, ISO 10474 3.1B, (Flow Cal., 1-10ft/s [0.3-3 m/s]) •
(11)
Q5
Hydrostatic Testing Certification (place on sales order, not on model string) •
Q8 Material Traceability Certificate per DIN 3.1 B •
Q9 Material Traceability Certificate (electrodes only) per DIN 3.1B 337 •
(10) (11)
Q15
NACE Certificate •
Q66 Welding Procedure Qualification Record Documentation •
Q67 Welder Performance Qualification Record Documentation •
(12)
Q68
Welding Procedure Specification Documentation •
Q70 Inspection Certificate Weld Examination, ISO 10474 3.1B (½- to 12-inch [15-300 mm], 14- to 18-inch
[350-450 mm], and 20- to 36-inch [500-900 mm] flowtube line sizes only – see pricing below)
– 0.5- to 12-inch [15-300 mm] flowtube line sizes
– 14- to 18-inch [350-450 mm] flowtube line sizes •
– 20- to 36-inch [500-900 mm] flow tube line sizes
Typical Model Number: 8705 T SA 040 C1 W0 N0
(1) Electrode options limited to two measurement electrodes or two measurement electrodes + third grounding electrode.
(2) Electrode options limited to two measurement electrodes or two measurement electrodes only.
(3) Lining Protectors not available.
(4) Option code limited to Liner material T, P, or F; cannot be ordered with ground rings, lining protectors AX or HX options.
(5) For use with E1 / K1 transmitter.
(6) Grounding Rings and Lining Protectors provide the same fluid grounding function. Lining Protectors available in Teflon (PTFE) and Tefzel (ETFE) only.
(7) Sealed, welded housing (Option Code W0 or W1) required. Only available with Teflon (PTFE) lining material (Option Code T) and 316L Stainless Steel,
Hastelloy C-276, and 90% Platinum-10% Iridium electrode material (Option Codes S, H, and P). Not available with integral mount Rosemount 8712
transmitter. Sanitary connection codes A4 and A6 only available in line size code 020.
(8) Option Code must be ordered for both flowtube and transmitter.
(9) Pending approval, consult factory for availability.
(10) Order as a separate line item.
(11) Order by placing model code in manufacturing notes on sales order. This code does not belong in the model string.
(12) Order as a separate line item, this code does not belong in the model string.
(8)
Rosemount 8742C
•
•
•
•
•
A-27
Page 98

Reference Manual
00809-0100-4793, Rev CA
Rosemount 8742C
August 2004
Rosemount 8707
Code Product Description Availability
8707 High-Signal Magnetic Flowmeter Flowtube •
Code Lining Material
A PFA
T Tefl on (PTFE) •
F Tefz el (ETFE) •
P Polyurethane •
N Neoprene •
L Linatex natural rubber •
Other lining materials available upon request. Consult factory. For availability by Line Size, see chart below. •
Code Electrode Material / Electrode Type
SA 316L Stainless Steel •
HA Hastelloy C-276 •
TA Tantalum •
PA 90% Platinum —10% Iridium •
NA Titanium •
SE 316L Stainless Steel •
HE Hastelloy C-276 •
TE Tantalum •
PE 90% Platinum —10% Iridium •
NE Titanium •
SB 316L Stainless Steel •
HB Hastelloy C-276 •
Code Line Size Code A Code T Code F
030 3 inch (80 mm) • • • •
040 4 inch (100 mm) • • • •
060 6 inch (150 mm) • • • •
080 8 inch (200 mm) • • • •
100 10 inch (250 mm) • • • •
120 12 inch (300 mm) • • • •
140 14 inch (350 mm) NA • • •
160 16 inch (400 mm) NA • • •
180 18 inch (450 mm) NA • NA •
200 20 inch (500 mm) NA • NA •
240 24 inch (600 mm) NA • NA •
300 30 inch (750 mm) NA • NA •
360 36 inch (900 mm) NA • NA •
Code Flange Material, Type, and Rating
C1 Carbon Steel, ASME B16.5 (ANSI) Class 150 (30- and 36-inch AWWA C207 Table 2 Class D Flat Face) •
C2 Carbon Steel, MSS SP44 Class 150 (30-inch [750 mm] only) •
C3 Carbon Steel, ASME B16.5 (ANSI) Class 300 •
S1 304 Stainless Steel, ASME B16.5 (ANSI) Class 150 (30- and 36-inch AWWA C207 Table 2 Class D Flat Face) •
S2 304 Stainless Steel, MSS SP44 Class 150 (30- through 36-inch [750 through 900 mm] only) •
S3 304 Stainless Steel, ASME B16.5 (ANSI) Class 300 •
(1)
Two Measurement Electrodes
Two Measurement Electrodes + Third Grounding Electrodes
Two Bulletnose Measurement Electrodes (Available in 2-inch (50 mm) and larger line sizes only)
Continued on Next Page
(2)
Lining Material (from above)
P, N, and L
Code
A-28
Page 99

Reference Manual
00809-0100-4793, Rev CA
August 2004
Rosemount 8742C
Code Housing Configuration
W0 Sealed, welded housing •
W1 Sealed, welded housing with pressure relief •
W3 Sealed, welded housing with separate electrode compartments •
Code Product Certifications
N0 Factory Mutual (FM) Class I, Division 2 Approval for nonflammable fluids;
Canadian Standards Association (CSA) Class I, Division 2 Approval
N5 Factory Mutual (FM) Class 1, Division 2 Approval for flammable fluids •
Code Options
Optional Grounding Rings
G1 316L SST Grounding Rings •
G2 Hastelloy C-276 Grounding Rings (3- through 12-inch (80 through 300 mm) flowtube line sizes) •
G3 Titanium Grounding Rings (3- through 12-inch (80 through 300 mm) flowtube line sizes) •
G4 Tantalum Grounding Rings (3- through 8-inch (80 through 200 mm) flowtube line sizes) •
G5 Single 316L SST Grounding Ring •
G6 Single Hastelloy C-276 Grounding Ring (3- through 12-inch (80 through 300 mm) flowtube line sizes) •
G7 Single Titanium Grounding Ring (3- through 12-inch (80 through 300 mm) flowtube line sizes) •
G8 Single Tantalum Grounding Ring (3- through 8-inch (80 through 200 mm) flowtube line sizes) •
Optional Lining Protectors
L1 316L SST Lining Protectors
L2 Hastelloy C-276 Lining Protectors (3- through 12-inch (80 through 300 mm) flowtube line sizes) •
L3 Titanium Lining Protectors (3- through 12-inch (80 through 300 mm) flowtube line sizes) •
Other Options
B3 Integral Mount with Rosemount 8732C (8742C) transmitter •
D1 High Accuracy Calibration [0.25% of rate from 3-30 ft/s (0.9-10 m/s)] matched flowtube and transmitter system
D2 Dual Flowtube Calibration Numbers on Rosemount 8712H and 8712C Transmitters •
DT Heavy Duty Tagging •
H1 Rosemount 8703 flowtube lay length (available for 3- through 4-inch (80 through 100 mm) line sizes);
H2 Rosemount 8703 flowtube lay length (available for 3- through 16-inch (80 through 400 mm) line sizes •
H5 Foxboro® Model 2800 lay length (available for 3.0 through 18 inch (80 through 450mm line sizes)) spool piece:
H7 ABB Fischer & Porter® Model CopaX and MagX lay length (available for 0.5 through 12in (15 through 3000 mm
J1 CM20 Conduit Adapter •
J2 CM13.5 Conduit Adapter •
Q4 Inspection Certificate-Calibration Data, ISO 10474 3.1B, (Flow Cal., 1-10ft/s [0.3-3 m/s]) •
Q5 Hydrostatic Testing Certification •
Q8 Material Traceability Certificate per DIN 3.1 B •
Q9 Material Traceability Certificate (electrodes only) per DIN 3.1B 337 •
Q15 NACE Certification
Q66 Welding Procedure Qualification Record Documentation •
Q67 Welder Performance Qualification Record Documentation •
Q68 Welding Procedure Specification Documentation •
Q70 Inspection Certificate Weld Examination, ISO 10474 3.1B (3- to 12-inch [80-300 mm], 14- to 18-inch
Typical Model Number: 8707 T SA 040 C1 W0 N0
(1) Electrode options limited to two Hastelloy C-276 or two 90% Platinum-10% Iridium electrode material.
Cannot be ordered with 300# lining protectors or Quality Certificates Q8, Q9, Q66, Q67, Q68, or Q70.
(2) Available for 10 inch and larger line sizes only.
(3) Grounding Rings and Lining Protectors provide the same fluid grounding function. Lining Protectors available with Teflon (PTFE) and Tefzel (ETFE) lining
material only.
(4) Option Code must be ordered for both flowtube and transmitter.
(5) Order as a separate line item.
spool piece: ASME B16.5 (ANSI) Class 150 or Class 300 flange and 304 stainless steel pipe
ASME B16.5 (ANSI) Class 150 flange and 304 stainless steel pipe.
line sizes)) spool piece: ASME B16.5 (ANSI) Class 150 flange and 304 stainless steel pipe or teflon spacer.
(5)
[350-450 mm], and 20- to 36-inch [500-900 mm] flowtube line sizes only – see pricing below)
– 3- to 12-inch [80-300 mm] flowtube line sizes •
– 14- to 18-inch [350-450 mm] flowtube line sizes •
– 20- to 36-inch [500-900 mm] flow tube line sizes •
(3)
(3)
Availability
(4)
•
•
•
•
•
•
A-29
Page 100

Reference Manual
00809-0100-4793, Rev CA
Rosemount 8742C
August 2004
Rosemount 8711
Model Product Description Availability
8711 Magnetic Flowmeter Flowtube (flangeless construction) •
Code Lining Material
T Tefzel (ETFE) •
S Teflon (PTFE) (not available with 0.15 and 0.30 inch [4 and 8 mm] line sizes) •
Code Electrode Material / Electrode Type
Two Measurement Electrodes
SA 316L Stainless Steel •
HA Hastelloy C-276 •
TA Tantalum •
PA 90% Platinum—10% Iridium •
NA Titanium •
Two Measurement Electrodes + Third Grounding Electrode
SE 316L Stainless Steel •
HE Hastelloy C-276 •
TE Tantalum •
PE 90% Platinum—10% Iridium •
NE Titanium •
Two Bulletnose Measurement Electrodes (Available in 2-inch (50 mm) and larger line sizes only)
SB 316L Stainless Steel •
HB Hastelloy C-276 •
Lining Material (from above)
Code Line Size Code T Code S
15F 0.15 inch (4 mm) (not available with Tef lo n (PTFE) lining material) • NA
30F 0.30 inch (8 mm) (not available with Tef lo n (PTFE) lining material) • NA
005 ½ inch (15 mm) • •
010 1inch (25 mm) • •
015 1½ inch (40mm) • •
020 2 inch (50mm) • •
030 3 inch (80 mm) • •
040 4 inch (100 mm) • •
060 6 inch (150 mm) • •
080 8 inch (200 mm) • •
Code Line Size
15F 0.15 inch (4 mm) (not available with Tef lo n (PTFE) lining material) •
30F 0.30 inch (8 mm) (not available with Tef lo n (PTFE) lining material) •
005 ½ inch (15 mm) •
010 1inch (25 mm) •
015 1½ inch (40mm) •
020 2 inch (50mm) •
030 3 inch (80 mm) •
040 4 inch (100 mm) •
060 6 inch (150 mm) •
080 8 inch (200 mm) •
Code Transmitter Mounting Configuration
R Remote •
U Integral, mounted to Rosemount 8732C/8742C transmitter •
Continued on Next Page
A-30
 Loading...