

Page 1

Quick Installation Guide
Step 1:Wiring Connection
Step 2: Configure the Transducer Block
Product Certification
Star t
End
00825-0100-4377, Rev BA
October 2010
Rosemount 752
Rosemount 752 Remote Indicator with
OUNDATION
F
™
fieldbus Protocol
¢00825-0100-4377J¤
www.rosemount.com
Page 2
Quick Installation Guide
IMPORTANT NOTICE
WARNING
00825-0100-4377, Rev BA
Rosemount 752
© 2010 Rosemount Inc. All rights reserved. All marks property of owner. Rosemount and the Rosemount logotype are
registered trademarks of Rosemount Inc.
Rosemount Inc.
8200 Market Boulevard
Chanhassen, MN USA 55317
T (US) (800) 999-9307
T (Intnl) (952) 906-8888
F (952) 949-7001
This installation guide provides basic guidelines for Rosemount® 752 Remote Indicator. It does not
provide instructions for configuration, diagnostics, maintenance, service, troubleshooting,
Explosion-proof, Flameproof, or intrinsically safe (I.S.) installations. Refer to the Rosemount 752
reference manual (document number 00809-0100-4377) for more instruction. This manual is also
available electronically on www.rosemount.com.
Explosions could result in death or serious injury:
Installation of this indicator in an explosive environment must be in accordance with the appropriate
local, national, and international standards, codes, and practices. Please review the approvals section
of the Rosemount 752 reference manual for any restrictions associated with a safe installation.
• Before connecting a Fieldbus-based communicator in an explosive atmosphere, make sure the
instruments in the loop are installed in accordance with intrinsically safe or non-incendive field
wiring practices.
• In an Explosion-proof/Flameproof installation, do not remove the indicator cover when power is
applied to the unit.
Electrical shock can result in death or serious injury.
• Avoid contact with the leads and terminals. High voltage that may be present on leads can cause
electrical shock.
October 2010
2
Page 3
Quick Installation Guide
STEP 1: WIRING CONNECTION
See Safety Messages page 2 for complete warning information.
00825-0100-4377, Rev BA
October 2010
Rosemount 752
Wiring for FOUNDATION fieldbus protocol
1. Remove the housing cover on terminal compartment side. Do not remove the cover in
explosive atmospheres when the circuit is live. Signal wiring supplies all power to the
indicator.
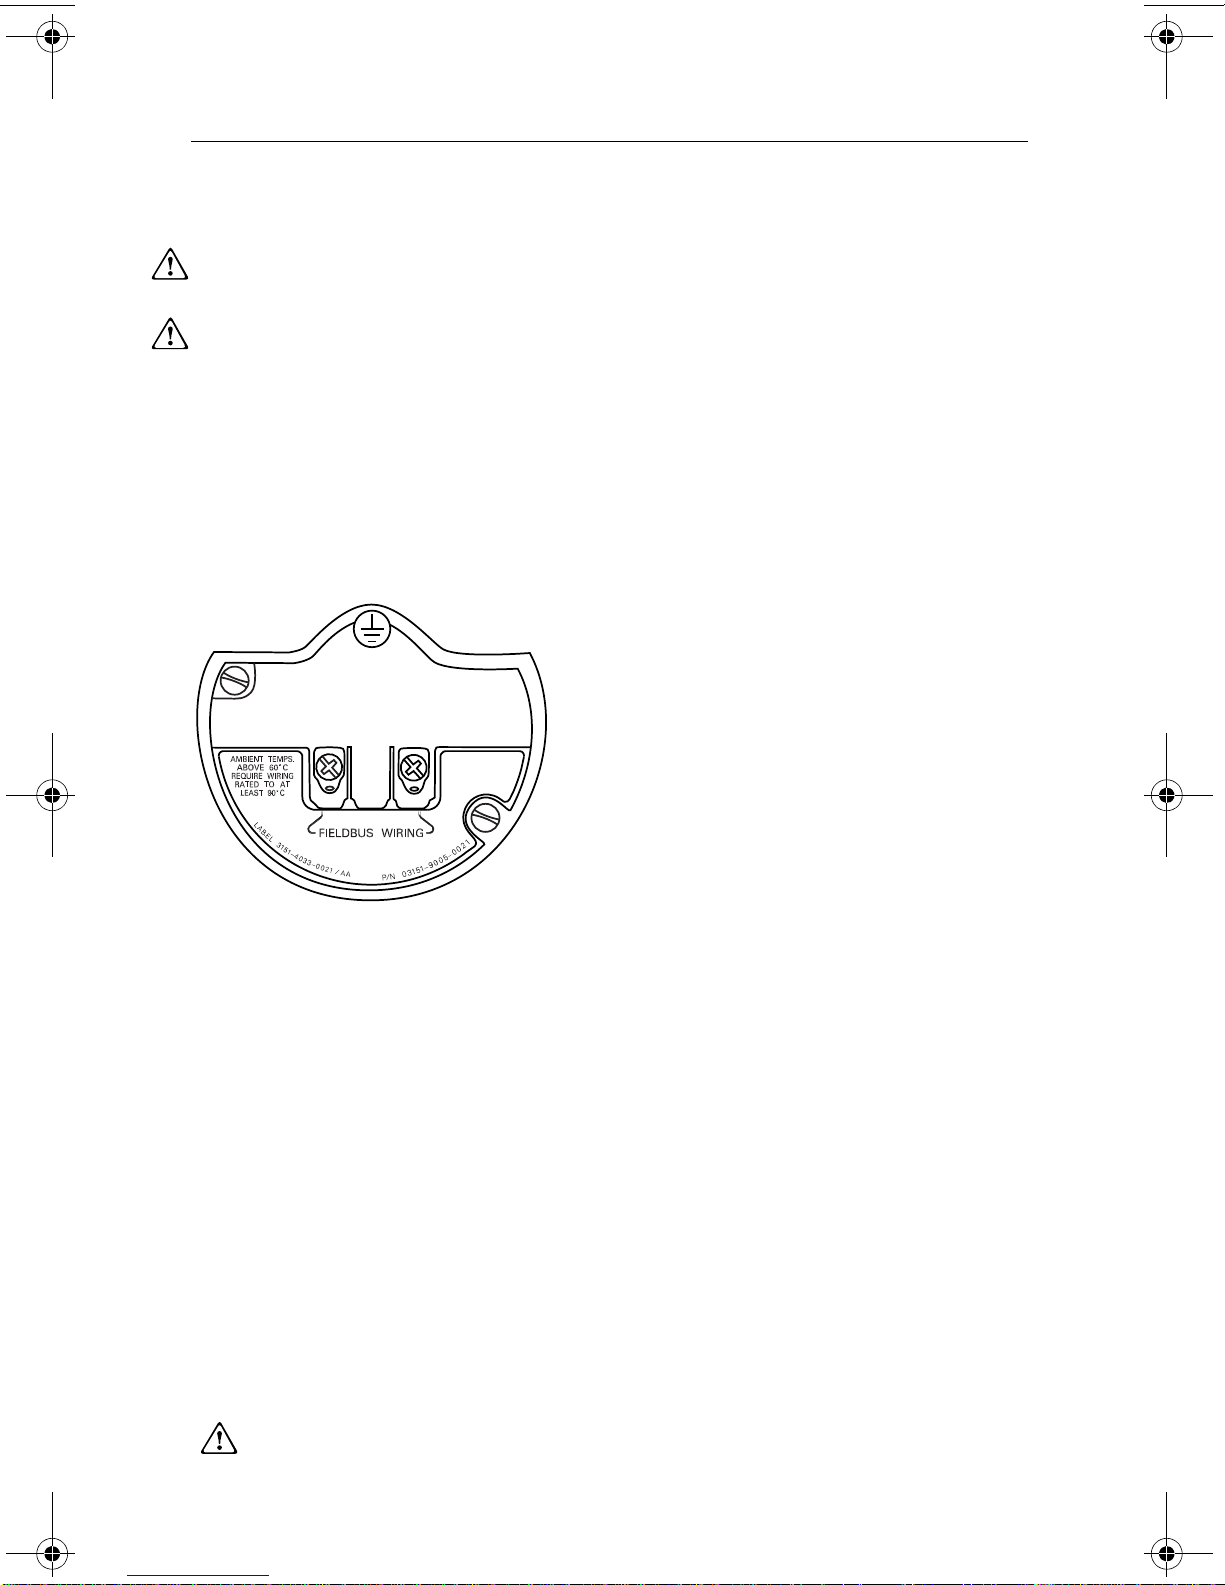
2. Connect the power leads to the terminals marked “FIELDBUS WIRING” as shown in
Figure 1. The power terminals are not polarity sensitive.
3. Plug and seal unused conduit connections on the indicator housing to avoid moisture
accumulation in the terminal side. If you do not seal unused connections, mount the
indicator with the electrical housing positioned downward for drainage. Install wiring with
a drip loop. Arrange the drip loop so the bottom is lower than the conduit connections
and the indicator housing.
NOTE
Do not apply high voltage (e.g. ac line voltage) to the indicator terminals. Abnormally high
voltage can damage the unit. (Indicator poser terminals are rated to 32 Vdc.
Figure 1. Fieldbus terminal block
Electrical Considerations
Proper electrical installation is necessary to prevent errors due to improper grounding and
electrical noise. Shielded, twisted pair cable should be used for best results in electrically
noisy environments. Cable Type A is recommended by F
Power Supply
The indicator requires between 9 and 32 Vdc (9 and 15 V dc for FISCO) to operate and
provide complete functionality. The dc power supply should provide power with less than 2%
ripple.
Power Conditioner
A fieldbus segment requires a power conditioner to isolate the power supply, filter, and
decouple the segment from other segments attached to the same power supply.
Grounding
Signal wiring of the fieldbus segment can not be grounded. Grounding out one of the signal
wires will shut down the entire fieldbus segment.
Shield Wire Ground
To protect the fieldbus segment from noise, grounding techniques for shield wire usually
require a single grounding point for shield wire to avoid creating a ground loop. The ground
point is typically at the power supply.
OUNDATION fieldbus.
3
Page 4
Rosemount 752
Power
Supply
Terminators
Integrated Power
Conditioner
and Filter
(Trunk)
(Spur)
(Spur)
(The power supply, filter, first
terminator, and configuration tool
are typically located in the control
room.)
Fieldbus
Segment
6234 ft (1900 m) max
(depending upon cable
characteristics)
* Intrinsically safe installations
may allow fewer devices per I.S.
barrier due to current limitations.
fieldbus devices
on segment
FOUNDATION
fieldbus
Configuration
Tool
Signal
Wiring
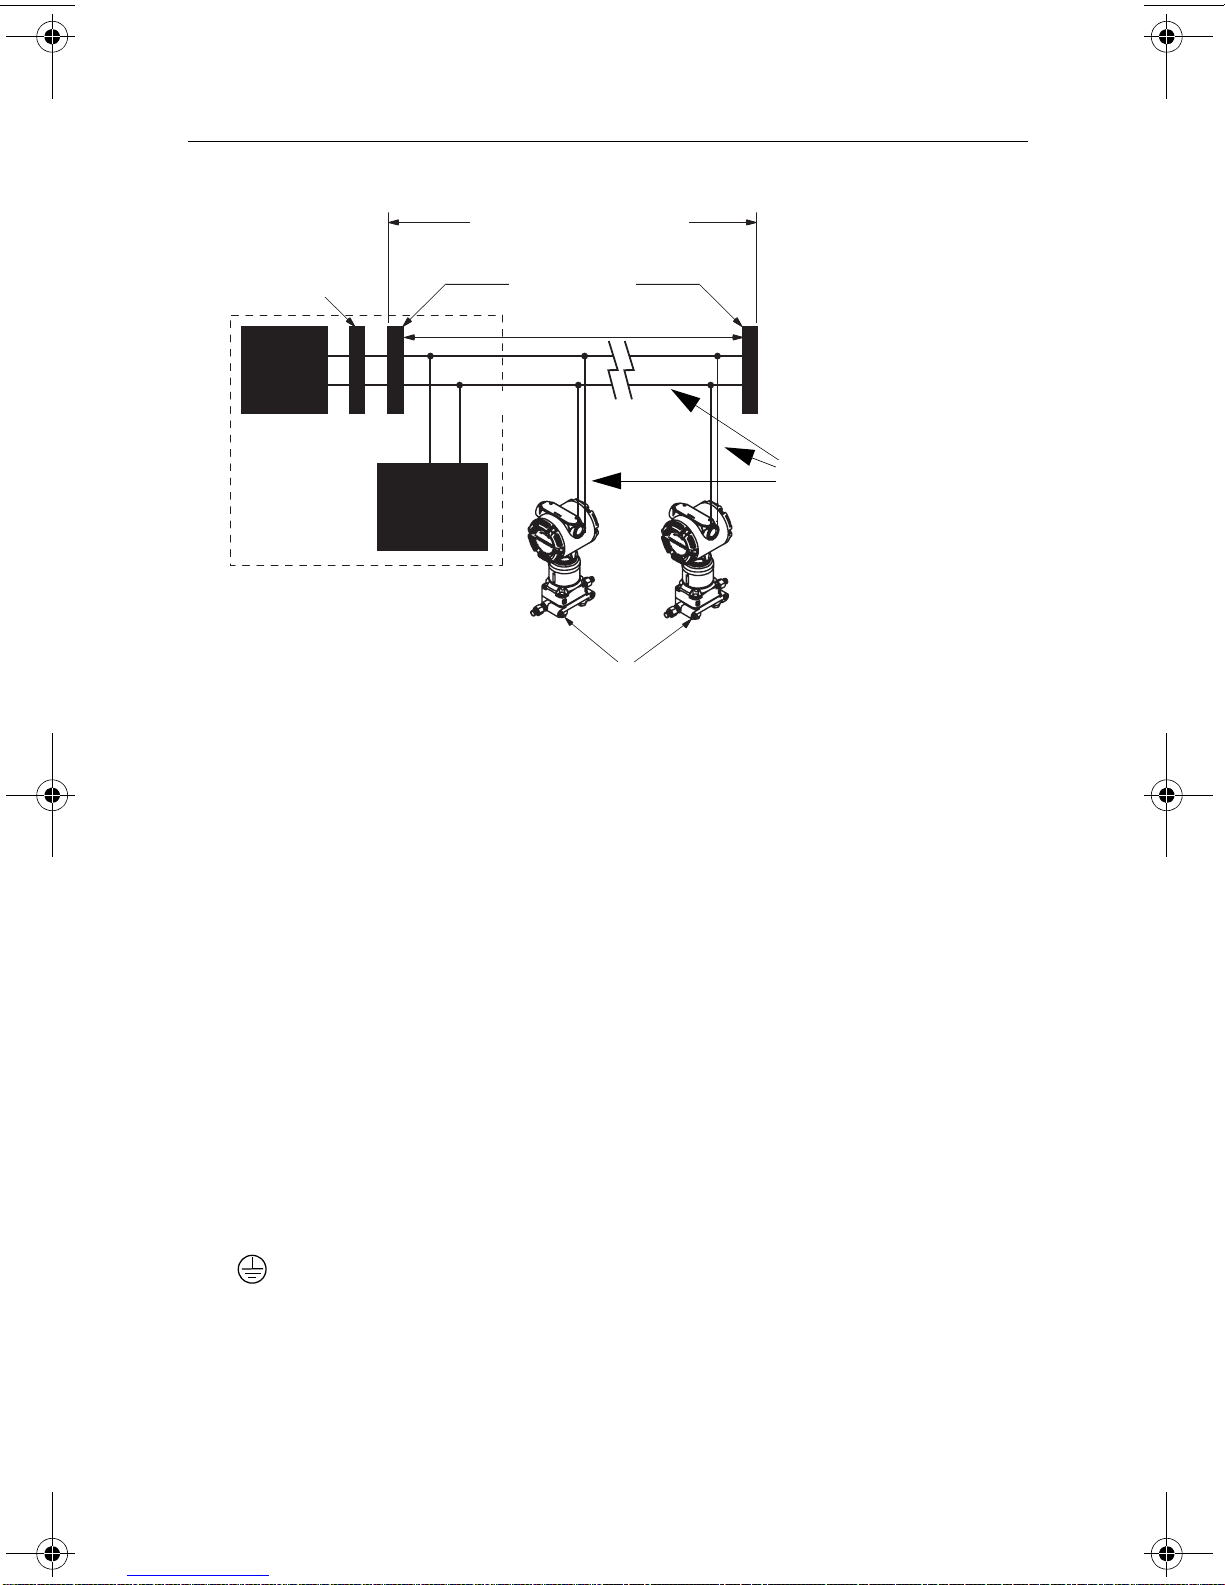
Figure 2. FOUNDATION fieldbus indicator field wiring
Quick Installation Guide
00825-0100-4377, Rev BA
October 2010
Surges/Transients
The indicator will withstand electrical transients of the energy level usually encountered in
static discharges or induced switching transients. However, high-energy transients, such as
those induced in wiring from nearby lightning strikes, can damage the indicator.
Optional Transient Protection Terminal Block
The transient protection terminal block can be ordered as an installed option (Option Code
T1 in the indicator model number) or as a spare part. The spare part number is
03151-4131-0002. The lightning bolt symbol shown identifies it as a transient protection
terminal block.
NOTE
The fieldbus physical layer specification requires indicator communication during extreme
operating conditions of 250 V
designed to limit common mode voltages to 90 V and cannot be used in these extreme
operating conditions.
Grounding the Indicator Case
Always ground the indicator case in accordance with national and local electrical codes. The
most effective indicator case grounding method is a direct connection to earth ground with
minimal impedance. Methods for grounding the indicator case include:
• Internal Ground Connection: The Internal Ground Connection screw is inside the
terminal side of the electronics housing. The screw is identified by a ground symbol
( ), and is standard on the 752 Remote Indicators.
• External Ground Assembly: Ground screw is located at the bottom of the mounting
bracket.
NOTE
Grounding the indicator case using the threaded conduit connection may not provide a
sufficient ground. The transient protection terminal block (Option Code T1) will not provide
transient protection unless the indicator case is properly grounded. Use the above
guidelines to ground the indicator case. Do not run transient protection ground wire with
signal wiring; the ground wire may carry excessive current if a lightning strike occurs.
4
common mode signal. The transient terminal block was
rms
Page 5

Quick Installation Guide
STEP 2: CONFIGURE THE TRANSDUCER BLOCK
00825-0100-4377, Rev BA
October 2010
The LCD Transducer Block can be configured to sequence eight different process variables.
If a function block is scheduled in the Rosemount 752 that links a process variable
from another device on the segment, that process variable can be displayed on the
LCD.
To configure the 752 Fieldbus Indicator use any F
OUNDATION fieldbus configuration tool to
modify the configuration parameters for each value that is to be displayed.
DISPLAY_PARAM_SEL
The DISPLAY_PARAM_SEL parameter specifies how many process variables will be
displayed. Select up to eight display parameters.
BLK_TAG_#
(1)
Enter the Block Tag of the function block that contains the parameter to be displayed. The
default function block tags from the factory are:
PID_1200
ISEL_1300
CHAR_1400
ARITH_1500
INTEG_1600
(1)
BLK_TYPE_#
Enter the Block Type of the function block that contains the parameter to be displayed. (e.g.
ISEL PID, etc.)
PARAM_INDEX_#
(1)
Choose the parameter to be displayed.
CUSTOM_TAG_#
(1)
The CUSTOM_TAG_# is an optional user-specified tag identifier that can be configured to
be displayed with the parameter in place of the block tag. Enter a tag of up to five characters.
UNITS_TYPE_#
(1)
The UNITS_TYPE_# parameter is generally selected via a drop-down menu with three
options: AUTO, CUSTOM, or NONE. Select CUSTOM and be sure to configure the
CUSTOM_UNITS_# parameter. Select NONE if the parameter is to be displayed without
associated units.
CUSTOM_UNITS_#
(1)
Specify custom units to be displayed with the parameter. Enter up to six characters. To
display Custom Units the UNITS_TYPE_# must be set to CUSTOM.
Rosemount 752
(1) _# represents the specified parameter number.
5
Page 6

Quick Installation Guide
00825-0100-4377, Rev BA
Rosemount 752
October 2010
PRODUCT CERTIFICATIONS
Approved Manufacturing Locations
Rosemount Inc. — Chanhassen, Minnesota USA
European Directive Information
The EC declaration of conformity for all applicable European directives for this product can
be found on the Rosemount website at www.rosemount.com. A hard copy may be obtained
by contacting our local sales office.
Electro Magnetic Compatibility (EMC)
EN 61326:2006
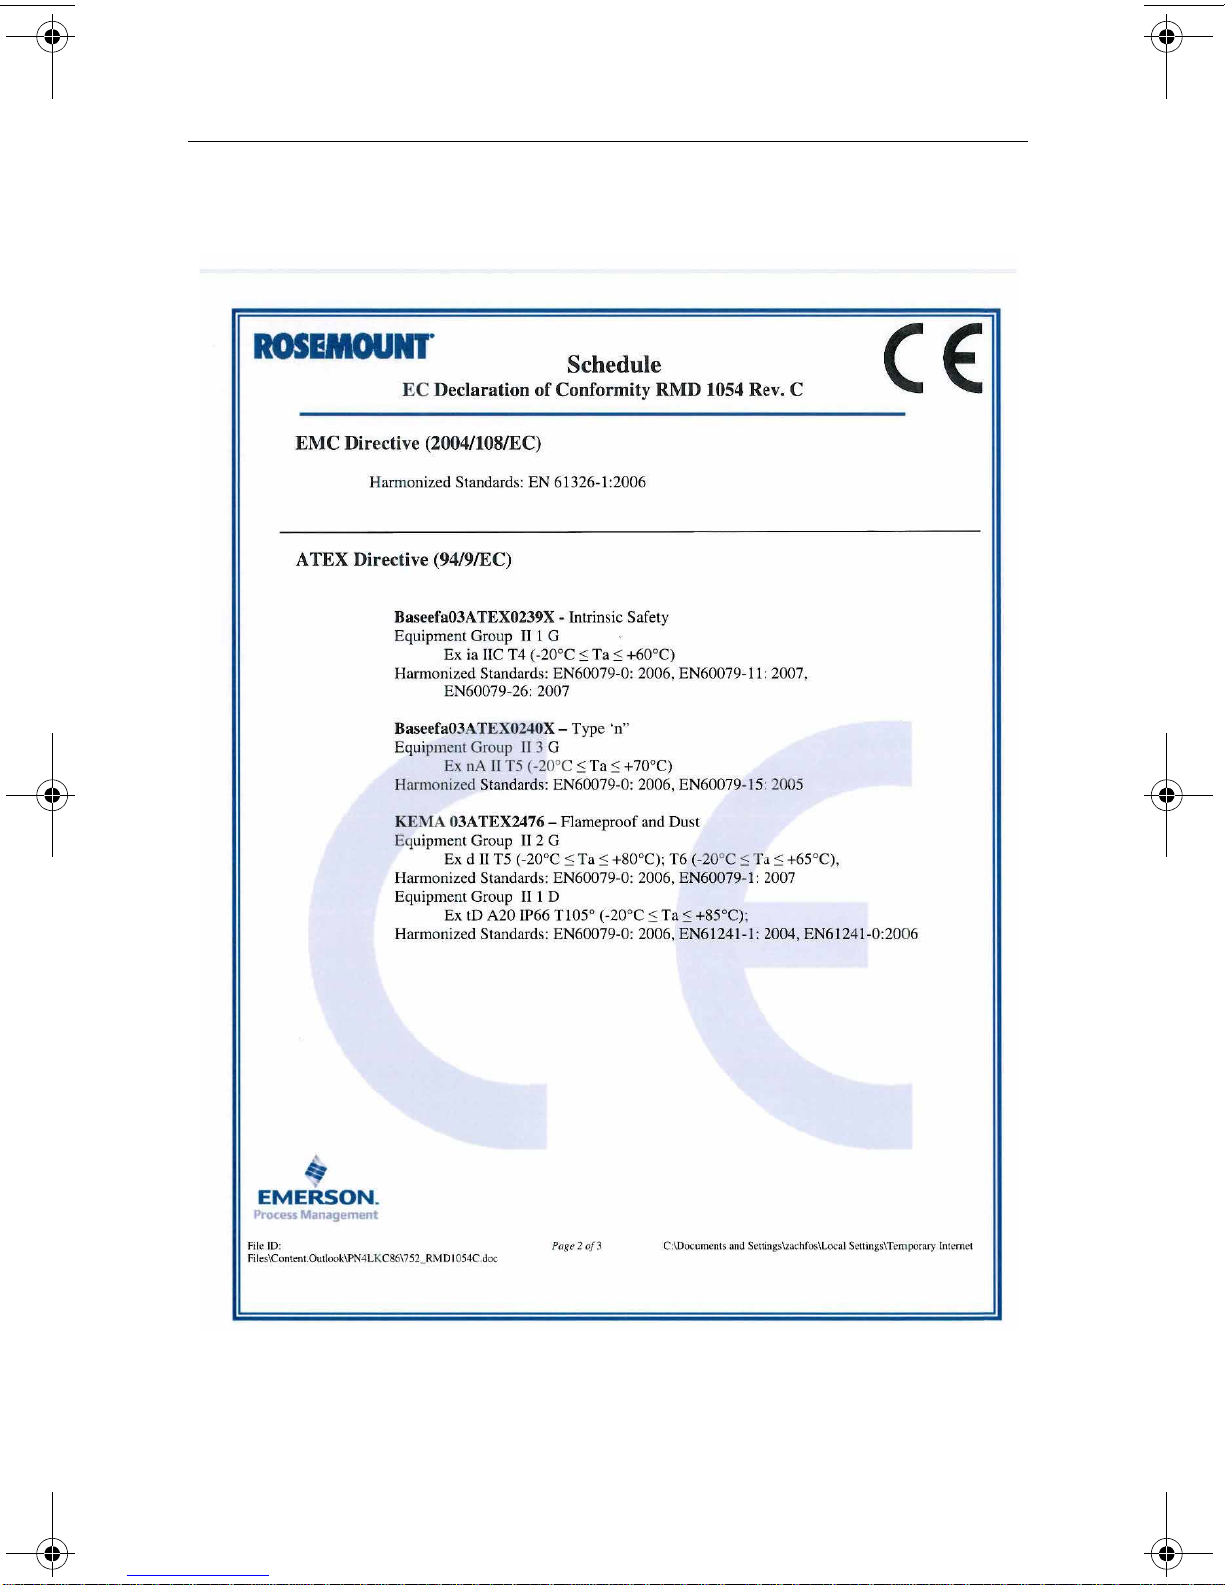
ATEX Directive (94/9/EC)
Emerson Process Management complies with the ATEX Directive.
Hazardous Locations Certifications
North American Certifications
Factory Mutual (FM) Approvals
E5 Explosion-proof for Class I, Division 1, Groups B, C, and D;
Dust Ignition-proof for Class II and Class III, Division 1, Groups E, F, and G hazardous
locations;
T5 (-50 °C to 80 °C) conduit seal not required
Enclosure Type 4X
I5/IE Intrinsically Safe for use in Class I, Division 1,
Groups A, B, C, and D; Class II, Division 1,
Groups E, F, and G; Class III, Division 1; Class I, Zone 0
AEx ia IIC T4; when connected in accordance with Rosemount drawing 00752-1010;
Temperature Code T4 (T
Non-incendive for Class I, Division 2, Groups A, B, C, and D.
Enclosure Type 4X
For entity parameters see control drawing 00752-1010.
Canadian Standards Association (CSA) Approvals
E6 Explosion-proof for Class I, Division 1, Groups B, C, D;
Dust Ignition-proof for Class II, Groups E, F, G;
Dust Ignition-proof for Class III
Temperature Code T5, (T
Suitable for Class I, Division 2, Groups A, B, C,D;
Temperature Code T3C (T
Enclosure Type 4X
I6/IF Intrinsically Safe for Class I, Division 1, Groups A, B, C, D when installed in
accordance with Rosemount drawing 00752-1020.
Temperature Code T3C (T
Enclosure Type 4X
= 60 °C);
a
= 80 °C)
a
= 40° C)
a
= 40° C)
a
6
Page 7
Quick Installation Guide
00825-0100-4377, Rev BA
October 2010
Rosemount 752
European Certifications
E1 ATEX Flameproof
Certificate Number: KEMA 03 ATEX2476X II 2 G
Ex d IIC T6 (-50 °C T
Ex d IIC T5 (-20 °C Ta 80°C)
= 32 V
V
max
11 80
Special Conditions for Safe Use (X)
1. The Ex d blanking elements, cable glands and wirings shall be suitable for a temperature
of 90 °C. In case of repair, contact the manufacturer for information on the dimensions of
the flame proof joints.
I1/IA ATEX Intrinsic Safety
Certificate Number: Baseefa03ATEX0239X II 1G
Ex ia IIC T4 (-20°C
11 80
Table 1. Input Parameters
Fieldbus FISCO
Ui = 30 V dc Ui = 17.5 V dc
Ii = 300 mA Ii = 380 mA
Pi = 1.3 W Pi = 5.32 W
Ci = 0 Ci = 0
Li = 0 Li = 0
65°C)
a
Ta 60°C)
Special Conditions for Safe Use (X)
1. When fitted with the transient option, the apparatus is not capable of withstanding the
500V test as defined in Clause 6.3.12 of EN 60079-11:2007. This must be taken into
account during installation.
2. The enclosure may be aluminium, protected against low-levels of impact by a coating of
epoxy polyester or polyurethane paint. The risk of high-levels of impact must be
considered in any installation and protected accordingly.
N1 ATEX Type n
Certificate Number: Baseefa03ATEX0240X II 3 G
Ex nA II T5 (Ta = -20 °C T
70 °C)
a
Input Parameters:
= 32 V dc
U
i
= 0
C
i
= 0
L
i
Special Conditions for Safe Use (x)
1. The apparatus is not capable of withstanding the 500V insulation test required by Clause
6.8.1 of EN 60079-15:2005. This must be taken into account when installing the
apparatus.
7
Page 8
Quick Installation Guide
00825-0100-4377, Rev BA
Rosemount 752
October 2010
ND ATEX Dust
Certificate Number: KEMA 03 ATEX2476X II 1 D
Ex tD A20 IP66 T105 °C (-20 °C T
85°C)
a
V = 32 V Max
Special Conditions for Safe Use (X)
1. The Ex d blanking elements, cable glands and wirings shall be suitable for a temperature
of 90 °C. In case of repair, contact the manufacturer for information on the dimensions of
the flame proof joints.
International Certifications
I7/IG IECEx Intrinsic Safety
Certificate Number: IECEx BAS 04.0028X
Ex ia IIC T4 (-20 °C T
Table 2. Input Parameters
Fieldbus FISCO
Ui = 30 V Ui = 17.5 V
Ii = 300 mA Ii = 380 mA
Pi = 1.3 W Pi = 5.32 W
Ci = 0 Ci = 0
Li = 0 Li = 0
60 °C)
a
Special Condition for Safe Use (X):
1. When fitted with the transient option, the apparatus is not capable of withstanding the
500 V electrical strength test as defined in clause 6.4.12 of IEC 60079-11:1999. This
must be taken into account during installation.
2. The enclosure maybe aluminum, protected against low-levels of impact by a coating of
epoxy polyester or polyurethane paint. The risk of high-levels of impact must be
considered in any installation and protected accordingly.
N7 IECEx Type n
Certificate Number: IECEx BAS 04.0030X
Ex nA II T5 (-40 °C T
70 °C)
a
Special Condition for Safe Use (X):
1. When fitted with the transient option, the apparatus is not capable of withstanding the
500 V electrical strength test as defined in Clause 8 of IEC 60079-15:1987. This must be
taken into account when installing the apparatus.
Combination Certifications
Stainless steel certification tag is provided when optional approval is specified. Once a
device labeled with multiple approval types is installed, it should not be reinstalled using any
other approval types. Permanently mark the approval label to distinguish it from unused
approval types.
K5 FM Combination (E5, I5)
K6 CSA Combination (E6, I6)
K1 ATEX Combination (E1, I1, N1, ND)
KA CSA and ATEX Combination (E6, I6, E1, I1)
KB FM and CSA Combination (E5, I5, E6, I6)
KC FM and ATEX Combination (E5, I5, E1, I1)
8
Page 9
Quick Installation Guide
00825-0100-4377, Rev BA
October 2010
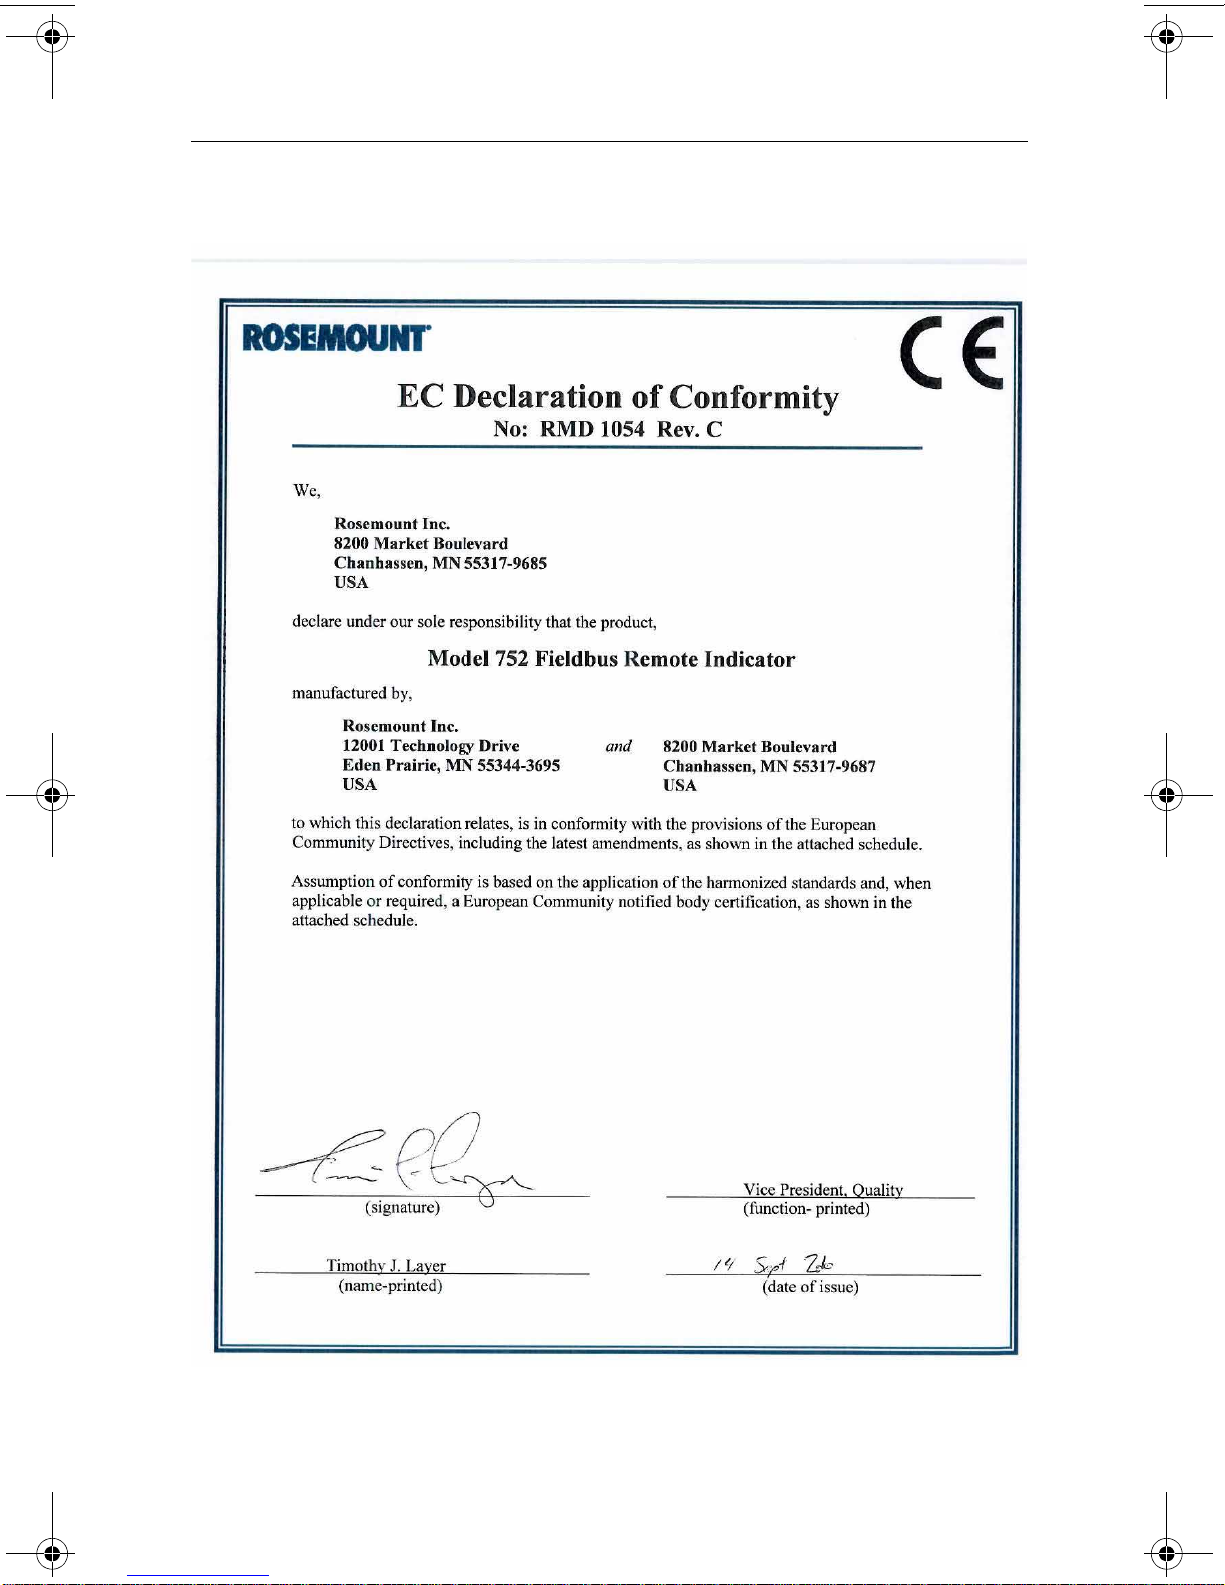
Figure 3. 752 EC Declaration of Conformity
Rosemount 752
9
Page 10
Rosemount 752
Quick Installation Guide
00825-0100-4377, Rev BA
October 2010
10
Page 11
Quick Installation Guide
00825-0100-4377, Rev BA
October 2010
Rosemount 752
11
Page 12

Rosemount 752
Quick Installation Guide
00825-0100-4377, Rev BA
October 2010
12
 Loading...