

Page 1
KEYSTONE K-LOK® SERIES 36 AND 37 HIGH PERFORMANCE BUTTERFLY VALVE
ISO VERSION INSTALLATION AND OPERATION MANUAL
Before installation, these instructions must be carefully read and understood.
3. Inspect the seat and disc edge to insure that
they were not damaged in handling. This is
especially important in the case of valves
with ‘fail-open’ actuators.
4. Confirm that the materials of construction
listed on the valve nameplate are
appropriate for the service intended and are
as specified.
5. Locate the directional arrow on the body
that defines the preferred mounting
orientation in respect to the pressure. In
most cases, the valve is properly installed
when the actual fluid flow or high pressure
is acting on the front face of the disc when
the valve is closed.
6. Ensure that the packing gland nuts and
GENERAL
bottom cover bolts are tight.
Suggested installation orientation is with
valve shaft horizontal or inclined from vertical.
Unless otherwise recommended by Emerson,
mount the valve in the preferred direction with
the direc tional arrow pointing to the lower
pres sure side so that the front face of the disc
will beupstream when the valve is in the closed
position.
Thermal insulation of the body is mandatory for
operating temperatures above 392°F [200°C].
K-LOK offers the following body styles:
Series 36 and 37 – Wafer style
Series 36 and 37 – Lug Style
INSPECTION
1. Carefully remove the valve from the
shipping package (box or pallet) to avoid
any damage to the valve and, in the
case of automated valves, to the electric
or pneumatic/hydraulic actuator or
instrumentation.
2. Prior to installation, clean the inside of
the valve. Insure that there are no solid
objects such as pieces of wood, plastic or
packing materials within the valve or on
thevalveseat.
CAUTION
The valve should be installed in the closed
position to insure that the seat and disc are not
damaged during installation. Particular care
should be taken with valves equipped with ‘fail
open’ actuators. Failure to insure proper handling
may result in damage to the valve.
If the pipe is lined, confirm that the disc rotation
does not contact the lining during the opening
stroke. Failure to confirm that the disc rotation
does not contact the lining may result in damage
to the valve.
IMPORTANT
Whenever possible, install the valve with the shaft
in the horizontal position and, if possible, with the
cast-in disc stop located top-side of the pipe. If the
shaft cannot be positioned horizontally, position
the shaft so that it is not on the vertical centerline
in a horizontal pipe run. This will minimize any
depositing of solid particles present in the fluid
into the lower bearing.
Emerson.com
© 2017 Emerson. All Rights Reserved. VCIOM-02650-EN 20/11
Page 2
KEYSTONE K-LOK® SERIES 36 AND 37 HIGH PERFORMANCE BUTTERFLY VALVE
ISO VERSION INSTALLATION AND OPERATION MANUAL
INSTALLATION
The valves are shipped with flange gasket
surface protection. Before installing the valve,
remove the protection and carefully clean and
de-grease both surfaces with a solvent.
Series 36 and 37 – Wafer style
1. Orient the valve with the directional flow
arrow (preferred direction) pointing in the
proper direction.
2. Insert the valve between the flanges until
the alignment holes at either side of the
valve match the corresponding holes in
the flanges.
3. Insert a long bolt or stud through the flange
and thread it through the alignment hole.
This will allow the valve to center itself
properly for the installation of the flange
gaskets.
4. Install the flange gaskets and the remaining
flange bolting.
5. Remove the long bolts/studs from the lower
alignment holes and replace with correctlysized bolts.
6. Using the crossover method, tighten all
flange bolts.
Series 36 and 37 – Lug style
1. Orient the valve with the directional flow
arrow (preferred direction) pointing in the
proper direction.
2. Insert the valve between the flanges until
the two bottom holes in the valve align with
the two lower flange holes.
3. Insert a bolt or stud through the flange and
thread it into the holes in the valve body.
This will allow the valve to center itself
properly for the installation of the flange
gaskets.
4. Install the flange gaskets and the remaining
flange bolting.
5. Use the crossover method to tighten all
flange bolting.
VALVE CHECKOUT
1. Tighten the packing gland bolting just
enough to prevent shaft leakage. Overtightening will decrease packing life and
increase operating torque requirements.
2. Check the operation of the valve by stroking
it to ‘full open’ and ‘full close’. To determine
the valve orientation of the disc, double
D’s and keyways are aligned with the disc.
The valve disc travels clockwise to close.
3. For automated valves, set the air pressure/
electrical voltage for at least the minimum
given to operate the actuator. For pneumatic
actuators, do not apply more than 1.25times
the pressure for which the actuator was
designed.
Note: for spring return actuators with
positioners, overpressure will cause excessive
time delay in the spring movement for the valve
disc to travel out of the seat.
OPERATION
The K-LOK has been designed to require a
minimum of maintenance. Generally, only
maintenance on the packing box is required.
MAINTENANCE
If shaft leakage is observed through the packing
box, tighten the gland nuts.
Note: do not over-tighten packing box gland
nuts. Over-tightening will increase the torque
required to operate the valve. When tightening
the gland nuts, use half-turn increments until
leakage has stopped.
DISASSEMBLY
To begin disassembly, refer to the parts list
(Figure 4) and proceed as follows:
WARNING
Depressurize the valve and associated piping
before disassembly. Failure to do so may cause
serious personal injury and/or equipment
damage.
1. Remove the valve from the line. Clean
the valve according to proper cleaning
procedures as outlined by the plant or
according to a prescribed procedure.
2. Remove the actuator and relevant
connecting key. Note the actuator position
relative to the valve.
3. Removing the Bracket and Adapter
To disassemble adapter and bracket remove
the following components
: Bracket (28)
: Adapter (26)
: Washers (29, 31)
: Bolts (30)
: Set screw (32)
: Key (25)
: Nuts (16)
CAUTION
Throughout disassembly and assembly, always
use cardboard or brass shims to protect the
valve body, disc, flange and sealing surfaces from
damage. Failure to do so may result in serious
damage to the valve.
Figure 1 - Valve properly clamped in place.
Removing the disc-to-shaft tapered pin
connections
1. Open the valve disc (2) to its full open
position.
Note: on valve sizes NPS 10 (DN 250) and
larger, it is recommended that two workers
perform the disc tapered pin (5) removal
process.
2. Place the disc in a vise.
3. Using a tool steel punch, locate the punch
on the small end of the disc taper pin (5) and
then strike the punch with a heavy hammer.
Note: some of the weld on the taper pins (5)
may need to be removed by grinding.
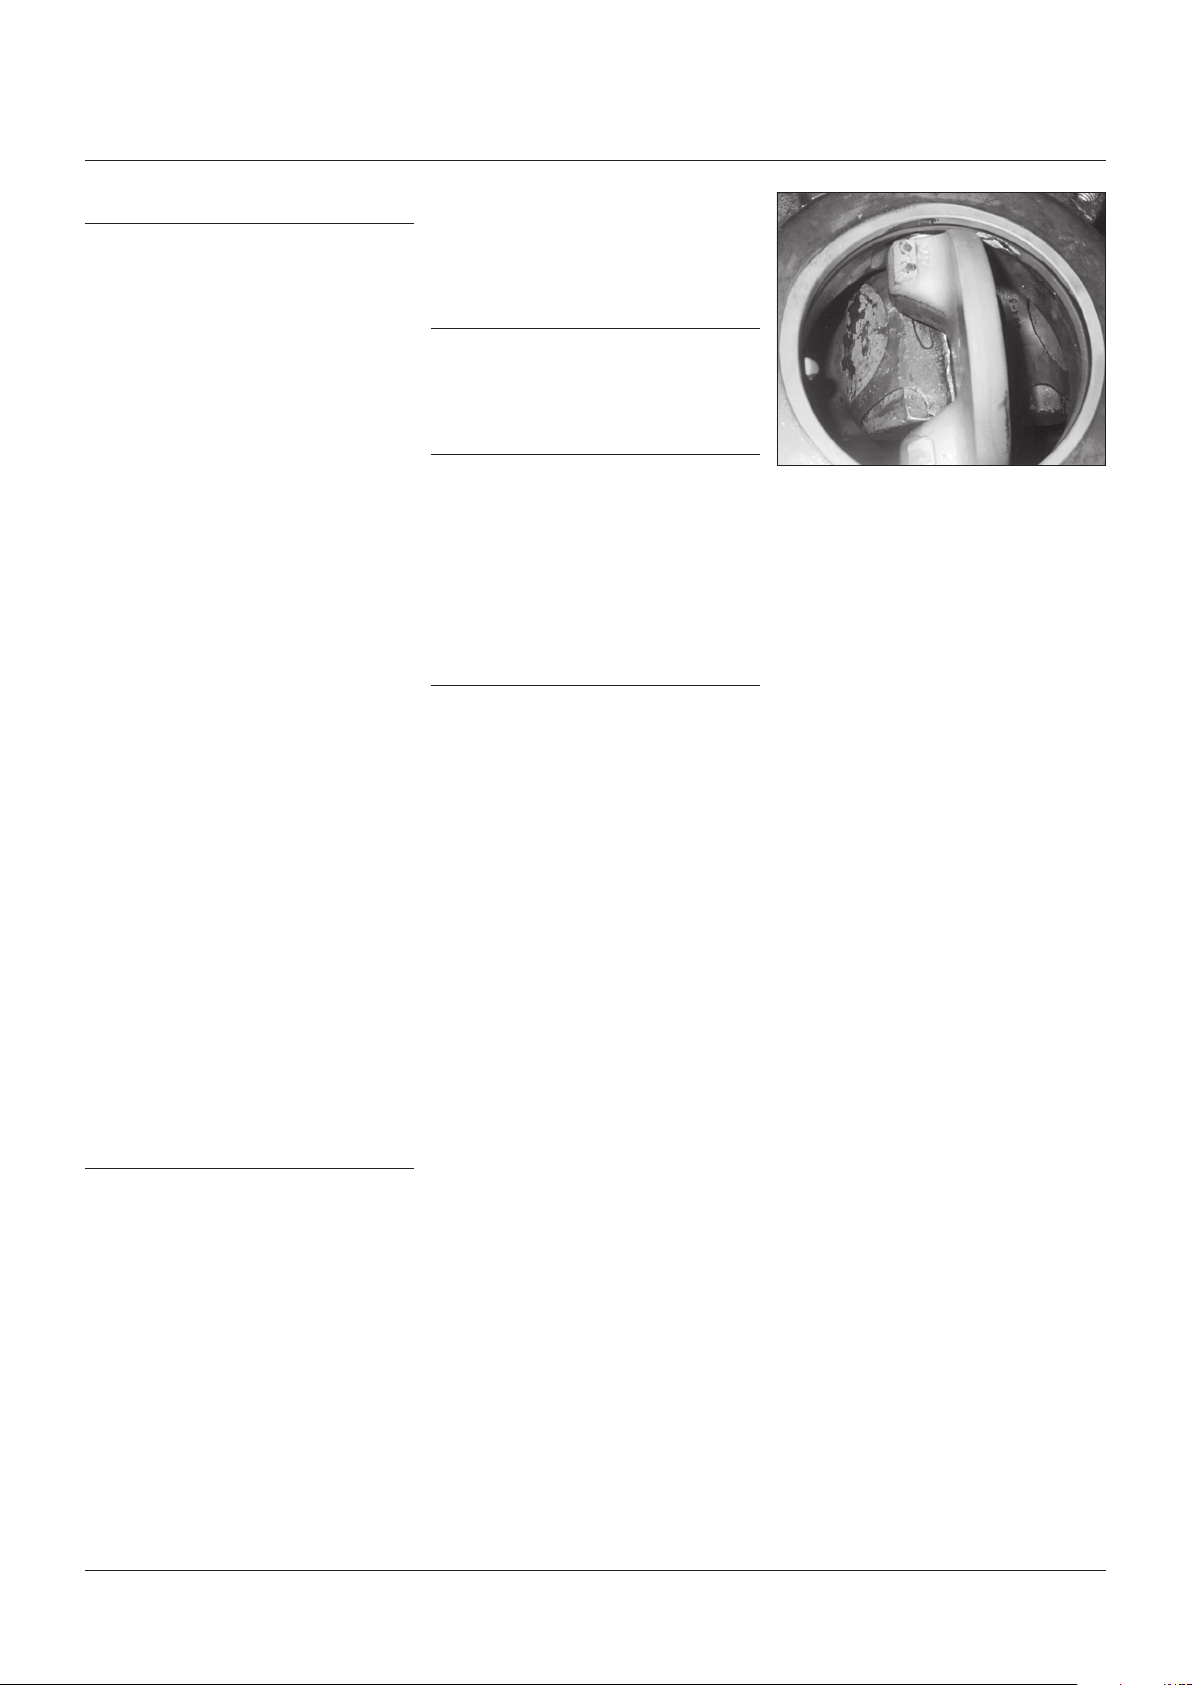
WARNING
When placing the valve into the bench vise, make
sure the small end of the disc (2) taper pin faces
the assembler. (see Figure 1)
Hold the punch with a punch holder or a pair of
vise grips. Otherwise, serious injury may occur.
2
Page 3
KEYSTONE K-LOK® SERIES 36 AND 37 HIGH PERFORMANCE BUTTERFLY VALVE
ISO VERSION INSTALLATION AND OPERATION MANUAL
Removing the bottom cover assembly
To disassemble the bottom cover assembly,
remove the following bottom cover assembly
components:
• bottom cover plate (18)
• bottom cover gasket (17)
• washer (19)
• screw (20)
Removing Bottom cover gasket
Remove the Bottom cover gasket (17). Use pick
and hook tool to remove the gasket that may
have adhered to gasket groove in bottom cover.
Removing the lower shaft assembly
CAUTION
Throughout this operation, make sure the disc
edges remain protected from contact with the
body by installing cardboard at all disc hub areas.
Failure to do so may cause damage to the disc
sealing edge.
1. Spray penetrating oil into the disc hub
where it meets the shaft connection.
2. Insert an eyebolt into the lower shaft (4)
and use it to pull the lower shaft (4) out
of the disc (2). See chart below for proper
eyebolt size.
Valve size Tap
NPS 2 to NPS 6 (DN 50 to 150) M6 X 1
NPS 8 to NPS 12 (DN 200 to 300) M10 X 1.5
NPS 14 to NPS 36 (DN 350 to 900) M14 X 2
3. Lightly strike the backside of the disc hub
area with a hammer if the shaft is resistant
to removal.
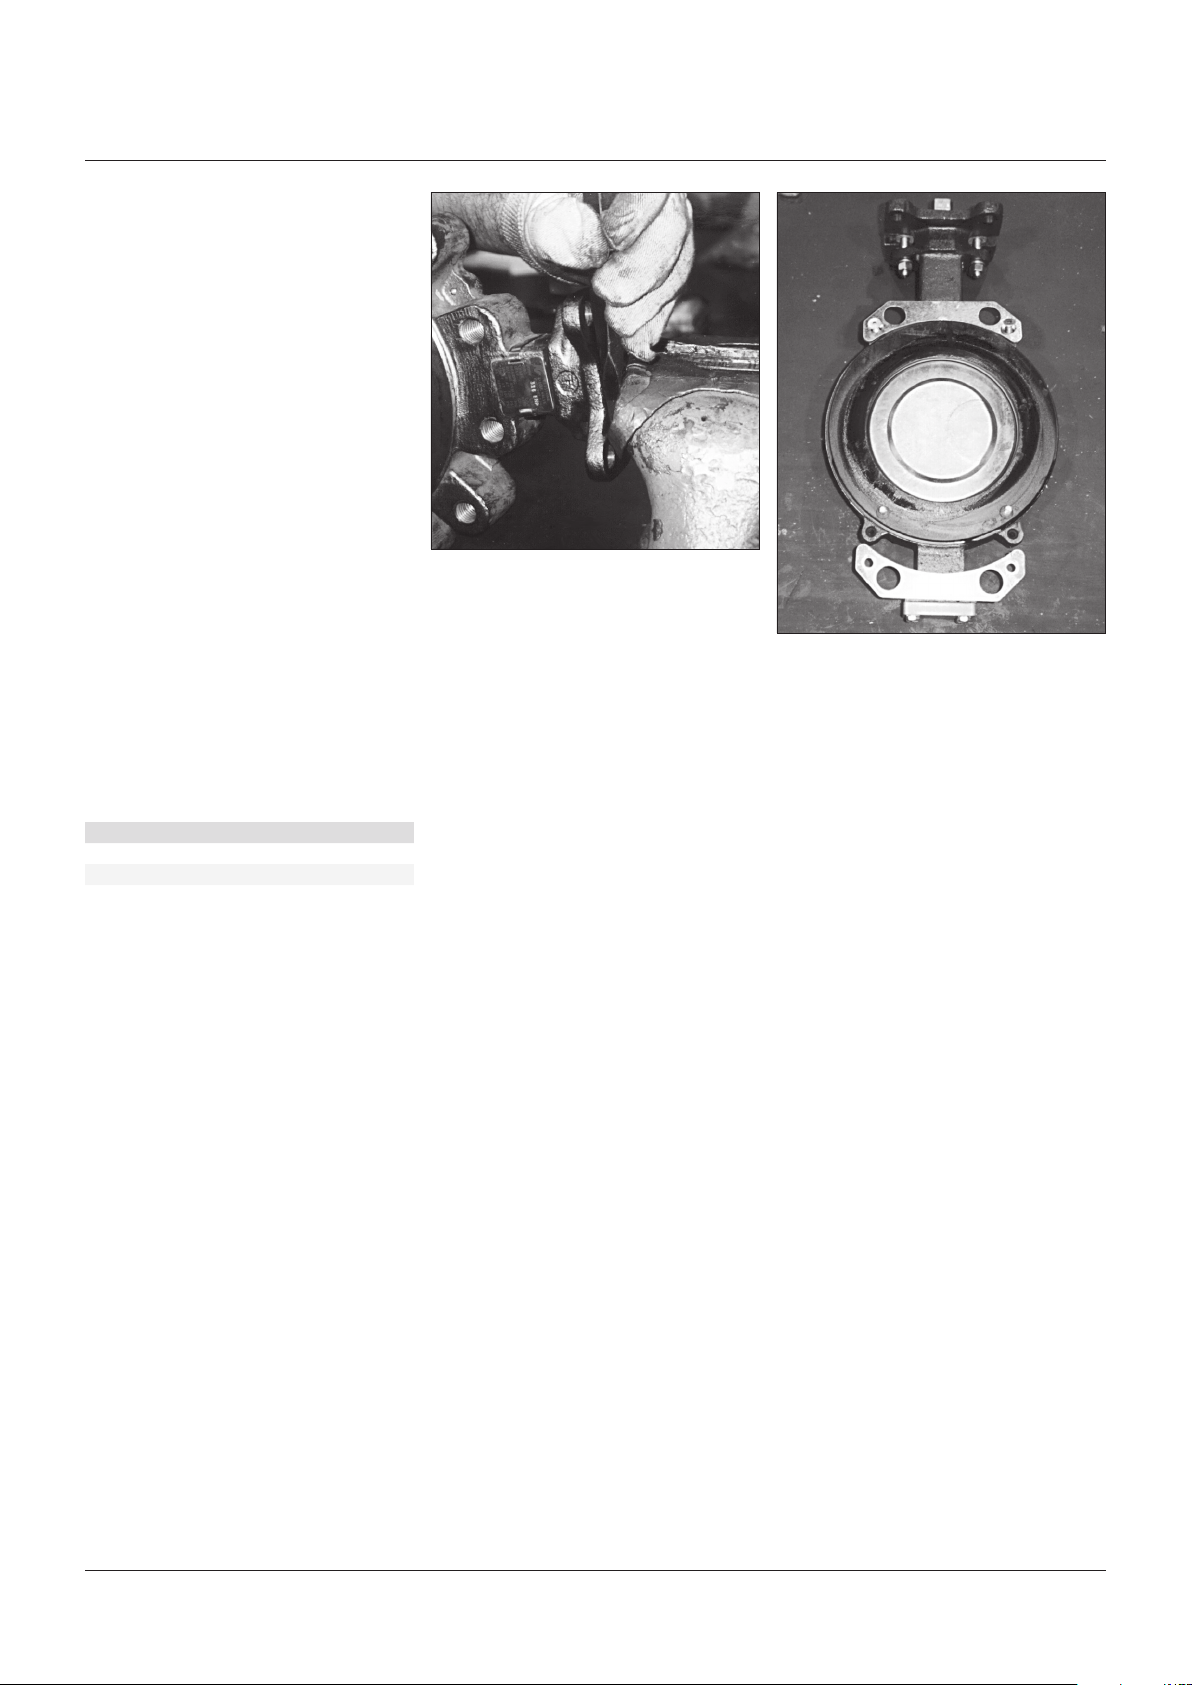
Removing the upper shaft and disc
Figure 2 - How the upper shaft is removed from
the upper disc hub.
CAUTION
Physically hold the disc to prevent the disc from
falling and becoming damaged during removal.
When both the upper shaft (3) and lower shaft
(4) are removed from the disc (2), the disc is
unsupported.
WARNING
Smaller discs may be removed by hand
(NPS 2 to NPS 8 (DN 50 to DN 200)). Remove
larger discs with proper hoisting equipment.
Failure to do so may result in personal injury or
damage to equipment.
Removing the seatretainer ring
Remove the seat retainer ring (23) by removing
hex socket screws (24) from the seat retaining
ring for the lugged body or the retainer plate
screw (34) from the locating plates (33) and/or
clips (35) for the wafer body. (see Figure 3)
Figure 3 - Seat retainer ring and parts.
Removing the packing assembly
Method 1: for packing replacement with shaft
inbody
1. Remove the packing gland bolts (14) nuts
and belleville washer (15,16) packing gland
bridge (13), packing gland follower (12) and
shaft retention ring (11). Using the screws,
grab and remove each packing ring, one at
a time.
Note: to remove the packing set (10) with the
upper shaft (3) still in the valve body (1), two
long, slender screws are required. The screws
must not have a diameter greater than ¼” and
must be at least six inches long. The most
commonly used screws are ‘drywall screws’.
CAUTION
Throughout this operation, make sure the disc
edges remain protected from contact with the
body by installing cardboard at all disc hub areas.
Failure to do so may cause damage to the disc
sealing edge. Protect the shaft from the vise teeth
to prevent damage and to eliminate potential for
packing leakage.
1. When removing the upper shaft (3) from the
disc (2), clamp the vise jaws on to the upper
shaft (3) area above the valve body top plate.
2. Once the vise jaws are secure against the
upper shaft (3), drive the wedge-shaped
chisel/punch between the valve body (1) top
plate and the bench vise. (see Figure 2)
3. As the valve body (1) moves away from the
bench vise, the upper shaft (3) is removed
from the upper disc (2) hub.
4. Continue to reposition the valve body (1) with
the bench vise so as to allow removal of
upper shaft (3).
Removing the seatretainer gasket
Remove the seat retainer gasket (22). Use a
powered wire brush tool to remove the gasket
material that may have adhered to the mating
body surfaces.
Removing the seatassembly
To remove the seat assembly, treat the seat
(21) and its associated components as a single
assembly by removing the following:
• seat (21.1)
• wire wrap (21.2)
• seat backing ring (21.3)
3
Page 4

KEYSTONE K-LOK® SERIES 36 AND 37 HIGH PERFORMANCE BUTTERFLY VALVE
ISO VERSION INSTALLATION AND OPERATION MANUAL
Figure 4
MATERIALS OF CONSTRUCTION
21.1
21.3
21.2
4
Page 5

KEYSTONE K-LOK® SERIES 36 AND 37 HIGH PERFORMANCE BUTTERFLY VALVE
ISO VERSION INSTALLATION AND OPERATION MANUAL
STANDARD MATERIALS OF CONSTRUCTION
Sl no. Part name Material Material Standard
1 Body Carbon Steel ASTM A216-WCB/ EN 10213 GP240H/ 1.0619
Stainless Steel ASTM A351-CF8M/ EN 10213 Gx5CrNiMO 19-11-7/ 1.4408
2 Disc 316 SS ASTM A351-CF8M/ EN 10213 Gx5CrNiMO 19-11-7/ 1.4408
316 SS/ENP ASTM A351-CF8M/ EN 10213 Gx5CrNiMO 19-11-7/ 1.4408/ ENP
3 Upper Stem 17-4PH SS ASTM A564- Condition H1075 or H1100
4 Lower Stem 17-4PH SS ASTM A564- Condition H1075 or H1100
5 Taper Pin 17-4PH SS ASTM A564- Condition H1075 or H1100
6 Spacer 316 SS
7 Thrust Washer 316SS/BRZ/PTFE
8 Bearing 316SS/BRZ/PTFE
RTFE/Composite
9 Anti-Extrusion Ring 316 SS
10 Stem Packing PTFE
11 Ring,Stem Retention 316 SS
12 Gland 316 SS
13 Gland Bridge 17-4PH SS
14 Stud B8 CL2
15 Belleville Washer 50 CrV4
16 Hex Nut Stainless Steel 18.8
17 Bottom Spiral Wound Gasket AISI 316+Graphite
18 Bottom Cover Carbon Steel ASTM A516 Gr.70-WCB
Stainless Steel ASTM A351-CF8M
19 Washer, ext. Tooth Lock Stainless Steel 18.8
20 Screw, Hex HD Cap B8 CL2
21 Seat Assembly
21.1 Seat Polymer PTFE , RTFE, UHMWPE
21.2 Wire Sructure Stainless Steel
21.3 Seat Backing Ring Phenolic
Stainless Steel
22 Gasket Seat Retaining Ring Graphite
Non-asbestos fiber
23 Seat Retaining Ring Carbon Steel ASTM A516 Gr.70-WCB
Stainless Steel ASTM A351-CF8M
24 Screw, socket hd cap Stainless steel
25 Key Carbon Steel
26 Coupling (Adaptor) 17-4PH SS
27 Indicator Pin Rubber Black color
28 Bracket Carbon Steel Protection level C2 per ISO2081
29 Washer, Split lock Stainless Steel
30 Hex Head Bolt Stainless Steel
31 Plain Washer Stainless Steel
32 Set Screw Stainless Steel
33 Retainer Plate Stainless Steel
Carbon Steel/Zinc Plated
34 Retainer Plate/Clip Screw Stainless Steel 18.8
35 Clip Stainless Steel
Carbon Steel/Zinc Plated
All fasteners are SS (B8M CL2/B8 CL2)
5
Page 6

KEYSTONE K-LOK® SERIES 36 AND 37 HIGH PERFORMANCE BUTTERFLY VALVE
ISO VERSION INSTALLATION AND OPERATION MANUAL
Method 2: packingremoval with shaft removed
from body
1. To remove the packing set (10) with the
upper shaft removed, use a hook-type tool
to pull out one packing ring at a time.
Removing the shaftbearing
Note: a special bearing removal/installation
tool is required to remove or install the shaft
bearing (8). The tool O.D. dimension should
be as near in size as the valve shaft bore I.D.
dimension and have a Class 3 fit. Any Machinist
Handbook can provide Class 3 tolerances.
1. Insert the removal tool in the valve body (1)
top plate area and down the upper shaft
journal until the tool contacts the upper
shaft bearing.
2. Remove the upper shaft bearing (8) by
striking the tool with a hammer.
3. Insert the removal tool in the valve body (1)
bottom plate area and down the lower shaft
journal until the tool contacts the lower
shaft bearing.
4. Strike the tool until the lower shaft bearing
(8) is clear of the lower body shaft journal.
Inspecting the valve components
1. After disassembly, visually inspect the seat
retainer ring (23) and the bottom cover
plate(18).
2. Make sure all body sealing surfaces:
• are flat
• are free of corrosion damage
• have a smooth surface
• are free of burrs.
ASSEMBLY
Installing shaft bearing
1. Insert the body into a vice as shown below.
Protect the body flange surfaces from the
vise clamping surfaces with cardboard or
brass shims.
2. To avoid damaging the shaft bearing (8),
gently press the bearing into the shaft body
journal by lightly striking the bearing (8) with
a rubber mallet.
3. Once the shaft bearing (8) has been partially
inserted into the valve body journal, insert
the installation/removal tool against the
upper shaft bearing. (see Figure 5)
4. Strike the tool with a hammer to continue
inserting the shaft bearing until it is
flush with the body flowpath surface.
(see Figure 6)
Installing the disc/shaft assembly
CAUTION
To prevent damage to the disc, do not allow the
disc edges to contact the body flowpath surface.
1. Install the upper shaft (3) and lower shaft (4)
into the valve body shaft journals with the
pinning grooves position on top of the shaft
side view.
Note: the upper and lower shafts are correctly
installed when the lower ends of the shafts are
flush with the body flowpath surface.
Figure 5 - Partial insertion of the shaft bearing.
Figure 6 - Shaft bearing flush with the flow
path surface.
Remove any burrs with fine grit sandpaper.
3. Inspect for scratches around disc edges:
• If scratched, smooth the edge with
fine grit sandpaper (220/400 wet/dry
sandpaper)
• Remove the scratch by using a blending
motion and extend the smoothed area at
least two inches above, below and around
the original scratch
• To polish the disc edge, use a powered
wire brush
• Finish sand or polish the edge on a lathe,
as required.
4. Check to see that the upper and lower (3,
4) shaft-to-bearing (8) contact locations are
free of galling.
5. Check to see that the upper (3)
shaft-to-packing (23) contact area is free of
scratches.
Note: if scratched or galled, these surfaces
should be polished or replaced.
6
Page 7

KEYSTONE K-LOK® SERIES 36 AND 37 HIGH PERFORMANCE BUTTERFLY VALVE
ISO VERSION INSTALLATION AND OPERATION MANUAL
2. Insert the disc locating spacers (6) and
thrust washers into the grooves on either
side of the disc (2). Align the spacer flat
surface with the body flat surface on the
shaft journals.
3. While holding the disc (2) with the backside
of the disc facing up and the double pin
hub facing toward the body (1) upper shaft
journal, position the disc (2) in the body (1).
4. Push the shafts (3 and 4) through the
spacers (6) and into the disc (2) hub shaft
holes.
5. If required, rotate the shafts until the shaft
tapered pin holes are in alignment with the
disc (2) hub tapered pin holes.
6. Manually push the disc tapered pins (5) to
install them through the disc hub tapered
pin holes.
7. Install the packing set (see Installing the
packing set).
8. Carefully drive the tapered pins (5) firmly
into the connection with a punch and
hammer.
Installing the packing set
1. Install the anti-extrusion packing ring (9),
packing set (10), second anti-extrusion ring
(9), shaft retention ring (11), belleville washers
(15) and packing gland (12) into the upper
journal of the valve body (1). (See Figure 8)
2. Keeping the disc assembly (2 - 7) in the
closed position, tighten the packing nuts
(16). Nuts have been correctly tightened
when the packing gland plate (13) is flush
with the valve body (1) top plate. Refer to the
below table for bolt torque.
Belleville Washer
Size Qty
NPS 2 - NPS 12 [DN 50 to DN 300] 8
Torque for Gland Bolts
3. Tighten the four bolts and washers (19, 20).
(as below)
4. There should be a uniform gap between
bottom cover and body.
Table 1: Bottom Cover Gasket Screw Torques
Class 150/300
Metric bolt size in-lb ft-lb N-m N-cm
M6 62.4
M8 159.6 13.3 18 1800
M10 266.4 22.2 30 3000
5.2 7 700
Installing the standard seat assembly
1. Check to make sure the disc (2) is in
the closed position against the body (1)
discstop.
2. Install the seat with the smallest inside
diameter down. If the seat is incorrectly
installed, it will ride higher on the disc than
if installed correctly.
To install RTFE and PTFE seats:
1. Place the seat backing ring (21.3) into the
seat (21.1).
2. Press the backing ring into the seat (21.1)
until no gaps are present between the
backing splits.
3. Rotate the seat assembly until the seat
backing ring (21.3) splits align with the body
shaft journals.
4. Place the seat assembly (21) into the valve
body (1) seat pocket. The seat assembly is
correctly placed when the ‘V’ groove on the
side of the seat (21) is facing toward the
assembler.
Figure 7 - Proper placement of seat retainer
gasket.
Nut
Belleville
Spring
Gland Stud
Figure 8 - Installing the Packing Set
Class 150/300
Valve (in) Stud Torque (Nm)
2 M8 x 1.25 23
2.5 M8 x 1.25 23
3 M8 x 1.25 24
4 M8 x 1.25 28
5 M8 x 1.25 28
6 M10 x 1.5 39
8 M10 x 1.5 48
10 M10 x 1.5 57
12 M10 x 1.5 61
Installing the bottom cover assembly
1. Place the bottom cover gasket (17) on the
bottom cover plate (18) gasket groove.
2. Align the bottom cover plate (18) with the
body (1) bottom surface, making sure
the bottom cover gasket (17) remains in
alignment with the bottom cover plate (18)
gasket groove.
Installing the seat retainer ring
1. Check to make sure the disc (2) is in
the closed position against the body (1)
discstop.
2. Put the seat retainer gasket (22) on the valve
body (1) gasket surface. (see Figure 7)
3. For lug style bodies, align the seat retainer
ring gasket (22) holes with the holes in the
body (see Figure 7).
4. Place the seat retainer ring (23) on top of
the seat retainer gasket (22). For lug style
valves, align the holes in the seat retainer
ring (23) with the holes in the gasket (22)
and the body (1).
5. Place the locating plates (33) and/or clips
(35) for wafer style valve body.
6. Install and tighten the screws (34) for wafer
valve and (24) for lug valve.
7
Page 8

KEYSTONE K-LOK® SERIES 36 AND 37 HIGH PERFORMANCE BUTTERFLY VALVE
ISO VERSION INSTALLATION AND OPERATION MANUAL
CAUTION
The standard seat retainer screws provide only
enough force to hold the seat retainer ring (23)
for shipment and installation. If valve actuation
CAUTION
To prevent damage to the valve when clamping,
protect the body flange surfaces from the vise
clamping surfaces with cardboard or brass shims.
TABLE 1
Shaft and pin material Filler rod
17-4 PH 1075 HT 312 Stainless steel
is required before installation, press the seat
retainer into the seat to prevent damage to the
valve seat before actuation.
TIG welding of the disc taper pins
1. After assembling and testing the valve,
lock the three disc/shaft taper pins (5) by
7. Press the seat retainer ring into the seat
(21) and body (1) using two C-clamps to
provide the needed compressive load.
To press the seat retainer ring with the
forcefully driving the tapered pins in place
with a hammer and steel punch.
2. TIG weld the disc taper pins (5). Weld using
filler rod referenced in Table 1.
C-clamps, place the C-clamps on the valve
assembly to allow an even load to be applied
all around the seat retainer ring (23) and
tighten until the seat retainer gasket (22) is
compressed.
8. With the C-clamps pressing the seat
retainer ring (23) into the gasket (22).
Tighten the screws (34).
Symptom Possible cause Resolution
Valve won’t rotate 1. Actuator has failed 1. Repair or replace
2. Valve packed with debris 2. Flush or clean valve to remove debris
3. Shaft key has sheared 3. Determine cause of shearing and correct, replace
Shaft packing leaking 1. Gland flange bolting loose 1. Tighten gland flange bolting
2. Packing damaged 2. Depressurize valve and replace packing
Bottom cover gasket leaking 1. Bottom cover bolting loose 1. Tighten bottom cover bolting
2. Gasket damage 2. Remove valve from service and replace gasket
Valve leaking 1. Valve not fully closed 1. Close valve
2. Debris trapped in valve 2. Cycle and flush to remove debris
3. Seat or disc edge damaged 3. Remove valve from service and replace seat and/or repair or replace disc
4. Actuator mechanical closure stop incorrect 4. Adjust the stop to allow further closure
Jerky operation 1. Shaft/bearing damaged 1. Disassemble valve and inspect for damage, repair or replace damaged parts,
reassemble
2. Actuator/shaft adapter misaligned 2. Remove actuator mounting and realign
3. Overtightened packing 3. Loosen packing to hand tight, cycle valve, retighten
4. Air supply inadequate 4. Increase air supply pressure
Neither Emerson, Emerson Automation Solutions, nor any of their affiliated entities assumes responsibility for the selection, use or maintenance of any product.
Responsibility for proper selection, use, and maintenance of any product remains solely with the purchaser and end user.
Keystone is a mark owned by one of the companies in the Emerson Automation Solutions business unit of Emerson Electric Co. Emerson Automation Solutions, Emerson
and the Emerson logo are trademarks and service marks of Emerson Electric Co. All other marks are the property of their respective owners.
The contents of this publication are presented for informational purposes only, and while every effort has been made to ensure their accuracy, they are not to be
construed as warranties or guarantees, express or implied, regarding the products or services described herein or their use or applicability. All sales are governed by
our terms and conditions, which are available upon request. We reserve the right to modify or improve the designs or specifications of such products at any time without
notice.
Emerson.com
8
 Loading...