

Emerson ES-805 Series, ES-905 Series, ES-805-SO, ES-805-PSO, ES-905-SO Instruction Manual
...Page 1
Instruction Manual
D104466X012
ES-805 and ES-905 Series
April 2019
ES-805 and ES-905 Series Vent Valves
Table of Contents
Introduction ............................................................................1
Specifications ........................................................................2
Principle of Operation ............................................................2
Model Identification................................................................2
Installation .............................................................................2
Maintenance ..........................................................................5
V-ring Replacement ...............................................................6
Retrofit ES-805 and ES-905 Series Pallet Assembly ............6
Parts Ordering .......................................................................6
Parts List................................................................................7
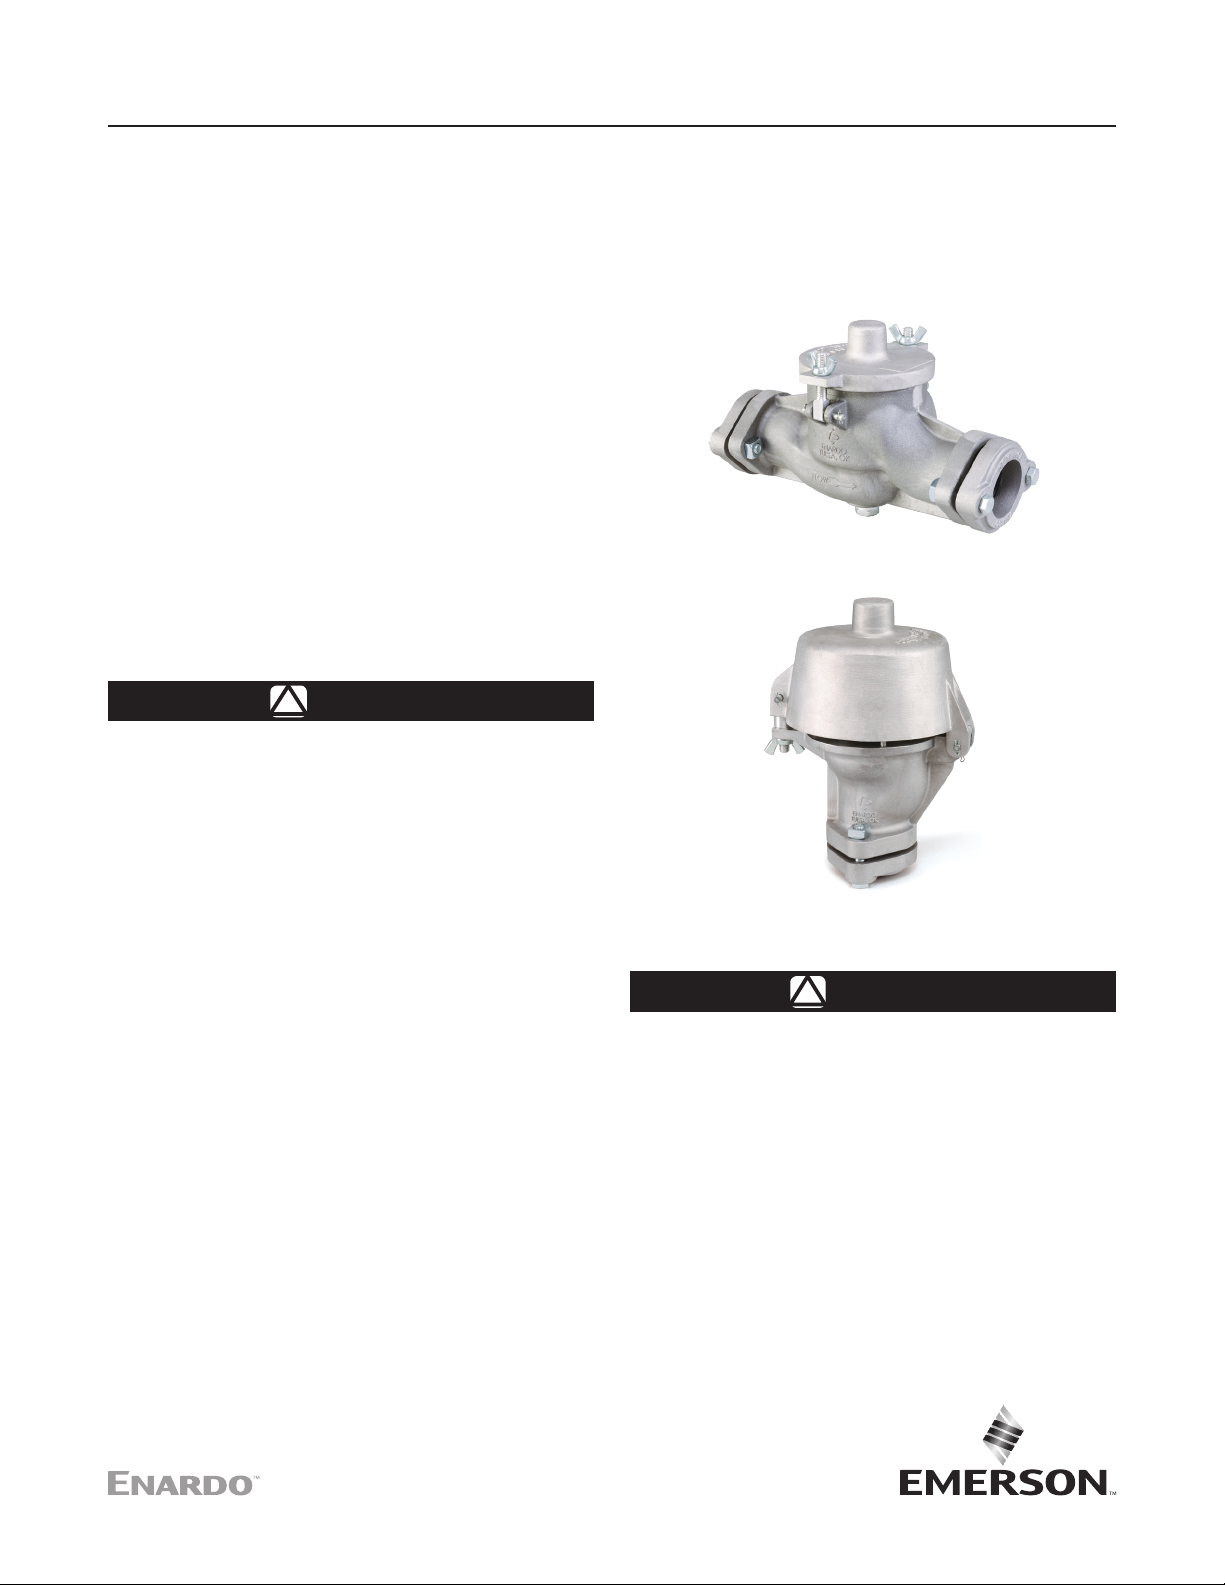
Figure 1. Typical ES-805 Series In-Line Vent Valve
WARNING
!
Failure to follow these instructions or to
properly install and maintain this equipment
could result in an explosion, re and/or
chemical contamination causing property
damage and personal injury or death.
Enardo™ vent valves must be installed,
operated and maintained in accordance
with federal, state and local codes, rules
and regulations and Emerson Process
Management Regulator Technologies
Tulsa, LLC instructions.
Failure to correct trouble could result in a
hazardous condition. Call a qualied service
person to service the unit. Installation,
operation and maintenance procedures
performed by unqualied person may result
in improper adjustment and unsafe operation.
Either condition may result in equipment
damage or personal injury. Only a qualied
person shall install or service the vent valves.
Introduction
Scope of the Manual
This Instruction Manual provides instructions for installation,
maintenance and parts ordering guide for the ES-805 and
ES-905 Series vent valves.
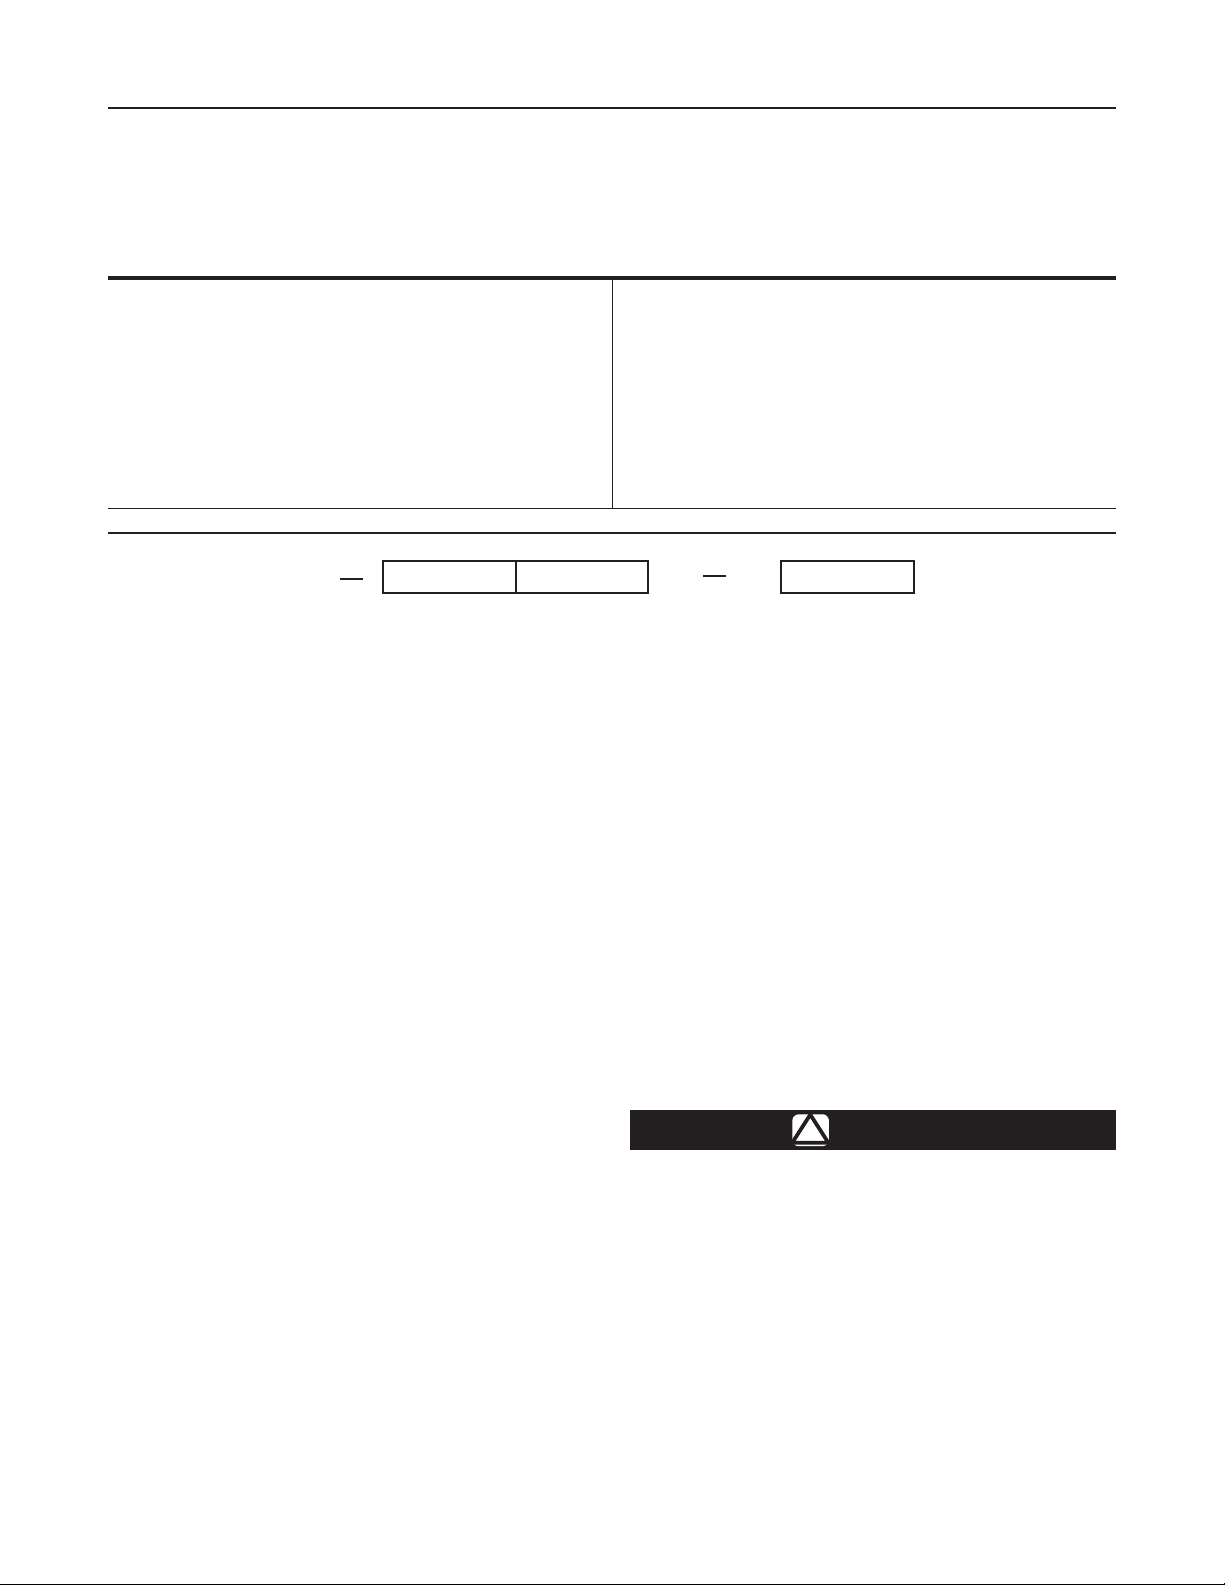
Figure 2. Typical ES-905 Series End-of-Line Vent Valve
WARNING
!
The ES-805 and ES-905 Series vent valves is
not necessarily grounded when installed on
berglass reinforced plastic tanks unless the
base is electrically bonded to the tank.
To avoid personal injury or property damage
resulting from the effects of a static electricity
discharge from hatch components in a
hazardous atmosphere or where the process
uid is combustible, electrically bond the base
to the tank with grounding strap.
North America Only
Page 2
ES-805 and ES-905 Series
Specications
The Specications section on this page provides specications for the ES-805 and ES-905 Series vent valves. Specications
such as model number, connection size, date of manufacture, valve type, seal materials and pressure/vacuum settings are
stamped on the nameplate attached to the vent valve. Weights are keyed to the pallet stem. Every weight is stamped with the
setting (oz.), the valve size and the part number.
Available Construction
See Figure 3
Available Sizes
2 through 4 in. / 50 through 100 mm
Set Pressure/Vacuum
See Table 1
Construction Materials
See Table 2
1. The pressure limits in this Instruction Manual and any applicable standard or code limitation should not be exceeded.
(1)
ES 8 25 PSO
Series
8 = 805
9 = 905
Figure 3. Model Number Identification
Size
25 = 2 in.
35 = 3 in.
45 = 4 in.
Product Description
ES-805 and ES-905 Series vent valves represent the latest
development in high-performance, tight-sealing tank venting
products and complement Enardo™’s industry-leading
ES-665 Series thief hatch product line. With a leakage
rate of no more than 0.1 SCFH at 90% of set point, the
ES-805 and ES-905 Series offers unparalleled vent
valve performance.
Model ES-805-SO - is an In-line vent valve. It is installed
directly into the vent line exhaust. The Model ES-805-SO
has both pressure and vacuum relief capability.
Model ES-805-PSO - is a pressure only vent valve designed
to relieve pressure only through the vent line. It is designed
the same as the Model ES-805-SO pressure/vacuum except
they omit the vacuum side of the valve that eliminates the
possibility of two way ow.
Model ES-905-SO - is an end-of-line vent valve. The
end-of-line vent valve is installed directly on the end of the
vent line exhaust. The Model ES-905-SO has both pressure
and vacuum relief capability.
Model ES-905-PSO - is an end-of-line vent valve. The
end-of-line vent valve is installed directly on the end of the
vent line exhaust. The Model ES-905-PSO only has pressure
relief capability.
Principle of Operation
ES-805 and ES-905 Series vent valves are designed to
prevent the escape of light ends of crude by maintaining
pressure in the storage tank.
Approximate Weight
ES-805 Series Vent Valve
2 In. / 50 mm body: 12 lbs. / 5 kg
3 In. / 80 mm body: 17 lbs. / 8 kg
4 In. / 100 mm body: 23 lbs. / 10 kg
ES-905 Series Vent Valve
2 In. / 50 mm body: 11 lbs. / 5 kg
3 In. / 80 mm body: 15 lbs. / 7 kg
4 In. / 100 mm body: 19 lbs. / 9 kg
The vent valve opens when the system pressure or vacuum
exceeds the set pressure of the valve. When over pressure
occurs, the pallet lifts, breaking the seal between the seat
and pallet, allowing vapors to pass through the valve orice
and relieving the pressure or vacuum buildup. The valve
closes once the tank pressure goes below the set pressure.
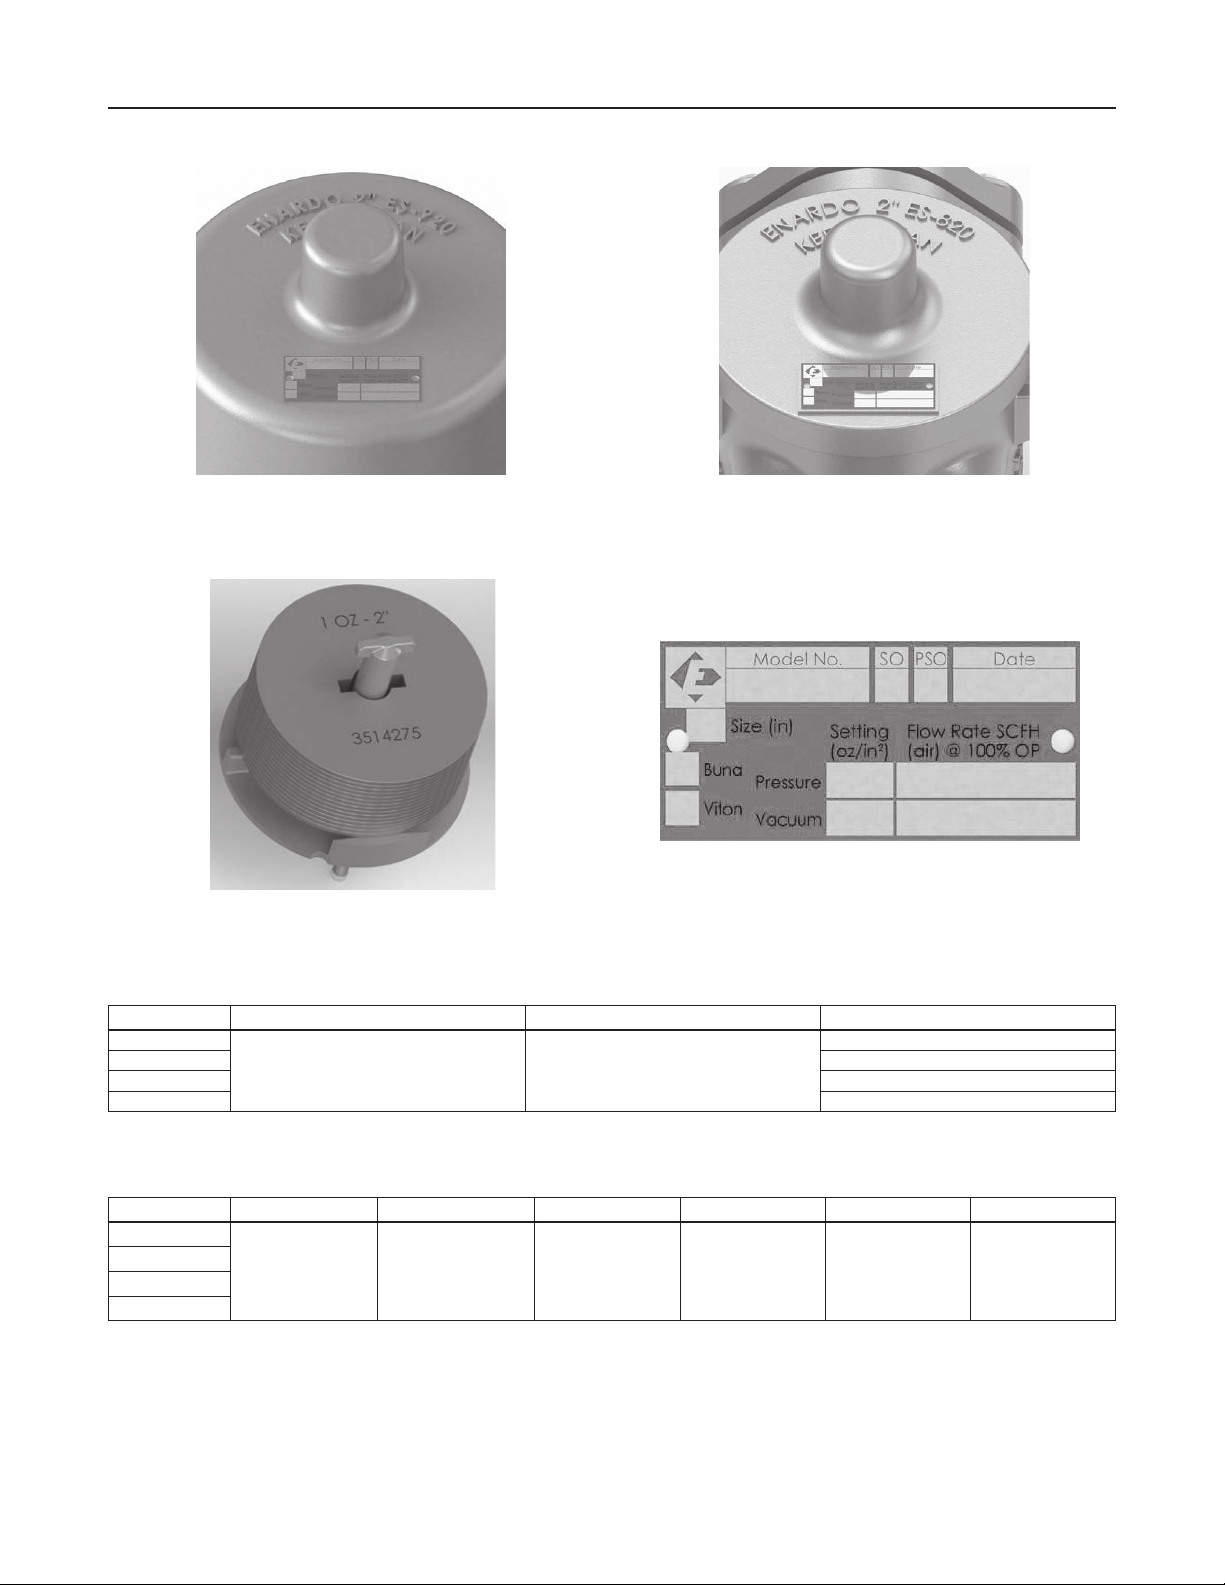
Model Identication
Tagging Information
For ES-805 Series, the nameplate is located on the unit’s lid
and for ES-905 Series, the nameplate is located on the unit’s
hood. Actual layout of nameplate may vary.
Installation
The valve and its pallet assembly are shipped
separately. The pallet assembly may be heavy
and can cause personal injury or damage to the
unit if not handled with care.
All wing-nuts shall be hand tightened only.
Tools are not to be used.
Prior to installation, remove the unit from its packaging
and discard any protective coverings. Below is a list of
instructions that are recommended for the installation of an
Enardo vent valve.
Pressure Type
SO = Pressure and Vacuum
PSO = Pressure Only
WARNING
!
North America Only
2
Page 3
ES-805 and ES-905 Series
ES-905 SERIES NAMEPLATE LOCATION ES-805 SERIES NAMEPLATE LOCATION
Figure 4. Nameplate Location
Figure 6. Nameplate ExampleFigure 5. ES-805 and ES-905 Series Weights
Table 1. Vent Setting Range
MODEL SIZE PRESSURE VACUUM
ES-805-SO
ES-805-PSO N/A
ES-905-SO 0.4 oz./sq.in. / 1.7 mbar
ES-905-PSO N/A
2 through 4 in. / 50 through 100 mm
1.0 to 16.0 oz./sq.in. / 4.3 to 6.90 mbar
(0.5 oz./sq.in. / 2 mbar increments)
0.4 oz./sq.in. / 1.7 mbar
Table 2. Construction Materials
MODEL HOUSING PALLET V-RING SEAL HARDWARE WEIGHTS GASKETS
ES-805-SO
ES-805-PSO
ES-905-SO
ES-905-PSO
Cast Aluminum Aluminum
Nitrile (NBR) or
Fluorocarbon (FKM)
Zinc-plated carbon steel
Zinc-plated carbon steel
(to 12 oz./sq.in.)
or Lead
Nitrile (NBR) or
Fluorocarbon (FKM)
North America Only
3
Page 4

ES-805 and ES-905 Series
ES-805 Series In-Line Vent Valve
1. Unbolt and remove the anges from the body.
2. Slide the ange onto the receiving pipe. Then slide the
slip-on gasket onto the pipe. The tapered section of the
gasket points away from the ange and towards the
valve. Repeat on the other pipe using the second ange.
ES-905 Series End-of-Line Vent Valve
1. Unbolt and remove the anges from the body.
3. Reinstall the ange bolts and nuts, one on each side.
Tighten bolts until anges are ushed against the body.
4. Install the pallet assembly. The center rib of the pallet
should be in-line with the rib on the body. Then close the
lid and hand tighten the wing-nuts on both sides. Tools
are not to be used to tighten wing-nuts. Check for proper
alignment between the lid and pallet stem. If the pallet is
not installed correctly, the lid would not close.
2. Slide the ange onto the receiving pipe. Then slide the
slip-on gasket onto the pipe. The tapered section of the
gasket points away from the ange and towards the
valve (up).
North America Only
3. Reinstall the ange bolts and nuts, one on each side of
the ange. Tighten bolts until ange is ushed against
the body.
4
Page 5

4. Install the pallet assembly. The notch in the center
rib of the pallet should be in-line with the front guide
rod. Check for proper alignment between the lid and
pallet stem. Then close the hood and hand tighten the
wing-nut. Tools are not to be used to tighten wing-nuts.
If the pallet is not installed correctly, the hood would
not close.
Maintenance
ES-805 and ES-905 Series
1. Remove the pallet assembly from the valve. Pull the
vacuum disk down until it stops and release it. If the
vacuum disk does not return to the closed position,
clean the rods with a mild solvent and apply a graphite
lubricant. If cleaning does not x the problem, replace
the pallet assembly immediately.
2. Check the vacuum disk for proper opening. Pull the
vacuum disk down until it stops and then rotate the disk in
both directions. If the vacuum disk does not rotate freely,
replace the pallet assembly immediately.
WARNING
!
Ensure the tank is at atmospheric pressure
before opening. A pressure build-up inside the
tank can cause a spray to be emitted from the
vent valve if opened under pressure.
All wing-nuts shall be hand tightened only.
Tools are not to be used.
Do not use greases or oils on guide rods.
These will not allow the vacuum assembly to
work properly.
Perform a scheduled maintenance every
three (3) months or more often if needed.
Units in corrosive or dusty atmospheres
may require more frequent inspections and
maintenance. Always inspect the pressure and
vacuum gaskets and all sealing surfaces when
performing maintenance.
North America Only
3. Inspect the vacuum gasket. Remove any debris on this
gasket. If there are any tears or holes in the gasket,
replace the pallet assembly immediately.
4. Inspect the pressure seal. Remove any debris on this
seal. If there are any tears or cracks in the seal, replace
the pressure seal immediately.
5
Page 6

ES-805 and ES-905 Series
Table 3. Pallet Assembly Options
MODEL MATERIAL 2 IN. / 50 mm 3 IN. / 80 mm 4 IN. / 100 mm
ES-805-SO or ES-905-SO
ES-805-PSO or ES-905-PSO - - - - 3514268 3514294 3514333
MATERIAL 2 IN. / 50 mm 3 IN. / 80 mm 4 IN. / 100 mm
Nitrile (NBR) 3514286 3514316 3514323
Fluorocarbon (FKM) 3514313 3514317 3514324
Convert from Convert to
ES-820/ES-920 ES-825/ES-925 2 in. / 50 mm
ES-830/ES-930 ES-835/ES-935 3 in. / 80 mm
ES-840/ES-940 ES-845/ES-945 4 in. / 100 mm
Note: Convert existing ES-800 and ES-900 Series valves by installing these parts. Kit includes ES-805/ES-905 Series pallet assembly, new V-ring pressure seal and new ES-805/
ES-905 Series nameplate.
SERIES
Nitrile (NBR) ERAA43150A0 ERAA43150A2 ERAA43150A4
Fluorocarbon (FKM) ERAA43150A1 ERAA43150A3 ERAA43150A5
Table 4. V-ring Seal - Pressure Seal Options
Table 5. Retrofit Kits
SIZE MATERIAL PART NUMBER
Nitrile (NBR) (Buna) 3514826
Fluorocarbon (FKM) (Viton
Nitrile (NBR) (Buna) 3514828
Fluorocarbon (FKM) (Viton
Nitrile (NBR) (Buna) 3514830
Fluorocarbon (FKM) (Viton
®
) 3514832
®
) 3514829
®
) 3514831
V-ring Replacement
WARNING
!
Ensure the tank is at atmospheric pressure
before opening. A pressure build-up inside the
tank can cause a spray to be emitted from the
vent valve if opened under pressure.
1. Remove the pallet assembly. Grasp the pressure seal
rmly by the lip and pull out.
Retrot ES-805 and ES-905 Series
Pallet Assembly
WARNING
!
Ensure the tank is at atmospheric pressure
before opening. A pressure build-up inside the
tank can cause a spray to be emitted from the
vent valve if opened under pressure.
The legacy ES-800 and ES-900 Series valve can be
upgraded to an ES-805/ES-905 Series by replacing the
existing pallet assembly with the new ES-805/ES-905 Series
pallet assembly.
Retrot kits that include a new ES-805/ES-905 Series pallet
assembly, V-ring seal and nameplate are available. Follow
the instructions outlined in the Maintenance section of this
manual for removal and replacement of pallet assembly and
V-ring seal. Part numbers for ES-805/ES-905 Series retrot
kits can be found in Table 5.
Parts Ordering
When corresponding with your local Sales Ofce about
this equipment, always reference the equipment serial
number and model number that can be found etched on
the nameplate.
When ordering replacement parts, specify the complete
model number and 7-character part number of each required
part as found in the following parts list.
North America Only
2. Insert the new seal. Use a nger, wrench or other
smooth edge to apply a rm pressure while sliding
around the entire seal several times. When the seal is
completely seated, there will be no humps or waves in
the lip.
Viton® is a mark owned by E.I. du Pont de Nemours and Co.
6
Page 7

NOTE: TOP LID AREA IS ROTATED 90 DEGREES
ES-805 and ES-905 Series
ES-905 SERIESES-805 SERIES
Figure 7. ES-805 and ES-905 Series Assembly Drawing
Parts List
ES-805 Series In-line Vent Valve
Key Description Part Number
1 Valve Body
2 in. / 50 mm 3514261
3 in. / 80 mm 3514297
4 in. / 100 mm 3514321
2 Lid
2 in. / 50 mm 3514264
3 in. / 80 mm 3514300
4 in. / 100 mm 3514335
3 Flange Gasket
2 in. / 50 mm 3505501
3 in. / 80 mm 3505502
4 in. / 100 mm 3505503
4 Pipe Plug 2023802
5 Slip-on Flange
2 in. / 50 mm 3508901
3 in. / 80 mm 3508902
4 in. / 100 mm 3508903
6 Hex Bolt
2 in. / 50 mm 2021203
3 in. / 80 mm 2021200
4 in. / 100 mm 2021200
7 Square Nut 2021901
8 Eyebolt 3505601
9 Wing Nut 2001002
10 Latch Pin 4505103
11 Latch Clip (HPC-148) 2027100
12 Pallet Assembly See Table 3
13 V-ring Seal See Table 4
14 Lid O-ring
Nitrile (NBR)
2 in. / 50 mm 3514285
3 in. / 80 mm 3514318
4 in. / 100 mm 3514365
Fluorocarbon (FKM)
2 in. / 50 mm 3514314
3 in. / 80 mm 3514319
4 in. / 100 mm 3514372
15 Nylock Nut 1/2-13
16 Pressure Weight (as required) - - - - - - -
ES-905 Series In-line Vent Valve
Key Description Part Number
1 Valve Body
2 in. / 50 mm 3514326
3 in. / 80 mm 3514337
4 in. / 100 mm 3514341
2 Hood
2 in. / 50 mm 3514329
3 in. / 80 mm 3514339
4 in. / 100 mm 3514343
3 Flange Gasket
2 in. / 50 mm 3505501
3 in. / 80 mm 3505502
4 in. / 100 mm 3505503
4 Slip-on Flange
2 in. / 50 mm 3508901
3 in. / 80 mm 3508902
4 in. / 100 mm 3508903
5 Hex Bolt
2 in. / 50 mm 2021203
3 in. / 80 mm 2021200
4 in. / 100 mm 2021200
6 Square Nut 2021901
7 Eyebolt 3505601
8 Wing Nut 2001002
9 Latch Pin 4505103
10 Latch Clip (HPC-148) 2027100
11 Pallet Assembly See Table 3
12 V-ring Seal See Table 4
13 Guide Rod
2 in. / 50 mm 3514344
3 in. / 80 mm 3514345
4 in. / 100 mm 3514346
14 Lever 3514350
15 Lever Spring 3514351
16 Screen
2 in. / 50 mm 3514330
3 in. / 80 mm 3514347
4 in. / 100 mm 3514348
17 Pressure Weight (as required) - - - - - - -
North America Only
7
Page 8

ES-805 and ES-905 Series
NOTE: PARTS A AND B ABOVE ARE USED IN BOTH
ES-805 AND ES-905 SERIES. PART C VARIES BASED
ON THE MODEL.
Figure 8. ES-905 Series Assembly Drawing
ITEM ID DESCRIPTION
A Pallet assembly
B Pressure seal
C Valve body assembly
Webadmin.Regulators@emerson.com
Enardo.com
Emerson Automation Solutions
Americas
McKinney, Texas 75070 USA
T +1 800 558 5853
+1 972 548 3574
Tulsa, OK 74146 USA
T +1 918 662 6161
Europe
Bologna 40013, Italy
T +39 051 419 0611
Facebook.com/EmersonAutomationSolutions
LinkedIn.com/company/emerson-automation-solutions
Twitter.com/emr_automation
Asia Pacic
Singapore 128461, Singapore
T +65 6777 8211
Middle East and Africa
Dubai, United Arab Emirates
T +971 4 811 8100
D104466X012 © 2019 Emerson Process Management Regulator
Technologies, Inc. All rights reserved. 04/19.
The Emerson logo is a trademark and service mark of Emerson
Electric Co. All other marks are the property of their prospective owners.
Enardo™ is a mark owned by Regulator Technologies Tulsa, LLC, a
business of Emerson Automation Solutions.
The contents of this publication are presented for information purposes
only, and while effort has been made to ensure their accuracy, they are
not to be construed as warranties or guarantees, express or implied,
regardingthe products or services described herein or their use or
applicability. All sales are governed by our terms and conditions, which
are available on request. We reserve the right to modify or improve the
designs or specications of our products at any time without notice.
Emerson Process Management Regulator Technologies Tulsa, LLC
does not assume responsibility for the selection, use or maintenance of
any product. Responsibility for proper selection, use and maintenance of
any Emerson Process Management Regulator Technologies Tulsa, LLC
product remains solely with the purchaser.
North America Only
 Loading...