

Page 1
Smart Energy
Programmable Thermostat + Energy Monitor
EE542-1Z I User Manual
Page 2
Contents
1
1.0 Welcome!
4-5
5-8
8-9
10-11
15
15-17
17-19
19
20-22
2
3
3
4
5
12
13
13
14
2.0 Get to Know Your Thermostat
2.1 Use the Navigation Keypad
2.2 Initiate a Temporary Hold
2.3 Away Preset
2.4 Get Messages
3.0 Customize Thermostat Settings
3.1 Program a Heating / Cooling Schedule
3.2 Set Thermostat Clock
3.3 Set Alerts
3.4 Set Thermostat Lock
3.5 Set Vacation Hold
3.6 Activate the Fan
3.7 Advanced Settings
4.0 Monitor Whole-Home Energy Use When
Connected to a Smart Meter
4.1 Set Monthly Budget Target
4.2 Track Energy Use Against Budget Target
5.0 Tiered Pricing Plan Program
Exclusive Features
5.1 Enable Price Protection
22
23
5.2 View Scheduled Rate Changes
5.3 View Costs by Rate
23
24-25
25
6.0 Direct Load Control Program
Exclusive Features
6.1 View Scheduled Utility Events
7.0 Support
Page 3

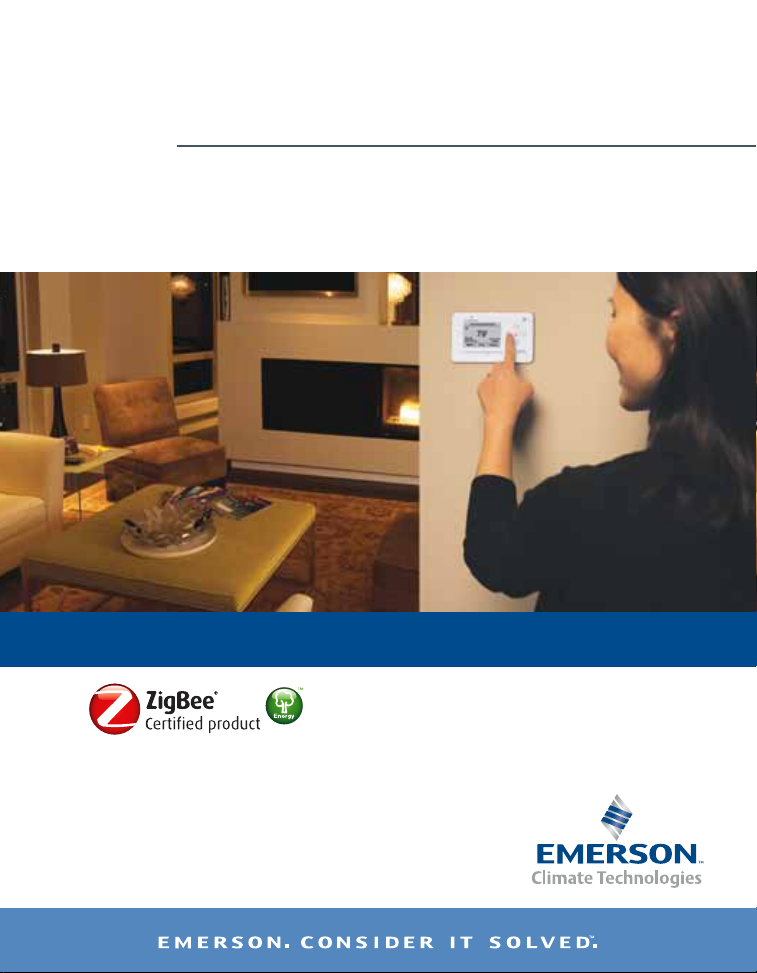
1.0 Welcome
Congratulations on the purchase of your new Smart Energy
Thermostat! The thermostat is designed to help you save money and
conserve energy. When connected to a smart meter, you can use
the product to get real-time access to information about energy
consumption in your home so you can make more informed decisions
and better manage your energy use.
This thermostat may have been installed in conjunction with a plan
from your utility designed to help you save money and/or to ensure
grid reliability. Two prevalent utility plans are:
• DIRECT LOAD CONTROL PLAN
In a Direct Load Control (DLC) plan, you voluntarily allow your utility company to
control major appliances in your home when demand for electricity peaks. These
instances of peak demand are called “utility events” and when they occur, the
utility will take action, such as adjusting the thermostat temperature or cycling
your air conditioner on and off, for the duration of the event. These events are
relatively infrequent and under most circumstances, you will have the option to
opt in or opt out of the event. (To view thermostat features exclusive to Direct
Load Control plan customers, see page 24-26.)
• TIERED PRICING PLAN
In a tiered pricing plan, electricity rates fluctuate with demand during the course
of each day. You can determine - in advance - how you want your thermostat to
respond when prices change. You may decide it’s worth giving up a few degrees
of comfort to save money when rates reach a certain level. (To view thermostat
features exclusive to Tiered Pricing plan customers, see page 20-23.)
For more information about this product:
Customer Service: 1-888-725-9797
1
Page 4
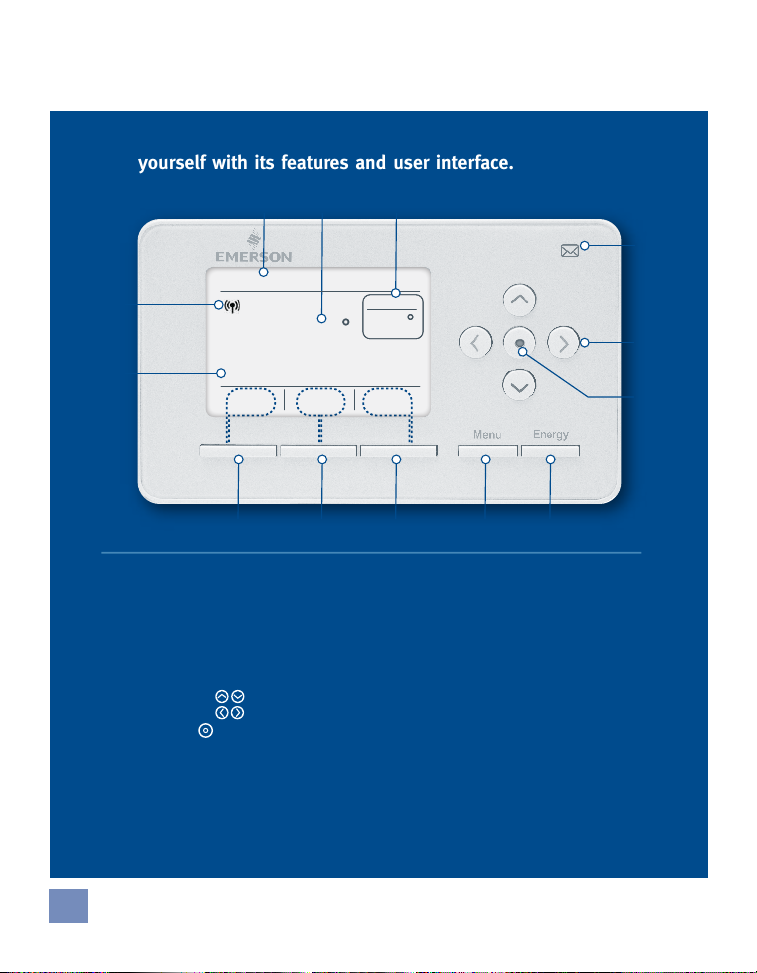
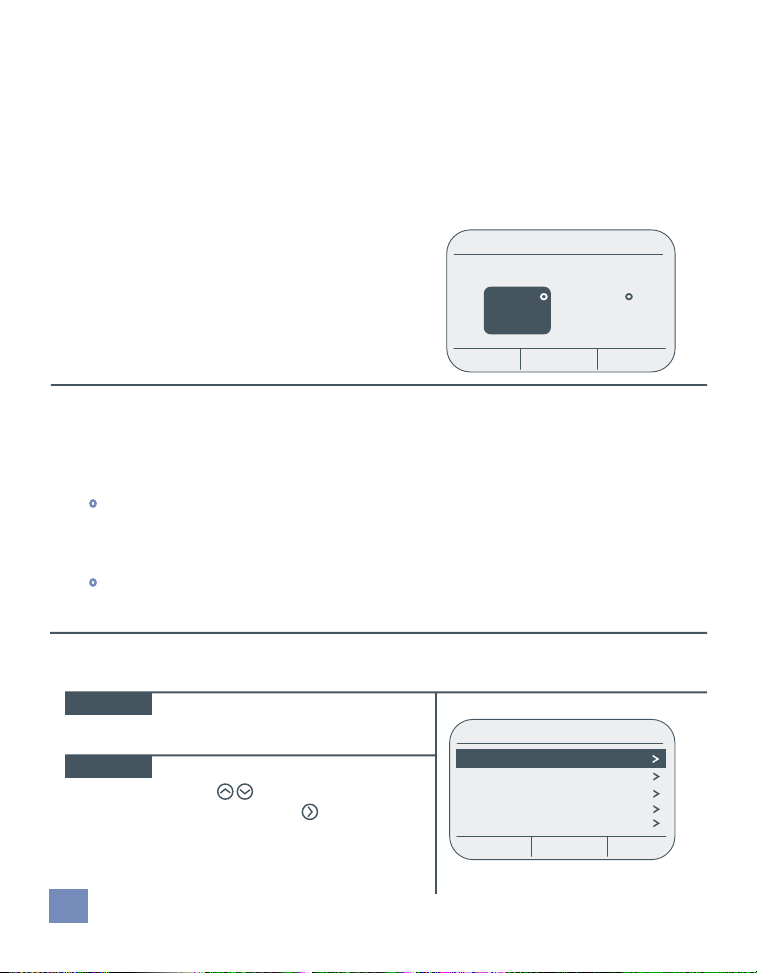
2.0 Get to Know Your Thermostat
Before setting up your thermostat, familiarize
yourself with its features and user interface.
13
Base Rate
12
Base Rate
$0.08
$0.08
Inbox
Inbox
11 10 9 8 7
1.
Current time and date
2.
Current room temperature
3.
Desired temperature
4.
Message icon
Lit when an unread message
is in the inbox
5.
Navigation pad
Up/Down
Left/Right
Enter ( )
(see section 2.1 for details.)
6.
Tri-color LED
Lit during utility events and price tiers
7.
Energy key
Use to access whole-home
energy use information
21
1:54 PM - Mar. 12
1:54 PM - Mar. 12
79
79
kWh
kWh
Cool
Cool
3
Set At76Set At
Set At76Set At
76
76
F
F
Away
Away
8.
Menu key
Use to configure thermostat
settings
9.
Away “soft” key
Use to set one-touch
temperature hold
10.
Heating/cooling “soft” key
(Indicates current mode, press to change.)
11.
Inbox “soft” key
use to view messages
12.
Current electricity rate
when in a tiered pricing plan
(see section 7.0 for details.)
13.
Wireless icon
appears when thermostat has
established a wireless connection
4
5
6
2
Page 5
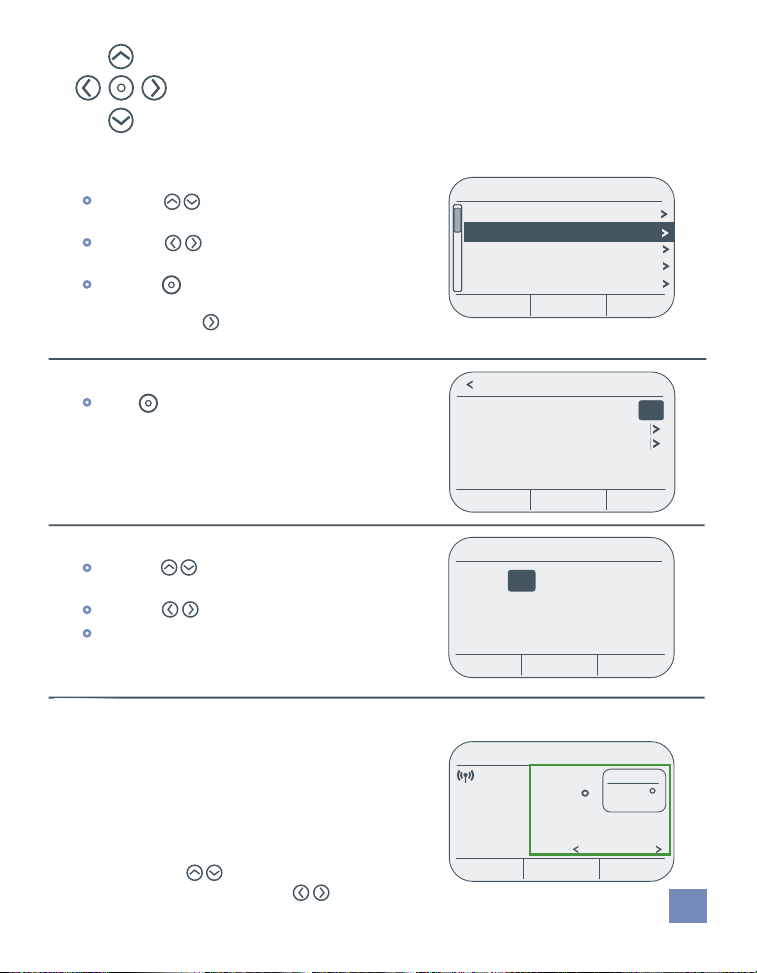
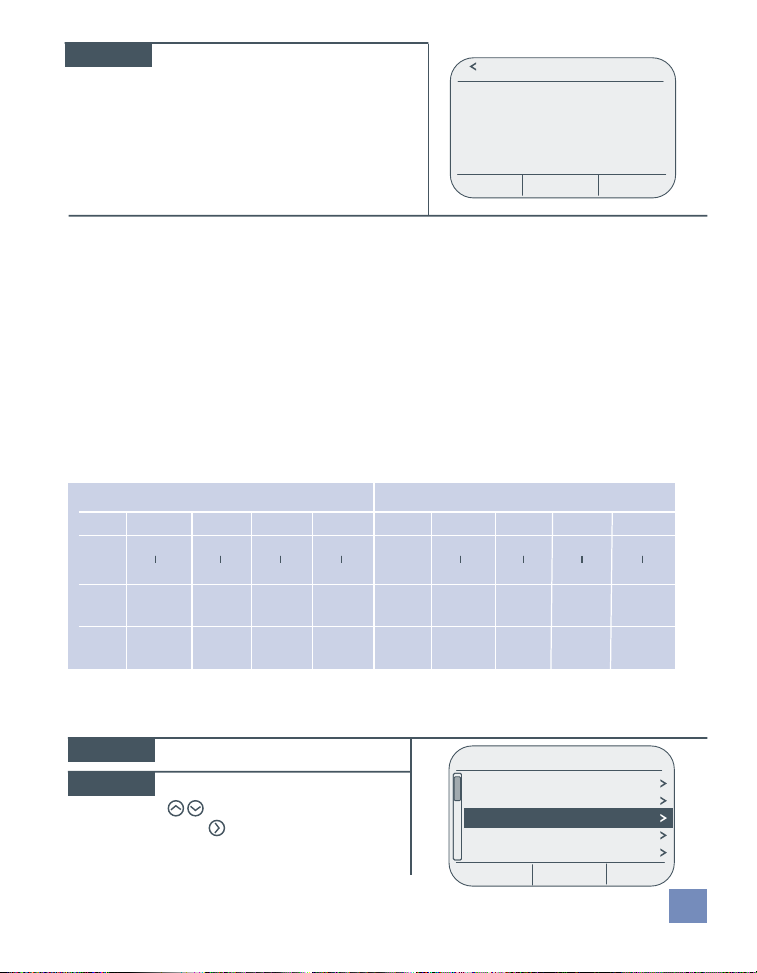
2.1 Use the Navigation Keypad
When on a menu screen, the five-way navigation pad
functions as follows:
•
Use the arrows to move through the
displayed menu listings
•
Use the arrows to advance to the next
screen or return to a previous screen.
•
Use the key to confirm a selection or
advance to the next screen.
(similar to the key.)
Settings
Settings
Fan Auto
Fan Auto
Clock
Clock
Schedules On
Schedules On
Price Protection
Price Protection
Alerts
Alerts
Home
Exit
On
On
•
The key is also used to toggle back
and forth between options, such as On/Off,
as shown in the Schedules menu.
When setting preferences for a specific menu option:
•
Use the arrows to change the setting
of the highlighted item.
•
Use the arrows to tab between values.
•
Use the three “soft keys” at the bottom of the
screen to complete a step.
2.2 Initiate a Temporary Hold
TEMPORARY HOLD lets you override a
programmed heating/cooling schedule
for a brief period of time.
To initiate a TEMPORARY HOLD, adjust the temperature
by pressing the arrows. To change the duration
of the temporary hold, press the arrows.
Schedules
Schedules On
Set Heat Schedule
Set Cool Schedule
Periods Per Day 4
Exit
Set Time & Date
12 : 00 pm
1/1/12
Friday
Cancel Save
1:54 PM - Mar. 12
Hold At
77
F
kWh
75
CoolInbox
Hold Until
5:30PM – Mon
End
Hold
Base Rate
$0.08
3
Page 6
2.3 Set One-touch Away Preset
With just one touch, the AWAY preset will instantly change your desired
temperature to a set point that will save you money. This is a convenient feature
when you’re leaving home unexpectedly or intend to be away from home for an
extended period of time. The unit has been shipped with “Away” settings based
on Energy Star recommendations of 85° in the summer and 62° in the winter, but
those temperatures can easily be changed with
the touch of one key.
To change the default setting, press and hold
the AWAY key for three seconds, adjust settings,
then press SAVE.
Away Preset
COOLING HEATING
85 62
Cancel Save
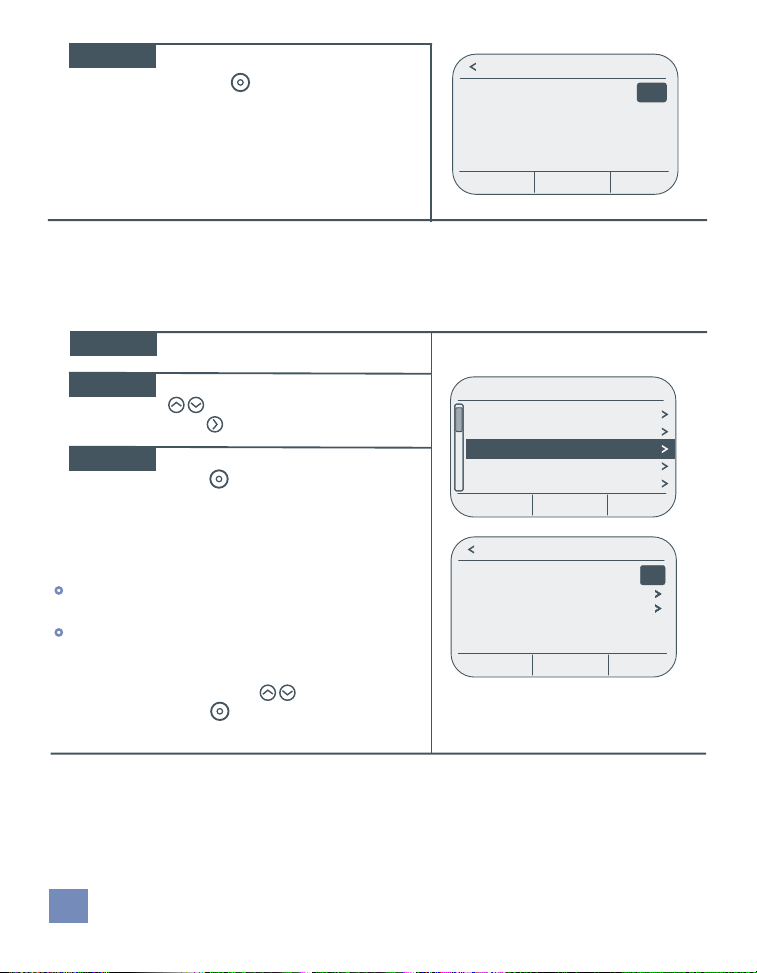
2.4 Get Messages
In the upper right corner of the unit, an envelope icon will be illuminated when
an unread message is in your INBOX.
• Messages may be sent from your utility or software service provider.
As an example, the utility may send an alert that “Crews will be working in
your neighborhood and you may experience an intermittent outage between
2:00 pm and 4:00 pm.”
•
Messages may also be generated by the thermostat itself. “It’s time to
replace the air filter.”
To view a message:
STEP 1
STEP 2
4
Press INBOX key in the lower left
corner of the thermostat display.
From the MESSAGE INBOX menu,
use the arrows to select a
message, then press .
Message Inbox
• Air Filter
• Cost Alert
• 9:30 am 4/28/11
2:37 pm 4/23/11
5:11 pm 4/18/11
Exit
Page 7
STEP 3
The resulting screen displays the
message details.
Air Filter
It’s time to replace this item.
Press “Reset” to reset the timer.
Press “Snooze” to be reminded
again in one week.
Reset Snooze
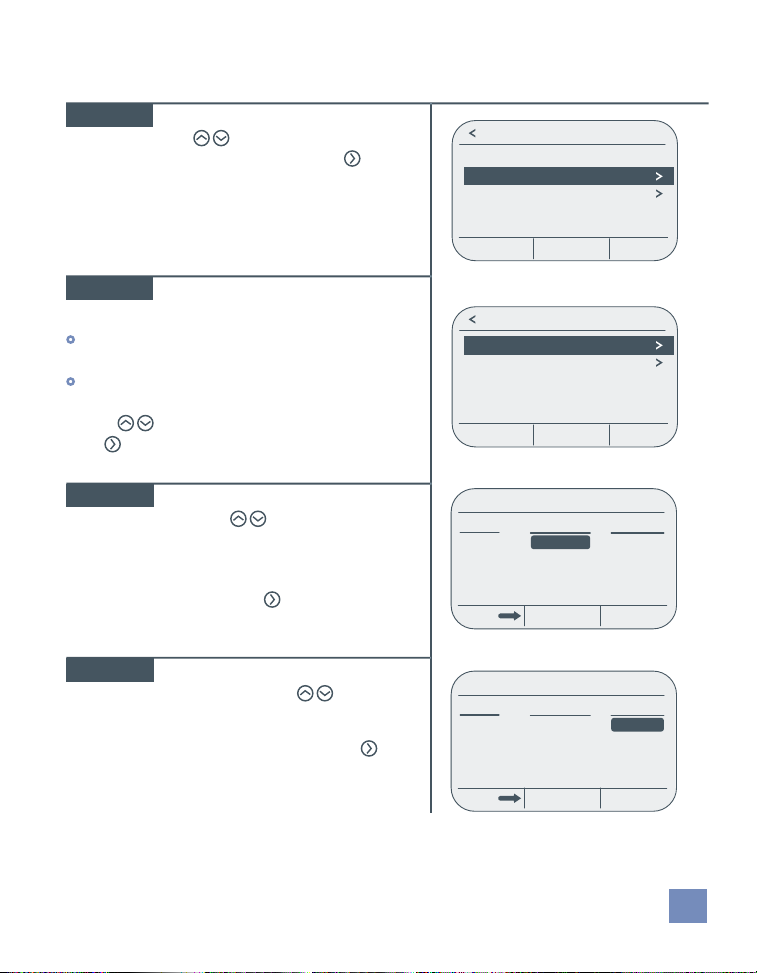
3.0 Customize
Thermostat Settings
3.1 Program a Heating/Cooling Schedule
By programming a thermostat schedule, you can save energy while maintaining
comfort. The thermostat was installed with the following pre-programmed,
energy-efficient schedule. If this schedule meets your needs, no further action
is required.
Heating
MORN DAY EVEN NITE
Period
MonFri
SatSun
6:00am
8:00am
8:00am
6:00pm
70°F 60°F 70°F 62°F
62°F 70°F 70°F 62°F
6:00pm
10:00pm
10:00pm
6:00am
Cooling
MORN DAY EVEN NITE
6:00am
8:00am
MonFri
SatSun
78°F 85°F 78°F 82° F
82°F 78° F 78°F 82°F
To run the thermostat as a non-programmable model:
Menu > Settings > Schedules
STEP 1
STEP 2
Press the MENU key.
From the Settings menu, use the
arrows to select SCHEDULES.
Press .
Fan Auto
Clock
Schedules On
Price Protection
Alerts
Exit
8:00am
6:00pm
SettingsSettings
6:00pm
10:00pm
10:00pm
6:00am
5
Page 8
STEP 3
If the SCHEDULES feature is ON,
press the key to turn it OFF.
Schedules
Schedules Off
Exit
To customize the heating/cooling schedule:
Menu > Settings > Schedules
You can easily change the day, time period or temperature settings of the
pre-programmed schedule.
STEP 1
STEP 2
Press the MENU key.
From the Settings menu, use the
arrows to select SCHEDULES.
Press .
STEP 3
If the SCHEDULES feature is OFF,
press . You should now
see options to set a schedule for
heating, cooling and periods per day.
Start by deciding how many times during the day
you want the temperature to change.
•
If you want to set one temperature for daytime
and one temperature for night time, select 2.
•
If you want to set four temperature settings
throughout the day (morning, day, evening,
night) select 4.
To make your selection, use the arrows to select
PERIODS PER DAY. Press to select either 2 or 4.
6
SettingsSettings
Fan Auto
Clock
Schedules Off
Alerts
Thermostat Lock
Exit
Schedules
Schedules On
Set Heat Schedule
Set Cool Schedule
Periods Per Day 4
Exit
Page 9
To set a schedule:
Menu > Settings > Schedules > Set Heat (or Cool) Schedule
STEP 1
From the SCHEDULES menu, use
the arrows to select
SET HEAT SCHEDULE. Press .
STEP 2
From the HEAT SCHEDULE
screen, you can either:
•
Set one schedule for weekdays and one
for the weekend.
•
Make edits to the schedule of any
individual day.
Use the arrow keys to make your selection.
Press .
STEP 3
The first day part should be highlighted.
Using the arrows, adjust the start
time for the first temperature setting.
Times adjust in increments of
15 minutes. Once the start time is
selected, press to move to the
HEAT TO column.
STEP 4
With the HEAT TO field
highlighted, use the
arrows to set the temperature for
your first day period. Once the
temperature is selected, press
to proceed to the next day period.
Schedules
Schedules On
Set Heat Schedule
Set Cool Schedule
Periods Per Day 4
Exit
Heat Schedule
Weekdays / Weekend
Individual Days
Exit
Mon - Fri
Period
Morning
Day
Evening
Night
Period
Morning
Day
Evening
Night
Starts At
6:00 AM
8:00 AM
6:00 PM
10:00 PM
CancelDays Save
Mon - Fri
Starts At
6:00 AM
8:00 AM
6:00 PM
10:00 PM
CancelDays Save
Heat To
70º
60º
70º
62º
Heat To
68º
60º
70º
62º
7
Page 10

STEP 5
STEP 6
Repeat steps 3 and 4 until all day
periods are complete. When finished,
press DAYS to advance to the
weekend schedule where you will repeat
steps 3 and 4.
When finished, press SAVE to save
both schedules.
Period
Morning
Day
Evening
Night
Mon - Fri
Starts At
6:00 AM
8:00 AM
6:00 PM
10:00 PM
CancelDays Save
Heat To
68º
60º
70º
62º
STEP 7
STEP 8
To make edits to any individual day or
if you just want to view your current
schedule by day, select INDIVIDUAL
DAYS by pressing the arrow.
To set the cool schedule, return to the
SCHEDULES menu, select SET COOL
Heat Schedule
Weekdays / Weekend
Individual Days
Exit
SCHEDULE, and repeat steps 2-7.
3.2 Set Thermostat Clock
Menu > Settings > Clock
If the thermostat is connected to a smart meter, the time will be automatically set and
maintained, but you may still make adjustments to the time zone and daylight savings if
necessary. If the thermostat is not connected to a smart meter you can manually set the
clock using this feature.
To set the time and date:
Menu > Settings > Clock > Set Time & Date
STEP 1
STEP 2
STEP 3
STEP 4
Press the MENU key.
From the Settings menu, use the
arrows to select CLOCK.
Press .
Use the arrows to select
SET TIME AND DATE. Press .
Use the arrows to change
the value in each field, and
to toggle between fields.
Settings
Settings
Fan Auto
Clock
Schedules Off
Alerts
Thermostat Lock
Exit
12:39PM - 1/1/12
Set Time & Date
Time Zone
Daylight Savings On
8
Exit
Page 11

STEP 5
When finished press SAVE to save
settings.
To set your time zone:
Menu > Settings > Clock > Set Time Zone
Set Time & Date
12 : 00 pm
1/1/12
Friday
Cancel Save
STEP 1
STEP 2
From the CLOCK screen, use the
arrows to scroll through the menu
listings until TIME ZONE is highlighted.
Press .
Use the arrows to select a time
zone, then press .
12:39PM - 1/1/12
Set Time & Date
Time Zone
Daylight Savings On
Exit
Set Time Zone
Newfoundland Std Time
Eastern Standard Time
Central Standard Time
Mountain Standard Time
Pacific Standard Time
Your thermostat can be set to automatically adjust the clock for daylight savings.
Menu > Settings > Clock > Daylight Savings
From the CLOCK screen, use the
arrows to select DAYLIGHT SAVINGS.
Press .
To disable the feature, press
to select OFF.
12:39PM - 1/1/12
Set Time & Date
Time Zone PST
Daylight Savings On
Exit
9
Page 12

3.3 Set Alerts
Menu > Settings > Alerts
The thermostat is designed to alert you to important information about your energy use.
You can set the unit to notify you - with an auditory beep or with a pop-up message -
when a new load control or pricing event takes place, or when it’s time to perform routine
maintenance such as changing the filter on your heating/cooling system. To enable alerts,
take the following steps:
To set an a HVAC maintenance reminder:
STEP 1
STEP 2
STEP 3
STEP 4
From the ALERTS screen, you can
choose to be alerted when it’s time to
perform routine HVAC maintenance.
Use the arrows to select HVAC
MAINTENANCE. Press .
From this screen, you can choose to be
reminded to change the air filter,
humidifier pad and UV lights on your
HVAC unit.
•
Highlight the reminder of interest,
then press the arrow to
configure its settings.
•
Use the key to turn the
reminder ON.
• Use the arrows to select
REMIND ME IN, then press .
Use the arrows to select the
number of months from today that
you’d like to be reminded to perform
the routine maintenance.
Press to return to the HVAC
MAINTENANCE menu.
Alerts
HVAC Maintenance
Beeper Notification
Pop Up Notification On
Exit
Maintenance Reminders
Air Filter On
Humidifier Pad On
UV Lights On
Exit
Air Filter Reminder
Status On
Remind Me In 4 mo
Exit
10
Page 13

STEP 5
Repeat steps 2-4 for any other
equipment maintenance reminders of
interest. Press to return to the
ALERTS menu.
Air Filter
Remind me to replace this in:
4
Months
To identify the manner in which you’d like to be alerted to utility events, rate changes or messages
Menu > Settings > Alerts > Beeper Notifications
STEP 1
STEP 2
STEP 3
From the BEEPER NOTIFICATIONS
screen, you can choose the manner
in which you want to be alerted when
you receive priority messages or
notification of a utility event or peak rate.
•
Use the arrows to make
a selection and press .
To change the default setting, use the
arrow keys to select whether you
would like to turn the alert off, be alerted
once when the message is received, or
you acknowledge the alert. Make your
selection then press .
Repeat steps 1-2 until all BEEPER
NOTIFICATIONS are set. Press to
return to the main ALERTS menu.
Some alerts can be configured to
“popup” and occupy the thermostat home
screen until the user presses any key.
The following alerts will “popup” when
this menu item is set to the ON position:
•
Monthly electricity budget has
been exceeded
•
Pending peak rate event
•
Important messages
To be alerted by text which pops up
on your thermostat display, use the
arrow to select POPUP
NOTIFICATIONS, then press to
select either ON or OFF.
Beeper Notifications
Priority Messages 15 Min
Peak Rates Once
Utility Events Once
Exit
Beeper: Priority Messages
Off
Once Upon Receipt
Every 15 Min Until Button Press
Alerts
HVAC Maintenance
Beeper Notification
Pop Up Notification On
Exit
11
Page 14

3.4 Set Thermostat Lock
Menu > Settings > Thermostat Lock
Thermostat lock lets you prevent unwanted users from changing thermostat settings.
To lock the thermostat display:
From the THERMOSTAT LOCK screen,
enter a three-digit combination that will
be required to unlock the thermostat.
Write down the code for safekeeping,
then press LOCK.
To unlock the thermostat display:
STEP 1
STEP 2
Forgot your combination? Simultaneously press the 3 soft keys at the bottom of the display
for 20 seconds to unlock and reset the code to 000.
Press UNLOCK.
Enter the three-digit combination you
set, then press UNLOCK.
KEEP IN MIND:
Thermostat Lock
0
1:54 PM - Mar. 12
Base Rate
kWh
$0.08
Thermostat Lock
0
0 0
Cancel
F
75
Cool UnlockInbox
0 0
Cancel
Unlock
Lock
Hold At
77
12
Page 15

3.5 Set Vacation Hold
Menu > Settings > Vacation Hold
Vacation Hold lets you override your thermostat’s programmed schedule while you’re away,
yet ensures that you return to a comfortable home.
To set vacation hold:
Menu > Settings > Vacation Hold
STEP 1
From the VACATION HOLD screen,
select the desired vacation hold
temperature and press SET.
Vacation Hold
Heating Set Point
55°
Set
STEP 2
Vacation hold can remain in effect
for up to one year. Select the date
and time on which you’d like the
thermostat to return to its programmed
schedule, then press SAVE to initiate
the hold.
Hold Until...
12 : 00 pm
FRI 1/1/12
Cancel Save
KEEP IN MIND:
Energy Star recommends vacation hold temperatures be set to 85° in the summer and
62° in the winter.
3.6 Activate Fan
Menu > Settings > Fan
When the fan is set to AUTO, it will only turn on with heat and cool. By setting the fan to
ALWAYS ON, you can circulate air in the home even when the HVAC unit isn’t running. The fan
can help to reduce hot and cold spots, remove humidity or help dry carpet after a cleaning.
13
Page 16

3.7 Advanced Settings
Adjust Backlight:
Menu > Settings > Advanced Settings > Backlight
The thermostat backlight has two settings. It can be set to illuminate only when the keypad
is touched (AUTO), or it can be set to illuminate continuously (ALWAYS ON).
Select Fahrenheit or Celsius:
Menu > Settings > Advanced Settings > °F or °C
Set Point Limits:
Menu > Settings > Advanced Settings > Set Point Limits
This feature lets you establish low and high temperature limits that cannot be exceeded.
This can be particularly helpful if you want to prevent children or tenants from adjusting
the thermostat beyond a level acceptable to you. The unit has been shipped with default
set point limits of 45° minimum cooling and 99° maximum heating.
Temperature Display Adjustment:
Menu > Settings > Advanced Settings > Temp Display Adjust
Your thermostat was accurately calibrated at the factory. But if you’d like the displayed
temperature to be higher or lower than the actual temperature, this feature lets you adjust
the displayed temperature.
Key Pad Beeper:
Menu > Settings > Advanced Settings > Key Pad Beeper
This feature activates a sound each time a thermostat key is pressed. This feature is OFF
by default. To turn the feature ON, select KEY PAD BEEPER from the menu and press the
key.
Comfort Recovery:
Menu > Settings > Advanced Settings > Comfort Recovery
The COMFORT RECOVERY feature activates heating or cooling in advance of the set schedule.
If, for example, you set the 7:00 am temperature to 68°, COMFORT RECOVERY begins the
process of heating or cooling in advance, so the room temperature reaches 68° by 7:00.
This feature is OFF by default. To turn the feature ON, select COMFORT RECOVERY from the
menu and press the key.
14
Page 17

4.0 Monitor Whole-Home Energy
Use When Connected to a Smart Meter
When the thermostat is connected to a smart meter, it will help you track your entire home’s
energy use - not just the electricity being used by your heating and cooling equipment. And
by giving you a detailed view of usage in real time, you can take action to increase your level
of energy efficiency - preserving resources and saving money. In this section, you’ll learn how
to set a monthly target for energy use and how to track your use against that target.
KEEP IN MIND:
To take advantage of the energy monitoring features, the thermostat must establish
communication with your utility. In most instances this will mean that your home must be
equipped with a ZigBee enabled smart meter. If you aren’t sure if you have this type of meter,
contact your utility company.
If you have established a wireless connection with the meter but certain features listed below
do not appear in the Energy menu, or you see an error message reading “data not available”,
then chances are the meter doesn’t support the specific data set required for the feature.
4.1 Set Monthly Budget Target
The first step toward monitoring your energy use is to set a monthly budget target or cost
threshold, that when met will generate an alert. Think about how much would you like to
spend each month for electricity. Say, for example, your target is $100 per month. The
thermostat is capable of monitoring your energy use and notifying you when you have
exceeded this monthly threshold. To establish a monthly target, take these steps:
Set a monthly budget target start date:
Energy > More > Set Monthly Budget > Billing Cycle Start Date
From the START OF BILLING CYCLE
screen, use the arrows to identify
the date of the month that you’d like a
target cycle to begin. When your date is
selected, press .
Start of Billing Cycle
Day of the month that my billing
cycle starts
1
15
Page 18

KEEP IN MIND:
The product will start measuring your energy consumption immediately upon connecting it to a
smart meter or other data source. By default, the counter will reset to
day of every month. For a closer approximation of how you’re tracking against your monthly
bill, you can change the start date to correspond with the first day of your billing cycle (which
can usually be found on your utility bill).
Set a monthly budget dollar target:
Energy > More > Set Monthly Budget > Monthly Budget
Ideally, how much would you like to spend each month for electricity?
$
0
on the first calendar
From the MONTHLY BUDGET screen,
use the arrows to set the dollar
value of the monthly target budget.
Monthly Budget
For Electricity Usage:
$100
When the dollar value is selected,
press .
(excluding regional fees/taxes)
Help
KEEP IN MIND:
You may want to set the target slightly lower than the total amount you’d like to pay, to
accommodate fees and taxes that may be added to your electricity bill.
To change the beeper settings for this alert:
Energy > More > Set Monthly Budget > Alert Beeper
From the ALERT BEEPER screen,
determine if and how you want to
be alerted that you have reached
your target budget threshold. The
beeper can be off, set to beep once
when the alert occurs, or every 15
minutes until you press a key. Use the
to highlight your selection then
press .
Off
Once Upon Receipt
Every 15 Min Until Button Press
Alert Beeper
16
Page 19

If you have enabled popup message
alerts, the following screen will appear
on your display when your target
budget has been exceeded.
A message will also be sent to your
INBOX.
Month To Date
Cost Alert
Costs Have
Exceeded
$100 5
Exit
Days Left
In Month
4.2 Track Energy Use Against A Budget Target
Once you have set a budget target, the following features are designed to help you track
energy use against it.
To view month-to-date usage:
Energy
STEP 1
STEP 2
Press the ENERGY key.
The month-to-date usage chart shows
energy use for each day of the current
month. The top line shows you how
much energy you have consumed so far
this month. The second line shows if you
are above or below your targeted month
Month To Date Usage: $224.19
Over Budget By: $74.05
$0.61
01/01/12
$4.84
Daily
Electricity Use
Exit
Budget
Days
More
to date usage. Use to scroll
through the days. As you do so, the
actual cost per day will appear on the
display.
KEEP IN MIND:
To take advantage of the budget tracking feature, your meter must be configured to provide
electricity rate information. If your meter does not support rate information, then this screen
will simply show your energy usage measured by kWh. To estimate your month-to-date energy
costs, you will need to multiply the kWh value shown on the product display by your kWh rate
which can likely be found on your electricity bill.
17
Page 20

To view current cost estimates:
Energy > More > Current Cost Per Hour
Want to know how much it costs to run your dryer? The CURRENT COST PER HOUR feature
will allow you to figure out how much it costs to operate any electrically powered appliance
or device in your home. This feature shows your whole home’s energy use in real time. First,
take a look at the screen and note your energy use. Then, start the dryer and check back to
see the cost difference. Unless other appliances turned on while you were starting the dryer,
you can infer the difference between the original and new “cost per hour” values is what it
costs you per hour to run the dryer.
From the CURRENT COST PER HOUR
screen, you’ll see the current cost per
hour kWh, the rate at which you’re
currently using electricity and the
cost per kWh.
Current Cost Per Hour
Cost Per Hour $0.41
Current Use 3.4 kWh
Current Rate $0.12 kWh
Exit
To view HVAC cost estimate:
Energy > More > HVAC Cost Estimate
Heating, ventilation and air conditioning (HVAC) account for almost half of all residential
energy consumption. The HVAC COST ESTIMATE screen lets you see how much you’re
spending on electricity to run your HVAC equipment and how much it contributes to your
total electricity costs.
From the HVAC COST ESTIMATE SCREEN,
you’ll see the percentage of your home’s
total electricity usage devoted to cooling
and heating.
Electricity Cost Estimate
Cooling Heating
Month To Date
% of Total 65% 0%
Exit
$78.21 $0
18
Page 21

5.0 Tiered Pricing Plan Exclusive Features
We define a “Tiered Pricing Plan” as one where your electricity rates change based on the
time of day. The following features are only pertinent to users who are enrolled in this type
of utility pricing plan.
Utilities are increasingly looking to “time-of-use” rates as a way to help them balance load
and maintain grid reliability when capacity is scarce. By shifting your consumption to off
peak hours you may significantly lower your energy costs.
If you are enrolled in this type of pricing plan, the thermostat can protect you by
automatically changing the temperature of your home when rates are high.
Specifically, you can determine - in advance - how you want your thermostat to respond
when prices change. You may decide it’s worth giving up a few degrees of comfort to save
money when rates reach a certain level.
KEEP IN MIND:
To take advantage of the tiered pricing plan features offered by this thermostat, your home
must be equipped with a smart meter or a gateway that is in communication with your utility
and you must be enrolled in a tiered pricing program.
19
Page 22

5.1 Enable Price Protection
The “Price Protection” feature is designed to save you money by letting you automate how
your heating and cooling system responds to peak rates. First, determine how you want your
thermostat to respond to each price tier. The product will always display the lowest price tier
first and each tier that follows is more expensive than the one before it.
You can then assign how many degrees warmer or cooler you’d like your home to be when
each tier is active. The thermostat only lets you make adjustments that save you money
(regardless if you’re in a heating or cooling program) so don’t worry about the direction of
the adjustment.
When rates increase, the home screen of the thermostat will indicate that Price Protection is
active and whatever temperature adjustment was previously defined will take effect. To
cancel Price Protection when rates are high, simply press the “Cancel” key.
For more information on your utility’s specific rate structure, visit their website.
To set your Price Protection preferences:
Menu > Settings > Price Protection > Set Cooling (or Heating) Response
20
STEP 1
STEP 2
STEP 3
Press the MENU key.
From the Settings menu, use
the arrows to select
PRICE PROTECTION. Press .
If the PRICE PROTECTION feature shows
OFF, press . You should now see a
listing titled SET COOLING RESPONSE.
If you have a Heat Pump you will
also see a SET HEATING RESPONSE
option. Select COOLING RESPONSE
and press . .
SettingsSettings
Fan Auto
Clock
Schedules On
Alerts
Price Protection On
Exit
Price Protection
Price Protection On
Set Cooling Response
Exit
Help
Page 23

STEP 4
STEP 5
On the PRICE RESPONSE: COOLING
screen, the pricing tiers offered by
your utility will be listed. Indicate
how you want your thermostat to
respond when each tier is active.
Use the arrows to select a tier,
then press .
Use the arrows to select the
temperature adjustment you’d like to
have in place when that tier price is
active. In COOLING mode, for example,
an adjustment of 2° will result in the
room being two degrees warmer for
the duration of that rate.
Price Response: Cooling
Tier 2: $0.12 kWh 2°
Tier 3: $0.18 kWh 2°
Tier 4: $0.24 kWh 3°
Tier 5: $0.28 kWh 3°
Tier 6: $0.35 kWh 4°
Tier 7: $0.75 kWh 5°
Exit
Tier 2
When this rate is
active, adjust
temperature:
2º
Alert
Beeper
Off
STEP 6
STEP 7
STEP 8
NOTE
If you want to change the Alert Beeper
setting, press to advance to the next
field and using the arrows, select
how you want to be alerted when this
pricing tier is active. Press twice to
return to the tier menu.
Repeat steps 5-6 until temperature
adjustments are set for each of the
cooling price tiers.
To set temperature adjustments for
heating price tiers, return to Step 4
and select SET HEATING RESPONSE.
Repeat steps 5-8.
When the price of electricity exceeds
your base rate, the words PRICE
PROTECTION ACTIVE will appear at the
top of your thermostat display and the
active price tier will be displayed in the
lower left corner.
The key light will also blink
according to the level of the rate:
Red = high, Yellow = medium,
Green = above base rate, but not as
high as yellow and red.
Price Protection Active
F
Tier 2
$0.16
75
kWh
Inbox Cool Cancel
Active Until
6:00PM
21
Page 24

To disable Price Protection when active:
When rates are high and Price Protection is active, you can always override the feature
by either pressing the CANCEL key or by using the arrows to change the set point.
STEP 1
STEP 2
To opt out at any time during a pricing
event, press the CANCEL key.
The system will ask you to confirm your
decision to opt out.
Price Protection Active
F
Tier 4
$0.25
Changing the set point
temperature will cancel Price
Protection for this event. Are you
sure you want to do this?
75
kWh
Inbox Cool Cancel
Cancel Price Protection
No Yes
5.2 View Scheduled Rate Changes
Most utilities can anticipate in advance when rates will fluctuate. When scheduled,
pending rate changes will be displayed on the thermostat so
you are aware of every opportunity to save money.
To view scheduled rate change details:
Energy > More > Scheduled Rates
From the SCHEDULED RATES menu,
use the arrows to scroll through
the list of scheduled rates. To view the
details of any rate, press .
Details of the rate change are presented
in the display.
Scheduled Rates
2:00PM Wed - 01/01/12
2:00PM Thu - 01/02/12
Exit
Scheduled Rate
Date
Tier 2
Start Time
Duration
Wed - 01/01/12
Active Until
6:00PM
$0.16 kWh
2:00PM
4 hours
22
Exit
Page 25

5.3 View Costs by Rate
This feature of the thermostat is designed to show you the impact of higher rates on your
total monthly energy costs.
To view cost by rate:
Energy > More > Costs by Rate
STEP 1
STEP 2
STEP 3
STEP 4
Press the ENERGY key.
Press MORE at the bottom of
the display.
From the Energy Monitor menu, use
the arrows to select COSTS BY
RATE. Press .
In this example, the COSTS BY RATE
screen shows that while you may have
consumed only a fraction of your total
Energy Monitor
Scheduled Utility Event
Scheduled Rate
Current Cost Estimates
Block Rate Usage
Costs By Rate
Exit
Month To Date Cost Est.
Tier 1
Tier 2
Tier 3
Rate kWh Cost
$0.08
1171
$0.16
105
$0.85
11
$93.72
$16.82
$9.61
energy under the highest rate, that cost
STEP 5
represents a significantly higher portion
of your total energy spent.
To view the proportion by percentage,
press the % key.
Month To Date Cost Est.
Tier 1
Tier 2
Tier 3
%
Rate kWh Cost
$0.08
91%
8%
1%
78%
14%
8%
$0.16
$0.85
kWh / $
6.0 Direct Load Control Plan Exclusive Features
In a direct load control (DLC) plan, you voluntarily allow your utility company to control
major appliances in your home when demand for electricity peaks. These instances of peak
demand are called "utility events" and when they occur, the utility will take action, such as
adjusting the thermostat temperature or cycling your air conditioner on and off, for the
duration of the event. Under most circumstances you can opt in or opt out of a utility event.
23
Page 26

6.1 View Scheduled Utility Events
Utility events are most likely to happen on the hottest weekday summer afternoons when
the electric grid is under pressure. Many utilities can anticipate and will schedule an
event at least one day in advance.
To opt out of a utility event:
When a utility event is active, the words
ACTIVE UTILITY EVENT will appear on the
thermostat display along with the time
when the event is expected to end.
The ENTER key light will also illuminate
based on the level of criticality:
•
Green = Low
•
Yellow = Medium
•
Red = High (Mandatory Participation)
STEP 1
To opt out at any time during the utility
event, press OPT OUT key.
STEP 2
The system will ask you to confirm your
decision to opt out.
1:54 PM - Jan. 01
Active
Utility
Event
F
76
Cool Opt OutInbox
Event Participation
By participating in this event
you can save money and help
maintain grid reliability. Are
you sure you want to opt out?
No Yes
Ends At
6:00PM
To opt back into an active utility event:
STEP 1
STEP 2
To opt in to an active utility event,
press OPT IN key
The phrase ACTIVE UTILITY EVENT will
now be prominently displayed in the
upper RIGHT area of the screen.
24
1:54 PM - Jan. 01
Active
Utility Event
76
Cool Opt InInbox
Set At
75
F
Ends At
6:00PM
Page 27

KEEP IN MIND:
Under the most critical circumstances - such as, a potential blackout – the key light will
illuminate in RED. If at all possible, try not to Opt Out of these types of events.
To view the details of any scheduled utility event:
Energy > More > Scheduled Events
STEP 1
STEP 2
STEP 3
STEP 4
STEP 5
Press the ENERGY key.
Press MORE at the bottom of
the display.
From the Energy Monitor menu, select
SCHEDULED EVENTS and press .
To view the details of any event, select
the event then press .
The date, start time and duration of
each event is presented in the
display. You may opt in to this event
in advance by pressing OPT IN.
7.0 Support
For more information about this product:
Customer Service: 1-888-725-9797
Energy
Scheduled Utility Event
Exit
Scheduled Utility Events
2:00PM Wed - 08/01/12
2:00PM Fri - 01/03/12
Scheduled Utility Events
Date
Start Time
Duration
Status
Wed - 08/01/12
2:00PM CDT
4 hours
Opted Out
Opt In
25
Page 28

37-7302C
Emerson Electric Co. or one of its affiliated companies. ©2013 Emerson Electric Co.
2013 Emerson, Emerson Climate Technologies are trademarks of
All rights reserved.
 Loading...