

EBTC08RE1 EBTC10RE1 EBTC10RE2
EBTC12RE1 EBTC12RE2
EBTC14RD2
EBTH14RD2
EBTE1 2RD2


CONTENTS
IMPORTANT SAFETY INSTRUCTIONS
INSTALLATION INSTRUCTIONS
NORMAL SOUNDS
AIR CONDITIONER FEATURES
HANDLING THE REMOTE CONTROLLER
INSTALLATION INSTRUCTIONS OF BATTERY
REMOTE CONTROLLER SPECIFICATIONS
FUNCTION BUTTONS
HOW TO USE THE BUTTONS
CARE AND CLEANING
TROUBLESHOOTING TIPS
...................................................18
.............................................23
.............................................29
......................................30
................................4
...............................18
................................24
....................1
..............21
..........22
......21
● Plug in power plug properly. Otherwise, it may cause electric shock or fire due to excess heat
generation.
● Do not operate or stop the unit by inserting or pulling out the power plug. It may cause electric
shock or fire due to heat generation.
● Do not damage or use an unspecified power cord. It may cause electric shock or fire. If the power
cord is damaged, it must be replaced by the manufacturer or an authorised service centre or a
similarly qualified per son in order to avoid a hazard.
● Always install circuit Do not direct airflow at room occupants only. breaker and a dedicated power
circuit.
● Incorrect installation may cause fire and electric shock.
● Do not operate with wet hands or in damp environment. It may cause electric shock.
● Do not direct airflow at room occupants only.This could damage your health.
● Always ensure effective grounding.Incorrect grounding may cause electric shock.
● Do not allow water to run into electric parts.It may cause failure of machine or electric shock.
● Do not modify power cord length or share the outlet with other appliances. It may cause electric
shock or fire due to heat generation.
● Unplug the unit if strange sounds, smell, or smoke comes from it. It may cause fire and electric
shock.
● Do not use the socket if it is loose or damaged. It may cause fire and electric shock.
● Do not open the unit during operation. It may cause electric shock.
● Keep firearms away. It may cause fire.
● Do not use the power cord close to heating appliances. It may cause fire and electric shock.
● Do not use the power cord near flammable gas or combustibles, such as gasoline, benzene,
thinner, etc. It may cause an explosion or fire.
● Ventilate room before operating air conditioner if there is a gas leakage from another appliance. It
may cause explosion, fire and, burns.
● Do not disassemble or modify unit. It may cause failure and electric shock.
● When the air filter is to be removed, do not touch the metal parts of the unit. It may cause an injury.
● Do not put a pet or house plant where it will be exposed to direct air flow. This could injure the pet or
plant.
● Ventilate the room well when used together with a stove, etc. An oxygen shortage may occur.
● Do not use strong detergent such as wax or thinner but use a soft cloth. Appearance may be
deteriorated due to change of product color or scratching of its surface.
● Do not clean the air conditioner with water. Water may enter the unit and degrade the insulation. It
may cause an electric shock.
● Do not use for special purposes. Do not use this air conditioner to preserve precision devices, food,
pets, plants, and art objects.It may cause deterioration of quality, etc.
● Stop operation and close the window in storm or hurricane. Operation with windows opened may
cause wetting of indoor and soaking of household furniture.
● When the unit is to be cleaned, switch off, and turn off the circuit breaker. Do not clean unit when
power is on as it may c ause fi re an d el ectric sh ock, it may cause an injury.
● Ensure that the installation bracket of the outdoor appliance is not damaged due to prolonged
exposure. If bracket is damaged, there is concern of damage due to falling of unit.
● Always insert the filters securely. Clean filter once every t wo w eeks. Operation without filters
maycause failure.
● Hold the plug by the head of the power plug when taking it out. It may cause electric shock and
damage.
● Turn off the main power switch when not using the unit for a long time. It may cause failure of
product or fire.
● Do not place obstacles around air-inlets or inside of air-outlet. It may cause failure of appliance or
accident.
● Do not place heavy object on the power cord and ensure that the cord is not compressed. There is
danger of fire or electric shock.
● Do not drink water drained from air conditioner. It contains contaminants and could make you sick.
● Use caution when unpacking and installing. Sharp edges could cause injury.
● If water enters the unit, turn the unit off at the power outlet and switch off the circuit breaker. Isolate
supply by taking the power-plug out and contact a qualified service technician.
● This appliance is not designed for use by young children. Young children should be supervised to
ensure that they do not play with or climb on the unit.
● Do not alter or modify the plug or cord of this air conditioner. If the power cord becomes worn or
damaged, the cord should only be replaced by a qualified service technician using genuine
replacement parts.
● This appliance shall be installed in accordance with national wiring regulations.
● Contact an authorized installer for installation of this unit.
● Contact an authorized service technician for repair or maintenance of this unit.
● Do not operate your air conditioner in a wet room such as a bathroom or laundry room.
● The appliance with electric heater shall be at least 1 meter (add equivalent in feet) away from
combustible materials.

Do not unplug and plug in the cord to turn the unit on or off.
needed
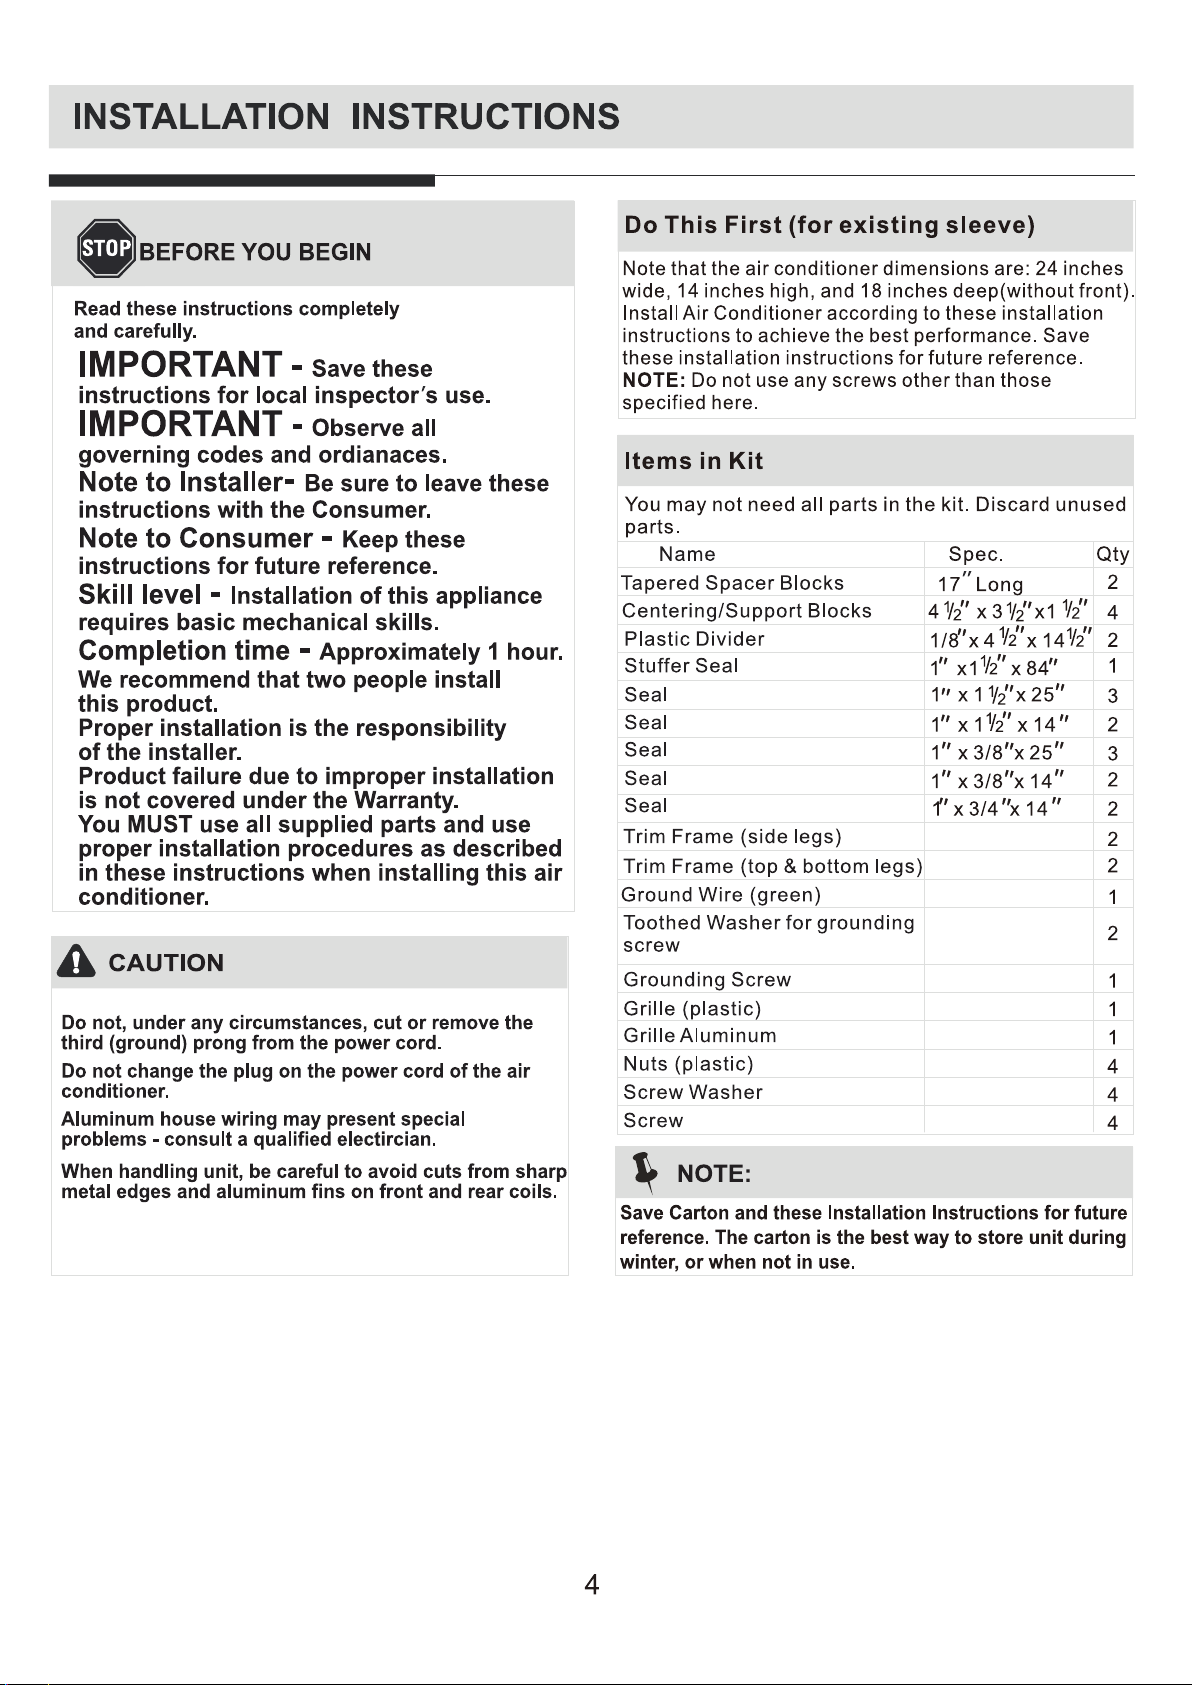
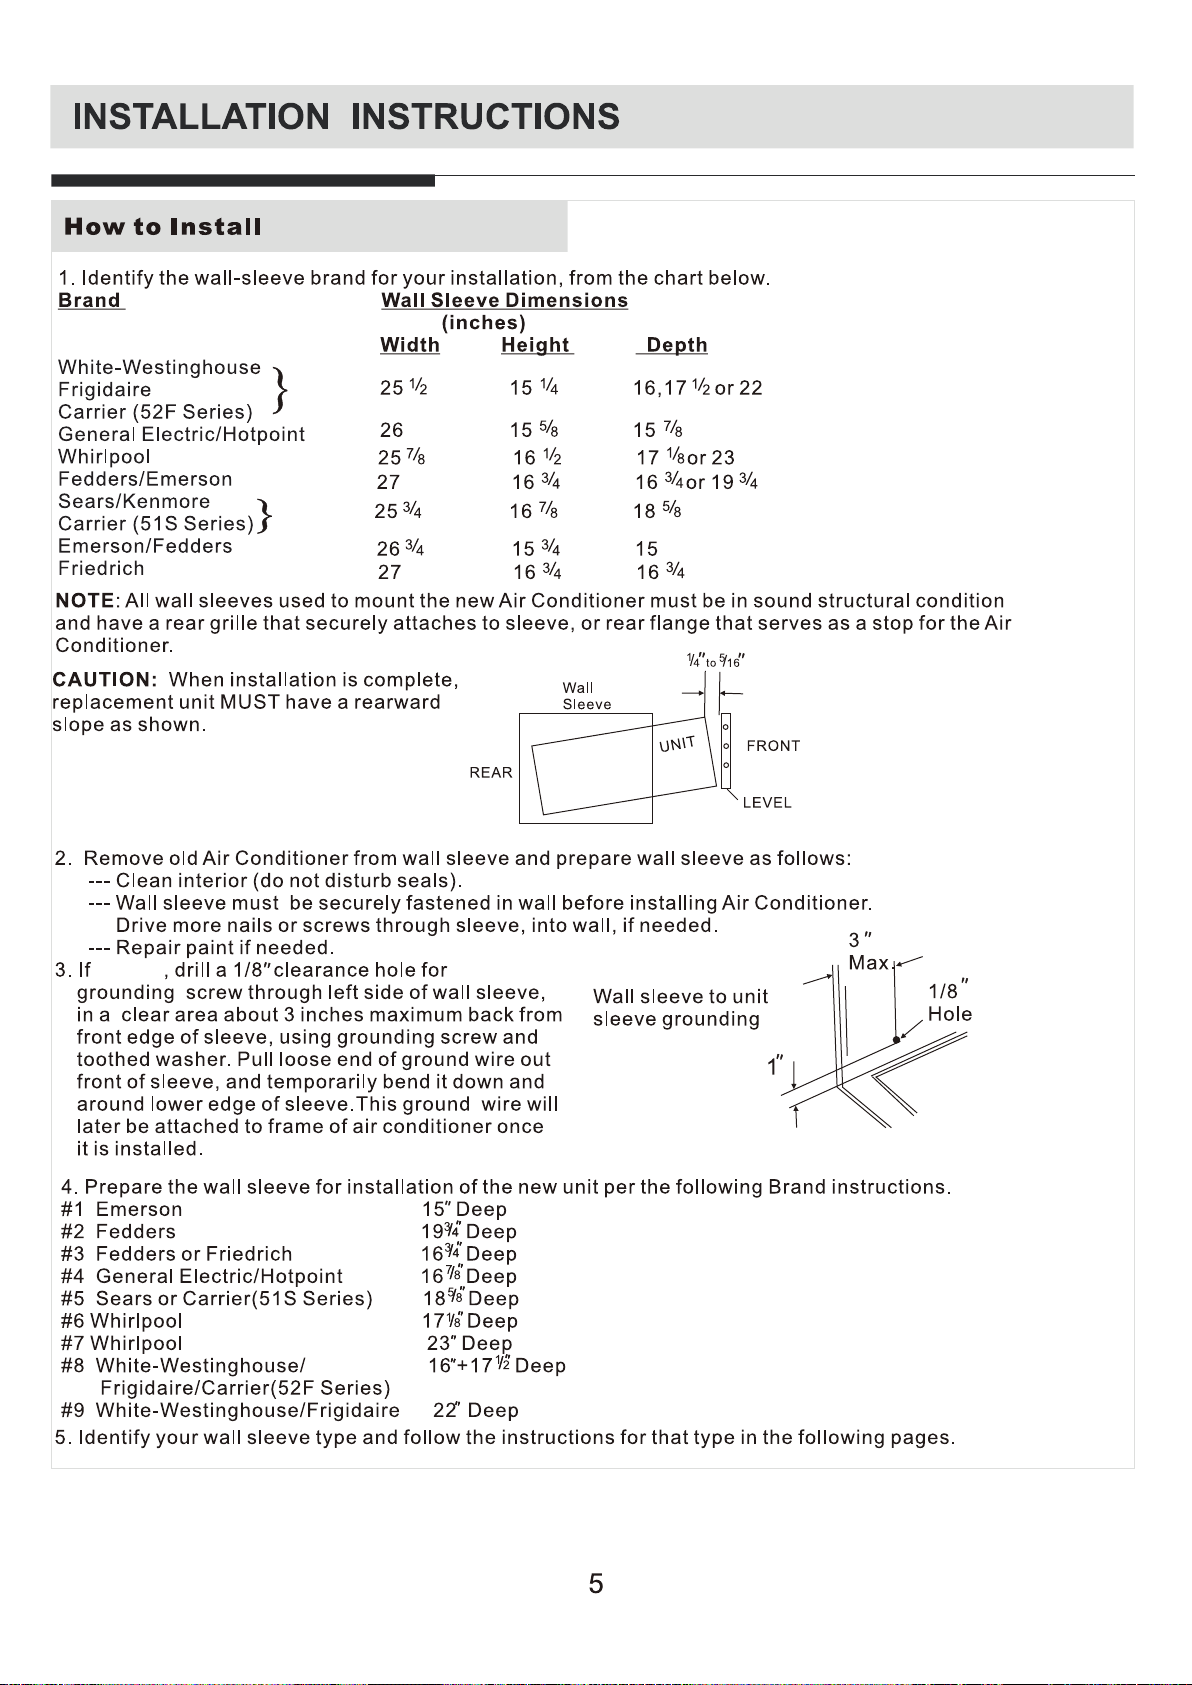
If there is an existing sleeve and rear grille, they will need to be replaced by the one included in the accessory kit.
and
and

and

and
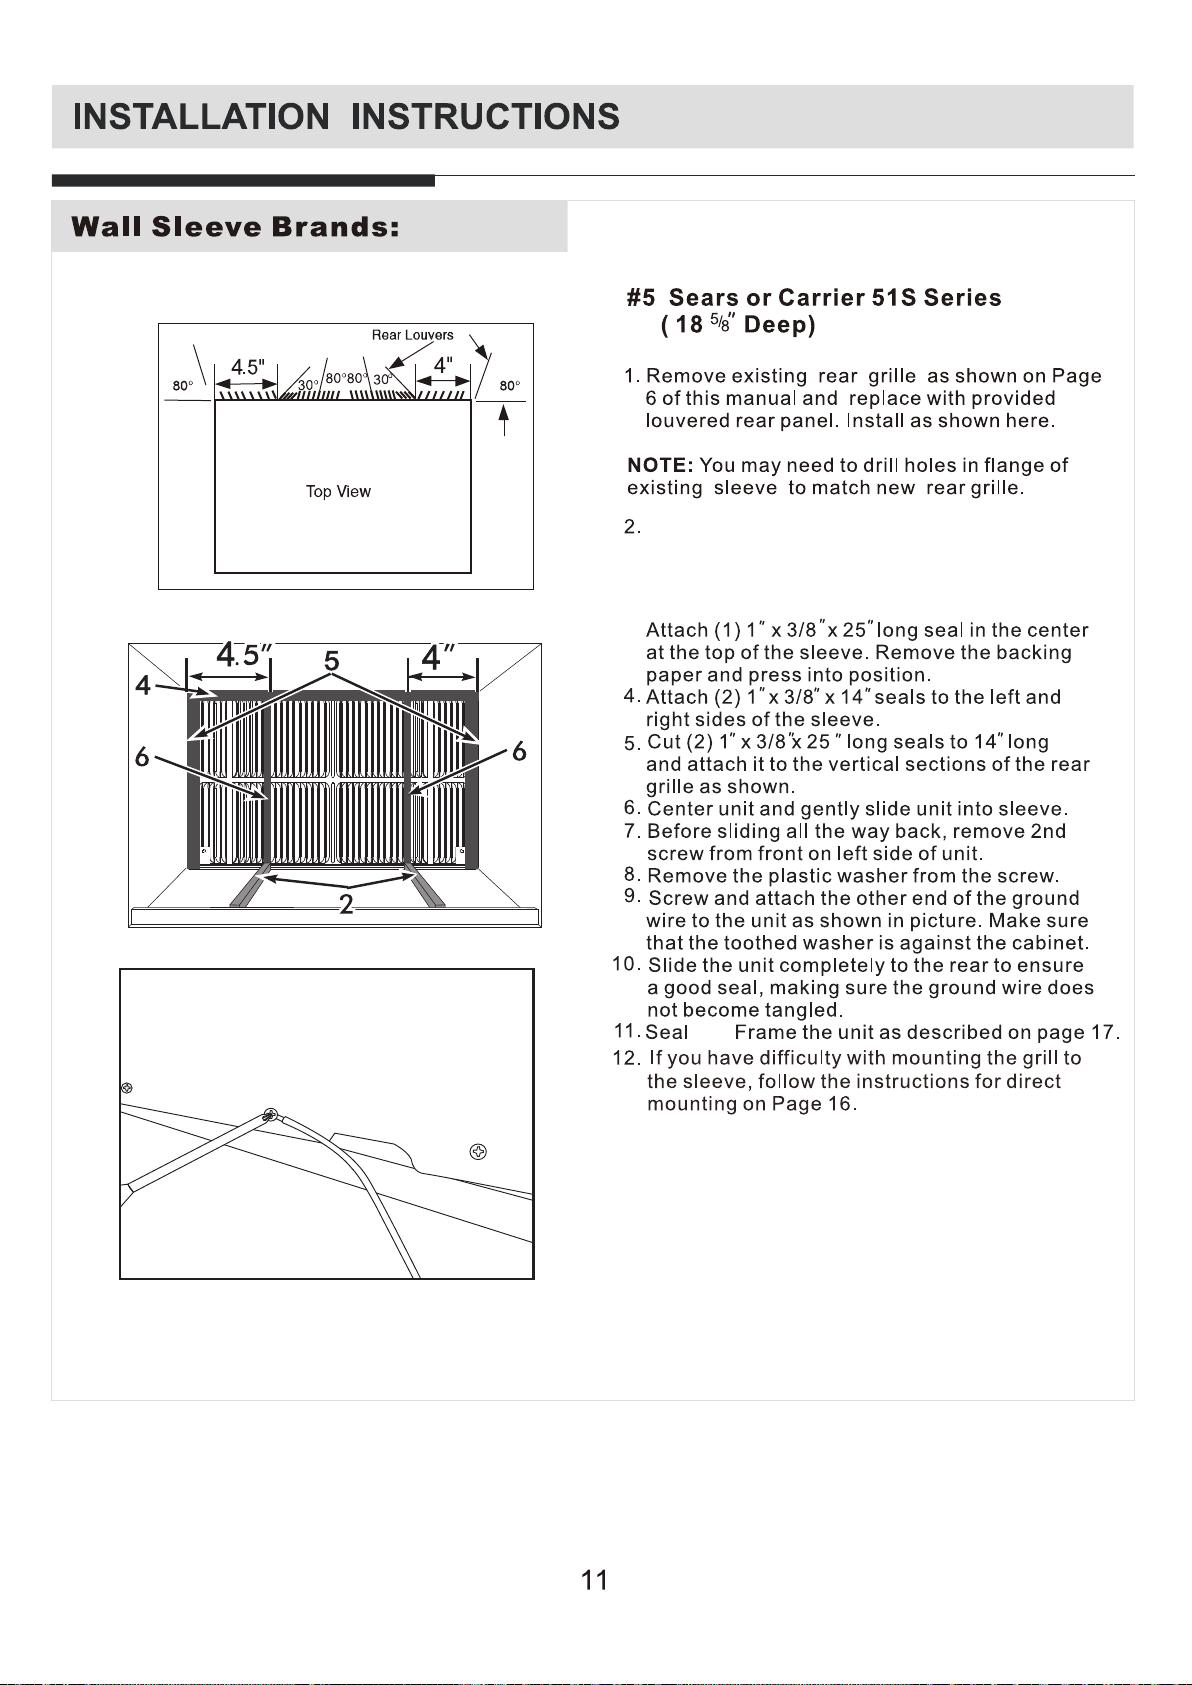
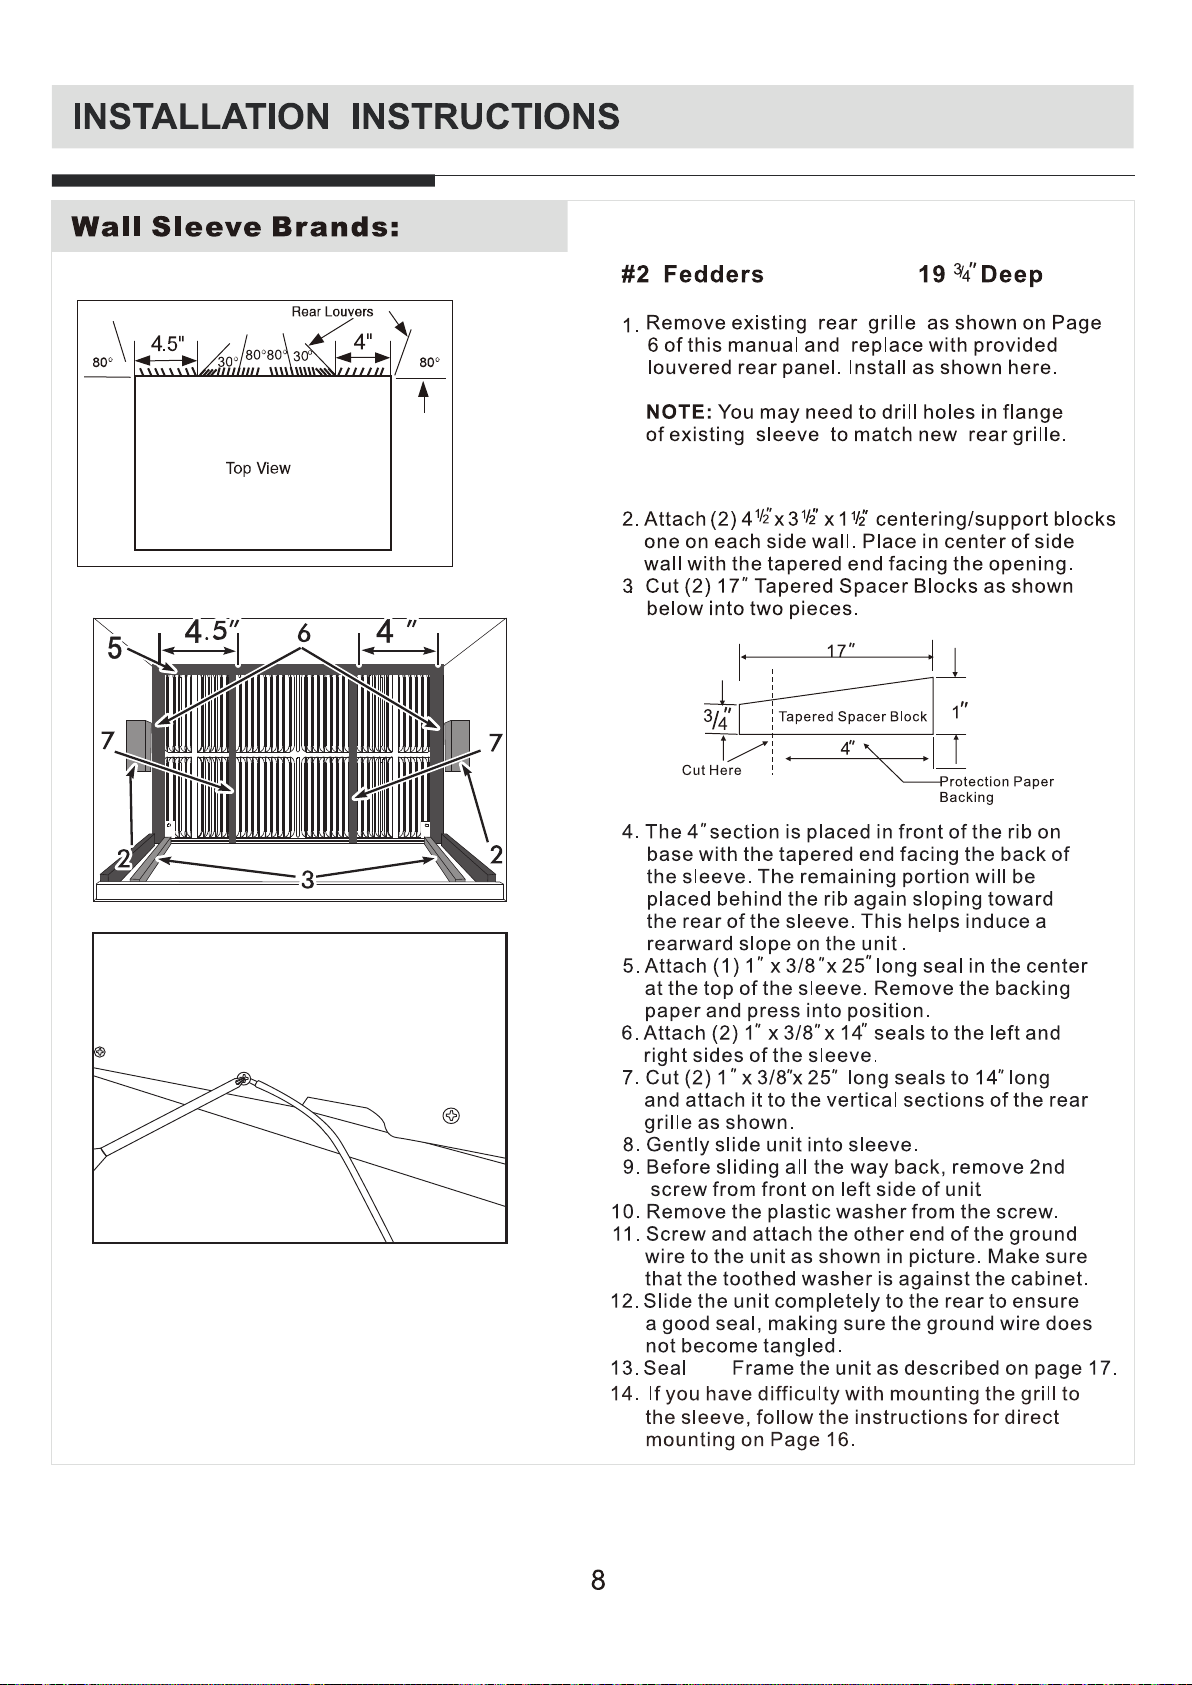
Install (2) tapered spacer blocks to the floor of
the sleeve as shown. with the tapered end 1/2
from the back of the sleeve. This helps induce a
rearward slop on the unit.
3.
and

and

and

and
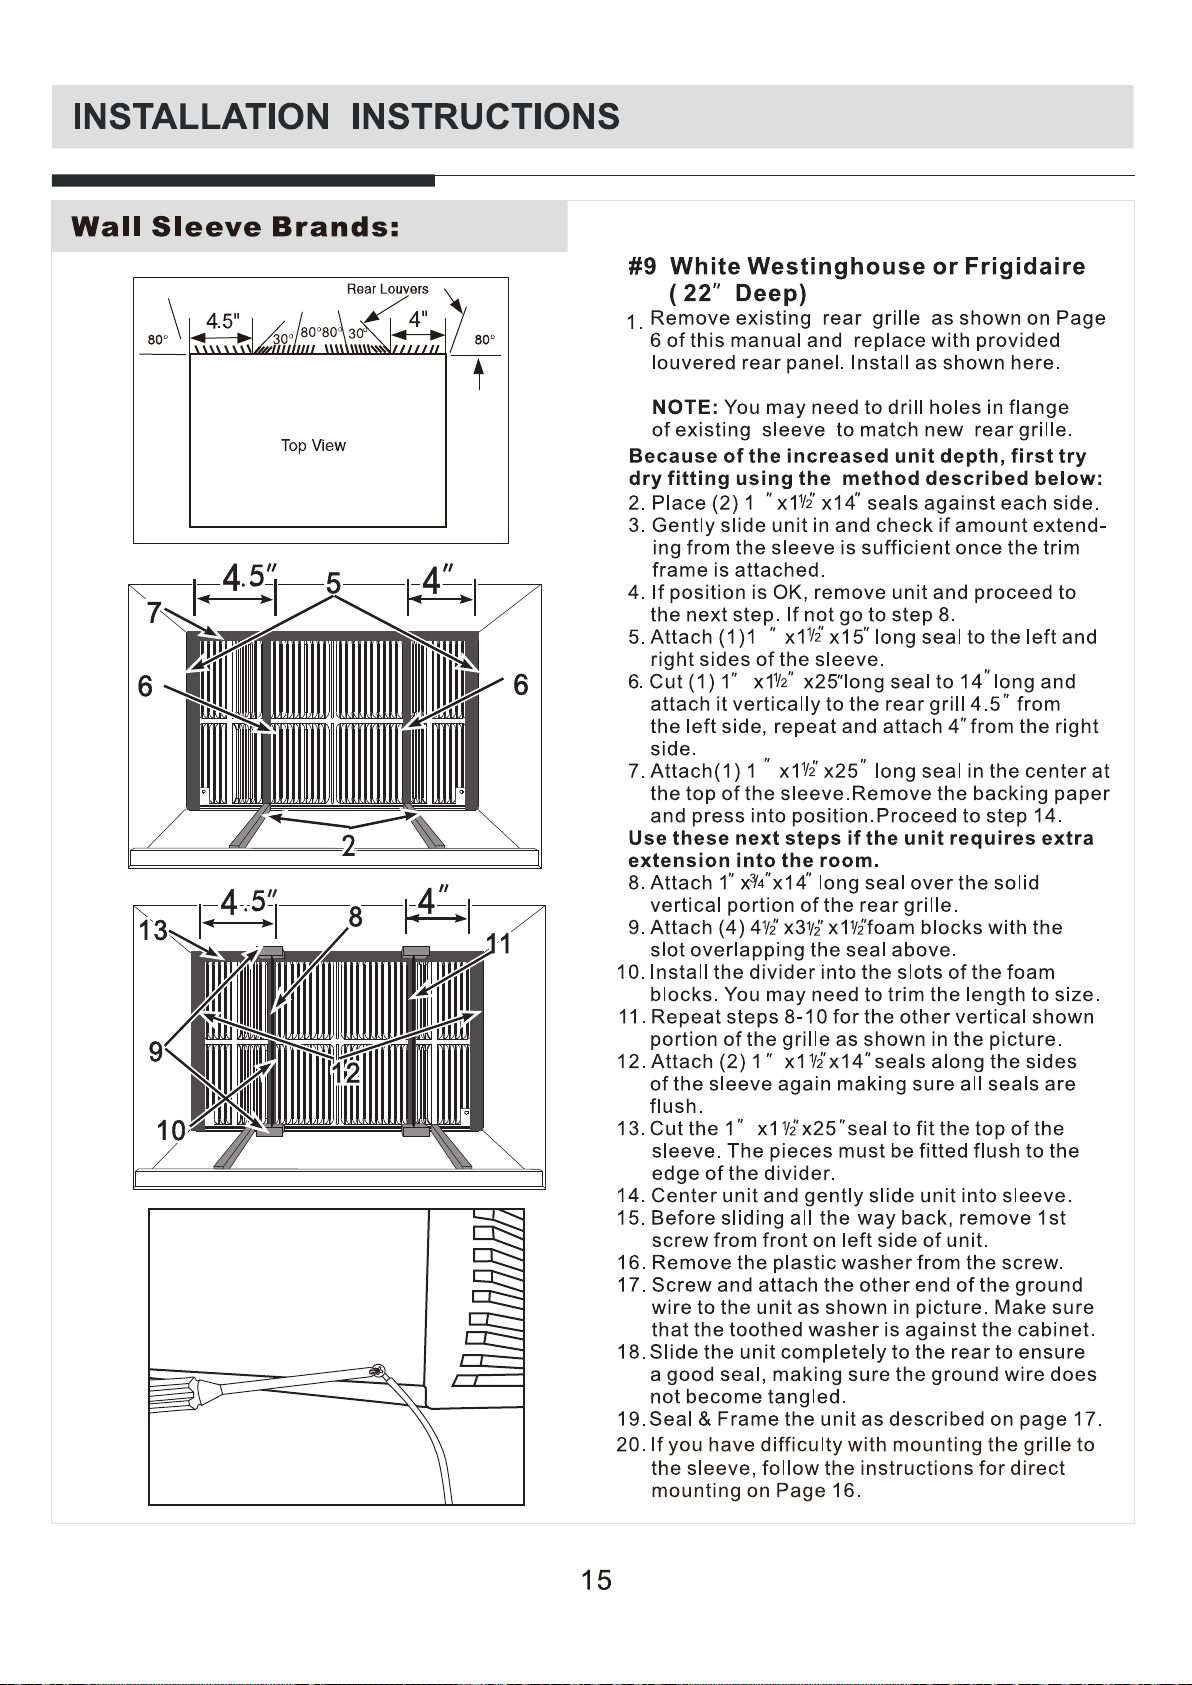

The previous directions are the preferred installation method for the rear grille for optimal performance. Only
use the Direct Mounting option as a last resort. As a last resort, direct mounting of the grille to the unit can
be considered.
Align the top of the grille with the top of the unit making sure the overhang on both sides is equal.

between the
wall-sleeve and the unit using a flat-head screwdriver
or putty knife.

Before you begin, thoroughly
familiarize yourself with the control panel and functions (shown below). This unit can be controlled by the control panel
or with the included remote.
default to
seen on the display and the temperature will be
automatically maintained. The unit’s operating range is
between

Press to select the Fan Speed: Auto, Low, Med, or
High. On certain models the fan speed cannot be
adjusted under HEAT mode. On Dry mode the Fan
Speed will automatically be set to Low.
The new temperature will be maintained for 6 hours
then it will return to the previously programmed setting.
The LED (light) will illuminate after 250 hours of
operation as a reminder to clean the Air Filter for
optimal performance. To reset after cleaning the filter,
press the Check Filter button and the light will turn
off.
to cycle through modes: Auto, Cool, Dry, Heat (select
models), and Fan. An indicator light will show the selected
mode. The unite will automatically start in Energy Saver
mode when Cool, Dry, Auto (only Auto-Cooling and
Auto-Fan) modes are selected.
In Auto mode, the unit will automatically select cooling,
heating (select models), or fan only mode depending on
the set temperature and the room’s current temperature.
In this mode, the fan speed cannot be adjusted manually.
The unit will automatically choose the speed based on the
set temperature and the room’s current temperature.
Use the Fan Only function to circulate the air in a room or
to exhaust stale air (select models) when cooling is not
necessary. Remember to open the vent in this mode, but
keep it closed for maximum efficiency in Cooling Mode.
The display will show the actual room temperature. All fan
speeds are available in this mode. Note: in Fan Only mode
the temperature cannot be adjusted.
This feature can be activated from the remote control
ONLY. The remote control serves as a remote
thermostat allowing for precise temperature control.
To activate the Follow Me feature, point the remote
control towards the unit and press the Follow Me
button. The remote will display the actual temperature
from the remote’s location. A signal will be sent from
the remote control to the air conditioner in 3-minute
intervals. To end the Follow Me mode, press the Follow
Me button. If the unit does not receive the Follow Me
signal during a 7-minute interval, the unit will beep to
indicate it is no longer in Follow Me mode. To end the
Follow Me mode manually, press the Follow Me button.
Mode:
In this mode the air conditioner will act as a dehumidifier.
Depending on the space, some degree of cooling will
continue.
When the unit is on or off press Timer button once and
the TIMER ON indicator will illuminate initiating the Auto
Start program.
Press the Timer button a second time and the TIMER OFF
indicator will illuminate initiating the Auto Stop program.
Press or hold the UP or DOWN buttons to set the time by
0.5 hour increments up to 10 hours, then in hour
increments up to 24 hours. The control will count down the
time remaining until the unit will turn on.
The selected time will register in 5 seconds and the system
will display the previously set temperature or room
temperature if the unit is turned on. (When the unit is off,
the display will not be lit.)
To cancel a timer manually turn the unit ON or OFF or
adjust the timer setting to 0.0.

If the unit shuts off unexpectedly due to a power failure,
it will restart with the previous settings automatically
when the power has been restored.
Here are more control features you should be familiar
with:
The Cool circuit has an automatic 3-minute time delay if
the unit is turned off and on quickly. This is a safeguard
to prevent overheating of the compressor and possible
tripping of the circuit breaker. The fan will continue to run
during this time.
The temperature can be displayed in either Fahrenheit
or Celsius. To change, press and hold the Left and Right
Temp/Timer buttons at the same time for 3 seconds.
4-way Air Directional Louvers control air flow direction.
Use the center handles to adjust the louvers left or right.
Pivot the horizontal louvers with your fingertips up or
down.
Chemical Burn Hazard. Keep batteries away from children.
This product contains a lithium button/coin cell battery. If a new or
used lithium button/coin cell battery is swallowed or enters the body,
it can cause severe internal burns and can lead to death in as little as
2 hours. Always completely secure the battery compartment. If the
battery compartment does not close securely, stop using the product,
remove the batteries, and keep it away from children. If you think
batteries might have been swallowed or placed inside any part of the
body, seek immediate medical attention.
The cells shall be disposed of properly, including keeping them away
from children. Even used cells may cause injury.
20
HANDLING THE REMOTE CONTROLLER
TEMP/TIMER
ESnaevregry
Sleep
e
e
krc
t
FC
l
h
i
TEMP/TIMER
FoMlleow
Auto
on
off
Cool
Auto
Mode
Dry
High
Fan
On/off
Timer
Heat
Fan
Med
Low
5m
The air conditioner will not operate if curtains, doors or other materials block
the signals from the remote controller to the unit.
Prevent any liquid from falling into the remote controller. Do not expose the
remote controller to direct sunlight or heat.
If the infrared signal receiver on the indoor unit is exposed to direct sunlight,
the air conditioner may not function properly. Use curtains to p
sunlight from falling on the receiver.
If other electrical appliances react to the remote controller, either move these
appliances or consult your local dealer.
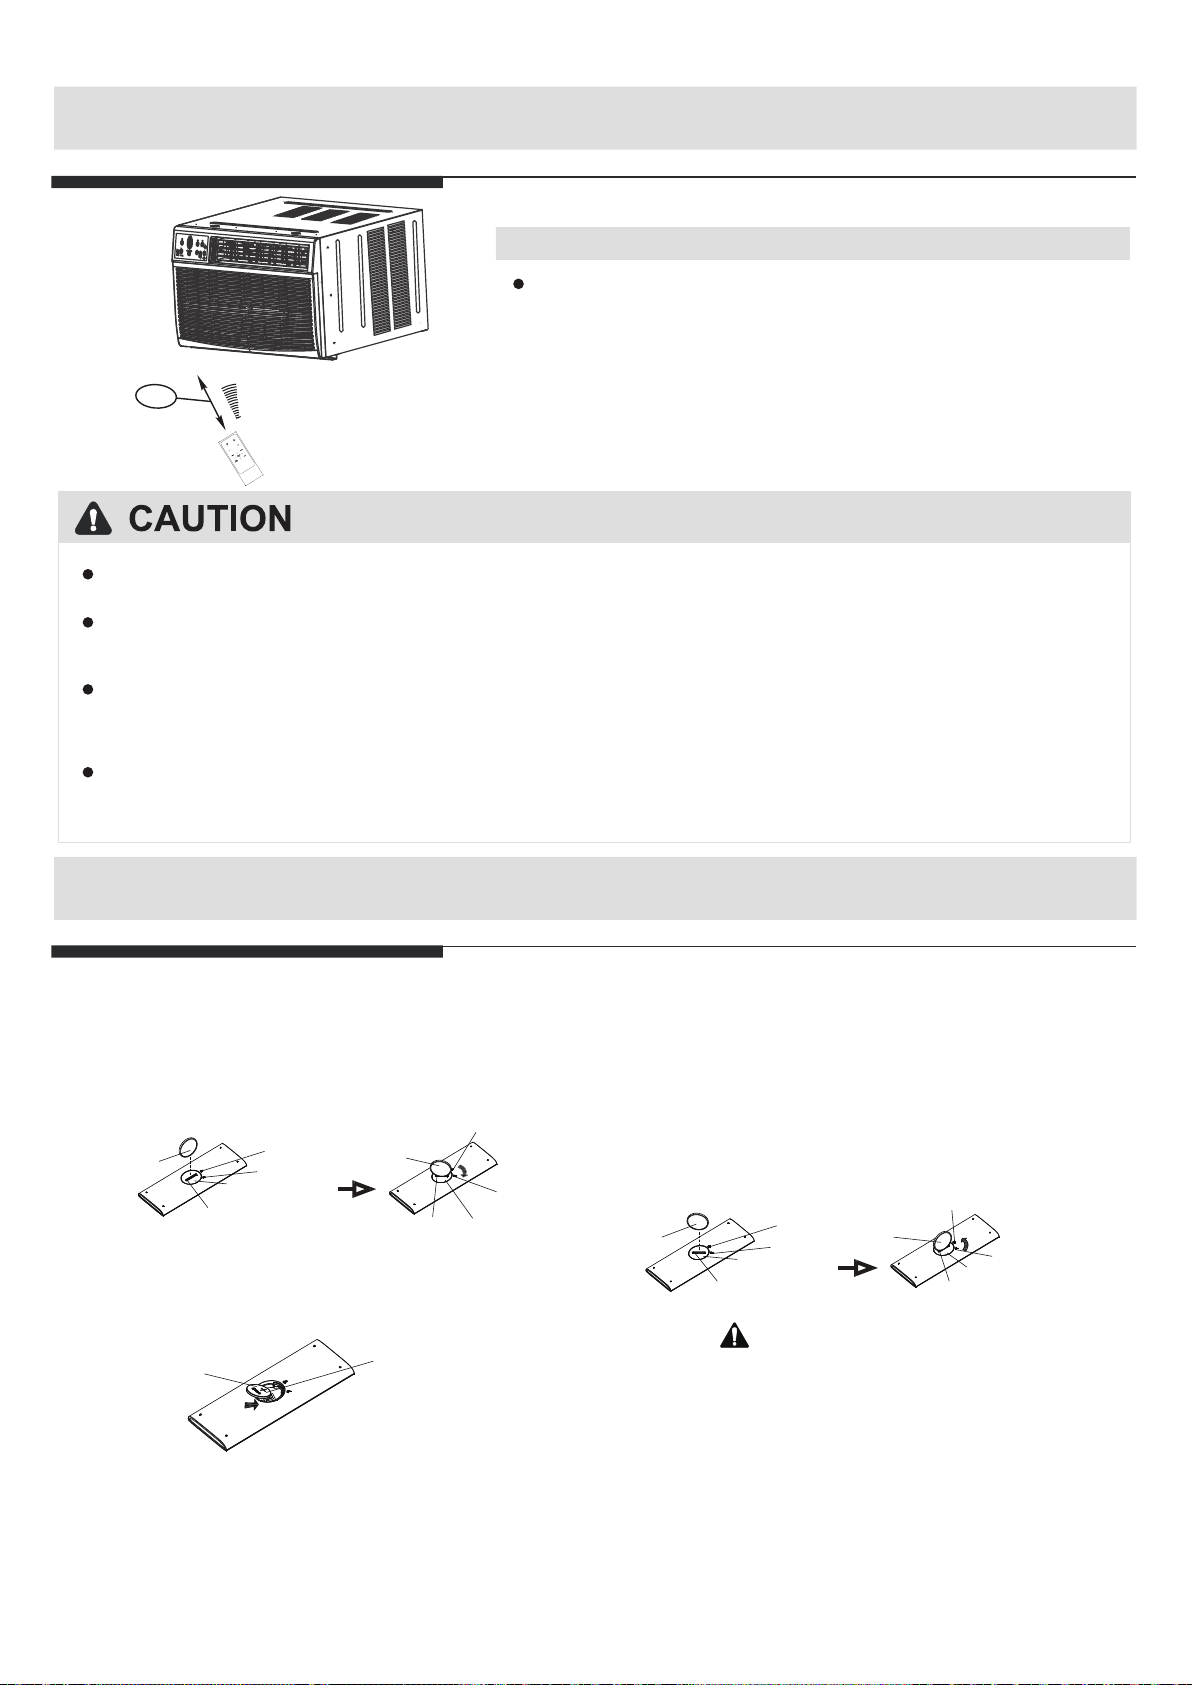
Location of the remote controller.
Use the remote controller within a distance of 5
meters from the appliance, pointing it towards
the receiver. Reception is confirmed by a beep.
revent the
INSTALLATION INSTRUCTIONS OF BATTERY
Step 1: Insert a coin vertically in the groove
on the battery cover, clockwise rotation of 45
degrees, make sure that the groove is aligned
with the "unlock" sign as shown below
and remove the battery cover.
Lock sign
Coin
Battery cover
Groove
Lock sign
Unlock sign
Coin
Groove
Unlock sign
Battery cover
Step 2: Install battery inside the remote
controller, the positive (+) side up.
Battery
Positive (+) side up
Step 3: Install the battery cover, make
sure the battery cover groove is aligned
with the "unlock" sign. Insert a coin
vertically in the groove and press it
gently, then counter clockwise rotation
of 45 degrees, make sure the groove is
aligned with the "lock" sign as shown
below.
Coin
Battery cover
Groove
Lock sign
Unlock sign
Coin
WARNING
1. Battery must be disposed of properly. Do not
short circuit or dispose of in the fire.
2. Keep batteries out of the reach of children.
3. Caution for ingestion.
4. Non-rechargeable batteries are not to be
recharged.
5. Exhausted batteries are to be removed from
the product.
Lock sign
Battery cover
Groove
Unlock sign
21

REMOTE CONTROLLER SPECIFICATIONS
Model
Rated Voltage
Lowest Voltage of
CPU Emitting Signal
Signal Receiving Range
Environment
-Buttons design is based on typical model and might be slightly different
from the actual one you purchased, the actual shape shall prevail.
-All the functions described are accomplished by the unit, if the unit has
no this feature, there is no corresponding operation happened when
press the relative button on the remote controller.
-When there are wide differences between Remote controller Illustration
and USERS MANUAL
MANUAL shall prevail.
on function description, the description on USERS
RG15A(B)/E,
3.0V( Lithium battery CR2025)
2.4V
5m
O O O O
-5 C~60 C(23 F~140 F)
RG15A3(B)/E,
RG15A4(B)/E, RG15A5(B)/E,
RG15A(B)/E
RG15A4(B)/E
RG15A5(B)/E
RG15A3(B)/E
22

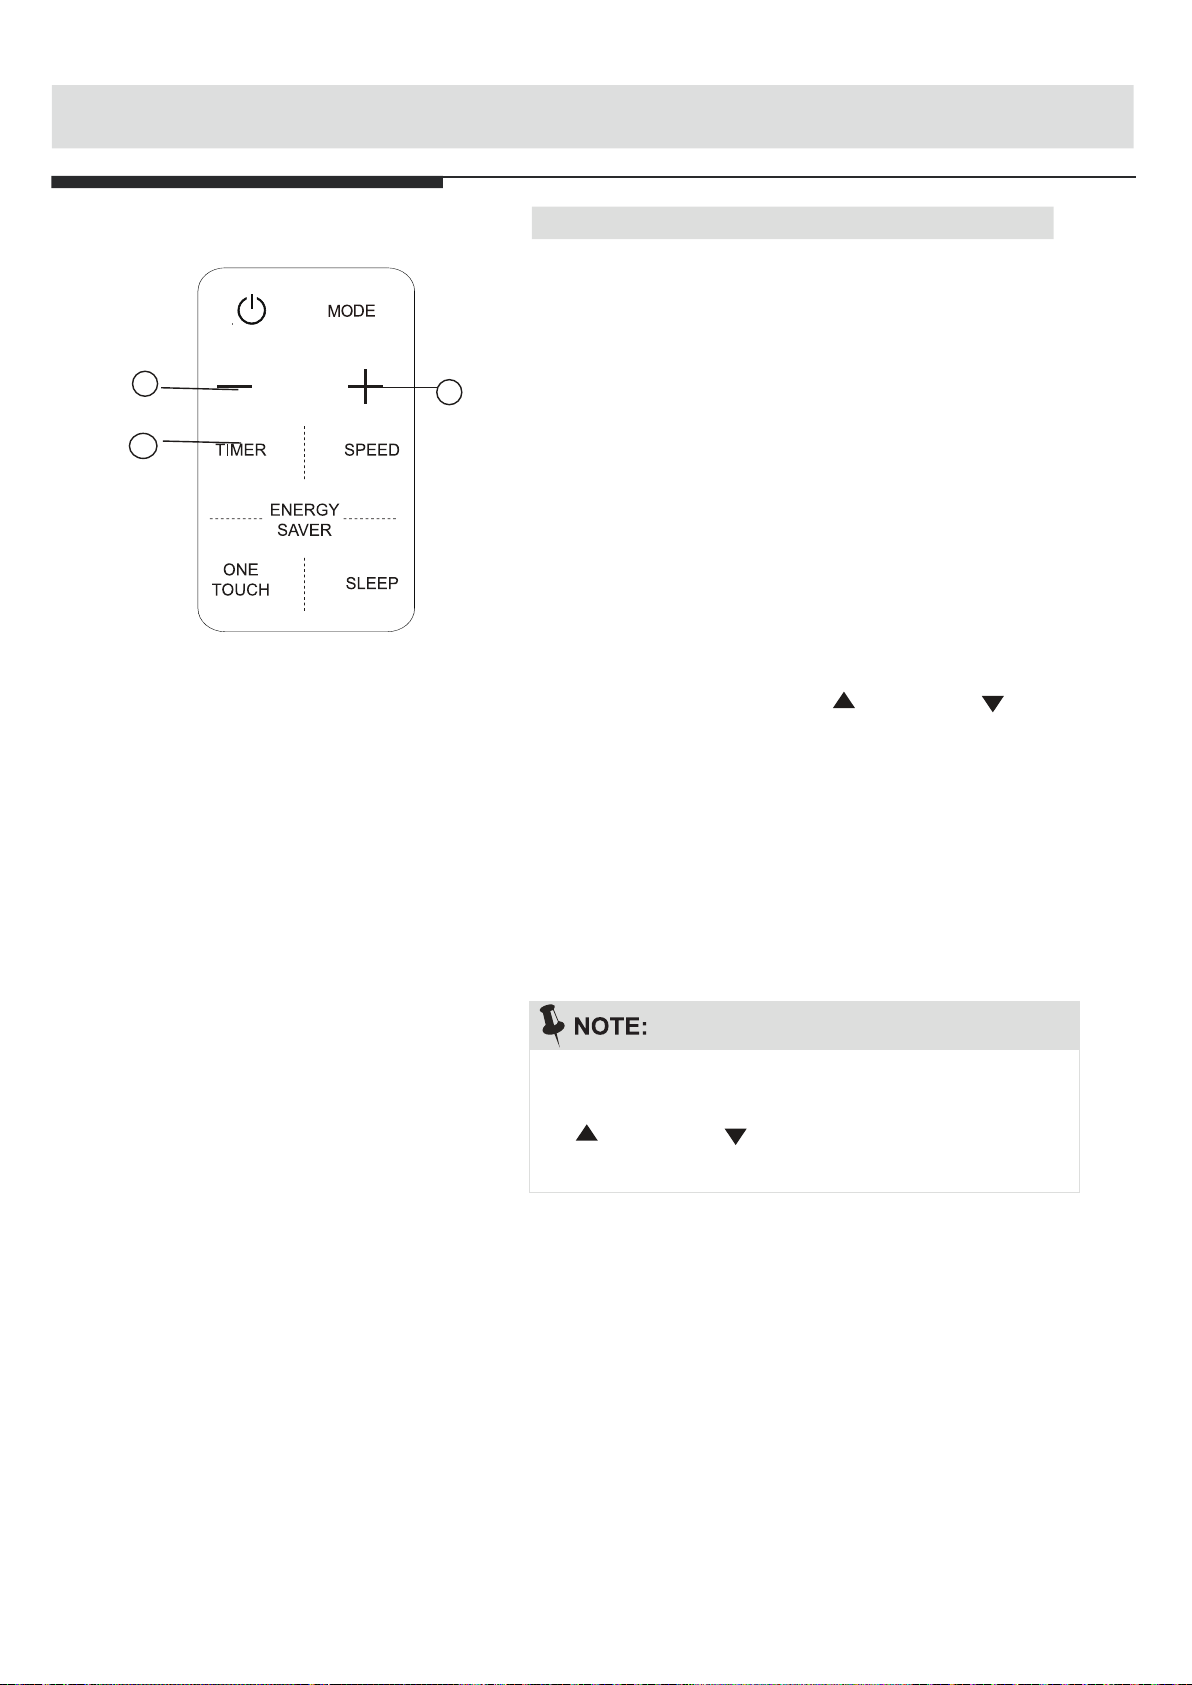
FUNCTION BUTTONS
ON/OFF button
Operation starts when this button is
pressed and stops when the button
is pressed again.
NOTE: If the unit has ENERGY
SAVER function, it wil l ini tia te
a utomatically the Energy Saver
function under C ool, Dry, and
Auto(only Au to-Cooling and
Auto-Fan) modes.
MODE button
Press this button to
select the desired
operation mode.
TEMP DOWN button
Push this button to
decrease the indoor
temperature setting.
TIMER button
Push this button to
activate the uto
Start or uto Stop
program.
Push this button, the
system will automatically
shift to COOL operation
with auto fan speed, the
setting temperature is
26 C/80 F. And the timer
setting program will be
cancelled.(on some models)
" "A "
ONE TOUCH button
O O
"A
ENERGY SAVER button
Press this button to
activate the Energysaving mode. Press
it again to stop the
funtion.(on some
models)
TEMP UP button
Push this button to
increase the temperature setting.
FAN button
Used to select the
desired fan speed.
SLEEP button
Press this button to
activate the Sleep
mode. This function is
available on COOL,
HEAT or AUTO mode
only and maintain the
most comfortable
temperature for you
and save enrgy. For
the detail, see sleep
operation in
,,
USER S MANUAL.
,,
,
,,
,,
23

HOW TO USE THE BUTTONS
1
3
2
Ensure the unit is plugged in and power is
available.
Press the ON/OFFbutton to start the air
3
1.
conditioner.
2.
Press the MODE button to select Auto.
3. Press the TEMP UP/DOWN button to set
the desired temperature.
1. In the Auto mode, the air conditioner can logically
choose the mode of Cooling, Fan, Heating and
by sensing the difference between the actual
ambient room temperature and the set temperature
on the remote controller.
2. In the Auto mode, you can not switch the fan speed.
It has already been automatically controlled.
3. If the Auto mode is not comfortable for you , the
desired mode can be selected manually.
Auto operation
Cooling /Heating/ operationFan
1
2
Ensure the unit is plugged in and power is
available.
Press the ON/OFF button to start the air
3
3
4
1.
conditioner.
2.
Press the MODE button to select Cool, Heat
(cooling&heating models only) or mode.
Fan
3. Press the TEMP UP/DOWN button to set the
desired temperature.
4. Press the FAN button to select the fan
speed.
In the Fan mode, you are not able to control the
room temperature either. In this case, only step 1, 2
and 4 may be performed.
24

HOW TO USE THE BUTTONS
Dehumidifying operation
1
3
2
3
Ensure the unit is plugged in and power is
available.
Press the ON/OFFbutton to start the air
1.
conditioner.
2.
Press the MODE button to select Dry.
3. Press the TEMP UP/DOWN button to
set the desired temperature.
In the Dehumidifying mode, you can not switch the
fan speed. It has already been automatically
controlled.
25
HOW TO USE THE BUTTONS
Timer operation
Press the TIMER button can initiate the
Auto-start and Auto-stop setting program
of the unit.
2
1
2
To set the Auto-start/stop time.
1. Press the TIMER button, when the TIMER
ON indicator displayed on the LED window
of the air conditioner, it indicates the Auto
Start setting program is initiated. When the
TIMER OFF indicator displayed on the LED
window of the air conditioner, it indicates the
Auto Stop setting program is initiated.
2. Press or hold the Up( ) or Down( ) to
change the Auto time. The control will count
down the time remaining until start/stop.
3. The selected time will register in 5 seconds
and the air conditioner will automatically
revert back to display the previous temper ature setting.
4. Turning the unit ON or OFF at any time
will cancel the Auto Start/stop function.
To cancel the TIMER setting, push
the TIMER button and press or hold the Up
( ) or Down( ) until 0 hour is displayed
on the LCD window of the air conditioner.
26

HOW TO USE THE BUTTONS
COMBINED TIMER
(Setting both ON and OFF timers simultaneously)
AUTO STOP AUTO START
(On Stop Start operation)
This feature is useful when you want to stop the
2
1
2
air conditioner after you go to bed, and start it
again in the morning when you wake up or when
you return home.
Example:
To stop the air conditioner 2 hours after setting
and start it again 10 hours after setting.
1. Press the TIMER button until the TIMER
OFF indicator is displayed on the LED display
of the air conditioner.
2. Use the UP/DOWN button to display "2.0" on
the LED display of the air conditioner.
3. Press the TIMER button again to display the
TIMER ON on the LED display of the unit.
4. Use the UP/DOWN button to display "10" on
the LED display of the unit.
5. Wait for 5 seconds until the previous display
revert back to the LED window.
AUTO START ATUO STOP
(Off Start Stop operation)
This feature is useful when you want to start
the air conditioner before you wake up and
stop it after you leave the house.
Example:
To start the air conditioner 5 hours after setting,
and stop it 8 hours after setting.
1. Press the TIMER button until the TIMER
ON indicator is displayed on the LED display
of the air conditioner.
2. Use the UP/DOWN button to display
"5.0" on the LED display of the air conditioner.
3. Press the TIMER button again to display
the TIMER OFF on the LED display of the unit.
4. Use the UP/DOWN button to display
"8.0" on the LED display of the unit.
5. Wait for 5 seconds until the previous display
revert back to the LED window.
27

HOW TO USE THE BUTTONS
Energy saver operation
In this mode, the fan will continue to
run for 3 minutes after the compressor
shuts off. The fan then cycles on for 2
minutes at 10 minute intervals until the
room temperature is above the set
temperature, at which time the compre-
1
-Buttons design is based on typical model and might be slightly different
from the actual one you purchased, the actual shape shall prevail.
-All the functions described are accomplished by the unit, if the unit has
no this feature, there is no corresponding operation happened when
press the relative button on the remote controller.
-When there are wide differences between Remote controller Illustration
and USERS MANUAL on function description, the description on USERS
MANUAL shall prevail.
-The device could comply with the local national regulations. I n Canada,
it should comply with CAN ICES-3(B)/NMB-3(B). In USA, this device
complies with part 15 of the FCC Rules. Operation is subject to the
following two conditions: (1) This device may not cause harmful interfe rence, and (2) this device must accept any interference received,
including interference that may cause undesired operation.
-This equipment has been tested and found to comply with the limits for
a Class B digital device, pursuant to part 15 of the
limits are designed to provide reasonable protection against harmful
interference in a residential installation. This equipment generates, uses
and can radiate radio frequency energy and, if not installed and used in
accordance with the instructions, may cause harmful interference to radio
communications. However, there is no guarantee that interference will
not occur in a particular installation. If this equipment does cause harmful
interference to radio or television reception, which can be determined by
turning the equipment off and on, the user is encouraged to try to correct
the interference by one or more of the following measures:
Reorient or relocate the receiving antenna.
Increase the separation between the equipment and receiver.
Connect the equipment into an outlet on a circuit different from that to
which the receiver is connected.
Consult the dealer or an experienced radio/TV technician for help.
Changes or modifications not approved by the party responsible for
compliance could void suers authority to operate the equipment.
ssor turns back on and cooling stars.
FCC Rules. These
28

Take the filter by the center and pull up and out.
Wash the filter using liquid dishwashing detergent and
warm water. Rinse filter thoroughly and gently shake to
remove excess water from the filter. Gently shake
excess water from the filter. Be sure the filter is
thoroughly dry before replacing. The filter can also be
vacuumed to remove dust and debris.
29

Before calling for service, review the following Troubleshooting Tips. This is a list of common occurrences that are not
the result of defective workmanship or materials and can save you time and money.
Temperature sensor located behind the air filter is in contact with the cold coil. Keep
sensor away from the cold coil.
30

Please call Customer Service: 1-844-801-8880
and
31


 Loading...