

Page 1
Page 2

THIS PAGE INTENTIONALLY LEFT BLANK
Page 3
Please follow the precautions below for your new refrigerator:
1. This refrigerator must be properly installed and located in accordance with the Installation
Instructions before it is used.
2. Do not allow children to climb, stand or hang on the shelves in the refri ge ra to r. They could
damage the refrigerator and seriously injure themselves.
3. Do not store or use gasoline or other flammable vapors an d li qu id s in t he v ic in it y of t hi s or
any other appliance.
4. Keep fingers out of the clearances between the doors and cabi ne t. B e ca re fu l cl os in g do or s
when children are in the ar
5. Unplug the refrigerator before cleaning and making repa ir s.
6. We strongly recommend that any servicing be performed by a qualified individual.
7. Turning the temperature control dial to the OFF position stops cooling but does no t sh ut o ff
power to the refrigerator.
8. Do not leave refrigerator in extreme cold or warm temperatures.
9. Do not place refrigerator near heat sources or open flames.
10. Clean the refrigerator with a soft, damp cloth. Remove stains with a mild soap . Do n ot c le an
the unit with industrial grade solvents, or abrasive chemicals.
11. Do not place hea
12. Never install the refrigerator where there is a lot of moisture and wa te r ca n sp la sh .
13. Do not allow children to hang on the doors; the refrigerator may be tipp ed o ve r an d hu rt
children.
14. Never eat spoiled food stored too long in the refrigerator or in an ou t- of -o rd er r ef ri ge ra to r.
15. Do not use sharp tools inside the refrigerator - for example - to remove i ce a s da ma ge m ay
occur.
16. Unplug and remove food from the refrigerator if not used for a long period o f ti me .
vy items on top of the refrigerator.
ea.
An empty refrigerator is an extremely dangerous attraction to chil dr en . If y ou a re g et ti ng r id o f
your old refrigerator. Please follow the instructions in the Child En tr ap me nt Warning.
CHILD ENTRAPMENT WARNING:
Risk of child entrapment. Before you throw away your old refrige ra to r or f re ez er :
1. Take off t he d oo rs .
2. Leave the shelves in place so that children may not easily clim b in si de .
CAUTIONS: USE OF AN EXTENSION CORD IS NOT RECOMMENDED.
FOR HOUSEHOLD USE ONLY
SAVE THESE INSTRUCTIONS
1
Page 4
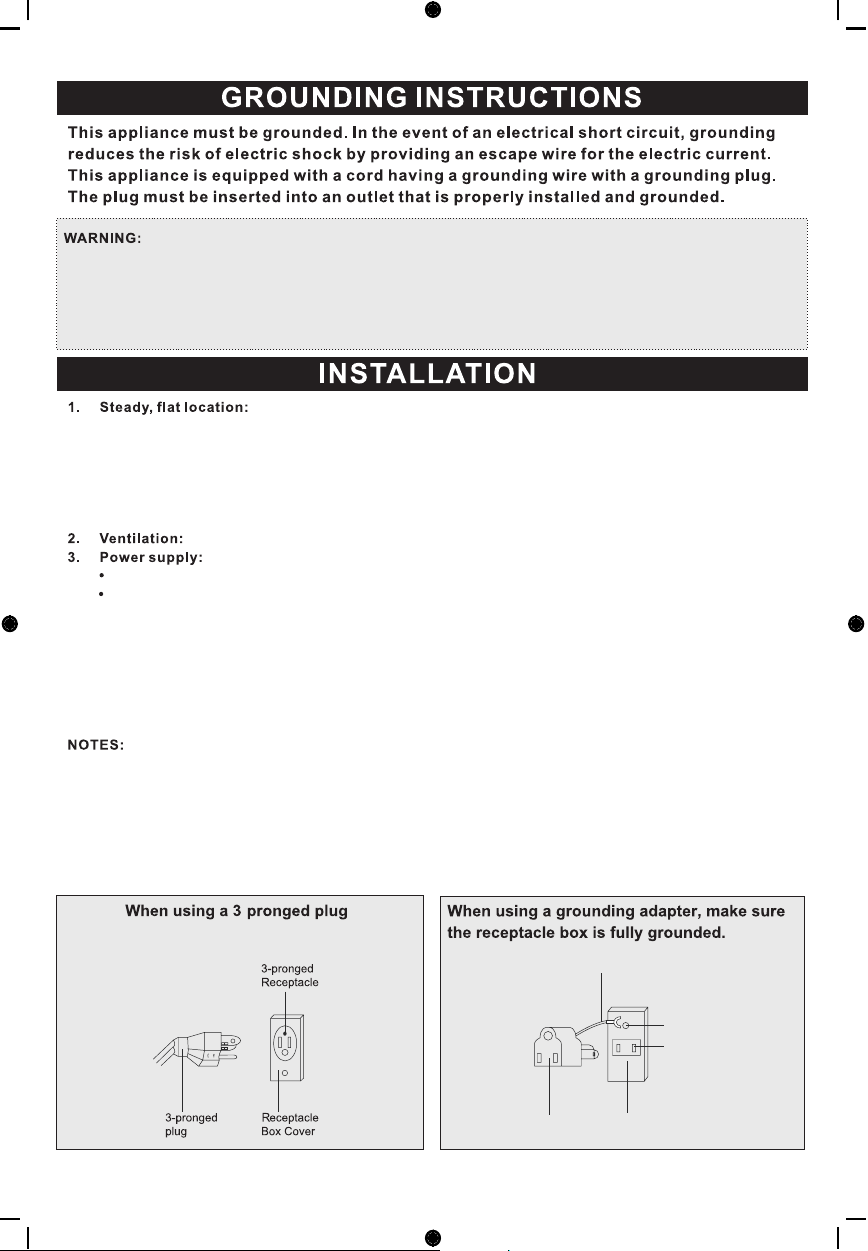
electrician or service per son if the grounding instructions ar e not co mplete ly understood, or if
Improper use of the grounding plug can res ult in a risk of elec tric shock. Co nsu lt a qua lified
doub t exists as to whet her the app liance is properly grounded. If it is necess ary to use an
extension cord, use only a three wire extension cor d that has a thr ee blade gr oun din g plug, and a
three slot receptacle that will accept the plug on the applia nce. The mar ked rating of the extensi on
cord should be equal to or grea ter than the electrical rating of the appliance.
If the refrigerator is not leveled during installation, the doors may not close or seal properly, causing
cooling, frost, or moisture problems. It is very important for the refrigerator to be level in order to
function properly.
To level your refri ger ator, you may either turn the leve l leg clockwise to raise that side to the refrigerator
or turn counter-clockwise to lower tha t side. Hav ing someone push against the to p of the
will take some weight off the level ing leg.
This make s it eas ier to adjust th e leveling leg.
ref rigerator, it
Do not block air vents.
Check you r local pow er source. This refrigerator requi res a 110V - 120V, 60Hz power supply.
Use a receptacle that will accept th e ground prong. The power cord of this app liance is equi pped with a
3-prong (groundi ng) plug wh ich mates with a standard 3-prong (grounding) wa ll outle t to min imi ze the
possibility of electric shock hazard fro m this appl ian ce.
A. Longer cord sets or extension cor ds are avai lable and may be used if care is exercise d in the ir use.
B. If a long cord or extensi on cord is used, (1) the marked electrical rating of the cor d set or extension
cord shoul d be at least as g
reat as the electrical rating of the appl iance, (2) the exte nsi on cord must be a
grounding-type 3-wi re cord, and (3) the longer cord should be arranged so that it will not drape over the
counter top or table to p wher e it can be pulled on by children or tri ppe d over unin ten tional ly.
The refrigerator shoul d always be pl ugged into its own individual electrical out let which has a
voltage ra ting that matc hes the rat ing plate.
If you have only a standard 2-pr ong wall ou tlet, it is your personal responsibility and obli gat ion
to have it repl ace d with a properly grou nded 3-prong wall outlet.
Never unplug you r refrigerator by pull ing on the power cord. Always grip pl ug firmly and pull
straight out from the outlet.
Grounding Lead
Screw
Receptacle
Grounding
Adapter
Receptacle
Box Cover
2
Page 5

1. The Handle
2. Refrigerator Door
3. Leveling Feet
Page 6

Thermostat Control Knob
1.
Chiller Compartment
2.
3. Drip Tray
4. Shelf
Refrigerator Compartment
5.
6. Crisper Drawer Cover
7. Crisper Drawer
8.
Bottle Storage
9.
Soda Can Storage
Door Gasket
10.
Page 7

NOTES: Temperature range of the chiller compartment is 30°F to 48°F at room temperature of 77°F
(25°C). Ice cream and Popsicles must be kept cool at -5°F to 0°F, hence this chiller compartment is not
suitable to store these types of items.
USING THE THERMOSTAT
The thermostat control for the refrigerator and
chiller is located at the upper right hand
c
orner of the
The first time you turn the unit on, adjust the
thermostat control knob to 3 and give your
refrigerator time to cool down completely
efore
b
ecommended.
r
After it is fully cooled, test it and adjust
owards 1 to
t
c
ool more to best suit
t
he setting of 3 should be
ome or office refrigerator use.
h
NOTE:
t
he
OFF position will stop the cooling cycle.
chiller compartment.
adding food; a full 24 hours is
make less cool or towards 6 to
Tur ni ng t he control knob to
your needs. However,
appropriate for
thermostat
DEFROSTING
Chiller compartment:
accumulated excessive frost/ice please do the
following:
1. Turn the thermostat knob to the OFF
p
osition and
2. Remove all food and ice cube tray or
ransfer to
t
3. Place towel under compact refrigerator or
m
ove
amage can
d
4. Clean and wipe out the melted frost with a
c
loth.
leave the chiller door open.
refrigerator compartment.
refrigerator outdoors where no water
occur.
If the chiller has
NOTE:
To avoid damaging the chiller
c
ompartment
o
bjects to remove the
f
rozen food.
5
wall, do not use any sharp
frost or to separate the
Page 8

1
.
To avoid to yourself and/or property, we recommend someone assist you during the door
reversal process.
injury
NOTE:
To take the door off it is necessary to tilt the
Appliance backward. You should rest the
Appliance on something solid, e.g. a chair just
below the top panel.
DO NOT lay the Appliance completely flat as
this may damage the coolant system.
• Ensure the Appliance is unplugged and empty.
• Adjust the two leveling feet to their highest
position.
• We recommend you have someone to assist
you.
• 8mm socket screw driver
• Phillips style screw driver
1. Upper Hinge Bracket
2. Adjustable Leveling Foot
3. Machine Screw
4. Bottom Hinge Bracket
5. Level Foot
Remove the upper hinge cover, then unscrew the upper screws of metal hinge bracket and take off
the hinge. Then take off the left side screw cover. Pull the appliance door upward to take it off.
At the same time, remove the mounting screws next to left leveling foot .
Remove left leveling foot and the bottom hinge bracket by unscrewing the mounting screws.
REVERSING THE DOOR POSITION
2
Page 9

3
BOTTO M VI EW
Install the leveling foot and the bottom hinge bracket on the new bottom side. Then tighten the
screws of the bottom hinge bracket.
Slot in the appliance door into the bottom hinge pin. Replace the upper hinge bracket on the new
side and check the fitting between the door/ hinge moving smoothly. Then tighten the screws of
upper hinge bracket. Replace the hinge cover and the right side screw cover.
4
Check that the door is aligned horizontally and vertically and that the seals are closed on all
sides before finally tightening the upper hinge. Re-adjust the leveling feet.
Page 10

The power supply cord is unplugged.
The thermostat knob is set to the OFF position.
A household fuse o r ci rc ui t br ea ke r ha s tr ip pe d.
The thermostat knob is set too cold.
The position of food stored touches the refrigerator back wall.
The air vents are blocked in the compartment; this prevents the movement of cold air.
The door is opened too often or not closed properly.
A large amount of food has j us t be en a dd ed t o th e re fr ig er at or o r ch il le r co mp ar tm en t.
The position of thermostat knob is adjusted too low.
The refrigerator is not leveled on the floor.
The body of the refrige
The drip tray is not placed properly.
The air vents are blocked in the refrigerator.
The door is opened too often or not closed properly.
The room is humid.
The food is not packaged correctly.
Food packages are keeping the door from closing properly.
The shelves are out of position
The gaskets are dirty.
The refrigerator is not level.
rator touches a wall.
Unit Dimension (WxDxH) (inches)
Power Supply
Current
Power consumption per year
20.4 x 21.5 x 32.4
AC115V 60Hz 84W
1.21A
344 kwh
Page 11

Emerson Radio Corp. warrants manufacturing defects in original material, including
original parts and workmanship, under normal use and conditions, for a period of one
year from the date of original purchase in the U.S. With your dated proof of purchase,
we will provide repair service at no charge for labor and parts at an authorized Depot
Repair Facility, or replace the product in our discretion. For repair or replacement, pack
your unit in a padded box, enclose your check or money order payable to Emerson
Radio Corp. in the amount of $10.00 (not required by California residents) to cover shipping
and handling costs, and enclose a copy of your proof of purchase. Send your unit to:
Emerson Returns Warehouse,
11500 Philadelphia Street,
Mira Loma Ca. 91752
AU898N
This warranty does not cover damage from negligence, misuse, abuse, accident,
failure to follow operating instructions, commercial use, rental, repairs by an unauthorized
facility, or products purchased, used, serviced or damaged outside of the United States.
THIS WARRANTY GIVES YOU SPECIFIC LEGAL RIGHTS AND YOU MAY ALSO HAVE
OTHER RIGHTS WHICH VARY FROM STATE TO STATE.
The serial number can be found on the rear of the unit. We suggest that you record the
serial number of your unit in the space below for future reference.
Model Num ber: CR51 9B
Serial Nu mber:
Page 12

PART NO.: CR519B-12112010-01
 Loading...