

Page 1

®
COMPACT REFRIGERATOR
OWNER’S MANUAL
CR500
Visit our web site at www.emersonradio.com
Page 2

IMPORTANT SAFETY INSTRUCTIONS
lease follow the precautions below for your new refrigerator:
P
1. This refrigerator must be properly installed and located in accordance with the Installation Instructions before it is
used.
2. Do not allow children to climb, stand or hang on the shelves in the refrigerator. They could damage the refrigerator
nd seriously injure themselves.
a
3. Do not store or use gasoline or other flammable vapors and liquids in the vicinity of this or any other appliance.
4. Before replacing a burned-out light bulb, the refrigerator should be unplugged in order to avoid contact with a live
wire filament. (A burned-out light bulb may break when being replaced.)
5. Keep fingers out of the clearances between the doors and cabinet. Be careful closing doors when children are in the
area.
6. Unplug the refrigerator before cleaning and making repairs.
7. We strongly recommend that any servicing be performed by a qualified individual.
8. Turning the temperature control dial to the OFF position stops cooling but does not shut off power to the refrigerator.
9. Do not leave refrigerator in extreme cold or warm temperatures.
10. Do not place refrigerator near heat sources or open flames.
11. Clean the refrigerator with a soft, damp cloth. Remove stains with a mild soap. Do not clean the unit with industrial
grade solvents, or abrasive chemicals.
12. Do not place heavy items on top of the refrigerator.
13. Never install the refrigerator where there is a lot of moisture and water can splash.
14. Do not allow children to hang on the doors; the refrigerator may be tipped over to hurt children.
15. Never eat spoiled food stored too long in the refrigerator or in an out-of-order refrigerator.
16. Do not use sharp tools inside the refrigerator - for example - to remove ice as damage may occur.
17. Unplug and remove food from the refrigerator if not used a for long period of time.
PROPER DISPOSAL
An empty refrigerator is an extremely dangerous attraction to children. If you are getting rid of your old refrigerator, please
follow the instructions below to help prevent accidents.
Before You Throw Away Your Old Refrigerator or Freezer:
1. Take off the doors.
2. Leave the shelves in place so that children may not easily climb inside.
SAVE THESE INSTRUCTIONS
1
Page 3
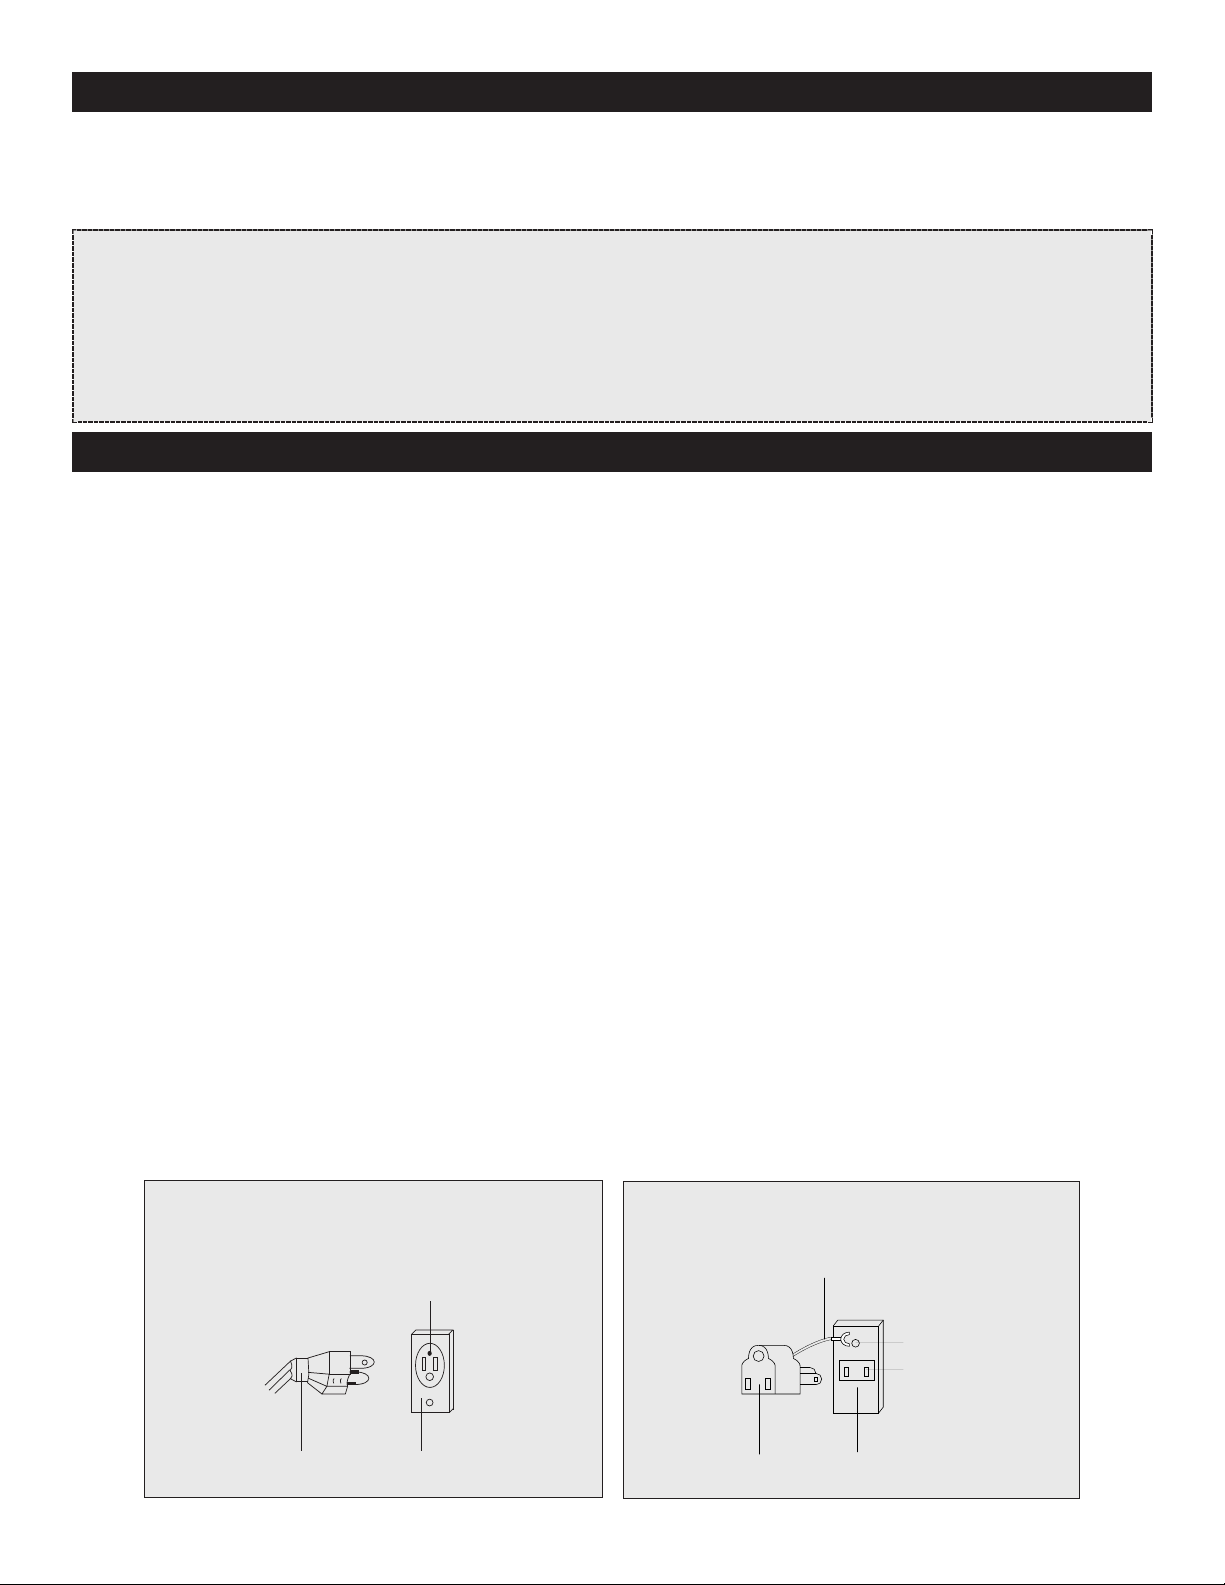
3-pronged
Receptacle
Receptacle
Box Cover
3-pronged
plug
When using a 3-pronged plug
Receptacle
Receptacle
Box Cover
Grounding
Adapter
Grounding Lead
Screw
GROUNDING INSTRUCTIONS
his appliance must be grounded. In the event of an electrical short circuit, grounding reduces the risk of
T
electric shock by providing an escape wire for the electric current. This appliance is equipped with a cord having
grounding wire with a grounding plug. The plug must be inserted into an outlet that is properly installed and
a
grounded.
WARNING: Improper use of the grounding plug can result in a risk of electric shock. Consult a qualified electrician or service
person if the grounding instructions are not completely understood, or if doubt exists as to whether the appliance
is properly grounded.
If it is necessary to use an extension cord, use only a three wire extension cord that has a three blade grounding
plug, and a three slot receptacle that will accept the plug on the appliance. The marked rating of the extension
cord should be equal to or greater than the electrical rating of the appliance.
INSTALLATION
1. Steady, flat location:
If the refrigerator is not leveled during installation. The doors may not close or seal properly,
causing cooling, frost, or moisture problems. It is very important of the refrigerator to be level in order to function
properly.
To level your refrigerator, you may either turn the level leg clockwise to raise that side to the refrigerator or turn counter
– clockwise to lower that side. Having someone push against the top of the refrigerator take some weight off the
leveling leg. This makes it easier to adjust the leveling leg.
2. Ventilation: Do not block air vents.
3. Power supply:
• Check your local power source. This refrigerator requires a 120V, 60Hz power supply.
• Use a receptacle that will accept the ground prong. The power cord of this appliance is equipped with a 3-prong
(grounding) plug which mates with a standard 3-prong (grounding) wall outlet to minimize the possibility of electric
shock hazard from this appliance.
A. Longer cord sets or extension cords are available and may be used if care is exercised in their use.
B. If a long cord or extension cord is used, (1) the marked electrical rating of the cord set or extension cord should
be at least as great as the electrical rating of the appliance, (2) the extension cord must be a grounding-type 3-wire
cord, and (3) the longer cord should be arranged so that it will not drape over the counter top or tabletop where it can
be pulled on by children or tripped over unintentionally.
NOTES:
• The refrigerator should always be plugged into its own individual electrical outlet which has a voltage rating that
matches the rating plate.
• If you have only a standard 2-prong wall outlet, it is your personal responsibility and obligation to have it replaced
with a properly grounded 3-prong wall outlet.
• Never unplug your refrigerator by pulling on the power cord. Always grip plug firmly and pull straight out from the
outlet.
When using a grounding adapter, make sure
the receptacle box is fully grounded.
2
Page 4
1
2
3
4
CLOSED
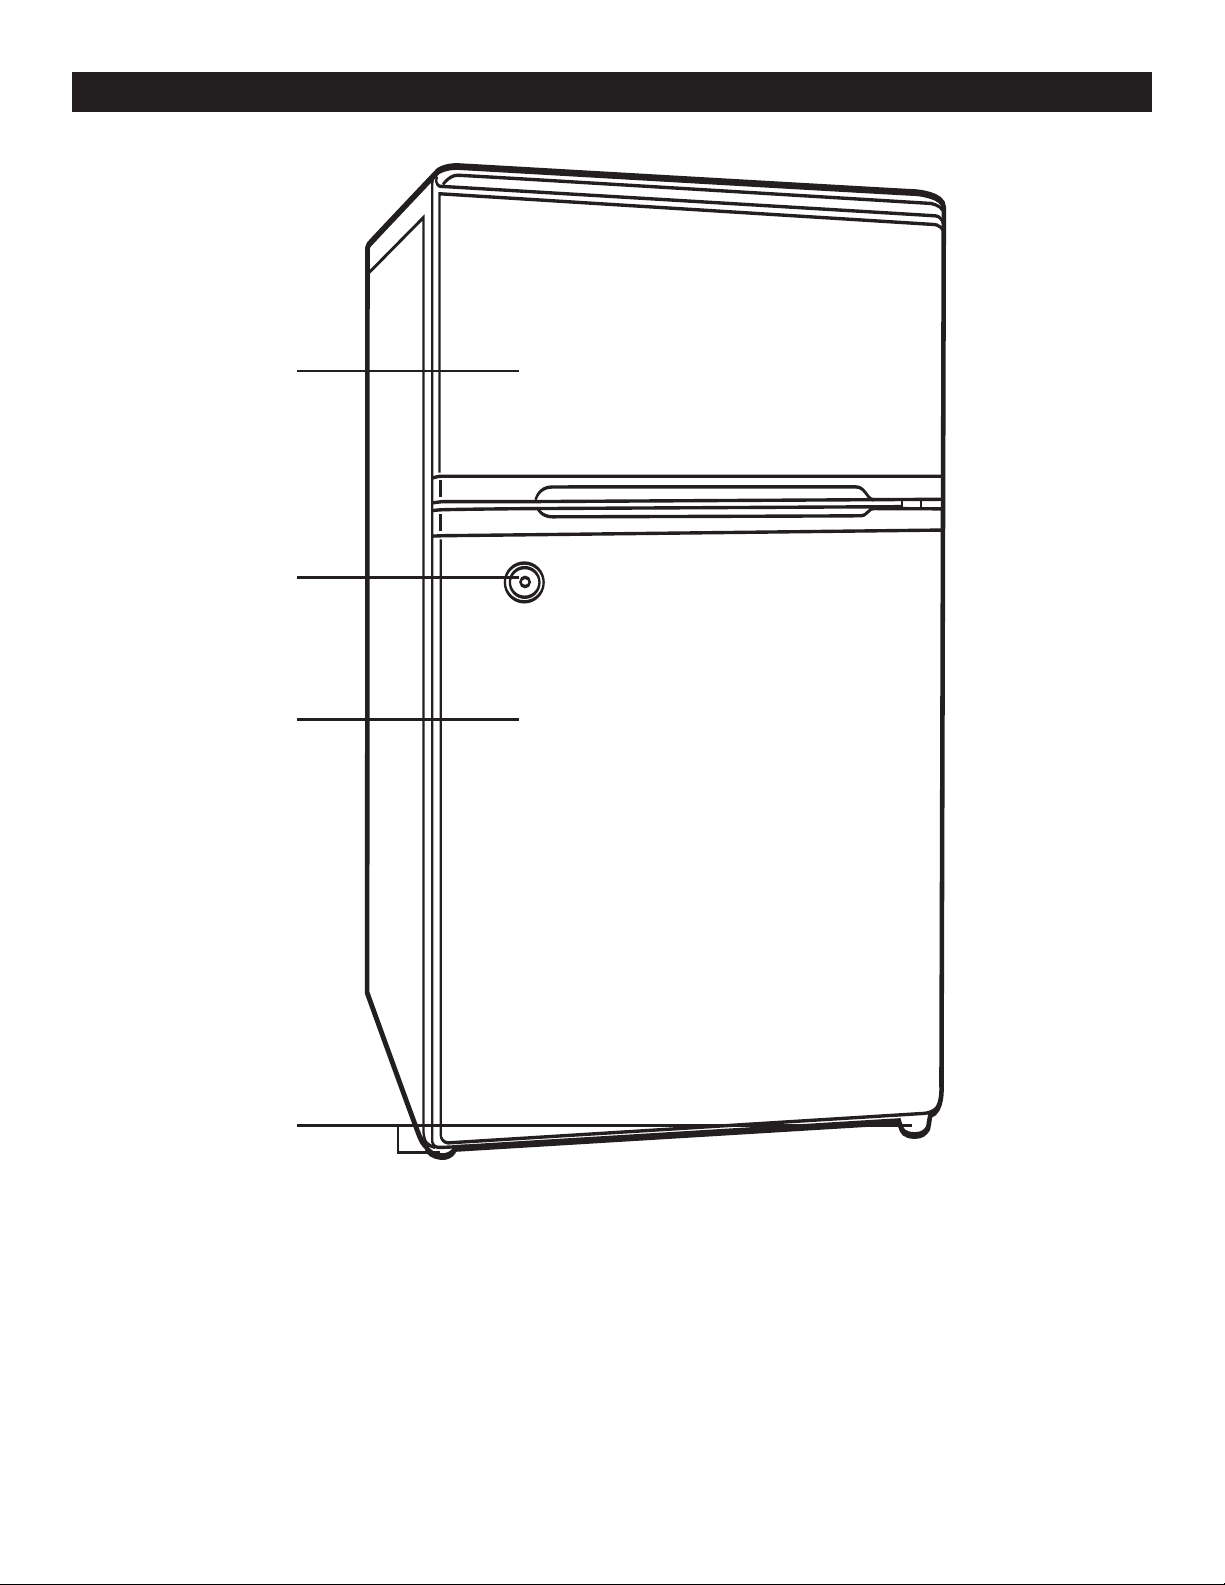
LOCATION OF CONTROLS
1. Freezer Door
2. Door Lock
3. Refrigerator Door
4. Leveling Feet
3
Page 5

1
7
9
10
8
2
3
4
6
5
OPEN
LOCATION OF CONTROLS (CONTINUED)
1. Freezer Compartment
2. Thermostat
3. Light Bulb (Behind Thermostat)
4. Shelf
5. Refrigerator Compartment
6 . Crisper Drawer
7. Small Rack
8. Can Storage
9. Bottle/Carton Storage
10.Keys
4
Page 6

USING THE THERMOSTAT
OPERATION
1
USING THE LOCK
The Thermostat for the refrigerator and freezer is
located at the upper right hand corner of the
refrigerator compartment.
The first time you turn the unit on, adjust the
temperature control knob to “3” and give your
refrigerator time to cool down completely before
adding food; a full 24 hours is recommended.
After it is fully cooled, test it and adjust towards 1
to make less cool or towards 6 to cool more to
best suit your needs. However, the setting of 3
should be appropriate for home or office
refrigerator use.
NOTE: Turning the temperature control knob to
the OFF position will stop the cooling cycle but
does not shut off the power to the unit.
1
1. Insert the key (two keys are provided) and then
push and turn clockwise to lock the freezer and
refrigerator doors.
2. Insert the key and then push and turn counterclockwise to unlock the refrigerator and freezer
doors.
NOTE: If the key does not lock the refrigerator
and freezer doors properly
the lock holes by
respective door to adjust.
GENTLY pushing/pulling on the
, you will need to adjust
5
Page 7

DEFROSTING
OPERATION (CONTINUED)
1
REPLACING THE LIGHT BULB
Refrigerator compartment: Defrosting process is
automatic; melted frost flow into drip tray and
automatically evaporate.
Freezer compartment: Defrosting for the freezer
must be performed manually.
1. Turn the thermostat knob to the OFF position
and leave the freezer door open.
2. Remove all food and ice cube tray or transfer to
refrigerator compartment.
3. Clean and wipe out the melted frost with a
cloth.
4. After defrosting, turn thermostat knob to origin
position.
Note: To avoid damaging the freezing
compartment wall, do not use any sharp objects to
remove the frost or to separate the frozen food.
1
1. Unplug refrigerator or disconnect refrigerator
from power supply before you remove the light
bulb.
2. Unscrew the middle and lower parts of the
thermostat holder assembly, marked by the
arrows in the diagram).
3. Pull the light bulb cover (Thermostat holder
assembly) outward to remove it.
4. Unscrew the light bulb.
5. Replace with a 15-watt 120V appliance bulb
only. (Not all bulbs will fit your refrigerator. Be
sure to replace the bulb with the same
Candelabra screw T
bulb T6 can be used.)
6. Plug in refrigerator or reconnect refrigerator to
power supply.
ype E-12 and shape. The
6
Page 8

OPERATION (CONTINUED)
REVERSING THE DOOR POSITION
Caution: To avoid injury to yourself and/or properly,we recommend someone assist you during the door reversal process.
IMPORTANT NOTE: The Lock is only functional when the Doors are in the original positions. If
the door is reversed, the Lock will not function.
1
2
To access the lower hinge assembly, tilt back the
refrigerator cabinet or lay the refrigerator on its back.
Remove both legs located at the front of the cabinet:
adjustable leg on hinge side and fixed leg on opposite side.
Remove the screws holding the lower hinge assembly to the
cabinet.
Remove the main door assembly from the refrigerator
cabinet by opening the door and pulling down.
Remove the screws from the middle hinge assembly.Then
remove the hinge and freezer door.
Remove the top hinge pin and the lock tack.
Re-install the top hinge pin on the opposite side of the
cabinet.
Remove the door plugs and door bushing located on the top
and bottom of each door assembly.
3
Interchange positions of plugs and bushings on both doors
(ie.door plug right side,door bushing left side).
Re-install freezer door assembly on cabinet.
Re-install the middle Hinge assembly on the opposite side.
Make sure the door assembly is properly aligned on the
cabinet ,before tightening hinge screws.
Re-install the main door assembly on cabinet.
Re-install the lower hinge assembly on the opposite side.
Make sure to change bushing and screw on opposite sides
on bottom of unit.
Make sure the door assembly is properly aligned on the
cabinet, before tightening lower hinge screws.
Re-install both legs (reversed from the original positions:
adjustable leg on hinge side and fixed leg on opposite side.)
7
Page 9

TROUBLESHOOTING GUIDE
The refrigerator will not operate
• The power supply cord is unplugged.
• The thermostat knob is set to the OFF position.
• A household fuse or circuit breaker has tripped.
The light does not work
• The power supply cord is unplugged.
• A household fuse or circuit breaker has tripped.
• The light bulb is loose in the socket.
• The light bulb has burned out.
Food in the refrigerator compartment is freezing
• The thermostat knob is set too cold.
• The position of food stored touches the refrigerator back wall.
Food in the refrigerator compartment is not cold
• The air vents are blocked in the compartment; this prevents the movement of cold air.
• The door(s) are opened too often or not closed properly.
• A large amount of food has just been added to the refrigerator or freezer compartment.
• The position of thermostat knob is adjusted too low.
The refrigerator seems to make unusual noise
• The refrigerator is not leveled on the floor.
• The body of the refrigerator touches a wall.
• The drip tray is not placed properly.
There is interior moisture build - up
• The air vents are blocked in the refrigerator.
• The door(s) are opened too often or not closed properly
• The room is humid.
• The food is not packaged correctly.
The doors will not close completely
• Food packages are keeping the door from closing properly.
• The shelves are out of position
• The gaskets are dirty.
• The refrigerator is not level.
.
8
Page 10

LIMITED WARRANTY
TO FIND THE LOCATION AND PHONE
NUMBER OF YOUR NEAREST SERVICE
CENTER PERMITTED TO PERFORM
WARRANTY...
CALL TOLL FREE:
1-800-695-0098
SERVICE
FOR CUSTOMER SERVICE, PLEASE WRITE TO:
Emerson Radio Corp.,
Consumer Affairs Dept.,
5101 Statesman Drive,
Irving, TX 75063.
FOR ADDITIONAL SET-UP OR OPERATING ASSISTANCE
PLEASE CALL:
1-800-898-9020
R
Emerson Radio Corp. warrants manufacturing defects in original material, including
original parts and workmanship, under normal use and conditions, for a period of one
year from the date of original purchase in the U.S. With your dated proof of purchase,
we will provide repair service at no charge for labor and parts at an authorized Depot
Repair Facility, or replace the product in our discretion. For repair or replacement, pack
your unit in a padded box, enclose your check or money order payable to Emerson Radio
Corp. in the amount of $10.00 (not required by California residents) to cover shipping
and handling costs, and enclose a copy of your proof of purchase. Send your unit to:
Emerson Radio Corp.,
5101 Statesman Drive,
Irving, TX 75063
This warranty does not cover damage from negligence, misuse, abuse, accident, failure to
follow operating instructions, commercial use, rental, repairs by an unauthorized facility,
or products purchased, used, serviced or damaged outside of the United States.
THIS WARRANTY GIVES YOU SPECIFIC LEGAL RIGHTS, AND YOU MAY
ALSO HAVE OTHER RIGHTS WHICH VARY FROM STATE TO STATE.
AU898N
The serial number can be found on the rear of the unit. We suggest that you record the serial number of your unit in the
space below for future reference.
Model Number: CR500
Serial Number:__________________________________
9
Page 11

EMERSON
®
Part No. CR500-10022007-01 Printed In China
 Loading...