

Emerson Comverge IntelliTEMP 900 Homeowner's Manual

Comverge
IntelliTEMP
™
900
Homeowners Guide
Version Number: 2.0
Release Date: July 2012
Copyright © 2012 by Comverge, Inc. and Emerson, Inc.
All rights reserved.
™
IntelliTEMP
is a registered trademark of Comverge, Inc.
All other brand and product names are trademarks or registered
trademarks of their respective companies.
Document Change Record
Version Date Comments
1.0 March 2011 1st release
2.0 July 2012 2nd release

Table of Contents
Introduction ................................................................. 2
Step 1: Getting started Guide ..................................... 3
Step 2 : Homeowner Main Menu ................................ 8
Step 3: Thermostat Settings Menu ............................. 11
Description of Homeowner Menu Options .................. 13
Troubleshooting Assistance Guide ............................. 16
1

Introduction
Congratulations, you are now in possession of the most
advanced demand response thermostat available.
About this Guide
This guide describes how to set up and use the various
features of the Comverge IntelliTEMP™ 900.
Thermostat Models Covered by this Guide
This guide covers the IntelliTEMP™ 900 thermostat, firmware
version number starting with 0160 0263 07 or greater.
2

Getting Started • Homeowner Manual
Step 1
Getting Started Guide
Before using your thermostat, you should familiarize yourself
with its features and user interface. Your thermostat consists of
two parts: the thermostat chassis and the mounting base. To
detach the two parts gently pull on the thermostat chassis until
it releases from the mounting base. To attach the thermostat
back onto the mounting base, align the retention tabs on the
mounting base with the retention slots in the thermostat and
gently press the two together until the retention tabs click. If the
thermostat does not easily click onto the mounting base, be
certain not to press with excessive force that may damage the
thermostat and/or mounting base.
Note: It is recommended to turn off the HVAC power before
removing the thermostat from the mounting base when
installed.
3
Getting Started • Homeowner Manual
1
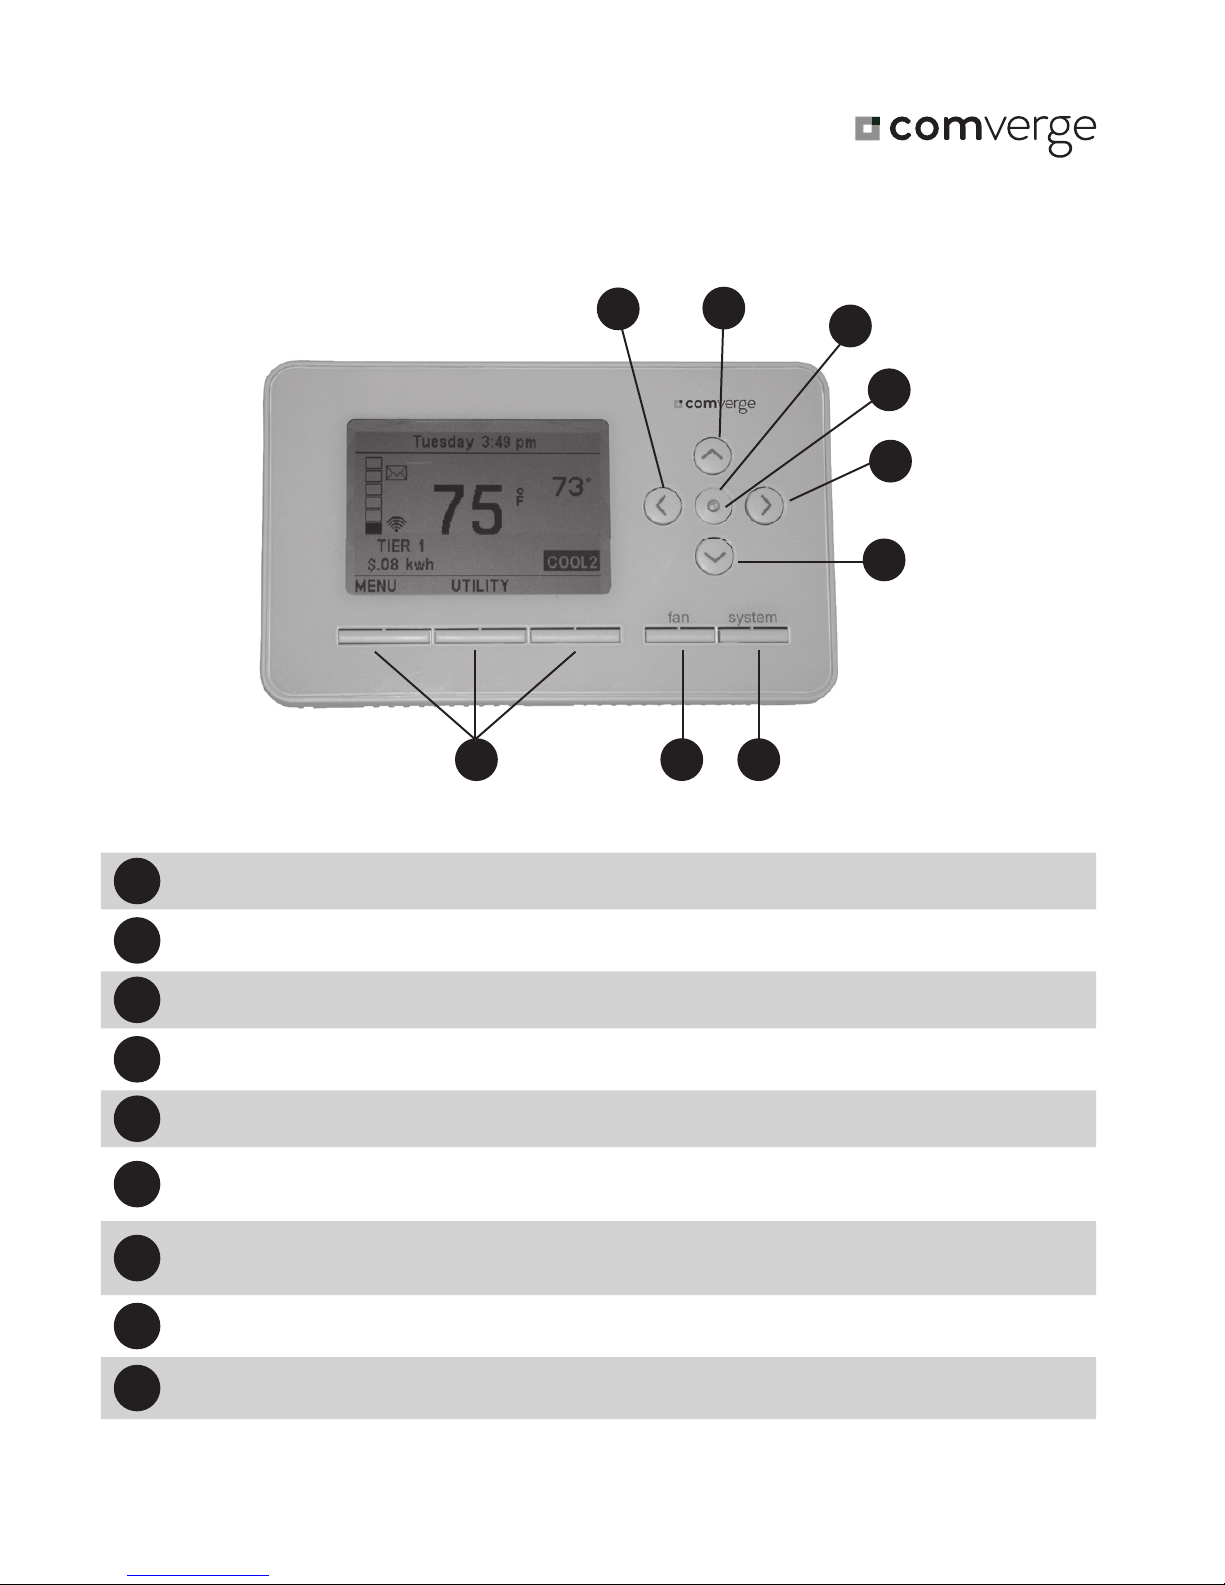
A. The Thermostat Buttons and Indicators
9
1
“Left Arrow” – navigates menu items
1
2
8
7
3
4
5
6
2
“Up Arrow” – raises temperature setpoint/changes selected item
3
“Action Button” – selects action of selected menu item
4
“LED” – indicates occurrence of curtailment event
5
“Right Arrow” – navigates menu items
“Down Arrow” – lowers temperature setpoint/changes
6
selected item
“SYSTEM Button” – changes system selection [OFF, COOL,
7
HEAT, AUX (displayed on heat pump units only)]
8
“FAN Button” – change fan setting (Auto/On)
9
“Soft Keys” – perform action listed on display above the button
4
Getting Started • Homeowner Manual
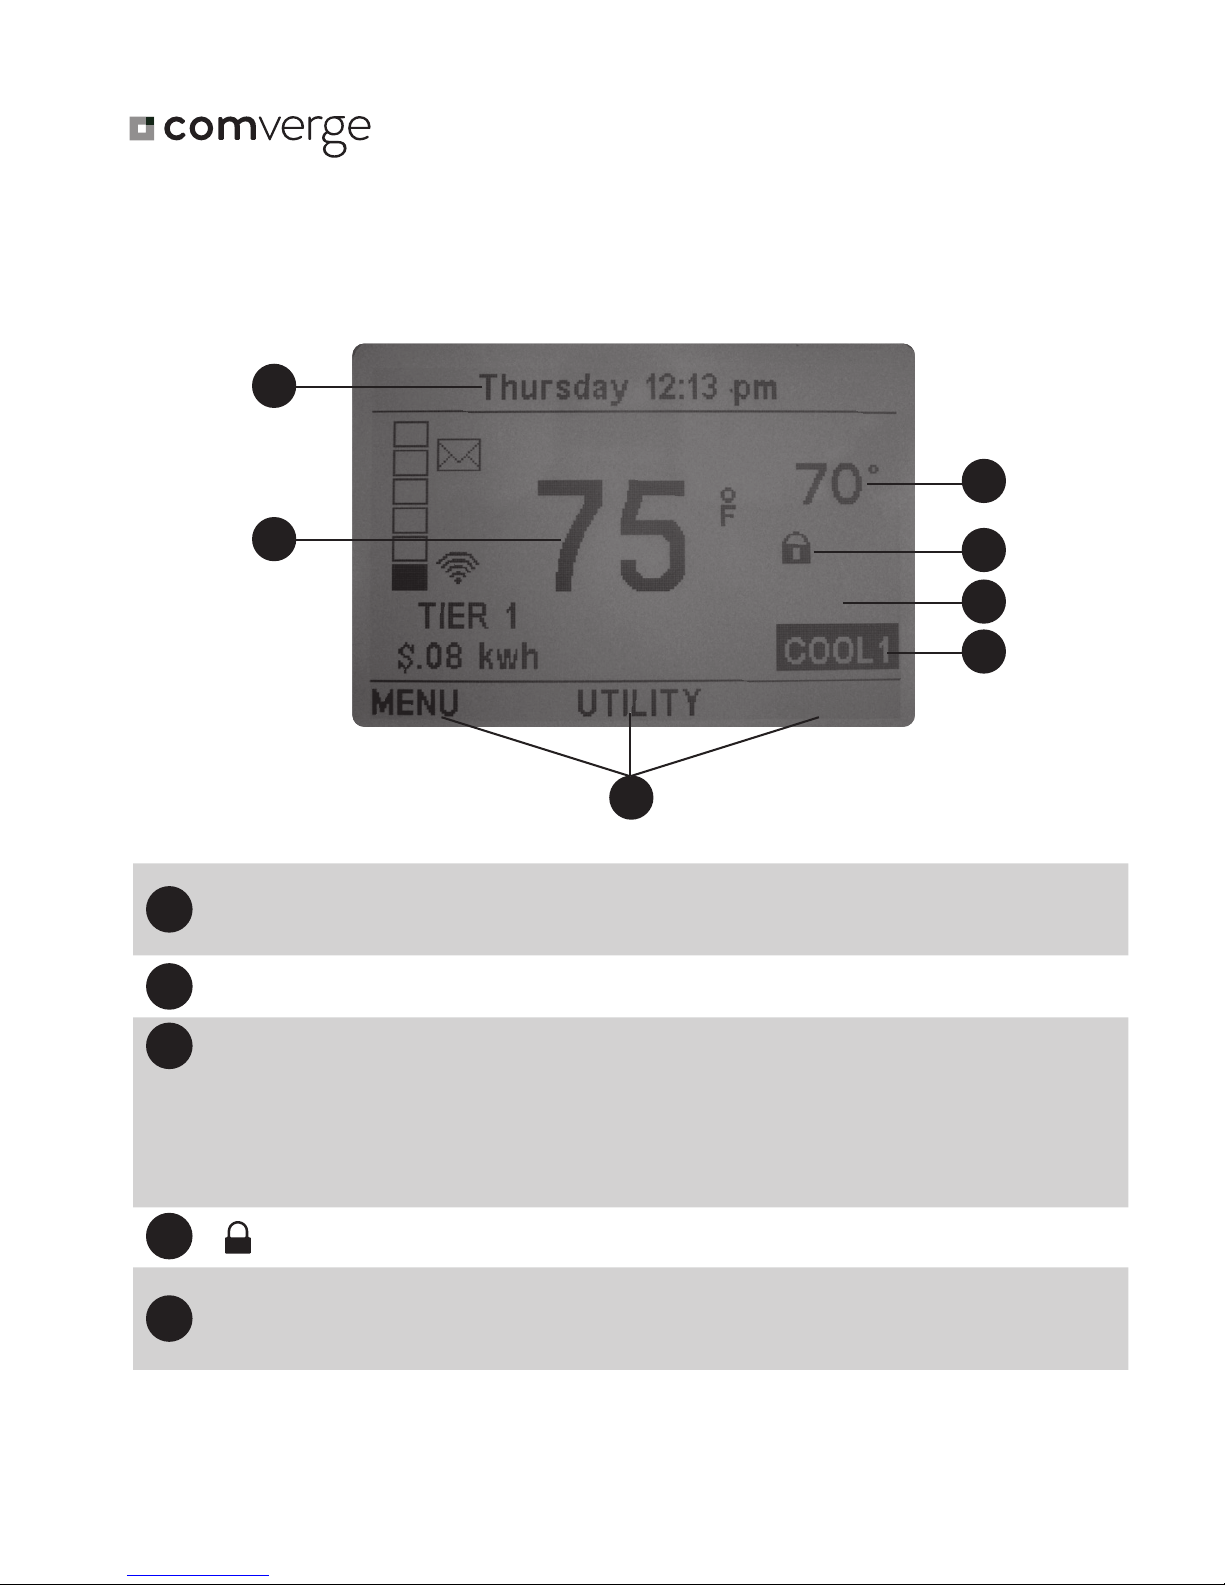
B. The Thermostat Display
1
3
2
7
“Messaging Area” – displays day/time, thermostat and utility
1
4
5
6
related messages
2
“Temperature” – displays current room temperature
“Setpoint Temperature” – displays current desired temperature
3
• Blank when system is in OFF mode
• SET AT changes to HOLD AT when in temporary or
permanent hold. SET AT not displayed during Utility
control event
4
“ ”
– displays when keypad is locked.
“FAN status” – blank when in auto mode – displays “FAN ON”
5
when fan is on continuously
5
Getting Started • Homeowner Manual
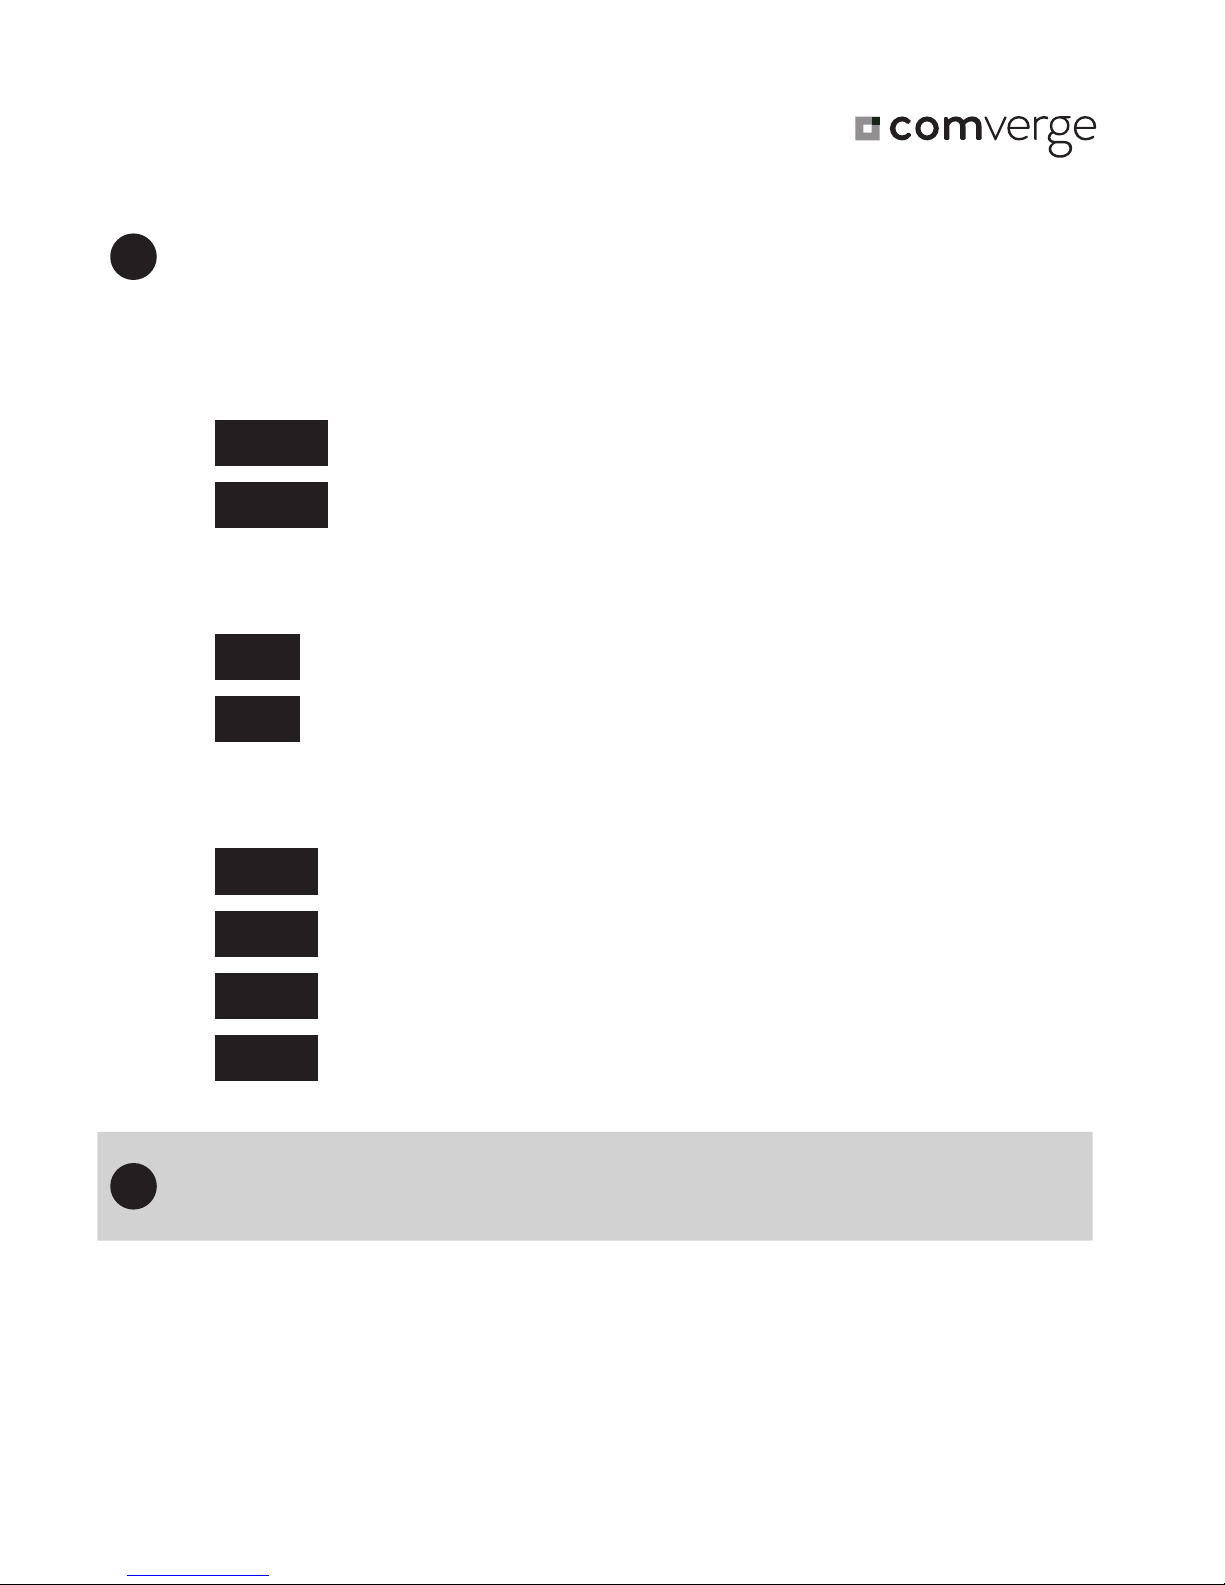
“System Status” – displays current operation mode according
6
to system configuration
OFF – system is OFF
COOL – system is in COOL mode but no call for cool
COOL1
COOL2
– call for 1
– call for 2
st
stage of cool
nd
stage of cool (multi-stage units only)
AUX – system is in AUX heat mode but no call for heat
(heat pump only)
AUX1
AUX2
– call for 1
– call for 2
st
stage of Auxiliary heat (heat pump only)
nd
stage of Auxiliary heat (multi-stage heat
pump only)
HEAT – system is in HEAT mode but no call for heat
HEAT1
HEAT2
HEAT3
– call for 1
– call for 2
– call for 1
st
stage of heat
nd
stage of heat (multi-stage units only)
st
stage of auxiliary heat (heat pump only)
HEAT4
– call for 2
(multi-stage heat pump systems)
“Soft Keys” – actions to be performed when corresponding
7
button is pressed
nd
stage of auxiliary heat
6
 Loading...