

Emerson Bettis PressureGuard Installation And Maintenance Manual

Installation and Maintenance Manual
E-90090005 Rev. A
March 2014
Bettis™ PressureGuard™ Self-Contained
Hydraulic Emergency Shutdown Systems
For Rotary or Non-API 6A Linear Valves


Installation and Maintenance Manual
E-90090005 Rev. A
Table of Contents
Section 1: Safety Warning ����������������������������������������������������1
Section 2: Introduction
2.1 General Service Information ........................................................................... 2
2.2 Definition of Terms ......................................................................................... 3
2.3 Scope ............................................................................................................. 3
Section 3: Storage Instructions ���������������������������������������������4
Section 4: Operation
4.1 Manual Mode ................................................................................................. 6
4.2 Automatic Mode ............................................................................................ 7
4.3 Shutdown Mode ............................................................................................ 7
Table of Contents
March 2014
Section 5: Installation ����������������������������������������������������������� 8
Section 6: Maintenance
6.1 Regular Maintenance ................................................................................... 13
6.2 Troubleshooting ........................................................................................... 14
Section 7: Document Revision ��������������������������������������������16
Appendix A: List of Tables ���������������������������������������������������17
Appendix B: List of Figures ��������������������������������������������������18
Appendix C: List of Drawings ����������������������������������������������19
ITable of Contents

Section 1:Safety Warning
March 2014
Section 1: Safety Warning
All personnel involved should read and understand all applicable sections of this manual before
attempting to install, operate, service, or perform maintenance on any operators. Adhere to
any tags, warning labels, or instructions presented on the operator. These may provide more
specific and significant information regarding the operator than this general manual can.
It is the responsibility of the user to ensure proper safety. Always take necessary precautions
and utilize proper personal protective equipment when dealing with compressed air,
compressed hydraulic fluid, pinch points, and electricity.
It is necessary to rig and lift valve and operator separately. Service personnel need to ensure the
lifting capacity of the crane/hoist/rigging is appropriate for the desired load.
Block the power gas supply and depressurize the system before attempting to install or service.
Isolate the power gas from controls if the operator is supplied with control system.
Caustic gases and fluids may be contained in the operators and valves in most applications.
Vent all poisonous or flammable gases and store all liquids in a safe location to prevent
personnel injury. Discharge at sonic velocity may occur when venting or releasing pressure;
service personnel must utilize proper hearing protection.
Installation and Maintenance Manual
E-90090005 Rev. A
The following are general instructions since there are variations of linear operators and valves.
It is critical to install the operator properly so that performance and safety are guaranteed.
Any technicians using the following instructions must be trained and knowledgeable regarding
valve operators and valves.
It is required to go through the above instructions which will help to prevent personnel injury,
property damage, and damage to operator.
Safety notices (warning, caution, and note) are presented in this manual in three forms:
WARNING:
If not observed, user incurs a high risk of severe damage to operator and/or fatal injury to personnel.
CAUTION:
If not observed, user may incur damage to operator and/or injury to personnel.
NOTE:
Advisory and informational comments provided to assist maintenance personnel to perform maintenance procedures.
Please refer to the applicable section for details and further information.
1
Safety Warning

Installation and Maintenance Manual
E-90090005 Rev. A
Section 2: Introduction
2�1 General Service Information
BETTIS™ PressureGuard™ is a self-contained hydraulic Emergency Shutdown (ESD) system.
It is designed to provide reliable valve shutdown on production wellheads in remote
locations where automatic local valve ESD is required, but a power source is not available
and/or local supervision is minimal.
Available as a complete, tailored-solution, BETTIS™ PressureGuard™ usually consists of
a self-contained hydraulic module, a hydraulic operator, and application-specific
shutdown trigger accessories. PressureGuard™ systems can be configured for rotary
hydraulic operators for use with ball, plug, and other quarter-turn valves, as well as non-6A
linear-operated valves. A variety of shutdown trigger controls including pressure pilots,
solenoid valves, and a temperature-sensing fusible plug are available to suit application
requirements. Instructions for installing BETTIS™ PressureGuard™ system are provided in
Section 5.
(Installation)
.
Section 2: Introduction
March 2014
Under normal conditions, BETTIS™ PressureGuard™ maintains the valve in its operational
position by resisting the spring force with hydraulic fluid pressure. In an event requiring
automatic ESD valve operation, the PressureGuard™ employs a control component to
shift hydraulic fluid from the valve operator to an internal reservoir. Without fluid pressure,
the compressed spring in the operator moves the valve to its shutdown position. Further
information on the operation of BETTIS™ PressureGuard™ is provided in Section 4
(Operation)
Through robust design and quality construction, minimal maintenance is required of
BETTIS™ PressureGuard™. The ESD system is shipped fully-lubricated and serviced.
Depending upon service type, a varying degree of maintenance is required and will be
detailed subsequently in Section 6.
in Section 6.2.
Additional drawings and valve-specific information is provided in Appendix C
(List of Drawings)
.
(Troubleshooting)
.
(Maintenance)
in an unlikely event the ESD system displays a problem.
. Troubleshooting guide is also provided
Introduction
2

Section 2: Introduction
March 2014
2�2 Definition of Terms
The abbreviations included in this IOM manual are listed in the table below:
Table 1� Definition of Terms
Abbreviated Term Definition
IOM Installation, Operation, and Maintenance
SCH Self-Contained Hydraulic
ESD Emergency Shutdown
GVO Gate Valve Operator Series
FS Fail Safe
SR Spring Return
HP High Pressure
LP Low Pressure
MAWP Maximum Allowable Working Pressure
ID Inside Diameter
OD Outside Diameter
Installation and Maintenance Manual
E-90090005 Rev. A
2�3 Scope
This manual is a resource for technicians involved in the installation, operation, and
maintenance of Bettis™ PressureGuard™. It serves as a guide and must be thoroughly
understood prior to any work on the operators such as installation, operation, or
maintenance. For any questions, please contact the manufacturer.
3
Introduction

Installation and Maintenance Manual
E-90090005 Rev. A
Section 3: Storage Instructions
Section 3: Storage Instructions
Proper storage is required when the operator will not be used immediately.
1. Remove all dirt, dust, grease, and contaminants from any exposed, unpainted
surface (for example, Drive Rod OD, Yoke ID) by using a soft cloth dampened with
an appropriate oil based solvent. Avoid using abrasive material when cleaning rod
surfaces.
2. Lightly grease any exposed, unpainted surfaces.
3. Any plastic plugs used to plug the pressure ports during assembly should be
removed and replaced with steel plugs. All controls should also be plugged with
steel plugs.
NOTE:
Sealants such as pipe dope or Teflon tape should be applied to steel plug threads.
March 2014
4. Lightly lubricate all exposed threads and unpainted surfaces
(for example, mounting surfaces).
5. Cover the PressureGuard™ to prevent accumulation of dirt and debris.
6. Repeat the storage steps listed above to ensure the proper storage condition
(in case the PressureGuard™ will be moved and stored again).
Indoor environment is the ideal storage condition for BETTIS™ PressureGuard™.
For additional information on storage, please contact the manufacturer.
Storage Instructions
4

Section 4: Operation
March 2014
Section 4: Operation
Installation and Maintenance Manual
E-90090005 Rev. A
Before operating BETTIS™ PressureGuard™ system, it is critical to know its components
and understand what they do. Refer to Figure 1.
PressureGuard™)
BETTIS
TM
PressureGuard™ Components and Descriptions)
(
PressureGuard™ system.
Figure 1 SCH Module Portion of BETTIS™ PressureGuard™
, Figure 3.
(BETTIS
TM
PressureGuard™ Schematic)
(SCH Module Portion of BETTIS
, and Table 2.
for components in BETTIS™
TM
5
Operation
Installation and Maintenance Manual
E-90090005 Rev. A
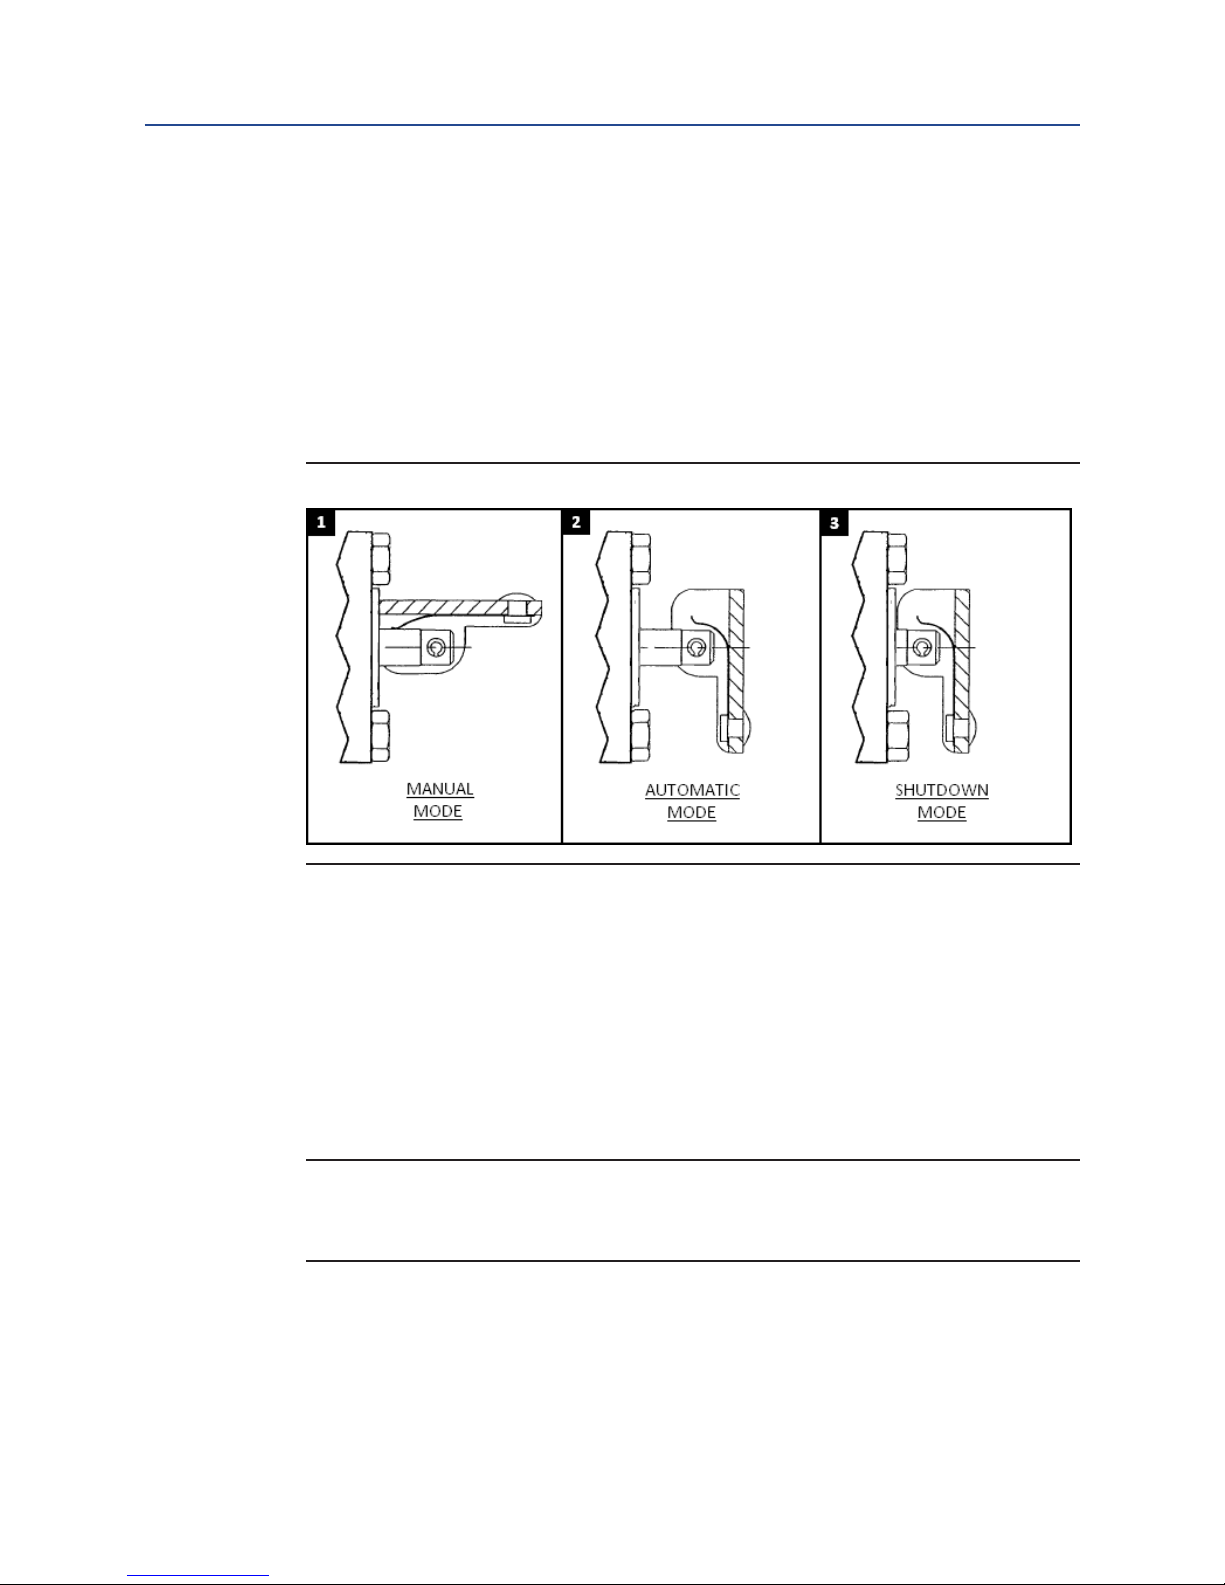
4�1 Manual Mode
1. Lift/pull the toggle on the Reset Valve (23) and latch it in the upward position
(pane #1 of Figure 2.
2. Stroke the Handpump (3) to pressurize the SCH module and begin applying
pressure to the operator’s Piston (refer to Appendix C
for diagrams of typical rotary and linear operators) to move the valve to its
operational position.
Figure 2 Three Modes of Reset Valve
(Three Modes of Reset Valve))
Section 4: Operation
.
(List of Drawings)
March 2014
3. The resistance of the Handpump (3) to pumping will increase noticeably when
the valve reaches its full operational position. Pump approximately one-half of
additional stroke at this point. The High Pressure Gauge (9) will read above the
minimum operating pressure of the operator, and if so equipped, its needle will
rest in the middle of the green band.
4. At this point, hydraulic fluid pressure in the SCH module and operator cylinder
opposing the operator spring forces to hold the line valve in position.
NOTE:
Plug the Low Pressure Port (L) if the signal device is not connected to the manifold to
prevent fluid loss from the manifold. Follow the instructions above to operate the unit.
Operation
6
 Loading...