

Page 1

Installation, Operation and Maintenance Manual
Bettis M Series
Stainless Steel Scotch Yoke Actuators
MAN-02-01-39-0704-EN Rev. 0
July 2019
Page 2

Installation, Operation and Maintenance Manual
MAN-02-01-39-0704-EN Rev. 0
Table of Contents
Section 1: Introduction
1.1 General Application ....................................................................................... 1
1.2 Technical Data ...............................................................................................1
1.3 Installation .................................................................................................... 2
Section 2: Maintenance
Section 3: Jackscrew Override
3.1 Jackscrew Operating Instructions .................................................................. 4
3.2 Actuator Stroke Adjustment .......................................................................... 4
3.3 Models 006 through 270 .............................................................................. 4
3.4 Models 370, 740 & 575 .................................................................................4
Table of Contents
July 2019
Section 4: Manual HandPump
Hydraulic Override
4.1 Hydraulic Fluid Level ...................................................................................... 9
4.2 Remote Mounting the HandPump ................................................................. 9
Section 5: Integral Proximity
Switch Mounting
Section 6: Spring Conversion to change Operating Pressure
Section 7: Failure Mode Change - Spring Return
Section 8: Removal of Actuator from Valve
Section 9: Disassembly
9.1 Disassembly of Symmetric Yoke Actuators .................................................. 14
9.2 Disassembly of Canted Yoke Actuators ........................................................ 16
Section 10: Assembly & Operating Instructions
10.1 Assembly of Symmetric Yoke Actuators ...................................................... 17
10.2 Spring-Return Only ..................................................................................... 20
10.3 Assembly of Canted Yoke Actuators ............................................................ 21
Table of Contents
I
Page 3

Table of Contents
July 2019
Section 11: Operating Instructions
Section 12: Important Safeguards
Section 13: Additional Safety Instructions for Actuators used
in a Potentially Explosive Atmosphere under
ATEX 2014/34/EU
Section 14: Additional Safety Instructions for Actuators
used in Emergency Shut-down Service
or IEC 61508 safety integrity
level (SIL) Compliant Installations
Installation, Operation and Maintenance Manual
MAN-02-01-39-0704-EN Rev. 0
13.1 Marking ...................................................................................................... 24
13.2 Selection ..................................................................................................... 24
13.3 Installation .................................................................................................. 24
13.4 Maintenance ............................................................................................... 24
II
Table of Contents
Page 4

Installation, Operation and Maintenance Manual
MAN-02-01-39-0704-EN Rev. 0 July 2019
Section 1: Introduction
Section 1: Introduction
1.1 General Application
Actuators are designed for "on-off" or modulating control of any quarter-turn ball,
buttery, rotary plug or damper style valve application.
1.2 Technical Data
Supply Pressure 40-160 psig, see product nameplate
Supply Medium Any pneumatic uid compatible with materials of construction
Temperature Rating Standard Range: -20°F to 210°F
Optional Range: -65°F to 300°F
Angular Rotation 90 degrees ± 8 degrees
NOTE:
Language translations of the safety related portions of this document are available at
www.emerson.com
Introduction
1
Page 5

Section 1: Introduction
July 2019
1.3 Installation
The actuator can be mounted parallel or perpendicular to pipeline. The actuator can be
installed in any convenient position including vertical, horizontal or upside down.
A. Begin by bolting the mounting bracket to actuator only hand tight.
B. Install coupling on valve. Remove or disable any stops on the valve.
Use only the actuator position stops!
C. Install the actuator and bracket to valve being sure to leave all fastener
connections hand tight. If possible, stroke valve and actuator to a half open
position and physically shift actuator back and forth until coupling and all fasteners
are centered then tighten all bolts and nuts. This procedure will accurately align
valve stem to actuator output shaft and prolong valve stem seal life.
D. Cycle valve / actuator assembly and conrm smooth operation.
E. Adjust the actuator travel stops for perfect valve alignment in both open and
closed positions.
Installation, Operation and Maintenance Manual
MAN-02-01-39-0704-EN Rev. 0
NOTE:
If the valve disk is torque seated (E.G. Vanessa buttery), close the valve against the
actuator stop, then unscrew the stop until turns freely, then screw the stop back in until it
stops, then turn the stop with a wrench one additional turn and lock into place.
F. Tubing Connections – some models utilize two pistons for added power. Spring
return (single acting) dual cylinders designs require one “jumper” to make the
supply port common on both pistons. Double acting (air to air) dual cylinder
designs require two “jumpers.” See Figure 1 for typical arrangement.
CAUTION
Use correct length mounting bolts! Mounting bolts used in actuator mounting pad may
interfere with the actuator rotary mechanism. Select bolts that will not extend more than
two threads above the back of the mounting pad.
2
Introduction
Page 6

Installation, Operation and Maintenance Manual
TE
TE
Section 2: Maintenance
MAN-02-01-39-0704-EN Rev. 0 July 2019
Section 2: Maintenance
Actuators are factory lubricated and in general do not require periodic lubrication or
maintenance while in service. Actuators should be visually inspected periodically for
corrosion damage and promptly repaired. Actuators should be operated at least annually
to assure proper operation.
Figure 1
SINGLE ACTING ACTUATOR
ONE CYLINDER
SUPPLYSUPPLY
SOLENOID
OR
POSITIONER
EXHAUS
SINGLE ACTING ACTUATOR
TWO CYLINDERS WITH JUMPER
SUPPLYSUPPLY
SOLENOID
OR
POSITIONER
EXHAUS
DOUBLE ACTING ACTUATOR
ONE CYLINDER
SOLENOID
OR
POSITIONER
SHUT
OPEN
SHUT
XHAUST
OPEN
DOUBLE ACTING ACTUATOR
TWO CYLINDERS WITH JUMPER
SOLENOID
OR
POSITIONER
XHAUST
Maintenance
3
Page 7

Section 3: Jackscrew Override
July 2019
Installation, Operation and Maintenance Manual
Section 3: Jackscrew Override
The jackscrew option is intended for infrequent or emergency on-site operation of the
automated valve.
3.1 Jackscrew Operating Instructions
1. Disengage power supply and vent air from actuator.
2. Operate the handwheel to drive the actuator into the desired position. Valve
position can be veried by checking the actuator position indicator. For models
006 through 270, the jackscrew must be returned to the fully retracted position
before actuator can resume normal operation. Back the jackscrew out until it
stops. Air will leak from the jackscrew unless it has been fully retracted against its
internal seal.
3.2 Actuator Stroke Adjustment
MAN-02-01-39-0704-EN Rev. 0
The jackscrew has a built-in actuator stroke adjustment, see Figure 2 and 3.
3.3 Models 006 through 270
See Figure 2:
1. Retract the jackscrew override completely by rotating counter clockwise.
2. Loosen the lock nut and turn the brass adjusting screw to the desired position.
The handwheel will rotate with the adjusting screw. Never make stroke
adjustments by turning the handwheel only.
3. Tighten lock nut.
3.4 Models 370, 740 & 575
See Figure 3:
1. Retract the jackscrew override completely by rotating clockwise.
2. Loosen the stroke adjusting screw and lock nut.
3. Using the handwheel, turn the jackscrew to adjust the actuator to the
desired position.
4. Screw the adjusting screw until it stops and tighten lock nut.
4
Jackscrew Override
Page 8

Installation, Operation and Maintenance Manual
OPEN
SHUT
OPEN
SHUT
Section 3: Jackscrew Override
MAN-02-01-39-0704-EN Rev. 0 July 2019
Figure 2 Jackscrew Override - Models 006 through 270
Actuator stroke
adjusting screw
Note: Air escapes unless
jackscrew is fully retracted
Stroke adjusting screw
Jackscrew
Lock nut
Seal
JACKSCREW FULLY RETRACTED JACKSCREW EXTENDED
Jackscrew seal
Figure 3 Jackscrew Override - Models 370, 575 & 740
Handwheel
Lock nut
Stroke
adjusting
screw
Sealed jackscrew
assembly
Figure 4 Hydraulic Override
Reservoir
Handle
Selector valve
SHUT
OPEN
OPEN
SHUT
Lock nut
Stroke adjusting screw
Jackscrew Override
Manual Handpump Specications:
1. Maximum reservoir ll volume = 75 cu. in.
2. Pump relief pressure = 1500 psi
3. Pump volume/stroke = 0.66 cu. in.
4. Handle length = 24 in.
5
Page 9
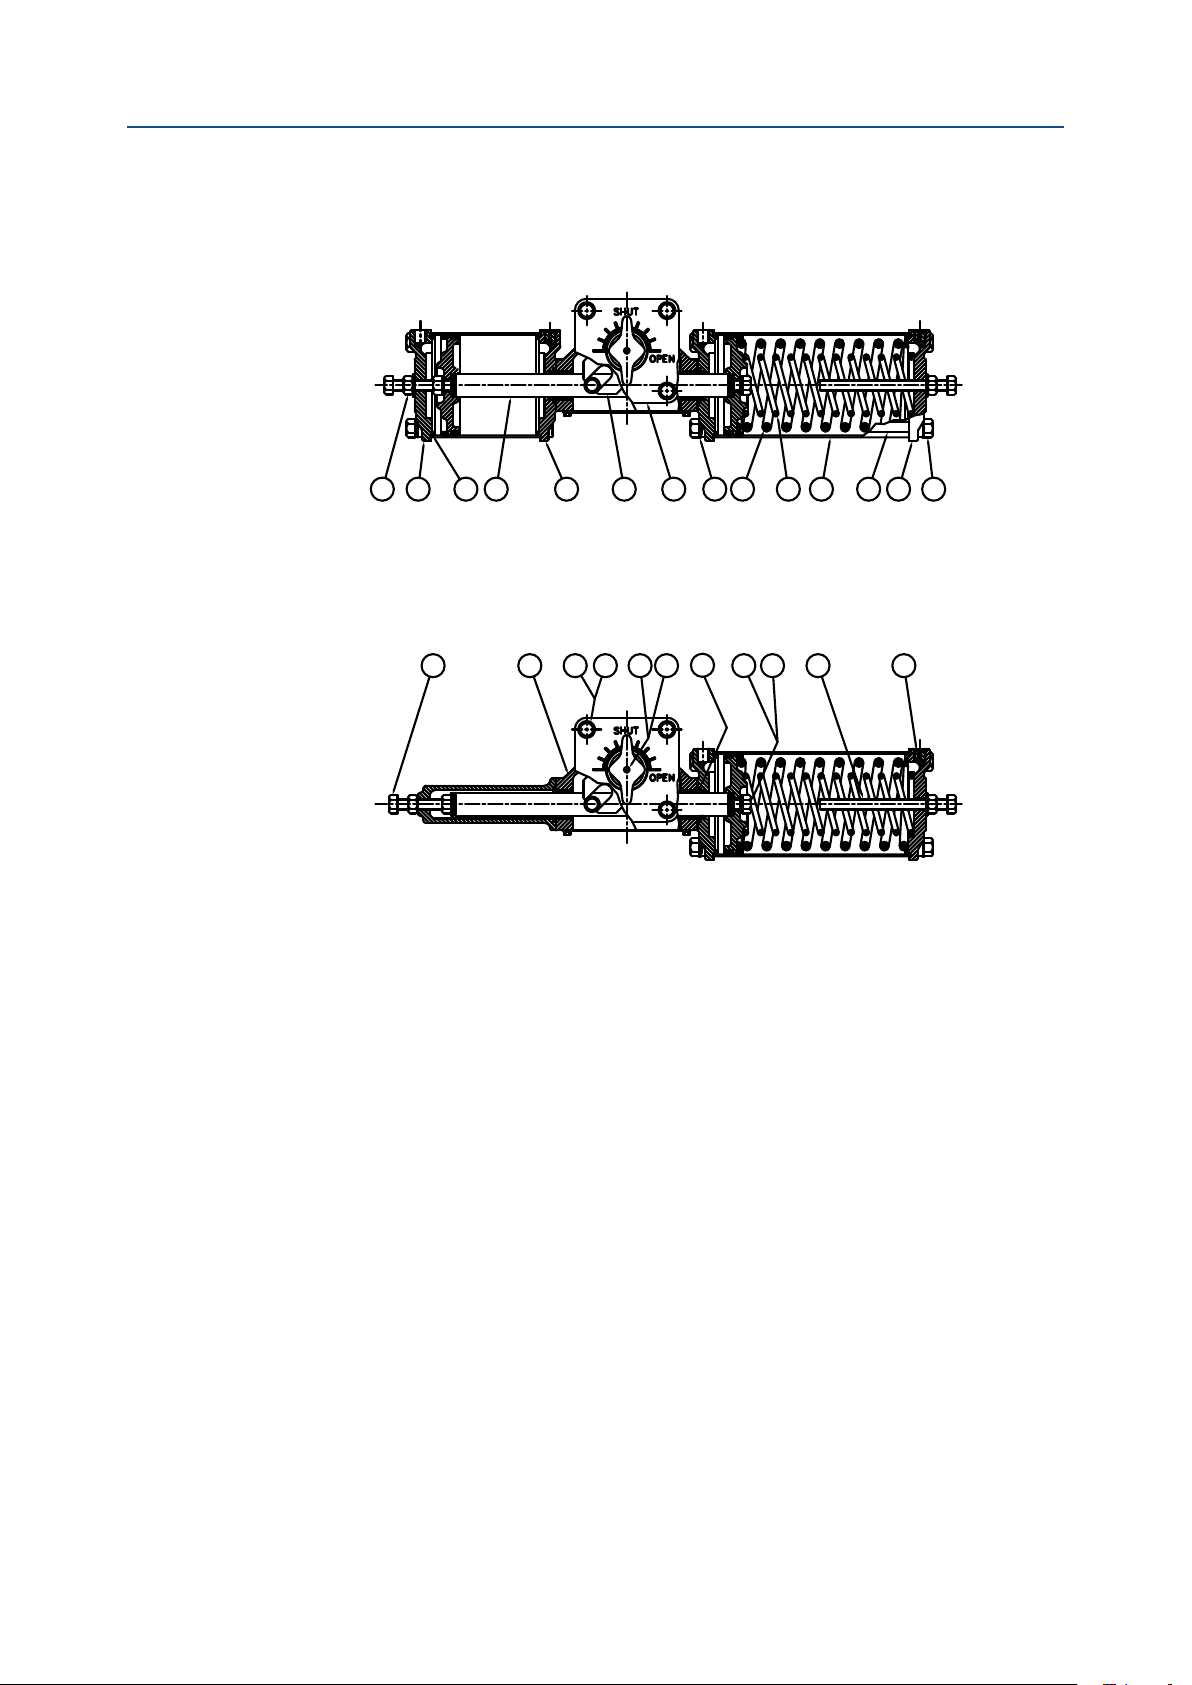
38
27
46
4
51545049565553132264462738
38
27
46
4
Section 3: Jackscrew Override
July 2019
Single-Acting Spring-Return Two Pistons
Models: 012, 046, 058, 059, 072, 100, 144, 270, 344, 345, 420, 740, 944, 945, 1150,
1480, 1929, 1930, 2380
Single-Acting Spring-Return One Piston
Models: 006, 015, 023, 036, 050, 135, 210, 370 and 575
Installation, Operation and Maintenance Manual
MAN-02-01-39-0704-EN Rev. 0
51545049565553132264462738
37 1 14 15 17 21 33 34 52 57
8a
6
Jackscrew Override
Page 10

Installation, Operation and Maintenance Manual
37 1 14 15 17 21 33 34 52 57
51545049565553132264462738
12
38
27
46
4
4
8a
SEC
Section 3: Jackscrew Override
MAN-02-01-39-0704-EN Rev. 0 July 2019
Double-Acting Air to Air Two Pistons
Models: 012, 059, 072, 100, 144, 270, 345, 420, 740, 945, 1150, 1480, 1930, 2380
43
41 24 32 18 19 20 3531 25
36
Double-Acting Air to Air One Piston
Models: 006, 015, 023, 036, 050, 135, 210, 370, 575
TION A-A, MODELS 003-1150
42
3
1
6
12
5
11
8
YOKE SHOWN AT MID-STROKE, POINTER OMITTED FOR CLARITY
12
48
5
10
1
9
3
13
8
13c
22
6b
12b
5
SECTION A-A, MODELS 135 - 1150
SECTION A-A, MODELS 1480-2380
18
20
19
1
2
42
12
42
13
5
22
2
14
15
5
22
Jackscrew Override
7
Page 11

Section 3: Jackscrew Override
July 2019
Table 1. Materials of Construction
Item 003-100 135-1150 Item 1480-2380
1 Housing 316 SS 316 SS 1 Housing 316 SS
2 Yoke 17-4 PH 17-4 PH 2 Yoke 17-4 PH
3 Output shaft 17-4 SS 17-4 SS 3
4 Piston rod 316 SS 316 SS 4 Piston rod 316 SS
5 Bushing - output shaft Teon Teon
6a Yoke pin 18-8 SS - 6a
6b Key - yoke - 17-4 PH 6b
7 Bushing - piston rod Teon Teon 7 Bushing - piston rod Bronze
8 Retaining ring - output shaft 15-7 MO 15-7 MO 8
9 Thrust pin 440C SS 440C SS 9 Thrust pin 440C SS
10 Roller bearing 440C SS 440C SS 10 Slide Block Bronze
11 Retaining ring - pin 15-7 MO 15-7 MO 11 Retaining ring - pin 15-7 MO
12 Seal, thrust plate - BUNA-N 12 Plug - thrust pin access 18-8 SS
12a Set screw 18-8 SS - 12a
12b Retaining ring - lower bearing - 18-8 SS 12b
13 Pointer adaptor - Nylon 13 Pointer adaptor Nylon
13a Position indicator 304 SS - 13a
13b Thrust plate - 316 SS 13b
13c Gasket, thrust plate - Fiber 13c
14 Hex head bolt 18-8 SS 18-8 SS 14 Drive bar Steel
15 Lock washer 18-8 SS 18-8 SS 15 Screw - accessory deive Steel
16 Pointer Soft PVC Soft PVC 16 Pointer Soft PVC
17 Round head screw 18-8 SS 18-8 SS 17 Round head screw 18-8 SS
18 Cover - housing 316 SS 316 SS 18 Cover - housing 316 SS
19 Hex head bolt 18-8 SS 18-8 SS 19 Hex head bolt - cover 18-8 SS
20 Lock washer 18-8 SS 18-8 SS 20 Lock washer - cover 18-8 SS
21 Pointer washer 18-8 SS 18-8 SS 21 Pointer washer 18-8 SS
22 Thrust washer - 18-8 SS 22 Vent Valve Brass
23 Gasket - cover Fiber Fiber 23
24 Cylinder 316 SS 316 SS 24 Cylinder 316 SS
25 Piston 316 SS 316 SS 25 Piston 316 SS
26 Adaptor 316 SS 316 SS 26 Adaptor 316 SS
27 End cap 316 SS 316 SS 27 End cap 316 SS
28 Rod cover 316 SS 316 SS 28 Rod cover 316 SS
29 Seal - piston rod BUNA-N BUNA-N 29 Seal - piston rod BUNA-N
30 Seal - piston bolt BUNA-N BUNA-N 30 Seal - piston bolt BUNA-N
31 Seal- piston BUNA-N BUNA-N 31 Seal- piston BUNA-N
32 Gasket - housing Fiber Fiber 32 Gasket - housing Fiber
33 Piston bolt 18-8 SS 18-8 SS 33 Hex head bolt - piston 18-8 SS
34 Lock washer 18-8 SS 18-8 SS 34 Lock washer - piston 18-8 SS
35 Bearing - piston Teon Teon 35 Bearing - piston Teon
36 Thread seal SS/EPDM SS/EPDM 36 Thread seal SS/EPDM
37 Travel stop bolt 18-8 SS 18-8 SS 37 Travel stop bolt 18-8SS
38 Jam nut 18-8 SS 18-8 SS 38 Jam nut 18-8SS
39 Socket head cap screw 18-8 SS 18-8 SS 39 Socket head cap screw 18-8SS
41 Tie rod 18-8 SS 18-8 SS 41 Tie rod 18-8 SS
42 Seal - output shaft - - 42 Seal - yoke BUNA- N
43 Lock washer 18-8 SS 18-8 SS 43 Lock washer 18-8 SS
45 Stato-seal BUNA-N BUNA-N 44 Hex head bolt 18-8 SS
46 Cylinder gasket or O-ring TFE or BUNA-N BUNA-N 45 Stato-seal BUNA -N
47 Label - nameplate MYLAR MYLAR 46 Cylinder O-ring BUNA-N
48 Seal - output shaft bushing - - 47 Label - Nameplate MYLAR
49 Cylinder - spring side 316 SS 316 SS 48 Seal - Outpuut shaft bushing BUNA-N
50 Tie rod - spring side 316 SS 316 SS 49 Cylinder - spring side 316 SS
51 Hex head bolt 18-8 SS 18-8 SS 50 Tie rod - spring side 316 SS
52 Travel stop bolt 18-8 SS 18-8 SS 51 Hex head bolt 18-8 SS
53 Flat washer 18-8 SS 18-8 SS 52 Travel stop bolt 18-8 SS
Installation, Operation and Maintenance Manual
MAN-02-01-39-0704-EN Rev. 0
Material Material
5 Bearing - yoke Teon
composite
Composite
8
Jackscrew Override
Page 12

Installation, Operation and Maintenance Manual
MAN-02-01-39-0704-EN Rev. 0 July 2019
Section 4: Manual HandPump Hydraulic Override
Section 4: Manual HandPump
Hydraulic Override
See Figure 4.
A. Maintain uid level to ll line using ISO-22 hydraulic uid. Use Chevron "Hydraulic
Oil AW" or equal.
B. The selector control valve is set in center position for remote operation. Select left
or right positions for manual open or manual close as shown on pump label.
C. Store and lock handle to keep pump plunger closed. Do not remotely operate
actuator with handle on plunger.
4.1 Hydraulic Fluid Level
The uid level in the handpump reservoir changes when the actuator is operated.
The uid level is high when the hydraulic cylinder piston rod is retracted into the hydraulic
cylinder. The uid level is low when the hydraulic cylinder piston rod is extended out of
the hydraulic cylinder. Measure the uid level in the low position, using a dip stick, and
maintain this level as shown on the sticker (1 inch above the pump base). Operate the
actuator open and closed and view the uid level to verify where the low position is.
Be sure to tighten the ll port plug securely.
CAUTION
Do not exceed this uid level or uid may squirt out of the relief valve.
4.2 Remote Mounting the HandPump
The handpump is normally installed on the actuator with the ll port on top.
When installed on a valve in a pipeline, the ll port must remain on top regardless of the
angle of the valve in the pipeline. This may require the handpump to be reinstalled in the
eld. The handpump can be remote mounted on an adjacent structure.
The optimum position is close to and above the actuator. If the handpump is located below
the actuator, BOTH speed control valves must be completely closed before removing the
reservoir ll plug to check the uid level. This will prevent hydraulic uid from draining out
of the actuator. Reset both speed controls after the ll plug is reinstalled.
NOTE
Handpump must not be located more than 33' lower than the actuator.
Manual HandPump Hydraulic Override
9
Page 13

Section 5: Integral Proximity Switch Mounting
July 2019
Installation, Operation and Maintenance Manual
Section 5: Integral Proximity
Switch Mounting
(Only with Prox Prep Factory Ordered Option)
A. Remove plastic plugs from proximity ports located on the back of the
actuator housing.
B. Insert switch and turn clockwise until switch touches ferrous activator on yoke,
then back off approximately 1/16”.
C. Test switch by stroking actuator and verifying make and break of switch.
D. Repeat procedure for second switch if required.
MAN-02-01-39-0704-EN Rev. 0
10
Integral Proximity Switch Mounting
Page 14

Installation, Operation and Maintenance Manual
MAN-02-01-39-0704-EN Rev. 0 July 2019
Section 6: Spring Conversion to change Operating Pressure
Section 6: Spring Conversion to change
Operating Pressure
All spring packs except the 40 psi consist of an inner and outer spring. The 40 psi spring
pack uses an outer spring only. Various spring packages are available as shown in the
Bettis catalog.
CAUTION
Before attempting spring conversions always be sure that spring is in the ‘failed’ or
extended position. Remove any accessory equipment that may cause the spring to be
cocked (e.g.: declutchable override, jackscrew override, etc.).
A. Back off adjustable travel stop on end of actuator opposite spring end. This will
allow maximum spring extension inside the actuator.
(Models 003)
B. Remove tie rod bolts (41). Back off piston bolt (33) until spring is fully relaxed and
piston (25) is free.
C. Remove 80 psi spring package and replace with desired spring package.
D. Re-assemble piston, cylinder, endcap and tie rods, being sure to follow the tie rod
tightening sequence (Figure 5A). Do not over tighten bolts. Refer to Assembly
Torque Requirements Chart (Table 3).
(All models except 003)
A. Alternately and uniformly remove bolts (51) from hollow tie rods. Back off each
bolt approximately 1/4”, following the tie rod sequence (Figure 5A). Repeat the
sequence until spring(s) is/are totally relaxed and endcap is free.
B. Remove 80 psi spring package and replace with desired spring package.
C. Re-assembly endcap with bolts (51). Use reverse procedure as shown in step B,
being sure to follow the tie rod tightening sequence (Figure 5A). Be sure each
hollow tie rod slides into the counterbore in endcap. Do not over tighten bolts.
Refer to Assembly Torque Requirement Chart (Table 3).
D. Remove nameplate from actuator and stamp or etch correct spring pressure
rating accordingly.
Spring Conversion to change Operating Pressure
11
Page 15

Section 7: Failure Mode Change
July 2019
Installation, Operation and Maintenance Manual
Section 7: Failure Mode Change -
Spring Return
(Models 003-100) Symmetric Yoke Actuators Only
Conversion from "fail close" to "fail open" is accomplished by ipping the actuator over (i.e.
left to right). The top and bottom of the center housing have identical mounting anges
and output shaft dimensions. Remove the vinyl pointer and indicator plate and mount
them on opposite side of actuator.
(Models 023-2380) Canted and Symmetric Yoke Actuators (Except Noted Above)
Conversion requires removal of the spring cylinder assembly and reinstallation on the other
side of the housing. It is recommended that fail open and fail closed be ordered from
the factory.
MAN-02-01-39-0704-EN Rev. 0
12
Failure Mode Change
Page 16

Installation, Operation and Maintenance Manual
MAN-02-01-39-0704-EN Rev. 0 July 2019
Section 8: Removal of Actuator from Valve
Section 8: Removal of Actuator from Valve
CAUTION
Do not attempt to remove mounting bolts between actuator and valve until supply pressure has been disconnected and vented. If spring return, be sure that valve is completely
in failed position. If valve is frozen in a position causing the spring to be cocked, removal of
bracket bolts would allow spring to stroke, resulting in the actuator rotating over bracket
causing possible injury or damage.
A. Loosen bracket to actuator bolts to hand tight position.
B. Physically shift actuator back and forth to be sure there is no strain (or shear
stress) on the bracket bolts. Once it has been determined that there is no pressure
or spring coil remaining in the actuator, remove bolts and remove actuator and
coupling from valve.
C. In the event the valve is frozen or locked in place, resulting in spring energy
remaining in the actuator, replace adjusting screw (37) on end of actuator
opposite spring end with length of ‘all thread’ rod of sufcient length and turn
clockwise until it contacts the piston. This procedure will safely secure the piston
and spring assembly and allow actuator removal. Be sure to remove "all thread" rod
prior to actuator disassembly.
Figure 5
Figure 6
Figure 7
Removal of Actuator from Valve
13
Page 17

Section 9: Disassembly
July 2019
Installation, Operation and Maintenance Manual
MAN-02-01-39-0704-EN Rev. 0
Section 9: Disassembly
9.1 Disassembly of Symmetric Yoke Actuators
A. Remove endcap(s) (27); tie rods (41) and cylinder (24). Remove rod cover (28)
if applicable.
B. Remove piston bolts (33) and pistons (25) and springs if applicable (55 and 56).
C. Remove adaptor (26) and piston rod seals (29).
Note: 003 one piece cast housing / adaptor.
D. Remove housing cover (18), pointer (16) and position indicator (where applicable)
(13).
(Models 003-100)
E. Disengage yoke (2) from roller bearing assembly by pulling piston rod to extreme
right, as in Figure 5, and swing yoke mechanism clear of roller bearing as in Figure 6.
F. Rotate piston rod 90° to allow access to retaining ring (11) as shown in Figure 7.
G. Remove retaining ring and bearing (10). Then rotate piston rod (4) 180° and
remove the bearing and thrust pin assembly.
H. Remove piston rod (4) and piston rod bushings (7).
I. Remove plug (12) from back of housing.
J. Using a punch or suitable dowel pin, insert through clearance hole and press yoke
pin (6) out.
K. Remove retaining ring (8) from output shaft. Remove output shaft and yoke.
L. Remove bushings (5) from housing.
(Models 135, 270-1150)
E. Disengage yoke (2) from roller bearing assembly by pulling piston rod (4) to
extreme right, as in Figure 5, and swing yoke (2) clear of roller bearing (10)
assembly. See Figure 6.
F. Rotate piston rod (4) 90° to allow access to retaining ring (11) as shown in Figure 7.
G. Remove the thrust pin retaining rings (11) and withdraw the roller bearings (10),
and thrust pin (9).
H. Remove piston rod (4) and piston rod bushings (7).
I. Remove retaining rings (8) and (12b) on both ends of output shaft.
J. Remove thrust plate (13b) and thrust washers (22) from the output shaft (3).
K. Position the yoke (2) in the fully clockwise position (viewed from the thrust plate
(13b) side).
L. Using a soft hammer, drive output shaft (3) out through top of housing (1).
M. Withdraw yoke (2) from housing (1).
N. Remove the output shaft bushings (5) from the housing (1).
(Models 1480, 1929, 1930, 2380)
E. Remove the pointer (16) and accessory drive (13) from the actuator by removing
the screw (14) from inside the yoke (2) bore.
F. Remove all cover bolts (19). Three of these bolts occupy "jack bolts" holes and are
14
Disassembly
Page 18

Installation, Operation and Maintenance Manual
MAN-02-01-39-0704-EN Rev. 0 July 2019
Section 9: Disassembly
threaded into the cover (18). Screw three long cover bolts into these "jack bolt" holes
and turn them sequentially ½ turn at a time to pry the cover off. See Figure 6A.
G. Remove the thrust pin access plug (12). (Figure 5A)
H. Push the yoke (2) using the piston rod (4) until the thrust pin (9) is centered over
the thrust pin access hole (See Figure 5A). Remove the upper thrust pin retaining
ring (11) from the thrust pin (9) (Figure 7A).
I. Push the thrust pin (9) and lower retaining ring (11) out through the thrust pin
access hole allowing the slide blocks (10) to fall free. Remove the slide blocks (10).
J. Remove the piston rod (4), piston rod bushings (7), yoke (2). Remove yoke
bearings (5), and yoke seals (48) from the housing (1) and cover (18).
Remove the upper and lower vent valves (22) from the back of the housing.
Figure 5A
Figure 6A
Figure 7A
Yoke
Jack bolts
Thrust pin
access
Slide block
and thrust
pin
Disassembly
15
Page 19

Section 9: Disassembly
July 2019
Installation, Operation and Maintenance Manual
MAN-02-01-39-0704-EN Rev. 0
9.2 Disassembly of Canted Yoke Actuators
Canted yoke actuators are disassembled the same way as the symmetric yoke actuators
except for the following additional instructions for specic models:
(Models 023-100)
These actuators are disassembled using the same procedure as the symmetric actuators.
However, the thrust pin (9) is removed from the housing (1) via access plugs on the upper
and lower housing mounting anges.
(Models 135-1150)
A. Remove the pointer (16), pointer adaptor (13) and pry out the thrust plate seal
(12) (if tted).
B. Remove the thrust plate (13b) and thrust washers (22) from the output shaft (3).
C. Position the yoke (2) in the fully clockwise position (viewed from the thrust plate
(13b) side).
D. Using a soft hammer, drive output shaft (3) out through the thrust plate side of the
housing (1). This will drive out the upper output shaft bushing (5) and yoke key (6b).
E. Remove the piston rod bushings (7) from the housing (1).
F. Shift the yoke (2) around in the housing (1) so that the thrust pin (9) and roller
bearing (10) assembly can be moved out of the yoke slot. Remove the thrust pin
retaining rings (11) and withdraw the roller bearings (10), thrust pin (9), piston rod
(4) and yoke (2).
G. Remove the lower output shaft bushing retaining ring (12b) and lower output
shaft bushing (5).
Figure 7C
Curved arm
of yoke
Long DimensionShort Dimension
Canted Yoke Ac tuator
Open Position - Top view
Equal Dimension Equal Dimension
Symmetric Yoke Ac tuator
Open Position - Top view
1. The canted yoke piston rod is not symmetrical, it must be positioned as shown.
The symmetrical yoke piston rod can be installed either way.
2. Canted yoke must be installed oriented as shown.
16
Disassembly
Page 20

Installation, Operation and Maintenance Manual
MAN-02-01-39-0704-EN Rev. 0 July 2019
Section 10: Assembly
Section 10: Assembly & Operating Instructions
10.1 Assembly of Symmetric Yoke Actuators
(Models 003-100)
A. Insert piston rod bushings (7) and output shaft bushings (5) in housing.
(On models B-006 through 100 lube output shaft bushings O-rings (48) with "Dow
Corning #112" lubricant. Push one O-ring halfway on each bushing and install
bushings in housing.)
B. Place yoke (2) in position in housing. Lubricate with "WD-40" or similar lubricant
and install output shaft (3). (On models B-006 through 100, lube output shaft
O-rings (42) with "Dow Corning #112" lubricant. Install one O-ring on one end
of output shaft and insert through housing and yoke. Install second O-ring on
opposite end of output shaft and push output shaft back into housing.)
Secure output shaft with retaining rings (8).
C. Lubricate and press yoke pin (6) into yoke and output shaft assembly from open
side of housing. Be sure pin is pressed ush in yoke to prevent interference with
piston rod (4).
(Models 135, 270-1150)
A. Insert yoke key (6b) into output shaft (3).
B. Install yoke (2) in housing (1). Slide output shaft (3) through top of housing (1)
into the yoke (2). Install lubricated upper and lower bearings (5a).
C. Install lower thrust washer (22), thrust plate (13), upper thrust washer (22)
retaining ring (8) and thrust plate seal (12) (if tted). Install lower bearing
retaining ring (12b).
(Models 003-1150)
D. Lubricate with "WD40" and install piston rod (4) being careful not to scratch sealing
surfaces when sliding through yoke assembly.
E. Swing yoke clear toward left side of housing as shown in Figure 7.
F. Sub-assemble thrust pin (9) with one roller bearing (10) and one retaining
ring (11). Pre-lubricate sub-assembly with high temperature grease such as
"Whitmore’s Omnitemp II".
G. Install roller bearing sub-assembly per Figure 7. Rotate piston rod 180° and
assemble second roller bearing and retaining ring. Place ample amount of high
temperature grease on roller bearing and inside wear area of yoke.
H. Engage roller bearing in yoke assembly as shown in Figure 7, 6, & 5.
I. Install plug (12) in back of housing if applicable. Use "Loctite 222 Thread Locker".
Assembly
17
Page 21

Section 10: Assembly
July 2019
(Models 1480-2380)
A. Install yoke seals (42) using o-ring lube and yoke bearings (5) using WD-40 into the
B. Inspect the housing upper and lower vent passages and clear any blockage. Install
C. Lubricate the bearing surfaces of the yoke (2) with WD-40 and install the yoke
D. Install the piston rod bushings (7) and the piston rod (4).
E. Install the lower retaining ring (11) on the thrust pin (9) and lubricate the pin with
F. Place joint compound on the sealing surface of the cover (18), install the cover on
G. Insert a bead of Dow Corning 732 silicone sealant on the cover (18) sealing surface
H. Install the cap seal (12a) and cap (15).
(Cylinder and Rod Cover Assembly-All Models)
Installation, Operation and Maintenance Manual
MAN-02-01-39-0704-EN Rev. 0
cover (18) and housing (1).
new vent valves (22).
(2) in the housing (1). Install the yoke with the marking and the pointer drive bar
visible through the cover hole.
Whitmore grease. Lubricate the slide blocks (10) with Whitmore grease inside and
out and position them in the yoke (2) slots. Insert the thrust pin (9) through the
thrust pin access hole (Figure 5) and slide it through the lower slide block (10),
piston rod (4), and upper slide block (10). Install the upper retaining ring (11) on
the thrust pin (9).
the housing (1), and torque the cover bolts (19) to 30 ft-lb. Install the short cover
bolts (19) into the jack bolt holes of the cover (18).
and install the cover (18) on the housing (1) torquing the bolts to 15 in-lb.
Assemble bolt (33) on end of piston rod before installing rod cover when rod cover
is required.
A. Install rod cover (28) if applicable. Actuators utilizing one piston only require a rod
cover. Bolt rod cover and gasket in place with socket head screws (39).
Use “Locktite 222 Thread Locker.”
B. For models 1485 – 3072 install the piston rod spacer plate.
C. Assemble piston rod o-ring (29) on piston rod. Lubricate o-ring with "Dow Corning
#112" lubricant.
18
Assembly
Page 22

Installation, Operation and Maintenance Manual
MAN-02-01-39-0704-EN Rev. 0 July 2019
Figure 8 TIe Rod Tightening Sequence
Section 10: Assembly
1
1
4
3
5
3
4
6
2
2
Table 2. Assembly Torque Requirements (ft./lbs.)
Model No. Adaptor Bolt (44) Piston Bolt (33) Tie Rod (41)
003 N/A 15 10 N/A
S-006, 012 15 15 15 10
023 thru 100 30 40 30 25
135, 270 150 150 150 100
344 150 150 250 100
345 150 150 150 250
210, 420 150 150 250 250
370, 575 thru 7114 250 250 250 250
Tie Rod Bolt
Spring Side (51)
D. Assemble adaptor (26) to housing using gasket (32) between adaptor and
housing. If actuator is spring return model be sure to insert long tie rod bolts (51)
with washer into adaptor prior to bolting adaptor to housing. Secure the adaptor
(26) using hex head bolts (44) with stato-seals (45). Use “Locktite 222 Removable
Thread Locker” on the bolts. Uniformly tighten referring to Assembly Torque
Requirement (Figure 8 and Table 2) for proper bolt torque.
E. Lubricate piston bolt o-ring (30) with "Dow Corning #112" lubricant and put on
piston rod. Assemble piston (25) to piston rod with bolt (33) and lock washer (34).
Use "Locktite 262 Permanent Thread Locker"on bolt threads. Rotate piston before
tightening piston bolt to ensure proper seating of o-ring.
F. Install cylinder gasket or lubricated o-ring (46) in adaptor groove.
G. Lubricate piston seal (31) with "Dow Corning #112" lubricant and install on piston.
H. Lubricate piston bearing (35) and cylinder (24) with "Dow Corning #112" lubricant.
Hold piston bearing (35) in place on piston (25) and slide cylinder (24) over piston and
I. Assemble tie rods (41) on adaptor.
J. Insert cylinder gasket / o-ring (46) in endcap (27) groove and place endcap over tie
K. Assemble lock washers (43) and hex nuts (HP Models) on tie rods and uniformly
bearing until cylinder is in contact with gasket / o-ring (46) in adaptor groove.
On spring return models substitute one cylinder (24) with cylinder (49) on spring side.
rods (41) and on cylinder (24).
tighten. Do not exceed torque values shown in Assembly Torque Requirement
Table (Figure 8 and Table 2).
Assembly
19
Page 23

Section 10: Assembly
July 2019
10.2 Spring-Return Only
(Models 003)
L. Place cylinder gasket / O-ring (46) in endcap (54).
M. Place springs in adaptor, being sure to nest in contours. Mount piston (25) over
springs and fasten with piston bolt (33) and lock washer (34). Do not over tighten
bolts. Refer to Assembly torque requirements chart (Table 3).
All Models (except 003)
N. On spring return models; hollow tie rods (50) must be screwed onto long bolts
(51) protruding from adaptor (26).
O. Place cylinder gasket / o-ring (46) in endcap (54). Insert long bolts (51) with at
washer (53) in endcap.
P. Place spring(s) in cylinder, being sure to nest in piston contours. Mount endcap
over extended spring(s) and fasten to hollow tie rods (50) with bolts (51).
To prevent galling, lubricate bolts (51) with "Whitmore’s Omnitemp II" grease or
equal. Alternately and uniformly tighten bolts (51) in hollow tie rods. Tighten each
bolt approximately ¼” – ½” following the sequence shown in Tie Rod Tightening
Sequence (Figure 8) until spring is completely compressed. Be sure that each
hollow tie rod slides into the counterbore in the endcap. Do not over tighten bolts.
Refer to Assembly Torque Requirements Table (Figure 8 and Table 2).
All Models
Installation, Operation and Maintenance Manual
MAN-02-01-39-0704-EN Rev. 0
Q. Install position indicator (13) and pointer (16), where applicable. Assemble
adjusting screws (37), thread seals (36) and jam nuts (38). Lubricate the rubber
face of the thread seal with Dow Corning #112 lubricant and install nger tight
against the endcap. Tighten the seal approximately one turn so that the rubber
begins to bulge beyond the metal portion of the seal.
R. Stoke actuator with rated supply air and check for leaks. The thread seal may be
tightened up to one additional turn if there is any leakage at the adjusting bolt.
20
Assembly
Page 24

Installation, Operation and Maintenance Manual
MAN-02-01-39-0704-EN Rev. 0 July 2019
Section 10: Assembly
10.3 Assembly of Canted Yoke Actuators
Canted yoke actuators are assembled the same way as the symmetric yoke actuators
except for the following additional instructions for specic models.
Canted yoke actuators have a non-symmetrical piston rod as well as a nonsymmetrical yoke. It is important to orient the piston rod with the longer dimension
in relation to the yoke as shown in Figure 7. Note that the nished housing assembly
is used for both fail open and fail closed actuators.
(Models 135-1150)
A. Insert the yoke (2) into the housing (1) and position the yoke in the fully clockwise
position (viewed from the thrust plate (13b) side).
B. Insert the piston rod (4) correctly oriented with the longer dimension as shown in
Figure 7.
C. Install the thrust pin (9) and roller bearings (10) using generous amounts of
Whitmore Omnitemp grease and install both pin retaining rings (11).
D. Shift the yoke (2) and piston rod (4) so that the thrust pin (11) and roller bearing
(10) assembly can be inserted into the yoke slot. The absence of the piston rod
bushings (7) and output shaft bushings (5) allows just enough room for
this process.
E. Insert the lower output shaft bushing (5) and retaining ring (12b). This bushing
must have a press t. The integral seal o-ring must be oriented toward the yoke.
F. Insert the yoke key (6b) into the output shaft (3), then insert the output shaft into
the housing (1) and yoke(2) and lower output shaft bushing (5).
G. Install the upper output shaft bushing (5) over the output shaft and into the
housing (5). The bearing must have a press t. The integral seal o-ring must be
oriented toward the yoke.
H. Install output shaft thrust washer (22), thrust plate gasket(13b) thrust plate (13b),
thrust washer (22) and retaining ring (8).
I. Install Pointer adaptor (13) using two socket head cap screws.
J. Install the thrust plate seal (12), pointer (16) and pointer washer (21).
Assembly
21
Page 25

Section 11: Operating Instructions
July 2019
Installation, Operation and Maintenance Manual
MAN-02-01-39-0704-EN Rev. 0
Section 11: Operating Instructions
Operate the actuator in accordance with the pressure and temperature limits specied on
the nameplate. See the appropriate Bettis Catalog for technical information.
22
Operating Instructions
Page 26

Installation, Operation and Maintenance Manual
MAN-02-01-39-0704-EN Rev. 0 July 2019
Section 12: Important Safeguards
Section 12: Important Safeguards
CAUTION: TO REDUCE THE RISK OF INJURY
• Read the entire Operation and maintenance Instruction manual before installing,
operating, or servicing this actuator.
• Inspect the actuator regularly for signs of corrosion and repair immediately.
• Always remove pressure and disconnect power supply before servicing the actuator.
• Keep hands and feet clear of an actuator that is in service.
• Do not disassemble the actuator without reviewing the disassembly procedure in
this manual rst. This is particularly important that the proper procedure be
followed to avoid injury from internal spring power.
• Before attempting to remove an actuator from the equipment it is assembled to,
always be sure that spring is in the “failed” or extended position. Remove any
accessory equipment that may cause the spring to be cocked. If there is any doubt
that the actuator is in the “failed” position, remove the air pressure from the
actuator and install a long threaded bolt (a bolt that exceeds the length of the
cylinder) in place of both travel stops. Once the actuator has been removed
from the equipment the long bolts must be removed rst before the actuator can
be disassembled.
• Repair or replace a damaged actuator immediately.
• Inspect the vent valves on models 1480 – 2380 during regular maintenance periods.
The valves should allow leaking uids to escape but prevent contaminates from the
surrounding atmosphere from entering the actuator. Fluid leaking from the lower
valve indicates a valve stem seal leak. Fluid leaking from the upper valve indicates a
leaking cylinder seal. If leakage is observed from either valve disassemble and repair
the source immediately. Never replace the vent valves with plugs.
• Operate the actuators within the pressure and temperature ranges specied on
the nameplate. Otherwise the actuator life may be reduced or serious safety hazards
may develop.
Important Safeguards
23
Page 27

Section 13: Additional Safety Instructions
July 2019
Installation, Operation and Maintenance Manual
MAN-02-01-39-0704-EN Rev. 0
Section 13: Additional Safety Instructions
for Actuators used in a
Potentially Explosive Atmosphere
under ATEX 2014/34/EU
13.1 Marking
• ATEX 2014/34/EU, Ex II 2G Ex h IIc T4 Gb
13.2 Selection
• Ensure that the equipment is marked with the correct equipment group, category
and type of atmosphere for the application and that the safety instructions are
followed for each item of the equipment.
• In particular, all items included in an actuator package, including valve, actuator and
all accessories should be CE marked to ATEX in the appropriate and / or requested
category.
13.3 Installation
• The installer must only use tooling appropriate to the working area, see EN 1127-1
Annex A.
• Installation must be carried out at ambient temperature.
• During installation ensure that no metallic shocks / impacts are made to the
equipment or the adjacent piping.
• Ensure that the equipment is suitably earthed (grounded) through the pipe or
individually.
• The installer should thoroughly follow the operating and safety instructions
provided for each individual item of equipment.
• When the valve is to handle hot uids or uids where exothermic reactions may
take place, the end user must take al the necessary measures to ensure that the
hot surface of the valve cannot provide a source of ignition to the surrounding gas,
vapour, mist or dust atmosphere.
• Before putting into use or during operation with a dangerous uid, ensure that no
release of the uid to atmosphere can take place.
13.4 Maintenance
• The operator shall ensure that maintenance and testing activities are carried out
by competent personnel.
• The operator must ensure that only personnel qualied to work in a potentially
hazardous area are allowed to carry out maintenance appropriate to the category
of the equipment in use.
• The end user must ensure that only tooling appropriate to the working area is
used, see EN 1127-1 Annex A.
• All equipment must only be tted with manufacturer’s original spare parts.
24
Additional Safety Instructions
Page 28

Installation, Operation and Maintenance Manual
MAN-02-01-39-0704-EN Rev. 0 July 2019
Section 14: Additional Safety Instructions
Section 14: Additional Safety Instructions
for Actuators used in
Emergency Shut-down Service
or IEC 61508 safety integrity
level (SIL) Compliant Installations
1. The actuator will move a valve to the designated safe position per the actuator
design within the specied safety time.
2. The actuator has met the systematic requirements for SIL-3.
3. The actuator is a Type A device with a hardware fault tolerance (HFT) = 0.
4. If the automated partial valve stroke test (PVST) diagnostics is used, the
diagnostics time is the PVST test interval.
5. Customer is required to conrm the actuator is operated within the listed
temperature limitations shown on page 1.
6. Customers may voluntarily register their actuator by contacting Bettis Actuator
sales department.
7. Actuators should be inspected for proper functioning and signs of deterioration
every 100,000 cycles or annually (whichever comes rst) under normal operating
conditions. Inspect more frequently under severe operating conditions Defects
should be repaired promptly.
8. Normal operating conditions are: Air Quality within ANSI/ISA-7.0.01 standards;
operating temperature and pressures consistent with the actuator nameplate
and catalog limits; environment free from excessive particulates; operating
environment consistent with the actuator materials of construction. Under these
conditions, actuator life can exceed a million cycles.
9. The recommended minimum operating interval is six months and a partial stroke
is acceptable to conrm that the installation is functioning.
10. When an actuator has been repaired or any maintenance is performed, check
the actuator for proper function (proof testing). Any failures effecting functional
safety should be reported to the Pelham facility.
11. IEC 61508 (SIL) installations should consult the Emerson factory to obtain the
assessment and FMEDA report, which include failure data, PFDAVG, and other
associated statistical data to establish or satisfy SIL level or requirements. This
information is available in report MOR 12\04-064 R001 V1 R1 FMEDA.
12. Proof testing of the actuator shall be performed on the interval determined per IEC
61508 / IEC 61511 requirements. A suggested proof test is included in report MOR
12\04-064 R001 V1 R1 FMEDA. No special tools are needed. The report includes
the achieved proof test coverage.
13. Service and maintenance on actuators shall only be performed by personnel
trained in Safety Integrity Systems (SIS) operations and in the repair and
maintenance procedure for Bettis actuators.
Additional Safety Instructions
25
Page 29

Page 30

World Area Conguration Centers (WACC) offer sales support, service,
inventory and commissioning to our global customers.
Choose the WACC or sales ofce nearest you:
NORTH & SOUTH AMERICA
19200 Northwest Freeway
Houston TX 77065
USA
T +1 281 477 4100
Av. Hollingsworth
325 Iporanga Sorocaba
SP 18087-105
Brazil
MIDDLE EAST & AFRICA
P. O. Box 17033
Jebel Ali Free Zone
Dubai
T +971 4 811 8100
P. O. Box 10305
Jubail 31961
Saudi Arabia
T +966 3 340 8650
T +55 15 3413 8888
24 Angus Crescent
ASIA PACIFIC
Longmeadow Business Estate East
P.O. Box 6908 Greenstone
No. 9 Gul Road
#01-02 Singapore 629361
T +65 6777 8211
No. 1 Lai Yuan Road
1616 Modderfontein Extension 5
South Africa
T +27 11 451 3700
EUROPE
Wuqing Development Area
Tianjin 301700
P. R. China
T +86 22 8212 3300
Holland Fasor 6
Székesfehérvár 8000
Hungary
T +36 22 53 09 50
Strada Biffi 165
29017 Fiorenzuola d’Arda (PC)
Italy
T +39 0523 944 411
For complete list of sales and manufacturing sites, please visit
www.emerson.com/actuationtechnologieslocations or contact us at
info.actuationtechnologies@emerson.com
www.emerson.com/bettis
©2019 Emerson. All rights reserved.
The Emerson logo is a trademark and service mark of Emerson Electric Co.
TM
is a mark of one of the Emerson family of companies.
Bettis
All other marks are property of their respective owners.
The contents of this publication are presented for information purposes
only, and while every effort has been made to ensure their accuracy, they
are not to be construed as warranties or guarantees, express or implied,
regarding the products or services described herein or their use or
applicability. All sales are governed by our terms and conditions, which are
available on request. We reserve the right to modify or improve the designs
or specifications of our products at any time without notice.
 Loading...