

Page 1
Bettis GVO-C Series
GVO-CHP-DA Hydraulic Actuators
Operation and Maintenance Manual
GVO-CHP-DA.IOM.1001 Rev. 0
March 2016
Page 2

Page 3

Operation and Maintenance Manual
GVO-CHP-DA.IOM.1001 Rev. 0
Table of Contents
Section 1: Introduction ��������������������������������������������������������1
Section 2: Operation ������������������������������������������������������������2
Section 3: Maintenance
3.1 Checking the Gland Packing and Barrel Seals .............................................. 3
3.2 Checking the Piston Packing ....................................................................... 3
Section 4: Packing Replacement
4.1 Dismantling the Cylinder ............................................................................ 4
4.2 Reassembling the Cylinder .......................................................................... 5
Table of Contents
March 2016
Section 5: Packing-Kit Selection �������������������������������������������7
Section 6: Storage Condition ������������������������������������������������8
Table of Contents
I
Page 4

Section 1: Introduction
March 2016
Section 1: Introduction
Bettis GVO-C Linear cylinder has been engineered and manufactured to meet or exceed
the most varied applications.
It has been factory inspected, adjusted and tested to pre-determined tolerances and
specifications to ensure trouble free operation.
Operation and Maintenance Manual
GVO-CHP-DA.IOM.1001 Rev. 0
1
Introduction
Page 5

Operation and Maintenance Manual
GVO-CHP-DA.IOM.1001 Rev. 0
Section 2: Operation
1. Only filtered hydraulic oil ESSO NUTO-H32 or equivalent should be used to
actuate cylinder. The oil must be filtered to remove all contaminants.
2. Care should be exercised to ensure that regulated oil pressure does not
exceed the indicated pressure rating.
3. Unless supplied with optional metallic rod-scraper and rod boot, the cylinder
should be operated in a low dust and abrasive free environment for maximum
life.
4. The standard operating temperature is between –30°C and +120°C
(–25°F and +250°F). Consult the factory for extreme temperature applications.
For Special Application, please consult technical staff or your nearest distributor.
Section 2: Operation
March 2016
Operation
2
Page 6

Section 3: Maintenance
March 2016
Operation and Maintenance Manual
GVO-CHP-DA.IOM.1001 Rev. 0
Section 3: Maintenance
Bettis GVO-C Linear cylinder has been designed for a long life expectancy, with the
exception of the piston packings and gland packings, which should be replaced
periodically, depending on environmental conditions and frequency of operation.
NOTE:
This product is only intended for use in large-scale fixed installations excluded from the
scope of Directive 2011/65/EU on the restriction of the use of certain hazardous
substances in electrical and electronic equipment (RoHS 2).
3�1 Checking the Gland Packing and Barrel Seals
1. Connect pressure at the rod end port.
2. Verify the gland bushing to observe any abnormal oil accumulation in this zone.
3. Verify the zone between head and barrel.
4. Connect pressure at the cap end port.
5. Verify the zone between cap and barrel.
3�2 Checking the Piston Packing
1. Connect pressure at the cap end port to allow cylinder to fully extend the piston
rod.
2. Install a pressure gauge at the rod end port and read it during a lead of time of
30 seconds. If the pressure gauge reads 0 PSI, that means there is no leak.
If the pressure rises, the packing should be changed.
3. Connect pressure at the rod end port and the gauge to the cap end port and
repeat the same steps to verify the piston packing in the opposite direction.
3
Maintenance
Page 7

Operation and Maintenance Manual
GVO-CHP-DA.IOM.1001 Rev. 0
Section 4: Packing Replacement
Section 4: Packing Replacement
4�1 Dismantling the Cylinder
1. Remove the cylinder from machine to which it is mounted.
2. Place the cylinder in a clean work area.
3. Unscrew tie rod nuts and remove the tie rods. Always use appropriate tools.
NOTE:
There are two set screws that retain the tie rods to the head that must be loosened.
March 2016
4. Remove the head and the cap from barrel. Use a rubber mallet if necessary.
5. Pull out the piston and piston rod assembly from barrel. Take care not to damage
the rod and the barrel. Do Not Disassemble the Rod from the Piston.
6. Remove gland retainer.
7. Remove packings from both piston and gland bushing, noting orientation of
packing lips (vees). Packing must face pressure. Remove seals (O-rings) from
head and cap grooves.
8. Verify inside of barrel, gland bushing and rod surface for damage and/or excessive
wear.
Packing Replacement
4
Page 8

Section 4: Packing Replacement
March 2016
Operation and Maintenance Manual
4�2 Reassembling the Cylinder
1. Clean carefully all parts, grooves and surfaces prior to starting the assembly.
Use compressed air to remove all solid particles.
2. Apply a light coat of grease (ESSO LIDOK EP2 or equivalent) to all packings and
seal grooves.
3. Place the O-rings in the head and cap grooves.
4. Install the piston packing. Vees must face pressure.
5. Install the wear band on piston (if any).
6. Slide the piston and piston rod assembly into the barrel. Take care not to
damage the packing.
7. Carefully install gland seal, gland packing, back-ups and rod wiper on the
gland bushing.
GVO-CHP-DA.IOM.1001 Rev. 0
8. Insert the gland bushing into the head. Use a rubber hammer if necessary.
9. Install gland retainer.
10. Install the cap on the barrel. Check if the barrel seal (O-ring) is in the groove.
11. Slide the cap over the piston rod, being sure not to damage the bushing packing
and barrel seal remains in place. Install the head on the barrel.
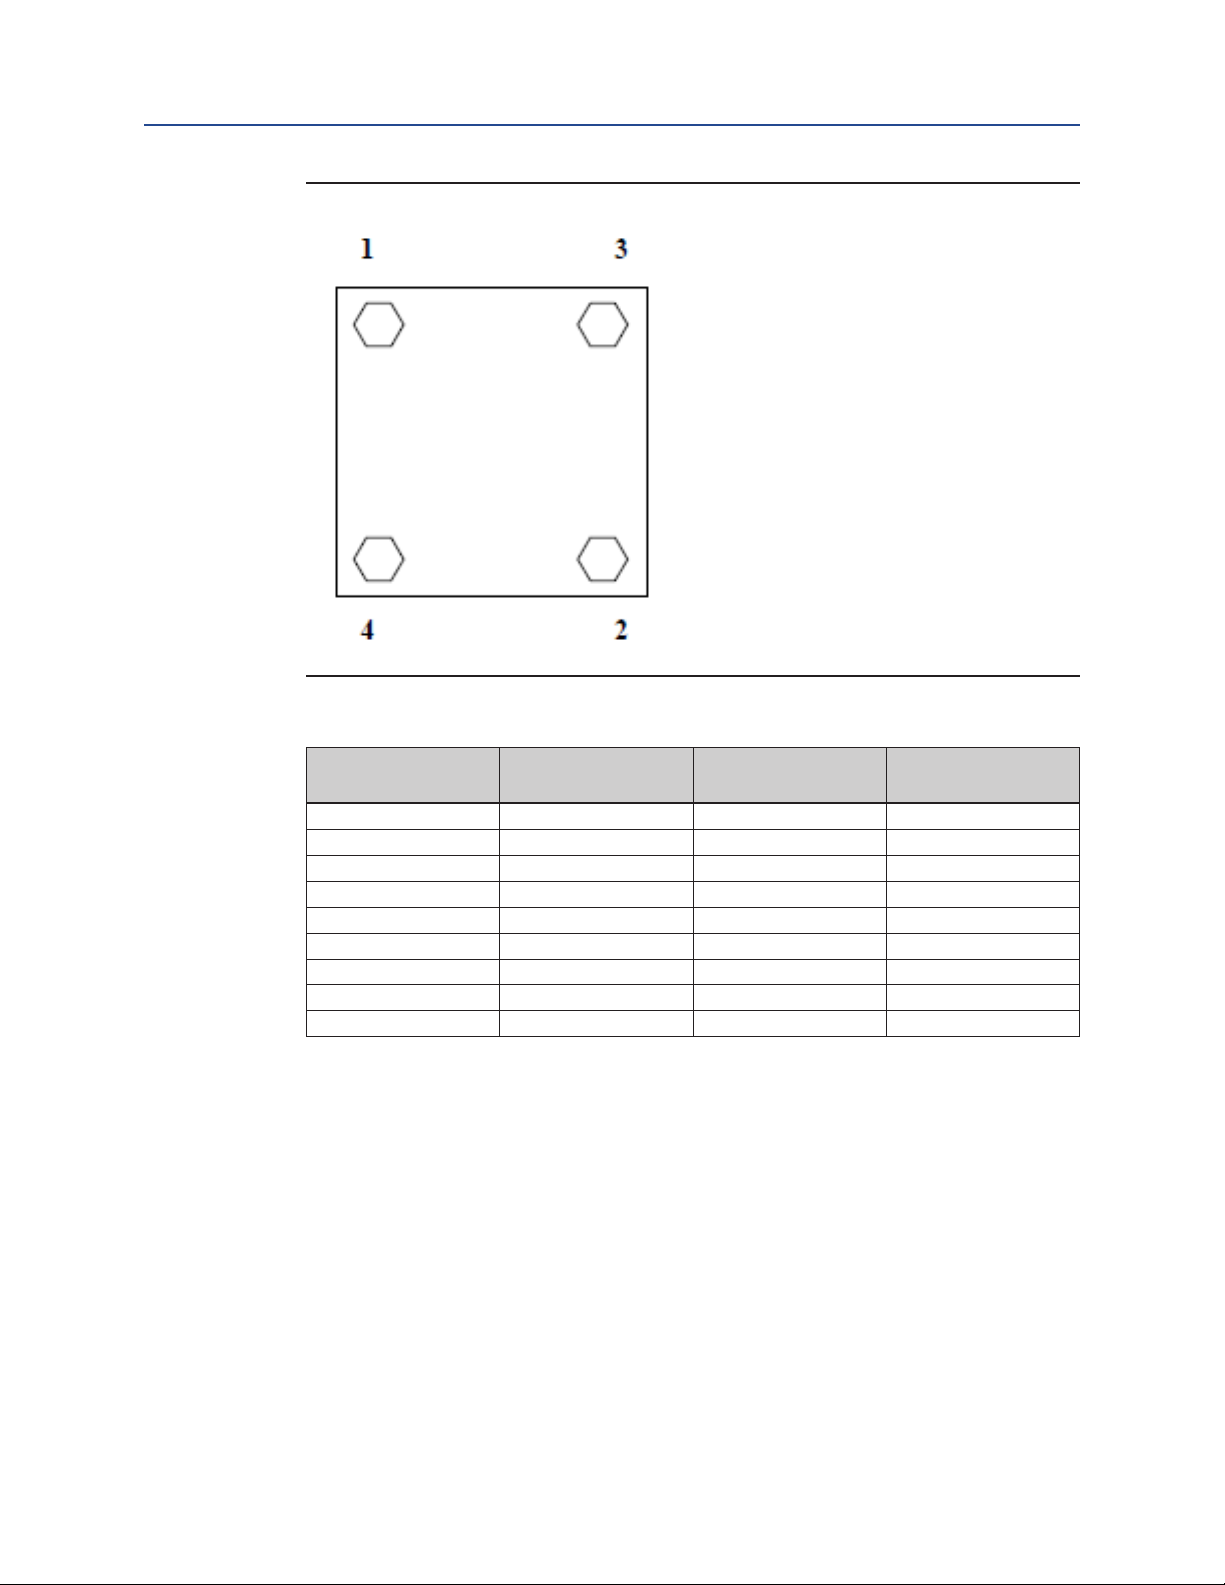
12. Install tie rods and nuts. Verify head and cap alignment.
13. Tighten tie rod nuts using a sequential method (1, 2, 3 and 4. See Figure 1).
Torque applied: See Table 1.
5
Packing Replacement
Page 9
Operation and Maintenance Manual
GVO-CHP-DA.IOM.1001 Rev. 0
Figure 1 Tie Rod Nut Torquing Sequence
Section 4: Packing Replacement
March 2016
Table 1� Torque Values
Cylinder Bore
(Inches)
1-1/2 4 3/8 25
2 4 1/2 63
2-1/2 4 1/2 63
3-1/4 4 5/8 168
4 4 5/8 184
5 4 7/8 437
6 4 1 740
7 4 1-1/8 890
8 4 1-1/4 1200
Number of
Tie Rods
Diameter of
Tie Rods (Inches)
Torque
(lb-ft)
Packing Replacement
6
Page 10

Section 5: Packing-Kit Selection
March 2016
Operation and Maintenance Manual
Section 5: Packing-Kit Selection
Always use genuine Bettis GVO-C Linear parts to ensure proper fit and function for
continuous trouble free operation.
In order to purchase the right repair kit for your cylinder, you must give us the part
number and the serial number shown on the identification tag of the cylinder located
on the barrel.
For more technical information, please consult our brochure or call us.
GVO-CHP-DA.IOM.1001 Rev. 0
7
Packing-Kit Selection
Page 11

Operation and Maintenance Manual
GVO-CHP-DA.IOM.1001 Rev. 0
Section 6: Storage Condition
Bettis GVO-C Linear actuators are shipped pre-lubricated, with exposed machined
parts protected against corrosion. Piston rods and extended tie rods are protected
against physical damage with polyurethane mesh sleeving.
Supply ports are protected with plastic cap plugs. All actuators are ready to use when
they are shipped from factory. If the actuators must be stored before installation for a
period of time, following storage conditions are required:
1. Actuators must be stored indoors.
2. Actuators must be stored in vertical position to prevent packing deformation.
3. Ambient storage temperature: –20°C to +40°C (–4°F to +104°F).
4. Humidity: maximum 60%.
5. Do not remove protective cap plugs or protective covers.
6. Apply every 6 months a thin layer of metal protective coating on all machined
exposed parts (threads).
Before installation and start-up, following steps must be taken:
Section 6: Storage Condition
March 2016
1. Remove all protective plastic plugs from air supply ports.
2. Spray a small amount (approximately 10 ml) of clean mineral petroleum based
oil into the air supply ports.
3. Run the actuator for 8 to 10 dry cycles (piston rod free, without being
connected to any device).
If cylinders are stored horizontally, there may be a chance that the piston and gland
seals will become deformed and lose their sealing effectiveness.
1. Repeat Steps 1 and 2 as above.
2. Pressurize the cylinder and then cycle the cylinder Without Any Load and at
slow speed for at least Twenty Full Cycles.
3. Observe if there is any leakage across the piston or at the gland bushing.
If so, replace the seals.
Storage Condition
8
Page 12

Page 13

World Area Confi guration Centers (WACC) offer sales support, service,
inventory and commissioning to our global customers.
Choose the WACC or sales offi ce nearest you:
NORTH & SOUTH AMERICA
19200 Northwest Freeway
Houston TX 77065
USA
T +1 281 477 4100
Av. Hollingsworth
325 Iporanga Sorocaba
SP 18087-105
Brazil
MIDDLE EAST & AFRICA
P. O. Box 17033
Jebel Ali Free Zone
Dubai
T +971 4 811 8100
P. O. Box 10305
Jubail 31961
Saudi Arabia
T +966 3 340 8650
T +55 15 3413 8888
24 Angus Crescent
ASIA PACIFIC
Longmeadow Business Estate East
P.O. Box 6908 Greenstone
No. 9 Gul Road
#01-02 Singapore 629361
T +65 6777 8211
No. 1 Lai Yuan Road
1616 Modderfontein Extension 5
South Africa
T +27 11 451 3700
EUROPE
Wuqing Development Area
Tianjin 301700
P. R. China
T +86 22 8212 3300
Holland Fasor 6
Székesfehérvár 8000
Hungary
T +36 22 53 09 50
Strada Biffi 165
29017 Fiorenzuola d’Arda (PC)
Italy
T +39 0523 944 411
For complete list of sales and manufacturing sites, please visit
www.emerson.com/actuationtechnologieslocations or contact us at
info.actuationtechnologies@emerson.com
www.emerson.com/bettis
©2018 Emerson. All rights reserved.
The Emerson logo is a trademark and service mark of Emerson Electric Co.
TM
is a mark of one of the Emerson family of companies.
Bettis
All other marks are property of their respective owners.
The contents of this publication are presented for information purposes
only, and while every effort has been made to ensure their accuracy,
they are not to be construed as warranties or guarantees, express or
implied, regarding the products or services described herein or their use
or applicability. All sales are governed by our terms and conditions, which
are available on request. We reserve the right to modify or improve the
designs or specifications of our products at any time without notice.
 Loading...