

Emerson Anderson Greenwood 9300, Anderson Greenwood 9390P, Anderson Greenwood 9340C, Anderson Greenwood 9309V, Anderson Greenwood 9304V Installation And Maintenance Instructions Manual
...Page 1

ANDERSON GREENWOOD SERIES 9300 PILOT OPERATED SAFETY RELIEF VALVES
InstallatIon and MaIntenance InstructIons
Before installation these instructions must be fully read and understood
TABLE OF CONTENTS
1 Introduction .................................................. 2
2 Main valve .................................................... 3
3 Pilot maintenance ...................................... 14
4 Functional testing of complete
assemblyofmain valve and pilot .............. 27
5 Storage and handling ................................ 29
6 Trouble shooting ........................................ 30
7 Main valve spare parts and repair kits ..... 30
8 Pilot spare parts and repair kits ............... 31
9 Accessories, options, and
accessoryrepairkit ................................... 32
10 Lubricants and sealants for Series 9300.. 32
Installation and Maintenance Instructions
for Anderson Greenwood Series 9300 Pilot
Operated Safety Relief Valves (POSRV).
The intent of these instructions is to acquaint
the user with the storage, installation and
operation of this product. Please read these
instructions carefully before installation.
SAFETY PRECAUTIONS
When the safety valve is under pressure
neverplace any part of your body near
the outlet/exhaust of the valve.
The valve outlet and any separate drains should
be piped or vented to a safe location.
Always wear proper safety gear to protect hands,
head, eyes, ears, etc. anytime you are near
pressurized valves.
Never attempt to remove the safety valve from
asystem that is pressurized.
Never make adjustments to or perform
maintenance on the safety valve while in service
unless the valve is isolated from the system
pressure. If not properly isolated from the system
pressure, the safety valve may inadvertently open
resulting in serious injury.
Remove the safety valve prior to performing any
pressure testing of the system.
The safety of lives and property often depends on
the proper operation of the safety valve. The valve
must be maintained according to appropriate
instructions and must be periodically tested and
reconditioned to ensure correct function.
WARNING
The protection and safety of equipment, property
and personnel depends on the proper operation
of the safety valves described in this manual.
AllEmerson safety valves should be kept in proper
working condition in accordance with the
manufacturer’s written instructions. Periodic
testing and maintenance by the user of this
equipment is essential for reliable and safe valve
operation.
All installation, maintenance, adjustment,
repair and testing performed on safety valves
should be done by qualified technicians having
the necessary skills and training adequate to
perform such work. All applicable Codes and
Standards, governing regulations and authorities
should be adhered to when performing safety
valve repair. No repair, assembly, adjustment or
testing performed by other than Emerson or its
authorized assemblers and representatives shall
be covered by the warranty extended by Emerson
to its customers. The user should use only original,
factory supplied OEM parts in any maintenance or
repair activity involving this product.
This Maintenance Manual is provided as a general
guide for the repair and maintenance of the safety
valves described herein. It is not possible to
describe all configurations or variations with such
equipment. The user is advised to contact Emerson
or its authorized assemblers and representatives
for assistance in situations that are not adequately
covered or described in this manual.
Before removing a safety valve for maintenance,
ensure that the system pressure has been fully
depressurized. If an isolation block valve is used
ensure that any trapped fluid between the block
valve and the safety valve is safely vented.
Before disassembling the safety valve ensure that the
valve has been decontaminated from any harmful
gasses or fluids and that it is at a safe temperature
range for handling. Fluids can be trapped in
thedome space of pilot operated safety valves.
installation, the Installation and Operational Safety
Instructions should be fully read and understood.
These Instructions may
be requested from the factory or are available at
www.valves.emerson.com.
Before
STORAGE AND HANDLING
Pressure/vacuum relief valve performance may
be adversely affected if the valve is stored for
an extended period without proper protection.
Rough handling and dirt may damage, deform,
or cause misalignment of valve parts and
may alter the pressure setting and adversely
affect valve performance and seat tightness.
It is recommended that the valve be stored in
theoriginal shipping container in a warehouse
or at a minimum on a dry surface with a
protective covering until installation. Inlet and
outlet protectors should remain in place until
the valve is ready to be installed in the system.
Emerson.com/FinalControl
© 2017 Emerson. All rights reserved.
Engineering Doc. #05.9040.275 Rev.D
VCIOM-06024-US 15/01
Page 2

ANDERSON GREENWOOD SERIES 9300 PILOT OPERATED SAFETY RELIEF VALVES
InstallatIon and MaIntenance InstructIons
1 INTRODUCTION
1.1 Description of valve
The Series 9300 employs the highly successful
pressurized PTFE film seat, as well as
protected FEP diaphragms. The design allows
these valves to be used in the pilot operated
pressure relief mode and simultaneously
provide vacuum relief, either via weight loads
of the internals, or with a specific pilot control
of the vacuum opening. The Series 9300
was designed with a special studded inlet
connection to reduce the inlet profile, and
coupled with larger orifice areas, these valves
provide flow capacities as much as 45% greater
than the Series 90 valves. The Series 9300 is
a full body valve to pipe away the discharge if
required.
1.1.1 Pilot operated safety relief valve with
non-flowing modulating pilot
• 9340P - Positive pressure relief valve
• 9340C - Positive and negative pressure relief
valve
• 9304V - Negative pressure relief valve
Pilot operated valves use a pilot to control
pressure over a large unbalanced member in
the main valve, such as a diaphragm piston.
Thelarge overbalance means a much larger
force on top of the seat compared to process
forces pushing up on the seat. At set pressure,
the pilot relieves the pressure quickly,
permitting the main valve seat to open rapidly.
All of the pilots have the same construction,
except for the location of the connections
to the main valve diaphragm actuators, or
theconnections for the pressure sense.
Foreither the 9340P or the 9340C, thepilot
controls only the positive pressure relief.
Thenegative pressure relief is controlled by
theweight of the parts that move in the main
valve when it opens. In the 9304V, the pilot
controls thenegative pressure relief.
1.1.2 Pilot operated safety relief valve with flowing
modulating or snap action pilot
• 9390P - Positive pressure relief valve
• 9390C - Positive and negative pressure relief
valve
• 9309V - Negative pressure relief valve
Weighted-loaded and spring operated valves
open as process forces overcome downward
forces, with little flexibility to overcome
problem applications. Anderson Greenwood
pilot operated valves can be adjusted to open
with a rapid ‘snap’ action or modulating action.
Most applications are well served by the snap
action mode, with full opening at set pressure
and full reseating after a short blowdown.
However, some systems might best be served
by a proportional opening, whereby the valve
opens just enough to satisfy small upsets
and maintain constant system pressure, yet
still have the capability to reach full capacity
within 10% overpressure. The 9390C and 9309V
pilots have the same construction except for
thelocation of the connections for the pressure
sense. For either the 9390P or 9390C, thepilot
controls only the positive pressure relief.
Inthe9309V, pressure relief is controlled
by theweight of the parts that move in the
main valve when it opens. The pilot controls
the negative pressure relief on the negative
pressure relief valve. The Anderson Greenwood
9390 Series can be set for a snap acting or
modulating mode with a simple adjustment of
the external blowdown screw. No part changes
are necessary to change the operating mode.
1.2 Service applicability
Refrigerated or cryogenic storage tanks
(accurate low-pressure protection), natural
gas transmission and distribution, blanketed
vessels in the petrochemical, food and
electronics industries, ammonia, air blowers in
the waste water treatment plants and marine
(LNG and LPG).
1.3 Code applicability
The Series 9300 are designed to meet
therequirements of ASME UV Code Stamp, NB
certified capacity 15 psig and above, and API 2000.
1.4 Conversion
Valve conversions are defined as any change
w
hich affects critical parts and/or valve
nameplate data, from that which was originally
supplied by the manufacturer such as a change
in set pressure. Conversions, when required
by the owner/user, shall only be performed
the manufacturer, their appointed/authorized
assembler or repair center in strict
accordance with written instructions provided
by themanufacturer. Communication with
themanufacturer is critical when making
any conversion to ensure the converted
valve(s) provides the same safe, reliable
performance as the original valve supplied by
the manufacturer.
For conversion information on the Series 9300
Pressure Relief Valves:
www.valves.emerson.com
by
2
Page 3

ANDERSON GREENWOOD SERIES 9300 PILOT OPERATED SAFETY RELIEF VALVES
InstallatIon and MaIntenance InstructIons
1.5 SIZE/PRESSURE RANGES OF SERIES 9300 PRESSURE/VACUUM RELIEF VALVES
Materials AL, CS, SS
Main valve soft goods PTFE Diaphragm seat and seals
Pilot soft goods Elastomer or all PTFE Soft goods
Set pressure range 4” wc to 50 psig (9.9 mbarg to 3.45 barg)
Vacuum range -1.73” wc to -14.7 psig (-4.3 mbarg to -1.01 barg)
Process temperature -320°F to 200°F (-196°C to 93°C)
Size 2” to 12”
Blowdown - (fixed or variable)
1.6 Basic pilot series for the 9300 main valve
1.6.1 Series 91 Pilot
The Series 91 was designed for specific
applications where FEP diaphragms alone were
not rugged enough and premium sealing
required for super cryogenic fluids. Series9
was
1
design includes stainless steel (SS), and PTFE
diaphragms which provide extraordinary
performance for hard to hold cryogenic fluids.
1.6.2 Series 93 Pilot
The Series 93 is a pilot operated pressure
relief valve designed with elastomer seats
and seals, and construction materials in
aluminum (AL), carbon steel (CS), and stainless
steel(SS). These construction materials satisfy
the majority of gas piping and chemical tank
applications. The Series 93 pilot can be used
on any Series 9000 valve except a combination
9000 larger than 6”.
1.6.3 Series 93T Pilot
The Series 93T was an offshoot of the Series
93, designed specifically for cryogenic and
chemical applications where an elastomer seal
is not satisfactory.
1.6.4 Series 400B
The Series 400B is used with 8”, 10”, and
12” combination weight-loaded vacuum and
pressure valves where quick relieving of dual
chamber diaphragms is required to open
themain valve.
2 MAIN VALVE
2.1 General main valve maintenance
Since the Series 9300 valve can be either a
pressure only, vacuum only, or pressure/
vacuum relieving device, it is built in a modular
fashion. The standard single diaphragm unit
will function on pressure and vacuum, however,
opening under very low vacuum requires use of
the auxiliary diaphragm chamber. The valve can
also be repaired in a modular fashion. The seat
can be replaced without complete disassembly
of the diaphragm cases. Selective repair can be
performed as required.
Prior to disassembly of the main valve
or pilot, it is recommended to stamp or
mark the location of the pilot, and the
orientation of thediaphragm cases, studs,
and column supports to the main valve body.
Thispracticewill ensure proper alignment and
location of parts during reassembly.
To prevent mixing up parts it is recommended
to repair the main valve and pilot in stages.
Forthis reason, the diaphragm, nozzle, and seat
maintenance and/or replacement instructions
are separate from the pilot instructions.
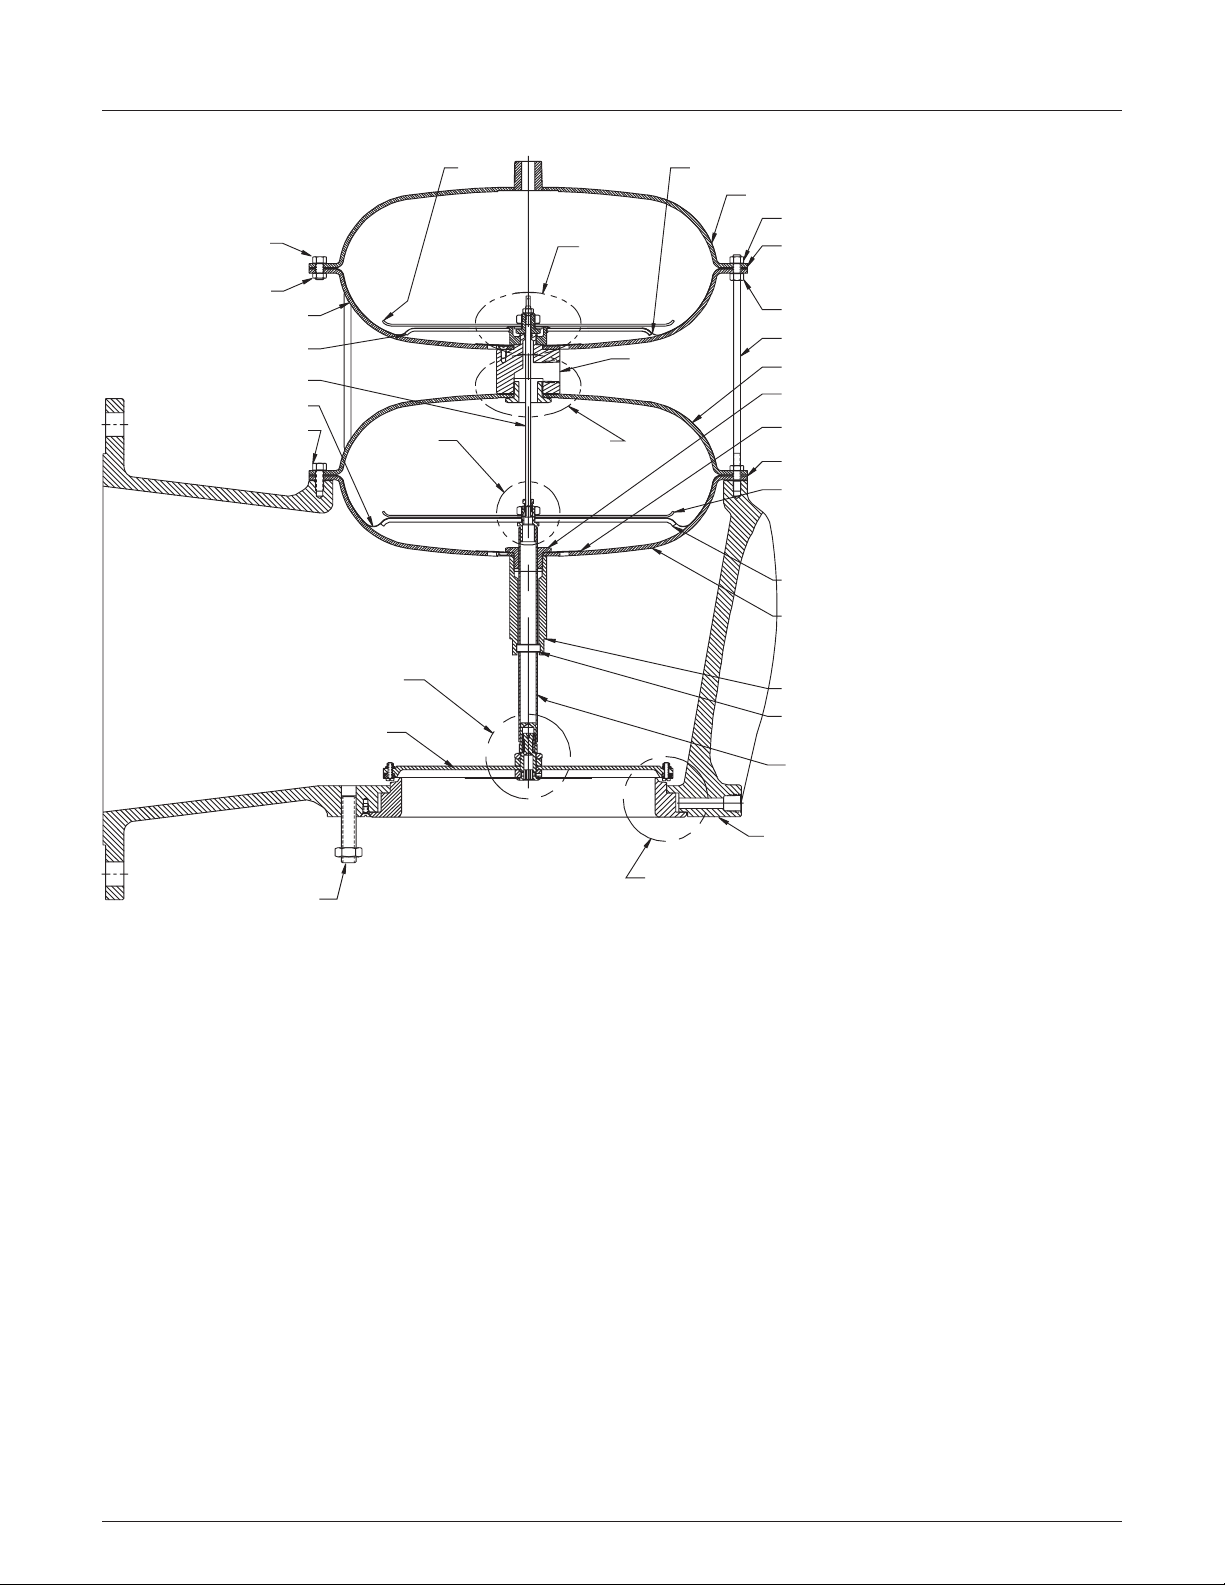
2.2 Main valve single chamber diaphragm
disassembly (Refer to figure 1)
1. Remove the pilot (as a unit) and the tubing
from the diaphragm case. Set them aside.
Note: match mark orientation of tubing and
case assembly to the body. This will assist in
reassembly.
2. Unscrew the case bolts (700/710) and
remove the upper diaphragm case (210).
3. On valve sizes 2” through 4”, remove the
diaphragm assembly, lower case (280), shaft
(320) and seat plate assembly from the main
valve body (100).
4. On valve sizes 6” and larger, remove seat
plate assembly from shaft (320) prior to
removing diaphragm assembly, lower
case (280), and shaft (320). To remove, spin
diaphragm plate assembly counterclockwise
while holding seat plate assembly stationary
until shaft (320) is free of seat hub (420).
Theseat plate assembly should then rest on
nozzle (460).
5. On valve sizes 6” and larger, remove
diaphragm assembly and shaft (320) from
lower case (280). Then remove lower case
from the body (100).
6. On valve sizes 6” and larger, lift seat plate
assembly from the body (100).
CAUTION
When removing seat plate assembly, be careful
not to damage thenozzle (460).
7. Unscrew counterclockwise the seat plate
assembly from the main shaft (320). This is
9
normally a hand operation, however, a
/
16”
(14.3 mm) wrenching flat is provided on the
seat hub (420). The connecting thread will
run free, then tighten, and run free again as
it disengages from a locking helicoil (330)
in the vertical shaft (320). This will allow the
seat plate assembly, diaphragm assembly
and lower case (280) to be separated.
8. Holding the shaft (320) stationary, remove
the jam nut (520) from the diaphragm
assembly. Remove the diaphragms
(170,175, 950, 960), washers (580, 590, 600),
gaskets (620), plates (150, 160), and lower
case (280) (as a unit) from the shaft (320).
3
Page 4

ANDERSON GREENWOOD SERIES 9300 PILOT OPERATED SAFETY RELIEF VALVES
InstallatIon and MaIntenance InstructIons
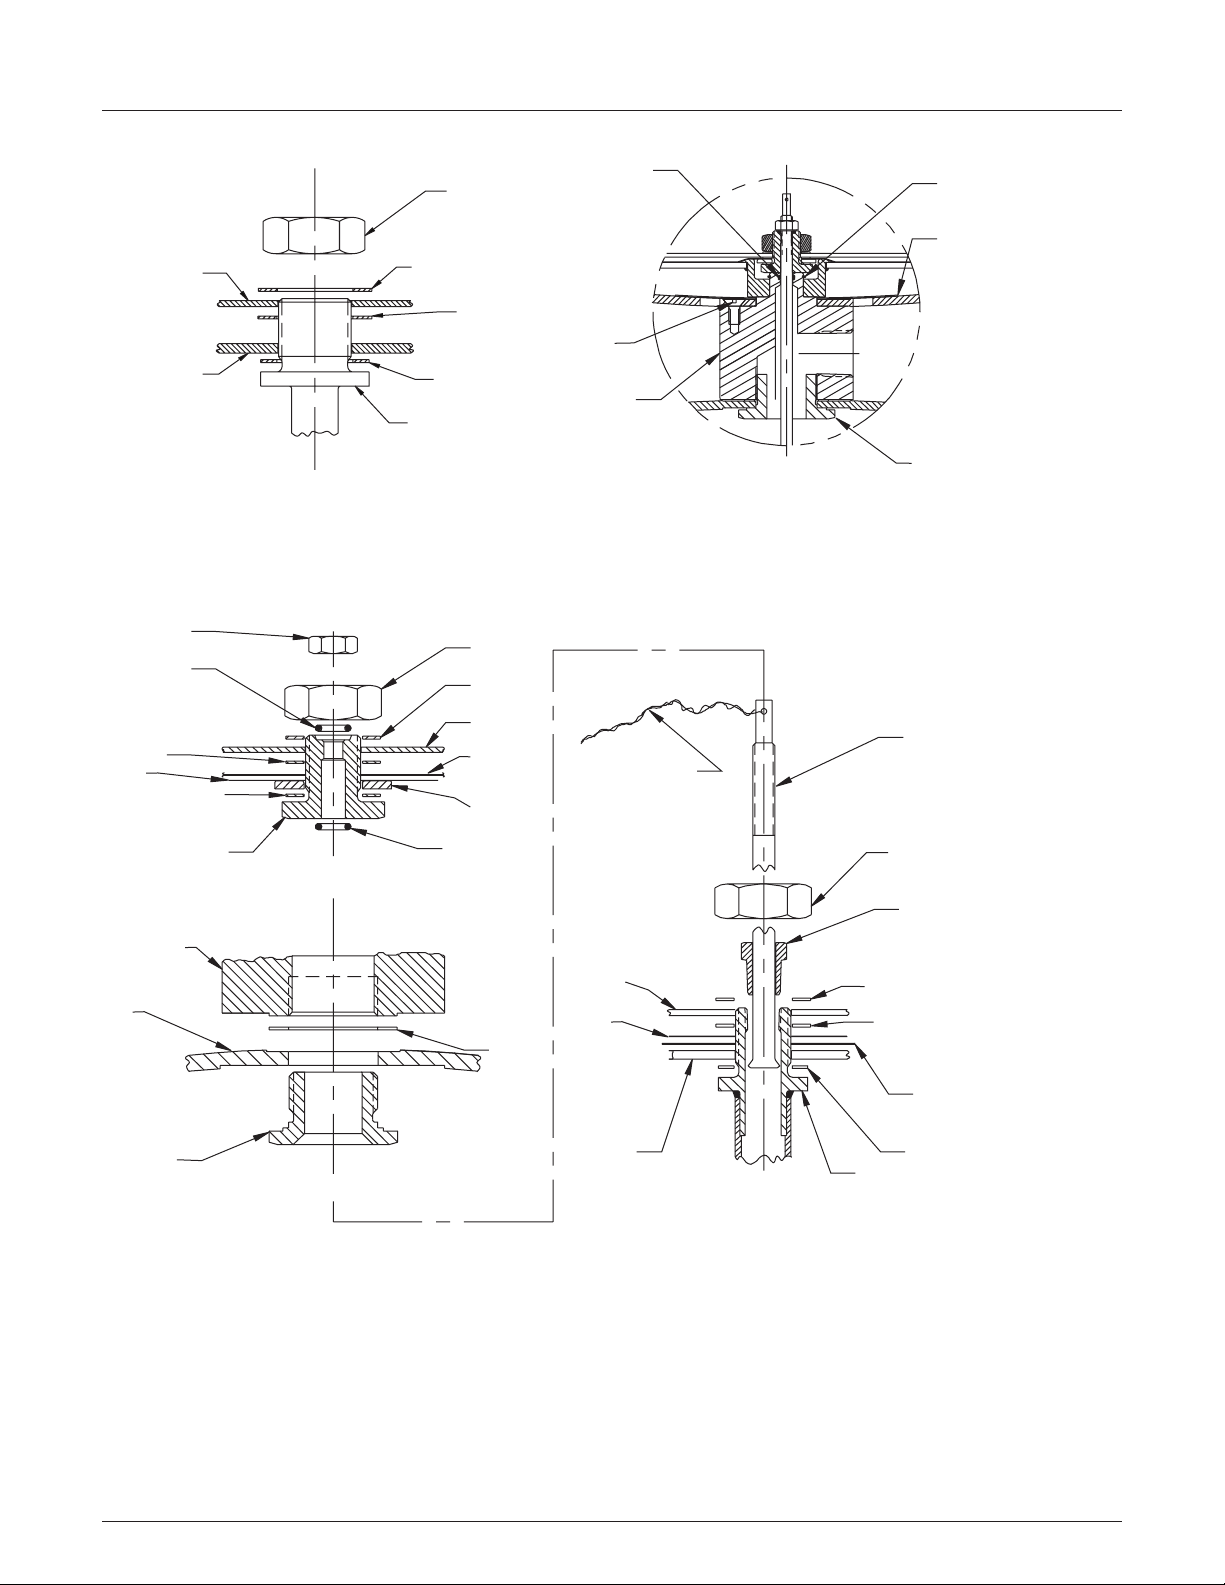
2.3 Main valve dual chamber diaphragm
disassembly (refer to figure 2)
1. Remove the pilot and tubing from
theauxiliary diaphragm case.
Note: match mark orientation of tubing and
case assembly with the body. This will assist
in reassembly.
2. Unscrew the upper auxiliary case bolts
(700) and nuts (730), and remove the upper
auxiliary diaphragm case (210B).
3. Install a 6” to 8” long braided wire through
the hole at the top of the lift rod (250) to retain
the lift rod (250). (See Figure 3, detail C)
4. Lift the auxiliary (160B, 170B, 290) and main
diaphragm (150, 160A, 170A) assemblies
to the full open position using the auxiliary
vacuum plate (160B). The open dome port
can be temporarily capped to hold the main
diaphragm assembly open.
5. Remove nuts (530 and 520B) and PTFE
O-ring (670). (See Figure 3, detail A).
6. The lift rod (250) is attached to the auxiliary
plate bushing (240) with threads. Unscrew
the lift rod (250) from the bushing (240) by
turning the rod (250) clockwise until it drops
down into the main valve shaft bore (320).
7. Remove the main diaphragm case bolts
(700, 710). Remove the studs (810) from
the body (100). Remove the lower auxiliary
diaphragm case (280B) and the upper main
diaphragm case (220) as a unit, which is
assembled to the diaphragm case adapter
(230). Allow the lift rod (250) to slip from
the center hole and lift the lower auxiliary
diaphragm case (280B), upper main
diaphragm case (220), and adapter (230)
upwards as one unit.
10. On valve sizes 6” and larger, remove
diaphragm assembly (150, 160A, 170A) and
shaft (320) from lower case (280A). Then
remove lower (280A) case from the body (100).
11. On valve sizes 6” and larger, lift seat plate
(910, 920) assembly from the body (100).
CAUTION
When removing seat plate assembly (910, 920),
becareful not to damage the nozzle (460).
12. Unscrew counterclockwise the seat
plate (910, 920) assembly from the main
shaft (320). This is normally a hand
9
operation, however, a
/
16” (14.3 mm)
wrenching flat is provided on the seat
hub (420). Theconnecting thread will
run free, thentighten, and run free again
as it disengages from a locking helicoil
(330) in the vertical shaft (320). This will
allow theseat plate assembly (910, 920),
diaphragm (150,160A,170A) assembly and
lower case (280A) to be separated.
13. Holding the shaft (320) stationary,
remove the jam nut (520A) from the
diaphragm (150, 160A, 170A) assembly.
Removethediaphragms (170A, 175A, 950,
960), washers (580, 590, 600), gaskets
(620A), plates (150A, 160A), and lower
case (280A) (as a unit) from the shaft (320).
(Seefigure 3, detail C).
With the main valve disassembled, you are now
ready to disassemble, inspect, and replace soft
goods starting with the seat plate (910, 920)
assembly.
CAUTION
Be careful not to bend the lift rod (250) during
case assembly removal.
8. On valve sizes 2” through 4”, remove
thediaphragm assembly (150, 160A, 170A),
lower case (280), shaft (320) and seat plate
assembly (910, 920) from the main valve
body (100).
9. On valve sizes 6” and larger, remove seat
plate assembly (910, 920) from shaft (320)
prior to removing diaphragm assembly
(150, 160A, 170A), lower case (280) and
shaft (320). To remove, spin diaphragm
plates (150, 160A, 170A) assembly
counterclockwise while holding seat plate
(910, 920) assembly stationary until shaft
(320) is free of seat hub (420). The seat plate
(910, 920) assembly should then rest on
nozzle (460).
4
Page 5

ANDERSON GREENWOOD SERIES 9300 PILOT OPERATED SAFETY RELIEF VALVES
InstallatIon and MaIntenance InstructIons
MAIN VALVE PARTS
Item Description
100 Body
110 Screw - nozzle retainer
120 Screw - seat (used with Item 130 seat plate assembly option 1)
125 Clamp band - seat (used in place of item 120 and 130 seat plate assembly option 2)
130 Nut, lock (used with item 120 seat plate assembly option 1)
140 Retainer seat
150 Plate - main pressure
160 Plate - main vacuum
170 Diaphragm - main
175 Diaphragm reinforcement (used on 2” and 3” low pressure only)
210 Case, upper diaphragm
215 Cap spacer (6” only, not used on dual chamber diaphragm)
220 Case, upper main (used on dual chamber diaphragm only)
230 Adapter (used on dual chamber diaphragm only)
240 Bushing (used on dual chamber diaphragm only)
250 Rod (used on dual chamber diaphragm only)
260 Bushing - rod (used on dual chamber diaphragm only)
270 Washer (used on dual chamber diaphragm only)
280 Case, lower diaphragm
290 Plate - aux pressure (used on dual chamber diaphragm only)
300 Washers (used under 700/710 on aluminum cases only)
320 Shaft - assembly (includes item 330 as part of assy)
330 Helicoil
340 Sleeve guide
360 Bushing split (not used on 2” and 3” or high pressure)
420 Hub seat
430 Spacer seat
440 Bushing seat
450 Nut - seat jam
460 Nozzle (assembly)
500 Bushing guide
520 Nut - jam
530 Nut (used on dual chamber diaphragm only)
570 Secondary seat (high pressure only)
580 Washer
590 Washer
600 Gasket - clamp plate
610 Seat - film
620 Gasket - case
630 Nozzle gasket
640 Spacer (O-ring/-018)
660 Gasket - adapter (used on dual chamber diaphragm only)
670 Seal - adapter (used on dual chamber diaphragm only)
680 Retaining - ring (used on dual chamber diaphragm only)
690 Seal - rod (used on dual chamber diaphragm only)
700 Cap bolt - hex
710 Cap bolt - eye (not shown used on 4” and above)
730 Nuts (used on dual chamber diaphragm only)
810 Stud
820 Nut
840 Stud - 2nd chamber support (used on dual chamber diaphragm only)
850 Nuts (used on dual chamber diaphragm only)
890 Screen - lower case
900 Screen - upper case (used on dual chamber diaphragm only)
910 Plate - seat
920 Plate - seat protector
930 Nameplate (not shown)
940 Rivets (not shown)
950 Diaphragm slipper outer
960 Diaphragm slipper inner
970 Washer seat (used prior to 1990)
NOTE
Suffix A and B are used after Item #s to denote parts
for main and auxiliary chambers in the dual chamber
design.
5
Page 6

ANDERSON GREENWOOD SERIES 9300 PILOT OPERATED SAFETY RELIEF VALVES
InstallatIon and MaIntenance InstructIons
170/175
700/710
620
950
960
Seat plate assembly
(lowandhighpressure aluminum)
(highpressurestainless steel)
100
810/820 110 460
500
See detail C
See detail D
Internal pressure pickup not included with
remote pressure sense
210
890
160
150
280
340
360
320
See detail E
Seat plate assembly
(lowpressure stainless steel)
See detail D
FIGURE 1
9390P Single chamber diaphragm assembly
See detail E
6
Page 7
ANDERSON GREENWOOD SERIES 9300 PILOT OPERATED SAFETY RELIEF VALVES
InstallatIon and MaIntenance InstructIons
700
730
280B
290
250
170A/170B
700/710
See detail D
Seat plate assembly
See detail C
160B
See detail A
See detail B
Dome port
170B/175B
210B
730
620B
730
840
220
500A
890
620A
160A
150
280A
340
360
320
810/820
FIGURE 2
9390C Dual chamber diaphragm assembly
Remote pressure sense shown
100
See detail E
7
Page 8
ANDERSON GREENWOOD SERIES 9300 PILOT OPERATED SAFETY RELIEF VALVES
InstallatIon and MaIntenance InstructIons
175B
590B
530
670
160
150
Single chamber diaphragm
600
580
320
600
520
590
520B
580
160B
170B
270
690
110
230
Detail “A” and “B” assembledDetail “D”
Retaining wire for assembly
and disassembly
680
900
500B
250*
220
500B
FIGURE 3
240
Detail “A”
Auxiliary diaphragm chamber assembly
230
Detail “B”
690
660
160A
170A
150A
580
590
320
Detail “C”
* Used only with dual chamber diaphragm model
520A
260*
175A
600
8
Page 9
ANDERSON GREENWOOD SERIES 9300 PILOT OPERATED SAFETY RELIEF VALVES
InstallatIon and MaIntenance InstructIons
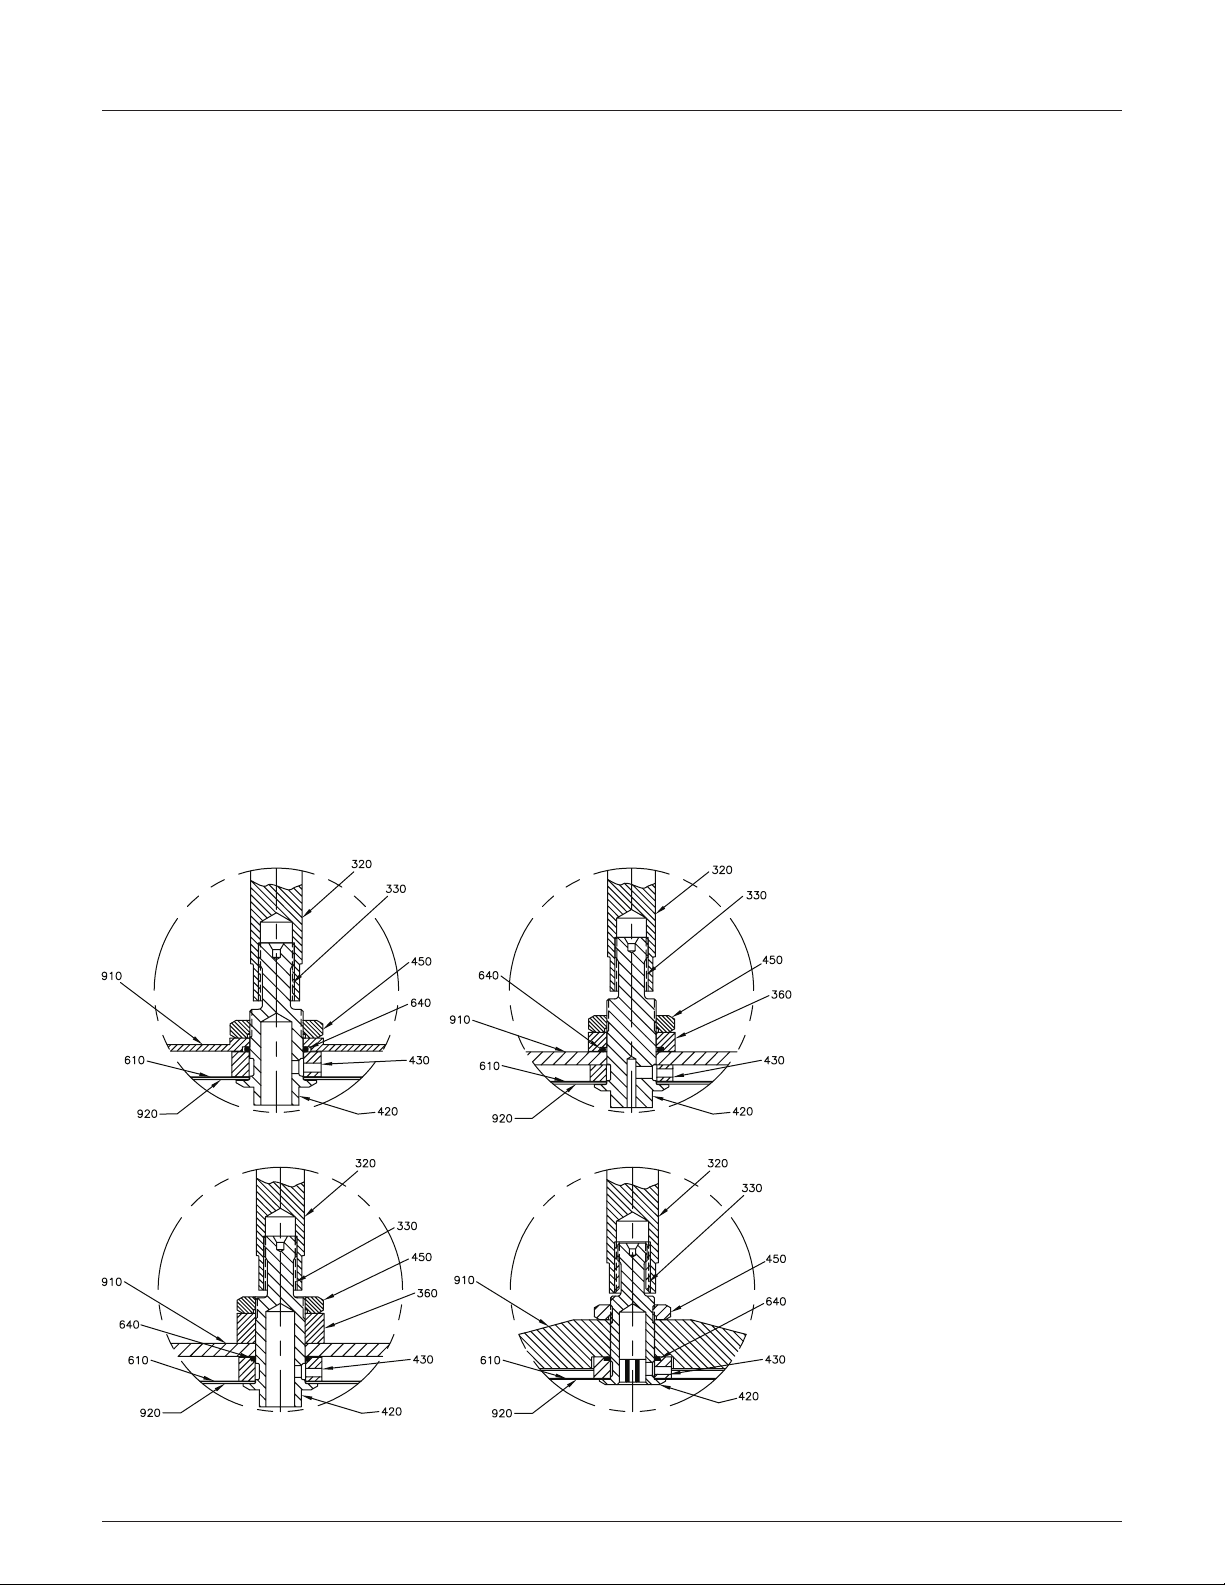
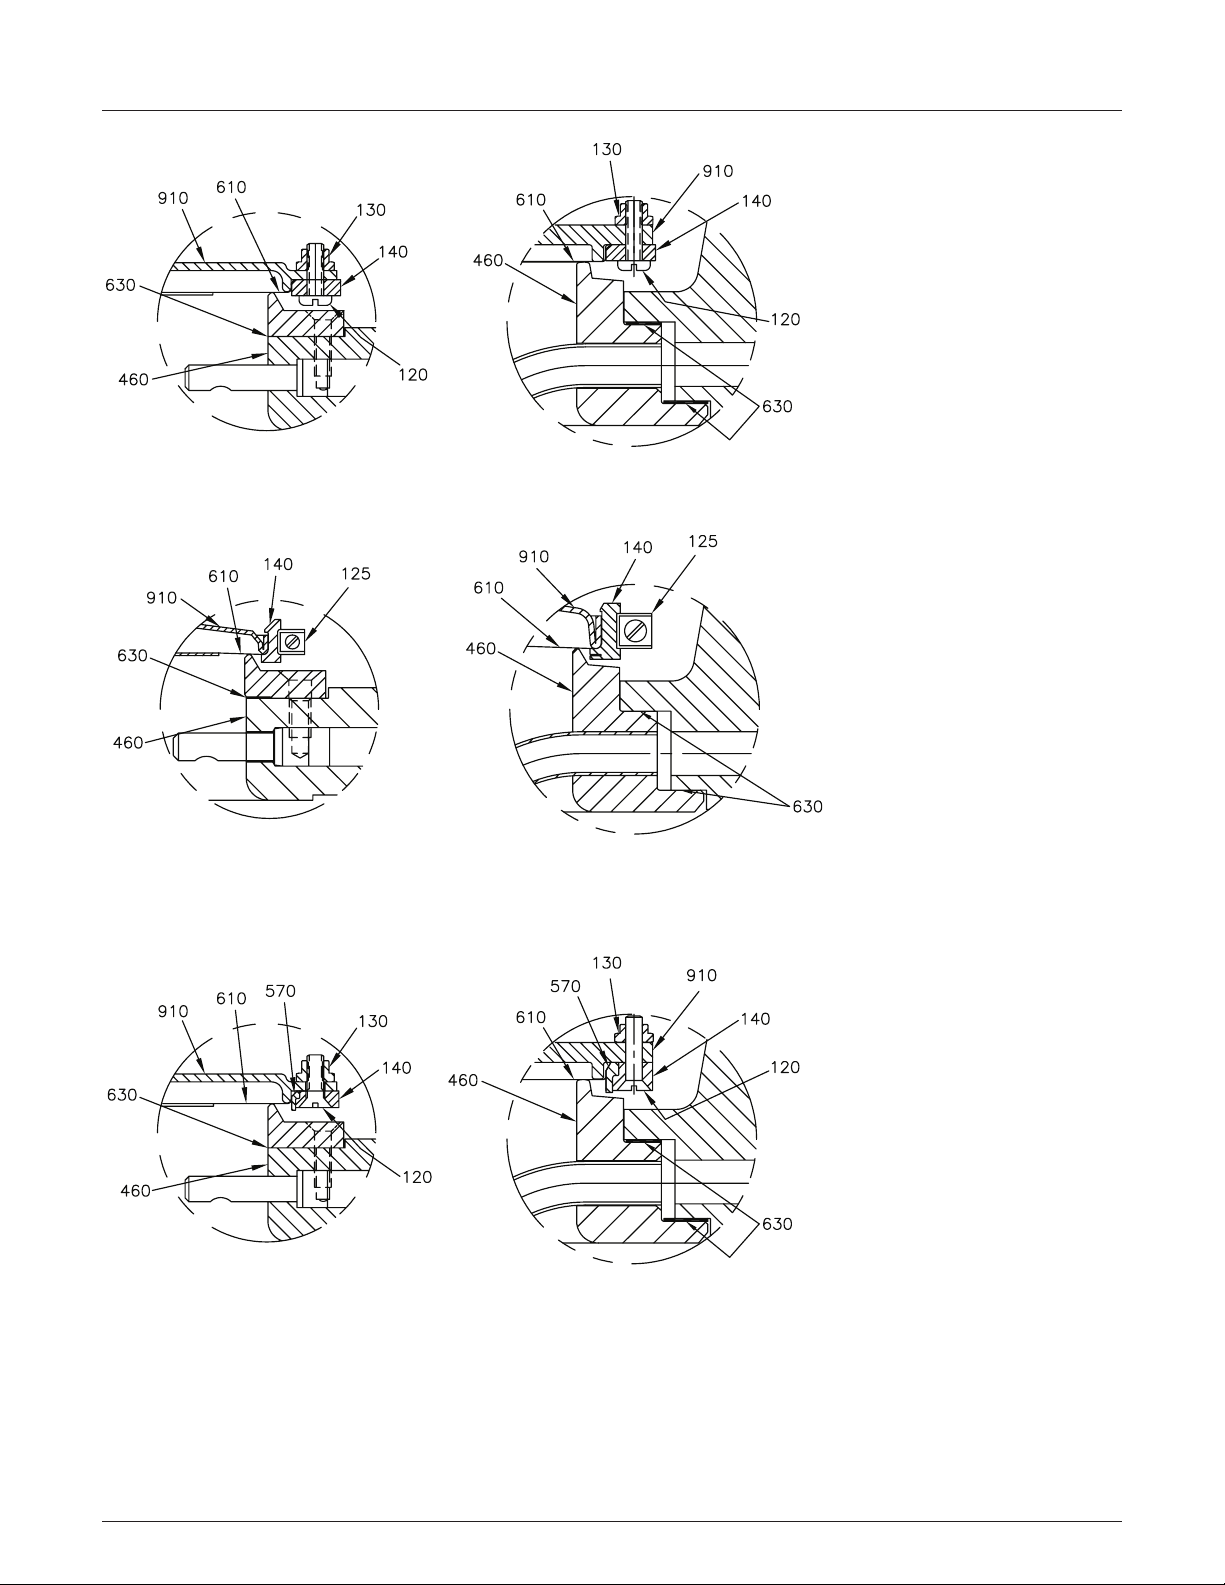
2.4 Main valve seat disassembly and
replacement (bolted) (refer to Figure 4, detail
D, and Figure 5, detail E)
1. To assist in seat plate disassembly, partially
thread the seat plate assembly into the
fixture which consists of a 6” long hexagon
bar with a ½” x 13 x 1” deep threaded hole in
5
one end, and a
/
16” x 18 x 1” deep threaded
hole in the other end.
5
Note: the
/
16
” hole is for valves sizes
2” through 6” and the ½” hole is for 8”
through12”.
2. With the seat plate assembly threaded into
the fixture, secure the fixture into a vise and
remove the seat screws (120) by holding
thelock nut (130) and turning the screws
(120) counterclockwise. Then remove
theseat plate (910).
9
3. Holding the
⁄
16” wrench flat (located at
the top end of the seat hub (420)) secure,
loosenthe seat plate jam nut (450) by
turning it clockwise. Then remove the seat
hub (420) from the fixture and disassemble
the remaining parts of the seat plate
assembly.
Note: secondary PTFE seat (570) used only
in high pressure stainless steel options.
4. Inspect seat plate (910) radius for damage.
Minor nicks and scratches may be removed
by polishing radius with 320 grit or finer
sand paper, maintaining seat shape.
WARNING
No lapping or machining of seat plate allowed.
5. Inspect threaded parts and sealing surfaces
and if damaged replace. Otherwise, clean all
metal parts with oil free solvent and dry with
lint free towel.
6. The new seat film (610) is supplied as a
square sheet of PTFE without holes for
thescrews. To install, secure the larger end
9
of the seat hub with the
/
16” wrenching flat
into a vise and install in this order: protector
plate (920), PTFE seat film (610), seat
bushing (430), spacer (640) (on outside of
seat plate (910), on 6” size seat plates), seat
plate (910) (radius side down) and jam nut
(450). Then tighten by turning the jam nut
(450) clockwise.
7. Remove the seat hub (420) from the vise and
install it into the fixture. To complete the
assembly, install the secondary seat (570)
(high pressure stainless steel only) and then
the seat retainer (140) (bevel side down)
onto the seat film (610). Then using a scribe
punch out a hole in the film starting with the
four threaded indicator holes (only threaded
holes in seat retainer (140)). Then install
the
4 long retainer screws (120) through those
holes and tighten in a criss cross pattern.
Note: lubricate retainer screws (120) with
Fluorolube to reduce the chances of galling.
8. Punch out the remaining seat screw holes
and install the screws (120) and nuts (130)
and tighten.
CAUTION
Be careful not to puncture or scratch the seat
(610) during this operation.
9. Trim off the excess film from the outside
diameter of the seat plate (910) to complete
the replacement process.
FIGURE 4, DETAIL D
Main valve seat plate hub assembly
9
Page 10
ANDERSON GREENWOOD SERIES 9300 PILOT OPERATED SAFETY RELIEF VALVES
InstallatIon and MaIntenance InstructIons
2” Inlet size 3” thru 12” inlet size
Aluminum internals
2” Inlet size 3” thru 12” inlet size
Low pressure stainless steel internals
2” Inlet size 3” thru 12” Inlet size
High pressure stainless steel internals
FIGURE 5, DETAIL E
Main valve seat plate assembly (internal pressure sense shown)
10
Page 11

ANDERSON GREENWOOD SERIES 9300 PILOT OPERATED SAFETY RELIEF VALVES
InstallatIon and MaIntenance InstructIons
2.5 Main valve seat disassembly and
replacement (banded) (Refer to Figure 4,
detail D and Figure 5, detail E)
1.
To assist in seat plate disassembly, partially
thread the seat plate assembly into the fixture
which consists of a 6” long hexagon bar with
a ½” x 13 x 1” deep threaded hole in one end,
5
/
and a
16” x 18 x 1” deep threaded hole in the
other end.
5
Note: the
/
16” hole is for valves sizes
2” through 6” and the ½” hole is for 8”
through12”.
2. With the seat plate assembly threaded into
the fixture and secured in a vise, remove
9
the band clamp (125). Then holding the
/
16
wrench flat on the seat hub (420) stationery
remove the seat plate jam nut (450).
3. Remove the seat hub (420) from the fixture
and disassemble the remaining parts from
the seat plate assembly.
4. Inspect seat plate (910) radius for damage.
Minor nicks and scratches may be removed
by polishing radius with 320 grit or finer
sand paper maintaining seat shape.
WARNING
No lapping or machining of seat plate allowed.
5. Inspect threaded parts and sealing surfaces
and if damaged replace. Otherwise, clean all
metal parts with oil free solvent and dry with
lint free towel.
6. The new seat film (610) is pre-molded.
Toinstall, secure the wrenching flat of
theseat hub (420) into a vise and install
the protector plate (920), PTFE seat film
(610) (radius side down), seat bushing (430),
spacer (640), seat plate (910) (radius side up),
and install the jam nut (450) HAND TIGHT.
CAUTION
Tightening the jam nut (450) prior to stretching
the film (610) will cause ripples in the film.
(SeeFigure 5, Detail E)
7. Remove the seat hub (420) from the vise
and install it into the fixture. Then install
the seat retainer (140) (beveled side down)
onto the seat film (610), and then install
theclamp band (125) and tighten.
8.
Using a heat gun, apply heat to the seat film
(610) in a circular motion approximately 2” to
3” above surface until all ripples and
creases
are gone. This usually takes less than 1minute.
Now tighten jam nut (450) wrench tight.
9. Trim excess film (610) from back side of seat
plate (910) to complete reassembly process.
2.6 Diaphragm replacement
2.6.1 Single chamber diaphragm replacement
(See Figure 3, detail D)
1. Secure the main valve shaft (320) wrenching
surface in a soft jaw vise. Caution should be
taken when securing aluminum shaft (320)
to prevent destroying the part.
2. Remove jam nut (520) by turning it
counterclockwise.
3. Note: mark plates as top (vacuum) and
bottom (pressure) prior to disassembly.
Remove the following parts in thisorder:
washer (580), vacuum plate (160),
washer (590), diaphragm (170), *slipper/
reinforcement diaphragm (950,960/175)
(seenotes for configuration variances),
pressure plate (150), and PTFE washer (600).
Note: on single chamber valves with high
pressure stainless steel internals, an outer
(950) and inner (960) diaphragm slipper is
used to protect the diaphragm (170) from
wear. The outer slipper (950) is between
the diaphragm (170) and lower case (280).
Theinner slipper (960) is between the
diaphragm (170) and the pressure plate(150).
Note: on 2” and 3” single and dual chamber
valves with low pressure aluminum or low
pressure stainless steel internals, use a
reinforcement diaphragm (175) between
the main diaphragm (170) and lower case
(280). The reinforcement diaphragm (175)
is recognized by a small offset hole at
thecenter of the diaphragm.
CAUTION
Installing the reinforcement diaphragm (175)
in the wrong location will cause damage to
thediaphragm assembly.
4. Inspect plates (150, 160) for cracks,
warpage. Clean all metal parts with oil free
solvent, and dry with lint free towel.
5.
Proceed with this step only on disassembly of
main valve dual diaphragms. Inspect lift rod
(250) straightness and ensure small diameter
tip is not damaged. Also raise the lift rod(250)
up and check the surface for damage.
6. Proceed with this step only on disassembly
of main valve dual diaphragms. Install 6” to
8” of braided stiff wire through the hole at
the top of the lift rod (250). This will aid in
reassembly of auxiliary diaphragm.
7. Install new PTFE washer (600), pressure
plate (150), *slipper/reinforcement
diaphragm (950,960/175) (radius side down)
(see notes for configuration variances),
diaphragm (170), flat washer (590), vacuum
plate (160), flat washer (580), and jam nut (520).
Note: on single chamber valves with high
pressure stainless steel internals, an outer
(950) and inner (960) diaphragm slipper is
used to protect the diaphragm (170) from
wear. The outer slipper (950) is between
thediaphragm (170) and lower case (280).
The inner slipper (960) is between the
diaphragm (170) and the pressure plate (150).
Note: on 2” and 3” single and dual chamber
valves with low pressure aluminum or low
pressure stainless steel internals, use a
reinforcement diaphragm (175) between
the main diaphragm (170) and lower case
(280). The reinforcement diaphragm (175)
is recognized by a small offset hole at
thecenter of the diaphragm.
CAUTION
Installing the reinforcement diaphragm (175)
in the wrong location will cause damage to
thediaphragm assembly.
8. Tighten jam nut (520), wrench tight.
11
Page 12

ANDERSON GREENWOOD SERIES 9300 PILOT OPERATED SAFETY RELIEF VALVES
InstallatIon and MaIntenance InstructIons
2.6.2 Dual chamber diaphragm replacement
(SeeFigure 3, detail A, B, C)
1.
Secure auxiliary diaphragm bushing(240) into
CAUTION
When tightening jam nut be careful not to damage
diaphragm.
soft jaw vise, and remove nut(530) and jam
nut (520B) by turning it counterclockwise.
2. Remove washer (580), auxiliary plate (160B),
washer (590A), reinforcement diaphragm
(175), washer (270), and PTFE washer (600).
3. Inspect threads on bushing (240) and general
condition of metal washers (270, 580, 590B)
including sealing surface where PTFE
washers (600) seat. Clean metal parts with
Note: on 2” and 3” single and dual chamber
valves with low pressure aluminum or low
pressure stainless steel internals, use
areinforcement diaphragm (175B) between
the main diaphragm (170B) and lower
case (280B). The reinforcement diaphragm
(175B) is recognized by a small offset hole at
thecenter of the diaphragm. (See detail A)
oil free solvent, and dry with lint free towel.
4. Install PTFE washer (600), washer (smooth
side up) (270), auxiliary diaphragm (radius
side down) (170), washer (smooth sidedown)
(590B), auxiliary plate (bevel side down) (160B),
washer (580), jam nut (520B), and tighten by
turning the jam nut (520B) clockwise.
2.7 Main valve nozzle replacement
1. Remove nozzle retaining screws (110) and
gently tap nozzle (460) with soft face mallet.
2. Inspect nozzle seating surface for nicks or
scratches. If they cannot be removed with a
crocus cloth or finer sandpaper, the nozzle
(460) must be replaced.
1. The contact surfaces must be clean, free from grease, and dry.
2. Remove the protective strip on the adhesive tape.
3. Lightly press in place as shown below.
UPPER CASE(S) AND TOP OF BODY
3. If the upper and lower nozzle gaskets (630)
are to be replaced, install PTFE gasketing.
(See Figure 6, Section A-A, the nozzle part only)
4. Reattach nozzle (460) and retaining
screws(110).
Put tape just inside of bolt holes, overlapping ends at a bolt hole. Put tape on top case only.
Puttape on top surface of body. Do not put on lower case of mating pair.
Nozzle
A
Section A - A
A
Place tape toward outer edge of each gasket ledge. Put overlaps on opposite sides.
3
Use ⅛” tape on 3” and 4” nozzles.
/
16” tape on all cases and larger nozzles.
FIGURE 6
PTFE Tape gasket mounting instructions
12
Page 13

ANDERSON GREENWOOD SERIES 9300 PILOT OPERATED SAFETY RELIEF VALVES
InstallatIon and MaIntenance InstructIons
2.8 Reassembly of main valve single chamber
diaphragm
1. Ensure nozzle (460) maintenance is
complete and nozzle (460) is reinstalled.
2. Secure seat hub (420) into soft jaw vise.
3. Install lower case (280) on top of seat plate.
4. Lower shaft (320) and diaphragm assembly
through center hole of case (280).
5. Holding shaft (320) stationary, screw the
seat plate assembly (910, 920) onto the main
valve shaft (320). The connecting thread
will run free, tighten, and free again as it
engages with the locking helicoil (330).
CAUTION
Do not tighten the seat hub against the shoulder
of the shaft.
6. Apply PTFE gasketing (620) to top of the
main valve body (100). (See Figure 6)
7. Lower seat plate (910, 920), shaft assembly,
(320) and lower diaphragm case (280) into
main valve body (100). Align bolt holes with
diaphragm (170), case (280), and body (100).
8. Install PTFE gasket (620) material to upper
case (280). (See Figure 6)
9. Reattach the upper diaphragm case (210)
and seat plate assembly (910, 920) to
thebody (100).
10. Align match marks of case (210) with body
(100), and install cap bolts (700, 710) and
tighten in a crisscross pattern.
11. Reattach the pilot and tubing.
2.9 Reassembly of main valve dual chamber
diaphragm
1. Ensure nozzle (460) maintenance is
complete and nozzle (460) is reinstalled.
2. Secure seat hub (420) into soft jaw vise.
3. Install lower case (280A) on top of seat
plate(910).
4. Lower shaft (320) and diaphragm assembly
through center hole of case (280A).
5. Holding shaft (320) stationary, screw the
seat plate assembly onto the main valve
shaft (320). The connecting thread will run
free, tighten, and free again as it engages
with the locking helicoil (330).
CAUTION
Do not tighten the seat hub against the shoulder
of the shaft.
6. Apply PTFE gasketing (620) to top of
themain valve body (100). (See Figure 6)
7. Lower seat plate (910, 920), shaft assembly
(320), and lower diaphragm case (280A) into
main valve body (100). Align bolt hole with
diaphragm (170A), case (280A), and body (100).
8. Replace the Seal Rod (690) in the upper end
of the adapter bore (230) lubricating it with
Dow Corning FS3451 or equivalent when the
new one is installed. (See Figure 3, Detail A)
9. Install PTFE gasket material to upper main
case (220) (See Figure 6) and lower auxiliary
case assembly spool (see Figure 6).
10. Lubricate threads and shaft of lift rod (250)
and lower spool assembly onto the main
valve (100) while lifting rod wire through
thecenter hole of the adapter (230).
11. Align match marks of case (220, 280A) with
body (100), and install cap bolts (700, 710)
and tighten in a crisscross pattern.
12. Lower auxiliary diaphragm assembly onto
lower auxiliary case (280B) lifting rod wire
through the center of diaphragm bushing
(240). Holding the wire, spin diaphragm
assembly 2 full turns clockwise.
13
. Now bend the wire in half and spin the liftrod
(250) counterclockwise approximately 20turns.
This is the starting position for setting the
lift of the auxiliary diaphragm (170B).
14. To set lift position, position the edge of a
ruler at the top edge of the auxiliary vacuum
plate (160B) and lift the rod (250) up. Normal
3
lift is ⅛” to
/
16”. To increase lift, spin rod
(250) clockwise. To decrease lift, turn rod
counterclockwise.
15. To lock setting insert PTFE seal rod O-ring
(690) onto rod (250) and install jam nut
(520B). To tighten, hold jam nut (520B) and
lift rod (250) stationery and turn rod jam nut
(530) clockwise until wrench tight.
Note: re-check Lift to ensure adjustment
did not change during tightening.
16. Uncap the dome port and close the auxiliary
and main diaphragm assemblies.
17.
Apply PTFE Gasket (620B) to upper auxiliary
diaphragm case. (See Figure 6) Replace the
upper auxiliary diaphragm case (620B). Install
case bolts (700) and nuts (730) and tighten.
18. Replace the pilot and tubing.
3 PILOT MAINTENANCE
3.1 Pilot disassembly for non-flowing
modulating pilots (Series 400B)
(RefertoFigures 7 and 8)
1. Remove bonnet cap (5), loosen adjustment
screw lock nut (7), back out adjusting screw
(6) to relieve spring (9) tension. Removebonnet
nuts (11), bonnet washers (10and 53), bonnet
assembly (4, 29, 51), bonnet gasket (12), spring
washer (8), and spring (9).
2. Push down on spool retaining nut (30)
with a Phillips screw driver engaging the
spool anti-rotation pin (21), and remove
nut (30) with a ½” open end wrench turning
counterclockwise.
3.
Remove spindle spring (31), case bolts (13and
48), nuts (17 and 49), washers (16and 50) and
upper case (3). Remove the bonnet studs (43).
Note: internals are now accessible for removal.
4. Remove -014 O-ring (32), plate sense gasket
(18), sense plate (33), sense diaphragm (34),
gasket (15), ring lantern (35), diaphragm
(19), feedback diaphragm (38), gasket (15),
feedback diaphragm plate (14) and gasket (15).
5. Remove spool (36) and spindle (24) assembly.
6. Remove the lower spindle, -013 O-ring
(23), outlet seat (22), -014 O-ring (32) from
the spindle (24). Now the spindle (24) may
be removed from the spool (36). Remove
thetop inlet seat O-ring from the spindle.
7. Remove the lower diaphragm case (2)
from the body by removing the 4 inner case
bolts(20).
8. Remove the inlet connector (27) and inlet
screen (41) by removing the 2 bolts (28) on
the side of the pilot body (1).
9. Clean all metal parts, and throw away all
gaskets, diaphragms, and seals.
Note: pay particular attention to all port
holes and polished areas.
13
Page 14

ANDERSON GREENWOOD SERIES 9300 PILOT OPERATED SAFETY RELIEF VALVES
InstallatIon and MaIntenance InstructIons
FIGURE 7
Detail A
2
43
18
19
20
Auxiliary dome
connection ½ NPT
Exhaust ports (frontand back)
withventscreen item 29
54/10
5
53
8
11
12
3
21
22
42
32
23 24
Pressure
actuator
connection
1
6
7
32
29
Detail C
9
4
30
51
31
32
33
34
35
36
Detail B
25 26 27 283741
48
50
49
38
¾ NPT
Pilot inlet pressure
Inlet ½ NPT
Detail D
PARTS
Item Description Item Description Item Description
1 Body 20 Bolt 35 Ring - lantern
2 Case - diaphragm, lower 21 Pin - groove 36 Spool
3 Case - diaphragm, upper 22 Bushing - guide 37 Gasket - body
4 Bonnet assembly 23 O-ring (-013) 38 Slipper - feedback diaphragm
5 Cap - bonnet 24 Spindle 41 Screen - inlet
6 Screw - pressure adjustment 25 Ferrule - tubing 42 Plug - pipe
7 Nut - lock 26 Retainer - inlet connection 43 Stud - bonnet
8 Washer - spring 27 Connector - inlet 48 Case bolt
9 Spring 28 Bolt 49 Nut
10 Washer - plain 30 Nut - spool retainer 50 Washer
11 Nut 31 Spring - spindle 51 Plug
12 Gasket - bonnet 32 O-ring (-014) 52 Insert
18 O-ring (-022) 33 Plate - sense 53 O-ring
19 Diaphragm - feedback 34 Diaphragm - sense 54 Seal - thread
14
Page 15

ANDERSON GREENWOOD SERIES 9300 PILOT OPERATED SAFETY RELIEF VALVES
InstallatIon and MaIntenance InstructIons
13
34
19
16
Detail A
28
40
39
Vacuum actuator connection
Detail B
15
14
15
17
Remote vacuum
sense ⅜” NPT
1
27
26
Detail C
PARTS
Item Description
13 Bolt
14 Plate, diaphragm support
15 Gasket, diaphragm case
16 Washer, lock
17 Nut
19 Diaphragm, feedback
29 Vent
34 Diaphragm, sense
39 Ferrule, tubing
40 Retainer, dome tubing
44 Bushing
FIGURE 8
3.2 Pilot assembly for non-flowing modulating
pilots (Series 400B)
Assembly is done in the reverse order of
disassembly.
1. Lubricate all O-rings, sliding surfaces,
screw threads and spring washer pivot
points with Dow Corning No. 33 silicone
grease or equivalent.
Note: for oxygen service valves use only
lubricants suitable for this service, such as
Krytox 240AC.
2. The spindle O-ring and bearing surface should
be lubricated with Dow Corning FS 3451 or
equivalent.
Note: do not lubricate inlet or outlet seat
O-rings
3. Assemble the diaphragm lower case (2) to
the body (1).
Note: for Pilots with Kalrez
®
O-rings, use
two PTFE gaskets (37) between the lower
diaphragm case (2) and the body (1).
44
29
Detail D
4. Assemble the inlet screen (41) to the inlet
connector (26) and the inlet connector (26)
to the body (1).
5. Assemble the inlet seat (upper O-ring [-014])
(UPPER 32) and the spindle O-ring (23) to
the spindle (24).
6. Assemble the spindle (24) to the spool (36)
and install the outlet seat (lower O-ring
[-014]) (LOWER 32) to the spindle (24).
NOTE
Kalrez® is a registered trademark of DuPont Dow
Elastomers.
15
Page 16

ANDERSON GREENWOOD SERIES 9300 PILOT OPERATED SAFETY RELIEF VALVES
InstallatIon and MaIntenance InstructIons
7. Install the spool (36) with spindle (24) in
thebody (1). Position the spool (36) to
engage the anti-rotation groove pin (21).
8. Install a diaphragm case gasket (15) on
thelower diaphragm case (2) and the
feedback diaphragm support plate (14).
Note: install the support plate (14) with
the rounded edge up towards the feedback
diaphragm (38).
9. Install the following parts in the order listed
on the spool (36):
a. Feedback diaphragm support plate (14)
b. Gasket (15)
c. Feedback diaphragm (38)
d. Diaphragm (19)
e. Lantern ring (35)
f. Gasket (15)
g. Sense diaphragm (34)
h. Sense plate (33)
Note: install the sense plate (33) with the round
edge towards the sense diaphragm (34).
i. Install -022 O-ring (18) around
thespindle. On the sense, add plenty of
lubricant to the O-ring.
10. Install bonnet studs (43) thru upper
diaphragm case (3). Install the upper
diaphragm case (3), case bolts (13, 48),
washers (16, 50), and nuts (17, 49).
11. Install the spindle spring (3) and spool
retainer nut (30). Lube nut with Dow
Corning 33 on bevel and use Fluorolube
on the threads. Push down on the spool
retainer nut (30) with a Phillips screw driver
engaging the anti-rotation pin (21) and
tighten the nut to 10 foot pounds using ½”
open end wrench.
Note: do not over tighten, the diaphragms
may be damaged.
12. Pretest pilot function by depressing
spindle/diaphragm assembly stack
downward. The spindle spring should return
the stack assembly to the upward position.
If it doesn’t return to upward position,
disassemble pilot and re-check assembly.
13. Install spring (9), spring washer (8), bonnet
gasket (12) and bonnet (4) onto upper
diaphragm case (3). Install bonnet washers
(10,53) and nuts (11) and tighten.
14. Install pressure adjustment screw (6),
locknut (7) and cap (5).
This pilot is now ready for testing.
3.3 Pilot disassembly for flowing modulating
or snap action pilots (Series 91, 93, and 93T)
refer to Figures 9 thru 13
The pilot disassembly instructions and soft
goods vary between pilot series. Pay particular
attention to orientation of parts and materials.
The 93T pilot has all PTFE soft goods including
diaphragms, and its maximum set pressure
is 15 psig. The 91 pilot has PTFE soft goods
with stainless steel (SS), Hastelloy
diaphragms, and its set pressure ranges from
16 psig to 50 psig. The 93 pilot is different from
®
, and PTFE
the 93T and 91 pilot in that it uses elastomer
seat, seals and diaphragms.
1. Remove cap (760) and adjusting screw (790)
and adjusting screw seal (720) for vacuum
pilot. Remove bonnet bolts (770), seals (700)
for vacuum pilot, bonnet (200), spring (840)
and spring washer (820).
2. On Series 91 and 93T pilots, loosen boost
tube fitting (310) on boost tube (320) at boost
tube connector bolt (270). Refer to detailB.
Remove boost tube connector nut (300),
washer (290), lover boost tube seal (590),
seal retainer (280). Let these three parts
slide down boost tube. Remove boost tube
connector bolt (270), upper boost tube seal
(590) and seal retainer (280).
3. On Series 93 pilot, loosen boost tube fitting
(310) on boost tube (320) at boost tube
connector bolt (270). Refer to detail B.
Remove boost tube connector nut (300),
washer (290), lover boost tube seal (600)
Letthese three parts slide down boost tube.
Remove boost tube connector bolt (270) and
upper boost tube seal (590).
4. Remove case bolt nuts (260), washer (250)
and bolts (240). Remove upper case (210).
5. On Series 91 and 93T pilot. Hold hex spacer
(120) with a shortwell ¾” socket that has
theratchet area bored out and inserting
another socket into the bored out hole, loosen.
6. Remove parts in the following order: hex
spacer (120), sense plate (150), upper gasket
(650), sense diaphragm case gasket
spindle gasket (680), sense spacer (140),
plate (160), spacer ring (230), diaphragm
gasket (620), boost diaphragm gasket (680)
(See Figure 12, detail A)
7. On Series 93 pilot. Hold hex spacer (120)
with a shortwell ¾” socket that has the
ratchet area bored out and inserting another
socket into the bored out hole, loosen.
8. Remove parts in the following order: hex
spacer (120), sense plate (150),sense
diaphragm (510), upper gasket (650), sense
spacer (140), boost plate (160), spacer
ring (230), diaphragm gasket (620), boost
diaphragm gasket (510), boost spacer (130),
check plate (560) and spindle seal (660).
(See figure 12, detail A)
9. Remove boost tube (320) from body (100)
and lower boost tube seal (590/600(93T))
from boost tube (320).
10. Remove spindle diaphragm (500) and gasket
(690) for 93T pilot and spindle/disc assembly
(550) from body (100).
11. Remove spindle diaphragm plate (170) and
shim washer(s) (490) from spindle/seat
assembly (550).
Note: shim washer(s) may not always be
used in assembly (550).
12. Refer to detail A. For the 93T pilot seat
assembly, remove the retainer ring (430)
and seat retainer (420) from the spindle/disc
assembly (550). Remove the seat (570).
(650),
boost
16
Page 17

ANDERSON GREENWOOD SERIES 9300 PILOT OPERATED SAFETY RELIEF VALVES
InstallatIon and MaIntenance InstructIons
13. Remove blowdown bushing (390) and
blowdown seal (630) from body (100).
Note: the blowdown screw retainer (380)
is a loose fit on the blowdown adjustment
screw (350). Be prepared to catch it
when the bushing (390) is removed from
thebody(100).
14. Loosen the blowdown screw locknut (370)
and remove the blowdown adjusting screw
(350) and seal (630) from the bushing (390).
15. Remove the vent (800) from the body (100).
Note: it is not necessary to remove
thefilter screen (400) or nozzle (110) from
thebody(100).
16. Clean all parts and replace all soft goods.
The spindle/seat assembly (550) is factory
assembled and must be replaced as a unit.
If the nozzle (110) is nicked or scratched,
it should be replaced. To remove it, use a
deepsocket.
3.4 Pilot assembly for flowing modulating or
snap action pilots (Series 91, 93, and 93T)
1. On Series 93 and PTFE seat Series 91
and93T pilots, if you removed the nozzle
(110), reattach the nozzle (110) to the body
(100), and replace the spindle seat assembly
(550).
2. If you removed the filter screen (400),
reattach the filter screen (400), and reattach
the vent (800) to the body (100).
3. Reattach the blowdown seal (620), and
blowdown adjusting screw (350) to
theblowdown bushing (390), and tighten
theblowdown nut (370).
Note: make sure the blowdown screw
retainer (380) is on the blowdown
adjustment screw (350).
4. Attach the bushing seal (630) and the
blowdown bushing (390) to the body (100).
5. Place the shim washer(s) (490), if applicable,
and spindle spacer (170) on the spindle seat
assembly (550). Then place the spindle seat
assembly (550) in the body (100).
6. Lay a straight edge across the body (100)
and check the gap between the straight
edge and the spindle spacer (170). Add or
remove shim(s) (490) as required to make
the top of the spindle spacer (170) even with
the top of the body (100).
7. Align the small hole in the lower diaphragm
case (220) with the hole in the spindle
diaphragm (500). Then align the spindle
diaphragm hole (500) with the hole in the
body (100). Install the lower case (220), body
bolts (340) and bolt seals (610) onto the body
(100) and tighten together.
Note: on the 91 and 93T pilots, there are
gaskets (690) on each side of the spindle
diaphragm (500) and a diaphragm case plate
(180) that must be installed onto the lower
case (220) using the spiral pin (410).
8. On Series 91 and 93T pilots, slide the hex
nut (300), flat washer (290), seal retainer
(280), and seal boost tube (590) on to the
boost tube (320).
On Series 93 pilots, slide the hex nut (300),
flat washer (290), and thread seal (600)
on to the boost tube (320). Then attach
the boost tube (320) to the body (100) with
theconnector (330).
9. On Series 91 and 93T pilots, install parts in
the following order: spindle seal (660), boost
spacer (130), diaphragm case gasket (640),
boost diaphragm (510/520), diaphragm
case gasket (larger I. D. hole) (640),
spacer ring (230), boost plate (160),
spacer (140), diaphragm case gasket (640),
sensediaphragm (510), diaphragm gasket
(smaller I.D. hole)(640), sense gasket (670),
sense plate (150), hex spacer (120), springdisc
(830), lock washer (780) and jam nut (750).
Note: be sure to align large hole in
diaphragm(s) (510/520) and gaskets
(ALL640) with the boost tube hole (270).
10.
On Series 93 pilot, install parts in
thefollowing order: spindle seal (660),
checkplate (rubber side down) (560),
boost spacer (130), boost diaphragm (510),
diaphragm gasket (650), spacer ring (230),
boost plate (160), sense spacer (140),
diaphragm gasket (650), sense diaphragm
(510), sense plate (150), hex washer (120),
spring disc (830),
nut (750).
Note: be sure to align large hole in
diaphragm(s) (510) and gaskets (ALL 650)
with the boost tube (270) hole.
11. To tighten spindle (550) and diaphragm
assembly, hold ¾” socket tool onto hex
washer (120) stationary, and tighten the jam
nut (750).
12. Install upper diaphragm case (210), case
bolts (240), washers (250) and nuts (260),
and tighten.
13. Install the upper boost tube seal (590)
(Series93 pilot), PTFE seal (590) and seal
retainer (280) (Series 91 and 93T pilot),
andboost tube connector/bolt (270) into
thelarge hole of the diaphragm cases
(210,220). Slide
(600) (Series93 pilot),
seal retainer (280) (Series 91 and 93T pilot),
washer (290), nut (300), and boost tube
connector nut (310/480) up the boost tube
(320) attach to the boost tube connector/
bolt (270). Tighten boost tube fitting (310)
on the boost tube (320) at the boost tube
connector/bolt (270).
14. Install the spring (840), spring washer (820),
bonnet assembly (200), and bonnet bolts
(770), adjusting screw (790), locknut (190),
and cap (760).
Note: for the vacuum pilot remember to
replace bonnet bolt (700), bonnet gasket
(580) and adjusting screw seal (720).
lock washer (780), and jam
the lower boost tube seal
PTFE seal (590) and
sense
17
Page 18

ANDERSON GREENWOOD SERIES 9300 PILOT OPERATED SAFETY RELIEF VALVES
InstallatIon and MaIntenance InstructIons
PILOT PARTS (FIGURES 9, 10, 11)
Item Description
100 Body
110 Nozzle
120 Spacer - hex
130 Spacer - boost
140 Spacer sense
150 Sense plate
160 Plate - boost
170 Spacer - spindle
180 Plate - diaphragm case (93T only)
190 Pressure adjustment lock nut
200 Bonnet assembly (items 450 - 710 part of assembly)
210 Diaphragm case upper
220 Diaphragm case lower
230 Ring - spacer
240 Case - bolt
250 Case washer - lock
260 Case nut - hex
270 Connector - boost tube
280 Seal - retainer (93T only)
290 Washer - flat
300 Nut - hex
310 Nut - connector
320 Tube - boost
330 Connector - straight
340 Bolt - body
350 Needle - blowdown adjustment
370 Blowdown nut
380 Blowdown retainer
390 Blowdown bushing
400 Screen filter
410 Pin - spiral (93T only)
430 Ring - retainer (93T only)
440 Nut - swage (93T only)
450 Insert - bonnet (part of item 200 assembly)
460 Wire
470 Seal - ½” dia
480 Ferrule (not shown)
Item Description
490 Washer - shim (for stack height only)
500 Diaphragm - spindle
510 Diaphragm - sense/boost
520 Diaphragm - sense (93T only)
550 Spindle
560 Plate - check
570 Seat
580 Gasket - bonnet
590 Seal - boost tube
600 Seal - thread
610 Seal - body bolt
620 Seal - blowdown
630 Seal - bushing
640 Gasket - case
650 Gasket - diaphragm
660 Seal - spindle
670 Gasket - sense (93T only)
680 Gasket - spindle (93T only)
690 Gasket - spindle diaphragm used if item 500 is PTFE)
700 Seal - bonnet bolt (93T only)
710 Seal - bonnet insert (part of item 200 assembly vacuum only)
720 Seal adjustment screw (93T only)
730 Base - seat (93T only)
740 Ball
750 Nut - hex
760 Cap
770 Bolt - bonnet
780 Washer - lock
790 Pressure adjustment screw
800 Vent - body (dependent on configuration of assembly)
810 Vent - bonnet
820 Washer - spring
830 Disc spring
840 Spring
910 Name plate (not shown)
920 Screw - drive (not shown)
18
Page 19

ANDERSON GREENWOOD SERIES 9300 PILOT OPERATED SAFETY RELIEF VALVES
InstallatIon and MaIntenance InstructIons
450
460
See detail B
Figure 13
230
150 210 470
160
320
220
440
770
A
180
See detail A
Figure 13
580
500
690
520
510
240
250
260
640
410
A
Exhaust
See Figure 7 or 8
800
630
380
390
100
To main valve dome
350
620
340 610
370
FIGURE 9
Series 93 and 93T pressure pilot (below 15 psig)
330
400
To process
View A - A
19
Page 20

ANDERSON GREENWOOD SERIES 9300 PILOT OPERATED SAFETY RELIEF VALVES
InstallatIon and MaIntenance InstructIons
820 790
840
750
780
830
470
150
520
240
250
260
640
680
A
460
760
190
450
200
120
770
810
140
580
160
210
230
220
510
690
See detail A
Figure 13
380
330
320
620
400
350
340610
800
A
100
370
390
630
View A - A
FIGURE 10
Series 91 and 93 pressure pilot (Above 15 psig)
20
Page 21

ANDERSON GREENWOOD SERIES 9300 PILOT OPERATED SAFETY RELIEF VALVES
InstallatIon and MaIntenance InstructIons
To process
To process
See detail B
See detail A
Main valve dome
FIGURE 11
Series 93 vacuum pilot
21
Page 22

ANDERSON GREENWOOD SERIES 9300 PILOT OPERATED SAFETY RELIEF VALVES
InstallatIon and MaIntenance InstructIons
Detail A
Series 93 - pressure
above 15 psig
Detail A
Series 91 - pressure
above 15 psig
FIGURE 12
Detail A
Series 93 - pressure
below 15 psig and vacuum
Detail A
Series 93T - pressure
below15psig
22
Page 23

ANDERSON GREENWOOD SERIES 9300 PILOT OPERATED SAFETY RELIEF VALVES
InstallatIon and MaIntenance InstructIons
270 270
210
650
230
650
220
600
290
300
310
480
590
510
520
210
640
220
280
280
590
670
510
520
590
290
300
310
480
FIGURE 13
Detail B
Series 93 pilot - pressure
below 15 psig and vacuum
Detail B
Series 93 pilot - pressure
below 15 psig
23
Page 24

ANDERSON GREENWOOD SERIES 9300 PILOT OPERATED SAFETY RELIEF VALVES
InstallatIon and MaIntenance InstructIons
3.5 Pilot adjustment for non-flowing
modulating pilots (Series 400B)
The pilot may be set separate from the main
valve provided there is access to a pilot test
system similar to the one shown in Figure 14.
3.5.1 Adjustment of set pressure
1. Install the pilot valve onto the pilot test
system and attach gage sensing lines to
thesupply and dome connections.
2. Remove cap.
3. Screw the set pressure adjustment screw
clockwise until it is screwed IN 80% to 90%.
4. Increase the supply pressure to nameplate
setting and slowly back out the adjustment
screw until flow through the pilot exhaust
begins.
5. Continue to back the set pressure
adjustment screw out until the dome
pressure is 70% of the supply pressure.
When the dome pressure reaches 70% of
the supply pressure read the supply gage
pressure. If it is below set pressure, youwill
need to tighten down on the pressure screw,
or back off it if you are high. Tighten the locknut
once the desired set pressure is achieved.
Note: adjust the set pressure for 101% ± 1%
of the nameplate set pressure.
6. Cycle the pilot valve a minimum of 5times
to assure that the dome pressure reduction
at set pressure is consistent. Increase
thepressure very slowly in order to obtain
an accurate reading of thecracking
pressure and to expose any erratic
performance.
Note: cracking pressure on vacuum pilots
is that pressure at which the initial dome
pressure change is noted.
7. Hold the pilot valve at set pressure to obtain
the dome pressure reading.
Note: the first 6 steps should be
completed before this step is undertaken.
Inmodulating 400B pilots, the dome
pressure decreases proportional to increase
in inlet pressure.
Full dome reduction (dome pressure)
occurs ≤ 6% over pressure.
8. Check the pilot exhaust for leakage when
the pilot is in null position between crack
and reseat.
Note: maximum leakage allowed is
60bubbles per minute.
3.5.2 Reseat pressure
Reseat is defined as that supply pressure when
the dome pressure is 75% of the supply pressure.
Note: blowdown adjustment is not required on
Series 400B pilots.
3.5.3 ADJUSTMENT TOLERANCES
Pressure Tolerance
Set pressure ± 3%
Crack pressure 98% of set
Reseat pressure 96% of set
24
Page 25

ANDERSON GREENWOOD SERIES 9300 PILOT OPERATED SAFETY RELIEF VALVES
InstallatIon and MaIntenance InstructIons
Set pressure adjustment
Supply pressure gauge
Supply
pressure
Supply vacuum gauge
½” Pipe (min)
Vent
Accumulator .25 ft
Supply port (½” NPT)
Positive pressure pilot
Vacuum set adjustment
⅜” Pipe (min)
3
[.007 m3]
Test pilot
Reseat pressure adjustment
Dome pressure gauge
Test pilot
Supply vacuum
FIGURE 14
Vent
Accumulator .25 ft
Supply port (⅜” NPT)
Negative pressure pilot
3
[.007 m3]
Reseat vacuum
adjustment on back side
Dome vacuum gauge
25
Page 26

ANDERSON GREENWOOD SERIES 9300 PILOT OPERATED SAFETY RELIEF VALVES
InstallatIon and MaIntenance InstructIons
3.6 Pilot adjustment for flowing modulating or
snap action pilots (Series 91, 93, and 93T pilots)
The pilot may be set separate from the main
valve provided there is access to a pilot test
system similar to the one shown in Figure 14.
3.6.1 Adjustment of set pressure
1. Install the pilot valve onto the pilot test
system, and attach gage sensing lines to
thesupply and dome connections.
2. Remove the cap.
3. Screw the set pressure adjustment screw
clockwise until it is screwed in 80% to 90%.
4. Increase the supply pressure to nameplate
setting and slowly back out the set pressure
adjustment screw until flow through the pilot
exhaust begins.
5.
Continue to back the set pressure adjustment
screw out until the dome pressure is 70%
of the supply pressure.
When the dome
pressure reaches 70% of the supply
pressure read the supply gage pressure.
If it is below set pressure, you will need to
tighten down on the pressure screw, or back
off it if you are high. Tighten the locknut
once the desired set pressure is achieved.
Note: set pressure on a vacuum pilot is
evidenced by a rapid change of the dome
pressure (0 gage) to the supply pressure.
Aslow ramp speed is recommended on low
set valves in order to obtain true reading of
set pressure.
6. Check the pilot exhaust vent for leakage.
The pilot shall be bubble tight up to crack
pressure shown in 3.6.3. Also, check upper
pilot vent for leakage. There should be
0leakage from the upper vent.
3.6.2 Reseat pressure
1. Turn the blowdown adjusting screw
clockwise to decrease the reseat pressure
or counterclockwise to increase the reseat
pressure.
2.
A small interaction between set pressure
and reseat pressure adjustments will occur;
therefore, it may be necessary to readjust
theset pressure after setting reseat
pressure.
Note: if the blowdown adjusting screw has
been removed or turned to either extreme,
positioning it midway will aid in obtaining
the correct reseat pressure. There are
approximately 7 to 8 turns to obtain full travel
of the adjustment. Midway from either end
should produce a blowdown for snap action.
For modulating pilot action, back the
adjustment screw out counterclockwise.
3. Cycle the pilot valve a minimum of 5
times to assure that dome pressure
reduction at set pressure is consistent.
Increasethepressure very slowly in order to
obtain an accurate reading of thecracking
pressure and to expose any erratic
performance.
Note: cracking pressure on vacuum pilots
is that pressure at which the initial dome
pressure change is noted.
4. Hold the pilot valve at set pressure to obtain
the dome pressure reading. For modulating
pilots, dome pressure shall be read with
theinlet at 105% of set pressure.
Note: the first 4 steps should be completed
before this step is undertaken.
On snap action pilots, the dome pressure
decreases rapidly with a “snap” to
15% ± 10% of set pressure.
On modulating action pilots (Series 90),
the dome pressure decreases slowly to
30% ± 5% of set pressure and recovers to
60% ± 10% of set pressure at set pressure.
5. After desired pilot action is set, verify pilot
seat tightness. This is accomplished by
checking the pilot exhaust vent for leakage.
The pilot should be bubble tight up to crack
pressure as shown in 3.6.3. Be aware
of crack pressure changes between set
pressure ranges.
3.6.3 ADJUSTMENT TOLERANCES
Set press.
Pilot action Set press.
Snap 4” WC to 7” WC ± .2” WC 75% 90% ± 1
Snap 7” WC to 1.0 psig ± 3% 90% 90% ± 1
Snap Above 1 psig ± 3% 95% 92% ± 1
Snap -4” WC to -7” WC ± .2” WC 75% 90% ± 1
Snap -7” WC to -1.0 psig ± 3% 90% 90% ± 1
Snap -1 PSI to -14.7 psig ± 3% 95% 92% ± 1
Modulating action 4” WC to 7” WC ± .2” WC 75% 100%
Modulating action 7” WC to 1.0 psig ± 3% 90% 100%
Modulating action Above 1.0 psig ± 3% 95% 100%
Modulating action -4” WC to -7” WC ± .2” WC 75% 100%
Modulating action -7” WC to -1.0 psig ± 3% 90% 100%
Modulating action -1.0 PSI to -14.7 psig ± 3% 95% 100%
tolerances
Crack press.
% set
Reseat press.
% set
26
Page 27

ANDERSON GREENWOOD SERIES 9300 PILOT OPERATED SAFETY RELIEF VALVES
InstallatIon and MaIntenance InstructIons
4 FUNCTIONAL TESTING OF COMPLETE
ASSEMBLY OF MAIN VALVE AND PILOT
4.1 General
Assemble the pilot to the main valve, and
install remaining tubing and accessories.
Thecomplete valve assembly should be leak
tested for internal and external leaks using
apressure equal to 30% and 90% of set.
4.1.1 Leakage check - pressure relief valves
Apply pressure to the inlet equal to 30% of
theset pressure. Check for leakage at the
main valve seat, no visible leakage shall occur.
Holdtime is 1 minute.
Increase the inlet pressure to 90% of the set
pressure. Check for leakage at the cap seal,
casting, pilot support pipe and supply tube and
other applicable connections using leak test
solution and at the main valve seat. No visible
leakage shall occur for a hold time of 1 minute.
4.1.2 Leakage check - vacuum relief valves
Valves equipped with vacuum pilots shall be
leak tested per 4.1.1 on positive pressure with
the set pressure equal to the reciprocal of
thevacuum set pressure. Valves with weighted
diaphragms shall be tested for leakage at 50%
of their weighted set.
4.1.3 Back flow preventers and/or field test
The use of some field test connection or
back flow preventers necessitates the use of
check valves. These valves shall be installed
per theapplicable assembly drawings and in
thefree flow direction shall open at less than
.5” W.C. The check valves may be tested for
forward flow either before or after assembly
at the shops option. The output check valve of
back flow preventers shall be checked for zero
leakage per 4.1.1 paragraph 2.
4.2 Leakage check - pressure relief valves
pressure pilot (Series 400B pilot)
1. Connect gas bottle as shown in Figure 15.
2. Close valve “C”.
3. Open block valve “B” to supply regulator.
Note: regulator pressure should be set at 0.
4. Connect bubble tester bottle to pilot exhaust
vent and block the second pilot vent if
thepilot is equipped with one.
5. Increase pressure at field test port to
slightly above tank pressure by slowly
increasing regulated pressure.
6. Open field test valve “A” and slowly increase
regulator pressure until bubbles are seen in
the bottle. That pressure will be within 3% of
the set pressure.
7. To remove the test set-up, close valves “A”
and “B” and open valve “C”.
27
Page 28

ANDERSON GREENWOOD SERIES 9300 PILOT OPERATED SAFETY RELIEF VALVES
InstallatIon and MaIntenance InstructIons
Pressure regulator w/
test gauge or manometer
Field test valve “A”
Vent valve “C”
Block valve “B”
Compressed nitrogen
FIGURE 15
4.3 Field test instructions for flowing
modulating or snap action pilots
4.3.1 General
An optional field test accessory is available
for checking the positive set pressure without
removing the valve from service. The field test
accessory consists of a 3-way ball valve to allow
the pilot to sense pressure from either the
process or from the test gas source.
A standard bottle of nitrogen equipped with
a pressure regulator, block valve, pressure
gage, and convenient length of high pressure
flexible hose is recommended for testing. A set
up similar to that shown in Figure 13 should be
used. Such a test kit is available from Anderson
Greenwood under the part number 04.4812.001
plus additional dash numbers for the pressure
gages required.
Remote sense connection
(to tank)
5. Increase pressure at field test port to
slightly above tank pressure by slowly
increasing regulated pressure.
6. Open field test valve “A” and slowly increase
regulator pressure until bubbles are seen in
the bottle. That pressure will be within 10%
of the set pressure.
Note: for pilots adjusted for snap action, the
main valve seat will open at set pressure
if the tank pressure is present. If it is not,
asudden increase in pilot exhaust flow will
be observed at set pressure.
7. To remove the test set-up, close valves “A”
and “B” and open valve “C”.
4.3.2 Field test procedure for flowing modulating
or snap action pilots
1.
Connect the gas bottle as shown in Figure 16.
2. Close vent valve “C”.
3. Open block valve “B” to supply regulator.
Note: regulator pressure should be set at 0.
4. Connect bubble tester bottle to pilot exhaust
vent.
28
Page 29

ANDERSON GREENWOOD SERIES 9300 PILOT OPERATED SAFETY RELIEF VALVES
InstallatIon and MaIntenance InstructIons
5 STORAGE AND HANDLING
Because cleanliness is essential to
thesatisfactory operation and tightness of
a Series 9000 pilot operated relief valve,
precautions should be taken to keep out all
foreign particles and materials. Valves should
be closed off properly at both the valve inlet
and outlet. Particular care should be taken
to keep the valve inlet absolutely clean.
Valvesshould preferably be stored indoors
with the original factory installed protective
measures left in place. This includes all
desiccants, flange protectors, and factory seals.
FIGURE 16
Valves should be placed on wooden pallets
or other blocking materials to keep them off
the floor or in a location where dirt and other
forms of contamination are kept to a minimum.
Valvesshould not be thrown in a pile or laid on
the bare ground waiting for installation.
Field test valve “B”
Flexible hose
Test gauge
Nitrogen
bottle
Block valve
“A”
Block valve
“C”
29
Page 30

ANDERSON GREENWOOD SERIES 9300 PILOT OPERATED SAFETY RELIEF VALVES
InstallatIon and MaIntenance InstructIons
6 TROUBLE SHOOTING
Problem Possible cause Resolution
1. Valve opens below set 1. Improper installation of sense line 1. Verify if sense line is installed properly
2. Plugged sense line 2. Check sense line, inlet screen, and dipper tube for cleanliness
3. Improper gauge accuracy and/or location 3. Verify gauge accuracy for valve being tested and ensure
location is at valve being tested
2. Pilot leaks from upper vent 1. Sense diaphragm failure 1. Replace diaphragm
2. Spindle lock nut loose 2. Tighten spindle lock nut
3. Pilot leaks from lower vent 1. Pilot seat leakage 1. On the 93 pilot, replace spindle disc assembly.
On the 93T and 91 pilots, replace seat.
Inspect nozzle and relap if necessary
2. Nozzle over tightened 2. Tighten nozzle per assembly instructions
4. Main valve leaks 1. Seat film damaged 1. Replace seat film
2. Nozzle damaged 2. Inspect nozzle and relap if necessary
3. Nozzle seal damaged, missing, or out of place 3. Position nozzle seal per assembly instructions
4. Seat plate assembly is loose 4. Tighten seat plate assembly
5. Operating too close to set pressure (above 96%) 5. Lower operating pressure
6. Main valve diaphragm failure 6. Replace diaphragm
7. Diaphragm assembly loose 7. Tighten diaphragm assembly
8. Seat plate not fully threaded on hub 8. Install seat per assembly instructions
7 MAIN VALVE SPARE PARTS AND REPAIR KITS
Soft goods repair kits contain all thediaphragms,
seals, and seats to a repair valve. To orderakit,
specify the base number and select thelast
three digits from the following tables.
Toensure the purchase of the correct
repair kit, the order should specify the valve
model and serial number. For chloride rich
environments, the bolts in the main valve and
pilot exposed to the environment should be
replaced during routine maintenance or at least
every 5 years.
7.1 - SERIES 9300 MAIN VALVE SINGLE CHAMBER DIAPHRAGM REPAIR KIT (06.0235.XXX)
Kit type Internals Materials 2” 3” 4” 6” 8” 10” 12”
Soft goods Aluminum PTFE 319 321 323 526 327 329 331
Soft goods SST-LP PTFE 496 498 500 527 504 506 508
Soft goods SST-HP PTFE 356 360 364 528 372 376 380
Bolt Aluminum SST 332 333 334 335 336 337 338
Bolt SST-LP SST 339 340 341 342 343 344 345
Bolt SST-HP <15 psig SST 346 347 348 570 350 351 352
Bolt SST-HP ≥15 psig SST 346 347 348 349 350 351 352
Bolt SST Marine SST 624 625 626 627 628 629 630
Bolt SST Marine certs SST - - - 631 632 633 634
7.2 - SERIES 9300 MAIN VALVE DUAL CHAMBER DIAPHRAGM REPAIR KIT (06.0235.XXX))
Kit type Internals Materials 2” 3” 4” 6” 8” 10” 12”
Soft goods Aluminum PTFE/Kalrez®382 384 386 388 390 392 394
Soft goods SST PTFE/Kalrez®545 547 549 551 553 555 557
Bolt Aluminum SST 395 396 397 398 399 400 401
Bolt SST SST 402 403 404 405 406 407 408
30
Page 31

ANDERSON GREENWOOD SERIES 9300 PILOT OPERATED SAFETY RELIEF VALVES
InstallatIon and MaIntenance InstructIons
8 PILOT SPARE PARTS AND REPAIR KITS
8.1 - 91 PILOT REPAIR KIT (04.4744.XXX)
Pilot type Pressure Kit type Material Pressure
91 Pilot 15 - 50 psig Soft goods PTFE/Stainless 003
8.2 - 93 PILOT REPAIR KIT (06.0235.XXX)
Pilot Series Pressure Kit type Material Pressure Vacuum
93 Pilot 4”WC - 14.9 psig Soft goods NBR 133 152
93 Pilot 4”WC - 14.9 psig Soft goods FKM 134 153
93 Pilot 4”WC - 14.9 psig Soft goods EPR 135 154
93 Pilot 4”WC - 14.9 psig Soft goods NBR
93 Pilot 4”WC - 14.9 psig Soft goods FKM
93 Pilot 4”WC - 14.9 psig Soft goods EPR
93 Pilot 4”WC - 14.9 psig Bolt SST 287 287
93 Pilot marine 4”WC - 14.9 psig Bolt SST 702 702
93 Pilot 15 - 50 psig* Soft goods NBR 141 93 Pilot 15 - 50 psig* Soft goods FKM 142 93 Pilot 15 - 50 psig* Soft goods EPR 143 93 Pilot 15 - 50 psig* Bolt SST 416 -
1. PTFE diaphragm
* (3 - 50 psig marine)
[1]
[1]
[1]
136 155
137 156
138 157
8.3 - 93T PILOT REPAIR KIT (06.0235.XXX)
Pilot Series Pressure Kit type Material Pressure Vacuum
93T Pilot 4”WC - 15 psig Soft goods PTFE 139 158
93T Pilot 4”WC - 15 psig Bolt SST 288 288
93T Pilot marine 4”WC - 15 psig Bolt SST 701 701
8.4 - 400A/B PILOT REPAIR KIT (06.0235.XXX)
Pilot Series Pressure Kit type Material Pressure Vacuum
400A/B Pilot 4”WC - 10”WC Soft goods NBR
400A/B Pilot 4”WC - 10”WC Soft goods FKM
400A/B Pilot 4”WC - 10”WC Soft goods EPR
400A/B Pilot 4”WC - 10”WC Soft goods Kalrez
400A/B Pilot >10” WC - 15 psig Soft goods NBR
400A/B Pilot >10” WC - 15 psig Soft goods FKM
400A/B Pilot >10” WC - 15 psig Soft goods EPR
400A/B Pilot >10” WC - 15 psig Soft goods Kalrez®
400A/B Pilot 4” WC - 15 psig Bolt SST 409 409
1. PTFE diaphragm
[1]
[1]
[1]
[1]
[1]
[1]
[1]
[1]
127 149
128 150
129 151
455 456
558 562
559 563
560 564
561 565
8.5 - 400A PILOT REPAIR KIT (06.0235.000)
Pilot Series Pressure Kit type Material Pressure Vacuum
400A Pilot 15 - 50 psig Soft goods NBR
400A Pilot 15 - 50 psig Soft goods FKM
400A Pilot 15 - 50 psig Soft goods EPR
400A Pilot 15 - 50 psig Soft goods Kalrez®
400A Pilot 15 - 50 psig Bolt SST 462 -
1. PTFE diaphragm
[1]
[1]
[1]
[1]
458 459 460 461 -
NOTES
®
Kalrez
is a registered trademark of DuPont Dow Elastomers
31
Page 32

ANDERSON GREENWOOD SERIES 9300 PILOT OPERATED SAFETY RELIEF VALVES
InstallatIon and MaIntenance InstructIons
9 ACCESSORIES, OPTIONS AND ACCESSORY
REPAIR KIT
9.1 Accessories
1. Field test connection
• In-service verification of set pressure.
• Simplifies the periodic testing of pressure
relief valves.
2. Backflow preventer
• Prevents accidental reverse flow through
pressure relief valve.
9.2 Options
1. Manual unloader
• Permits the pressure relief valve to be opened
at pressures below the nameplate setting.
• Acts as manual override to normal
pressure setting, but has no effect on the
sealed pressure setting.
2. Remote unloader
• Permits the pressure relief valve to be
remotely opened to depressurize the
system.
3. Pilot exhaust tubed to main valve outlet
(PEMVO)
• Eliminates any local venting of fluid media
from pilot.
4. Remote pressure sense connection
• Pressure relief valve will respond to actual
system pressure conditions.
• Eliminates undesirable cycling due to
excessive inlet pressure losses.
• Improves safety under adverse operating
conditions.
9.3 - ACCESSORY REPAIR KIT (06.0235.XXX)
Accessory Kit type Material Dash number
Shuttle check Soft goods PTFE 140
Shuttle check Bolt SST 410
Diaphragm Soft goods PTFE 144
Diaphragm Bolt SST 414
Ball check Soft goods NBR 145
Ball check Soft goods FKM 146
Ball check Soft goods EPR 147
Ball check Soft goods Kalrez
®
148
10 LUBRICANT AND SEALANTS FOR SERIES 9300
(Only include lubricants referenced in the manual)
10.1 - LUBRICANTS USED ON PILOT PARTS
Pilot parts Description Lubricant
Pressure adjustment, screw and locknut Threads Dow corning 33, #05.1500.012
Diaphragm and gaskets (91 and 93T pilots) Seal surfaces between
cases and spacer ring
Stainless steel case, bolts and nuts Threads Fluorolube LG 160, #05.1500.023
Carbon steel case bolts Threads Dow corning 33, #05.1500.012
Stainless to aluminum or aluminum parts Threads Dow corning 33, #05.1500.012
Sliding seals PTFE or elastomer Dow corning 33, #05.1500.012
Pipe fittings and vents Threads PTFE Tape and dow corning 33,
1. For oxygen service use Krytoc 240AC
Slick stuff, #05.1500.015
#05.1500.012
10.2 - LUBRICANTS AND SEALANTS USED ON MAIN VALVE PARTS
Main valve parts Description Lubricant
Carbon steel bolts, screws and nuts, fittings Threads Dow corning 33,
#05.1500.012
Stainless on stainless bolts, screws, nuts and
fittings
Diaphragms and gaskets (91 and 93T) Seal surfaces
Seat hub and jam nut Threads - Loctite
Shaft assembly and diaphragm Assembly jam nut
Sliding seals PTFE and elastomers Dow corning 33,
Pipe fittings and vents Threads PTFE Tape and
1. For oxygen service use Krytoc 240AC
Threads Fluorolube LG 160,
#05.1500.023
Slick Stuff #4,
between diaphragm
and cases
Threads - Loctite
#05.1500.015
#05.1500.012
dow corning 33,
#05.1500.012
[1]
[1]
Sealant
-
-
-
-
-
© 2017 Emerson. All rights reserved.
32
 Loading...