

Page 1
Liebert NX™ UPS
User Manual–40-200kVA, 480V, 60Hz
AC Power
For Business-Critical Continuity™
Page 2

Page 3

TABLE OF CONTENTS
IMPORTANT SAFETY INSTRUCTIONS . . . . . . . . . . . . . . . . . . . . . . . . . . . . . . . . . . . . . . . . . . . . . . . . 1
GLOSSARY OF SYMBOLS . . . . . . . . . . . . . . . . . . . . . . . . . . . . . . . . . . . . . . . . . . . . . . . . . . . . . . . .5
1.0 INTRODUCTION . . . . . . . . . . . . . . . . . . . . . . . . . . . . . . . . . . . . . . . . . . . . . . . . . . . . . . . . . .6
2.0 INSTALLATION . . . . . . . . . . . . . . . . . . . . . . . . . . . . . . . . . . . . . . . . . . . . . . . . . . . . . . . . . .7
2.1 External Inspections . . . . . . . . . . . . . . . . . . . . . . . . . . . . . . . . . . . . . . . . . . . . . . . . . . . . . . . . . 7
2.2 Internal Inspections . . . . . . . . . . . . . . . . . . . . . . . . . . . . . . . . . . . . . . . . . . . . . . . . . . . . . . . . . . 7
2.2.1 Storing for Delayed Installation . . . . . . . . . . . . . . . . . . . . . . . . . . . . . . . . . . . . . . . . . . . . . . . . . 8
2.3 Preliminary Checks . . . . . . . . . . . . . . . . . . . . . . . . . . . . . . . . . . . . . . . . . . . . . . . . . . . . . . . . . . 8
2.3.1 Identification. . . . . . . . . . . . . . . . . . . . . . . . . . . . . . . . . . . . . . . . . . . . . . . . . . . . . . . . . . . . . . . . . 8
2.4 UPS Location . . . . . . . . . . . . . . . . . . . . . . . . . . . . . . . . . . . . . . . . . . . . . . . . . . . . . . . . . . . . . . . 8
2.4.1 Positioning the UPS . . . . . . . . . . . . . . . . . . . . . . . . . . . . . . . . . . . . . . . . . . . . . . . . . . . . . . . . . . . 8
2.4.2 Environmental Considerations . . . . . . . . . . . . . . . . . . . . . . . . . . . . . . . . . . . . . . . . . . . . . . . . . . 8
2.4.3 Special Considerations for Parallel Systems . . . . . . . . . . . . . . . . . . . . . . . . . . . . . . . . . . . . . . . 9
2.5 Considerations in Moving the Liebert NX . . . . . . . . . . . . . . . . . . . . . . . . . . . . . . . . . . . . . . . . 9
2.6 Mechanical Considerations . . . . . . . . . . . . . . . . . . . . . . . . . . . . . . . . . . . . . . . . . . . . . . . . . . . 10
2.6.1 Clearances. . . . . . . . . . . . . . . . . . . . . . . . . . . . . . . . . . . . . . . . . . . . . . . . . . . . . . . . . . . . . . . . . . 10
2.6.2 Floor Installation . . . . . . . . . . . . . . . . . . . . . . . . . . . . . . . . . . . . . . . . . . . . . . . . . . . . . . . . . . . . 10
2.6.3 Cable Entry . . . . . . . . . . . . . . . . . . . . . . . . . . . . . . . . . . . . . . . . . . . . . . . . . . . . . . . . . . . . . . . . . 10
2.6.4 Optional Cabinets. . . . . . . . . . . . . . . . . . . . . . . . . . . . . . . . . . . . . . . . . . . . . . . . . . . . . . . . . . . . 11
3.0 ELECTRICAL CONNECTIONS . . . . . . . . . . . . . . . . . . . . . . . . . . . . . . . . . . . . . . . . . . . . . . .13
3.1 Power Cabling. . . . . . . . . . . . . . . . . . . . . . . . . . . . . . . . . . . . . . . . . . . . . . . . . . . . . . . . . . . . . . 13
3.1.1 Cable Rating . . . . . . . . . . . . . . . . . . . . . . . . . . . . . . . . . . . . . . . . . . . . . . . . . . . . . . . . . . . . . . . . 13
3.1.2 UPS Input Configuration . . . . . . . . . . . . . . . . . . . . . . . . . . . . . . . . . . . . . . . . . . . . . . . . . . . . . . 14
3.1.3 Cabling Guidelines . . . . . . . . . . . . . . . . . . . . . . . . . . . . . . . . . . . . . . . . . . . . . . . . . . . . . . . . . . . 14
3.1.4 Cable Connections . . . . . . . . . . . . . . . . . . . . . . . . . . . . . . . . . . . . . . . . . . . . . . . . . . . . . . . . . . . 15
3.1.5 Safety Ground . . . . . . . . . . . . . . . . . . . . . . . . . . . . . . . . . . . . . . . . . . . . . . . . . . . . . . . . . . . . . . . 15
3.1.6 Protective Devices. . . . . . . . . . . . . . . . . . . . . . . . . . . . . . . . . . . . . . . . . . . . . . . . . . . . . . . . . . . . 15
3.1.7 Cabling Procedure . . . . . . . . . . . . . . . . . . . . . . . . . . . . . . . . . . . . . . . . . . . . . . . . . . . . . . . . . . . 16
3.2 Control Cables . . . . . . . . . . . . . . . . . . . . . . . . . . . . . . . . . . . . . . . . . . . . . . . . . . . . . . . . . . . . . 18
3.2.1 Monitor Board Features . . . . . . . . . . . . . . . . . . . . . . . . . . . . . . . . . . . . . . . . . . . . . . . . . . . . . . . 18
3.3 Dry Contacts . . . . . . . . . . . . . . . . . . . . . . . . . . . . . . . . . . . . . . . . . . . . . . . . . . . . . . . . . . . . . . . 20
3.3.1 Input Dry Contacts. . . . . . . . . . . . . . . . . . . . . . . . . . . . . . . . . . . . . . . . . . . . . . . . . . . . . . . . . . . 20
3.3.2 Maintenance Bypass Cabinet Interface . . . . . . . . . . . . . . . . . . . . . . . . . . . . . . . . . . . . . . . . . . 20
3.3.3 Battery Circuit Breaker Control Interface . . . . . . . . . . . . . . . . . . . . . . . . . . . . . . . . . . . . . . . . 21
3.3.4 Output Dry Contacts . . . . . . . . . . . . . . . . . . . . . . . . . . . . . . . . . . . . . . . . . . . . . . . . . . . . . . . . . 21
3.3.5 EPO Input—Optional . . . . . . . . . . . . . . . . . . . . . . . . . . . . . . . . . . . . . . . . . . . . . . . . . . . . . . . . . 22
4.0 BATTERY INSTALLATION . . . . . . . . . . . . . . . . . . . . . . . . . . . . . . . . . . . . . . . . . . . . . . . . . .23
4.1 Introduction . . . . . . . . . . . . . . . . . . . . . . . . . . . . . . . . . . . . . . . . . . . . . . . . . . . . . . . . . . . . . . . 23
4.2 Safety . . . . . . . . . . . . . . . . . . . . . . . . . . . . . . . . . . . . . . . . . . . . . . . . . . . . . . . . . . . . . . . . . . . . 23
i
Page 4

4.3 External Battery Cabinet Installation . . . . . . . . . . . . . . . . . . . . . . . . . . . . . . . . . . . . . . . . . . 24
4.3.1 Battery Cabinets. . . . . . . . . . . . . . . . . . . . . . . . . . . . . . . . . . . . . . . . . . . . . . . . . . . . . . . . . . . . . 24
4.3.2 Connecting the Batteries . . . . . . . . . . . . . . . . . . . . . . . . . . . . . . . . . . . . . . . . . . . . . . . . . . . . . . 25
4.3.3 Installation Considerations . . . . . . . . . . . . . . . . . . . . . . . . . . . . . . . . . . . . . . . . . . . . . . . . . . . . 25
4.3.4 Connecting the Battery Cabinet to the UPS . . . . . . . . . . . . . . . . . . . . . . . . . . . . . . . . . . . . . . . 26
4.4 Non-Standard Batteries. . . . . . . . . . . . . . . . . . . . . . . . . . . . . . . . . . . . . . . . . . . . . . . . . . . . . . 26
4.5 BCB Shunt Trip . . . . . . . . . . . . . . . . . . . . . . . . . . . . . . . . . . . . . . . . . . . . . . . . . . . . . . . . . . . . 27
4.6 Alber Monitoring System—Optional . . . . . . . . . . . . . . . . . . . . . . . . . . . . . . . . . . . . . . . . . . . . 27
5.0 OPTIONS . . . . . . . . . . . . . . . . . . . . . . . . . . . . . . . . . . . . . . . . . . . . . . . . . . . . . . . . . . . . .28
5.1 Load Bus Synchronization . . . . . . . . . . . . . . . . . . . . . . . . . . . . . . . . . . . . . . . . . . . . . . . . . . . . 28
5.1.1 Performance Requirements . . . . . . . . . . . . . . . . . . . . . . . . . . . . . . . . . . . . . . . . . . . . . . . . . . . . 28
5.1.2 LBS Cable and Settings . . . . . . . . . . . . . . . . . . . . . . . . . . . . . . . . . . . . . . . . . . . . . . . . . . . . . . . 28
5.2 Configuring Parallel Sbasystem Operation . . . . . . . . . . . . . . . . . . . . . . . . . . . . . . . . . . . . . . 30
5.2.1 General . . . . . . . . . . . . . . . . . . . . . . . . . . . . . . . . . . . . . . . . . . . . . . . . . . . . . . . . . . . . . . . . . . . . 30
5.2.2 Features of Parallel System . . . . . . . . . . . . . . . . . . . . . . . . . . . . . . . . . . . . . . . . . . . . . . . . . . . . 30
5.2.3 Operating Principles. . . . . . . . . . . . . . . . . . . . . . . . . . . . . . . . . . . . . . . . . . . . . . . . . . . . . . . . . . 32
5.2.4 Operation Modes Summary . . . . . . . . . . . . . . . . . . . . . . . . . . . . . . . . . . . . . . . . . . . . . . . . . . . . 32
5.3 Installing Parallel System . . . . . . . . . . . . . . . . . . . . . . . . . . . . . . . . . . . . . . . . . . . . . . . . . . . . 32
5.3.1 Conditions for Parallel System . . . . . . . . . . . . . . . . . . . . . . . . . . . . . . . . . . . . . . . . . . . . . . . . . 32
5.3.2 Cabinet Installation . . . . . . . . . . . . . . . . . . . . . . . . . . . . . . . . . . . . . . . . . . . . . . . . . . . . . . . . . . 33
5.3.3 Preliminary Checks . . . . . . . . . . . . . . . . . . . . . . . . . . . . . . . . . . . . . . . . . . . . . . . . . . . . . . . . . . 33
5.3.4 Power Cables. . . . . . . . . . . . . . . . . . . . . . . . . . . . . . . . . . . . . . . . . . . . . . . . . . . . . . . . . . . . . . . . 33
5.3.5 Parallel Control Cables . . . . . . . . . . . . . . . . . . . . . . . . . . . . . . . . . . . . . . . . . . . . . . . . . . . . . . . 33
5.3.6 Emergency Power Off (EPO) . . . . . . . . . . . . . . . . . . . . . . . . . . . . . . . . . . . . . . . . . . . . . . . . . . . 35
6.0 UPS SPECIFICATIONS. . . . . . . . . . . . . . . . . . . . . . . . . . . . . . . . . . . . . . . . . . . . . . . . . . . .36
6.1 Conformity and Standards. . . . . . . . . . . . . . . . . . . . . . . . . . . . . . . . . . . . . . . . . . . . . . . . . . . . 36
6.2 UPS Environmental . . . . . . . . . . . . . . . . . . . . . . . . . . . . . . . . . . . . . . . . . . . . . . . . . . . . . . . . . 36
6.3 UPS Mechanical Characteristics . . . . . . . . . . . . . . . . . . . . . . . . . . . . . . . . . . . . . . . . . . . . . . . 36
6.4 UPS Electrical Characteristics . . . . . . . . . . . . . . . . . . . . . . . . . . . . . . . . . . . . . . . . . . . . . . . . 37
6.4.1 Input Rectifier. . . . . . . . . . . . . . . . . . . . . . . . . . . . . . . . . . . . . . . . . . . . . . . . . . . . . . . . . . . . . . . 38
6.4.2 DC Intermediate Circuit . . . . . . . . . . . . . . . . . . . . . . . . . . . . . . . . . . . . . . . . . . . . . . . . . . . . . . 39
6.4.3 Inverter Output . . . . . . . . . . . . . . . . . . . . . . . . . . . . . . . . . . . . . . . . . . . . . . . . . . . . . . . . . . . . . 40
6.4.4 Bypass Input . . . . . . . . . . . . . . . . . . . . . . . . . . . . . . . . . . . . . . . . . . . . . . . . . . . . . . . . . . . . . . . . 40
7.0 LIEBERT® BDC
7.1 Normal (UPS) Mode . . . . . . . . . . . . . . . . . . . . . . . . . . . . . . . . . . . . . . . . . . . . . . . . . . . . . . . . . 41
7.1.1 Bypass Mode . . . . . . . . . . . . . . . . . . . . . . . . . . . . . . . . . . . . . . . . . . . . . . . . . . . . . . . . . . . . . . . . 42
7.2 Maintenance Mode . . . . . . . . . . . . . . . . . . . . . . . . . . . . . . . . . . . . . . . . . . . . . . . . . . . . . . . . . . 42
7.3 Locating the Cabinet . . . . . . . . . . . . . . . . . . . . . . . . . . . . . . . . . . . . . . . . . . . . . . . . . . . . . . . . 42
7.4 Cable Installation . . . . . . . . . . . . . . . . . . . . . . . . . . . . . . . . . . . . . . . . . . . . . . . . . . . . . . . . . . . 42
7.4.1 Wiring Preparation. . . . . . . . . . . . . . . . . . . . . . . . . . . . . . . . . . . . . . . . . . . . . . . . . . . . . . . . . . . 42
7.4.2 Power Cable Installation . . . . . . . . . . . . . . . . . . . . . . . . . . . . . . . . . . . . . . . . . . . . . . . . . . . . . . 42
7.4.3 Input/Output Wiring . . . . . . . . . . . . . . . . . . . . . . . . . . . . . . . . . . . . . . . . . . . . . . . . . . . . . . . . . 43
7.5 Bolting Cabinets Together . . . . . . . . . . . . . . . . . . . . . . . . . . . . . . . . . . . . . . . . . . . . . . . . . . . . 49
™ . . . . . . . . . . . . . . . . . . . . . . . . . . . . . . . . . . . . . . . . . . . . . . . . . . . . . . . . . . . . . . . . . . . . .41
ii
Page 5

8.0 INSTALLATION DRAWINGS. . . . . . . . . . . . . . . . . . . . . . . . . . . . . . . . . . . . . . . . . . . . . . . . . 51
9.0 OPERATION . . . . . . . . . . . . . . . . . . . . . . . . . . . . . . . . . . . . . . . . . . . . . . . . . . . . . . . . . . .77
9.1 General Description . . . . . . . . . . . . . . . . . . . . . . . . . . . . . . . . . . . . . . . . . . . . . . . . . . . . . . . . . 77
9.1.1 Bypass Supplies . . . . . . . . . . . . . . . . . . . . . . . . . . . . . . . . . . . . . . . . . . . . . . . . . . . . . . . . . . . . . 78
9.1.2 Operating Modes. . . . . . . . . . . . . . . . . . . . . . . . . . . . . . . . . . . . . . . . . . . . . . . . . . . . . . . . . . . . . 78
10.0 OPERATOR CONTROL AND DISPLAY PANEL . . . . . . . . . . . . . . . . . . . . . . . . . . . . . . . . . . .80
10.1 Operator Control Panel . . . . . . . . . . . . . . . . . . . . . . . . . . . . . . . . . . . . . . . . . . . . . . . . . . . . . . 80
10.1.1 Display Panel Layout . . . . . . . . . . . . . . . . . . . . . . . . . . . . . . . . . . . . . . . . . . . . . . . . . . . . . . . . . 80
10.2 Mimic Display Indicators . . . . . . . . . . . . . . . . . . . . . . . . . . . . . . . . . . . . . . . . . . . . . . . . . . . . . 81
10.3 Control Buttons . . . . . . . . . . . . . . . . . . . . . . . . . . . . . . . . . . . . . . . . . . . . . . . . . . . . . . . . . . . . 82
10.4 Audible Buzzer . . . . . . . . . . . . . . . . . . . . . . . . . . . . . . . . . . . . . . . . . . . . . . . . . . . . . . . . . . . . . 83
10.5 LCD Overview . . . . . . . . . . . . . . . . . . . . . . . . . . . . . . . . . . . . . . . . . . . . . . . . . . . . . . . . . . . . . 83
10.6 Navigation Keys . . . . . . . . . . . . . . . . . . . . . . . . . . . . . . . . . . . . . . . . . . . . . . . . . . . . . . . . . . . . 84
10.7 UPS System Information . . . . . . . . . . . . . . . . . . . . . . . . . . . . . . . . . . . . . . . . . . . . . . . . . . . . . 84
10.8 LCD Menus and Data Items . . . . . . . . . . . . . . . . . . . . . . . . . . . . . . . . . . . . . . . . . . . . . . . . . . 85
10.9 Language Selection . . . . . . . . . . . . . . . . . . . . . . . . . . . . . . . . . . . . . . . . . . . . . . . . . . . . . . . . . 88
10.10 Current Date and Time . . . . . . . . . . . . . . . . . . . . . . . . . . . . . . . . . . . . . . . . . . . . . . . . . . . . . . 88
10.11 UPS Status Messages. . . . . . . . . . . . . . . . . . . . . . . . . . . . . . . . . . . . . . . . . . . . . . . . . . . . . . . . 90
10.12 Types of LCD Screens . . . . . . . . . . . . . . . . . . . . . . . . . . . . . . . . . . . . . . . . . . . . . . . . . . . . . . . 91
10.12.1 Opening Display . . . . . . . . . . . . . . . . . . . . . . . . . . . . . . . . . . . . . . . . . . . . . . . . . . . . . . . . . . . . . 91
10.12.2 Default Screen . . . . . . . . . . . . . . . . . . . . . . . . . . . . . . . . . . . . . . . . . . . . . . . . . . . . . . . . . . . . . . 91
10.12.3 UPS Help Screen . . . . . . . . . . . . . . . . . . . . . . . . . . . . . . . . . . . . . . . . . . . . . . . . . . . . . . . . . . . . 92
10.12.4 Screen Saver Window. . . . . . . . . . . . . . . . . . . . . . . . . . . . . . . . . . . . . . . . . . . . . . . . . . . . . . . . . 92
10.13 Pop-Up Windows . . . . . . . . . . . . . . . . . . . . . . . . . . . . . . . . . . . . . . . . . . . . . . . . . . . . . . . . . . . 93
10.13.1 From Bypass to Inverter Mode With Power Interruption . . . . . . . . . . . . . . . . . . . . . . . . . . . . 93
10.13.2 From Inverter to Bypass Mode With Interruption . . . . . . . . . . . . . . . . . . . . . . . . . . . . . . . . . . 93
10.13.3 System Self-Test . . . . . . . . . . . . . . . . . . . . . . . . . . . . . . . . . . . . . . . . . . . . . . . . . . . . . . . . . . . . . 93
10.13.4 Battery Capacity Test Confirmation . . . . . . . . . . . . . . . . . . . . . . . . . . . . . . . . . . . . . . . . . . . . . 93
10.13.5 Battery Self-Test Aborted, Condition Not Met . . . . . . . . . . . . . . . . . . . . . . . . . . . . . . . . . . . . . 93
10.13.6 Battery Refresh Charge Aborted, Condition Not Met . . . . . . . . . . . . . . . . . . . . . . . . . . . . . . . 93
11.0 OPERATING INSTRUCTIONS . . . . . . . . . . . . . . . . . . . . . . . . . . . . . . . . . . . . . . . . . . . . . . . .94
11.1 Liebert® NX™ Operating Modes . . . . . . . . . . . . . . . . . . . . . . . . . . . . . . . . . . . . . . . . . . . . . . . 94
11.1.1 Circuit Breakers . . . . . . . . . . . . . . . . . . . . . . . . . . . . . . . . . . . . . . . . . . . . . . . . . . . . . . . . . . . . . 95
11.2 UPS Startup . . . . . . . . . . . . . . . . . . . . . . . . . . . . . . . . . . . . . . . . . . . . . . . . . . . . . . . . . . . . . . . 95
11.2.1 Startup Procedure . . . . . . . . . . . . . . . . . . . . . . . . . . . . . . . . . . . . . . . . . . . . . . . . . . . . . . . . . . . 95
11.2.2 Verify Switching Between Operation Modes . . . . . . . . . . . . . . . . . . . . . . . . . . . . . . . . . . . . . . 97
11.3 Partially De-Energize the Liebert Nx 480 with Internal Maintenance Bypass . . . . . . . . . . 98
11.4 Partially De-Energize the Liebert Nx 480 with Bypass Distribution Cabinet (BDC) . . . . . 99
11.5 De-Energize the Liebert Nx 480 with Bypass Distribution Cabinet (BDC) . . . . . . . . . . . . 100
11.6 Energize Nx 480 with Bypass Distribution Cabinet (BDC). . . . . . . . . . . . . . . . . . . . . . . . . 100
11.7 Auto Restart . . . . . . . . . . . . . . . . . . . . . . . . . . . . . . . . . . . . . . . . . . . . . . . . . . . . . . . . . . . . . . 101
11.8 Emergency Shutdown With EPO . . . . . . . . . . . . . . . . . . . . . . . . . . . . . . . . . . . . . . . . . . . . . 101
11.9 Reset After Shutdown for Emergency Stop (EPO Action) or Other Conditions . . . . . . . . . 101
iii
Page 6

11.10 Battery Protection . . . . . . . . . . . . . . . . . . . . . . . . . . . . . . . . . . . . . . . . . . . . . . . . . . . . . . . . . 102
11.10.1 Battery Undervoltage Pre-Warning . . . . . . . . . . . . . . . . . . . . . . . . . . . . . . . . . . . . . . . . . . . . 102
11.10.2 Battery End-of-Discharge (EOD) Protection. . . . . . . . . . . . . . . . . . . . . . . . . . . . . . . . . . . . . . 102
11.11 Multi-Module System Procedures . . . . . . . . . . . . . . . . . . . . . . . . . . . . . . . . . . . . . . . . . . . . . 102
11.11.1 Isolating One Module in a Multi-Module System. . . . . . . . . . . . . . . . . . . . . . . . . . . . . . . . . . 102
11.11.2 Inserting One Module into a Multi-Module System. . . . . . . . . . . . . . . . . . . . . . . . . . . . . . . . 104
11.11.3 Shutdown Procedure—Complete UPS and Load Shutdown . . . . . . . . . . . . . . . . . . . . . . . . . 105
11.12 Commissioning a Parallel System . . . . . . . . . . . . . . . . . . . . . . . . . . . . . . . . . . . . . . . . . . . . . 105
11.13 Parallel System Startup. . . . . . . . . . . . . . . . . . . . . . . . . . . . . . . . . . . . . . . . . . . . . . . . . . . . . 105
12.0 OPTIONS . . . . . . . . . . . . . . . . . . . . . . . . . . . . . . . . . . . . . . . . . . . . . . . . . . . . . . . . . . . .106
12.1 Communication and Other User Terminals . . . . . . . . . . . . . . . . . . . . . . . . . . . . . . . . . . . . . 106
12.1.1 Analog Input Interface . . . . . . . . . . . . . . . . . . . . . . . . . . . . . . . . . . . . . . . . . . . . . . . . . . . . . . . 106
12.1.2 Power Output . . . . . . . . . . . . . . . . . . . . . . . . . . . . . . . . . . . . . . . . . . . . . . . . . . . . . . . . . . . . . . 106
12.1.3 Liebert IntelliSlot Communication . . . . . . . . . . . . . . . . . . . . . . . . . . . . . . . . . . . . . . . . . . . . . 106
12.1.4 Communication and Monitoring . . . . . . . . . . . . . . . . . . . . . . . . . . . . . . . . . . . . . . . . . . . . . . . 107
12.1.5 Configuring Baud Rates . . . . . . . . . . . . . . . . . . . . . . . . . . . . . . . . . . . . . . . . . . . . . . . . . . . . . . 107
12.2 LBS Mode—Load Bus Synchronization . . . . . . . . . . . . . . . . . . . . . . . . . . . . . . . . . . . . . . . . 109
12.2.1 Remote Alarm Monitor. . . . . . . . . . . . . . . . . . . . . . . . . . . . . . . . . . . . . . . . . . . . . . . . . . . . . . . 109
12.3 Replacing Dust Filters . . . . . . . . . . . . . . . . . . . . . . . . . . . . . . . . . . . . . . . . . . . . . . . . . . . . . . 109
13.0 SPECIFICATIONS AND TECHNICAL DATA. . . . . . . . . . . . . . . . . . . . . . . . . . . . . . . . . . . . . . 110
13.1 Lug Size and Torque Requirements . . . . . . . . . . . . . . . . . . . . . . . . . . . . . . . . . . . . . . . . . . . 110
13.2 Cable Lengths: Floor to Connection Point Inside UPS . . . . . . . . . . . . . . . . . . . . . . . . . . . . 111
13.3 Cable size and tightening torques . . . . . . . . . . . . . . . . . . . . . . . . . . . . . . . . . . . . . . . . . . . . . 112
13.4 Battery Run Times . . . . . . . . . . . . . . . . . . . . . . . . . . . . . . . . . . . . . . . . . . . . . . . . . . . . . . . . . 114
APPENDIX A-UPS STATUS MESSAGES . . . . . . . . . . . . . . . . . . . . . . . . . . . . . . . . . . . . . . . . . . 117
FIGURES
Figure 1 Cabinet arrangement—Liebert® NX™ units and battery cabinets . . . . . . . . . . . . . . . . . . . . . . . . 11
Figure 2 Cabinet arrangement—Liebert
distribution cabinets . . . . . . . . . . . . . . . . . . . . . . . . . . . . . . . . . . . . . . . . . . . . . . . . . . . . . . . . . . . . . 12
Figure 3 Single module block diagram—dual input configuration . . . . . . . . . . . . . . . . . . . . . . . . . . . . . . . . 14
Figure 4 Monitor board U2 . . . . . . . . . . . . . . . . . . . . . . . . . . . . . . . . . . . . . . . . . . . . . . . . . . . . . . . . . . . . . . . 18
Figure 5 Auxiliary terminal block detail (Monitoring Board) . . . . . . . . . . . . . . . . . . . . . . . . . . . . . . . . . . . . 19
Figure 6 Input dry contacts . . . . . . . . . . . . . . . . . . . . . . . . . . . . . . . . . . . . . . . . . . . . . . . . . . . . . . . . . . . . . . . 20
Figure 7 Output dry contacts and EPO wiring for firmware before M170 . . . . . . . . . . . . . . . . . . . . . . . . . . 21
Figure 8 EPO wiring . . . . . . . . . . . . . . . . . . . . . . . . . . . . . . . . . . . . . . . . . . . . . . . . . . . . . . . . . . . . . . . . . . . . 22
Figure 9 Battery cabinets for Liebert
Figure 10 Battery cabinet—details . . . . . . . . . . . . . . . . . . . . . . . . . . . . . . . . . . . . . . . . . . . . . . . . . . . . . . . . . . 25
Figure 11 Battery tray and supports . . . . . . . . . . . . . . . . . . . . . . . . . . . . . . . . . . . . . . . . . . . . . . . . . . . . . . . . 26
Figure 12 Load Bus Synchronization cable connection in single module systems. . . . . . . . . . . . . . . . . . . . . 28
Figure 13 Load Bus Synchronization cable connection with multi-module systems . . . . . . . . . . . . . . . . . . . 29
Figure 14 Parallel system block diagram . . . . . . . . . . . . . . . . . . . . . . . . . . . . . . . . . . . . . . . . . . . . . . . . . . . . . 30
Figure 15 Paralleling cabinet with input and bypass circuit breakers. . . . . . . . . . . . . . . . . . . . . . . . . . . . . . 31
Figure 16 Paralleling cabinet with input, bypass and distribution circuit breakers. . . . . . . . . . . . . . . . . . . 31
Figure 17 Connecting system parallel control cables. . . . . . . . . . . . . . . . . . . . . . . . . . . . . . . . . . . . . . . . . . . . 33
Figure 18 Auxiliary dry contact cables for output breaker in multi-module system . . . . . . . . . . . . . . . . . . . 34
®
NX™ UPS, battery cabinets and Liebert NX bypass
®
NX™ . . . . . . . . . . . . . . . . . . . . . . . . . . . . . . . . . . . . . . . . . . . . . . . . . 24
iv
Page 7

Figure 19 Connecting EPO push button. . . . . . . . . . . . . . . . . . . . . . . . . . . . . . . . . . . . . . . . . . . . . . . . . . . . . . 35
Figure 20 Single input UPS with external Liebert BDC with optional internal transformer—typical
configuration . . . . . . . . . . . . . . . . . . . . . . . . . . . . . . . . . . . . . . . . . . . . . . . . . . . . . . . . . . . . . . . . . . . 41
Figure 21 Liebert
Figure 22 Liebert BDC connection to Liebert
Figure 23 Bolting a Liebert
Figure 24 Outline drawing, Liebert BDC
®
BDC connection to UPS . . . . . . . . . . . . . . . . . . . . . . . . . . . . . . . . . . . . . . . . . . . . . . . . . . . 44
®
NX™UPS to a Liebert BDC™ . . . . . . . . . . . . . . . . . . . . . . . . . . . . . . . . . . . . . . 49
®
NX™. . . . . . . . . . . . . . . . . . . . . . . . . . . . . . . . . . . . . . . . . . . . 45
™,
47" cabinet . . . . . . . . . . . . . . . . . . . . . . . . . . . . . . . . . . . . . . . . . 50
Figure 25 Outline drawing, Liebert NX 40-120kVA . . . . . . . . . . . . . . . . . . . . . . . . . . . . . . . . . . . . . . . . . . . . 51
Figure 26 Terminal details, 34" battery power pack system for Liebert
Figure 27 Liebert
Figure 28 Liebert
Figure 29 Liebert
Figure 30 Liebert
Figure 31 Liebert
Figure 32 Liebert
Figure 33 Liebert
Figure 34 Liebert
Figure 35 Liebert
®
NX™ 80-120kVA dimensions—front and left side . . . . . . . . . . . . . . . . . . . . . . . . . . . . . . 53
®
NX™ 160-200kVA dimensions—front and left side . . . . . . . . . . . . . . . . . . . . . . . . . . . . . 54
®
NX™ 160-200kVA dimensions—front and left side . . . . . . . . . . . . . . . . . . . . . . . . . . . . . 55
®
NX™ 40-120kVA main components—typical unit . . . . . . . . . . . . . . . . . . . . . . . . . . . . . . 56
®
NX™ 160-200kVA dimensional view—front and left side . . . . . . . . . . . . . . . . . . . . . . . . 57
®
NX™ 160-200kVA dimensions continued—top and bottom view . . . . . . . . . . . . . . . . . . 58
®
NX™ 160-200kVA main components—typical unit . . . . . . . . . . . . . . . . . . . . . . . . . . . . . 59
®
NX™ 40-120kVA cable connections. . . . . . . . . . . . . . . . . . . . . . . . . . . . . . . . . . . . . . . . . . 60
®
NX™ 160-200kVA cable connections. . . . . . . . . . . . . . . . . . . . . . . . . . . . . . . . . . . . . . . . . 61
®
NX™ 480V UPS. . . . . . . . . . . . . . 52
Figure 36 Outline drawing, 33" battery power pack system, single cabinet . . . . . . . . . . . . . . . . . . . . . . . . . 62
Figure 37 Terminal details, 33" battery power pack system, single cabinet Liebert
®
NX™. . . . . . . . . . . . . 63
Figure 38 Outline drawing, 49" battery power pack system, single cabinet . . . . . . . . . . . . . . . . . . . . . . . . . 64
Figure 39 Terminal details, 49" battery power pack system . . . . . . . . . . . . . . . . . . . . . . . . . . . . . . . . . . . . . . 65
Figure 40 Liebert
Figure 41 Liebert
Figure 42 Outline drawing, Liebert
Figure 43 Outline drawing, Liebert
Figure 44 Liebert
®
NX™ 160-200kVA UPS to 49" battery cabinet interconnection . . . . . . . . . . . . . . . . . . . 66
®
NX™ 40-120kVA UPS to 33" battery cabinet interconnection . . . . . . . . . . . . . . . . . . . . 67
®
NX™ 480V paralleling cabinet with input and bypass circuit breakers, main
®
NX™ 480V 33" parallel cabinet . . . . . . . . . . . . . . . . . . . . . . . . . . . . . . 68
®
NX™ 480V 49" parallel cabinet . . . . . . . . . . . . . . . . . . . . . . . . . . . . . . 69
components . . . . . . . . . . . . . . . . . . . . . . . . . . . . . . . . . . . . . . . . . . . . . . . . . . . . . . . . . . . . . . . . . . . . 70
Figure 45 Liebert
®
NX™ 480V paralleling cabinet main components—input, bypass and distribution
circuit breaker configuration . . . . . . . . . . . . . . . . . . . . . . . . . . . . . . . . . . . . . . . . . . . . . . . . . . . . . . 71
Figure 46 Main component location drawing Liebert
Figure 47 Liebert
®
NX™ 480V 40-120kVA UPS to Paralleling Cabinet
®
NX™ 480V, CB2, CB3, CB4 configurations . . . . . . 72
Interconnection—Configuration BB0, FB0, KB0 parallel connection to Liebert NX . . . . . . . . . . 73
Figure 48 Interconnecting details for Liebert
®
NX™ 40-120kVA UPS to paralleling cabinet with
input, bypass and distribution circuit breakers . . . . . . . . . . . . . . . . . . . . . . . . . . . . . . . . . . . . . . . 74
Figure 49 Lineup detail—Configuration CB2, CB3, CB4 parallel connection to Liebert
Figure 50 Line-up detail, bolt together description, 40-120 kVA Liebert
®
NX™. . . . . . . . . . . . . . . . . . . . . . 76
®
NX™. . . . . . . . . . 75
Figure 51 Single module block diagram (dual input configuration) . . . . . . . . . . . . . . . . . . . . . . . . . . . . . . . . 77
Figure 52 Overview of control panel . . . . . . . . . . . . . . . . . . . . . . . . . . . . . . . . . . . . . . . . . . . . . . . . . . . . . . . . . 80
Figure 53 Detailed view of control panel . . . . . . . . . . . . . . . . . . . . . . . . . . . . . . . . . . . . . . . . . . . . . . . . . . . . . 80
Figure 54 Mimic display indicators location. . . . . . . . . . . . . . . . . . . . . . . . . . . . . . . . . . . . . . . . . . . . . . . . . . . 81
Figure 55 Location of control buttons . . . . . . . . . . . . . . . . . . . . . . . . . . . . . . . . . . . . . . . . . . . . . . . . . . . . . . . . 82
Figure 56 Buzzer location . . . . . . . . . . . . . . . . . . . . . . . . . . . . . . . . . . . . . . . . . . . . . . . . . . . . . . . . . . . . . . . . . 83
Figure 57 Sections of the LCD. . . . . . . . . . . . . . . . . . . . . . . . . . . . . . . . . . . . . . . . . . . . . . . . . . . . . . . . . . . . . . 83
Figure 58 Menu tree . . . . . . . . . . . . . . . . . . . . . . . . . . . . . . . . . . . . . . . . . . . . . . . . . . . . . . . . . . . . . . . . . . . . . 86
Figure 59 Language selection . . . . . . . . . . . . . . . . . . . . . . . . . . . . . . . . . . . . . . . . . . . . . . . . . . . . . . . . . . . . . . 88
Figure 60 Set date and time . . . . . . . . . . . . . . . . . . . . . . . . . . . . . . . . . . . . . . . . . . . . . . . . . . . . . . . . . . . . . . . 89
Figure 61 Current status and history log records . . . . . . . . . . . . . . . . . . . . . . . . . . . . . . . . . . . . . . . . . . . . . . 90
Figure 62 Opening display. . . . . . . . . . . . . . . . . . . . . . . . . . . . . . . . . . . . . . . . . . . . . . . . . . . . . . . . . . . . . . . . . 91
Figure 63 Default screen . . . . . . . . . . . . . . . . . . . . . . . . . . . . . . . . . . . . . . . . . . . . . . . . . . . . . . . . . . . . . . . . . . 91
v
Page 8

Figure 64 Help screen . . . . . . . . . . . . . . . . . . . . . . . . . . . . . . . . . . . . . . . . . . . . . . . . . . . . . . . . . . . . . . . . . . . . 92
Figure 65 Screen saver window. . . . . . . . . . . . . . . . . . . . . . . . . . . . . . . . . . . . . . . . . . . . . . . . . . . . . . . . . . . . . 92
Figure 66 Circuit breakers . . . . . . . . . . . . . . . . . . . . . . . . . . . . . . . . . . . . . . . . . . . . . . . . . . . . . . . . . . . . . . . . 95
Figure 67 Typical parallel system block diagram with common input supply, with separate batteries
and optional output / bypass distribution panel . . . . . . . . . . . . . . . . . . . . . . . . . . . . . . . . . . . . . . 103
Figure 68 Monitoring board (U2) auxiliary terminal block detail. . . . . . . . . . . . . . . . . . . . . . . . . . . . . . . . . 106
Figure 69 Liebert
®
IntelliSlot™ Web card display . . . . . . . . . . . . . . . . . . . . . . . . . . . . . . . . . . . . . . . . . . . . . 108
Figure 70 MultiPort 4 card pin assignment . . . . . . . . . . . . . . . . . . . . . . . . . . . . . . . . . . . . . . . . . . . . . . . . . . 109
Figure 71 Dust filter replacement. . . . . . . . . . . . . . . . . . . . . . . . . . . . . . . . . . . . . . . . . . . . . . . . . . . . . . . . . . 109
TABLES
Table 1 Input dry contacts at X3 . . . . . . . . . . . . . . . . . . . . . . . . . . . . . . . . . . . . . . . . . . . . . . . . . . . . . . . . . . 20
Table 2 Maintenance bypass cabinet interface. . . . . . . . . . . . . . . . . . . . . . . . . . . . . . . . . . . . . . . . . . . . . . . 20
Table 3 BCB control interface . . . . . . . . . . . . . . . . . . . . . . . . . . . . . . . . . . . . . . . . . . . . . . . . . . . . . . . . . . . . 21
Table 4 Output dry contact relays . . . . . . . . . . . . . . . . . . . . . . . . . . . . . . . . . . . . . . . . . . . . . . . . . . . . . . . . . 21
Table 5 EPO input contact relays . . . . . . . . . . . . . . . . . . . . . . . . . . . . . . . . . . . . . . . . . . . . . . . . . . . . . . . . . 22
Table 6 Environmental characteristics . . . . . . . . . . . . . . . . . . . . . . . . . . . . . . . . . . . . . . . . . . . . . . . . . . . . . 36
Table 7 UPS mechanical characteristics. . . . . . . . . . . . . . . . . . . . . . . . . . . . . . . . . . . . . . . . . . . . . . . . . . . . 36
Table 8 UPS terminal. . . . . . . . . . . . . . . . . . . . . . . . . . . . . . . . . . . . . . . . . . . . . . . . . . . . . . . . . . . . . . . . . . . 37
Table 9 Rectifier input power . . . . . . . . . . . . . . . . . . . . . . . . . . . . . . . . . . . . . . . . . . . . . . . . . . . . . . . . . . . . 38
Table 10 Input voltage window with derating . . . . . . . . . . . . . . . . . . . . . . . . . . . . . . . . . . . . . . . . . . . . . . . . 38
Table 11 Liebert-approved replacement batteries . . . . . . . . . . . . . . . . . . . . . . . . . . . . . . . . . . . . . . . . . . . . . 39
Table 12 DC intermediate circuit . . . . . . . . . . . . . . . . . . . . . . . . . . . . . . . . . . . . . . . . . . . . . . . . . . . . . . . . . . 39
Table 13 Inverter output . . . . . . . . . . . . . . . . . . . . . . . . . . . . . . . . . . . . . . . . . . . . . . . . . . . . . . . . . . . . . . . . . 40
Table 14 Bypass input . . . . . . . . . . . . . . . . . . . . . . . . . . . . . . . . . . . . . . . . . . . . . . . . . . . . . . . . . . . . . . . . . . . 40
Table 15 Power cable size selection (Copper Wire Only) . . . . . . . . . . . . . . . . . . . . . . . . . . . . . . . . . . . . . . . . 42
Table 16 Control wiring for Liebert
Table 17 Circuit breaker schedule - Main circuit breaker . . . . . . . . . . . . . . . . . . . . . . . . . . . . . . . . . . . . . . . 46
Table 18 Main panelboard circuit breaker . . . . . . . . . . . . . . . . . . . . . . . . . . . . . . . . . . . . . . . . . . . . . . . . . . . 47
Table 19 Panelboard branch circuit breaker . . . . . . . . . . . . . . . . . . . . . . . . . . . . . . . . . . . . . . . . . . . . . . . . . 47
Table 20 Subfeed circuit breaker. . . . . . . . . . . . . . . . . . . . . . . . . . . . . . . . . . . . . . . . . . . . . . . . . . . . . . . . . . . 48
Table 21 Square D I-Line panelboard circuit breaker . . . . . . . . . . . . . . . . . . . . . . . . . . . . . . . . . . . . . . . . . . 48
Table 22 Weights, Liebert NX 40-120kVA . . . . . . . . . . . . . . . . . . . . . . . . . . . . . . . . . . . . . . . . . . . . . . . . . . . 51
Table 23 Battery cabinet ground . . . . . . . . . . . . . . . . . . . . . . . . . . . . . . . . . . . . . . . . . . . . . . . . . . . . . . . . . . . 52
Table 24 Battery cabinet circuit breaker . . . . . . . . . . . . . . . . . . . . . . . . . . . . . . . . . . . . . . . . . . . . . . . . . . . . 52
Table 25 UPS terminal specifications . . . . . . . . . . . . . . . . . . . . . . . . . . . . . . . . . . . . . . . . . . . . . . . . . . . . . . . 53
Table 26 Electrical specifications, Liebert NX 160-200kVA . . . . . . . . . . . . . . . . . . . . . . . . . . . . . . . . . . . . . 54
Table 27 Mimic display status indicators . . . . . . . . . . . . . . . . . . . . . . . . . . . . . . . . . . . . . . . . . . . . . . . . . . . . 81
Table 28 Control buttons . . . . . . . . . . . . . . . . . . . . . . . . . . . . . . . . . . . . . . . . . . . . . . . . . . . . . . . . . . . . . . . . . 82
Table 29 Icons for navigation keys . . . . . . . . . . . . . . . . . . . . . . . . . . . . . . . . . . . . . . . . . . . . . . . . . . . . . . . . . 84
Table 30 Description of items in UPS system window . . . . . . . . . . . . . . . . . . . . . . . . . . . . . . . . . . . . . . . . . . 84
Table 31 Descriptions of UPS menus and data window items . . . . . . . . . . . . . . . . . . . . . . . . . . . . . . . . . . . 86
Table 32 UPS operating modes . . . . . . . . . . . . . . . . . . . . . . . . . . . . . . . . . . . . . . . . . . . . . . . . . . . . . . . . . . . . 94
Table 33 Liebert
®
NX™ communication options. . . . . . . . . . . . . . . . . . . . . . . . . . . . . . . . . . . . . . . . . . . . . . 107
Table 34 Torque specifications . . . . . . . . . . . . . . . . . . . . . . . . . . . . . . . . . . . . . . . . . . . . . . . . . . . . . . . . . . . 110
Table 35 Battery torque rating . . . . . . . . . . . . . . . . . . . . . . . . . . . . . . . . . . . . . . . . . . . . . . . . . . . . . . . . . . . 110
Table 36 Distance to connection points on the Liebert NX UPS . . . . . . . . . . . . . . . . . . . . . . . . . . . . . . . . . 111
Table 37 Parallel system current table . . . . . . . . . . . . . . . . . . . . . . . . . . . . . . . . . . . . . . . . . . . . . . . . . . . . . 111
Table 38 External cabinet dimensions, including side panels. . . . . . . . . . . . . . . . . . . . . . . . . . . . . . . . . . . 112
Table 39 Cable size tightening torque at Liebert
Table 40 Cable size tightening torque at Liebert NX 60kVA UPS terminals. . . . . . . . . . . . . . . . . . . . . . . 112
®
NX™ UPS to Liebert BDC . . . . . . . . . . . . . . . . . . . . . . . . . . . . . . . . . 44
®
NX™ 40kVA UPS terminals . . . . . . . . . . . . . . . . . . . . 112
vi
Page 9

Table 41 Cable size tightening torque at Liebert NX 80kVA UPS terminals. . . . . . . . . . . . . . . . . . . . . . . 112
Table 42 Cable size tightening torque at Liebert
®
NX™ 100kVA UPS terminals . . . . . . . . . . . . . . . . . . . 113
Table 43 Cable size tightening torque at Liebert NX 120kVA UPS terminals. . . . . . . . . . . . . . . . . . . . . . 113
Table 44 Cable size tightening torque at Liebert NX 160kVA UPS terminals. . . . . . . . . . . . . . . . . . . . . . 113
Table 45 Cable size tightening torque at Liebert NX 200kVA UPS terminals. . . . . . . . . . . . . . . . . . . . . . 113
Table 46 Cable size tightening torque at Liebert NX 480V Battery Cabinet DC input bus terminals. . . 113
Table 47 Enersys battery run times in minutes . . . . . . . . . . . . . . . . . . . . . . . . . . . . . . . . . . . . . . . . . . . . . . 114
Table 48 C&D Dynasty battery run times in minutes . . . . . . . . . . . . . . . . . . . . . . . . . . . . . . . . . . . . . . . . . 115
Table 49 UPS status messages . . . . . . . . . . . . . . . . . . . . . . . . . . . . . . . . . . . . . . . . . . . . . . . . . . . . . . . . . . . 117
vii
Page 10

viii
Page 11

IMPORTANT SAFETY INSTRUCTIONS
!
!
!
SAVE THESE INSTRUCTIONS
This manual contains important instructions that should be followed during installation of your
Liebert
Read this manual thoroughly, paying special attention to the sections that apply to your installation,
before working with the UPS. Retain this manual for use by installing personnel.
®
NX™ UPS and ancillary equipment.
WARNING
Risk of heavy unit tipping over. Can cause property damage, injury and death.
Exercise extreme care when handling UPS cabinets to avoid equipment damage or injury to
personnel. The UPS module weight ranges from 1180 to 2205 lb. (535 to 1000kg).
Determine unit weight and locate center of gravity symbols
before handling the UPS. Test lift and balance the cabinet
before transporting. Never tilt equipment more than 15 degrees from vertical.
Battery manufacturers supply details of the necessary precautions to be observed when
working on, or in the vicinity of, a large bank of battery cells. These precautions should be
followed implicitly at all times.
Follow all battery safety precautions when installing, charging or servicing batteries. In
addition to the hazard of electric shock, gas produced by batteries can be explosive and
sulfuric acid can cause severe burns. When connected, the nominal battery voltage is 480VDC
and is potentially lethal.
In case of fire involving electrical equipment, use only carbon dioxide fire extinguishers or
those approved for use in fighting electrical fires.
Extreme caution is required when performing maintenance. Be constantly aware that the
UPS system contains high DC as well as AC voltages.
Check for voltage with both AC and DC voltmeters prior to making contact.
WARNING
Risk of electric shock. Can cause injury and death.
Dangerous voltages are present within the UPS and battery enclosure. The risk of contact
with these voltages is minimized as the live component parts are housed behind a hinged,
lockable door. Further internal safety screens make the equipment protected to IP20
standards.
No risk exists to any personnel when operating the equipment in the normal manner,
following the recommended operating procedures.
All equipment maintenance and servicing procedures involve internal access and should be
carried out only by trained personnel.
WARNING
Risk of electric shock from high leakage current. Can cause injury, property damage and
death.
High ground leakage current: Ground connection is essential before connecting the input
supply.
This equipment must be grounded in accordance with local electrical codes.
Maximum load must not exceed that shown on the UPS rating label.
1
Page 12

!
WARNING
!
Risk of electric shock. Can cause injury and death.
Under typical operation and with all UPS doors closed, only normal safety precautions are
necessary. The area around the UPS system should be kept free of puddles of water, excess
moisture and debris.
Special safety precautions are required for procedures involving handling, installation and
maintenance of the UPS system and the batteries. Observe all safety precautions in this
manual before handling or installing the UPS system. Observe all precautions in this manual,
before as well as during performance of all maintenance procedures. Observe all battery
safety precautions before working on or near the battery.
This equipment contains several circuits that are energized with high voltage. Only
test equipment designed for troubleshooting should be used. This is particularly true for
oscilloscopes. Always check with an AC and DC voltmeter to ensure safety before making
contact or using tools. Even when the power is turned Off, dangerously high electric charges
may exist within the UPS.
All power and control wiring should be installed by a qualified electrician. All power
and control wiring must comply with the NEC and applicable local codes.
ONLY qualified service personnel should perform maintenance on the UPS system.
When performing maintenance with any part of the equipment under power, service
personnel and test equipment should be standing on rubber mats. The service personnel
should wear insulating shoes for isolation from direct contact with the floor (earth ground).
Never work alone, even if all power is removed from the equipment. A second person should
be standing by to assist and summon help in case an accident should occur.
CAUTION
This equipment is fitted with RFI suppression filters.
Ground leakage current exceeds 3.5 mA and is less than 30 mA.
Transient and steady-state ground leakage currents, which may occur when starting the
equipment, should be taken into account when selecting instantaneous residual current
circuit breakers (RCCBs) or residual current devices (RCDs).
RCCBs must be selected sensitive to DC unidirectional pulses (Class A) and insensitive to
transient current pulses.
Note also that the ground leakage currents of the load will be carried by this RCCB or RCD.
NOTICE
Risk of improper improper electromagnetic shielding. Can cause radio communication
interference.
This unit complies with the limits for a Class A digital device, pursuant to Part 15 Subpart J
of the FCC rules. These limits provide reasonable protection against harmful interference in a
commercial environment. This unit generates, uses and radiates radio frequency energy and,
if not installed and used in accordance with this instruction manual, may cause harmful
interference to radio communications. This unit is not designed for use in a residential area.
Operation of this unit in a residential area may cause harmful interference that the user must
correct at his own expense.
2
Page 13

Battery Cabinet Precautions
!
!
The following warning applies to all battery cabinets supplied with UPS systems. Additional
warnings and cautions applicable to battery cabinets may be found in 4.0 - Battery Installation.
WARNING
Risk of electric shock. Can cause injury, property damage and death.
Special care should be taken when working with the batteries associated with this equipment.
Batteries are always live. Battery terminal voltage will exceed 480VDC and is potentially
lethal.
In addition to the hazard of electric shock, gas produced by batteries can be explosive and
sulfuric acid can cause severe burns.
Batteries should be installed, serviced and replaced only by properly trained and qualified
service personnel trained in safe battery handling methods and who have the correct PPE
(Personal Protection Equipment) and tools.
The following precautions should be observed when working with the batteries:
• Eye protection should be worn to prevent injury from electrical arcs.
• Remove rings, watches and all other metal objects.
• Use only tools with insulated handles.
• Wear rubber gloves and boots.
• When replacing batteries, replace them with the same type and number of batteries or battery packs.
• Do not dispose of batteries in a fire. The batteries may explode.
• Do not open or mutilate batteries. Released electrolyte is harmful to the skin and eyes. It is
toxic.
• Never lay metal objects of any type on top of the batteries.
• Disconnect the charging source before connecting or disconnecting battery terminals.
• Determine whether the battery is grounded. If the battery is grounded, remove source of
the ground. Contact with any part of a grounded battery can result in electrical shock. The
likelihood of such shock can be reduced if such grounds are removed during installation and
maintenance.
WARNING
Risk of heavy unit tipping. Can cause property damage, injury and death.
Internal battery strapping must be verified by manufacturer prior to moving a battery cabinet
(after initial installation).
• Battery cabinets contain non-spillable batteries.
• Keep units upright.
• Do not stack.
• Do not tilt.
Failure to heed this warning could result in smoke, fire or electric hazard.
Call 1-800-LIEBERT before moving battery cabinets (after initial installation).
WARNING
Risk of electric shock. Can cause injury and death.
The Liebert
Off. To minimize the risk of injury, a properly trained and qualified service person should
disconnect the batteries before any maintenance is performed on the unit.
Servicing of batteries should be performed or supervised only by properly trained and
qualified personnel knowledgeable about batteries and the required precautions.
When replacing batteries, replace with the same manufacturer and type, or equivalent. See
your local Emerson
®
NX’s internal batteries are connected and energized even if the UPS is turned
®
representative for a list of approved batteries.
3
Page 14

!
CAUTION
Risk of replacing battery with an incorrect type. Can cause property damage injury and
death.
Dispose of used batteries according to the instructions.
When replacing batteries, replace with the same manufacturer and type, or equivalent. See
your local Emerson representative for a list of approved batteries.
4
Page 15

GLOSSARY OF SYMBOLS
!
PbH2SO4
-
+
R
Risk of electrical shock
Indicates caution followed by important instructions
AC input
AC output
i
Requests the user to consult the manual
Indicates the unit contains a valve-regulated lead acid battery
Recycle
DC voltage
Equipment grounding conductor
Bonded to ground
AC voltage
5
Page 16

1.0 INTRODUCTION
The Liebert® NX™ Uninterruptible Power Supply system provides continuous, high-quality AC power
to your business-critical equipment, such as telecommunications and data processing equipment.
The Liebert NX UPS is a SmartAisle
approach.
The Liebert NX supplies power that is free of the disturbances and variations in voltage and
frequency common to utility power, which is subject to brownouts, blackouts, surges and sags.
The Liebert NX utilizes the latest in high-frequency, double-conversion pulse width modulation
technology and fully digital controls to enhance its reliability and increase the ease of use.
Introduction
™
technology, appropriate for use with the SmartAisle design
6
Page 17

2.0 INSTALLATION
!
!
!
This section describes the Liebert® NX™ environmental requirements and mechanical considerations
that must be taken into account when planning the positioning and cabling of the UPS equipment.
Because every site is unique, this section presents a guide to general procedures and practices that
should be observed by the installing engineer, rather than step-by-step installation instructions.
WARNING
Do not apply electrical power to the UPS equipment before the arrival of the commissioning
engineer.
WARNING
The UPS equipment should be installed by a qualified engineer in accordance with the
information contained in this section.
WARNING
Risk of electric shock. Can cause injury and death.
Special care should be taken when working with the batteries associated with this equipment.
When connected together, the nominal battery voltage is 480VDC and is potentially lethal.
• Eye protection should be worn to prevent injury from accidental electrical arcs.
• Remove rings, watches and all other metal objects.
• Use only tools with insulated handles.
• Wear rubber gloves.
If a battery leaks electrolyte or is otherwise physically damaged, it must be replaced, stored in
a container resistant to sulfuric acid and disposed of in accordance with local regulations.
If electrolyte comes into contact with skin, the affected area should be washed immediately
with large amounts of water.
Installation
NOTE
The Liebert NX UPS can be used in TN utility system.
2.1 External Inspections
1. While the UPS system is still on the truck, inspect the equipment and shipping container(s) for
any signs of damage or mishandling. Do not attempt to install the system if damage is apparent.
If any damage is noted, file a damage claim with the shipping agency within 24 hours and contact
Emerson Network Power
claim and the condition of the equipment.
2. Compare the contents of the shipment with the bill of lading. Report any missing items to the
carrier and your local Liebert representative immediately.
2.2 Internal Inspections
1. Remove any packaging material, then visually examine the UPS and battery equipment for
transit damage, both internally and externally. Report any such damage to the shipper and to
Liebert immediately.
2. Check the nameplate inside the cabinet door to verify that the model number and rating
correspond to the ones specified. Record the model number and serial number in the front of this
installation manual. This information is necessary should service be required.
3. Check for loose connections or unsecured components in the cabinet.
4. Check for shipping damage to internal components.
®
Liebert Services at 1-800-LIEBERT to inform them of the damage
7
Page 18

2.2.1 Storing for Delayed Installation
If the equipment will not be installed immediately, it must be stored indoors where the humidity is no
higher than 90% and the temperature is no higher than 104°F (40°C). The storage area must protect
the Liebert
®
NX™ from excessive moisture (see 6.2 - UPS Environmental).
NOTE
If the battery cabinet must remain disconnected from power for more than six (6) months, the
battery must be recharged before use. To charge the batteries, the battery cabinet must be
connected to the Liebert NX UPS and the UPS must be connected to utility power and started
up because the charger operates only while the Liebert NX UPS is operating
NOTE
When batteries are installed in a cabinet adjacent to the UPS unit, the battery—not the
UPS—dictates the designed maximum ambient operating temperature.
2.3 Preliminary Checks
2.3.1 Identification
The equipment supplied has an identification tag on the back of the main door listing the type and
size of the UPS.
2.4 UPS Location
2.4.1 Positioning the UPS
Choose a location for the UPS that offers:
• Easy connection to inputs, outputs and auxiliary equipment
• Enough space to service the UPS
• Air circulation sufficient to expel heat produced by UPS
• Protection against moisture and excessive humidity
• Protection against dust and other particulate matter
• Compliance with fire prevention regulations and practices
• Operating environment temperature of 74-80°F (23-27°C) for maximum battery efficiency
2.4.2 Environmental Considerations
Installation
Before installing the Liebert NX, verify that the UPS room satisfies the environmental conditions
stipulated in 6.2 - UPS Environmental, paying particular attention to the ambient temperature
and air exchange system.
The UPS unit should be installed in a cool, dry, clean-air environment with adequate ventilation to
keep the ambient temperature within the specified operating range 32°F to 104°F (0°C to 40°C).
For optimal UPS and battery system performance and service life, maintain the operating
temperature within the range of 74-80°F, (23-27°C).
The Liebert NX UPS cooled by internal fans. Cooling air enters the unit through the front of the unit
and is exhausted out the top. To permit proper air flow and prevent overheating, do NOT block or
cover the ventilation openings or blow air down onto the unit. Ventilation clearance above the unit
must be a minimum of 8 in. (203mm).
See Table 7 for details on heat dissipation.
8
Page 19

Battery Location
!
!
Batteries must be installed in Liebert® NX™ 480V battery cabinets or battery room. Temperature is a
major factor in determining battery life and capacity. Battery manufacturers recommend an
operating temperature of 77°F (25°C). Ambient temperatures higher than this reduce battery life;
temperatures lower than this reduce battery capacity. In a typical installation, battery temperature
should be maintained between 74°F and 80°F (23-27°C). Batteries should be placed where there are
no main heat sources or air inlets to prevent portions of batteries from being either much warmer or
much cooler than other parts of the batteries.
2.4.3 Special Considerations for Parallel Systems
1. Consider the grounding configuration of your system before finalizing module placement. For
optimal ground performance, the Liebert NX modules should be close together.
2. For optimal load-sharing performance, the UPS output cables should be approximately the same
length, plus or minus 20 percent.
3. Position modules in such a way as to minimize the length of power cables and control wiring
between UPS modules and the paralleling cabinet.
2.5 Considerations in Moving the Liebert NX
Ensure that the UPS weight is within the designated surface weight loading (lb./ft2 or kg/cm2) of any
handling equipment. See Table 7 for weights of various units.
To move the UPS and optional battery cabinets:
• The Liebert NX may be rolled on its casters when moving the unit a short distance. For longer distances, move the UPS with a forklift or similar equipment to ease the relocation and to reduce
vibration.
Installation
The optional battery cabinets should be moved with a forklift or similar equipment.
WARNING
Risk of heavy unit falling. Can cause property damage, injury and death.
Ensure that any equipment that will be used to move the Liebert NX has sufficient lifting
capacity. The Liebert NX weight ranges from 1180 to 2201 lb. (535 to 1000kg). See Table 7 for
details. The UPS presents a tipping hazard. Do not tilt the Liebert NX further than 15
degrees from vertical.
The UPS is fitted with casters—take care to prevent movement when unbolting the
equipment from its shipping pallet. Ensure adequate personnel and lifting equipment are
available when taking the Liebert NX off its shipping pallet. Do not tilt the unit more than 15
degrees from center.
WARNING
Risk of heavy unit falling. Can cause property damage, injury and death.
The casters are strong enough for movement across even surfaces only. Casters may fail if
they are subjected to shock loading, such as being dropped or rolled over holes in the floor or
obstructions. Such failure may cause the unit to tip over, injuring personnel and damaging
the equipment.
Care must be taken when maneuvering cabinets fitted with batteries. Keep such moves to a
minimum. For further information, see Battery Cabinet Precautions on page 3.
Final Position
When the equipment has been finally positioned, ensure that the adjustable stops are set so that the
UPS will remain stationary and stable (see 8.0 - Installation Drawings).
9
Page 20

2.6 Mechanical Considerations
!
The Liebert NX is constructed with a steel frame and removable panels. Top and side panels are
secured to the chassis by screws. The doors may be opened for access to power connections bars,
auxiliary terminal blocks and power switches.
The UPS comes with an operator control panel, which provides basic operational status and alarm
information. Cooling is provided by internal fans. The unit sits on four casters. Adjustable stops are
provided to prevent the UPS from moving once it has been moved to its final position.
2.6.1 Clearances
There are no ventilation grilles on the sides or rear of the UPS. The unit may be placed with the rear
against a wall and optional cabinets on either side.
Installation
To enable routine tightening of power terminations within the UPS, make sure there is sufficient
clearance in front of the Liebert
Leave a minimum of 8 in. (203mm) between the top of the UPS and the ceiling to permit adequate air
circulation above the unit. Liebert recommends against using air conditioning or other systems that
blow air onto the top of the unit.
2.6.2 Floor Installation
The diagrams in 8.0 - Installation Drawings show the location of holes in the base plate for bolting
the equipment to the floor.
If the equipment is to be placed on a raised floor, it should be mounted on a pedestal that will support
the equipment point loading. Refer to the cabinet-bottom views in 8.0 - Installation Drawings to
design this pedestal.
2.6.3 Cable Entry
Cables can enter the Liebert NX from the top or bottom. Cable entry is made possible by removing a
metal plate attached to the UPS.
These plates are designed to allow the personnel to punch holes for fitting and securing the conduit.
Once the conduit holes are punched, these plates should be reattached to the UPS.
WARNING
Risk of explosion and fire. Can cause property damage, injury and death.
To reduce the risk of fire, connect only to a circuit provided with correct amperes maximum
branch circuit overcurrent protection (see Table 8) in accordance with the National Electric
Code, ANSI/NFPA 70.
®
NX™ to permit free passage of personnel with the door fully opened.
NOTE
When installing the UPS, the customer must provide a disconnect with overcurrent protection
at the output of the UPS.
System Composition
A UPS system can comprise a number of equipment cabinets, depending on the individual system
design requirements—e.g., UPS cabinet with External Bypass cabinet and Maintenance Bypass
cabinet. In general, all cabinets used will be the same height and are designed to be positioned sideby-side to form an aesthetically appealing equipment suite.
10
Page 21
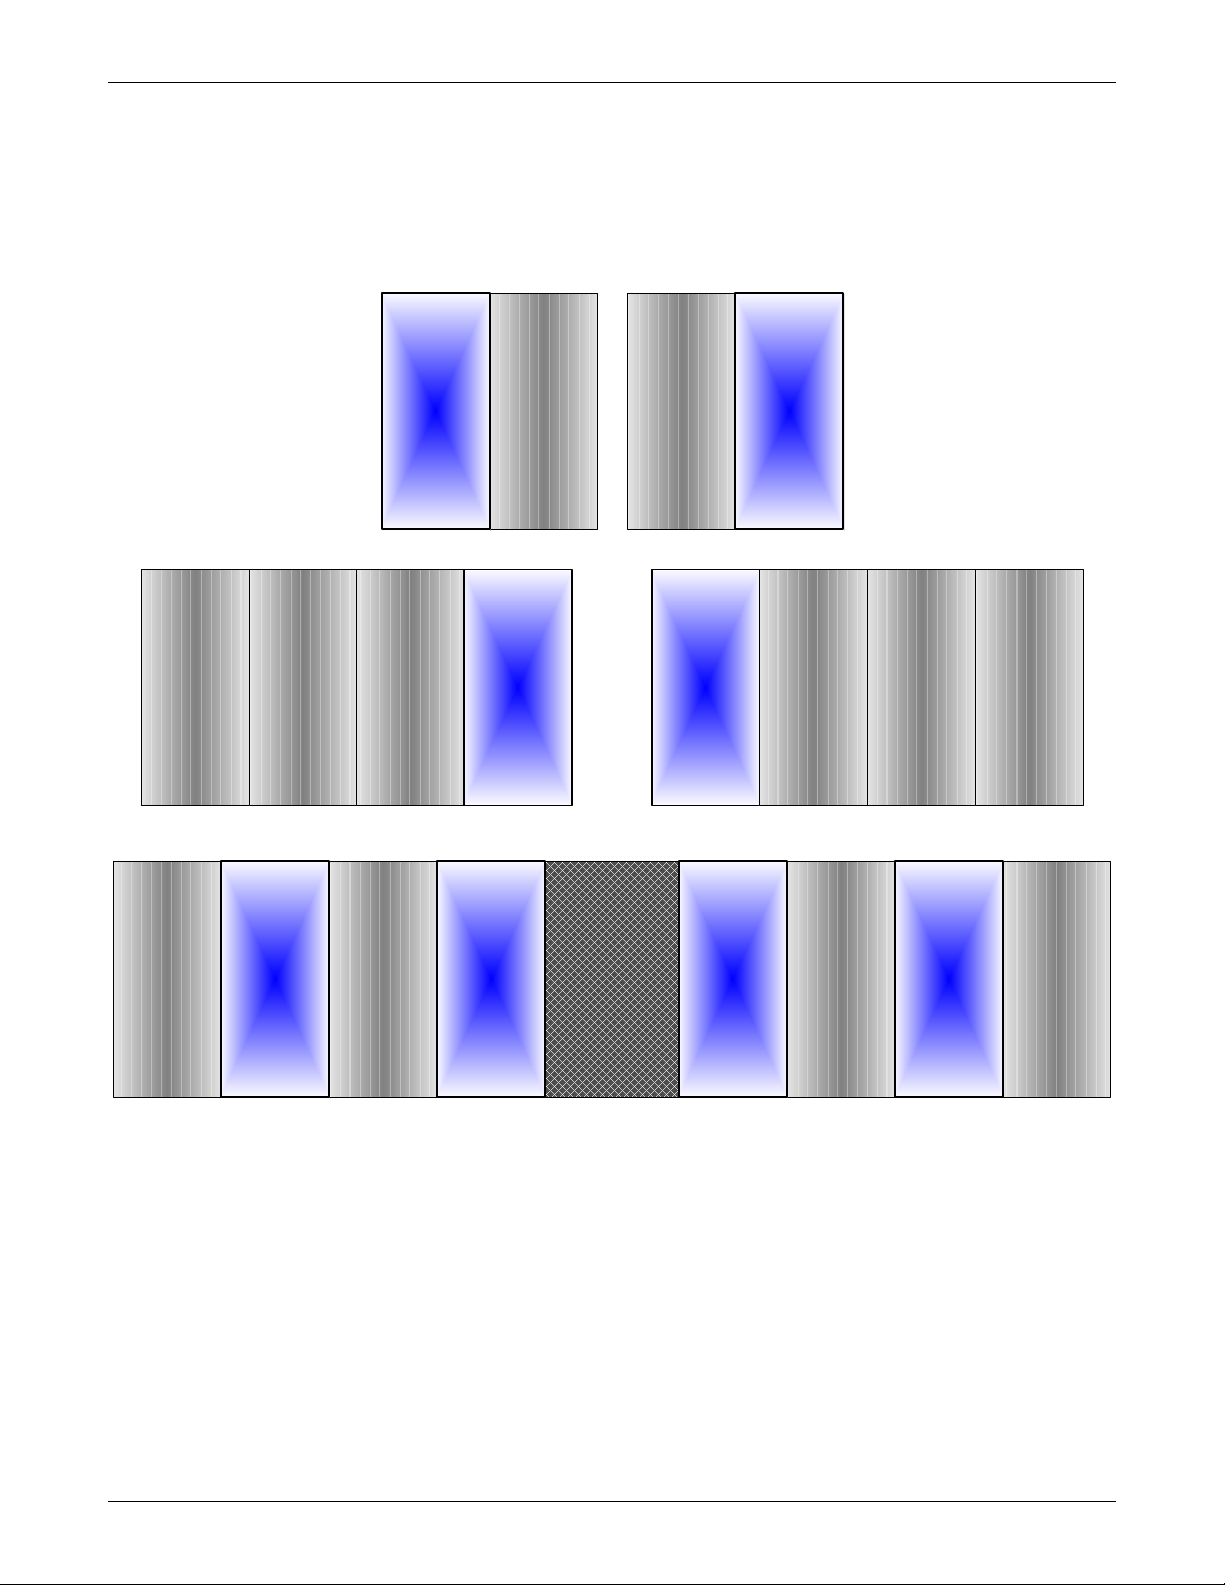
2.6.4 Optional Cabinets
Front of Units
Battery
Cabinet
Battery
Cabinet
Battery
Cabinet
Liebert
NX
UPS
Front of Units
Battery
Cabinet
Battery
Cabinet
Battery
Cabinet
Liebert
NX
UPS
Front of Units
Multi-Module
Parallel Cabinet
Battery
Cabinet
Battery
Cabinet
Battery
Cabinet
Liebert
NX
UPS
Liebert
NX
UPS
Liebert
NX
UPS
Liebert
NX
UPS
Battery
Cabinet
Front of Units
Front of Units
Battery
Cabinet
Liebert
NX
UPS
Battery
Cabinet
Liebert
NX
UPS
The Maintenance Bypass Cabinet must be cabled and bolted to the Liebert NX before the UPS and
bypass cabinet are moved into their final position. Connect the input wiring to the Maintenance
Bypass Cabinet ONLY after the units are connected and positioned.
Battery cabinets may be bolted to either side of the Liebert NX; see Figure 1.
Figure 1 Cabinet arrangement—Liebert
®
NX™ units and battery cabinets
Installation
11
Page 22

Installation
Front of Units
Liebert NX
Bypass
Distribution
Cabinet
Battery
Cabinet
Liebert
NX
UPS
Front of Units
Liebert NX
Bypass
Distribution
Cabinet
Battery
Cabinet
Battery
Cabinet
Battery
Cabinet
Liebert
NX
UPS
Figure 2 Cabinet arrangement—Liebert® NX™ UPS, battery cabinets and Liebert NX bypass distribution
cabinets
12
Page 23

3.0 ELECTRICAL CONNECTIONS
!
The UPS requires both power and control cabling once it has been mechanically installed. All control
cables must run separate from power cables in metal conduits or metal ducts that are electrically
bonded to the metalwork of the cabinets to which they are connected.
WARNING
Risk of electrical shock. Can cause injury and death.
Before connecting input power to the Liebert
and operation of the overcurrent protection devices that connect the UPS input/bypass supply
to the power distribution panel.
De-energize and lockout or tagout all incoming high- and low-voltage power circuits before
installing cables or making any electrical connections.
3.1 Power Cabling
3.1.1 Cable Rating
The main factors affecting the choice and size of cable are voltage, current (also taking into account
overcurrent), room temperature and conditions of installation of the cable.
The power cables of the system must be sized with respect to the following description:
Electrical Connections
®
NX™, ensure that you are aware of the location
• UPS input cables - The UPS input cables must be sized for the maximum input current, including the maximum battery recharge current, given in Table 8, with respect to the unit rating and
the input AC voltage.
• UPS bypass and output cables - The bypass and output cables must be sized for the nominal
output current, given in Table 8, with respect to the unit rating and the output AC voltage.
• Battery cables - When connecting an external battery cabinet, the battery cables must be sized
for the battery discharge current at the end-of-discharge voltage, as given in Table 8, with
respect to the unit rating.
NOTE
Table 8 gives nominal currents for determining the size of UPS power cables. Other important
factors to consider include cable route length and coordination with protective devices.
The power cables can be sized to suit the UPS unit rating according to Table 8.
NOTE
When installing a Liebert NX with Softscale
bypass and output cabling for the UPS’s maximum rating. Properly sizing the cable will
reduce the work required to upgrade the UPS.
™
capability Liebert recommends sizing the input,
Lug Size and Torque Requirements
Refer to Table 34 for lug size and torque requirements.
13
Page 24
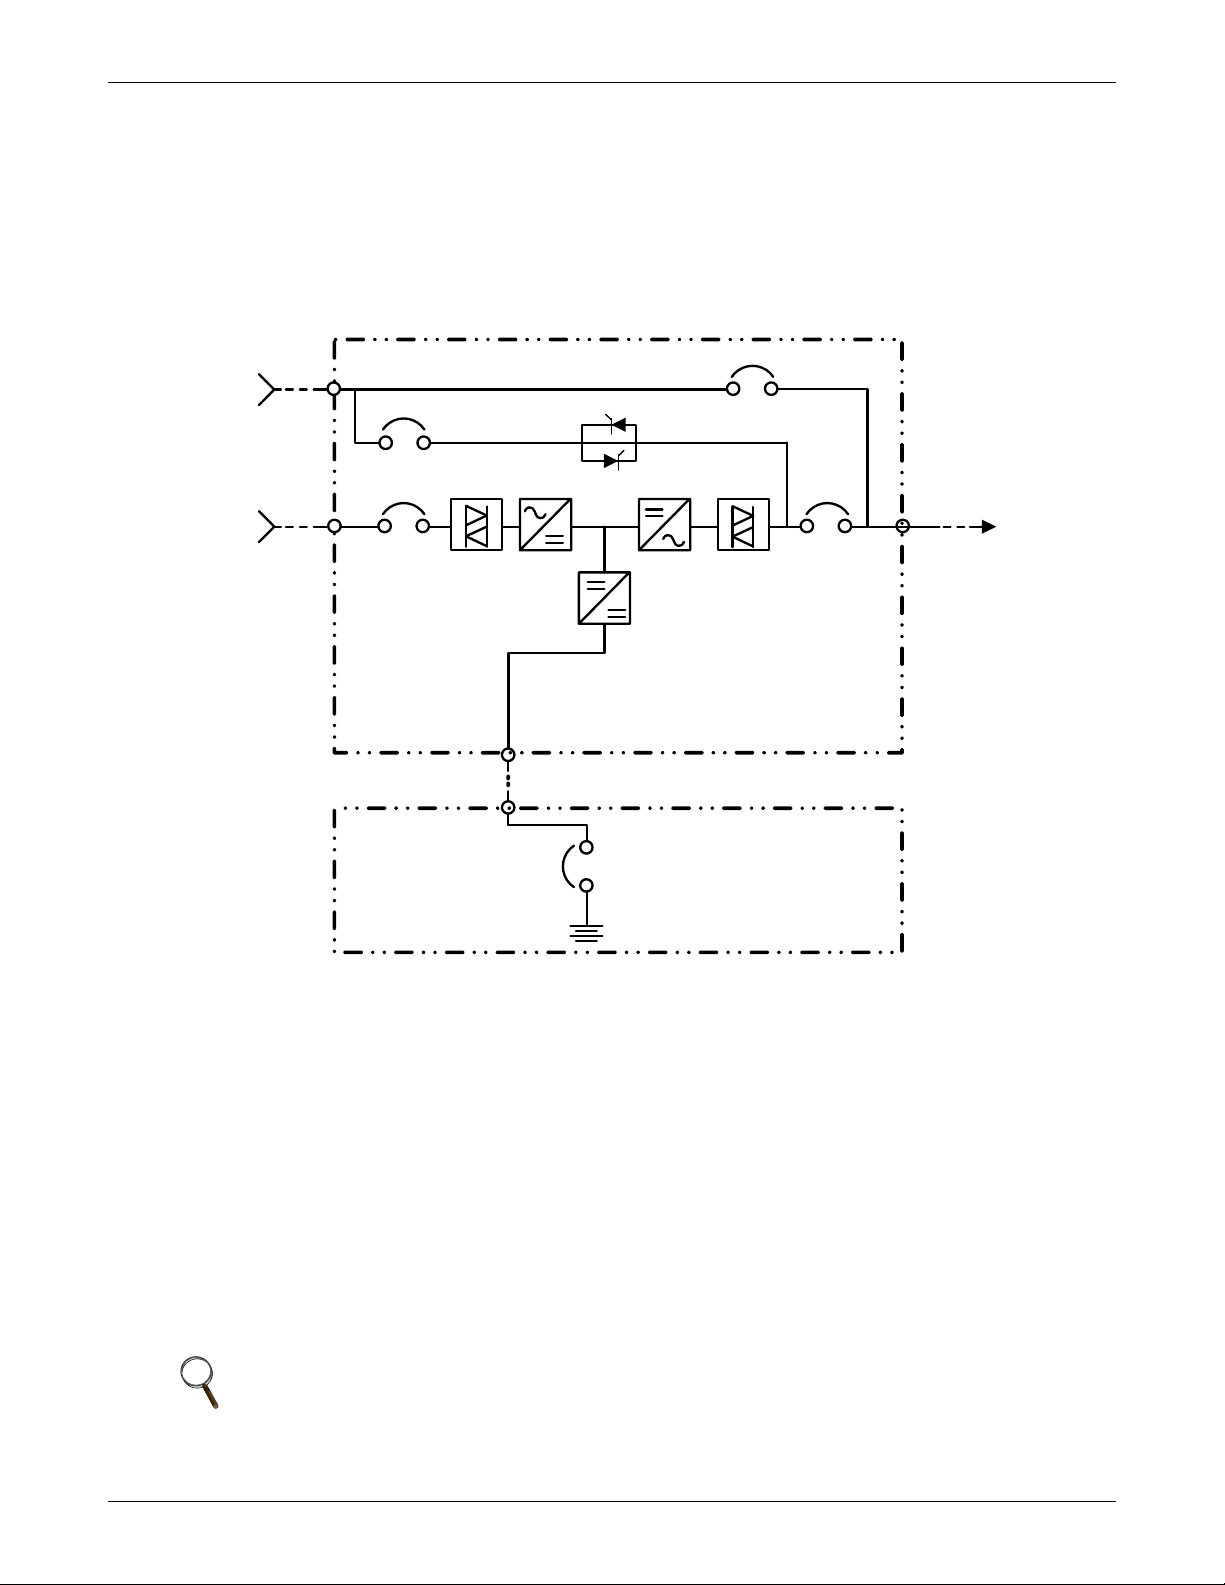
3.1.2 UPS Input Configuration
3-Phase
3W + Gnd
3-Phase
3W + Gnd
AC Input
AC Output
3-Phase
3W + Gnd
Battery Cabinet
2W + Gnd
UPS Cabinet
Conv erter
InverterRectifier
Static Bypass
Internal Maintenance Bypass
Figure 3 illustrates the Liebert® NX™ in a split bypass (dual-input) configuration. In this
configuration, the Static Bypass and the Maintenance Bypass lines are supplied from a separate feed
from the Main input. Both sources must be protected externally with properly sized protective
devices. By default, the unit ships with internal links installed between the bypass input and main
input (Single Input configuration). To wire the unit as a dual input UPS, remove the links and wire
the bypass to the input bus bars, then wire the main input directly to CB1 (see Figure 3).
Figure 3 Single module block diagram—dual input configuration
Electrical Connections
3.1.3 Cabling Guidelines
The following are guidelines only and are superseded by local regulations and codes of practice where
applicable. Use wiring rated at 75°C or greater.
1. The ground conductor should be sized in accordance with the input overcurrent protection device
data in Table 8. The ground cable connecting the UPS to the main ground system must follow the
most direct route possible. Control wiring and power wiring must be run in separate conduit.
Output and input cables must be run in separate conduit.
2. Consider using paralleled smaller cables for heavy currents—this can ease installation.
3. When sizing battery cables, a maximum voltage drop of 4VDC is permissible at the current
ratings in UPS terminal. For terminal connection sizing, see Table 8.
4. In most installations, especially parallel multi-module systems, the load equipment is connected
to a distribution network of individually protected busbars fed by the UPS output, rather than
connected directly to the UPS itself. When this is the case, the UPS output cables can be rated to
suit the individual distribution network demands rather than being fully load-rated.
NOTE
If more load is added to the distribution panel, the unit’s cabling must be resized.
5. When laying power cables, do not form coils; this will help avoid increasing formation of
electromagnetic interference.
14
Page 25

3.1.4 Cable Connections
!
Electrical Connections
The rectifier input, bypass and output are easily accessible from the front of the unit for installation.
All require lug type terminations. They are connected to busbars on the front side of the Liebert
and below the circuit breaker, as shown in Figure 3. These busbars are accessible when the front
side panel is removed. Busbars to connect external batteries are accessible from the front of the UPS.
NOTE
External connection access requires removal of a protective panel on the lower front of the UPS.
NOTE
There is no battery fuse in the UPS; the battery cabinet must include a circuit breaker
to cut off the current in case of short circuit. Refer to Table 8 for current ratings.
3.1.5 Safety Ground
The safety ground busbar is located below the Maintenance Bypass circuit breaker or to the right of
the UPS Output breaker for 160-200KVA models as shown in Figure 3. The safety ground cable must
be connected to the ground busbar and bonded to each cabinet in the system.
All cabinets and cable conduit should be grounded in accordance with local regulations.
WARNING
Risk of electrical shock from ground fault. Can cause injury and death.
Failure to follow proper grounding procedures can result in electric shock hazard to personnel
or the risk of fire, should a ground fault occur.
NOTE
Proper grounding significantly reduces electromagnetic interference problems in systems.
®
NX™
NOTE
The ground busbar is easily accessible when the lower protective cover plate is removed.
3.1.6 Protective Devices
For safety, it is necessary to install circuit breakers in the input AC supply and external battery
battery cabinets, external to the UPS system. Given that every installation has its own
characteristics, this section provides guidelines for qualified installation engineers with knowledge of
operating practices, regulatory standards and the equipment to be installed.
UPS Rectifier and Bypass Input Supply
• Protection from excessive overcurrents and short circuits in power supply input
External overcurrent protection for the AC output circuit is to be provided. See 6.4 - UPS
Electrical Characteristics and Table 9 for overload capacity.
When an external battery supply not made by Liebert is used, the customer must provide
overcurrent protection for the battery circuit.
• Dual Input
When wiring the UPS with dual inputs, the Rectifier input and the Bypass input must be
protected separately. Size the breakers according to the input currents shown in Table 8.
15
Page 26

3.1.7 Cabling Procedure
NOTICE
Risk of improper installation. Can cause improper operation and void warranty.
The operations described in this section must be performed by authorized electricians or
qualified technical personnel. If you have any difficulties, contact your local Liebert
representative or Liebert Services.
NOTE
Hydraulic pressure pliers, combinative tools and piston ring pliers should be used to connect
AC wiring.
Once the equipment has been positioned and secured for operation, and the battery and ground
collars have been connected (see 3.1.4 - Cable Connections), connect the power cables as described
below. (Study the reference drawing in 8.0 - Installation Drawings.)
1. Verify that all incoming high and low voltage power circuits are de-energized and locked out or
tagged out before installing cables or making any electrical connections.
2. Remove the front protective cover to gain easier access to the connections busbars.
3. Connect the safety ground and bonding ground bus cables to the copper ground busbar located on
the bottom of the equipment below the power connections. All cabinets in the UPS system must be
connected to the user’s ground connection.
Electrical Connections
®
NOTE
The grounding bonding arrangement must comply with the National Electrical Code and all
applicable local codes.
4. Identify and make power connections with incoming cables according to Steps 5 through 11.
Common Input Connections
5. For common bypass and rectifier inputs, connect the AC input supply cables between the power
distribution panel and the UPS input busbars (A-B-C terminals) and tighten the connections to
88 lb-in. (10 N-m) using the M8 bolt provided.
Dual Input Connections
6. Remove the internal links installed between the Input circuit breaker (CB1) busbars and Bypass
Input busbars as shown in Figure 3.
7. For the bypass, connect the AC input supply cables between the power distribution panel and the
UPS Rectifier Input busbars (CB1 A-B-C terminals) and tighten the connections to 88 lb-in.
(10 N-m) using the M8 bolt provided.
8. For the Rectifier Input, connect AC input supply cables between the power distribution panel and
the UPS Rectifier Input busbars (CB1 A-B-C terminals).
16
Page 27

Electrical Connections
!
NOTE
Both the rectifier and bypass feeds must come from the same utility source. The UPS can be
powered from separate sources provided all the following conditions are met:
1. The transformers are delta/wye isolation transformers where the wye secondary’s are
connected to the NX 480V UPS.
2. The individual transformer used to supply the Bypass of the NX 480V is solidly bonded to
earth ground at the transformer.
3. The individual transformer used to supply the Input (rectifier) of the NX 480V is solidly
bonded to earth ground at the transformer.
4. There are no appreciable ground currents flowing between the two transformers.
5. No delta/delta (ungrounded or corner grounded) transformers are used as a source to the
NX 480V UPS.
6. No high resistance or low resistance grounds can be used in the neutral bonding path to
ground of the delta/wye isolation transformers described above in Items 2 and 3.
7. All applicable NEC standards and wiring rules are enforced.
8. The internal bypass to input (rectifier) shorting bars in the NX 480V UPS are removed.
The above all apply to single-module systems.
9. For 1+N paralleled system, the Bypass to each unit must be fed from the same utility
source.
Output System Connections—Ensure Correct Phase Rotation
10. Connect the system output cables between the UPS output busbars (A-B-C terminals) and the
critical load and tighten the connections to 88 lb-in. (10 N-m) (M8 bolt).
WARNING
Risk of electric shock. Can cause injury and death.
If the load equipment will not be ready to accept power on the arrival of the commissioning
engineer, then ensure that the system output cables are safely isolated.
Observe the battery cable polarity. Be sure that the battery connector is made with the
correct polarity.
11. Refit all protective covers removed for cable installation.
Frequency Converter Mode
If a frequency converter configuration is used, connect the AC input supply cables to the rectifier
input busbars (A-B-C terminals). Torque to 88 lb-in (10N-m) for M8 bolts. Ensure correct phase
rotation. There will not be any AC bypass supply cables to the bypass input (A-B-C terminals) and
tighten the connections.
NOTE
The operations described in this section must be performed by authorized electricians or
qualified technical personnel. If any difficulties arise, contact Liebert
NOTE
For frequency converter operation, ensure that the linking busbars between the bypass and the
rectifier input are removed.
®
at 1-800-LIEBERT.
17
Page 28

3.2 Control Cables
X1
User Interface
Board
U1
DSP Control
K1
Key & LED Board
U2
Monitor Board
M3
Parallel Logic
Board
M5
Auxiliary Power
3.2.1 Monitor Board Features
Based on your site’s specific needs, the UPS may require auxiliary connections to manage the battery
system (external battery circuit breaker, battery temperature sensor), communicate with a personal
computer or provide alarm signaling to external devices or for Remote Emergency Power Off (REPO).
The monitor board, arranged for this purpose, is located on the rear of the operator access door. The
main features are:
• Input and Output dry contacts signal (one pair of contacts of relay)
• Emergency Power Off control (EPO)
• Environmental parameter input interface
• User communication (for data setting and user background monitor)
•Liebert
• Modem interface
• Temperature detect interface
Figure 4 shows the relationship and connection between the monitoring (U2) board and other boards
in the UPS.
Figure 4 Monitor board U2
®
IntelliSlot® interface
Electrical Connections
18
Page 29
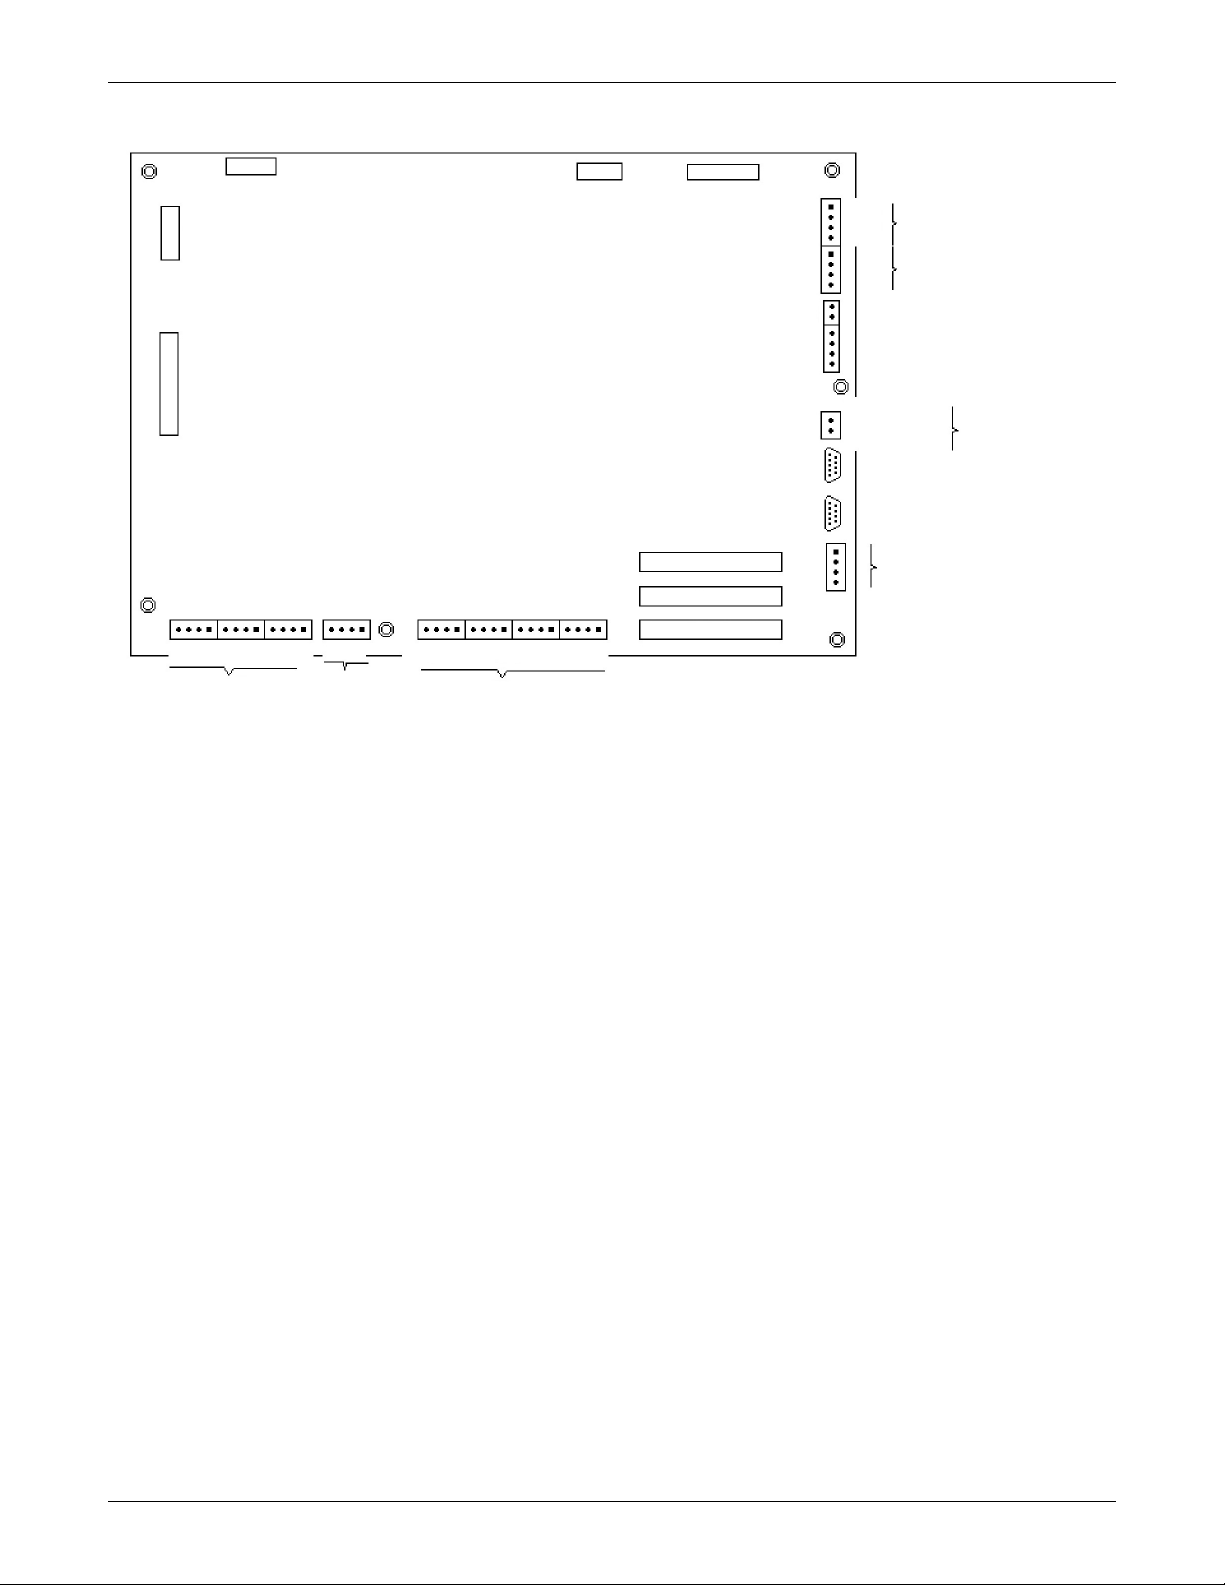
Figure 5 Auxiliary terminal block detail (Monitoring Board)
NOTE: The black square ()
on each slot indicates Pin 1.
J3
J1
J13 J21 J25 J28 J4 J26 J30 J10
J22
J23
J12
J9
J15
J17
J24
X4
X4
J16
X1
X2
X3
Liebert IntelliSlot 2
Liebert IntelliSlot 1
Liebert IntelliSlot 3
J8
J2
LCD
BFP INV ACF EPO Dry in MBC BCB
X5
X6
X7
PWR
MODEM
SNMP CARD
Electrical Connections
19
Page 30
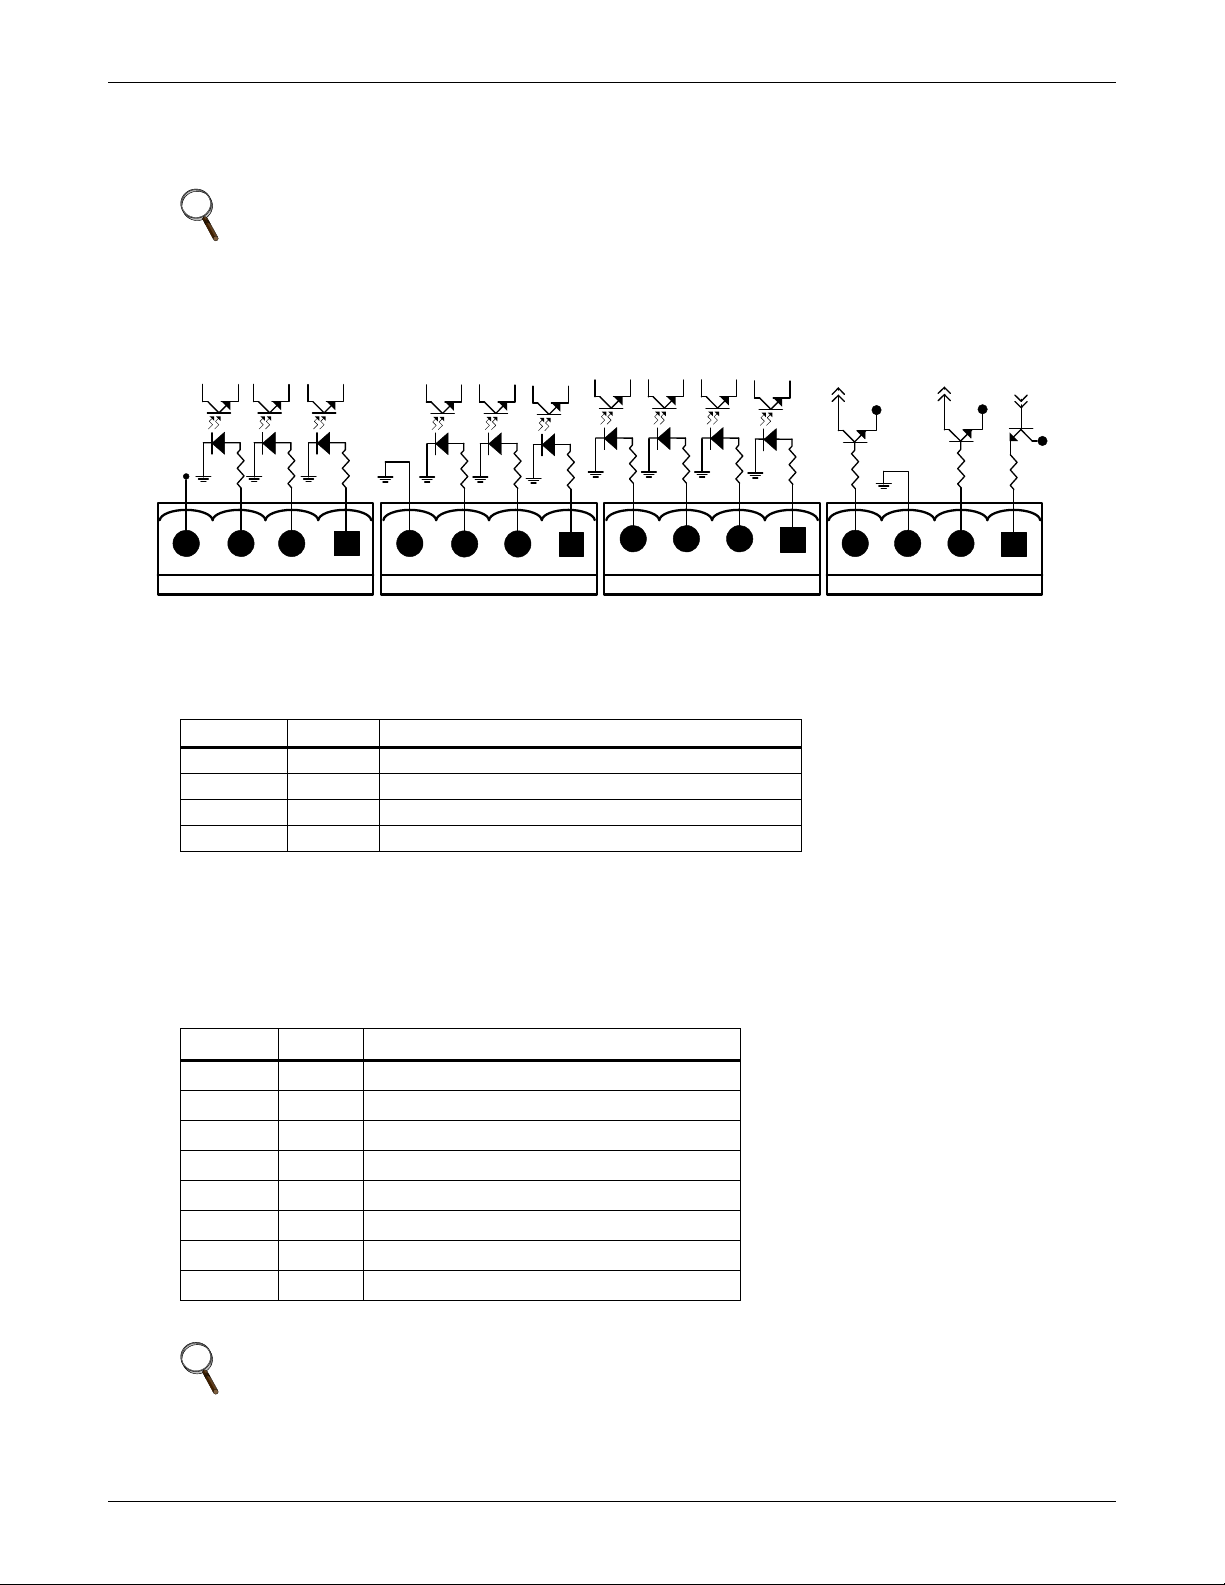
3.3 Dry Contacts
+12V
GEN
BtG
ENV
GND
GND
+12V
AUX_I
T_IT
AUX_ 0
T_0T
F_F AN
FUSE
OL
FB
DRV
+12V
+12V+12V
+12V
X3
J4 J26 J30 J10
NOTE: The black square () on each slot indicates Pin 1.
The UPS provides input dry contacts and output dry contacts.
NOTE
When operating the Liebert® NX™ with dry contacts, ESD measures must be taken or the
contacts may be damaged.
3.3.1 Input Dry Contacts
There are several input dry contacts at the X3 slot.
Figure 6 Input dry contacts
Electrical Connections
Table 1 Input dry contacts at X3
Position
J4.1 ENV
J4.2 BtG Battery Ground Fault Detection (Normally Closed)
J4.3 GEN
J4.4 +12V +12V Power
1 - Must be configured using configuration software before becoming active.
2 - When activated, the charger current can be limited, via software, to a percentage of the full charger current (0-100%).
3 - Activating this feature turns the battery charger off.
Name
1,2
Description
3
Battery Room Alarm (Normally Closed)
Generator Detection (Normally Open)
3.3.2 Maintenance Bypass Cabinet Interface
J26 and J30 are the MBC interface.
Table 2 Maintenance bypass cabinet interface
Position
J26.1 T_IT
J26.2 AUX_I Reserved
J26.3 +12V +12V Power
J26.4 GND Power Ground
J30.1 FUSE Reserved
J30.2 F_FAN Fan Fail Alarm (N.C.)
J30.3 T_OT
J30.4 AUX_O Reserved
1
- Must be configured using configuration software before becoming active.
Name
Description
1
Input transformer over temperature (N.C.)
1
Output Transformer Overtemperature (N.C.)
NOTE
All auxiliary cables of terminal must be double-insulated. The wire must be 600V, 18-16 AWG
stranded for maximum runs between 82 and 197 feet (25-60m), respectively.
20
Page 31

3.3.3 Battery Circuit Breaker Control Interface
J25
ACF_O
ACF_S
ACF _C
J21
INV_C
INV_S
INV_O
X1
J13
BFP_C
BFP_S
BF P_O
NOTE: The black square on each slot indicates Pin 1.
J10 is the Battery Circuit Breaker (BCB) box interface.
Table 3 BCB control interface
Position
J10.1 DRV BCB Driver Signal
J10.2 FB BCB Contact State
J10.3 GND Power Ground
J10.4 OL
Name
Description
BCB On-Line - Input - This pin will become active when
BCB interface is connected. (N.O.)
NOTE
All auxiliary cables of terminal must be double-insulated. The wire must be 600V, 18-16 AWG
stranded for maximum runs between 82 and 197 feet (25-60m), respectively.
3.3.4 Output Dry Contacts
There are three output dry contact relays at the X1 slot (see Figure 7 and Table 4).
Figure 7 Output dry contacts and EPO wiring for firmware before M170
Electrical Connections
Table 4 Output dry contact relays
Position Name
J13.2 BFP_O
J13.3 BFP_S Bypass feedback protection relay center; 5A, 250VAC/24 VDC
J13.4 BFP_C
J21.2 INV_O
J21.3 INV_S Inverter mode relay center; 5A, 250VAC/24 VDC
J21.4 INV_C
J25.2 ACF_O
J25.3 ACF_S Main input fault relay center; 5A, 250VAC/24 VDC
J25.4 ACF_C
Description
Bypass feedback protection relay. Normally open. Closed when bypass SCR is
shorted;. 5A, 250VAC/24 VDC
Bypass feedback protection relay. Normally closed. Open when bypass SCR is shorted;
5A, 250VAC/24 VDC
Inverter mode relay. Normally open. Closed when UPS is in inverter mode.; 5A,
250VAC/24 VDC
Inverter mode relay. Normally closed. Open when UPS is in inverter mode;
5A, 250VAC/24 VDC
Main input fault relay. Normally open. Closed when main input is in fault;
5A, 250VAC/24 VDC
Main input fault relay. Normally closed. Open when main input is in fault;
5A, 250VAC/24 VDC
NOTE
All auxiliary cables of terminal must be double-insulated. The wire must be 600V, 18-16 AWG
stranded for maximum runs between 82 and 197 feet (25-60m), respectively.
21
Page 32

3.3.5 EPO Input—Optional
EPO - NO
EPO - NC
J2 8
X2
NOTE: The black square indicates Pin 1.
The UPS has an Emergency Power Off (EPO) function operated by a button on the control panel or by
a remote contact provided by the user. The local EPO button is under a hinged, clear plastic shield.
The X2 slot, shown in Figure 8, is the remote EPO input interface. The EPO has a NO/NC contact
point that becomes active when shorting terminals X2: 3 and 4 or open terminal connection
X2: 2 and 1.
If an external Emergency Stop facility is required, it is connected terminals X2: 1 and 2 or X2: 3 and 4
of the auxiliary terminal block (X2). It also is connected to the Normally Open or Normally Closed
remote stop switch between these two terminals using shielded cable (see Figure 8 and Table 5). If
this function is not used, terminals X2: 3 and 4 must be opened and X2: 1 and 2 must be closed.
Figure 8 EPO wiring
Table 5 EPO input contact relays
Position Name Description
J28.1 EPO_NC EPO Activated when opened to J28.2
J28.2 EPO_NC EPO Activated when opened to J28.1
J28.3 EPO_NO EPO Activated when shorted to J28.4
J28.4 EPO_NO EPO Activated when shorted to J28.3
Electrical Connections
NOTE
The Emergency Stop action within the UPS shuts down the rectifier, inverter and static
bypass. It does not internally disconnect the input power supply. To disconnect ALL power to
the UPS, open the upstream feeder breaker(s) when the remote EPO is activated.
NOTE
Normally Closed EPO – X2: 1,2, these terminals are supplied factory-linked on the monitor
board and must remain installed if using NO contacts.
NOTE
All auxiliary cables of terminal must be double-insulated. The wire must be 600V, 18-16 AWG
stranded for maximum runs between 82 and 197 feet (25-60m), respectively.
22
Page 33

4.0 BATTERY INSTALLATION
!
4.1 Introduction
If using multiple sets of batteries connected in parallel to provide the required battery backup run
times, fit each set with an isolating device to permit working on one of the battery sets while leaving
the others in service and providing backup protection.
Battery Installation
When replacing batteries, replace with the same manufacturer and type, or equivalent. See your
Liebert
4.2 Safety
Special care should be taken when working with the batteries associated with the Liebert NX™
system equipment. When all batteries are connected together, the battery terminal voltage may
exceed 480V and is POTENTIALLY LETHAL.
®
representative for a list of approved batteries.
WARNING
Risk of electric shock. Can cause injury, property damage and death.
Special care should be taken when working with the batteries associated with this equipment.
Batteries are always live. Battery terminal voltage will exceed 480VDC and is potentially
lethal.
In addition to the hazard of electric shock, gas produced by batteries can be explosive and
sulfuric acid can cause severe burns.
Batteries should be installed, serviced and replaced only by properly trained and qualified
service personnel trained in safe battery handling methods and who have the correct PPE
(Personal Protection Equipment) and tools.
The following precautions should be observed when working with the batteries:
• Eye protection should be worn to prevent injury from electrical arcs.
• Remove rings, watches and all other metal objects.
• Use only tools with insulated handles.
• Wear rubber gloves and boots.
• When replacing batteries, replace them with the same type and number of batteries or battery packs.
• Do not dispose of batteries in a fire. The batteries may explode.
• Do not open or mutilate batteries. Released electrolyte is harmful to the skin and eyes. It is
toxic.
• Never lay metal objects of any type on top of the batteries.
• Disconnect the charging source before connecting or disconnecting battery terminals.
• Determine whether the battery is grounded. If the battery is grounded, remove source of
the ground. Contact with any part of a grounded battery can result in electrical shock. The
likelihood of such shock can be reduced if such grounds are removed during installation and
maintenance.
CAUTION
Risk of explosion and fire. Can cause property damage, injury and death.
To reduce the risk of fire, connect only to a circuit provided with correct amperes maximum
branch circuit overcurrent protection (see Table 12) in accordance with the National Electric
Code, ANSI/NFPA 70.
NOTE
The maximum available fault current from the battery supply is 8500A and the DC voltage
rating of the battery supply overcurrent protective device that is to be installed near the battery
supply must be at least 600VDC.
23
Page 34

4.3 External Battery Cabinet Installation
!
Top Cable Entry
Battery Trays
BCB Plate and BCB
Optional Alber BDSi
Data Collection/Load
Module
Optional Alber
BDSi Controller
Module
Liebert 49" Battery Cabinet
Liebert 33" Battery Cabinet
4.3.1 Battery Cabinets
Figure 9 Battery cabinets for Liebert® NX
™
Battery Installation
The same model battery cabinet may be installed in parallel in multiple cabinet striSngs for additional
capacity. Battery run time depends on the cabinet model, the number of cabinets and the load on the UPS.
Handling—The battery cabinet has casters to facilitate movement over short distances. The bottoms
of the battery cabinets are reinforced to permit movement by forklift over longer distances.
Inspection—Remove all panels and visually inspect the batteries, bus connections and cabinet for
any damage. Exercise caution: voltage is present within the battery cabinet even before installation.
If there are signs of damage, do not proceed. Call Liebert Services at 1-800-542-2378.
Storage—The batteries can be stored for up to six months without appreciable deterioration. If
planning to store a battery cabinet for longer than six months or at temperatures higher than 77°F
(25°C), contact Liebert Services for recommended precautions.
CAUTION
Risk of electrical shock. Can cause injury and death.
Any battery system should be installed by properly trained and qualified personnel.
When installing an external battery cabinet that is NOT a Liebert NX battery cabinet, the customer
must provide overcurrent protection. See Table 8 for sizing of protection devices.
NOTE
When using an external battery supply that is not provided by Liebert, refer to the battery
manufacturer’s installation manual for battery installation and maintenance instructions,
available on the manufacturer’s Web site.
NOTE
When replacing batteries, Liebert recommends that the all batteries in external cabinets be the
same type. See Table 11 for a list of batteries that are approved for use with this product.
24
Page 35

4.3.2 Connecting the Batteries
Insulated Post
for Cabling
Tray Handle
If the Liebert® NX™ battery cabinets are installed on a raised floor, the battery power cables and
circuit breaker control cables may be routed to the UPS cabinet via the floor of the cabinet (bottom
entry).
If the Liebert NX battery cabinets are installed adjacent to one another on a solid floor, these cables
may be passed between the cabinets through lifting slots in the lower sides of the cabinets.
Intertray connections must be made before the battery cabinet can be used.
Figure 10 Battery cabinet—details
Battery Installation
4.3.3 Installation Considerations
Position— If the system includes a matching maintenance bypass cabinet (MBC), the MBC should
be installed first and the battery cabinet installed on the opposite side of the UPS. Otherwise, leftside placement of the battery cabinet is preferable.
The battery cabinet(s) are designed to be located conveniently next to each UPS module, and are also
available in stand-alone configurations with painted side panels. The front access design eliminates
side and rear service clearance requirements. Refer to Table 38 for battery cabinet dimensions and
weights.
Bolt-On Cabinets—Matching battery cabinets are designed to bolt onto the side of the UPS module
cabinet. Use bolts that ship with each unit to connect cabinet frames at posts, two places in the front
and two places in the rear.
Service Clearance—Allow front access to the battery cabinet at all times for maintenance and
servicing. Electrical codes require that the battery cabinet be installed with no less than 3 feet (1m) of
clearance at the front of the cabinet when operating. Side and rear panels do not require service
clearance.
Cables—Cables may be run between the cabinets through cutouts in the top of the cabinet,
eliminating the need for external conduit runs. Route cables before moving cabinets into final position
for bolting together. No top or bottom entry cables are required, except for remotely located cabinets
which require conduits.
Software—To allow the UPS to accurately display the battery run time, the number of battery
cabinets must be noted when performing initial startup and setup using the configuration software.
This is to be performed by the Liebert Services customer engineer when commissioning the unit.
Casters and Adjustable Stops—The adjustable stops are not designed to bear the full weight of the
cabinet. Lower the stops until they are finger-tight in contact with the floor. Then tighten a small
amount with a wrench (less than two turns) to give a good friction fit. When mounting the battery
cabinet on seismic stands, ensure that the casters are bearing the weight of the cabinet.
Battery Support Tray—Be sure to connect the battery tray support to the front of the cabinet
before sliding a battery tray out for connection or service. Without the support, the battery tray may
fall out of the cabinet. See Figure 11 for details.
25
Page 36

Figure 11 Battery tray and supports
Slot in support
secured by screw-in
connector at corner
of battery tray...
... and notched end of
support slips into slot at
top corner of battery
compartment
4.3.4 Connecting the Battery Cabinet to the UPS
After the battery cabinet equipment has been positioned and secured for operation and the batteries
have been connected, connect the power cables as described below.
1. Verify that all incoming high and low voltage power circuits are de-energized and locked out or
tagged out before installing cables or making any electrical connections.
2. Remove the UPS front protective cover to gain access to the equipment ground busbar.
3. Connect the safety ground and any necessary bonding ground cables to the copper ground busbar.
(example: UPS located on the bottom of the equipment below the power connections).
All cabinets in the UPS system must be connected to the user's ground connection.
Battery Installation
NOTE
The grounding bonding arrangement must be in accordance with the National Electrical Code
and all applicable local codes.
4. Connect the system battery cables. Be sure that the battery connections are made with the right
polarity, and tighten the connections to 44 lb-in. (5 N-m) (M6 Bolt). Do not close the battery circuit
breaker before the equipment has been commissioned.
5. Connect supplied auxiliary control cable to pins J10.2 and J10.3 on the U2 monitoring board (see
3.3 - Dry Contacts).
4.4 Non-Standard Batteries
When batteries other than a matching battery cabinet are used, a remote battery disconnect switch
with overcurrent protection is required per the National Electrical Code. Contact your local Liebert
sales representative about this option.
Install battery racks, cabinets and batteries in accordance with the manufacturer's instructions.
Verify that the battery area has adequate ventilation and battery operating temperature complies
with the manufacturer's specifications and with all applicable national and local codes.
If you have any questions concerning batteries, battery racks or accessories, contact Liebert Services
at 1-800-543-2378.
®
26
Page 37

4.5 BCB Shunt Trip
The Liebert NX battery cabinet has the shunt trip installed in the circuit breaker. When a DC ground
fault (using the optional DC Ground Fault kit), a battery overtemperature or EPO is activated, the
shunt trip will open the circuit breaker.
NOTE
The Liebert NX battery Cabinet circuit breaker will not open at the end of a battery discharge.
The UPS will isolate the batteries internally in this situation.
4.6 Alber Monitoring System—Optional
The Liebert® matching battery cabinet allows installing an optional Alber® battery monitoring system
in the cabinet. The Alber Battery Monitoring by Liebert continuously checks all critical battery
parameters, such as cell voltage, overall string voltage, current and temperature. Automatic periodic
tests of internal resistance of each battery will verify the battery’s operating integrity. Additional
capabilities include automatic internal DC resistance tests and trend analysis providing the ability to
analyze performance and aid in troubleshooting.
The Alber monitoring system is installed inside the battery cabinet (see Figure 9). The monitoring
system requires approximately 0.5A, single-phase 480V.
NOTE
This power must be UPS protected.
Battery Installation
This power can come from the output terminals of the UPS, a distribution panel, or another
UPS-protected source. This power is to be field supplied. See Figure 37 for wiring location.
For details about operating the Alber system, see the Alber Monitoring System manual.
27
Page 38

5.0 OPTIONS
X1-1 X1-2
X2-1 X2-2
Parallel Board
X4
X1-1 X1-2
X2-1 X2-2
Parallel Board
X4
X3
LBS Cable
UPS Module or
System #1
UPS Module or
System #2
The parallel board is on the
interior of the Liebert
®
NX™ UPS,
above and left of the power
electronics; see Figure 29.
5.1 Load Bus Synchronization
The Load Bus Synchronizer (LBS) keeps the output of two independent UPS systems or parallel UPS
systems in synchronization even when the systems are operating in different modes and even when
either or both systems are operating on batteries. When the LBS is used, one UPS system is
designated as master, the other as slave.
The LBS option is typically used with dual-corded equipment or with either the Liebert
SmartSwitch
5.1.1 Performance Requirements
The LBS operates under the following conditions:
• Both master and slave are on inverter
(either system may be on inverter through the rectifier or on inverter through the batteries)
• Master on inverter and slave on bypass
• Master on bypass and slave on inverter
• Master and slave on bypass IF the bypass source is the same for both systems
5.1.2 LBS Cable and Settings
For Liebert NX™-to-Liebert NX dual bus configuration, only one optional LBS cable is required, the
built-in LBS will operate normally without an extra LBS control box or interface box. The LBS port is
X4 on the Parallel Board (M3). The Parallel Board is on the interior of the Liebert NX, above and left
of the power electronics; see Figures 30 and 33.
™
or Liebert Static Transfer Switch™ (STS) for single-corded equipment.
Options
®
Figure 12 Load Bus Synchronization cable connection in single module systems
An optional, 9-pin LBS cable is used to connect two UPS systems through each system’s DB9 port on
its Parallel Board. For two parallel systems, the LBS cable can be mounted between any two units
belonging to different parallel systems. For information about the LBS kit or to order the optional
equipment, see your local Liebert representative.
The LBS cable is connected as illustrated in Figures 12 and 13.
28
Page 39

Figure 13 Load Bus Synchronization cable connection with multi-module systems
UPS
X1-1 X1-2
X2-2 X2- 1
Parallel Bo ard
X4
X3
P5
P3
P4 P1
P2
X1-1 X1-2
X2-2 X2- 1
Parallel Board
X4
X3
P5
P3
P4 P1
P2
8
X1-1 X1-2
X2-2 X2-1
Parallel Board
X4
X3
P5
P3
P4 P 1
P2
X1-1 X1-2
X2-2 X2-1
Parallel Board
X4
X3
P5
P3
P4 P 1
P2
8
UPS
B
Parallel System I Parallel System II
DBS Cable
A
LBS Cable
Options
The LBS function is activated with configuration software; when the LBS takes effect, the graphic
LCD will display “LBS active.”
29
Page 40

5.2 Configuring Parallel Sbasystem Operation
UPS Module 2
UPS Module 3
UPS Module 4
480V, 3W
Output
IOB1
IOB2
IOB3
IOB4
UOB
480V DC
Battery Input
480V, 3 W
Input
(Field Removable
Jumper for Dual
Input)
Bypass
Static
Switch
DC
DC
Liebert NX UPS (40-200kVA) Liebert NX Basic Paralleling Cabinet
AC
DC
DC
AC
RIB = Rectifier Input
Breaker
IOB = Inverter Output
Breaker
MBB = Maintenance
Bypass Breaker
MIB = Maintenance
Isolation Breaker
LDB = Load Distribution
Breaker
5.2.1 General
The Liebert® NX™ uses intelligent and reliable decentralized technology to achieve parallel operation
of two or more modules.
The parallel system is used to:
• Increase the reliability of the system to ensure adequate power supply to the critical load connected.
• Increase serviceability and allow the execution of maintenance operations and repairs without
affecting the ordinary operating conditions of the system (depending on the redundancy level).
5.2.2 Features of Parallel System
• The controls for parallel UPS module operation are standard in the Liebert NX, and the configuration can be set up by changing the settings in configuration software.
• It is easy to install the parallel cables in a ring, providing high reliability and redundancy. And
the intelligent paralleling logic provides the user with maximum flexibility. For example, shutting down or starting up the UPS modules in the parallel system can be done in any sequence. If
an overload transfer occurs, the whole system can recover automatically from bypass mode after
the overload is cleared.
• The total load of the parallel system can be queried from each module’s liquid crystal display
screen.
Options
Figure 14 Parallel system block diagram
30
Page 41

Figure 15 Paralleling cabinet with input and bypass circuit breakers
480V, 3W
System Input
480V, 3W
System Output
480V DC
Battery
Input
AC
DC
DC
AC
Bypass
Static
Switch
RIB 1
RIB 2
RIB 3
RIB 4 IOB 4
IOB 3
IOB 2
IOB 1
UPS Module 2
UPS Module 3
UPS Module 4
MBB
MOB
Liebert NX UPS (40-200kVA)
DC
DC
RIB = Rectifier Input
Breaker
IOB = Inverter Output
Breaker
MBB = Maintenance
Bypass Breaker
MIB = Maintenance
Isolation Breaker
LDB = Load
Distribution
Breaker
480V, 3W
System Input
480V, 3W
Output
480V DC
Battery Input
AC
DC
DC
AC
Bypass
Static
Switch
DC
DC
RIB 1
RIB 2
RIB 3
RIB 4 IOB 4
IOB 3
IOB 2
IOB 1
UPS Module 3
MBB
MIB
User Supplied
Plug-In Output
Breakers
480V, 3W
Output
UPS Module 4
UPS Module 2
Liebert NX UPS (40-200kVA)
LDB 1
LDB N
Options
Figure 16 Paralleling cabinet with input, bypass and distribution circuit breakers
31
Page 42

5.2.3 Operating Principles
Redundancy Paralleling
The parallel redundant system can noticeably improve system reliability. In normal condition, none of
the UPS modules work at full load. That means that even if the load is increased, the system will not
transfer to bypass. And when a UPS module shuts down due to any failure, the remaining UPS
modules can still power and protect the load. When redundancy is lost due to module failure or load
increase, the parallel system will trigger an alarm.
5.2.4 Operation Modes Summary
The parallel system also has operation modes such as normal, battery, bypass and maintenance
bypass. All UPS modules in the parallel system operate in coordination.
• Normal Mode Operation
The load is powered by the inverters of all the UPS modules in the system. If the frequency of
bypass is within the synchronous range, the inverter will be synchronized with the bypass.
Otherwise, the system will operate at nominal frequency.
• Battery Mode Operation
The batteries of all UPS modules power the load through their inverters. The system operates at
nominal frequency.
• Bypass Mode Operation
The condition to transfer to bypass mode is essentially the same as that of single module system.
The bypass of all the UPS modules powers the load.
• Maintenance Bypass Mode Operation
The sequence to transfer to maintenance bypass mode is the same as for transferring a single-
module system. The maintenance bypass switches should be switched on as synchronously as
possible. Thus the system can be repaired without interrupting the power supply to critical load.
If ECO mode is selected, the double-conversion UPS operation is inhibited at most times for the
purpose of saving energy. In this mode of operation, not unlike UPS of line-interactive or standby
technology, the bypass is the preferred source. Only when the voltage and/or frequency of the
bypass supply is beyond pre-defined and adjustable limits is the critical AC load transferred to
the inverter.
Options
5.3 Installing Parallel System
The basic installation procedure of parallel system is the same as that of single module system. The
following sections introduce only the installation procedures specific to the parallel system.
5.3.1 Conditions for Parallel System
• Each UPS module must have the same bypass source.
• The outputs of all UPS modules are connected altogether.
• The main inputs can be from different sources, but the phase rotation sequence of main inputs,
bypass inputs and outputs must be correct and the same.
• The parallel logic cable and load sharing cable must be connected in a ring correctly (see
Figure 17).
NOTICE
Risk of creating parallel systems with incorrect power ratings. Can cause equipment damage.
When paralleling UPS’s with different power ratings, the power rating of the larger UPS can
be no more than four times the power rating of the smaller UPS.
• 40-80kVA Liebert
units.
• 80-120kVA Liebert NX units can be installed in parallel with 160-200kVA.
• 40-80kVA Liebert NX units must not be installed in parallel with 160-200kVA Liebert NX
units.
®
NX™ units can be installed in parallel with 80-120kVA Liebert NX
32
Page 43

5.3.2 Cabinet Installation
X1-1 X1-2
X2-2 X2-1
Parallel Bo ard
X4
X3
P5
P3
P4 P1
P2
X1-1 X1-2
X2-2 X2-1
Parallel Board
X4
X3
P5
P3
P4 P1
P2
X1-1 X1-2
X2-2 X2-1
Parallel Board
X4
X3
P5
P3
P4 P1
P2
X1-1 X1-2
X2-2 X2-1
Parallel Board
X4
X3
P5
P3
P4 P1
P2
1 2 3 4
UPS
Interconnecting
Cables
Parallel system composed of two or more UPS modules using parallel cabinet
The UPS modules that will form the parallel system should be placed side-by-side. Each battery
cabinet is placed next to its corresponding UPS module.
The parallel cabinet should be placed in the middle of the system.
5.3.3 Preliminary Checks
Each UPS module should have the same firmware and the same hardware version. Refer to the
instructions in 5.3.1 - Conditions for Parallel System.
5.3.4 Power Cables
Wiring of power cables is similar to that of a single module system (See 3.1 - Power Cabling). The
bypass sources of all modules should be the same, and the outputs should be connected altogether
correctly.
Power cables are field-supplied. Power cables to the UPS’s of the paralleling cabinet must be routed
through either the top or bottom entry access of the UPS.
NOTE
The system input and/or output circuit breaker is to be field-supplied. See Table 8 for current
rating.
Options
NOTE
The length and specifications of power cables including the bypass input cables and UPS
output cables should be the same, thus the load can be shared evenly in bypass mode.
5.3.5 Parallel Control Cables
Parallel System Control Cables
Make the connections listed below on the parallel logic board (M3) inside the Liebert NX. (See
Figure 30 for the location of the parallel logic board):
Shielded and double-insulated control cables, available in lengths of up to 100 feet (30m), must be
interconnected in a ring configuration between UPS modules as shown below. The ring configuration
ensures high reliability of the control (refer to Figure 17).
Figure 17 Connecting system parallel control cables
33
Page 44

Auxiliary Dry Contact Cables
!
485-
P2 X2
2
485+
DBS
X3
P1 X2
1
:X T M AIN T
The external output breaker of each UPS must have Normally Open auxiliary contacts. These
contacts must be wired to connector X3 on the Parallel Logic Board (M3). See Figure 18.
Figure 18 Auxiliary dry contact cables for output breaker in multi-module system
Options
CAUTION
The auxiliary control wire must be installed to ensure proper operation of the system.
NOTE
For startup procedure, 11.2 - UPS Startup.
34
Page 45

5.3.6 Emergency Power Off (EPO)
UPS2
UPS1
Monitor Board
Monitor Board
X2:1
X2:2
X2:1
X2:2
Normally
Closed EPO
UPS1
X2:3
X2:4
Monitor Board
UPS2
X2:3
X2:4
Monitor Board
Normally
Open EPO
The external emergency stop facility is identical to that described for the single unit installation—
that an individual emergency stop button is provided for each unit.
Figure 19 Connecting EPO push button
Options
35
Page 46

6.0 UPS SPECIFICATIONS
These specifications describe requirements for the Liebert® NX™ UPS.
6.1 Conformity and Standards
The UPS has been designed to conform to the following standards:
• UL Standard 1778
• CSA 22.2, No. 107.1
• FCC Part 15, Class A
• IEC 61000-4-5
• National Electrical Code (NFPA-70)
• NEMA PE-1
•ISTA_1H
The UPS shall be UL and cUL listed per UL Standard 1778.
6.2 UPS Environmental
The UPS is designed to operate under the following environmental conditions without damage or
degradation in electrical operating characteristics.
Table 6 Environmental characteristics
Rated Power
Operating Temperature, UPS 32°F to 104°F (0°C to 40°C)
Optimal Operating Temperature, Battery 68°F to 86°F (20°C to 30°C)
Relative Humidity 0 to 95%, non-condensing
Accoustical Noise, dBA at 39 in. (1m)
(fans at low speed)
Altitude of Operation
Storage-Transport Temperature, UPS, -4°F to 158°F (-25°C to 70°C)
Storage-Transport Temperature, Battery -4°F to 86°F (-20°C to 33°C)
40kVA 60/80kVA 100/120kVA 160/200kVA
61 61 63 68.5
Up to 6562 ft. (2000m) above mean sea level without derating. Linearly
derated from 100% load at 6,562 ft. (2000m) to 88% load at 9843 ft. (3000m)
UPS Specifications
6.3 UPS Mechanical Characteristics
Table 7 UPS mechanical characteristics
Parameter 40 kVA 60kVA 80kVA 80kVA 100kVA 120kVA 160kVA 200kVA
Dimensions, W x D x H, inches (mm)
All Units
Units for use
with Liebert BDC
Units with Wiring
Cabinet Extension
Weight, lb (kg)
All Units 1290 (585) — —
For use with Liebert BDC — 1422 (645) 2201 (998)
Includes Wiring Cabinet Extension — 1847 (837) 2626 (1191)
Heat Dissipation, BTU/H (kWH)
3
Airflow, CFM (m
Cable Entry Bottom or Top
Color Black (ZP-7021)
Protection Grade
(with open/closed front doors)
/h)
25.5 x 39.0 x 78.7
(648 x 978 x 2000)
———
———
12,200
(3.6)
(1050)
620
15,400
(4.5)
620
(1050)
20,600
(6.0)
620
(1050)
—— — — —
25.5 x 39.0 x 78.7
(648 x 978 x 2000)
41.0 x 39.0 x 78.7
(1041 x 978 x 2000)
19,700
(5.8))
1668
(2834)
24,300
(7.1)
920
(1550)
28,700
(8.4)
920
(1550)
IP 20
48.8 x 39.0 x 78.7
(1239 x 978 x 2000)
64.4 x 39.0 x 78.7
(1636 x 990 x 2000)
35,900
(10.5)
1590
(2700)
47,00
(13.8)
1590
(2700)
36
Page 47

UPS Specifications
6.4 UPS Electrical Characteristics
Table 8 UPS terminal
Input (For Single-Input Unit)
Maximum Recommended Lug
Unit
Rating
40 48 60 72 80 M8 54140 ADR35
60 71 89 106.8 110/125 M8 54148 ADR35
80 94 118 141.5 150 M8 54110 ADR35
100 117 147 176.3 175 M8 54112 31015
120 140 175 210 225 M8 54174 31015
160 186 233 279.5 300 M10 54286 31015
200 234 293 351.5 350 M10 256-30695-886 31015
Rectifier Input (For Dual Input Unit Only)
Unit
Rating
40 48 60 72 80 M8 54140 ADR35
60 71 89 106.8 110/125 M8 54148 ADR35
80 94 118 141.5 150 M8 54110 ADR35
100 117 147 176.3 175 M8 54112 31015
120 140 175 210 225 M8 54174 31015
160 186 233 279.5 300 M10 54286 250mcm
200 234 293 351.5 350 M10 256-30695-886 500mcm
Bypass Input (For Dual Input Units)
Unit
Rating
40 48 60 70 M8 54140 ADR35
60 72 90 110 M8 54145-TB ADR35
80 96 120 125 M8 54155-TB ADR35
100 120 150 150 M8 54110 ADR35
120 144 180 200 M8 54112 31015
160 192 240 250 M10 54286 31015
200 241 300 300 M10 256-30695-886 31015
Output
Unit
Rating
40 48 60 70 M8 54140 ADR35
60 72 90 110 M8 54145-TB ADR35
80 96 120 125 M8 54155-TB ADR35
100 120 150 150 M8 54110 ADR35
120 144 180 200 M8 54112 31015
160 192 240 250 M10 54174 31015
200 241 300 300 M10 256-30695-886 31015
Nominal
Input
Current
Nominal
Input
Current
Nominal
Input
Current
Nominal
Output
Current
Maximum
Input
Current
Maximum
Input
Current
Maximum
Input
Current
Maximum
Output
Current
OCP
Current
OCP
Current
OCP
Device
Rating
OCP
Device
Rating
OCP
Device
Rating
OCP
Device
Rating
Bolt
Size
Bolt
Size
Bolt
Size
Bolt
Size
Maximum Recommended Lug
(Thomas & Betts Part #)
Compression
1-Hole
Maximum Recommended Lug
(Thomas & Betts Part #)
Compression
1-Hole
(Thomas & Betts Part #)
Compression
1-Hole
Maximum Recommended Lug
(Thomas & Betts Part #)
Compression
1-Hole
Mechanical
1-Hole
Mechanical
1-Hole
Mechanical
Mechanical
1-Hole;
1-Hole
37
Page 48

UPS Specifications
Table 8 UPS terminal (continued)
Battery
Maximum
Recommended
Lug
(Thomas &
Betts Part #)
Unit
Rating
40 82 at 480VDC 103 at 384VDC 125 M8 54106
60 122 at 480VDC 155 at 384VDC 175 M8 54107
80 163 at 480VDC 206 at 384VDC 225 M8 54152-TB
100 204 at 480VDC 258 at 384VDC 300 M8 54157
120 244 at 480VDC 309 at 384VDC 350 M8 54167
160 367 at 480VDC 412 at 384VDC 450 M10 54115
200 408 at 480VDC 515 at 400VDC 600 M10 54115
1. Nominal (Nom) current is based on full rated output load.
2. Maximum (Max) current (125% of nominal) is short duration for battery recharge conditions.
3. UPS input and bypass cables must be run in separate conduit from output cables.
4. Nominal battery voltage is shown at 2.0 volts/cell per NEC 480-2.
5. OCPD = Overcurrent Protection Device. Recommended AC input and AC output overcurrent protection represents 125% of nominal full
load current (continuous) per NEC 215.
6. Minimum-sized grounding conductors to be per NEC 250-122. Parity-sized ground conductors are recommended. References are per
NEC 1999.
7. Wiring requirements:
a. AC Input: 3-phase, 3-wire, plus ground.
b. AC Output: 3-phase, 3-wire, plus ground.
8. All wiring is to be in accordance with national and local electric codes.
Nominal
Discharge
Current
Maximum
Discharge
Current
OCP
Device
Rating
Bolt
Size
Compression
One-Hole; 3/8"
bolt
6.4.1 Input Rectifier
Table 9 Rectifier input power
Rated Power kVA
Rated Voltage, VAC 480
Supply 3-phase, 3-wire plus ground
Input Voltage Tolerance, VAC
(without derating)
Overload capacity of input
current
Frequency, Hz 57-66
Power Factor > 0.99 at full load; >0.98 at half load
Harmonic Current Less than 3% at full rated UPS output load
See Table 8 for current ratings.
Table 10 Input voltage window with derating
Input Voltage Window
(L-L Voltage)
432VAC to 552VAC
431VAC to 384VAC
383VAC to 360VAC
359VAC to 288VAC 60-74 80% 0%
40 60 80 100 120 160 200
480V Nominal +15%, -20% without derating
100% Imax <I<125% Imax: 60 min
125% Imax <I<150% Imax: 10 min; >150% load, less than 200msec
Percentage
of Nominal
90-115
80-89
75-79
Inverter Load,
Percentage
100% 100%
100% 30%
100% 0%
Charger Load,
Percentage
38
Page 49

Table 11 Liebert-approved replacement batteries
Battery
Manufacturer
Enersys
East Penn
C&D
Models
Supplied
12HX205FR
12HX300FR
12HX330FR
12HX400RF
12HX505FR
45HR2000
24HR3000
27HR3500
31HR4000
31HR5000
UPS12-100MR
UPS12-150MR
UPS12-210MR
UPS12-300MR
UPS12-400MR
UPS12-490MR
UPS12-540MR
UPS Specifications
6.4.2 DC Intermediate Circuit
Table 12 DC intermediate circuit
Rated Power kVA
Recommended number
of lead-acid batteries
Recommended float charge voltage 2.27VDC *
Recommended boost charge voltage 2.4VDC *
Recommended end of discharge voltage 1.67 - 1.75 VDC
Maximum recharge battery current, A * 14.8 22.2 29.6 37.0 44.4 59.2 74
Maximum boost charge duration, min. * 1800
Boost-float threshold current, A * 0.1 C default
Temperature voltage compensation, mV/°C * From 0 to 5 mV/deg. C/cell. Default value is 3mV/deg. C/cell.*
Ripple voltage superimposed% ≤ 1
* Set by configuration software and based on usage of VLRA batteries.
See Table 8 for current ratings.
40 60 80 100 120 160 200
Total 40 battery blocks of 12VDC (240 cells of 2VDC)
will be supported by UPS
39
Page 50

6.4.3 Inverter Output
Table 13 Inverter output
Rated Power kVA
Rated voltage, VAC 480
Supply 3-phase, 3-wire plus ground
Frequency, Hz 60 (50Hz in frequency converter mode)
Rated Power, kW 36 54 72 90 108 144 180
Three-phase transient
overload, min. load
Voltage Regulation%
Frequency Regulation%
Maximum rate of change
of frequency, Hz/sec
See Table 8 for current ratings.
UPS Specifications
40 60 80 100 120 160 200
105% to 110% for 60 minutes
111% to 125% for 10 minutes
126% to 150% for 1 minute
±1% 3-phase RMS average for a balanced three-phase load for the combined variation
effects of input voltage, connected load, battery voltage, ambient temperature and load
power factor
±2% 3-phase RMS average for a 100% unbalanced load for the combined variation
effects of input voltage, connected load, battery voltage, ambient temperature and load
power factor
Nominal frequency regulation is ±0.05% in single module mode,
and+/- 0.25% in parallel mode.
Selectable from 0.1Hz/sec to 3.0Hz/sec maximum for single unit
Fixed maximum of 0.2Hz/sec for paralleled units
6.4.4 Bypass Input
Table 14 Bypass input
Rated Power, kVA 40 60 80 100 120 160 200
Rated voltage, VAC 480
Supply 3-phase, 3-wire plus ground
Bypass voltage tolerance%
Frequency, Hz 60
Input frequency tolerance% ±2.5%, ±5%, ±10% and ±20%; default ±10%
Bypass overload
capacity (all ratings)
See Table 8 for current ratings.
Bypass frequency synchronization range setting should be wider than bypass frequency shift range.
Upper limit: +10%, +15% or +20%; Upper limit default: +15%
Lower limit: -10%, -20%, -30% or -40%; Lower limit default: -20%
Rated Output Current: Duration of Overload
105% to 110%: 60 Minutes
111% to 125%: 10 Minutes
126% to 150%: 1 Minute
1000%: 100 Milliseconds
40
Page 51

Liebert® BDC
Local Grounding
Electrode
UPS AC input and AC output cables are factory-supplied when UPS and Bypass
Distribution Cabinet are bolted together
Field-Supplied Wiring
Static Bypass
SKRU
MBD
CB1
CB5
UPS Cabinet
* AC Input
3W + G
Remove Jumper
for Dual Input
Configuration
Battery Cabinet
FPC12004
Rev. 3
225A 42 Poles
225A 42 Poles
225A 42 Poles
225A 42 Poles
200kVA
Only
Isolation
Transformer
BIB
CB2
CB3
MBB
MIB
2 Wire + Ground
* External Overcurrent
Protection By Others
Bypass Distribution Cabinet
Rectifier
Converter
Inverter
™
7.0 LIEBERT® BDC
™
The Liebert BDC is designed to operate in UPS mode, bypass mode and maintenance mode. The
Liebert BDC offers either 45kVA or 90kVA capacity to match the associated Liebert NX
™
frame
offerings. Each of the Liebert BDC capacities offer optional 480V and 600V internal transformers as
well as multiple output distribution selections.
Figure 20 Single input UPS with external Liebert BDC with optional internal transformer—typical
configuration
7.1 Normal (UPS) Mode
While the Liebert BDC is in Normal mode (MBB open; BIB/MIB closed), the UPS is supplying the
connected load with continuous, high-quality AC power. In this mode of operation, the load is
protected by the UPS.
41
Page 52

7.1.1 Bypass Mode
When the Liebert BDC is in Bypass mode, it provides an alternate path for power to the connected
equipment. Should the UPS need to be taken out of service for limited maintenance or repair, manual
activation of the bypass will cause an immediate transfer of the equipment from the UPS inverter to
the bypass source. In this mode, power will still be supplied to the UPS; however, the load is NOT
protected by the UPS.
7.2 Maintenance Mode
When the Liebert BDC is in Maintenance mode (MBB closed; BIB/MIB open), it provides an alternate
path for power to the connected equipment should the UPS need to be taken out of service for limited
maintenance or repair. In this mode of operation, no power is supplied to the UPS and the load is
NOT protected by the UPS.
7.3 Locating the Cabinet
This Liebert BDC may be mounted to the left of the UPS or installed as a stand-alone unit. In either
case, ensure that the unit is in a well-ventilated area and that there is clearance for access to the
switches and cable connections as required by national and local codes.
7.4 Cable Installation
7.4.1 Wiring Preparation
Be sure that the unit is not connected to any AC utility power source or UPS before installing any
wiring to this unit. This Liebert BDC should be installed by a qualified / certified electrician.
Liebert® BDC
™
WARNING
Risk of electrical shock and arc flash. Can cause property damage, injury and death.
Read this section thoroughly before attempting to install wiring to this unit. Read and
comply with all warnings and cautions in this manual.
Removing the Cover Plates
Plates cover the input and output terminals on the front of the Liebert BDC. Remove these and keep
the screws and plates for reinstallation.
7.4.2 Power Cable Installation
Refer to Table 15 when selecting cables.
Table 15 Power cable size selection (Copper Wire Only)
Terminal
Liebert® NX™ 40kVA UPS 4 4 4 3
Liebert NX 60kVA UPS 1 1 2 2
Liebert NX 80kVA UPS 2/0 2/0 1/0 1/0
®
Liebert
Liebert NX 120kVA UPS 250 250 4/0 4/0
Liebert NX 160kVA UPS 2-3/0 2-3/0 2-3/0 2-3/0
Liebert NX 200kVA UPS 2-4/0 2-4/0 2-4/0 2-4/0
Liebert NX 480V
Battery Cabinet DC Input Bus
NX™ 100kVA UPS 4/0 4/0 2/0 2/0
Bus Type
Main Input Bypass Input
OutputSingle Input Dual Input Dual Input
225A 350A 600A —
4/0AWG 400kcmi 2-350kcmil —
NOTE
Transient and steady state earth leakage currents may occur when starting the equipment.
This should be taken into account when selecting ground current detection devices because
these will carry the earth leakage currents of both the UPS equipment and the load.
42
Page 53

7.4.3 Input/Output Wiring
Follow the steps below to connect the input wiring:
NOTE
Input wiring must be installed using conduit if cabinet is not mounted to the immediate right
of the UPS.
1. Locate the input wiring access (top or bottom access), remove the conduit landing plate and punch
the appropriate size hole for the size conduit being used. Pull the three/four input wires through
it, allowing some slack for installation. For cabinets that are located to the immediate left of the
UPS, the access plate is on the lower right of the cabinet. Remove the access plate and verify that
the edge guarding is installed and intact.
2. Secure the conduit to the access plate of the Liebert BDC.
3. Input power cables connect to the system input circuit breaker; refer to Figure 21 and Table 34.
4. Connect the ground (earth) wire to the earth busbar and tighten it to 240lb-in. (27N-m) (M10
bolt).
5. Locate UPS input and output cables and access panel to UPS on lower right side.
NOTE
If the Liebert BDC is not to be bolted to the UPS, use either top or bottom access plate.
6. Connect the system ground cable between the Liebert BDC and UPS and tighten the connections
to 240lb-in. (27N-m) (M10 bolt).
7. Connect the system input cables between the Liebert BDC “UPS Input” Busbars (A-B-C N
terminals) and UPS input busbars (A-B-C N terminals) and tighten the connections to 240lb-in.
(27N-m) (M10 bolt).
8. Connect the system output cables between the Liebert BDC 'UPS Output' Busbars (A-B-C N
terminals) and UPS output busbars (A-B-C N terminals) and tighten the connections to 240lb-in.
(27N-m) (M10 bolt).
Liebert® BDC
™
NOTICE
Risk of improper wiring connection. Can cause equipment damage.
The control wire must be installed to ensure proper operation of the system and fully protect
the load when switching between bypass cabinet and UPS.
43
Page 54

Figure 21 Liebert® BDC connection to UPS
Liebert® BDC
™
NOTES
1. All Liebert-supplied cable must be repositioned prior to and while the cabinets are being placed in
their final installed location.
2. All interconnection hardware supplied by Emerson
3. AC connections must be made to the UPS module before attaching Liebert BDC to UPS module.
4. All cabling will be field-supplied when a Liebert BDC is configured as a stand-alone cabinet.
5. Liebert BDCs must attach to the right side only of the Liebert NX
6. Refer to the individual drawing of each piece of equipment for additional details.
Table 16 Control wiring for Liebert
From To
Liebert NX UPS
Monitor Board X1-J21 Liebert BDC Terminal Strip (TB2)
J21-3 INV_S TB1-2
J21-4 INV_C TB2-1
NX 480 UPS Parallel Board X3 Liebert BDC Terminal Strip (TB2)
X3-1-EXT-MAINT TB2-3
X3-2-GND2 TB2-4
®
NX™ UPS to Liebert BDC
44
®
.
™
.
Page 55

Liebert® BDC
™
Figure 22 Liebert BDC connection to Liebert® NX
Push Button Switch
3
2
K1
1
W565
6
9
B
8
5
A
7
4
™
W566
Solenoid Key Release Unit
W567
W567
W569
OK to Transfer
Indicator
W570
Solenoid Key Release Unit
(Auxiliary switch shown in
Interlock key normally retained
In lock. Key removable when
Solenoid is energized.
1234567
W569
W568
W564
TB2
position with key installed.)
8
W573
W572
W572
Black
W565
W573
13456
2
TB2-1
TB2-2
TB2-3
TB2-4
53469
Rev. 5
Wiring Legend
Factory-Supplied Wiring
Field-Supplied Wiring
Factory-Supplied Busbar
W570
W571
Transformer
600V White
Fuse 1
1/2 Amp
Black
480V Orange
400V Blue
240V Red
W571
600 Volt
W563
X1
Red
24 VAC
208V Yellow
Common Black
Black
Fuse 6
W574
X2
Isolation
H1
H2
See Note 1
& Table
1/2 Amp
600 Volt
W564
X3
Transformer
H3
3 Amp Inline Fuse
Provided With
T2 Transformer
X0
J21-INV_C
To UPS Monitor Board
Tap Location
T2 Transformer
Output Voltage
Isolation Transformer
Table 1
J21-INV_S
To Parallel Board X3-2-GND2
To Parallel Board X3-1-EXT-MAINT
inhibited When
Circuit Is Closed
Terminal Block J21
Inverter Bus Output Switch
240V (Red)
208V (Yellow)
208/120
220/127
NOTE
Install jumper on TB1 pins 4 and 5. For startup procedure, see 11.2 - UPS Startup.
45
Page 56

Table 17 Circuit breaker schedule - Main circuit breaker
kVa Voltage In Vendor Frame Amps Trip Amps Model Number
15
30
50
75
100
125
208V
240V 250A 50A T4S050TW-S24 100K
380V 250A 30A T4S030TW-S24 35K
400V 250A 30A T4S030TW-S24 35K
ABB
415V 250A 30A T4S030TW-S24 35K
480V 250A 25A T4S025TW-S24 35K
600V 250A 20A T4S020TW-S24 25K
208V
240V 400A 100A T4S100TW-S24 100K
380V 250A 60A T4S060TW-S24 35K
400V 250A 60A T4S060TW-S24 35K
ABB
415V 250A 60A T4S060TW-S24 35K
480V 250A 50A T4S050TW-S24 35K
600V 250A 40A T4S040TW-S24 25K
208V
240V 400A 175A T4S175TW-S24 100K
380V 250A 100A T4S100TW-S24 35K
400V 250A 100A T4S100TW-S24 35K
ABB
415V 250A 90A T4S090TW-S24 35K
480V 250A 80A T4S080TW-S24 35K
600V 250A 70A T4S070TW-S24 25K
208V
240V 600A 250A T4S250TW-S24 100K
380V 400A 150A T4S150TW-S24 35K
400V 400A 150A T4S150TW-S24 35K
ABB
415V 400A 150A T4S150TW-S24 35K
480V 250A 125A T4S125TW-S24 35K
600V 250A 100A T4S100TW-S24 25K
208V
240V 250A 350A T5S350TW-S24 100K
380V 250A 200A T4S200TW-S24 35K
400V 250A 200A T4S200TW-S24 35K
ABB
415V 250A 200A T4S200TW-S24 35K
480V 250A 175A T4S175TW-S24 35K
600V 250A 125A T4S125TW-S24 25K
208V
240V 250A 400A T5S400BW-S24 100K
380V 250A 250A T4S250TW-S24 35K
400V 250A 250A T4S250TW-S24 35K
ABB
415V 250A 225A T4S225TW-S24 35K
480V 250A 200A T4S200TW-S24 35K
600V 250A 175A T4S175TW-S24 25K
250A 60A T4S060TW-S24 100K
400A 110A T4S110TW-S24 100K
600A 200A T4S200TW-S24 100K
600A 300A T5S300TW-S24 100K
250A 400A T5S400TW-S24 100K
250A 450A T5S450BW-S24 100K
Interrupting
Rating AIC
Liebert® BDC
™
46
Page 57

Table 17 Circuit breaker schedule - Main circuit breaker (continued)
kVa Voltage In Vendor Frame Amps Trip Amps Model Number
150
200
225
300
208V
240V 250A 500A T5S500BW-S24 100K
380V 250A 300A T5S300BW-S24 35K
400V 250A 300A T5S300BW-S24 35K
415V 250A 300A T5S300BW-S24 35K
480V 250A 250A T4S250TW-S24 35K
600V 250A 200A T4S200TW-S24 25K
380V
400V 400V 400A T5S400BW-S24 35K
415V 400A 400A T5S400BW-S24 35K
480V 400A 350A T5S350BW-S24 35K
600V 250A 250A T4S250TW-S24 25K
380V
400V 600V 450A T5S400BW-S24 35K
415V 600A 450A T5S400BW-S24 35K
480V 400A 350A T5S350BW-S24 35K
600V 400A 300A T5S300BW-S24 25K
380V
400V 600V 600A T5S600BW-S24 35K
415V 600A 600A T5S600BW-S24 35K
480V 600A 500A T5S500BW-S24 35K
600V 400A 400A T5S400BW-S24 25K
ABB
ABB
ABB
ABB
400A 600A T5S600BW-S24 100K
400A 400A T5S450BW-S24 35K
600A 450A T5S450BW-S24 35K
600A 600A T5S600BW-S24 35K
Interrupting
Rating AIC
Liebert® BDC
™
Table 18 Main panelboard circuit breaker
kVA Voltage In Vendor Type
15-300 208V ABB FIX MTD 225A 225A T3N225TW 22k
15-300 208V ABB PLUG-IN 225A 225A T3N225TW + 22k
Frame
Amps
Tri
pAmps
Model
Number
Interrupting
Rating AIC
Table 19 Panelboard branch circuit breaker
kVA
15-100 208V SQUARE D PLUG-IN 100A 15-100A QO 10K
15-100 208V SQUARE D BOLT-IN 100A 15-100A QOB 10K
15-100 208V SQUARE D PLUG-IN 100A 15-100A QOxxVH 22K
15-100 208V SQUARE D BOLT-IN 100A 15-100A QOBxxVH 22K
15-100 208V GE PLUG-IN 100A 15-100A THQL 10K
15-100 208V GE BOLT-IN 100A 15-100A THQB 10K
15-100 208V GE PLUG-IN 100A 15-100A THHQL 22K
15-100 208V GE BOLT-IN 100A 15-100A THHQB 22K
Voltage
In Vendor Type
Frame
Amps
Trip
Amps
Model
Number
Interrupting
Rating AIC
47
Page 58

Table 20 Subfeed circuit breaker
Voltage
kVA
15-300 208V ABB FIX MTD 250A 100A T4N100TW 65K
15-300 208V ABB FIX MTD 250A 125A T4N125TW 65K
15-300 208V ABB FIX MTD 250A 150A T4N150TW 65K
15-300 208V ABB FIX MTD 250A 175A T4N175TW 65K
15-300 208V ABB FIX MTD 250A 200A T4N200TW 65K
15-300 208V ABB FIX MTD 250A 225A T4N225TW 65K
15-300 208V ABB FIX MTD 250A 250A T4N250TW 65K
150-300 208V ABB FIX MTD 400A 300A T5N300TW 65K
150-300 208V ABB FIX MTD 400A 350A T5N350TW 65K
150-300 208V ABB FIX MTD 400A 400A T5N400TW 65K
In Vendor Type
Frame
Amps
Trip
Amps
Model
Number
Interrupting
Rating AIC
Table 21 Square D I-Line panelboard circuit breaker
kVA
50-300 208V SQUARE D PLUG-IN 150A 100A HGA36100 65K
50-300 208V SQUARE D PLUG-IN 150A 125A HGA36125 65K
50-300 208V SQUARE D PLUG-IN 150A 150A HGA36150 65K
50-300 208V SQUARE D PLUG-IN 250A 175A JGA36175 65K
50-300 208V SQUARE D PLUG-IN 250A 200A JGA36200 65K
50-300 208V SQUARE D PLUG-IN 250A 225A JGA36225 65K
50-300 208V SQUARE D PLUG-IN 250A 250A JGA36250 65K
225-300 208V SQUARE D PLUG-IN 400A 300A LA36300 42K
225-300 208V SQUARE D PLUG-IN 400A 350A LA36350 42K
225-300 208V SQUARE D PLUG-IN 400A 400A LA36400 42K
Voltage
In Vendor Type
Frame
Amps
Trip
Amps
Model
Number
Interrupting
Rating AIC
Liebert® BDC
™
48
Page 59

7.5 Bolting Cabinets Together
NOTE
UPS wiring must be completed before the cabinets are bolted together.
1. Line up cabinets so that mounting holes are aligned.
Figure 23 Bolting a Liebert
Air
Exhaust
Input
Wires
®
TOP VIEW
23.5"
(597mm)
NX™UPS to a Liebert BDC
Output
Cable Plate
(See Note 4)
Control
Wires
Cable
Pass-Through
Area
™
39.5" (1003mm)
38.6" (980mm)
Including Hinge and
Bezel Projection
78.7?
(2000mm)
Liebert® BDC
™
RIGHT SIDE VIEW
FRONT VIEW
10 x 5.7 (254mm x 145mm)
Input Landing
8.3" (211mm)
19.9
(504mm)
Output Cable Plate
(See Note 4)
Notes
1. All dimensions are in inches (mm).
2. 24" (610mm) minimum clearance above unit required for air exhaust.
3. Keep cabinets within 15 degrees of vertical.
4. Output Cable Plates
Panelboard Option: Top output plates have 84 knockouts for
1/2" conduit per plate. Bottom output plates have 84 plugs
for 1/2" conduit per plate.
Output Circuit Breaker Option: Top and bottom output plates
are removable blank plates. Remove, punch to suit conduit size and reinstall.
5. Control wiring and power wiring must be run in separate conduits.
6. All wiring is to be in accordance with national and local electrical codes.
7. Depth dimensions include front and rear doors.
8. Width dimensions without side panels. Add 2.2 (56mm) when adding
both side panels.
9. Clearance of 36" (914mm) minimum is recommended at front and rear for
service access.
17"
(432mm)
BOTTOM VIEW
3.1"
(80mm)
27.7"
(702mm)
Inlet Area
For Cooling
Pedestal Location
Ø0.9" (22mm) Typical
Right Side Output
Cable Entry Area
9.5 x 6.5 (241mm x 165mm)
36.4"
(925mm)
Base Footprint Shaded Area
Indicates Floor Cutout Dimensions
For Colling Air And Cable Entry/exit
Unit
kVA
75
125 1650 (748)
REAR VIEW
23.5"
(597mm)
6.0"
(152mm)
11. 5"
(292mm)
FRONT
Weight
lb (kg)
1350 (6128)
FPC13600
Rev. 4
1.2"
(30mm)
34.0"
(864mm)
Full Load
Heat Output
BTU/HR (kw)
8150 (239)
11,500 (3.37)
2. Using supplied hardware, bolt the cabinets together. The bolts may be inserted from either the
UPS side or from the Liebert BDC side, whichever is more convenient.
49
Page 60

Figure 24 Outline drawing, Liebert BDC™, 47" cabinet
NOTES
1. All dimensions are in inches (mm).
2. 18" [457mm] minimum clearance above unit required for air exhaust.
3. Keep cabinets within 15 degrees of vertical.
4. Output conduit plates
Panelboard option:
Top output plates have 84 knockouts for 1/2" conduit per plate.
Bottom output plates have 84 plugs for 1/2" conduit per plate.
Output circuit breaker option:
Top and bottom output plates are removable blank plates. Remove,
punch to suit conduit size and reinstall.
5. Control wiring and power wiring must be run in separate conduits.
6. All wiring is to be in accordance with national and local electrical codes.
7. Depth dimensions include front and rear doors.
8. Width dimensions without side panels. Add 2.2 [56mm] when adding
both side panels.
9. Clearance of 36" [914mm] minimum is recommended at front and rear for
service access.
AIR INLET
FOR COOLING
R 25.3" (643mm) x
180° Door Swing°
R 25.3" (643mm) x
180° Door Swing°
R 25.3" (643mm) x
180° Door Swing°
R 25.3" (643mm) x
180° Door Swing°
Output Conduit Plates
11.9" x 15.7" (302 x 400mm)
See Note 4
47" (1194mm)
See Note 8
39.5" (1003mm)
38.6" (980mm)
79.6"
(2021mm)
3.8"
(97mm)
2.2"
(56mm)
1.9"
(48mm)
6.6" (168mm)
26.7"
(677mm)
39.2" (996mm)
Input Conduit Plates
5" x 8.5" (127 x 216mm)
Input Conduit Plates
5" x 8.5" (127 x 216mm)
Control Wiring Holes
2-1/2" (64mm)
Including Hinge
and Bezel
Projection
TOP VIEW
RIGHT
SIDE
VIEW
REAR VIEW
FRONT VIEW
BOTTOM VIEW
Input Conduit Plates
32" x 8" (812 x 204mm)
Output Conduit Plates
15.7" x 11.9" (400 x 302mm)
See Note 4
Left and Right Side
Output Cable Access
Area; (2) @ 2"x10"
(210 x 254mm)
47" (1194mm)
36.4"
(925mm)
33.8"
(859mm)
FRONT
Base Footprint Shaded Area
Indicates Floor Cutout Dimensions
For Cooling Air and Cable
Entry and Exit
6" (152mm)
1.3"
(33mm)
Unit
kVA
200
Weight
lb. (kg)
2610
(1184)
Full Load
Hea Output
BTU/Hr (kw)
15,500
(4.54)
FPC1360
Rev. 1
Liebert® BDC
™
50
Page 61

8.0 INSTALLATION DRAWINGS
1. All dimensions are in inches (mm).
2. Minimum clearance 36" front and 8" top
required for air exhaust.
3. Keep cabinet within 15 deg. of vertical
while handling.
4. Top and bottom cable entry available
through removable access plates.
Remove punch to suit conduit size and replace.
5. Color: Black.
6. Unit bottom is structurally adequate for forklift
handling.
7. Open door to replace air filter, washable type.
8. Side panels are removed between adjacent units
that are bolted together.
9. Leveling feet are not designed to carry the full weight of the
cabinet. Finger-tighten leveler against the floor, then tighten
with a wrench less than two turns for friction fit against floor.
Power Cable Entry
3.7 x 22.8 (94x 580)
U3819203
Rev. 4
TOP VIEW
FRONT
FRONT
FRONT VIEW
FRONT
SIDE VIEW
BOTTOM VIEW
Display
Power Cable Entry
4.9 x 11.4 (125 x290)
1.55 (39) Leveler
to Outside Frame (See Note 9)
1.6 (41) Leveler to Outside Frame
3.5 (90) Caster
To Outside Frame
5.9 (150)
to Outside
Frame
Power
Cable
Entry
DETAIL A
Detail A
1.5 (38) Cable Panel
To Outside Frame
3.7 (94) Caster
To Outside Frame
Caster
Outer Panel
Outer Panel
20.9
(530)
25.5 (648)
23.6 (600)
78.7
(2000)
33.1
(842)
15.4
(390)
20.3
(515)
38.5 (978)
39 (990)
To Display
40.9
(1040)
1.6 (40)
Center
of Gravity
Center
of Gravity
Installation Drawings
The diagrams in this section illustrate the key mechanical and electrical characteristics of the
Liebert
®
NX™ UPS System cabinets.
Figure 25 Outline drawing, Liebert NX 40-120kVA
Table 22 Weights, Liebert NX 40-120kVA
kVA Rating
40 1290 (585 1440 (653) 11612 620
60 1290 (585 1440 (653) 15204 620
80 1290 (585 1440 (653) 20273 620
80* 1422 (645 1572 (713) 19700 920
100* 1422 (645 1572 (713) 23496 920
120 1422 (645 1572 (713) 28196 920
Source: U3819203, Rev. 4
UPS Weight, lb (kg)
BTU/Hr
Heat
Cooling Air
51
CFMNet Crated
Page 62

Figure 26 Terminal details, 34" battery power pack system for Liebert® NX™ 480V UPS
1. All dimensions are in inches [mm].
2.All cables should be routed before bolting cabinets
together.
3. For stand-alone installations, the interconnecting
cables between the battery cabinet and the UPS
must be provided by others. Optional battery
intercabinet wiring kits are available for
side-by-side line-up installations.
4. All hardware supplied with battery cabinet for
bolting cabinet to UPS. Use M6 hardware provided;
assemble as shown in detail drawings.
5. See installation, operation and maintenance
manual for additional information.
6. All external wiring is to be in accordance with
national and local electrical codes.
U3819205
Rev. 2
Fuse input Alber
monitoring system
(optional)
(+) Positive
Transformer for Alber
monitoring system
(optional)
PCB
FRONT VIEW
Without Doors and Protecting Plate
TOP VIEW
Without Protecting Plates
DETAIL B
DETAIL C
DETAIL A
GND
Busbar
See
Detail B
See
Detail A
See
Detail C
Terminal Block
Aux. Contacts
1.2 (30)
1.2 (30)
30 (76)
2.3 (59)
Ø 0.4
(9)
(-) Negative
Installation Drawings
Table 23 Battery cabinet ground
Unit Rating Bolt Size
Source: U3819205, Rev. 2
Table 24 Battery cabinet circuit breaker
Cabinet
Source: U3819205, Rev. 2
80 1/4" (M6) 44 (5)
Battery
Rating
Current
80kVA 195 225 1/4" (M6) 44 (5)
Torque
lb-in (N-m)
OCP Device
Rating
Bolt Size
Torque
lb-in (N-m)
52
Page 63

Figure 27 Liebert® NX™ 80-120kVA dimensions—front and left side
Installation Drawings
Table 25 UPS terminal specifications
Utility Configurations Breaker Size, Amps
Bolt Shaft
Unit Rating
80-120 M8 88 (10) 225 225 225 225 225
Source: U3819611, Rev. 0
Size
Torque
lb-in (N-m) CB1 CB2 CB3 CB4 CB5
53
Page 64

Figure 28 Liebert® NX™ 160-200kVA dimensions—front and left side
39.0 (990) to Display
48.9 (1242)
38.5 (978)
78.7
(2000)
61.9
(1573)
Low Voltage
Entry
5.1 x 3.9
(130x100)
2.7 (68)
Front
Frame
Installation Drawings
.9 (23)
Outside
Frame
.4 (10)
Outside
Frame
TOP VIEW (Door Open)
Power Cable
Entry
14 x 13 (355x330)
.8 (19)
Front
Frame
DETAIL A
FRONT
5.0 (127) Typ
Outside Frame
1.9 (49)
Front Frame
38.9 (987)
To Centers of Caster Brkt. Typ
Front
32.3 x 6.4 (820x163)
Cable Entry Panel
BOTTOM
NOTES:
1. All dimensions are in inches [mm]. Weight est. 2201 lb. (1000kg).
2. 24" [610] minimum clearance above unit required for air exhaust, and 36" [914] minimum service clearance at front of unit.
3. Keep cabinet within 15 degrees of vertical.
4. Top and bottom cable entry available through removable access plates. Remove, punch to suit conduit size and replace.
5. Control wiring and power wiring must be run in separate conduits.
6. Aluminum and copper-clad aluminum cables are not recommended.
7. All wiring is to be in accordance with national and local electrical codes.
8. Depth dimensions include front door and rear panel.
9. Width dimension includes side panels. Subtract 2.2" (56mm) when removing both side panels.
(Looking Top Down)
RIGHT SIDE
5.7 (146) Typ
27.1 (688)
To Centers
of Caster
Brkt. Typ
7.3 (186)
REAR
See Detail A
43.7 (1111) Typ.
LEVELER SPACING
Looking Top Down
3
(76)
33.1
(842)
Typ
U3819621
Rev. 1
1.6 (41) Outside
Frame Typ
4.1 (104)
Table 26 Electrical specifications, Liebert NX 160-200kVA
Voltage Heat
Rejection
Rating, kVA
BTU/hr
160 480 480 35,900 1590
200 480 480 47,000 1590
Source: U3819621, Rev. 1
Cooling Air
CFMInput Output
1.6 (41) Outside
Frame Typ
54
Page 65

Figure 29 Liebert® NX™ 160-200kVA dimensions—front and left side
1. All dimensions are in inches [mm].
2. 24" [610] minimum clearance above unit required
for air exhaust and 36" [914] minimum service clearance at front of unit.
3. Keep cabinet within 15 degrees of vertical.
4. Top and bottom cable entry available through removable access
plates. Remove, punch to suit conduit size and replace.
5. Control wiring and power wiring must be run in separate conduits.
6. Aluminum and copper-clad aluminum cables are not recommended.
7. All wiring is to be in accordance with national and local electrical codes.
8. Terminal connecting hardware included.
BOTTOM CABLE ENTRY
3.9 (100)
Access Plate Height
DETAIL A
Input/Output/Bypass
GROUND BUS
DC BUS
Rear
BOTTOM VIEW
U389641
Rev. 0
RIGHT SIDE FRONT
Right Front Corner
Post Not Shown
Main Input Bus
See Detail A
Bypass Input Bus
(Dual Input)
See Detail A
Output
Bus
See Detail A
FRONT
LOWER
Ø .39
(10) Typ
Ø .39
(10) Typ
Ø .39
(10) Typ
DC
Bus
Ground
Bus
20.3
(516)
10.6
(268)
10.1
(258)8(203)
Typ
5.9
(150)
1.6
(40)
1
(25)
Typ
1
(25)
Typ
1
(25)
Typ
Installation Drawings
55
Page 66

Figure 30 Liebert® NX™ 40-120kVA main components—typical unit
Monitor
Board
Intellislot
Communication
Ports
Replaceable
Air Filters
FRONT VIEW
(door open)
DC Bus
Main Input
Bus
Bypass
Input Bus
(Dual Input)
Output Bus
GND
Output Breaker
(CB5)
Maintenance
Bypass Breaker (CB3)
Bypass Breaker
(CB2)
Input Breaker
(CB1)
Parallel Board
CB1 CB2 CB3 CB5
Installation Drawings
56
Page 67

Figure 31 Liebert® NX™ 160-200kVA dimensional view—front and left side
FRONT VIEW LEFT VIEW
1239mm (48.8")
979mm (38.5")
2000mm
(78.7")
1000mm
(39.4")
610mm (24")
590mm 23.2"
Installation Drawings
57
Page 68

Figure 32 Liebert® NX™ 160-200kVA dimensions continued—top and bottom view
BOTTOM VIEW
TOP VIEW
Front of UPS
Front of UPS
1239mm (48.77")
972mm
(38.28")
1239mm (48.77"
842mm
(33.14")
1110mm (43.72")
A
Detail A
355mm
(13.99")
330mm
(12.99")
Installation Drawings
58
Page 69

Figure 33 Liebert® NX™ 160-200kVA main components—typical unit
Monitor
Board
Intellislot
Communication
Ports
Replaceable
Air Filters
Parallel Board
Input Breaker
(CB1)
Bypass Breaker
(CB2)
Maintenance
Bypass Breaker
(CB3)
Output Breaker
(CB5)
DC Bus
Main Input
Bus
Bypass
Input Bus
Output
Bus
Ground
Installation Drawings
59
Page 70

Figure 34 Liebert® NX™ 40-120kVA cable connections
NOTES
1. All dimensions are millimeters (in.).
2. Top and bottom cable entry available through
removable access plates. Remove, punch to
accommodate conduit size and replace.
3. Control wiring and power wiring must be run in
separate conduit. Output and input cables must
be run in separate conduit.
4. Aluminum and copper-clad aluminum cables are
not recommended.
5. All wiring is to be in accordance with national
and local electrical codes.
20 (.79")
35
(1.38")
158.1
(6.22")
35
(1.38")
36 (1.42")
Output
GND
DC
Bypass
Main
25.4
(1")
6
(.24")
CB1 CB2 CB3 CB5
DETAIL A
600
(23.6")
2000
(78.7")
FRONT VIEW
(with door removed)
Installation Drawings
60
Page 71

Figure 35 Liebert® NX™ 160-200kVA cable connections
DC Bus
Main Input
Bus
Bypass
Input Bus
(Dual Input)
Output
Bus
O 10mm
(0.394")
DETAIL A
80mm
(3.15")
80mm
(3.15")
80mm
(3.15")
65mm
(2.56")
224mm
(8.83")
FRONT VIEW
(door removed)
A
Installation Drawings
61
Page 72

Figure 36 Outline drawing, 33" battery power pack system, single cabinet
169.5 (6.7)
372.7 (14.7)
575.9
(22.7)
779.1
(30.7)
172.1
(6.8)
965
(38)
Bottom
(Viewed From Below)
Right Side
Front
(Without Door)
To p
(Viewed From Above)
Max. Door Swing: 120°
490.3
(19.3)
896.6
(35.3)
474.3
(18.7)
26.8 (1.1)
609.3
(24)
322.9
(12.7)
322.9
(12.7)
872.2
(34.3)
845
(33.2)
418.9 (16.5)
683
(26.9)
2000
(78.7)
Leveling
Feet
(See
Note #9)
U3819204
Center
of Gravity
Center
of Gravity
1. All dimensions are in millimeters (inches)
2. Minimum clearance 36" front and 8" top required for air exhaust.
3. Top and bottom cable entry available through removable access plates.
4. Keep cabinet within 15 deg. of vertical while handling.
5. Control wiring and power wiring must be run in separate conduit.
6. Aluminum and copper clad cables are not recommended.
7. All wiring is to be in accordance with national and local electrical codes.
8. Intercabinet wiring between the UPS and the external battery cabinet is
field-supplied.
9. Leveling feet are not designed to carry the full weight of the cabinet.
Finger-tight leveler against the floor, then tighten with a wrench less
than 2 turns for friction fit against floor.
10. Side panels included.
11. M10 threaded mounting holes used for seismic anchoring or floor stand.
NOTE: If floor stand is used the weight of the unit must be supported under
all casters. Mounting holes same spacing front and rear.
13. Battery-support tray connects to the front of the cabinet with the
support brackets. Without the support, the battery may fall out of the cabinet.
Installation Drawings
62
Page 73

Installation Drawings
NOTES:
1. All dimensions are in millimeters (inches).
2. All cables should be routed before bolting cabinets togethe r.
3. The cables between the battery cabinet and the UPS cabinet
must be supplied by others.
4. All hardware supplied with battery cabinet for bolting cabinet
to UPS use M6 hardware provided; assemble as shown in
detail drawings.
5. All external wiring is to be in accordance with national
and local electrical codes.
Front
(Without Doors and
Protective Plates)
To p
(Without Protective Plates)
Transformer
For Alber Monitoring
System (Optional)
Fused Input
for Alber Monitoring
System (Optional)
Terminal Block
Aux. Contacts
DETAIL B
PCB
59
(2.32)
(-) Negative
9
(0.30)
76.2
(3)
B
A
(+) Positive
U3819205
Figure 37 Terminal details, 33" battery power pack system, single cabinet Liebert® NX
™
63
Page 74

Figure 38 Outline drawing, 49" battery power pack system, single cabinet
FRONTFRONT
RIGHT SIDE
SECTION A-A
(Plan View)
LEVELER SPACING
TOP VIEW
(Door Open)
Rear
323mm
(12.7") typ.
323mm
(12.7") typ.
138mm
(5.4") typ.
188mm
(7.4")typ.
974mm (38.3")
1240mm (48.8)
1997mm
(78.6")
482mm
(19.0")
typ.
482mm
(19.0") typ.
1140mm (44.9")
typ.
841mm
(33.1")
typ.
Cable Entry Panel
190x290mm (7.2x11.4")
typ. 2
Cable Entry Panel
190x290mm (7.2x11.4")
typ. 2
183mm (7.2)
Outside
Frame
271mm
(10.7")
Rear Frame
271mm
(10.7")
Front Frame
98mm (3.9")
Outside Frame
509mm (20")
FrontFrame
296mm (11.7")
Outside Frame
1616mm
(63.6")
868.7mm
(34.2")
485.3mm
(19.1")
481.1mm (18.94")
AA
Installation Drawings
64
Page 75

Figure 39 Terminal details, 49" battery power pack system
Detail B
Top V ie w
(without BCB Cover Plate)
B
A
Detail A
Positive
(+)
Negative
(-)
Ground
PCB
Transformer for Alber
Monitoring System
(Optional)
Ter m i n a l Bl o c k /
Aux Contacts
Fused Input
for Alber Monitoring
System (Optional)
Positive
Installation Drawings
65
Page 76

Figure 40 Liebert® NX™ 160-200kVA UPS to 49" battery cabinet interconnection
C
C
C
A
A
NX 160-200KVA UPS Module
Front View
49" Battery Cabinet Right-Side Views
B
B
D
D
D
NOTES:
1. All cables must be repositioned prior to and while setting the cabinets in their installed location.
2. Refer to the individual drawing of each piece of equipment for additional details.
Run From To Conductors
A UPS Battery Terminal Block External Battery Cabinet Positive, Negative
B External Battery Cabinet
Additional External
Battery Cabinet(s)
Positive, Negative
C
Battery Cabinet(s) Breaker
Control Terminal Block
UPS Monitoring Board
Battery Breaker
Auxiliary Contacts
D UPS Ground Battery Cabinets Ground Ground
Installation Drawings
66
Page 77

Figure 41 Liebert® NX™ 40-120kVA UPS to 33" battery cabinet interconnection
NOTES:
1. All cables must be repositioned prior to and while setting the cabinets in their installed location.
2. Refer to the individual drawing of each piece of equipment for additional details.
Run From To Conductors
A UPS Battery Terminal Block First External Battery Cabinet Positive, Negative
B External Battery Cabinet
Additional External
Battery Cabinet(s)
Positive, Negative
C
Battery Cabinet(s) Breaker
Control Terminal Block
UPS Monitoring Board
Battery Breaker
Auxiliary Contacts
D UPS Ground Battery Cabinets Ground Ground
Installation Drawings
67
Page 78

Figure 42 Outline drawing, Liebert® NX™ 480V 33" parallel cabinet
Top
Right Side
845
(33.2)
965
(38)
Front
2000
(78.7)
NOTE:
1. All dimensions are in millimeters (in).
2. Eight-inch minimum clearance above unit required for air exhaust.
3. Keep cabinet within 15 degrees of vertical while handling.
4. Top and bottom cable entry available through removable access plates. Remove access plate,
punch to suit conduit size and replace.
5. Color - black.
6. Unit bottom is structurally adequate for forklift handling.
7. M10 threaded mounting holes used for seismic anchoring or floor stand.
NOTE: If floor stand is used, the weight of the unit must be supported under all casters.
8. Each mounting location is supported by two 10 ga. (.135") galvanized steel. The threaded
insert is approximately 3/4" deep. Mounting holes are underneath unit base; mounting bolts
must be threaded into unit.
9. Side panels must be removed from adjacent units that are bolted together.
10. Leveling feet are not designed to carry the full weight of the cabinet. Finger-tighten leveler
against the floor, then tighten with a wrench less than 2 turns for friction fit against floor.
Installation Drawings
68
Page 79

Figure 43 Outline drawing, Liebert® NX™ 480V 49" parallel cabinet
2000
(78.7)
Front
965
(38)
1240
(48.8)
Top
Right Side
NOTE:
1. All dimensions are in millimeters (in).
2. Eight-inch minimum clearance above unit required for air exhaust.
3. Keep cabinet within 15 degrees of vertical while handling.
4. Top and bottom cable entry available through removable access plates. Remove access plate punch to
suit conduit size and replace.
5. Color - black.
6. Unit bottom is structurally adequate for forklift handling.
7. M10 threaded mounting holes used for seismic anchoring or floor stand.
NOTE: If floor stand is used, the weight of the unit must be supported under all casters.
8. Each mounting location is supported by two 10 ga. (.135") galvanized steel. The threaded insert is
approximately 3/4" deep. Mounting holes are underneath unit base; mounting bolts must be threaded
into unit.
9. Side panels must be removed from adjacent units that are bolted together.
10. Leveling feet are not designed to carry the full weight of the cabinet. Finger-tighten leveler against
the floor, then tighten with a wrench less than 2 turns for friction fit against floor.
Installation Drawings
69
Page 80

Installation Drawings
Front
Rear
System Output
Tie Breaker
Kirk - Key
Fuse
Disconnect
System
Output
Busbar
Ground
Busbar
UPS Output
Breaker
System
Bypass
Tie Breaker
UPS
Input
Breakers
System
Input
Figure 44 Liebert® NX™ 480V paralleling cabinet with input and bypass circuit breakers, main components
70
Page 81

Installation Drawings
Front
With Covers
Bypass
Tie
Breaker
Bypass
Tie
Breaker
Ground
Bus
UPS Input
System Input
Front
Without Covers
Rear
With Covers
Rear
Without Covers
UPS
Output
Output
Distribution
Figure 45 Liebert® NX™ 480V paralleling cabinet main components—input, bypass and distribution circuit
breaker configuration
71
Page 82

Installation Drawings
System
Bypass
Kirk-Key
Fuse
Disconnect
System
Output
Busbars
Ground
Busbar
UPS
Output
Breakers
FRONT
Figure 46 Main component location drawing Liebert® NX™ 480V, CB2, CB3, CB4 configurations
72
Page 83

Installation Drawings
C1-C4
D
E1-E4
B1-B4
C1-C4
B1-B4
A
G1-G4
H1-H4
E1-E4
F
FRONT
Without Covers
FRONT
Door Open
REAR
Without Covers
G1-G4
H1-H4
Run From To Conductors
A Utility Source Parallel Cabinet
Ph A, B, C - System
Input
B1-B4 Parallel Cabinet
UPS #1-UPS #4 Module
AC Input
Ph A, B, C - UPS
Inputs
C1-C4
UPS #1-UPS #4
Module AC Output
Parallel Cabinet
Ph A, B, C -
UPS Outputs
D Parallel Cabinet Critical Loads
Ph A, B, C - System
Outputs
E1-E4 Parallel Cabinet
UPS #1-UPS #4
Module Gnd
Ground - UPS
F Parallel Cabinet Building Gnd Ground - System
G1-G4 Parallel Cabinet
UPS #1-UPS #4 Module
UPS Parallel Logic
Board (M3)
Output Breaker Aux
Contact
H1-H4 Parallel Cabinet
UPS #1-UPS #4 Module
UPS Parallel Logic
Board (M3)
UPS Bypass
Detection
Figure 47 Liebert® NX™ 480V 40-120kVA UPS to Paralleling Cabinet Interconnection—Configuration BB0,
FB0, KB0 parallel connection to Liebert NX
73
Page 84

Installation Drawings
Run From To Conductors
A Utility Source Parallel Cabinet Ph A, B, C - System Input
B1-B4 Parallel Cabinet
UPS #1-UPS #4 Module
AC Input
Ph A, B, C - UPS Inputs
C1-C4
UPS #1-UPS #4 Module
AC Output
Parallel Cabinet Ph A, B, C - UPS Outputs
D Parallel Cabinet Critical Loads Ph A, B, C - System Outputs
E1-E4 Parallel Cabinet
UPS #1-UPS #4 Module
Gnd
Ground - UPS
F Parallel Cabinet Building Gnd Ground - System
G1-G4 Parallel Cabinet
UPS #1-UPS #4 Module
UPS Parallel Logic Board (M3)
Output Breaker Aux Contact
H1-H4 Parallel Cabinet
UPS #1-UPS #4 Module
UPS Parallel Logic Board (M3)
UPS Bypass Detection
Figure 48 Interconnecting details for Liebert® NX™ 40-120kVA UPS to paralleling cabinet with input,
bypass and distribution circuit breakers
B1-B4
A
FRONT
Without Covers
G1-G4,
H1-H4
E1-E4, F
G1-G4,
H1-H4
D
B1-B4
E1-E4
C1-C4
FRONT
With Door Open
REAR
C1-C4
Without Covers
74
Page 85

Installation Drawings
Run From To Conductors
B1-B4 Utility
UPS #1-UPS #4 Module AC
Input
Ph A, B, C - UPS Inputs
C1-C4
UPS #1-UPS #4
Module AC Output
Parallel Cabinet Ph A, B, C - UPS Outputs
D Parallel Cabinet Critical Loads Ph A, B, C - System Outputs
E1-E4 Parallel Cabinet UPS #1-UPS #4 Module Gnd Ground - UPS
F Parallel Cabinet Building Gnd Ground - System
G1-G4 Parallel Cabinet
UPS #1-UPS #4 Module
UPS Parallel Logic Board (M3)
Output Breaker Aux Contact
H1-H4 Parallel Cabinet
UPS #1-UPS #4 Module
UPS Parallel Logic Board (M3)
UPS Bypass Detection
Figure 49 Lineup detail—Configuration CB2, CB3, CB4 parallel connection to Liebert® NX
G1-G4
H1-H4
C1-C4
E1-E4
F
G1-G4
H1-H4
™
D
FRONT
Without Covers
FRONT
Door Open
75
B1-B4
C1-C4
E1-E4
Page 86

Installation Drawings
Remove
when cabinets
are to be bolted
together
DETAIL A
A
U3819301
NOTES:
1. All dimensions are in millimeters (inches)
2. All cables should be routed before bolting
cabinets together.
3. The cables between the auxillary cabinets
and the UPS cabinet must be supplied by customer.
4. All hardware supplied with ancillary cabinets
for bolting cabinet to UPS.
5. Use M6 hardware provided. Assemble as
shown in detail drawing.
6. All external wiring is to be in accordance
with national and local codes.
2000
(78.7 in)
965
(38 in.)
LEFT SIDE
Without Exterior
Panels
RIGHT SIDE
Without Exterior
Panels
LEFT SIDE
Isometric View
Figure 50 Line-up detail, bolt together description, 40-120 kVA Liebert® NX
™
76
Page 87

9.0 OPERATION
3-Phase
3W + Gnd
3-Phase
3W + Gnd
AC Input
AC Output
3-Phase
3W + Gnd
Battery Cabinet
2W + Gnd
UPS Cabinet
Converter
InverterRectifier
Static Bypass
Internal Maintenance Bypass
9.1 General Description
Liebert’s NX provides continuous, high-quality AC power to your business-critical equipment, such as
telecommunications and data processing equipment. The Liebert
free of the disturbances and variations in voltage and frequency common to utility power, which is
subject to brownouts, blackouts, surges and sags.
The Liebert NX utilizes the latest in high-frequency, double-conversion pulse width modulation
technology and fully digital controls to enhance its reliability and increase the ease of use.
Specifically, the Liebert NX 480V utilizes soft-switching technology to greatly enhance efficiency.
As shown in Figure 51, the AC utility source is input at CB1 and the rectifier converts the AC utility
into DC power. The inverter converts that DC power from the utility—or DC power from the
batteries—into AC power for the load. The batteries power the load through the inverter in the event
of a power failure. The utility source can also power the load through the static bypass.
If maintenance or repair of the UPS is necessary, the load can be switched without interruption in
service to the maintenance bypass.
Figure 51 Single module block diagram (dual input configuration)
Operation
®
NX™ UPS supplies power that is
77
Page 88

9.1.1 Bypass Supplies
The Liebert® NX™ contains an electronically controlled switching circuit that enables the critical load
to be connected to either the inverter output or to a bypass power source via the static bypass line.
During normal system operation the load is connected to the inverter and the inverter contactor is
closed; but in the event of a UPS overload or an inverter failure, the load is automatically transferred
to the static bypass line.
To provide a clean (no-break) load transfer between the inverter output and static bypass line, the
bypass static switch activates, connecting the load to bypass. To achieve this, the inverter output and
bypass supply must be fully synchronized during normal operating conditions. This is achieved
through the inverter control electronics, which make the inverter frequency track that of the static
bypass supply, provided that the bypass remains within an acceptable frequency window.
A manually controlled, maintenance bypass supply is incorporated into the UPS design. It enables the
critical load to be powered from the utility (bypass) supply while the UPS is shut down for routine
maintenance.
NOTE
When the UPS is operating in bypass mode or on maintenance bypass, the connected
equipment is not protected from power failures or surges and sags.
9.1.2 Operating Modes
The UPS is designed to operate as an on-line, double-conversion, reverse-transfer system in the
following modes:
Operation
Normal Mode
Operating in normal mode, the Liebert NX’s rectifier derives power from a utility AC source and
supplies regulated DC power to the inverter, which regenerates precise AC power to supply the
connected equipment. The rectifier also uses the utility source power to charge the batteries.
Battery Mode
When utility AC power fails, the Liebert NX protects the critical load by instantaneously channeling
battery power to the inverter, which continues supporting the critical load without interruption.
When utility power returns and is within acceptable limits, the Liebert NX automatically shifts back
to Normal mode, with the rectifier powering the critical load.
Bypass Mode
When the Liebert NX is in bypass mode, the load is directly supported by utility power and is without
battery backup protection.
The Liebert NX’s inverter static switch and bypass static switch will shift the load from the inverter
to bypass mode without an interruption in AC power if the inverter is synchronous with the bypass
and any of the following occurs:
• inverter fails
• inverter overload capacity is exceeded
• inverter is manually turned off by the user
NOTE
If the inverter is asynchronous with the bypass, the static switch will transfer the load from the
inverter to the bypass WITH interruption in AC power to the critical load. This interruption
will be less than 10ms. This interruption time may be altered by modifying the Output transfer
interrupt time setting.
78
Page 89

Operation
!
Maintenance Mode
For maintenance or repair, the Liebert® NX™ may be operated in maintenance mode. To place the
Liebert NX in maintenance mode, the load must be transferred to bypass and the inverter must be
turned off. When those conditions are met, the CB3 may be turned on and the UPS may be shut down,
permitting disconnecting the batteries for maintenance.
WARNING
Risk of electrical shock. Can cause injury and death.
The UPS input and output must be protected with external overcurrent protection devices. In
maintenance mode, the input and output busbars remain energized.
NOTICE
Risk of improper operation. Can cause loss of power to the load and damage to the UPS.
The internal maintenance bypass must not be used when the UPS system is in a parallel
system. Doing so can cause a backfeed that can damage the UPS and interrupt power to the
load.
Parallel Redundancy Mode (System Expansion)
For higher capacity, higher reliability or both, the outputs of up to four UPS modules can be
programmed for directly paralleling while a built-in parallel controller in each UPS ensures
automatic load-sharing.
Frequency Converter Mode
The Liebert NX can be programmed into frequency converter mode for either 50Hz or 60Hz stable
output frequency. The input frequency may vary from 57Hz to 66Hz. In this mode, the static bypass
operation is disabled and the battery becomes optional, depending on any requirement to operate in
battery mode (stored energy mode).
Eco Mode
If ECO mode is selected, the double-conversion UPS operation is inhibited at most times for the
purpose of saving energy. In this mode of operation, not unlike UPS of line-interactive or stand-by
technology, the bypass is the preferred source, and only when the voltage and/or frequency of the
bypass supply is beyond pre-defined and adjustable limits is the critical AC load transferred to the
inverter. This transfer takes place with an interruption of less than 3/4 of an electrical cycle, e.g., less
than 15ms (50Hz) or less than 12.5ms (60Hz).
79
Page 90

10.0 OPERATOR CONTROL AND DISPLAY PANEL
INVERTER ON
SILENCE ON/O FF
IN VER TER OFF FA ULT C LEAR
EPO
LED1
LED2
LED3
LED4
LED5
STATUS
Liquid Crystal
Display (LCD)
Navigation
keys
buttons
Control
Mimic
display
F2
F4
HELPF1 F3
?
L-N current (A )
Frequenc y (H Z)
L-L volta ge (V)
PowerFactor
L1-N /L2
71.4
59.9
480
0.99
L2-N /L3
70. 8
59. 9
480
0.99
L3-N /L1
71.3
59.9
480
0. 9 9
Output
Input disconnec t close d 0 1-0 6 09: 15
Bypass abnormal 01-06 09:15
Liebert NX 2007-01-06 09:20:37
Single N ormal80kVA-3X3
Output disconnect closed 01-06 09 :15
BypassMain
13245 6
7
8 9 10 11
12
13
14 15 16 17 18 19
Mimic indicators Control buttons Navigation keys
1. Rectifier indicator 8. Inverter Off Button 15. F1
2. Battery indicator 9. Emergency Power Off Button 16. F2
3. Inverter indicator 10. EPO Cover 17. F3
4. Bypass indicator 11. Fault Clear Button 18. F4
5. Load indicator 12. Silence On/Off Button 19. Help
6. Status indicator 13. Inverter On Button
7. Buzzer 14. LCD
10.1 Operator Control Panel
The control panel and LCD on the front of the Liebert® NX™ lets the operator:
• turn the UPS On or Off
• transfer into the various operating modes
• silence alarms
• check the status of the UPS and its batteries, including all measured parameters, events and
alarms
The main areas of the control panel are shown below in Figure 52 and detailed in Figure 53.
• Mimic Display - view the status of the Liebert NX in single-line diagram format—indicators
show status by changing color when ON, flashing or OFF
• Liquid Crystal Display (LCD) and Navigation keys - view status and operational data from
the Liebert NX in tabular format
• Control buttons - turn the Liebert NX on or off, silence alarms
Figure 52 Overview of control panel
Operator Control and Display Panel
10.1.1 Display Panel Layout
Figure 53 shows the control panel in greater detail, identifying individual items that are described in
the rest of this section.
Figure 53 Detailed view of control panel
80
Page 91

10.2 Mimic Display Indicators
INVERTER ON
SILENC E ON/OFF
IN VER TER OF F FAULT CLEA R
EPO
F2 F4 HELPF1 F3
?
L-N current(A)
Freque ncy (HZ)
L-L volt age ( V)
PowerFactor
L1-N /L2
71.4
59.9
480
0.99
L2-N/L3
70.8
59.9
480
0.99
L3-N/L1
71.3
59.9
480
0.99
Output
Input disconnect closed 01-06 09:15
By pa s s a bno rm a l 01 -06 09 : 1 5
Liebert NX 2007-01-06 09:20:37
Single Normal80kVA-3X3
Output disconnect closed 01-06 09:15
Bypass
Main
LED1
LED2
LED3
LED4
LED5
STATUS
Rectifier indicator
Battery indicator
Bypass indicator
Inverter indicator
Load indicator
Status indicator
Buzzer
The Mimic display on the front panel consists of six indicators arranged in a single-line diagram
depicting the various paths of UPS power, as shown in Figure 54.
Figure 54 Mimic display indicators location
Operator Control and Display Panel
The current operational status of the Liebert
®
NX™ is indicated by the color of the indicators—green,
amber or red—and whether they are ON (solid), flashing or OFF. Table 27 provides a guide to
interpreting the various states of the indicators.
Table 27 Mimic display status indicators
Indicator
(see
Figure 54) Green Flashing Green / Amber Red Off
Rectifier Load on rectifier
Battery
Inverter
Bypass
Battery powering
the load
Inverter powering
the load normally
Load on Bypass
power
Load UPS output on —
Status
No alarms—UPS
working normally
Flashing Green: Utility normal,
but rectifier not operating
Flashing Green: Battery prewarning (low battery)
Flashing Green: Inverter on
standby
—
Amber: UPS has a general
alarm
Rectifier fault
Battery or battery
converter abnormal*
Inverter fault Inverter normal, but off
Bypass out of
normal range
UPS output
overloaded
UPS has a serious
alarm
* Battery or battery converter abnormal events include these event messages (see Appendix A): No Battery, Battery Replaced, Battery
Reverse, Batt. Conv. Over. Curr., Batt. Converter Fault, Batt. Converter Overtemp.
Rectifier is normal, but utility is
abnormal
Battery and converter are
normal, and battery is not
discharging
Bypass Normal
UPS no output power
—
81
Page 92

10.3 Control Buttons
Silence On/Off button
INVERTER ON
SILENCE ON/ OFF
INVERTER OFF FAULT CLEAR
EPO
LED1
LED2
LED3
LED4
LED5
STATUS
F2 F4 HELPF1 F3
?
L-N current(A)
Frequen cy (HZ)
L-L volt age ( V)
PowerFactor
L1-N /L2
71.4
59.9
480
0.99
L2-N/L3
70.8
59.9
480
0.99
L3-N/L1
71.3
59.9
480
0.99
Output
Input disconnect closed 01-06 09:15
By pa s s a bno rm a l 01 -06 09 : 1 5
Liebert NX 2007-01-06 09:20:37
Single
Normal80kVA-3X3
Output disconne ct c losed 01 -06 09: 15
Bypass
Main
Button cover
EPO button
Inverter On button
Inverter Off bu tton
Fault Clear button
The Control Buttons on the front panel may be used to shut down the UPS completely, turn the
inverter On or Off, restart the UPS after a fault and silence the alarm, as shown in Figure 55. The
function of each button is described in Table 28.
NOTE
To activate a button properly, press and hold until you hear a short beep—about two seconds.
Figure 55 Location of control buttons
Table 28 Control buttons
Button
(see Figure 55) Function
Completely shuts down the UPS, including the static switch.
EPO
Inverter Off
Fault Clear
Silence On/Off
Inverter On
CAUTION: Use caution before pressing the Emergency Power Off (EPO) button. This button
completely shuts down the unit and cuts off power to the critical load.
Press this button to shut down the inverter during operation. The load will be transferred to
static bypass.
After the UPS shuts down due to a fault and the alarm condition has been resolved, press
this button to clear the fault and restart the UPS.
Press this button once to silence the alarm buzzer when an alarm is active. Any new fault will
sound the buzzer again.
If the alarm buzzer is not beeping, press this button to test the alarm sound.
Press this button to start the inverter and transfer from static bypass to inverter.
NOTE: If the inverter is not ready, this will not activate the UPS.
Operator Control and Display Panel
82
Page 93

10.4 Audible Buzzer
INVERTER ON
SILENC E ON/OFF
INVERTER OFF FAULT CLEAR
EPO
LED1
LED2
LED3
LED4
LED5
STATUS
F2
F4
HELPF1 F3
?
L-N current (A)
Frequency (H Z)
L-L voltage (V )
PowerFactor
L1-N/L2
71.4
59.9
480
0.99
L2-N/L3
70.8
59.9
480
0.99
L3-N/ L1
71.3
59.9
480
0.99
Output
Input disconnect closed 01-06 09:15
By pa s s a bno rm a l 01 - 06 09 : 15
Liebert NX 2007-01-06 09:20:37
Single Normal80kVA-3X3
Output disconne ct c losed 01 -06 09: 15
BypassMain
Buzzer
Current status
messages
F2
F4
HELPF1 F3
?
L-N cu rren t (A)
Frequency(HZ)
L-L voltage(V)
PowerFactor
L1- N/L 2
71.4
59.9
480
0.99
L2-N/L3
70.8
59.9
480
0.99
L3-N/L1
71.3
59.9
480
0.99
Out pu t
Input disconnect closed 01-06 09:15
Bypass abnormal 01-06 09:15
Liebert NX 2007-01-06 09:20:37
Single Normal
80kVA-3X3
Output disconnect closed 01-06 09:15
Bypass
Main
LCD menu
Data and settings
UPS system
information
Navigation
key icons
The buzzer produces three types of sounds:
• Single beep - when any control button is pressed
• Single beep repeating every two seconds - the system has a general alarm
• Continuous - the system has a serious fault
If the buzzer makes no sound, the system may be operating properly, or an alarm may have been
silenced manually.
Figure 56 Buzzer location
Operator Control and Display Panel
10.5 LCD Overview
Figure 57 Sections of the LCD
The LCD on the front panel has five main sections, as shown in Figure 57. Press the F1 key below
the LCD to scroll through these sections.
• UPS System Information - view UPS name and model, date and time, overall status (see
Table 30).
• LCD Menu - choose a category of data items to appear below the menus (see Table 31).
• Data and Settings - view data items for the selected menu (see Table 31).
• Current Status Messages - check any active UPS event and alarm messages (see Appendix A).
• Navigation Key Icons - look at the icon above each navigation key to determine how the key
operates when pressed (see 10.6 - Navigation Keys).
The LCD displays alarm information in real time. After appearing in the current status section of the
LCD, status messages are stored in the history log—512 records can be stored and retrieved.
83
Page 94

10.6 Navigation Keys
?
ESC
The navigation keys on the front panel—F1 through F4 and Help—are used to access the LCD to view
the current status and other information about the Liebert
Navigation key icons on the LCD appear above each key to indicate its operation (see Table 29). The
keys are “soft keys” that can change functions according to the icon.
•Use F1 either to move to a different portion of the LCD (Shift icon) or to escape to a previous view
(ESC icon).
•Use F2 and F3 as cursor keys to move left and right or up and down, depending on the icons dis-
played above the keys.
•Use F4 as an Enter key to confirm a choice.
•Use HELP to access help information on the LCD.
Table 29 Icons for navigation keys
Key F1 F2 F3 F4 HELP
®
NX™.
Operator Control and Display Panel
Functions
Available
Shift Left Right
Exit Up Down
10.7 UPS System Information
The UPS system information displayed at the top of the LCD is detailed in Table 30.
Table 30 Description of items in UPS system window
Item Type
Liebert NX UPS name
2007-10-12 Current date
12:30:36 Current time
080kVA-3x3
Unit #1 #1 of 6 Paralleled changed to “Unit #1”
Single UPS is configured as a single unit system running in Normal mode
Normal UPS in normal operation, inverter powering load, no warnings
Warning UPS has a general alarm
Fault UPS has a serious fault
Explanation
080 means UPS model is 80kVA;
3x3 means 3 by 3 system (three-phase input and three-phase output)
Enter Help
84
Page 95

10.8 LCD Menus and Data Items
The LCD menus provide access to the following categories of information and settings for the UPS.
Selecting a menu changes the information displayed in the UPS data items portion of the LCD. The
menu choices are listed below and described in detail in Table 31.
• Mains - view utility power input data: voltage, current, frequency and power factor
• TX Input - view input transformer voltages
• Bypass - view bypass data: voltage and frequency
• Output - view output data: voltage, current, frequency and power factor
• Load - view load data: load percent, output current, output power and crest factor (CF)
• System - view system data
• Battery - view battery characteristics—voltage, current, temperature and remaining time—and
messages when the battery is boost/float charging or disconnected
• Records - access the history log—displays all records in the log (newest records added at end)
• Language - select a language for LCD text (choices appear in the native language)
• Settings - configure UPS settings: adjust the display contrast, choose a format for date display,
set the date and time, set up the UPS for modem communications (baud rate, address, mode and
phone numbers to dial for alarm notifications) and change the password
• Command - start or stop a battery maintenance test, battery capacity test or system test
• Version - view firmware versions for the inverter, rectifier and software display board and the
model information for the UPS
Operator Control and Display Panel
Figure 58 shows a menu tree of the options available from the LCD menus.
85
Page 96

Figure 58 Menu tree
Battery
Battery voltage (V)
Battery current (A)
Battery temperature (°C)
Remain Time Min.
Battery boost charging
Battery float charging
Battery disconnected
Command
Battery maintenance test
Battery capacity test
System test
Stop testing
Freshening Charge
Stop Freshening Charge
Modem auto-answer enable
Battery Commission
Version
UPS model
Monitor version
Rectifier version
Inverter version
System
Sout (kVA)
Pout (kW)
Qout (kVAR)
Single unit, no
parallel data
Records
(history log)
Language
(Choices for
display)
Mains (input)
L-N current (A)
Frequency (Hz)
L-L voltage (V)
Power factor
Load
Sout (kVA)
Pout (kW)
Qout (kVAR)
Loadlevel %
Crest factor
Bypass
Frequency (Hz)
L-L voltage (V)
Output
L-N current (A)
Frequency (Hz)
L-L voltage (V)
Power factor
TX Input *
L-L voltage (V)
* When configured, input transformer voltages are
displayed on the front LCD. When not activated, the
values are hidden.
** When configured, output transformer voltages are
displayed on the front LCD. When not activated, the
values are hidden.
TX Output **
L-L voltage (V)
Settings
Display contrast
Date format set
Date & time
Comm1 baud rate
Comm2 baud rate
Comm3 baud rate
Communication address
Communication mode
Callback times
Phone No.1
Phone No.2
Phone No.3
Command password
Audible Alarm
Operator Control and Display Panel
Table 31 Descriptions of UPS menus and data window items
Menu Type Item Type Explanation
Mains
(input)
TX Input L-L voltage (V) Line-line voltage
Bypass
Output
TX Output L-L voltage (V) Line-line voltage
Load
L-N current (A) Phase current
Frequency (Hz) Input frequency
L-L voltage (v Line-line voltage
Power factor Power factor
Frequency (Hz) Bypass frequency
L-L voltage (A) Line-line voltage
L-N current (A) Phase current
Frequency (Hz) Output frequency
L-L voltage (V) Line-line voltage
Power factor Power factor
Sout (kVA) Sout: Apparent power
Pout (kW) Pout: Active power
Qout (kVAR) Qout: Reactive power
Loadlevel % The percent of the UPS rating load
Crest factor Output current Crest Factor
86
Page 97

Operator Control and Display Panel
Table 31 Descriptions of UPS menus and data window items (continued)
Menu Type Item Type Explanation
Sout (kVA) Sout: Apparent power
System
Battery
Records (History Log) Displays all records in the history log.
Language (choices for text displayed) User may select any of 12 languages for LCD text.
Settings
Settings
Command
(start/stop
battery &
system
tests)
Version
Pout (kW) Pout: Active power
Qout (kVAR) Qout: Reactive power
Single unit, no parallel data When configured as a single unit, UPS has only native load, no system load.
Battery voltage (V) Battery bus voltage
Battery current (A) Battery bus current
Battery temperature (°C) Internal battery temperature °C
Remain Time Min. Battery run time remaining.
Battery boost charging Battery is boost charging.
Battery float charging Battery is float charging.
Battery disconnected Battery is not connected.
Display contrast Adjust the LCD contrast
Date format set Choose the format for date display: M/D/Y, D/M/Y, M/D/Y, Y/M/D
Date & time Set the date and time
Comm1 baud rate Communication baud rate setting for Liebert IntelliSlot 1
Comm2 baud rate Communication baud rate setting for Liebert IntelliSlot 2
Comm3 baud rate Communication baud rate setting for Liebert IntelliSlot 3
Communication address This setting is applicable to RS485 communication mode.
Communication mode Communication Mode Setting
Callback times
Phone No.1
Phone No.2
Phone No.3
Command password User can modify the command password.
Audible Alarm User can Enable and Disable the UPS audible alarm.
Battery maintenance test
Battery capacity test
System test
Stop testing
Freshening Charge
Stop Freshening Charge Manually stops a Freshening Charge.
Modem Auto-answer
enable
Battery Commission Resets the UPS battery detection logic after new/fresh batteries are installed.
UPS version
UPS model Provides UPS model information—for example, 480V-60Hz.
When Liebert IntelliSlot 1 Communication mode is Modem, this parameter
sets the number of times a number is redialed to send an alarm notification.
When Liebert IntelliSlot 1 Communication mode is Modem, this is the first
phone number to be dialed (to send an alarm notification).
When Liebert IntelliSlot 1 Communication mode is Modem, this is the second
phone number to be dialed (to send an alarm notification).
When Liebert IntelliSlot 1 Communication mode is Modem, this is the third
phone number to be dialed (to send an alarm notification).
This test performs a partial discharge of the battery to obtain a rough estimate
of the battery capacity. Load must be between 20% and 80%.
This test performs a full discharge of the battery to obtain a precise measure of
the battery capacity. Load must be between 20% and 80%.
This is a self-test of the UPS. When the user activates this function, a pop-up
window appears about 5 seconds later to show the results.
Manually stops a battery maintenance test, battery capacity test or system
test.
Allows a temporary Equalize charge for the batteries. This charge is
configurable for 1 to 36 hours.
Manually enable the modem’s auto-answer function.
Provides UPS firmware version numbers for the inverter, rectifier and software
display board.
87
Page 98

10.9 Language Selection
?
LanguageHistoryBattery
F2 F4 HELPF1 F3
English DEUTSCH
POLSKI
FRANCAIS
ESPAÑOL
ITALIANO
NEDERLANDS SVENSKA
РУССКИЙ PORTUGUêS
Liebert NX
2007-01-12 12:30:36
80KVA-3X3
Single Normal
Input disconnect closed 01-12 12:30
Output disconnect closed 01-12 12:30
Bypass disconnect open 01-12 12:30
The LCD menus and data display are available in 12 languages (Chinese, Dutch, English, French,
German, Italian, Japanese, Polish, Portuguese, Russian, Spanish and Swedish). To select a different
language:
• From the main menu, press the F1 (Shift) key to move the cursor to the menu at the top of the
screen.
• Press F2 and F3 (left and right arrows) as needed to select the Language menu.
• Press F1 (shift) to move the cursor to the data and settings area of the LCD.
•Use F2 and F3 (up and down) to select the required language.
• Press the F4 (enter) key to accept the language selection.
• Return to the main menu by repeatedly pressing F1 (ESC) as needed; all text on the LCD will now
be displayed in the selected language.
Figure 59 Language selection
Operator Control and Display Panel
10.10 Current Date and Time
To change the system date and time:
• From the main menu, press the F1 (shift) key to move the cursor to the menu at the top of the
screen.
• Press F2 and F3 (left and right arrows) as needed to select the Settings menu.
• Press F1 (shift) to move the cursor to the data and settings area of the LCD.
•Use F2 and F3 (up and down) to select the Date & Time option, then press F4 (enter).
• Position the cursor on the row in which the date and time are displayed, then press F4 (enter).
•Using the F2 and F3 (up and down) keys, enter the current time and date information.
• Press F4 (enter) to save the settings, then press F1 (ESC) to return to the main menu.
88
Page 99

Figure 60 Set date and time
?
Language Setting
Date format
LCD contrast
Date & Time
M/D/Y D/M/Y
2007-01-12
Command
Y/M/D
Y/M/D
12:30:36
F2 F4 HELPF1 F3
Liebert NX
2007-01-12 12:30:36
80KVA-3X3
Single Normal
Input disconnect closed 01-12 12:30
Output disconnect closed 01-12 12:30
Bypass disconnect open 01-12 12:30
Operator Control and Display Panel
89
Page 100

10.11 UPS Status Messages
?
Language
Battery
History
Inverter in setting
2003-01 -21 12 :21:12
2003-01 -21 12 :21:12
UPS shutd own
2003 - 01 -21 12 : 21:12
2003 - 01 -22 12 : 30:16
Bypass abnormal
2003 - 01 -21 12 : 21:12
2003 - 01 -21 12 : 30:16
F2 F4 HELPF1 F3
Liebert NX
2007-01-12 12:30:36
80KVA-3X3
Single Normal
Input disconnect closed 01-12 12:30
Output disconnect closed 01-12 12:30
Bypass disconnect open 01-12 12:30
History Log
(records
menu)
Current
Status
Messages
The Liebert® NX™ displays status changes as they occur in the current status window of the LCD,
then stores that data in the history log, as shown in Figure 61.
• Current Status Window: The status messages are displayed chronologically and include the
date and time of the events. Three status messages are visible in the window at a time. To see
other messages, use the navigation keys to scroll up or down the list. A status message remains in
the current status area of the LCD until the status changes, when it is moved to the history log.
• History Log: When a record moves to the history log, the time the status changed is recorded.
The history log can hold up to 512 records. History log records may be viewed by accessing the
Records menu.
Figure 61 Current status and history log records
Operator Control and Display Panel
See Appendix A for a complete list of status messages, along with a description and any
recommended actions.
90
 Loading...