

Page 1
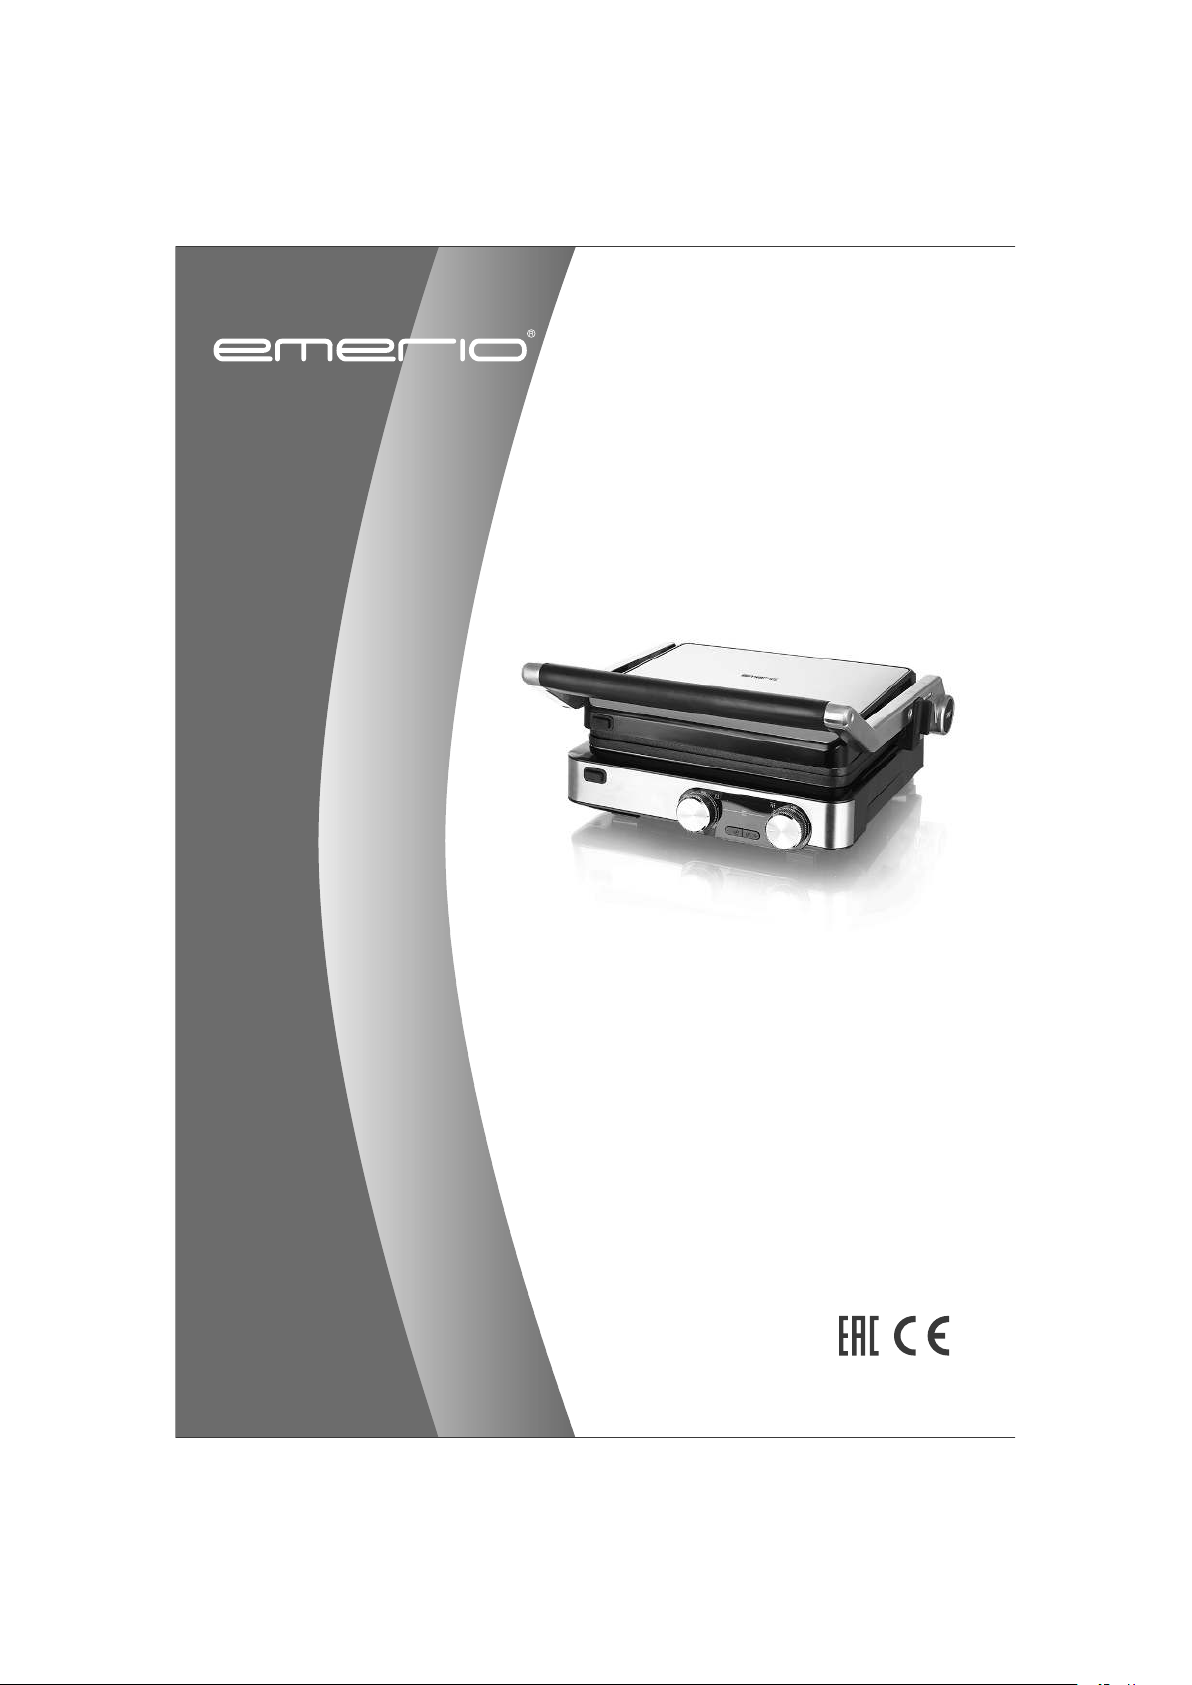
CG-124243.1
Multi Grill (EN)
Multi-Grill (DE)
Multigrill (FR)
Griglia multifunzionale (IT)
Page 2

Content
Inhalt Teneur Contenuto
Instruction manual
Bedienungsanleitung
Français ............................................................................................ - 16 -
Manuale d'istruzioni
English .......................................................................................... - 2 -
Deutsch ..................................................................................... - 9 -
Italiano ..................................................................................... - 23 -
- 1 -
Page 3

Instruction manual
control system.
English
SAFETY INSTRUCTIONS
Before use make sure to read all of the below instructions in
order to avoid injury or damage, and to get the best results from
the appliance. Make sure to keep this manual in a safe place. If
you give or transfer this appliance to someone else make sure
to also include this manual.
In case of damage caused by user failing to follow the
instructions in this manual the warranty will be void. The
manufacturer/importer accepts no liability for damages caused
by failure to follow the manual, a negligent use or use not in
accordance with the requirements of this manual.
1. This appliance can be used by children aged from 8 years and
above and persons with reduced physical, sensory or mental
capabilities or lack of experience and knowledge if they have
been given supervision or instruction concerning use of the
appliance in a safe way and understand the hazards involved.
2. Children shall not play with the appliance.
3. Cleaning and user maintenance shall not be made by children
unless they are older than 8 and supervised.
4. Keep the appliance and its cord out of reach of children less
than 8 years.
5. If the supply cord is damaged, it must be replaced by the
manufacturer, its service agent or similarly qualified persons
in order to avoid a hazard.
6. Regarding the instructions for cleaning the surfaces which
come in contact with food or oil, please refer to the
7. This appliance is not intended to be operated by means of an
external timer or separate remote-
8. Before inserting the plug into the mains socket, please check
that the voltage and frequency comply with the
specifications on the rating label.
- 2 -
Page 4

9. Always plug the appliance into an earthed plug socket.
10. If an extension cord is used it must be suited to the power
consumption of the appliance, otherwise overheating of the
extension cord and/or plug may occur. There is a potential
risk of injuries from tripping over the extension cord. Be
careful to avoid dangerous situations.
11. Disconnect the mains plug from the socket when the
appliance is not in use and before cleaning.
12. Ensure that the mains cable is not hung over sharp edges and
keep it away from hot objects and open flames.
13. Do not immerse the appliance or the mains plug in water or
other liquids. There is danger to life due to electric shock!
14. To remove the plug from the plug socket, pull the plug. Do
not pull the power cord.
15. Do not touch the appliance if it falls into water. Remove the
plug from its socket, turn off the appliance and send it to an
authorized service center for repair.
16. Do not plug or unplug the appliance from the electrical outlet
with a wet hand.
17. Never attempt to open the housing of the appliance, or to
repair the appliance yourself. This could cause electric shock.
18. Never leave the appliance unattended during use.
19. Do not use the appliance for other than intended use.
20. Do not wind the cord around the appliance and do not bend
it.
21. The use of accessory attachment not recommended by the
appliance manufacturer may cause injuries.
22. If you use products with non-stick surfaces, please make sure
no birds are in the same room and that the room can be
completely closed off and well-ventilated.
23. WARNING!!
Please do not touch surface while in use. The
temperature of accessible surfaces may be high
when the appliance is operating.
- 3 -
Page 5

24. Always use the product on a flat, stable, heat-resistant
surface.
25. The appliance must only be used with both plates properly
installed.
26. Use the product in a well-ventilated area. Keep at least 4-6
inches of space on all sides of the product to allow adequate
air circulation.
27. Do not place the product on or near a gas or electric burner,
or inside or on top of a heated oven or other heat source.
28. Do not allow the product to touch curtains, wall coverings,
clothing, dishtowels, or other flammable materials during its
use.
29. Do not touch hot surfaces of the product. Do not move the
product while it is plugged in. Allow the product to
thoroughly cool before handling it.
30. Do not use the product near water or other liquids.
31. Keep the product and its power cord away from heated
surfaces.
32. This product is intended for indoor, non-industrial, noncommercial, household use only as a panini maker and
healthy grill. Do not use the item outdoors or for any other
purpose.
- 4 -
Page 6

CG-124243.1 EN
PARTS IDENTIFICATION
1. Handle
2. Grill plate release button (upper)
3. Removable upper grill plate, nonstick coated
4. Grease run-off (upper)
5. Grease run-off (lower)
6. Removable lower grill plate, nonstick coated
7. Grill plate release button (lower)
8. Led screen
Led screen
A. Temperature display of the lower grill plate
B. Temperature display of the upper grill plate
C. Time display
BEFORE INITIAL USE
1. Remove all packaging.
2. Press the slide control
the the grease drip tray.
display the time and the temperature
9. Temperature control, lower grill plate
10. Time control, decrease the time
11. Time control, increase the time
12. Temperature control, upper grill plate
13. Grease drip tray
14. Grill lock and end stop
15. Release button for open grilling
16. Slide control for grill lock and end stop
ance. Clean it as described in
- 5 -
Page 7
3. Unwind the mains cable completely.
During manufacturing, parts of the product are coated with a thin oil film for their protection. To remove the
production residue, run the product for approx. 10 minutes without foodstuffs. Make sure there is sufficient
ventilation as a slight odor and some smoke may occur. This is harmless and will disappear shortly.
HOW TO USE
CAUTION: Do not use this product to cook or defrost frozen food. All food must be completely defrosted before
cooking.
1. For best results, lightly coat the cooking plates with a little cooking oil or cooking spray. Close the appliance.
2. Plug the appliance into an appropriate electrical outlet.
3. Set the left (lower grill plate) and right (upper grill plate) temperature control to the desired heating level (160-
230 ). The Led screen will light up and the digits will start flashing, which indicates the appliance is heating
up. As soon as the set temperature is reached, the digits will stop flashing with a beep sound.
4. Open the appliance by pushing the handle all the way up.
5. Lay the food to be grilled onto the lower heating surface without adding extra fat or oil.
6. Close the appliance. If needed you can set a minimum distance between both grilling plates using the slide
control for end stop.
Note: During the cooking process, the digits will flash and stay on from time to time. This indicates that the
heating element is switched on and off to maintain the correct temperature.
7. Monitor the cooking process now and then. Grill the food for approx. 3-8 minutes. The cooking time depends
on the type of food and on your personal taste. The gill items do not need to be turned over as they are cooked
with both the upper and lower grill plates.
Notes: The grill items are cooked in their own juices and excessive liquids flow into the grease drip tray. The
oil/fat collected in the drip tray must not be re-used.
8. When the food is cooked, use the handle to open the appliance. Remove the food with the help of a plastic
heat-resistant spatula. Never use metal tongs or a knife as these can cause damage to the non-stick coating of
the cooking plates.
Time control and auto shut off function:
Press the time control to set the desired working time (0-90 minutes). Long press for rapid adjustment. The Led
screen will show the set time and start to
beep sounds and shut off automatically.
If you do not set the time, remember to turn off the appliance manually after using. If not, the appliance will shut
off in approx. 60 minutes with no any operations.
USE AS OPEN GRILL
Use the grill as an open grill to cook steak, poultry (we do not recommend cooking bone-in chicken, since it does
not cook evenly on an open grill), fish and vegetables.
:00 send out
- 6 -
Page 8

1. Open the upper cover by the handle with one hand while the other hand to press the release button. Let go of
the release button as soon as the upper cover has been pushed all the way to the back.
2. For best results, lightly coat the cooking plates with a little cooking oil or cooking spray.
3. Plug the appliance into an appropriate electrical outlet.
4. Set the left (lower grill plate) and right (upper grill plate) temperature control to the desired heating level (160-
). The Led screen will light up and the digits will start flashing, which indicates the appliance is heating up.
230
As soon as the set temperature is reached, the digits will stop flashing with a beep sound.
5. Lay the food to be grilled onto the heating surfaces without adding extra fat or oil.
6. Turn over the food after a certain time.
Notes: The grill items are cooked in their own juices and excessive liquids flow into the grease drip tray. The
oil/fat collected in the drip tray must not be re-used.
7. Remove the food with the help of a plastic heat-resistant spatula. Never use metal tongs or a knife as these can
cause damage to the non-stick coating of the cooking plates.
WARNING:
Do not change the grill positions (from closed grill position to open grill position or from open grill position to
closed grill position) while the plates are hot. Please choose the grill position before switching on the appliance.
Always exercise caution when handling the appliance during cooking. To open the appliance grasp the black
plastic area of the handle. This part of the handle stays cool to touch while cooking. Do not touch the other
parts during or immediately after cooking. Use an oven mitt to prevent burns.
Allow the appliance to cool down before handling (at least 30 minutes).
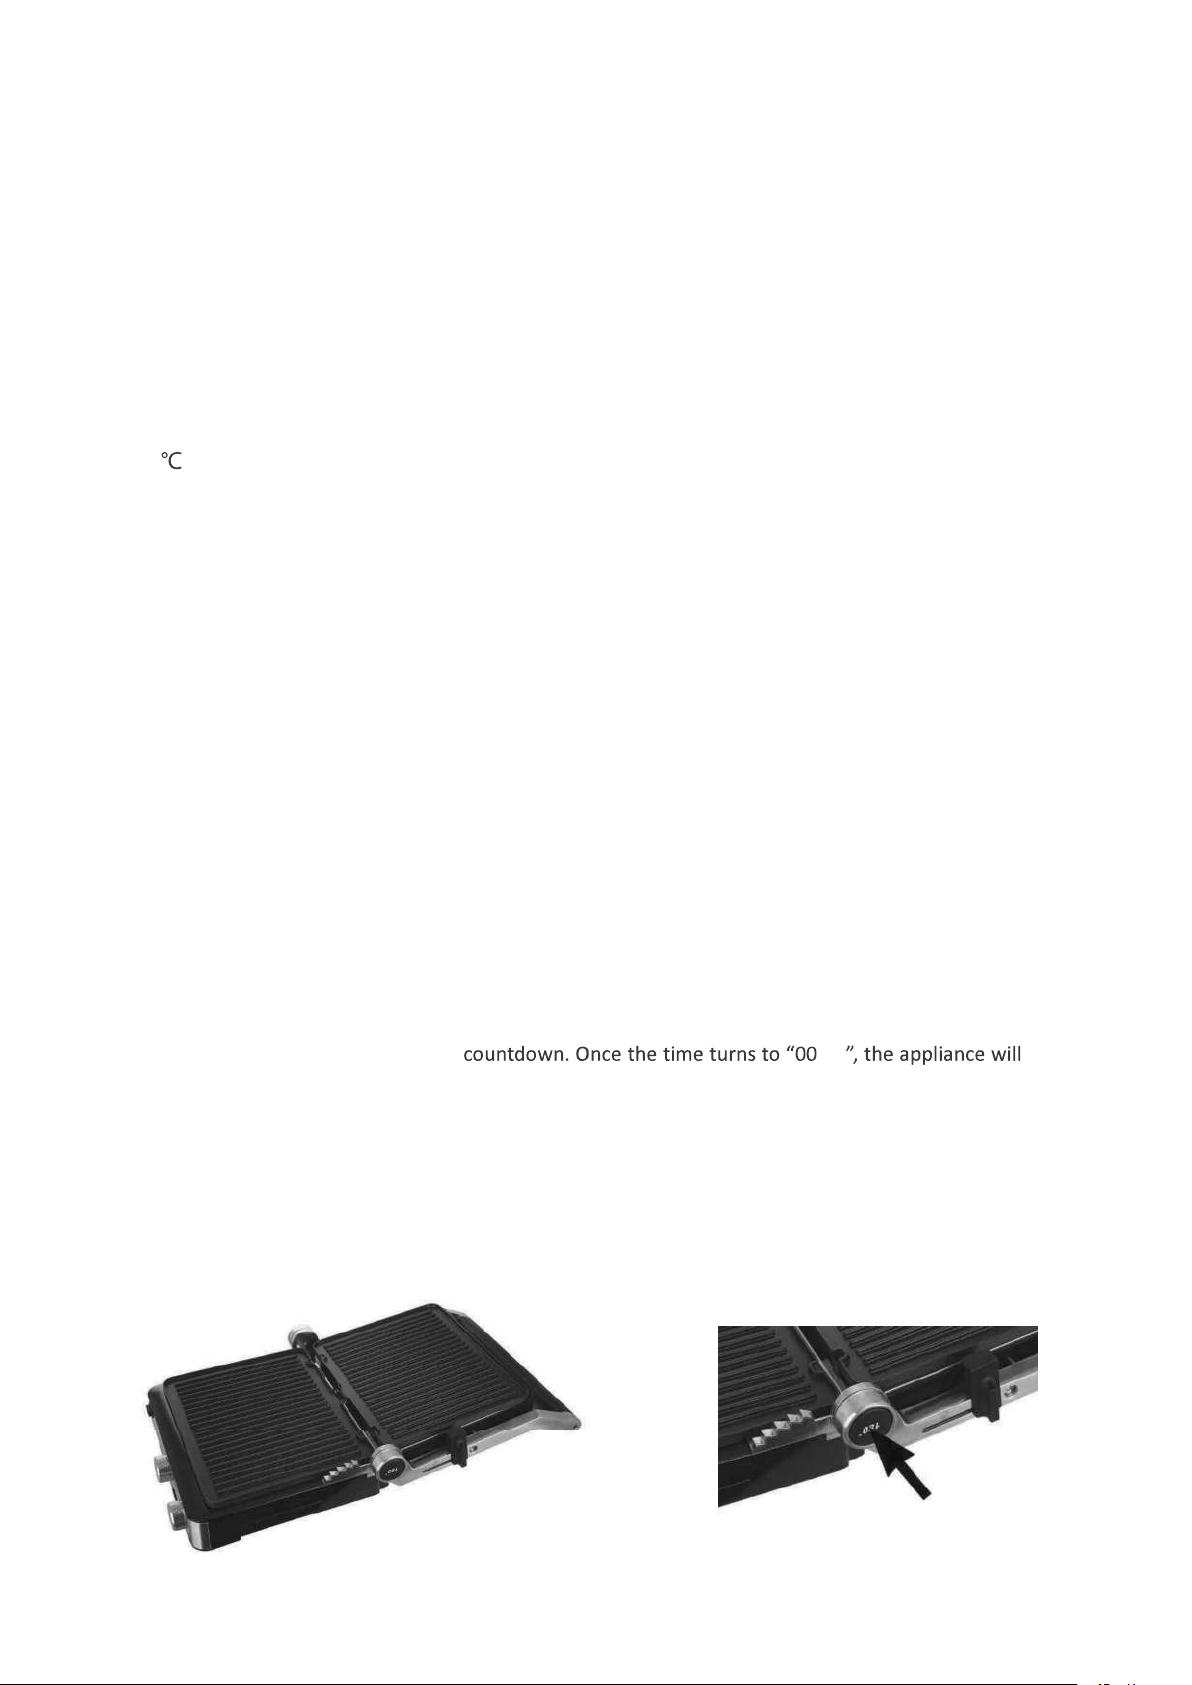
CLEANING AND MAINTENANCE
1. Always switch off and unplug the appliance after use. Allow it to cool down before cleaning.
2. Remove the grease drip tray carefully from the appliance (Fig.1) and rinse it with hot water and a neutral
dishwashing detergent. The oil inside the tray can be very hot; let it cool down completely before cleaning. The
grease drip tray is dishwasher safe.
3. Remove the excess grease with a paper towel before detaching the grill plates. To detach the grill plates, push
the respective release buttons on the upper and lower housing. (Fig.2) Clean the grill plates with a soft cloth
and hot water.
4. Use a damp cloth and warm water with a little dishwashing detergent to clean the appliance housing. After each
cleaning, dry all surfaces thoroughly.
5. Dry the grill plates and especially their electric contacts and reassemble the appliance. The grill plates can only
be mounted in their respective positions. First inert the long sides opposite the release buttons into the housing.
Then push the other longs sides into the latches so that the release buttons click and the grill plates engage.
6. Never use abrasive cleaning agents or sharp objects (e.g. scrubbing brush or knife) for cleaning.
Caution: Do not immerse the appliance in water or other liquids. There is danger to life due to electric shock!
Fig.1 Fig.2
- 7 -
Page 9
Error warning
ER1 The NTC is in short circuit or open circuit.
ER2 Temperature is below 80
ER3 Temperature is above 320 .
Please send the appliance for repair when the error occurs mentioned above.
TECHNICAL DATA
Operating voltage: 220-240V ~ 50-60Hz
Power: 2000W
GUARANTEE AND CUSTOMER SERVICE
Before delivery our devices are subjected to rigorous quality control. If, despite all care, damage has occurred during
production or transportation, please return the device to your dealer. In addition to statutory legal rights, the
purchaser has an option to claim under the terms of the following guarantee:
For the purchased device we provide 2 years guarantee, commencing from the day of sale. If you have a defective
product, you can directly go back to the point of purchase.
Defects which arise due to improper handling of the device and malfunctions due to interventions and repairs by
third parties or the fitting of non-original parts are not covered by this guarantee. Always keep your receipt, without
to a void of warranty, if this results in consequential damages then we will not be liable. Neither can we hold
responsible for material damage or personal injury caused by improper use if the instruction manual is not properly
executed. Damage to accessories does not mean free replacement of the whole appliance. In such case please
contact our service department. Broken glass or breakage of plastic parts is always subject to a charge. Defects to
consumables or parts subjected to wearing, as well as cleaning, maintenance, replacement of said parts or shipping
and transportation costs to and from any place of repair are not covered by the warranty and are to be paid.
ENVIRONMENT FRIENDLY DISPOSAL
Recycling
This marking indicates that this product should not be disposed with other household wastes. To prevent
possible harm to the environment or human health from uncontrolled waste disposal, recycle it
responsibly to promote the sustainable reuse of material resources. To return your used device, please
use the return and collection systems or contact the retailer where the product was purchased. They can take this
product for environmentally safe recycling.
Emerio Switzerland AG
Industriestrasse 47
6300 Zug
Switzerland
European Directive 2012/19/EU
- 8 -
Page 10

Bedienungsanleitung
Bedienungsanleitung.
Deutsch
SICHERHEITSHINWEISE
Lesen Sie vor dem Gebrauch unbedingt die nachfolgenden
Anleitungen, um Verletzungen oder Beschädigungen zu
vermeiden und das beste Ergebnis mit dem Gerät zu erzielen.
Bewahren Sie diese Bedienungsanleitung an einem sicheren Ort
auf. Wenn Sie dieses Gerät an eine andere Person weitergeben,
stellen Sie sicher, dass Sie auch diese Bedienungsanleitung
aushändigen.
Im Falle von Beschädigungen, die durch die Missachtung der
Anleitungen in dieser Bedienungsanleitung verursacht wurden,
wird die Garantie ungültig. Der Hersteller/Importeur haftet
nicht für Schäden, die durch Missachtung der
Bedienungsanleitung, fahrlässigen Gebrauch oder Benutzung,
die nicht in Übereinstimmung mit den Anforderungen dieser
Bedienungsanleitung erfolgt, verursacht wurden.
1. Dieses Gerät kann von Kindern ab 8 Jahren und Personen mit
eingeschränkten körperlichen, sensorischen oder geistigen
Fähigkeiten oder mangelnder Erfahrung und Kenntnis
benutzt werden, wenn sie beaufsichtigt werden oder in die
sichere Benutzung des Gerätes unterwiesen werden und die
damit verbundenen Gefahren verstehen.
2. Kinder dürfen nicht mit dem Gerät spielen.
3. Die Reinigung und vom Benutzer auszuführende
Wartungsarbeiten sollten nicht von Kindern ausgeführt
werden; es sei denn, sie sind älter als 8 Jahre und werden
beaufsichtigt.
4. Halten Sie das Gerät und sein Netzkabel außer Reichweite
von Kindern unter 8 Jahren.
5. Wenn das Netzkabel beschädigt ist, muss es vom Hersteller,
seinem Kundendienst oder einer ähnlich qualifizierten
Person ausgewechselt werden, um Gefahren zu vermeiden.
6. Um Informationen zur Reinigung der Flächen zu erhalten, die
mit Lebensmitteln oder Öl in Berührung kommen, lesen Sie
REINIGUNG UND PFLEGE
- 9 -
Page 11

7. Dieses Gerät ist nicht für die Bedienung über einen externen
Timer oder ein separates Fernbedienungssystem bestimmt.
8. Bevor Sie den Stecker mit der Netzsteckdose verbinden,
prüfen Sie bitte, ob die Spannung und die Frequenz mit den
Angaben auf dem Typenschild übereinstimmen.
9. Schließen Sie das Gerät nur an geerdete Steckdosen
(Schukosteckdosen) an.
10. Falls ein Verlängerungskabel verwendet wird, muss es für
den Stromverbrauch des Gerätes geeignet sein, sonst kann es
zum Überhitzen des Verlängerungskabels und/oder des
Steckers kommen. Es besteht Verletzungsgefahr durch
Stolpern über das Verlängerungskabel. Lassen Sie Vorsicht
walten, um gefährliche Situationen zu vermeiden.
11. Ziehen Sie den Netzstecker aus der Steckdose, wenn das
Gerät nicht benutzt und bevor es gereinigt wird.
12. Achten Sie darauf, dass das Netzkabel nicht über scharfe
Kanten hängt und halten Sie es von heißen Objekten und
offenen Flammen fern.
13. Tauchen Sie das Gerät oder den Netzstecker nicht in Wasser
oder andere Flüssigkeiten. Es besteht Lebensgefahr aufgrund
von Stromschlag!
14. Um den Stecker aus der Steckdose zu entfernen, ziehen Sie
am Stecker. Ziehen Sie nicht am Kabel.
15. Berühren Sie das Gerät nicht, wenn es ins Wasser gefallen ist.
Ziehen Sie den Stecker aus der Steckdose, schalten Sie das
Gerät aus und schicken Sie es an einen autorisierten
Kundendienst zwecks Reparatur.
16. Den Netzstecker des Gerätes nicht mit einer nassen Hand aus
der Steckdose ziehen oder mit der Steckdose verbinden.
17. Versuchen Sie unter keinen Umständen, das Gehäuse des
Gerätes zu öffnen oder das Gerät selbst zu reparieren. Dies
könnte einen Stromschlag verursachen.
18. Lassen Sie das Gerät während des Gebrauchs niemals
unbeaufsichtigt.
19. Verwenden Sie das Gerät nur zu seinem
bestimmungsgemäßen Zweck.
20. Wickeln Sie das Kabel nicht um das Gerät und knicken Sie es
nicht.
- 10 -
Page 12

21. Die Verwendung von Zubehör, das nicht vom Hersteller
empfohlen wird, kann Verletzungen verursachen.
22. Wenn Sie Produkte mit Antihaftbeschichtung benutzen,
stellen Sie bitte sicher, dass sich keine Vögel im gleichen
Zimmer befinden und dass das Zimmer komplett geschlossen
und gut belüftet werden kann.
23. WARNUNG!
Bitte berühren Sie während des Gebrauchs nicht
die Oberfläche. Die Temperatur der zugänglichen
Oberflächen kann sehr hoch sein, wenn das Gerät
in Betrieb ist.
24. Das Gerät immer auf einer flachen, stabilen und
wärmefesten Fläche benutzen.
25. Das Gerät darf nur benutzt werden, wenn beide Platten
korrekt montiert sind.
26. Das Gerät in einem gut belüfteten Bereich benutzen. Auf
allen Seiten des Geräts mindestens 10 bis 15 cm Platz für eine
ausreichende Belüftung lassen.
27. Das Gerät nicht auf oder in der Nähe von Gas- oder
Elektroherden oder in bzw. auf einen beheizten Ofen oder
eine andere Wärmequelle stellen.
28. Das Gerät darf während des Gebrauchs keine Vorhänge,
Wandverkleidungen, Kleidung, Geschirrhandtücher oder
andere brennbare Materialien berühren.
29. Die heiße Oberfläche des Geräts nicht berühren. Das Gerät
nicht versetzen, wenn es eingesteckt ist. Vor dem
Transportieren das Gerät vollständig abkühlen lassen.
30. Das Gerät nicht in der Nähe von Wasser oder anderen
Flüssigkeiten benutzen.
31. Das Gerät und das Netzkabel von beheizten Flächen fernhalten.
32. Das Gerät ist für den Gebrauch in Innenräumen sowie für
Privathaushalte zur Zubereitung von Panini und als gesunder
Grill geeignet, jedoch nicht für industrielle oder gewerbliche
Zwecke. Das Gerät weder im Freien noch für andere Zwecke
gebrauchen.
- 11 -
Page 13

CG-124243.1 DE
BEZEICHNUNG DER TEILE
1. Griff
2. Grillplattenentriegelung (oben)
3. Abnehmbare obere Grillplatte, antihaftbeschichtet
4. Fettrinne (oben)
5. Fettrinne (unten)
6. Abnehmbare untere Grillplatte,
antihaftbeschichtet
7. Grillplattenentriegelung (unten)
8. LED-Display
LED-Display
A. Temperaturanzeige der unteren Grillplatte
B. Temperaturanzeige der oberen Grillplatte
C. Zeitanzeige
VOR ERSTER INBETRIEBNAHME
1. Sämtliche Verpackungsmaterialien entfernen.
2.
3. Wickeln Sie das Netzkabel vollständig ab.
zeigt Uhrzeit und Temperatur an
9. Temperaturregler, untere Grillplatte
10. Zeiteinstellung, Zeit verringern
11. Zeiteinstellung, Zeit verlängern
12. Temperaturregler, obere Grillplatte
13. Abtropfwanne
14. Grillverriegelung und Endabschaltung
15. Entriegelung für offenes Grillen
16. Schieberegler für Grillverriegelung und
Endabschaltung
Das Gerät wie
wiedereinzusetzen.
- 12 -
Page 14

Bei der Herstellung werden bestimmte Geräteteile zum Schutz dünn eingeölt. Zum Beseitigen von
Produktionsrückständen das Gerät ca. 10 Minuten ohne Zutaten einschalten. Auf ausreichende Belüftung achten,
da hierbei Gerüche und etwas Rauch freigesetzt werden können. Dies ist vollkommen harmlos und verschwindet
nach kurzer Zeit.
ANLEITUNG ZUR ANWENDUNG
VORSICHT: Das Gerät nicht zum Garen oder Auftauen von Tiefkühlkost verwenden. Vor der Zubereitung müssen
alle Zutaten vollständig aufgetaut sein.
1. Fetten Sie die Grillflächen für optimale Ergebnisse leicht mit ein wenig Speiseöl oder Ölspray ein. Gerät
schließen.
2. Gerät an eine geeignete Steckdose anschließen.
3. Den linken (untere Grillplatte) und rechten (obere Grillplatte) Temperaturregler auf die gewünschte Heizstufe
stellen (160 - 230 °C). Das LED-Display leuchtet auf und die Ziffern beginnen zu blinken. Das bedeutet, dass sich
das Gerät gerade aufheizt. Sobald die Solltemperatur erreicht ist, ertönt ein Signal und die Ziffern hören zu
blinken auf.
4. Das Gerät öffnen. Dazu den Griff ganz nach oben klappen.
5. Das Grillgut auf die untere Heizfläche legen. Dazu kein weiteres Fett oder Öl auftragen.
6. Gerät schließen. Bei Bedarf kann mit dem Schieberegler für den Anschlag ein Mindestabstand zwischen den
Grillplatten eingestellt werden.
Hinweis: Während des Garvorgangs blinken die Display-Ziffern und bleiben hin und wieder eingeschaltet. Das
bedeutet, dass sich das Heizelement zwischendurch ein- und ausschaltet, um die richtige Temperatur zu halten.
7. Den Garvorgang ab und zu kontrollieren. Die Zutaten etwa 3 - 8 Minuten grillen. Die Garzeit hängt von den
Zutaten und von den persönlichen Vorlieben ab. Das Grillgut muss nicht gewendet werden, da es von den
oberen und unteren Grillplatten gleichzeitig gegrillt wird.
Hinweise: Das Grillgut gart im eigenen Saft. Die überschüssige Flüssigkeit fließt in die Abtropfwanne. Das Öl/Fett
in der Abtropfwanne darf nicht wiederverwendet werden.
8. Nach dem Grillen der Essenszutaten öffnen Sie den Grill mit dem Griff. Die Speise mit Hilfe eines
hitzebeständigen Plastikschabers entnehmen. Verwenden Sie niemals Metallzangen oder ein Messer, da diese
die nichthaftende Schicht der Grillplatten beschädigen können.
Zeiteinstellung und automatische Abschaltung:
Die Zeiteinstellung drücken, um die gewünschte Betriebsdauer (0 - 90 Minuten) einzustellen. Zum schnellen
Einstellen die Taste länger gedrückt halten. Im LED-Display wird die eingestellte Dauer angezeigt und das Gerät
automatisch ab.
Falls keine Zeit eingestellt ist, nicht vergessen, das Gerät nach dem Gebrauch selbst von Hand auszuschalten.
Andernfalls schaltet sich das Gerät nach ca. 60 Minuten ab, wenn es inzwischen nicht bedient wurde.
ANWENDUNG ALS EINEN OFFENEN GRILL
Verwenden Sie den Grill als einen offenen Grill zum Grillen von Steaks, Geflügel (ein Grillen von Geflügel mit
Knochen wird nicht empfohlen, da das Fleisch auf einem offenen Grill nicht gleichmäßig gegrillt wird), Fisch und
Gemüse.
- 13 -
Page 15

1. Das Gerät am Griff anfassen und mit der Hand die Entriegelung drücken, um das Oberteil zu öffnen. Die
Entriegelung loslassen, sobald das Oberteil ganz nach hinten geklappt ist.
2. Fetten Sie die Grillflächen für optimale Ergebnisse leicht mit ein wenig Speiseöl oder Ölspray ein.
3. Gerät an eine geeignete Steckdose anschließen.
4. Den linken (untere Grillplatte) und rechten (obere Grillplatte) Temperaturregler auf die gewünschte Heizstufe
stellen (160 - 230 °C). Das LED-Display leuchtet auf und die Ziffern beginnen zu blinken. Das bedeutet, dass sich
das Gerät gerade aufheizt. Sobald die Solltemperatur erreicht ist, ertönt ein Signal und die Ziffern hören zu
blinken auf.
5. Das Grillgut ohne weiteres Fett oder Öl auf die Heizflächen legen.
6. Die Zutaten nach einer gewissen Zeit wenden.
Hinweise: Das Grillgut gart im eigenen Saft. Die überschüssige Flüssigkeit fließt in die Abtropfwanne. Das Öl/Fett
in der Abtropfwanne darf nicht wiederverwendet werden.
7. Die Speise mit Hilfe eines hitzebeständigen Plastikschabers entnehmen. Verwenden Sie niemals Metallzangen
oder ein Messer, da diese die nichthaftende Schicht der Grillplatten beschädigen können.
WARNUNG:
Bei aufgeheizten Platten nicht die Grillpositionen wechseln (z. B. von der geschlossenen Grillposition zur
offenen oder von der offenen zur geschlossenen Position). Die Grillposition muss gewählt werden, bevor das
Gerät eingeschaltet wird.
Während des Garvorgangs das Gerät immer vorsichtig handhaben. Zum Öffnen des Geräts immer den
schwarzen Kunststoffbereich des Griffs anfassen. Dieser Bereich bleibt am Griff auch während des Betriebs
kühl. Während des oder direkt nach dem Zubereiten keine anderen Teile anfassen. Einen Ofenhandschuh
anziehen, um sich vor Verbrennungen zu schützen.
Vor dem Handhaben das Gerät abkühlen lassen (mindestens 30 Minuten).
REINIGUNG UND PFLEGE
1. Schalten Sie das Gerät nach Gebrauch stets aus und ziehen Sie den Netzstecker. Lassen Sie das Gerät vor der
Reinigung abkühlen.
2. Die Abtropfwanne vorsichtig vom Gerät abnehmen (Abb. 1) und mit heißem Wasser und einem neutralen
Geschirrspülmittel abspülen. Das Öl in der Abtropfwanne kann sehr heiß werden. Vor dem Reinigen vollständig
abkühlen lassen. Die Abtropfwanne ist spülmaschinenfest.
3. Das überschüssige Fett mit einem Papiertuch aufnehmen, bevor die Grillplatten abgenommen werden. Zum
Abnehmen der Grillplatten die jeweiligen Entriegelungen am oberen und unteren Gehäuseteil drücken. (Abb.
2) Die Grillplatten mit einem weichen Lappen und heißem Wasser reinigen.
4. Zum Reinigen des Gerätegehäuses einen feuchten Lappen und warmes Wasser mit etwas Geschirrspülmittel
verwenden. Nach jeder Reinigung sämtliche Flächen gründlich abtrocknen.
5. Die Grillplatten und besonders die elektrischen Kontakte gründlich trocknen und das Gerät wieder
zusammenbauen. Die Grillplatten lassen sich nur an ihren jeweiligen Positionen wieder montieren. Zuerst die
langen Kanten gegenüber den Entriegelungen in das Gehäuse einsetzen. Anschließend die anderen langen
Seiten in die Rastaufnahmen einsetzen, sodass die Entriegelungen hörbar rasten und die Grillplatten arretiert
sind.
6. Verwenden Sie niemals Scheuermittel oder scharfe Gegenstände (z. B. Scheuerbürsten oder Messer) für die
Reinigung.
Vorsicht: Tauchen Sie das Gerät niemals in Wasser oder andere Flüssigkeiten. Lebensgefahr wegen eines
elektrischen Schlags!
- 14 -
Page 16

Abb. 1 Abb. 2
Fehlerwarnung
ER1 Der NTC ist kurzgeschlossen oder unterbrochen.
ER2 Temperatur ist unter 80 °C.
ER3 Temperatur ist über 320 °C.
Das Gerät bitte zur Reparatur einsenden, wenn der oben erwähnte Fehler auftritt.
TECHNISCHE DATEN
Betriebsspannung: 220-240V ~ 50-60Hz
Leistungsaufnahme: 2000W
GEWÄHRLEISTUNG UND KUNDENSERVICE
Vor der Lieferung werden unsere Geräte einer strengen Qualitätskontrolle unterzogen. Wenn, trotz aller Sorgfalt,
während der Produktion oder dem Transport Beschädigungen aufgetreten sind, senden Sie das Gerät zurück an den
Händler. Zusätzlich zu den gesetzlichen Rechten hat der Käufer die Option, gemäß den folgenden Bedingungen
Gewährleistung zu fordern:
Wir bieten eine 2-Jahres-Gewährleistung für das erworbene Gerät, beginnend am Tag des Verkaufs. Defekte, die
aufgrund von unangemessenem Umgang mit dem Gerät entstehen und Störungen aufgrund von Eingriffen und
Reparaturen Dritter oder das Montieren von nicht-Originalteilen, werden nicht von dieser Garantie abgedeckt. Die
Quittung immer aufbewahren, ohne Quittung wird jegliche Garantie ausgeschlossen. Bei Schäden durch
Nichteinhalten der Bedienungsanleitung erlischt die Garantie. Wir sind für daraus resultierende Folgeschäden nicht
haftbar. Für Materialschäden oder Verletzungen aufgrund falscher Anwendung oder Nichtbefolgen der
Sicherheitshinweise sind wir nicht haftbar. Schäden an den Zubehörteilen bedeutet nicht, dass das gesamte Gerät
kostenlos ausgetauscht wird. In diesem Fall kontaktieren Sie unseren Kundendienst. Zerbrochenes Glas oder
Kunststoffteile sind immer kostenpflichtig. Schäden an Verbrauchsmaterialien oder Verschleißteilen, sowie
Reinigung, Wartung, Austausch oder Kosten für Versand/Transport zum Reparaturort und zurück, der besagten Teile
werden durch die Garantie nicht abgedeckt und sind deshalb kostenpflichtig.
UMWELTGERECHTE ENTSORGUNG
Wiederverwertung
Europäischen Richtlinie 2012/19/EG
Dieses Symbol zeigt an, dass das Produkt nicht zusammen mit Haushaltsabfällen entsorgt werden darf.
Um Umwelt- und Gesundheitsschäden durch unkontrollierte Abfallentsorgung zu verhindern, bitte
verantwortungsbewusst entsorgen, um die nachhaltige Wiederverwertung von Ressourcen zu fördern.
Nutzen Sie zur Rückgabe Ihres Altgeräts bitte die Rückgabe- und Sammelsysteme oder wenden Sie sich an den
Händler, bei dem Sie dieses Gerät erworben haben. Dieser kann das Gerät umweltschonend entsorgen.
Emerio Switzerland AG
Industriestrasse 47
6300 Zug
Switzerland
- 15 -
Page 17

Mode d
emploi Français
CONSIGNES DE SÉCURITÉ
pour éviter des blessures et des dommages, et pour optimiser
les performances de votre appareil. Conservez cette notice
sûr. Si vous donnez ou transférez
cet appareil à un tiers, veillez à lui remettre également cette
En cas de détérioration due au non-
Le fabricant/importateur rejette toute responsabilité en cas de
dommages dus au non-respect des instructions de la notice
1. Cet appareil peut être utilisé par des enfants âgés de 8 ans et
plus et les personnes ayant des capacités physiques,
sensorielles ou mentales, ou un manque d'expérience et de
connaissances si elles ont été formées et encadrées pour
l'utilisation de cet appareil en toute sécurité et de
comprendre les risques impliqués.
2. Les enfants ne doivent pas jouer avec l'appareil.
3.
sont surveillés.
4. Gardez l'appareil et son câble hors de la portée des enfants
de moins de 8 ans.
5. Si le câble d'alimentation est endommagé, il doit être
remplacé par le fabricant, son service après vente ou des
personnes de qualification similaire afin d'éviter un danger.
6. Pour obtenir des instructions sur comment nettoyer les
reportez-vous au paragraphe « NETTOYAGE ET ENTRETIEN »
- 16 -
Page 18

7. Les appareils ne sont pas destinés à être mis en
fonctionnement au moyen d'une minuterie extérieure ou par
un système de commande à distance séparé.
8.
vérifiez que la tension et la fréquence du secteur
correspondent aux spécifications indiquées sur la plaque
signalétique.
9.
10. Si vous utilisez une rallonge électrique, elle doit être
rallonge et/ou la fiche risquent de chauffer excessivement. Il
existe un risque potentiel de blessures par trébuchement sur
le cordon électrique. Prenez vos précautions pour éviter
toute situation dangereuse.
11. Débranchez la fiche électrique de la prise électrique quand
12.
des arêtes coupantes et maintenez-le éloigné des objets
chauds et des flammes nues.
13. N'immergez jamais l'appareil ou sa fiche dans de l'eau ni dans
aucun autre liquide. Cela peut provoquer un choc électrique !
14. Pour débrancher la fiche de la prise, saisissez la fiche et tirezla hors de la prise.
15.
et rapportez-le au centre de réparation agréé pour le faire
réparer.
16. Ne branchez pas et ne déb
électrique avec les mains mouillées.
17.
-même. Cela peut provoquer un choc
électrique.
18. Ne laissez jamais l'appareil sans surveillance quand il est en
fonctionnement.
19.
lequel il a été conçu.
- 17 -
Page 19

20.
et ne le pliez pas.
21.
l peut provoquer des blessures.
22.
ait aucun oiseau dans la pièce et à ce que la pièce soit
complètement fermée et bien aéré.
23. AVERTISSEMENT !!
nt
accessibles peut être élevée quand l'appareil est
en fonctionnement.
24. Utilisez toujours le produit sur une surface plane, stable et
résistante à la chaleur.
25.
es
correctement installées.
26. Utilisez le produit dans une zone bien ventilée. Maintenez au
moins un espace de 10 à 15 cm (4 à 6 pouces) tout autour du
27.
ière au gaz
autre source de chaleur.
28. Veillez à ce que le produit ne touche pas de rideau,
revêtement mural, vêtement, serviette, ni aucun autre
matériau inflammable pendant son utilisation.
29. Ne touchez pas les surfaces chaudes du produit. Ne déplacez
Laissez le produit
refroidir complètement avant de le manipuler.
30.
31. Veillez à éviter tout contact du produit et du cordon
32. Ce produit est destiné à un usage en intérieur, non industriel,
non commercial, domestique uniquement comme machine
à panini et grill sain.
ins.
- 18 -
Page 20

CG-124243.1 FR
IDENTIFICATION DES PARTIES
1. Poignée
2. Bouton de déblocage de la plaque du grill
(supérieure)
3. Plaque supérieure du grill amovible, revêtement
antiadhésif
4. Évacuation de la graisse (supérieure)
5. Évacuation de la graisse (inférieure)
6. Plaque inférieure du grill amovible, revêtement
antiadhésif
7. Bouton de déblocage de la plaque du grill
(inférieure)
8. Écran LED : affiche la durée et la température
Écran LED
9. Bouton de réglage de la température, plaque
inférieure du grill
10. Bouton de réglage de la durée, diminuer la durée
11. Bouton de réglage de la durée, augmenter la durée
12. Bouton de réglage de la température, plaque
supérieure du grill
13. Bac récupérateur de graisse
14. Verrouillage du grill et butée de fin de course
15. Bouton de déblocage pour faire une grillade
ouverte
16. Bouton de réglage coulissant pour le verrouillage
du grill et la butée de fin de course
A. Affichage de la température de la plaque inférieure du grill
B. Affichage de la température de la plaque supérieure du gril
C. Affichage de la durée
- 19 -
Page 21

AVANT LA PREMIERE UTILISATION
1. Retirez tous les éléments d'emballage.
2. Appuyez sur le bouton de réglage coulissant de la marque « Low/Lock » à « Open
Nettoyez-le de la manière décrite à la section « Nettoyage et entretien ». Veillez à replacer le bac récupérateur
de graisse.
3. Déroulez complètement le cordon d'alimentation.
pour leur protection. Faites
Cela est sans danger
et disparaît rapidement.
UTILISATION
ATTENTION :
Tous les aliments doivent être
1. Pour garantir une bonne cuisson, badigeonnez les plaques de cuisson d'un peu d'huile de cuisson ou de
vaporisateur à cuisson.
2.
3. Réglez les boutons gauche (plaque inférieure du grill) et droit (plaque supérieure du grill) de réglage de la
température sur le niveau de chauffage souhaité (160-230
atteinte, les chiffres arrêtent de clignoter et un bip est émis.
4.
5.
supplémentaire.
6.
distance minimale entre les deux plaques de cuisson en
utilisant le bouton de réglage coulissant avec butée de fin de course.
Remarque : Pendant la cuisson, les chiffres clignotent et restent allumés de temps en temps. Cela indique que
7. Surveillez le processus de cuisson de temps en temps. Faites griller les aliments pendant environ 3 à 8 minutes.
Remarques : Les aliments grillés sont cuits dans leur propre jus et les liquides en excès coulent dans le bac
réutilisées.
8. Lorsque les aliments sont cuits, utilisez la poignée pour ouvrir le grill
de plastiq -ci peuvent
endommager le revêtement antiadhésif des plaques de cuisson.
:
Appuyez sur le bouton de réglage de la durée pour régler la durée de fonctionnement désirée (entre 0 et
90
à rebours. Une fois que la durée passe à « 00:00
-utilisation.
UTILISATION EN TANT QUE GRIL OUVERT
Utilisez le gril en tant que gril ouvert pour la cuisson de steak, de volaille (nous déconseillons de faire cuire du poulet
- 20 -
Page 22

1. O
2. Pour garantir une bonne cuisson, badigeonnez les plaques de cuisson d'un peu d'huile de cuisson ou de
vaporisateur à cuisson.
3.
4. Réglez les boutons gauche (plaque inférieure du grill) et droit (plaque supérieure du grill) de réglage de la
température sur le niveau de chauffage souhaité (160-230
atteinte, les chiffres arrêtent de clignoter et un bip est émis.
5.
6. Retournez les aliments après un certain temps.
Remarques : Les aliments grillés sont cuits dans leur propre jus et les liquides en excès coulent dans le bac
réutilisées.
7.
métalliques ou un couteau car ceux-ci peuvent endommager le revêtement antiadhésif des plaques de cuisson.
AVERTISSEMENT :
Ne changez pas les positions du grill (de la position fermée à la position ouverte ou vice versa) tant que les
plaques sont chaudes.
ilisez jamais des pinces
la zone en plastique noire de la poignée. Cette partie de la poignée reste froide au toucher pendant la cuisson.
Ne touchez pas les autres pièces pendant ou immédiatement après la cuisson. Utilisez un gant de cuisine pour
éviter les brûlures.
minutes).
NETTOYAGE ET ENTRETIEN
1. Éteignez toujours l
2.
détergent neutre de lavecomplètement avant de nettoyer le bac. Le bac récupérateur de graisse passe au lave-vaisselle.
3.
les plaques de cuisson, appuyez sur les boutons de déblocage respectifs des logements supérieurs et inférieurs.
4.
Après chaque nettoyage, séchez soigneusement toutes les surfaces.
5. Séchez les plaques de cuisson et en particulier leurs contacts électri
6. N'utilisez jamais de produits de nettoyage abrasifs ou d'objets coupants (ex: brosses à récurer ou couteau) pour
le nettoyage.
Attention: N'immergez jamais l'appareil dans l'eau ou tout autre liquide. Il y a un risque d'électrocution fatale!
appareil et débranchez-le après utilisation. Attendez qu'il refroidisse avant de le nettoyer.
- t un
; laissez-la refroidir
ie-tout avant de détacher les plaques de cuisson. Pour détacher
sorte
- 21 -
Page 23

Avertissement
ER1 Le NTC est en court-circuit ou en circuit ouvert.
ER2 Température inférieure à 80 °C.
ER3 Température supérieure à 320 °C.
DONNÉES TECHNIQUES
Tension de fonctionnement: 220-240V ~ 50-60Hz
Puissance : 2000W
GARANTIE ET SERVICE APRÈS-VENTE
Nos
plus des droits juridiques, le client a la possibilité dans les limites de la garantie de déposer les réclamations
suivantes :
Fig.1 Fig.2
dommages dus à une intervention ou réparation faite par une tierce
-dessus se produisent.
toujours votre reçu, car sans celui-ci vous ne pourrez réclamer aucune sorte de garantie. Les dommages causés par
le non respect des instructions de ce manuel rendront la garantie caduque. Nous déclinons toute responsabilité en
cas de dommages indirects. Nous déclinons toute responsabilité en cas de dégâts matériels ou de dommages
observées. Si les accessoires sont endommagés, cela ne signifie pas que toute la machine sera remplacée
gratuitement. Dans de tels cas, veuillez contacter notre assistance. Des pièces brisées en verre ou en plastique sont
tion et de transport à destination et au départ de tout lieu de
réparation. Desdites pièces ne sont pas couverts par la garantie et doivent donc être payés.
Recyclage Directive européenne 2012/19/EU
Ce symbole indique que le produit ne doit pas être jeté avec les ordures ménagères. Pour limiter les
dernier pour promouvoir une réutilisation responsable de ses matériaux. Pour recycler votre produit,
utilisez les réseaux de collecte de votre région ou prenez contact avec le revendeur du produit. Ce
dernier pourra vous aider à le recycler.
Emerio Switzerland AG
Industriestrasse 47
6300 Zug
Switzerland
- 22 -
Page 24

Manuale d'istruzioni
NUTENZIONE" del manuale.
ramite timer esterni o telecomandi separati.
Italiano
ISTRUZIONI DI SICUREZZA
Prima dell'uso, accertarsi di aver letto tutte le istruzioni
riportate di seguito per evitare lesioni o danni e ottenere i
migliori risultati dall'apparecchio. Conservare questo manuale
in un luogo sicuro. In caso di passaggio di proprietà
dell'apparecchio, includere anche questo manuale di istruzioni.
In caso di danni causati dal mancato rispetto delle istruzioni
riportate in questo manuale, la garanzia sarà annullata. Il
costruttore/importatore declina ogni responsabilità per danni
causati dal mancato rispetto del manuale o da un uso
negligente o non conforme con i requisiti riportati in questo
manuale.
1. Questo apparecchio può essere usato da bambini di età
superiore a 8 anni e da persone con ridotte capacità fisiche,
sensoriali o mentali o prive di esperienza o conoscenza, solo
se comprendono i rischi correlati.
2.
3. Le operazioni di pulizia e manutenzione ordinaria non
devono essere effettuate da bambini a meno che non
abbiano almeno 8 anni e siano supervisionati.
4.
portata dei bambini di età inferiore a 8 anni.
5. Per motivi di sicurezza, se il cavo di alimentazione è
danneggiato deve essere sostituito dal fabbricante, dal suo
centro di assistenza o da un tecnico qualificato.
6. Per le istruzioni relative alla pulizia delle superfici a contatto
con olio o alimenti, fare riferimento al paragrafo "PULIZIA E
MA
7. Questo apparecchio non è progettato per essere attivato
t
8. Prima di collegare la spina alla presa di corrente, verificare
che il voltaggio e la frequenza siano conformi alle specifiche
riportate sulla targa dell'apparecchio.
- 23 -
Page 25

9.
corrente dotata di messa a terra.
10. Eventuali prolunghe elettriche utilizzate devono essere
adatte al consumo di energia dell'apparecchio per evitare il
surriscaldamento della prolunga e/o della spina. Prestare
attenzione a non inciampare sulla prolunga per evitare il
rischio di lesioni. Prestare attenzione a evitare situazioni di
pericolo.
11. Scollegare la spina dalla presa di corrente quando
l'apparecchio non è in uso e prima di pulirlo.
12. Assicurarsi che il cavo di alimentazione non penda da bordi
appuntiti e tenerlo lontano da oggetti caldi e fiamme libere.
13. Non immergere l'apparecchio o la spina in acqua o altri
liquidi. Pericolo di morte a causa delle scosse elettriche!
14. Per scollegare la spina dalla presa di corrente, tirare la spina
e non il cavo.
15. Non toccare l'apparecchio se è caduto nell'acqua. Scollegare
la spina dalla presa di corrente, spegnere l'apparecchio e
inviarlo a un centro di assistenza autorizzato per la
riparazione.
16. Non collegare o scollegare l'apparecchio dalla presa di
corrente con le mani bagnate.
17. Non tentare mai di aprire l'involucro dell'apparecchio o di
riparare l'apparecchio per evitare il rischio di scossa elettrica.
18. Non lasciare mai l'apparecchio incustodito quando è in
funzione.
19. Non usare l'apparecchio per scopri diversi da quelli previsti.
20. Non avvolgere il cavo intorno all'apparecchio e non piegarlo.
21. L'uso di accessori non raccomandati dal costruttore
dell'apparecchio comporta il rischio di lesioni.
22. Se si utilizzano prodotti con superfici non aderenti, accertarsi
che non siano presenti uccelli e che il locale possa essere
completamente chiuso e ben ventilato.
- 24 -
Page 26

23. AVVERTENZA!
Non toccare la superficie mentre l'apparecchio è
in funzione. La temperatura delle superfici
accessibili può essere elevata quando
l'apparecchio è in funzione.
24. Usare l'apparecchio su una superficie stabile, piana e
resistente al calore.
25. L'apparecchio deve essere utilizzato esclusivamente con
entrambe le piastre installate correttamente.
26. Usare l'apparecchio in un'area ben ventilata. Mantenere uno
spazio libero di almeno 10-15 cm intorno a tutti i lati
dell'apparecchio per assicurare un'adeguata circolazione
dell'aria.
27. Non posizionare l'apparecchio sopra o in prossimità di
fornelli elettrici o a gas, o all'interno o sopra forni caldi o altre
fonti di calore.
28. Quando l'apparecchio è in funzione, evitare che entri a
contatto con tende, tappezzerie, indumenti, panni da cucina
o altri materiali infiammabili.
29. Non toccare le parti calde dell'apparecchio. Non spostare
l'apparecchio quando è collegato alla presa di corrente.
Attendere che l'apparecchio si raffreddi completamente
prima di toccarlo.
30. Non usare l'apparecchio in prossimità di acqua o altri liquidi.
31. Tenere l'apparecchio e il cavo di alimentazione lontano da
superfici calde.
32. Questo prodotto è destinato all'uso domestico e in interni ed
esclusivamente per preparare panini o alimenti grigliati. Non
è destinato all'uso commerciale o industriale. Non usare
l'apparecchio all'aperto o per altri scopi.
- 25 -
Page 27

CG-124243.1 IT
IDENTIFICAZIONE DELLE PARTI
1. Impugnatura
2. Pulsante di rilascio della piastra (superiore)
3. Piastra superiore removibile e antiaderente
4. Scivolo raccogli-grassi (superiore)
5. Scivolo raccogli-grassi (inferiore)
6. Piastra inferiore removibile e antiaderente
7. Pulsante di rilascio della piastra (inferiore)
8. Display LED (tempo e temperatura)
9. Manopola della temperatura, piastra inferiore
Display LED
A. Temperatura della piastra inferiore
B. Temperatura della piastra superiore
C. Timer
PRIMA DEL PRIMO UTILIZZO
1. Rimuovere tutti i materiali di imballaggio.
2. Portare il cursore dal simbolo di bloccaggio al simbolo di apertura per aprire l'apparecchio. Pulire l'apparecchio
come indicato alla sezione "Pulizia e manutenzione". Assicurarsi di riposizionare la vaschetta raccogli-grassi.
10. Timer, diminuzione del tempo di cottura
11. Timer, aumento del tempo di cottura
12. Manopola della temperatura, piastra superiore
13. Vaschetta raccogli-grassi
14. Scanalatura di distanziamento e bloccaggio
15. Pulsante di apertura della griglia
16. Cursore di distanziamento delle piastre
- 26 -
Page 28

3. Svolgere completamente il cavo di alimentazione.
Durante la fabbricazione, alcune parti del prodotto sono state rivestite con un sottile strato di olio protettivo. Per
rimuovere i residui di fabbricazione, lasciare l'apparecchio in funzione per circa 10 minuti senza alimenti. Assicurarsi
di garantire una sufficiente ventilazione, perché l'apparecchio può emettere un leggero odore e una scia di fumo.
È un fenomeno innocuo che scomparirà in breve tempo.
ISTRUZIONI PER L'USO
ATTENZIONE! Non usare l'apparecchio per cuocere o scongelare alimenti surgelati. Tutti gli alimenti devono essere
completamente scongelati prima della cottura.
1. Per risultati ottimali, distribuire sulle piastre di cottura un leggero strato di olio da cucina o di spray da cottura.
Chiudere l'apparecchio.
2. Collegare l'apparecchio a una presa di corrente adatta.
3. Impostare la manopola della temperatura sinistra (piastra inferiore) e destra (piastra superiore) in
corrispondenza del livello di calore desiderato (160-230°C). Il display LED si accenderà e le cifre inizieranno a
lampeggiare, a indicare che l'apparecchio si sta riscaldando. Al raggiungimento della temperatura impostata,
le cifre smetteranno di lampeggiare e verrà emesso un segnale acustico.
4. Aprire l'apparecchio sollevando completamente l'impugnatura.
5. Disporre gli alimenti sulla piastra inferiore senza aggiungere grassi o oli.
6. Chiudere l'apparecchio. Se necessario, è possibile impostare una distanza minima tra le piastre usando il
cursore di distanziamento.
Nota: durante la cottura, le cifre lampeggeranno di tanto in tanto. Ciò indica che l'elemento riscaldante si
accende e si spegne per mantenere la temperatura impostata.
7. Monitorare la cottura di tanto in tanto. Cuocere gli alimenti per circa 3-8 minuti. Il tempo di cottura dipende
dal tipo di alimento e dai gusti personali. Non è necessario voltare gli alimenti durante la cottura, perché
vengono cotti con entrambe le piastre.
Nota: i grassi e i succhi prodotti dagli alimenti verranno raccolti nella vaschetta raccogli-grassi. Gli oli e i grassi
raccolti nella vaschetta non devono essere riutilizzati.
8. Al termine della cottura, aprire la piastra usando la maniglia. Rimuovere gli alimenti aiutandosi con una spatola
in plastica termoresistente. Non usare mestoli in metallo o coltelli, poiché potrebbero danneggiare il
rivestimento antiaderente delle piastre di cottura.
Regolazione del timer e spegnimento automatico
Usare i pulsanti del timer per impostare la durata di funzionamento desiderata (0-90 minuti). Tenere premuto i
pulsanti per scorrere rapidamente le cifre. Sul display LED apparirà il tempo, e inizierà il conto alla rovescia. Al
termine del conto alla rovescia verrà emesso un segnale acustico e l'apparecchio si spegnerà automaticamente.
Se non viene impostato il timer, ricordarsi di spegnere manualmente l'apparecchio dopo l'uso. In ogni caso,
l'apparecchio si spegnerà automaticamente dopo circa 60 minuti di inutilizzo.
USO IN POSIZIONE APERTA
È possibile usare la piastra aperta per cuocere bistecche, pollame (si sconsiglia la cottura di pezzi di pollo con ossa,
poiché non cuocerebbero in modo uniforme), pesce e verdure.
- 27 -
Page 29

1. Per aprire l'apparecchio, tenere l'impugnatura con una mano e premere il pulsante di apertura con l'altra.
Rilasciare il pulsante di apertura quando il coperchio superiore è completamente aperto.
2. Per risultati ottimali, distribuire sulle piastre di cottura un leggero strato di olio da cucina o di spray da cottura.
3. Collegare l'apparecchio a una presa di corrente adatta.
4. Impostare la manopola della temperatura sinistra (piastra inferiore) e destra (piastra superiore) in
corrispondenza del livello di calore desiderato (160-230°C). Il display LED si accenderà e le cifre inizieranno a
lampeggiare, a indicare che l'apparecchio si sta riscaldando. Al raggiungimento della temperatura impostata,
le cifre smetteranno di lampeggiare e verrà emesso un segnale acustico.
5. Disporre gli alimenti sulle piastre senza aggiungere grassi o oli.
6. Voltare gli alimenti di tanto in tanto.
Nota: i grassi e i succhi prodotti dagli alimenti verranno raccolti nella vaschetta raccogli-grassi. Gli oli e i grassi
raccolti nella vaschetta non devono essere riutilizzati.
7. Rimuovere gli alimenti aiutandosi con una spatola in plastica termoresistente. Non usare mestoli in metallo o
coltelli, poiché potrebbero danneggiare il rivestimento antiaderente delle piastre di cottura.
AVVERTENZA!
Non modificare la modalità d'uso dell'apparecchio (dalla posizione aperta a quella chiusa o viceversa) quando
le piastre sono calde. Selezionare la modalità d'uso prima di accendere l'apparecchio.
Prestare attenzione alle superfici calde dell'apparecchio quando è in funzione. Per aprire l'apparecchio,
afferrare l'area in plastica nera dell'impugnatura. Questa parte dell'impugnatura rimane fredda al tatto
durante la cottura. Non toccare le altre parti dell'apparecchio durante o immediatamente dopo la cottura.
Indossare un guanto da forno per evitare il rischio di ustioni.
Attendere che l'apparecchio si raffreddi prima di toccarlo (almeno 30 minuti).
PULIZIA E MANUTENZIONE
1.
qualsiasi operazione di pulizia.
2. Rimuovere con attenzione la vaschetta raccogli-grassi dall'apparecchio (Fig. 1) e risciacquarla con acqua calda
e detersivo per piatti. L'interno della vaschetta può essere molto caldo; attendere che si raffreddi
completamente prima di pulirla. La vaschetta raccogli-grassi è lavabile in lavastoviglie.
3. Rimuovere il grasso in eccesso con della carta assorbente prima di rimuovere le piastre. Per rimuovere le piastre,
premere i rispettivi pulsanti di rilascio sulla parte superiore e inferiore dell'apparecchio. Pulire le piastre con un
panno morbido e dell'acqua calda (Fig. 2).
4. Pulire le superfici esterne dell'apparecchio con un panno umido, acqua calda e detersivo per piatti. Al termine
della pulizia, asciugare accuratamente tutte le superfici.
5. Asciugare le piastre, in particolare i contatti elettrici, e riposizionarle sull'apparecchio. Le piastre non sono
intercambiabili. Inserire per primi i lati lunghi dal lato opposto dei pulsanti di rilascio. Quindi inserire gli altri lati
lunghi nei fermagli finché i pulsanti di rilascio non si incastrano in posizione.
6. Non usare mai detergenti abrasivi od oggetti affilati (ad es., spazzole o coltelli) per pulire la piastra.
Attenzione: non immergere l'apparecchio in acqua o altri liquidi. Pericolo di morte a causa delle scosse elettriche!
Lasciare raffreddare prima di
Fig. 1 Fig. 2
- 28 -
Page 30

Codici errore
ER1 Corto circuito del termistore NTC.
ER2 La temperatura è inferiore a 80°C.
ER3 La temperatura è superiore a 320°C.
Se compaiono questi codici errore, portare l'apparecchio presso un centro di assistenza.
SPECIFICHE TECNICHE
Potenza di funzionamento: 220-240V ~ 50-60Hz
Potenza: 2000W
GARANZIA E SERVIZIO DI ASSISTENZA
Prima della fornitura, i nostri apparecchi vengono sottoposti ad un severo controllo di qualità. Se, nonostante la
massima cura, si sono verificati danni durante la produzione o il trasporto, si prega di restituire l'apparecchio al
rivenditore. Oltre ai diritti legali previsti dalla legge, l'acquirente può far valere i diritti derivanti dalla seguente
garanzia:
Concediamo 2 anni di garanzia sull'apparecchio acquistato; il periodo di garanzia inizia dal giorno dell'acquisto.
Durante questo periodo ripariamo o sostituiamo gratuitamente ogni componente guasto, la cui malfunzione può
essere manifestamente attribuita a difetti del materiale o al processo di produzione. In caso di apparecchio difettoso,
rivolgersi direttamente al rivenditore. I difetti derivanti da un uso scorretto dell'apparecchio e le malfunzioni dovute
all'intervento o alla riparazione da parte di terzi o alla sostituzione di componenti con ricambi non originali non sono
coperti da questa garanzia. Conservare sempre lo scontrino, senza il quale non è possibile far valere la garanzia. I
danni dovuti al non rispetto del manuale di istruzioni rendono nulla la garanzia; se ciò porta a conseguenti danni
non potremmo essere ritenuti responsabili. Decliniamo inoltre qualsiasi responsabilità per eventuali danni o lesioni
personali causati da un uso improprio o in caso di mancata aderenza al manuale di istruzioni. Eventuali danni agli
accessori non implicano la sostituzione gratuita dell'intero apparecchio. In tal caso, contattare il reparto di assistenza.
La rottura di componenti in vetro o plastica è sempre soggetta a un costo. I difetti ai componenti di consumo o a
componenti soggetti a usura, compresa la pulizia, manutenzione, sostituzione o le spese di spedizione e di trasporto
verso il luogo di riparazione e ritorno. degli stessi, non sono coperti dalla garanzia e saranno soggetti a un costo.
SMALTIMENTO ECOCOMPATIBILE
Riciclaggio
Direttiva europea 2012/19/EU
Questo simbolo indica che il prodotto non deve essere smaltito con altri rifiuti domestici. Per prevenire
rischi all'ambiente o alla salute da uno smaltimento non controllato, riciclare responsabilmente per
promuovere un riutilizzo sostenibile delle risorse materiali. Per restituire il dispositivo utilizzato, servirsi
dei sistemi di restituzione e raccolta o contattare il proprio rivenditore autorizzato dove il prodotto è stato acquistato.
Il rivenditore autorizzato si occuperà dello smaltimento sicuro del prodotto.
Emerio Switzerland AG
Industriestrasse 47
6300 Zug
Switzerland
- 29 -
 Loading...