

Page 1
Preceptor Series – Remote Load Die Cast EXIT Series
Preceptor Series – Remote Load Die Cast EXIT Series
IMPORTANT SAFEGUARDS
When using electrical equipment, basic safety precautions should
always be followed including the following:
READ AND FOLLOW ALL SAFETY
INSTRUCTIONS
1. Do not use outdoors.
2. Do not let power supply cords touch hot surfaces.
3. Do not mount near gas or electric heaters.
4. Use caution when handling batteries. Avoid possible shorting.
5. Equipment should be mounted in locations and at heights where it
will not readily be subjected to tampering by unauthorized personnel.
6. The use of accessory equipment not recommended by the manufacturer may cause an unsafe condition.
7. Caution: If optional Halogen cycle lamp(s), symbol (H—), are used in
this equipment, to avoid shattering: do not operate lamp in excess of
rated voltage, protect lamp against abrasion and scratches and
against liquids when lamp is operating, dispose of lamp with care.
8. Halogen cycle lamps operate at high temperatures. Do not store or
place flammable materials near lamp.
9. Do not use this equipment for other than intended use.
10. All servicing should be performed by qualified service personnel.
SAVE THESE INSTRUCTIONS
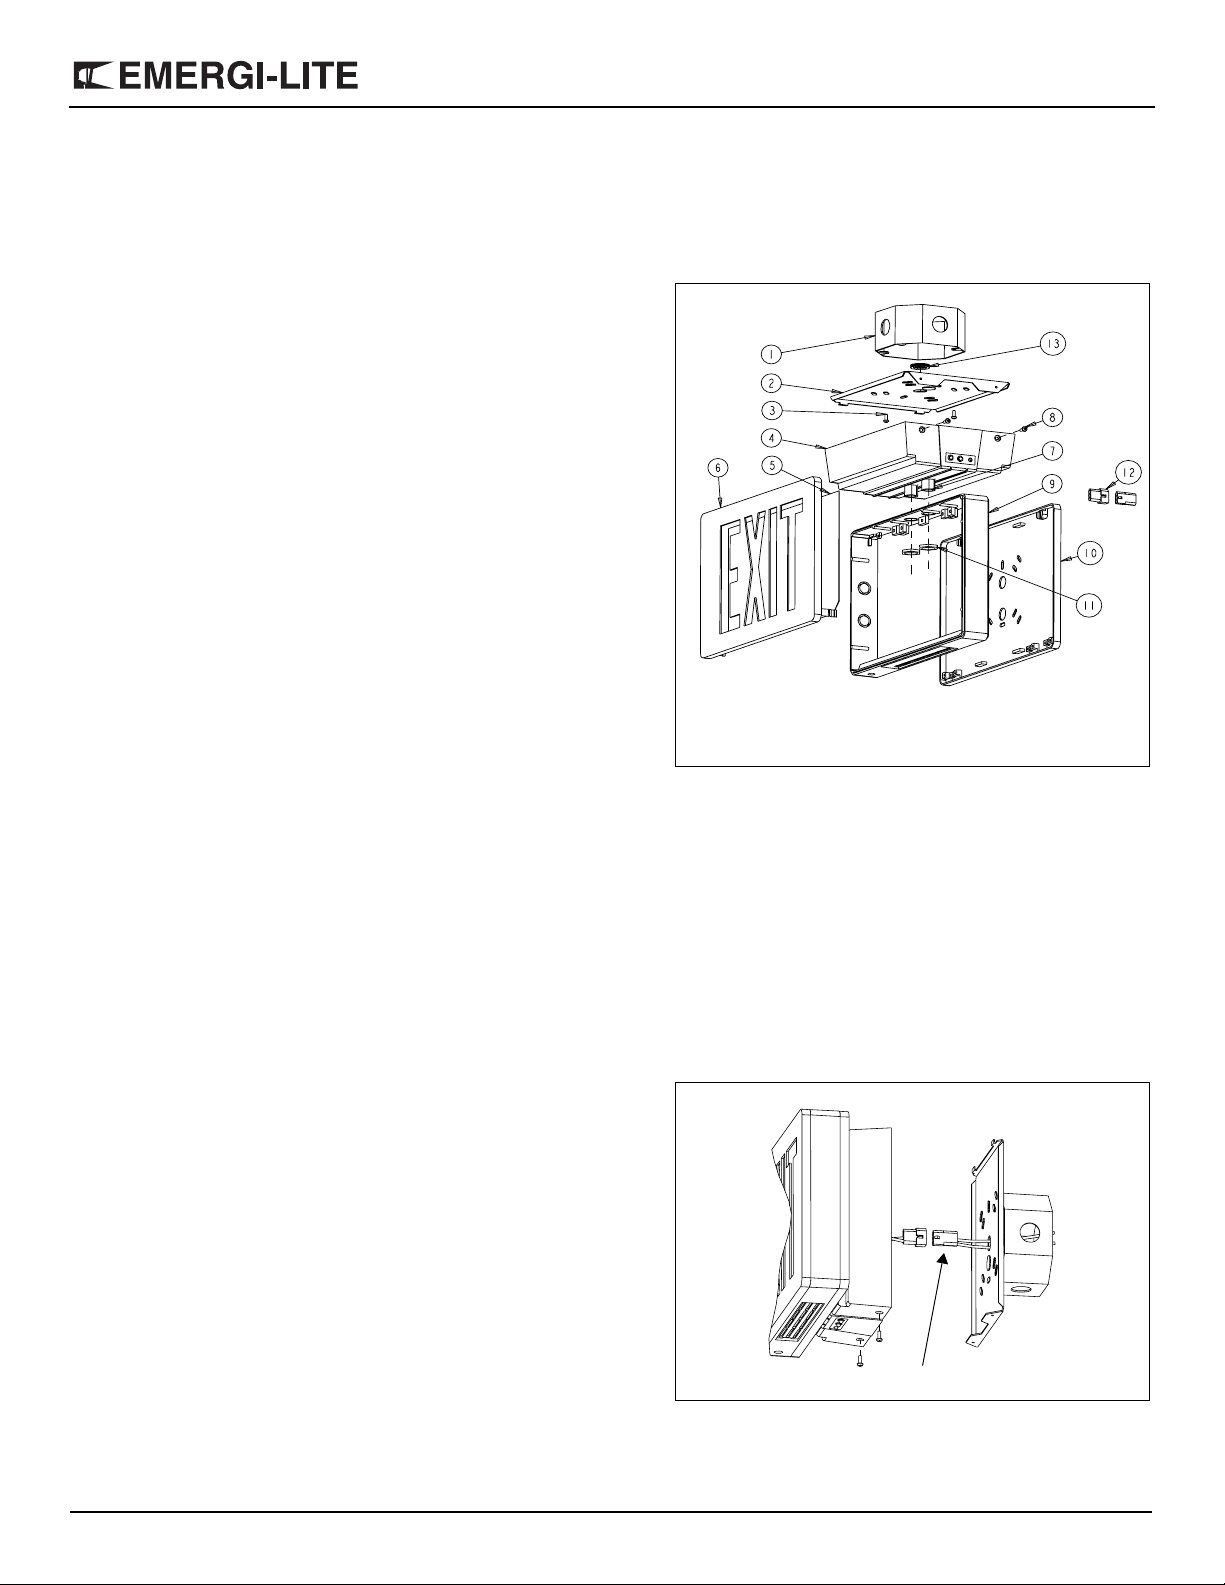
Figure 1
Part List
1. Junction box (not supplied)
2. Canopy backplate
3. Junction box screws (not
supplied)
4. Canopy
5. Colored diffuser (one for
single sided units and two
for double sided units)
6. Exit door
7. Hex. nipple (2)
8. Securement screws (2)
9. Exit frame
10. Exit back (or second exit
door for double faced units)
11. Hexagonal nuts (2)
12. AC connector
13. Bushing
Installation Instructions
1. Turn off unswitched AC power.
2. Route unswitched AC wires into the junction box and leave 12” of
wire length.
3. Remove canopy assembly from carton. Remove canopy backplate
from canopy and retain securement screws.
4. Remove proper knockouts in canopy backplate (including the center
knockout) to mount to the wall. Route unswitched AC wires through
center hole in canopy backplate. Mount canopy backplate to the electrical box using the existing screws.
Note — For wall mounted signs, make sure that the screw holes on
the canopy backplate are facing down - this will ensure that the test
switch and pilot light face downwards.
5. Disconnect male half of the AC connector (located in the canopy, see
fig. 2) from AC wire harness and make the proper connections. Our
unit accepts an input voltage of 120 VAC or 277 VAC (see fig. 5).
Emergi-Lite Tel: (888) 552-6467 ext. 547 or 255 Fax: (888) 867-1565 www.emergi-lite.com
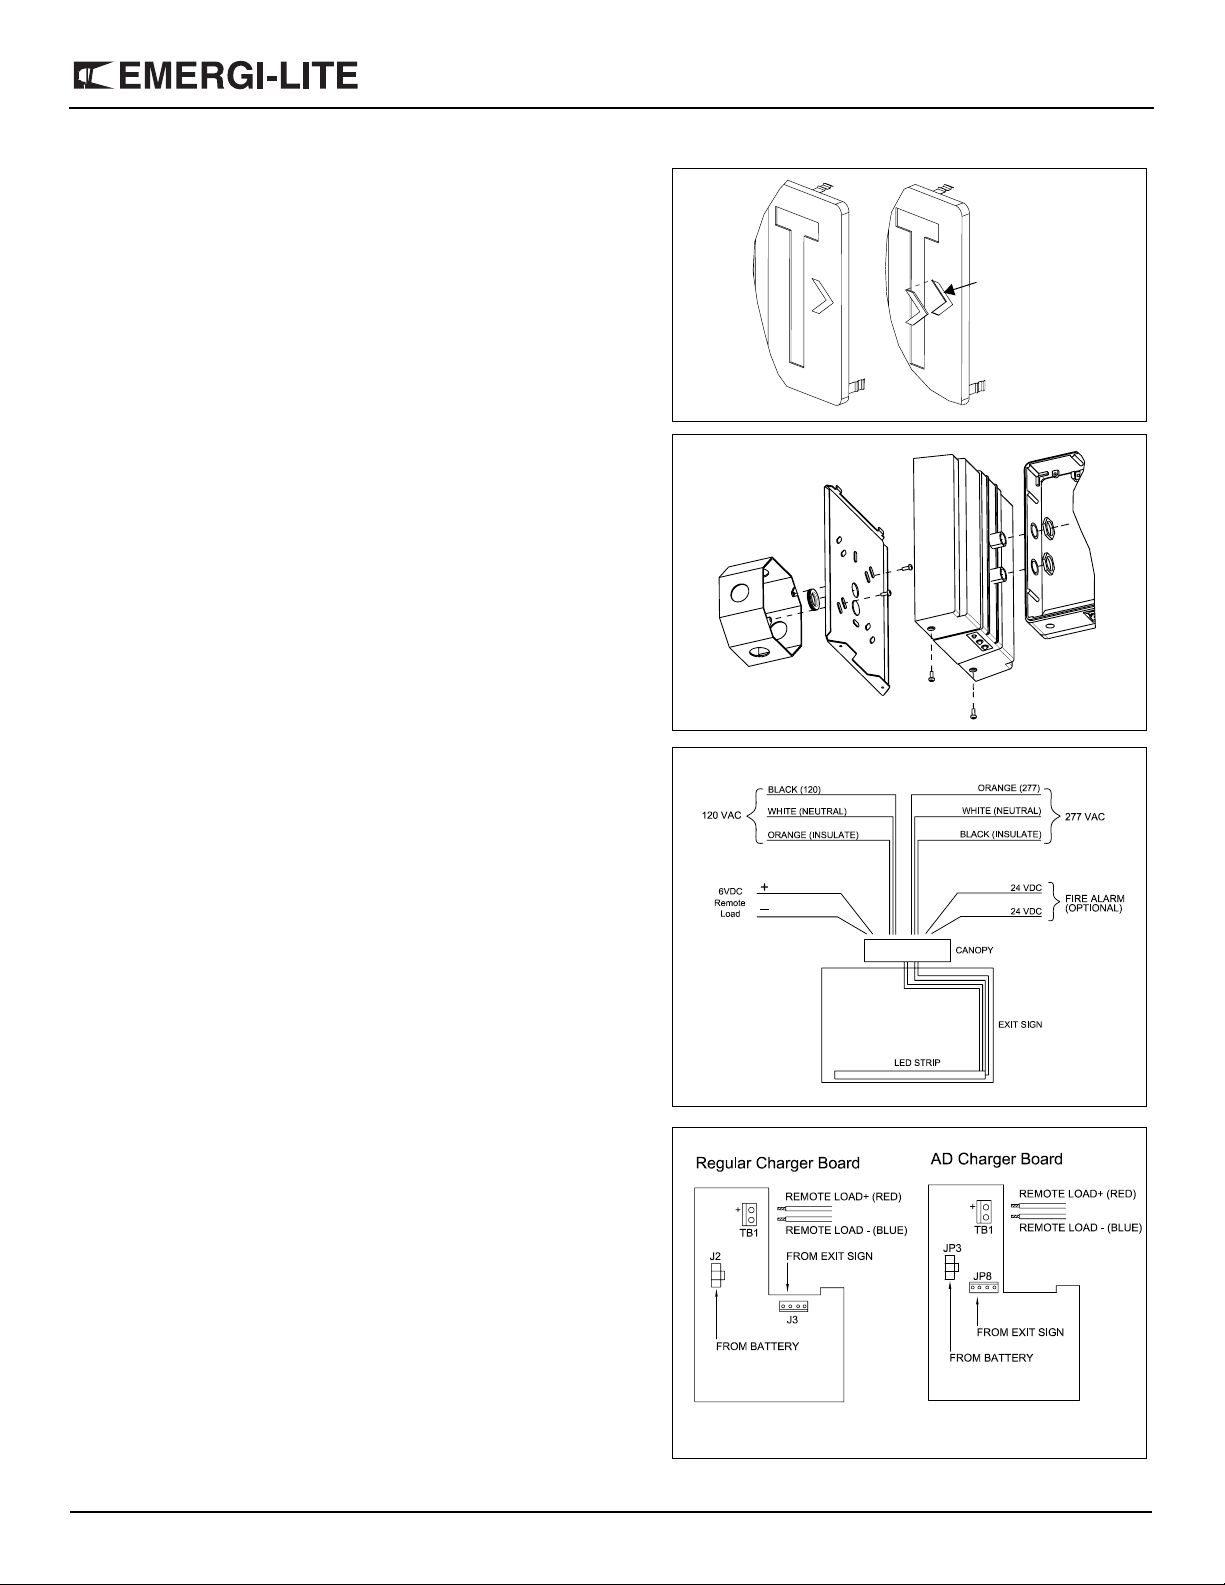
Figure 2
AC connector
07/04 750.1099 Rev. A
1/4
Page 2
120 VAC — Connect the black wire (120 VAC) and white (neutral) to
the building utility. Insulate the orange wire.
277 VAC — Connect the orange (277 VAC) and white (neutral) to the
building utility. Insulate the black wire.
Push excess wires into junction box.
6. Remove exit from carton.
7. Remove exit door. Firmly grip top of door and pull forward. Push
against side of exit door to disengage hinge tab.
Note — On double-faced signs, only one side will open. Other side
must be detached by removing screws from inside of sign.
8. To knock out chevrons (see fig. 3), remove colored lens(es) by warping center of lens and pulling out from the securement clips. Support
door chevrons with two blocks of wood, strike chevron knockouts
from the inside with a hammer and screwdriver. To reinstall colored
lens(es), warp to slide under securement clips. Press securement
clips tightly onto lens. If sign is double-faced, repeat the procedure
for the second face.
9. Determine which two holes in the exit frame will be used for mounting. Support area around knockouts by two blocks of wood, maximum one inch apart. Strike knockouts from the inside with a hammer
and screwdriver. Clear holes of burrs to allow proper fit with hex. nipples.
10. Remove hexagonal nuts from hex. nipples.
11. Push hex. nipples, attached to canopy, through knockouts in exit
frame (see fig. 4). Fasten canopy to exit frame using large hexagonal
nuts. Thread nuts onto nipples and tighten.
12. Route the 4-pin harness from the EXIT sign into the canopy through
either nipple.
13. For regular charger board, connect the EXIT sign harness to the J3
terminal (see fig.6 A). For AD charger board, connect the EXIT sign
harness to the JP8 terminal (see fig.6 B).
14. Connect the remote load wires to the TB1 terminal block. Check for
correct polarity before connecting (see fig. 6). Do not exceed the
rated remote power of the equipment (check catalogue for details).
15. Connect the battery harness to J2, for regular charger board (see
fig.6 A) or to JP3, for AD charger board (see fig.6 B).
16. Mount EXIT sign and canopy assembly to canopy backplate by guiding the notches on the canopy backplate into the slots of the canopy.
Secure with the two provided screws (see fig. 4).
17. Re-install exit door.
18. Energize AC. EXIT sign will illuminate. The Green "AC ON" indicator
will be ON continuously.
Preceptor Series – Remote Load Die Cast EXIT Series
removing the chevrons
Figure 3
Figure 4
*Connect either 120 VAC or 277 VAC*
Figure 5
Figure 6
A
Emergi-Lite Tel: (888) 552-6467 ext. 547 or 255 Fax: (888) 867-1565 www.emergi-lite.com
B
07/04 750.1099 Rev. A
2/4
Page 3

Testing
Depending on the type of battery charger unit installed in the canopy, follow the appropriate section below.
Unit with regular battery charger (green & yellow LED)
The display of the regular charger includes a green LED for “AC ON” and
a yellow LED for “Charger ON” (see fig. 7). In normal AC operation the
green LED is on and depending on the type of battery used and the
charge level of the battery, the yellow LED may light in different ways:
- Continuously ON: The battery is in full charge mode
- Flashing at a rate of one flash per second or less: Lead acid battery at
the end of charge
- Flashing continuously, approximately 10 flashes per second: NiCad or
NiMH battery in trickle charge.
1. Manual test
Push the test button. The "AC ON" indicator will stay ON and the
"CHARGER ON" indicator will be OFF. The EXIT sign will stay illuminated (may flicker once or twice during the transfer) and the remote
loads will be on. The remote loads will stay ON for "one minute" if the
test button is not pushed again. The transfer test can be aborted by
pushing the test button any time during the one minute. After one minute
or if the test button is pushed again, the unit will automatically go back to
charging mode. The remote loads will turn OFF and the "CHARGER ON"
indicator will turn on.
2. Automatic Unit Cycle test (optional)
For the units equipped with AUC function, the unit will automatically run a
10 minute or 30 minute emergency testing cycle once a month.
3. Time Delay (optional)
For the units equipped with TD function, turn the AC power OFF and ON
again, the "CHARGER ON' indicator will be OFF. The unit will stay in
emergency mode with the remote loads turned on, for the length of the
time delay (5,10,15, 20 or 30 minutes). Once this time has elapsed, the
unit will automatically go back to charging mode.
Preceptor Series – Remote Load Die Cast EXIT Series
Test switch
and pilot light
Exit frame
Figure 7
Emergi-Lite Tel: (888) 552-6467 ext. 547 or 255 Fax: (888) 867-1565 www.emergi-lite.com
07/04 750.1099 Rev. A
3/4
Page 4

Unit with Advanced Diagnostic battery charger (green & red
LED)
The display of the advanced diagnostic charger includes a green LED for
“AC ON” and a red LED for “Service Alarm” ( see fig. 8). In normal AC
operation the green LED is on and the red LED is off. The “Service
Alarm” turns on whenever the equipment has identified a component
fault in either the charger circuitry, the battery, the emergency remote
load, etc. If the “service alarm” turns on, the canopy has to be opened
for troubleshooting - for details read the Remote Canopy AD - Owner’s
Manual.
1. Manual Test
Push the test button: the “AC ON” indicator will stay on, the EXIT sign
and the remote lights will turn off. The one-minute test can be aborted
earlier by pressing the test button another time.
2. Time Delay (optional)
After a short-duration power failure, the unit equipped with the time delay
option will remain in emergency mode with the remote load turned ON
for the length of the time delay (5,10,15,20 minutes). Once this time has
elapsed, the unit will automatically go back to stand-by.
3. Advanced Diagnostic Testing
For details, see the Owner’s Manual “Remote Canopy Advanced Diagnostic”.
Preceptor Series – Remote Load Die Cast EXIT Series
Test switch
and pilot light
Exit frame
Figure 8
Maintenance
None required. The regular charger unit should be tested monthly in
accordance with the requirements of NFPA 101, Life Safety Code or
local codes. If AC supply to the unit is to be disconnected for 2 months or
more, the battery must be disconnected.
Emergi-Lite Tel: (888) 552-6467 ext. 547 or 255 Fax: (888) 867-1565 www.emergi-lite.com
07/04 750.1099 Rev. A
4/4
 Loading...