


®
DLM-2 Series
WARNING:
Risk of Shock.
Disconnect Power before Installation.
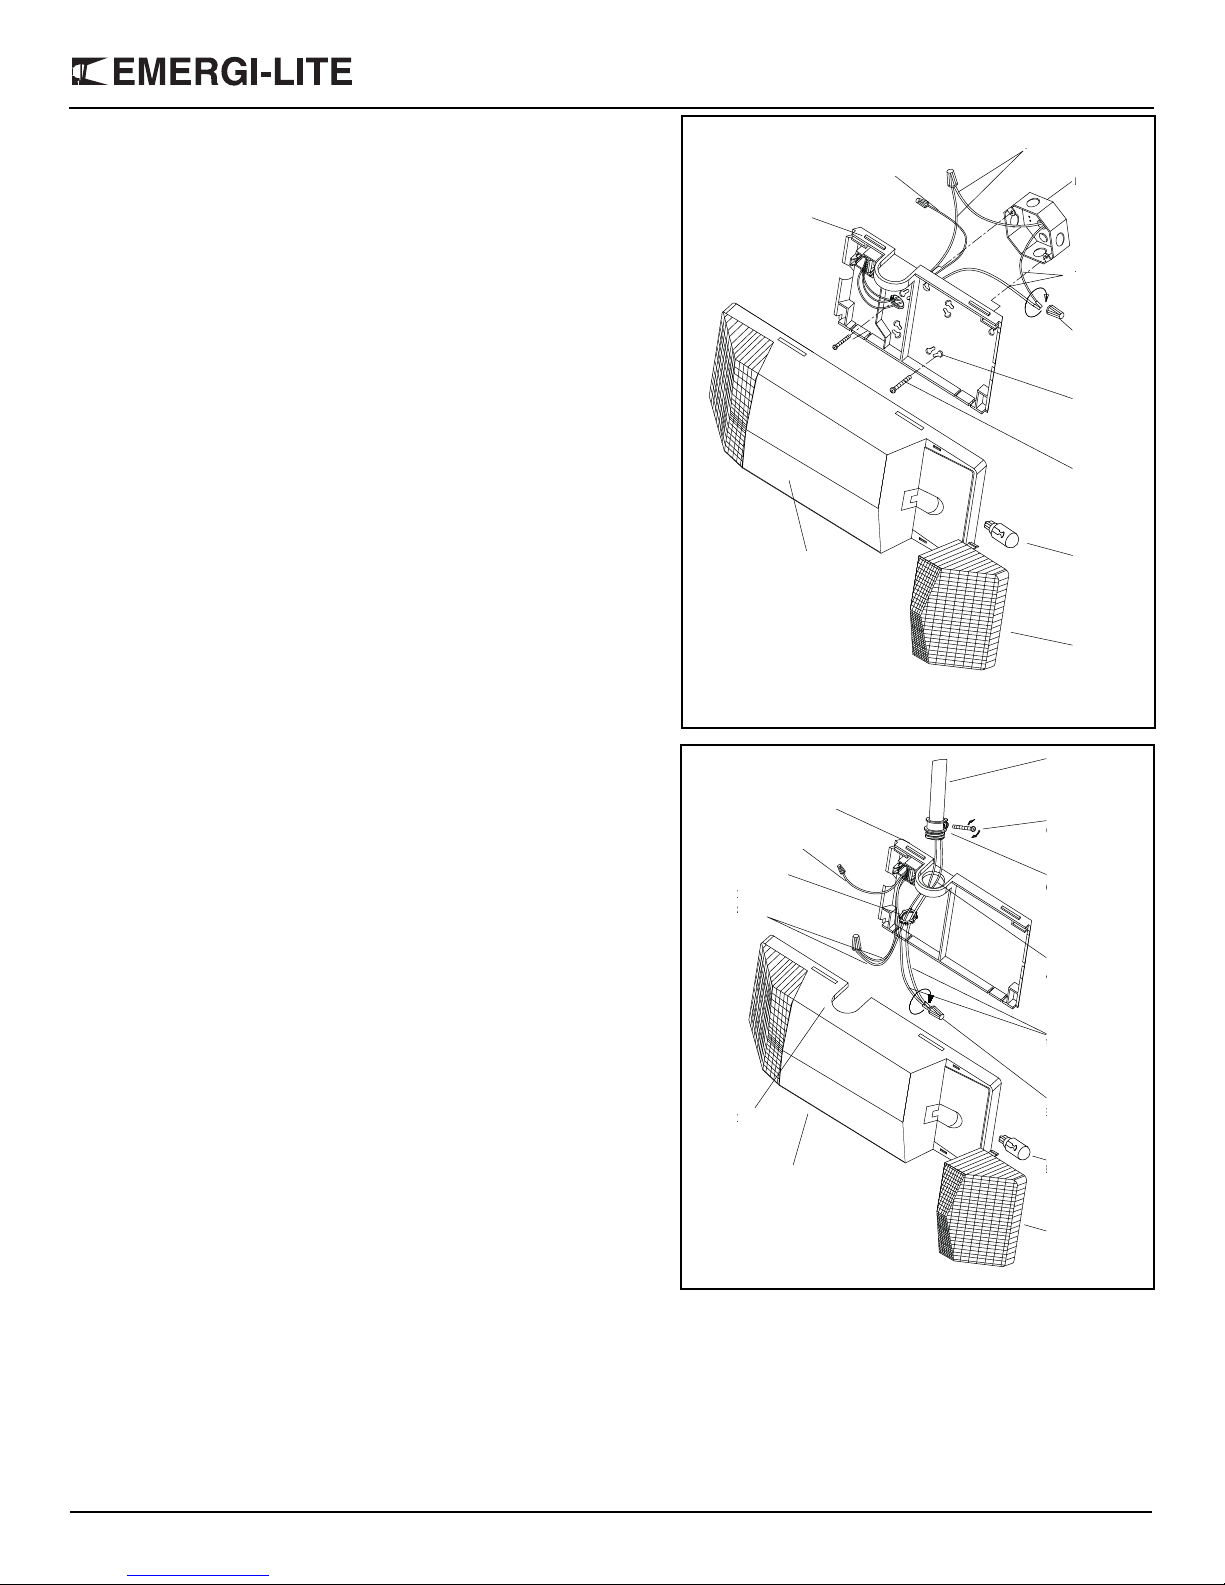
Figure 2
PARTS DESCRIPTION
Figure 1
Parts list
1. Lens
2. Lamp bulbs(2)
3. Housing
4. Lamp holder
5. PCBA board
6. Power connector
7. Battery
8. Battery bracket
9. Back plate
Figure 3
Red battery
lead
Battery
Decorative Emergency Lighting Unit
IMPORTANT SAFEGUARDS
When using electrical equipment, basic safety precautions should always
be followed including the following:
READ AND FOLLOW ALL SAFETY
INSTRUCTIONS
1. All servicing should be performed by qualified service personnel.
2. All unused wires must be insulated to prevent shorting.
3. Do not use outdoors.
4. Do not let power supply cords touch hot surfaces.
5. Do not mount near gas or electric heaters.
6. Use caution when handling batteries. Battery acid can cause burns to the skin
and eyes. If acid is spilled on the skin or eyes, flush affected area with fresh
water and contact a physician immediately.
7. Avoid possible shorting.
8. Equipment should be mounted in locations and at heights where it will not
readily be subjected to tampering by unauthorized personnel.
9. The use of accessory equipment not recommended by the manufacturer may
cause an unsafe condition.
10. Do not use this equipment for other than intended use.
11. When relamping, only use lamps specified in the fixture.
12. Allow battery to charge for 24 hours before first use.
DLM-2 Series
SAVE THESE INSTRUCTIONS
Installation Instructions
Install product no higher than the maximum
IMPORTANT:
1. Turn of AC power.
2. Using a flat head screwdriver, insert the blade into the slot and gently
pry off the back plate (see figure 2).
Wall and Ceiling Mount
1. Remove the appropriate knockouts in the back plate to mount to a
standard junction box.
2. Feed unit wires through the center hole of the back plate.
3. Make the proper connections (see figure 4):
a. For 120VAC, connect the black wire (120Vac) and white wire
(neutral) to the building utility.
b. For
c. Feed wires back into the junction bo x.
4. Mount and secure the back plate to the junction box.
5. Connect the red wire to the battery positive terminal (see figure 3).
6. Snap housing to back plate.
7. Restore power and press the test button.
Emergi-Lite® Tel: (888) 552-6467 Fax: (800) 316-4515 www.emergi-lite.com
277VAC, connect the orange wire (277Vac) and white wire
(neutral) to the building utility.
mounting height of 7 feet 6 inches from the
floor.
10/16 750.1329 Rev. B
1/2
®
Wall mount Conduit entry
ORANGE
(FOR 277V CONNECTION)
NUT
K
120V CONNECTION)
P COVER
FIXTURE
B
WIR
E
WHI
T
MOUNTING PLATE
S
C
PIPE
C
K
N
Wire connector
White (neutral)
Black
Orange (277 Vac)
Top of
Housing
Conduit
Back plate
Conduit
Figure 5
(not ptovided)
connector
Screw
Conduit
connector
nut
(120 Vac)
Bulb
Lens
housing
Conduit
knockout
ORANGE
(FOR 277V CONNECTION)
MOUNTING PLATE
()
J
BL
(F
FIXTURE
Figure 4
Wire
Back plate
Bulb
Junction box
Slots for
Housing
Lens
Black
Junction box
White (neutral)
Orange (277Vac)
connector
(120Vac)
junction box
screws
1. Remove the top knockout on the top flange of the fixture (see figure 5).
2. Remove keyhole knockouts on the back plate and mount to the wall.
3. Secure conduit to knockout and feed wires into the fixture.
4. Make the proper connections (see figure 5):
a. For 120VAC, connect the black wire (120Vac) and white wire
(neutral) to the building utility.
b. For
277VAC, connect the orange wire (277Vac) and white wire
(neutral) to the building utility.
5. Connect the red wire to the battery positive terminal (see figure 3).
6. Snap housing to back plate.
7. Restore power and press the test button.
Relamping
1. Snap off to remove lens.
2. Refer to the relamping information located near lamp holder for recommended maximum wattage. Do not exceed this wattage.
3. Install the bulb.
4. Reinstall the lens.
Maintenance
None required. Replace the batteries as needed according to ambient
conditions. Equipment must be tested reguarly in accordance with local
codes.
DLM-2 Series
Emergi-Lite® Tel: (888) 552-6467 Fax: (800) 316-4515 www.emergi-lite.com
10/16 750.1329 Rev. B
2/2
 Loading...