

Page 1
erald Int ons
www.emeraldintegrations.com
BMW09
Model: PIP-BM09-N3-V2
Specication & Installation
Page 2
-PIP BMW 09 Feature
-
Clear quality view
Emerald Integrations
www.emeraldintegrations.com
-NTSC, PAL Auto detection
-AV source switching thru genuine button in vehicle.
-Convenient use by remote & keypad
-SAFETY function
Page 3
-Precaution
All steps of installation should be done by well
trained specialist
permission to break attached label on the board.)
inform to the supplier or manufacturer
not be guaranteed
Emerald Integrations
www.emeraldintegrations.com
-Ignition key should be taken off before starting installation, interface power
connection must be the last step in installation.
-Power cable should be separated when connecting interface.
-Should be no any electronic devices or magnetic pole around installation place.
-
-Dismantling without manufacturer’s permission can not be guaranteed, (No
-Kindly check all parts are in the box, when receiving the product, if anything missing,
-According to our sales policy, any problems caused by user’s mistake, careless can
.
-
.
.
Page 4
-Main Spec.
p
A/V I
12WATT, M
ible t
ith K
l)
Emerald Integrations
www.emeraldintegrations.com
1. Input Spec. (MULTI VIDEO INTERFACE)
-. 3 x
-. 1 x CVBS(REAR CAMERA) Input. (Rear camera source)
-. 1 x Analog RGB Input (Navigation System output)
-. 1 x LCD Input (Car system Input)
2. Output Spec.
-. 1 x LCD Output
3. Power Spec.
- Input Power : 8VDC ~ 24VDC
-Consumption Power :
nput (External video source).
ax
4. Switch Input mode
- Input Video MUTE Function : Possible to make each input mute by operating Dip S/W.
-Poss
- Possible to switch AV3(Front camera) with switch for source toggle
- Detecting rear camera by CAN or rear-lamp wire
o switch Input mode w
eypad(or Remote contro
Page 5
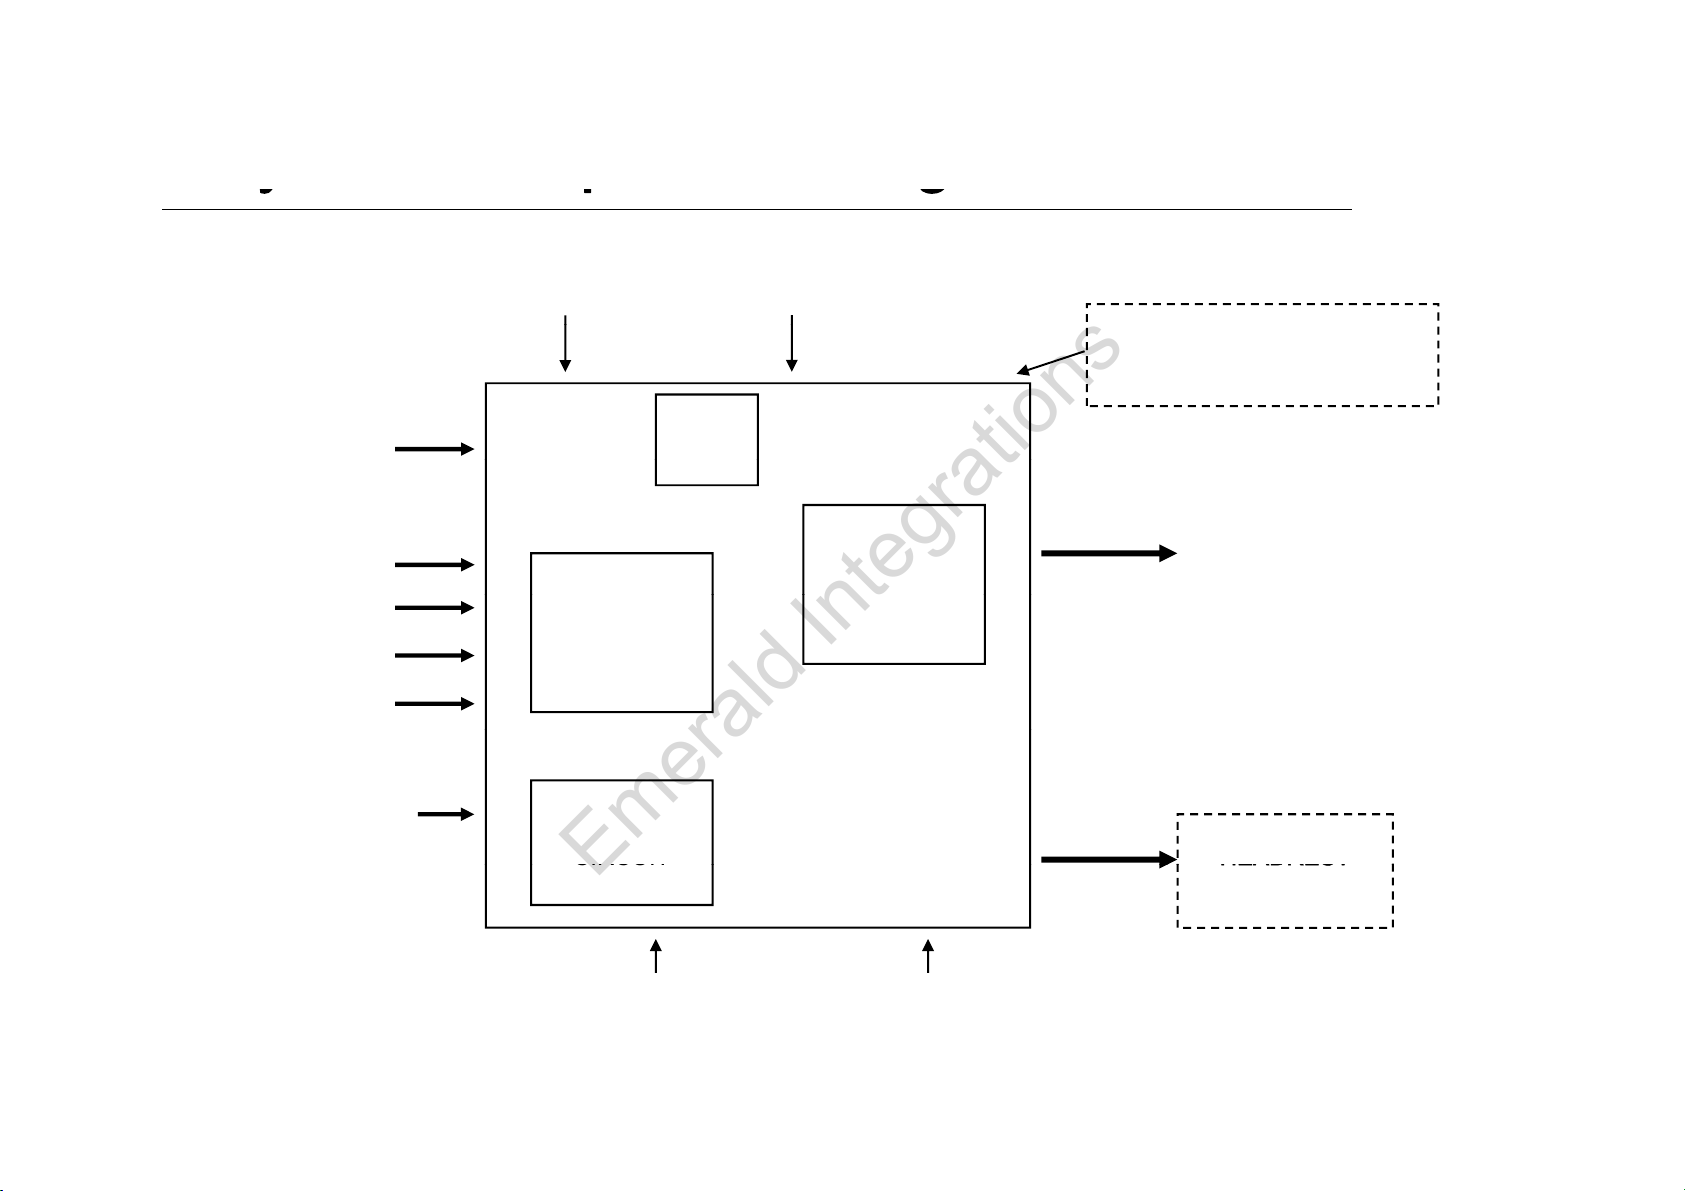
-System Composition Diagram
yp g
A
(R
)
CIRCUIT
HEADREST
Power Input
Dip S/W
Emerald Integrations
www.emeraldintegrations.com
NAVIGATION Input
(Analog RGB)
A/V 1
/V 2
A/V 3
CVBS
ear camera
Car Screen Input
(CAR MAIN BOARD)
Keypad
CIRCUIT
POWER
VIDEO
Switch for source toggle
MCU
VIDEO MUX
DISPLAY
A/V OUT
OEM Button (Can Intrface)
Car Installation
OEM LCD
(+8VDC ~ +24VDC)
MONITOR
Page 6
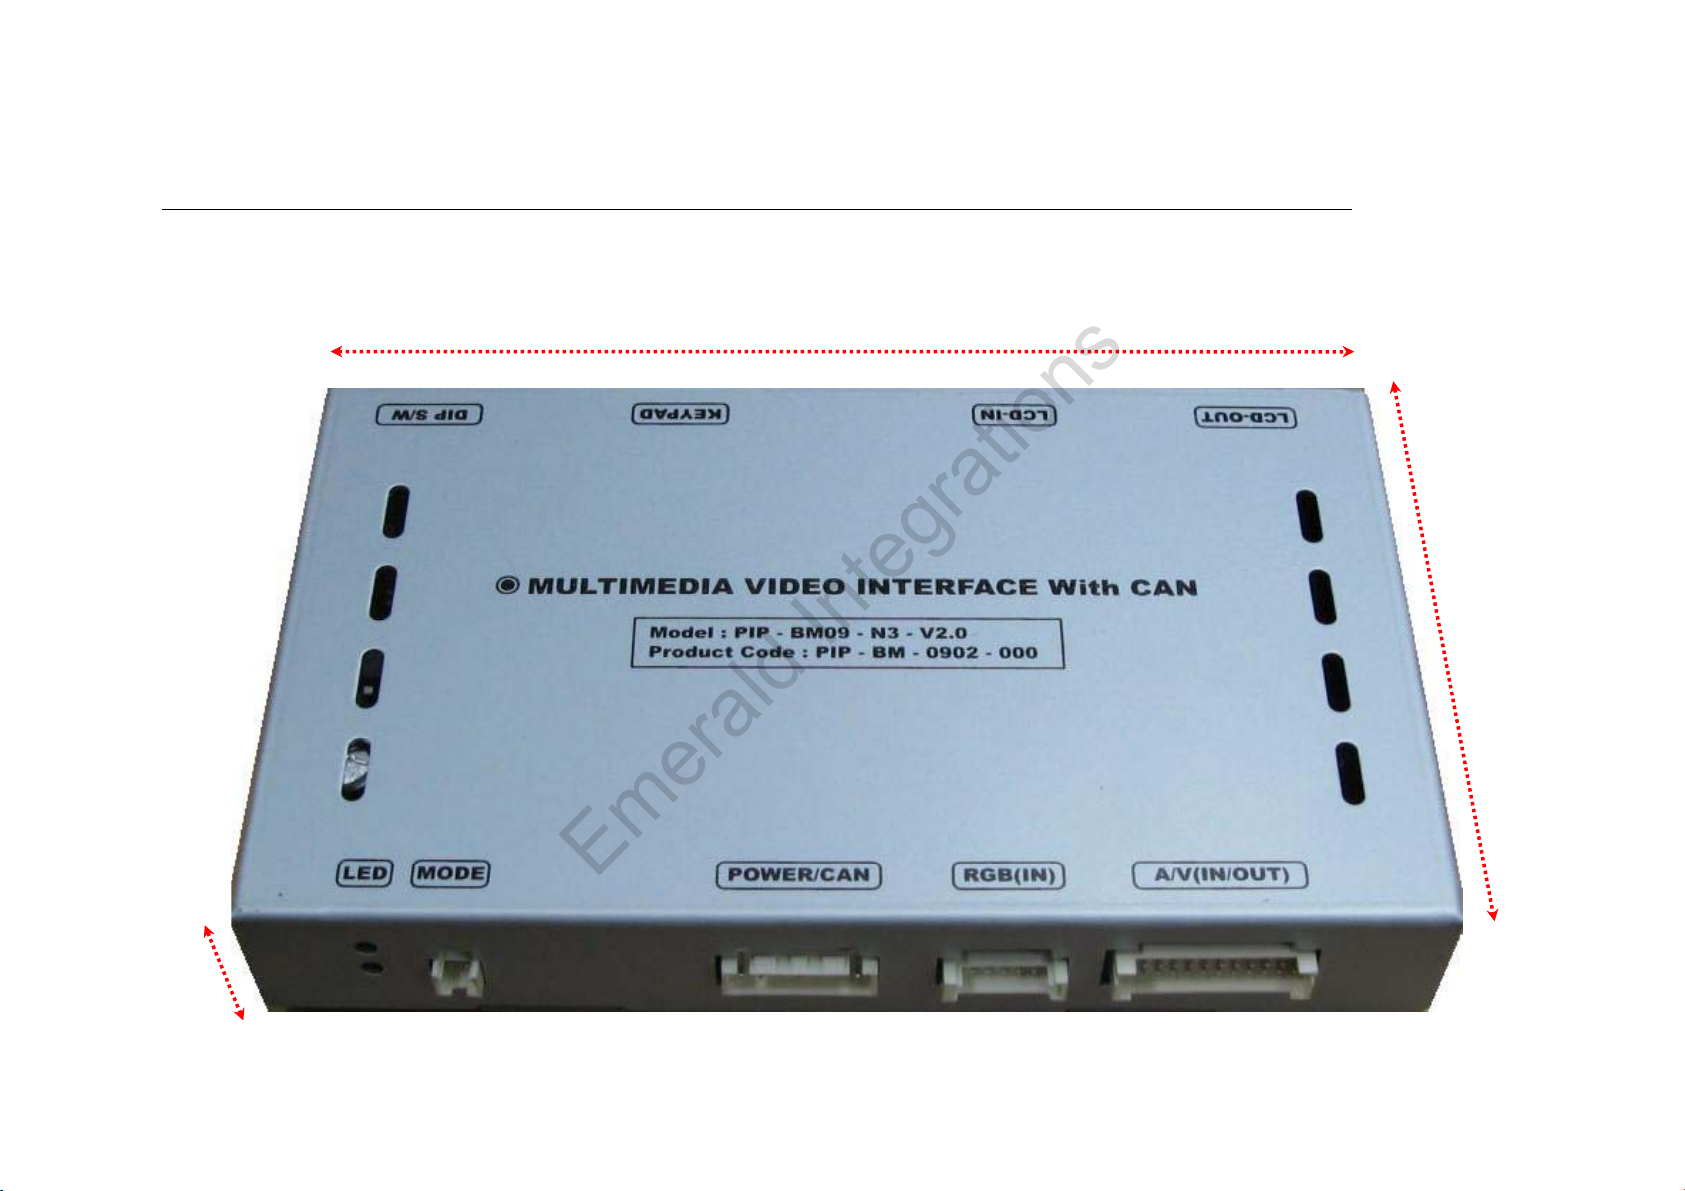
-Dimension
155mm
Emerald Integrations
www.emeraldintegrations.com
155mm * 93mm * 22mm
93mm
22mm
Page 7
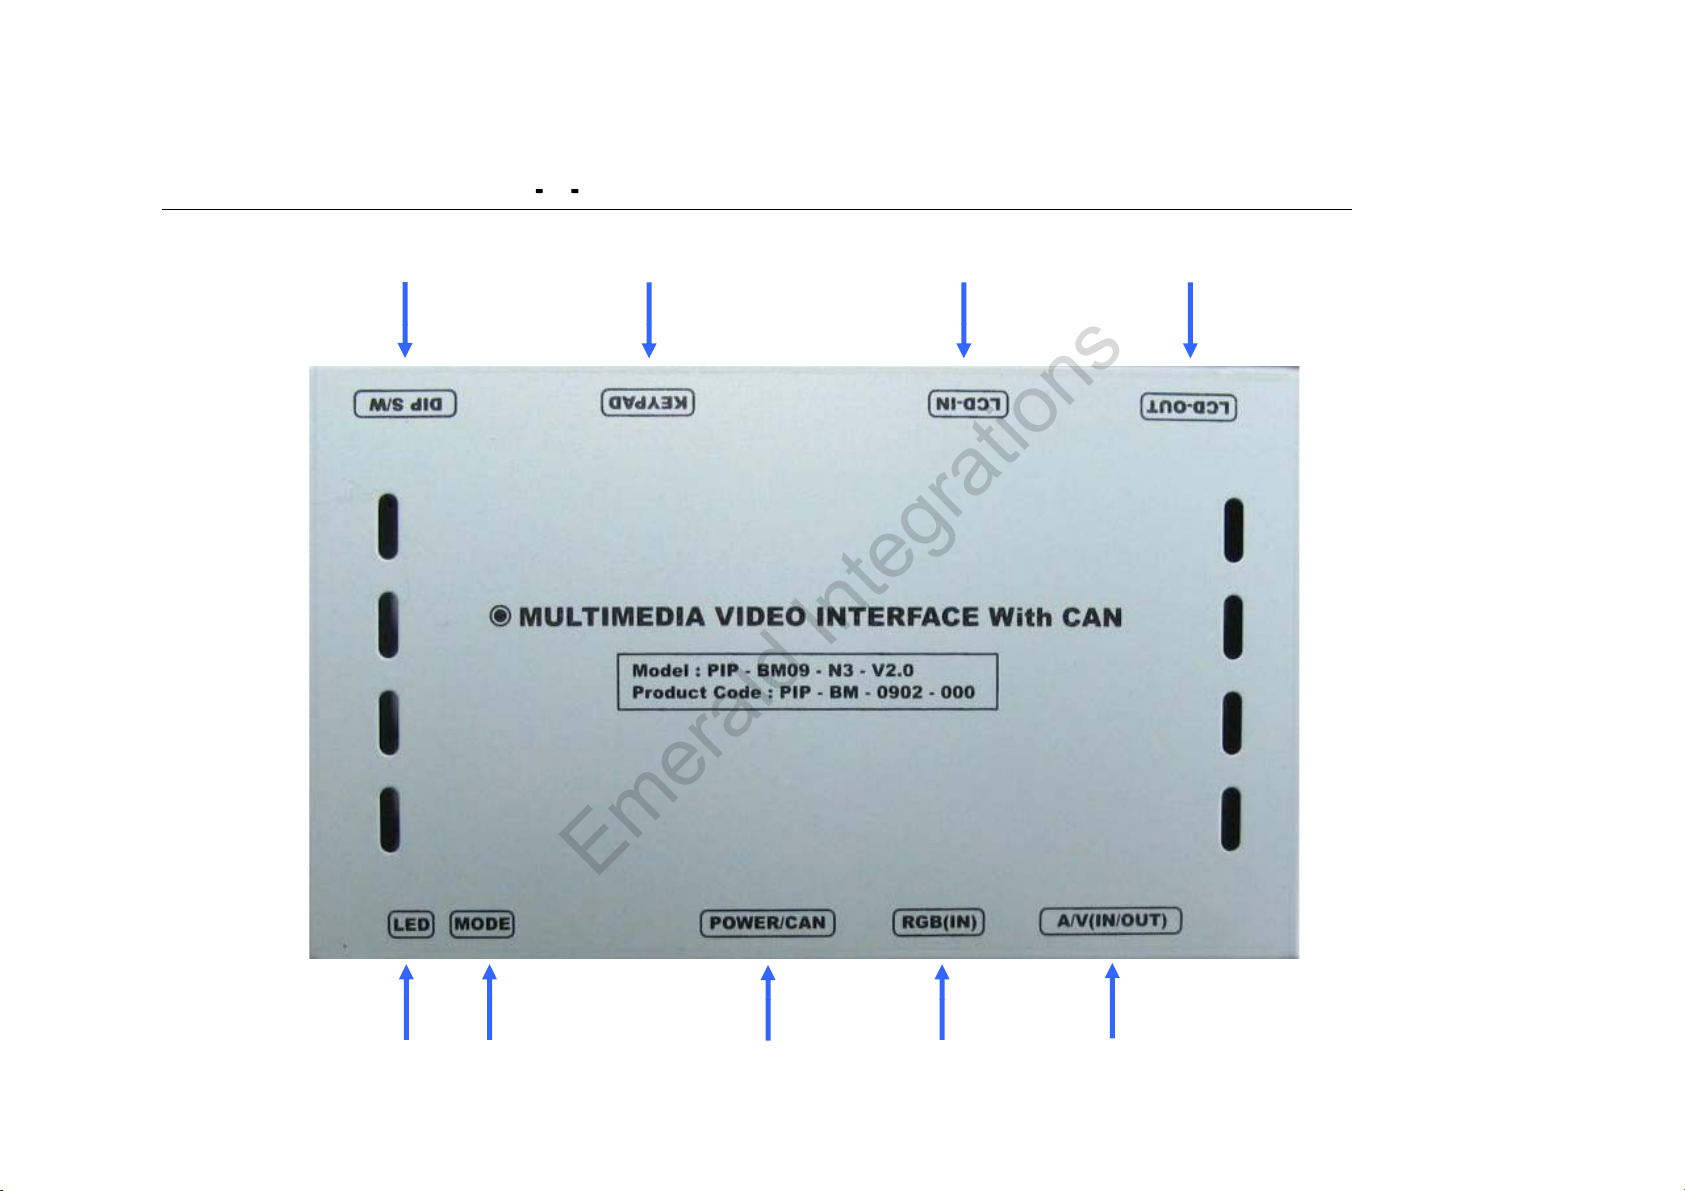
-External A
pp
pp
Emerald Integrations
www.emeraldintegrations.com
earance
DIP S/W KEYPAD
LCD-IN
LCD-OUT
LED
MODE
POWER/
CAN
RGB(IN)
A/V(IN/OUT)
Page 8
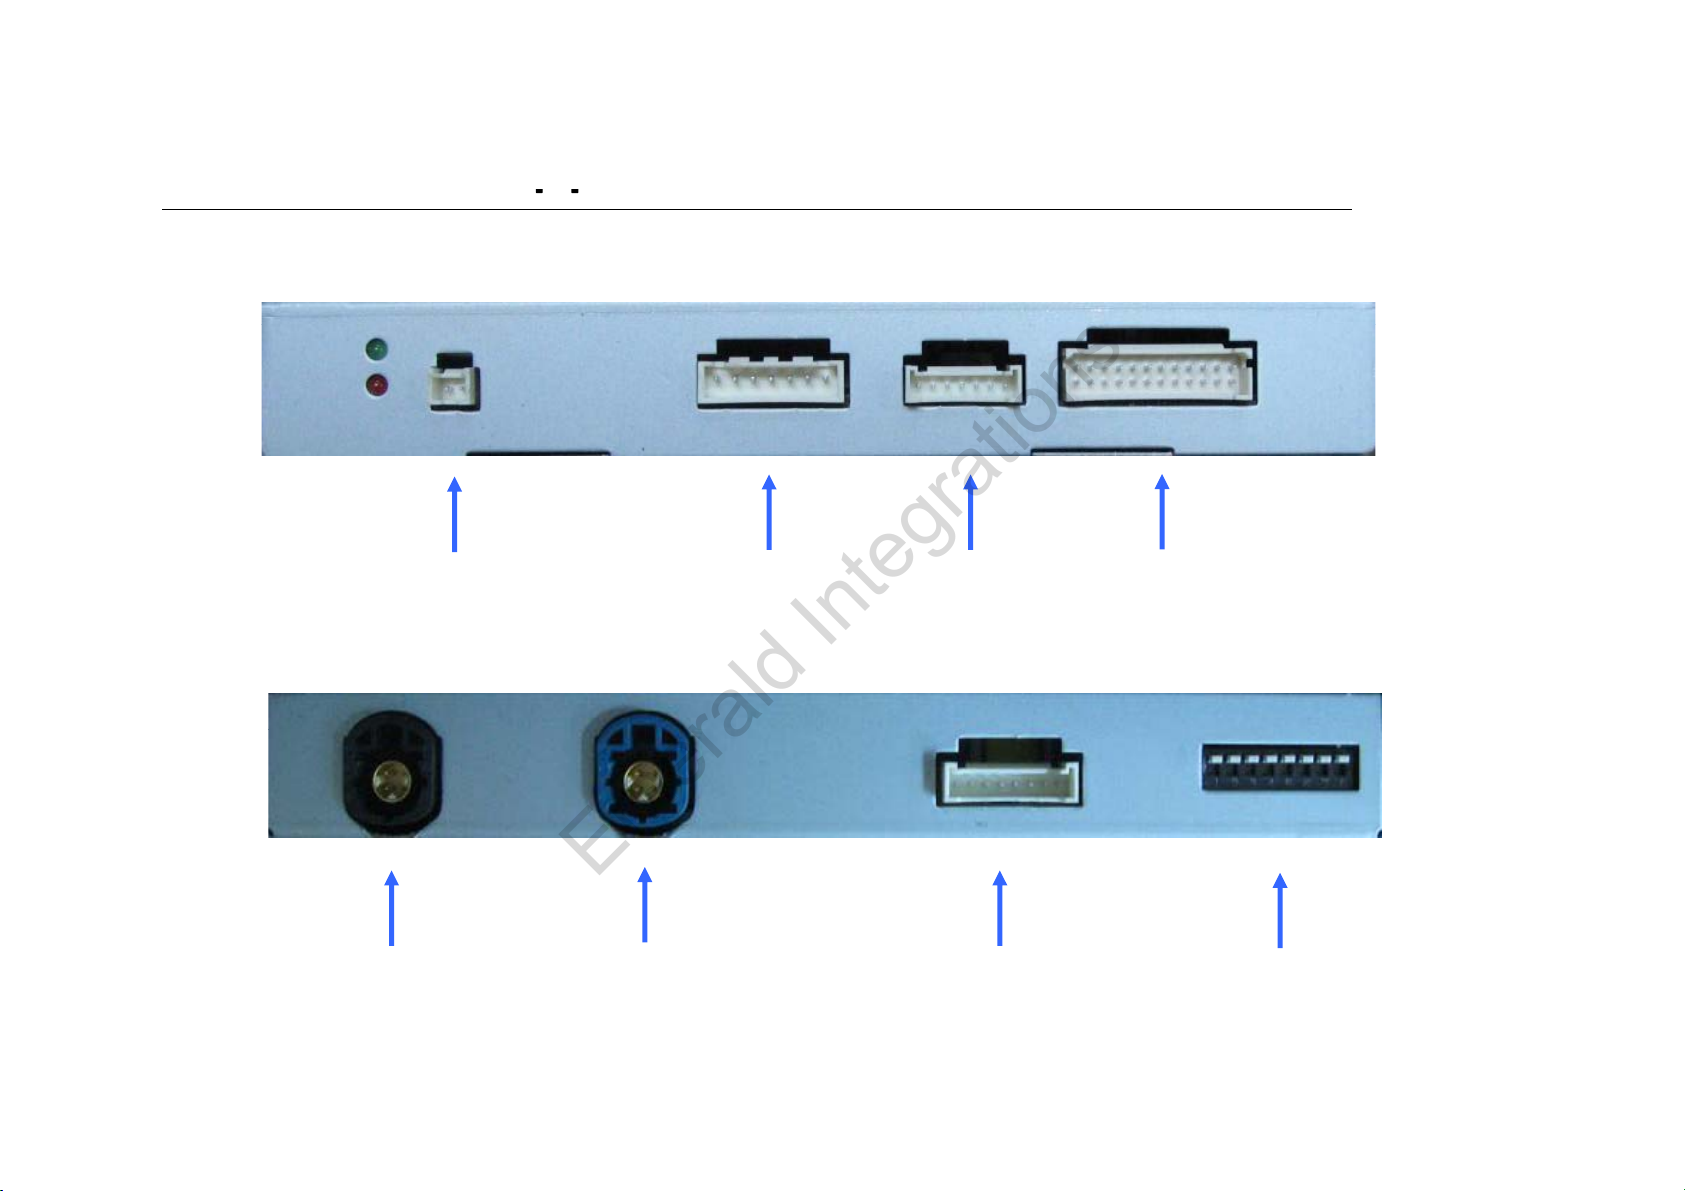
-External A
pp
pp
Emerald Integrations
www.emeraldintegrations.com
earance
MODE RGB(IN)
LCD-OUT
LCD-IN
POWER/CAN
KEYPAD
A/V(IN/OUT)
DIP S/W
Page 9
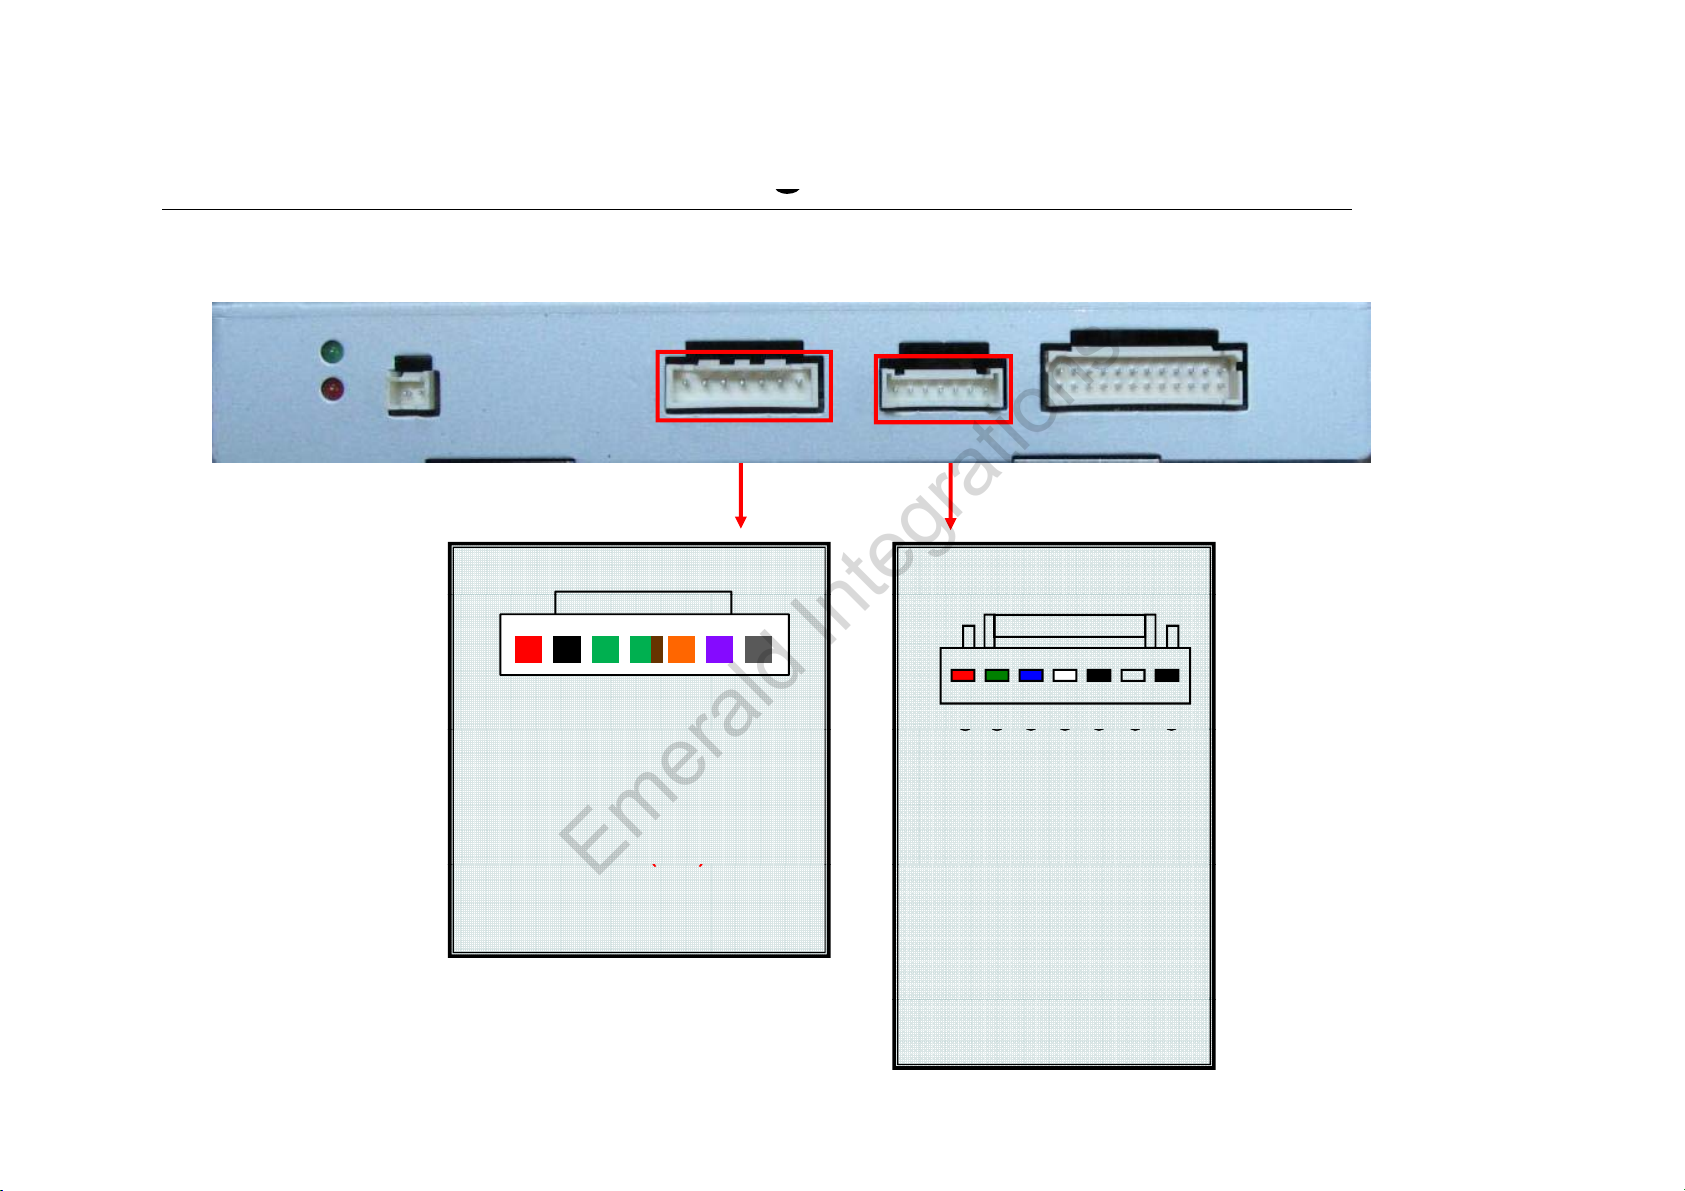
-Connector Pin Assignment
g
①
②
③④⑤⑥⑦
①②③④⑤⑥⑦
①
ACC (RED)
)
()
Emerald Integrations
www.emeraldintegrations.com
*Power Connect
②③④⑤⑥ ⑦
①
② GND (Black)
③ CAN(H) (Green+Brown)
④ CAN(L) (Green)
⑤ F-CAM-DET (N.C
⑥ SAFE (Violet)
⑦ REAR-C (Grey)
*RGB-IN Connect
① R DATA (Red)
② G DATA (Green)
③ B DATA (Blue)
④ SYNC (White)
⑤ GND (Black)
⑥N.C
⑦N.C
Page 10
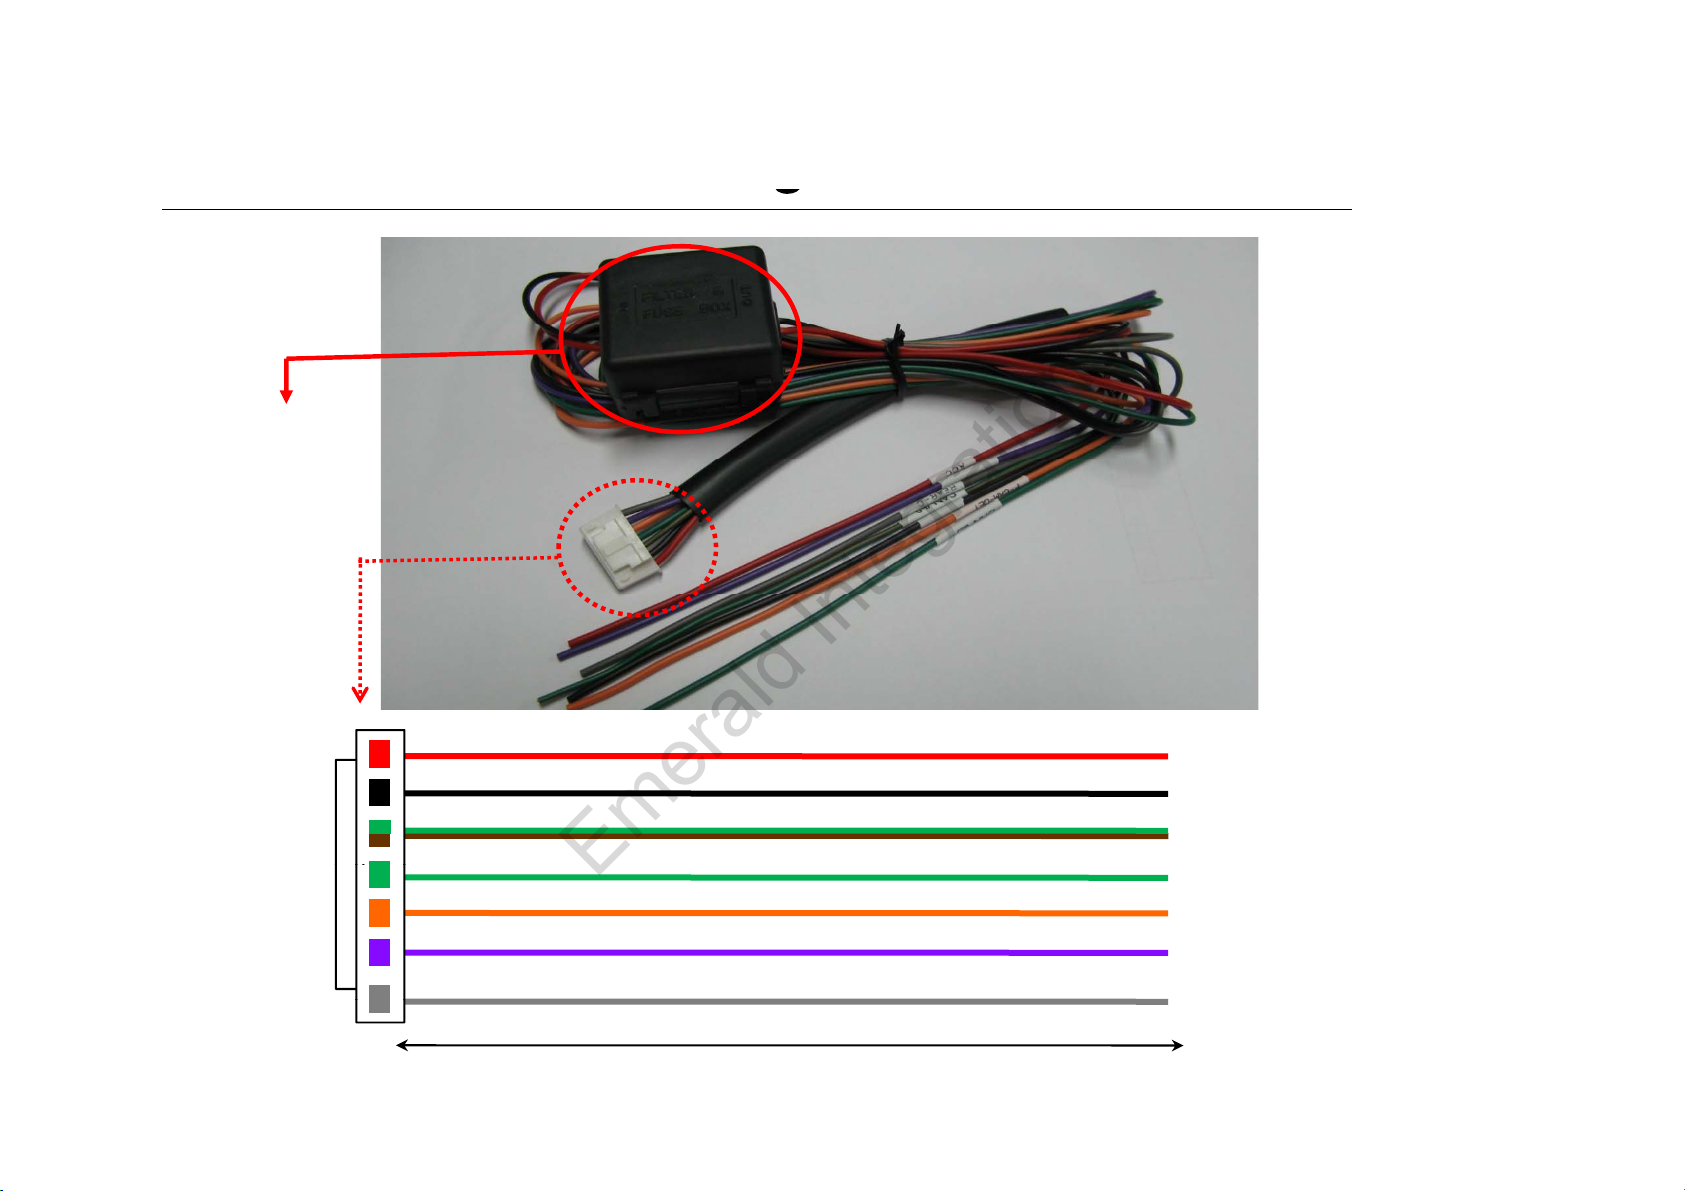
-Connector Pin Assignment
g
REAR
Emerald Integrations
www.emeraldintegrations.com
* Power Cable
FILTER
& FUSE BOX
1m
ACC : 12V~24V
GND
CAN-H
CAN-L
F-CAM-DET (Not Available)
SAFE
-C
*SAFE : When connecting to
GND, switched to MAIN image
and initialized.
Page 11
-
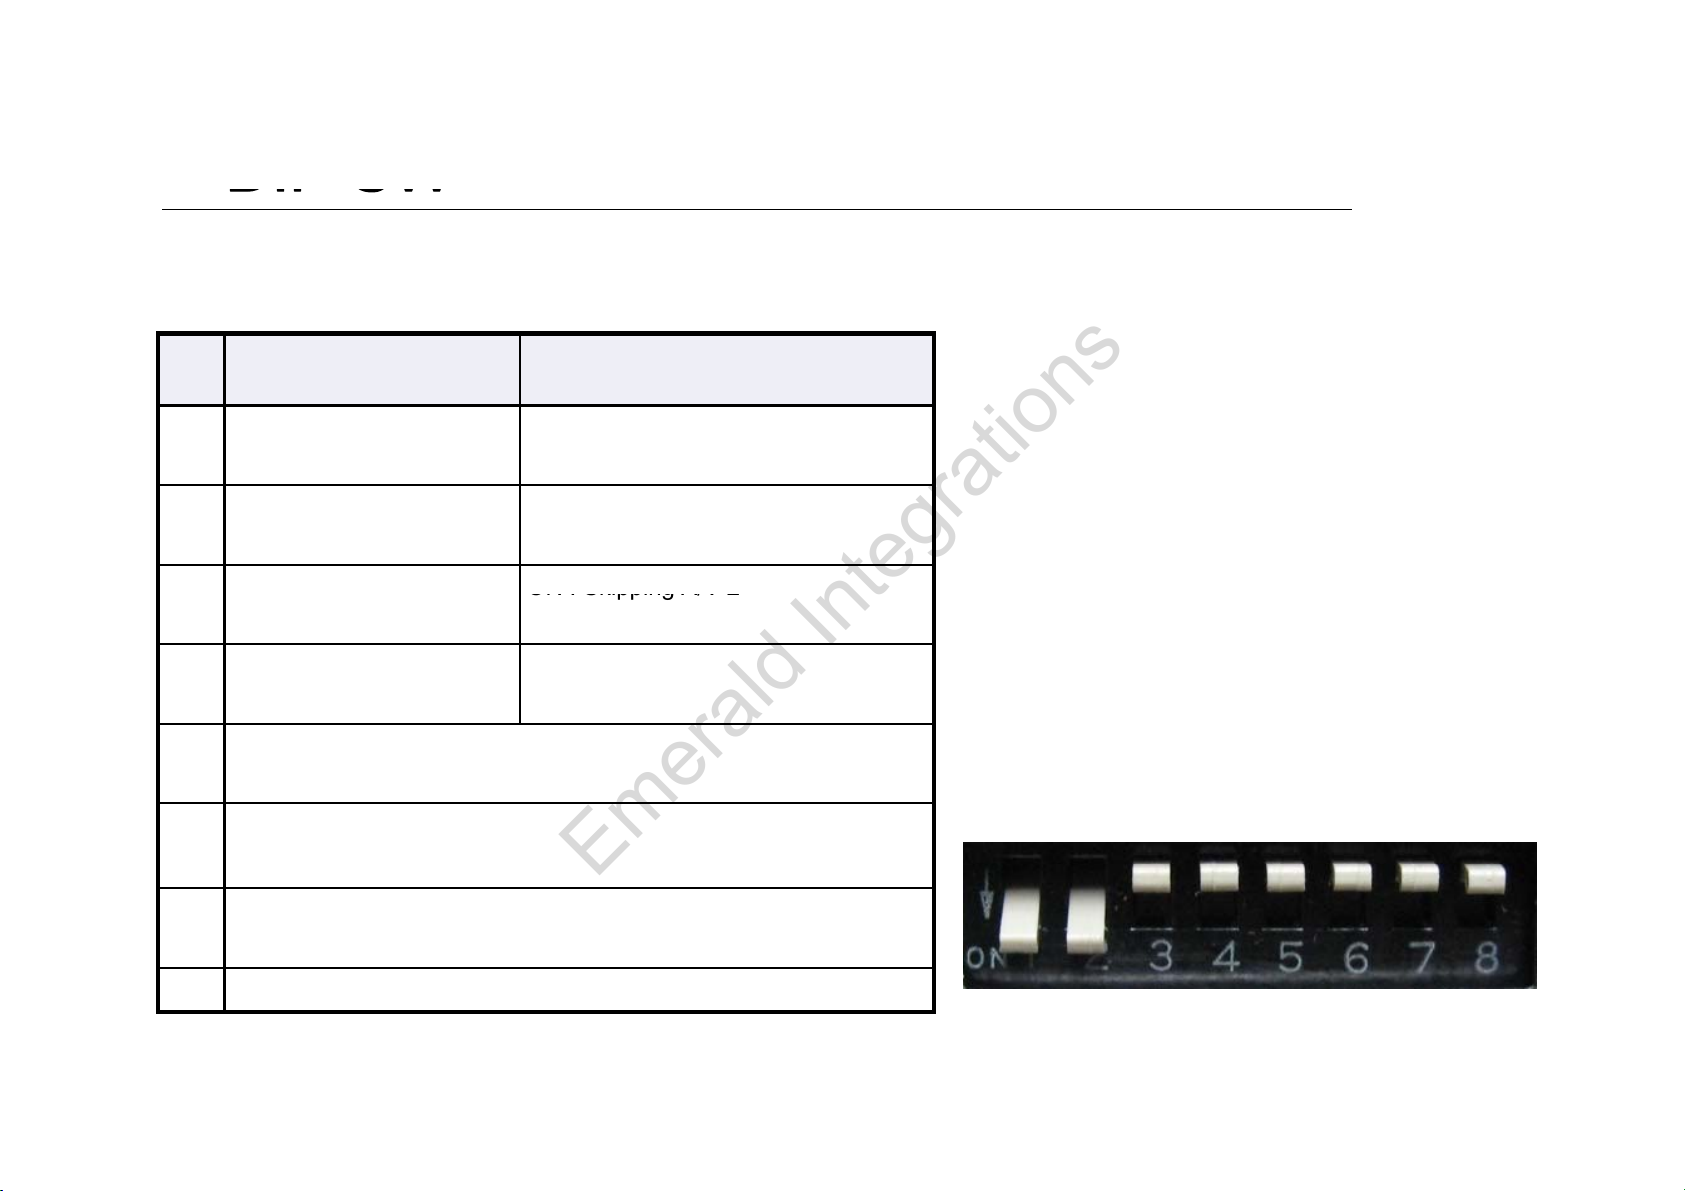
DIP SW
OFF : RGB Display
A
ON :
Skipping A/V 2
▷
DIP S/W : 1,2
ON (INPUT MODE SKIP)
Emerald Integrations
www.emeraldintegrations.com
※ ON : DOWN, OFF : UP ; Default : all OFF
#PI
N
1 RGB INPUT MUTE
2 A/V 1 MUTE
3
4 A/V 3 MUTE
5N.C
6N.C
7 When to choose rear mode (ON : CVBS4, OFF : MAIN)
FUNCTION DIP S/W Selection
ON : Skipping RGB Mode
ON : Skipping A/V 1
OFF : A/V1 Display
/V 2 MUTE
OFF : A/V2 Display
ON : Skipping A/V 3
OFF : A/V3 Display
※DIP S/W Use Example
-. Use Input Mode : A/V2, A/V3
-. Use original Navigation
-. Use rear camera
▷ DIP S/W : 3 - OFF (enable A/V3)
▷ DIP S/W : 4 - OFF (enable A/V3)
▷ DIP S/W : 5,6 - OFF
▷ DIP S/W : 7 - ON
▷ DIP S/W : 8 - OFF
8N.C
Page 12
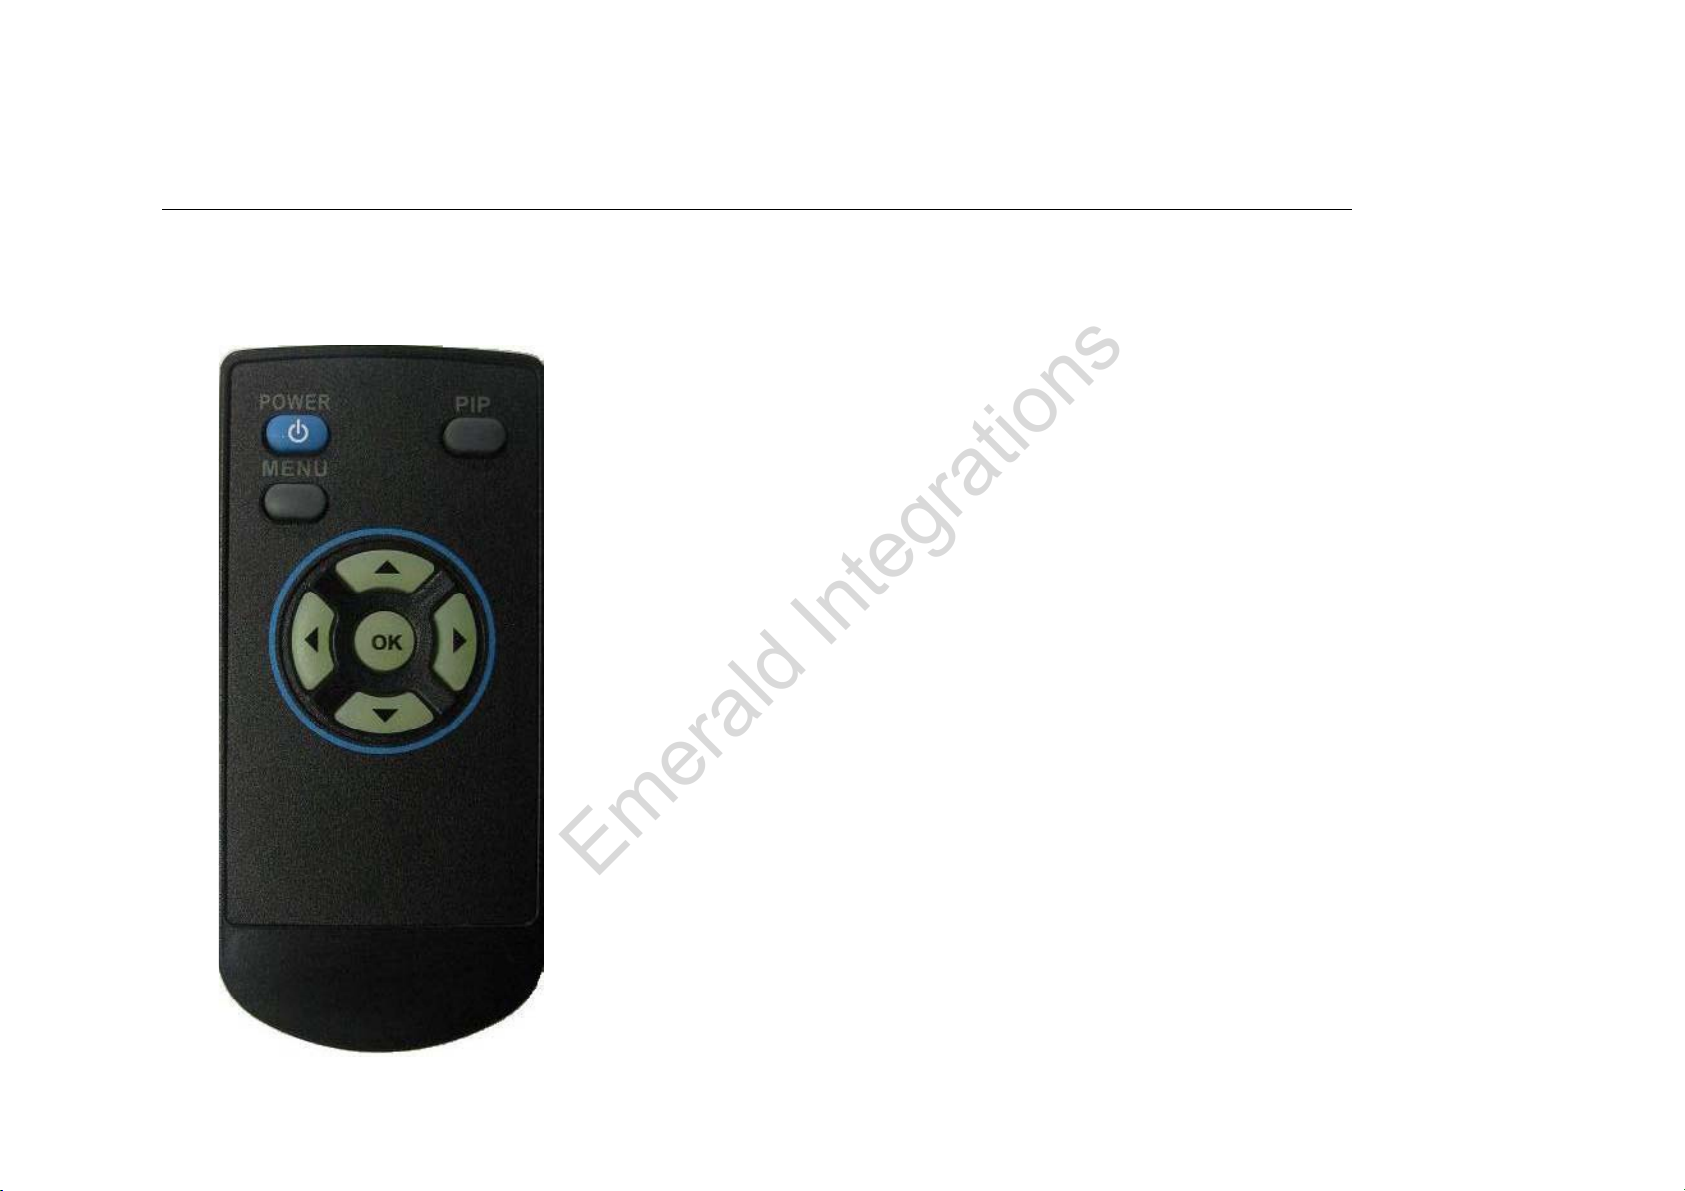
-How to use remote
▲
: Up
More than 5sec : Operating SAFE MODE
Emerald Integrations
www.emeraldintegrations.com
Dimension : 85 * 40 * 8 (mm) – Remote or Keypad (Optional)
POWER&PIP : N.C
MENU : OSD MENU
OK : Selection
▼: Down
◀ : Left
▶ : Right
*FACTORY MODE (Interface setting for installer)
: Operated by pressing ▲ → ▼ → ▲ →MENU of remote or
keypad in order.
,
“
”
Page 13
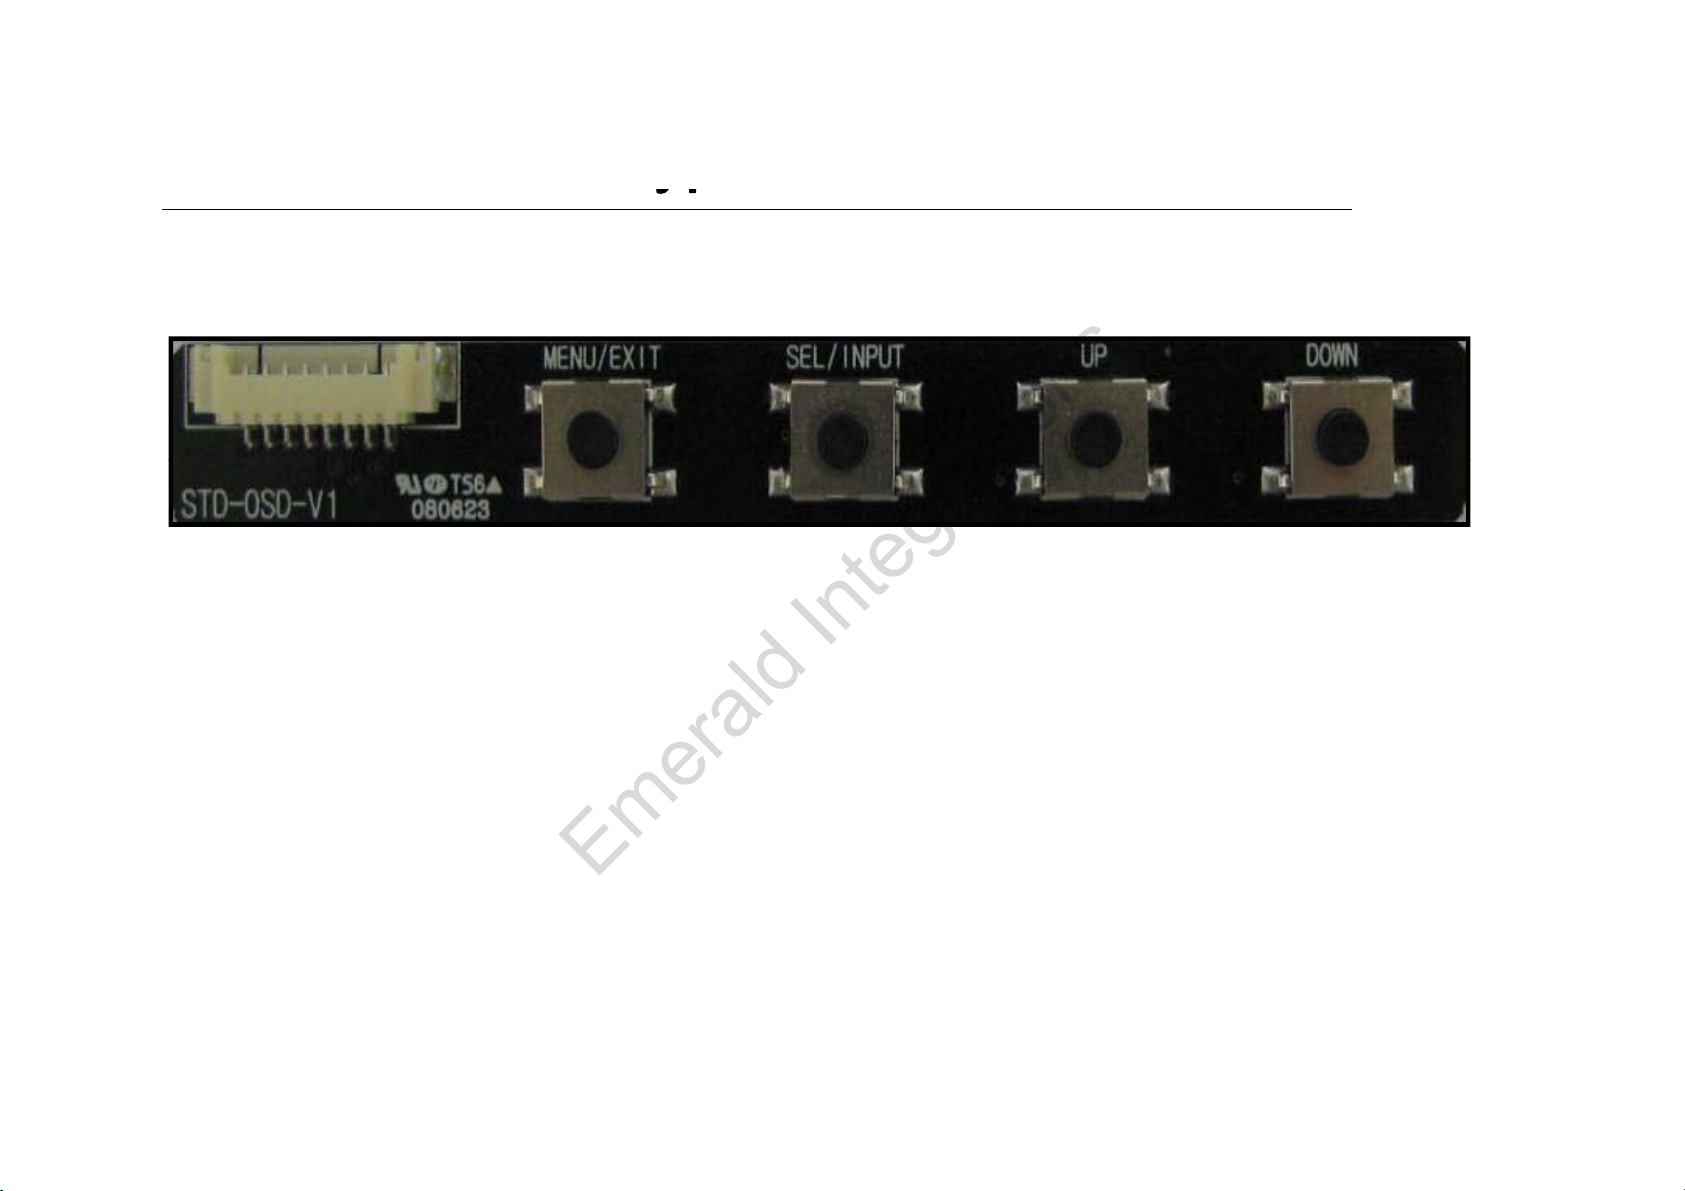
-How to use Ke
yp
yp
: Operated by pressing
▲
→ ▼
→ ▲→MENU of remote or keypad in order
Emerald Integrations
www.emeraldintegrations.com
※ Remote or Keypad (Optional)
MENU : OSD Menu, switching to previous mode.
SEL : Selection in menu, switching AV sources.
ad
UP : Move to Left, Up
DOWN : Move to Right, Down
UP + DOWN at once : Operating “SAFE MODE”
*FACTORY MODE (Interface setting for installer)
.
Page 14
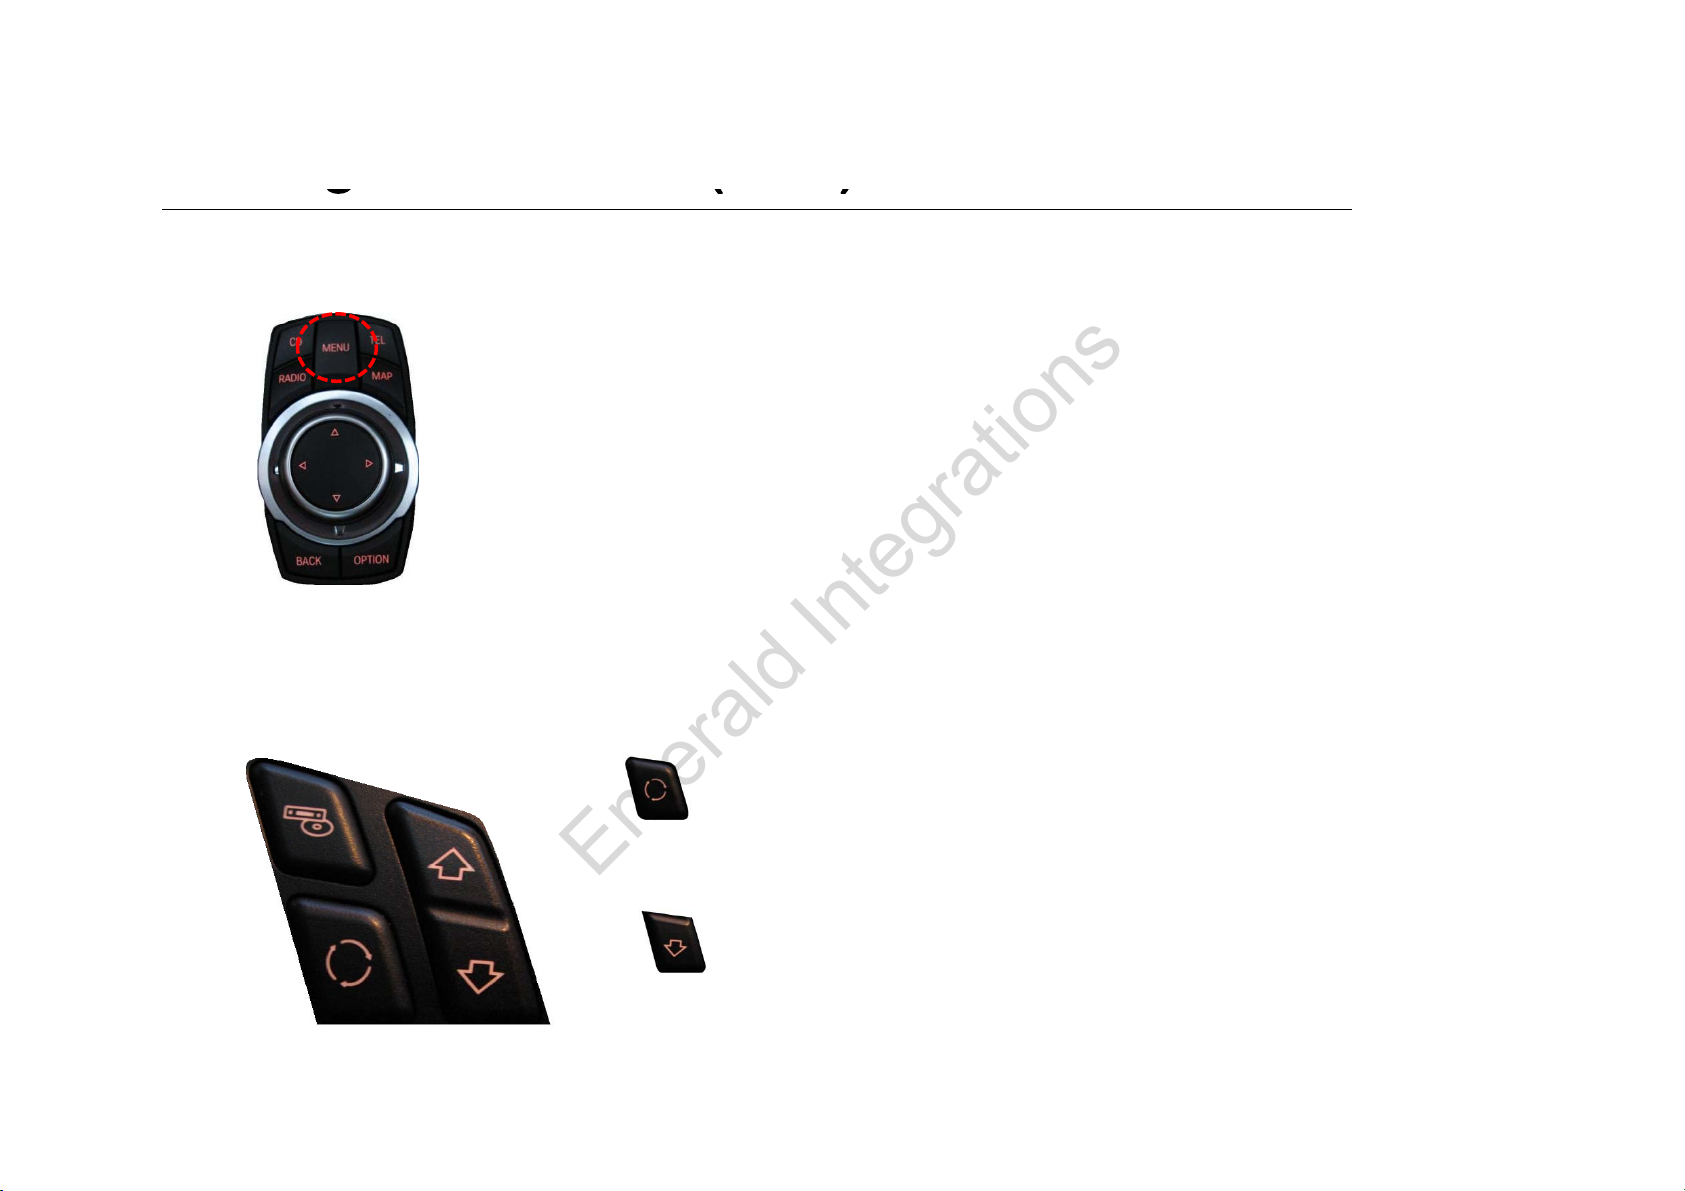
-Original buttons (E60
)
g()
Emerald Integrations
www.emeraldintegrations.com
- I-Drive Button
“MENU button” : Long press – Mode switching
Short press – Switching to OEM mode
- Steering wheel buttons
button : Long press – Dual screen operation
button : Long press - Mode Switching
Page 15
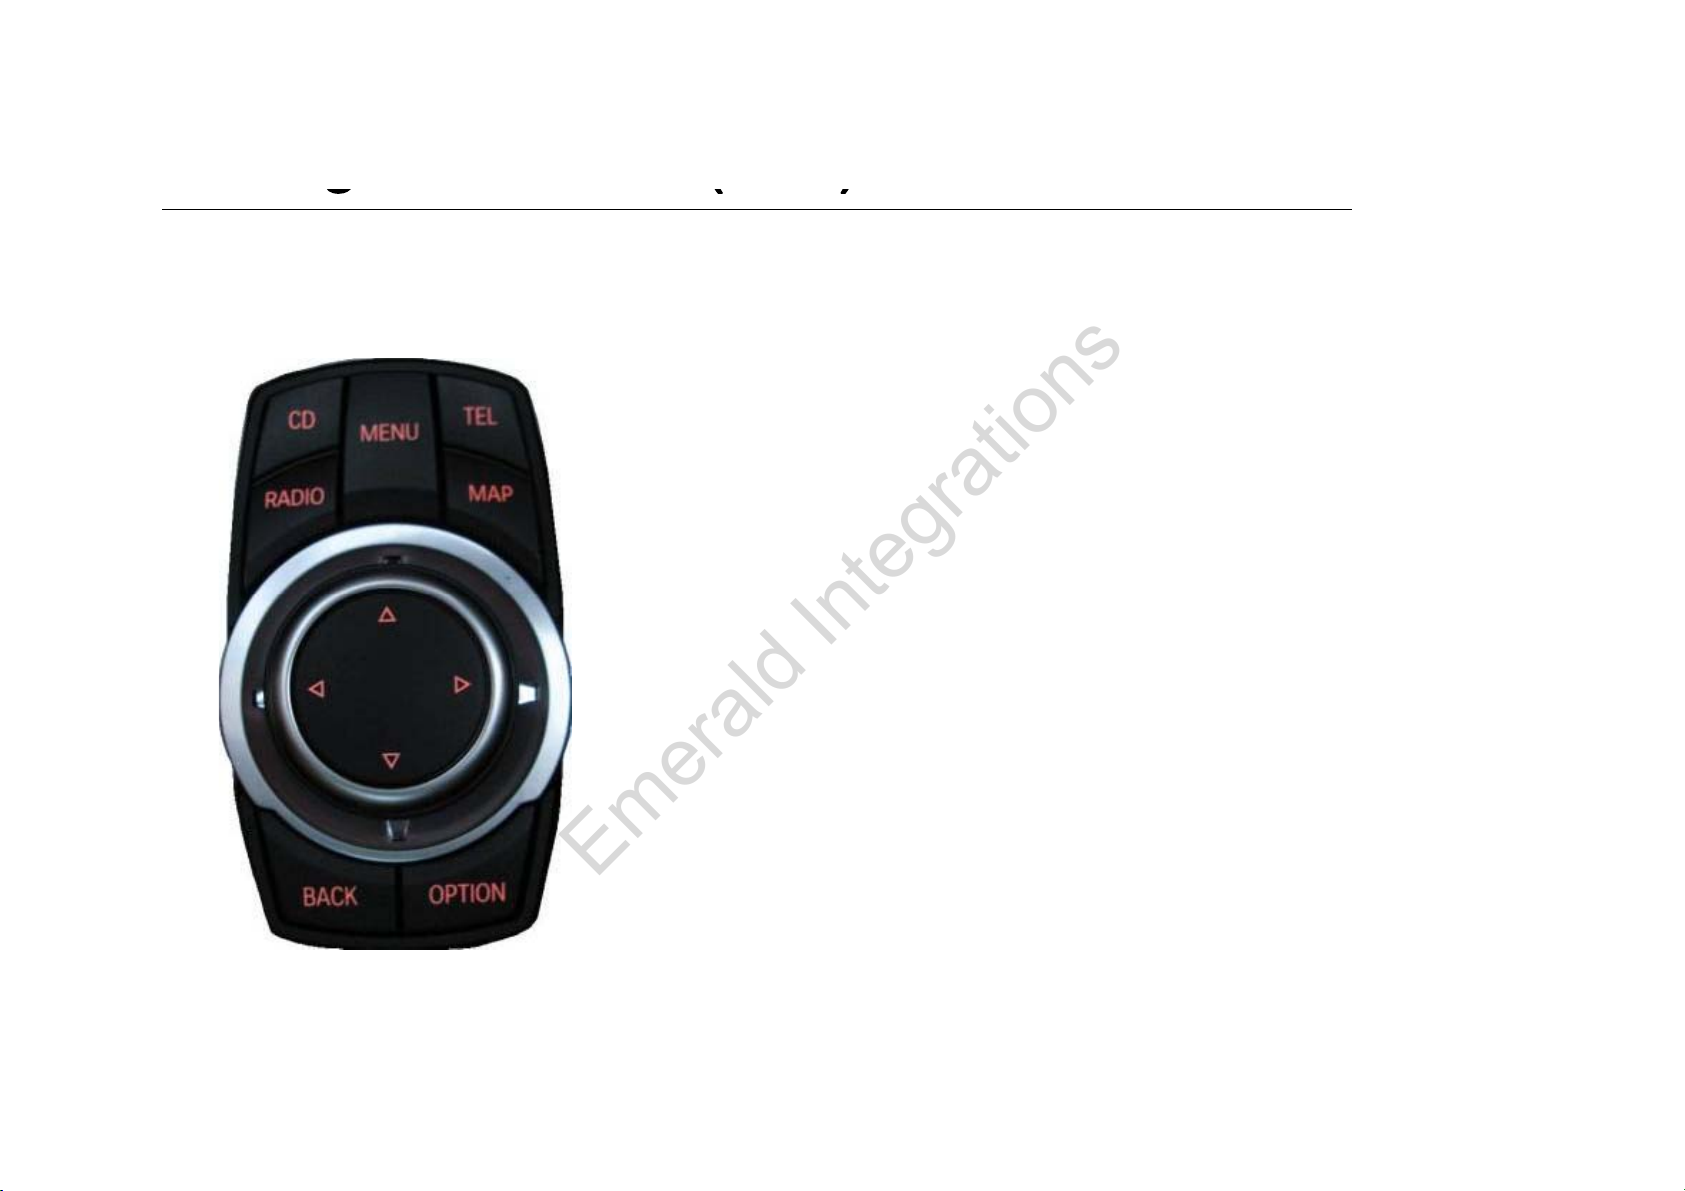
-Original buttons (E65
)
g()
MENU Button
: Long press
Mode switching
Short press
–
Positioning Translucent
PDC
Emerald Integrations
www.emeraldintegrations.com
- I-Drive Button
Short press – Back to OEM image
▽ Button : Long press – PIP function Operation
※ In Reverse gear – This function is only available in
▽ Button : Long press – PIP function Operation
–
cars with aftermarket rear camera.
Image
Page 16
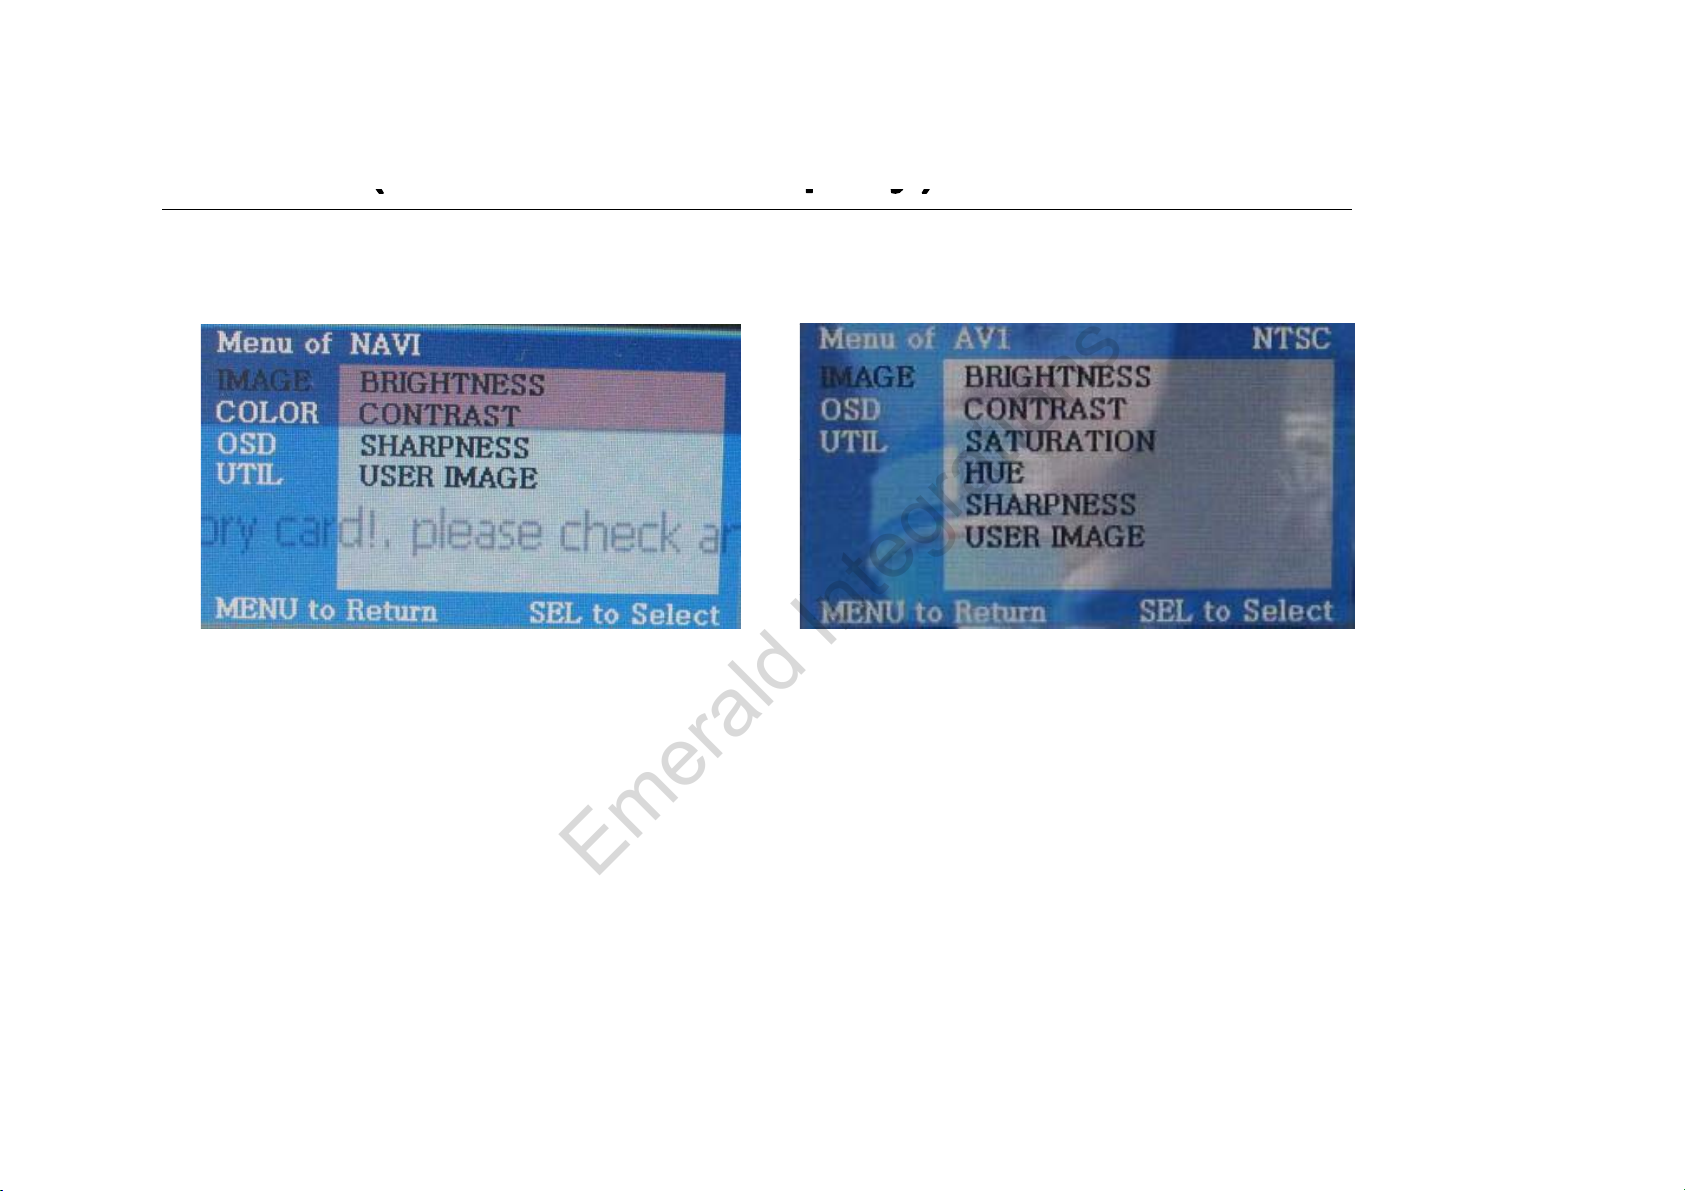
-OSD(On Screen Displa
y)
(py)
SATURATION
USER IMAGE
Emerald Integrations
www.emeraldintegrations.com
· Analog RGB Mode · Video Mode
IMAGE Menu :
- BRIGHTNESS
- CONTRAST
-
- HUE
- SHARPNESS
-
Page 17
OSD(On Screen Displa
y)
(py)
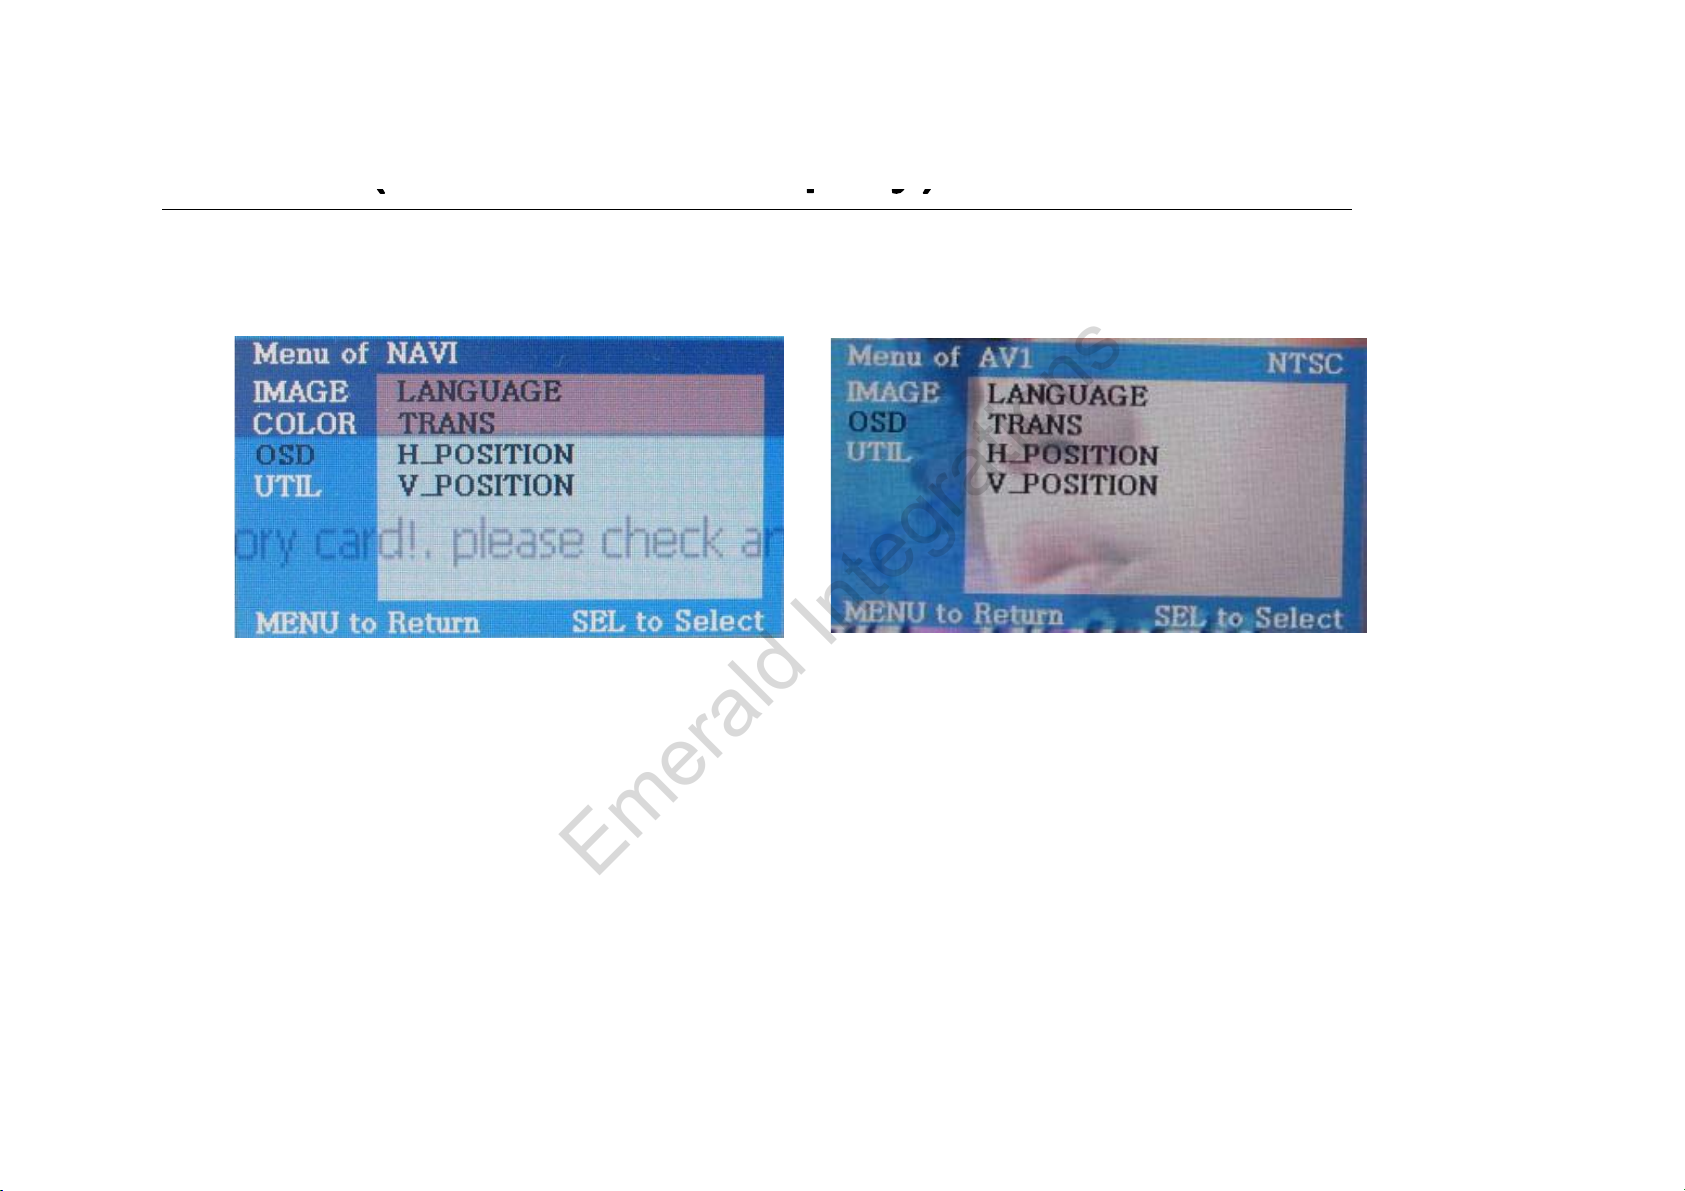
OSD TRANS
Emerald Integrations
www.emeraldintegrations.com
· Analog RGB Mode · Video Mode
OSD Menu
- LANGUAGE
-
- OSD H_POS
- OSD V_POS
Page 18
OSD(On Screen Displa
y)
(py)
Emerald Integrations
www.emeraldintegrations.com
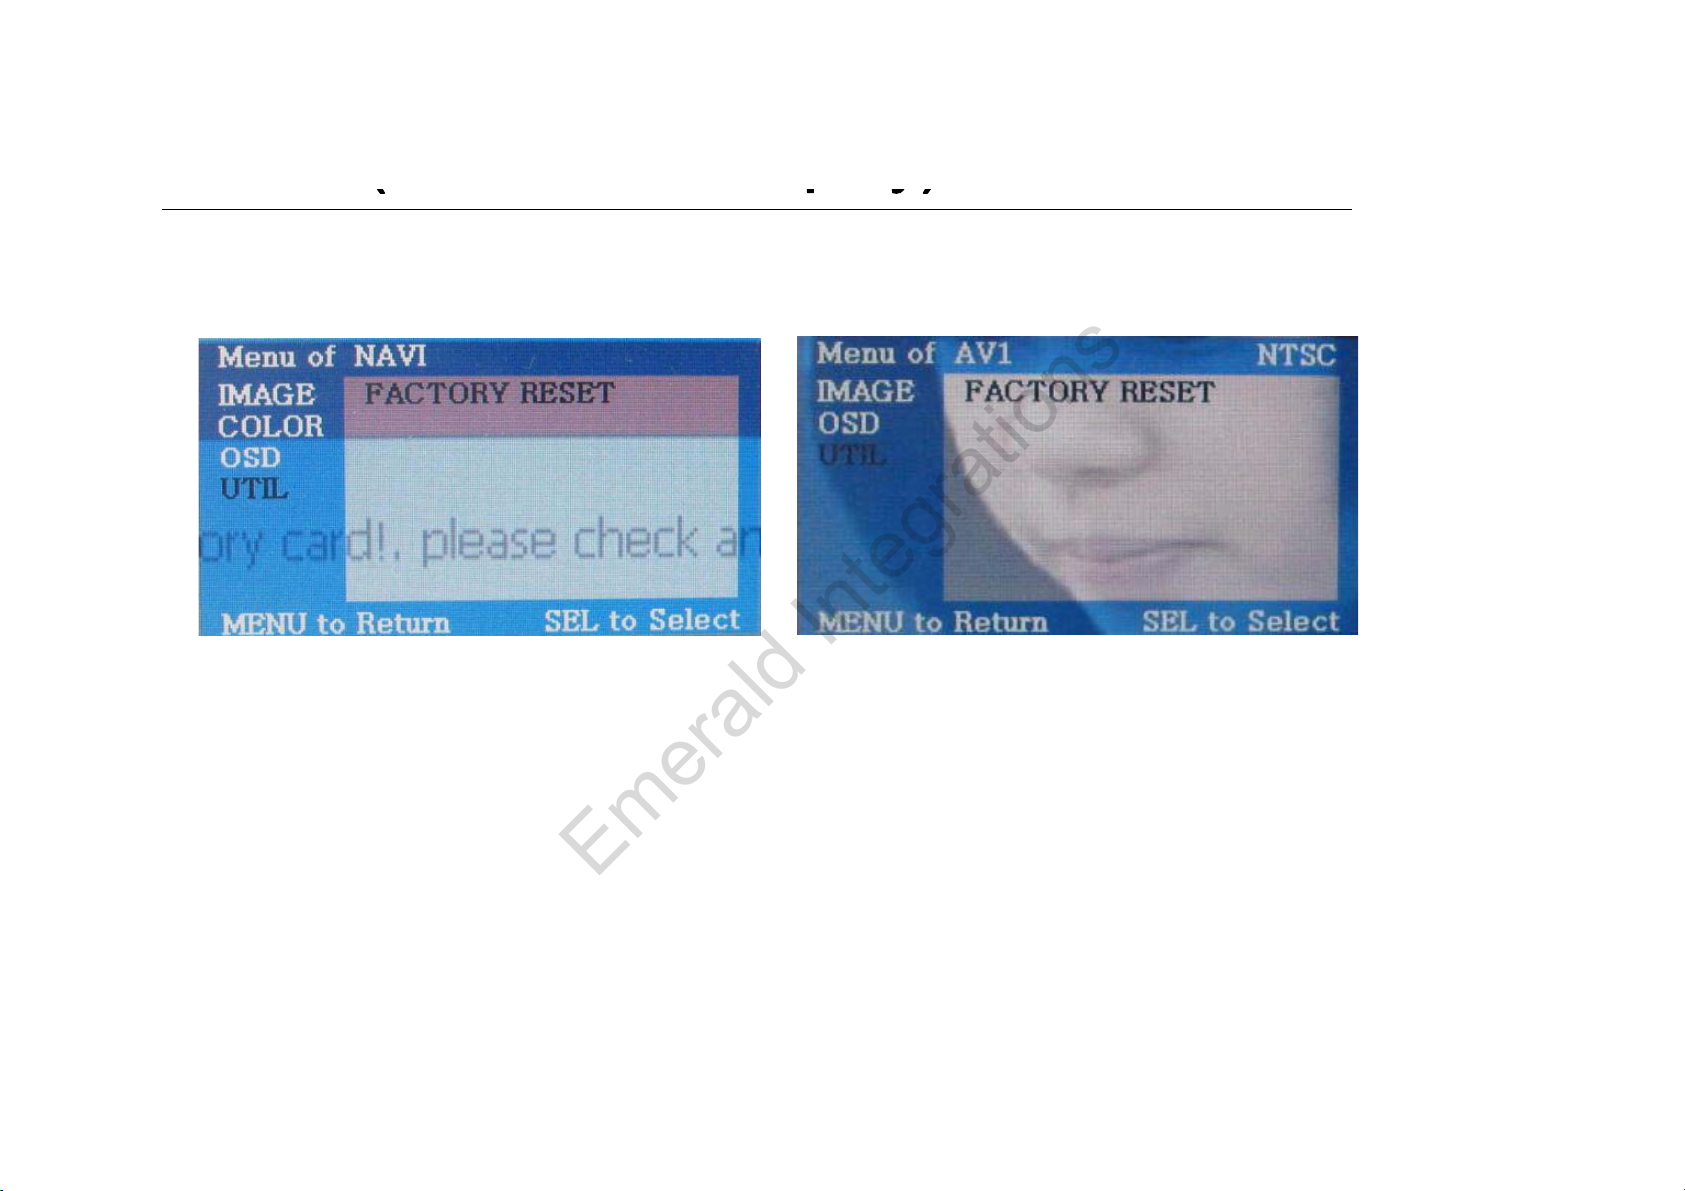
· Analog RGB Mode · Video Mode
UTIL Menu
- FACTORY RESET : Initializing setting value (NAVI, AV individual initialization)
Page 19
OSD(On Screen Displa
y)
(py)
pag
pg
Emerald Integrations
www.emeraldintegrations.com
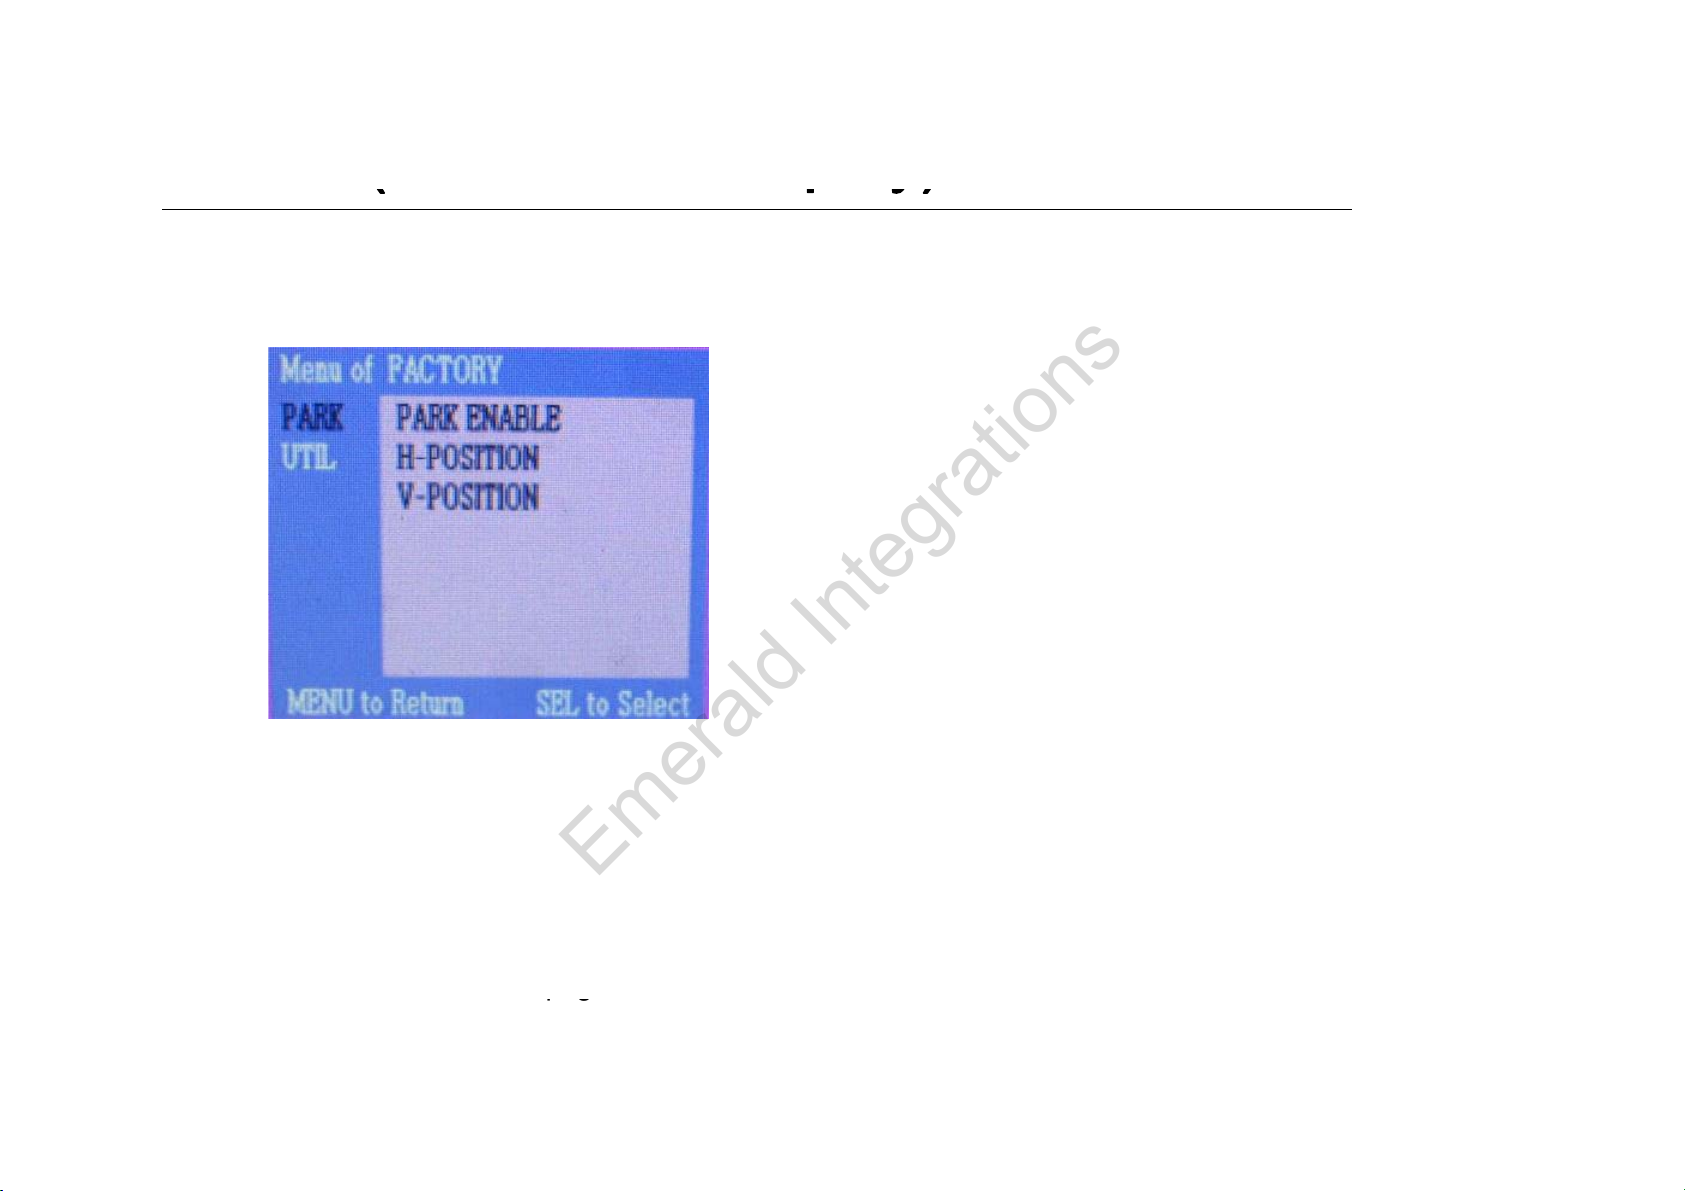
· Factory Mode
-Operated by pressing ▲ → ▼ → ▲ →MENU of remote or keypad in order.
Factory Mode
- IMAGE :
- H-POSITION : Move to left and right
- V-POSITION : Move to up and down
- PARK : Refer to the next
e for detail.
Page 20
OSD(On Screen Displa
y)
(py)
b
ith CAN wi
)
Emerald Integrations
www.emeraldintegrations.com
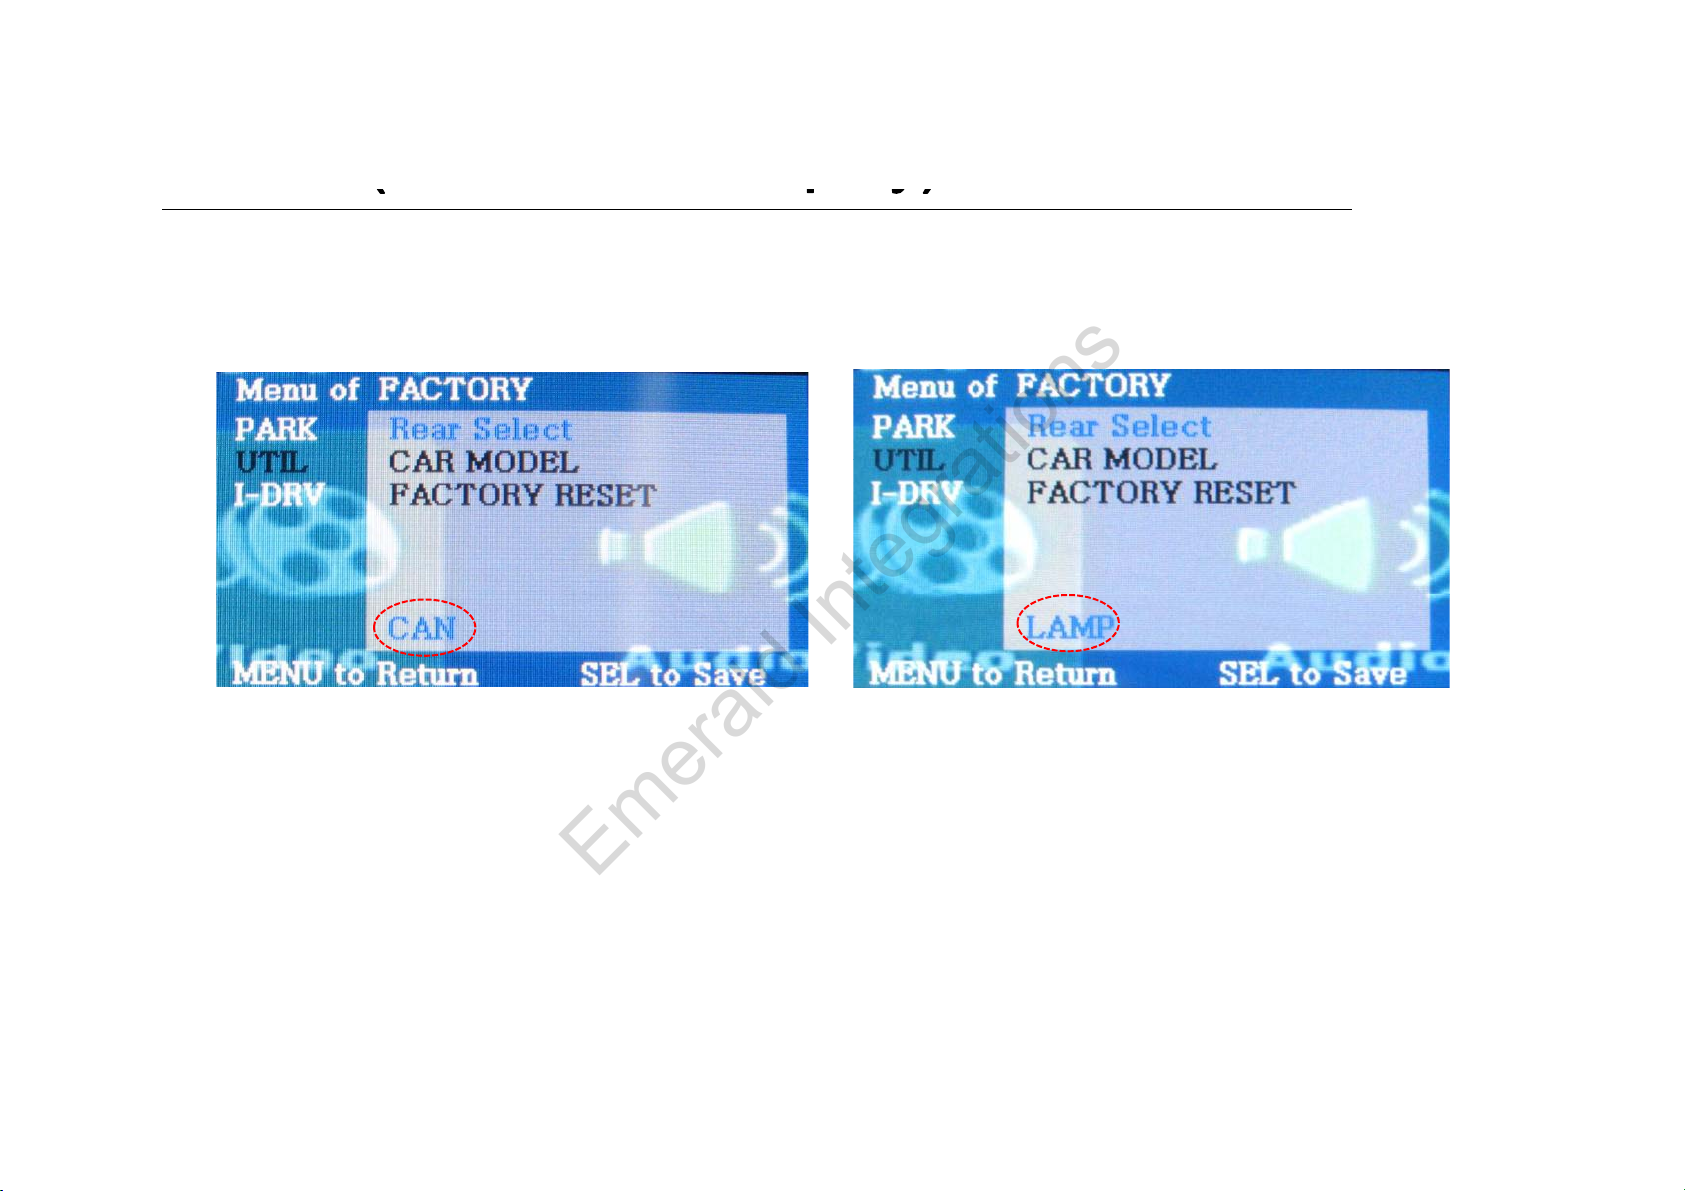
· Factory Mode
-Operated by pressing ▲ → ▼ → ▲ →MENU of remote or keypad in order.
Factory Mode
- UTIL :
-Rear Selection : Rear Camera Detection Method Selection
LAMP : Detecting Rear Cam by rear lamp in vehicle (‘Rear-C’ wire of
Power cable should be connected with rear lamp in vehicle)
CAN : Detecting Rear Cam by CAN Signal (‘CAN’ wires of power should
e connected w
- FACTORY RESET : Initialization
res in vehicle
Page 21
OSD(On Screen Displa
y)
(py)
UTIL
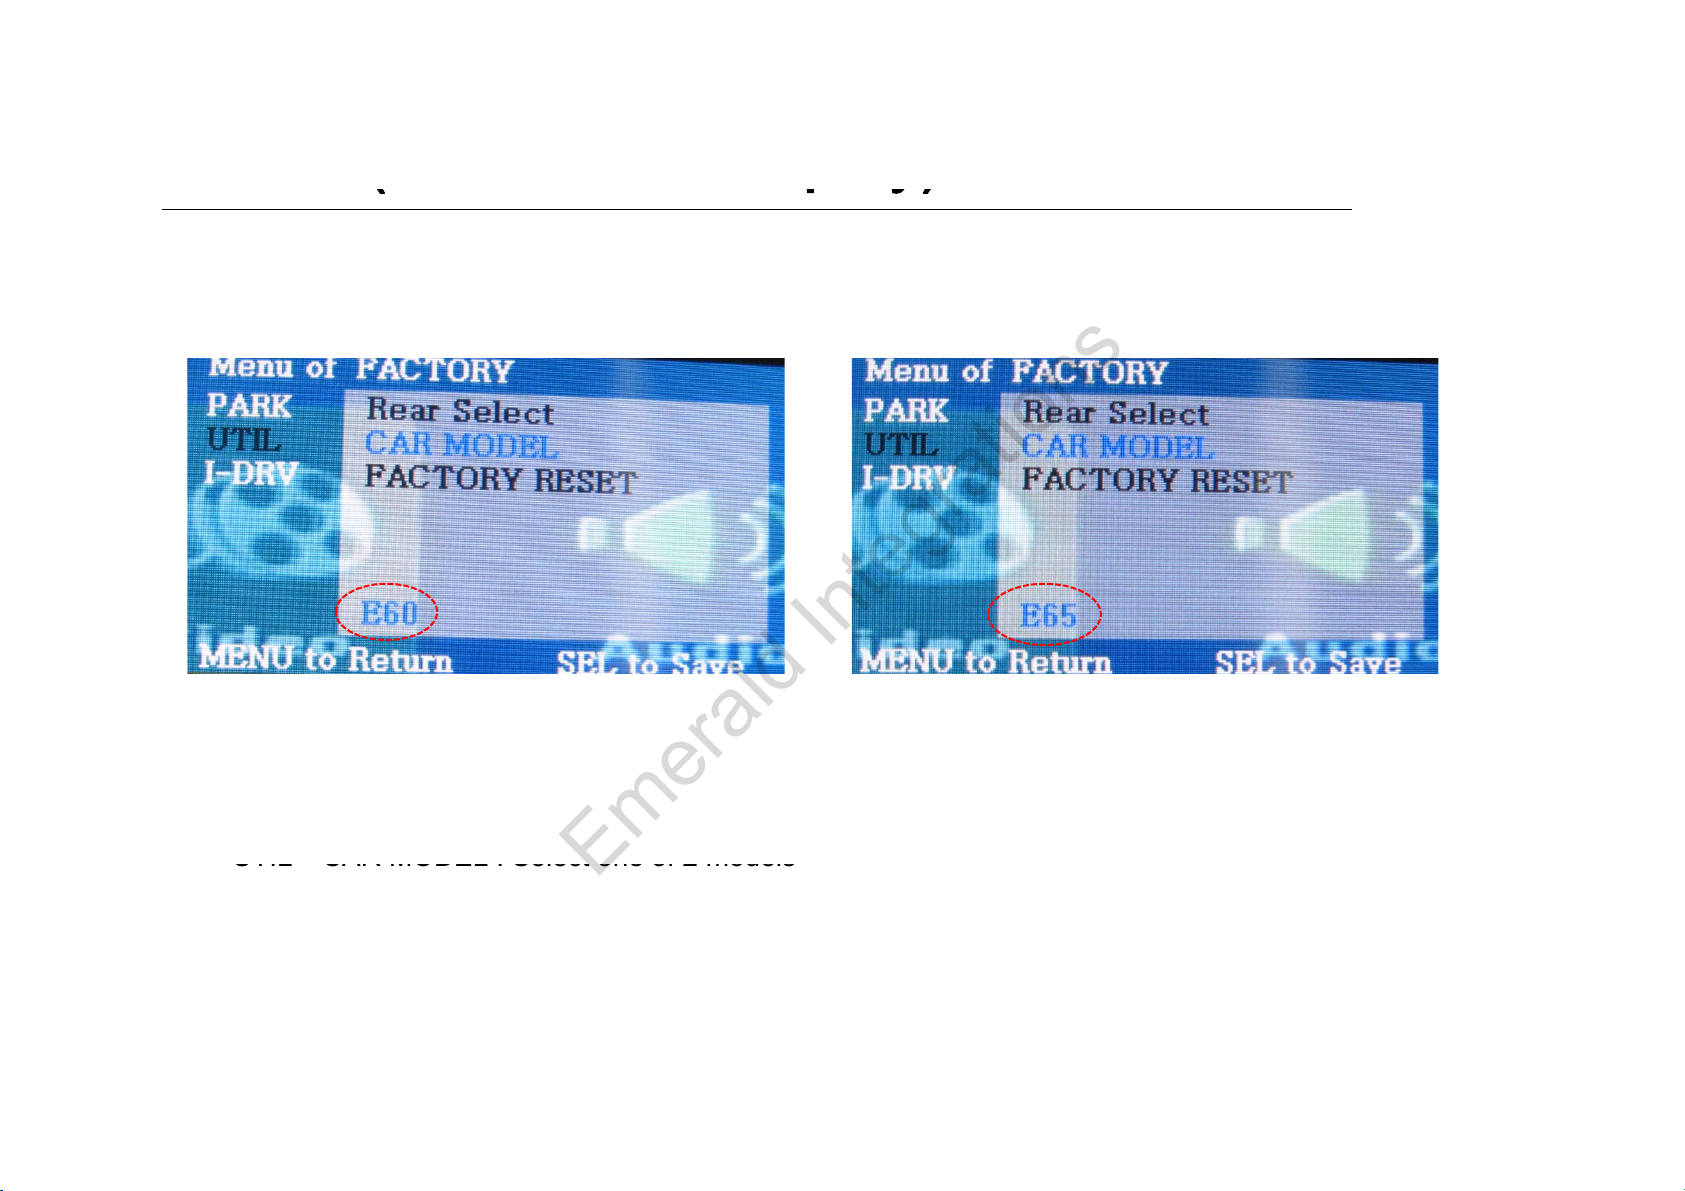
CAR MODEL : Select one of 2 models
Emerald Integrations
www.emeraldintegrations.com
· Factory Mode
-Operated by pressing ▲ → ▼ → ▲ →MENU of remote or keypad in order.
Factory Mode :
-
: E60 – For 3, 5 series.
: E65 – For 7 series
Page 22
-Rear parking guide line
pgg
①
p
p
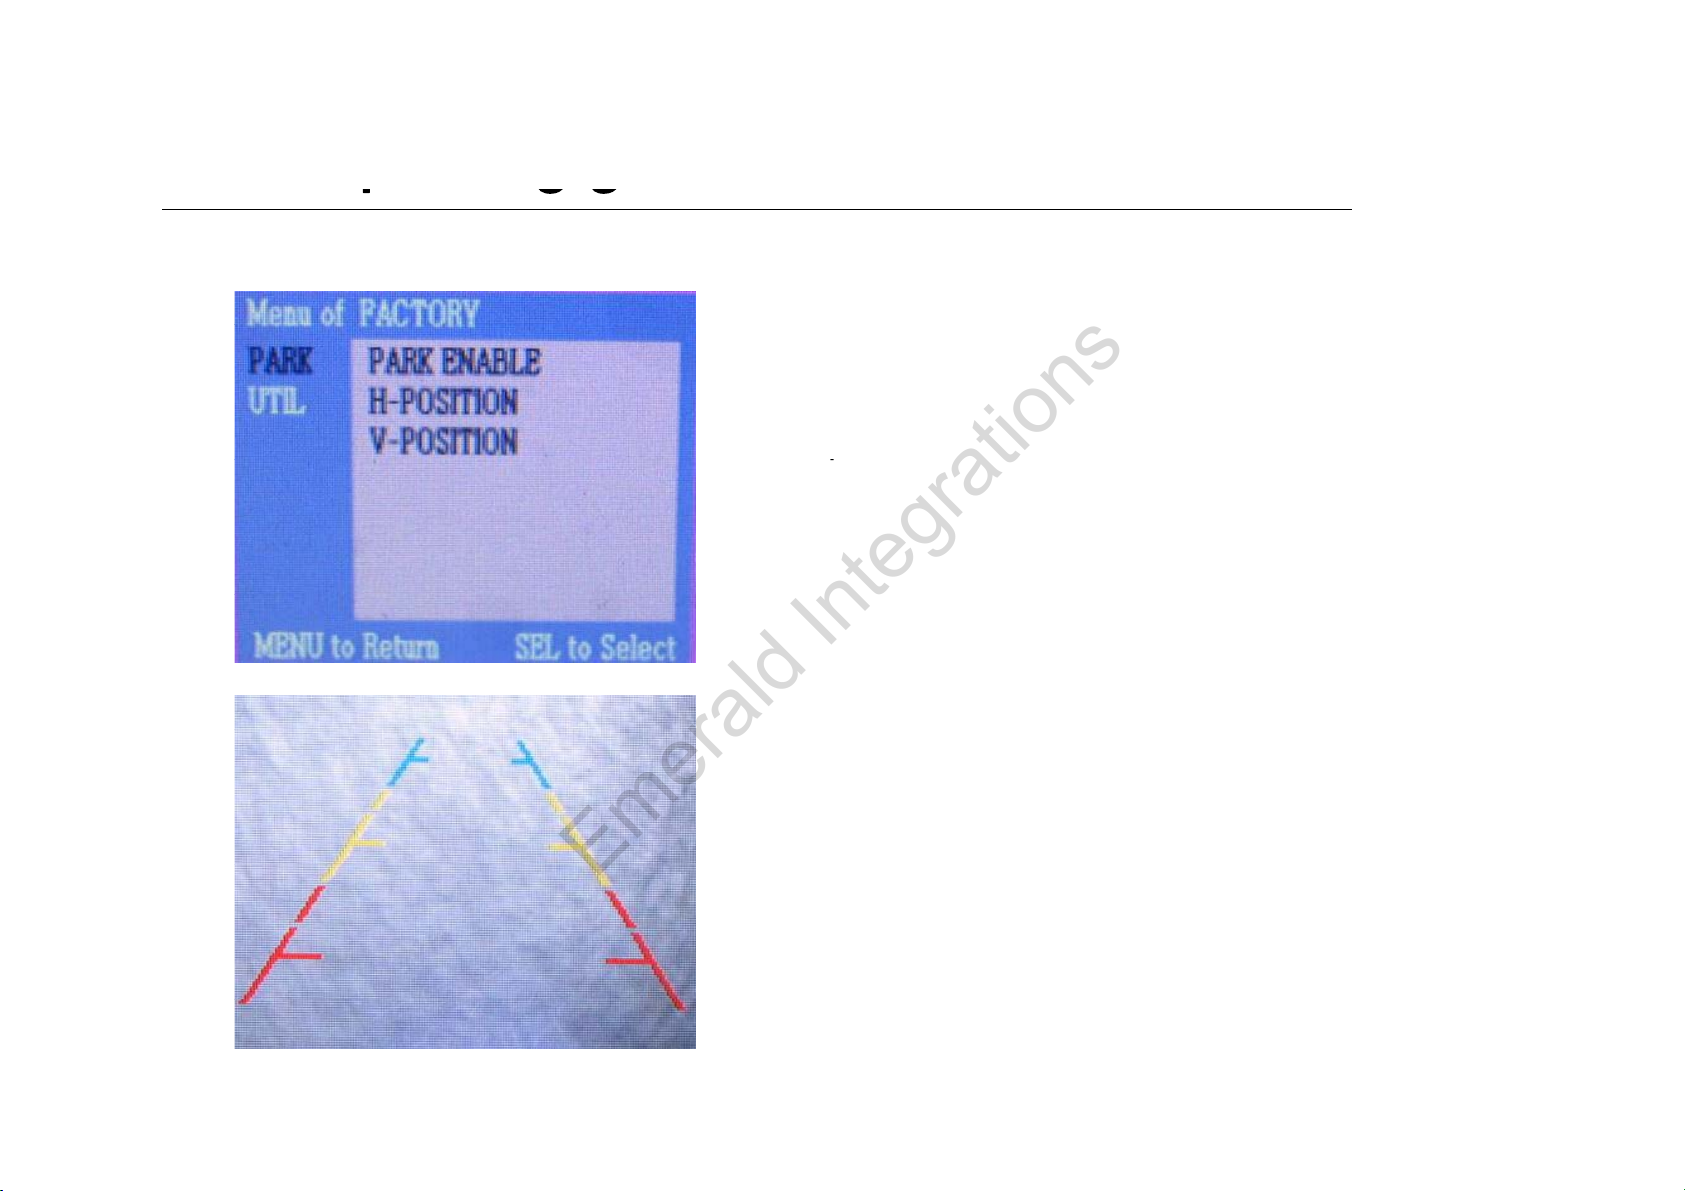
②②Select PARK ENABLE to ON
Emerald Integrations
www.emeraldintegrations.com
Factory Default : DISPLAY – ENABLE
① To get factory mode like left
picture, put gear to reverse and
remote or keypad.
ress ‘▲ → ▼ → ▲ →MENU’ of
‘
then the guide line appears as
left picture.
’
‘
’
,
Page 23
-Rear parking guide line
pgg
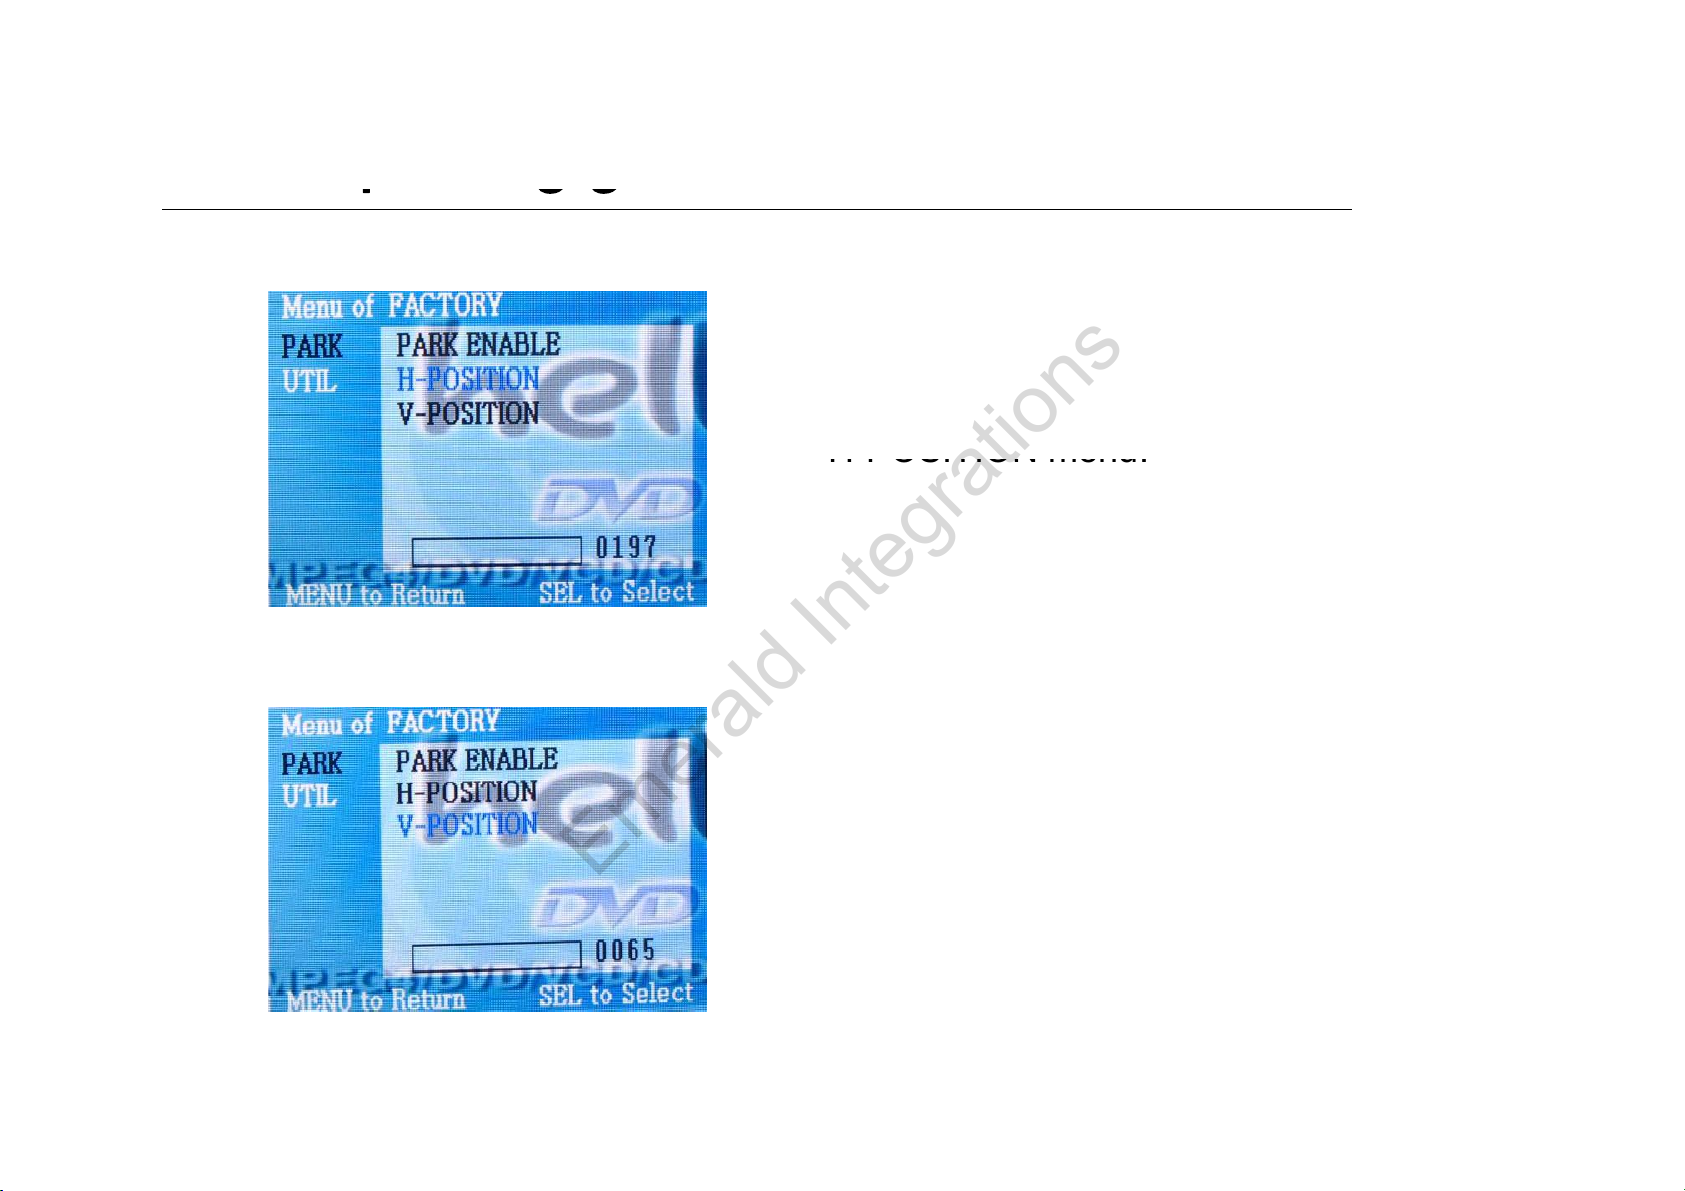
③③On Step no.2, after Factory
H
POSITION menu.
④④A
Emerald Integrations
www.emeraldintegrations.com
“
Mode” operated, line’s position
can be moved to left and right in
-
lso can move the line to up and
down in H-POSITON menu.
Page 24
-Rear parking guide line (E60)
<Full R
PDC T
>
Emerald Integrations
www.emeraldintegrations.com
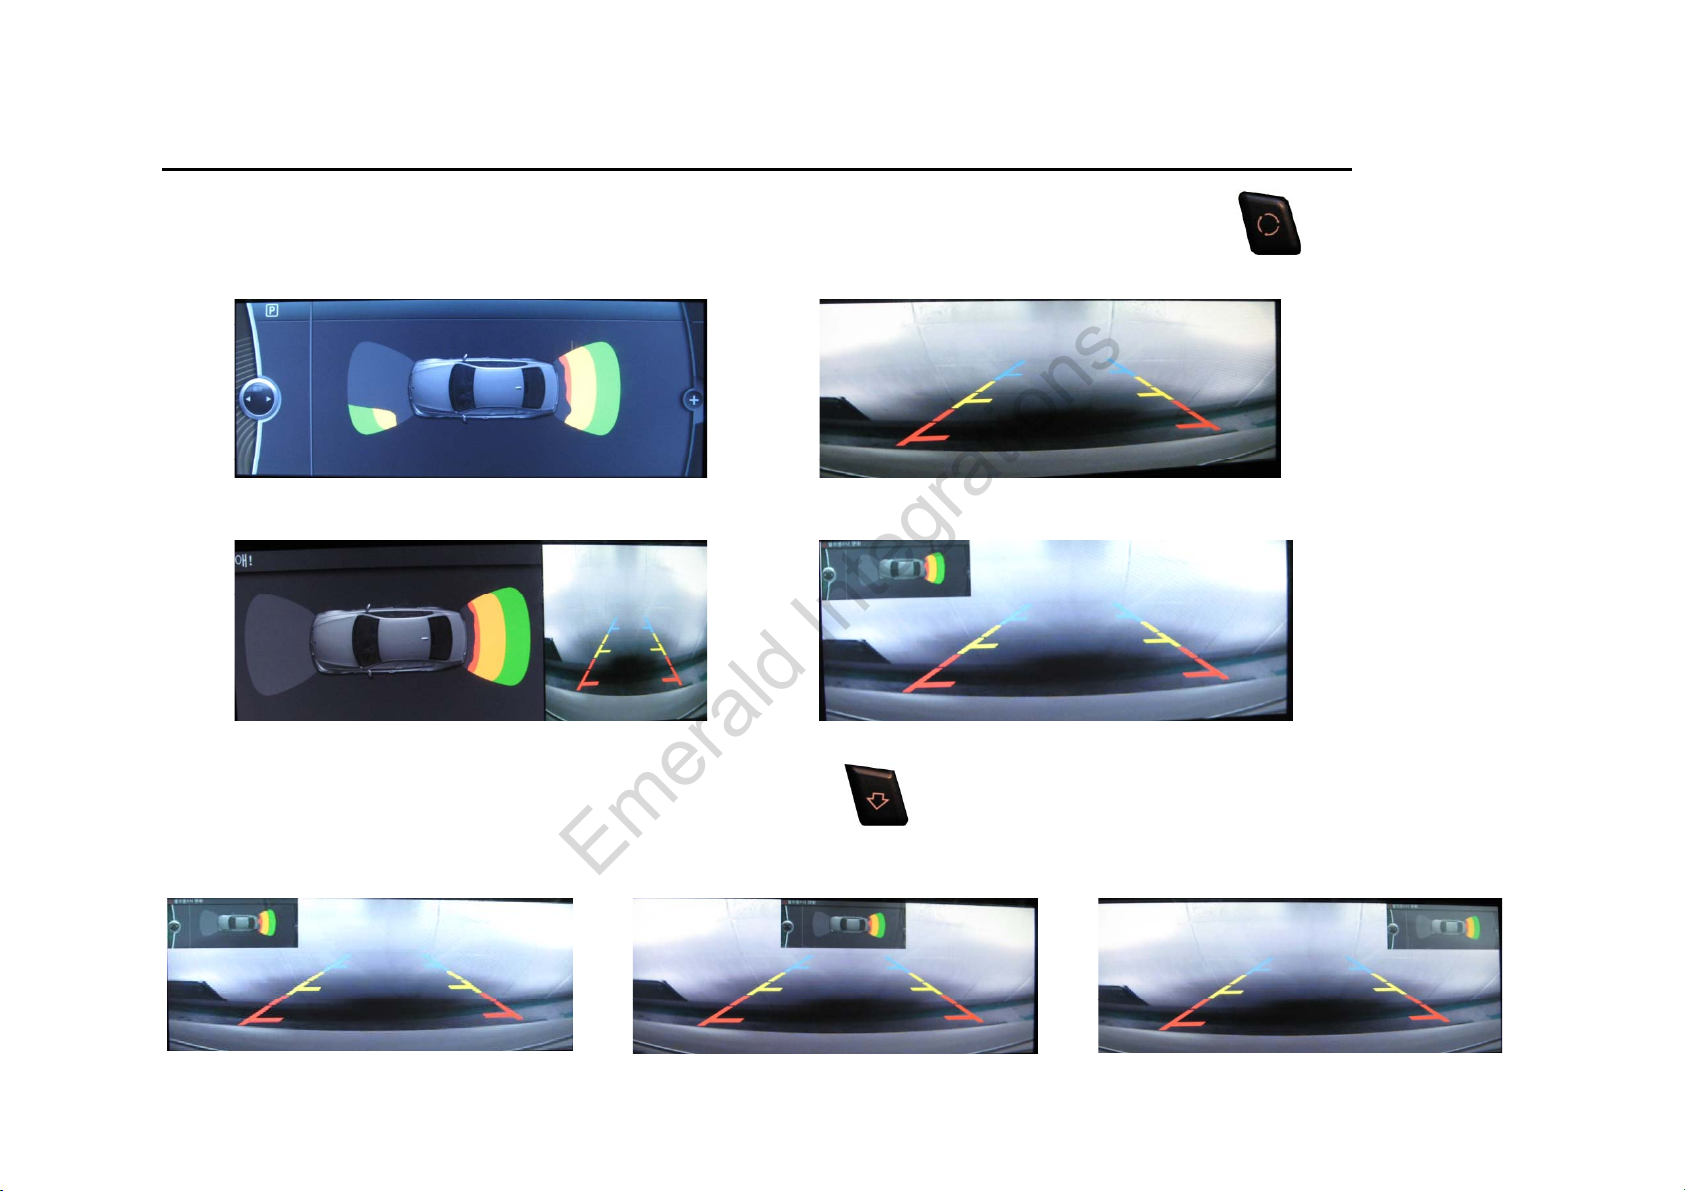
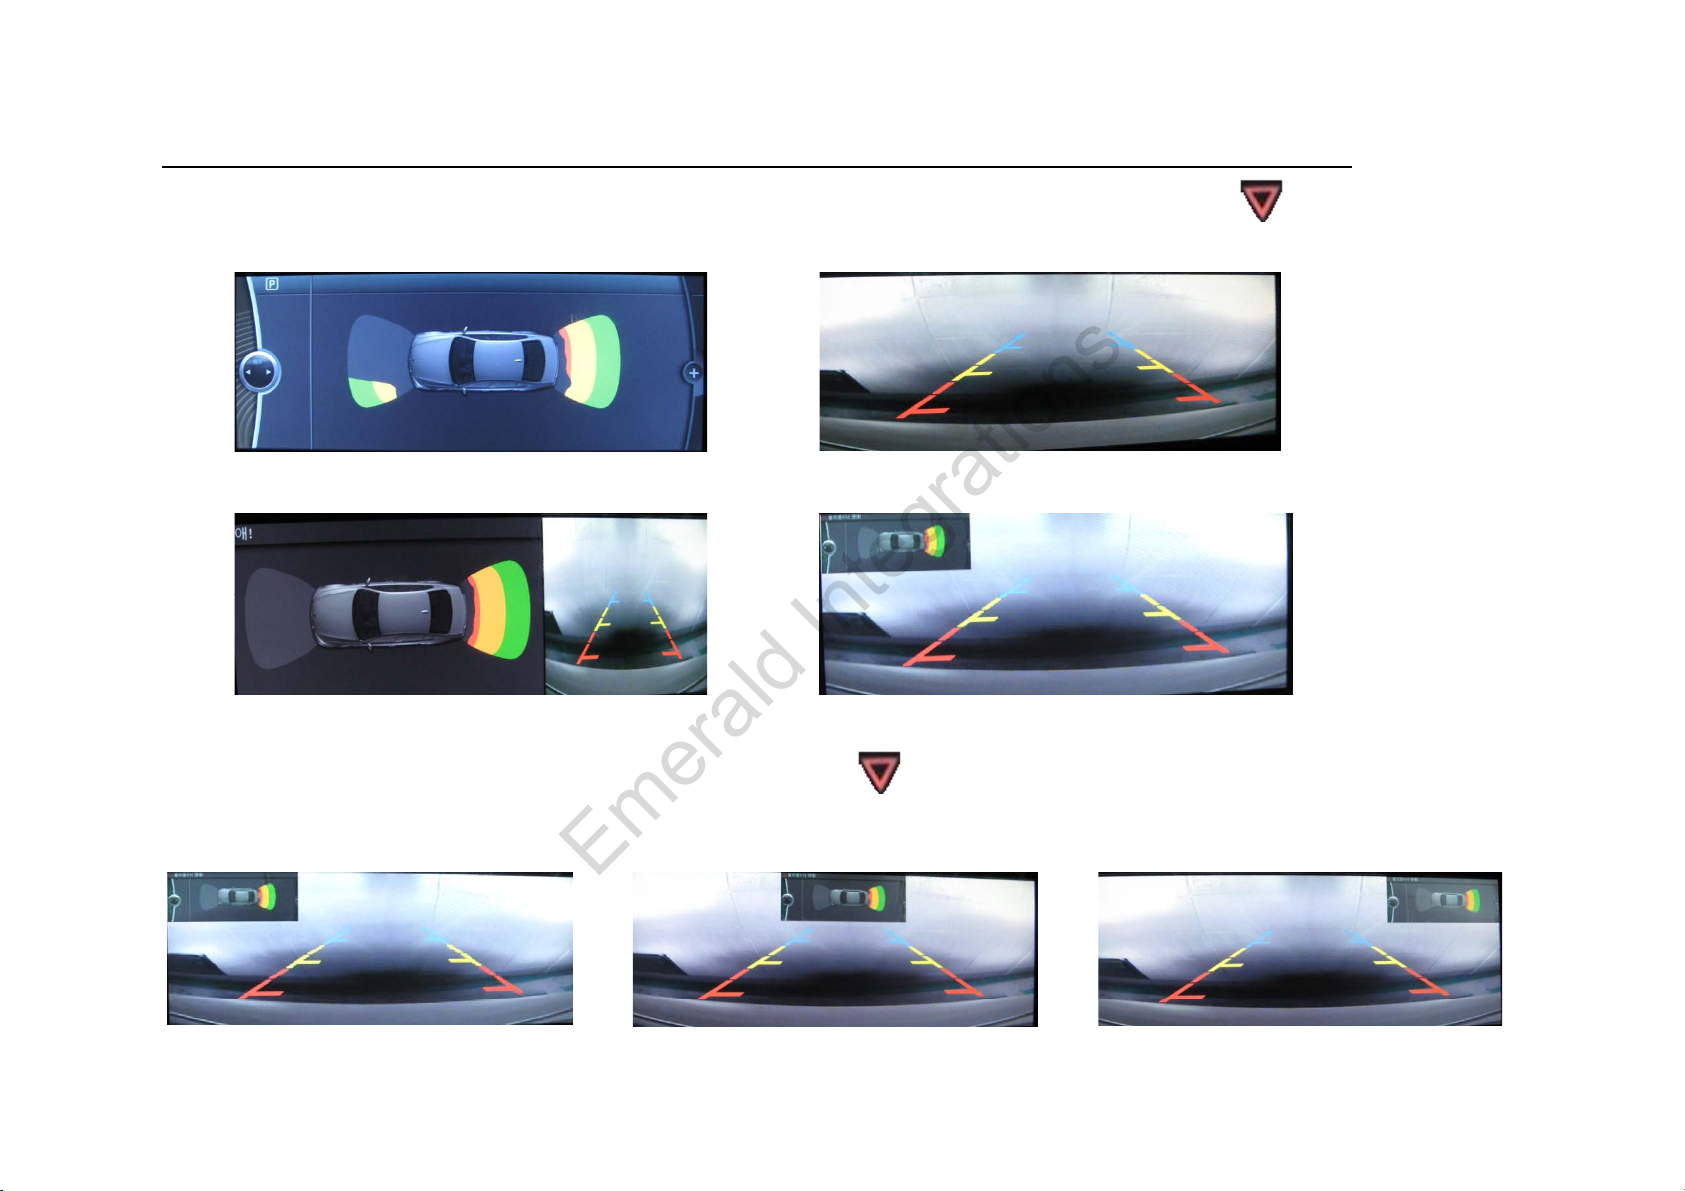
-Rear Display Setting : Select one of 4 displayed types as below by
button on the steering wheel.
<Full PDC Type>
<Dual Screen type>
-Translucent PDC Image positioning : By button on the steering wheel,
you can position PDC image to one type of below 3 types.
<Full Rear Camera Type>
ear Camera+ Translucent
ype
Page 25
-Rear parking guide line (E65)
Rear Display Setting
Select one of 4 displayed types as below b
PDC
T
<Full R
>
Emerald Integrations
www.emeraldintegrations.com
-
:
y
button with long press on I-Drive
<Full
<Dual Screen type>
ype>
<Full Rear Camera+ Translucent PDC Type>
ear Camera Type
-Translucent PDC Image positioning : By button with long press on I-Drive,
you can position PDC image to one type of below 3 types.
* This function is only available in vehicle with aftermarket rear camera
Page 26
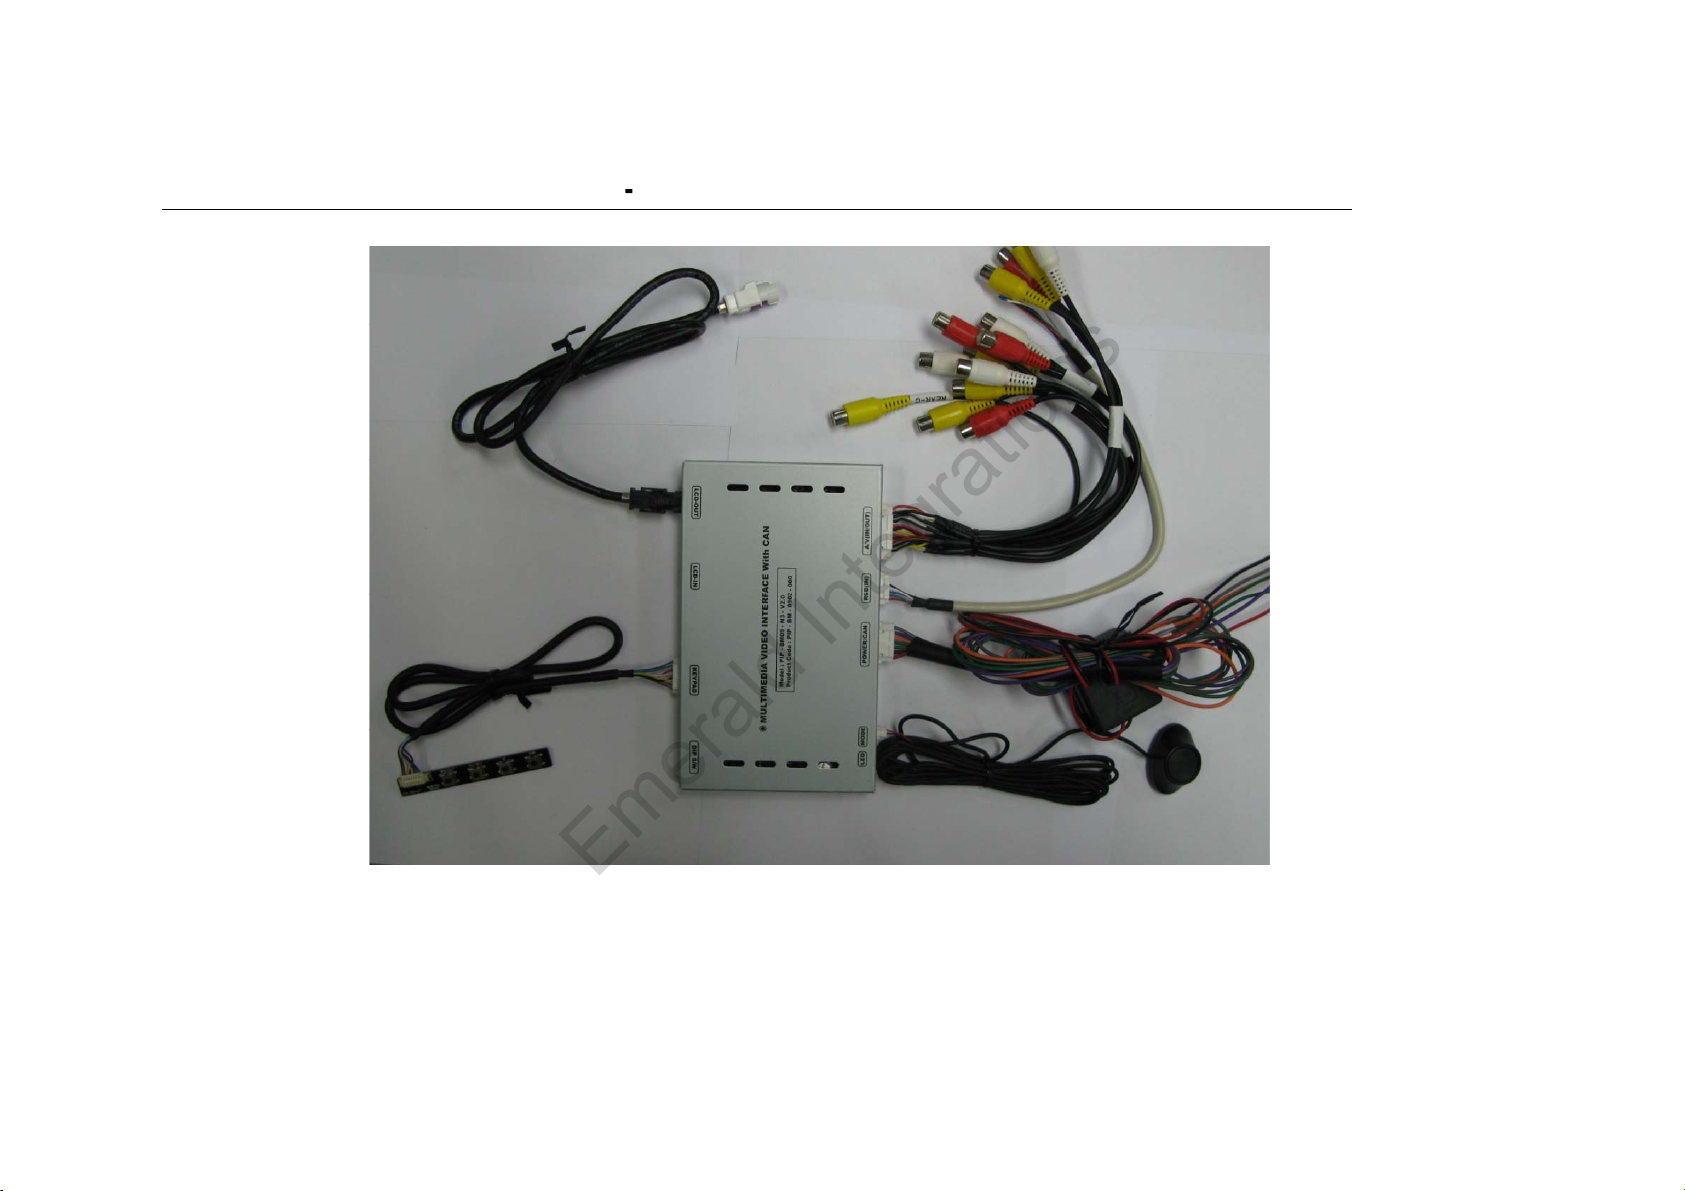
-Product Composition
p
Emerald Integrations
www.emeraldintegrations.com
OSD Keypad or Remote : 1 EA (Optional) Power Cable : 1 EA
LCD Cable : 1 EA A/V Cable : 1 EA
Navi Cable : 1 EA Ground or IR Cable : 1 EA
Toggle Switch : 1 EA (Optional)
Page 27
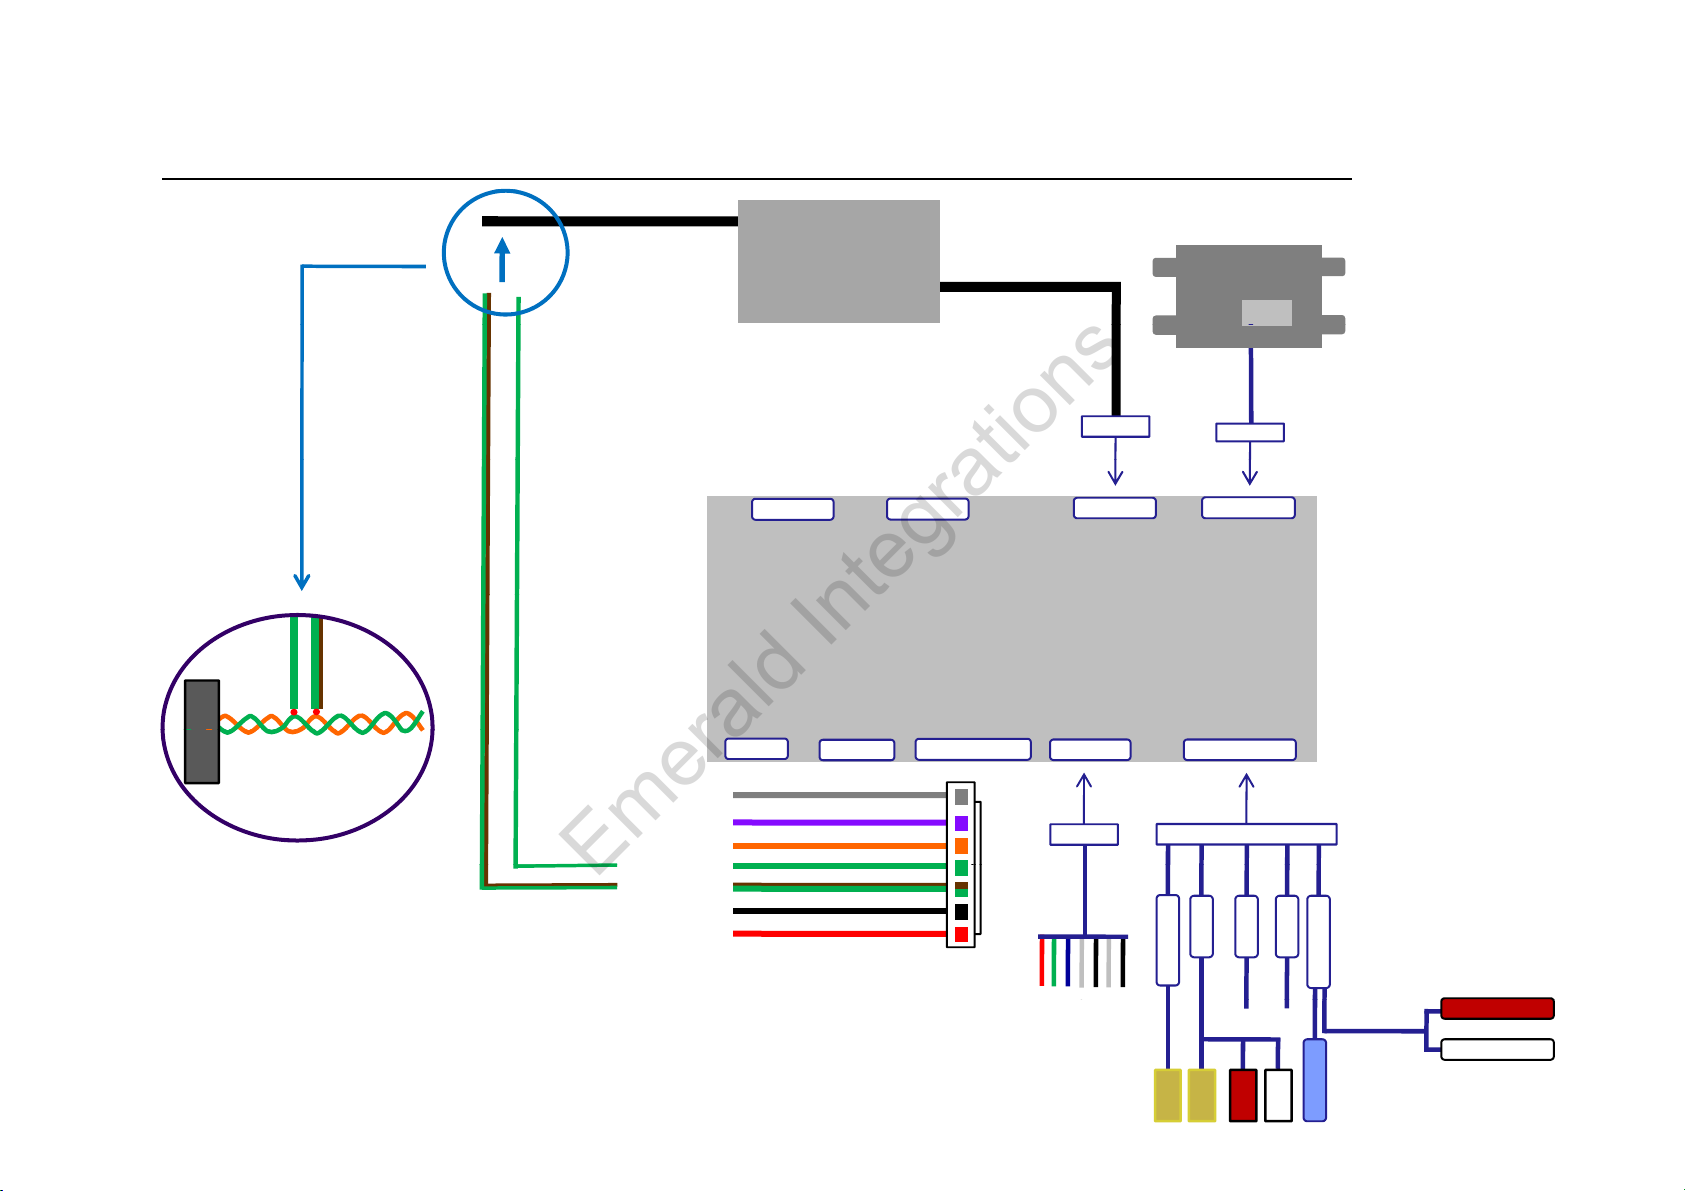
-Installation Diagram
S
CAN-L
W : White
A
S
Emerald Integrations
www.emeraldintegrations.com
Original CAN wires
Y
CAN
※ Connect Green + Brown wire(CAN High) to
Orange wire from the car.
※ Connect Green Wire (CAN Low) to Green
from the car.
W
REAR-C
SAFE
F-CAM-DET
CAN-H
GND
ACC
Control Box
DIP S/W
LED
MODE
Original LCD Cable
KEYPAD
LCD-IN
PIP BMW 09 3series
POWER/CAN
RGB(IN) A/V(IN/OUT)
Back side monitor
LCD-OUT
AV1
REAR
C
Connector
AV2
AV3
R : Red
AV/OUT
Y : Yellow
R
G
B
N
D
G
A
V
N
Y
V
D
D
N
I
C
Y Y
R W
VIDEO
UDIO R
AUDIO L
Page 28
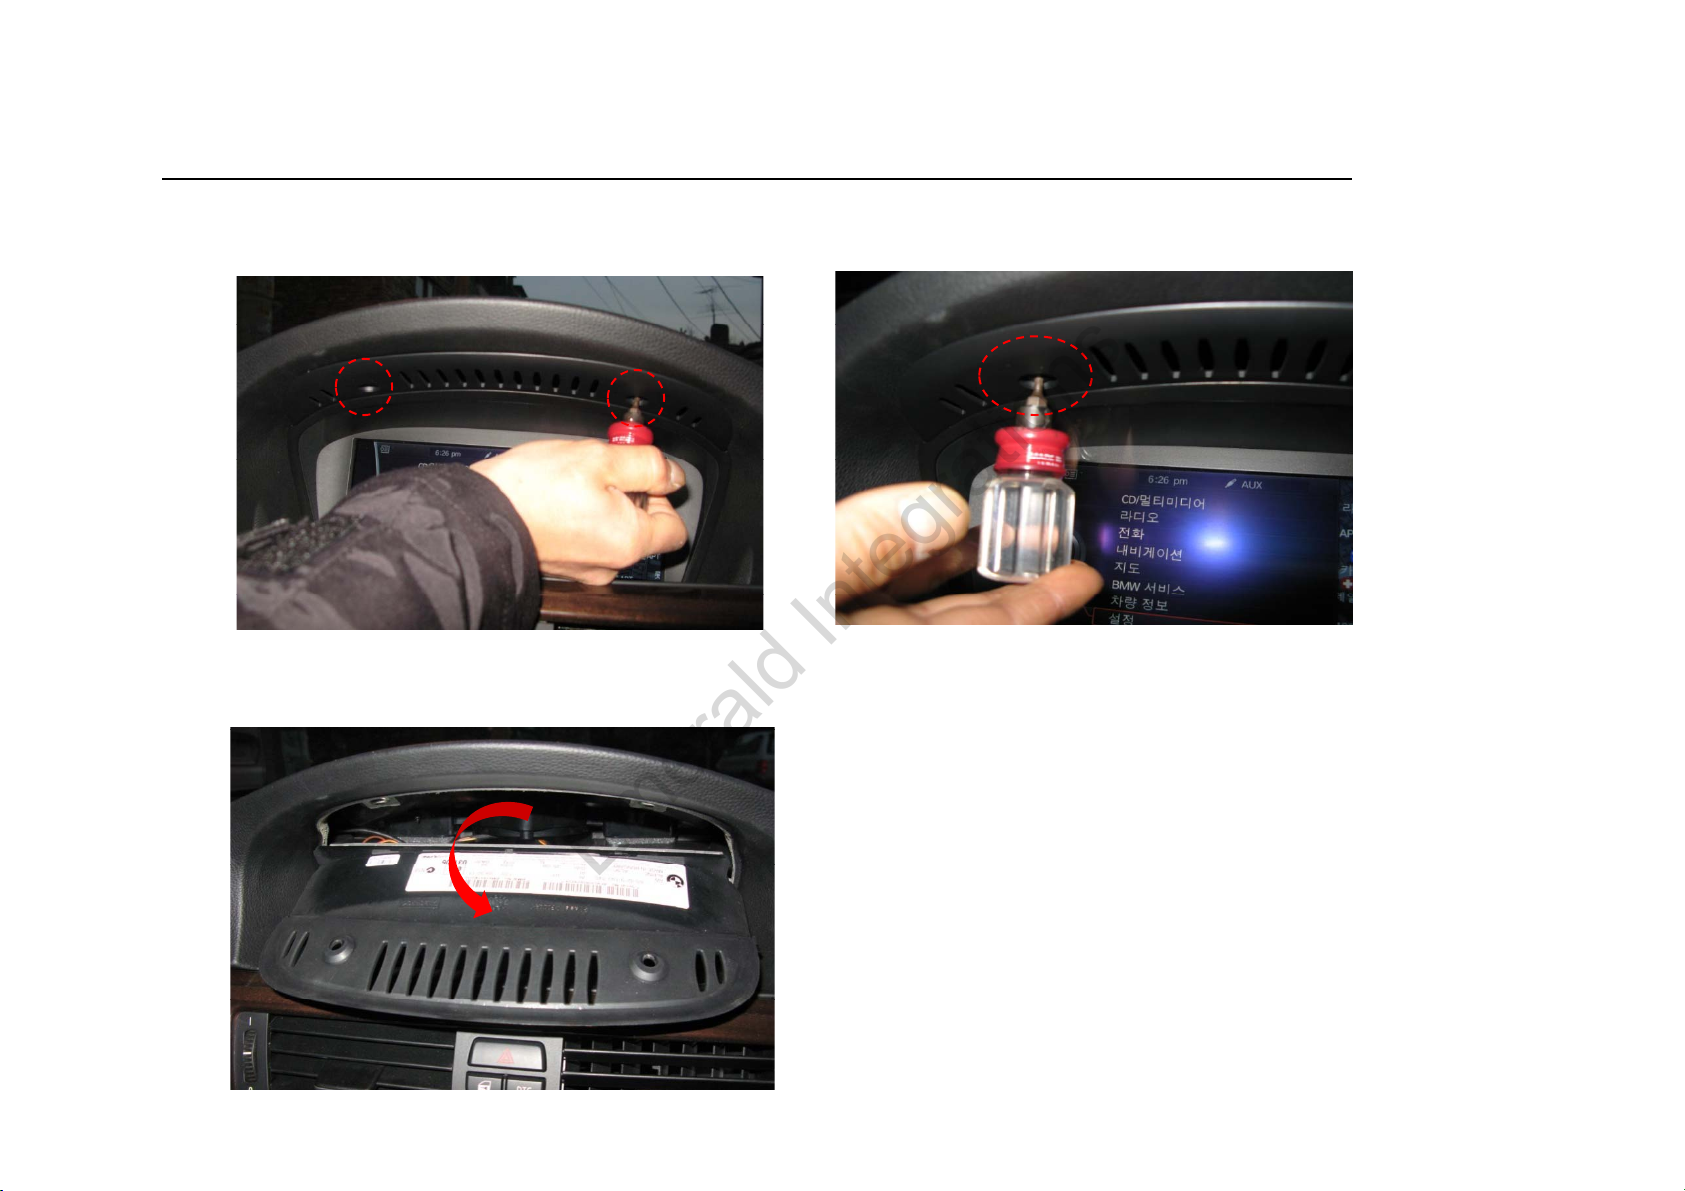
-Installation Manual
Emerald Integrations
www.emeraldintegrations.com
1. Monitor separation
- Remove indicated screws with a proper tool to take apart monitor from the
vehicle.
- Pull the monitor out from up to down
and take apart it.
Page 29
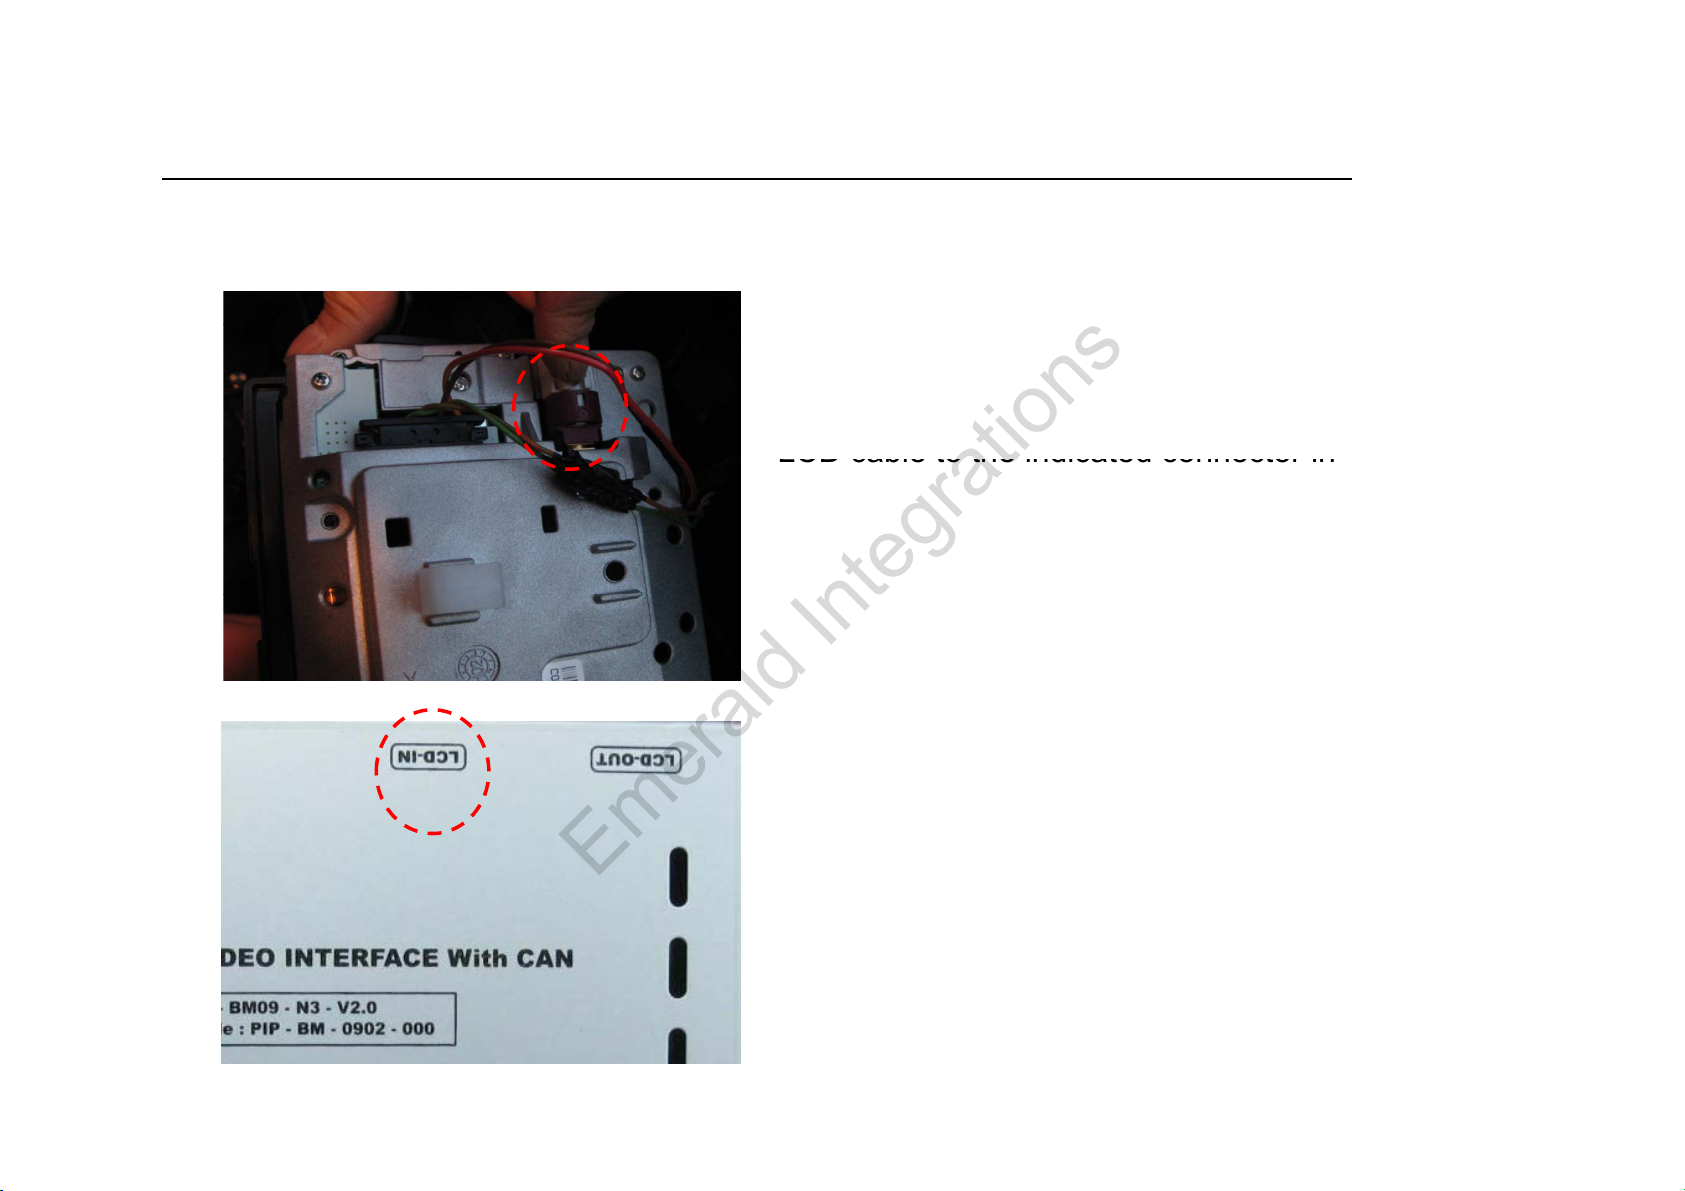
-Installation Manual
LCD cable to the indicated connector in
Make sure all connections are made
Emerald Integrations
www.emeraldintegrations.com
2. Connecting Monitor with Interface
- As left picture, after unplugging the
original LCD cable, plug the supplied
the monitor.
-Connect the unplugged original LCD
cable to the interface.
correctly the right way as described.
Page 30
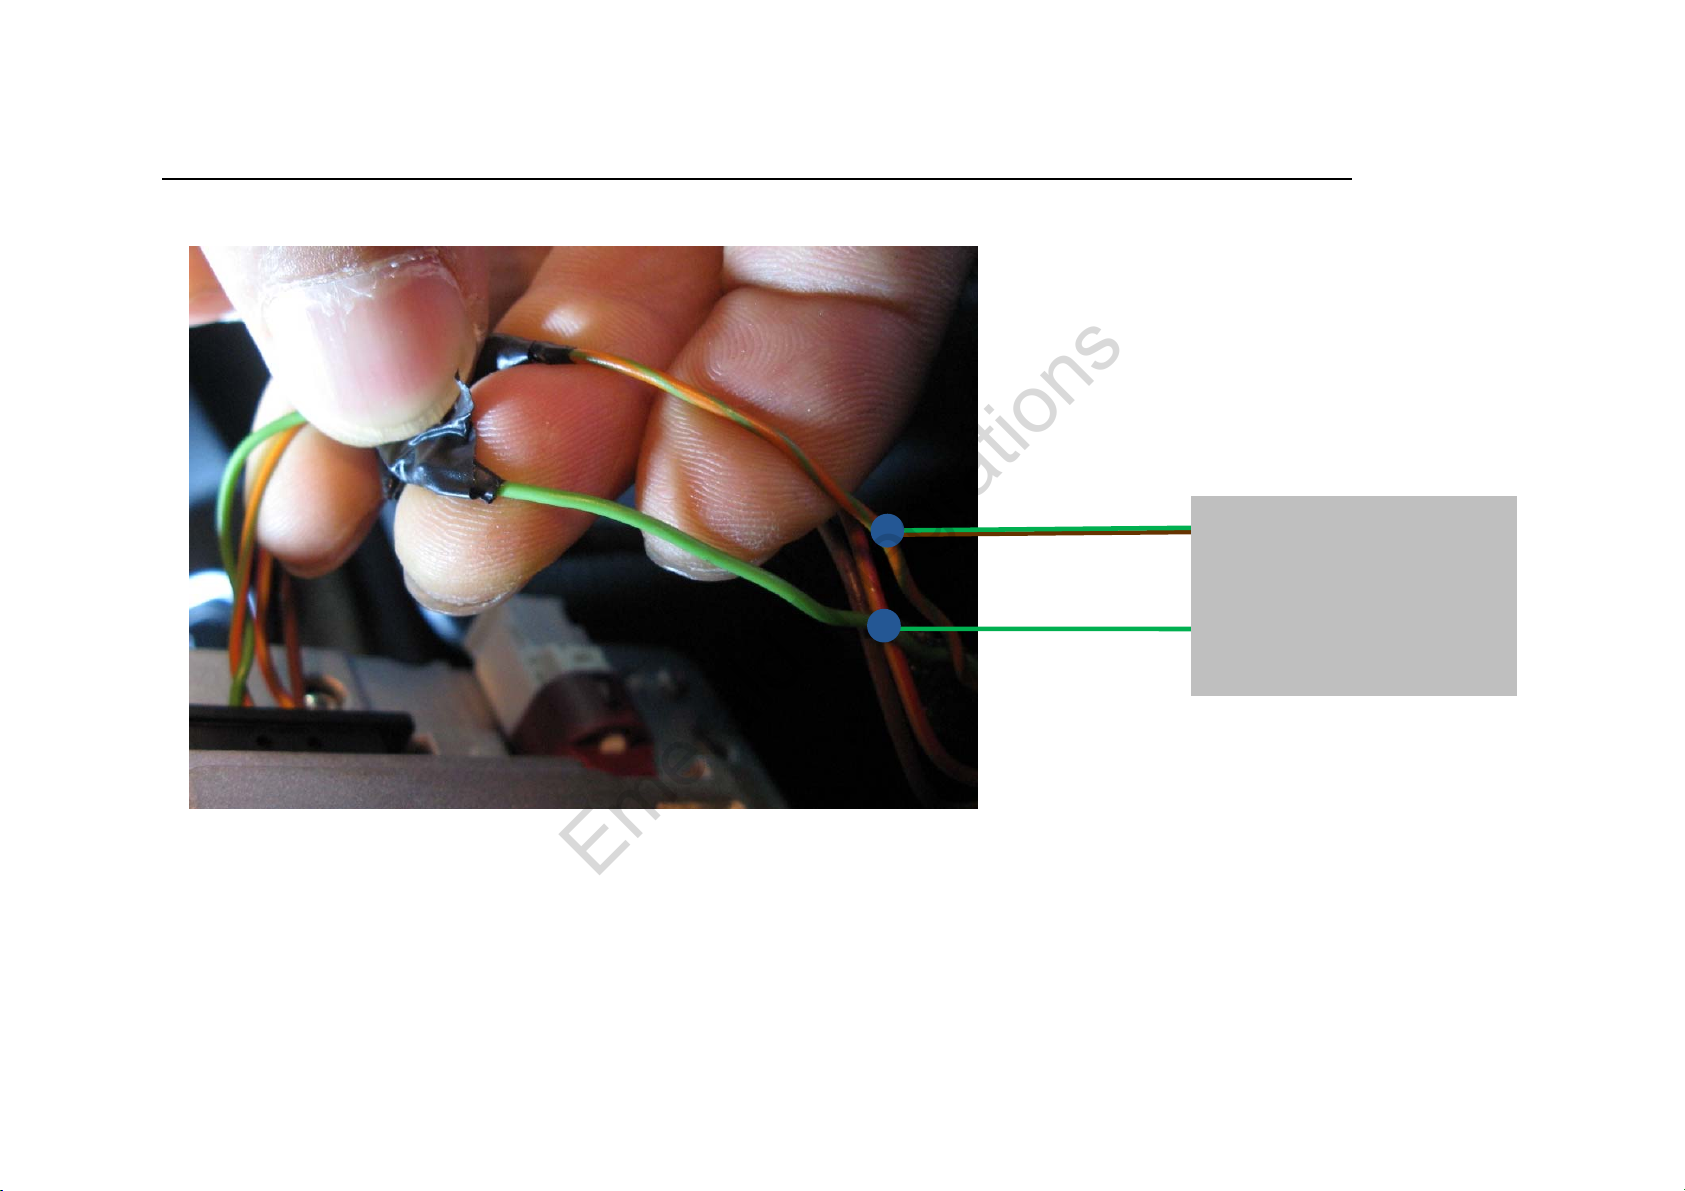
-Installation Manual
PIP BMW 09
Emerald Integrations
www.emeraldintegrations.com
CAN-High
CAN-Low
As the above picture, the offered CAN High wire (Green+Brown) to OEM CAN high
(Green+Orange) wire from car, the offered CAN Low wire (Green) to OEM CAN Low (Green)
Page 31
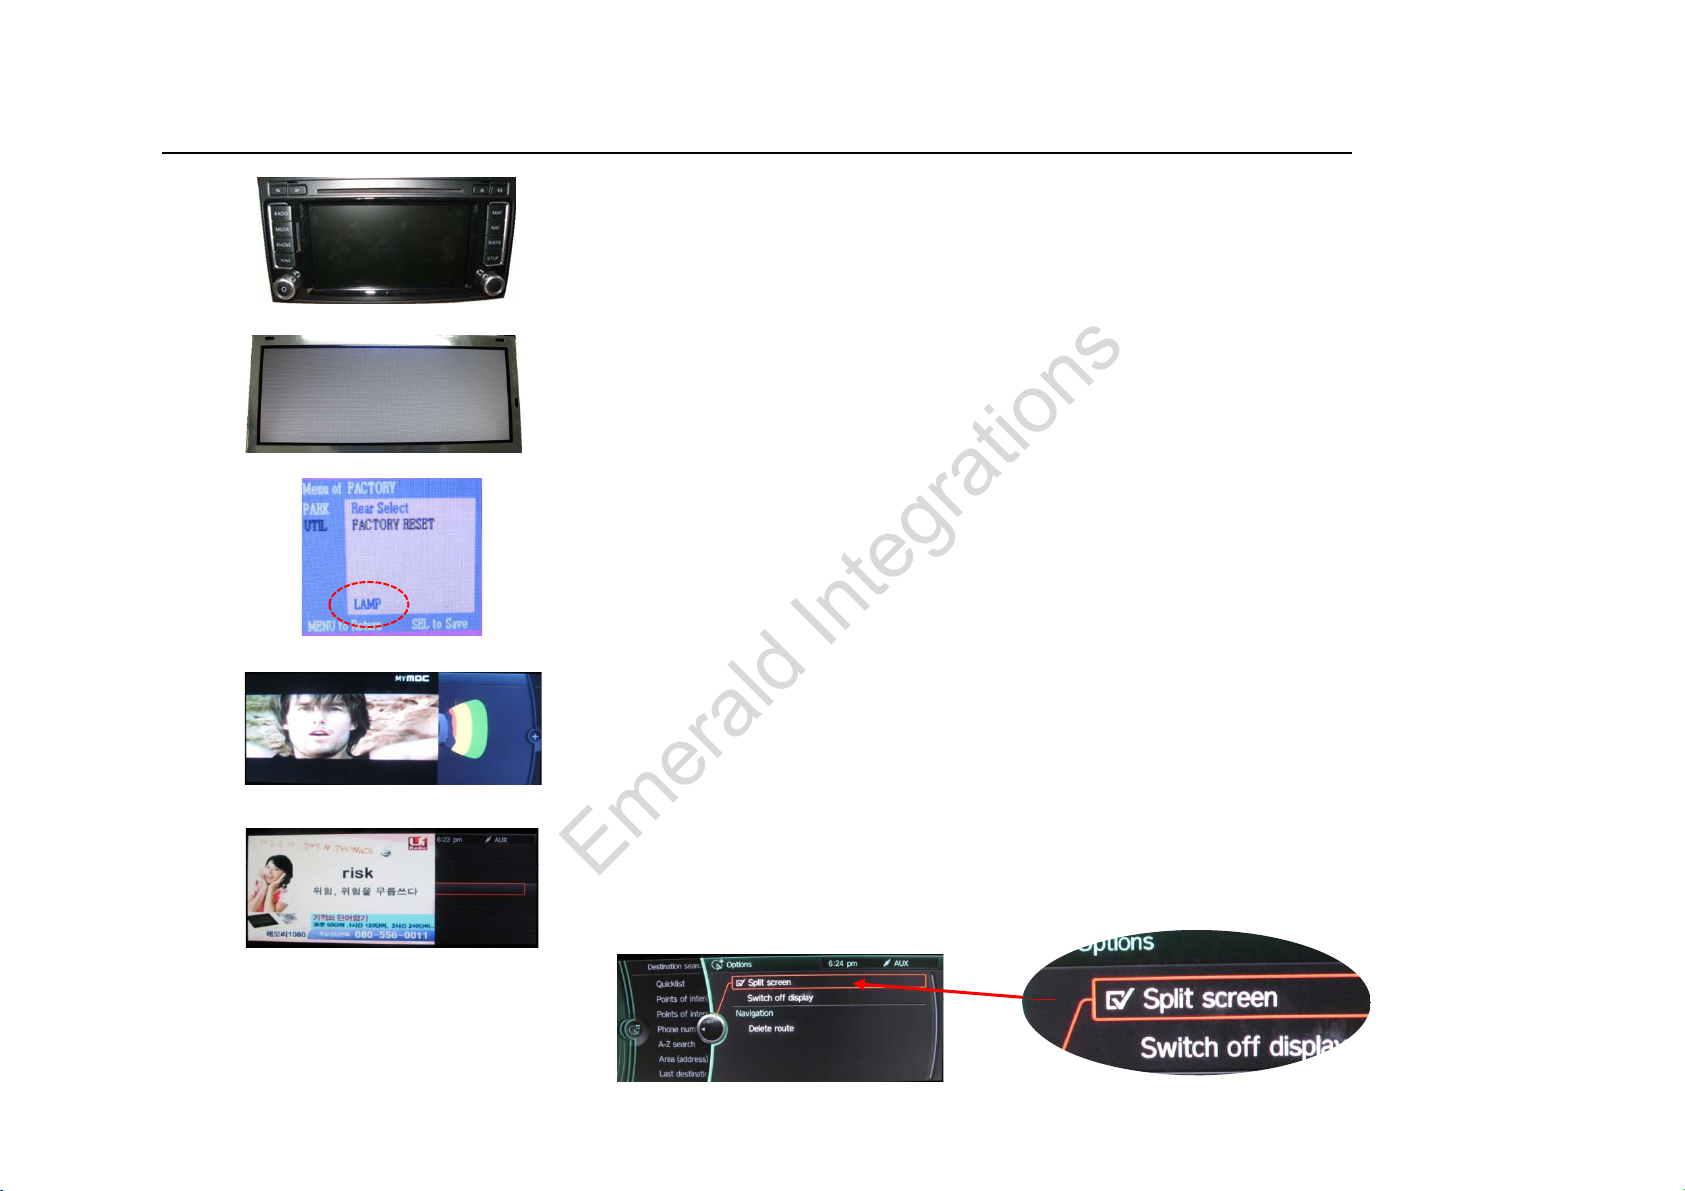
-Installation Q & A
①
Q. All I got on the screen is black
Emerald Integrations
www.emeraldintegrations.com
A. Check second LED lamp of the interface is on, if not,
check A/V sources connected are working well. (Second lamp
indicates AV sources connected works well.)
Check interface connection has been done well.
②
Q. Screen only displays white like left picture.
A. Check LCD out cable is connected well, if this status keeps,
inform to manufacturer.
Q. Rear CAM does not appear, when car is in reverse after CAN wiring.
③
A. Operate “FACTORY MODE” like left picture, then select “UTIL Rear Select”
If it is set as “LAMP”, change it to “CAN” by remote or keypad.
※ LAMP : In case of connecting “Rear-C” wire of Power Cable to Rear Lamp in
CAN : In case of detecting Rear Cam thru CAN signal. (CAN must be wired)
.
vehicle.
④
⑤
Q. After moving gear to “P” or “D” from “Reverse”, I can’t get navigation, but
half PDC Image in the screen.
- Once, you starts driving, the screen displays navigation right away, this is not an
system error.
Q. After setting PIP function, I got only half OEM image at the right in the screen.
- This is not an error, just caused by user’s setting mistake, user should set to
“Split Screen” in the OEM menu.
Page 32
-Installation Q & A
Check LED lamps in the interface, if it is not on, check power cable
⑧
Q. Unwanted A/V mode is displayed. (A/V source switching order
OEM
>RGB
>AV1
>AV2
>AV3)
Emerald Integrations
www.emeraldintegrations.com
⑥ Q. I can not switch A/V sources
A. Check IR or Ground cable connection.
.
⑦ Q. Displayed image color is not proper (too dim or not suitable color)
A. Try to select “INITIAL” in OSD menu, if it does not work, inform to manufacturer.)
:
A. Check DIP Switch Setting.
⑨ Q. OEM image is not displayed.
A. Check interface’s LCD In/Out cable connection. If the status keeps on, inform to manufacturer.
-
-
-
-
 Loading...