

Page 1
Everything you need
as an EMDR therapist
EMDR Kit Wireless | ENGLISH MANUAL
Model 4
v.1
www.emdrkit.com
Page 2

ENGLISH MANUAL (model 4)
Thank you for your purchase!
We hope you will enjoy working with the EMDR Kit.
To be used with model 4
The EMDR Kit should be used only by trained EMDR therapists.
ATTENTION
Visit our website for the most recent versions of this manual,
instruction video’s and and frequently asked questions.
2
Page 3

ENGLISH MANUAL (model 4)
Table of contents
1 Introduction 4
2 Downloading and installing the EMDR Kit app 5
2.1 Android 5
2.2 iOS (Apple) 5
3 Setting up connection with the EMDR Kit 6
3.1 Connecting the Light Tube 6
3.2 Connecting the Pulsators 7
3.3 Connecting the Headphone 8
3.4 Shutting down and battery saving 9
3.5 Reconnecting 9
4 Using the EMDR Kit 10
4.1 General usage information 10
4.2 Using the Light Tube 11
4.3 Using the Pulsators 11
4.4 Using the Headphone 12
5 Practical information 13
5.1 Charging 13
5.2 Cleaning 13
5.3 Blocking incomming calls & messages 14
5.4 Using multiple EMDR Kits in one location 14
5.5 Usage advise 14
5.6 Power information 14
6 Liability, warranty & Damage and defects 15
6.1 Liability 15
6.2 Warranty 15
6.3 Damage and defects 15
3
Page 4

ENGLISH MANUAL (model 4)
1 Introduction
This manual contains all the necessary information to operate the EMDR Kit in a safe and enjoyable
way. Please read this information carefully. If anything is unclear or if you have any questions, please
visit our website www.EMDRKit.com.
For convenience, this manual will refer to a tablet in explanations. However, the EMDR Kit can be used
with either a smartphone or a tablet.
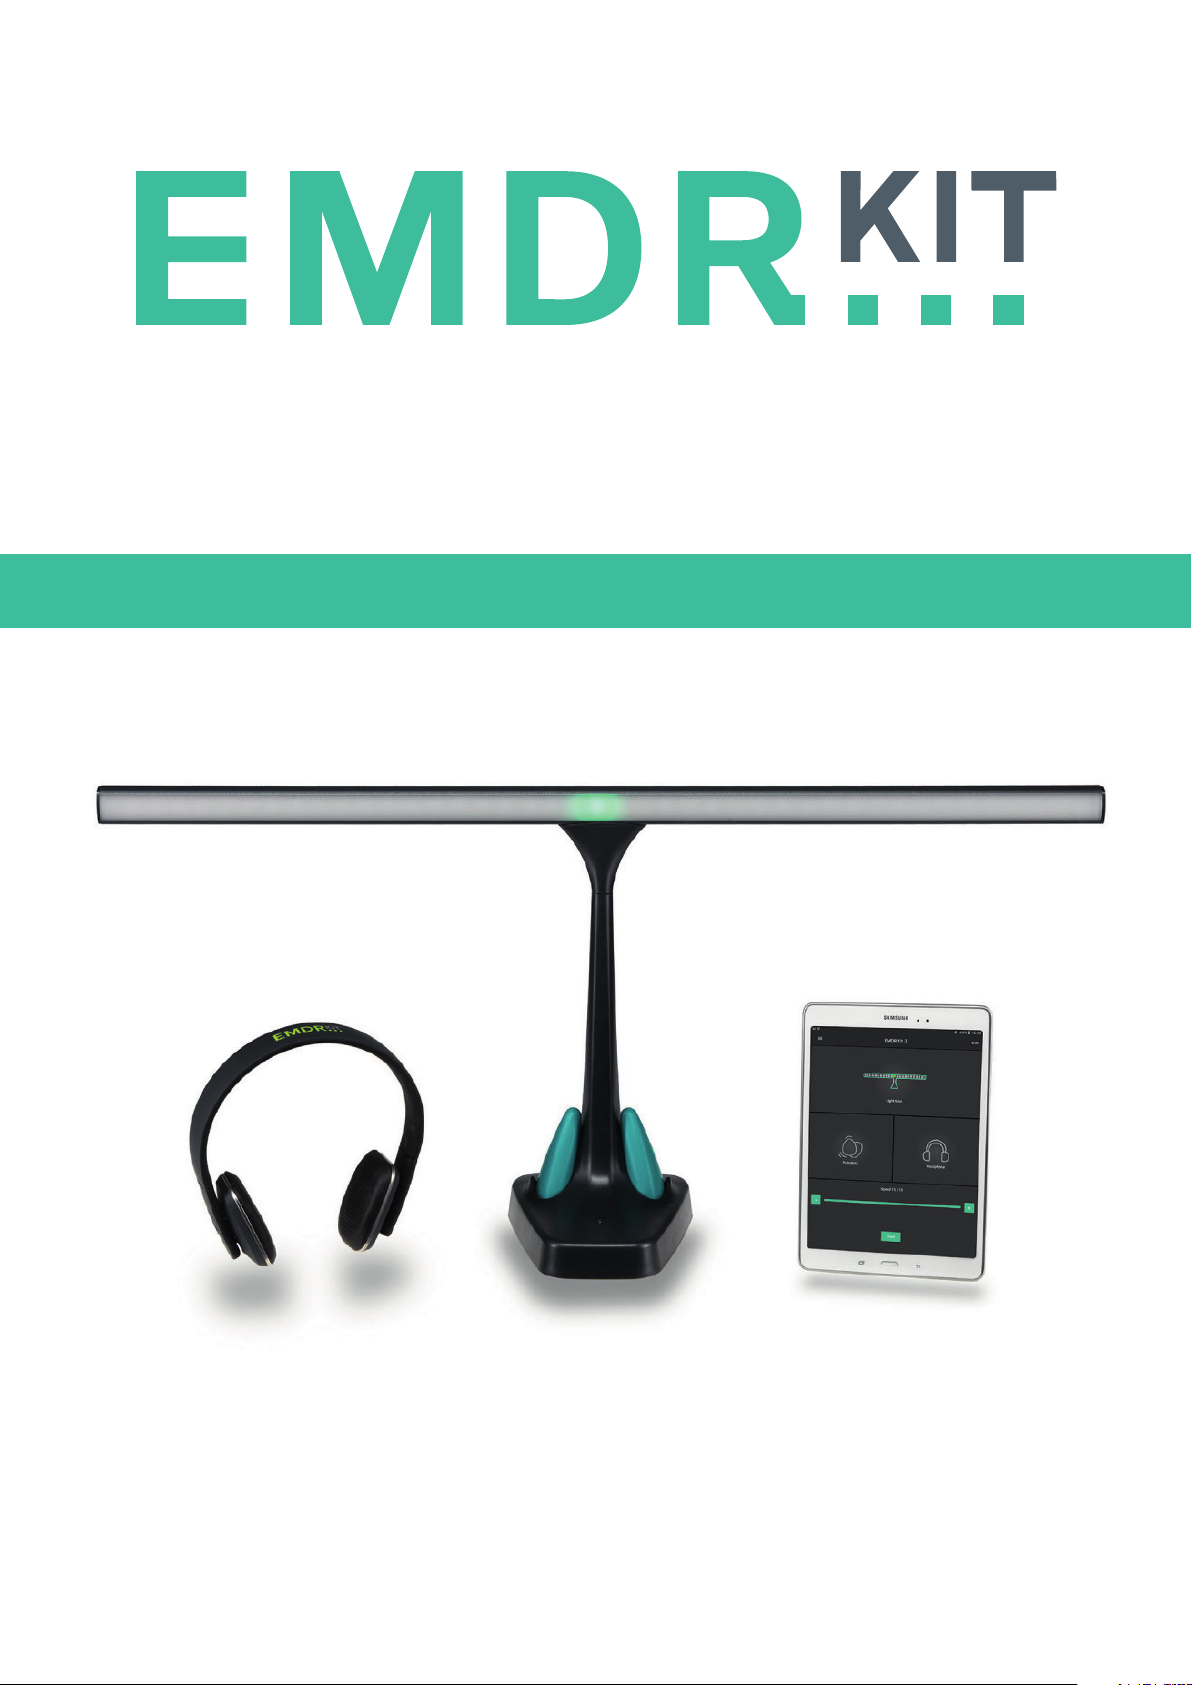
The EMDR Kit Wireless set consists of the following parts:
• Light Tube • Pulsators (2x)
• Headphone • Adapter (2x)
• EMDR Kit app (free to download) • Carrying case (optional)
• Tablet stand (optional)
1. To control the EMDR Kit, you must use an app that has been specifically developed for the EMDR
Kit. This app is free to download for Android in the Play Store or for iOS in the AppStore. The system
requirements are as follows: iOS 8.0 or up (iPhone 4s/iPad 3th generation or up). Android 4.3 or up.
For Android there are also additional minimum system requirements: CPU speed: 1600 GHzRAM: 2 GB.
2. Before using the EMDR Kit for the first time, charge the Light tube for a minimum of 12 hours. Also
place the Pulsators in the docking stations in the base of the Light Tube so that they can charge as
well. It is crucial that all parts of the EMDR Kit are charged before usage.
3. The Light Tube, Headphone and Pulsators work with Bluetooth technology. Turn on Bluetooth on
your tablet if you want to work with the EMDR Kit. Also make sure you allow access to location. This
is needed to work with Bluetooth.
4. The Light Tube and Pulsators only need to be connected once. If the app is closed and opened
again the next time, it will automatically restore the connection to the last parts used.
4
Page 5
ENGLISH MANUAL (model 4)
2 Downloading and installing the EMDR Kit app.
2.1 Android
To download and install the EMDR Kit app on an Android device, folow these steps:
• Open the Play store.
• Search for ‘EMDR Kit’ in the searchbar.
• Select the icon of the EMDR Kit app.
• Click on INSTALL to install the app. The download starts immediately.
• Open the app. If prompted, consent/activate the following:
Bluetooth
Access location
The minimum system requirements of Android devices are as follows:
• Android 4.3 or higher
• Processor speed: 1600 GHz
• RAM (memory): 2 GB
2.2 iOS
To download and install the EMDR Kit app, folow these steps:
• Open the App store.
• Search for ‘EMDR Kit’ in the searchbar.
• Select the icon of the EMDR Kit app.
• First click on DOWNLOAD to download the app.
• Then click INSTALL to install the app.
• Open the app. If prompted, consent/activate the following:
Bluetooth
Access location
The minimum system requirements of Android devices are as follows:
• iOS 8 or higher (iphone 4s or newer).
5
Page 6
ENGLISH MANUAL (model 4)
3 Setting up connection with the EMDR Kit
3.1 Connecting the Light Tube
Make sure Bluetooth is turned on on your tablet. When connecting, hold your tablet close to the
Light Tube.
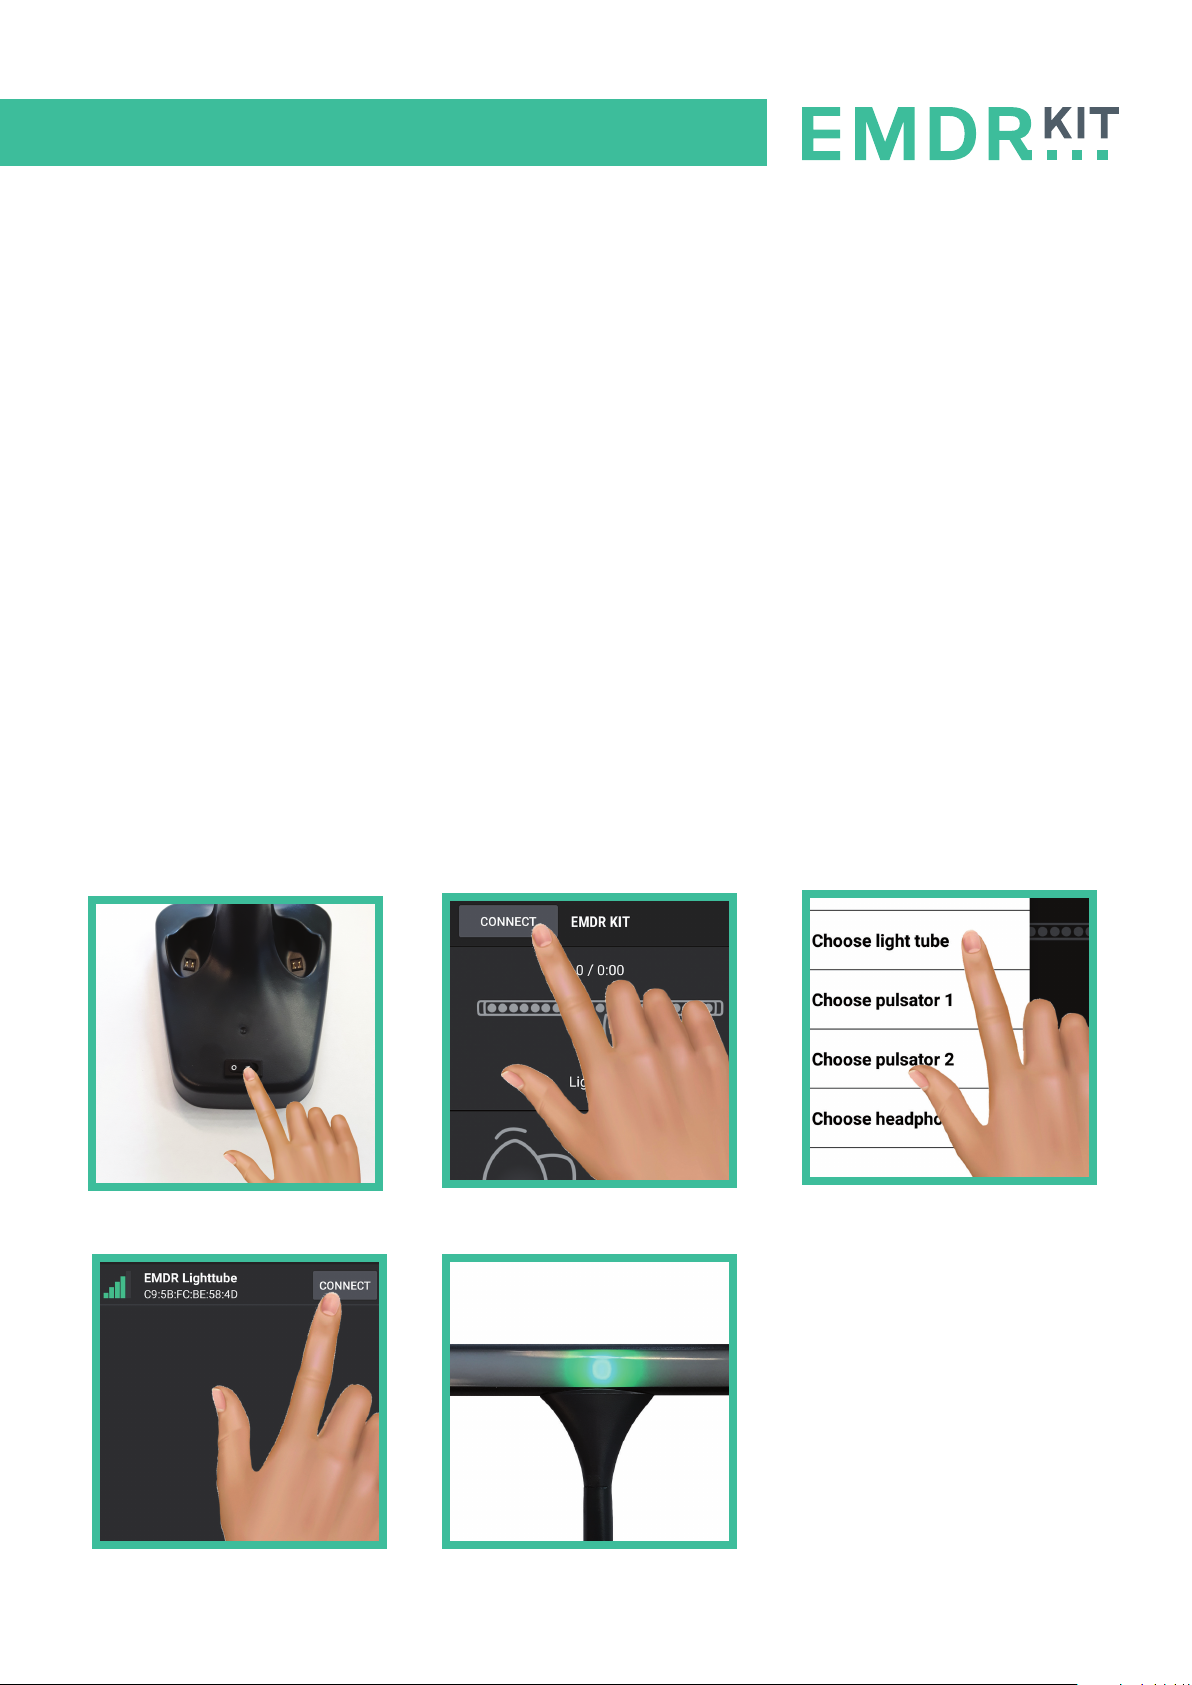
To connect with the Light Tube, follow these steps:
1. Turn the Light Tube ON with the switch that is positioned on the foot of the Light Tube.
The I down means ON and 0 down means OFF.
The Light on the back of the Light Tube will flash blue, indicating that it is ready to connect.
2. Click on the CONNECT button in the top left corner of the screen.
3. Click on the option: Choose Light Tube.
4. Select the Light Tube with the strongest Bluetooth signal (indicated by green bars).
5. The Light Tube is now connected. A luminous dot should appear in the middle of the Light Tube.
1
2
3
4
5
6
Page 7
ENGLISH MANUAL (model 4)
2
3.2 Connecting the Pulsators
Make sure Bluetooth is turned on on your tablet. When connecting, hold your tablet close to the Pul-
sators.
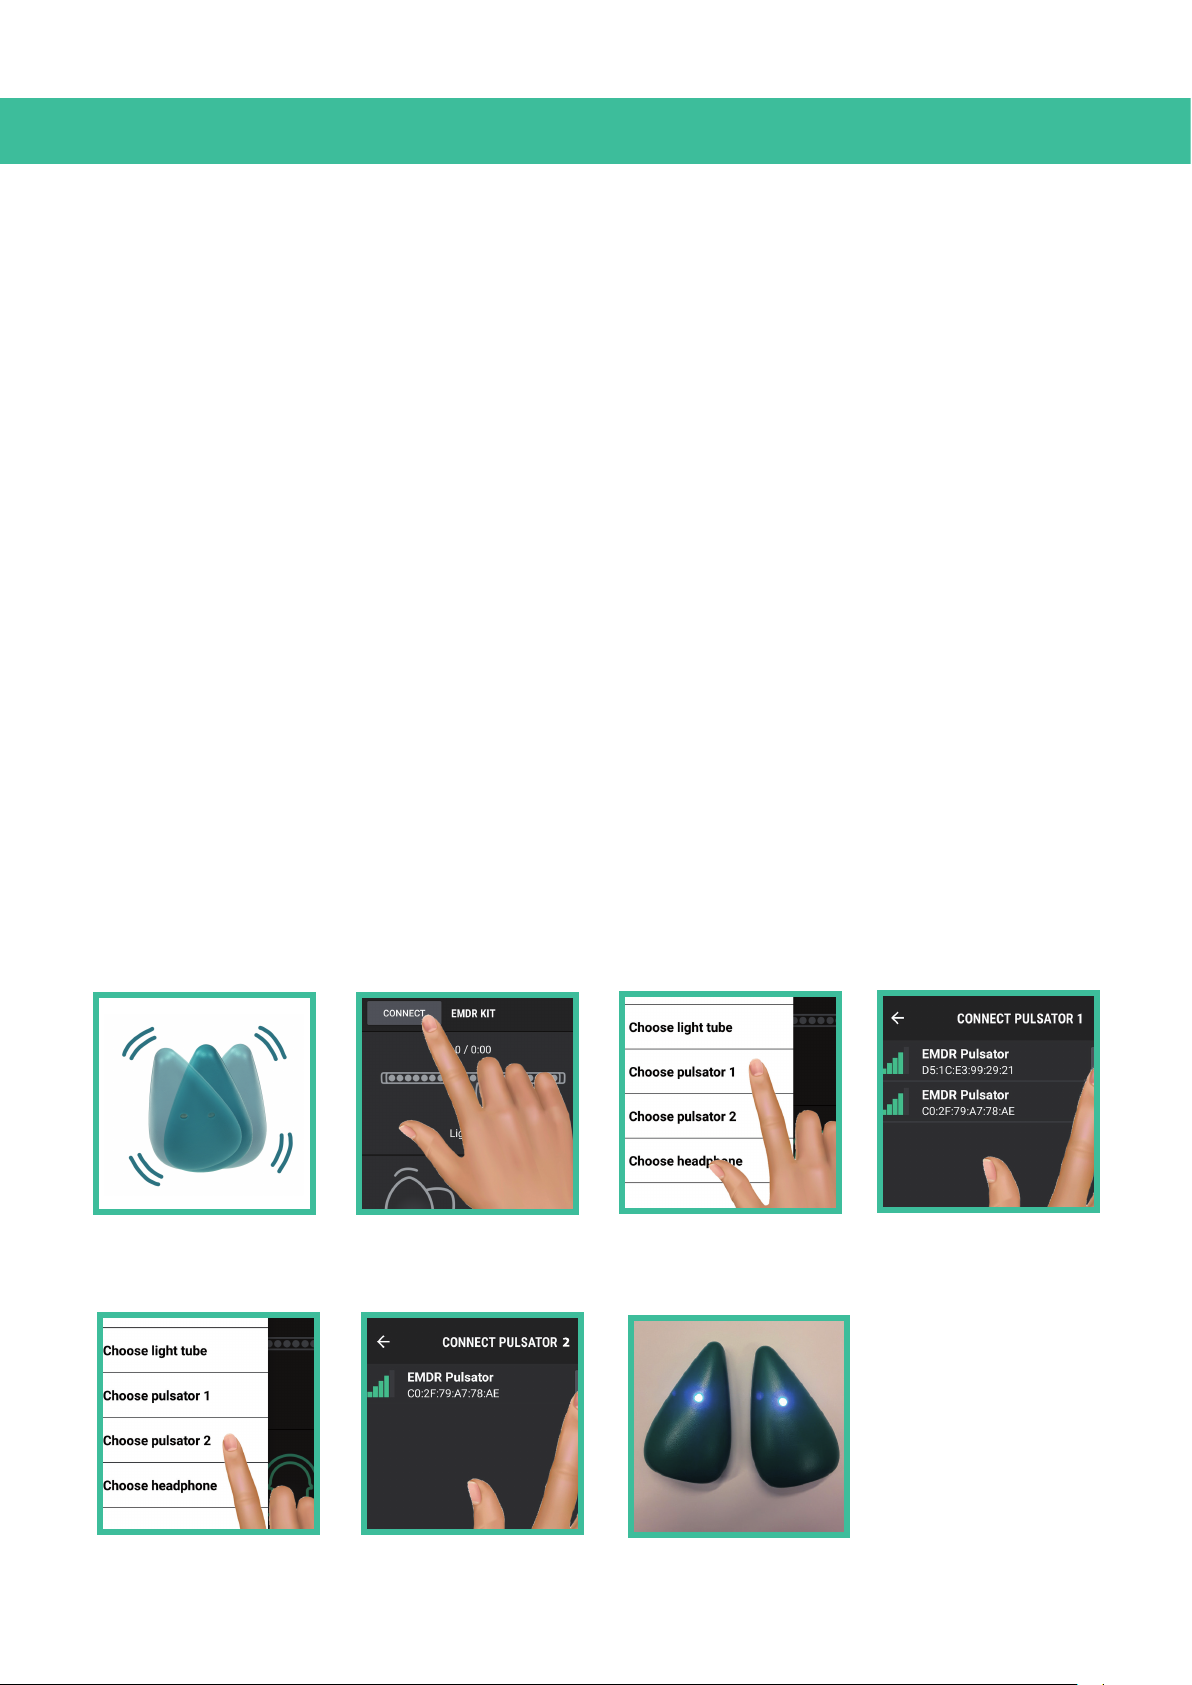
To connect with the Pulsators, follow these steps:
1. Shake the pulsators. This will activate them and they will be able to connect. The Lights on the
Pulsators will flash blue, indicating they are ready to connect.
The Pulsators will be able to connect for a period of 30 seconds. After that they will shut down
again. If you did not connect with them yet, simply shake them to activate them again.
2. Click on the CONNECT button in the top left corner of the screen.
3. Click on the option Choose Pulsator 1.
4. Select one of the Pulsators with the strongest Bluetooth signal indicated by the green bars.
5. Then click on Choose Pulsator 2.
6. Select the other Pulsator.
7. The Pulsators are now connected. To verify if the Pulsators are connected, take them out of the
dockingstations. When connected, the lights on the Pulsators turn a stable Blue.
1
2
3
4
5
6
7
7
Page 8
ENGLISH MANUAL (model 4)
EMDR Kit
EMDR Kit
EMDR Kit
2
2
3.3 Connecting the Headphone
Make sure Bluetooth is turned on on your tablet! When connecting, hold your tablet close to the
Headphone.
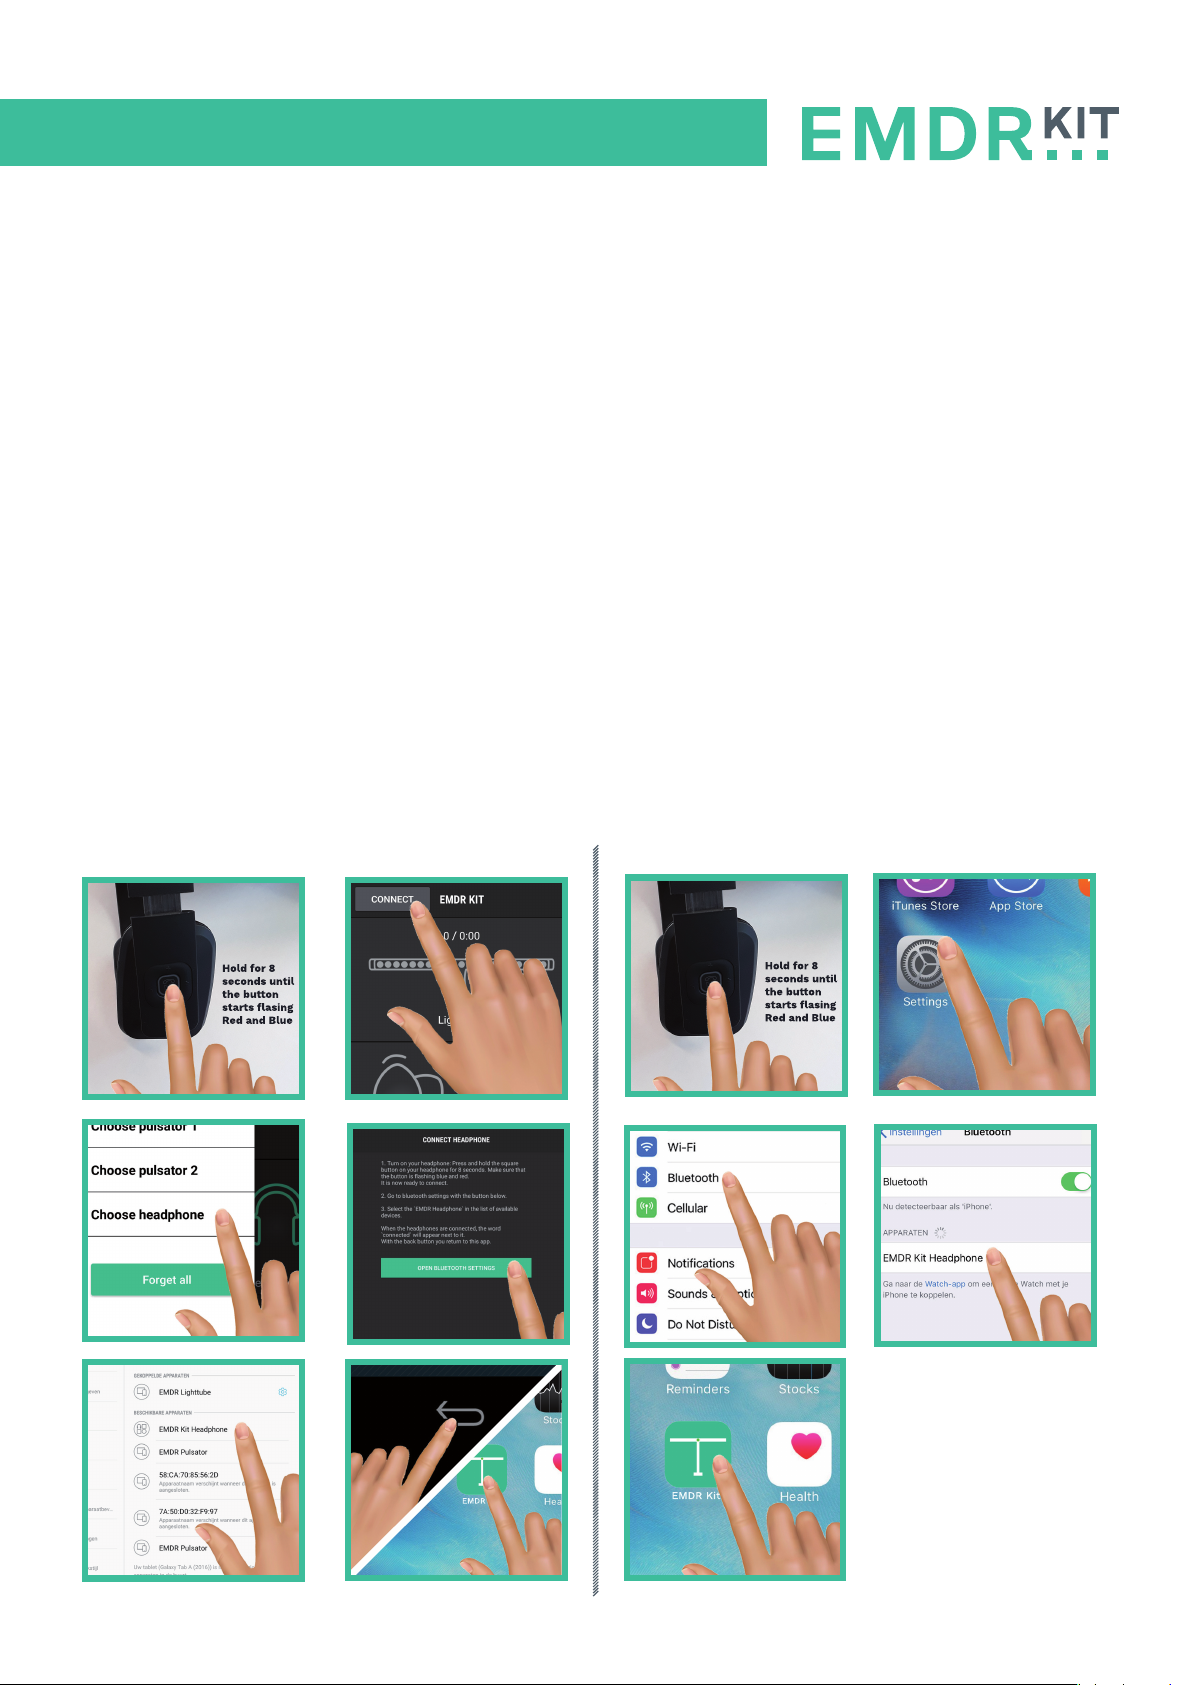
To connect with the Headphone, follow these steps:
1. Hold the button on the side of the Headphone for 7-8 seconds until the light on the head
phone starts flashes blue and red. The Headphone is now ready to connect.
2a. For Android users: Click on the CONNECT button in the top left corner of the app. Click on the
option: “Choose Headphone”. Then Click on “OPEN BLUETOOTH SETTING”.
2b. For iOS users: Close the app, open settings on the tablet and open Bluetooth settings.
3. Select the EMDR Kit headphone in the list “My devices”. When the Headphone is connected,
the text “connected” will appear next to it. When the Headphone is connected, all sound pro
duced by the tablet will come out of the Headphone when it is turned on.
5. You can now return to the EMDR Kit app. Click on the back button on your tablet or close the
settings and open the app normally.
Android: iOS:
1
2
1
2
3
5
8
4
6
3
5
4
Page 9
ENGLISH MANUAL (model 4)
3.4 Shuing down and baery saving
If you close the app, the parts will stay connected to your tablet.
It is important to switch off the EMDR Kit after use, for example at the end of the working day. In this
way you ensure that the batteries last longer and the equipment is available again for your
colleagues. Go through the following steps:
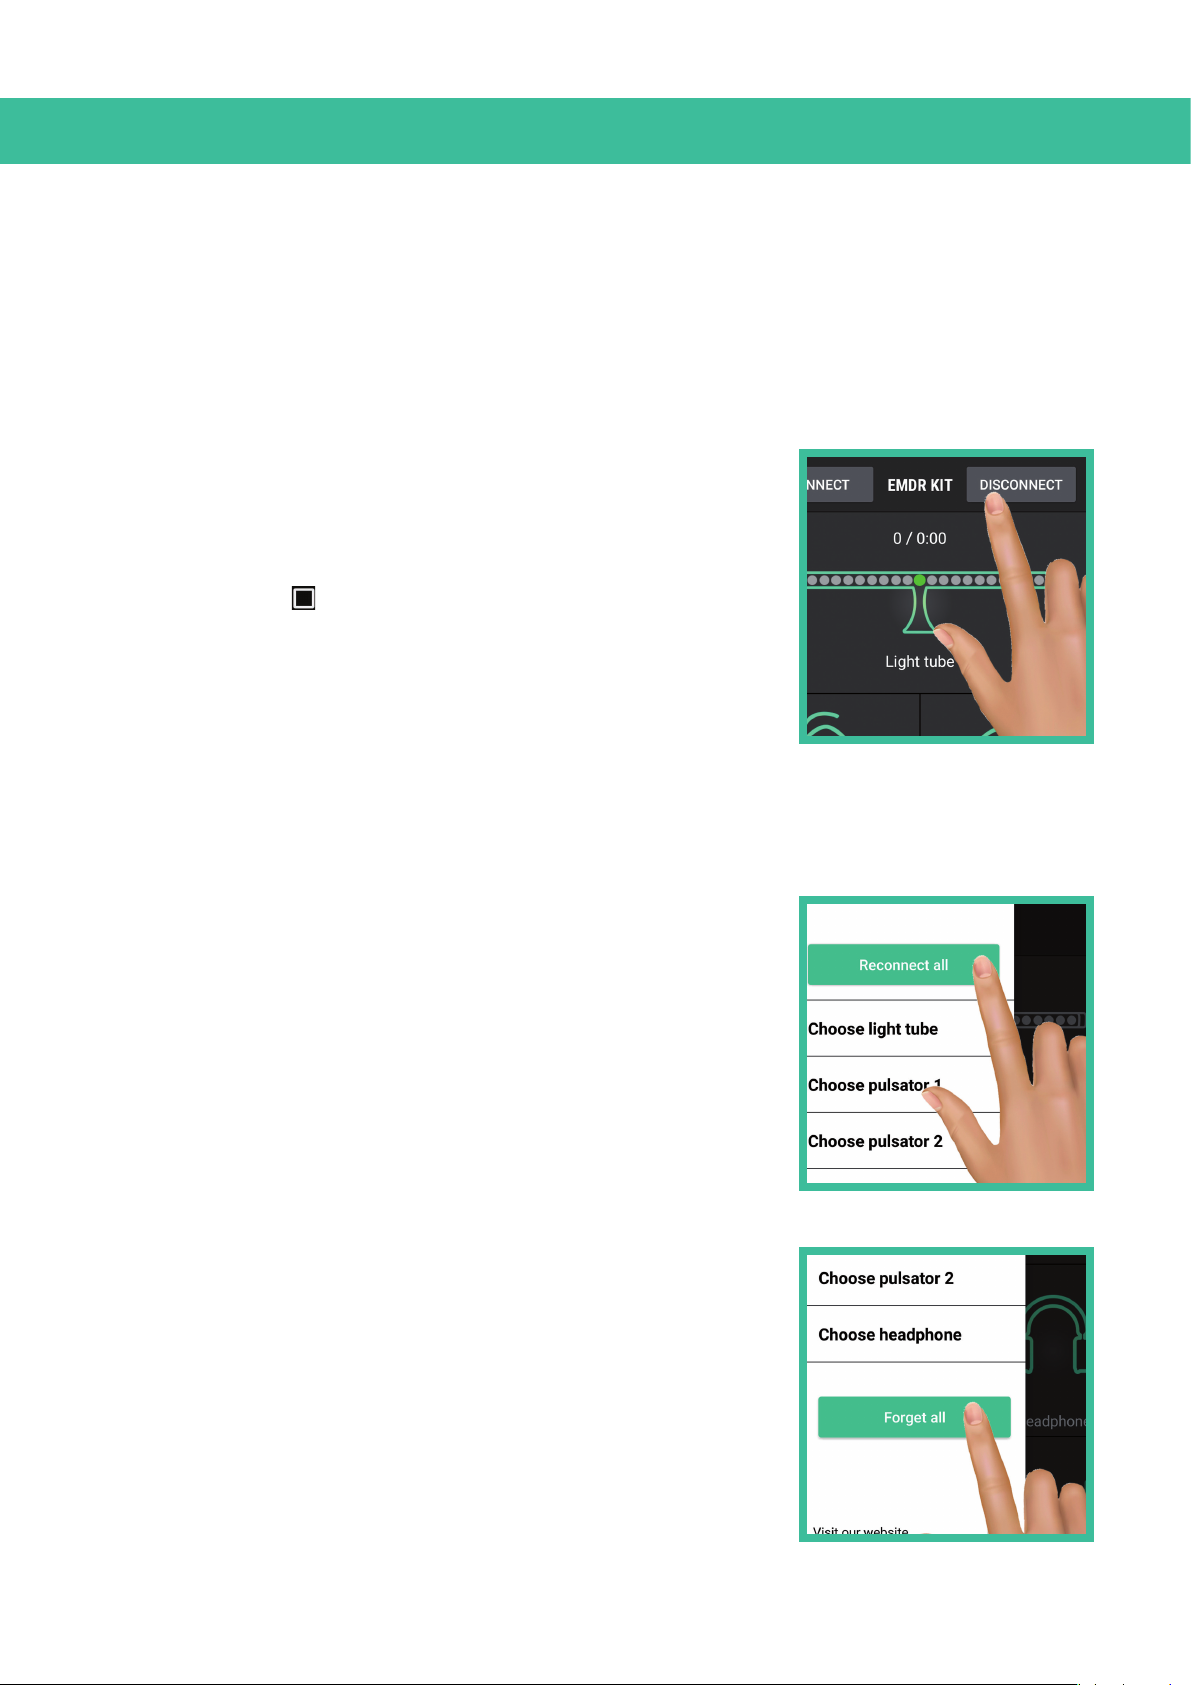
1. Press the DISCONNECT button in the main menu of the app to
disconnect the components from your tablet.
Instead of using the disconnect button you can also close the app
completely. With Android devices you can do that by pressing the
overview button and closing the app. With iOS you can do this
by quickly pressing the home button twice in succession and then
swiping the app away.
2. Turn off the Light Tube with the on/off button on the base of the
Light Tube. The Pulsators will flash blue for 30 seconds and then
switch off automatically.
3. You can switch off the Headphone by briefly holding down the
button on the Headphone.
3.5 Reconnecting
To reconnect, open the app. It will automatically connect to the parts
you previously connected to if they are available. Please note that the
Light Tube and Pulsators must be switched on to be able to connect.
Switch on the Light Tube using the on/off switch and shake the pul-
sators so that they are activated.
With the RECONNECT ALL button in the CONNECT menu you can
reconnect to all previously connected components when they have
been disconnected. This also happens automatically when you open
the app.
The FORGET ALL button in the CONNECT menu clears all currently
connected devices. This may be necessary if you want to connect to a
different Light Tube, for example at a different location.
9
Page 10
ENGLISH MANUAL (model 4)
4 Using the EMDR Kit
4.1 General usage information
All parts of the EMDR Kit can be used simultaneously or separately.
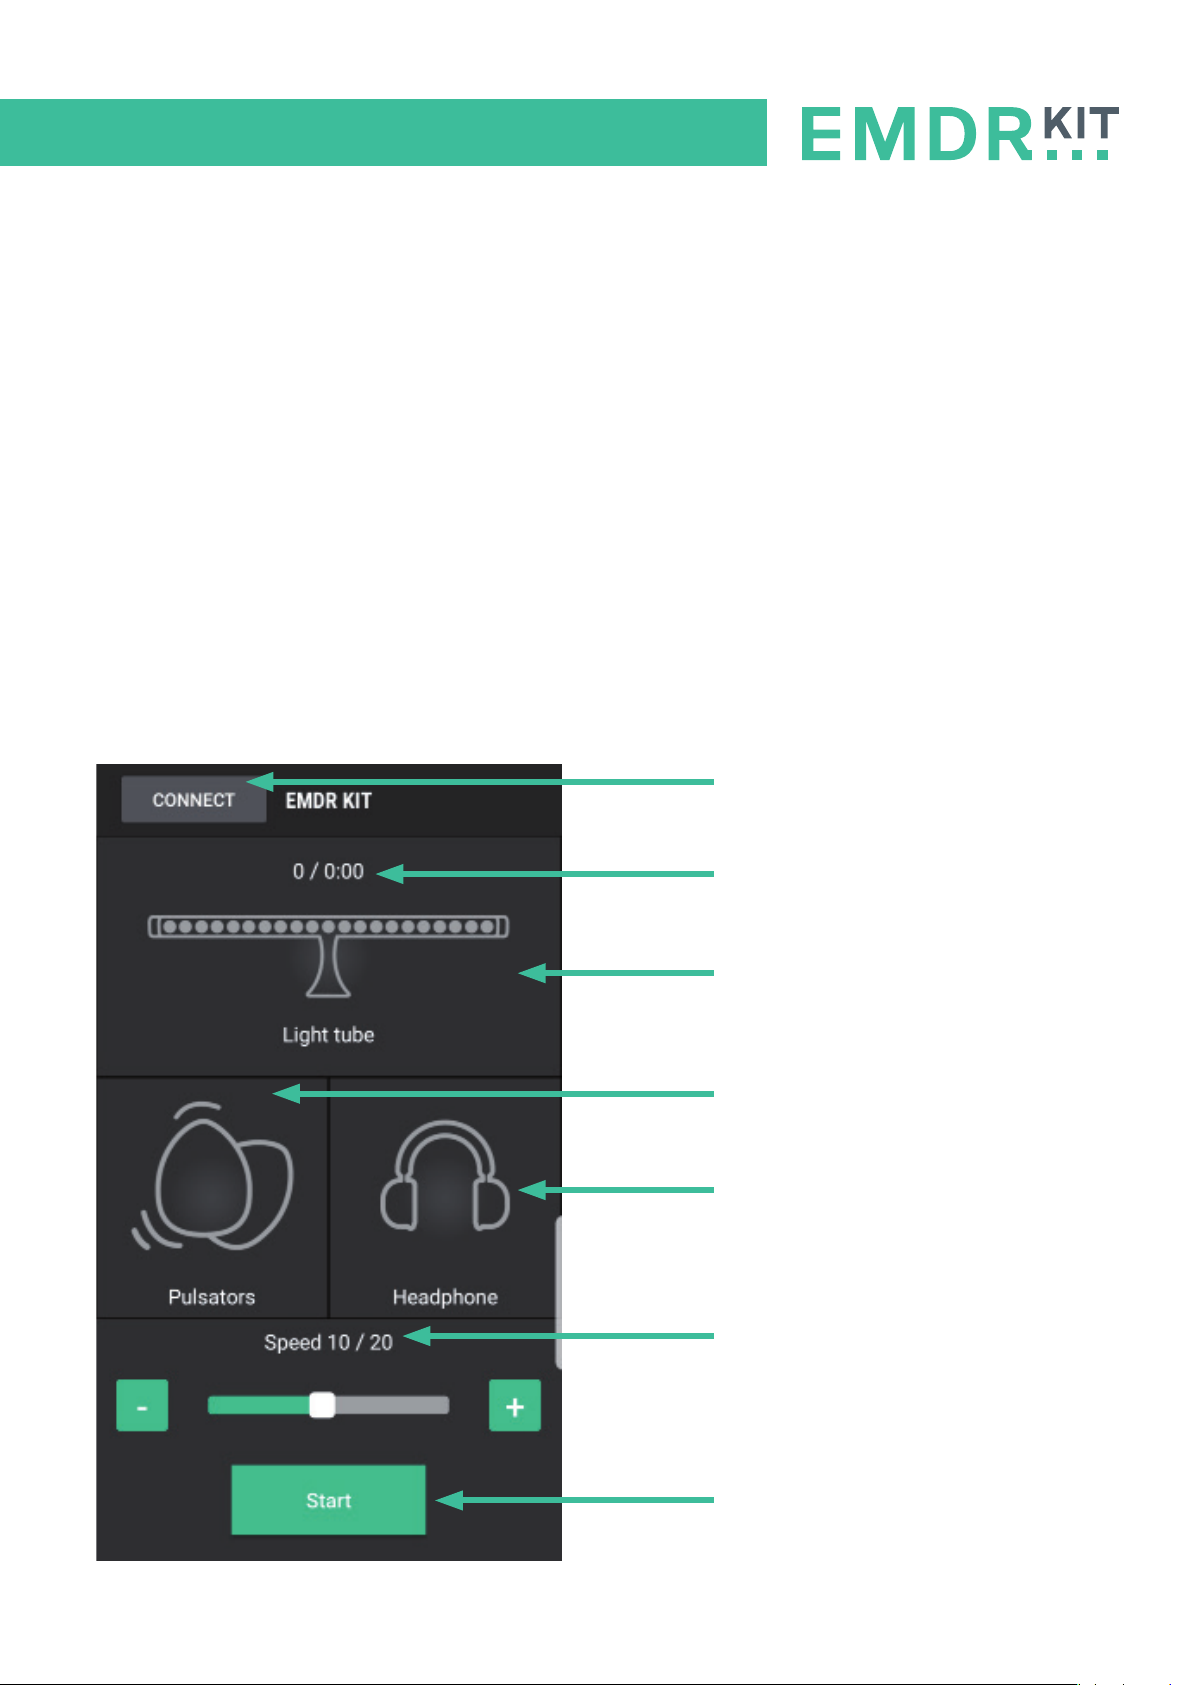
To start a session, press on Start. All functions that are connected and turned ON will start working.
The time of the set as well as the pass count are indicated in the meain menu.
Use the +/- buttons to adjust the speed of the stimuli.
When an icon in the main menu is grey, that part is currently not connected.
When an icon in the main menu is green, that part is connected and turned on.
When an icon in the main menu is orange, that part is connected, but turned off.
Tap the icon of to enter the corresponding part’s sub-menu. There you can turn it on/off and adjust
other settings
Connect menu
Pass counter / Set timer
Light Tube
(Click to enter sub-menu)
Pulsators
(Click to enter sub-menu)
Headphone
(Click to enter sub-menu)
10
Speed of the stimuli
(Adjust with the -/+ buttons)
Start / Stop button
Page 11
ENGLISH MANUAL (model 4)
4.2 Using the Light Tube
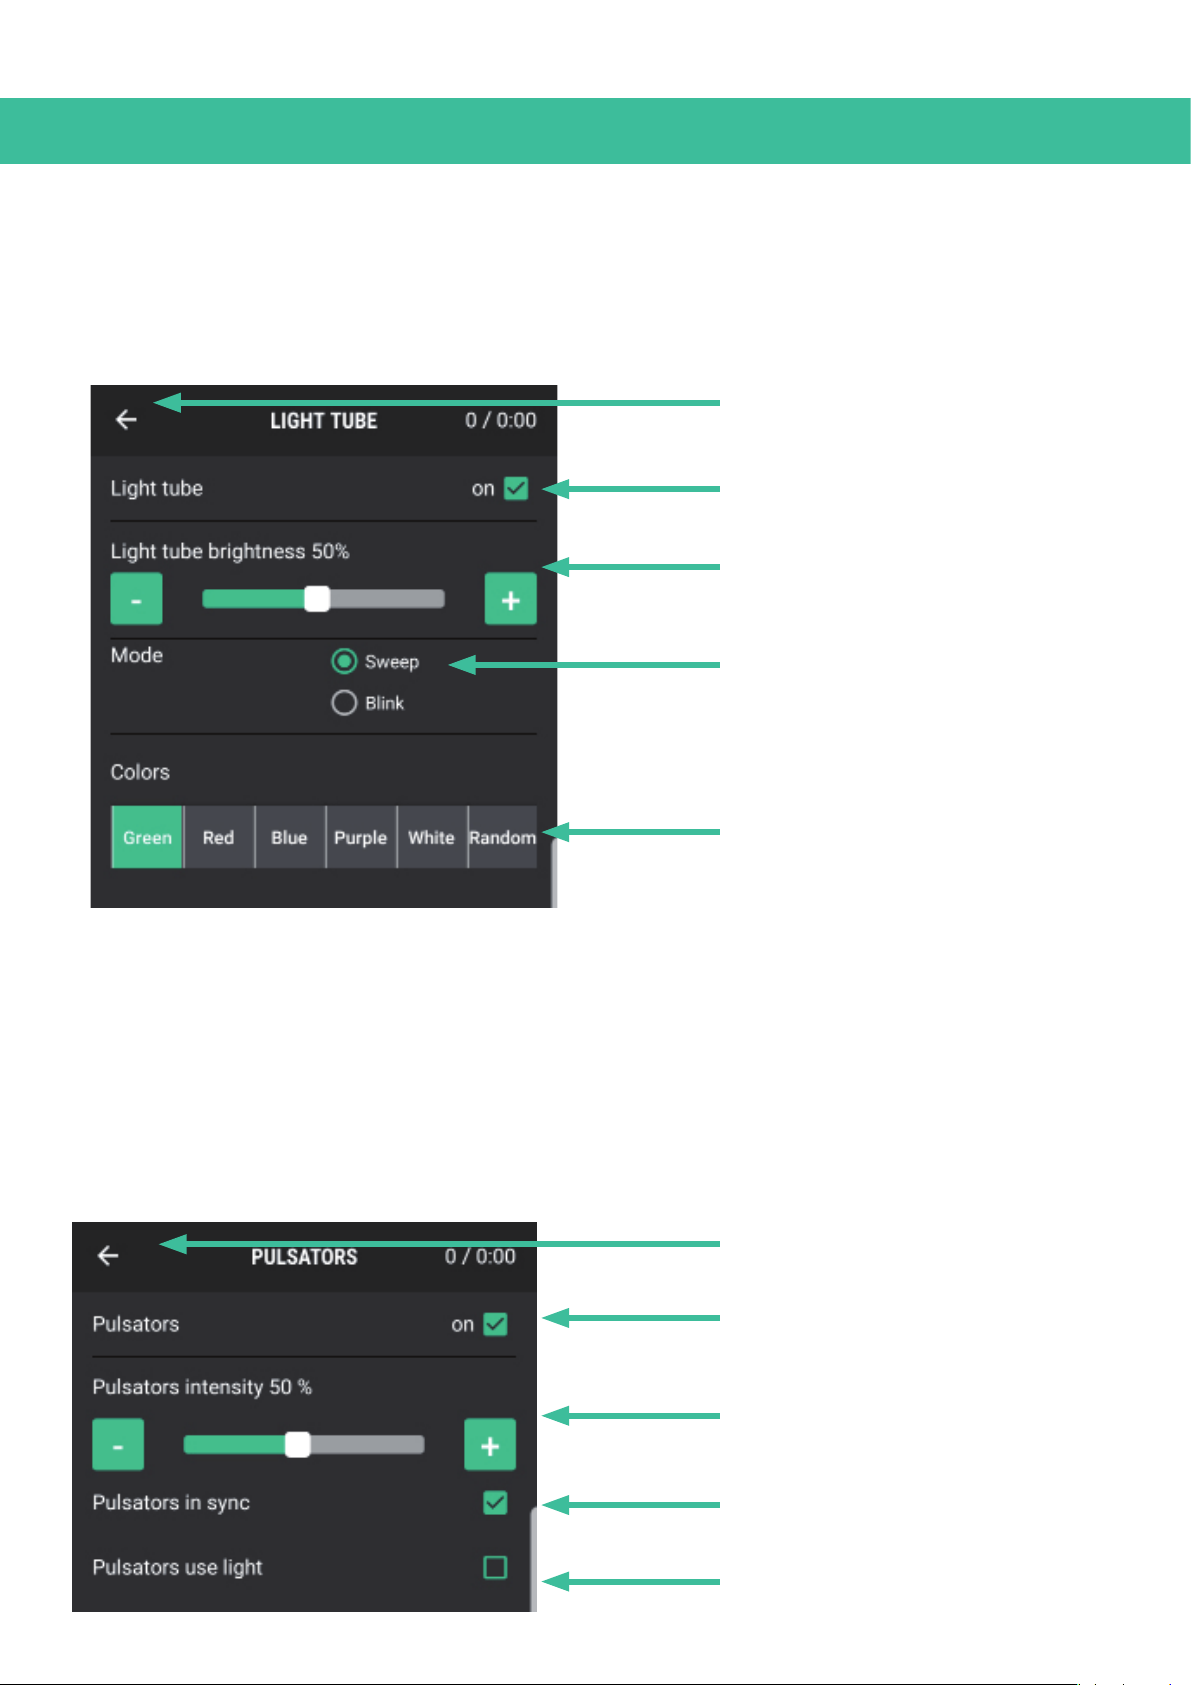
In the main menu, click on the Light Tube icon to open the Light Tube’s sub-menu. All of the settings
for the Light Tube can be adjusted in this menu.
Back button
Turn Light Tube on/off
Light Tube brightness
(Adjust with the - and + buttons)
Light Tube mode
Light Tube color
4.3 Using the Pulsators
In the main menu, click on the Pulsator icon to open the Pulsator sub-menu. In this menu, you can
switch the Pulsators on and off and adjust their intensity.
Furthermore, you can set the speed of the Pulsators independently from the Light tube with the ‘Pul-
sators in sync’ option and you can let the LED lights blink with the selected rhythm.
Back button
Turn Pulsators on/off
Pulsator intensity
(Adjust with the - and + buttons)
Pulsators in/out sync with Light Tube
(Turn off to adjust speed seperately)
Light stimuli on Pulsators
11
Page 12
ENGLISH MANUAL (model 4)
4.4 Using the Headphone
Once the Headphone is connected to your tablet (see 3.3), the next time you turn on Bluetooth and
the Headphone is turned ON your tablet will automatically connect with the Headphones again.
To turn on the Headphone, simply briefly press the big button on the Headphone. When held closely
or over your ears, you can hear an uprising tone indicating the headphone is turned ON. When you
press the button and you hear a descending tone, it indicates it is shutting down.
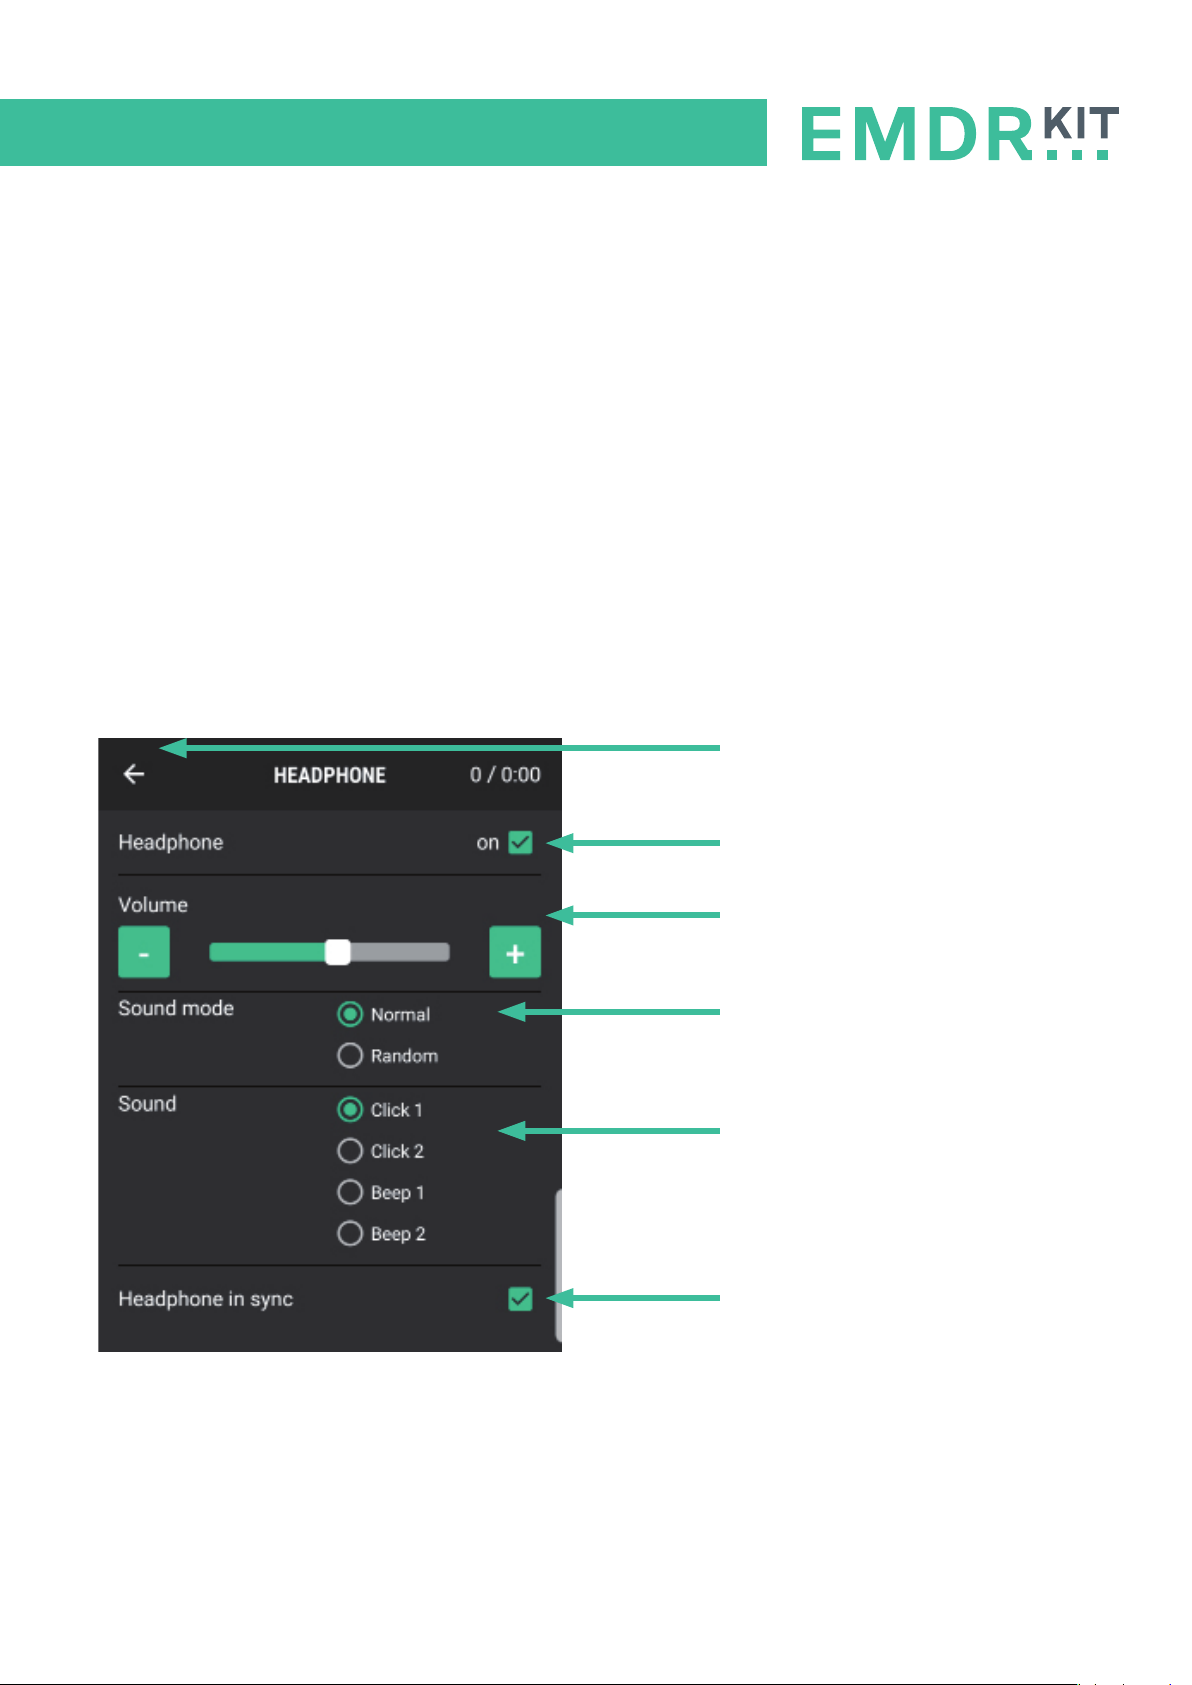
Click on the Headphone icon in the main menu of the app to open the corresponding submenu. The
settings for the headphones can be adjusted in this menu. This allows you to adjust the volume and
choose from different sounds. You can also choose a random interval sound and you can set the
speed of the headphones independently of the Lightbar with the option ‘Headphone in sync’.
Back button
Turn Sound on/off
Sound Volume
(Adjust with the - and + buttons)
Sound mode
- Normal for regular interval
- Random for irregular interval
Sound type
Sound in/out sync with Light tube
(Turn off to adjust speed seperately)
Please note: The volume of the Headphone can be adjusted in the app as well as on the
tablet itself. Make sure the sound on the tablet is set at maximum volume, so the Headphone’s volume can be controlled, using only the app.
12
Page 13

ENGLISH MANUAL (model 4)
5 Practical information
5.1 Charging
Before using the EMDR Kit for the first time, we advise to charge the parts for 12 hours.
Connect the adapter supplied to the back of the Light Tube and place the Pulsators in the docking-
stations positioned on the base of the Light tube. The LED indicators will start blinking red when
charging and will turn green when fully charged.
When the battery of the Light Tube is empty, but you want to use it anyway, connect the Light tube
to the adapter. The Light tube is then ready for use.
Please note: When the Pulsator batteries are empty, they must be re-charged before further use. So
always ensure that these are charged before use.
You can charge the Headphone with the included mini-USB charger.
Increase the life of the batteries by not charging unnecessarily long.
Light Tube and Pulsators LED color indicators
The LED’s on the Pulsators and Light tube signal their status with the following colors:
Blue, flashing : Ready to connect
Blue, stable : Connected
Green, stable : Battery Charging complete
Red, flashing : Battery Charging
Red, stable : Battery running empty
Blue, flasing with Green or Red in between: Pulsators are charged/charging and ready to connect.
Headphone LED color indicator
Blue & Red, flashing: Ready to connect
Blue, Flashing: Connected, Ready to use.
Red: Battery Charging
5.2 Cleaning
Regularly clear any dust on the contact points of the pulsators and in the dockingstations to prevent
charging problems. You can do this by using a tissue with some alcohol.
13
Page 14

ENGLISH MANUAL (model 4)
5.3 Blocking incomming calls & messages
We advise to put your smartphone or tablet in flight mode, to avoid being disturbed during a session.
Flight mode will prevent incoming calls or notifications during a session.
Don’t forget to switch Bluetooth on again.
5.4 Using multiple EMDR Kits in one location
There are a number of things to keep in mind when using multiple EMDR Kits in one location.
1. Ensure the parts are disconnected or that the app is exited properly at the end of a session or at
the end of the day. This ensures that the colleague who wants to use the EMDR Kit after you can
connect his/her tablet to it.
2. Always reset the existing connections when you start work with a different EMDR Kit or when
you change your location. To do this, use the options in the connection menu (for connecting, see
Chapter 3). This ensures that the correct parts are connected to the correct EMDR Kit.
3. If the EMDR Kit is set up correctly for connecting, always select the three parts with the strong-
est Bluetooth signal. This prevents connecting to a Light Tube or Pulsator from another EMDR Kit.
4. With multiple EMDR Kits, it is recommended to keep one tablet for each kit.
5. Each part has a unique code. In the connection menu, you can see the unique codes for each
part. You could write these down so you know which parts to connect. Such a code might look
like this: E0:0A:47:82:79:EE.
5.5 Usage advise
• This product is designed for trained EMDR therapists and should only be used by EMDR thera-
pists. The EMDR Kit is not designed to be used as a self-help tool.
• Keep the EMDR Kit out of reach from children, except of course if it is used by an EMDR therapist
that is using it to treat a child.
• Do not pick the EMDR Kit up at the Light Tube but instead grab it at the neck.
• If you want to transport the EMDR Kit, use the EMDR Kit bag that you can order on our website.
5.6 Power information
• Only use the adapters that were provided and do not manipulate/modify the adapters in any way.
• EMDR Kit Light Tube power: 12V 4.8 watt 0.4A
Light tube adapter:
Input: 100-220V 50/60Hz 0.3A
Ouput: 12V 0.6A
Headphone adapter:
Input: 100-240V 50/60Hz 0.15A
Output 5V 1.0A
14
Page 15

ENGLISH MANUAL (model 4)
6 Liability, Guarantee & Defects
6.1 Liability
The EMDR Kit is designed to support EMDR practitioners while givingEMDR treatment. The therapist
is always responsible for the outcome of treatment in which the EMDR Kit is deployed. The develop-
er or seller of the EMDR Kit can not be held responsible for results of the treatment and any client
complaints. The EMDR Kit is not designed to be used as a self-help instrument.
Read our Terms and Conditions on our website: www.emdrkit.com
6.2 Guarantee
A guarantee period of two years applies to the Light Tube, Pulsators, Headphones, adapter and carry-
ing bag. The guarantee begins on the day of delivery. Please keep your receipt or invoice.
The guarantee does not cover the following:
1. The guarantee does not cover normal wear and tear, faults caused by not handling the product
with due care, faults or damage caused by improper use of the product, including use that con-
tradicts the instructions provided with the EMDR Kit, and/or other acts for which the EMDR Kit
cannot reasonably be held responsible.
2. The guarantee does not cover faults or damage resulting from the use of the product in combi-
nation with or in connection with products, accessories, software and/or services that are not
produced or supplied by EMDR, or if the product is used in any way for which it was not intended.
3. The guarantee is not valid if the product has been opened, modified or repaired by an unauthor-
ised party, or is repaired with unauthorised parts.
4. The guarantee is not valid if the product has been exposed to moisture, damp, extreme tempera-
tures, environmental conditions or rapid changes in these conditions, corrosion, oxidation, or the
spillage of food or liquid.
6.3 Damage and defects
If your product has been damaged or shows a deficit, please contact us at [email protected].
In almost every case we can send replacement parts or help you in a other way.
Please note the following:
1. Deficits that fall under the 2 years guarantee will be replaced and we will pay for the shipment of
the package. In case of the pulsators, lightbar or controller, we would like to ask you to return the
deficit part to us. We will also pay for the shipping costs for sending the deficit part.
2. Deficits and/or damage that does not fall under the 2 years guarantee or that is caused by mis-
useor incautious use can be replaced as well. The replacement part has to be paid and also the
shipping cost has to be paid by the customer.
3. Defects of the product or incomplete delivery must always be stated within 14 days of delivery to
15
Page 16

www.emdrkit.com
 Loading...