

Page 1

1
VR
User manual
1. NOTICE
Please use original accessories such as the power adapter
Please keep the machine dry
Please preview the user manual before operation;
If suddenly the machine stopped working, press and hold the power button for 15 seconds to
force a shutdown. 10 seconds later, turn the power on again.
Please use original adapter for charging
The machine will be automatically powered on during charging even when it is already powered
off.
The blue light out on the surface case will be on during charging.
For better charging efficiency, please keep the machine in sleep mode.
When the battery status is lower than 5%, please charge up the machine. If the battery is used up
completely, please better turn the machine on after it has been charged for 10 minutes.
Use the HDMI cable to connect the device to the computer, then search for the storage disk and
transfer the target data.
Insert the TF card into the slot, and then the device will identify the TF card.
Insert 3.5mm standard headphone connector into the target interface for audio output.
Page 2
2
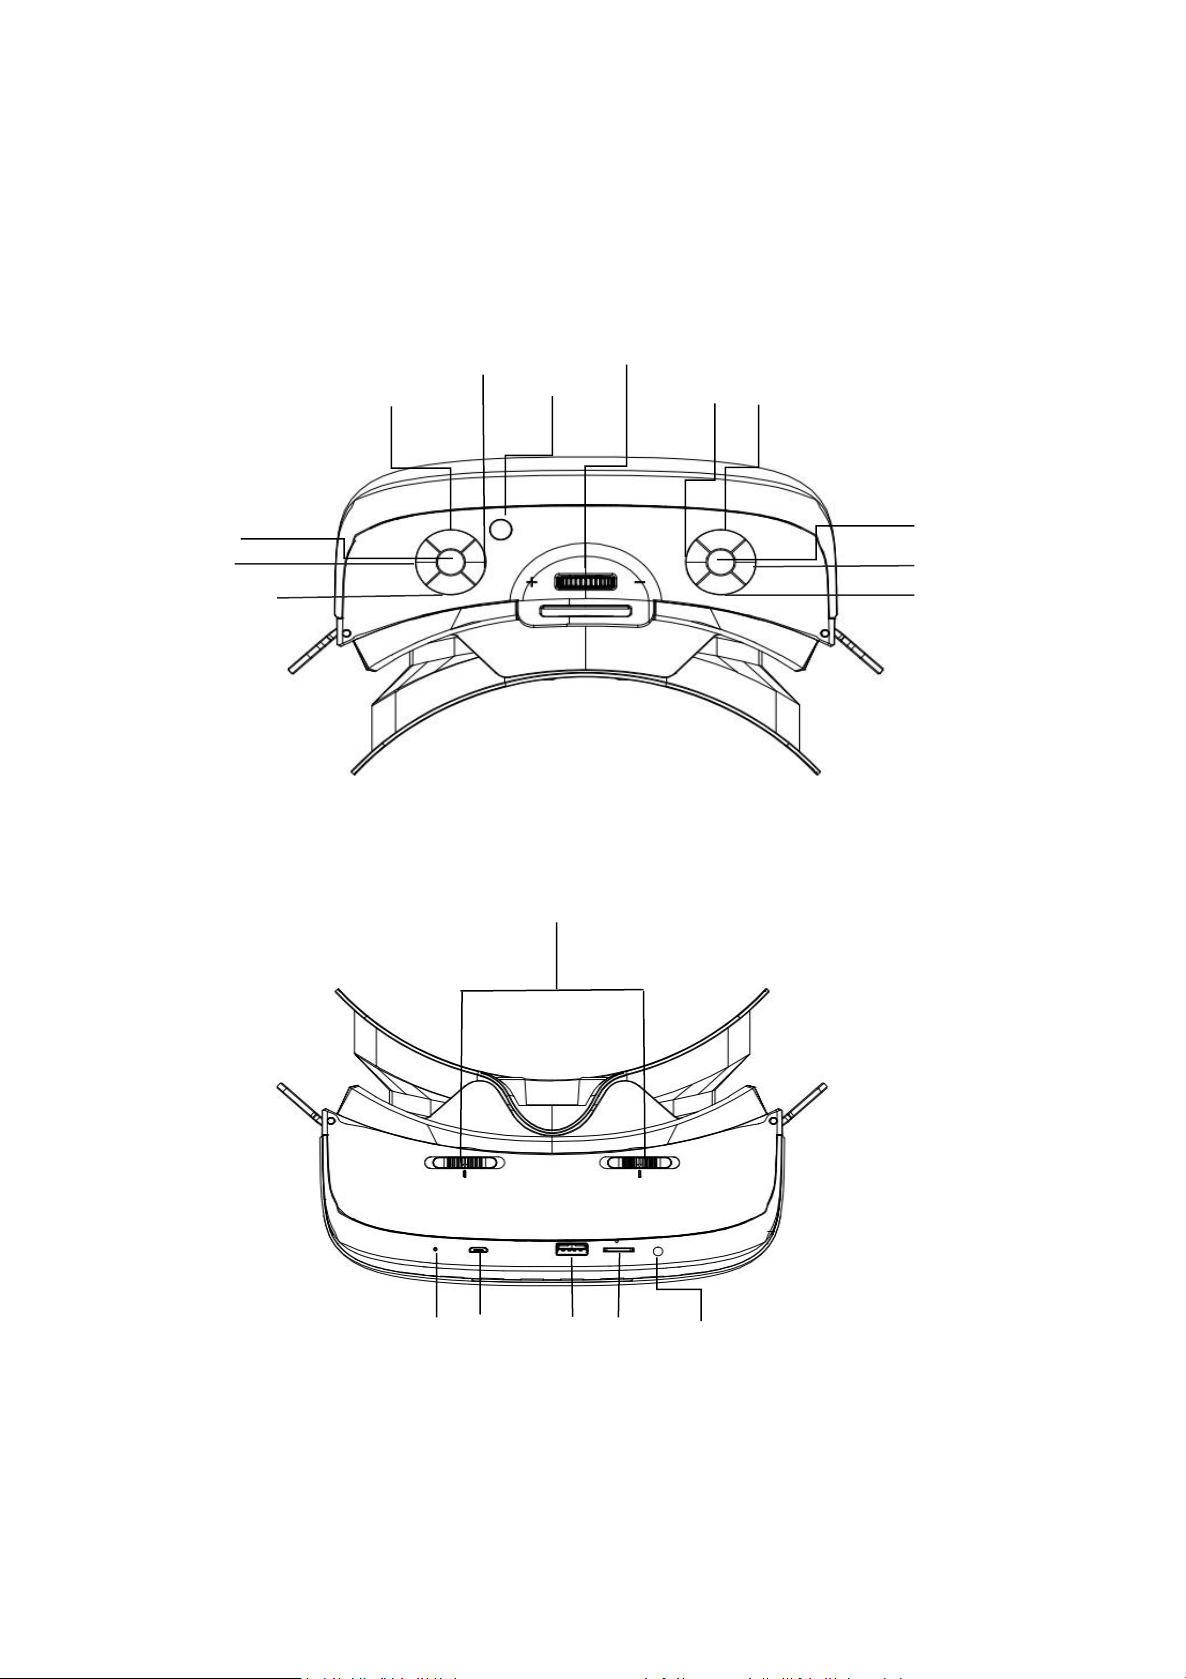
2. OPERATION GUIDELINE
Menu
Volume—
Volume+
R
Down
L
up
Back
Homepage
OK
Pupil Distance Adjustment
Indicator light
USB
USB
TF
Earphone jack
Power
Object Distance Adjustment
2.1. Function keys instruction
Power key:long pressing(3 seconds)on the key to achieve power on /off ,short pressing to
achieve sleep/wake-up action,long pressing(15 seconds)to force shutdown.
Volume key:volume up or down
Page 3

3
Up:press to select up
Down:press to select down
Left:press to select left
Right:press to select right
Ok key:press to confirm
Object distance adjustment:51mm ±5mm
Pupil distance adjustment:62mm ±5mm
TF card slot:insert TF card
USB2.0:insert USB flash disk
USB charging slot:charging and transmitting
Earphone jack:connect the earphone
Short pressing on Menu key:on / off of HMD cursor, the adjusting of brightness, the switching of
dual screen mode, and also the closing of application.
Long pressing on Menu key: reset and center the HMD display
Homepage:back to the main menu
Back: back to the previous menu
2.2 HMD
1)The HMD will be powered on after around 40 seconds, and there will be 6 main application
icons on the main menu. The calibration of Gyroscope will be working after pressing on the menu
button for 5 seconds.
2) The white dot is subject to gyro function, and can be used as the mouse cursor, Press the OK
button to confirm, or the Home button to back to main menu, or the Back button to back to the
former directory.
Page 4
4
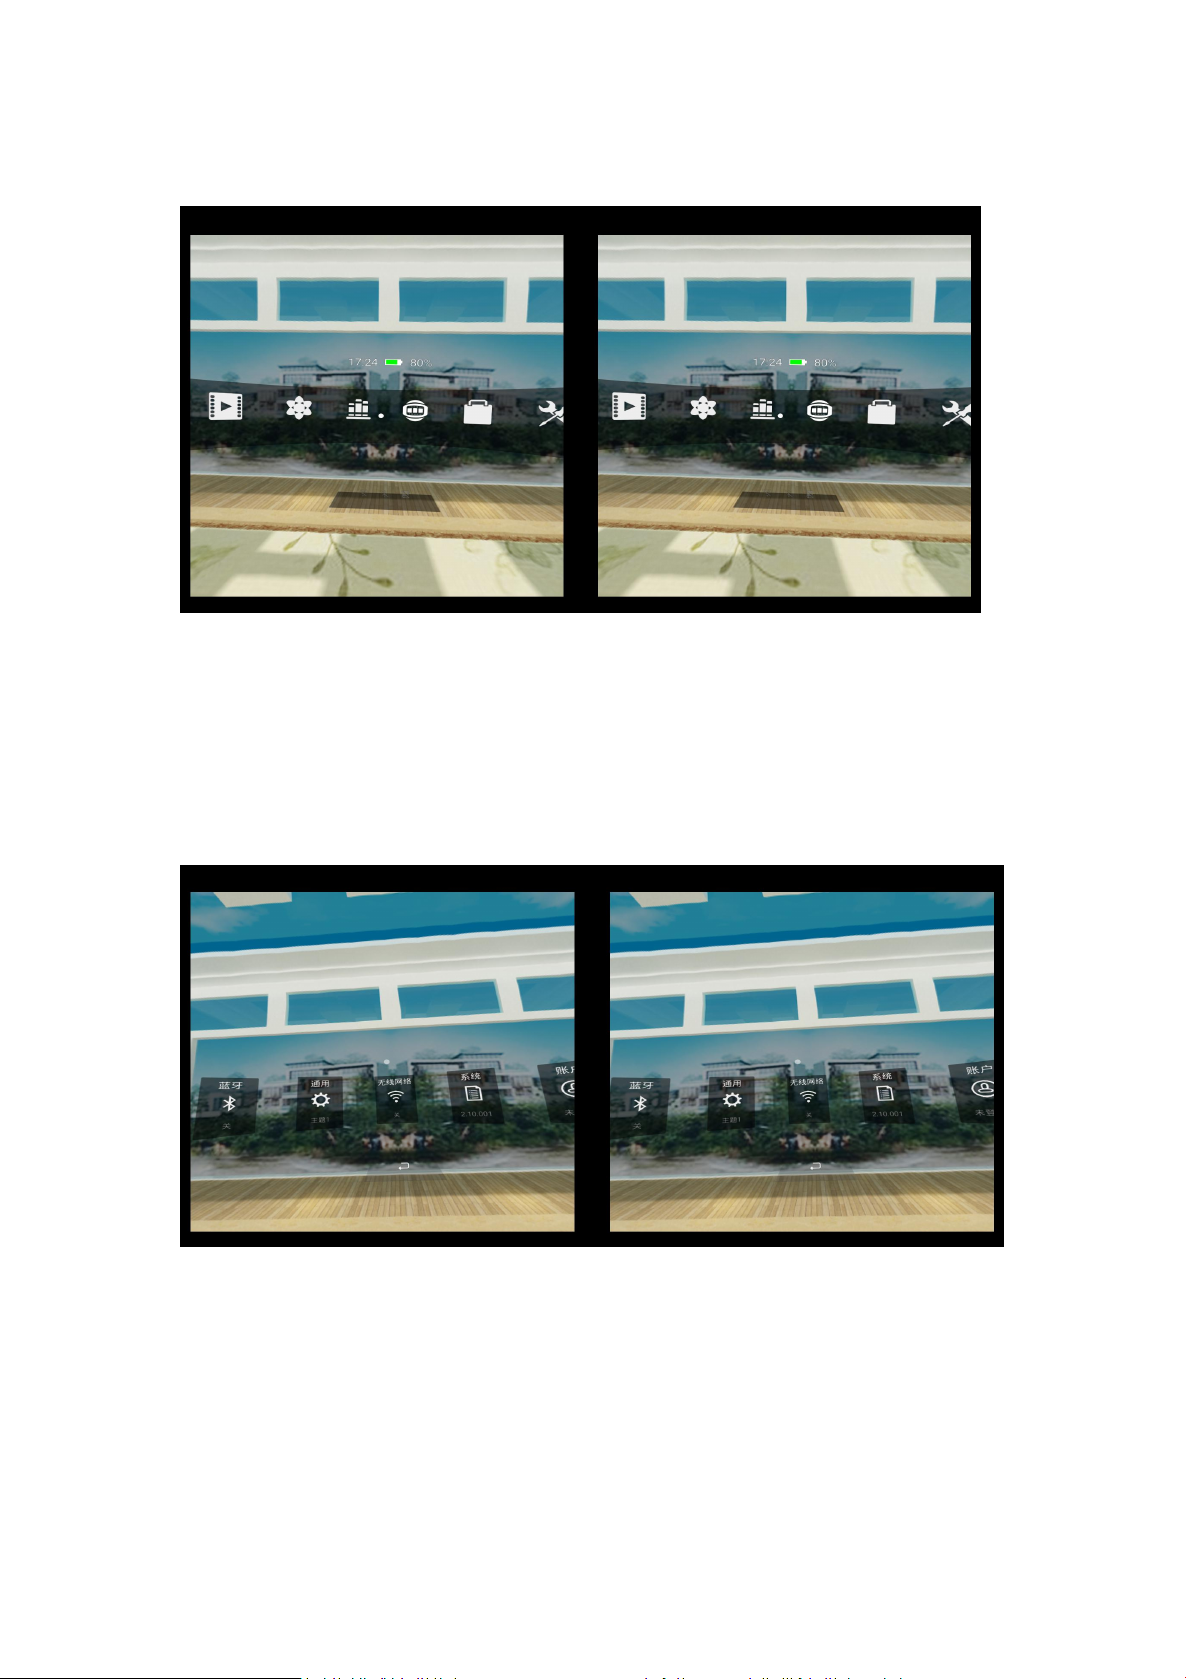
2.3. Home page
The main menu includes local applications, online cinema, panorama view of OL, VR bar of
singing, photos, setting and other statuses displaying such as battery level, time, accessed devices
and wireless network.
2.4 Settings
Setting options include Wi-Fi, Bluetooth, General, System, Connecting external devices.
Page 5

5
2.4.1 Wireless network
Scan for available wireless networks ,choose the wireless network and enter the password to
connect.
2.4.2 Bluetooth
When the Bluetooth is turned on, then it will automatically search for devices and come up a list
of devices which can be connected.
Notice:When the paired devices cannot be connected, cancel it and try again.
Page 6

6
2.4.3 General
The adjustment of the screen brightness, the settings of the volume, language, dormancy time,
and time zone are all included.
2.4.4 System
System update, factory reset and about device, these 3 parts are included.
Methods for system update:
a. If there is a new version available online, then it can be downloaded and updated directly.
b. Transfer the downloaded software into local file, and then update it manually.
About devices:User can check the system version, machine hardware/software parameters.
Page 7

7
2.5 Media player
Player includes local video and online video section.
Select the video:Using paired remote control or buttons on the mini host to select the video
Play video:After the video is selected, press the OK button to play
Pause video:Press the OK button when the video is playing to pause
Volume adjustment:Press up/down button to adjust the volume
Fast forward/fast backward:Move the cursor, and then press OK button
Exit play mode:Press the Back button
Remarks : If the dual screen mode appeared when the video starts to play, please exit the play
mode and start again.
Page 8

8
2.6 Application store
User can download and install games and other applications from app market via Wi-Fi.
2.7 All applications
All of the games, applications installed will be displayed in the option of all applications.
Users can manage these installed applications. Click on the icon of delete down on the right,
and then the selected application can be uninstalled.
Page 9

9
3、FAQ AND SOLUTIONS:
No.
Name
Quantity
1
VR All-in-one
1
3
Power adaptor
1
4
USB2.0 cable
1
5
Headbands
1
1) The device cannot be powered on:Please ensure that you have press and hold the power button
for 3 seconds, and check the battery status
2) The splash screen happens once the application is entered: back to the previous directory and
try again.
3) There are three patterns in VR video: 2D、3D、pano360, you can click the menu option down
on the right and then switch the patterns.
Packing list
Warranty Card
Notifications:
1, Welcome and thank you for choosing VR All-in-one, if there are any malfunction caused
from the quality issues, please send the device back to the specified maintenance office or the
sales agency. In 7 days since the purchase, the device can be returned, in 15 days, the device
can be exchanged for a new one, and the validity of maintenance is 1 year.
2, Improper use or disassembling which cause malfunction are not included in free
maintenance.
3, Please safely save the warranty card and apply for maintenance with it, and do not alter the
terms stated.
Page 10

10
Customer name
Contact
Address
Product model
Purchase date
Invoice number
Sales agency name
Sales agency address
Zip code
Page 11

FCC caution
This device was tested for typical body‐worn operations with the back of the handset
kept 5mm from the body.
To maintain compliance with FCC RF exposure requirements, use accessories that
maintain a 5mm separation distance between the user's body and the back of the
handset. The use of belt clips, holsters and similar accessories should not contain
metallic components in its assembly. The use of accessories that do not satisfy these
requirements may not comply with FCC RF exposure requirements, and should be
avoided.
FCC statements:
This device complies with part 15 of the FCC rules. Operation is subject to the
following two conditions: (1) this device may not cause harmful interference, and
(2) this device must accept any interference received, including interference that
may cause undesired operation.
NOTE: The manufacturer is not responsible for any radio or TV interference
caused by unauthorized modifications or changes to this equipment. Such
modifications or changes could void the user’s authority to operate the
equipment.
NOTE: This equipment has been tested and found to comply with the limits for a
Class B digital device, pursuant to part 15 of the FCC Rules. These limits are
designed to provide reasonable protection against harmful interference in a
residential installation. This equipment generates uses and can radiate radio
frequency energy and, if not installed and used in accordance with the
instructions, may cause harmful interference to radio communications. However,
there is no guarantee that interference will not occur in a particular installation.
If this equipment does cause harmful interference to radio or television reception,
which can be determined by turning the equipment off and on, the user is
encouraged to try to correct the interference by one or more of the following
measures:
‐ Reorient or relocate the receiving antenna.
‐ Increase the separation between the equipment and receiver.
‐Connect the equipment into an outlet on a circuit different from that to which
the receiver is connected.
‐Consult the dealer or an experienced radio/TV technician for help.
RF Exposure Information(SAR)
The SAR limit of USA (FCC) is 1.6 W/kg averaged over one gram of tissue.
Device types AVR1‐WT Android device (FCC ID:2ANTOR551‐A‐AVR1‐WT) hasalso bee
n tested against this SAR limit.The highest SAR value reported under this standard du
ring product .certification for use when properly worn on the body is 0.564W/kg.
 Loading...