

Page 1
powered by
USER MANUAL
VERS. 1.0
Page 2

2
IMPORTANT SAFETY INSTRUCTIONS
WARNING – When using electric products, basic precautions should always be followed, including the
following:
1) Read all the instructions before using the product.
2) Do not use this product near water – for example, near a bathtub, washbowl, kitchen sink, in a wet
basement, or near a swimming pool or the like.
3) This product should be used only with a cart or stand that is recommended by the manufacturer.
4) This product, in combination with an amplifier and headphones or speakers, may be capable of
producing sound levels that could cause permanent hearing loss. Do not operate for a long period of
time at a high volume level or at a level that is uncomfortable. If you experience any hearing loss or
ringing in your ears, you should consult an audiologist.
5) The product should be located so that its location does not interfere with its proper ventilation.
6) The product should be located away from heat sources such as radiators, heat registers, or other
products that produce heat.
7) The product should be connected to a power supply only of the type described in the operating
instructions or as marked on the product.
8) The power-supply cord of the product should be unplugged from the outlet when left unused for a
long period of time.
9) Care should be taken so that objects do not fall and liquids are not spilled into the enclosure through
openings.
10) The product should be serviced by qualified personnel when:
a) The power-supply cord or the plug has been damaged; or
b) Objects have fallen, or liquid has been spilled onto the product; or
c) The product has been exposed to rain; or
d) The product does not appear to operate normally or exhibits a marked change in
performance; or
e) The product has been dropped or the enclosure damaged.
11) Do not attempt to service the product beyond that described in the user-maintenance instructions.
All other servicing should be referred to qualified service personnel.
DANGER: INSTRUCTIONS PERTAINING TO RISK OF FIRE, ELECTRIC SHOCK, OR INJURY TO PERSONS: Do not
open the chassis. There are no user serviceable parts inside. Refer all servicing to qualified personnel
only.
GROUNDING INSTRUCTIONS:
This product must be grounded. If it should malfunction or breakdown, grounding provides a path of
least resistance for electrical current to reduce the risk of electric shock. This product is equipped with a
cord having an equipment grounding connector and a grounding plug. The plug must be plugged into
an appropriate outlet that is properly installed and grounded in accordance with all local codes and
ordinances.
DANGER – Improper connection of the equipment-grounding connector can result in a risk of electric
shock. Check with a qualified electrician or serviceman if you are in doubt as to whether the product is
properly grounded. Do not modify the plug provided with this product – if it will not fit in the outlet, have
a proper outlet installed by a qualified electrician.
SAVE THESE INSTRUCTIONS
Page 3

3
PREPARATIONS
4
I. PREPARATIONS
UNPACKING 5
ADJUSTING THE FRONTPANEL 5
CONNECTIONS 6
FIRST ENCOUNTER 8
II. FUNCTION OVERVIEW
FRONTPANEL LAYOUT 11
SIGNAL PATH 12
III. PROGRAMMING SOUNDS
OSCILLATOR SECTION 15
GROUP INPUT MODULES 36
FILTER SECTION 38
GROUP OUTPUT MODULES 51
GROUP 1/2 LEVEL MODULATION 52
MASTER ENVELOPE / VCA 55
GLIDE BEND 57
REALTIME CONTROLS 59
PRESET EDIT MENU 64
IV: GLOBAL FUNCTIONS
UTILITY MENU 67
SYSTEM MENU 69
SINGLE PRESET HANDLING 74
V. MULTIMODE
LOAD / SAVE MULTI PRESETS 78
SET UP MULTI PRESETS 79
MULTI UTILITY MENU 85
MULTI SYSTEM MENU 86
VI. APPENDIX
MIDI IMPLEMENTATION 89
TECHNICAL SPECIFICATIONS 98
WARRANTY 100
IMPRESSUM 102
CONTENTS
INTRODUCTION
WHO IS SCHMIDT? (”SH-MITT“)
In an ideal world, Schmidt is the synthesizer you have always been dreaming of. Well, anyway, this is the synthesizer
Mr. Stefan Smith, err, Schmidt – the creator of Schmidt – has always dreamed of. And – again in an ideal world –
you and Mr. Schmidt are sharing the same dream (in terms of synthesizers, of course). However, your new Schmidt
synthesizer is a very personal and very special affair. It is the vision of an engineer dedicated to sound, conceived and
perfected in close collaboration with musicians and music producers alike, brought to live in the most uncompromising
way imaginable. Now this dream has nally come true and is right here in front of you within an arm‘s reach –
congratulations if this arm is yours! Of course, Mr Schmidt and everybody else who has had the pleasure of having
been involved in turning this dream into reality, would like to say a big „Thank you!“ to you. We all hope that your new
Schmidt synthesizer will serve you as a creative, inspirational musical instrument for many years to come.
SCHMIDT‘S SKILLS
Schmidt‘s sound generation engine features virtually everything that subtractive synthesis is endowed with – and even
more so: The Oscillator section offers functions to shape very complex sounds with that probably have never been
available in the analog domain thus far. The powerful lter section Schmidt offers is like a fully programmable modular
synthesizer system. You have plenty of modulation routings that excel even your wildest dreams – and rest assured,
we know that synthesizer players like you tend to have really wild dreams. Sometimes, you even get up late at night to
tweak some controls, don‘t you? See, this is how well we know you!
USER MANUAL CONVENTIONS
In this manual we use some format conventions, hoping to make things a lot clearer. You will nd the following
formats:
• Cutoff represents a physical control on Schmidt‘s panel you are asked to work on.
• Space represents a parameter name.
• ON represents a parameter value/state that is indicated either by a lit LED or as data readout on
Schmidt‘s LCD. We take it you know that „LED“ stands for „light-emitting diode“ whereas „LCD“ means „liquid
crystal display“. We thought we should point this out though as these terms keep popping up throughout the
text.
Represents some important note. It is so important we do not even know as yet what it is. Further
reading seems thus recommended!
Sometimes you will be asked to perform a certain sequence of steps. Such a sequence looks e.g. like this:
1 - Select Ramp = ”CLK” on both LFOs.
2 - Select any waveshape (”LFO MODE”) on LFO VCF 1. This setting, in combination with the
LFO 1 Rate setting, determines the waveshape that modulates VCF 1.
3 - Select desired waveshape of LFO VCF 2. This setting, in combination with the LFO 2 Rate setting,
determines the waveshape that modulates VCF 2.
4 - Hit Ramp in LFO VCF 2 again. The „Special“ LED lights up and indicates that both LFOs are now
running in sync.
5 - Alter Mode (waveshape), Rate and Time settings of both LFOs as you please.
We tried to keep this user manual as compact as possible. That‘s why we deliberately avoided descriptions of
synthesizer basics. If you are new to synthesizer technology and sound generation in general, we advise you to go
on a quest for some secondary literature that you can nd on the web or in specialist magazines, like e.g. Keyboard
Magazin or Sound On Sound. Always a good read are classic books like those written by Allen Strange, Devarahi,
Beaver & Krause, or others.
Page 4
4
5
PREPARATIONS PREPARATIONS
PREPARATIONS
UNPACKING
Schmidt was delivered to you in a custom-made high-quality ight case. Every time you take Schmidt with you on the
road or to recording sessions, using this tailor-made case is recommended since it is the only adequate way to keep
Schmidt really save from harm and the rigors of traveling. In a pinch, it serves well as a bench or doorstop, too.
When unpacking Schmidt, please take its relatively high weight (tipping the scales at about 35 kg / 70 lbs) into account
– actually, it is really heavy. Shifting Schmidt by two people is a wise thing to do unless you are keen on hernia.
People with Polymoog or CS80 experience will probably shrug this caveat off with a smile but don‘t say we didn‘t warn
you.
Because of Schmidt‘s high weight you should carefully pick an adequately robust support or table as well. Make sure
the support / table is large and sturdy enough to carry Schmidt safely, even during your wildest keyboard
performances. Beer crates – full or empty – will not do a proper job… at least not on the synthesizer – but perhaps on
your performance. Feel free to share yourself with us.
Please make sure the ventilation grills on Schmidt‘s rear panel are not obstructed. There is a lot of electronics inside,
and be sure we did our best to keep those little electrons busy all the time and bring them out in a sweat!
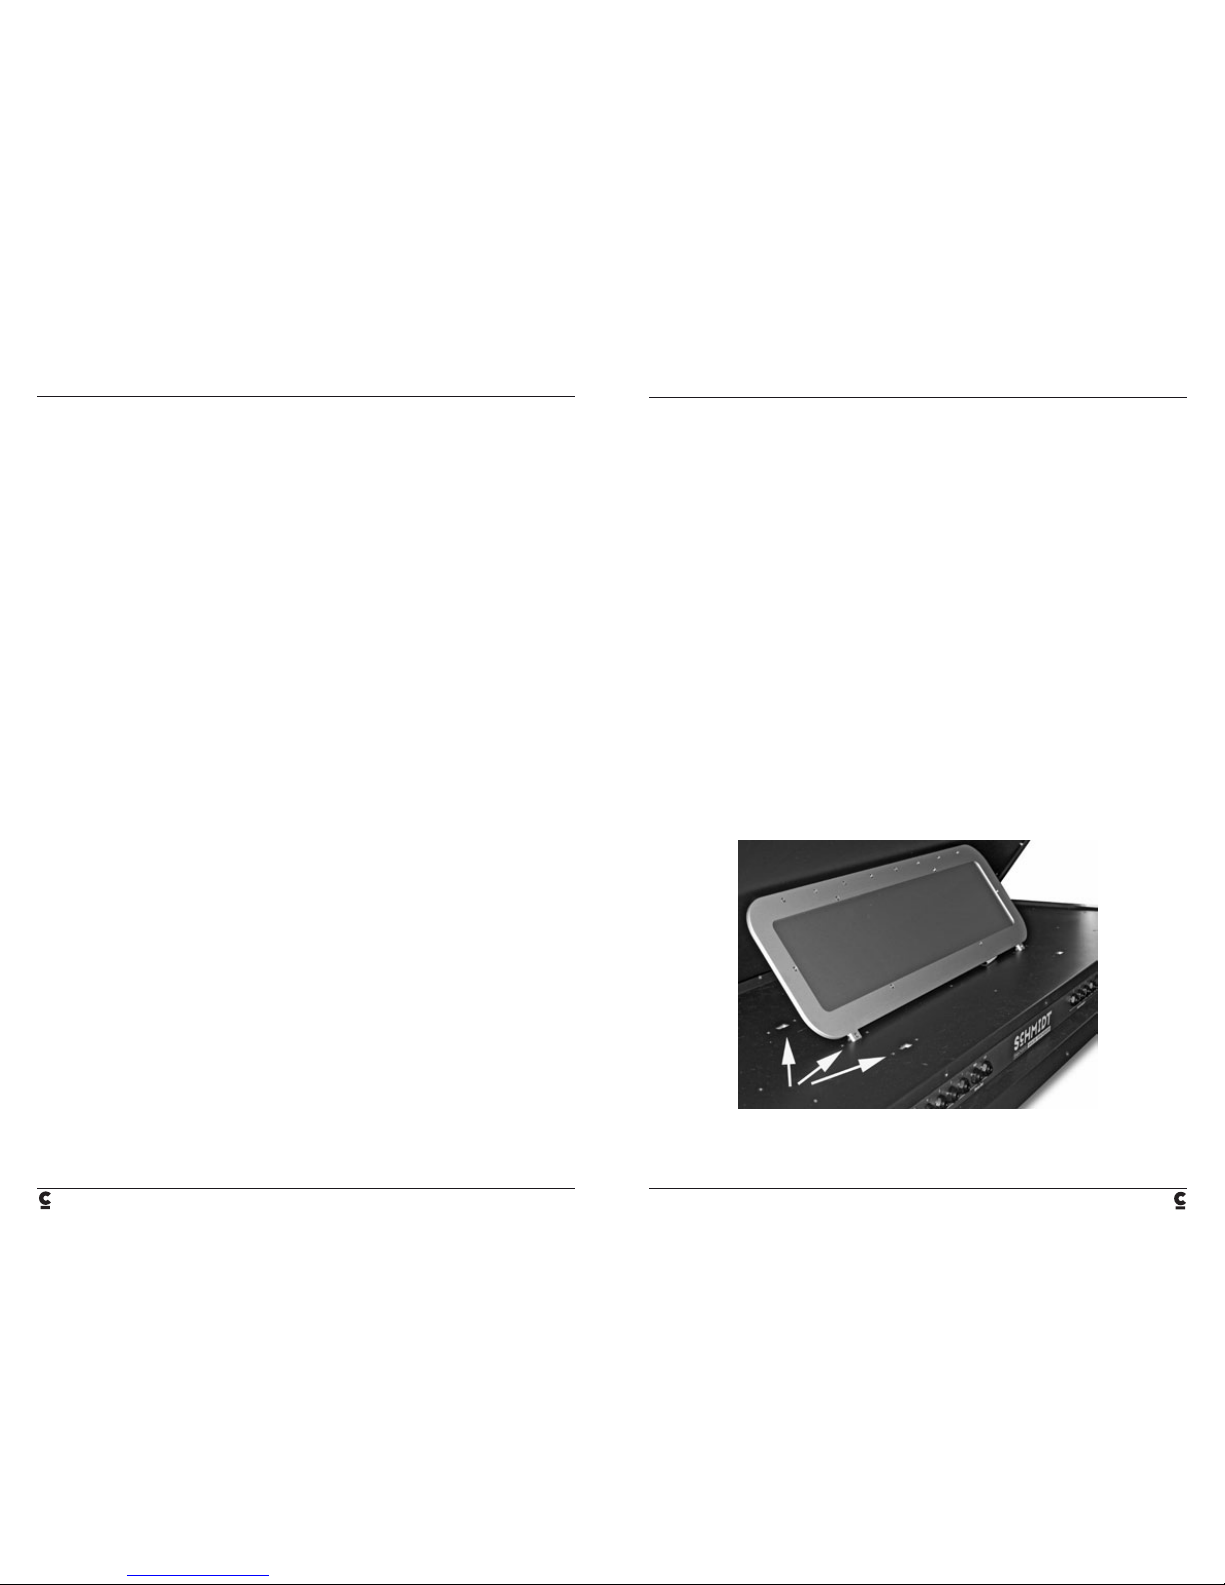
ADJUSTING THE FRONT PANEL
Schmidt‘s front panel can be adjusted to various angles. Raise or lower the front panel and the front panel support
as you feel most comfortable with. Make sure the support locks safely into the recesses on the underside of the front
panel.
Lock front panel support here
I.
PREPARATIONS
Page 5
6
7
PREPARATIONS PREPARATIONS
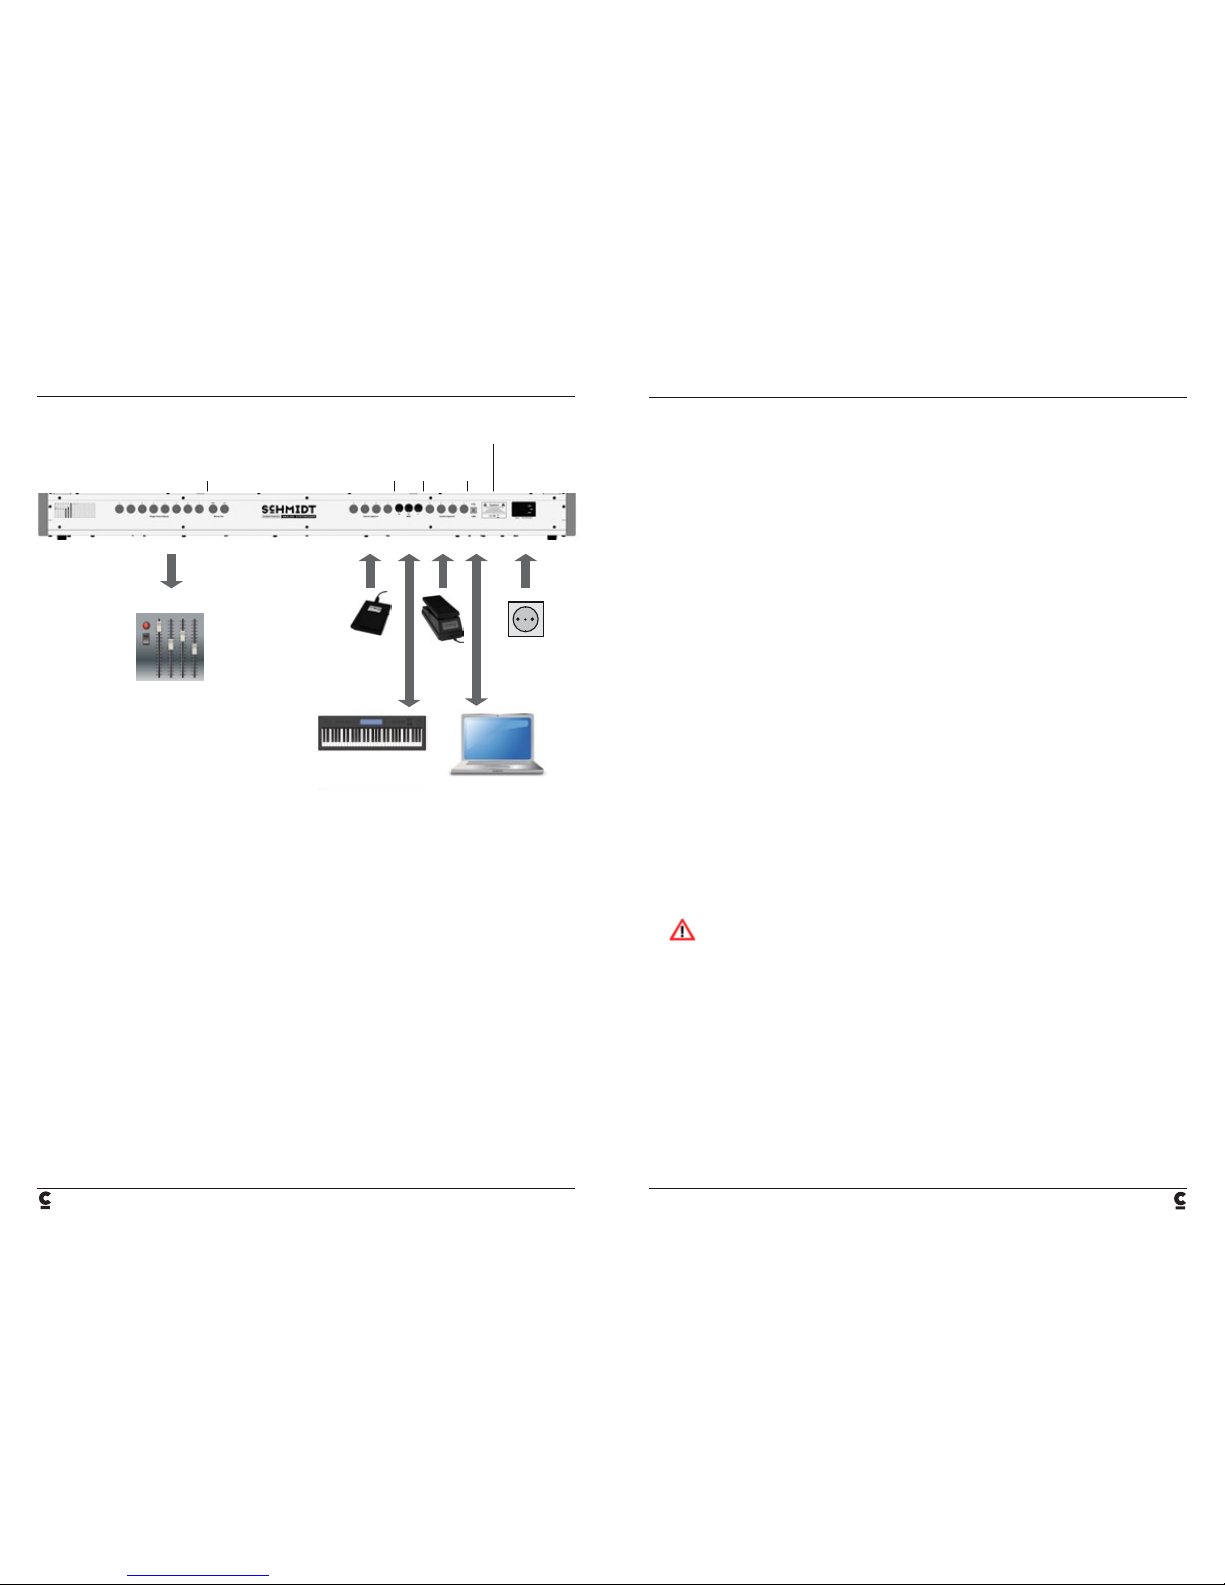
CONNECTIONS
Power
Connect the mains socket to the power outlet. Schmidt works with voltages ranging from 110VAC to 240VAC and can
be connected to any power outlet all over the world. If that isn‘t true internationalism, we don‘t know what is.
Headphones
Connect stereo headphones to the Phones socket on the left of the panel. You can control its volume independently,
using the Phones control. Be careful not to blow your eardrums.
Audio Outputs
All audio outs are 6.3 mm (1/4“) unbalanced jacks sporting line level.
Stereo Output L / R:
Provides the stereo master output signal. Level is governed by the Volume control.
Single Voice Output 1 – 8:
Taps the signals of all eight voices individually. The routing of voices 1 to 8 to outputs 1 to 8 is preset in hardware.
Their respective output level is also preset and independent of the Volume control setting.
Computer
MIDI-Device
Power Outlet
Mixer / Amplifier
Expression-
Pedal /
external
control voltage
(0...+5V linear)
Footswitch
(switch function)
A 1: Sustain
A 2: Sostenuto
Audio Outputs Control In/Outputs
Single Voice Outputs 1 - 8 Stereo Output L / R
Control
Inputs A
Control
Inputs B
USB
Mains
MIDI
MIDI
DIN sockets:
Transmits and receives MIDI data. See section ”Global / System / MIDI“ on page 69 for further information. Incoming
data on MIDI IN is put through to MIDI THROUGH socket.
USB:
Same function as MIDI IN / OUT sockets.
A Utility menu determines whether Schmidt will receive MIDI data through its USB port or through the
MIDI DIN sockets. Please refer to page 68 ”Global Functions / Utility menu / USB/MIDI select“.
Control Inputs
These inputs can be used to control various functions in real-time. They can be assigned to specic parameters, and
boy, does Schmidt have many parameters (just in case you haven‘t noticed yet).
For instant Joe Zawinul renditions, the next bit is for you:
Control Inputs A 1 - 4:
Connect up to four footswitches here to control up to four on/off or toggle functions. The assignment procedure will be
covered later as there are various types of footswitches around that all have different types of polarity, latched
operation etc.
• Control input A 1 provides a Sustain function.
• Control input A 2 provides a Sostenuto function.
• Control inputs A 3 and A 4 can be assigned to several functions (not yet implemented!)
Control Inputs B 1 – 4:
Connect up to four expression pedals or external control voltages here to control up to four parameter values
continuously. The assignment procedure will also be covered later on page 54, section „Performance Controllers“.
These inputs accept voltages from 0V to +5V.
• Control inputs B 1 to B 3 can be assigned to several functions.
• Control input B 4 provides a volume control function.
Warning: Never exceed the external control voltages of +5V or serious damages may occur!
These features will not only keep your ngers busy but also your feet. Make your band‘s guitarist look pathetic while
you are stomping away on your Schmidt pedal board. But do not try to sling Schmidt around your neck while you are
at it…
Page 6
8
9
PREPARATIONS PREPARATIONS
FIRST ENCOUNTER
We suppose you are by now hot on getting a rst impression of Schmidt other than a visual one. This is how to get
some sounds out of Schmidt without the bother. All explanations concerning ”why, when, and what“ will be covered
later. Enjoy yourself, get carried away... but please do not forget to continue reading this manual some time later. We
know it is hard but…
POWERING UP
Bring Schmidt to live using the Power switch on the rear panel. Schmidt will be idle for about three seconds while
booting. Once he is done with that, he is eagerly waiting for your input.
Warning: Handle Volume and Phones controls very carefully. Schmidt can produce excessive levels that
could possibly be harmful to your hearing – or your cat!
LISTENING TO PRESETS
Schmidt has a memory capacity of 1024 internal sound settings, called Presets. A distinction has to be made between
Single and Multi presets. In Single Mode, Schmidt produces one sound at a time, the same all across the entire
keyboard. In Multi Mode, Schmidt is capable of producing up to eight different sounds at a time that can be stacked,
layered or divided across the keyboard. All presets are easily controlled and managed using the Edit and Preset
sections in the lower right corner of the front panel.
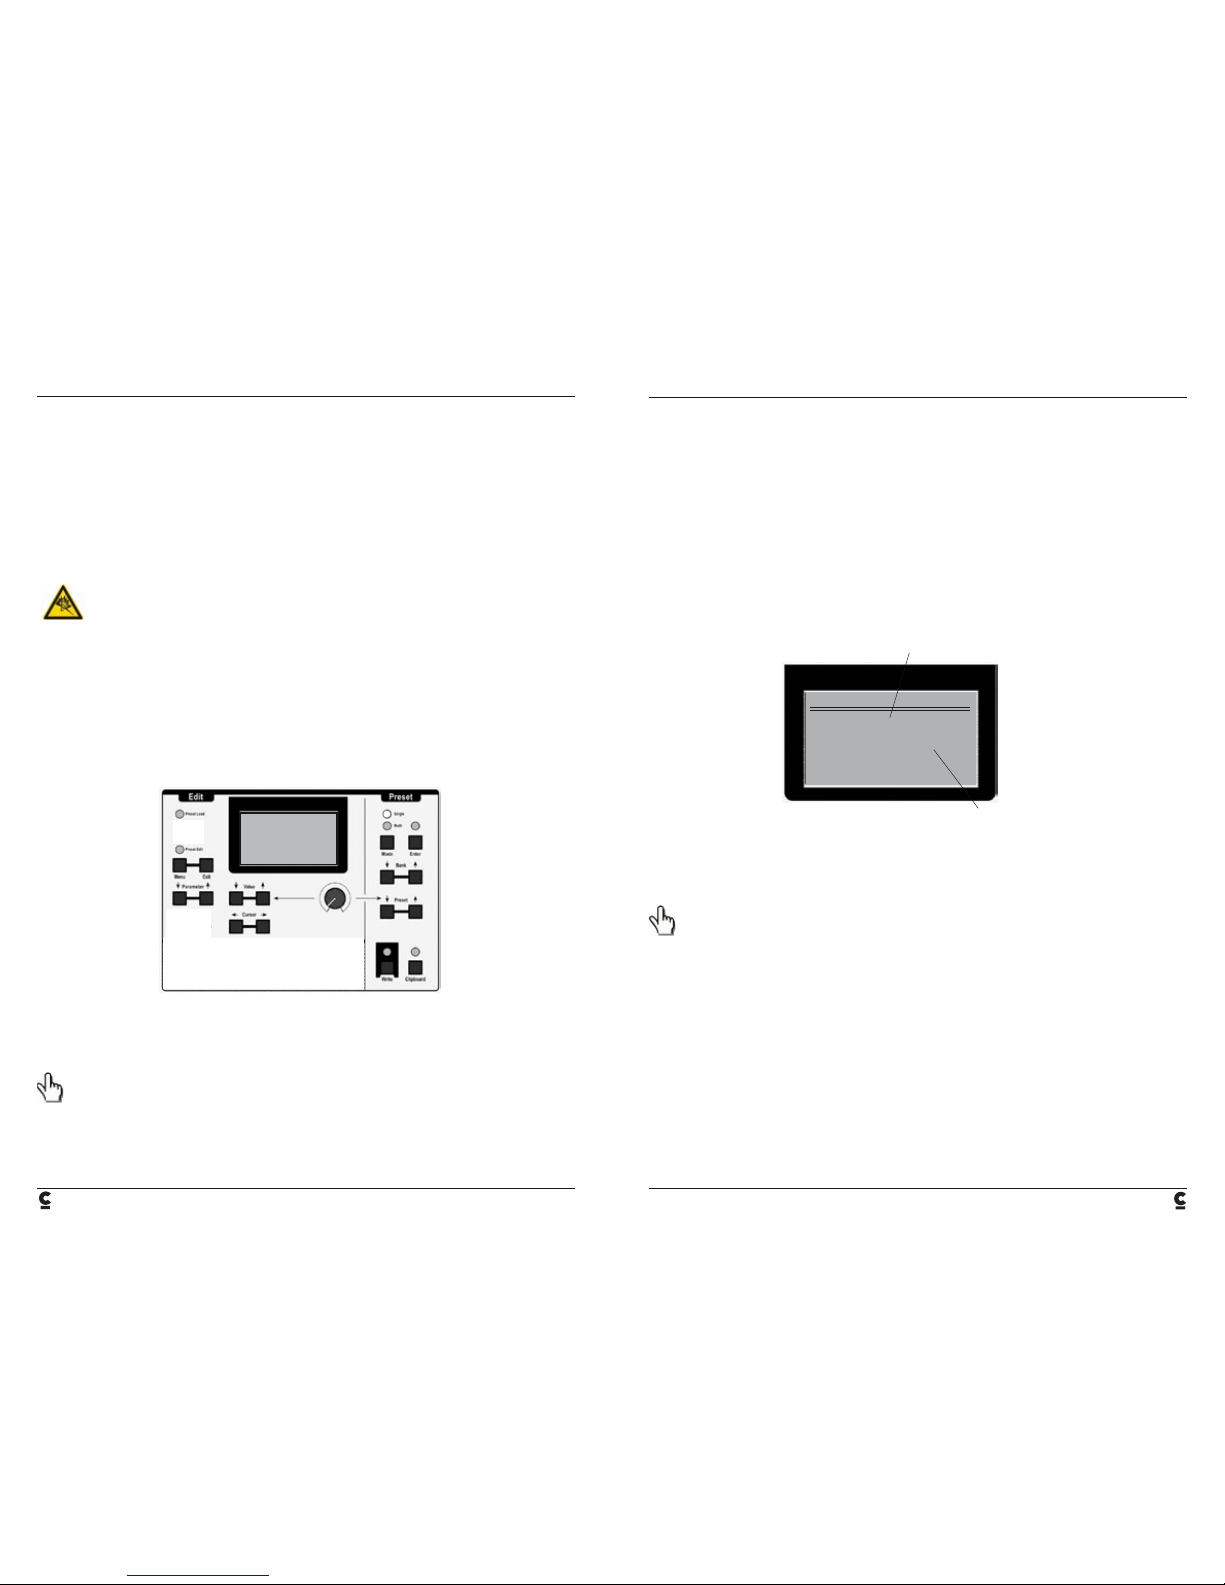
After powering up, Schmidt is in Preset Load Mode which allows for immediate access to the presets. Have a look at
the Preset / Edit / Global sections in the lower right corner of the front panel.
Loading Single Presets:
1 - Hit Mode until the SINGLE LED lights up.
2 - Hit Preset up/down or turn Value control to step/scroll through the Single presets. The LCD (liquid
crystal display, you remember?) shows bank number as well as preset number and name.
3 - Hit Enter to load the selected Single preset.
Hit the Quick Load key to enable the Quick Load option. Now you do not need to hit Enter anymore to load a selected
preset.
Preset
Single/Multi-Presets load, save, name, compare
Hit Bank up/down to select the Single preset bank. The Quick Load option also works for bank selection.
Adjust the Phones and/or Volume controls to a comfortable listening volume. Again, take care of your ears (”huh,
whatcha sayin‘?“).
Use joystick, pitch and modulation wheels as desired but please bear in mind that not every preset necessarily
makes use of these. The complete set of functions of the left-hand panel will be covered on page 59, section Real
Time Controllers.
Tweaking Presets
Unlock the front panel settings by hitting Edit Enable to tweak presets. Simply reload the preset to return to the
version previously stored in memory. Of course you can store edited presets. The store function will be covered later.
As soon as you turn a control or hit a switch, the LCD will show the name of the corresponding parameter as well as
the value stored in memory and the edited value for about three seconds. After that, the screen will return to its normal
state.
Loading Multi Presets:
1- Hit Mode until the MULTI LED lights up.
2 - Hit Preset up/down or turn Value control to step/scroll through the Multi presets.
3 - Hit Enter to load the selected Multi preset.
Hit Quick Load to enable Quick Load option. Now you do not need to hit Enter anymore to load the selected preset.
Hit Bank up/down to select the Multi preset bank. The Quick Load option also works for bank selection.
Bank 1 Single
(Preset Edited)
VCF1 Cutoff
Prog: 76
Edit : 163
Parameter name
Parameter value
Preset (programmed)
current (edited)
Page 7
10
11
FUNCTION OVERVIEW FUNCTION OVERVIEW
FUNCTION OVERVIEW
Now that you have got a vague idea of how impressive Schmidt can sound, you might be curious to learn more about
its inner secrets. In this section, you will – step by step – nd out about Schmidt‘s features and what is going on under
the hood of your new mighty synthesizer.
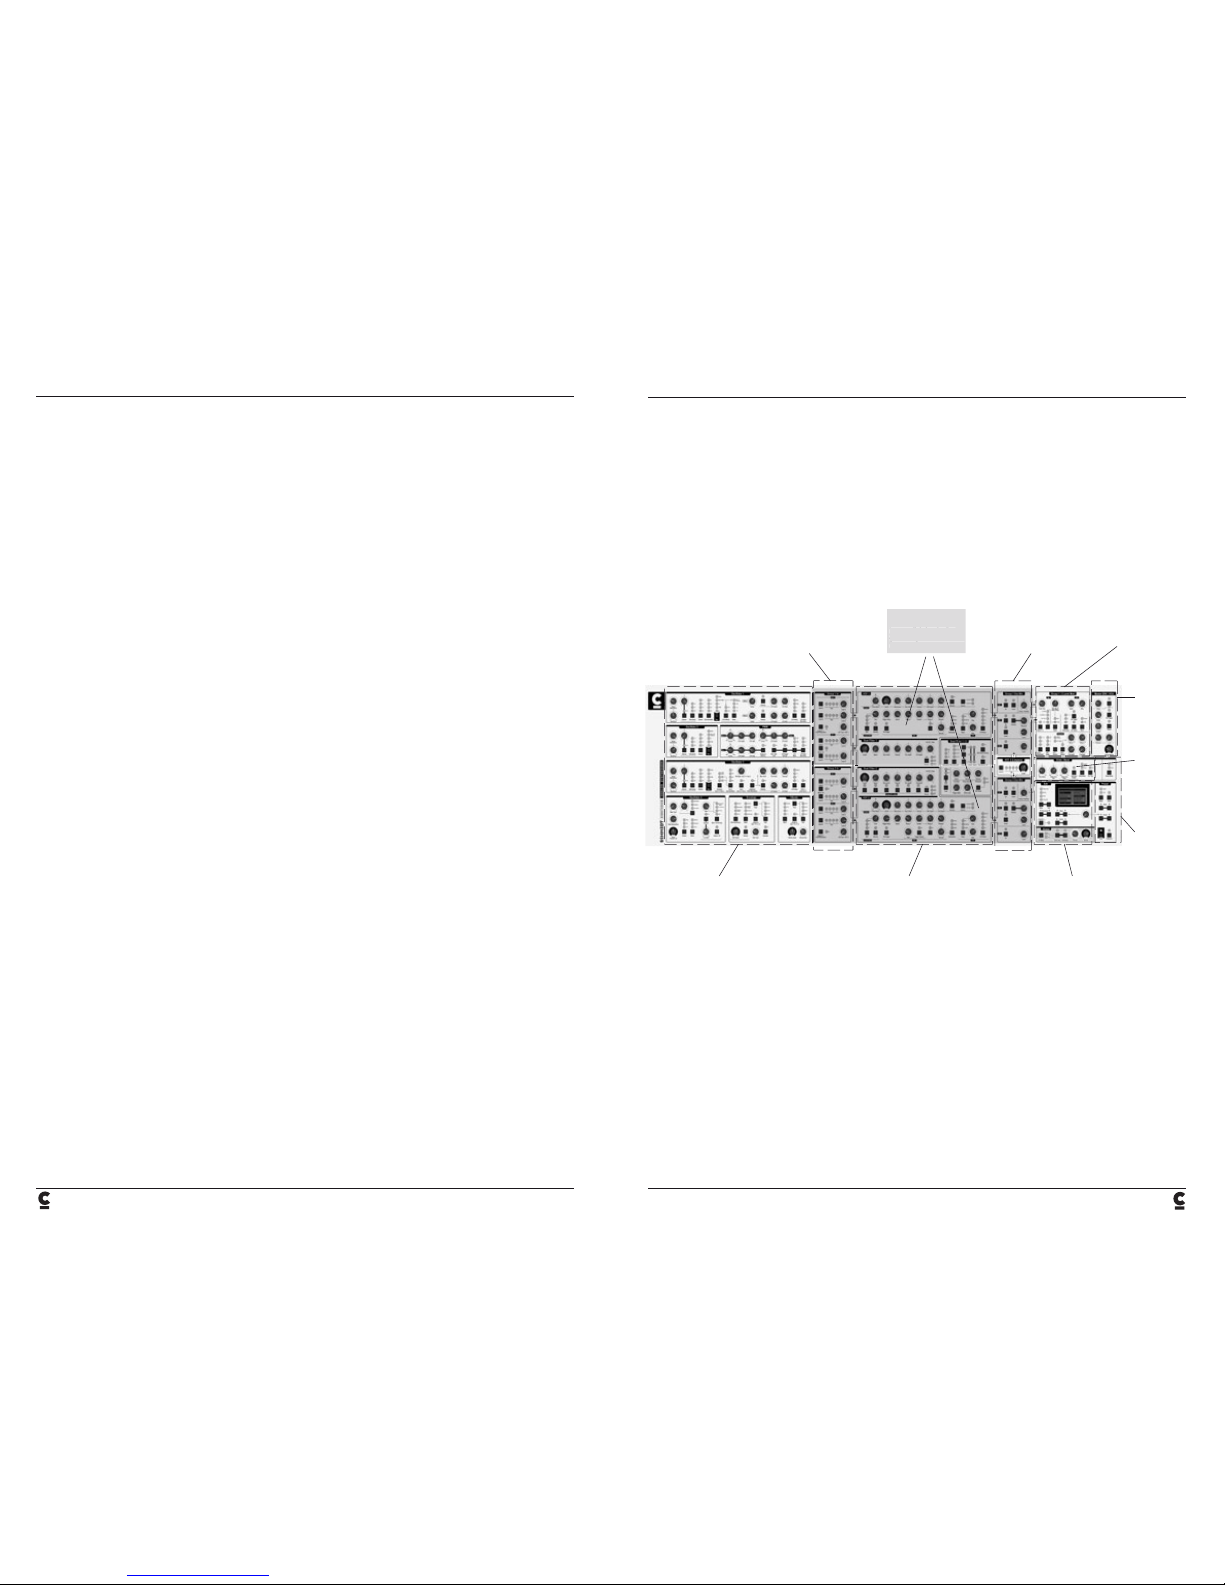
FRONTPANEL LAYOUT
On the frontpanel, you will nd all the sections spread out in front of you from left to right, according to the signal path.
About 95% of the sound generation functions can be accessed without using the LCD and menus. That means, even
though it is quite a complex beast, Schmidt is pretty intuitive to work on once you are familiar with the way its functions
are organized and accessed.
As you have already learned, Schmidt is an eight-voice polyphonic synthesizer boasting real analog signal
generation. To be more accurate, the audio signal path is fully analog for the biggest part. All modulation routings are
digitally controlled in order to provide outstanding results at the highest possible degree of precision. Let‘s have a peek
at Schmidt‘s guts on the following page.
II.
FUNCTION
OVERVIEW
Oscillator-Section
provides four audio oscillators
with envelopes and LFOs for
oscillator modulation
Filter-Section
provides five filters with envelopes
and LFOs for filter modulation
Group 1 + 2
two parallel signalpaths,
generating different sounds
for both stereo channels
Group In Mix
mixes oscillator signals and
routes them to the filter inputs
of Group 1 and Group 2
Group Out Mix
mixes filter outputs of Group 1,
Group 2 and VCF 3 to a stereo
signal
Level Modulation
generates a stereo panorama
and LFO panning
Glide / Bend
generates
pitchbending and
portamento effects
Edit / Global
parameter value display
and global functions
Preset
preset handling
Master ENV / VCA
modulates
main out level
Group 1 + 2
two parallel signalpaths,
generating different sounds
for both stereo channels
Page 8
12
13
FUNCTION OVERVIEW FUNCTION OVERVIEW
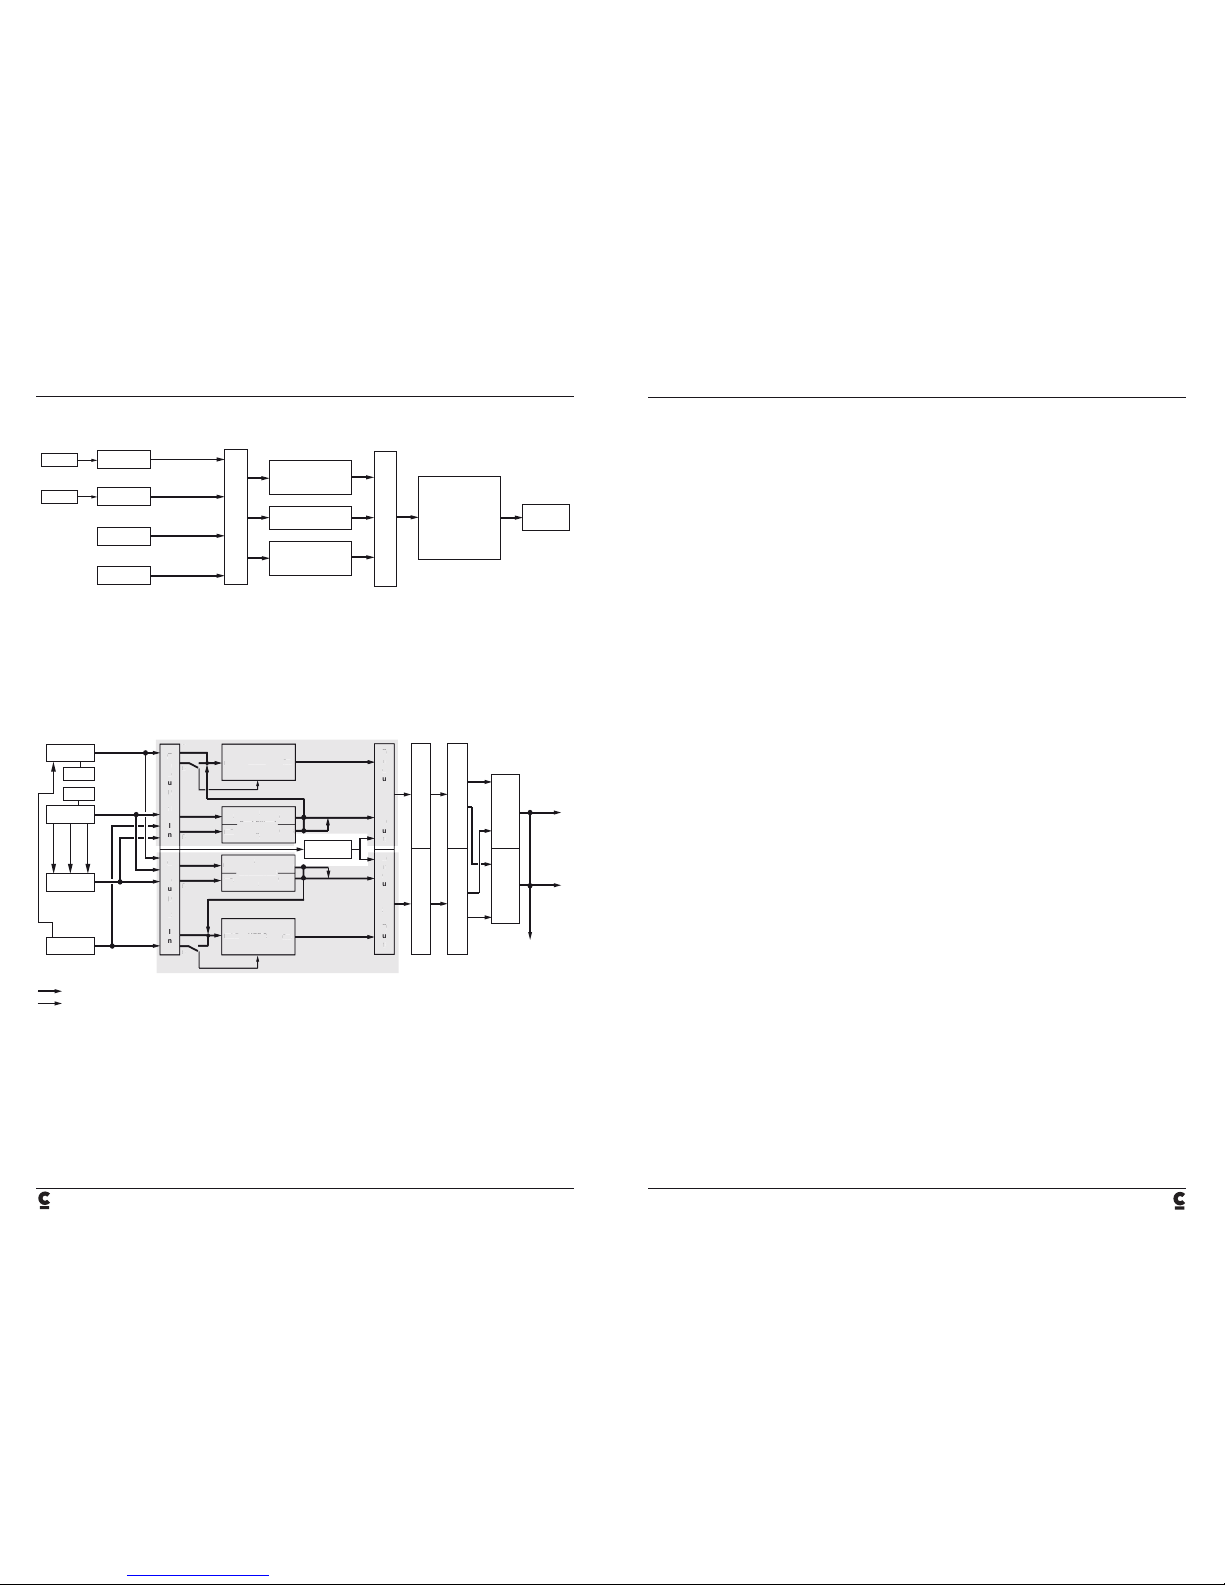
SIGNALPATH
Above you see a brief overview of Schmidt‘s signal path: Four OSCILLATORS (two of them with additional Sub
Oscillator) send their signals into a routing matrix which is called GROUP IN. Here, each Oscillator signal is routed into
the lter section which provides three parallel signal paths. Filter Section Group 1 and 2 are identical and pretty
complex in themselves. They can shape two entirely different timbres out of the incoming Oscillator signals. The third
lter section VCF 3 is an add-on to fatten up things a bit more. In the GROUP OUT section, the three signals are
mixed down into a stereo sum which is fed into the Level and Panning Modulation section, and nally into the master
VCA. This one controls the master volume before the nal stereo signal is sent to the outputs. Whew!
Using our trusty old magnifying glass, we will go much deeper into detail soon. We will follow the signalpath from left to
right:
Let‘s have a look at the Oscillator section rst (left handed):
• Oscillator 1 and 2 (each with Sub Oscillators) feed their signals into Group In 1 and/or Group In 2.
• Oscillator 3 and 4 also feed their respective signals into Group In 1 and/or Group In 2.
• Oscillator 2 can modulate Oscillator 3 (frequency modulation and ring modulation) and can be hard-synced to it
as well for even more timbral variety.
• Oscillator 4 is ring-modulated with Oscillator 1.
Each Oscillator is equipped with more or less complex modulation routings (essentially frequency/pitch and pulse-
width) with their own dedicated modulation sources.
Oscillator 1
Sub-Osc
RMRM
Audio
Audio Modulation
FM
Sync
A
B
A
B
Oscillator 2
Oscillator 3
Oscillator 4
Sub-Osc
G
r
o
u
p
1
I
n
G
r
o
u
p
2
I
n
G
r
o
u
p
1
O
u
t
L
e
v
e
l
-
M
o
d
P
a
n
n
i
n
g
M
o
d
P
a
n
n
i
n
g
M
o
d
L
e
v
e
l
-
M
o
d
G
r
o
u
p
2
O
u
t
VCF 1
Voice Out
Stereo Out /
Headphone
Out
VCF 3
Master
VCA
R
L
Dual Filter 1
Dual Filter 2
VCF 2
Mod In
Mod In
In A/B
Out
Out A
Out B
Out A
Out B
Out
A
B
B
B
B
A
A
A
In A/B
In A
In B
In A
In B
B
G
r
o
u
p
G
r
o
u
p
1
O
u
t
VCF 1
Dual Filter 1
Mod In
In A/B
Out
Out A
Out B
A
In A
A
B
G
r
o
u
p
2
I
n
Gou
p
O
u
t
Dual Filter 2
VCF 2
Mod In
Out A
Out B
Out
B
A
In A/B
Group 1
Group 2
G
r
o
u
p
I
n
G
r
o
u
p
O
u
t
Filter-Section
Group 1
VCF 3
Level Mod
Panning Mod
Master VCA
Filter-Section
Group 2
Oscillator 1
Outs
Sub-Osc
Oscillator 2
Oscillator 3
Oscillator 4
Sub-Osc
You will soon get an idea why, even on Oscillator level, Schmidt is capable of creating very complex timbres that go
way beyond conventional analog synthesizers.
The next section of the signal path is split into two parallel groups that will generate two different timbres at the same
time:
Each group comprises the input router (Group In) and two lters. The VCF is a more or less old-fashioned four-pole
lter (24 dB) that can morph between its different lter response characteristics.
The Dual Filter (DF) is merely a pair of two lters that can be combined with each other to produce a variety of
different response characteristics. VCF and Dual Filter each have a different character and ensure a maximum of
tonal and timbral exibility.
Group In 1 sends each Oscillator signal into the VCF and/or one or both inputs (A/B) of the Dual Filter. Apart from
that, the output of the Dual Filter can be fed back into VCF 1. Input B of the VCF can be used to control the cut-off
frequency. Mind-boggling? Not really. Take a minute or two to recapitulate the signal path up to this point. Group In 2
works the same way. In addition to that, all Oscillator signals can as well be routed to VCF 3 which is a traditional low-
pass lter.
The Group Out sums the output signals of all lter outputs into a single signal which is now modulated in terms of
level and pan position. You can have two different sounds in parallel at this point. They can be panned / cross-faded
by the Panning Mod section. The Master VCA generates a nal, global volume envelope and the signals are routed to
the various outputs. Please take another minute to recapitulate the second half of the signal path. It is easier than you
might believe at rst sight.
On the front panel, you will nd all the sections spread out in front of you from left to right, according to the signal
path. About 95% of the sound generation functions can be accessed without using the LCD and menus. That means,
even though it is quite a complex beast, Schmidt is pretty intuitive to work on once you are familiar with the way its
functions are organized and accessed.
Page 9

14
15
OSCILLATOR SECTION – PROGRAMMING OSCILLATOR SECTION – PROGRAMMING
PROGRAMMING SOUNDS
In this following chapter, we will dig even deeper and nd out about the inner secrets of each section. You will learn
everything about all functions and how to use them. Please read carefully and enjoy while you are at it.
OSCILLATOR SECTION
Schmidt‘s Oscillator section is denitely outstanding (we are a bit proud of that, as you may have noticed already).
You will nd lots and lots of routing and modulation options that yield very impressive and complex sounds even on
oscillator level. The main assets of Schmidt‘s sound generation are ring and pulse-width modulation – with some
pretty weird details that might be new even to you! By the way, the Oscillators are truly analog with digital
control to ensure most precise tuning, tracking, and modulation.
By taking a look at the Oscillator section, you will nd one thing that is common of all of Schmidt‘s modules: Each
section (oscillators, lters, panning, VCA) has its own dedicated modulation source (envelopes, LFOs etc.). That is
why you will not nd a modulation matrix but lots of modulation sources directly placed within the sound generating /
shaping modules which helps immediacy a lot in our humble opinion.
The Oscillator section features four Oscillators, each with a different scope of functions. Here you will nd all
modulation routings and sources relevant to the Oscillator as well.
First, we will check out the functions of each oscillator separately. With the next step we will learn about interaction
(modulation) between the various modules.
Oscillator 1
with Sub-Oscillator and two
LFOs for (Multi)-PWM
Envelope
four AD-envelopes for
pitch-modulation (Osc. 1-4)
resp. vibrato
Vibrato
four LFOs for pitch
modulation (Osc. 1-4)
Oscillator 3
with dedicated
pitch-LFO
Oscillator 4
with LFO for
waveform mix
PWM
three LFOs for PWM
of Osc 1, 2 and 3
Oscillator 2
with Sub-Oszillator
(located in Osc. 3)
III.
PROGRAMMING
SOUNDS
Page 10

16
17
OSCILLATOR SECTION – PROGRAMMING OSCILLATOR SECTION – PROGRAMMING
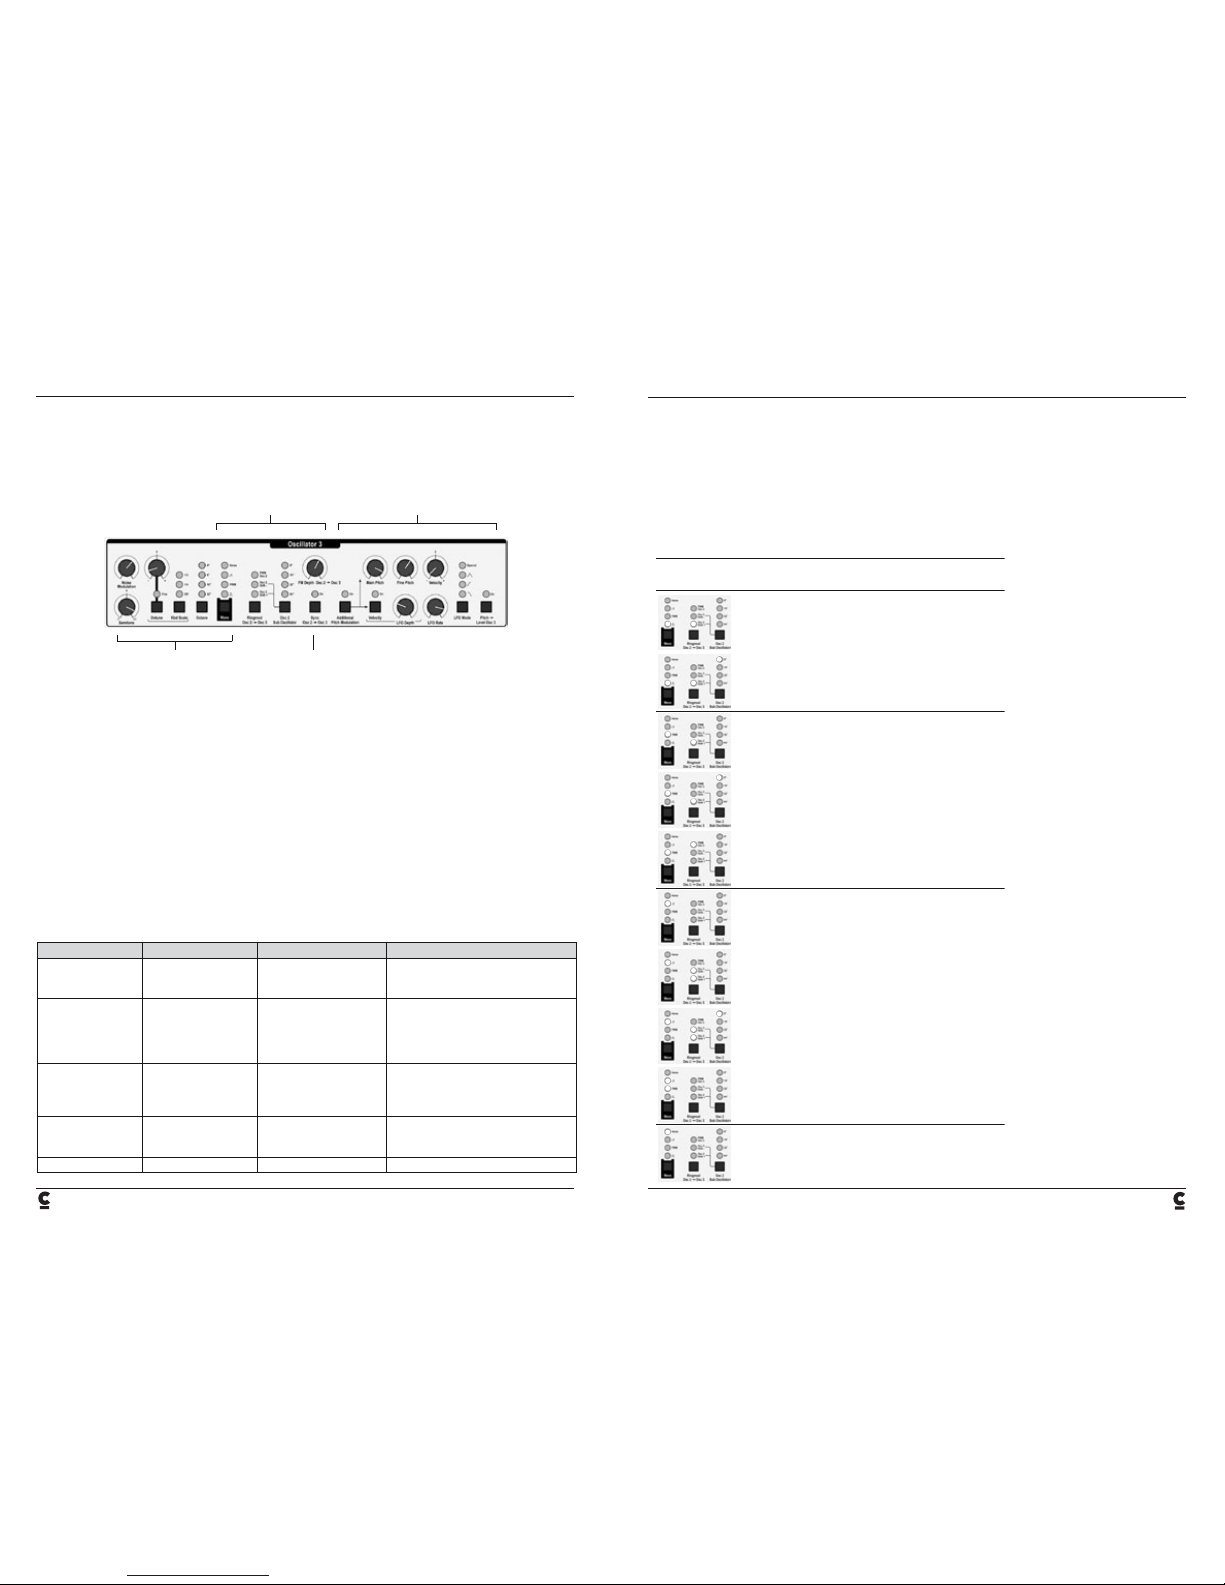
OSCILLATOR 1
Oscillator 1 has some pretty nifty tricks up his sleeve to produce complex timbres. We call it Multi PWM. Its function is
pretty unique and rather complex, so please indulge yourself some time for careful study.
Waveform Generation and Modulation Type / Operation Mode controls:
• Noise Modulation: Pitch of Oscillator 1 is modulated by a noise signal. Controls modulation depth.
• Semitone: Detunes Oscillator 1 up or down by seven semitones.
• Detune: Detunes Oscillator 1 up or down by one semitone, respectively 10 cent up / down
(if Fine key is pressed).
• Kbd Scale: Alters the Detune depending on the played note on the keyboard. Reference point is key A3:
1/2: Two octaves below A3 quadruples Detune; two octaves above A3 quarters Detune.
1/4: Two octaves below A3 doubles Detune; two octaves above A3 halves Detune.
OFF: Detune is independent of the played note on the keyboard.
The Kdb Scale function is useful to control the beat frequency between the oscillators more precise for lower and
higher note ranges.
• Octave: Octave setting of Oscillator 1.
• Sub Oscillator: Octave setting of Sub Oscillator 1 (square wave).
No LED active: Sub Oscillator is not active.
Please note: The octave setting of the Sub Oscillator is independent of the main Oscillator, i. e. the Sub Oscillator can
have a higher setting than the main Oscillator.
If main and Sub Oscillator have the same octave setting, the output signal can be almost inaudible due to phase and
frequency cancellation.
• Wave: Waveform / modulation type of Oscillator 1. Please refer to the following chart for all available
settings:
Wave key setting Waveform Modulation Type Modulation Source
R Square Pitch Vibrato LFO, Noise
PWM Pulse
Pulse
Pitch
Pulse Width
Vibrato LFO, Noise
PWM LFO 1
S Sawtooth Pitch Vibrato LFO, Noise
S + PWM
(see note below)
Two phase-shifted saw-
tooth waveforms
Pitch
Phase Modulation
Vibrato LFO, Noise
PWM LFO 1
Width LFO
Modulation-Type/
Operation Mode
WaveformGeneration
Space LFO
Wave key setting Waveform Modulation Type Modulation Source
MULTI PWM
(see note below)
Complex Wave Pitch
Waveform-Mod (depending
on Mode setting)
Vibrato LFO, Noise
Width/Space LFOs
MULTI PWM + PWM Complex Wave with PWM Pitch
Waveform-Mod (depending
on Mode setting)
Above + Pulse Width
Vibrato LFO, Noise
Width/Space LFOs
PWM LFO 1
NOISE Slightly coloured noise none none
S + PWM
When S and PWM are enabled, the Oscillators ( Osc 1 as well as 2 and 3) produce two sawtooth waves that are
phase-modulated – that means, their respective peaks are shifted against each other. The shift amount is determined
by the Center parameter which can be modulated by the PWM LFO.
Multi PWM
When MULTI PWM is enabled, the remaining controls of the Oscillator 1 section become active. But now it is about
time to clear up what is meant by ”Multi PWM”:
In Multi PWM mode, Oscillator 1 generates four pulse-waves in parallel that are combined in various ways to produce
complex waveforms. There are several parameters with which to control the shape of the resulting waveform:
• Space / Width: Space and Width determine the ratio between peaks and troughs of the four pulse-waves.
Depending on this ratio, the resulting waveform takes on different shapes. Please refer to the
upper section of the gure on page 20. These two parameters can be controlled
independently by two dedicated LFOs.
• Mode: Beyond that, modes 1 to 3 determine the way how the four pulse-waves are combined. As
a result, each mode again produces different waveshapes. Please refer to the lower section
of the gure on page 20.
In mode 4 (OSC 4 > RINGMOD), the resulting waveform that is produced by the process of
mode 3 is additionally ring-modulated by Oscillator 4.
The gure on the following page shows all available modes and their operation.
Center
Page 11
18
19
OSCILLATOR SECTION – PROGRAMMING OSCILLATOR SECTION – PROGRAMMING
Mode key setting Modulation Type Modulation Source
MODE 1 Pitch
Waveform-Modulation
Vibrato LFO, Noise
PWM LFO 1
MODE 2 Pitch
Waveform-Modulation
Vibrato LFO, Noise
PWM LFO 1
MODE 3 Pitch
Waveform-Modulation
Vibrato LFO, Noise
PWM LFO 1
MODE 4 Pitch
Waveform-Modulation
Waveform-Mod (Ringmodulation)
Vibrato LFO, Noise
PWM LFO 1
Oscillator 4
Space
Pulswave 1
Altered ratio between Space value
and Width value
=> the four source waveshapes
partially overlap
Space value significantly higher as
Width value
=> the four source waveshapes do
not overlap
No cancellations / amplification in
resulting waveshape
Pulswave 2
Pulswave 3
Pulswave 4
Pulswave 1
Pulswave 2
Pulswave 3
Pulswave 4
Resulting
waveshape
Resulting
waveshape
Mode 1:
1 + 2 + 3 + 4
Mode 2:
1 + 2 – 3 – 4
Mode 3:
Cancellations and
constant level
Width
LFO Controls Oscillator 1
The remaining controls belong to the Multi PWM Space and Width LFOs:
• LFO Depth: Modulation depth of Space / Width.
• Velocity: Modulation depth depends on keyboard velocity.
• LFO Rate: Modulation rate of Space / Width.
• LFO Mode: Modulation waveform of both LFOs
STEP: Space LFO produces Sample & Hold function (stepped waveform) while the S&H frequency is
controlled by the Rate parameter of the Width LFO (LFO Diffuse has to be disabled!).
/\/\/\ : Continuous triangular wave
/\ : One-shot triangular wave
I\ : One-shot saw wave
• LFO Diffuse: Each of the four pulse waves are modulated with different intensity (only Space LFO).
• LFO Rate
Kbd Scale: Scales the modulation speed (LFO Rate) of the LFO across the keyboard. Reference point is key A3:
1/2: Two octaves above A3 – quadruples LFO rate; two octaves below A3 quarters LFO rate.
1/4: Two octaves above A3 – doubles LFO rate; two octaves below A3 halves LFO rate.
OFF: Space / Width LFO rate is independent of played note position on the keyboard.
One important note on modulation depths:
Not only the current control setting of a parameter, but also the values of all other modulation depth controls are added
to the nal value of the resulting modulation depth. Please note that modulation depth usually has negative values as
well. If the resulting modulation depth value exceeds the total parameter range, certain modulators can have little or
no effect on the entire modulation. For example, if you set the Space control to 3 o‘clock position and add a high LFO
depth value, an additional second modulator (e.g. velocity) might produce no audible effect. Please refer to page 62. It
shows the summed modulation depth values for the VCF1 cut-off.
Oscillator 1 modulation paths
To make things even clearer (we are not being sarcastic, mind you!), we will cast a look under the hood of Oscillator 1
and examine all signal and modulation inputs and outputs.
Have a look at OSC1 in the gure on the next page. From right to left, you can see all the different modulation inputs
and their controls:
Inputs:
• Space and Width LFOs to control Multi PWM.
• The PWM input that is fed by the PWM LFO 1.
• The ring-modulation input that is fed by Oscillator 4.
• The noise modulation input with its amount control and its connection to the Oscillator envelope (more on this
later).
• The pitch modulation input that is fed by the pitch envelope, the Vibrato LFO (more on this later) and the noise
source.
• The Tuning and manual pitch controls.
Outputs:
• The audio output with a mix of main- and sub oscillator signals.
The modulation sources in the left half of the image will be covered as soon as we managed the other oscillators.
Page 12
20
21
OSCILLATOR SECTION – PROGRAMMING OSCILLATOR SECTION – PROGRAMMING
Noise
Mod
Pitch
Mod
Multi
PWM
Multi
PWM
Vel.
Vel.
Tune
PWM
Ring
mod
from
Osc 4
OSC 1
1
2
3
SUB-OSC 1
LFO-
Space
P
W
M
-
L
F
O
Sync
LFO-
Width
Vel.
Vel.
Vel.
Vel.
Vel.
E
n
v
e
l
o
p
e
1
2
3
4
Vel.
Vel.
Vel.
V
i
b
r
a
t
o
-
L
F
O
1
2
3
4
Vel.
+
x
Noise
Mod
Pitch
Mod
Multi
PWM
Multi
Vel.
Vel.
Tune
Ring
mod
OSC 1
SUB-OSC 1
LFO-
Space
LFO-
Width
x
2
3
W
M
O
Sync
Vel.
Vel.
Vel.
Vel.
Vel.
Vel.
Vel.
E
e
o
p
e
1
2
3
Vel.
b
r
a
t
o
O
3
4
Audiosignals, Ring-Modulation
Modulation-Depth
Modulation-Depth with additional Velocity Control
Sync
Pulsewidth-Modulation
Pitch/Noise-Modulation by Envelope 1
Pitch-Modulation by Vibrato LFO 1
OSCILLATOR 2
Oscillator 2 is much more basic. You will gure out pretty quickly. Oscillator 2 has a
Sub Oscillator but for technical reasons, it is fully controlled from the panel section
of Oscillator 3.
• Noise Modulation: Pitch of Oscillator 2 is modulated by a noise signal.
• Semitone: Detunes Oscillator 2 up or down by seven semitones.
• Detune: Detunes Oscillator 2 up or down by one semitone respectively 10 cent up / down
(Fine key pressed).
• Kbd Scale: Alters the Detune depending on the played note on the keyboard. Reference point is key A3:
1/2: Two octaves below A3 quadruples Detune; two octaves above A3 quarters Detune.
1/4: Two octaves below A3 doubles Detune; two octaves above A3 halves Detune.
OFF: Detune is independent of the played note on the keyboard.
The Kdb Scale function is useful to control the beat frequency of the oscillators more precise for lower and higher
note ranges.
• Octave: Octave setting of Oscillator 2.
• Wave: Waveform / modulation type of Oscillator 2.
Wave key setting Waveform Modulation Type Modulation Source
R Square Pitch Vibrato LFO, Noise
PWM Pulse
Pulse
Pitch
Pulse Width
Vibrato LFO, Noise
PWM LFO 2
S Sawtooth Pitch Vibrato LFO, Noise
S + PWM Two phase-shifted sawtooth
waves
Pitch
Phase Modulation
Vibrato LFO, Noise
PWM LFO 2
Osc 3 => Ringmod Complex Wave
Complex Wave
Pitch
Ring Modulation
Vibrato LFO, Noise
Oscillator 3
Noise Slightly coloured noise none none
The phase modulation mode (S + PWM) is described in the Oscillator 1 section above.
The signal and modulation inputs of Oscillator 2 are closely related to Oscillator 3. That is why we will examine them
when dealing with Oscillator 3.
Waveform
Generation
Page 13
22
23
OSCILLATOR SECTION – PROGRAMMING OSCILLATOR SECTION – PROGRAMMING
OSCILLATOR 3
Oscillator 3 is somewhat special again. It has outstanding ring-modulation power and it is closely related to
Oscillator 2. Take some time to explore it carefully.
• Noise Modulation: Pitch of Oscillator 3 is modulated by a noise signal.
• Semitone: Detunes Oscillator 3 up or down by seven semitones.
• Detune: Detunes Oscillator 3 up or down by one semitone resp. 10 cent up / down (Fine key pressed).
• Kbd Scale: Alters Detune independent of the note played on the keyboard. Reference point is key A3:
1/2: Two octaves below A3 quadruples Detune; two octaves above A3 quarters Detune.
1/4: Two octaves below A3 doubles Detune; two octaves above A3 halves Detune.
OFF: Detune is independent of the played note on the keyboard.
• Octave: Octave setting of Oscillator 3.
• FM Depth: Intensity of frequency modulation by Oscillator 2 (exponential FM).
• Wave: Waveform / modulation type of Oscillator 3.
The following chart shows which waveforms are available within the available types of modulation. Please note that
most of the different modulation types (pitch, FM, ringmod, PWM) are available at the same time.
Wave key setting Resulting Waveform Modulation Type Available Modulation Source
R Square
Complex Wave
Complex Wave
Pitch
FM
Ringmod
Vibrato LFO 3, Noise, Pitch LFO
Oscillator 2
Sub Oscillator 2
PWM Pulse
Pulse
Complex Wave
Complex Wave
Complex Wave
Pitch
Pulse Width
FM
Ringmod
Ringmod + Pulse Width
Vibrato LFO 3, Noise, Pitch LFO
PWM LFO 3
Oscillator 2
Sub Oscillator 2
Sub Oscillator 2, PWM LFO 3
S Sawtooth
Complex Wave
Saw/Pulse Mix
Complex Wave
Pitch
FM
Amplitude Modulation
Ampl-Mod + Ringmod
Vibrato LFO 3, Noise, Pitch LFO
Oscilliator 2
PWM LFO 3
PWM LFO 3, Sub Osc 2 (Phase +/–)
S + PWM 2 phase-shifted saw-
waves
Complex Wave
Pitch
Phase Modulation
FM
Vibrato LFO 3, Noise, Pitch LFO
PWM LFO 3
Oscillator 2
Noise Slightly coloured noise none none
Pitch LFO
Sync
Modulation-Type/
Operation Mode
WaveformGeneration
Modulation Type / Operation Mode controls
• Ringmod Osc2 => Osc3: Selects the ring-modulation source (Osc 2 or Sub Osc 2) and enables / disables
Sub Oscillator 2, depending on the setting of the ”Wave“ key.
• Osc2 SubOsc: Selects the octave range of the Sub Oscillator of Oscillator 2 or the octave range of
the ringmod source respectively. No LED means Sub Oscillator is ”OFF“.
The following gure shows the interaction of the three function keys Wave, Ringmod Osc2 –> Osc3 and
Osc2 SubOsc.
The phase modulation mode (S + PWM) is described above in the Oscillator 1 section.
Button Setting
Result
Output Sub Oscillator 2
Output Oscillator 3 /
Modulation type
Square Wave
No modulation
Ringmodulation
Sub Osc 2 modulates Osc 3 (Square)
Modulated Pulse Wave
Osc 3 gets PWM from PWM LFO 3
PWM / Ringmodulation
Sub Osc 2 modulates Osc 3 (with PWM)
PWM / Ringmodulation
Osc 2 (with PWM) modulates Osc 3 (with PWM)
disabled
disabled
disabled
Square Wave 32“ - 4“
Square Wave 32“ - 4“
Square Wave 32“ - 4“
Saw Wave
No modulation
Saw Wave mixed with slightly
amplitude-modulated Square Wave
Modulation controlled by PWM LFO 3
Phase-modulated pair of Saw Waves
Modulation controlled by PWM LFO 3
Noise Signal
No modulation
As above with additional Ringmodulation
by Sub Osc 2
Ampl. Modulation controlled by PWM LFO 3
Ringmod controlled by Osc 2
disabled
disabled
disabled
disabled
or
or
Page 14

24
25
OSCILLATOR SECTION – PROGRAMMING OSCILLATOR SECTION – PROGRAMMING
• Sync: Synchronizes Oscillator 3 to Oscillator 2. Sounds particularly interesting when
ring-modulation is enabled as well.
• Additional
Pitch Modulation: Enables additional unctions to control the pitch of Oscillator 3 independently of the
Vibrato LFO. You will nd here another LFO as well as controls for coarse/ne pitch
and velocity amount.
• Main Pitch: Shifts the pitch of Oscillator 3 up or down by approximately two octaves or sets the
range of the Pitch LFO respectively.
• Fine Pitch: Fine adjustment of Main Pitch.
• Velocity (control): When turned up, keyboard velocity directly controls the pitch of Oscillator 3 with
positive or negative amount. The entire Additional Pitch Modulation section is great
for expressive ring-modulation and sync sounds.
• LFO Depth: Modulation Depth
• Velocity (key): LFO Depth is controlled by keyboard velocity.
• LFO Rate: Modulation speed
• LFO Mode: /\ : Continuous triangular waveform
/I : One-shot rising slope
I\ : One-shot falling slope
SPECIAL: Space for future updates
• Pitch => Level Osc 3: Modulates the output level of Oscillator 3 according to the Pitch LFO settings.
Oscillator 2/3 modulation paths
The gure on the next page shows the entire signal routing with inputs and outputs of Oscillators 2 and 3.
Oscillator 2 is quite simple – there are just three modulation inputs and one modulation output:
Inputs:
• The PWM input fed by PWM-LFO 2.
• The pitch modulation input fed by the pitch envelope, the Vibrato LFO and the noise source.
• The controls for Tuning and manual pitch control.
Outputs:
• Oscillator 2 sends a sync signal to Oscillator 3.
Oscillator 3 is a bit more mind-boggling. Let‘s check out all its modulation inputs:
• The ring-modulation input fed by Oscillator 2 or Sub Oscillator 2.
• The PWM input fed by PWM LFO 3.
• The FM input fed by Oscillator 2.
• The pitch modulation input that is fed by the pitch envelope, the Vibrato LFO, the noise source, and the
„Additional Pitch Modulation“ with controls and LFO.
• The controls for Tuning and manual pitch control.
• The sync input fed by Oscillator 2.
The „Additional Pitch Modulation“ section can also control the output level of Oscillator 3.
Pitch
Mod
Pitch
Mod
Level
Mod
1
2
3
P
W
M
-
L
F
O
Sync
Sync
Noise
Mod
Tune
PWM
OSC 2
SUB-OSC 2
Vel.
Vel.
Vel.
Vel.
Vel.
Noise
Mod
Tune
PWM
FM
Ring
Mod
OSC 3
E
n
v
e
l
o
p
e
1
2
3
4
Vel.
Vel.
Vel.
V
i
b
r
a
t
o
-
L
F
O
1
2
3
4
Vel.
x
+
x
2
3
P
WML
F
O
Sync
Vel.
Vel.
Vel.
Vel.
Vel.
Vel.
Vel.
E
n
v
e
l
o
p
e
1
3
Vel.
i
b
r
a
t
o
-
L
F
O
1
2
3
Pitch
Mod
Noise
Mod
Tune
OSC 2
SUB-OSC 2
x
Pitch
Mod
Noise
Mod
Tune
PWM
Ring
Mod
OSC 3
x
Audiosignals (Ring-Modulation, FM)
Modulation-Depth
Modulation-Depth with additional Velocity Control
Sync, Level-Modulation
Pulsewidth-Modulation
Pitch/Noise-Modulation by Envelope 2, 3
Pitch-Modulation by Vibrato LFO 2, 3
Vel.
Vel.
Add. Pitch Mod
M/F-
Pitch
LFO
+
Vel.
Vel.
Add. Pitch Mod
M/F
Pitch
LFO
Page 15
26
27
OSCILLATOR SECTION – PROGRAMMING OSCILLATOR SECTION – PROGRAMMING
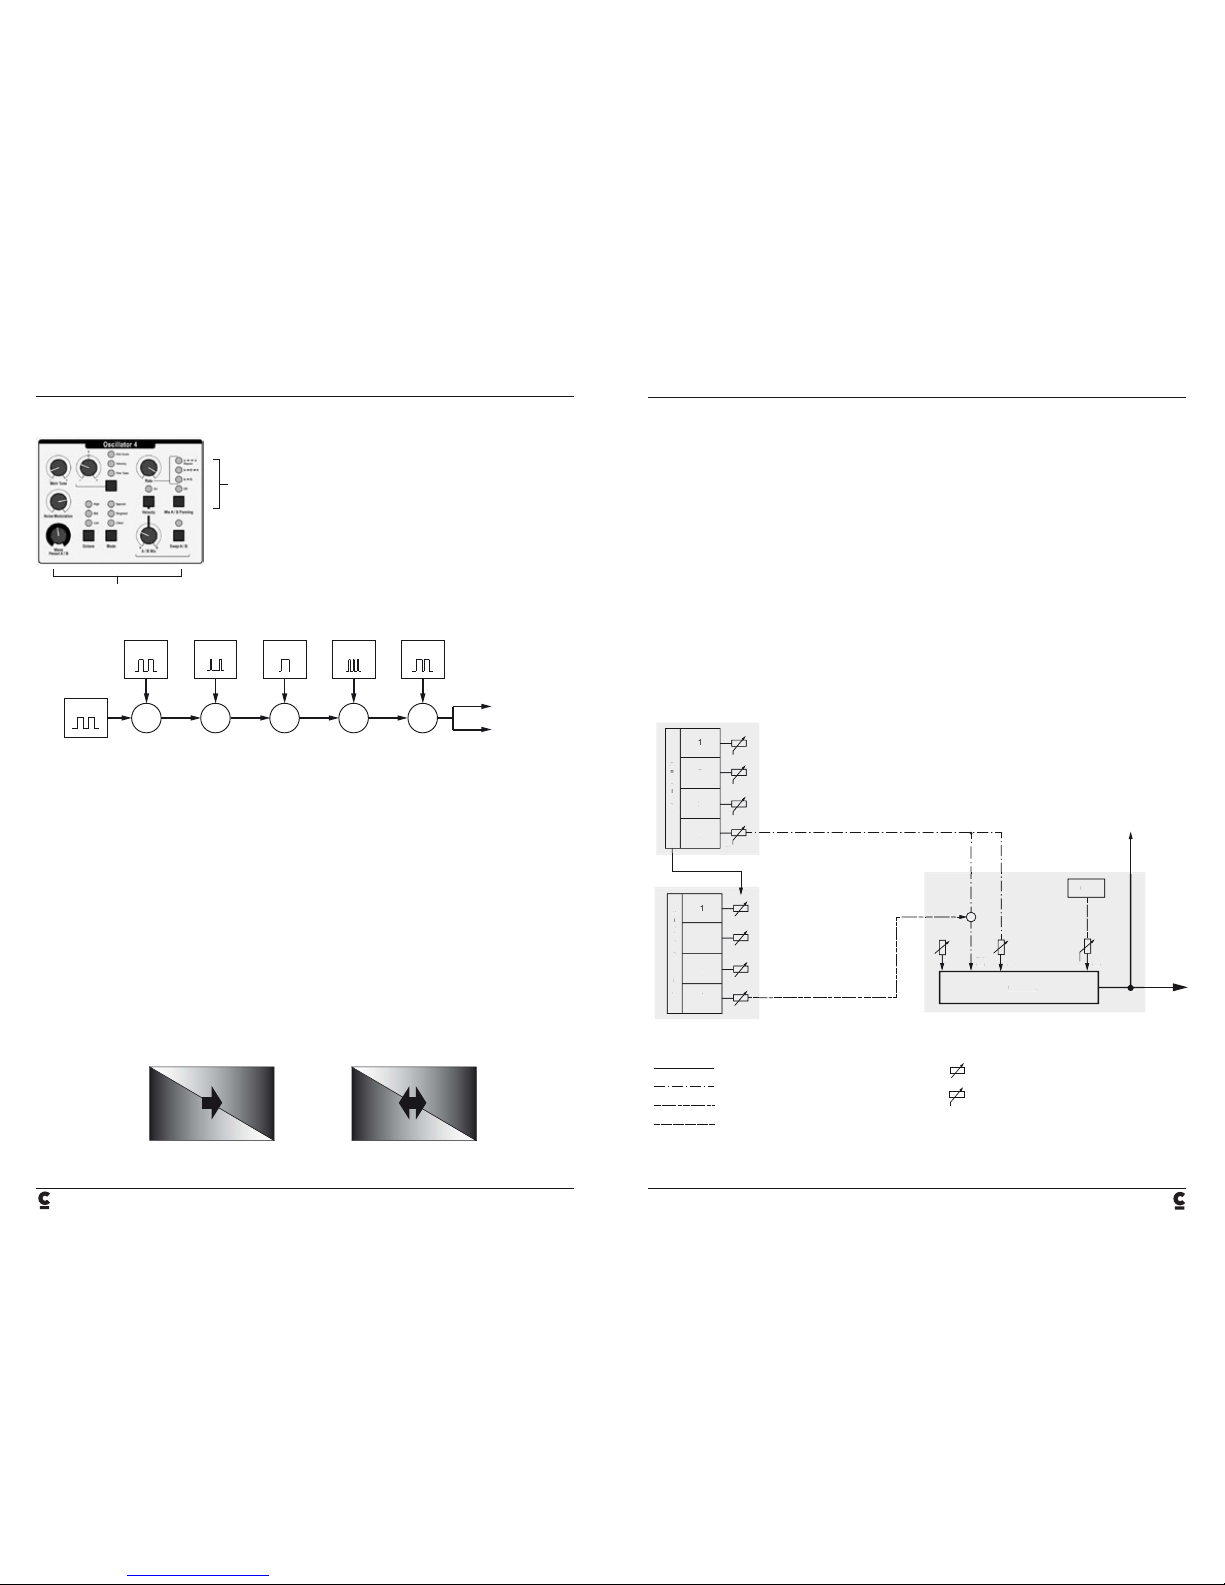
OSCILLATOR 4
Yes, there actually is a fourth Oscillator! It is also quite
special but a lot less complex than Oscillator 3. It is entirely
based on ring-modulation and produces complex wave-
forms.
Oscillator 4 features a chain of ve ring modulators that are
fed by six pulse-waves with different pulse-widths each.
The product of Ringmod 1 is ring-modulated by the third
pulse-wave and so on. Depending on the internal parameter
settings, two groups of 32 wave presets each are generated.
Waveform Generation and Mod LFO controls
• Noise Modulation: Pitch of Oscillator 4 is modulated by a noise signal.
• Main Tune: Detunes Oscillator 4 up or down by one octave.
• Fine Tune: The control handles three functions depending on the key setting:
FINE TUNE: Detunes Oscillator 4 up or down by about one semitone
VELOCITY: Routes keyboard velocity to pitch with positive or negative amount.
KBD SCALE: Determines keyboard / pitch scaling. In center position, each key produces
the same pitch.
• Octave: Octave setting of Oscillator 4.
• Mode: Sets the ring-modulation algorithm:
CLEAN: Produces harmonically related waveforms, resulting in a clean sound.
RINGMOD: No harmonically related waveforms, resulting in a more noisy, dissonant or
chiming sound.
• A / B Mix: Crossfades between two wave presets.
• Swap A / B: Switches both wave presets: A becomes B and B becomes A.
RM
1
2
32 Wave-Presets
Output A
Output B
3 4 5 6
RM RM RM RM
Mod LFO
WaveformGeneration
Preset
1 x
cont.
Preset
Rate
Rate
Velocity Velocity
Level
A
B
Level
A
B
Preset
Preset
• Velocity: Puts wave preset morphing under velocity control.
• Mix A / B Panning: Enables a dedicated LFO to crossfade between the wave presets automatically.
OFF: LFO disabled.
A => B: Crossfades between presets A and B.
A => B => A: Crossfades between presets A to B and back to A.
A <=> A
REPEAT: Continuous crossfade between A and B.
• Rate: LFO frequency
Oscillator 4 modulation paths
The following gure shows the entire signal routing with inputs and outputs of Oscillator 4.
Inputs:
• The wave crossfade / mod input fed by the internal LFO.
• The pitch modulation input that is fed by the pitch envelope, the Vibrato LFO, and the noise source.
• The Tuning controls for manual pitch control.
Outputs:
• The audio output is split and used as ring modulation source for Oscillator 1.
LFO
Vel.
Vel.
Vel.
Vel.
Vel.
Vel.
Pitch
Mod
Noise
Mod
Tune
Wave
Mod
OSC 4
E
n
v
e
l
o
p
e
1
2
3
4
V
i
b
r
a
t
o
-
L
F
O
1
2
3
4
Vel.
x
Vel.
Vel.
Vel.
Vel.
E
n
e
o
p
e
134
Vel.
i
b
a
t
o
-
L
O
3
4
LFO
Vel.
Pitch
Mod
Noise
Mod
Tune
Wave
Mod
OSC 4
x
Audiosignals, Ring-Modulation
Modulation-Depth
Modulation-Depth with additional Velocity Control
Pitch/Noise-Modulation by Envelope 4
Pitch-Modulation by Vibrato LFO 4
to Osc 1 Ring Mod
Waveform-Modulation
Page 16
28
29
OSCILLATOR SECTION – PROGRAMMING OSCILLATOR SECTION – PROGRAMMING
PWM LFOS
These three LFOs are used to control pulse-width
modulation (PWM) of Oscillators 1, 2, and 3. They are
all designed identically. The parameters controlled by a
knob can be adjusted individually, the key functions are
the same for all three LFOs.
• Center: Pulse-width of pulse waveform or phase shift amount of saw waves respectively
(please refer to description of Oscillator 1 on page 19).
• LFO Depth: Modulation depth.
• LFO Rate: Modulation frequency.
• Assign to Rate 2/3: Assigns rate setting of LFO 1 to LFOs 2 and 3.
• Min/Max Limit: Limits LFO modulation depth in order to prevent signal cancellation when pulse-width
goes beyond a certain level.
• LFO Depth Velocity: Adds keyboard velocity to LFO Depth value.
• LFO Mode: Modulation waveform:
/\/\/\ : Continuous sine wave
/\/\/\ : Continuous triangular wave
I\ : One shot sawtooth wave
• LFO Rate
Kbd Scale: Scales the modulation speed (LFO Rate) of the PWM LFO across the keyboard. Reference
point is key A3:
1/2: Two octaves above A3 quadruples LFO rate; two octaves below A3 quarters the
LFO rate.
1/4: Two octaves above A3 doubles LFO rate; two octaves below A3 halves LFO rate.
OFF: PWM LFO rate is independent of played note position on the keyboard.
LFO Osc 1 common LFO settings
LFO Osc 2 LFO Osc 3
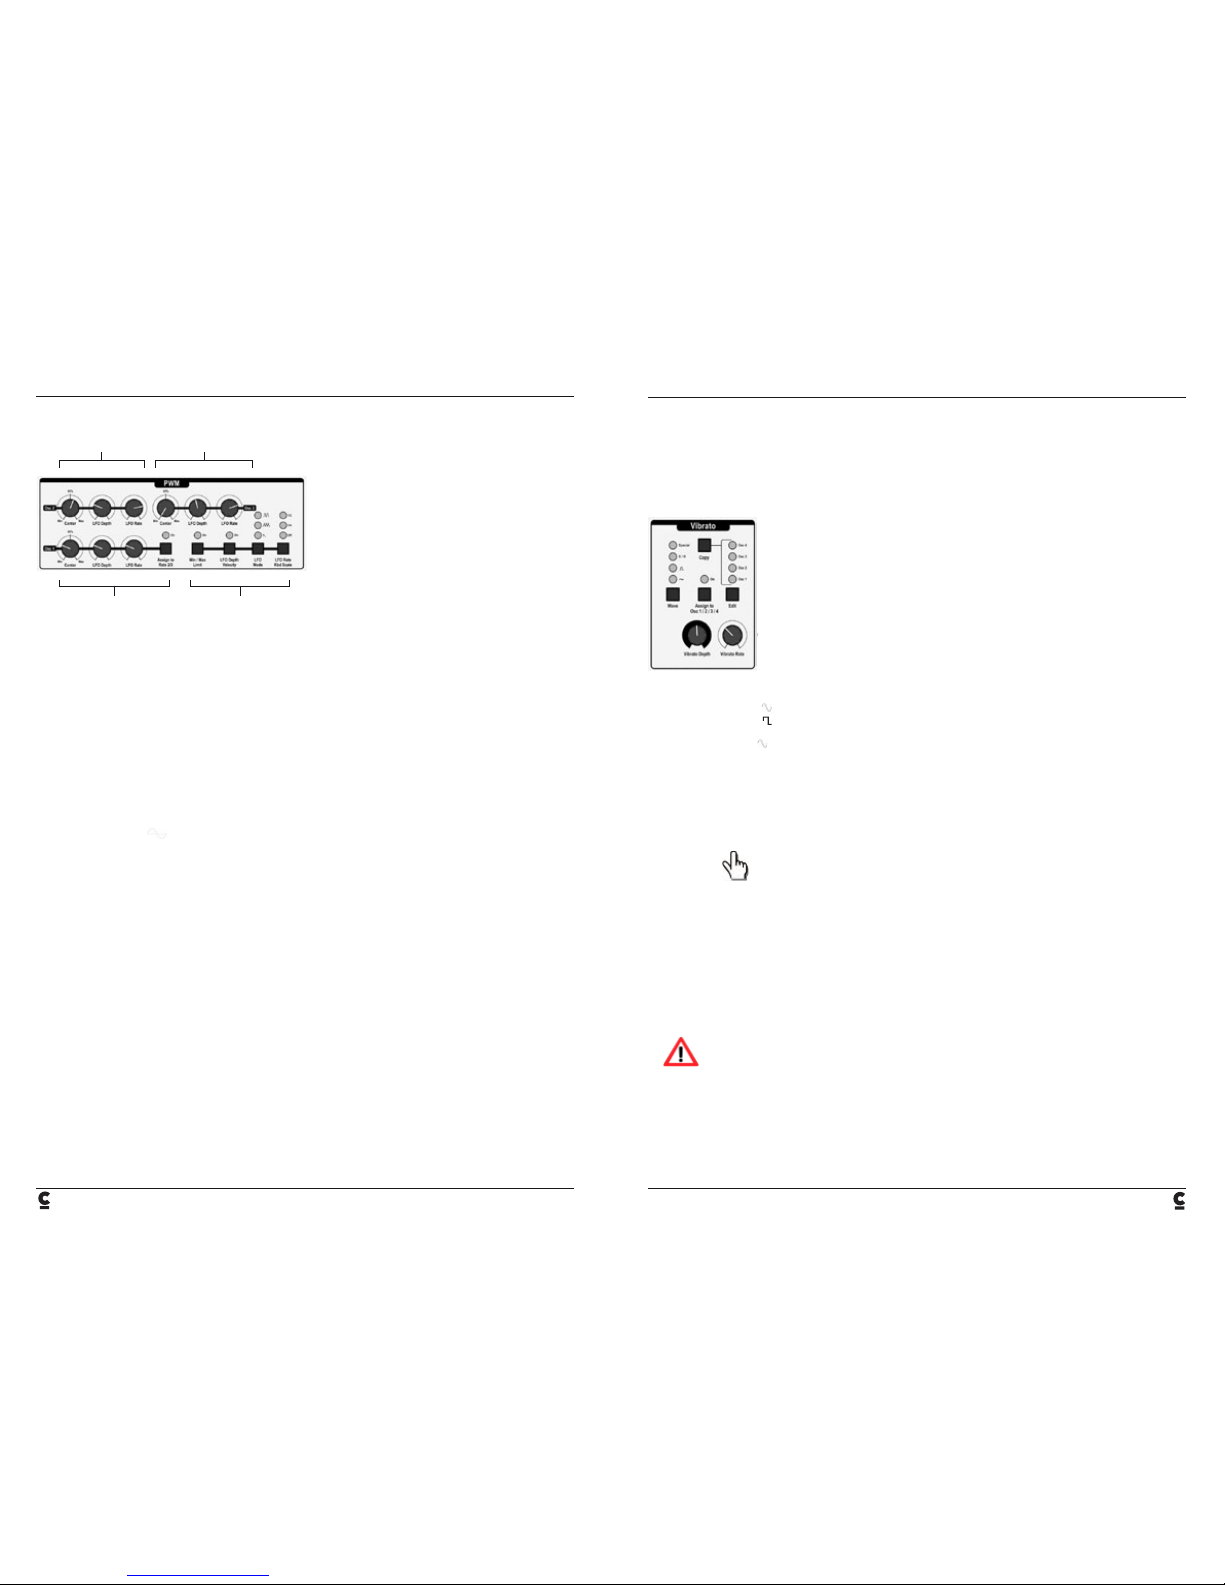
VIBRATO LFOS AND ENVELOPES IN THE OSCILLATOR SECTION
The Oscillator section features some more modulation sources to generate dynamic pitch modulation. For this
purpose you will nd a set of four LFOs (one for each Oscillator) and another set of four envelope generators (again
one for each Oscillator). That is truly generous.
Vibrato LFOs
These four identical LFOs govern the pitch of the four Oscillators. Each Oscillator can be
controlled by its dedicated LFO. The LFOs can be programmed individually or globally. All
four LFOs share the same set of controls.
• Wave: Vibrato LFO waveform
: Sine wave
: Square wave
S/H: Stepped random wave
+S/H: Smooth random wave (both LEDs ON)
Special: Space for future updates
• Vibrato Depth: Modulation depth.
• Vibrato Rate: Modulation frequency.
• Edit: Selects LFO to be edited.
• Copy: Copies settings from one LFO to another:
1 - Select e.g. LFO 1 using the Edit key.
2 - Adjust settings for LFO 1.
3 - Hit Copy key. OSC 2, OSC 3 and OSC 4 LEDs will start ashing.
4 - Hit Edit again to select LFO that is to have the settings of LFO 1.
Its LED keeps ashing.
5 - Hit Copy again to perform copy procedure.
6 - Repeat 3 - 5 to copy LFO 1 settings to other LFOs.
Assign to Osc. 1/2/3/4: If set to ”ON”, this function temporarily applies settings of the selected LFO to all other LFOs.
Settings return to programmed values as soon as Assign is disabled. This way it is easy to e.g. temporarily alter the
rate of all four LFOs globally at the same time and return to their programmed individual settings by just hitting the
Assign key once.
Please note: when using the Copy function or selecting an envelope, Assign to Osc. 1/2/3/4 has to be
disabled!
Page 17

30
31
OSCILLATOR SECTION – PROGRAMMING OSCILLATOR SECTION – PROGRAMMING
Envelopes
These four identical envelope generators directly govern the respective pitch of
the Oscillators. Also, they provide dynamic control over assigned parameters like
Vibrato Depth and Noise Modulation intensity. A simple example of application
would be vibrato fading in and out. Each Oscillator can be controlled by its
dedicated envelope. The envelopes can be programmed individually or globally.
All four envelopes share the same set of controls.
• ENV Destination: Selects the destination parameter:
PITCH: Oscillator pitch
VIBRATO
DEPTH: Modulation depth of the corresponding Vibrato LFO (e.g. ENV 1 controls
Vibrato LFO 1).
NOISE MOD: Modulation depth of Noise Modulation.
SPECIAL: Space for future updates
• Mode: Determines the shape of the envelope:
DECAY EXP: Exponential response
DECAY LIN: Linear response
ATTACK/
DECAY: Rising and falling envelope
SPECIAL: Space for future updates
• ENV Depth: Determines modulation depth:
- No pitch / vibrato / noise modulation in center position.
- When turned clockwise, the pitch rises or the vibrato / noise modulation intensity fades in
respectively.
- When turned counter-clockwise, the pitch lowers or the vibrato / noise modulation intensity
fades out respectively.
• Velocity: Includes keyboard velocity into ENV Depth values.
• ENV Time: Controls the duration of the envelope cycle or shortens and/or extends modulation fade in/out
respectively.
• Quantize: Provides a stepped progression of pitch rise / fall. Only active when
ENV Destination „PITCH“ is enabled.
• Edit: Selects envelope to be edited.
• Copy: Copies settings from one envelope to another:
1 - Select e.g. envelope 1 by hitting Edit key.
2 - Adjust settings for envelope 1.
3 - Hit Copy key. OSC 2, OSC 3 and OSC 4 LEDs will start ashing.
4 - Hit Edit again to select envelope that is to have the settings of
envelope 1. Its LED keeps ashing.
5 - Hit Copy again to perform copy procedure.
6 - Repeat 3 - 5 to copy envelope 1 settings to other envelopes.
• Assign to
Osc 1/2/3/4: If set to ”ON”, this function temporarily applies settings of a selected envelope to all other
envelopes (has to be disabled when using the Copy function / selecting envelopes!).
Settings return to programmed values as soon as Assign is disabled. This way it is easy to e.g. temporarily sweep the
respective pitch of all three Oscillators globally and return to their programmed individual settings by just hitting the
Assign key once.
OSCILLATOR MODULATION AND INTERACTION
Congratulations, you have just managed all the controls of Schmidt‘s mightily powerful Oscillator section. In order to
recap and deepen your knowledge, we will now have a look at the entire Oscillator section and nd out about how
all the different modulation paths are connected to the four Oscillators and their modiers. You can use the following
illustrations in combination with your recently gained knowledge of the Oscillator functions.
Pitch Modulation
The following gure shows the pitch modulation paths of all four Oscillators except the Oscillator envelopes.
Pitch
Mod
from ENV 1
from ENV 1-4
from ENV 2
from ENV 3
from ENV 4
Pitch
Mod
Pitch
Mod
Level
Mod
Tune
OSC 1
SUB-OSC 1
Tune
OSC 2
SUB-OSC 2
Vel.
Tune
Pitch
Mod
Tune
OSC 3
OSC 4
V
i
b
r
a
t
o
-
L
F
O
1
2
3
4
Vel.
x
+
+
x
x
x
Pitch
Mod
Tune
OSC 1
SUB-OSC 1
x
Vel.
V
b
a
t
o
-
L
O
2
3
4
Pitch
Mod
Tune
OSC 2
SUB-OSC 2
from ENV 3
Pitch
Mod
Tune
OSC 3
Pitch
Mod
Tune
OSC 4
x
Modulation-Depth
Modulation-Depth with
additional Velocity Control
Level-Modulation
Pitch-Modulation
by Vibrato LFO 1-4
Vel.
Vel.
Add. Pitch Mod
M/F-
Pitch
LFO
+
Vel.
Vel.
M/F
Pitch
LFO
Page 18

32
33
OSCILLATOR SECTION – PROGRAMMING OSCILLATOR SECTION – PROGRAMMING
Here you will see the pitch modulation paths of all four Oscillators with envelopes but without the Vibrato LFOs.
Noise
Mod
Pitch
Mod
Pitch
Mod
Pitch
Mod
Level
Mod
Tune
from Vibrato
LFO 1
from Vibrato
LFO 2
from Vibrato
LFO 3
from Vibrato
LFO 4
to
Vibrato LFO 1-4
OSC 1
SUB-OSC 1
LFO
Noise
Mod
Tune
OSC 2
SUB-OSC 2
Vel.
Vel.
Vel.
Vel.
Vel.
Vel.
Noise
Mod
Tune
Pitch
Mod
Noise
Mod
Tune
Wave
Mod
OSC 3
OSC 4
E
n
v
e
l
o
p
e
1
2
3
4
Vel.
x
+
+
x
x
x
Noise
Mod
Pitch
Mod
Tune
OSC 1
SUB-OSC 1
x
Vel.
Vel.
Vel.
Vel.
Envel
o
p
e
2
3
Pitch
Mod
Noise
Mod
Tune
OSC 2
SUB-OSC 2
Pitch
Mod
Noise
Mod
Tune
OSC 3
x
LFO
Vel.
Pitch
Mod
Noise
Mod
Tune
Wave
Mod
OSC 4
Modulation-Depth
Modulation-Depth with additional Velocity Control
Level-Modulation
Pitch/Noise-Modulation by Envelope 1-4
Vel.
Vel.
Add. Pitch Mod
M/F-
Pitch
LFO
+
Vel.
Vel.
M/F
Pitch
LFO
Pulse Width Modulation
This gure shows the interaction between the Oscillators and their PWM modiers or the waveform modulation LFO of
Oscillator 4 respectively.
Multi
PWM
Multi
PWM
Vel.
Vel.
PWM
OSC 1
1
2
3
SUB-OSC 1
LFO-
Space
P
W
M
-
L
F
O
Sync
LFO-
Width
LFO
PWM
OSC 2
SUB-OSC 2
Vel.
PWM
Wave
Mod
OSC 3
OSC 4
Vel.
Vel.
Vel.
Vel.
+
+
Multi
Multi
PWM
Vel.
Vel.
PWM
OSC 1
SUB-OSC 1
LFO-
Space
LFO-
Width
3
P
M
L
F
O
Sync
Vel.
Vel.
Vel.
OSC 2
SUB-OSC 2
PWM
OSC 3
LFO
Vel.
Wave
Mod
OSC 4
Modulation-Depth
Modulation-Depth with
additional Velocity Control
Pulsewidth-Modulation
(Osc 1-3)
Waveform-Modulation
(Osc 4)
Page 19

34
35
OSCILLATOR SECTION – PROGRAMMING OSCILLATOR SECTION – PROGRAMMING
Ringmodulation, FM and Sync
Here you will see the signal routing of the audio modulation paths (FM and ring-modulation) as well as the
sync connection.
Ring
mod
Ring
mod
OSC 1
SUB-OSC 1
Sync
OSC 2
SUB-OSC 2
FM
OSC 3
OSC 4
+
+
OSC 1
SUB-OSC 1
OSC 4
OSC 2
SUB-OSC 2
Ring
mod
FM
OSC 3
Audiosignals (Ring-Mod, FM)
Modulation-Depth
Sync
Complete Oscillator modulation routing
Finally, you can have a look at the complete Oscillator modulation routing. Please note that all these modulations can
be used all at once if so desired. You have got the entire scope at your ngertips, from the purest and most beautiful
timbres to absolute sonic mayhem – please feel free to experiment.
Noise
Mod
Pitch
Mod
Pitch
Mod
Pitch
Mod
Level
Mod
Multi
PWM
Multi
PWM
Vel.
Vel.
Tune
PWM
Ring
mod
OSC 1
1
2
3
SUB-OSC 1
LFO-
Space
P
W
M
-
L
F
O
Sync
Sync
LFO-
Width
LFO
Noise
Mod
Tune
PWM
OSC 2
SUB-OSC 2
Vel.
Vel.
Vel.
Vel.
Vel.
Vel.
Noise
Mod
Tune
PWM
FM
Ring
Mod
Pitch
Mod
Noise
Mod
Tune
Wave
Mod
OSC 3
OSC 4
E
n
v
e
l
o
p
e
1
2
3
4
Vel.
Vel.
Vel.
V
i
b
r
a
t
o
-
L
F
O
1
2
3
4
Vel.
x
+
+
x
x
x
Noise
Mod
Pitch
Mod
Multi
PWM
Multi
PWM
Vel.
Vel.
Tune
PWM
Ring
mod
OSC 1
SUB-OSC 1
LFO-
Space
LFO-
Width
Sync
1
P
M
F
O
2
3
Vel.
Vel.
Vel.
Vel.
Vel.
Vel.
Vel.
n
v
e
l
o
p
e
1
3
4
Vel.
b
r
a
t
o
L
O
2
3
4
Pitch
Mod
Noise
Mod
Tune
OSC 2
SUB-OSC 2
x
Pitch
Mod
Noise
Mod
Tune
PWM
FM
Ring
Mod
OSC 3
x
LFO
Vel.
Pitch
Mod
Noise
Mod
Tune
Wave
Mod
OSC 4
x
Audiosignals (Ring-Modulation, FM)
Modulation-Depth
Modulation-Depth with additional Velocity Control
Sync, Level-Modulation
Pulsewidth-Modulation
Pitch/Noise-Modulation by Envelope 1-4
Pitch-Modulation by Vibrato LFO 1-4
Vel.
Vel.
Add. Pitch Mod
M/F-
Pitch
LFO
+
Vel.
Vel.
M/F
Pitch
LFO
Page 20

36
37
GROUP INPUT – PROGRAMMING GROUP INPUT – PROGRAMMING
GROUP INPUT MODULES
When recalling the function overview on page 11, you might remember that, beyond the Oscillator section, Schmidt‘s
signal path is divided into two parallel and almost identical sections. Each of these sections, called Groups, sports
a lter array to shape the Oscillator timbres with. Splitting up the signal path into two parallel groups allows for the
creation of two very different timbres out of the Oscillator signals at the same time. Apart from the lters, which we will
explore soon, both groups contain input and output routing modules that allocate the different Oscillator signals to the
available lter inputs, and later combine the lter outputs into one stereo signal.
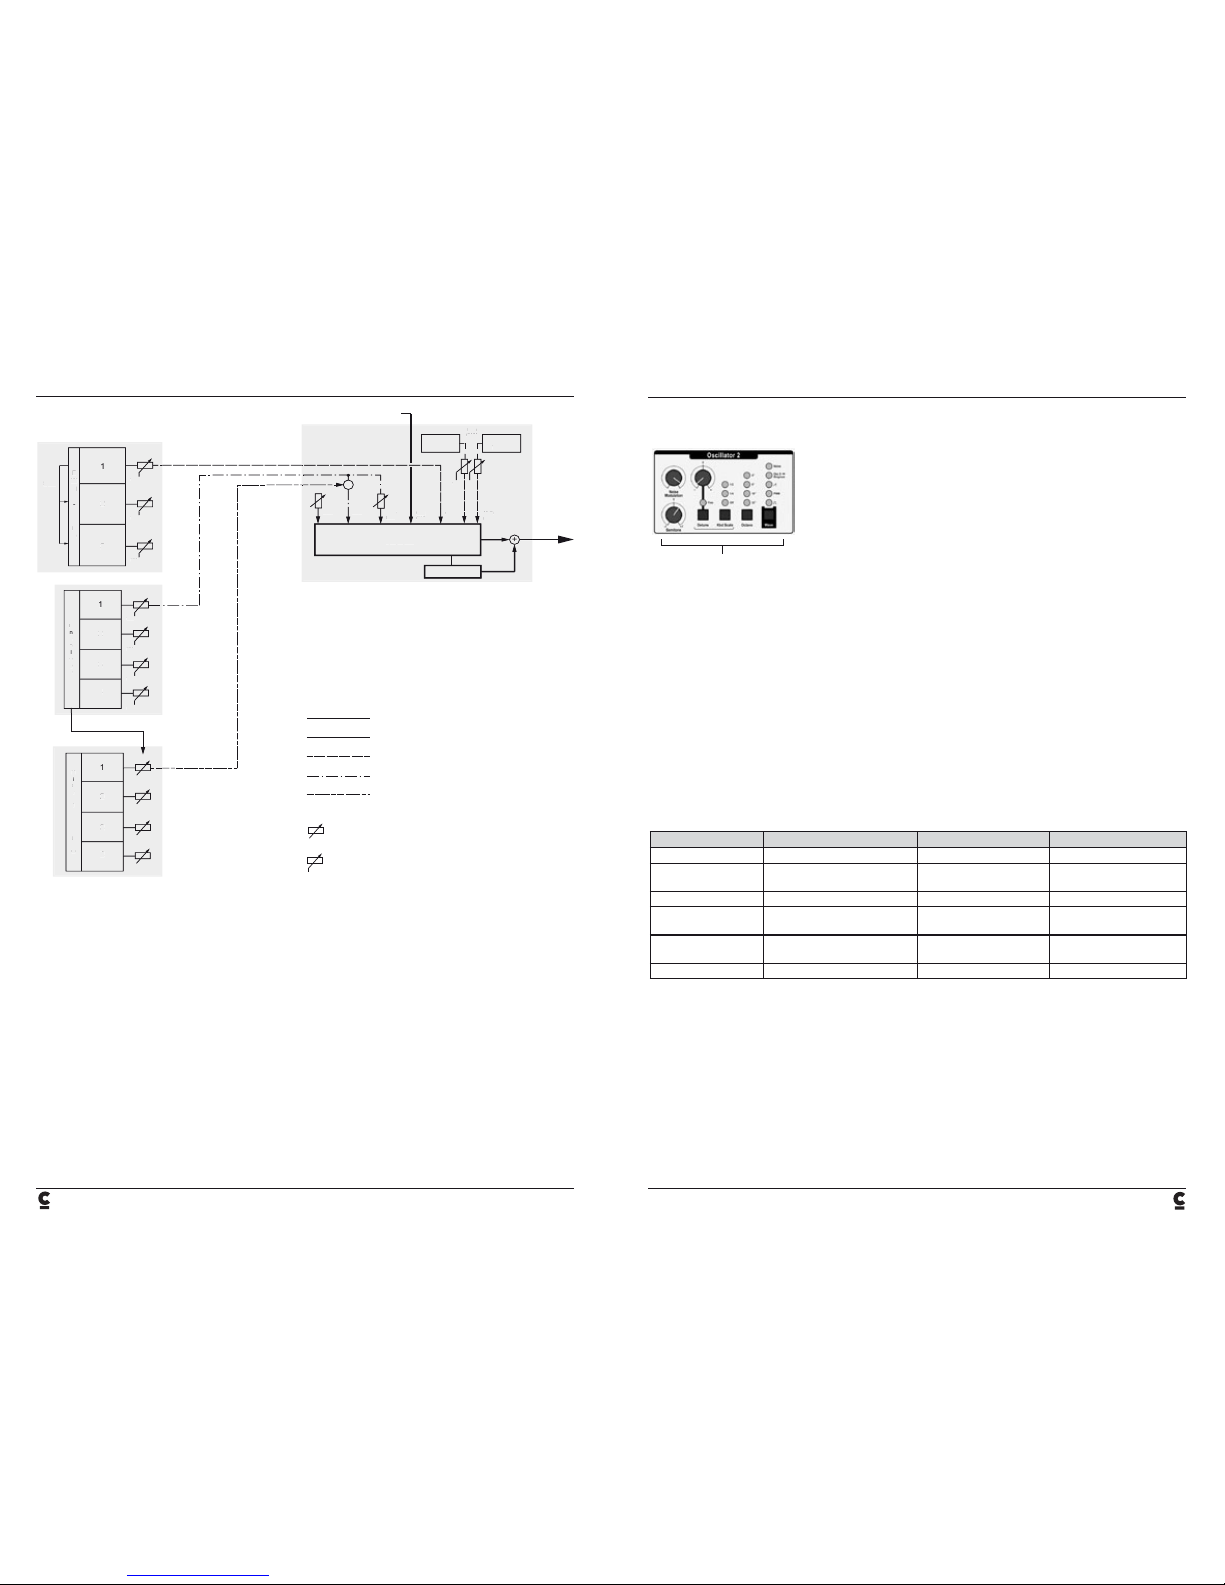
Following the signal path, we will have a closer look at the Group Input modules rst.
Group Inputs:
Each Group has two parallel lters (VCF and Dual Filter / DF)
and each of these lters has two inputs (A and B). All four
Oscillator outputs can be routed to each of these inputs by
using the controls of the Group Inputs.
Group 1 In
signal source selection
and mixer for filter inputs
Group 1
Group 2 In
signal source selection
and mixer for filter inputs
Group 2
Oscillator 1
Sub-Osc
RMRM
Audio
Audio Modulation
FM
Sync
A
B
A
B
Oscillator 2
Oscillator 3
Oscillator 4
Sub-Osc
G
r
o
u
p
1
I
n
G
r
o
u
p
2
I
n
G
r
o
u
p
1
O
u
t
L
e
v
e
l
-
M
o
d
P
a
n
n
i
n
g
-
M
o
d
P
a
n
n
i
n
g
-
M
o
d
L
e
v
e
l
-
M
o
d
G
r
o
u
p
2
O
u
t
VCF 1
Voice Out
Stereo Out /
Headphone
Out
VCF 3
Master
VCA
R
L
Dual Filter 1
Dual Filter 2
VCF 2
Mod In
Mod In
In A/B
Out
Out A
Out B
Out A
Out B
Out
A
B
B
B
B
A
A
A
In A/B
In A
In B
In A
In B
G
r
o
u
p
1
O
u
t
VCF 1
Dual Filter 1
Mod In
In A/B
Out
Out A
Out B
In A
In B
B
G
o
u
p
2
O
u
t
Dual Filter 2
VCF 2
Mod In
Out A
Out B
Out
In A/B
In A
In B
Group 1
Group 2
G
r
o
u
p
I
n
A
B
G
r
o
u
p
2
I
B
A
GROUP 1 IN
Group 1 In feeds both lters of group 1 with all available Oscillator signals. You will nd the following controls:
VCF 1
• Input A: Selects one Oscillator output and routes it to input A of VCF 1.
• Level A: Adjusts the level of the signal fed into input A of VCF 1.
• Input B: Selects one Oscillator output and routes it to input B of VCF 1.
• Level B: Adjusts the level of the signal fed into input B of VCF 1.
• Input B =>
Filter Modulation: Feeds the signal of Input B into the cut-off modulation input of VCF 1 instead of
Input B to produce lter frequency modulation.
• DF1 Out => VCF1: Adjusts the signal amount that is fed into the input of VCF 1 by Dual Filter 1 output.
The standard parallel conguration of VCF 1 and DF 1 is now gradually morphed into a
serial conguration.
Please note that the parallel outputs are still available together with the serial routing.
DF 1
• Input A: Selects one Oscillator output and routes it to input A of Dual Filter 1.
• Level A: Adjusts the level of the signal fed into input A of Dual Filter 1.
• Input B: Selects one Oscillator output and routes it into input B of Dual Filter 1.
• Level B: Adjusts the level of the signal fed into input B of Dual Filter 1.
• Mix A+B: Mixes inputs A and B.
GROUP 2 IN
Group 2 In feeds both lters of group 2 with all available Oscillator signals. Group 2 is structured exactly like Group 1.
Page 21

38
39
FILTER SECTION – PROGRAMMING FILTER SECTION – PROGRAMMING
FILTER SECTION
As has previously been mentioned, the lter section is divided into two nearly identical groups to provide two different
sonic treatments of the Oscillator signals in parallel. In addition to this, a third signal path can be found which feeds a
very simple lter. After the lter section, the signals are combined in a stereo sum.
Since both groups and their respective lter sets are structured in an almost identical fashion, we will focus on just one
group in detail and discuss the little differences later.
The following gure shows the controls of the entire lter section. As with the Oscillator section, the lter section also
contains all the necessary modulation sources (envelopes and LFOs).
Oscillator 1
Sub-Osc
RMRM
Audio
Audio Modulation
FM
Sync
A
B
A
B
Oscillator 2
Oscillator 3
Oscillator 4
Sub-Osc
G
r
o
u
p
1
I
n
G
r
o
u
p
2
I
n
G
r
o
u
p
1
O
u
t
L
e
v
e
l
-
M
o
d
P
a
n
n
i
n
g
-
M
o
d
P
a
n
n
i
n
g
-
M
o
d
L
e
v
e
l
-
M
o
d
G
r
o
u
p
2
O
u
t
VCF 1
Voice Out
Stereo Out /
Headphone
Out
VCF 3
Master
VCA
R
L
Dual Filter 1
Dual Filter 2
VCF 2
Mod In
Mod In
In A/B
Out
Out A
Out B
Out A
Out B
Out
A
B
B
B
B
A
A
A
In A/B
In A
In B
In A
In B
G
r
o
u
p
1
O
u
t
G
r
o
u
p
I
B
A
G
o
u
p
2
O
u
t
G
r
o
u
p
B
B
A
Group 1
Group 2
VCF 3
B
VCF 1
Dual Filter 1
Mod In
In A/B
Out
Out A
Out B
In B
A
B
Dual Filter 2
Out A
Out B
VCF 2
Mod In
Out
In A/B
In A
Group 1
Group 2
VCF 1
Moog style filter Group 1
with envelope and LFO for
cutoff modulation and
LFO for level modulation
Input B Group 1
VCF 3
12 dB Lowpass filter
Dual Filter 1
Dual-Multimode Filter Group 1
Dual Filter 1/2
Modulation of Dual Filter 1
and 2 (LFO, Ramp-Gen.)
Dual Filter 2
Dual-Multimode Filter Group 2
VCF 2
Moog style filter Group 2
with envelope and LFO for
cutoff modulation and
LFO for level modulation
Input B Group 2
Lets use our magnifying glass again. The following gure shows the entire signal path of one group plus lter 3 in a
more detailed way:
On the left-hand side you see the Group In module with the level controls and routing keys. Centrally, you will nd the
three lters (one group plus lter 3). On the right-hand side you will see the Group Out Mix module that combines the
lter outputs.
FILTER 3
Let‘s start with Filter 3. Its a very simple 12 dB (two-pole) low-pass lter. The
cut-off frequency can be adjusted but not modulated (no envelops or LFOs). It
does a good job when fattening up signals even a bit more. It also adds some
girth to harsh and gritty timbres if so desired.
• Input: Selects one Oscillator output and routes it to the input of VCF 3.
• Cutoff: Cut-off frequency of VCF 3 (no modulation).
+ +
+
+
+
+
Input
A
Level
Filter Mod
Level
Level
DF Out > VCF
Level
Group
Out
Filter 3
VCF
Distorsion
Dual Filter
A
B
Input
B
Input
Input
A
Mix
A+B
FiltMod
A>B
Input
B
Dual Filter
FiltMod
A>B
VCF
Filter 3
Distorsion
Page 22

40
41
FILTER SECTION – PROGRAMMING FILTER SECTION – PROGRAMMING
VCF 1 / 2
Each VCF uses two inputs (A and B) that are combined. The VCFs are 24 dB (four-pole) lters with resonance and
continuously variable response characteristics. In low-pass mode, they equal the classic Moog lter. Response
characteristics, cut-off frequency and resonance can be adjusted, cut-off frequency can be modulated by keyboard
position (Key Follow), keyboard velocity, envelope, and LFO. Input B can be used as cut-off modulation source as
well. Each VCF sports an envelope generator and an LFO. LFOs can be combined and synced to each other. An
additional modulation source controls the level of input B (Level B Mod).
Filter Controls:
• Filter Mode: Shifts the lter response characteristics continuously from low-pass to band-pass to high-pass.
• Cutoff: Cut-off frequency.
• Resonance: Resonance intensity.
Cut-off modulation controls:
All values are added to the resulting modulation depth. Please refer also to section „Real Time Controllers“ on
page 62.
• Key Follow: Adds the key position to cut-off modulation amount. Negative values invert the effect.
• Velocity (control): Adds keyboard velocity to cut-off modulation amount. Negative values invert the effect.
• ENV Depth: Adds the envelope to cut-off modulation amount. Negative values invert the polarity of
the envelope.
• LFO Depth: Adds LFO modulation to cut-off modulation amount. Negative values invert the effect of
the LFO curve.
• Velocity (key): When enabled, keyboard velocity affects the LFO modulation depth.
Filter controls Cutoff modulation controls
Envelope for Cutoff modulation LFO for
cutoff modulation
Ramp/LFO for
Input B
level modulation
(only on VCF 2)
• Source: Selects the LFO(s) from VCF 1 and/or VCF 2 as VCF frequency modulation sources.
If both LFOs are selected, their modulation signals are combined. Use different rates and
waveshapes to produce more complex cut-off modulation.
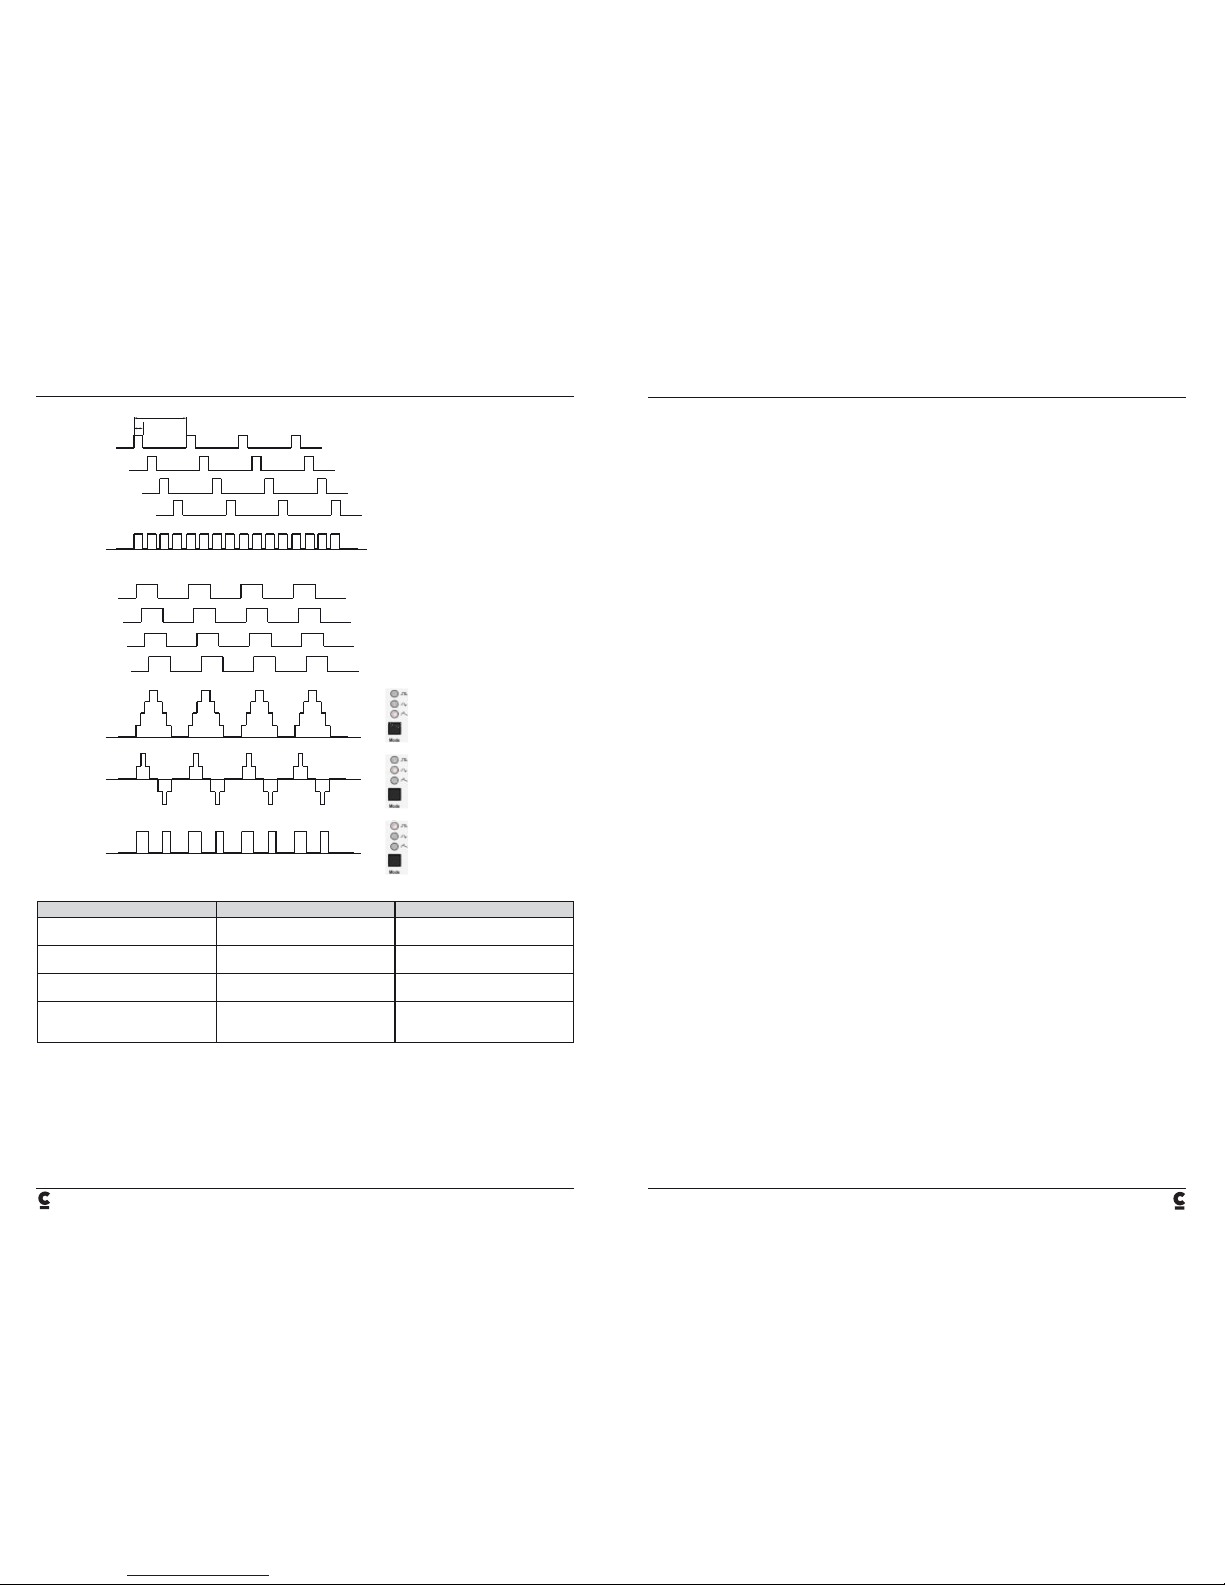
LFO controls:
The LFOs modulate the VCF cut-off frequency periodically. They sport several operation modes:
• In Standard LFO Mode (”Ramp” OFF), ”Rate” controls the LFO frequency and ”LFO Mode” determines the
modulation shape.
• In Fade Mode, the LFO generates a fade in/out modulation. The fade time is adjusted using the ”Time” control.
• In Clock Mode, more complex and random modulation waveshapes are produced. The settings of ”Time”,
”Rate” and ”Mode” determine the resulting modulation waveshape.
The following gure shows the different possible settings and their resulting waveshapes:
Standard LFO Mode:
Fade in/out Modulation Mode (available waveshapes as above):
Clock Mode (different complex waveshapes, depending on ”Mode” setting):
Staircase voltage:
Waveshapes:
(Random)
or
resulting LFO wave:
(staircase voltage)
LFO wave
(triangle or sine)
Clock pulses
or
Time
(Fade)-Time
”Bended“ squarewave (decaying shape):
Random Modulation:
resulting LFO wave:
(“bended“ squarewave / decay)
results in randomly altered
modulation depths
Clock pulses
LFO wave (square)
Time
Rate
Rate
Rate
Clock pulses
Time
Rate
all
available
Page 23

42
43
FILTER SECTION – PROGRAMMING FILTER SECTION – PROGRAMMING
LFO synchronisation:
LFO VCF 2 can be synchronised to LFO VCF 1. LFO VCF 1 produces a clock signal that is run through a divider and
then fed into LFO VCF 2. That way, both LFOs cannot only run in sync but also at different frequency ratios.
This is how to enable the sync function:
1 - Select Ramp = ”CLK” on both LFOs.
2 - Select any waveshape (”LFO Mode” key) on LFO VCF 1. This setting, in combination with the
LFO 1 Rate setting, determines the waveshape that modulates VCF 1.
3 - Select desired waveshape of LFO VCF 2 (”Mode“). This setting, in combination with the LFO 2 Rate
setting, determines the waveshape that modulates VCF 2.
4 - Hit Ramp in LFO VCF 2 again. The ”SPECIAL“ LED lights up and indicates that both LFOs are now
running in sync.
5 - Alter Mode (waveshape), Rate and Time settings of both LFOs as you please.
The following gure shows the interaction of both LFOs when sync is active.
Please bear in mind that you can swap or mix both LFO signals using the Source keys. Really wild modulation is
waiting for you.
LFO VCF 1
LFO VCF 2
Clock pulses of LFO VCF 1
Clock LFO VCF 1
(Time knob LFO VCF 1)
resulting waveshape of
LFO VCF 2
”omitted“ wave run
Clk + Special
all
available
all
available
Clock divider 1/1 to 1/8
(Time knob LFO VCF 2)
Time
Clock-Divider (Time LFO VCF 2)
Rate
Rate
Waveshape of LFO VCF 2
”Rate” and ”Mode” determine the waveshapes, ”Time” determines the master clock resp. clock divider.
LFO VCF 1
LFO VCF 2
MIDI-clock sync:
Both LFOs can be synced to MIDI clock. These settings have to be executed using a menu. Please have a closer look
at the Edit section on Schmidt‘s panel.
1 - Hit the Menu Key until the PRESET EDIT LED
lights up. You are in the Preset Edit menu now.
2 - Hit Parameter up/down keys to turn the menu
pages until you enter the second page of the
Preset Edit menu.
Now the LCD shows the following screen:
Use this page to set the sync options of the LFOs of VCF1/2:
• Key-Reset: restarts the VCF1/2 LFOs via note-on
information.
• MIDI-Sync: synchronizes VCF1/2 LFOs to MIDI clock.
When enabled, you can select between 13
different clock divider ratios.
„INT.“ means MIDI clock sync is disabled.
• Cursor left/right: Previous/next function
• Value up/down: Change value
• Exit: Quits Edit LFO Mode 1 page.
Envelope controls:
The envelopes ENV 1 and ENV 2 apply a modulation curve to the cut-off frequency of VCF 1 or VCF 2 respectively.
The following gure shows the envelope curve and its time and level parameters:
Edit LFO Mode 1
Cur : Par Val : Edit
Exit / Write
VCF1 Key-Reset: On
VCF2 Key-Reset: On
VCF1 Midi-Sync: Int.
VCF2 Midi-Sync: Int.
Par : Page
Note On Note Off
Sustain Level (Decay 2 OFF)
Sustain Level (Decay 2 ON)
A
A-Delay
D 1
D 2
R
Edit LFO Mode 1
Cur : Par Val : Edit
Exit / Write
VCF1 Key-Reset: On
VCF2 Key-Reset: On
VCF1 Midi-Sync: Int.
VCF2 Midi-Sync: Int.
Par : Page
Page 24

44
45
FILTER SECTION – PROGRAMMING FILTER SECTION – PROGRAMMING
• Trigger Delay: Delays the start of the Attack phase.
• Attack: Adjusts rise time from zero to maximum level.
• Decay 1: Adjusts fall time from maximum level to Sustain Level
• Sustain: Adjusts Sustain level.
• Decay 2 (control): Adjusts fall time from sustain level before receiving note-off message.
• Decay 2 (key): Enables / disables Decay 2 phase.
• Release: Adjusts fall time from sustain level after receiving note-off message.
• Re-Trigger: Retriggers the envelope if a new note-on message is received before the previous envelope
duty circle has been completed fully.
OFF: Envelope starts at the current level of the previous envelope duty cycle.
ON : Envelope starts at zero level.
• Destination: Determines which envelope modulation parameter is affected by keyboard velocity:
OFF: No keyboard velocity on envelope parameters.
DEPTH: Keyboard velocity controls envelope modulation depth.
ATTACK: Keyboard velocity controls Attack phase.
DECAY: Keyboard velocity controls Decay phase.
• Velocity: Adjusts the effect of the keyboard velocity control on the parameters listed above.
Negative values invert the effect.
Please note: Do not confuse this with the cut-off modulation control also named ”Velocity” (see above).
Envelope Trigger Repeat:
If Trigger Repeat is enabled, a trigger generator becomes active which continuously retriggers Envelope 1 as soon as
a note-on message comes in. This results in a gate-like chopping effect. Its shape can be controlled by Attack,
Decay, and Sustain parameters of envelope 1 (Trigger Delay, and Release become inactive).
The intensity is adjusted individually for VCF 1 and VCF 2 by the ENV Depth controls. Envelope VCF 2 generates its
usual ADSR shape that is now controlling the intensity of the effect dynamically. This way you can fade the chopping
effect in and out.
• Trigger Repeat (VCF 2): Enables the Envelope Trigger Repeat function.
• Rate (VCF 2): Controls the frequency of the Trigger Repeat.
The following two gures explain the function of the Trigger Repeat:
Note On
Re-Trigger OFF
Note OnNote Off Note Off
Note On
Re-Trigger ON
Re-Trigger OFF
Note OnNote Off Note Off
Note On Note OnNote Off
Note Off
Trigger Gen.
ENV VCF 1
ENV Depth
VCF 1
VCF 1
Cutoff Mod.
VCF 2
Cutoff Mod.
ENV Depth
VCF 2
Reset
Rate
Trigger
Trigger
Note On/Off
ENV VCF 2
X
(ADS)
AAD
D
S
S
R
(ADSR)
Trigger
short Attack
short Decay
Sustain = 0
long Attack
Decay = 0
Sustain = max
Note On Note Off
ENV 1
ENV 2
resulting
ENV shape
A
A R
D
Rate
Operation principle of the lter envelope trigger generator:
Operation example of the lter envelope trigger generator:
Level B Mod controls:
This section controls the level of the VCF input B. It is a kind of ”mini envelope / LFO combination”. This feature can
be very useful especially when input B is used for cut-off modulation (please refer to section Group In on page 36, 37).
That way you can fade the modulation effect in and out.
• ENV: Determines the shape of the modulation:
/I: Rising ramp (one shot)
I\: Falling ramp (one shot)
/\/\: Triangular waveshape (continuous)
• Time: Adjusts the modulation rate.
• Velocity: When enabled, keyboard velocity affects modulation depth.
Page 25

46
47
FILTER SECTION – PROGRAMMING FILTER SECTION – PROGRAMMING
Filter modulation summary:
In order to grasp this rather complex operation fully, please memorize the following gure: It shows the audio signal
path and all modulation paths of the VCF:
• Audio runs from inputs A and/or B through the lter where it is processed further.
• Input B level can be modulated (Level B Mod) and/or used for cut-off modulation in the audio range
(Input B > Filter Mod).
• The output signal of the Dual Filter can be mixed into the VCF input (DF Out > VCF).
In the lower half of the following gure the cut-off modulation sources are displayed: The envelope with its retrigger
generator as well as LFO VCF 1 and LFO VCF 2. Last but not least, the different modulation depth controls (Cutoff,
Key Follow, Velocity) are listed, along with the VCF envelope and LFO(s).
+ +
Input
A
Level
Out
Time
Sync
ENV Ve l
Input B >
Filter Mod
DF Out > VCF
VCF
Input
B
Level B Mod
Envelope
LFO 1
Cutoff ResoFltr Mode
+
Cutoff Mod
Modulation Sources
Key
Cut
Vel
Vel
ENV LFO
Vel
LFO 2
Retrigger
+
VCF
Cutoff
Reso
Fltr Mode
DUAL FILTER 1 / 2
Dual Filter 1 and 2 are structured identically. Each of the to Dual Filters offers a pair of parallel multi-mode (statevariable) lters with 12 dB slope each and variable resonance. Each half of the lter section uses its own input (A
and B).
Cutoff and Space can be adjusted separately for each part of the lter section, resonance and response
characteristics are governed by a common control for both lters and a selector key. Modulation sources are keyboard
velocity as well as one LFO and one envelope / ramp generator. The latter is shared by Dual Filter 1 and Dual Filter 2.
Instead of the internal LFOs, both VCF LFOs can be used as modulation sources.
Individual controls for DF 1 and DF 2:
Filter controls:
• Cutoff: Cut-off frequency
• Space: Spacing between the respective cut-off frequencies of the two lter sections.
Cutoff / Space modulation controls:
• Key Follow: Adds key position to the cut-off modulation amount. Negative values will invert the effect.
• Velocity: Adds keyboard velocity to the cut-off / space modulation amount. Negative values will invert
the effect.
Filter controls
individual controls for DF 1 / 2 common controls for DF 1 / 2
LFO
Cutoff / Space
modulation controls
Envelope / Ramp
generator
Modulation source
assignments
Filter
controls
Filter
selection
Note Position (Pitch)
Cutoff
Frequency
Key Follow ”0”
Key Follow ”+”
Key Follow ”–”
Center ”A3“
Page 26

48
49
FILTER SECTION – PROGRAMMING FILTER SECTION – PROGRAMMING
• Env Depth: Adds envelope / ramp generator modulation to cut-off / space modulation amount. Negative
values will invert the shape of the envelope / ramp.
• Assign DF 1 Value: (six keys, only DF 2) If enabled, the related parameter uses (copies) the value setting of DF 1.
Again, all values are added to the resulting modulation depth. Please refer to page 59.
LFO controls:
• LFO Depth: Adds LFO modulation to cut-off / space modulation amount. Negative values will invert the
effect of the LFO curve.
• LFO DF Rate: LFO modulation rate.
• LFO Source: Selects the LFO that is modulating the Dual Filter:
LFO DF 1
LFO VCF 1
LFO VCF 2
When LFO VCF 1 or 2 is selected, all sync features of these LFOs can be used in conjunction with the Dual Filters.
Common controls for DF 1 / 2:
Filter controls:
• DF1 / DF2: Assigns all following functions to DF1 or DF2. If both LEDs light up, DF2 temporarily uses
the settings of DF1. Switching back to LED DF1, reverts to DF2s individual settings.
• Copy: Hitting the Copy key twice copy/pasts the current settings to the respective other Dual Filter.
• Resonance: Resonance intensity can be selected in seven steps.
• Filter Mode AB: Selects the response characteristics of both lter sections:
LP / LP: Both lter sections = lowpass. Producing a 24 dB low-pass lter.
LP / HP: Filter A = lowpass, lter B = highpass. Producing a notch lter.
BP / BP: Both lter sections = bandpass. Producing a comb lter.
HP / HP: Both lter sections = highpass. Producing a 24 dB high-pass lter.
BP / BP
=> Comb
LP / LP
=> LP
HP / HP
=> HP
LP / HP
=> Notch
Filter A
Cutoff
Space
Filter B
Freq. Freq.
Freq.
Freq.
Filter A
Cutoff
Space
Filter B
Filter A
Filter B
Cutoff
Space
Filter A Filter B
Cutoff
Space
Modulation source assignments:
• Velocity: Keyboard velocity modulates cut-off or space.
• LFO: LFO modulates cut-off or space.
• ENV: Envelope / Ramp modulates cut-off or space.
• Filter Mod A->B: Output signal of lter section A modulates cut-off frequency of lter section B.
• ENV Depth Velocity: Envelope modulation depth is controlled by keyboard velocity.
Envelope / Ramp generator:
The Envelope / Ramp generator is a modulation source that produces an ADR envelope for shaped modulation or
32 waveshapes for complex continuous modulation of cut-off or space.
• ENV Mode: Selects the operation mode of the Envelope / Ramp generator:
=> ADR - ENVELOPE GENERATOR MODE (shaped modulations). The controls have the following functions:
Trigger Delay: Delays the start of the Attack phase.
Attack: Adjusts rise time from zero to maximum level.
Decay: Adjusts fall time from maximum level before note-off is received.
Release: Adjusts fall time after note-off is received.
=> RAMP - RAMP GENERATOR MODE. (continous modulations). The controls have the following functions:
Ramp Type: Selects 32 different waveshapes.
CLK Rate: Modulation frequency.
Ramp Quantize: Smoothes the selected waveshape. Available settings
(shown in the LCD in Schmidt‘s Edit section):
SQUARE: ”Edgy” waveshape
MIX 1-3: Three settings with increasingly smoothed waveshapes.
RAMP: Rounded, slewed waveshapes
# REPEATS: Determines the number of envelope duty cycles from
ONE to EIGHT (shown in the LCD).
With each repeat, the modulation depth fades out
gradually. Great for ”echoing” effects. If value is set
to ”CONT”, the modulation is generated continuously
just like a conventional LFO but with more complex
waveforms.
The following two gures explain both modes, their parameters, and their possible settings:
Note On
ADR Mode
Note Off
A D
R
Trig.Delay
Page 27

51
GROUP OUTPUT – PROGRAMMING
50
FILTER SECTION – PROGRAMMING
Note On
Ramp
Quantise
Ramp
# of Repeats
ADR Mode
Ramp Mode
Note Off
A D
R
Note On
Trig.Delay
Trig.Delay
Clk Rate
Square Mix 1-3 Ramp
1.Repeat 2.Repeat 3.Repeat 4.Repeat etc. (max. 8)
continous
Dual Filter Signal Flow / Modulation Routings:
In order to grasp yet another complex section, please memorize the following gure. It shows the audio signal path
and all modulation paths of Dual Filter 1. Dual Filter 2 works exactly the same way.
Audio is sent into inputs A and/or B, processed and then sent to the outputs A and B. Modulation destinations are
cut-off and space. The available modulation sources are combined and fed into the mod inputs of the lter sections
A and B. Apart from that, the output signal of lter A can be fed back into the cut-off modulation input of lter B (Filter
Mod A->B key). Resonance and Filter Mode AB cannot be modulated.
+
Cutoff Mod
Modulation
Sources
In A Out A
Out BIn B
Dual Filter 1
Dual Filter 2
Velocity LFO
LFO VCF 1
LFO VCF 2
Envelope/Ramp
Space Mod
A
B
Key
Cut
Filter
Mod A>B
Vel
Vel Vel
ENV LFO
+
Space
Cutoff
Cutoff
Vel
ENV LFO
Dual Filter 2
Dual Filter 1
A
B
Cutoff
Cutoff
Resonance
Filter Mode
AB
Space Mod
replaces
Cuto Mod B
GROUP OUTPUT MODULES
The Group Output modules come after the lter section. They sum all lter output signals into a stereo signal. You
should be already familiar with the signal path – if you might need a recap, please refer to page 12.
The controls for Group 1 Out Mix and Group 2 Out Mix are identical.
• VCF 1 ON: Enables / disables the output of VCF 1.
• VCF 1 Invert: Inverts the output phase of VCF 1.
• Group 1 Velocity: Keyboard velocity controls output level of Group 1. Negative values will invert the effect.
• DF 1 ON: Enables / disables the outputs of Dual Filter 1.
• DF 1 Invert: Inverts the output phase of Dual Filter 1.
• DF 1 Level: Controls the output level of Dual Filter 1.
• Distortion: Distorts the output signal of Dual Filter 1.
• Velocity (control): Puts distortion amount under the control of keyboard velocity.
• VCF 3 ON: Enables / disables the output of VCF 3.
• VCF 3 Level: Controls the output level of VCF 3.
Group 2 controls work exactly the same way.
Group 1 Out Mix
mixer for filter outputs
Group 1
Group 2 Out Mix
mixer for filter outputs
Group 2
Page 28

52
53
GROUP LEVEL MOD – PROGRAMMING GROUP LEVEL MOD – PROGRAMMING
GROUP 1/2 LEVEL MOD
Schmidt‘s advanced architecture allows you to tap two different sound variations at the Group outputs – why not toy
around with them a bit? Here we go: Since both Group outputs are routed to one stereo channel, the volume of both
signals can easily be modulated or swept across the stereo panorama respectively. That is exactly what Group 1/2
Level Mod does.
MIX
The Mix controls a cross-fade between both signal outputs of Group 1 and 2 or fades them in and out separately.
• Mode: Determines whether the (cross)fade is performed manually (”MAN“) using the Mix/Delay control or
automatically (”FADE“).
• Mix/Delay: - If Mode key is set to ”MAN”, this control governs the cross-fade manually.
- If Mode key is set to ”FADE“, this control governs the delay time before the fade starts.
The current value setting before the Mode key is switched to “FADE“ determines the sweep level or the minimum level
of the Group controlled by the sweep respectively.
• Fade Time: Duration time of the fade.
• Fade (key): Determines the direction of the sweep – please also refer to the following gure:
2 => MIN: Group 2 from full level to Fade level while Group 1 is keeping its level
constant.
2 => MIN => 2: Group 2 from full level to Fade level and back to full level while Group 1 is
keeping its level constant.
2 => 1: Group 2 is cross-faded with Group 1.
2 => 1 => 2: Group 2 is cross-faded to Group 1 and back to Group 2.
• Swap 1/2: Interchanges positions of both groups.
Mix
crossfade of
output signales
of Group 1 / 2
LFO
LFO for crossfade
modulation
Panorama
panorama control of stereo sum
with LFO panning
The following gure will illustrate the different (cross)fade options and their parameters:
LFO
The LFO controls add a level vibrato (tremolo) to both groups.
• Rate: Modulation frequency
• Depth: Modulation intensity
• Wave: Waveform selection of the LFO:
/VV\: Triangular LFO waveshape
SPECIAL: Space for future updates
• Re-Trigger: Note-on message restarts the LFO wave at a zero crossing.
• Vel. Depth: Adds keyboard velocity to the level modulation amount.
• Destination: Determines the destinations of the level modulation. The following options are available:
NO LED: LFO modulation disabled.
1: Modulation on Group 1.
2: Modulation on Group 2.
BOTH LEDS 1 + 2 Modulation on Group 1 and 2 with identical phase.
1+2– : Modulation on Group 1 and 2 with inverted phase.
PANORAMA
The Panorama controls govern stereo panning of both groups by a dedicated LFO.
• Offset 1: Stereo position of Group 1.
• Offset 2: Stereo position of Group 2.
• Voice Spread: Spreads out Schmidt‘s eight voices across the stereo eld. The width of the stereo eld is
determined by the Offset values.
• LFO Rate: Modulation frequency
StartLevel
StartLevel
Fade Time
Fade Level Fade Level
Fade Level Fade Level
Delay
Time
Group Group
Group
Group
Fade Time
Fade Time Fade Time
1
1
1
2
2
1
Delay
Time
Delay
Time
Delay
Time
Group
Group
Page 29

55
MASTER ENV / VCA – PROGRAMMING
54
GROUP LEVEL MOD – PROGRAMMING
• LFO Depth: Modulation intensity
• LFO Mode: Determines the movement of the Group signals within the stereo eld:
/VV\: Continuous panning (triangular waveshape).
I\: One movement from left to right / vice versa and back (one shot saw-tooth
waveshape). Enables Re-Trigger automatically.
/\: One movement from left to right / vice versa and back (one shot triangular
waveshape). Enables Re-Trigger automatically.
• Re-Trigger: Note-on message restarts the LFO wave within a zero crossing (triangular waveshape).
Always active when LFO one-shot waveshapes are enabled.
• Group Destination: Determines the destinations of the panning modulation:
NO LED: LFO panning modulation disabled.
1: Panning modulation on Group 1.
2: Panning modulation on Group 2.
Both LEDs 1 + 2: Panning modulation on Group 1 and 2 with identical phase.
1+2– : Panning modulation on Group 1 and 2 with inverted phase.
MASTER ENV / VCA
This is the main VCA controlled by the master envelope generator. It shapes the volume contour of the entire sound
and determines the output volume of a single sound.
• Attack (control): Adjusts rise time from zero to maximum level.
• Soft (key): Softens the initial state of the attack time in order to avoid audible artefacts when wide note
sweeps are played. Very useful with longer attack times.
• Decay: Adjusts fall time from maximum level to Sustain Level.
• Sustain: Adjusts Sustain level.
• Release: Adjusts fall time from sustain level after note-off message.
• Level: Starts the release state below the selected sustain level. When used e.g. with percussive
sounds, it produces some kind of ”reverb tail“-effect instead of the familiar fading sound.
• Re-Trigger: Determines the start of the envelope when a new note-on message is received before the
previous envelope duty cycle has been completed.
OFF: Envelope starts at the current level of the previous envelope cycle.
ON: Envelope starts at zero level.
• Repeat: Repeats (loops) the envelope innitely (not yet implemented – please check
www.emc-de.com for updates).
Master ENV / VCA
ADSR envelope for
level modulation
Sound Volume
volume single sound
Note On
Re-Trigger OFF
Note OnNote Off Note Off
Note On
Re-Trigger ON
Re-Trigger OFF
Note OnNote Off Note Off
Note On Note OnNote Off
Note Off
Page 30

57
GLIDE / BEND – PROGRAMMING
56
MASTER ENV / VCA – PROGRAMMING
The following gure shows the parameters of the master envelope:
• Sound Volume: Determines the volume of the active single sound. This setting is stored within a preset and is
overwritten by turning the global Volume / Phones controls.
Attack-Time
Decay-Time
Note On Note Off
Sustain-Level
Release-Time
Release-Level
Soft
GLIDE / BEND
This section controls the glide / portamento effect for both pitch and lter cut-off frequency as well as the note
allocation in single mode. Let‘s start with the latter.
Voice Allocation
• Single Mode: Determines Schmidt‘s voice allocation when running in single mode.
POLY: Eight-voice polyphonic
MONO: Monophonic (last note priority)
BOTH LEDS: Unison mode (eight voices stacked on just one key – last note priority).
In Unison mode (both LEDs on), the Master Tune control (left of the keyboard) determines the detuning of the eight
voices. This setting is stored within a preset. To tune such an unison-preset, switch Single Mode to MONO, tune the
preset with the Master Tune control and return to UNISON.
Glide / Bend
Depending on the mode selected, glide options and envelope response can be changed:
• Glide Mode: Turns Glide On/Off or selects its response respectively:
NO LED: Glide disabled.
NORM: Glide enabled. Active with every note trigger.
LEGATO: Glide only active when playing legato-style (only available in Mono and
Unison modes!)
• Env Trig: Usually set to ON. If Glide Mode is set to ”LEGATO“, this key can be used to enable the
triggering of all envelopes.
• Pitch Bend: Sets the range of the pitch bend wheel (up to 12 semitones). Negative values invert the effect
of the pitch bender. Depending on a global setting (page 74), this value works just for the
current preset or on a global level.
• Glide Time Osc: Glide duration of the Oscillator pitch.
• Glide Time Filter: - Glide duration of the lter cut-off (if ”Individual Assign“ is set to ON).
or
- Glide depth of pitch and cut-off (if ”Individual Assign“ is set to OFF).
In both settings, the glide effect can have different gradations:
EXP: The glide time is directly proportional to the interval played.
LIN: The glide time is independent of the interval played.
• Individual Assign: Controls the assignement function to pitch and lter cut-off:
OFF: Oscillator pitch glide and lter cut-off glide are both controlled simultaneously by the
Glide Time Osc control. The Glide Time Filter control governs Glide Depth.
ON: Oscillator pitch glide is governed by the Glide Time Osc control.
Filter cut-off glide is governed by the Glide Time Filter control.
Bend
Mod depth pitchbend
Voice Allocation
(Poly / Mono / Unison)
Glide
Portamento/Glissando for
pitch and filter cutoff
Unisono
Page 31

59
REALTIME CONTROLS – PROGRAMMING
58
GLIDE / BEND – PROGRAMMING
The following gure shows the different function states of the Glide / Bend controls in relation to the Individual Assign
control setting:
What is ”Glide Depth“?
As mentioned above, the Glide Time Filter control governs a parameter we call ”Glide Depth”. When playing polyphonically, a standard glide function can sound quite extreme, especially when playing wide intervals using a high
portamento rate. With ”Glide Depth” you can attenuate the glide effect.
An example: Set Individual Assign to ON and choose a medium value for Glide Time Osc. Play some monophonic
lines using wide intervals rst and listen to the glide effect. So far, so well. Now, please play some chord changes, also
using wide intervals. The result might not be all that satisfying as it takes a while for the respective pitches to fall into
place.
Now disable Individual Assign. The Glide Time Filter control becomes the control of Glide Depth. Set Glide Depth
value to e.g. ”2 SEMITONES“ and play the chords again. You will notice that the glide effect is much less intense but
musically a lot more useful. This is because the polyphonic notes use a much smaller sweep interval (in this example
a maximum of two semitones rather than a full octave or the like) than monophonic notes, played without using the
Glide Depth parameter.
Off
Glide Time Oscillator
(Pitch)
Glide Depth
(Oscillator + Filter)
On
Glide Time Oscillator
(Pitch)
Glide Time Filter
(Cutoff-Freq.)
REALTIME CONTROLS
We will now have a look at the panel to the left of the keyboard. Essentially, it features Schmidt‘s performance controls
and some interfacing to assign them to parameters of a sound.
• Preset Up/Down: Steps through the preset bank selected. Duplicates the Preset keys in the Preset section.
If required, enable Quick Load function.
• Volume: Controls the level of the main outputs. Duplicates the Volume control in the Global section.
• Colour: Adjust LED and LC-display color to suit your taste.
• Master Tune: Shifts the tuning of the entire instrument up or down by one semitone. If a preset is using
unisono-mode, this control detunes the voices. Please refer to page 59, section
„Voice Allocation“.
• Key Hold: When active, a note played will be indenitely held at the sustain level of the volume envelope
and sounds forever (or for the time you are away to make yourself a sandwich, have a
shower, what have you).
• Octave: Shifts the keyboard range up or down by one or two octaves.
The following gure shows the available setting for transposing up. Transposing down works
the same way. The following settings are available:
Performance Controls
• Pitch: „Bends“ the pitch. The range is programmable.
• Modulation: Controls a selectabl sound parameter. The range resp. modulation depth is programmable.
• Stick Control: Controls two selectable sound parameters (X/Y-axis) simultanously. The ranges are
programmable.
Master Tune
Headphone
Socket
Master Volume
Performance
Controls
Performance
Controls
Assignment
Preset
Selection
Octave
Transpose
LED/Display
Colour
Hold
Function
no transpose 1 octave up 2 octaves up
Page 32

60
61
REALTIME CONTROLS – PROGRAMMING REALTIME CONTROLS – PROGRAMMING
Real time Controls Assignment
You can assign any of Schmidt‘s parameter controls to one of the real time performance controllers (stick,
aftertouch, mod wheel and external input sockets).
Assignment
• Assign: Selects the real time control. The following options are available:
X: Stick controller x axis
Y: Stick controller y axis
AFT: Keyboard aftertouch (pressure)
WHEEL: Modulation wheel
EXT: External input B sockets (expression pedal, control voltage)
This is how to assign a real time control to a parameter:
1 - Select a real time control, e.g. Mod-WHEEL, using the Assign key.
2 - Now simply turn the control of the desired parameter of a sound, e.g. VCF1 Cutoff, to assign it to the
real time control. The LCD shows the screen in the gure above:
• The upper row shows the real time control resp. the modulation Source, e.g. Mod Wheel (already selected).
• The second row shows the parameter assigned, e.g. VCF1 Cutoff (already selected).
• The third row shows three parameters that can be selected by moving the Cursor. They dene the functioning
of the real time controllers.
Hitting the Value up/down keys or moving the Data dial will change the corresponding values:
Mod-Source:
- X-axis stick
- Y-axis stick
- Aftertouch
- Mod.Wheel
- External inputs
Key => Function Assignment:
- Value : Value Range/Direction
- Preset : Mod-Source
- Bank : Link Mod Destination
- Cursor : Cursor
- Exit : Quits menue
- Write : Promts to Utility menue to store
controller assignment
Value Range/
Direction:
0..+ 0..–
–..+ +..–
00..+ 00..–
+..00 –..00
Mod-Destination:
- any parameter control
(exceptions see text)
Status
(Active key)
Cursor
Value Range:
12% to 200%
Mod.Wheel
VCF1 Cutoff
0..+ 25% Off
Val Pre : Source
Cur Bnk : Dest-Par
Exit:Ouit Write:Util.
Controller Direction
This parameter determines the response of the real time control selected. The LCD reads its values like e.g. ” –0..+ “
or ” –..+ “. Eight different settings are available and determine the way the selected real time control works.
The following gure shows the different settings of the Mod Wheel as an example. Aftertouch and External Controllers
work accordingly.
The stick controller and its available parameter settings work a bit differently. The following gure illustrates their
operation with the X axis. Y axis works accordingly.
0 +
00
+
00
–
+
00
–
00
0
0
0
–
–
+
+
–
Settings: 0..+ 0..–
Perf. Controller
whole range
from 0 to max/min
Settings: 00..+ 00..–
Perf. Controller
half range
from center to max/min
Settings: +..00 –..00
Perf. Controller
half range
from max/min to center
Settings: –..+ –..+
Perf. Controller
whole range positive and
negative (center = 0)
max max
max
max max
max max
max
min min
min
min min
min min
min
–
0
+
–
Settings: –0+ +0–
Stick Controller X/Y
both directions positive/negative
(center = 0)
+
maxmin
max min
–
0
+
+
Settings: –0– +0+
Stick Controller X/Y
both directions positive or
negative (center = 0)
–
minmin
max max
–
0
+
–
Settings: –0+ +0–
Stick Controller X/Y
both directions positive/negative
(center = 0)
max
+
maxmin
max min
–
min
+
Settings: 00+ 00–
Stick Controller X/Y
right/up positive or negative
(center = 0, left/down inactive)
–
0
0
max
–
min
+
Settings: +00 –00
Stick Controller X/Y
left/down positive or negative
(center = 0, right/up inactive)
0
+
+
Settings: –0– +0+
Stick Controller X/Y
both directions positive or
negative (center = 0)
–
minmin
max max
Page 33

62
63
REALTIME CONTROLS – PROGRAMMING REALTIME CONTROLS – PROGRAMMING
Controller Depth
This parameter is shown as a percentage value (e.g. ”25%“) and determines the real time controls modulation depth.
Sixteen values from 12% to 200% are available. This value is added to the current control setting.
A word or two about modulation depth
Not only the current setting of the controls, but also all other parameters that control a modulation depth, are added
to the resulting modulation depth value. Please note that modulation depth usually has negative values as well. If the
resulting modulation depth value exceeds the total parameter range, some controllers may have little or no effect on
the entire modulation.
When, for example, you set the VCF1 cut-off control to a 3 o‘clock position and add a high ENV depth value, an
additional third controller will produce no audible effect until you decrease either of the two other settings. Please refer
to the following gure. It shows the cumulated modulation depth values for the VCF1 cut-off. In this example, all added
values are within the total parameter range.
Sound parameter setting
Real Time-Control
Value Range (e.g. 37%)
Real Time-Control
minimum position
Real Time-Control
maximum position
Parameter setting or
MIDI Ctlr value
Real time control
(ModWheel, Stick etc.)
ENV depth
entire parameter range
maximum resulting modulation depth
LFO depth
Key follow
Velocity
0 % 100 %
+
+
+
+
+
=
Activate real time controllers
• Active: Enables the selected performance controller (LC display shows ”ON“ / ”OFF“). You can use this key to
enable / disable specic performance controllers while playing.
At this point, the assignment process is completed. You can now continue by assigning another real time control to a
specic parameter of a sound.
You can also use the Preset and Bank selector keys to determine the real time control and the desired parameter.
• Preset up/down: Selects performance controller (”Source“).
• Bank up/down: Selects sound parameter (”Dest-Par“).
1 – Use the Cursor keys to navigate through the parameters.
2 – Use the Value keys to change values (or the data entry dial).
3 – Hit the Exit key to quit the performance controller assignment procedure.
Store real time controller assignment
You can store the real time controller assignment to the current preset by simply performing the preset storage
function:
1 – Hit the Write key to store the performance controller assignment in the current preset.
The LCD will read ”WRITE ASSIGN DATA TO PRESET?“
2 – Now hit Enter to save the performance controller assignment or hit EXIT to quit the performance
controller assignment procedure without saving it in the current preset.
Please note: Some sound parameters are controlled in tandem by the real time controls.
These parameters are listed right here:
Function Block Parameter LC-Display Readout (select with Bank key)
_________________________________________________________________________________
PWM OSZ1-LFO-Rate OSC1,OSC123
PWM OSZ1-LFO-Depth OSC1,OSC123
--
Envelope ENV Depth OSC1,OSC2,OSC3,OSC4,OSC1234
Envelope ENV Time OSC1,OSC2,OSC3,OSC4,OSC1234
---
Vibrato Vib Depth OSC1,OSC2,OSC3,OSC4,OSC1234
Vibrato Vib Rate OSC1,OSC2,OSC3,OSC4,OSC1234
---
Oscillator 4 Fine Tune Fine Tune , Vel Sens, Key Follow
---
VCF1 Cutoff Cutoff VCF1, Cutoff VCF12
---
Dual Filter 1 Cutoff Cutoff DF1, Cutoff DF 12
Dual Filter 1 Space Space DF1, Space DF 12
Dual Filter 1 Key Follow Key F. DF1, Key F. DF 12
Dual Filter 1 Velocity Vel DF1, Vel DF 12
Dual Filter 1 ENV Depth ENV DEpth DF1, ENV DEpth DF 12
Dual Filter 1 LFO Depth LFO DEpth DF1, LFO DEpth DF 12
Dual Filter 1 LFO Rate LFO Rate DF1, LFO Rate DF 12
--Duallter 1/2 Trigger Delay T.Delay DF1, T. DF12
Duallter 1/2 Attack Attack DF1, Attack DF12
Duallter 1/2 Decay Decay DF1, Decay DF12
Duallter 1/2 Release Release DF1 Releaee DF12,
Page 34

64
65
MENUES – PROGRAMMING MENUES – PROGRAMMING
PRESET EDIT MENU
You will nd most of Schmidt‘s parameters directly on the front panel. Still, there are some hidden functions in some
easy-to-access/operate menus. Most of them allow access to global functions but some additional parameters for
sound programming are to be found there as well. We will take a closer look at them right now. All corresponding
function keys can be found in the Edit section located around the LCD.
The Preset Edit menu features just three pages.
Hit the Menu Key until the PRESET EDIT LED lights up. The LCD now shows the following screen. If not, change the
pages using the Parameter up/down keys.
Naming Single Presets (Edit Single Name)
Use this page to name your new creation.
• Value up/down: Change character
• Cursor left/right: Previous/next character
• Preset down: Delete character
• Preset up: Insert character
• Bank down: Toggles between capital and small letters
• Bank up: Reloads the previous name.
• Exit: Quits Edit Single Name page
• Write: Saves settings in current preset
Additional LFO Parameters (Single LFO Mode 1)
Hit Parameter up/down keys to enter the second page of the Preset Edit menu.
Use this page to set the sync options of the VCF1/2 LFOs.
• Key-Reset: retriggers the VCF1/2 LFOs via note-on information (factory default setting is ON).
• MIDI-Sync: synchronizes VCF1/2 LFOs to MIDI clock. When enabled, you can select from 13 different
clock divider values (factory default setting is INTERNAL, respectively disabled
MIDI clock sync).
• Cursor left/right: Previous/next function
• Value up/down: Change value
• Exit: Quits Edit LFO Mode 1 page.
Edit Single Name
My Favorite
Val Pre DEL
Cur
Exit: Quit Write: Write
Pre INS Bnk Org
Bnk A a
Edit LFO Mode 1
Cur : Par Val : Edit
Exit / Write
VCF1 Key-Reset: On
VCF2 Key-Reset: On
VCF1 Midi-Sync: Int.
VCF2 Midi-Sync: Int.
Par : Page
Additional Single Parameters (Single Advanced 1)
Hit Parameter up/down keys to enter the third page of the Preset Edit menu.
Here you will nd some additional parameters that can be handy to have around from time to time, especially when
programming single presets. Currently, you will nd the following parameters:
• Fine Tune: tunes the current preset by cents. Using this function, you can give any preset an individual
ne tuning. Please note that this setting is only active with this preset – it is not a global
tuning parameter.
• Transpose: tunes the current preset by semitones. Using this function you can give any preset an
individual transposition. Please note that this setting is also only active with this preset –
it is not a global tuning parameter.
• Cursor left/right: Previous/next function
• Value up/down: Change value
• Exit Quits Single Advanced 1 page.
Single Advanced 1
Cur : Par Val : Edit
Exit / Write
FineTune (Cent) : 0
Transp. (Semi.) : 0
– – –
– – –
Par : Page
Page 35

66
67
GLOBAL FUNCTIONS GLOBAL FUNCTIONS
GLOBAL FUNCTIONS
The global functions provide settings that are not preset related. The global functions provide the Utility Menu and the
System Menu.
UTILITY MENU
Here you will nd Schmidt‘s utility functions. Hit the Menu key until the UTILITY LED lights up. The LCD now shows
the following screen. If not, change the pages using the Parameter up/down keys.
Send MIDI Dump
This function allows you to send banks of Single Presets as SysEx data le to external MIDI gear or your computer
respectively.
• Bank up/down: Selects Single Preset bank (1 – 8) to be transmitted.
• Enter: Perform MIDI dump.
• Exit: Quits Send MIDI Dump page.
Reset Global Parameters
Hit Parameter up/down keys to enter the second page of the Utility menu.
This function resets all global parameters to their factory default settings.
• Exit: Aborts the reset function.
• Enter: Performs the reset function.
Send Midi-Dump
Single-Bank 1
Par : Page Exit: Quit
Bnk : Bnk Enter: Send
U t i l i t y
Par : Page Exit: NO
Reset Global
Parameters ?
Enter: YES
IV.
GLOBAL
FUNCTIONS
Page 36

68
69
GLOBAL FUNCTIONS GLOBAL FUNCTIONS
Display / LED Settings
Hit Parameter up/down keys to enter the third page of the Utility menu.
Here you can adjust brightness, contrast, and color of the LEDs and LCD to suit your taste.
• LCD-Contrast: Controls LCD contrast. Factory setting is 10.
• LCD-Brightness: Controls LCD brightness in four steps (MIN / Mid1 / Mid2 / Max). Factory setting is Min.
• LED-Brightness: Controls LED brightness in two steps (MIN / MAX). Factory setting is Max.
• LED-Change: Enables color change of the LEDs. Factory setting is Off.
• Cursor left/right: Previous/next function
• Value up/down: Change value
• Exit: Quits Display / LED Settings page.
USB / MIDI - Select
Hit Parameter up/down keys to enter the fourth page of the Utility menu.
This function determines whether Schmidt will receive MIDI data through its USB port or through the
MIDI DIN sockets.
• Value up/down: Toggles between ”MIDI“ and ”USB“. Factory default setting is MIDI.
• Exit: Quits USB / MIDI - Select page.
Disp – LED – Set
Cur : Par Val : Edit
Exit : Quit
LCD-Contr.: 10
LCD-Bright: Min
LED-Bright: Max
LED-Change: On
Par : Page
USB / Midi – Select
Val : Edit
Exit : Quit
Input Source: Midi
Par : Page
SYSTEM MENU
The System menu allows access to some global functions, mostly for communication with other instruments /
computers, i. e. the conguration of Schmidt‘s MIDI interface, local control, and some more.
MIDI FUNCTIONS (FIVE PAGES)
The following menu comprises ve pages. It enables/disables the various MIDI parameters Schmidt obeys to.
Hit the Menu key until the SYSTEM LED lights up. The LCD is now showing the following screen. If not, change the
pages using the Parameter up/down keys.
This is the rst of currently ve Single-Global-MIDI pages within the System menu. Select MIDI channel numbers
(1 - 16) here for sending and receiving MIDI data (factory settings 1). You can also disable/enable sending/receiving all
MIDI data (factory settings On).
• Cursor left/right: Previous/next parameter.
• Value up/down: Change value.
• Exit: Quits Edit Single-Global-MIDI 1 page.
Hit Parameter up/down keys to enter Single-Global-MIDI 2 page of the System menu.
You will nd the following functions here:
• Running Stat: Enables/disables MIDI running status. Running status is a help to limit the MIDI data stream.
Factory setting is On.
• SND CC – 14 Bit: When enabled, Schmidt‘s controls transmit high-resolution MIDI controller data (14 bit).
Factory setting is On.
• SND Prg/Bnk: Enables/disables the transmission of MIDI program change and/or bank change data.
OFF: Transmission of MIDI program change and bank change disabled (factory setting).
PRG: Transmission of MIDI program change data enabled, bank change disabled.
P+B: Transmission of MIDI program change and bank change enabled.
• RCV Prg/Bnk: Enables/disables the reception of MIDI program and bank data. Available options are the
same as above. Factory setting is Off.
• Cursor left/right: Previous/next parameter.
• Value up/down: Change value.
• Exit: Quits Edit Single-Global-MIDI 2 page.
Sgl – Global – Midi 1
Cur : Par Val : Edit
Exit / Write
SND – Channel: 01
SND – Enable: On
RCV – Channel: 01
RCV – Enable: On
Par : Page
Sgl – Global – Midi 2
Cur : Par Val : Edit
Exit / Write
Running – Stat : On
SND CC – 14Bit: On
SND Prg / Bnk : Off
RCV Prg / Bnk : Off
Par : Page
Page 37

70
71
GLOBAL FUNCTIONS GLOBAL FUNCTIONS
Hit Parameter up/down keys to enter Single-Global-MIDI 3 page of the System menu.
Here you will nd the following set of functions:
• SND Pr. Param: Enables/disables Schmidt‘s panel control devices (control knobs, function keys) to transmit
MIDI controller data. Factory setting is On.
• –> Display: When using a control or a function key, the LCD will display its name and edited value.
Select between:
ON: LCD always shows parameter name and edited value.
3S: LCD shows parameter name and edited value for about three seconds before it
returns to normal view (factory setting).
OFF: LCD never shows parameter name and edited value.
• RCV Pr. Param: Enables/disables the reception of MIDI controller data to control Schmidt‘s panel control
devices (control knobs, function keys) remotely via external MIDI devices.
Factory setting is Off.
• –> Display: When receiving MIDI controller data, the LCD will display the controller number and current
value. Select between:
ON: LCD always shows controller number and current value.
3S: LCD shows controller number and current value for about three seconds before it
returns to normal view.
OFF: LCD never shows controller number and current value (factory setting).
• Cursor left/right: Previous/next parameter.
• Value up/down: Change value.
• Exit: Quits Edit Single-Global-MIDI 3 page.
Hit Parameter up/down keys to enter Single-Global-MIDI 4 page of the System menu.
Here you will nd the following set of functions:
• SND/RCV Pitch: Enables/disables the pitchwheel to send/receive MIDI controller data. Factory setting is Off.
• SND/RCV Mod-W: Enables/disables the modwheel to send/receive MIDI controller data. Factory setting is Off.
• SND/RCV X-Y: Enables/disables the stick controller to send/receive MIDI controller data.
Factory setting is On.
• SND/RCV Pres.: Enables/disables keyboard pressure (aftertouch) to send/receive MIDI controller data.
Factory setting is Off.
• Cursor left/right: Previous/next parameter.
• Value up/down: Change value.
• Exit: Quits Edit Single-Global-MIDI 4 page.
Sgl – Global – Midi 3
Cur : Par Val : Edit
Exit / Write
SND Pr. Param : On
–> Display : On
RCV Pr. Param : Off
–> Display : Off
Par : Page
Sgl – Global – Midi 4
Cur : Par Val : Edit
Exit / Write
SND / RCV Pitch : On
SND / RCV Mod-W: On
SND / RCV X–Y : Off
SND / RCV Pres. : On
Par : Page
Hit Parameter up/down keys to enter Single-Global-MIDI 5 page of the System menu.
Here you will nd the following set of functions:
• SND/RCV Ext.C: When enabled, voltage values received through the external control inputs on Schmidt‘s
rear panel will be transmitted as MIDI controller data. Factory setting is Off.
• SND/RCV KBD: Enables/disables Schmidt‘s keyboard to send/receive MIDI data. Factory setting is On.
• SND/RCV Vol: Enables/disables Schmidt‘s volume control to send/receive MIDI controller data
(controller #7). Factory setting is On.
• RCV Prg Dump: Enables/disables the reception of MIDI preset dumps. Factory setting is On.
• Cursor left/right: Previous/next parameter.
• Value up/down: Change value.
• Exit: Quits Edit Single-Global-MIDI 5 page.
Sgl – Global – Midi 5
Cur : Par Val : Edit
Exit / Write
SND / RCV Ext.C : Off
SND / RCV KBD : On
SND / RCV Vol : On
RCV Prg Dump : On
Par : Page
LOCAL ON/OFF MENU (TWO PAGES)
The following menu comprises two pages. It enables/disables the connection of the various controllers to Schmidt‘s
internal sound generation engine. If disabled, the related controller is disconnected from the sound generation engine
and transmits MIDI data only.
Hit Parameter up/down keys to enter Single-Global-Local 1 page of the System menu.
Here you will nd the following set of functions:
• Local Pitch: Connects/disconnects the pitch wheel from Schmidt‘s sound generation.
Factory setting is On.
• Local Mod-W.: Connects/disconnects the mod wheel from Schmidt‘s sound generation. Factory setting is On.
• Local X-Y: Connects/disconnects the stick controller from Schmidt‘s sound generation.
Factory setting is Off.
• Local Pres.: Connects/disconnects the keyboard pressure (aftertouch) from Schmidt‘s sound generation.
Factory setting is Off.
• Cursor left/right: Previous/next parameter.
• Value up/down: Change value.
• Exit: Quits Edit Single-Global-Local 1 page.
Sgl – Glob.Local 1
Cur : Par Val : Edit
Exit / Write
Local Pitch : On
Local Mod-W. : On
Local X-Y : Off
Local Pres. : Off
Par : Page
Page 38

72
73
GLOBAL FUNCTIONS GLOBAL FUNCTIONS
Hit Parameter up/down keys to enter Single-Global-Local 2 page of the System menu.
Here you will nd the following set of functions:
• Local Ext.C: Connects/disconnects the external control inputs on Schmidt‘s rear panel from Schmidt‘s
sound generation engine. When disabled, control voltages received through the inputs have
no effect on the sound generation but will be transmitted via MIDI. Factory setting is On.
• Local KBD: Connects/disconnects the keyboard from Schmidt‘s sound generation. Factory setting is Off.
• L.Vol (Ex B4): Determines the response of the volume (expression) pedal input (Ext In B 4).
The following options are available:
REL: The range of the connected expression pedal is limited by ”0” and the current setting
of the Master Volume control (factory setting).
ABS: The range of the connected expression pedal is limited by ”0” and the maximum level
(equal to fully clockwise setting of Master Volume control).
SGL: The range of the connected expression pedal is limited by ”0” and the volume setting
of the current preset (equal to setting of Sound Volume control).
• Cursor left/right: Previous/next parameter.
• Value up/down: Change value.
• Exit: Quits Edit Single-Global-Local 2 page.
ADVANCED FUNCTIONS MENU (ONE PAGE)
The following menu currently has just one single page. Here, you will nd some further setup functions that you use
less frequently. The functions currently available determine the performance of the footswitches connected to the
external inputs on Schmidt‘s rear panel.
Hit Parameter up/down keys to enter Single-Global-Advanced page of the System menu.
Here you will nd the following set of functions:
• Pitch-Global: When active, the pitch bender will affect all of Schmidt‘s multi sound slots equally
(factory default setting).
When disabled, the pitch bender will affect each program individually, according to the value
that has been programmed per program (you can assign a pitch bend range to a Single
sound, remember? Please refer to page 57).
Sgl – Glob.Local 2
Cur : Par Val : Edit
Exit / Write
Local Ext.C : Off
Local KBD : On
L.Vol (Ex B4) : Rel
Par : Page
Sgl – Glb. Advanced
Cur : Par Val : Edit
Exit / Write
Pitch-Global : On
Sus/Sos - Ex A 1/2: On
Sus/Sos - MIDI : RCV
Sus/Sos - SW-Pol : REV
Par : Page
This will lead to a different bend range for each part of the Multi setup – which may or may
not be musically useful. Imagine several individual pitch bends programmed at musical
intervals which make your Multi patch spread out like a peacock‘s fan when pitch-bend is
activated.
• Sus/Sos - EX A1/2: Enables/disables Schmidt‘s external control inputs EX A1/2. Both are used for connecting
Sustain / Sustenuto pedals or foot switches. Factory setting is Off.
• Sus/Sos - MIDI: Determines if Schmidt processes Sustain / Sustenuto MIDI controller data.
The following options are available:
OFF: Schmidt will not send or receive sustain / sustenuto MIDI data (factory setting).
RCV: Schmidt will receive sustain / sustenuto MIDI data.
SND: Sustain / sustenuto information received at the external control inputs EX A1/2 will be
transmitted as MIDI data.
R+S: Receive and send functions are both enabled.
• Sus/Sos - SW-Pol: Toggles the polarity of a connected foot switch between the settings Standard (STD) or
Reversed (REV). Factory setting is STD.
• Cursor left/right: Previous/next parameter.
• Value up/down: Change value.
• Exit: Quits Edit Single-Global-Advanced page.
RECEIVING SYSEX DATA
Schmidt is always ready to receive SysEx data, respectively Single preset banks and Multi preset banks. If Schmidt
recognises incoming SysEx data, it temporarily saves them into a memory buffer and asks if and where the data
should be saved permanently.
To receive Single preset banks, Schmidts Single mode has to be enabled. To receive Multi banks, Multi mode has to
be enabled. Otherwise, the SysEx data will be ignored.
If Schmidt receives suitable SysEx data, the LCD shows:
Now the data is loaded into the memory buffer, shown by a progression bar. Cancel the reception by hitting Exit.
As soon as the data reception is complete, the screen shows:
• Hit Enter to save the received preset bank to its current location.
• Use Bank up/down to select another target preset bank. Conrm with Enter key.
• Cancel the save process by hitting Exit.
Attention! Saving a received preset bank onto an existing bank overwrites the existing bank. Please
note that there is no undo function!
Exit: Quit Receive
Receiving Dump...
Type: Single-Bank 1
Dest. Quit Copy
Bnk Bnk Exit Enter
Receiving Dump Ready
Type: Single-Bank 1
Copy to Bank 1 ?
Page 39

74
75
GLOBAL FUNCTIONS GLOBAL FUNCTIONS
SINGLE PRESET HANDLING
LOADING PRESET
You should already know how to load a Single Preset from Schmidt‘s memory. You will nd all necessary controls in
the Preset section, right beside the LCD:
1 - Hit Mode until the SINGLE LED lights up.
2 - Hit Preset up/down or turn Value control to step/scroll through the Single presets.
The LCD (liquid crystal display, you remember?) shows bank number as well as
preset number and name.
3 - Hit Enter to load the selected Single preset.
Hit Quick Load to enable the Quick Load option. Now you do not need to hit Enter anymore to
load a selected preset.
Hit Bank up/down to select the Single preset bank. The Quick Load option also works for bank
selection.
Schmidt‘s on board memory holds 8 banks of 128 Single presets each.
SAVING SINGLE PRESETS
Do not forget to save your latest sound creation permanently. This section will show you how to store Single Presets.
Hit the Write key. The LCD reads:
The upper line shows the current preset location. Enter the destination of your preset in the line below.
1 - Simply select the bank destination using the Bank up/down keys and the preset destination using the
Preset up/down keys. You can also use the Data entry dial.
2 - Abort the write process by hitting Exit.
3 - Conrm the write process by hitting Write again. The display will briey read ”WRITE COMPLETE”
and returns to the preset load page.
To name your new preset, go to the rst page of the Single Edit Menu which is described on page 66.
Write Single
Bnk / Pre : Destination
Exit: Quit Write: Write
Bank 1 – 1
=> Bank 1 – 1
CLIPBOARD / COMPARE
The clipboard / compare function allows you to compare an edited preset with its original version. Also, you can put an
edited version of a preset aside into a clipboard and recall or save it later.
Hit the Clipboard key to enter the clipboard function. The LCD reads:
Clipboard function
The Clipboard function is active by default.
• Curs: Use the Cursor to toggle between the Compare and Clipboard functions.
• Exit: Hit Exit to abort the clipboard/compare function. The LCD returns to the preset load menu.
• Write: Hit Write to copy your edited version of the current preset to the clipboard. It will be put aside there
and left untouched while you can further edit the current preset or load (and tweak) other presets.
The LCD returns to the usual „Preset Load“ screen.
Hit the Clipboard key again to return to the version stored in the clipboard section.
Store a presed from the clipboard:
If you want to store the preset parked in the clipboard permanently, hit Write again. The LCD shows the already
familiar Single Preset Write page (please see page 68).
Use the Bank up/down and Preset up/down keys to select a preset destination. Hit Write again to execute the store
function. If you want to abort and quit, hit Exit key.
Compare function
When you are in clipboard mode, you have also access to a Compare function:
• Curs: Use the cursor again to toggle between the Compare and Clipboard functions.
When the Compare function is active, the LCD looks like this:
• Clip: Toggles between original preset and edited version.
• Write: Discard the edited version by overwriting it with the original preset version.
Clipboard Single
Exit : Abort
Curs : Mode => Comp
Clip : Paste Clipb.
Write : Copy To Clipb.
Bank 1 – 1
Compare Single
Original Preset
Curs : Mode => Clipb.
Write : Copy To Edit
Clip : Back To Edit
Bank 1 – 1
Page 40

76
77
MULTIMODE MULTIMODE
MULTIMODE
Schmidt provides a multi mode with up to eight different parts playing simultaneously. A part contains one single preset
and various settings which determine its performance within the multi preset.
Each part can consist of one to eight voices. The voice allocation is either xed or has to be programmed manually for
each multi preset respectively. As you may have gured out already, using e.g. one part with two voices and another
with six voices reduces the available number of multimode parts to two. In any case, the number of eight voices cannot be exceeded.
As well as the single presets, a multi preset can be stored in a memory space of eight banks with 32 presets each.
The following gure shows the schematic diagram of the multi mode. In this example, Part 1 uses voices #1 to #4,
Part 2 uses voice #5 and #6 while Part 3 uses voice #7 and Part 4 voice #8. Each part features an identical set of
parameters that can be edited in Multi Edit mode. It is illustrated for Part 1 here and will be described in detail below.
To enter Multi Mode, simply hit the Multi key in the Preset section of the front panel until the
MULTI LED lights up.
e.g.
Part 1
Part 1
1-8 Voices
Output Output Output Output Output Output Output Output
Multi parameters (pages) to edit:
1. Single Preset (1 of 256)
2. Mono/poly, # of voices
3. Keyboard range, Trigger source
4. Midi channel
5. Level, panorama
6. Transpose, tuning
7. Output routing
8/9. Controller assignment
10. Name
1 Single
Preset
1 Single
Preset
1 Single
Preset
1 Single
Preset
1 Single
Preset
1 Single
Preset
1 Single
Preset
1 Single
Preset
1-8 Voices 1-8 Voices 1-8 Voices 1-8 Voices 1-8 Voices 1-8 Voices 1-8 Voices
Part 2 Part 3 Part 4 Part 6Part 5 Part 7 Part 8
Voice 1 Voice 2 Voice 3 Voice 4 Voice 6Voice 5 Voice 7 Voice 8
V.
MULTIMODE
Page 41

78
79
MULTIMODE MULTIMODE
LOADING MULTI PRESETS:
1 - Hit Preset up/down or turn Value dial to scroll through the Multi presets.
2 - Hit Enter to load the selected Multi preset.
Hit Quick Load to enable Quick Load option. Now you do not need to hit Enter anymore to load
the selected preset.
Hit Bank up/down to select the Multi preset bank. The Quick Load option also works for bank
selection.
Schmidt‘s on-board memory holds 8 banks of 32 Multi presets each.
You can select a Single preset of one Multi Part and put it on Schmidt‘s front panel to edit its sound without leaving the
multi mode. As soon as you loaded a multi preset, the LCD reads:
Use Enter to execute the function. Use Exit to cancel thefunction.
SAVING MULTI PRESETS
Do not forget to save your latest Multi Preset permanently. This section will show you how to store Multi Presets.
Enter the Preset Load menu by hitting the Menu key.
Hit the Write key. The LCD reads:
The upper line shows the current preset location. Enter the desired destination of your preset in the line below.
1 - Simply select the bank destination using the Bank up/down keys and the preset destination
using the Preset up/down keys. You can also use the Data entry dial.
2 - Abort the write process by hitting Exit.
3 - Conrm the write process by hitting Write again. The display will briey read
”WRITE COMPLETE” and returns to the preset load page.
To name your new preset, go to the last page of the Edit Multi Menu which is described on page 86.
As you just learned, you can edit sounds that are used in the current multi preset without leaving the multi mode. You
simply have to assign them to Schmidts front panel. Thus you can also save such an edited sound right from the multi
mode.
Please keep in mind, that in multi mode just the links to the related single presets are saved, not the
no sound settings (single presets) itself. If you edit a single preset in multi mode, you have to save its
settings separately:
Hit the Mode key. The Single LED lights up
and
the LCD shows the following screen:
Please note that multi mode is still enabled. Now you can save the edited single preset to the current
location or any other location if desired.
• Hit Exit to cancel the write process and revert to the multi mode screen.
• Hit Write to perform the write process. The LCD asks ”Write Single Are you sure?“
• Hit Write again to conform and execute the write process.
• Hit Exit to cancel the write process.
When the write process is completed, the LCD reverts to the multi mode screen.
SETTING UP MULTI PRESETS
To setup a multi preset you will nd ten pages in the Multimode Menu (please refer to the gure on page 77. Each
page provides a set of functions to dene the properties of the Multi Preset.
Hit the Menu key until the Preset Edit LED lights up. If necessary, scroll through the Multimode pages by hitting the
Parameter up/down keys. The rst of the ten Multi preset edit menus reads like this:
Bank 1 Multi
My Multi
1
Cur Edit-Sgl Part 1
Hit the Cursor to select the
part that should be assigned
to the front panel for editing.
The LCD reads:
Change Edit-Sgl Part
Cur : Part
Enter: Exec.
Exit: Quit
act: Part 1: Sgl 32 – 1
=> Part 2: Sgl 4 – 2
”Super Bass”
Write Multi
Bnk / Pre : Destination
Mode: Sgl/Multi Write:
Multi Bank 1 – 1
=> Bank 1 – 1
Write Multi
Bnk / Pre : Destination
Mode: Sgl/Multi Write:
Single Bank 6 – 3
=> Bank 6 – 3
Page 42

80
81
MULTIMODE MULTIMODE
1. Assign Preset sounds
Hit Parameter up/down keys to enter the Edit Multi Voices page. On this page you can select Multi parts and load
single presets into each of them. The LCD reads like this:
• Pre: Hit the Preset up/down keys to select the desired Part (1 - 8).
• Bnk: Hit the Bank up/down keys to select the desired single preset bank (1 - 8).
• Val: Hit the Value up/down keys to select the desired single preset (1 - 256).
You can also use the data entry control.
2. Assign voices
Hit Parameter up/down keys to enter the Edit Multi Voices page. Here you can assign voices to the Multi parts.
The LCD shows this screen:
• The upper line shows the selected part and the associated preset.
• The second line informs you whether the eight slots use polyphonic (”P“) or monophonic (”M“) single presets.
Please refer to page 54, section „Glide / Bend“, „Voice Allocation“.
• The third line shows the maximum number of voices that can be played by the associated Part (”Voice Reserve“).
A single preset with unison setting becomes automatically monophonic (”M“) when used in multi mode.
If you assign two or more voices, it returns back to unison i.e. the assigned number of voices playable
on one key. The detuning function can be found in multi mode menu page 6 ”Tune Parts“ (see page 82).
• Use the Cursor up/down keys to select the parts.
• Use the Value up/down keys to select the maximum number of voices for each part („V.R.“ = „Voice Reserve“).
If anything has been edited, the screen will change to this message:
Edit Multi Preset
Part 1: Bnk–Sgl 1 – 1
”My Preset“
Par : Page Val : Sgl
Pre : Part Bnk : Bnk
Edit Multi Voice
Par : Page Val : V.R.
Mono/Poly: ppppppppp
Part1 – My Preset
VReserve : 421100000
Edit Multi Voice
Entr: Update Exit: Undo
Mono/Poly: ppppppppp
Part1 – My Preset
VReserve : 421100000
Hit Enter to conrm the changes or cancel the changes by hitting Exit. In either case, the screen will return to its
original state. Now you can select the next page.
3. Keyboard Mapping
Hit Parameter up/down keys to enter the Edit Multi Keyboard page. Here, you can create a keyboard mapping for
each Multi part.
Use the Cursor up/down keys to select a parameter.
Use the Value up/down keys or the data entry control to alter the values.
• Lower: Lowest note of the keyboard zone (available C-1 to G9).
• Upper: Highest note of the keyboard zone (available C-1 to G9).
• LU-On: Enables/disables the Lower/Upper settings i.e. if set to OFF, the part uses the entire keyboard range.
If set to ON, the settings above are enabled.
• Mode: Determines whether the selected part respon ds to the internal keyboard (”KBD“),
to MIDI data (”MIDI“) or both (”ALL“).
4. MIDI Settings
Hit Parameter up/down keys to enter the Edit Multi MIDI page. Please use this page to create a simple individual
MIDI setup for each multi part.
Use the Cursor up/down keys to select a parameter.
Use the Value up/down keys or the data entry control to alter the values.
• M-Chn: Select the MIDI channel of the current Multi part (1 to 16).
• TX-On: Determines whether the Multi part currently active transmits MIDI data or not.
• RX-On: Determines whether the Multi part currently active receives MIDI data or not.
Please note: TX/RX settings refer to the entire MIDI data transfer of the corresponding multi part.
Individual MIDI controllers can be enabled/disabled on MIDI Controller Setup (Multi menu pages 8 / 9).
Please refer to page 83.
Edit Multi Kbd
Lower: B 0 Upper: C 4
Part1 – My Preset
LU-On: On
Mode: All
Cur : Sel
Pre : Part
Edit Multi Midi
M-Chn: 1
Part1 – My Preset
TX-On: On
Rx-On: On
Cur : Sel
Pre : Part
Page 43

82
83
MULTIMODE MULTIMODE
5. Part Levels
Hit Parameter up/down keys to enter the Edit Multi Level page. This page works like a simple mixer for all Multi parts.
You can set a master level for the Multi preset and determine different levels as well as individual panorama settings
for each part.
Use the Cursor up/down keys to select a parameter.
Use the Value up/down keys or the data entry control to alter the values.
• Main-Lev: Determines the maximum output level of the Multi preset (0 to 127).
• Part-Lev: Determines the maximum output level of the current part (0 to 127).
• Panorama On/Off: Determines whether the panorama setting as well as the panorama LFO modulation settings
of the single preset will be used in the Multi part (”OFF“).
If set to ”ON“, the single preset settings are ignored and the value of the following parameter
is used instead.
• Panorama: Sets the current part to a panorama position (L63 to 0 to R63 – no panorama modulation).
6. Tune Parts
Hit Parameter up/down keys to enter the Edit Multi Tune page.
Here you can transpose and ne-tune the Multi parts individually.
Use the Cursor up/down keys to select a parameter.
Use the Value up/down keys or the data entry control to alter the values.
• Transp. (Semi.): Transposes the part by up to +/– 48 semitones.
• Finetune (Cent): Fine-tunes / detunes the part by up to +/– 50 cents.
• Unison: - If the current part uses a monophonic preset (”M“) with 2 or more voices the part is played
unisono and you can detune its voices.
- If the current part uses a preset with unison mode active, you can assign and detune its
voices independent of the single preset setting. Please refer to multi mode page 2
„Assign Voices“ on page 82.
The value goes from 0 to 100 cent.
If the single preset currently used by this part is not unison, the parameter is not available
and the LCD reads ”– – –“.
Edit Multi Level
Main – Lev. : 127
Part1 – My Preset
Part – Lev. : 127
Panorama : 0 Off
Cur : Sel
Pre : Part
Edit Multi Tune
Transp. (Semi.) : 0
Part1 – My Preset
Finetune (Cent) : 0
Unisono : – – –
Cur : Sel
Pre : Part
7. Multi Mix Page
Hit Parameter up/down keys to enter the Edit Multi Mix page. On this page you can determine whether the voice(s)
used by the eight parts are cancelled from the summing (master) output.
Use the Cursor to select the desired part.
Use the Value up/down keys to alter the setting.
• If set to ”X“, the corresponding part sends its voice(s) through the Master out.
• If set to ”–“, the corresponding voice(s) are cancelled from the Master out.
8. / 9. MIDI Controller Setup (two pages)
Hit Parameter up/down keys to enter the Edit Multi Controller 1 page.
The following page determines whether the Multi parts obey to Schmidt‘s real time controls (modwheel, aftertouch
etc.) or the incoming MIDI controller data respectively.
Use the Cursor up/down keys to select a parameter.
Use the Value up/down keys to alter the values.
• Pitch: Pitchwheel. Available options are:
M+L: The current part processes pitchwheel data from incoming MIDI as well as from Schmidt‘s
local pitchwheel.
MIDI: The current part processes pitchwheel data from incoming MIDI.
LOC: The current part processes pitchwheel data from Schmidt‘s local pitchwheel.
OFF: The current part will not process any pitchwheel data.
• Wheel: Modulation Wheel. The available options are the same as with the pitchwheel.
• Stick: Stick controller. The available options are the same as above.
• Ext.: External controller inputs. The available options are the same as above.
• Press: Keyboard pressure. The available options are the same as above.
Hit Parameter up/down keys to enter the Edit Multi Controller 2 page.
Edit Multi Ctrl1
Pitch: M+L Wheel: M+L
Press: Off
Part1 – My Preset
Stick: M+L Ext. : M+L
Cur : Sel
Pre : Part
Edit M. Master–Mix
Part-Nr. 12345678
Part1 – My Preset
Active xxxxxxxx-
Cur : Sel
Pre : Part
Page 44

84
85
MULTIMODE MULTIMODE
Edit Multi Ctrl2
Rx Vol: On Rx Par: Off
Hold : Off
Part1 – My Preset
Rx Ctr: On Tx Par: On
Cur : Sel
Pre : Part
Here you can enable / disable further MIDI controller communication for the Multi parts.
Use the Cursor up/down keys to select a parameter.
Use the Value up/down keys to alter the values.
• Rx Vol: Enables / disables the reception of MIDI volume controller (ctrl #7) for the selected Multi part.
• Rx Ctr: Enables / disables the reception of all MIDI controller data for the selected Multi part.
• Rx Par: Enables / disables the reception of Schmidt‘s parameter values (MIDI controller data) for
the selected Multi part.
• Tx Par: Enables / disables the transmission of Schmidt‘s parameter values (MIDI controller data) for
the selected Multi part.
• Hold: Determines the reception of MIDI hold pedal controller (ctrl #64 and #66) for the selected Multi part.
Available options are:
M+L: The current part processes hold pedal controller from incoming MIDI as well as from
Schmidt‘s local External Input.
MIDI: The current part processes hold pedal controller from incoming MIDI.
LOC: The current part processes hold pedal controller from Schmidt‘s local External Input.
OFF: The current part will not process any hold pedal controller data at all.
10. Naming a Multi Preset
Hit Parameter up/down keys to enter the Edit Multi Name page.
Here you can name your new Multi preset by using the following functions:
• Value up/down: Change character
• Cursor left/right: Previous/next character
• Preset down: Delete character
• Preset up: Insert character
• Bank down: Toggle between capitals and small letters
• Bank up: Reloads the previous name.
• Exit: Quits Edit Single Name page
• Write: Saves settings to current preset
Edit Multi Name
My Multi 1
Val Pre DEL
Cur
Exit: Quit Write: Write
Pre INS Bnk Org
Bnk A a
MULTI UTILITY MENU
There is also a utility menu for the Multi mode. It currently comprises one page only that provides a function to
transmit Multi preset banks via MIDI dump.
Select Utility with the Menu key while in Multi mode.
The LCD reads like this:
• Bank up/down: Selects Multi Preset bank (1 – 8) to be transmitted.
• Enter: Performs MIDI dump.
• Exit: Quits Send MIDI dump page.
Send Midi Dump
Multi-Bank 1
Par : Page Exit: Quit
Bnk : Bnk Enter: Send
Page 45

86
87
MULTIMODE MULTIMODE
MULTI SYSTEM MENU
You will also nd a system menu for the Multi mode. It currently has only one single page with some parameters that
enable / disable the transmission of performance controller MIDI data in Multi mode on a global level (in contrast to the
Edit Multi Controller 1 page, that deals with individual settings per Multi part).
Hit the System key while in Multi mode.
The LCD reads like this:
Use the Cursor to select one of the following parameters:
Use the Value up/down keys to enable / disable the selected function.
• Pitch: Pitchwheel
• Wheel: Modwheel
• Stick: Stick controller
• Press: Keyboard pressure
• Ext.: External Inputs
• Kbd: Keyboard (note on/off)
• Ctrl.: Controller (controller data generated by Schmidt‘s front panel).
• Vol.: Volume (controller #7 data generated by Schmidt‘s Volume control).
Tx – Midi Settings
Wheel: Off Kbd. : Off
Press : Off Vol. : Off
Pitch : Off Ext. : Off
Stick : Off Ctrl. : Off
Val : Edit Cur : Par
FIRMWARE UPDATE
It is quite easy to update Schmidts rmware via SysEx data dump. Please check out the EMC website frequently
(www.emc-de.com). We will announce new versions there.
Please download the rmware les from the EMC website and unzip the data. Schmidts rmware consists of three
different les. You will nd:
• VX.XX_voice.syx (Voice boards)
• VX.XX_system.syx (System)
• VX.XX_panel.syx (Panel boards)
The le names show the software version (e.g. V1.10), the function (e.g. system) and the data type (Sytem Exclusive).
To transfer the data to Schmidt, we recomend a freeware MIDI dump software just like SysEx Librarian.app (for Mac
OSX). Get it on www.snoize.com/SysExLibrarian/
or
MIDIOX for Windows. Get it on www.midiox.com
This is how to perform the update procedure (the LCD will also guide you through the entire procedure):
1 - Enable rmware download mode:
a) Power Schmidt down.
b) Keep Clipboard and Preset keys pressed down simultanously while powering up Schmidt.
=> A blue screen appears (no – this is not a crash...) and shows the OS menu.
c) Select ”Software Update“ and hit Enter key.
2 - Transfer Voice OS data:
a) Select ”Update Voices“ with the Cursor and hit Enter.
b) Upload the le ”VX.XX_voice.syx“ to Schmidts MIDI In socket.
=> As soon as the upload is complete, an automatic check up is performed.
c) Hit Enter key (OK).
d) Conrm with Enter key.
e) Hit Exit to quit the funtion.
3 - Transfer System OS data:
a) Select ”Update System“ with the Cursor and hit Enter.
b) Upload the le ”VX.XX_system.syx“ to Schmidts MIDI In socket.
=> As soon as the upload is complete, an automatic check up is performed.
c) Hit Enter key (OK).
d) Conrm with Enter key.
e) Hit Exit to quit the funtion.
4 - Transfer Panel OS data:
a) Select ”Update Panel“ with the Cursor and hit Enter.
b) Upload the le ”VX.XX_panel.syx“ to Schmidts MIDI In socket.
=> As soon as the upload is complete, an automatic check up is performed.
c) Hit Enter key (OK).
d) Conrm with Enter key.
e) Hit Exit to quit the funtion.
5 - Complete rmware update.
a) Power Schmidt down.
b) Wait for about ve seconds and power up Schmidt.
If an Error message shows up on the LCD, please do not panic. Simply repeat the entire procedure once again.
Attention: - Never, never (!) power down Schmidt while the update process is performed!
- Always keep to this order above resp. the instructions on the LCD.
Page 46

88
89
APPENDIX APPENDIX
VI.
APPENDIX
APPENDIX
MIDI IMPLEMENTATION
MIDI CONTROLLER ASSIGNMENTS
CC #
Parameter Send/Receive Explanation Comment
0/32 S/R Bank-Select MSB/LSB Single/Multi:
MSB=0
LSB=0É 7
1/33 S/R Mod-Wheel MSB/LSB
LSB nur gesendet bei
Snd-CC14Bit: On
6/38 S/R Data-Entry MSB/LSB Siehe NRPN
7/39 S/R Volume MSB/LSB
LSB nur gesendet bei
Snd-CC14Bit: On
64 S/R Sustain
66 S/R Sostenuto
98 S/R NRPN-Nummer LSB Siehe NRPN
99 S/R NRPN-Nummer MSB Siehe NRPN
102 S/R Joystick X-Position 0É 127
103 S/R Joystick Y-Position 0É 127
104 S/R Pedal Ext1 0É 127
105 S/R Pedal Ext2 0É 127
106 S/R Pedal Ext3 0É 127
107 R LED-Color 0É 63
108 R Display-Color 0É 63
109 R LED+Display-Color 0É 63
121 R Reset Controller
122 R Local Control nur im Single-Mode
123 R All Notes Off
Single-Mode only
Please note:
NRPN:
Used to send/receive the parameters of a sound. All parameters have the following in common:
1. NRPN # MSB (CC#99)
2. NRPN # LSB (CC#98)
3. Data entry (Ctrl. Value) MSB (CC#38)
4. Data entry (Ctrl. Value) LSB (CC#6)
Send:
When editing a new parameter, the NRPN # will always be transmitted. When editing the same parameter twice, only
the data entries (controller values) will be transmitted.
Receive:
When receiving controller data, all data entries (controller values) will refer to the last NRPN # received, as long as no
new NRPN # is received. When NRPN = 127-MSB + 127-LSB is received, subsequent data entries (controller values)
will be ignored.
only sent when
See
See
See
only sent when
Page 47

90
91
APPENDIX APPENDIX
OSZ 123
Parameter NRPN# Send/Receive Typ Data Format Explanation
PWM Settings 154 S/R Switch LMKKMVXR
L: Max Limit On/Off (1/0)
MM: LFO-Mode: 01 (One-Shot)
MM: LFO-Mode: 00 (Triangle)
MM: LFO-Mode: 10 (Sine)
KK: Kbd Scale: 00 (Off)
KK: Kbd Scale: 10 (1/4)
KK: Kbd Scale: 11 (1/2)
V: Vel-LFO-Depth On/Off (1/0)
OSZ 1234
Parameter NRPN# Send/Receive Typ Data Format Explanation
Vibrato Assign 222 S/R Switch
1XXXXXXX
0XXXXXXX
Assign to Osz1234 Off
Assign to Osz1234 On
Envelope Assign 223 S/R Switch
1XXXXXXX
0XXXXXXX
Assign to Osz1234 Off
Assign to Osz1234 On
Unisono Tune (Mono) 72 S/R M 0É 255
Single Fine Tune 73 S/R M 0É 128É 255 (-50CentÉ 0É +50Cent)
Single Transpose 74 S/R M 244É 255
0É 12
(-12HTÉ -1HT)
(0É +12HT)
OSZ 1
Parameter NRPN# Send/Receive Send/Receive Data Format Explanation
Vibrato Wave 206 S/R Switch 0
1
2
Sine
Square
Random
Vibrato Depth 198 S/R Pot 0...255
Vibrato Rate 202 S/R Pot 0É 255 0,1HzÉ 75Hz
0,2HzÉ 150Hz (Wave:Random)
Env Destination/Mode 218 S/R Switch DDXXQMVM
Q: Quant On/Off (1/0)
V: Vel On/Off (1/0)
DD: Dest: 00 (Pitch)
DD: Dest: 10 (Vib.Depth)
DD: Dest: 11 (Noise Depth)
MM: Mode: 00 (Decay Exp)
MM: Mode: 10 (Decay Lin)
Envelope Depth 210 S/R Pot 0É 255 (-15HTÉ +15HT)
Envelope Time 214 S/R Pot 0É 255
12msÉ 6,1S (Decay Lin/Exp)
7,5msÉ 3,8S (Attack/Decay)
Noise Modulation 152 S/R Pot 0...255
Detune 149 S/R Pot 0...255
fine on: (-15...+15Cent)
fine off: (-75...+75Cent)
Semitone 153 S/R Pot 2,4,6,8É 30 (-7HTÉ +7HT)
Detune Fine/KBD Scale/Wave 150 S/R Switch KKFXXWWW
KK: Kbd Scale: 00 (Off)
KK: Kbd Scale: 10 (1/4)
KK: Kbd Scale: 11 (1/2)
F: Fine On/Off: (0/1)
WWW: Wave: 001 (Square)
WWW: Wave: 010 (PW)
WWW: Wave: 101 (Saw)
WWW: Wave: 111 (Saw/PW)
WWW: Wave: 100 (Multi PWM)
WWW: Wave: 110 (Multi/PW)
Octave/Sub Octave 151 S/R Switch XSSSXXOO
SSS: Sub-Oct: 000 (Off)
SSS: Sub-Oct: 001 (64")
SSS: Sub-Oct: 010 (32")
SSS: Sub-Oct: 011 (16")
SSS: Sub-Oct: 100 (8")
OO: Octave: 00 (32")
OO: Octave: 01 (16")
OO: Octave: 10 (8")
Multi PWM Diffuse/Mode 170 S/R Switch XXXDDXMM
DD: LFO Diffuse: 00 (Off)
DD: LFO Diffuse: 10 (Slow)
DD: LFO Diffuse: 11 (Fast)
MM: Mode: 00 (1)
MM: Mode: 01 (2)
MM: Mode: 10 (3)
MIDI MESSAGES
OSZ 123
Parameter NRPN# Send/Receive Typ Data Format Explanation
PWM Settings 154 S/R Switch LMKKMVXR
L: Max Limit On/Off (1/0)
MM: LFO-Mode: 01 (One-Shot)
MM: LFO-Mode: 00 (Triangle)
MM: LFO-Mode: 10 (Sine)
KK: Kbd Scale: 00 (Off)
KK: Kbd Scale: 10 (1/4)
KK: Kbd Scale: 11 (1/2)
V: Vel-LFO-Depth On/Off (1/0)
OSZ 1234
Parameter NRPN# Send/Receive Typ Data Format Explanation
Vibrato Assign 222 S/R Switch
1XXXXXXX
0XXXXXXX
Assign to Osz1234 Off
Assign to Osz1234 On
Envelope Assign 223 S/R Switch
1XXXXXXX
0XXXXXXX
Assign to Osz1234 Off
Assign to Osz1234 On
Unisono Tune (Mono) 72 S/R M 0É 255
Single Fine Tune 73 S/R M 0É 128É 255 (-50CentÉ 0É +50Cent)
Single Transpose 74 S/R M 244É 255
0É 12
(-12HTÉ -1HT)
(0É +12HT)
OSZ 1
Parameter NRPN# Send/Receive Send/Receive Data Format Explanation
Vibrato Wave 206 S/R Switch 0
1
2
Sine
Square
Random
Vibrato Depth 198 S/R Pot 0...255
Vibrato Rate 202 S/R Pot 0É 255 0,1HzÉ 75Hz
0,2HzÉ 150Hz (Wave:Random)
Env Destination/Mode 218 S/R Switch DDXXQMVM
Q: Quant On/Off (1/0)
V: Vel On/Off (1/0)
DD: Dest: 00 (Pitch)
DD: Dest: 10 (Vib.Depth)
DD: Dest: 11 (Noise Depth)
MM: Mode: 00 (Decay Exp)
MM: Mode: 10 (Decay Lin)
Envelope Depth 210 S/R Pot 0É 255 (-15HTÉ +15HT)
Envelope Time 214 S/R Pot 0É 255
12msÉ 6,1S (Decay Lin/Exp)
7,5msÉ 3,8S (Attack/Decay)
Noise Modulation 152 S/R Pot 0...255
Detune 149 S/R Pot 0...255
fine on: (-15...+15Cent)
fine off: (-75...+75Cent)
Semitone 153 S/R Pot 2,4,6,8É 30 (-7HTÉ +7HT)
Detune Fine/KBD Scale/Wave 150 S/R Switch KKFXXWWW
KK: Kbd Scale: 00 (Off)
KK: Kbd Scale: 10 (1/4)
KK: Kbd Scale: 11 (1/2)
F: Fine On/Off: (0/1)
WWW: Wave: 001 (Square)
WWW: Wave: 010 (PW)
WWW: Wave: 101 (Saw)
WWW: Wave: 111 (Saw/PW)
WWW: Wave: 100 (Multi PWM)
WWW: Wave: 110 (Multi/PW)
Octave/Sub Octave 151 S/R Switch XSSSXXOO
SSS: Sub-Oct: 000 (Off)
SSS: Sub-Oct: 001 (64")
SSS: Sub-Oct: 010 (32")
SSS: Sub-Oct: 011 (16")
SSS: Sub-Oct: 100 (8")
OO: Octave: 00 (32")
OO: Octave: 01 (16")
OO: Octave: 10 (8")
Multi PWM Diffuse/Mode 170 S/R Switch XXXDDXMM
DD: LFO Diffuse: 00 (Off)
DD: LFO Diffuse: 10 (Slow)
DD: LFO Diffuse: 11 (Fast)
MM: Mode: 00 (1)
MM: Mode: 01 (2)
MM: Mode: 10 (3)
Multi PWM LFO Vel/Mode/Kbd 171 S/R Switch KKKMMMWS
KKK: Kbd Scale: 000 (Off)
KKK: Kbd Scale: 110 (1/4)
KKK: Kbd Scale: 111 (1/2)
MMM: Mode: 001 (Decay)
MMM: Mode: 101 (Attack/Deacy)
MMM: Mode: 000 (LFO)
MMM: Mode: 010 (Step)
W: Width-LFO-Vel On/Off: (1/0)
Multi PWM Width Center 164 S/R Pot 0..255
Multi PWM Width Lfo Depth 167 S/R Pot 0..255 (-MaxÉ OffÉ +Max)
Multi PWM Width LFO Rate 166 S/R Pot 0..255 0,025HzÉ 20Hz
Multi PWM Space Center 165 S/R Pot 0..255
Multi PWM Space LFO Depth 169 S/R Pot 0..255 (-MaxÉ OffÉ +Max)
VCF 1/2 DF1/2
Parameter NRPN# Send/Receive Typ Data Format Explanation
LFO Source 100 S/R Switch DDCCBBAA
DD: 11: DF2-LFO-Sorce: LFO-DF1
DD: 10: DF2-LFO-Sorce: LFO-VCF1
DD: 01: DF2-LFO-Sorce: LFO-DF2
CC: 11: DF1-LFO-Sorce: LFO-VCF2
CC: 10: DF1-LFO-Sorce: LFO-VCF1
CC: 00: DF1-LFO-Sorce: LFO-DF1
BB: 00: VCF1-LFO-Sorce: LFO-VCF1
BB: 01: VCF1-LFO-Sorce: LFO-VCF2
BB: 11: VCF1-LFO-Sorce: LFO-VCF1+2
AA: 01: VCF2-LFO-Sorce: LFO-VCF1
AA: 00: VCF2-LFO-Sorce: LFO-VCF2
VCF 1/2
Parameter NRPN# Send/Receive Typ Data Format Explanation
Input Source 79 S/R Switch DDBCCBAA
AA: VCF1 Input A
BB: VCF1 Input B
CC: VCF2 Input A
DD: VCF2 Input B
AA/BB/CC/DD:
10: Osz1
01: Osz2
11: Osz2
Input B Filter/Level Mod 81 S/R Switch/M ABCDFFMM
A: VCF2-Filter Mod On/Off (1/0)
B: VCF1-Filter Mod On/Off (1/0)
AB Edited in Preset Menu
C: VCF2-Lev.Mod Vel. On/Off (1/0)
D: VCF1-Lev.Mod Vel. On/Off (1/0)
FF: 00: VCF2-Lev.Mod ENV-Off
FF: 10: VCF2-Lev.Mod ENV-Attack
FF: 01: VCF2-Lev.Mod ENV-Decay
FF: 11: VCF2-Lev.Mod ENV-LFO
MM: 00: VCF1-Lev.Mod ENV-Off
MM: 10: VCF1-Lev.Mod ENV-Attack
MM: 01: VCF1-Lev.Mod ENV-Decay
VCF12 Decay2 On/Off 61 S/R Switch BAXXXXXX
B: VCF1 Decay2 On/Off (1/0)
A: VCF2 Decay2 On/Off (1/0)
VCF12 LFO-Sync-Mode 31 S/R M BBBBAAAA
BBBB: VCF2-Sync Mode
AAAA: VCF1-Sync Mode
0000 : Intern (LFO Time Pot.)
0001: Midi-Clock /32
0010: Midi-Clock /16
0011: Midi-Clock /16.
0100: Midi-Clock /8
0101: Midi-Clock /8.
0110: Midi-Clock /4
0111: Midi-Clock /4.
1000: Midi-Clock /2
1001: Midi-Clock /2.
1010: Midi-Clock /1
1011: Midi-Clock /1.
1100: Midi-Clock *2
Page 48

92
93
APPENDIX APPENDIX
VCF 1/2 DF1/2
Parameter NRPN# Send/Receive Typ Data Format Explanation
LFO Source 100 S/R Switch DDCCBBAA
DD: 11: DF2-LFO-Sorce: LFO-DF1
DD: 10: DF2-LFO-Sorce: LFO-VCF1
DD: 01: DF2-LFO-Sorce: LFO-DF2
CC: 11: DF1-LFO-Sorce: LFO-VCF2
CC: 10: DF1-LFO-Sorce: LFO-VCF1
CC: 00: DF1-LFO-Sorce: LFO-DF1
BB: 00: VCF1-LFO-Sorce: LFO-VCF1
BB: 01: VCF1-LFO-Sorce: LFO-VCF2
BB: 11: VCF1-LFO-Sorce: LFO-VCF1+2
AA: 01: VCF2-LFO-Sorce: LFO-VCF1
AA: 00: VCF2-LFO-Sorce: LFO-VCF2
VCF 1/2
Parameter NRPN# Send/Receive Typ Data Format Explanation
Input Source 79 S/R Switch DDBCCBAA
AA: VCF1 Input A
BB: VCF1 Input B
CC: VCF2 Input A
DD: VCF2 Input B
AA/BB/CC/DD:
10: Osz1
01: Osz2
11: Osz2
Input B Filter/Level Mod 81 S/R Switch/M ABCDFFMM
A: VCF2-Filter Mod On/Off (1/0)
B: VCF1-Filter Mod On/Off (1/0)
AB Edited in Preset Menu
C: VCF2-Lev.Mod Vel. On/Off (1/0)
D: VCF1-Lev.Mod Vel. On/Off (1/0)
FF: 00: VCF2-Lev.Mod ENV-Off
FF: 10: VCF2-Lev.Mod ENV-Attack
FF: 01: VCF2-Lev.Mod ENV-Decay
FF: 11: VCF2-Lev.Mod ENV-LFO
MM: 00: VCF1-Lev.Mod ENV-Off
MM: 10: VCF1-Lev.Mod ENV-Attack
MM: 01: VCF1-Lev.Mod ENV-Decay
VCF12 Decay2 On/Off 61 S/R Switch BAXXXXXX
B: VCF1 Decay2 On/Off (1/0)
A: VCF2 Decay2 On/Off (1/0)
VCF12 LFO-Sync-Mode 31 S/R M BBBBAAAA
BBBB: VCF2-Sync Mode
AAAA: VCF1-Sync Mode
0000 : Intern (LFO Time Pot.)
0001: Midi-Clock /32
0010: Midi-Clock /16
0011: Midi-Clock /16.
0100: Midi-Clock /8
0101: Midi-Clock /8.
0110: Midi-Clock /4
0111: Midi-Clock /4.
1000: Midi-Clock /2
1001: Midi-Clock /2.
1010: Midi-Clock /1
1011: Midi-Clock /1.
1100: Midi-Clock *2
DF1/2
Parameter NRPN# Send/Receive Typ Data Format Explanation
Input Source 80 S/R Switch DDCCBBAA
AA: DF1 Input A
BB: DF1 Input B
CC: DF2 Input A
DD: DF2 Input B
AA/BB/CC/DD:
00: Osz1
01: Osz2
10: Osz2
Resonance 131 S/R Switch XXBBBAAA
BBB: Reso-DF2
000..111 -> MinÉ Max
AAA: Reso-DF1
ENV-Mode/DF1->2 Assign 130 S/R Switch XXXXXCBA
C: Assign DF1->DF2 Settings On/Off (1/0)
B: ENV-Mode DF2 0:ENV 1:Ramp
Group12 Out Mix + Group12 In
Parameter NRPN# Send/Receive Typ Data Format Explanation
Input/output 109 S/R Switch GFEDCCBA
G: Input DF2-MIx A+B On/Off (1/0)
F: Input DF1-MIx A+B On/Off (1/0)
E: VCF2 Out-Invert On/Off (1/0)
D: VCF2 Out On/Off (0/1)
CC: 00: VCF3-Input : Osz1
CC: 01: VCF3-Input : Osz2
CC: 10: VCF3-Input : Osz3
CC: 11: VCF3-Input : Osz4
B: VCF1 Out-Invert On/Off (1/0)
VCF3 Group1/2 Out 110 S/R Switch BAXXXXX1
B: Group2 VCF3-On/Off (1/0)
A: Group1 VCF3-On/Off (1/0)
DF1/2 Group1/2 Out 114 S/R Switch XXFEDCBA
F: Group2 DF2 Dist-Vel. On/Off (1/0)
E: Group1 DF1 Dist-Vel. On/Off (1/0)
D: Group2 DF2 Invert On/Off (1/0)
C: Group1 DF1 Invert On/Off (1/0)
B: Group2 DF2-Out On/Off (1/0)
Group1 Velocity 38 S/R Pot 0É 128É 255 (-MaxÉ OffÉ +Max)
Group2 Velocity 39 S/R Pot 0É 128É 255 (-MaxÉ OffÉ +Max)
Group1 Out DF1 Distortion 115 S/R Pot 0É 255
Group2 Out DF2 Distortion 116 S/R Pot 0É 255
Group1 Out DF1 Level 98 S/R Pot 0É 255
Group2 Out DF2 Level 99 S/R Pot 0É 255
Group1 Out VCF3 Level 111 S/R Pot 0É 255
Group2 Out VCF3 Level 112 S/R Pot 0É 255
VCF3 Cutoff 113 S/R Pot 0É 255
Group 1/2 Level Mod
Parameter NRPN# Send/Receive Typ Data Format Explanation
Mix Man/Fade-Controls 48 S/R Switch XXFFMSXX
FF: 01: Fade-Mode: 2->1
FF: 11: Fade-Mode: 2->1->2
FF: 10: Fade-Mode: 2->Min->2
FF: 00: Fade-Mode: 2->Min
M: Mix-Mode: Man/Fade (1/0)
Group1/2 Man-Mix 49 S/R Pot 0É 255 Group1É Group2
Group1/2 Fade-Time 50 S/R Pot 0É 255
5msÉ 4S (Fade-Mode 2->1,2->Min)
10msÉ 8S (Fade-Mode 2->1->2)
Group1/2 Fade-Delay 51 S/R Pot 0É 255 0É 4,5S
LFO-Controls 57 S/R Switch DDDRVXXX
DDD: 000: Group-Dest: Off
DDD: 100: Group-Dest: 1
DDD: 010: Group-Dest: 2
DDD: 110: Group-Dest: 1+2
DDD: 111: Group-Dest: 1+ 2R: LFO-Note-Reset On/Off (1/0)
Mix-LFO-Depth 58 S/R Pot 0É 255
Mix-LFO-Rate 59 S/R Pot 0É 255 0É 4,5S
Group12 Out Mix + Group12 In
Parameter NRPN# Send/Receive Typ Data Format Explanation
Input/output 109 S/R Switch GFEDCCBA
G: Input DF2-MIx A+B On/Off (1/0)
F: Input DF1-MIx A+B On/Off (1/0)
E: VCF2 Out-Invert On/Off (1/0)
D: VCF2 Out On/Off (0/1)
CC: 00: VCF3-Input : Osz1
CC: 01: VCF3-Input : Osz2
CC: 10: VCF3-Input : Osz3
CC: 11: VCF3-Input : Osz4
B: VCF1 Out-Invert On/Off (1/0)
VCF3 Group1/2 Out 110 S/R Switch BAXXXXX1
B: Group2 VCF3-On/Off (1/0)
A: Group1 VCF3-On/Off (1/0)
DF1/2 Group1/2 Out 114 S/R Switch XXFEDCBA
F: Group2 DF2 Dist-Vel. On/Off (1/0)
E: Group1 DF1 Dist-Vel. On/Off (1/0)
D: Group2 DF2 Invert On/Off (1/0)
C: Group1 DF1 Invert On/Off (1/0)
B: Group2 DF2-Out On/Off (1/0)
Group1 Velocity 38 S/R Pot 0É 128É 255 (-MaxÉ OffÉ +Max)
Group2 Velocity 39 S/R Pot 0É 128É 255 (-MaxÉ OffÉ +Max)
Group1 Out DF1 Distortion 115 S/R Pot 0É 255
Group2 Out DF2 Distortion 116 S/R Pot 0É 255
Group1 Out DF1 Level 98 S/R Pot 0É 255
Group2 Out DF2 Level 99 S/R Pot 0É 255
Group1 Out VCF3 Level 111 S/R Pot 0É 255
Group2 Out VCF3 Level 112 S/R Pot 0É 255
VCF3 Cutoff 113 S/R Pot 0É 255
Group 1/2 Level Mod
Parameter NRPN# Send/Receive Typ Data Format Explanation
Mix Man/Fade-Controls 48 S/R Switch XXFFMSXX
FF: 01: Fade-Mode: 2->1
FF: 11: Fade-Mode: 2->1->2
FF: 10: Fade-Mode: 2->Min->2
FF: 00: Fade-Mode: 2->Min
M: Mix-Mode: Man/Fade (1/0)
Group1/2 Man-Mix 49 S/R Pot 0É 255 Group1É Group2
Group1/2 Fade-Time 50 S/R Pot 0É 255
5msÉ 4S (Fade-Mode 2->1,2->Min)
10msÉ 8S (Fade-Mode 2->1->2)
Group1/2 Fade-Delay 51 S/R Pot 0É 255 0É 4,5S
LFO-Controls 57 S/R Switch DDDRVXXX
DDD: 000: Group-Dest: Off
DDD: 100: Group-Dest: 1
DDD: 010: Group-Dest: 2
DDD: 110: Group-Dest: 1+2
DDD: 111: Group-Dest: 1+ 2-
R: LFO-Note-Reset On/Off (1/0)
Mix-LFO-Depth 58 S/R Pot 0É 255
Mix-LFO-Rate 59 S/R Pot 0É 255 0É 4,5S
Panorama-Controls 52 S/R Switch SDDVMMXD
S: Voice-Spread On/Off (1/0)
DDD: 000: Group-Dest: Off
DDD: 001: Group-Dest: 1
DDD: 010: Group-Dest: 2
DDD: 011: Group-Dest: 1+2
DDD: 111: Group-Dest: 1+ 2V: LFO-Depth-Velocity On/Off (1/0)
MM: 01: LFO-Mode: L>R
MM: 10: LFO-Mode: L>R>L
Panorama-LFO-Depth 55 S/R Pot 0É 255
Panorama-LFO-Rate 56 S/R Pot 0É 255
0,025HzÉ 10Hz (LFO-Continuous)
20SÉ 40ms (LFO-Mode: L>R)
Group1 Pan-Offset 53 S/R Pot 0É 255 LeftÉ Rigth
Group2 Pan-Offset 54 S/R Pot 0É 255 LeftÉ Rigth
Master ENV/VCA-VCF12 Retrigg
Parameter NRPN# Send/Receive Typ Data Format Explanation
Soft/VCA-VCF12-Retrigg 60 S/R Switch XXXXDCBA
D: VCF1-Retrigg On/Off (1/0)
C: VCF2-Retrigg On/Off (1/0)
B: VCA-Soft On/Off (1/0)
Sound Volume 32 S/R Pot 0É 255
Attack 33 S/R Pot 0É 255 1msÉ 10ms
Decay 34 S/R Pot 0É 255 2msÉ 20S
Sustain 35 S/R Pot 0É 255
Release 36 S/R Pot 0É 255 2msÉ 20S
Release-Level 37 S/R Pot 0É 255
Glide/Bend
Parameter NRPN# Send/Receive Send/Receive Data Format Explanation
Pitch Bend 148 S/R Pot
0,1,2
3É 13
14
1É 28
(-12HT)
(-11HTÉ -1HT)
Off
(+1É +11HT)
Page 49

94
95
APPENDIX APPENDIX
OSZ 123
Parameter NRPN# Send/Receive Typ Data Format Explanation
PWM Settings 154 S/R Switch LMKKMVXR
L: Max Limit On/Off (1/0)
MM: LFO-Mode: 01 (One-Shot)
MM: LFO-Mode: 00 (Triangle)
MM: LFO-Mode: 10 (Sine)
KK: Kbd Scale: 00 (Off)
KK: Kbd Scale: 10 (1/4)
KK: Kbd Scale: 11 (1/2)
V: Vel-LFO-Depth On/Off (1/0)
OSZ 1234
Parameter NRPN# Send/Receive Typ Data Format Explanation
Vibrato Assign 222 S/R Switch
1XXXXXXX
0XXXXXXX
Assign to Osz1234 Off
Assign to Osz1234 On
Envelope Assign 223 S/R Switch
1XXXXXXX
0XXXXXXX
Assign to Osz1234 Off
Assign to Osz1234 On
Unisono Tune (Mono) 72 S/R M 0É 255
Single Fine Tune 73 S/R M 0É 128É 255 (-50CentÉ 0É +50Cent)
Single Transpose 74 S/R M 244É 255
0É 12
(-12HTÉ -1HT)
(0É +12HT)
OSZ 1
Parameter NRPN# Send/Receive Send/Receive Data Format Explanation
Vibrato Wave 206 S/R Switch 0
1
2
Sine
Square
Random
Vibrato Depth 198 S/R Pot 0...255
Vibrato Rate 202 S/R Pot 0É 255 0,1HzÉ 75Hz
0,2HzÉ 150Hz (Wave:Random)
Env Destination/Mode 218 S/R Switch DDXXQMVM
Q: Quant On/Off (1/0)
V: Vel On/Off (1/0)
DD: Dest: 00 (Pitch)
DD: Dest: 10 (Vib.Depth)
DD: Dest: 11 (Noise Depth)
MM: Mode: 00 (Decay Exp)
MM: Mode: 10 (Decay Lin)
Envelope Depth 210 S/R Pot 0É 255 (-15HTÉ +15HT)
Envelope Time 214 S/R Pot 0É 255
12msÉ 6,1S (Decay Lin/Exp)
7,5msÉ 3,8S (Attack/Decay)
Noise Modulation 152 S/R Pot 0...255
Detune 149 S/R Pot 0...255
fine on: (-15...+15Cent)
fine off: (-75...+75Cent)
Semitone 153 S/R Pot 2,4,6,8É 30 (-7HTÉ +7HT)
Detune Fine/KBD Scale/Wave 150 S/R Switch KKFXXWWW
KK: Kbd Scale: 00 (Off)
KK: Kbd Scale: 10 (1/4)
KK: Kbd Scale: 11 (1/2)
F: Fine On/Off: (0/1)
WWW: Wave: 001 (Square)
WWW: Wave: 010 (PW)
WWW: Wave: 101 (Saw)
WWW: Wave: 111 (Saw/PW)
WWW: Wave: 100 (Multi PWM)
WWW: Wave: 110 (Multi/PW)
Octave/Sub Octave 151 S/R Switch XSSSXXOO
SSS: Sub-Oct: 000 (Off)
SSS: Sub-Oct: 001 (64")
SSS: Sub-Oct: 010 (32")
SSS: Sub-Oct: 011 (16")
SSS: Sub-Oct: 100 (8")
OO: Octave: 00 (32")
OO: Octave: 01 (16")
OO: Octave: 10 (8")
Multi PWM Diffuse/Mode 170 S/R Switch XXXDDXMM
DD: LFO Diffuse: 00 (Off)
DD: LFO Diffuse: 10 (Slow)
DD: LFO Diffuse: 11 (Fast)
MM: Mode: 00 (1)
MM: Mode: 01 (2)
MM: Mode: 10 (3)
NRPN CONTROLLER
OSZ 123
Parameter NRPN# Send/Receive Typ Data Format Explanation
PWM Settings 154 S/R Switch LMKKMVXR
L: Max Limit On/Off (1/0)
MM: LFO-Mode: 01 (One-Shot)
MM: LFO-Mode: 00 (Triangle)
MM: LFO-Mode: 10 (Sine)
KK: Kbd Scale: 00 (Off)
KK: Kbd Scale: 10 (1/4)
KK: Kbd Scale: 11 (1/2)
V: Vel-LFO-Depth On/Off (1/0)
OSZ 1234
Parameter NRPN# Send/Receive Typ Data Format Explanation
Vibrato Assign 222 S/R Switch
1XXXXXXX
0XXXXXXX
Assign to Osz1234 Off
Assign to Osz1234 On
Envelope Assign 223 S/R Switch
1XXXXXXX
0XXXXXXX
Assign to Osz1234 Off
Assign to Osz1234 On
Unisono Tune (Mono) 72 S/R M 0É 255
Single Fine Tune 73 S/R M 0É 128É 255 (-50CentÉ 0É +50Cent)
Single Transpose 74 S/R M 244É 255
0É 12
(-12HTÉ -1HT)
(0É +12HT)
OSZ 1
Parameter NRPN# Send/Receive Send/Receive Data Format Explanation
Vibrato Wave 206 S/R Switch 0
1
2
Sine
Square
Random
Vibrato Depth 198 S/R Pot 0...255
Vibrato Rate 202 S/R Pot 0É 255 0,1HzÉ 75Hz
0,2HzÉ 150Hz (Wave:Random)
Env Destination/Mode 218 S/R Switch DDXXQMVM
Q: Quant On/Off (1/0)
V: Vel On/Off (1/0)
DD: Dest: 00 (Pitch)
DD: Dest: 10 (Vib.Depth)
DD: Dest: 11 (Noise Depth)
MM: Mode: 00 (Decay Exp)
MM: Mode: 10 (Decay Lin)
Envelope Depth 210 S/R Pot 0É 255 (-15HTÉ +15HT)
Envelope Time 214 S/R Pot 0É 255
12msÉ 6,1S (Decay Lin/Exp)
7,5msÉ 3,8S (Attack/Decay)
Noise Modulation 152 S/R Pot 0...255
Detune 149 S/R Pot 0...255
fine on: (-15...+15Cent)
fine off: (-75...+75Cent)
Semitone 153 S/R Pot 2,4,6,8É 30 (-7HTÉ +7HT)
Detune Fine/KBD Scale/Wave 150 S/R Switch KKFXXWWW
KK: Kbd Scale: 00 (Off)
KK: Kbd Scale: 10 (1/4)
KK: Kbd Scale: 11 (1/2)
F: Fine On/Off: (0/1)
WWW: Wave: 001 (Square)
WWW: Wave: 010 (PW)
WWW: Wave: 101 (Saw)
WWW: Wave: 111 (Saw/PW)
WWW: Wave: 100 (Multi PWM)
WWW: Wave: 110 (Multi/PW)
Octave/Sub Octave 151 S/R Switch XSSSXXOO
SSS: Sub-Oct: 000 (Off)
SSS: Sub-Oct: 001 (64")
SSS: Sub-Oct: 010 (32")
SSS: Sub-Oct: 011 (16")
SSS: Sub-Oct: 100 (8")
OO: Octave: 00 (32")
OO: Octave: 01 (16")
OO: Octave: 10 (8")
Multi PWM Diffuse/Mode 170 S/R Switch XXXDDXMM
DD: LFO Diffuse: 00 (Off)
DD: LFO Diffuse: 10 (Slow)
DD: LFO Diffuse: 11 (Fast)
MM: Mode: 00 (1)
MM: Mode: 01 (2)
MM: Mode: 10 (3)
Multi PWM LFO Vel/Mode/Kbd 171 S/R Switch KKKMMMWS
KKK: Kbd Scale: 000 (Off)
KKK: Kbd Scale: 110 (1/4)
KKK: Kbd Scale: 111 (1/2)
MMM: Mode: 001 (Decay)
MMM: Mode: 101 (Attack/Deacy)
MMM: Mode: 000 (LFO)
MMM: Mode: 010 (Step)
W: Width-LFO-Vel On/Off: (1/0)
Multi PWM Width Center 164 S/R Pot 0..255
Multi PWM Width Lfo Depth 167 S/R Pot 0..255 (-MaxÉ OffÉ +Max)
Multi PWM Width LFO Rate 166 S/R Pot 0..255 0,025HzÉ 20Hz
Multi PWM Space Center 165 S/R Pot 0..255
Multi PWM Space LFO Depth 169 S/R Pot 0..255 (-MaxÉ OffÉ +Max)
VCF 1/2 DF1/2
Parameter NRPN# Send/Receive Typ Data Format Explanation
LFO Source 100 S/R Switch DDCCBBAA
DD: 11: DF2-LFO-Sorce: LFO-DF1
DD: 10: DF2-LFO-Sorce: LFO-VCF1
DD: 01: DF2-LFO-Sorce: LFO-DF2
CC: 11: DF1-LFO-Sorce: LFO-VCF2
CC: 10: DF1-LFO-Sorce: LFO-VCF1
CC: 00: DF1-LFO-Sorce: LFO-DF1
BB: 00: VCF1-LFO-Sorce: LFO-VCF1
BB: 01: VCF1-LFO-Sorce: LFO-VCF2
BB: 11: VCF1-LFO-Sorce: LFO-VCF1+2
AA: 01: VCF2-LFO-Sorce: LFO-VCF1
AA: 00: VCF2-LFO-Sorce: LFO-VCF2
VCF 1/2
Parameter NRPN# Send/Receive Typ Data Format Explanation
Input Source 79 S/R Switch DDBCCBAA
AA: VCF1 Input A
BB: VCF1 Input B
CC: VCF2 Input A
DD: VCF2 Input B
AA/BB/CC/DD:
10: Osz1
01: Osz2
11: Osz2
Input B Filter/Level Mod 81 S/R Switch/M ABCDFFMM
A: VCF2-Filter Mod On/Off (1/0)
B: VCF1-Filter Mod On/Off (1/0)
AB Edited in Preset Menu
C: VCF2-Lev.Mod Vel. On/Off (1/0)
D: VCF1-Lev.Mod Vel. On/Off (1/0)
FF: 00: VCF2-Lev.Mod ENV-Off
FF: 10: VCF2-Lev.Mod ENV-Attack
FF: 01: VCF2-Lev.Mod ENV-Decay
FF: 11: VCF2-Lev.Mod ENV-LFO
MM: 00: VCF1-Lev.Mod ENV-Off
MM: 10: VCF1-Lev.Mod ENV-Attack
MM: 01: VCF1-Lev.Mod ENV-Decay
VCF12 Decay2 On/Off 61 S/R Switch BAXXXXXX
B: VCF1 Decay2 On/Off (1/0)
A: VCF2 Decay2 On/Off (1/0)
VCF12 LFO-Sync-Mode 31 S/R M BBBBAAAA
BBBB: VCF2-Sync Mode
AAAA: VCF1-Sync Mode
0000 : Intern (LFO Time Pot.)
0001: Midi-Clock /32
0010: Midi-Clock /16
0011: Midi-Clock /16.
0100: Midi-Clock /8
0101: Midi-Clock /8.
0110: Midi-Clock /4
0111: Midi-Clock /4.
1000: Midi-Clock /2
1001: Midi-Clock /2.
1010: Midi-Clock /1
1011: Midi-Clock /1.
1100: Midi-Clock *2
Page 50

96
97
APPENDIX APPENDIX
VCF 1/2 DF1/2
Parameter NRPN# Send/Receive Typ Data Format Explanation
LFO Source 100 S/R Switch DDCCBBAA
DD: 11: DF2-LFO-Sorce: LFO-DF1
DD: 10: DF2-LFO-Sorce: LFO-VCF1
DD: 01: DF2-LFO-Sorce: LFO-DF2
CC: 11: DF1-LFO-Sorce: LFO-VCF2
CC: 10: DF1-LFO-Sorce: LFO-VCF1
CC: 00: DF1-LFO-Sorce: LFO-DF1
BB: 00: VCF1-LFO-Sorce: LFO-VCF1
BB: 01: VCF1-LFO-Sorce: LFO-VCF2
BB: 11: VCF1-LFO-Sorce: LFO-VCF1+2
AA: 01: VCF2-LFO-Sorce: LFO-VCF1
AA: 00: VCF2-LFO-Sorce: LFO-VCF2
VCF 1/2
Parameter NRPN# Send/Receive Typ Data Format Explanation
Input Source 79 S/R Switch DDBCCBAA
AA: VCF1 Input A
BB: VCF1 Input B
CC: VCF2 Input A
DD: VCF2 Input B
AA/BB/CC/DD:
10: Osz1
01: Osz2
11: Osz2
Input B Filter/Level Mod 81 S/R Switch/M ABCDFFMM
A: VCF2-Filter Mod On/Off (1/0)
B: VCF1-Filter Mod On/Off (1/0)
AB Edited in Preset Menu
C: VCF2-Lev.Mod Vel. On/Off (1/0)
D: VCF1-Lev.Mod Vel. On/Off (1/0)
FF: 00: VCF2-Lev.Mod ENV-Off
FF: 10: VCF2-Lev.Mod ENV-Attack
FF: 01: VCF2-Lev.Mod ENV-Decay
FF: 11: VCF2-Lev.Mod ENV-LFO
MM: 00: VCF1-Lev.Mod ENV-Off
MM: 10: VCF1-Lev.Mod ENV-Attack
MM: 01: VCF1-Lev.Mod ENV-Decay
VCF12 Decay2 On/Off 61 S/R Switch BAXXXXXX
B: VCF1 Decay2 On/Off (1/0)
A: VCF2 Decay2 On/Off (1/0)
VCF12 LFO-Sync-Mode 31 S/R M BBBBAAAA
BBBB: VCF2-Sync Mode
AAAA: VCF1-Sync Mode
0000 : Intern (LFO Time Pot.)
0001: Midi-Clock /32
0010: Midi-Clock /16
0011: Midi-Clock /16.
0100: Midi-Clock /8
0101: Midi-Clock /8.
0110: Midi-Clock /4
0111: Midi-Clock /4.
1000: Midi-Clock /2
1001: Midi-Clock /2.
1010: Midi-Clock /1
1011: Midi-Clock /1.
1100: Midi-Clock *2
DF1/2
Parameter NRPN# Send/Receive Typ Data Format Explanation
Input Source 80 S/R Switch DDCCBBAA
AA: DF1 Input A
BB: DF1 Input B
CC: DF2 Input A
DD: DF2 Input B
AA/BB/CC/DD:
00: Osz1
01: Osz2
10: Osz2
Resonance 131 S/R Switch XXBBBAAA
BBB: Reso-DF2
000..111 -> MinÉ Max
AAA: Reso-DF1
ENV-Mode/DF1->2 Assign 130 S/R Switch XXXXXCBA
C: Assign DF1->DF2 Settings On/Off (1/0)
B: ENV-Mode DF2 0:ENV 1:Ramp
VCF1
Parameter NRPN# Send/Receive Send/Receive Data Format Explanation
Input Level A 82 S/R Pot 0...255
Input Level B 83 S/R Pot 0...255
Input Level DF1 Out 96 S/R Pot 0...255
Level B Mod Time 86 S/R Pot 0...255
ENV Attack/Decay: 12,5msÉ 25S
ENV LFO: 40HzÉ 0,02Hz
Filter Mode (LP-BP-HP) 76 S/R Pot 0É 128É 255 LPÉ BPÉ HP
Group12 Out Mix + Group12 In
Parameter NRPN# Send/Receive Typ Data Format Explanation
Input/output 109 S/R Switch GFEDCCBA
G: Input DF2-MIx A+B On/Off (1/0)
F: Input DF1-MIx A+B On/Off (1/0)
E: VCF2 Out-Invert On/Off (1/0)
D: VCF2 Out On/Off (0/1)
CC: 00: VCF3-Input : Osz1
CC: 01: VCF3-Input : Osz2
CC: 10: VCF3-Input : Osz3
CC: 11: VCF3-Input : Osz4
B: VCF1 Out-Invert On/Off (1/0)
VCF3 Group1/2 Out 110 S/R Switch BAXXXXX1
B: Group2 VCF3-On/Off (1/0)
A: Group1 VCF3-On/Off (1/0)
DF1/2 Group1/2 Out 114 S/R Switch XXFEDCBA
F: Group2 DF2 Dist-Vel. On/Off (1/0)
E: Group1 DF1 Dist-Vel. On/Off (1/0)
D: Group2 DF2 Invert On/Off (1/0)
C: Group1 DF1 Invert On/Off (1/0)
B: Group2 DF2-Out On/Off (1/0)
Group1 Velocity 38 S/R Pot 0É 128É 255 (-MaxÉ OffÉ +Max)
Group2 Velocity 39 S/R Pot 0É 128É 255 (-MaxÉ OffÉ +Max)
Group1 Out DF1 Distortion 115 S/R Pot 0É 255
Group2 Out DF2 Distortion 116 S/R Pot 0É 255
Group1 Out DF1 Level 98 S/R Pot 0É 255
Group2 Out DF2 Level 99 S/R Pot 0É 255
Group1 Out VCF3 Level 111 S/R Pot 0É 255
Group2 Out VCF3 Level 112 S/R Pot 0É 255
VCF3 Cutoff 113 S/R Pot 0É 255
Group 1/2 Level Mod
Parameter NRPN# Send/Receive Typ Data Format Explanation
Mix Man/Fade-Controls 48 S/R Switch XXFFMSXX
FF: 01: Fade-Mode: 2->1
FF: 11: Fade-Mode: 2->1->2
FF: 10: Fade-Mode: 2->Min->2
FF: 00: Fade-Mode: 2->Min
M: Mix-Mode: Man/Fade (1/0)
Group1/2 Man-Mix 49 S/R Pot 0É 255 Group1É Group2
Group1/2 Fade-Time 50 S/R Pot 0É 255
5msÉ 4S (Fade-Mode 2->1,2->Min)
10msÉ 8S (Fade-Mode 2->1->2)
Group1/2 Fade-Delay 51 S/R Pot 0É 255 0É 4,5S
LFO-Controls 57 S/R Switch DDDRVXXX
DDD: 000: Group-Dest: Off
DDD: 100: Group-Dest: 1
DDD: 010: Group-Dest: 2
DDD: 110: Group-Dest: 1+2
DDD: 111: Group-Dest: 1+ 2R: LFO-Note-Reset On/Off (1/0)
Group12 Out Mix + Group12 In
Parameter NRPN# Send/Receive Typ Data Format Explanation
Input/output 109 S/R Switch GFEDCCBA
G: Input DF2-MIx A+B On/Off (1/0)
F: Input DF1-MIx A+B On/Off (1/0)
E: VCF2 Out-Invert On/Off (1/0)
D: VCF2 Out On/Off (0/1)
CC: 00: VCF3-Input : Osz1
CC: 01: VCF3-Input : Osz2
CC: 10: VCF3-Input : Osz3
CC: 11: VCF3-Input : Osz4
B: VCF1 Out-Invert On/Off (1/0)
VCF3 Group1/2 Out 110 S/R Switch BAXXXXX1
B: Group2 VCF3-On/Off (1/0)
A: Group1 VCF3-On/Off (1/0)
DF1/2 Group1/2 Out 114 S/R Switch XXFEDCBA
F: Group2 DF2 Dist-Vel. On/Off (1/0)
E: Group1 DF1 Dist-Vel. On/Off (1/0)
D: Group2 DF2 Invert On/Off (1/0)
C: Group1 DF1 Invert On/Off (1/0)
B: Group2 DF2-Out On/Off (1/0)
Group1 Velocity 38 S/R Pot 0É 128É 255 (-MaxÉ OffÉ +Max)
Group2 Velocity 39 S/R Pot 0É 128É 255 (-MaxÉ OffÉ +Max)
Group1 Out DF1 Distortion 115 S/R Pot 0É 255
Group2 Out DF2 Distortion 116 S/R Pot 0É 255
Group1 Out DF1 Level 98 S/R Pot 0É 255
Group2 Out DF2 Level 99 S/R Pot 0É 255
Group1 Out VCF3 Level 111 S/R Pot 0É 255
Group2 Out VCF3 Level 112 S/R Pot 0É 255
VCF3 Cutoff 113 S/R Pot 0É 255
Group 1/2 Level Mod
Parameter NRPN# Send/Receive Typ Data Format Explanation
Mix Man/Fade-Controls 48 S/R Switch XXFFMSXX
FF: 01: Fade-Mode: 2->1
FF: 11: Fade-Mode: 2->1->2
FF: 10: Fade-Mode: 2->Min->2
FF: 00: Fade-Mode: 2->Min
M: Mix-Mode: Man/Fade (1/0)
Group1/2 Man-Mix 49 S/R Pot 0É 255 Group1É Group2
Group1/2 Fade-Time 50 S/R Pot 0É 255
5msÉ 4S (Fade-Mode 2->1,2->Min)
10msÉ 8S (Fade-Mode 2->1->2)
Group1/2 Fade-Delay 51 S/R Pot 0É 255 0É 4,5S
LFO-Controls 57 S/R Switch DDDRVXXX
DDD: 000: Group-Dest: Off
DDD: 100: Group-Dest: 1
DDD: 010: Group-Dest: 2
DDD: 110: Group-Dest: 1+2
DDD: 111: Group-Dest: 1+ 2-
R: LFO-Note-Reset On/Off (1/0)
Mix-LFO-Depth 58 S/R Pot 0É 255
Mix-LFO-Rate 59 S/R Pot 0É 255 0É 4,5S
Panorama-Controls 52 S/R Switch SDDVMMXD
S: Voice-Spread On/Off (1/0)
DDD: 000: Group-Dest: Off
DDD: 001: Group-Dest: 1
DDD: 010: Group-Dest: 2
DDD: 011: Group-Dest: 1+2
DDD: 111: Group-Dest: 1+ 2V: LFO-Depth-Velocity On/Off (1/0)
MM: 01: LFO-Mode: L>R
MM: 10: LFO-Mode: L>R>L
Panorama-LFO-Depth 55 S/R Pot 0É 255
Panorama-LFO-Rate 56 S/R Pot 0É 255
0,025HzÉ 10Hz (LFO-Continuous)
20SÉ 40ms (LFO-Mode: L>R)
Group1 Pan-Offset 53 S/R Pot 0É 255 LeftÉ Rigth
Group2 Pan-Offset 54 S/R Pot 0É 255 LeftÉ Rigth
Master ENV/VCA-VCF12 Retrigg
Parameter NRPN# Send/Receive Typ Data Format Explanation
Soft/VCA-VCF12-Retrigg 60 S/R Switch XXXXDCBA
D: VCF1-Retrigg On/Off (1/0)
C: VCF2-Retrigg On/Off (1/0)
B: VCA-Soft On/Off (1/0)
Sound Volume 32 S/R Pot 0É 255
Attack 33 S/R Pot 0É 255 1msÉ 10ms
Decay 34 S/R Pot 0É 255 2msÉ 20S
Sustain 35 S/R Pot 0É 255
Release 36 S/R Pot 0É 255 2msÉ 20S
Release-Level 37 S/R Pot 0É 255
Glide/Bend
Parameter NRPN# Send/Receive Send/Receive Data Format Explanation
Pitch Bend 148 S/R Pot
0,1,2
3É 13
14
1É 28
(-12HT)
(-11HTÉ -1HT)
Off
(+1É +11HT)
Page 51

98
99
APPENDIX APPENDIX
TECHNICAL SPECIFICATIONS
Polyphony
• Eight Voices, Unisono mode, Multi mode (eight parts)
Oscillators
• Osc 1: Square (50%), PWM, SAW, Double-SAW, Noise, Multi-Pulse, additional suboscillator
• Osc 2: Square (50%), PWM, SAW, Double-SAW, Noise, Ringmod (Source Osc 3)
• Osc 3: Square (50%), PWM, SAW, Double-SAW, Noise, Sync (Source Osc 2), Sync with additional
suboscillator
• Osc 4: 32 combinations of ringmodulated square-waves.
Special lter features
• VCF 1/2: 24dB Moog-style ladder lter – with additional bandpass and highpass functions
• VCF 1/2: with oscillator modulation by Osc. 1 – 4
• VCF 1/2: envelopes with double-decay feature
• DF 1/2: dual lter with oscillator modulation
• DF 1/2: distortion
• Spread-modulation of both cutoff frequencies of DF1/2 (duallter)
Sound memory (Singles – Multis)
• 1024 singles (8 banks / 128 singles)
• 256 multis (8 banks / 32 multis)
Real Time Controls
• Aftertouch
• Joystick (X/Y)
• Mod-Wheel
• External inputs for control voltages and/or foot pedals/switches
Inputs/Outputs
• 1 Stereo master output, stereo (jack, unbalanced)
• 8 single outputs (voice 1…8, jack, unbalanced)
• Midi In/Out/Thru, MIDI via USB
• 4 External Inputs (switching controller)
• 4 External Inputs (continuous controller)
• Stereo phones output with independent level control
Additional features
• Fatar-Keyboard 61-keys half weigthed with aftertouch
• Adjustable colors for LEDs and LC-Display
• Internal power-supply 110V/220V
• Weight: 99.2 lbs (45 Kg)
• Dimensions (inch): 44.9 x 5.5 x 24.0
(cm) : 114 x 14 x 61
WARRANTY REGULATIONS
SERVICE AND TERMS OF WARRANTY.
Concerning service and warranty conditions, please refer to our terms of business.
You will nd our terms of business at:
www.emc-de.com
EMC, Untere Bergstraße 19, D-89129 Langenau, Germany
EMC warrants, that the described product has been free of failures within parts or components of the hardware and
was found to be fully functional. Please carefully read the following information, which is important in the case of
probable damages or malfunctions:
If goods are being found defective, missing features described within the present documentation or becoming defec-
tive due to eventual fabrication deciency or material defects within the rst twelve months after purchase, then EMC
shall at its sole discretion and evaluation replace or repair the defective parts or goods at no cost. Multiple repairs
shall be permissible. In case the malfunction or physical failure can not be xed, customer receives the right to cancel
the purchase with refund of the amount originally paid for the defective product. In case testing shows no physical
damages, customer will be charged for testing procedure and services.
Any deciencies caused by transportation have to be declared within a 14 days period after receipt of goods by written
notice. Please note, that any warranty repair at no cost ruled by the above regulations requires registration of name
and address by sending the proof of purchase together with the defective product.
To return defective goods, please contact the retailer where you purchased the product. As an alternative you can
also contact EMC directly. PLEASE NOTE: Please add a description of the failure occurred to enable us executing the
repair as soon as possible.
EMC, Untere Bergstraße 19, D-89129 Langenau, Germany
phone: 049(0)7345 2381410
fax: 049(0)7345 2381411
info@emc-de.com
The hardware described within this documentation is herewith certied to conform to the requirements set forth in the
guidelines for electromagnetic acceptability (89/336/EWG)
DISPOSAL
This device complies to the EU guidelines and is manufactured RoHS conform without the use of led, mercury,
cadmium and chrome. Still, this device is special waste and disposal in household waste is not permitted.
For disposal, please contact your dealer or:
EMC, Untere Bergstraße 19, D-89129 Langenau, Germany
phone: 049(0)7345 2381410
fax: 049(0)7345 2381411
info@emc-de.com
Page 52

100
101
APPENDIX APPENDIX
LEGAL DECLARATIONS
COMPLIANCE
FCC INFORMATION (U.S.A)
IMPORTANT NOTICE: DO NOT MODIFY THIS UNIT! This product, when installed as indicated in the instructions
contained in this manual, meets FCC requirements. Modications not expressly approved by EMC may void your
authority, granted by the FCC, to use this product. IMPORTANT: When connecting this product to accessories and/
or another product use only high quality shielded cables. Cable/s supplied with this product MUST be used. Follow all
installation instructions. Failure to follow instructions could void your FCC authorisation to use this product in the USA.
NOTE: This product has been tested and found to comply with the requirements listed in FCC Regulations, Part 15
for Class „B“ digital devices. Compliance with these requirements provides a reasonable level of assurance that your
use of this product in residential environment will not result in harmful interference with other electronic devices. This
equipment generates/ uses radio frequencies and, if not installed and used according to the instructions found in the
user manual, may cause interference harmful to the operation of other electronic devices, Compliance with FCC regulations does not guarantee that interference will not occur in all installations. If this product is found to be the source of
interference, which can be determinated by turning the unit ”OFF“ and ”ON“, please try to eliminate the problem by
using one of the following measures: Relocate either this product or the device that is being affected by the interfer-
ence. Utilise power outlets that are on branch (Circuitbreaker or fuse) circuits or install AC line lter/s. In the case
of radio or TV interference, relocate/reorient the antenna. If the antenna lead-in is 300 ohm ribbon lead, change the
lead-in to coaxial type cable. If these corrective measures do not produce satisfactory results, please contact the local
retailer authorised to distribute this type of product. The statements above apply ONLY to products distributed in the
USA.
SCHMIDT Keyboard Version 1.0 FCC Information (CANADA)
FCC INFORMATION (CANADA)
The digital section of this apparatus does not exceed the ”Class B“ limits for radio noise emmissions from digital apparatus set out in the radio interference regulation of the Canadian Department of Communications. Le present appareil
numerique n’emet pas debruit radioelectriques depassant les limites applicables aux appareils numerique de la „Class
B“ prescrites dans la reglement sur le brouillageradioelectrique edicte par le Ministre Des Communication du Canada.
This only applies to products distributed in Canada. Ceci ne s’applique qu’aux produits distribues dans Canada
OTHER STANDARDS (REST OF WORLD)
This product complies with the radio frequency interference requirements of the Council Directive 89/336/EC.
Cet appareil est conforme aux prescriptions de la directive communitaire 89/336/EC. Dette apparat overholder det
gaeldenda EF-direktivvedrorendareadiostoj. Dieses Gerät entspricht der EG-Richtlinie 89/336/EC.192
DECLARATION OF CONFORMITY
The following devices SCHMIDT Keyboard are hereby declared to conform with the requirements of Council Directive
89/336/FWG for radio frequency interference.
They also comply with regulations dated August 30th, 1995 concerning radio interference generated by electronic
devices. The following standards have been applied: EM 50 082-1 : 1992 , EN 50 081-1 : 1992 , EN60065 : 1993
This declaration has been given responsibly on behalf of the manufacturer:
EMC
Untere Bergstraße 19
D-89129 Langenau
Germany
phone: 049(0)7345 2381410
fax: 049(0)7345 2381411
info@emc-de.com
THANKS TO
Stefan Schmidt: Product conception, hard- and software design
Axel Hartmann / Designbox: Product design
Dirk Krause, Stefan Schmidt: Sound design
Matthias Fuchs / VISOPHON, Stephen Parsick: User manual
OWNERSHIPS
Windows is a registered trademark of Microsoft Corporation in the United States and other countries.
Mac and OSX are trademarks of Apple Inc., registered in the United States and other countries.
IMPRINT
Manual conceived and written by Matthias Fuchs / VISOPHON, Berlin, Germany.
Edited, surveyed, brushed up, and ne-tuned into oblivion by Stephen Parsick.
Copying, distribution or any commercial use in any way is prohibited and needs the written permission by the manufacturer.
Specications subject to change without notice.
Although the content of this owners manual has been thoroughly checked for errors, EMC cannot guarantee that it is
error-free throughout. EMC cannot be held liable for any misleading or incorrect information within this guide.
All rights reserved ©2014 EMC
User manual vers. 1.0
Untere Bergstraße 19
D-89129 Langenau
www.emc-de.com
Tel: 07345 2381410
Fax:07345 2381411
info
@
emc-de.com
Page 53

Untere Bergstraße 19
D-89129 Langenau,
Germany
www.schmidt-synthesizer.com
Tel: +49 7345 2381410
Fax:+49 7345 2381411
www.emc-de.com
info@emc-de.com
powered by
 Loading...